

Walkthrough Menu
- General Tips
- Chapter 1: The Pyramid
- Chapter 2: The Shaman's Village
- Chapter 3: N'ektah
- Chapter 4: Elsa
General Tips
- This is the official guide for Wanderlust: What Lies Beneath.
- This guide won't tell you when to zoom into a location; the screenshots show each zoom scene.
- Hidden-object puzzles are referred to as HOPs. Only the locations of the HOPs will be shown.
- Use the Map to fast travel to a location.
Chapter 1: The Pyramid
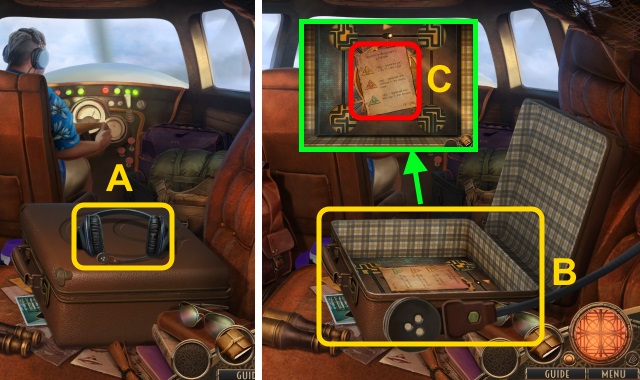
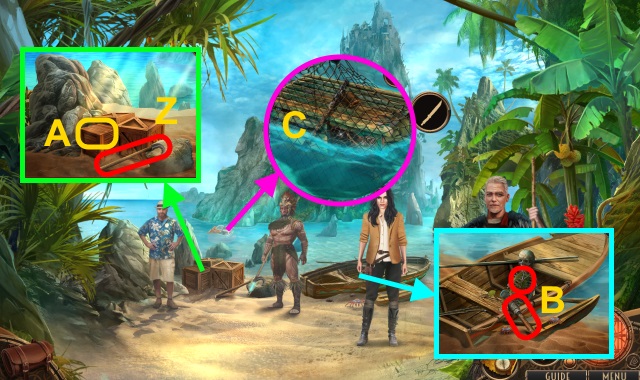
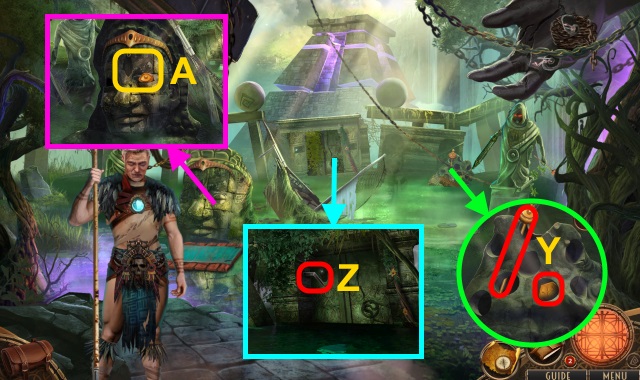
- Examine headphones (A).
- Open suitcase (B).
- Take note (C).
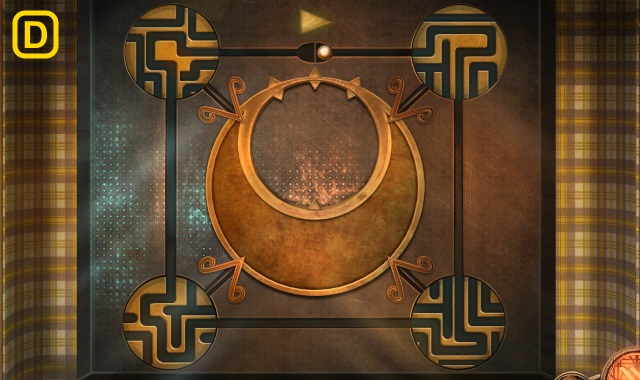
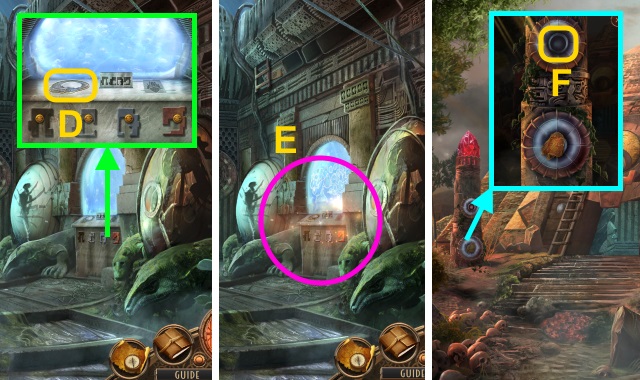
- Solution (D).
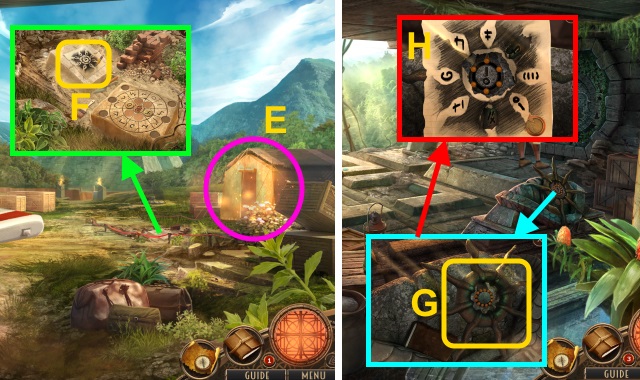
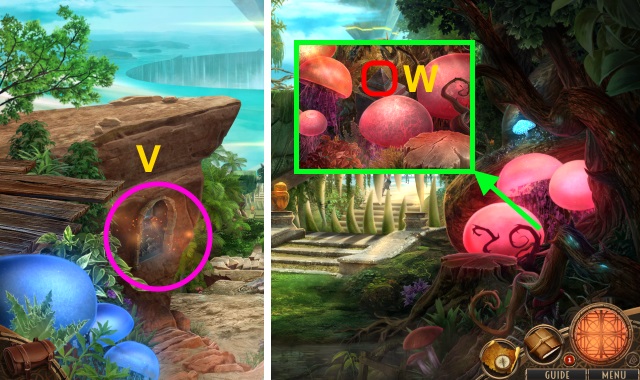
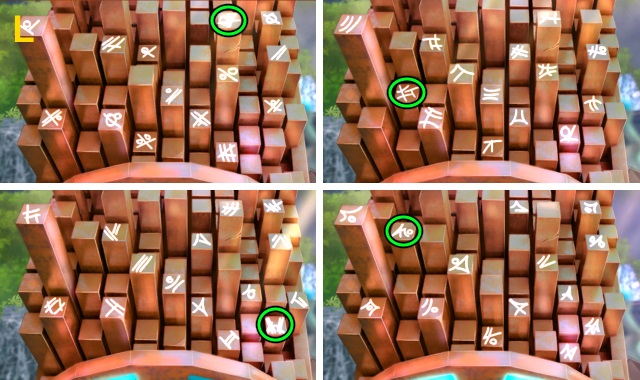
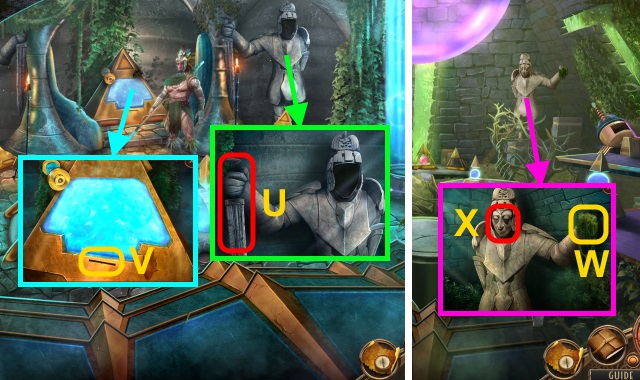
- Take PYRAMID SYMBOL.
- Go left.
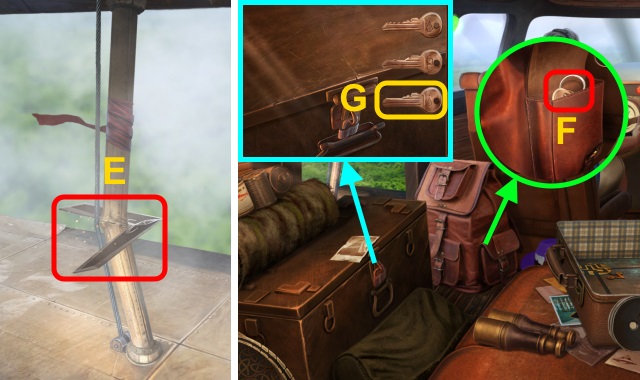
- Take STRANGE BOOMERANG (E).
- Walk down.
- Open bag; take KEYRING (F).
- Take photo; use KEYRING. Select key (G); open. Take TOOLBOX.
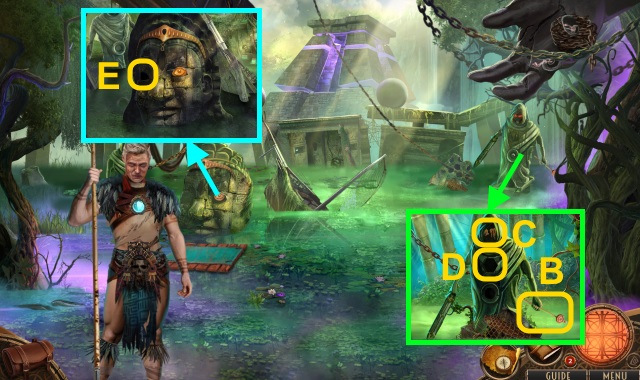
- Open TOOLBOX; remove items. Take EMERGENCY LIGHT and HAMMER.
- Go left.
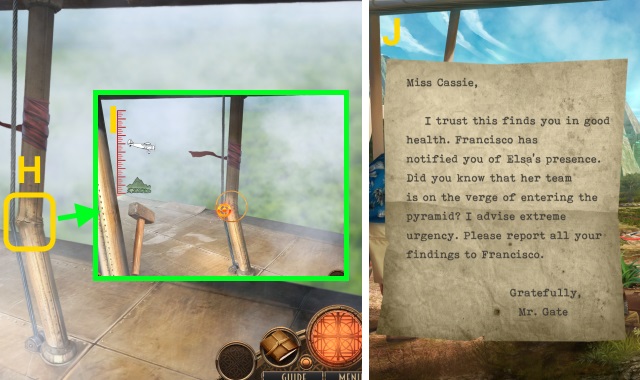
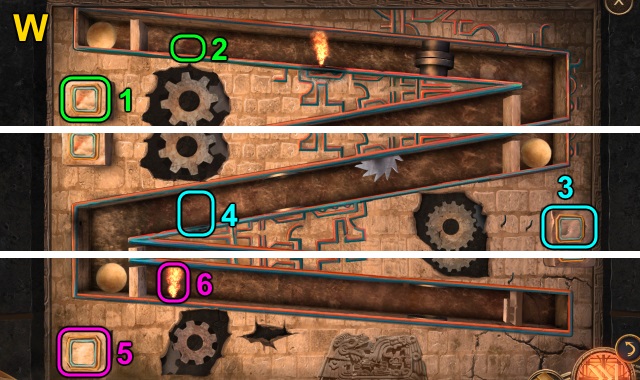
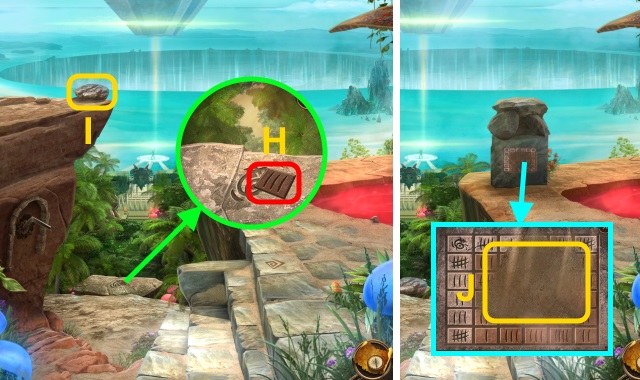
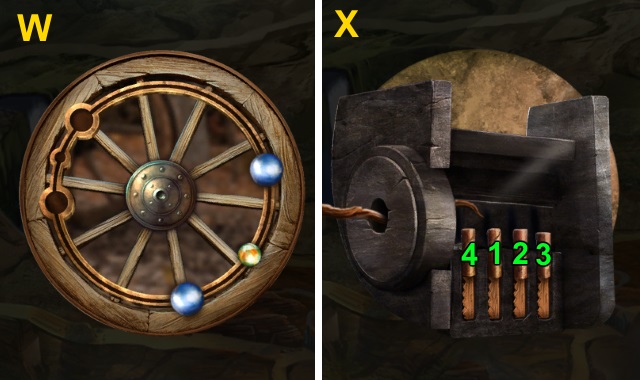
- Use HAMMER (H).
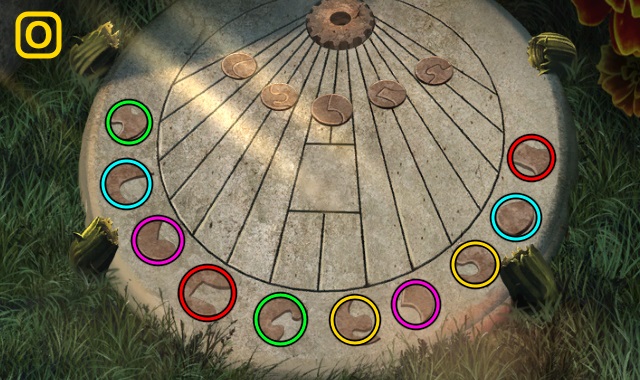
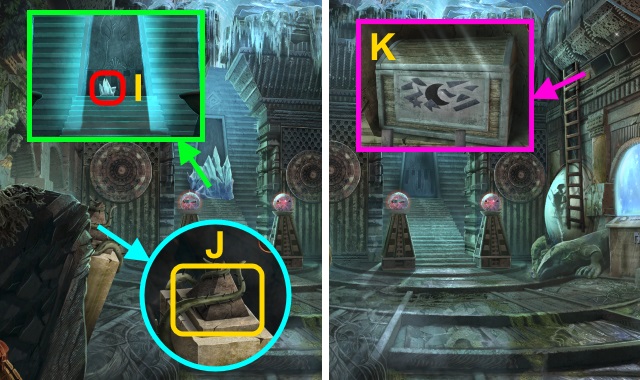
- Solution (I): stop red ball inside target 2x.
- Walk down.
- Read note (J).
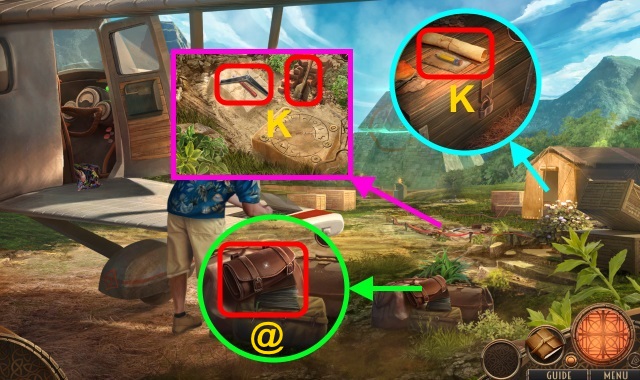
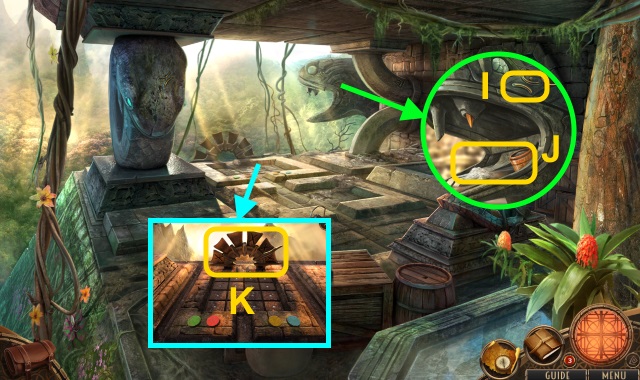
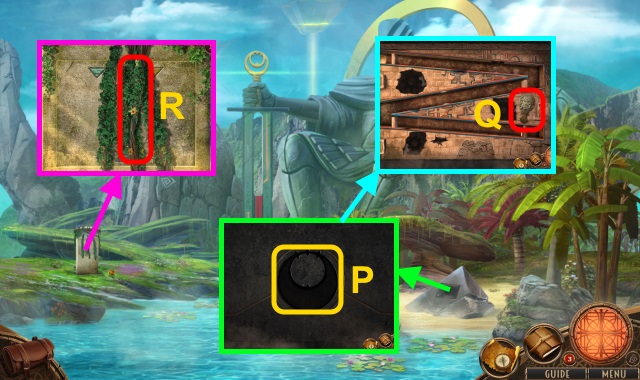
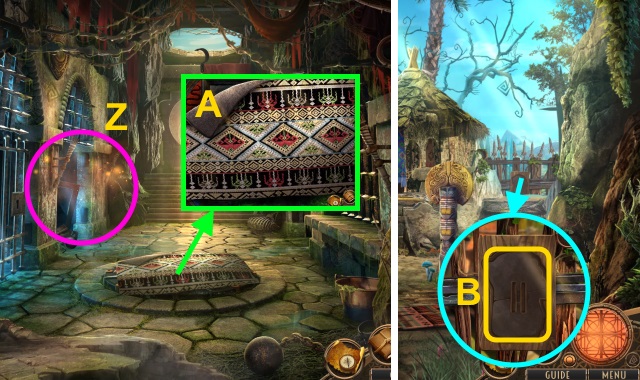
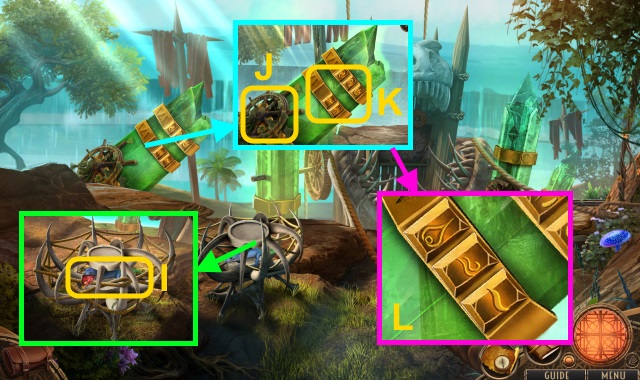
- Take Gear Bag and Glyph Book (@).
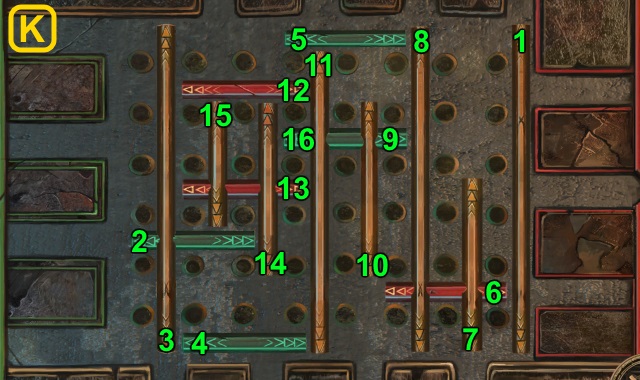
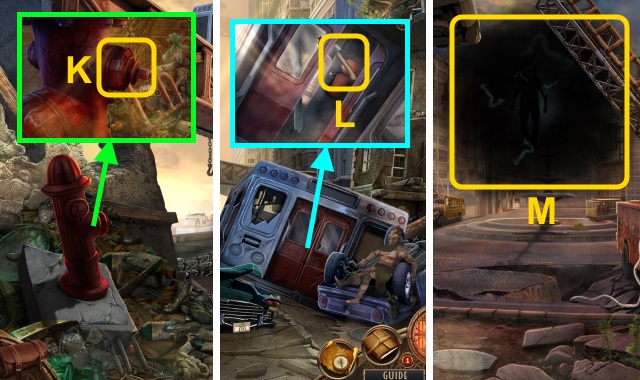
- Take PENCIL, Map, note, STRANGE BOOMERANGS, ENTRENCHING TOOL, and SIGNAL FLARE (K).
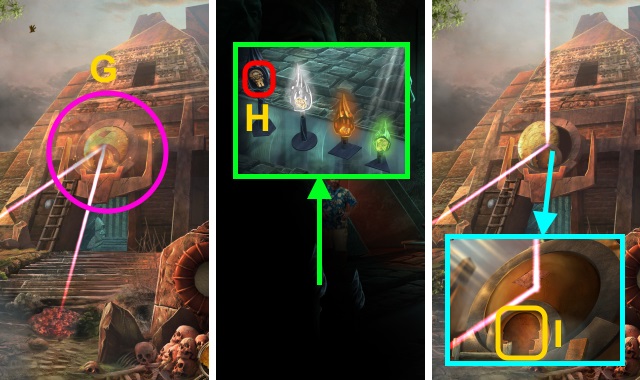
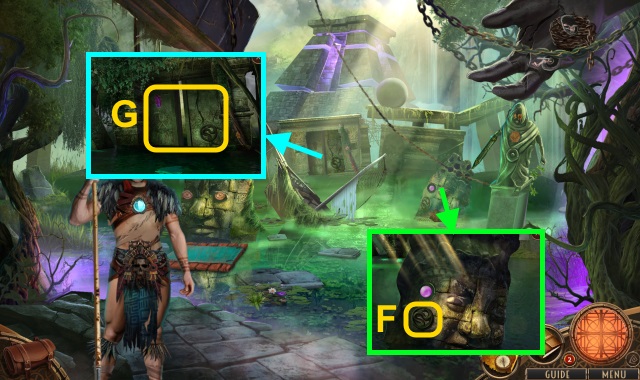
- Examine ENTRENCHING TOOL.
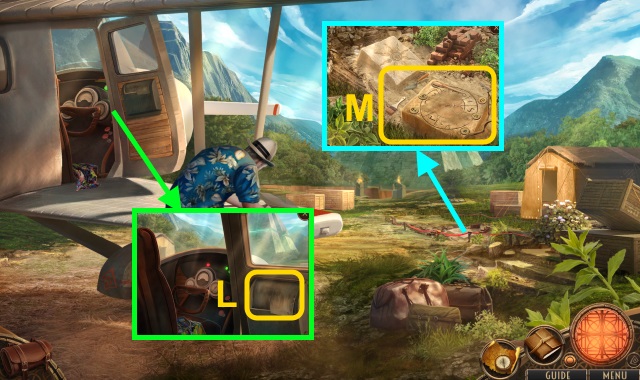
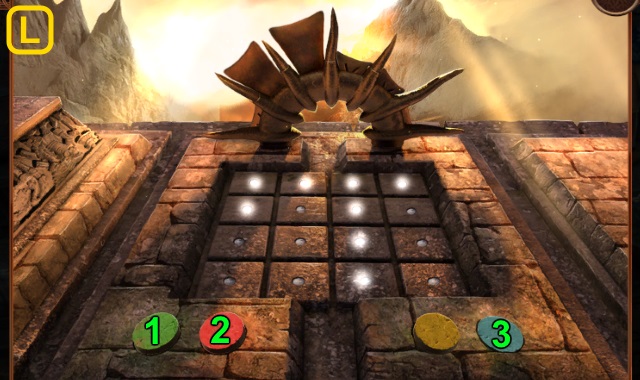
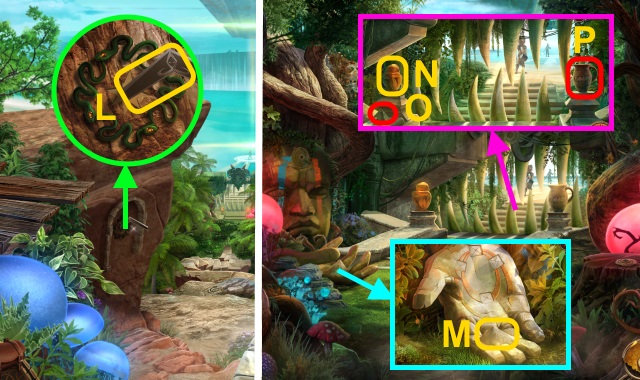
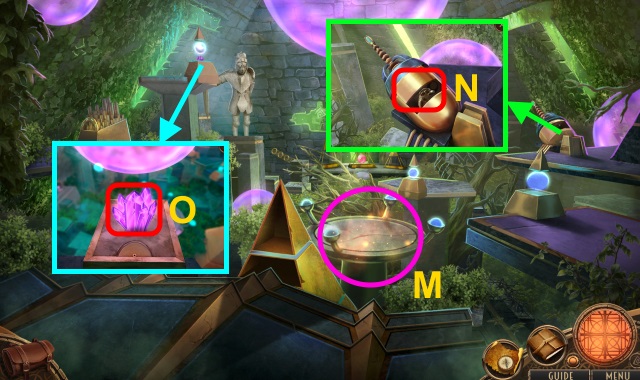
- Use ENTRENCHING TOOL (L); receive TOOL HANDLE. Take EXCAVATION KIT.
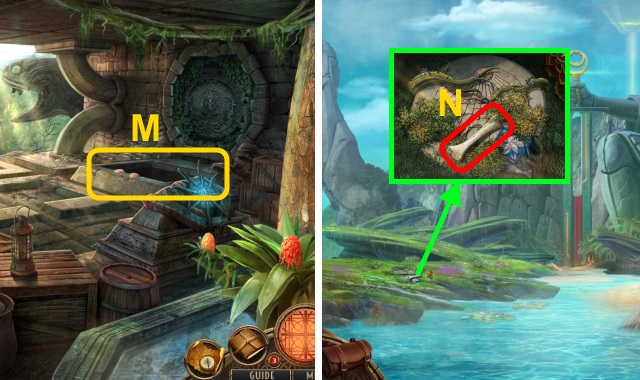
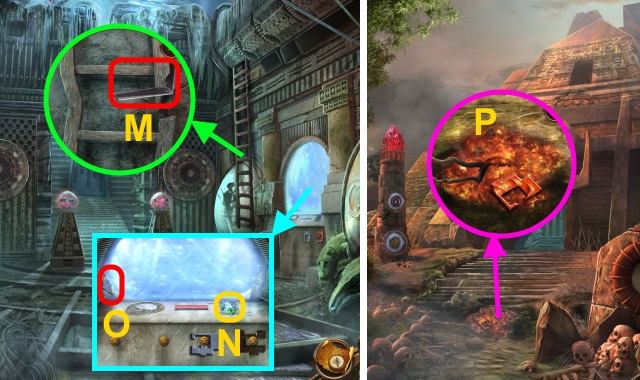
- Use EXCAVATION KIT (M); take Excavation Brush. Examine.
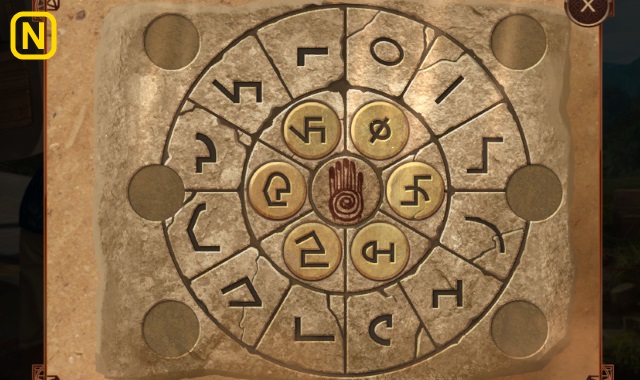
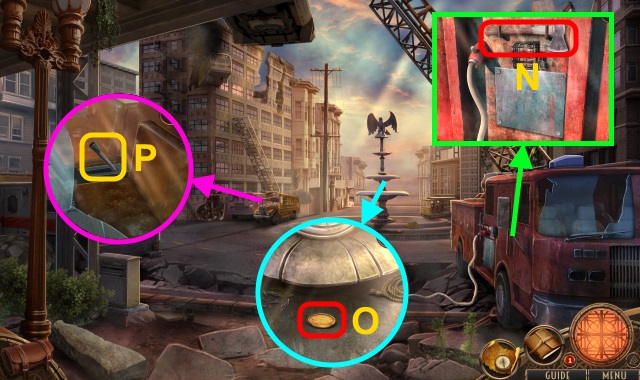
- Solution (N).
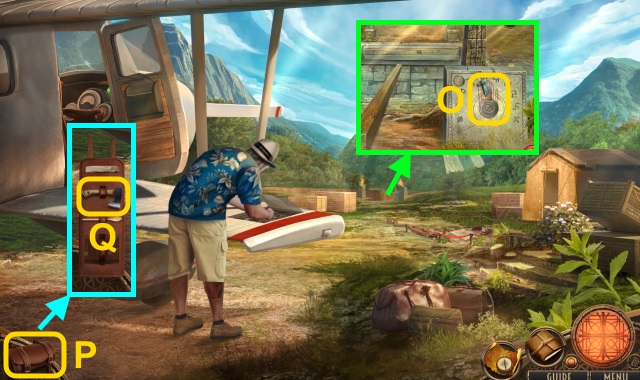
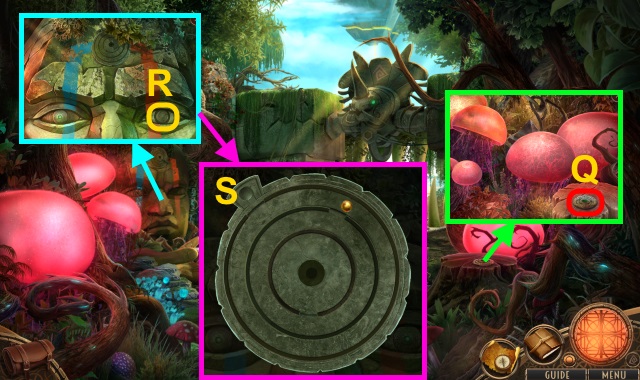
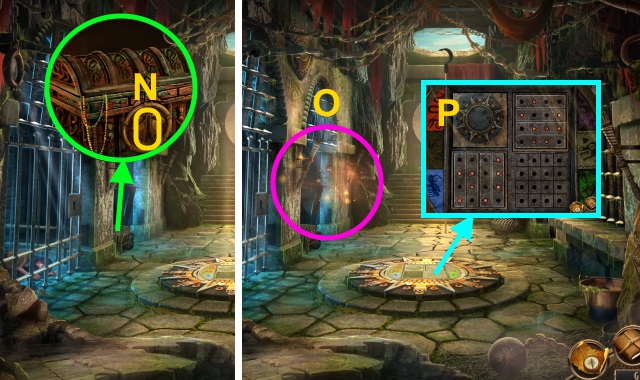
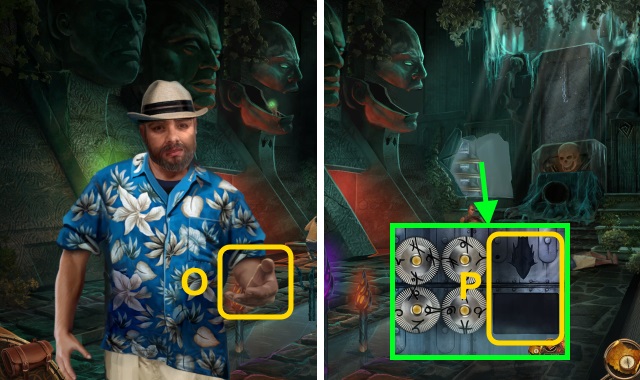
- Examine (O).
- Open Gear Bag (P). Use Survival Hatchet (Q) on (O); place TOOL HANDLE.
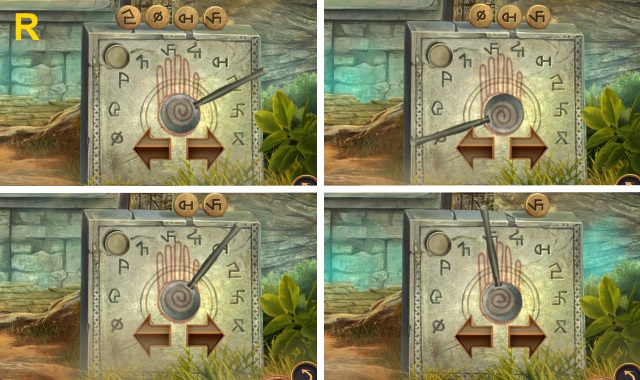
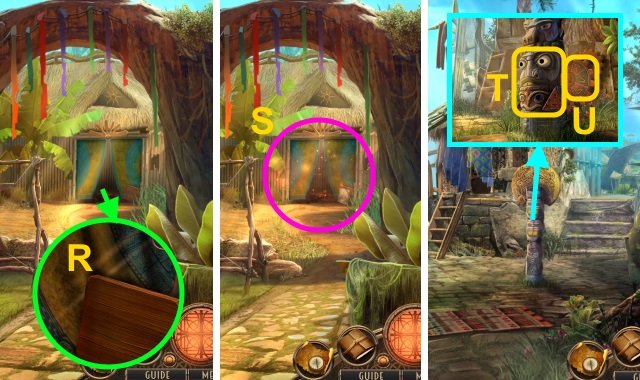
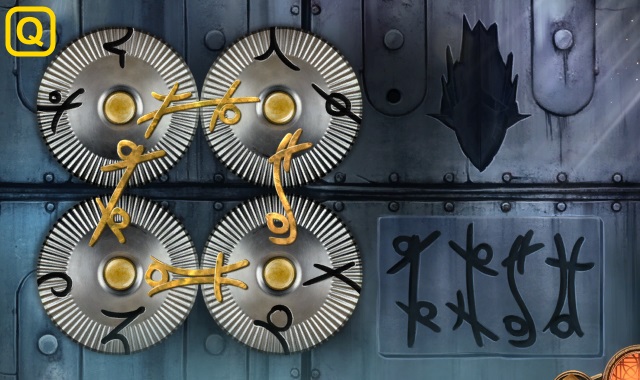
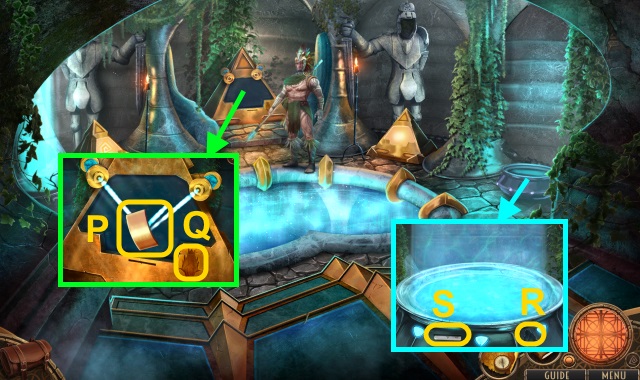
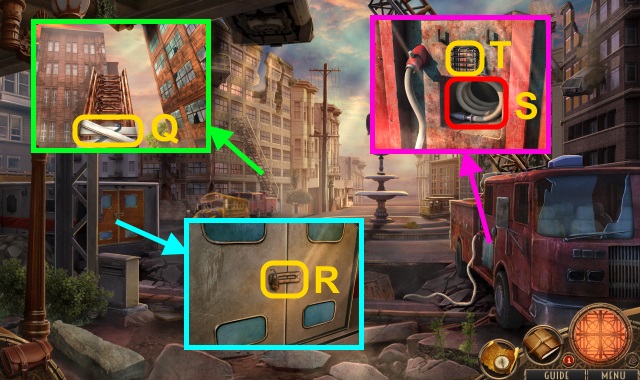
- Solution (R).
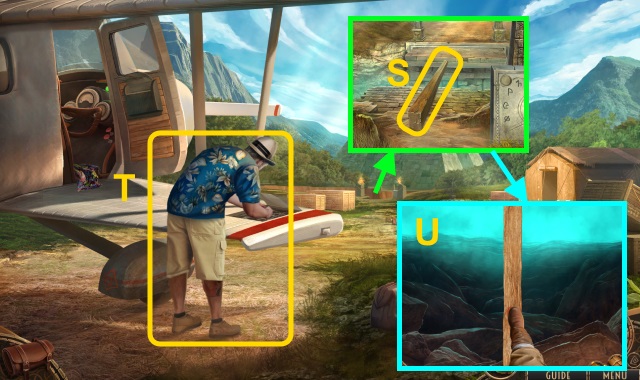
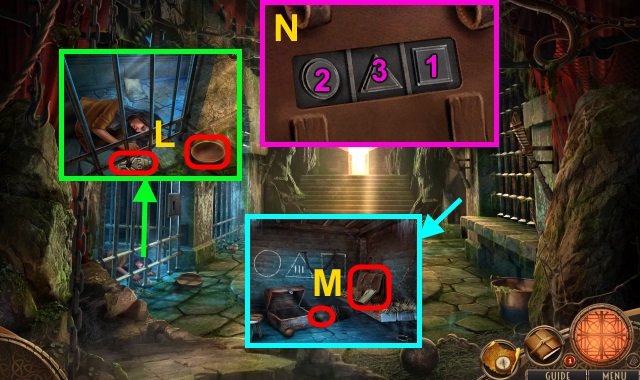
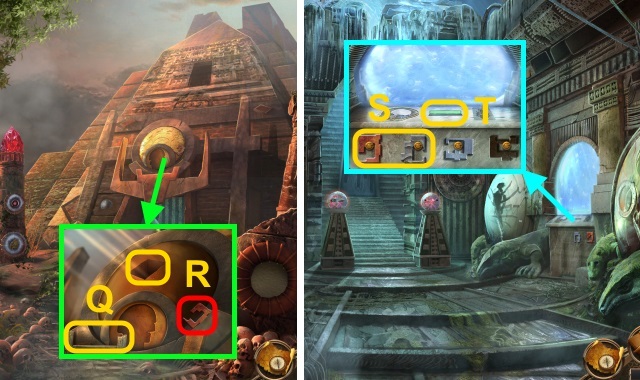
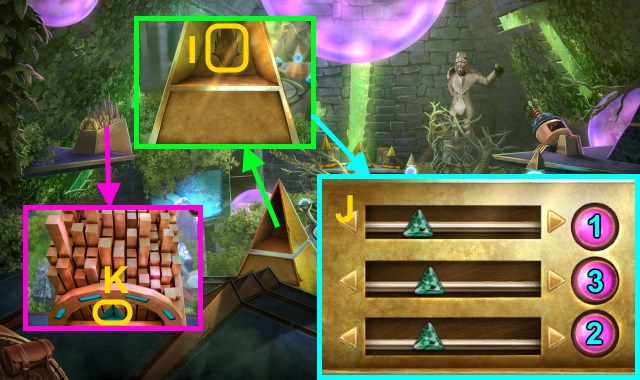
- Examine beam (S).
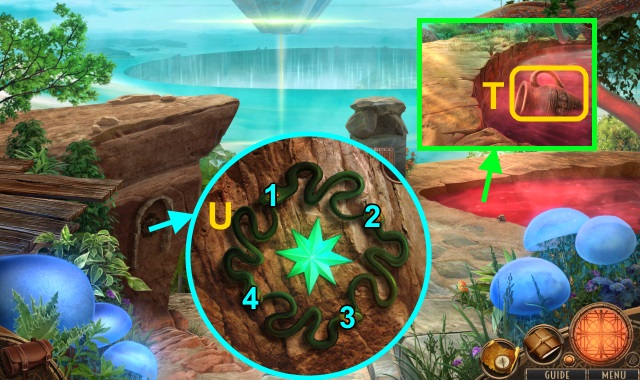
- Talk (T).
- Examine beam 2x (S).
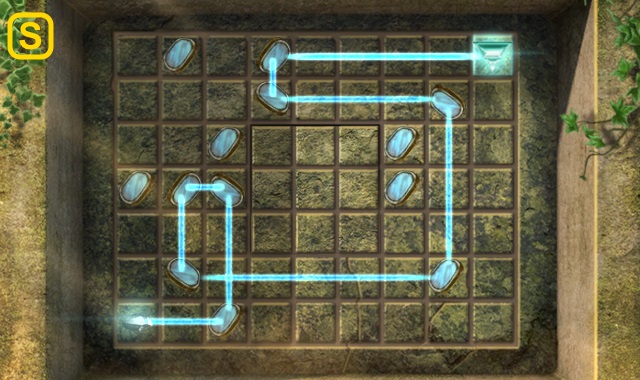
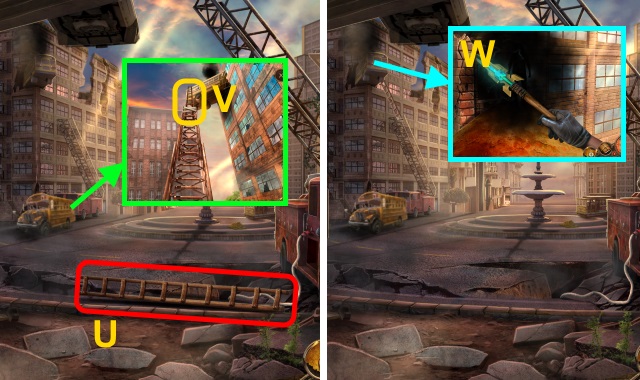
- Solution (U): stop foot over beam.
- Go up.
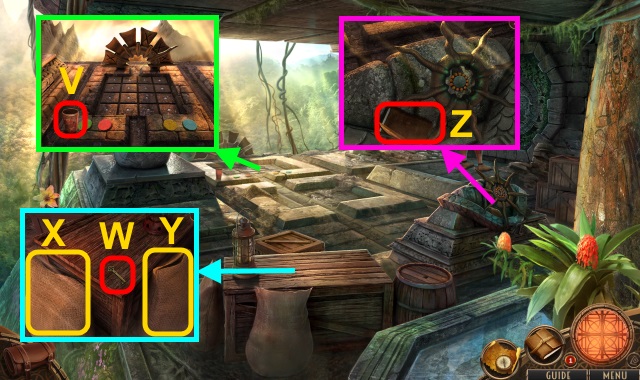
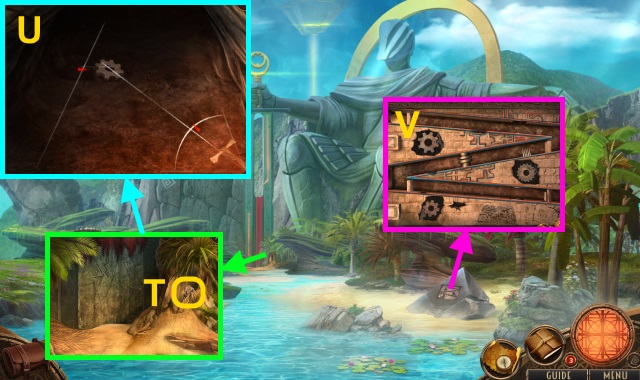
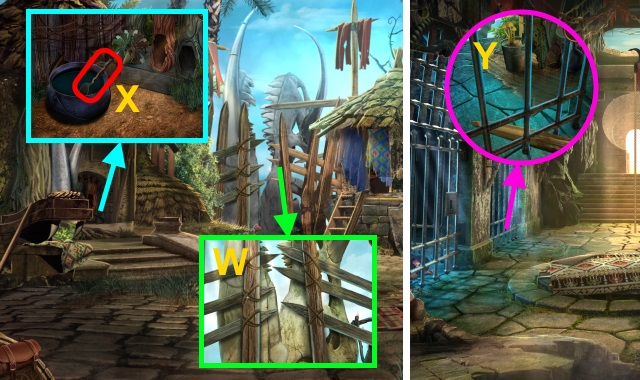
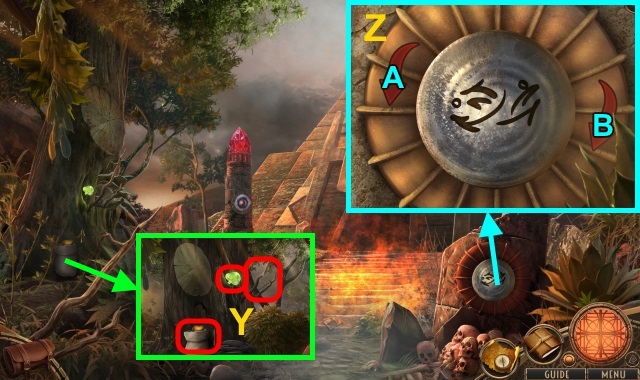
- Take CERAMIC CUP (V).
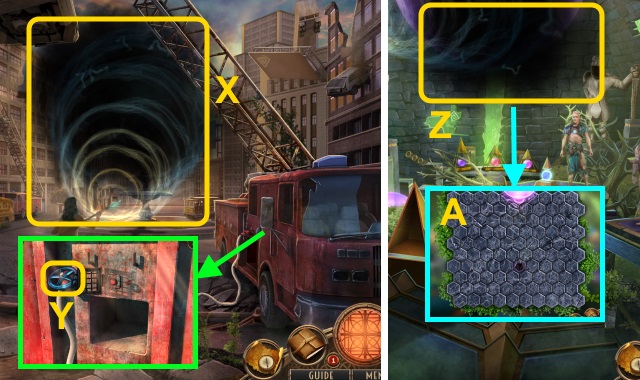
- Move lamp; take TRUNK KEY (W). Use Survival Hatchet; remove wood. Take FLINT AND STEEL. Open bag; take SAWDUST (X). Open bag (Y); use CERAMIC CUP. Receive CUP OF RICE.
- Take GOLDEN FANG (1/4) (Z). Examine book; take BLANK PAPER.
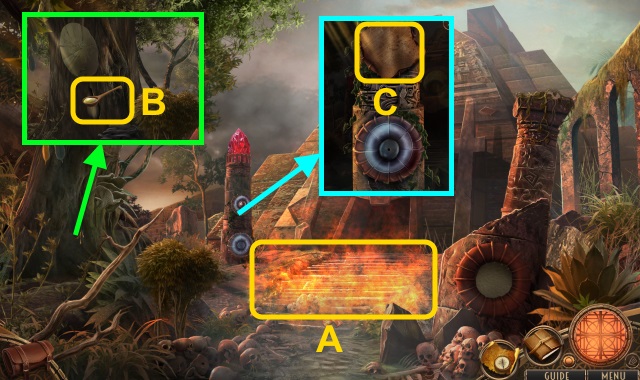
- Take STRANGE BOOMERANGS (A). Open Gear Bag; use Excavation Brush and Glyph Book (B) on snake (C). Use SAWDUST and FLINT AND STEEL. Take GOLDEN FANG (2/4).
- Walk down.
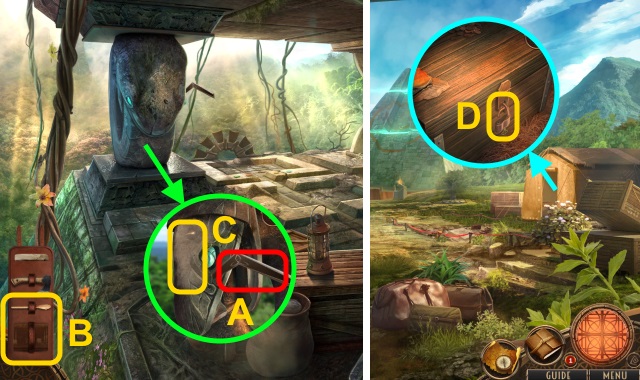
- Use TRUNK KEY (D); open.
- Play HOP; receive GOLDEN FANG (3/4) (E).
- Use BLANK PAPER and PENCIL (F); take PUZZLE CLUE.
- Walk forward.
- Use PUZZLE CLUE (G).
- Solution is random (H).
- Use Glyph Book (I). Use CUP OF RICE 3x (J); take GOLDEN FANG (4/4).
- Place GOLDEN FANG (4/4) (K).
- Solution (L).
- Examine (M).
- Go to Shore.
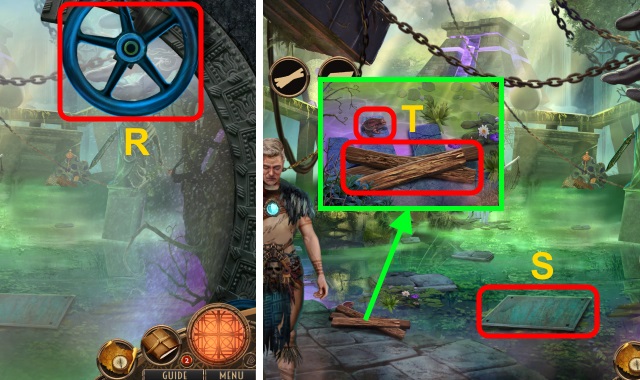
- Take LARGE BONE (N). Remove plants; examine cloth. Use Survival Hatchet.
- Solution (O).
- Take GEAR.
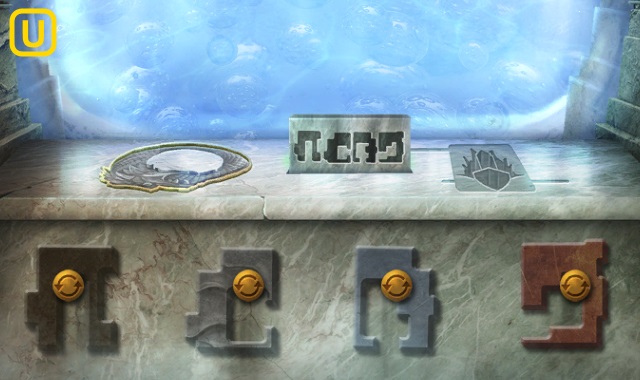
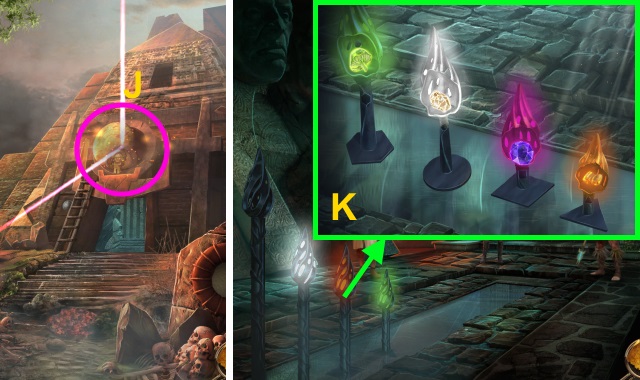
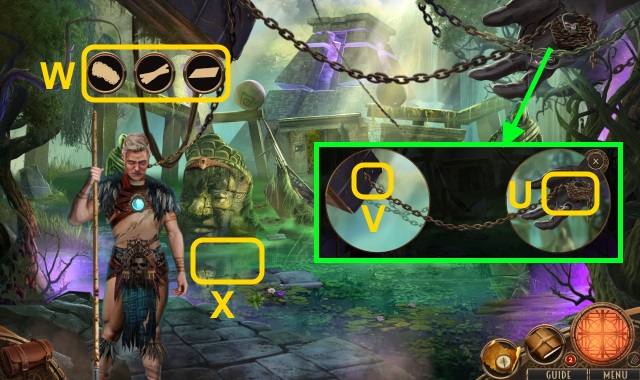
- Place PYRAMID SYMBOL (P); take STONE TOTEM (Q).
- Take VINE ROPE (R); move plants. Place STONE TOTEM.
- Solution (S).
- Take GEAR.
- LARGE BONE on VINE ROPE; take IMPROVISED HOOK.
- Read note (T); use Glyph Book. Take note. Use EMERGENCY LIGHT; examine.
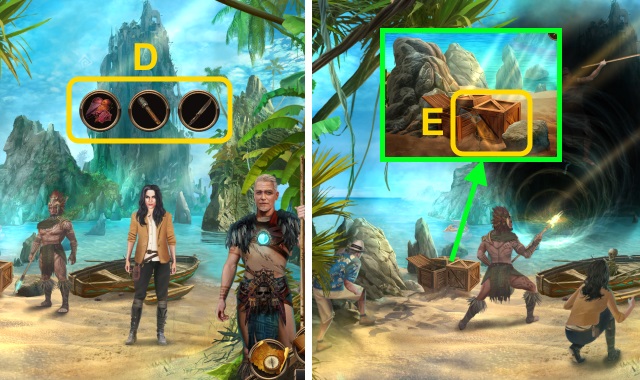
- Use IMPROVISED HOOK. Solution (U): stop pointers over white lines.
- Take GEAR.
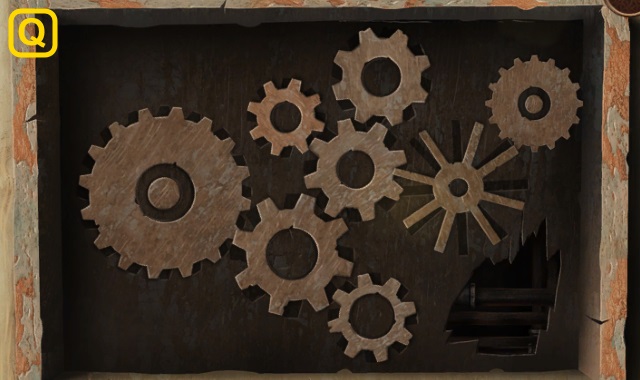
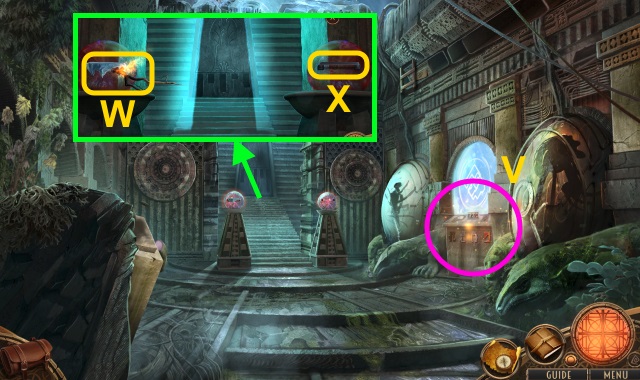
- Place 3 GEARS (V).
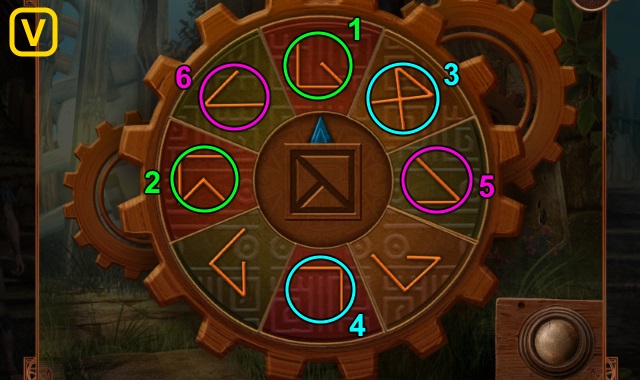
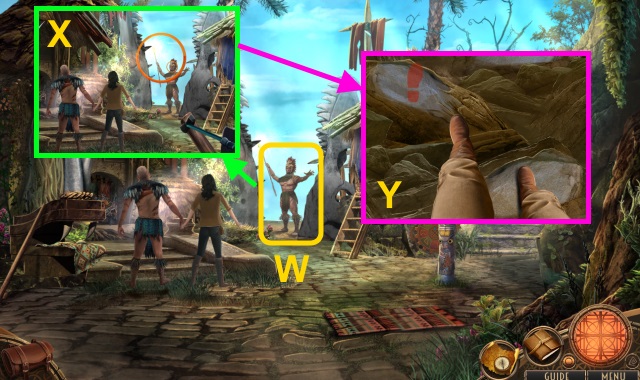
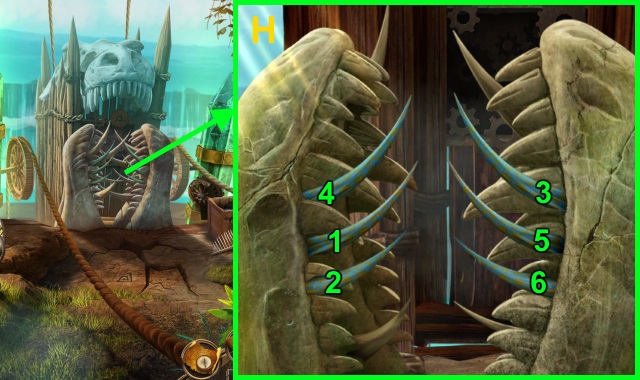
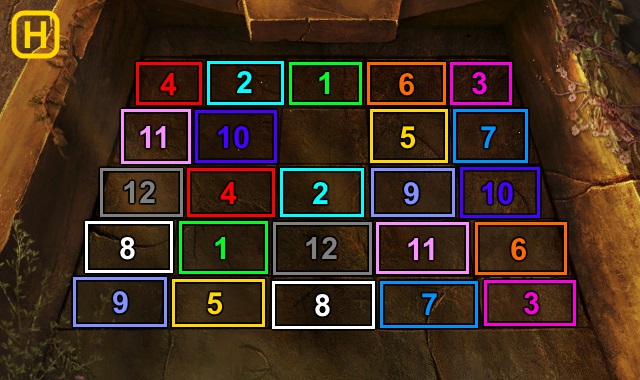
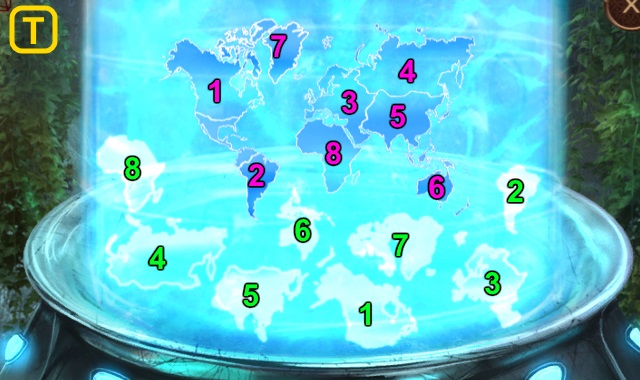
- Solution (W): Select (1) when spikes go down (2). Select (3) when fire goes out (4). Select (5) when fire starts (6).
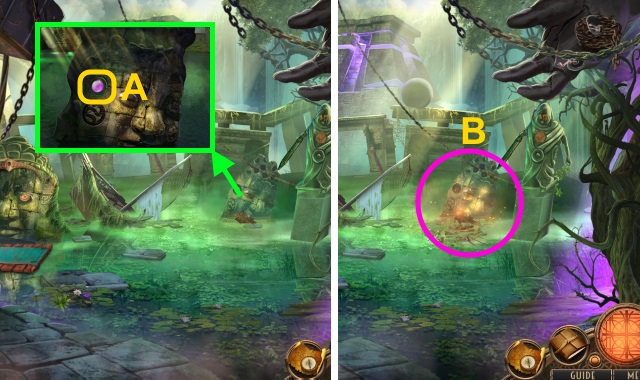
- Play HOP; receive RESEARCHER'S BAG (X).
- Examine scene.
- Examine RESEARCHER'S BAG; move items. Take INCOMPLETE GAS MASK.
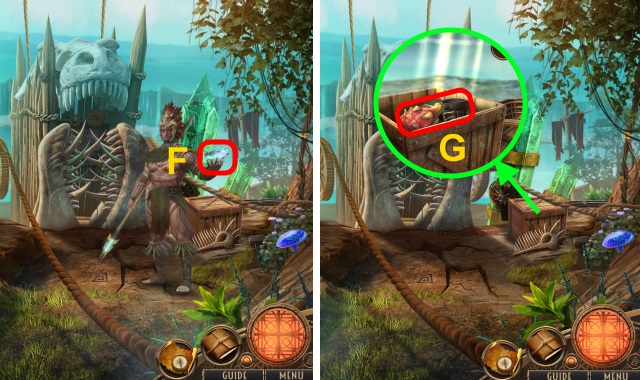
- Use Survival Hatchet on scene; receive STRANGE VINES.
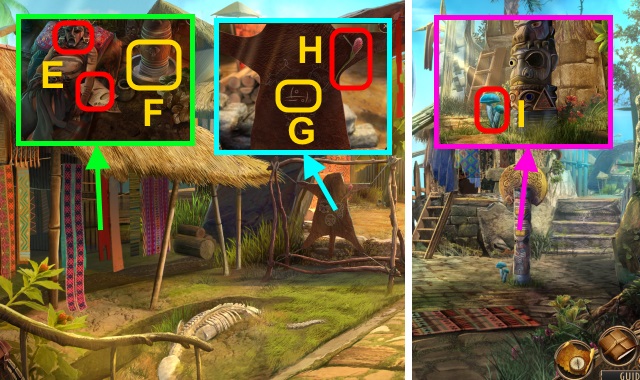
- Use STRANGE VINES and STRANGE BOOMERANG (Y).
- Move items; take GAS MASK FILTER and BAYONET (Z).
- GAS MASK FILTER on INCOMPLETE GAS MASK; take GAS MASK.
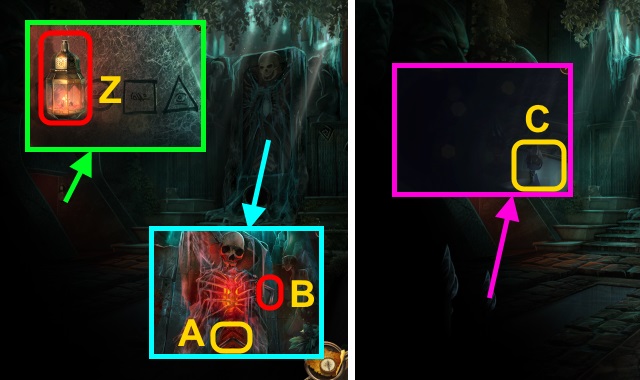
- Take RATIONS (A).
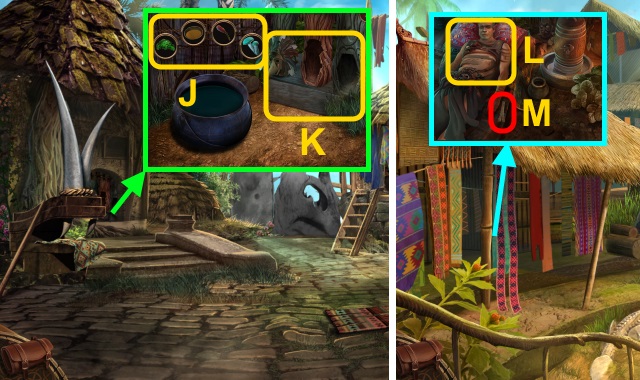
- Use GAS MASK. Place RATIONS; use BAYONET (B). Receive STICKY RATION.
- Use Survival Hatchet; give STICKY RATION (C). Examine (D).
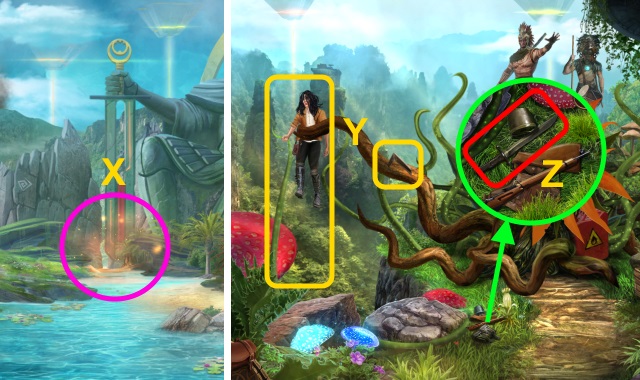
- Use SIGNAL FLARE (E).
- Talk (F); read papers.
- Walk forward.
- Examine scene 3x.
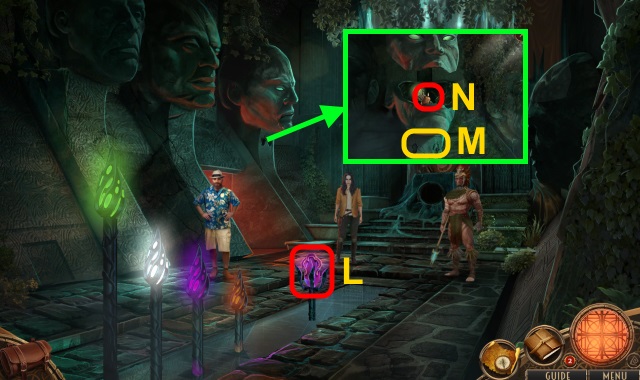
- Examine (G); take STONE BUTTON (1/2).
- Take STONE BUTTON (2/2) (H); use Glyph Book.
- Examine stone 3x (I).
- Use Excavation Brush (J); place STONE BUTTON (2/2).

- Solution (K).
- Take STRANGE BOOMERANGS (L).
- Walk forward.
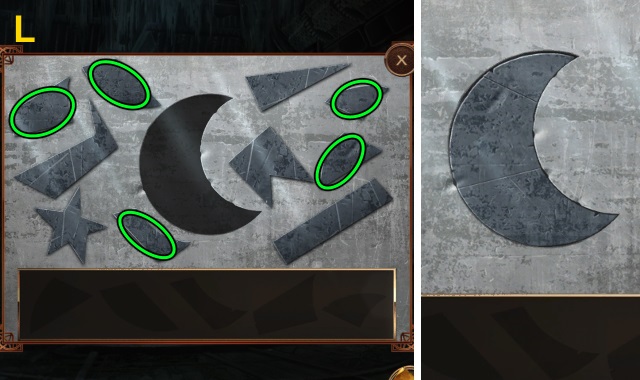
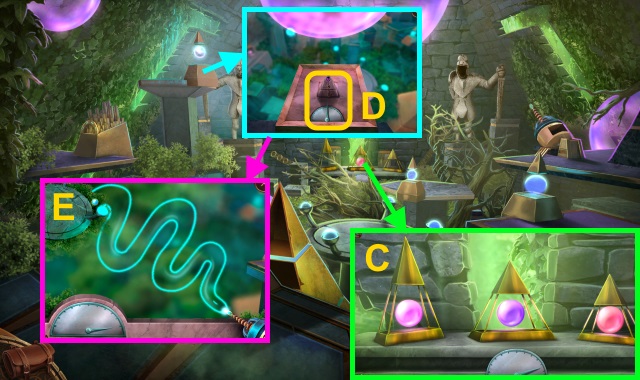
- Examine (M); use Excavation Brush. Take BLUE STAR.
- Examine (N); take SMALL PYRAMID (1/4) (O) and CERAMIC JUG (P).
- Take STONE PUPIL (Q).
- Place STONE PUPIL (R).
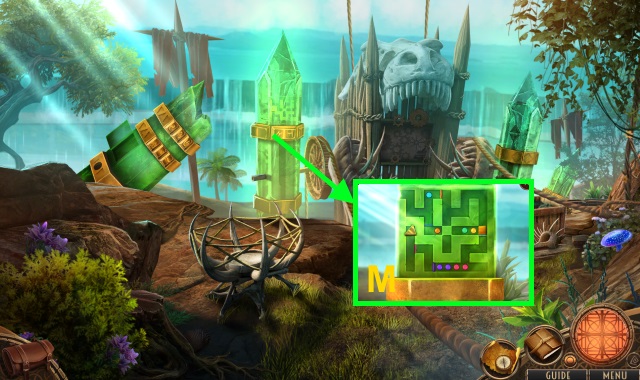
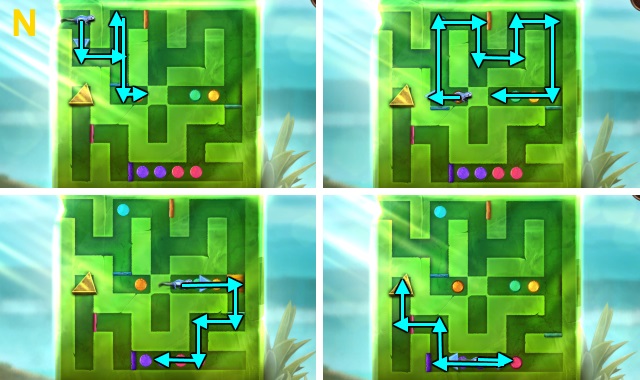
- Solution (S): move ball through maze.
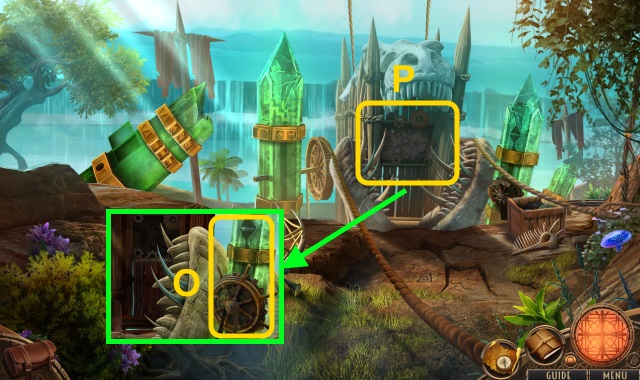
- Take SMALL-PYRAMID PART.
- Walk down.
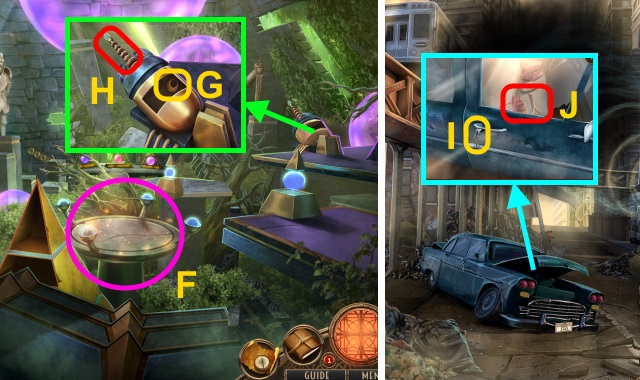
- Use CERAMIC JUG (T); receive JUG OF ACID. Take SMALL PYRAMID (2/4).
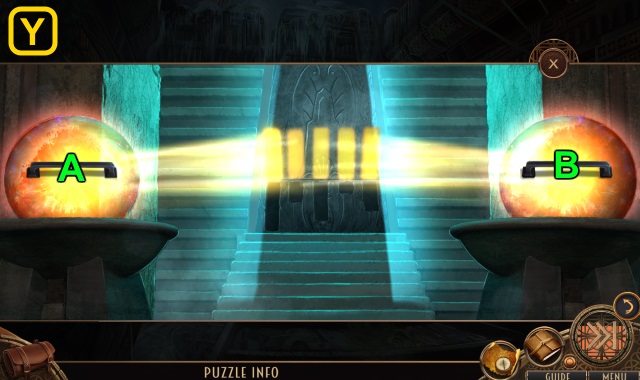
- Place BLUE STAR; solution (U).
- Play HOP; receive GOLDEN IDOL (V).
- Walk forward.
- Use JUG Of ACID; take SMALL PYRAMID (3/4) (W).

- Place GOLDEN IDOL; take SMALL-PYRAMID PART (X).
- Combine 2 SMALL-PYRAMID PARTS; take SMALL PYRAMID (4/4).
- Place SMALL PYRAMID (4/4) (Y).
- Walk forward.
- Examine scene 4x.
Chapter 2: The Shaman's Village
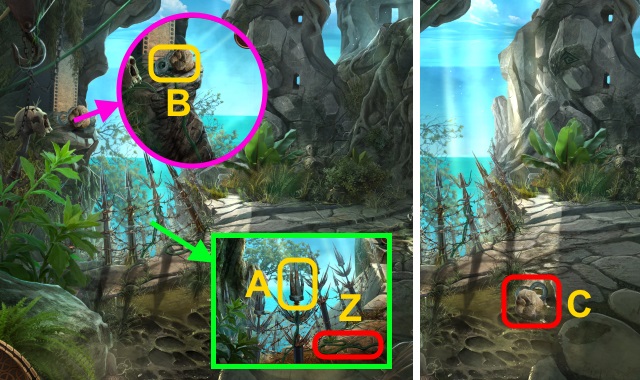
- Take VINE (Z). Examine 4x (A); take HARPOON.
- VINE on HARPOON; receive HOOK HARPOON.
- Use HOOK HARPOON (B); examine 3x.
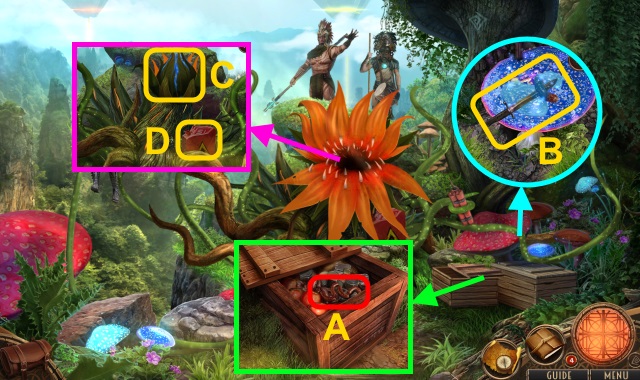
- Take HEAVY ROCK and INFINITY SYMBOL (C).
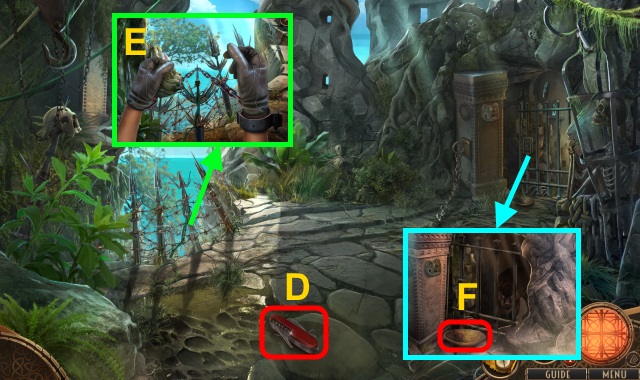
- Take MULTI-TOOL (D).
- Use HEAVY ROCK 3x (E).
- Take FOOD BOWL (F).
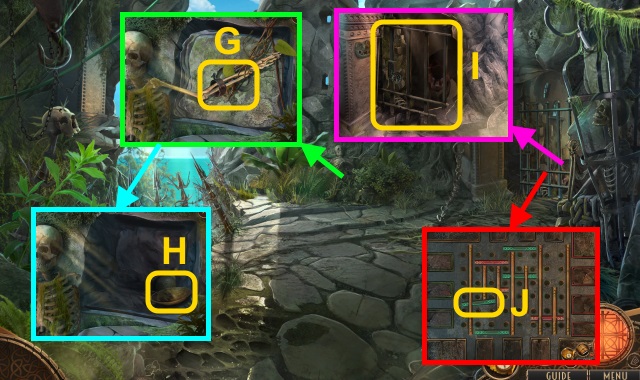
- Examine; take SHACKLE (G). Place INFINITY SYMBOL; take BONE DAGGER.
- Examine; place FOOD BOWL (H). Take MOUSE IN BOWL.
- Place MOUSE IN BOWL (I).
- Use MULTI-TOOL (J).
- Solution (K).
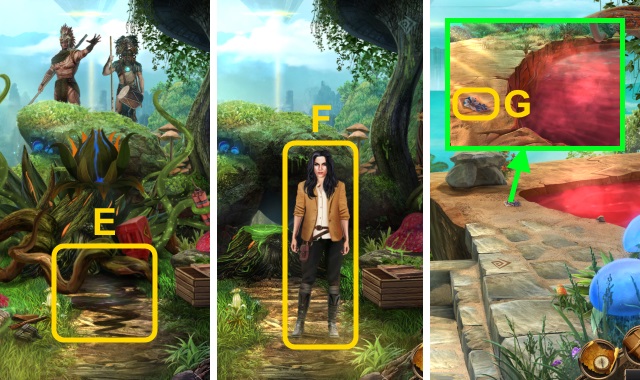
- Walk right.
- Talk; take SHAMAN'S STONE and EMPTY FOOD BOWL (L).
- Take COCONUT, SCRIBBLED NOTES, and TRAVEL BAG (M).
- Examine TRAVEL BAG; enter code (N). Take photo, DAD'S GLASSES, and FLOOR TILE (1/3).

- Examine SCRIBBLED NOTES; arrange (O).
- Take SLINGSHOT (P).
- Examine; use BONE DAGGER (Q). Receive ROPE.
- Examine; use COCONUT. Examine. Use hammer; take SPEAR (R). Examine.
- Examine SPEAR; place SHAMAN'S STONE. Take SHAMAN'S STAFF.
- ROPE on SHACKLE; take GRAPPLING HOOK.
- Use SHAMAN'S STAFF and GRAPPLING HOOK (S).
- Go up.
- Examine scene 2x.
- Take TRIBAL TOY and Gear Bag (T); examine (U).
- Solution (V).
- Open; take TOTEM EYE.
- Use Survival Hatchet (W); take WOODEN POLE.
- Take LADLE (X).
- Walk down.
- Use WOODEN POLE (Y).
- Play HOP; receive TOTEM FACE (Z).
- Take WET CLOTH (A). Use Survival Hatchet; receive FLUORESCENT MOSS.
- Go up.
- Place TOTEM FACE (B).
- Walk right.

- Use WET CLOTH (C).
- Play HOP; receive ANIMAL MASK (D).
- Move rugs; take TRIBAL MASK and REJUVENATION POTION RECIPE (E). Place EMPTY FOOD BOWL (F); turn handle. Take BOWL OF MEAD.
- Use Glyph Book (G); take BONE NEEDLE and MAGENTA FLOWER (H).
- Walk down.
- Take MUSHROOM (I).
- Place REJUVENATION POTION RECIPE; place FLUORESCENT MOSS, BOWL OF MEAD, MAGENTA FLOWER, and MUSHROOM (J). Use LADLE; receive POTION. Place TRIBAL MASK and ANIMAL MASK (K); take FLOOR TILE (2/3).
- Walk right.
- Give POTION (L); take BONE INSET (M).
- Walk down twice.
- Place BONE INSET (N).
- Play HOP; receive FLOOR TILE (3/3) (O).
- Place FLOOR TILE (3/3) (P).

- Solution (Q).
- Take DESIGN FOR CARVING.
- Walk right.
- Place DESIGN FOR CARVING (R).
- Play HOP; receive TRIANGULAR CARVING (S).
- Walk down.
- Place TOTEM EYE and TRIANGULAR CARVING (T); examine (U).
- Solution (V).
- Use SLINGSHOT (W).
- Solution (X): select when circles intersect 3x.
- Solution (Y): stop footprints over rocks.
- Take FISHERMAN'S HOOK (Z). Use Survival Hatchet (A); take WOODEN SPOON. Play HOP; receive SUPPLIES.
- Use TRIBAL TOY; take TORCH and FISHERMAN'S NECKLACE (B).
- Examine FISHERMAN'S NECKLACE; take STRING and FISHERMAN'S KEY.
- Use FISHERMAN'S HOOK (C) and FISHERMAN'S KEY. Open; take MACHETE.
- Use SUPPLIES, TORCH, and MACHETE (D).
- Use STRING and DAD'S GLASSES (E).
Chapter 3: N'ektah
- Take Shaman's Crystal (F).
- Use Survival Hatchet; take EXOTIC FRUIT and LEATHER BELT (G).
- Solution (H).
- Receive BONE TOOTH.
- Give EXOTIC FRUIT; use BONE TOOTH (I). Take HAPPY REPTILE and TILE.
- Remove plants (J); take SHIP'S WHEEL. Use Glyph Book; place TILE (K).
- Solution (L).
- Take TRIANGULAR BUTTONS (1/2).
- Use HAPPY REPTILE (M).
- Solution (N).
- Receive TRIANGULAR BUTTONS (2/2).
- Remove wheel; place SHIP'S WHEEL, LEATHER BELT, and TRIANGULAR BUTTONS (2/2) (O).
- Examine (P).
- Solution (Q).
- Walk forward.
- Solution (R).
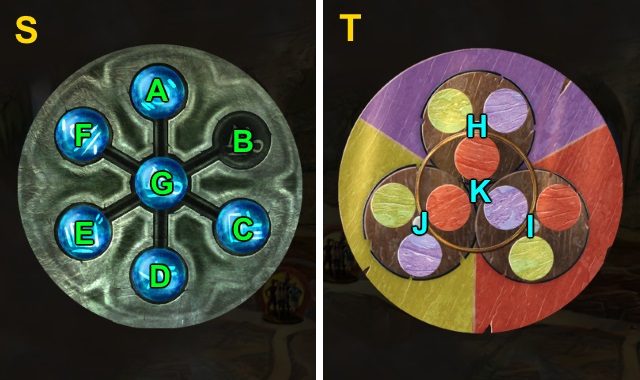
- Solution (S): (G-B)-(A-G-B)-(C-G-A)-(B-G-C)-(F-G-A)-(D-G-B)-(E-G-D)-(A-G-E)-(B-G-F).
- Solution (T): K-I-K-Jx2-K-Hx2-Kx2.
- Solution (U-V).
- Solution (W): press center button when ball is in position shown.
- Solution (X).
- Take BRANCH, PHOSPHORESCENT FUNGUS, and SACK OF FRUIT (Y).
- Examine SACK OF FRUIT; take EMPTY SACK.
- Use Glyph Book. Solution (Z): Ax3-Bx2.
- Take PISTOL. Use EMPTY SACK; use WOODEN SPOON 2x. Receive DIRTY WOODEN SPOON and SACK OF SAND.
- Use SACK OF SAND (A); receive BURNT CLOTH.
- Use Survival Hatchet; use DIRTY WOODEN SPOON (B). Receive SPOONFUL OF STICKY SAP.
- Examine; use SPOONFUL OF STICKY SAP and BURNT CLOTH (C).

- Use SPOONFUL OF STICKY SAP (D); receive CEMENT-LIKE MIX.
- Use CEMENT-LIKE MIX (E). Remove cloth (F); examine. Take ENERGY ORB.
- Use Excavation Brush (G).
- Solution (H).
- Use Glyph Book. Take SILVER BLADE; place ENERGY ORB.
- Walk forward.
- Use Survival Hatchet; take BLOCK OF ICE (I).
- Use Survival Hatchet (J). Take TINY PYRAMID; examine switch.
- Examine (K).
- Solution (L).
- Take EMPTY FLASK and HANDLE.
- Take N'EKTAH'S BOOMERANG (M). Use Survival Hatchet; receive LADDER HALF.
- Place Shaman's Crystal (N); take BOOMERANG (1/2) (O).
- Walk down.
- Receive CODE PLATE.
- Use BRANCH; receive BRANCH TORCH (P). Use BLOCK OF ICE; take IRON RECTANGLE.
- Place LADDER HALF and TINY PYRAMID (Q); take COPPER RECTANGLE (R).
- Walk forward.
- Place IRON RECTANGLE, COPPER RECTANGLE (S), and CODE PLATE (T).
- Solution (U).
- Play HOP; receive ENERGY ORB (V).
- Use BRANCH TORCH (W); place HANDLE (X).
- Solution (Y): B-Ax2-B-Ax4-B-A-B-Ax3-B.
- Walk forward.
- Take LANTERN (Z).
- Place N'EKTAH'S BOOMERANG (A); use Survival Hatchet. Take BOOMERANG (2/2) (B); place BOOMERANG (2/2) (A). Take OUROBOROS DISC.
- Use EMPTY FLASK (C); receive FLASK OF WATER.
- FLASK OF WATER on LANTERN; take EMBER.
- Walk down.
- Place OUROBOROS DISC (D).
- Play HOP; receive POD PLATE (E).
- Walk down.
- Place ENERGY ORB (F).
- Play HOP; receive GLOWING TOPAZ (G).
- Walk forward twice.
- Place PHOSPHORESCENT FUNGUS, EMBER, and GLOWING TOPAZ; take GOLDEN IDOL (H).
- Walk down twice.
- Place GOLDEN IDOL (I).
- Play HOP; receive AMETHYST (J).
- Walk forward twice.
- Place AMETHYST; solution (K).
- Take VIOLET CRYSTAL (L).
- Use Shaman's Crystal and VIOLET CRYSTAL (M); take LIT CANDLE (N).
- Give SILVER BLADE and PISTOL (O).
- Place Shaman's Crystal and POD PLATE (P).
- Solution (Q).
- Walk forward.
Chapter 4: Elsa
- Take WHEEL (R).
- Examine scene.
- Take POD PLATE (S).
- Take PLANKS and ACIDIC FROG (T).
- Use Survival Hatchet (U) and ACIDIC FROG (V); receive CHAINS.
- Give POD PLATE, CHAINS, and PLANKS (W); receive UNASSEMBLED RAFT.
- Examine UNASSEMBLED RAFT 3x; take RAFT.
- Place RAFT (X).
- Take HEXAGON SEAL and GOLDEN EYE (Y).
- Examine GOLDEN EYE.
- Use Survival Hatchet; take N'EKTAH'S BOOMERANG (Z).
- Place Shaman's Crystal and GOLDEN EYE (A).
- Examine (B); use LIT CANDLE (C). Use Excavation Brush; place HEXAGON SEAL (D). Take COPPER EYE.
- Examine COPPER EYE.
- Place COPPER EYE (E).
- Use N'EKTAH'S BOOMERANG (F); take ATLANTEAN SNAKE SEAL.
- Place VIOLET CRYSTAL and ATLANTEAN SNAKE SEAL (G).

- Solution (H) Ax7-Bx6-Cx4-Dx7-Ex5.
- Walk forward.
- Use Shaman's Crystal (I).
- Solution (J).
- Take PYRAMID KNOB.
- Place PYRAMID KNOB (K).
- Solution (L).
- Play HOP; receive PUZZLE PYRAMID (M).
- Use BONE NEEDLE; take PYRAMID FALCON and MIRROR SURFACE (N).
- Take CRYSTAL CHUNK (O).
- Survival Hatchet on CRYSTAL CHUNK; take CRYSTAL SHARDS and CRYSTAL PIECE.
- Enter Portal Hall.
- Examine; use MIRROR SURFACE (P). Take LASER PISTOL. Use Shaman's Crystal (Q) and Glyph Book. Examine screen; take COORDINATES KEY.
- Glyph Book on LASER PISTOL; use BONE NEEDLE and CRYSTAL SHARDS. Take CHARGED LASER PISTOL.
- Place Shaman's Crystal (R); use COORDINATES KEY (S).
- Solution (T).
- Examine; take COMPLETE COORDINATES KEY.
- Examine; use CHARGED LASER PISTOL. Take STONE SWORD (U).
- Use COMPLETE COORDINATES KEY (V).
- Walk down.
- Remove moss (W); give STONE SWORD. Take STONE FACE (X) and PYRAMID SNAKE.

- PYRAMID FALCON, CRYSTAL PIECE, and PYRAMID SNAKE on PUZZLE PYRAMID; solution (Y). Take PYRAMID CONSOLE KEY.
- Walk left.
- Place STONE FACE (Z); take PURPLE SPHERE.
- Walk down twice.
- Use CHARGED LASER PISTOL (A).
- Play HOP; receive PINK SPHERE (B).
- Walk forward.
- Place PURPLE SPHERE and PINK SPHERE; solution (C).
- Take POWER GAUGE.
- Place PYRAMID CONSOLE KEY and POWER GAUGE (D).
- Solution (E): move ball through path without touching edges.
- Play HOP; receive ANCIENT RELIC (F).
- Place ANCIENT RELIC (G); take SCEPTER OF ENSNAREMENT (H).
- Go left, then enter portal.
- Examine keys (I); use Survival Hatchet. Take MOTOR OIL and TENNIS RACQUET (J).
- Examine TENNIS RACQUET; take RACQUET HOOP.
- Use Survival Hatchet and MOTOR OIL (K); use Survival Hatchet. Receive SEBASTIAN'S STAFF.
- Use Survival Hatchet; examine (L). Use RACQUET HOOP; move beam.
- Walk right.
- Use SEBASTIAN'S STAFF (M); examine scene 3x.
- Take FIRE AXE (N).
- Take COIN (O).
- Examine (P).
- Use FIRE AXE (Q); receive LUG WRENCH.
- Use LUG WRENCH (R); open. Take BOLT CUTTER.
- Use COIN; take HOSE (S). Use BOLT CUTTER (T); press button.
- Take LADDER SEGMENT (U).
- Open ladder; place LADDER SEGMENT and HOSE (V).
- Use SEBASTIAN'S STAFF 3x (W). Use SCEPTER OF ENSNAREMENT; use 3x.
- Play HOP; examine scene.
- Use Shaman's Crystal 3x (X).
- Use WHEEL; turn (Y).
- Use Shaman's Crystal (Z).
- Solution is random (A).
- Congratulations! You have completed Wanderlust: What Lies Beneath.
Created at: 2018-03-30