

Walkthrough Menu
- General Tips
- Chapter 1: The Crash Site
- Chapter 2: The Street
- Chapter 3: The Catacombs
- Chapter 4: The Fisherman's House
- Chapter 5: The Laboratory
- Chapter 6: The Brewery
General Tips
- This is the official guide for Web of Deceit: Deadly Sands.
- This guide will not mention each time you have to zoom into a location; the screenshots will show each zoom scene.
- We will use the acronym HOP for Hidden-object puzzles. Interactive items will be color-coded and some will be numbered; please follow the numbers in sequence.
- The HOP lists may be random; our lists may vary from yours.
- Use the map to travel to a location.
Chapter 1: The Crash Site

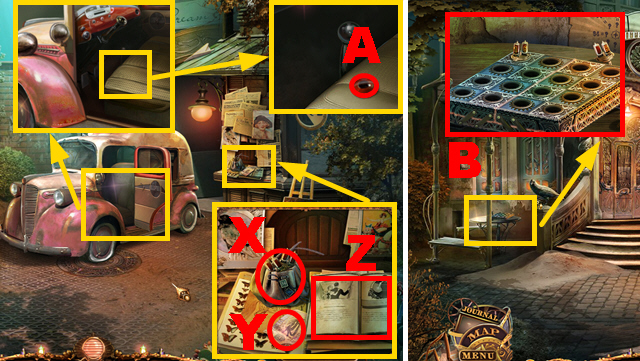
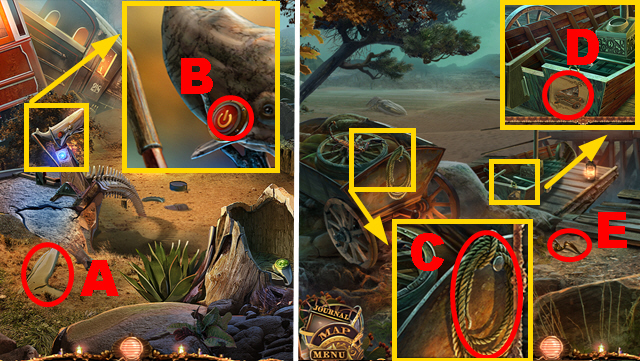
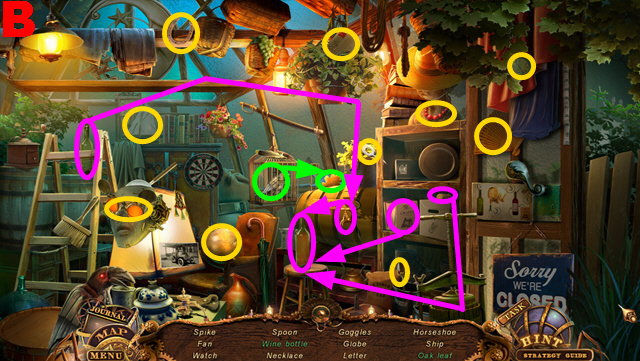
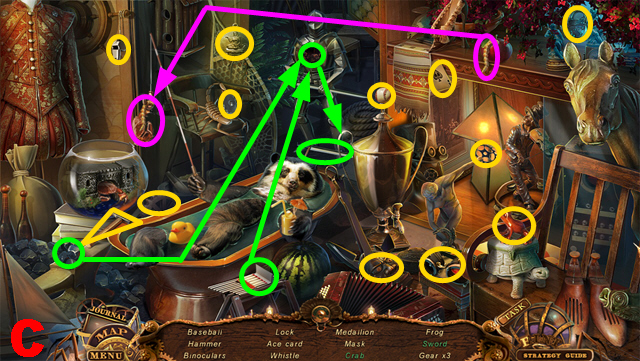
- Try to cross the bridge (A).
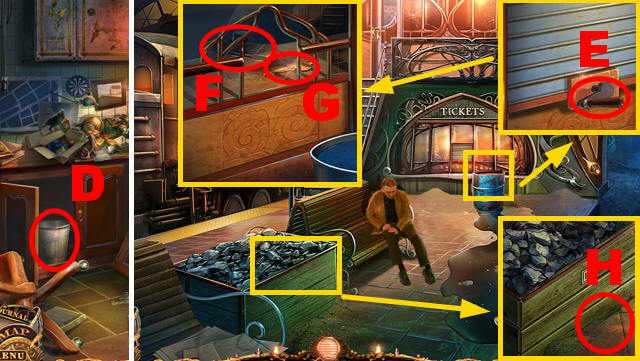
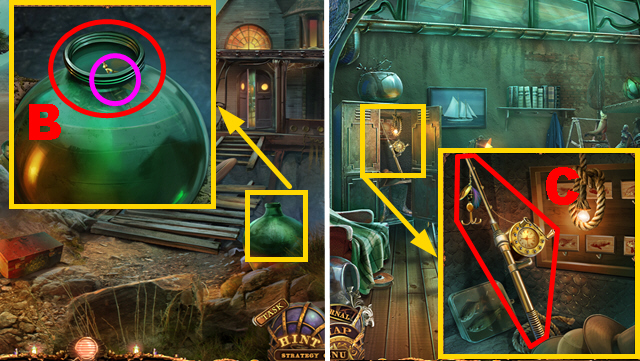
- Take the SUITCASE KEY (B) and the photo (C).
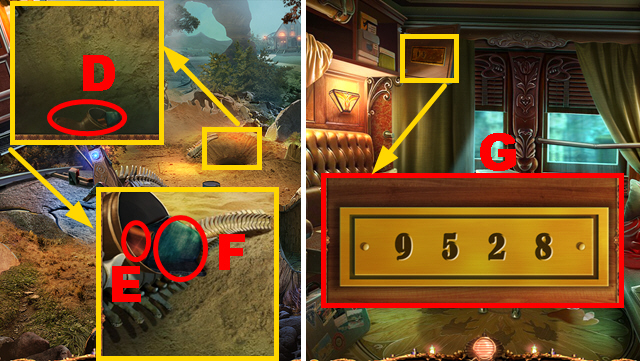
- Insert the SUITCASE KEY into the niche (D); take SAM'S HOUSE KEY (E).
- Open the door (F).
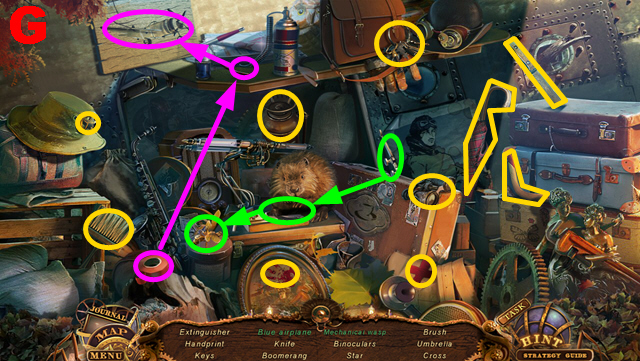
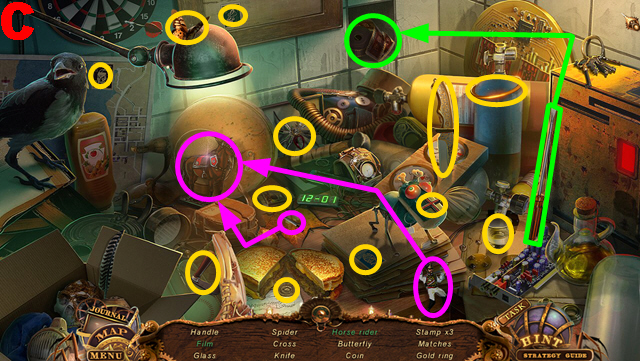
- Play the HOP.
- You receive the EXTINGUISHER (G).
- Put out the fire with the EXTINGUISHER (H).
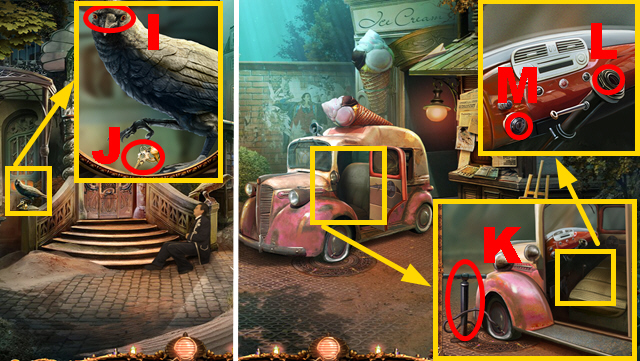
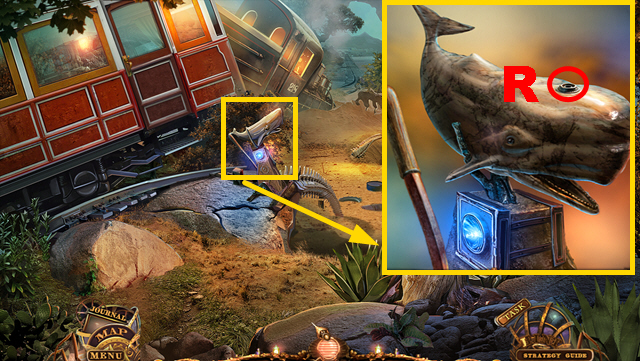
- Take the ROPE (I).
- Connect the ROPE to the pole (J) and the propeller (K).
- Push the handle (L).
- Move forward.
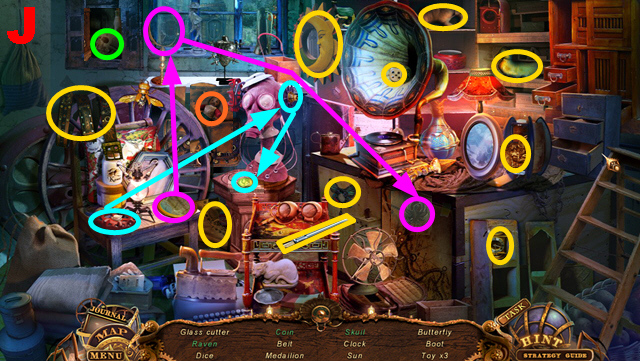
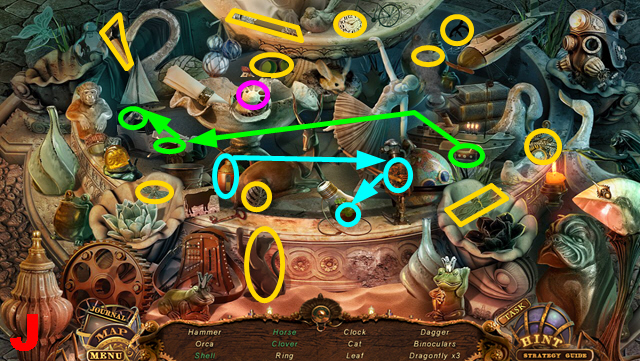
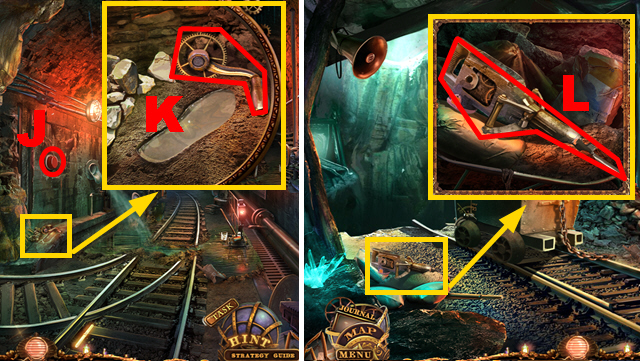
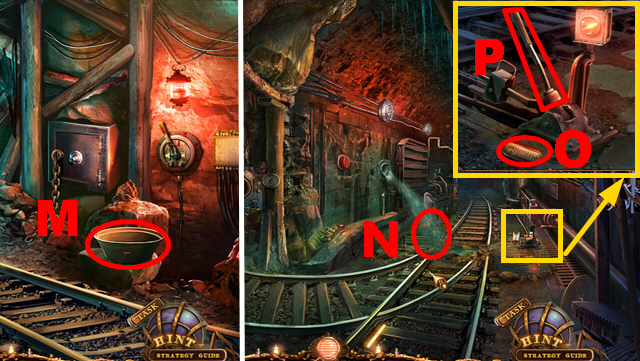
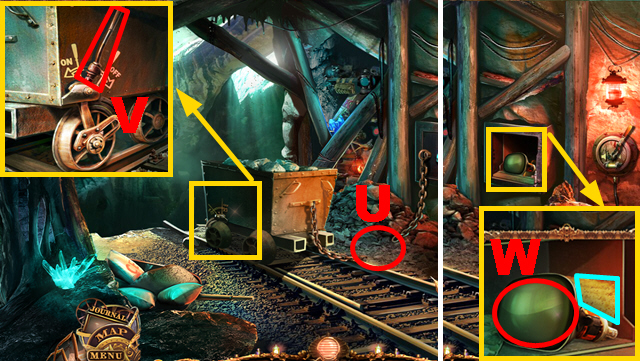
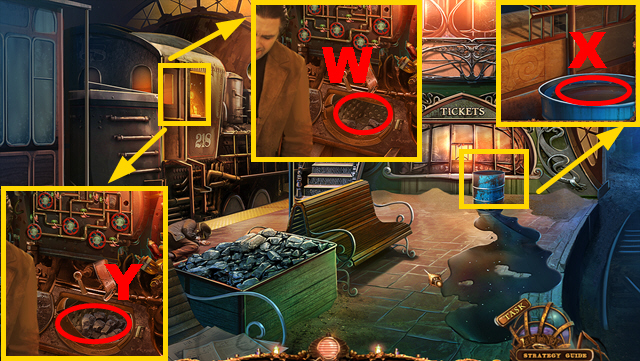
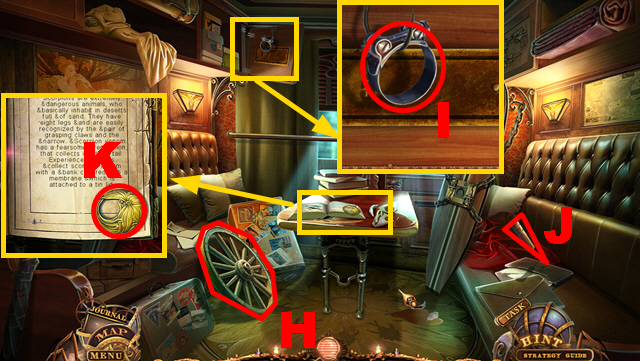
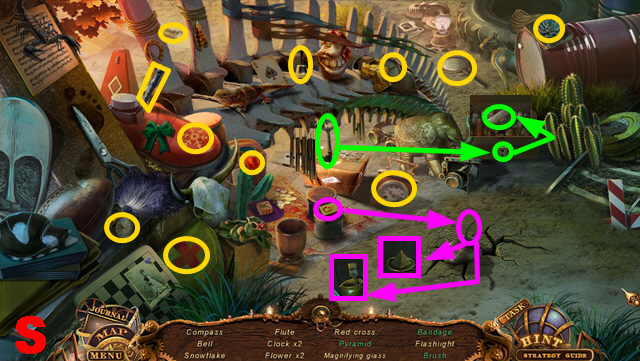
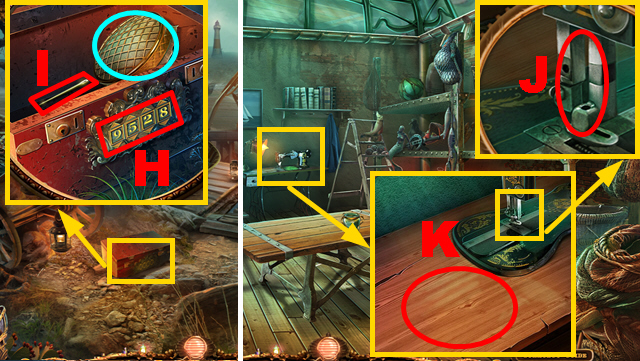
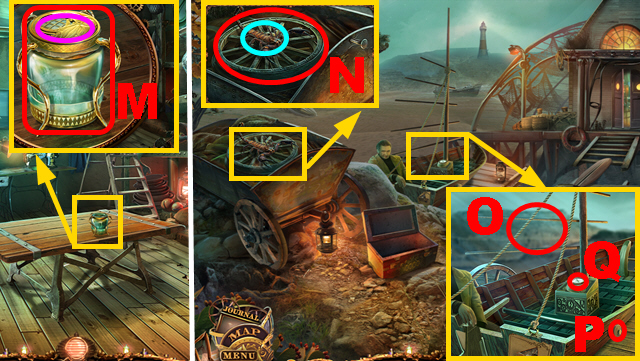
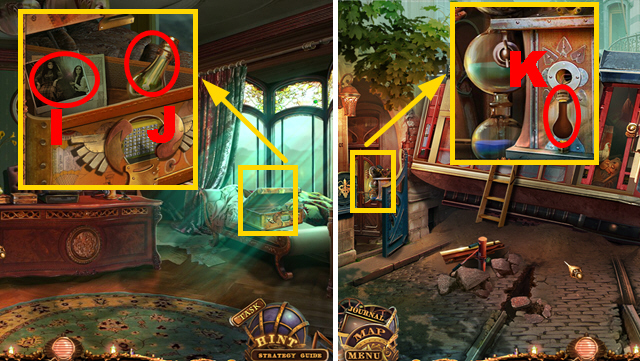
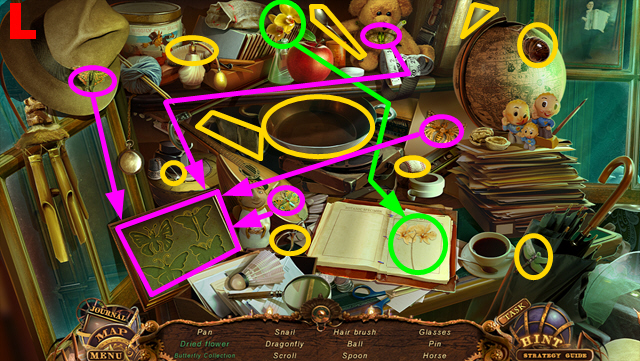
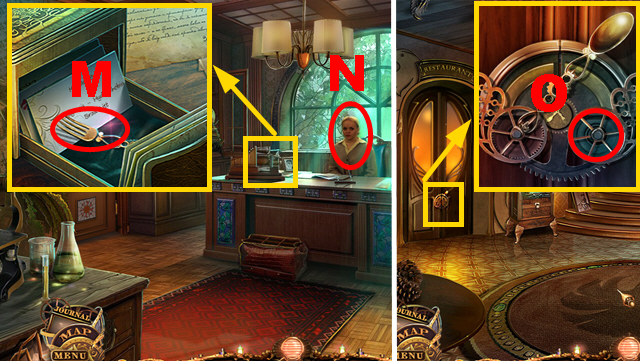
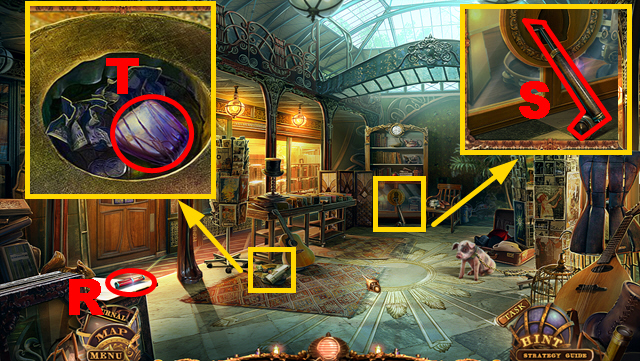
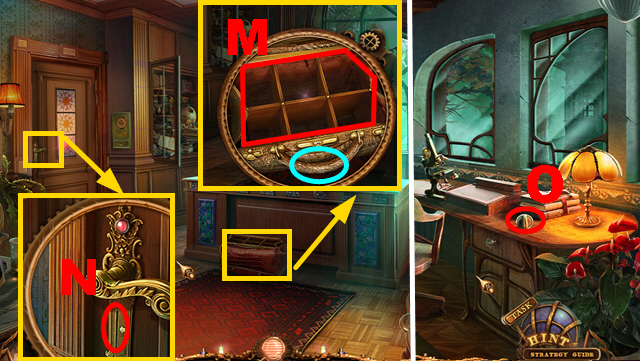
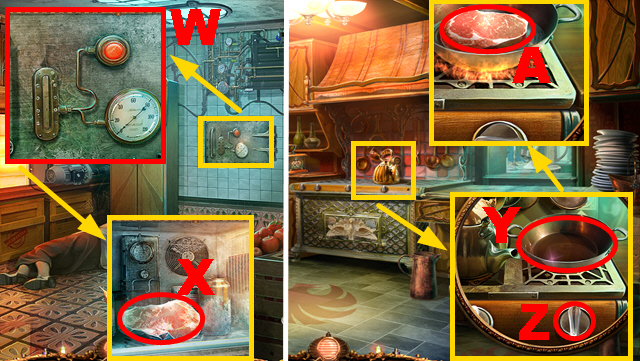
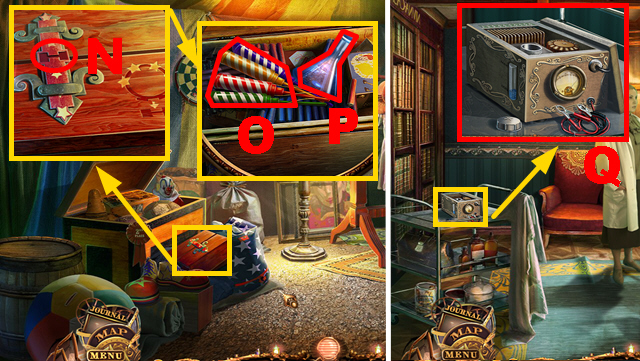
- Read the newspaper (M); take the LEVER (N) and BEARING 1/2 (O).
- Insert the SAM'S HOUSE KEY into the slot (P).
- Go through the door.
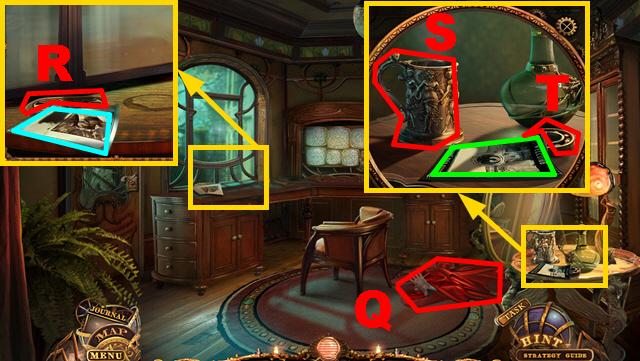
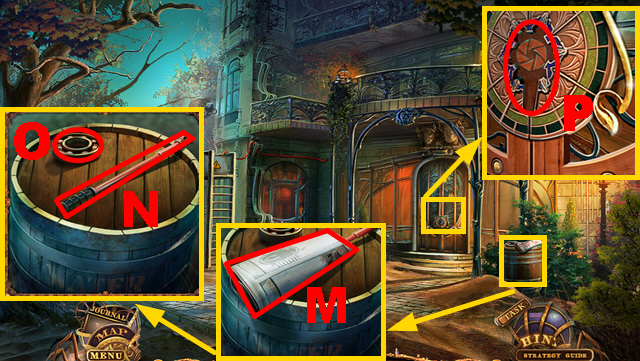
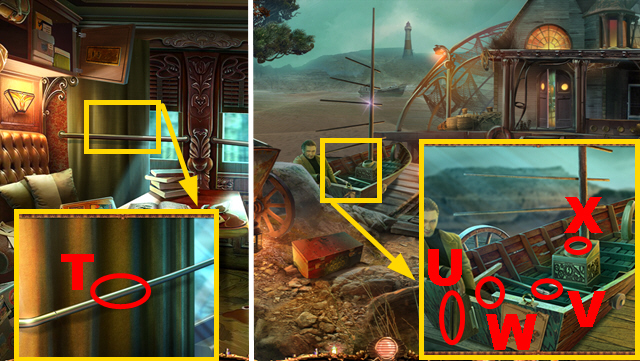
- Take the CURTAIN (Q).
- Take the page (blue) and the TAPE (R).
- Take the HOT TEA (S), read the note (green), and take BEARING 2/2 (T).
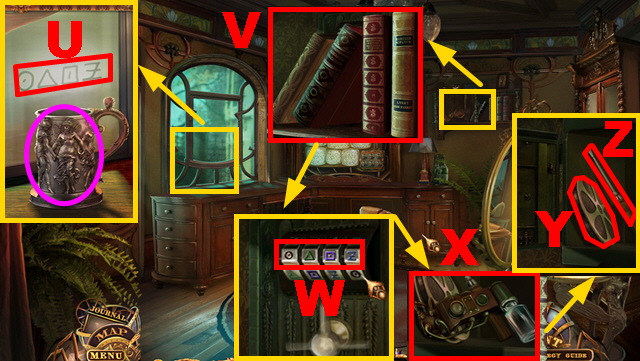
- Put down the HOT TEA (purple); read the code (U).
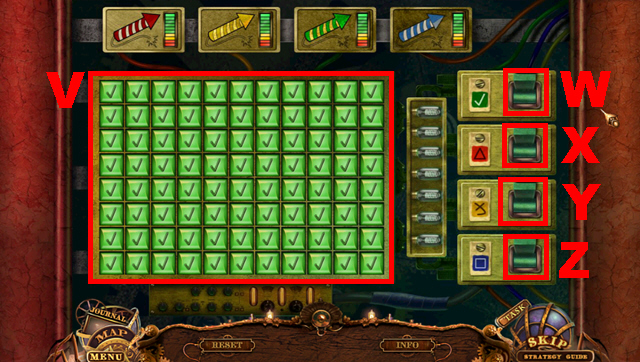
- Remove three books (V); enter the correct code (W).
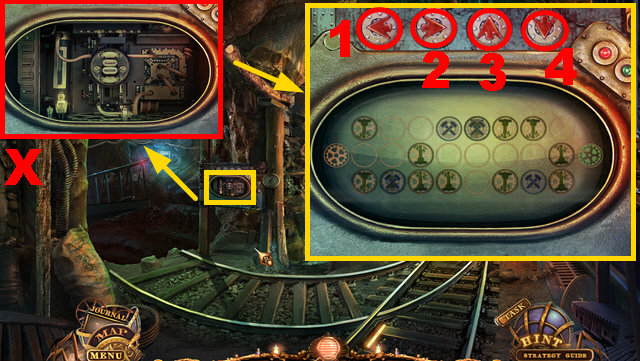
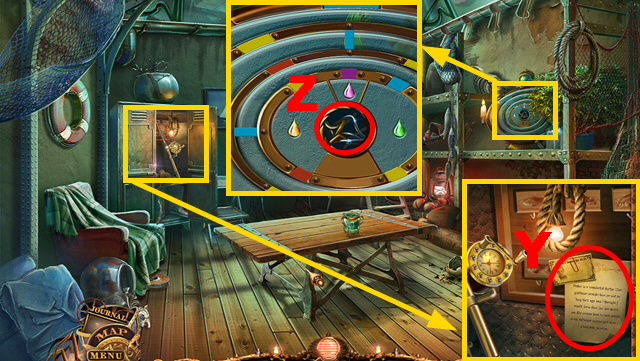
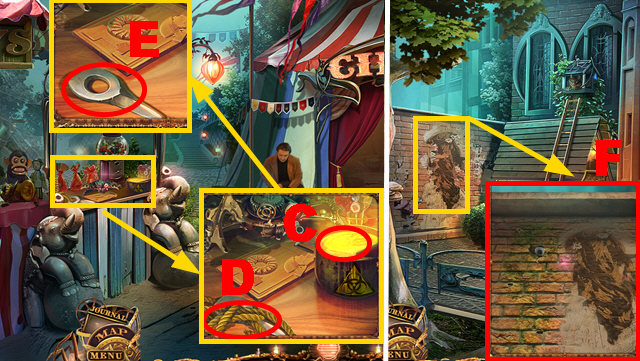
- Take the ANALYZER (X), the movie reel (Y), and the SCREWDRIVER (Z).
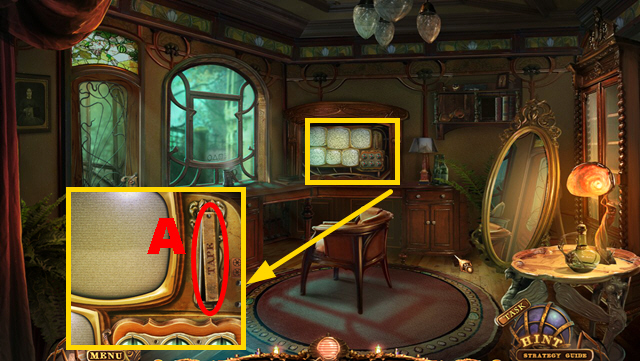
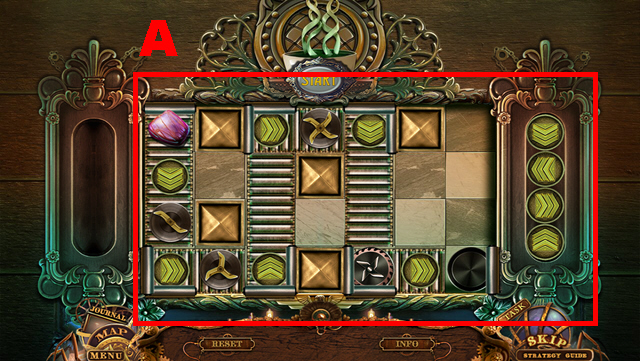
- Insert the TAPE into the slot (A).
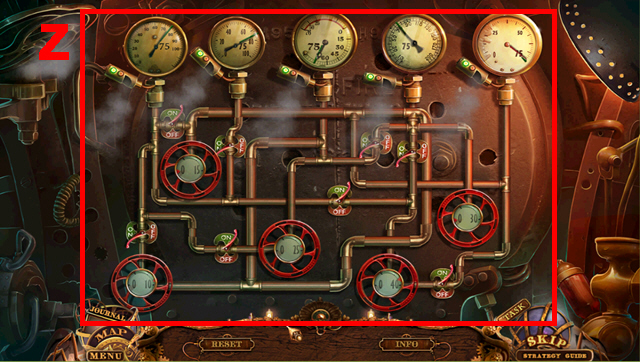
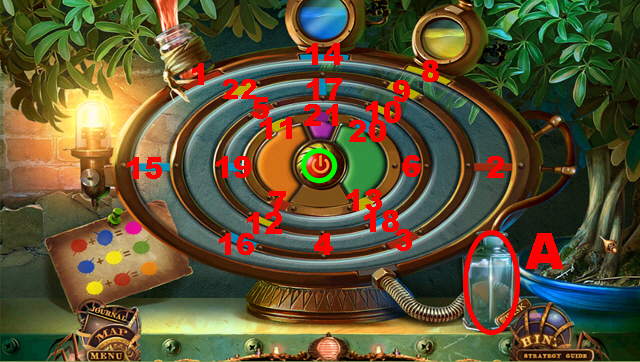
- Play the mini-game.
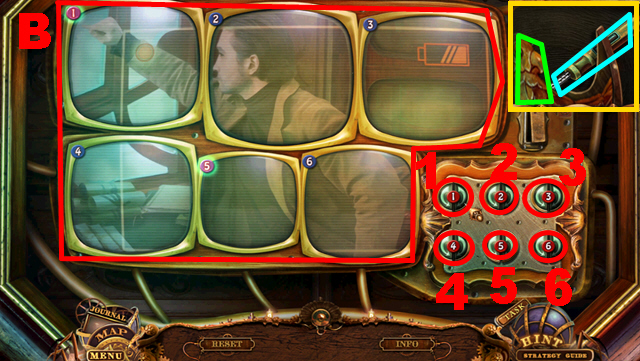
- Solution (B).Turn the screens counterclockwise in the following order: 2, 2, 5, 6, 6, 6, 1.
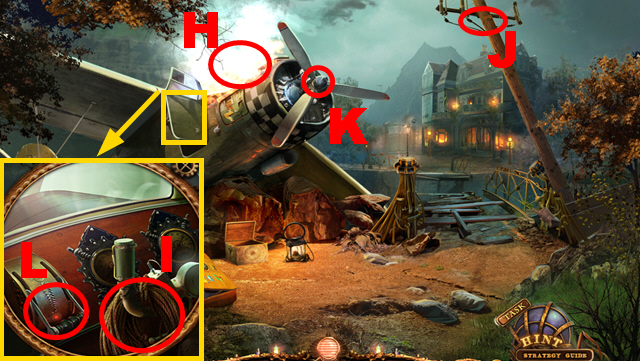
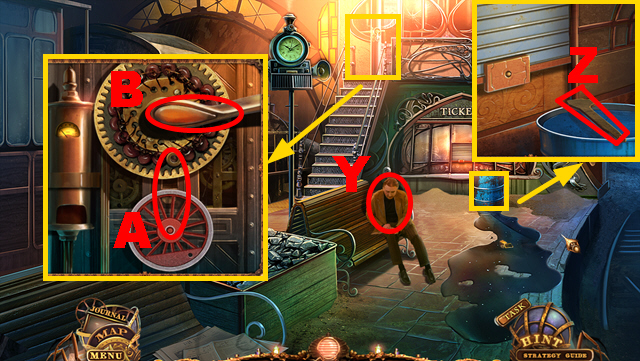
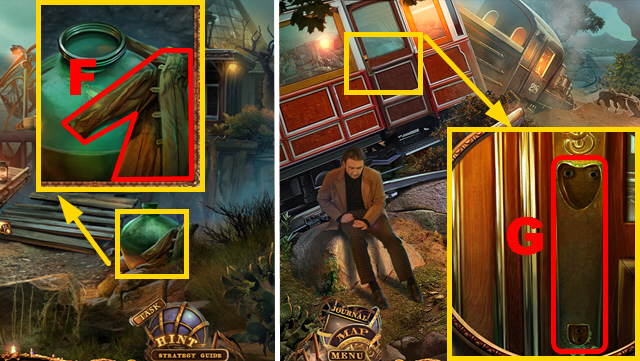
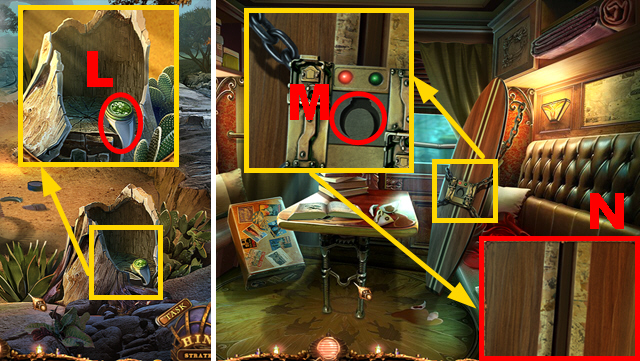
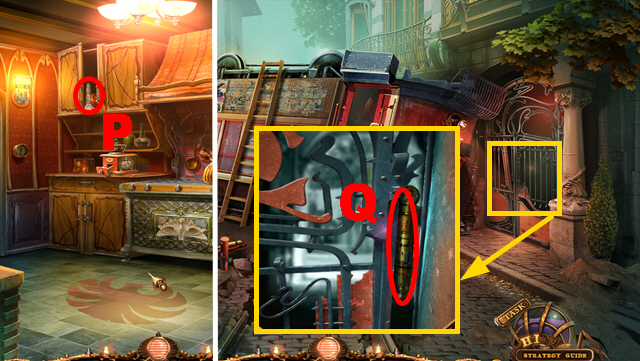
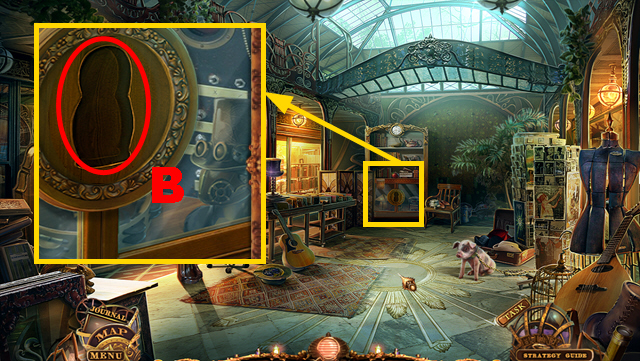
- Take the PARROT EMBLEM (green) and the SOLDERING IRON (blue).

- Repair the lock with the SOLDERING IRON (C); push the handle (D).
- Turn left.
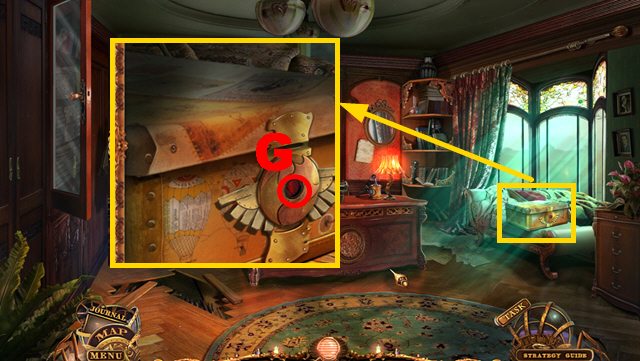
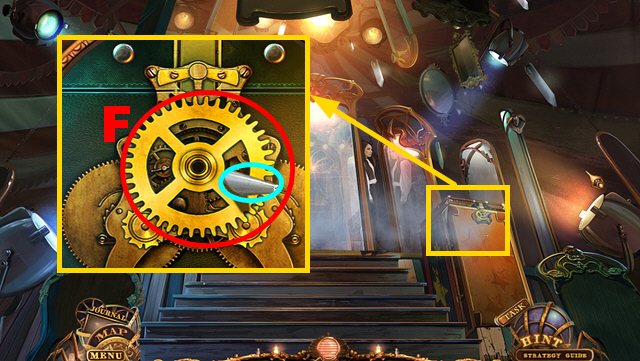
- Remove the screws with the SCREWDRIVER (E); take the ENGINE (F).
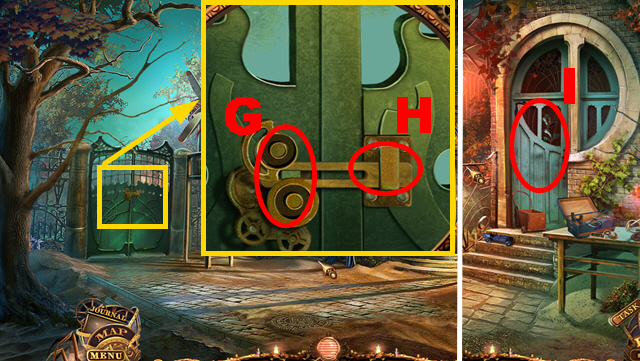
- Connect the 2 BEARINGS to the lock (G); move aside the latch (H).
- Go through the gate.
- Open the door (I).
- Play the HOP.
- You receive the GLASS CUTTER (J).
- Go to Sam's House.
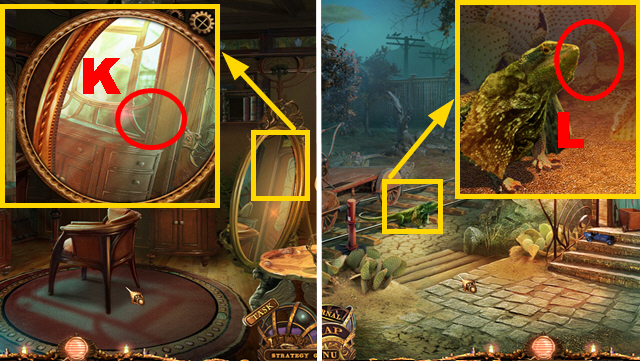
- Collect the MIRROR with the GLASS CUTTER (K).
- Go to the Rail.
- Hold the MIRROR in front of the lizard (L).
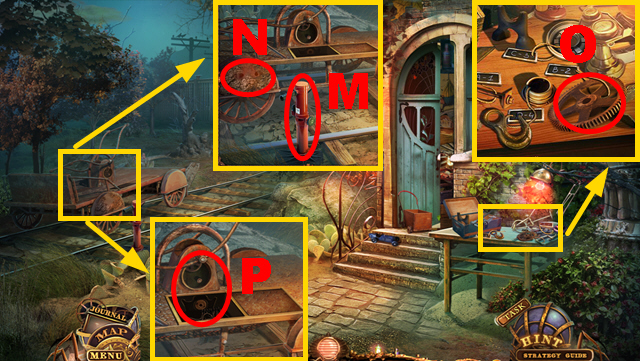
- Connect the LEVER to the jack (M); take the JACK.
- Clean the wheel with the CURTAIN (N).
- Take the B-2 GEAR (O).
- Connect the B-2 GEAR and the ENGINE to the trolley (P).
- Play the mini-game.
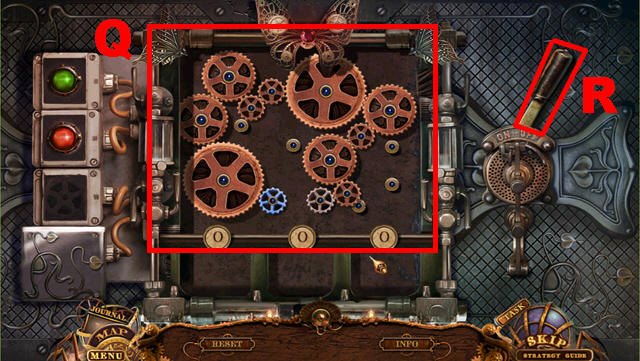
- Solution (Q).
- Turn the lever (R).
Chapter 2: The Street
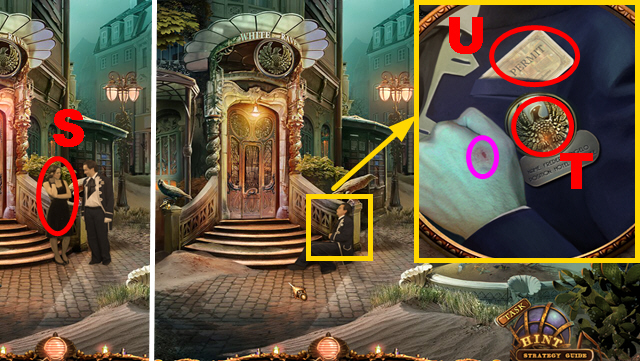
- Try to talk to the woman (S).
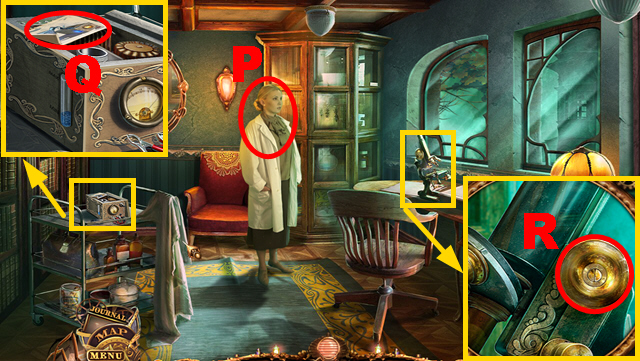
- Use the ANALYZER on the wound (purple) to acquire the SPIDER VENOM; take the BADGE (T) and the ID CARD (U).
- Try to turn right.
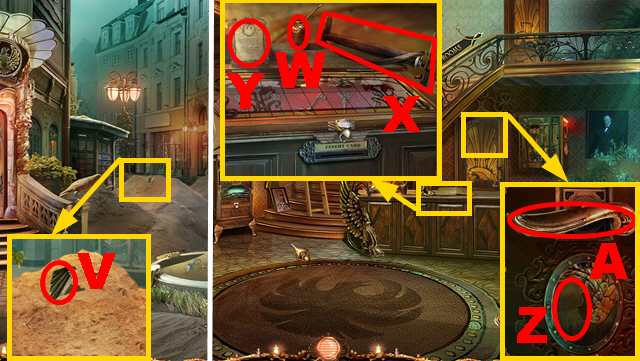
- Take the WING (V).
- Go through the door.
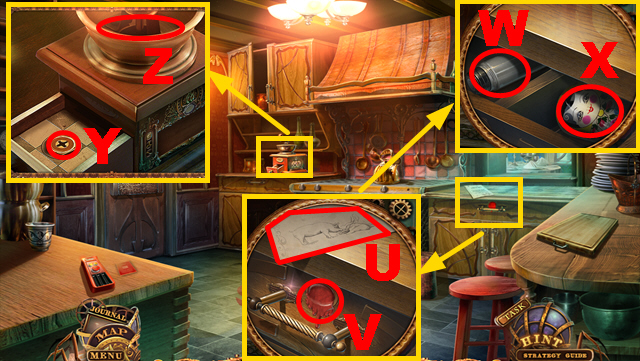
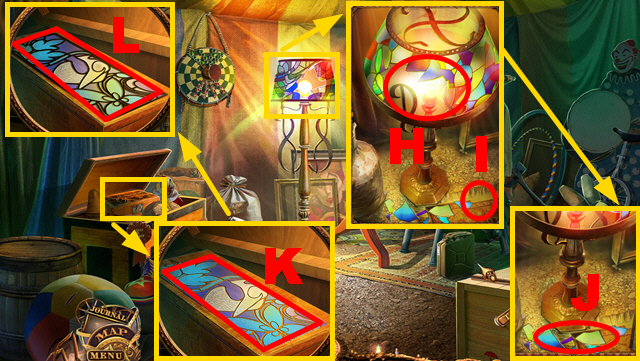
- Take the BURNING INCENSE (W), the PUMP (X), and read the note (Y).
- Insert the PARROT EMBLEM into the niche (Z); push the handle (A).
- Play the HOP.
- You receive the WING HANDLE (B).
- Insert the ID CARD into the slot (C); open the cover and take the DOOR KEY (D).
- Connect the WING and the WING HANDLE to the bird (E); insert the DOOR KEY into the lock (F), turn the key twice, and push the wing handle.
- Go through the door.

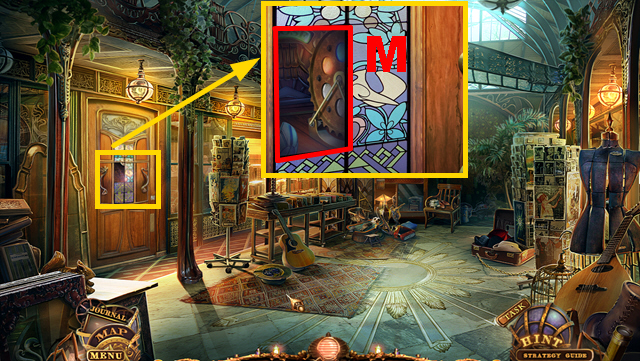
- Take the notes (G) and the BOW (H).
- Go to the Street.
- Connect the BOW to the statue (I).
- Play the HOP.
- You receive the HAMMER (J).
- Go to the Sam's Room.
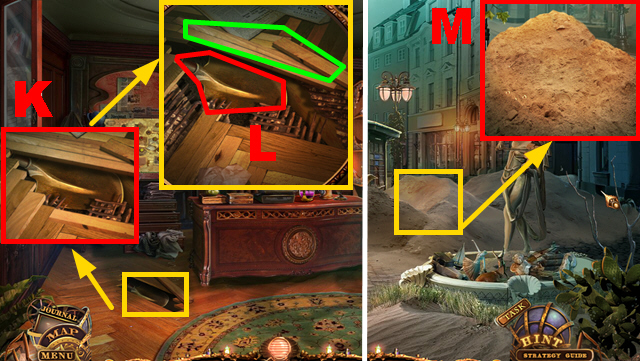
- Remove the boards with the HAMMER (K); take the SHOVEL (L) and the BOARDS (green).
- Walk down twice.
- Remove the sand with the SHOVEL (M).
- Turn right.
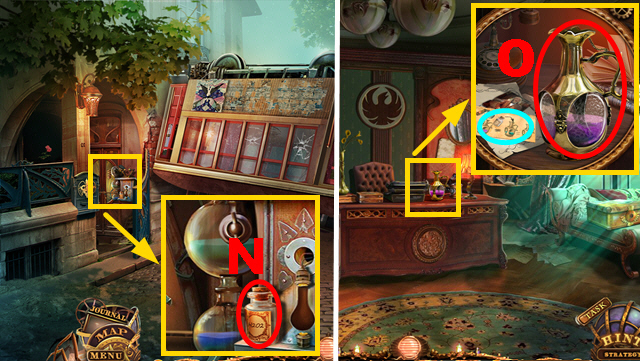
- Take the PEROXIDE (N).
- Go to the Sam's Room.
- Read the recipe (blue); pour the SPIDER VENOM and the PEROXIDE into the flask (O) and take the ACID.
- Go to the Crossroad.
- Put down the JACK (P) and turn its handle; take the STEERING WHEEL (Q).
- Pour the ACID over the chain (R).
- Play the mini-game.
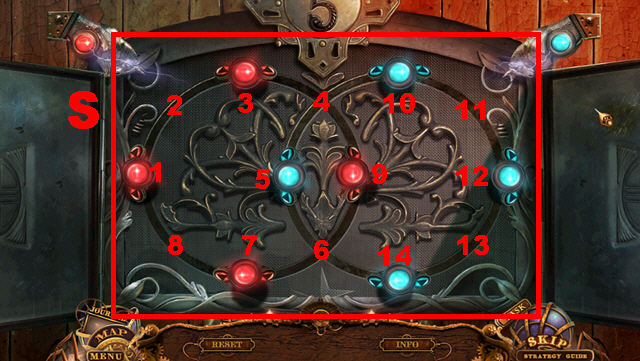
- Solution (S): 5-6, 3-4, 1-2, 7-8, 6-7, 14-6, 8-1, 2-3, 7-8, 6-7, 1-2, 12-6, 10-14, 4-12, 3-10, 2-4, 10-11, 4-10, 9-5, 8-3, 7-1, 6-7, 14-9, 12-14, 11-12.
- Push the button (T).
- Play the HOP.
- You receive the NAILS (U).
- Go to the Hotel Hall.
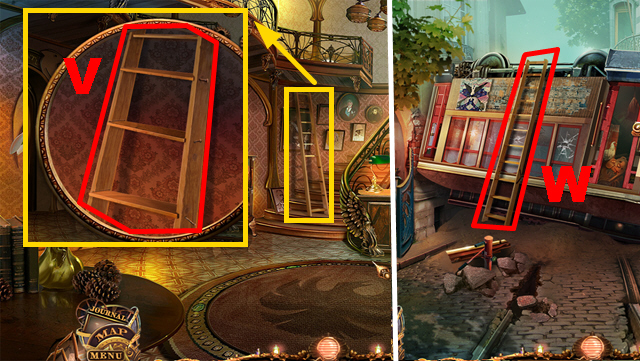
- Connect the BOARDS and the NAILS to the ladder (V); hit the nails with the HAMMER and take the LADDER.
- Go to the Crossroad.
- Put down the LADDER (W).
- Climb up the ladder.
- Take the BAG OF PLUGS (X), BANK NOTE 1/2 (Y), and read the book (Z).
- Take GLASS EYE 1/2 (A).
- Go to the Street.
- Put down the BAG OF PLUGS (B).
- Play the mini-game.
- Solution: (C).
- Take BANK NOTE 2/2 (D).
- Go to the Hotel Hall.
- Insert 2 BANK NOTES into the slot (E) and pull the handle (F); take the SODA (purple).
- Go to the Sam's Room.
- Take the note (G); put the BADGE in its place.
- Play the mini-game.
- Solution: (H).
- Open the compartment; take the movie reel (green) and GLASS EYE 2/2 (blue).
- Walk down twice.
- Connect the 2 GLASS EYES to the statue (I); take the TRUCK KEY (J).
- Turn right, move forward.
- Put down the PUMP (K) and press it to inflate the tire; connect the STEERING WHEEL to the car (L), insert the TRUCK KEY into the lock (M), and turn the key.
- Take the ALARM BELL (N).
- Go to the Hotel Hall.
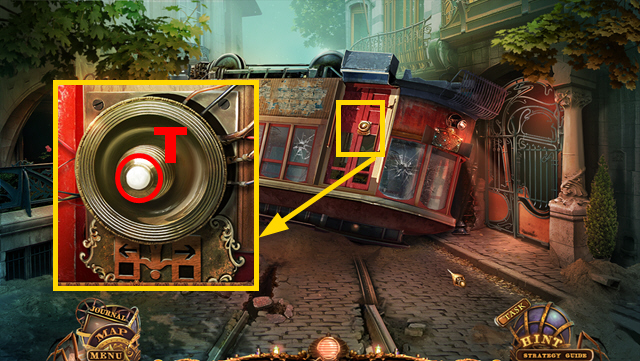
- Connect the ALARM BELL to the device (O) and hold the BURNING INCENSE next to it (P); take the HATCH KEY (Q).
- Go to the Dead End.
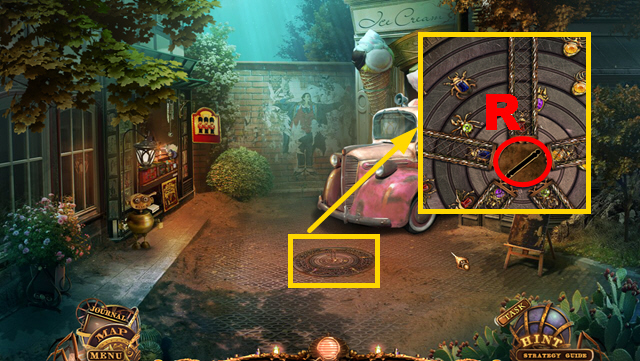
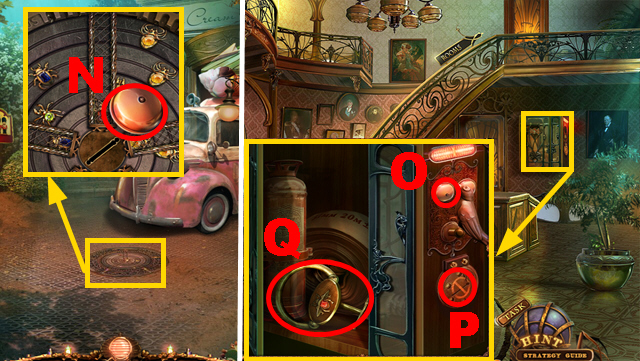
- Insert the HATCH KEY into the slot (R).
- Play the mini-game.

- Solution for the red spiders: Move spider 2 to A; 1 to B.
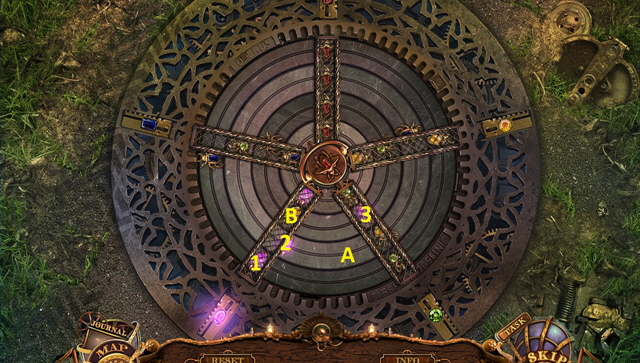
- Solution for the purple spiders: Move spider 2 to A; 3 to B; 1 back to 1.
- Solution for the green spiders: Move spider 2 to A; 3 back to 3; 1 back to 1.
- Solution for the yellow spiders: Move spider 2 to A; 3 to B; 1 back to 1.
- Solution for the blue spiders: Move spider 2 to A.
- Take the RECIPE HALF (D).
- Put down the RECIPE HALF (E); pour the SODA into the test tube (F).
- Shut the test tube (G); take the GLOW STICK (H).
- Throw the GLOW STICK down the drain (I).
- Go down the drain.
Chapter 3: The Catacombs
- Push the button (J).
- Take the JACKHAMMER HANDLE (K).
- Turn right.
- Connect the JACKHAMMER HANDLE to the jackhammer (L); take the JACKHAMMER.
- Take the PAN (M).
- Walk down.
- Put down the PAN (N).
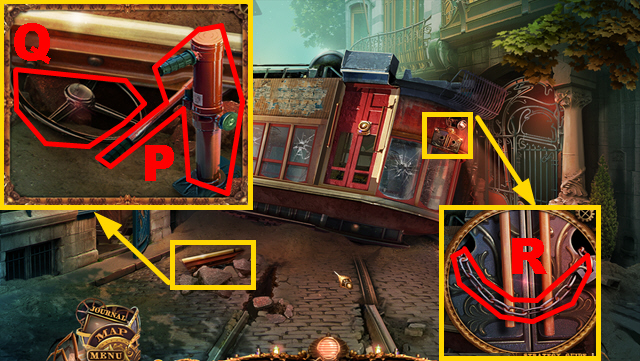
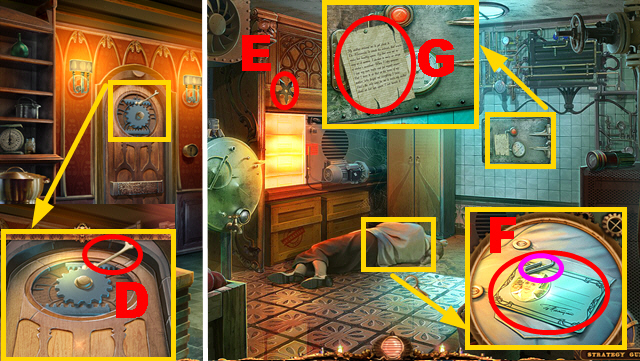
- Take the FUSE (O) and the LEVER (P).
- Turn right.
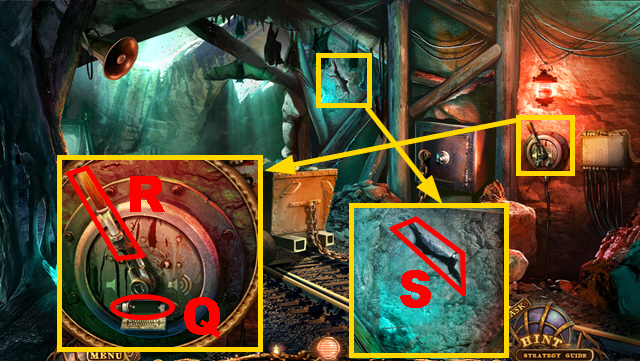
- Insert the FUSE into the slot (Q); turn the lever (R).
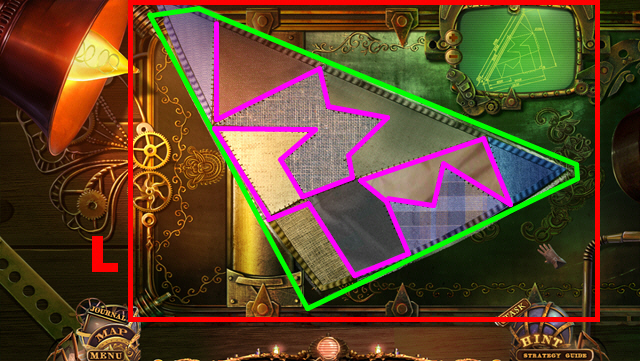
- Break the wall with the JACKHAMMER (S).
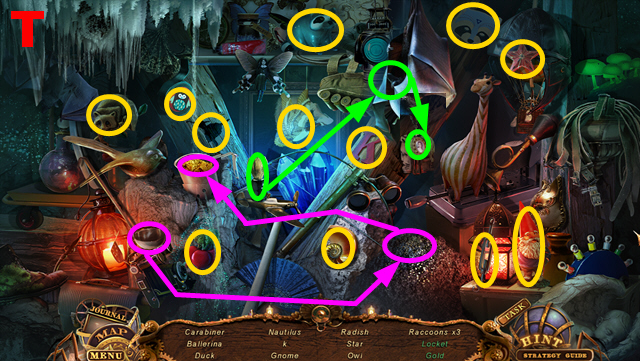
- Play the HOP.
- You receive the CARABINER (T).
- Connect the 2 chains with the CARABINER (U).
- Connect the LEVER to the cart (V); pull the lever.
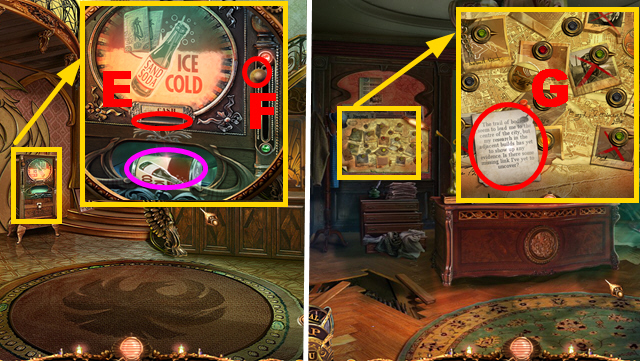
- Take the TV SCREEN (W); read the note (blue).
- Walk down.
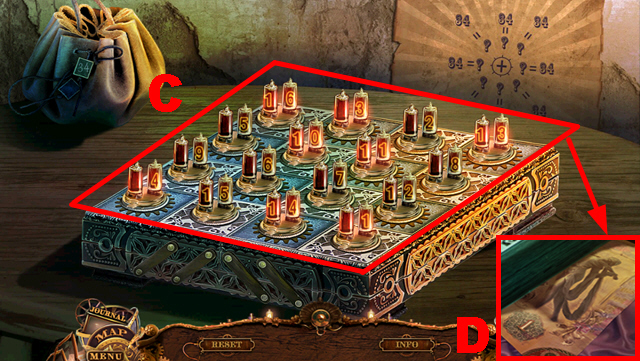
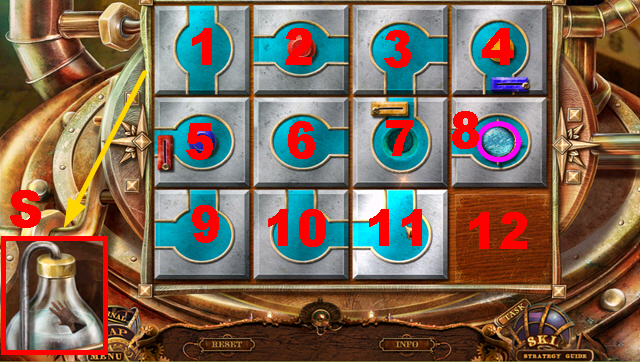
- Insert the TV SCREEN into the device (X).
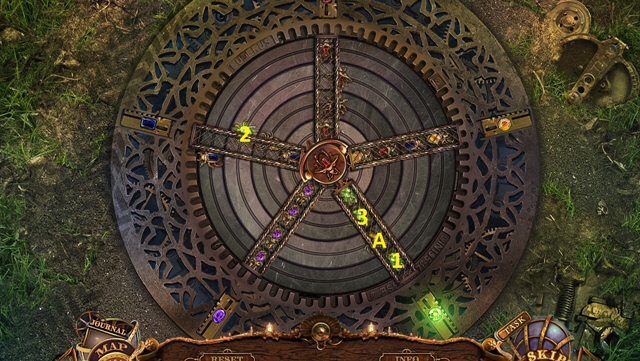
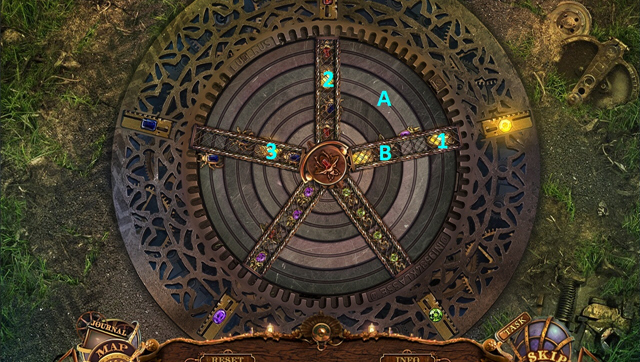
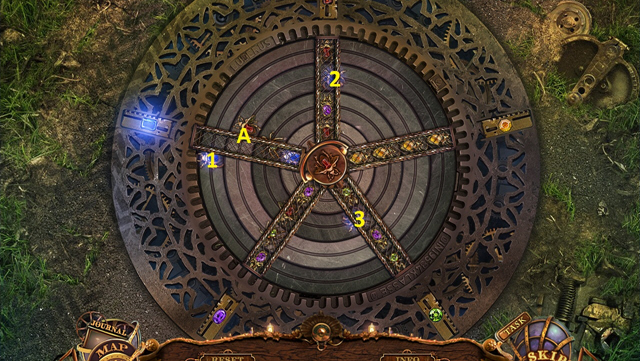
- Play the mini-game.
- Solution: 2, 4, 4, 4, 2, 3, 4, 2, 3, 3, 2, 2, 2, 4, 4, 2, 3, 4, 2, 2.
- Turn left.
- Talk to your uncle (Y).
- Take the PICKLOCK (Z).
- Connect the PICKLOCK to the door (A); turn the handle (B).
- Go through the door.
- Play the HOP.
- You receive the HANDLE (C).
- Take the EMPTY BUCKET (D).
- Walk down.
- Connect the HANDLE to the window (E); turn the handle.
- Take the PAPERWEIGHT (F) and the FIRST-AID KEY (G).
- Put down the EMPTY BUCKET (H).
- Enter the Controller's Office.
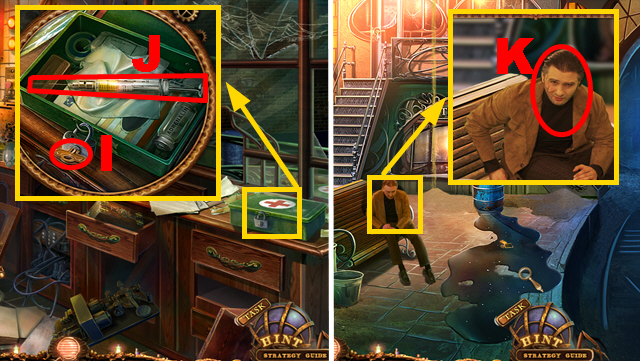
- Insert the FIRST-AID KEY into the lock (I) and turn the key; take the MORPHINE (J).
- Walk down.
- Give the MORPHINE to your uncle (K).
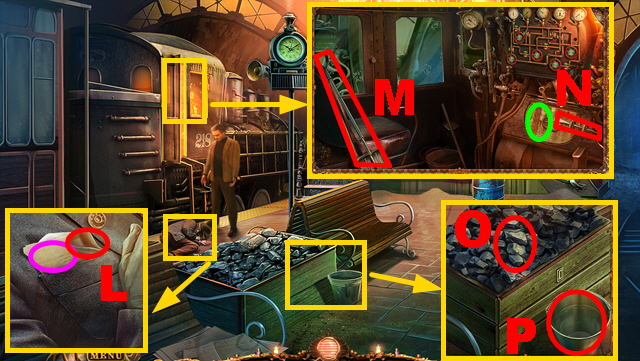
- Read the note (purple); take the HANDKERCHIEF (L).
- Take the COAL SHOVEL (M) and the CHISEL (N); open the cover (green).
- Put the coal into the empty bucket with the COAL SHOVEL (O); take the BUCKET WITH COAL (P).
- Enter the Controller's Office.
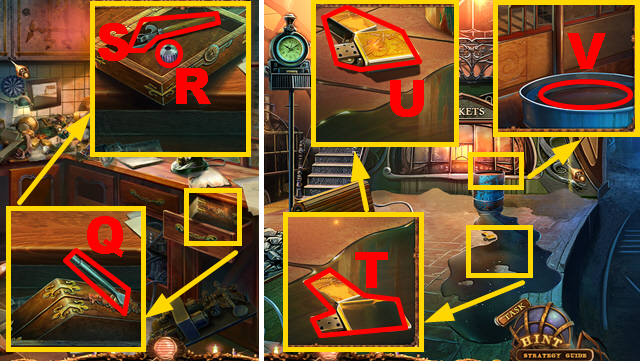
- Read the note, insert the CHISEL into the box, hit the chisel with the PAPERWEIGHT (Q), and open the box; take the SPARK WHEEL (R) and the CAN OPENER (S).
- Walk down.
- Clean the lighter with the HANDKERCHIEF (T); insert the SPARK WHEEL into the lighter (U) and take the LIGHTER.
- Open the can with the CAN OPENER (V).
- Pour the BUCKET WITH COAL into the compartment (W); you receive the EMPTY BUCKET.
- Put the EMPTY BUCKET into the can (X) to acquire the BUCKET WITH KEROSENE.
- Pour the BUCKET WITH KEROSENE into the compartment (Y); light the coal with the LIGHTER.
- Play the mini-game.
- Solution: (Z).
- Take the FISH TAIL (A).
- Take the BUTTON (B).
- Move forward.
- Take the ROPE (C).
- Take a look at the outline (D).
- Take the COMPARTMENT HANDLE (E).
- Take the SHIRT (F).
- Walk down.
- Connect the COMPARTMENT HANDLE to the door (G).
- Turn left.
- Take WHEEL 1/2 (H).
- Take the CLAMP (I) and read the plate below it.
- Take the AWL (J).
- Take the JAR CLAMP (K).
- Walk down.
- Use the AWL to acquire the MAGNETIC KEY (L).
- Turn left.
- Insert the MAGNETIC KEY into the slot (M); take the SURFBOARD (N).
- Go to the Fishing Wharf.
Chapter 4: The Fisherman's House
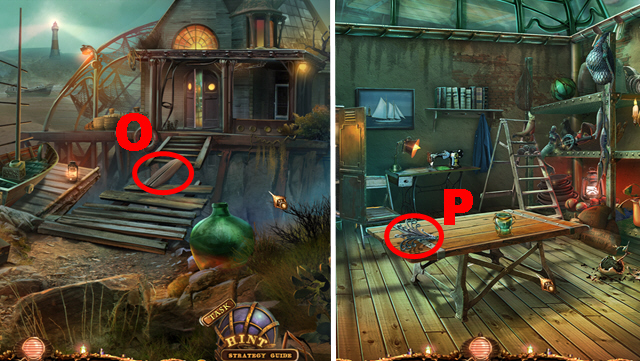
- Put down the SURFBOARD (O).
- Enter the house.
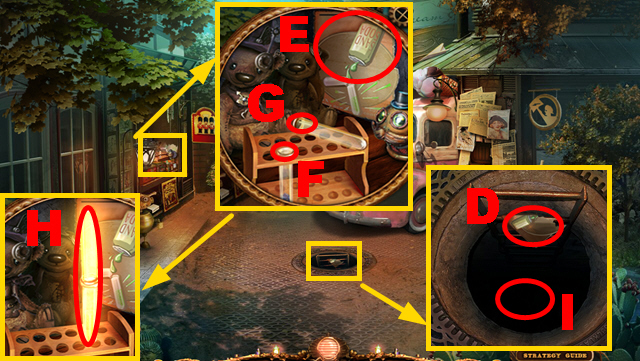
- Take the WHALE SPOUT (P).
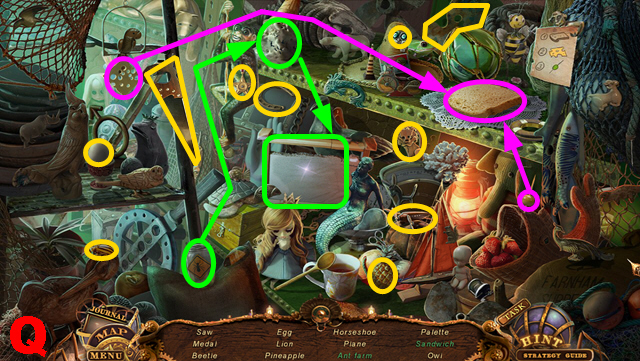
- Play the HOP.
- You receive the SAW (Q).
- Walk down twice.
- Insert the WHALE SPOUT into the whale (R).
- Play the HOP.
- You receive the COMPASS (S).
- Go to the Compartment.
- Saw the metal bar with the SAW (T) to acquire the AXLE.
- Go to the Fishing Wharf.
- Connect the FISH TAIL (U), the AXLE (V), the ROPE (W), and the COMPASS (X) to the boat.
- Move forward.
- Read the note (Y).
- Connect the BUTTON to the device (Z).
- Play the mini-game.
- Solution: 1, 2, 3, 4, 5, 6, 7, 8, 9, 10, 11, 8, 22, 12, 13, 14, 15, 16, 17, 18, 19, 20, 1, 2, 3, 4, 5, 14, 15, 16, 17, 18, 19, 21.
- Push the button (green).
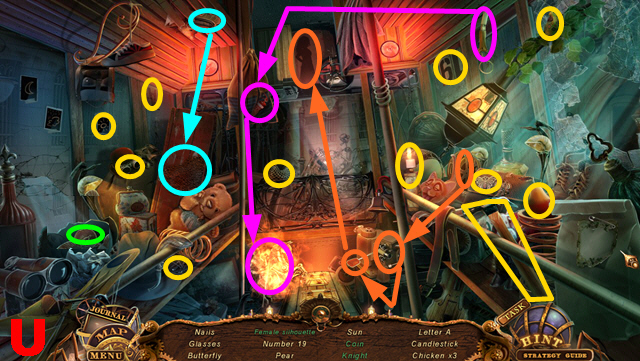
- Take the BOTTLE WITH WATER (A).
- Walk down.
- Pour the BOTTLE WITH WATER into the container (B); take the LURE (purple).
- Move forward.
- Connect the LURE to the fishing rod (C); take the FISHING ROD.
- Walk down twice.
- Throw the FISHING ROD at the boot (D); take the SANDPAPER (E) and the TROUSER LEG (F).
- Turn left.
- Use the SANDPAPER on the plate (G) to learn the code.
- Go to the Fishing Wharf.
- Enter the correct code (H) and open the box; take the NEEDLE (I) and the JAR COVER (blue).
- Move forward.
- Insert the NEEDLE and the CLAMP into the sewing machine (J); put down the TROUSER LEG and the SHIRT (K).
- Play the mini-game.
- Solution: (L).
- Saw the pieces of the sail (purple). Take the SAIL (green).
- Put the JAR COVER and the JAR CLAMP on the bottle (purple); take the BOTTLE FOR POISON (M).
- Walk down.
- Hold the BOTTLE FOR POISON next to the scorpion (blue) to acquire the BOTTLE WITH POISON; take WHEEL 2/2 (N).
- Connect the SAIL (O) and the 2 WHEELS to the boat (P); activate the compass (Q).
- Take the CLIMBING SPIKE 1/3 (R).
- Take the COFFEE-MACHINE BLADE (S) and the HERRING (T).
- Take the CYLINDER (U).
- Talk to your uncle (V).
- Move forward.
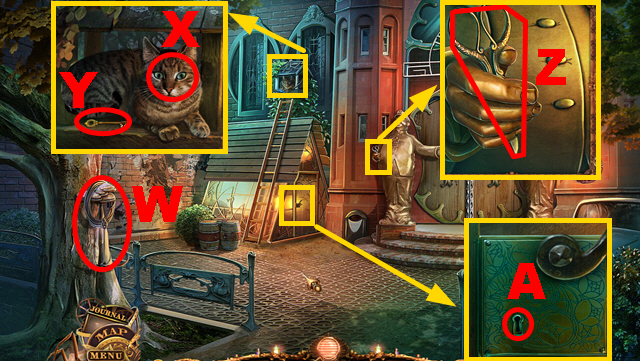
- Take the GRAPPLING HOOK (W).
- Give the HERRING to the cat (X); take the SHED KEY (Y).
- Take the SCISSORS (Z).
- Insert the SHED KEY into the lock (A); turn the key.
- Play the HOP.
- You receive CLIMBING SPIKE 2/3 (B).
- Walk down.
- Collect the TREACLE with the ANALYZER (C).
- Cut the rope with the SCISSORS (D); take CLIMBING SPIKE 3/3 (E).
- Move forward.
- Connect the 3 CLIMBING SPIKES and the GRAPPLING HOOK to the wall (F).
- Climb up the wall and go to Sam's Room.
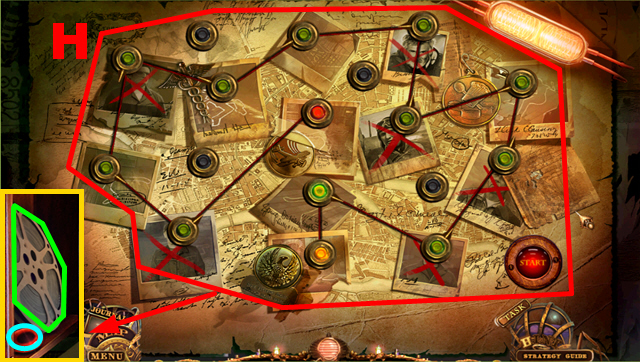
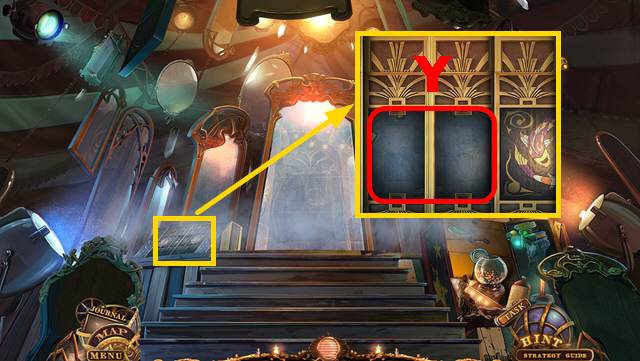
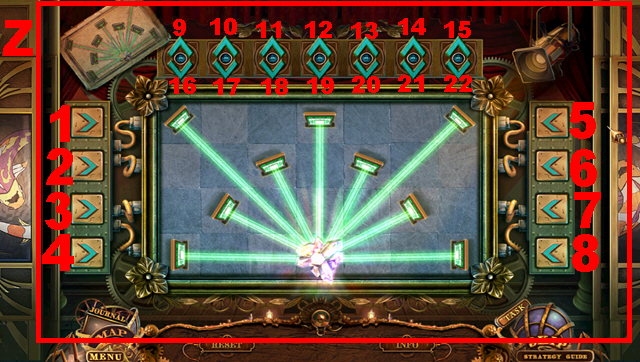
- Insert the CYLINDER into the slot (G).
- Play the mini-game.
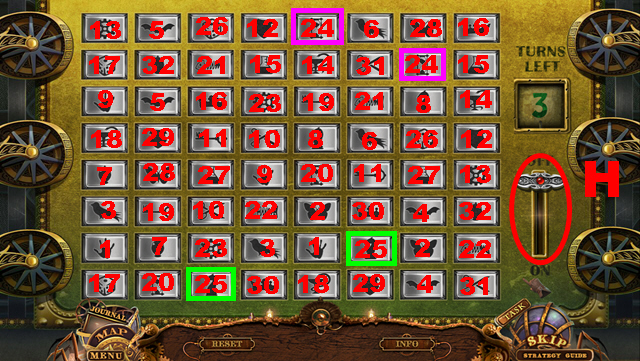
- Solution: 1-32.
- Activate the lever (H) to remove the button pairs marked 24 and 25.
- Look at the photo (I); take the GLASS BULB (J).
- Go to the Crossroad.
- Insert the GLASS BULB into the niche (K).
- Turn left.
Chapter 5: The Laboratory
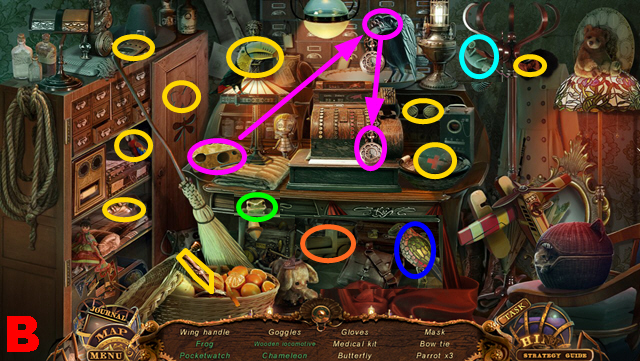
- Play the HOP.
- You receive the PAN (L).
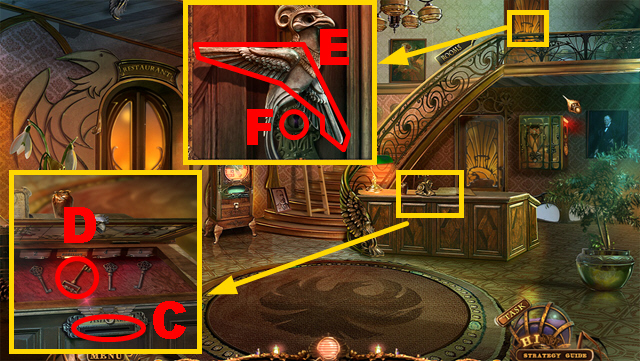
- Move aside four cards; take the FORK (M).
- Talk to the woman (N); you receive the ANTIDOTE RECIPE.
- Go to the Hotel Hall.
- Connect the FORK to the door (O); push the fork and spoon.
- Turn left.
- Open the cabinet; take the OLIVE OIL (P).
- Go to the Crossroad.
- Pour the OLIVE OIL on the hinge (Q).
- Open the gate.
- Turn right.
- Take BATTERY 1/3 (R).
- Take the SOLVENT (S).
- Remove the newspaper and the notes; take the MOONSTONE (T).
- Go to the Kitchen.
- Read the note (U); you receive CLIP 1/2.
- Spray the SOLVENT over the drawer (V) and open the drawer; take the EMPTY THERMOS (W) and the MATRYOSHKA (X).
- Insert the COFFEE MACHINE-BLADE (Y) and the MOONSTONE into the coffee machine (Z).
- Play the mini-game.
- Solution: (A).
- You receive the MOONSTONE POWDER.
- Go to the Flea Market.
- Insert the MATRYOSHKA into the niche (B).
- Play the HOP.
- You receive the BALL (C).
- Go to the Kitchen.
- Throw the BALL at the bone (D).
- Move forward.
- Take the THROWING STAR (E).
- Take CLIP 2/2 (purple) and the ASSISTANT'S ID CARD (F).
- Read the note (G).
- Hold the EMPTY THERMOS below the faucet (H) to acquire the THERMOS WITH MILK.
- Open the compartment; take BATTERY 2/3 (I).
- Go to the Flea Market.
- Open the lock with the 2 CLIPS (J); you receive the PIG.
- Go to the City Wharf.
- Talk to your uncle (K); you receive the BLOOD SAMPLE.
- Put the PIG on the soil (L); you receive the TRUFFLES.
- Go to the Laboratory.
- Put down the ANTIDOTE RECIPE (blue); insert the TREACLE, BOTTLE WITH POISON, MOONSTONE POWDER, TRUFFLES, BLOOD SAMPLE, and THERMOS WITH MILK into the bag (M).
- Insert the ASSISTANT'S ID CARD into the slot (N).
- Turn left.
- Take the STOVE KNOB (O).
- Talk to the assistant (P).
- Take the note (Q).
- Turn the screw shaft three times; take the SCREW SHAFT (R).
- Go to the City Wharf.
- Talk to your uncle (S); you receive the REAL BLOOD SAMPLE.
- Go to the Doctor's Lab.
- Give the REAL BLOOD SAMPLE to the assistant (T); you receive the ANTIDOTE.
- Go to the City Wharf.
- Give the ANTIDOTE to your uncle (U); you receive BATTERY 3/3.
- Go to the Kitchen.
- Insert the 3 BATTERIES into the remote (V) and close it; take the REFRIGERATOR REMOTE.
- Turn left.
- Open the refrigerator with the REFRIGERATOR REMOTE (W); take the FROZEN MEAT (X).
- Walk down.
- Put down the PAN (Y) and connect the STOVE KNOB to the oven (Z); put the FROZEN MEAT into the pan, turn the stove knob, and take the MEAT (A).
- Go to the City Wharf.
- Give the MEAT to the lion (B).
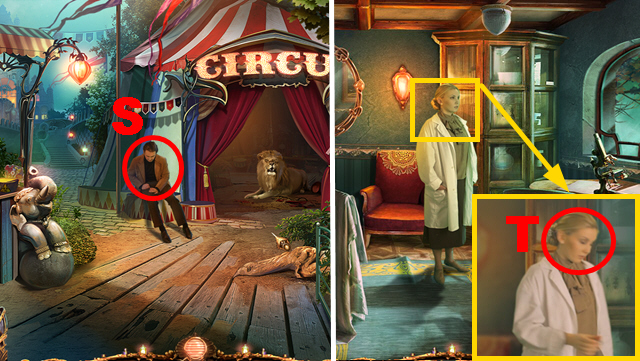
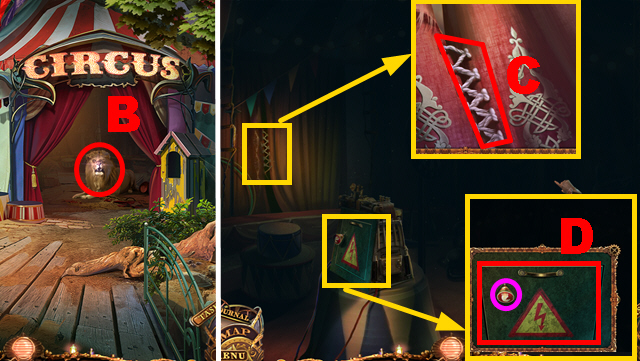
- Enter the Circus.
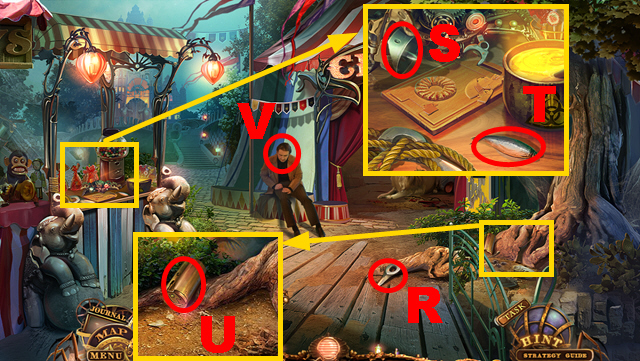
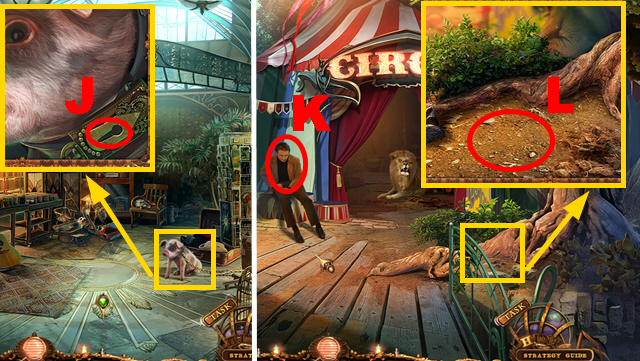
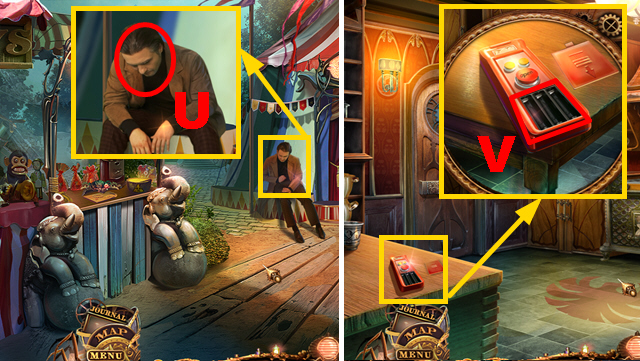
- Cut the seam with the THROWING STAR (C).
- Take DART 1/3 (purple); remove the cover (D).
- Turn left.
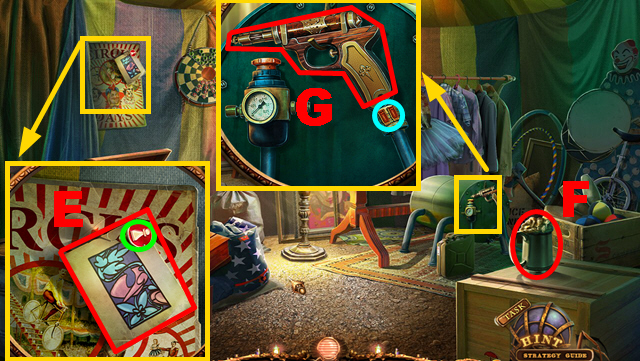
- Take DART 2/3 (green) and the sketch (E).
- Take the MUG (F).
- Remove the two latches (blue); take the SPRAY GUN (G).
- Go to the City Outskirts.
Chapter 6: The Brewery

- Put the MUG into the hand (H).
- Enter the Brewery.
- Take DART 3/3 (I) and read the book (purple); send the PIG into the niche (J) and take the BOX KEY (K).
- Take the SEPIA PAINT (L).
- Play the HOP.
- You receive the WARDROBE KEY (M).
- Go to the Green Room.
- Insert the BOX KEY into the slot (N); take the FIREWORKS (O) and the COPPER SULFATE (P).
- Go to the Doctor's Lab.
- Pour the COPPER SULFATE into the battery (Q); take the BATTERY CHARGER.
- Go to the Brewery.
- Connect the BATTERY CHARGER to the battery (R), turn it on, and take the CHARGED BATTERY.
- Go to the Circus.
- Insert the CHARGED BATTERY into the device (S).
- Take the SCOOP (T).
- Insert the FIREWORKS into the niche (U).
- Play the mini-game.
- Solution (V): X, Y, W, Y, Z, X, W.
- Go to the Brewery.
- Take the Brush (A).
- Go to the Green Room.
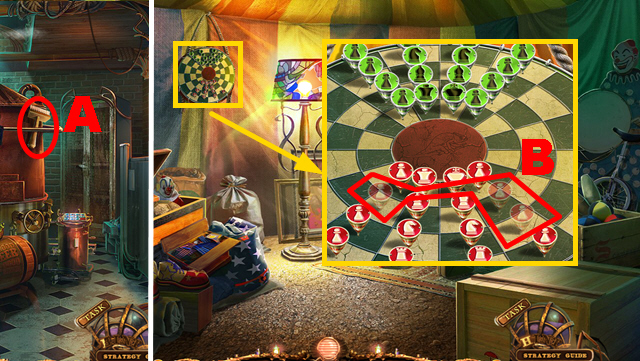
- Put down the 3 DARTS (B).
- Play the mini-game.
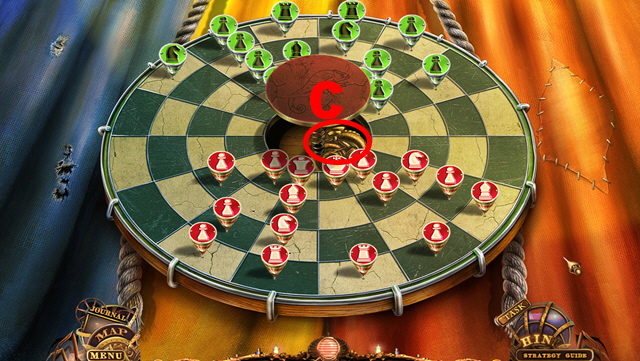
- Win a game of chess against the opponent.
- The rules of the original game apply.
- The opponent's moves are random.
- Take the CHAMELEON FIGURINE (C).
- Walk down.
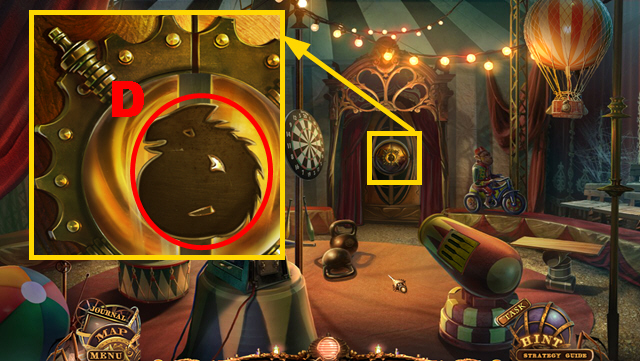
- Insert the CHAMELEON FIGURINE into the niche (D).
- Play the mini-game.
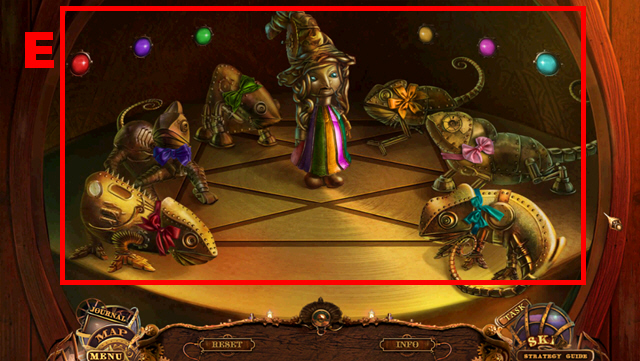
- Solution: (E).
- Go through the door.
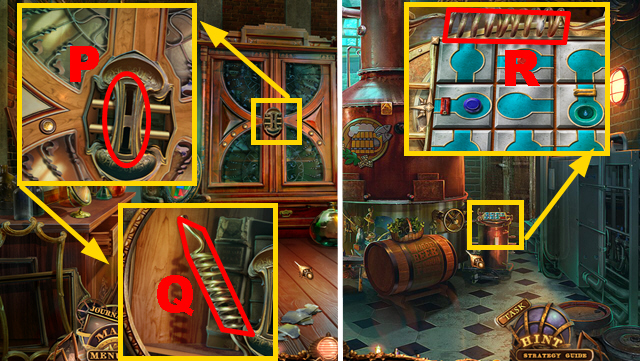
- Take the AIRBRUSH NOZZLES (blue); put the SCREW SHAFT on the gear (F).

- Play the HOP.
- You receive the STAINED-GLASS LEADING (G).
- Go to the Green Room.
- Shake the lamp (H); put down the SCOOP (I).
- Use the BRUSH to sweep the shards into the scoop (J) to acquire the STAINED-GLASS FRAGMENTS.
- Put the STAINED-GLASS FRAGMENTS and the STAINED-GLASS LEADING on the box (K); take the STAINED GLASS (L).
- Go to the Flea Market.
- Insert the STAINED GLASS into the door (M).
- Play the mini-game.

- Solution: (N).
- Push the button (O).
- Go through the door.
- Insert the WARDROBE KEY into the slot (P) and turn the key; take the SOLVENT PIPE (Q).
- Go to the Brewery.
- Put down the SOLVENT PIPE (R).
- Play the mini-game.
- Solution: 11, 7, 3, 2, 6, 7, 3, purple-7, purple-6, 2, 1, 5, 6, 7, 3, 2, 1, 5, 9, 10, 11, 7, purple-2, 6, 2, 1, 5, 9, 10, 11, 7, 8, 4, 3, 2, 1, 5, 6, 7, 8, 4, 3, 7, 6, 5, 1, 2, 3, 7, 6, 5, purple-6, purple-2, 6, 10, 9, 5, 6, 10, purple-6.
- Take the AIRBRUSH CANISTER (S).
- Go to the Mirror Shop.

- Put down the SEPIA PAINT (T) and the SPRAY GUN (U).
- Connect the AIRBRUSH CANISTER (V) and the AIRBRUSH NOZZLES (W) to the spray gun.
- Play the mini-game.

- Solution: (X).
- Use the nozzle (1) to spray the borders and the colors on the mirror.
- You receive the PAINTED MIRROR.
- Go to the Mirror Hall.
- Insert the PAINTED MIRROR into the niche (Y).
- Play the mini-game.
- Solution (Z): 18, 19, 2, 22, 22, 21, 21, 2, 2, 15, 17, 16, 20, 19, 6, 6, 11, 22, 5, 5, 15, 2, 2, 2, 20, 4, 20, 7, 7, 14, 4, 4, 21, 6, 6, 6, 18, 10, 7, 7, 16, 2, 3, 3, 3, 12, 12, 10, 5, 21, 8, 18, 18, 7, 17, 2, 15, 4, 10, 10, 2, 2, 12, 6, 18, 6, 6, 6, 3, 3, 13, 14, 11, 3, 3, 3, 7, 7, 7, 7, 18, 3, 3, 3, 3, 6, 11, 2, 14, 7, 21.
- Congratulations, you have completed Web of Deceit: Deadly Sands.
Created at: 2013-10-20