

Walkthrough Menu
- General Tips
- Chapter 1: Package from the Stranger
- Chapter 2: Ancient Temple
- Chapter 3: Another World Caves
- Chapter 4: Another World Sinister Shadows
- Chapter 5: Ghost Town Gateway
- Chapter 6: Ghost Town Upper Street
- Chapter 7: Ghost Town Central Tower
General Tips

- This is the official guide for Whispered Secrets: Into the Beyond.
- This guide will not mention each time you have to zoom into a location; the screenshots will show each zoom scene.
- We will use the acronym HOP for Hidden-object puzzles. Interactive items will be color-coded.
- The HOP lists may be random; our lists may vary from yours. You may choose between a Match-3 or HOP by selecting the Switch Mode button on the toolbar.
- Use the map to check locations and objective areas.
- Select the journal for clues and story updates.
- Use the Dragonfly on foggy areas to collect spheres.
Chapter 1: Package from the Stranger
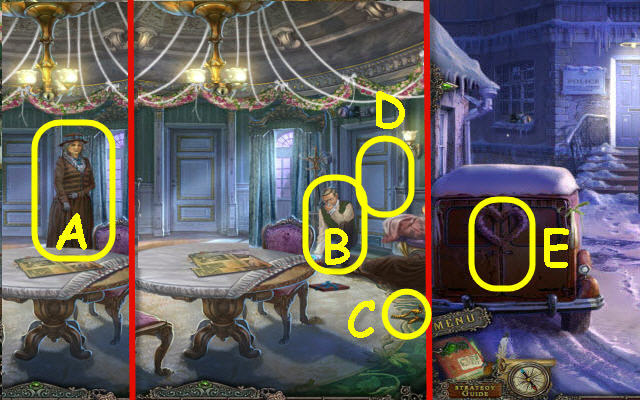
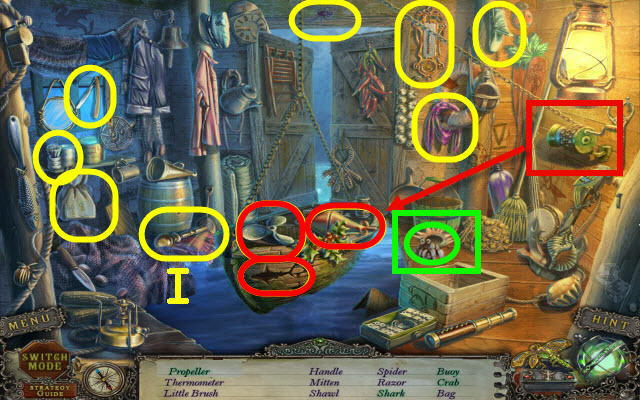
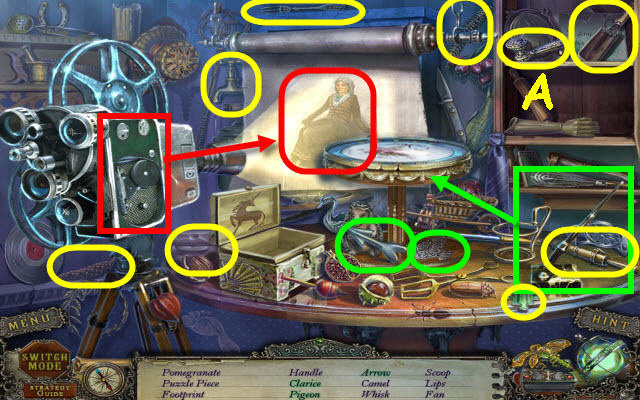
- Speak to the Clarice (A).
- Speak to Tim (B).
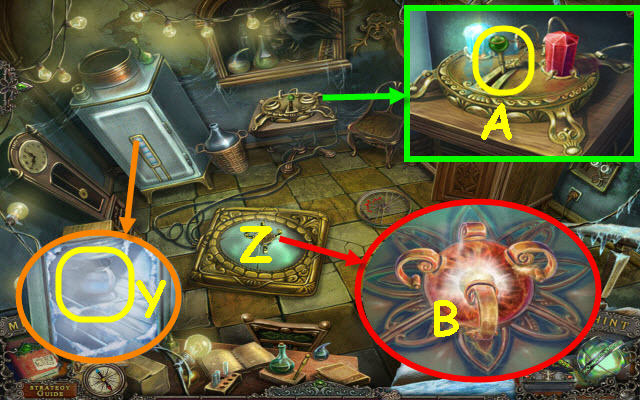
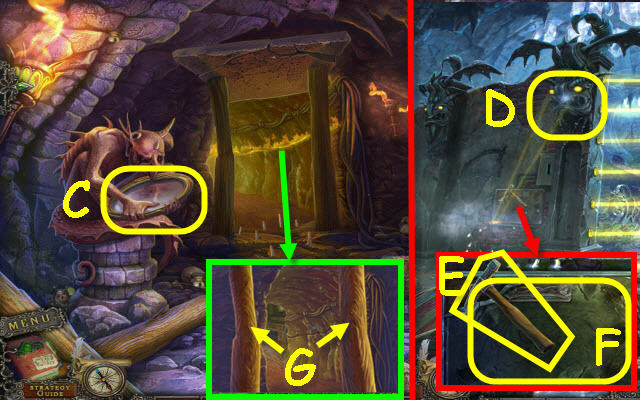
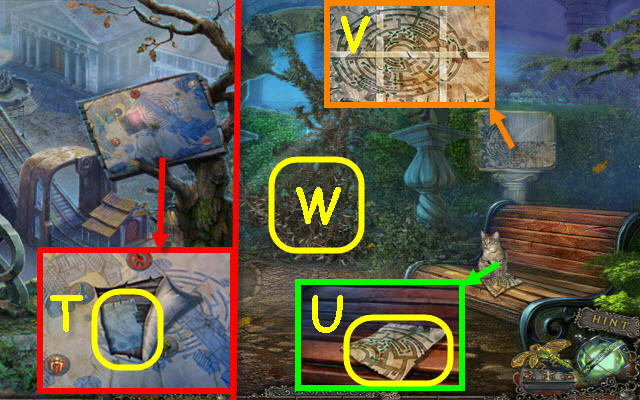
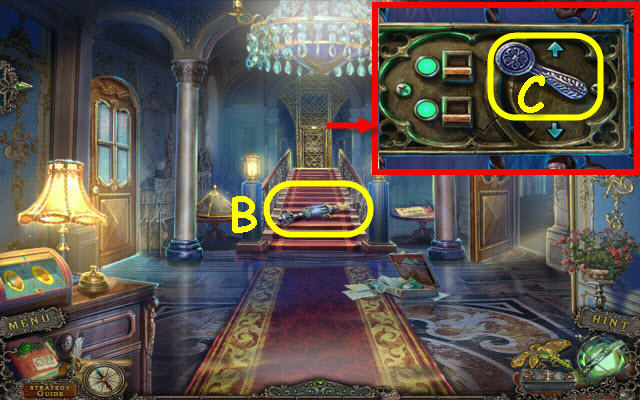
- Take the DOOR HANDLE (C).
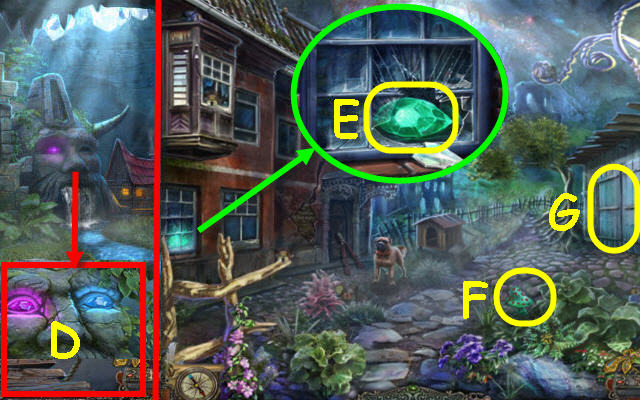
- Place the DOOR HANDLE on the door; turn it (D).
- Exit through the door.
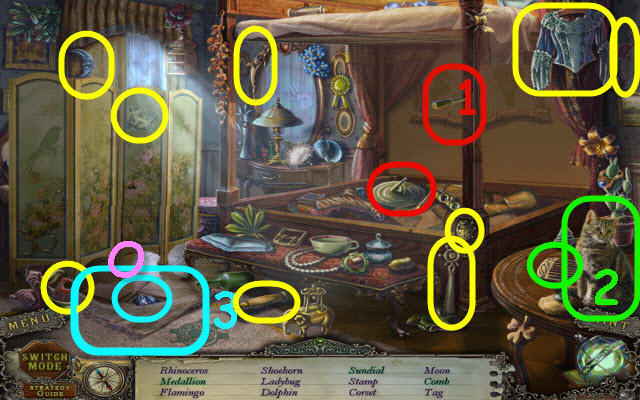
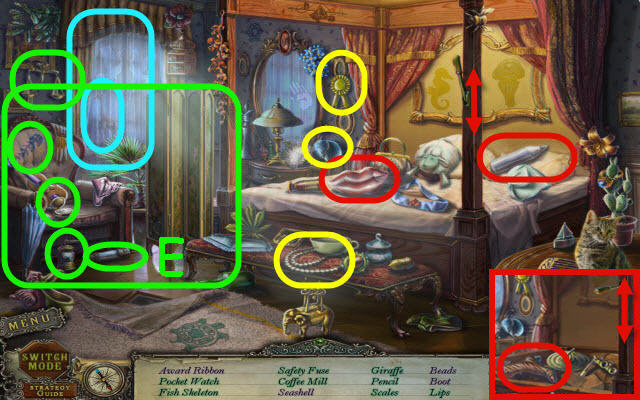
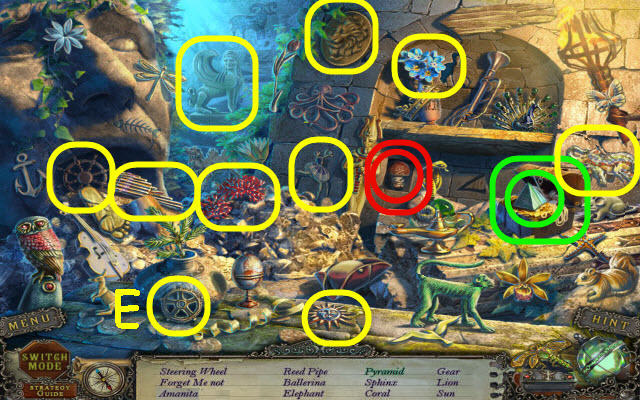
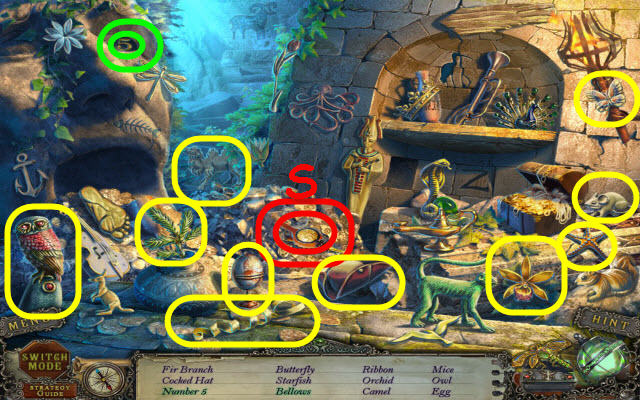
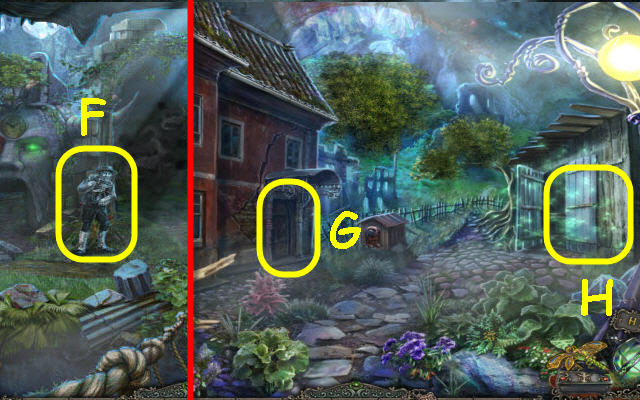
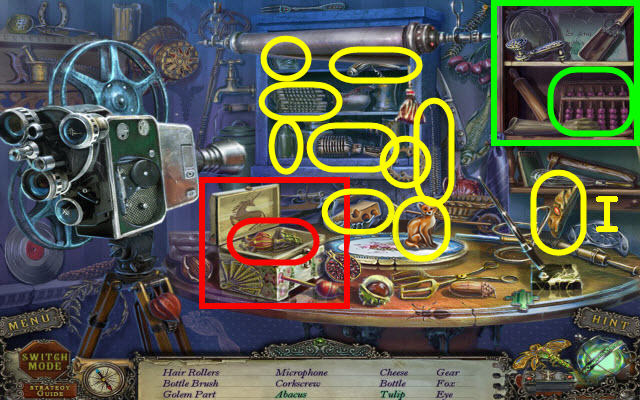
- Open the van door to trigger a HOP (E).
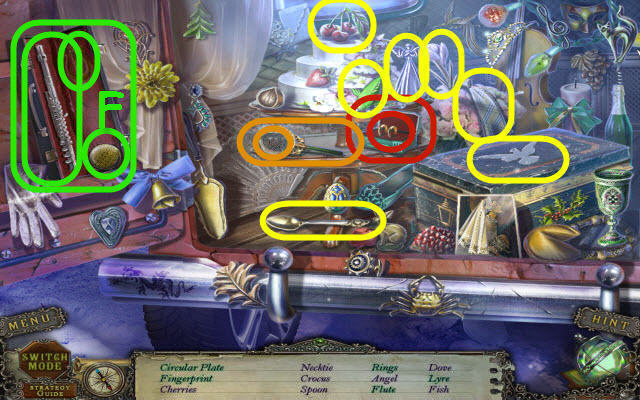
- Play the HOP.
- You earn a CIRCULAR PLATE (F).
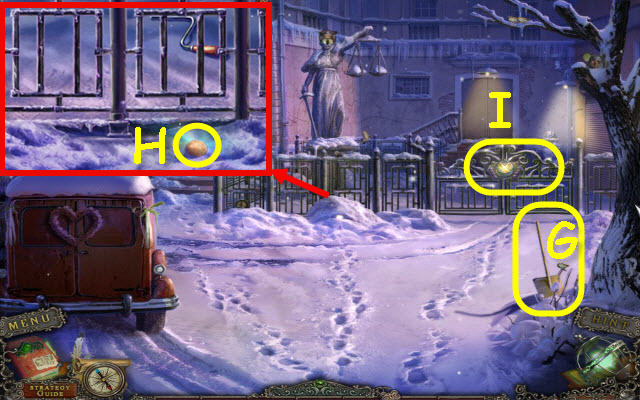
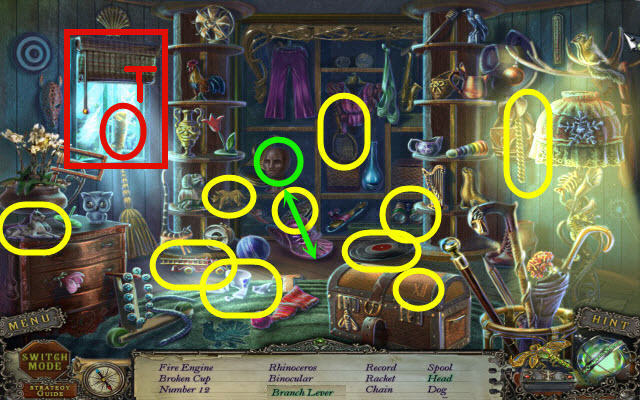
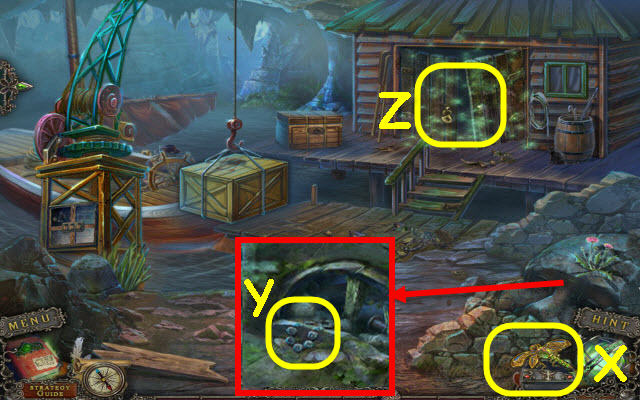
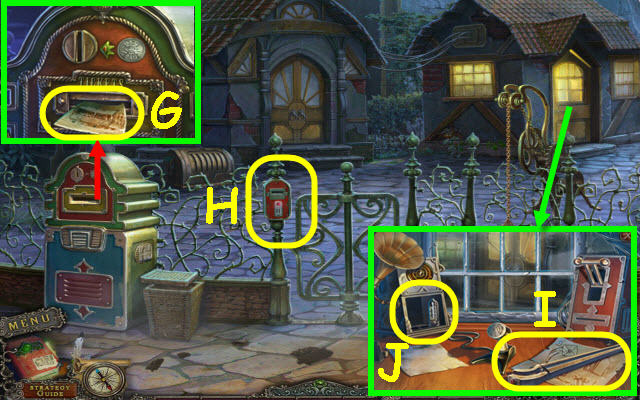
- Take the SHOVEL (G).
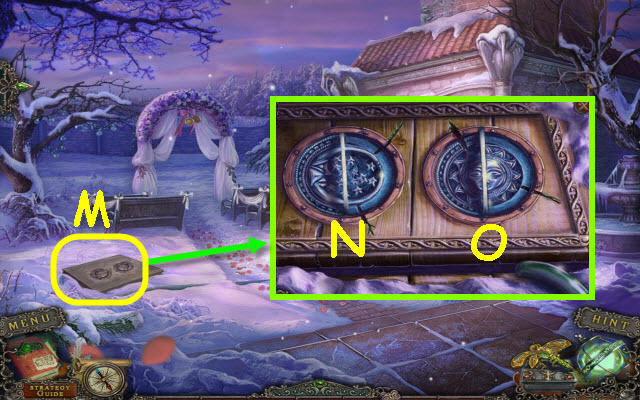
- Use the SHOVEL on the snow pile and receive a SNOWBALL; take the 2nd CIRCULAR PLATE (H).
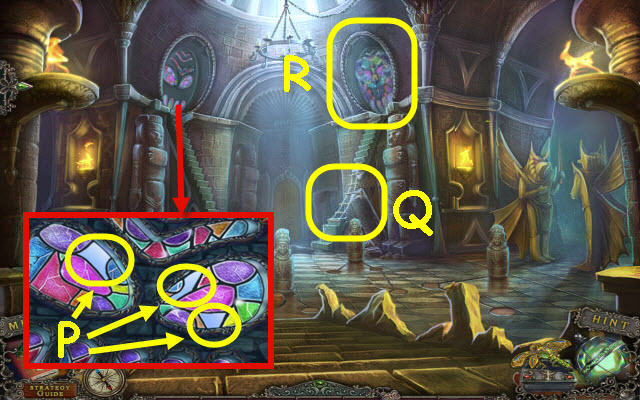
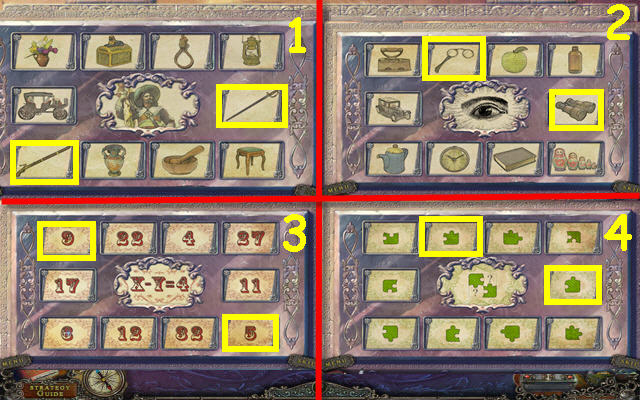
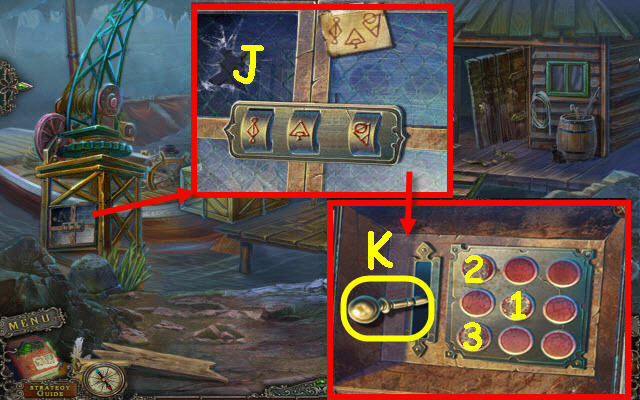
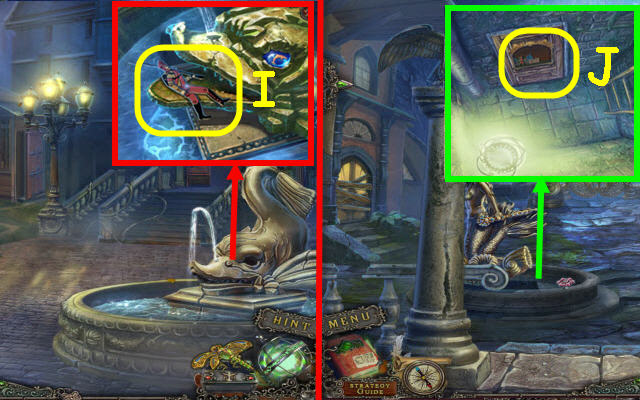
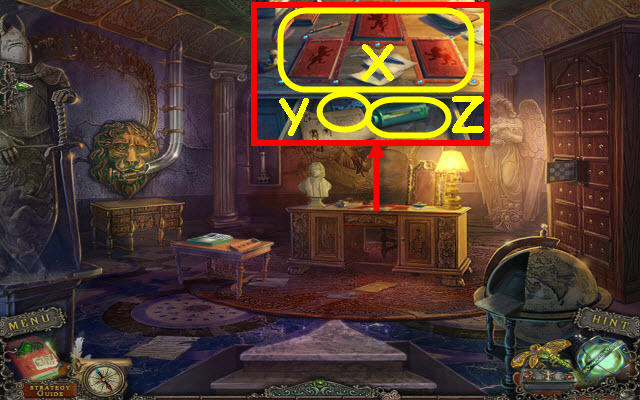
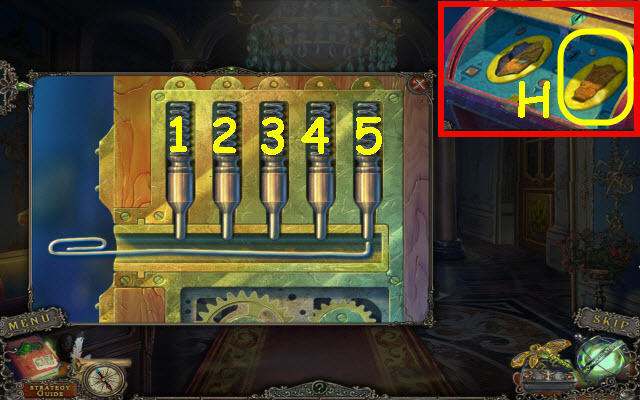
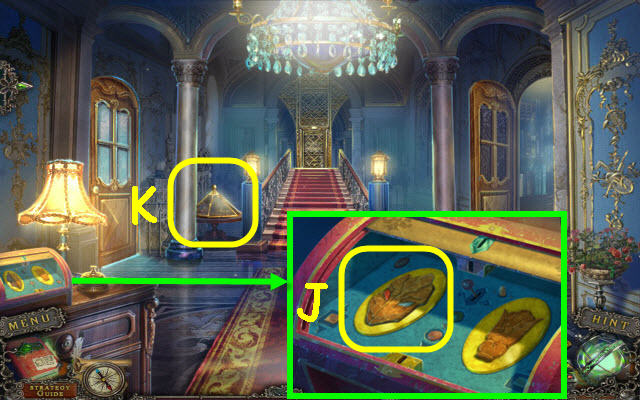
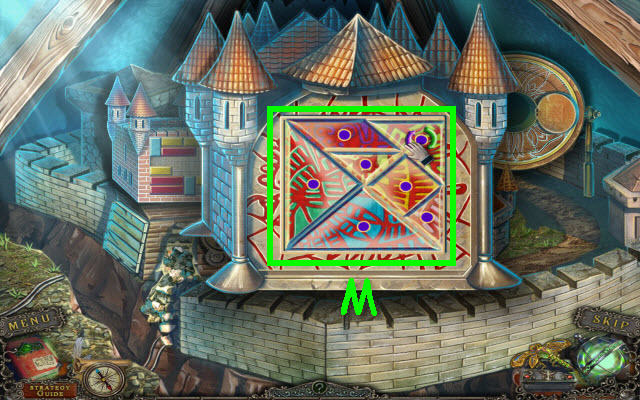
- Place the 2 CIRCULAR PLATES on the gate to trigger a puzzle (I).
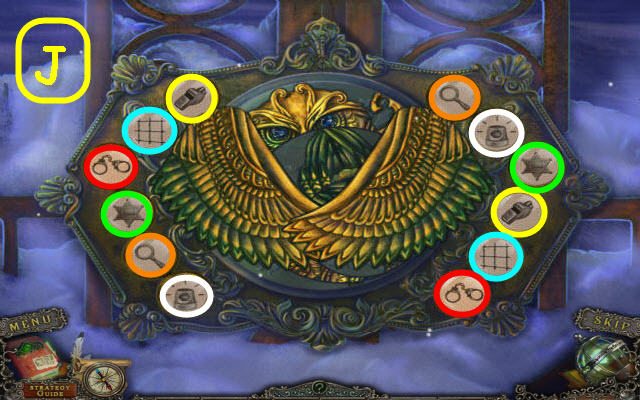
- Find the matching pairs.
- See screenshot for solution (J).

- Rotate the rings to complete the picture.
- See screenshot for solution (K).
- Go through the gate.
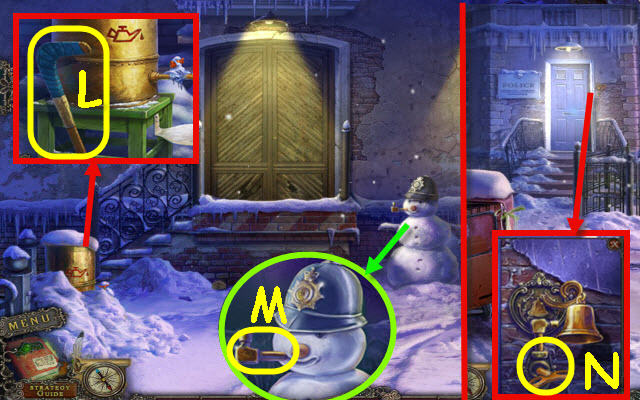
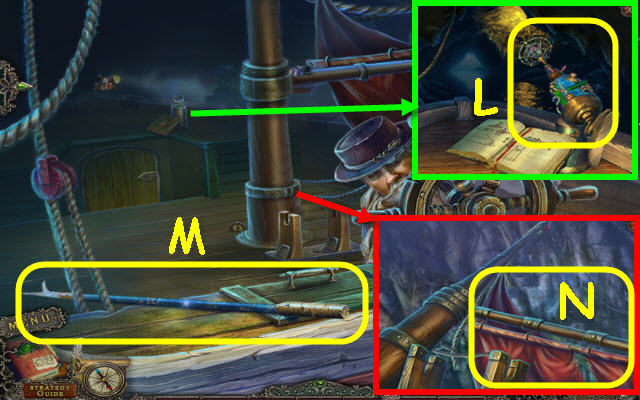
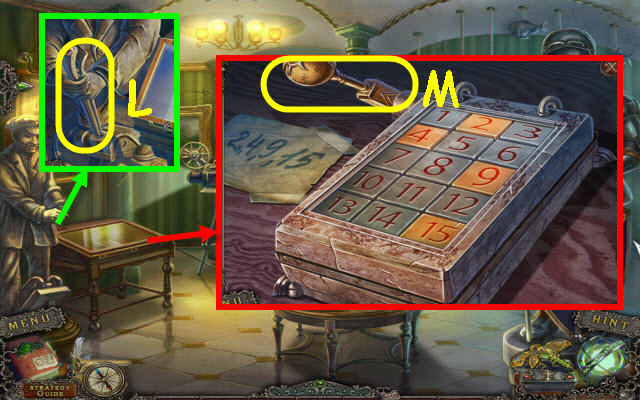
- Use the SHOVEL on the snow; take the HOCKEY STICK (L).
- Take the BELL HAMMER (M).
- Back out.
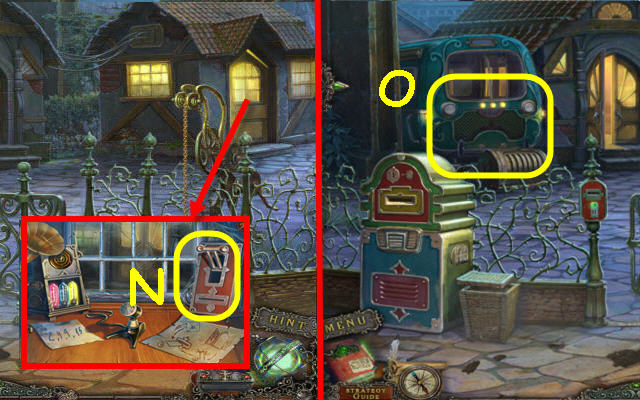
- Place the BELL HAMMER on the bell; turn the ringer (N).
- Enter the station.
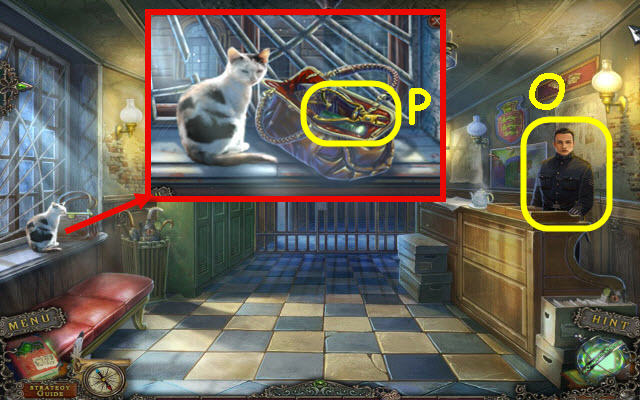
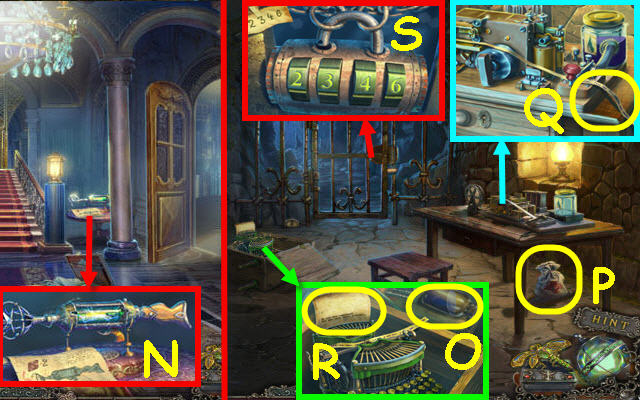
- Speak to Rudy (O).
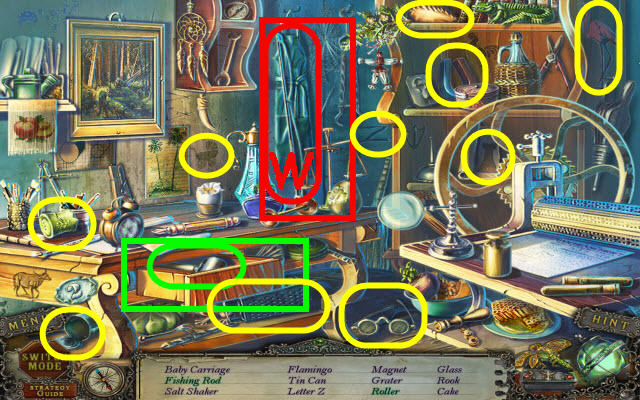
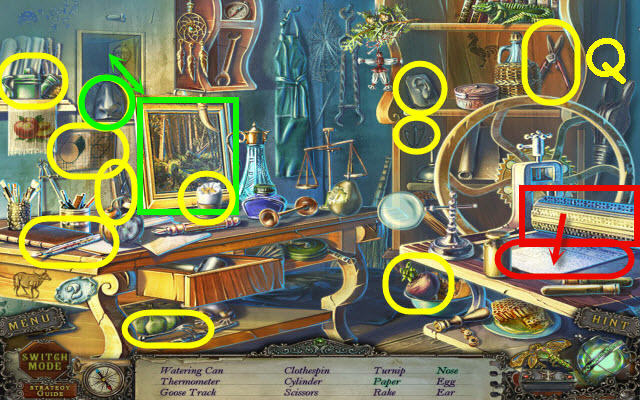
- Open the purse; take the NIPPERS (P).
- Back out.
- Examine the van to access a HOP.
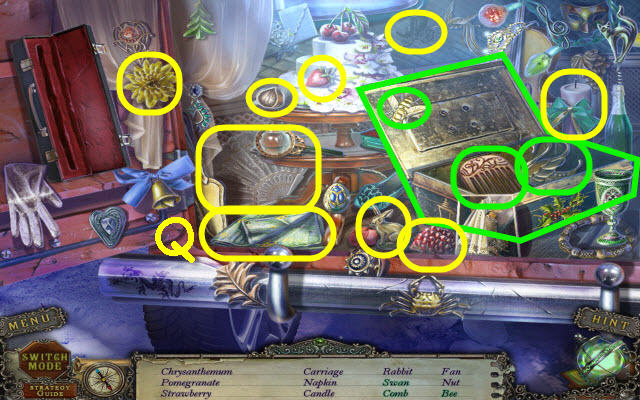
- Play the HOP.
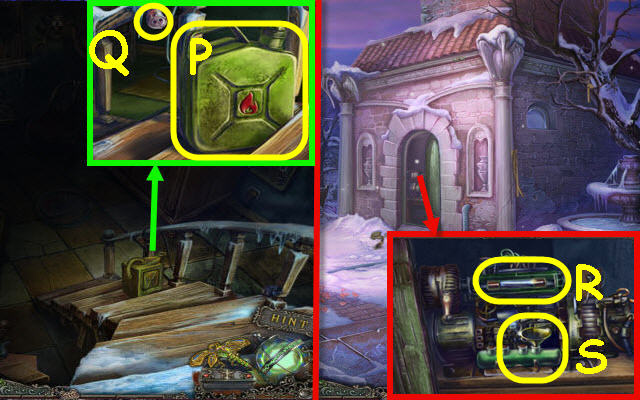
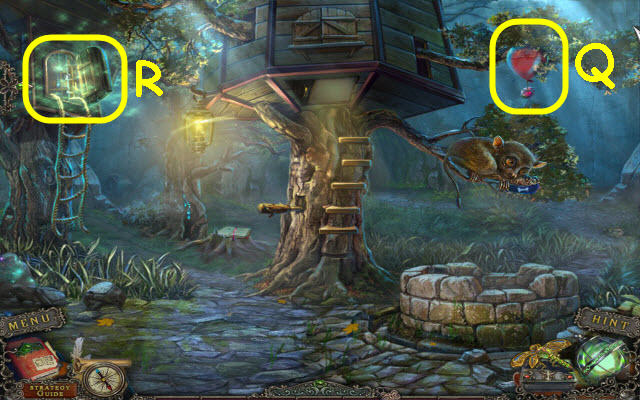
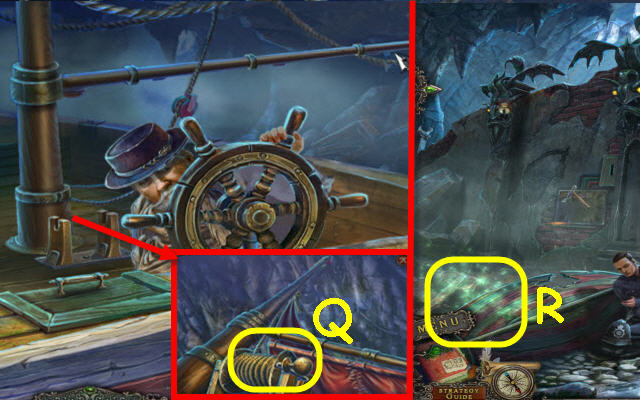
- You receive a NAPKIN (Q).
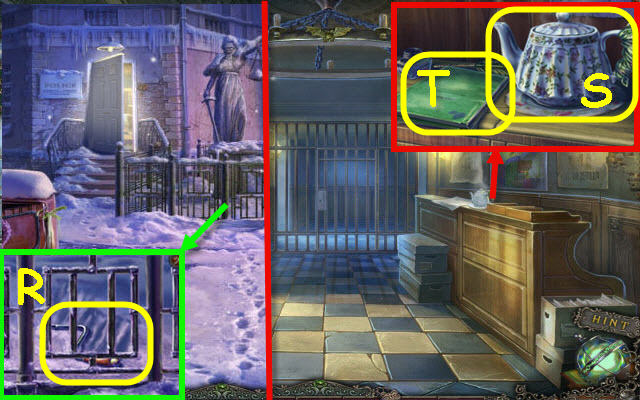
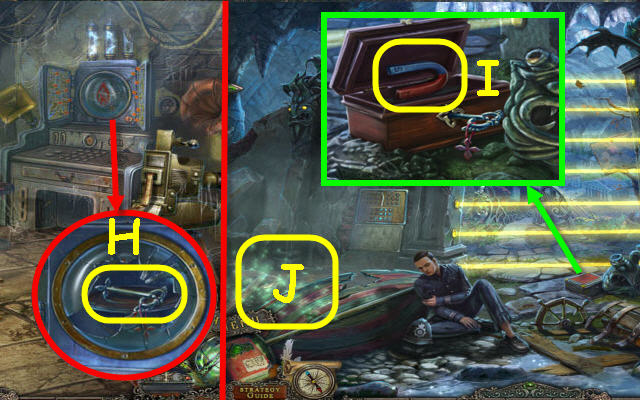
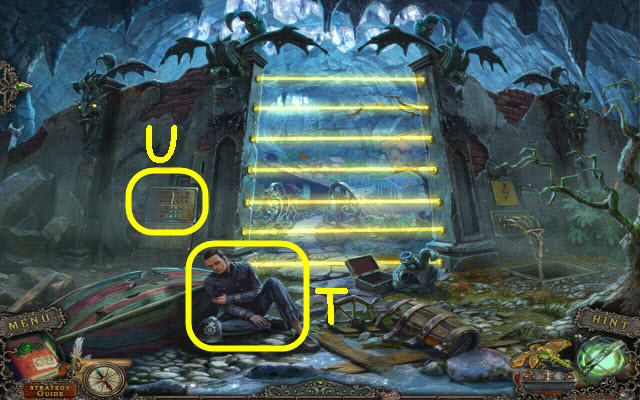
- Use the HOCKEY STICK on the winch; take the WINCH (R).
- Enter the station.
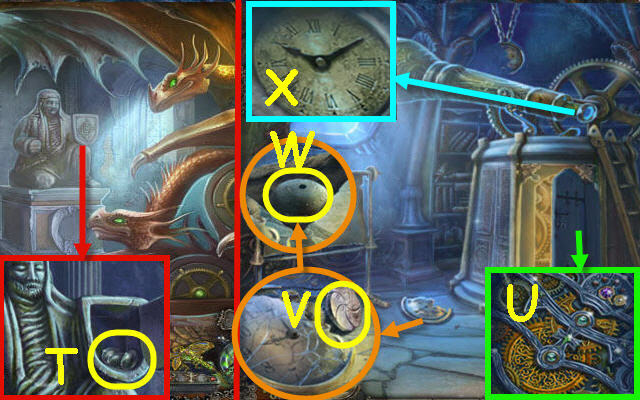
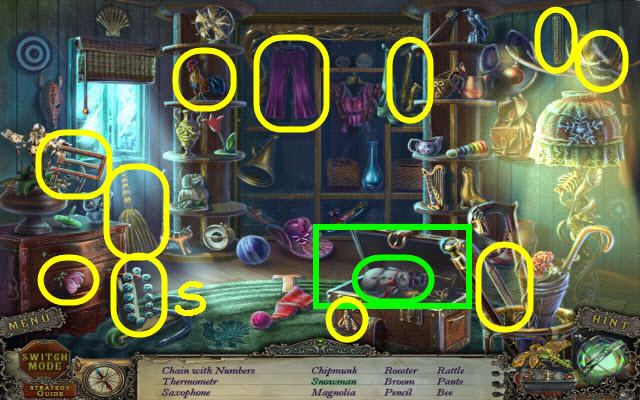
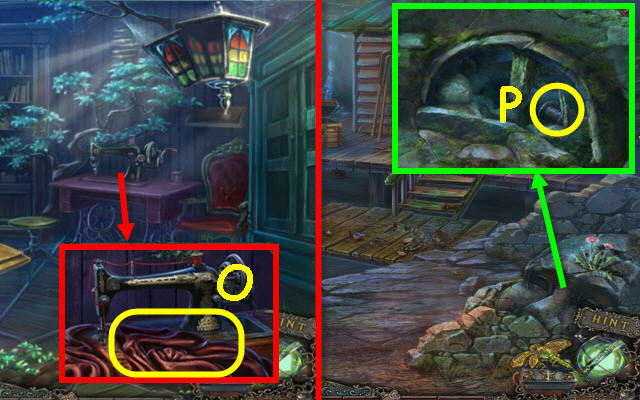
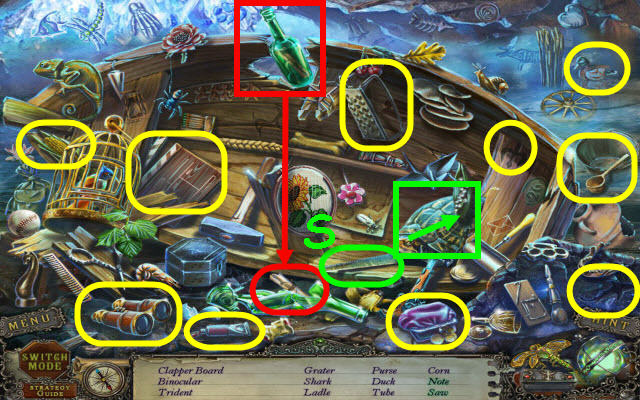
- Use the NAPKIN on the pot; take the KETTLE WITH HOT WATER (S). Select the book 3x to get the book (T).
- Back out; go forward on the right.
- Place the WINCH in the mechanism; turn it (U).
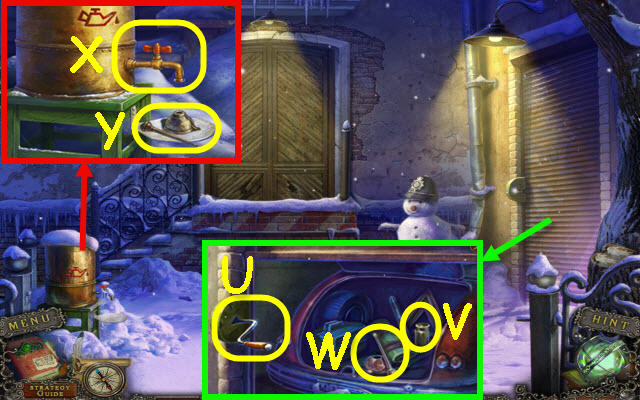
- Use the NIPPERS on the wire and remove it; take the WEIGHT (V) and EMPTY OILCAN (W).
- Place the EMPTY OILCAN on the shelf and use the KETTLE WITH HOT WATER on the spigot (X).
- Turn the spigot; take the FULL OILCAN (Y).
- Back out; enter police station.

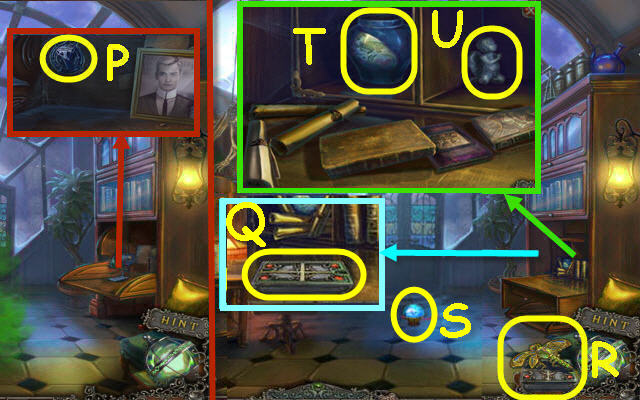
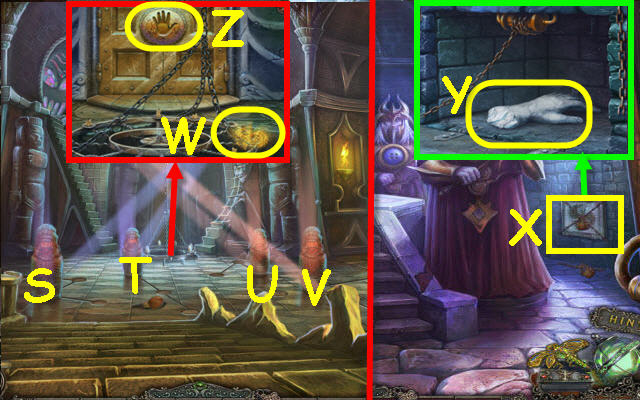
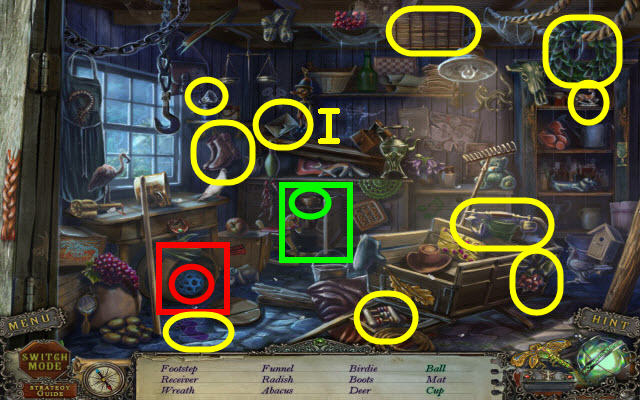
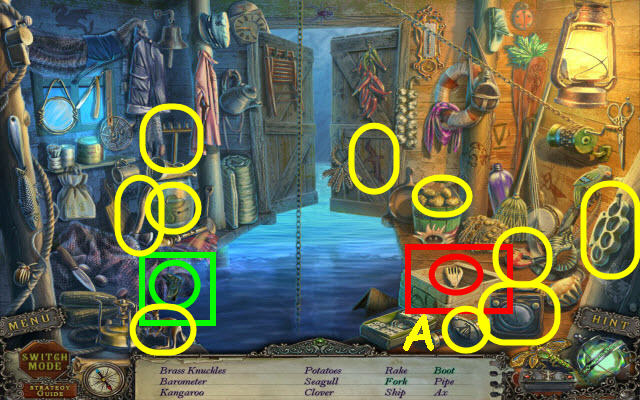
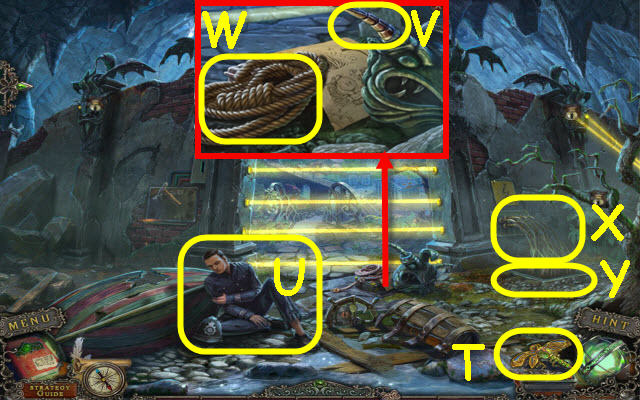
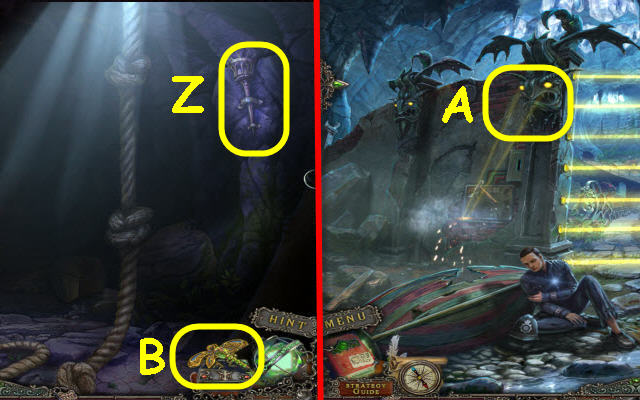
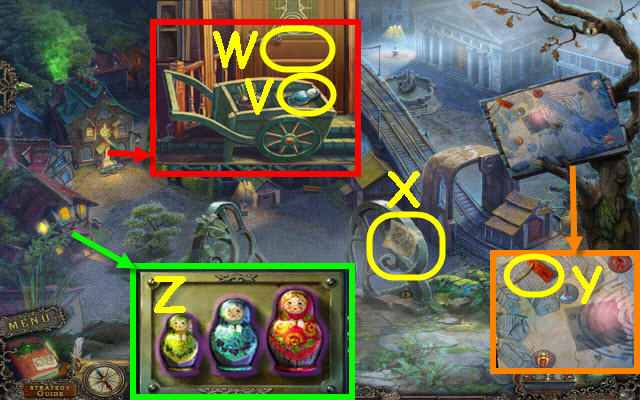
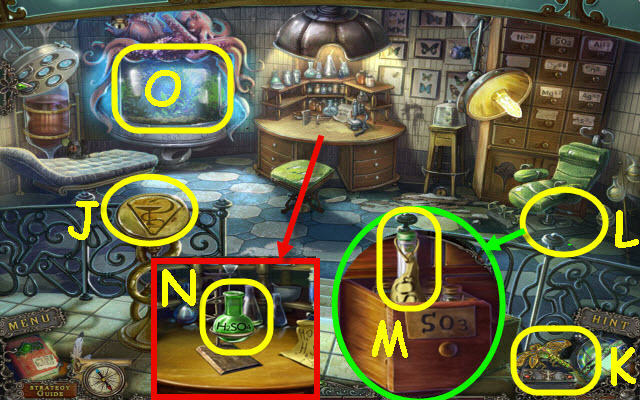
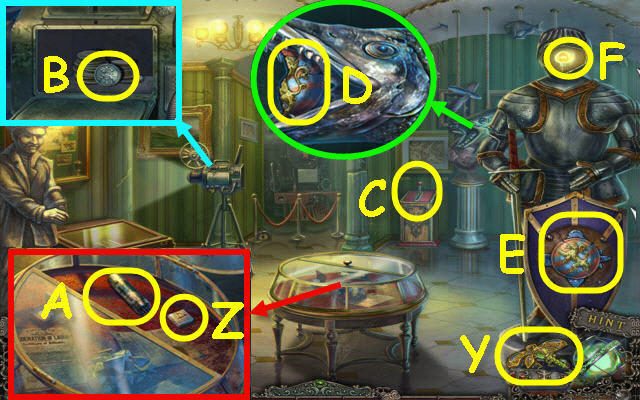
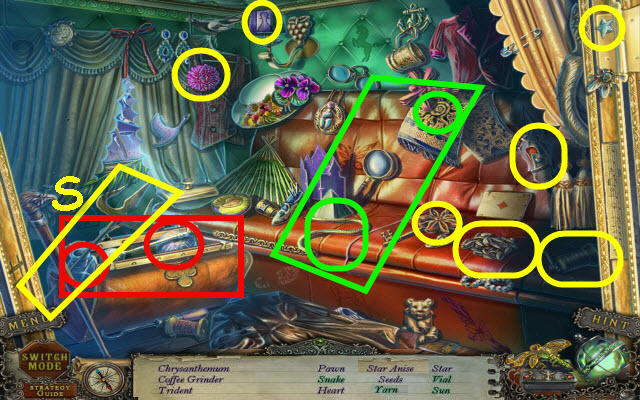
- Use the FULL OILCAN on the hinges; open the locker. Take the photos (Z), CONTROL STRING (A) and TIM'S TOOLBOX (B).
- Select the boxes (C).
- Back out twice.
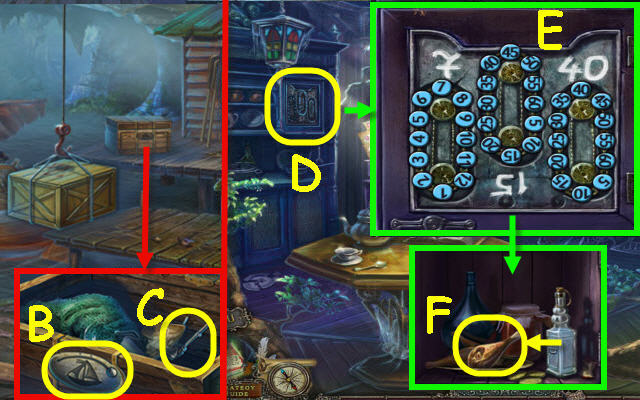
- Select the lab door (D) and enter.
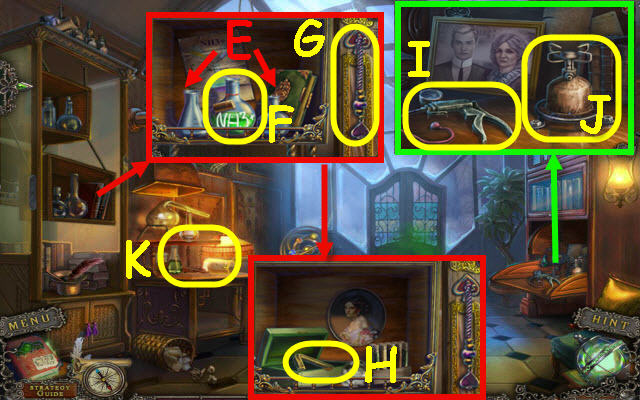
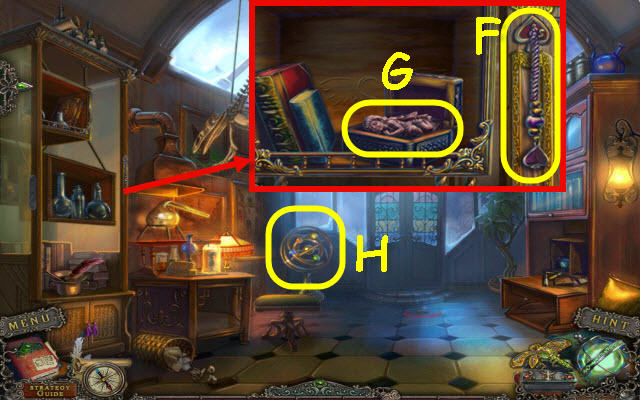
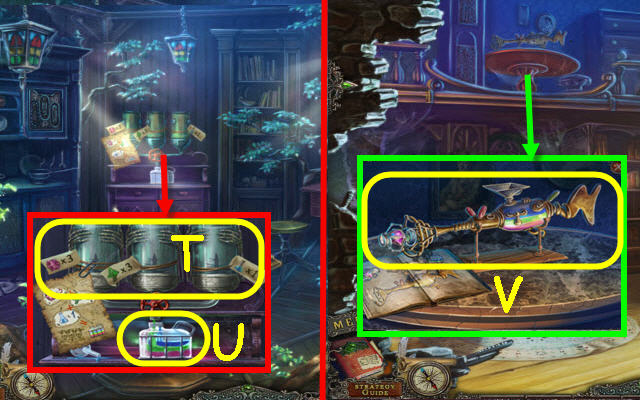
- Pour the beakers (E) into (F). Take the AMMONIA (F).
- Place the CONTROL STRING in the slot; pull it twice (G).
- Open the box; take the HEX NUT WRENCH (H).
- Take the VACUUM PUMP (I).
- Use the HEX NUT WRENCH on the bolts twice; take the GAS BURNER (J).
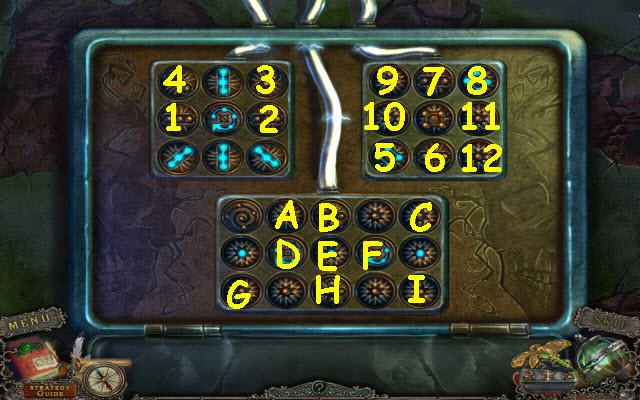
- Place TIM'S TOOLBOX, VACUUM PUMP, AMMONIA and GAS BURNER on the table to trigger a puzzle (K).
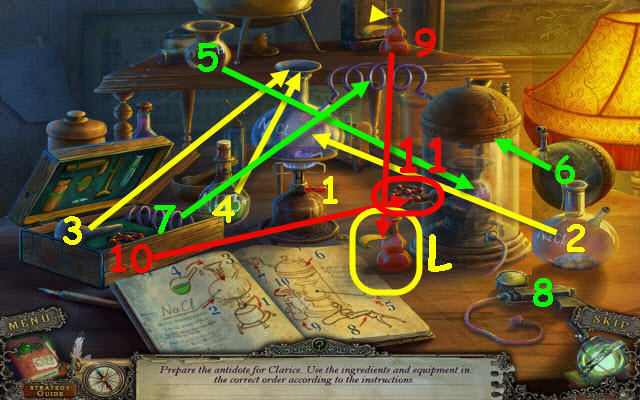
- Prepare the solution.
- Use or place the items as numbered (1-11).
- Take the ANTIDOTE (L).
- Back out.
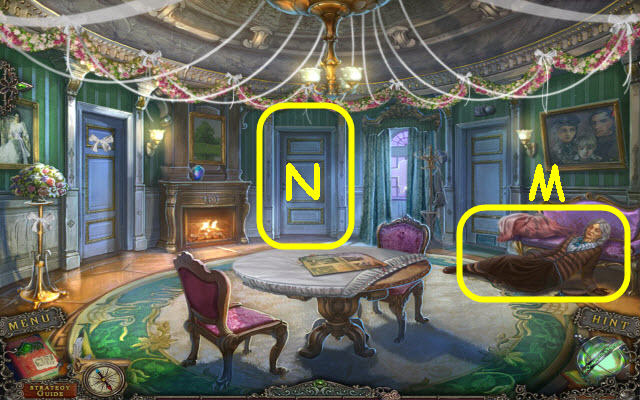
- Give the ANTIDOTE to Clarice; receive CLARICE'S ROOM KEY (M).
- Use CLARICE'S ROOM KEY on the lock; turn the key and the handle to trigger a HOP (N).
- Play the HOP.
- You receive a MEDALLION (O).
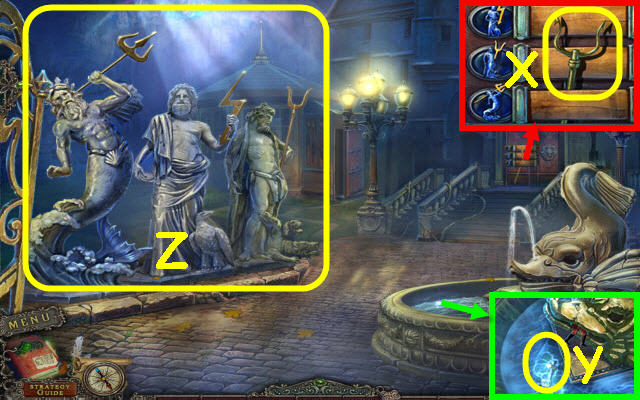
- Go left.
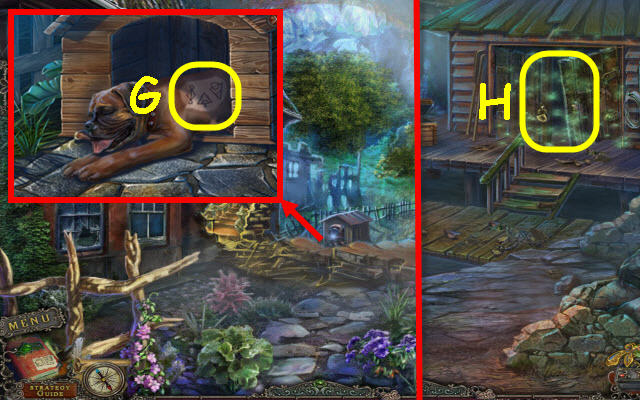
- Move the photo; use the MEDALLION on the symbol and turn it (P).
- Take the newspaper and book (Q).
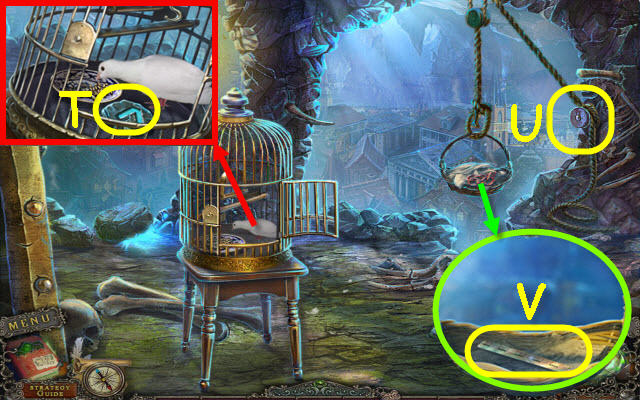
- You receive a Dragon Fly (R); select it.
- Take the PORTAL SPHERE (S).
- Move the scrolls and books; take the VASE (T) and ANGEL STATUE (U).
- Go forward.
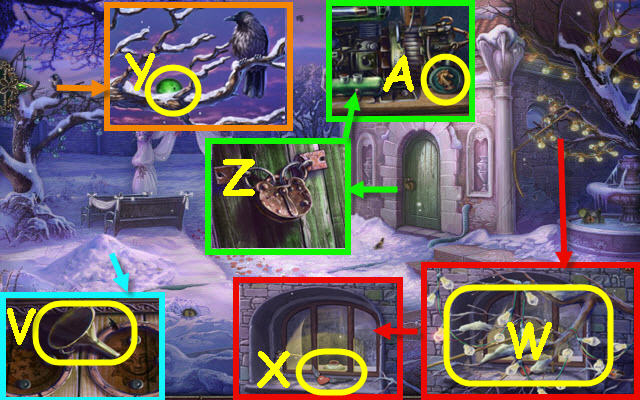
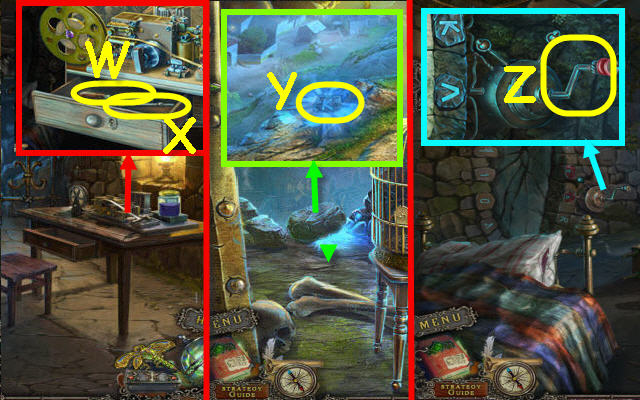
- Use the SHOVEL on the snow; take the FUNNEL (V).
- Take the LIGHT STRING (W).
- Use the NIPPERS on the rope; take the HEART KEY (X).
- Use the SNOWBALL on the branch; receive a PLANET (Y).
- Use the HEX NUT WRENCH twice on the lock; remove it and open the door (Z).
- Take the KNIGHT MEDALLION (A).
- Back out twice.
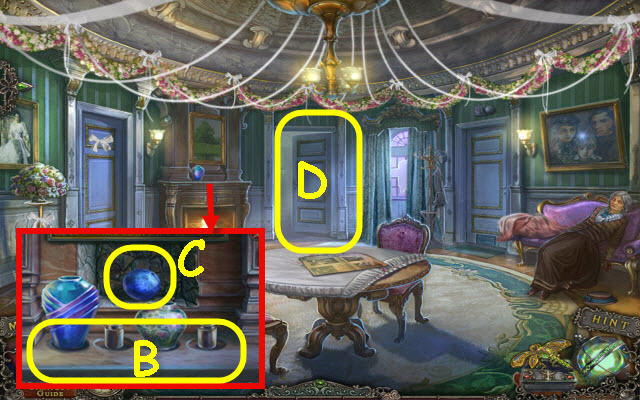
- Pick up the weight; place the WEIGHT and VASE on the pedestals (B). Take the book and 2nd PLANET (C).
- Examine the door to access a HOP (D).
- Play the HOP.
- You receive a SAFETY FUSE (E).
- Go left.
- Pull the rope twice (F).
- Place the HEART KEY on the box; open it. Take the 2nd ANGEL STATUE (G).
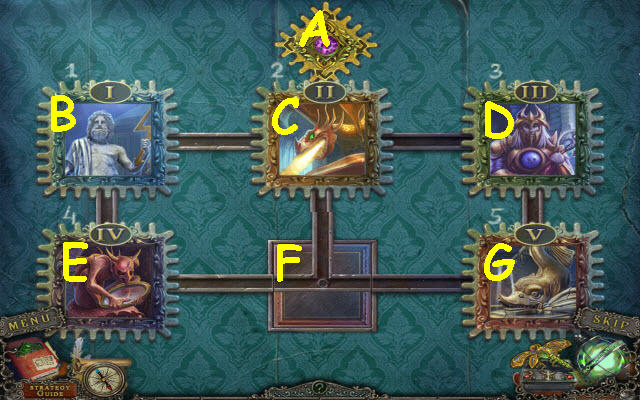
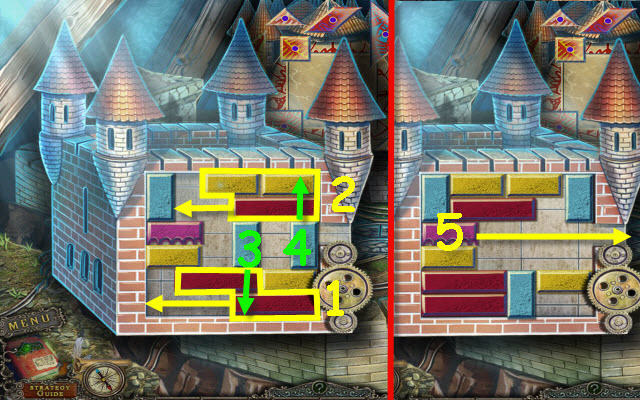
- Place the 2 PLANETS on the orbits to trigger a puzzle (H).
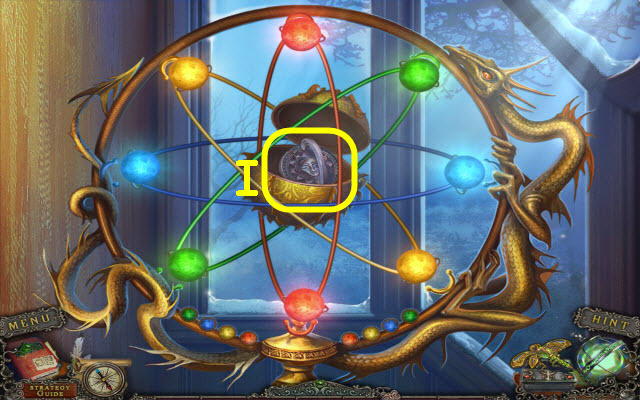
- Place the planets in their matching slots.
- Move the planets to their matching slots in this order: Green-up, red-down and blue-right.
- Take the SUN HANDLE (I).
- Go forward.
- Place the 2 ANGEL STATUES on the container; open the lid. Take the BISHOP MEDALLION (J).
- Back out twice.
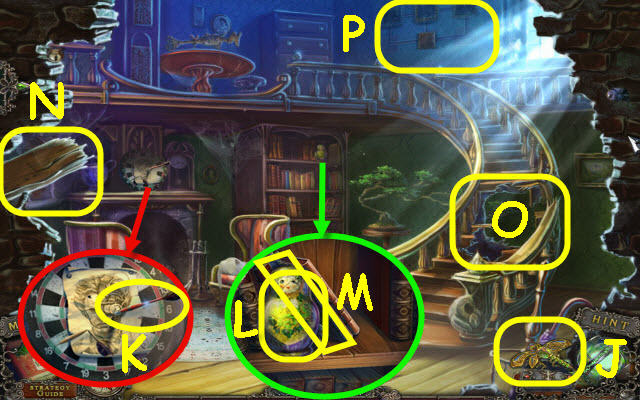
- Take the newspaper; use the NIPPERS on the string (K) and remove the cover.
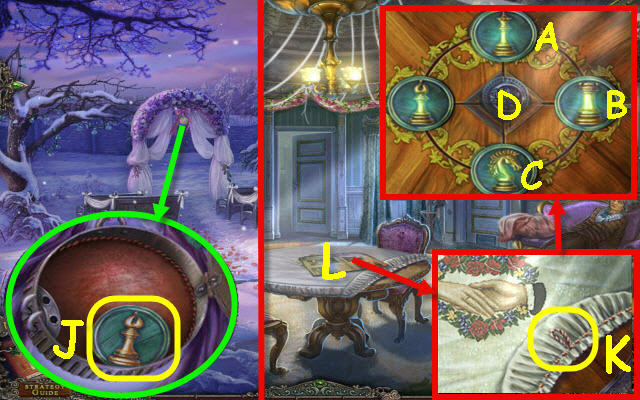
- Place the KNIGHT MEDALLION and BISHOP MEDALLION on the table to trigger a puzzle (L).
- Place the medallions in their matching slots.
- Select the following: C, B, A and D.
- Take the MOON HANDLE.
- Go left and forward.
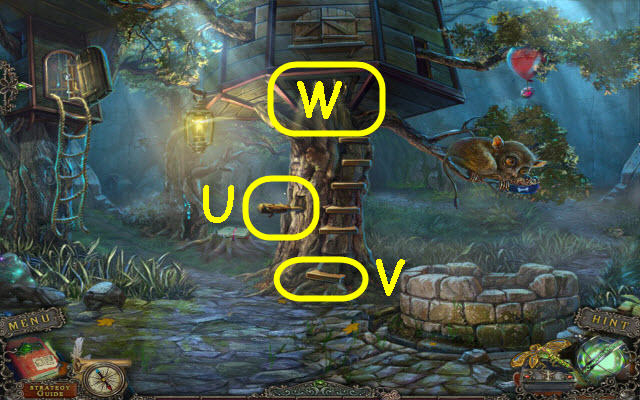
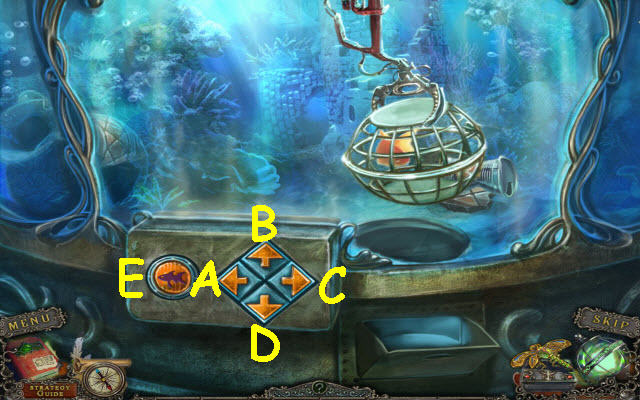
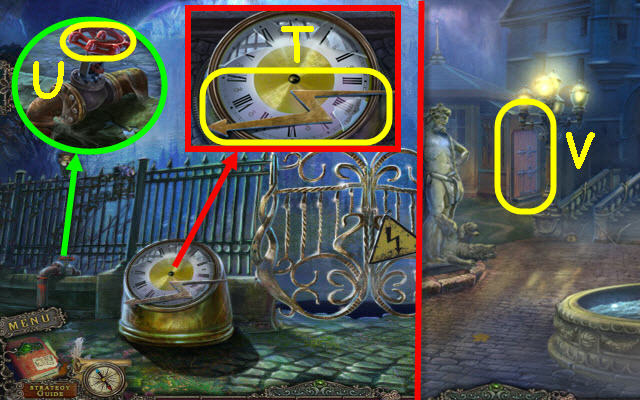
- Place the MOON HANDLE and SUN HANDLE in the slots; lift the handles to trigger a puzzle (M).
- Turn the handles to the correct setting.
- Turn N right 6x and left. Turn O left 3x.
- Go down the opening.
- Take the CAN OF GASOLINE (P).
- Plug the LIGHT STRING in the socket (Q).
- Back out.
- Select the motor; replace the SAFETY FUSE (R). Use the FUNNEL and CAN OF GASOLINE on it (S); select it.
- Go down the hatch.
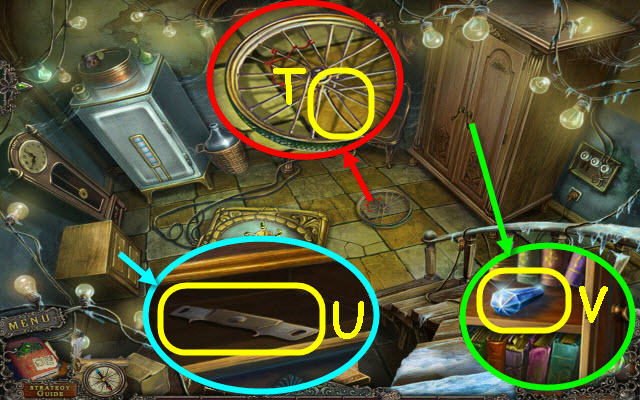
- Take the SPOKE (T).
- Open the drawer and take the newspaper; take the FLOOR-HATCH KEY (U).
- Open the cabinet; zoom in and take the BLUE CRYSTAL (V).
- Back out twice.
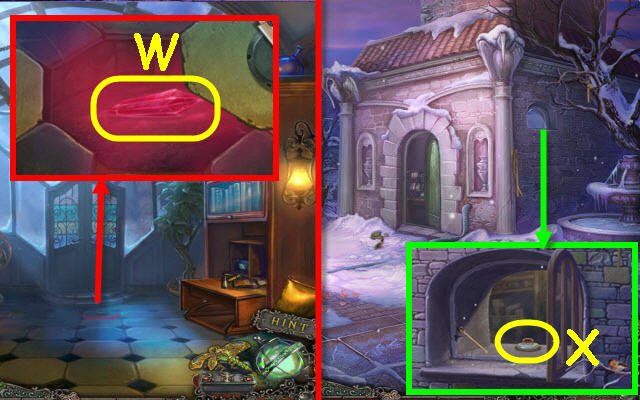
- Use the FLOOR-HATCH KEY on the lock and turn it; take the RED CRYSTAL (W).
- Go forward.
- Use the SPOKE on the latch and open the window; take the SUCTION HANDLE (X).
- Go down the hatch.
- Use the SUCTION HANDLE on the door; select it twice and take the LIQUID NITROGEN (Y).
- Place the PORTAL SPHERE on the pedestal (Z).
- Take the note; place the RED CRYSTAL and BLUE CRYSTAL on the device; pull the lever (A).
- Select the sphere; pour the LIQUID NITROGEN on it (B).
- Enter the portal.
Chapter 2: Ancient Temple
- Select the Dragonfly (C).
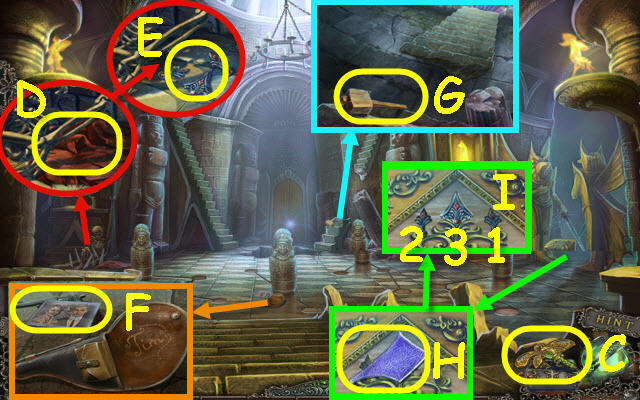
- Take the RAG (D) and BUTTONS (E).
- Take the photo and TIM'S GUN (F).
- Take the MALLET (G).
- Take the STAINED-GLASS PIECE (H).
- Place the BUTTONS on the pedestal; push in order (I).
- Go right.
- Place the RAG on the stick; take the MOP (J).
- Use the MOP on the window (K).
- Use the MALLET on the peg and remove the pillar; take the 2nd STAINED-GLASS PIECE (L) and ROPE LADDER (M).
- Select the buttons in order (1-4).
- Take the TEMPLE STONE (N).
- Select the right arrow twice; take the 3rd STAINED GLASS PIECE (O).
- Back out.
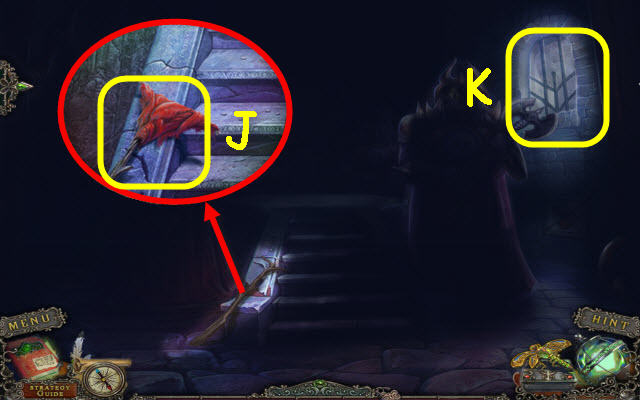
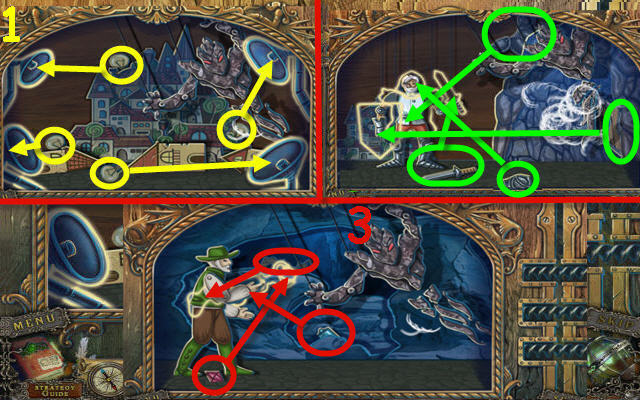
- Examine the left stained glass; place the 3 STAINED-GLASS PIECES in the slots (P).
- Place the ROPE LADDER on the gap (Q).
- Examine the stained glass to trigger a puzzle (R).
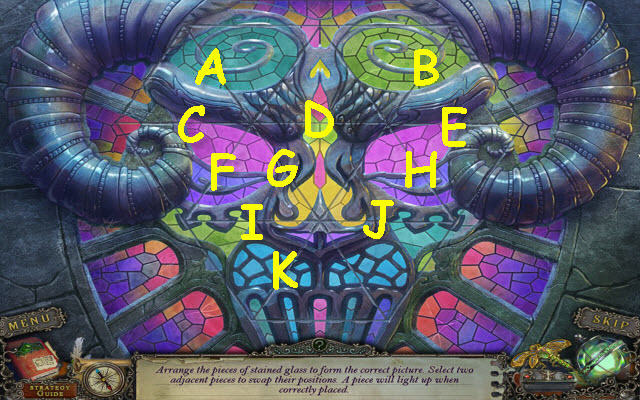
- Complete the image.
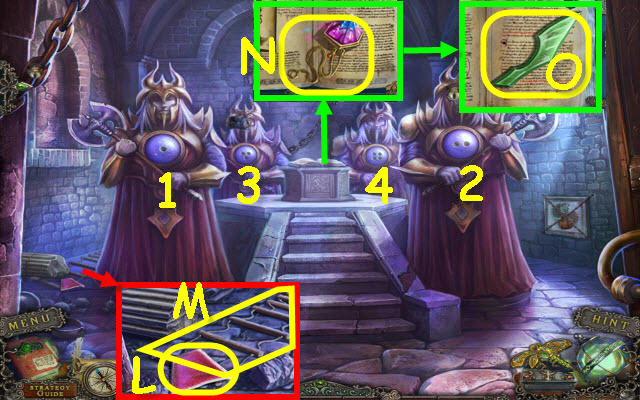
- Select the following: A-E-B-D-G-F-A-G-D-J-H-I-K-F and G.
- Select Sx2, Tx3, Ux3 and V.
- Take the PHOENIX EMBLEM (W).
- Go right.
- Use TIM'S GUN on the lock (X).
- Place the PHOENIX EMBLEM on the slab and select it; take the HAND (Y).
- Back out.
- Place the HAND in the recess; turn it (Z).
- Go forward.
Chapter 3: Another World Caves
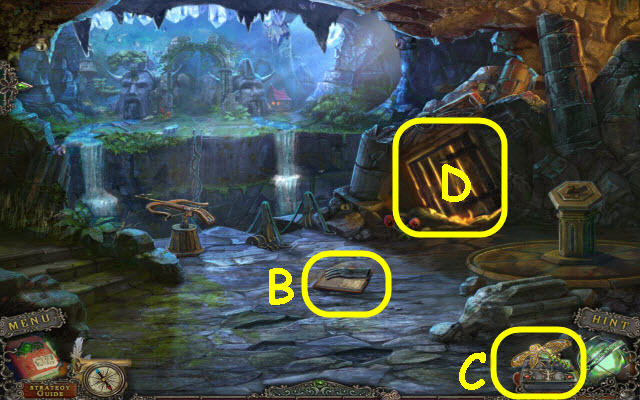
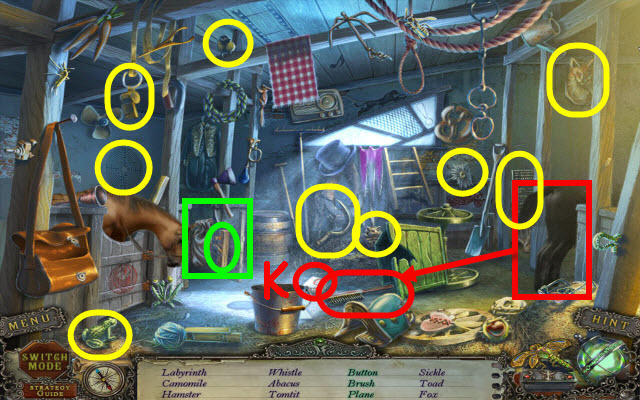
- Take TIM'S GLOVE and note (B).
- Select the Dragonfly (C).
- Open the gate to trigger a HOP (D).
- Play the HOP.
- You receive a GEAR (E).
- Go left.
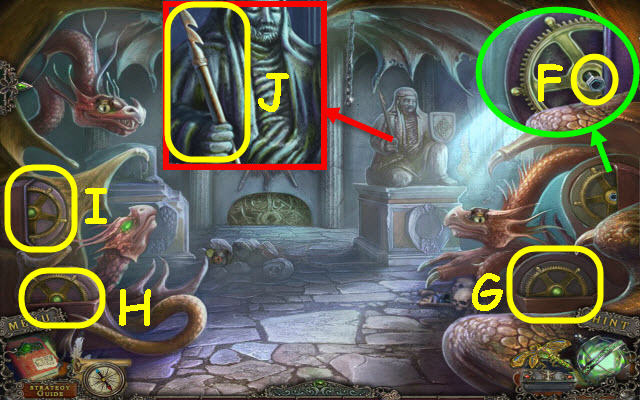
- Place the GEAR on the mechanism and move it; use the HEX NUT WRENCH on the screw and select the gear (F).
- Turn the gears (G-H).
- Use TIM'S GLOVE on the gear (I).
- Take the HARPOON (J).
- Back out.
- Place the HARPOON on the gun; select it and then wind it in. Take the BELL (K) and SWORD (L).
- Go left.
- Use the SWORD to get the DRAGON SYMBOL (M).
- Back out.
- Place the DRAGON SYMBOL on the pedestal; select it (N).
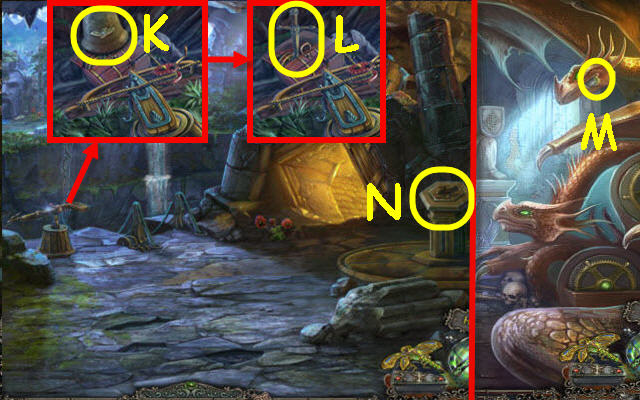
- Go upstairs.
- Select the Dragonfly (O).
- Open the door; take the STONE SPYGLASS (P).
- Unroll the screen (Q).
- Pull the lever (R).
- Examine the screen (Q).
- Back out.
- Examine the doorway to access a HOP.
- Play the HOP.
- You receive BELLOWS (S).
- Go left.
- Place the STONE SPYGLASS in the shield; open it and take the LENSES (T).
- Back out; go upstairs.
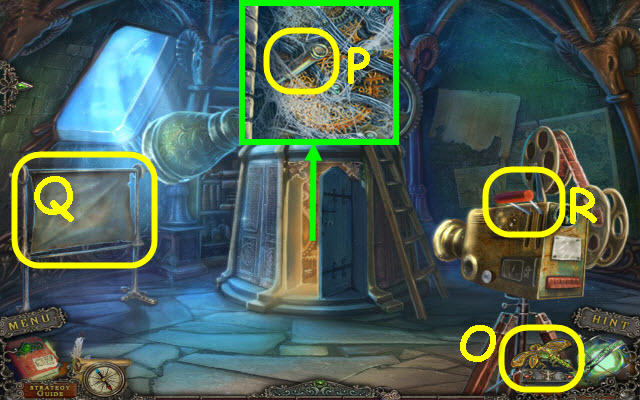
- Use the BELLOWS on the cobwebs; select the gears (U).
- Take the CLOCK PART (V).
- Move the clock and select the stone twice; take the 2nd BELL (W).
- Place the LENSES on the telescope slots and push them all in; get a code (X).
- Back out; go left.
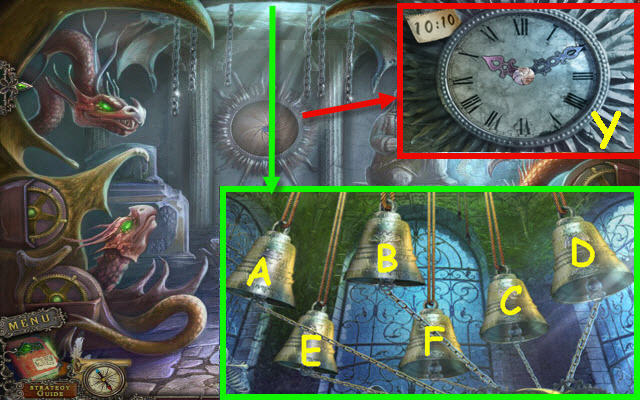
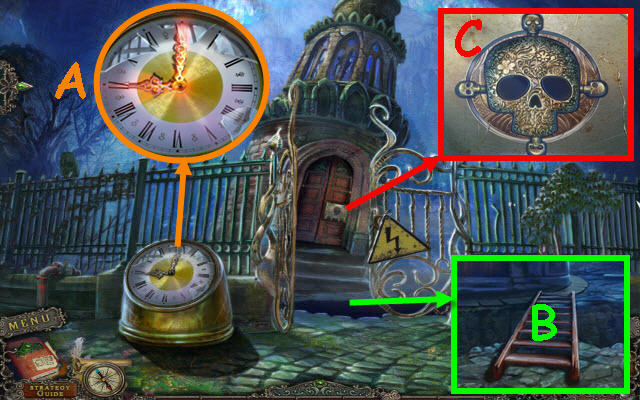
- Place the CLOCK PART in the circle and select it; set the time to 10:10 (Y).
- Go up.
- Hang the 2 BELLS on the hooks to trigger a puzzle.
- Make all the bells ring.
- Select the following bells: E, B, A, C, D and F.
- Back out; go forward.
Chapter 4: Another World Sinister Shadows
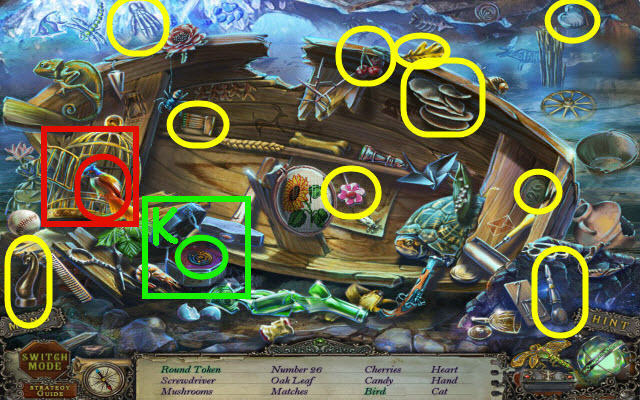
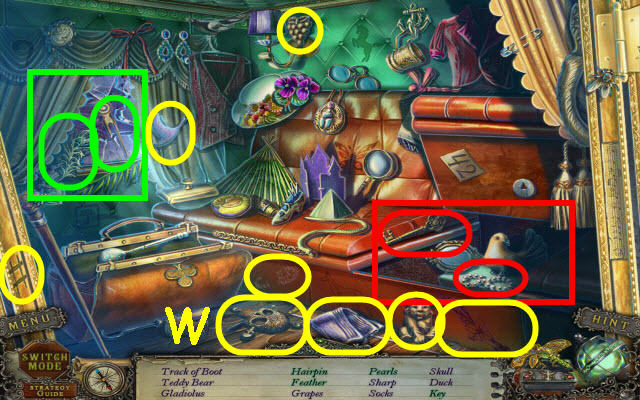
- Take the NET (Z).
- Take the TOADSTOOL 1/3 (A).
- Take the STATUETTE (B).
- Use the NET on the box; open it to trigger a puzzle (C).
- Find the correct matching pairs.
- Select as marked (1-4).
- Flip the pages twice; take the note and BLUE STONE.
- Place the BLUE STONE in the socket; push both stones (D).
- Go right.
- Use the STATUETTE on the window; take the GREEN STONE (E).
- Take the TOADSTOOL 2/3 (F).
- Open the door to trigger a HOP (G).

- Play the HOP.
- You receive a RED STONE (H).
- Back out.
- Place the RED STONE and GREEN STONE in their respective sockets; push both stones (I).
- Go left.
- Select the Dragonfly (J).
- Take the RESIN (K) and DOG WHISTLE (L).
- Back out; go right.
- Use the DOG WHISTLE on the dog; take the DOG FOOD (M).
- Take the PRUNERS (N).
- Back out; go left.
- Use the PRUNERS on the ivy and reexamine. Take the BOARD 1/3 (O), TOADSTOOL 3/3 (P) and GREEN BUBBLE (Q).
- Give the DOG FOOD to the creature; receive a RED BUBBLE (R).
- Use the PRUNERS on the ivy to trigger a HOP (S).
- Play the HOP.
- You receive a BRANCH LEVER (T).
- Use the BRANCH LEVER in the hole; pull it (U).
- Take the BOARD 2/3 (V).
- Examine the hatch and place the GREEN BUBBLE and RED BUBBLE on it to trigger a puzzle (W).

- Move the colored balls to their matching spaces.
- Move the following: X-Y-Z and X-Y-B. Red is C: C down and left, D up, C right, down, left, D up, C right, down, left, D up, C right and down.
- Part 2: U-N-L, R-G, L-N-G-H, N-U, H-G-R, E-G-Q, K-I, Q-G-I-P, I-G, P-I-K, W-I-G-Q, L-N, Q-N-M-G-R, M-L and I-K.
- Go up.
- Use the Dragonfly (A).
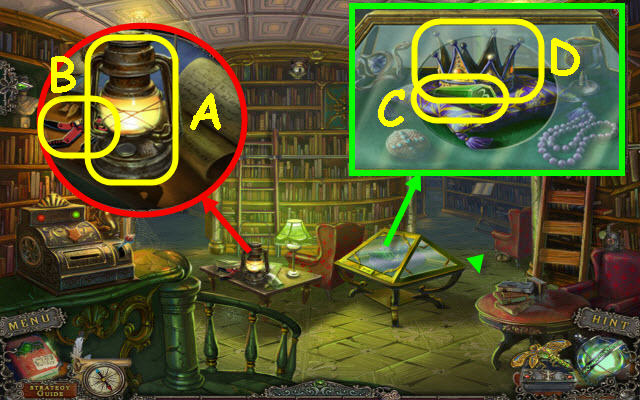
- Take the PICTURE (B).
- Take the notes and PANEL BUTTON 1/4 (C).
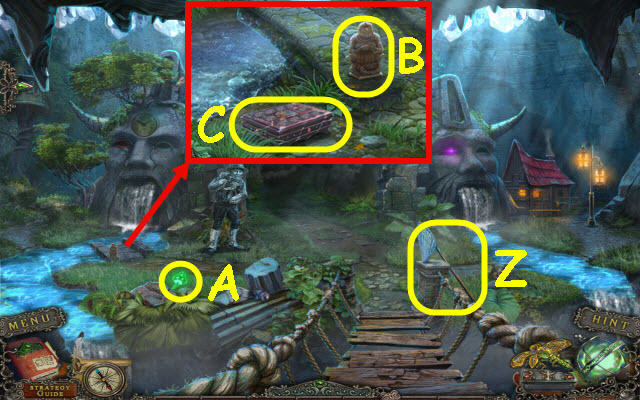
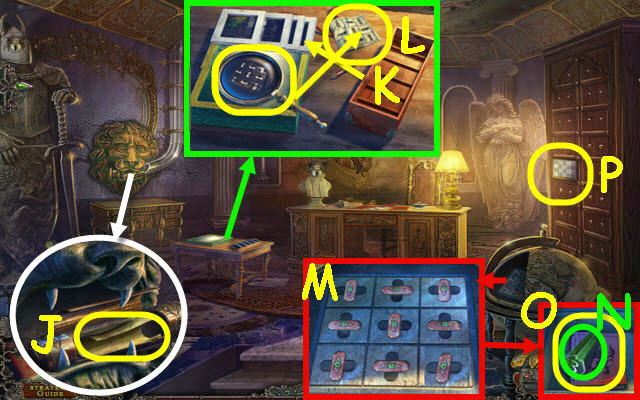
- Place the TEMPLE STONE in the hole; take the DESTONING DEVICE (D).
- Open the lamp; take the CRYSTAL 1/3 (E).
- Back out twice.
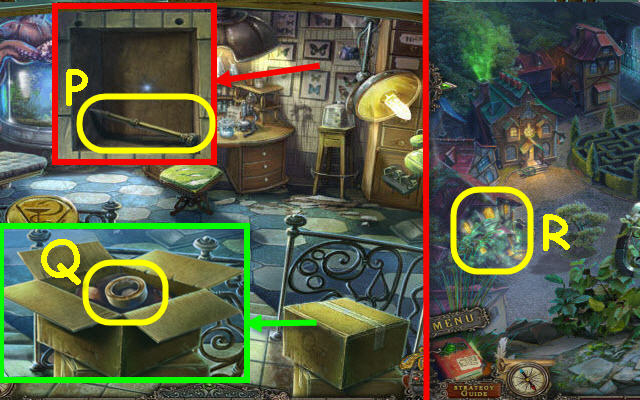
- Use the DESTONING DEVICE on the old man; receive a CROWBAR (F).
- Back out of close-up; go right.
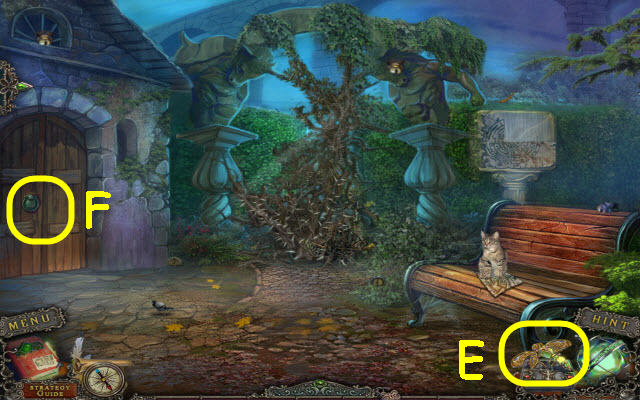
- Use the CROWBAR on the door (G).
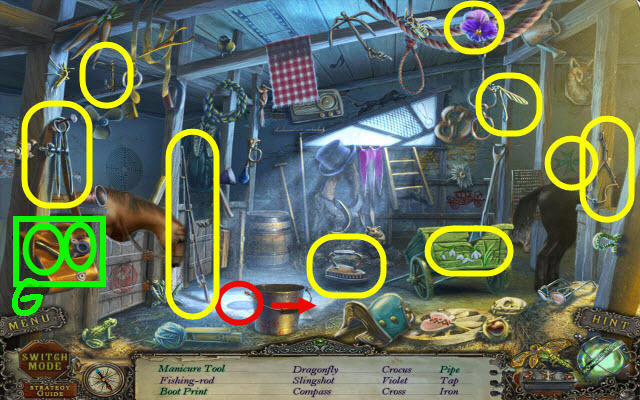
- Examine the shed to access a HOP (H).
- Play the HOP.
- You receive a FUNNEL (I).
- Go up the stairs.
- Select the Dragonfly (J).
- Take the DART (K).
- Take the GREEN MATRYOSHKA (L) and the 2nd PICTURE (M).
- Take the BOARD 3/3 (N).
- Place the 3 BOARDS on the gap (O).
- Place the 2 PICTURES on the wall to trigger a puzzle (P).
- Place the pictures in their proper locations.
- Select the following: B-A-E-F-C-D-Ax3-G-F-E-B-C-F and Ax2.
- Take the CRYSTAL 2/3.
- Back out twice; go left.
- Use the DART on the balloon; get a CRYSTAL 3/3 (Q).
- Examine the tree house to access a HOP (R).
- Play the HOP.
- You receive a CHAIN WITH NUMBERS (S).
- Go up the tree house.
- From left; place the 3 CRYSTALS, 3 TOADSTOOLS and RESIN in the containers (T).
- Turn the valve; take the LUMINESCENT FUEL (U).
- Back out twice; go right and then upstairs.
- Take the note and use the DESTONING DEVICE, FUNNEL and LUMINESCENT FUEL on the emitter. Take the LIGHT EMITTER (V).
- Back out twice.
- Use the LIGHT EMITTER on the black smoke (W).
- Go forward.
- Speak to the old man; then select the Dragonfly (X).
- Take the 2nd CHAIN WITH NUMBERS (Y).
- Examine the boathouse to access a HOP (Z).
- Play the HOP.
- You receive a CRATE LOCK (A).
- Place the CRATE LOCK on the crate; push it (B) and open the lid.
- Move the netting; take the photo and CLIPPERS (C).
- Back out; go left and up.
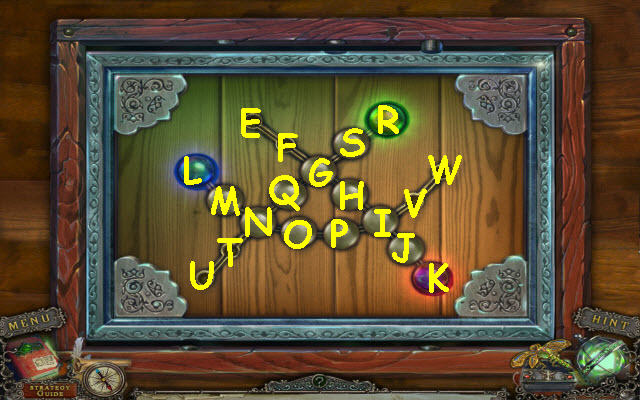
- Place the 2 CHAIN WITH NUMBERS on the cupboard to trigger a puzzle (D).
- Rotate the chains to match the numbers.
- See screenshot for solution (E).
- Open the cabinet; select the bottle and take the SOPORIFIC CHICKEN LEG (F).
- Back out twice; go right.
- Give the SOPORIFIC CHICKEN LEG to the dog; use the CLIPPERS on his side. Select the code (G).
- Back out; go forward.
- Examine the boathouse to access a HOP (H).
- Play the HOP.
- You receive a HANDLE (I).
- Enter the code; open the door (J).
- Place the HANDLE in the slot and pull (K).
- Select the buttons in the correct order (1-3).
- Enter the ship.
- Speak to Rudy.
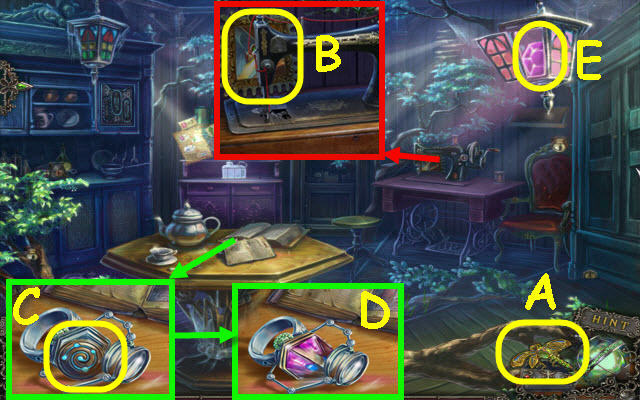
- Open the book and place the LIGHT EMITTER in the holder; select it 3x (L).
- Take the HOOK (M).
- Take the TORN SAIL (N).
- Back out twice; go left and up.
- Place the TORN SAIL on the sewing machine; select the fabric twice to get a SAIL (O).
- Back out twice; go forward.
- Use the HOOK to get the SPOOL (P).
- Enter the ship.
- Place the SPOOL and SAIL on the mast; turn the crank (Q).
- Select the wrecked boat to access a HOP (R).
- Play the HOP.
- You receive a SAW (S).
Chapter 5: Ghost Town Gateway
- Select the Dragonfly (T).
- Speak to Rudy (U).
- Take the note, HORN (V) and ROPE (W).
- Use the SAW and ROPE on the wires (X).
- Go down to the grotto (Y).
- Take the TORCH (Z).
- Back out.
- Light the TORCH with the rays; get a LIT TORCH (A).
- Go down to the grotto.
- Return the LIT TORCH to the holder (Z).
- Select the Dragonfly (B).
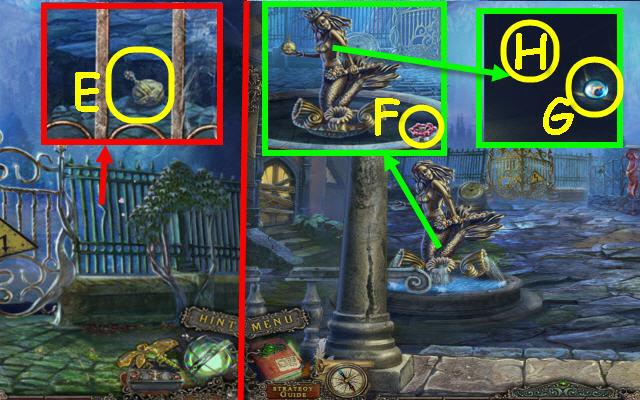
- Place the HORN on the statue; receive a MIRROR (C).
- Back out.
- Use the MIRROR on the rays (D).
- Take the PICK (E) and remove the panel (F).
- Return to the grotto.
- Use the PICK on each pillar (G).
- Go forward.
- Use the PICK on the glass; take the CROSS (H).
- Back out twice.
- Use the CROSS on the box and turn it; take the MAGNET (I).
- Examine the boat to access a HOP (J).
- Play the HOP.
- You receive a PANEL BUTTON 2/4 (K).
- Go down to the grotto and forward.

- Use the MAGNET on the slot; place the CROSS in it and turn. Take the FISH BUTTON (L) and REEL HANDLE (M).
- Back out.
- Place the REEL HANDLE on the chest and turn it; take the FILM REEL (N).
- Go forward.
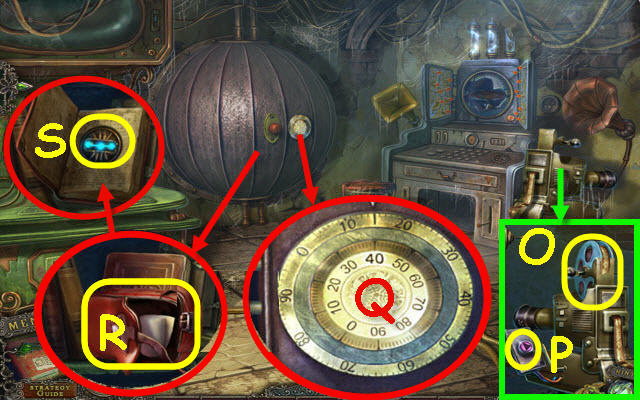
- Place the FILM REEL on the projector (O); press the button (P) to get a code.
- Set the dial to match the code: 15-40 (Q).
- Take the MEDICAL KIT (R).
- Open the book; take the PANEL BUTTON 3/4 (S).
- Back out twice.
- Give the MEDICAL KIT to Rudy; receive a PANEL BUTTON 4/4 (T).
- Place the 4 PANEL BUTTONS on the panel to trigger a puzzle (U).
- Turn all the lights on or off.
- Select the buttons in numerical order (1-12).
- Set 3: H-B-Dx2-F-E-G-A-C and I.
- Speak to Rudy; go forward.
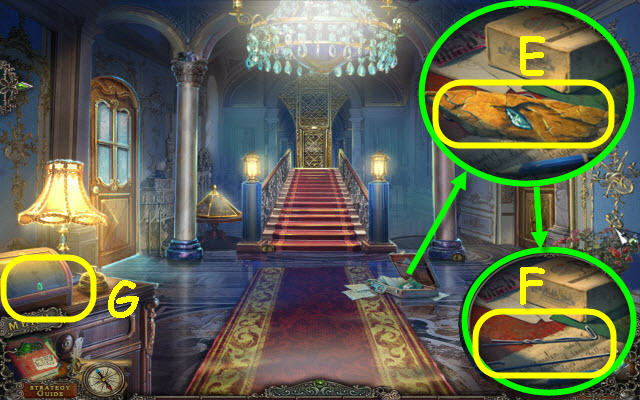
- Take the BLUE MATRYOSHKA (V); move the cart and select the door (W).
- Take the note (X).
- Select the rope twice to get TIM'S MAGNIFIER (Y).
- Place the BLUE MATRYOSHKA and GREEN MATRYOSHA on the lock; straighten them out to trigger a HOP (Z).
- Play the HOP.
- You receive H2O (A).
- Go right to the cable car.
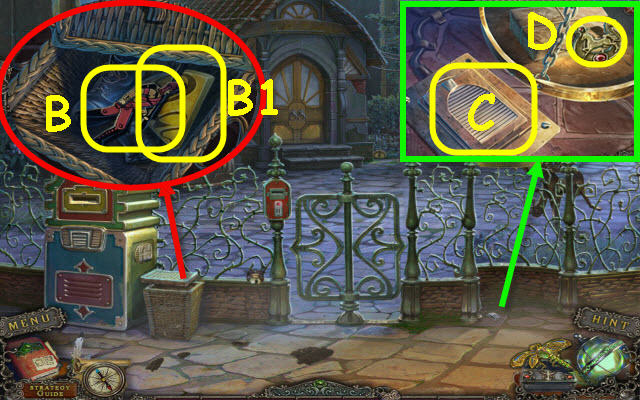
- Open the lid; take the TIN SOLDIER 1/3 (B) and SNAKE BUTTON (B1).
- Step on the pedal (C); take the HORSESHOE (D).
- Back out; go forward.
- Select the Dragonfly (E).
- Place the HORSESHOE on the lock and turn it to trigger a HOP (F).
- Play the HOP.
- You receive a MANICURE TOOL (G).
- Back out; go right.
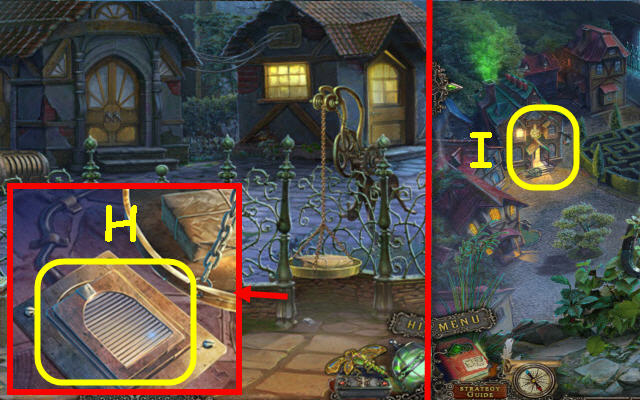
- Use the MANICURE TOOL on the 2 screws; take the PEDAL (H).
- Back out; enter the lab (I).
- Place the SNAKE BUTTON on the pedestal; push it (J).
- Select the Dragonfly (K).
- Place the PEDAL under the chair; push it (L).
- Open the drawer; select the tube twice to get SO3 (M).
- Stand up the holder and select the beaker; place the SO3 and H2O in the beaker. Take the ACID (N).
- Place the FISH BUTTON on the aquarium to trigger a puzzle (O).
- Catch the fish.
- Select the following: A-E-Cx2-E-A-B-E-C-E-A-E-C-D-Ex2-D and E.
- You receive a FISH.
- Use the MANICURE TOOL on the frame; take the PAPER CUTTER (P).
- Use the PAPER CUTER on the box; take the TAPE (Q).
- Back out.
- Examine the house to access a HOP (R).
- Play the HOP.
- You receive a SHIELD PART (S).
- Use the PAPER CUTTER on the map; take the MAP PART (T).
- Go forward.
- Give the FISH to the cat; take the 2nd MAP PART (U).
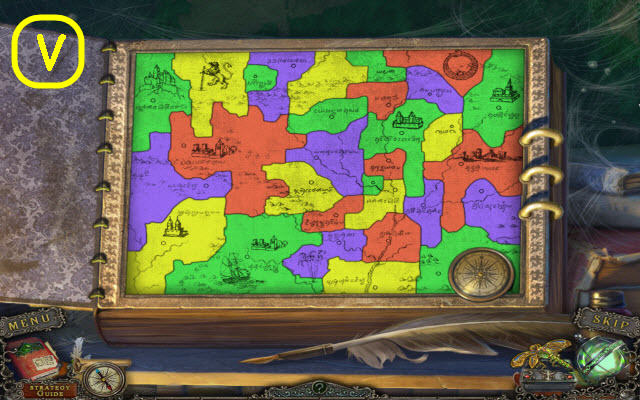
- Place the 2 MAP PARTS and TAPE on the map; take the MAP (V).
- Use the ACID on the vines (W).
- Go forward.
- Place the MAP anywhere to trigger a puzzle.

- Go through the labyrinth.
- Go left, right, forward, right, left, forward, right, forward, left and forward (X).
- Select the Dragonfly (Y).
- Open the lid; take the STAMP BUTTON (Z) and LAMP TUBE (A).
- Select the wire 3x; take a COIN (B).
- Pull the lever (C).
- Open the mouth; take the 2nd SHIELD PART (D).
- Place the 2 SHIELD PARTS on the shield (E); take the 2nd LAMP TUBE (F).
- Back out twice; go right.
- Place the COIN in the slot; push it in and take the CABLE-CAR TICKET (G).
- Place the CABLE-CAR TICKET in the turnstile (H); push it in.
- Take the RUSTED LEVER (I).
- Place the 2 LAMP TUBES in the speaker (J).
- Back out; go forward.
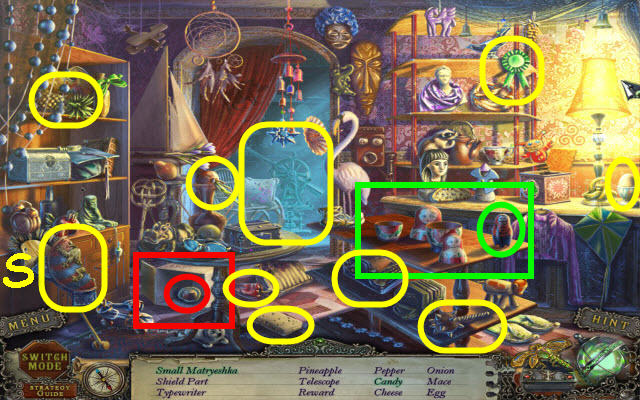
- Examine the stable to access a HOP.
- Play the HOP.
- You receive a 2nd STAMP BUTTON (K).
- Go forward.
- Place the RUSTED LEVER on the statue; pull it (L).
- Place the 2 STAMP BUTTONS on the panel to trigger a puzzle.
- Press them in order: 2-4-9-15 and pull the handle (M).
- Take the PUNCH CARD.
- Back out twice; go right.
- Place the PUNCH CARD in the slot and push it in; select the lever (N).
- Enter the cable car (O).
Chapter 6: Ghost Town Upper Street

- Select the Dragonfly (P).
- Take the note (Q).
- Open the carriage door to trigger a HOP (R).
- Play the HOP.
- You receive a TRIDENT (S).
- Go forward.
- Select the Dragonfly.
- Take the LIGHTNING (T).
- Take the VALVE (U).
- Back out and go right.
- Open the shed to trigger a HOP (V).
- Play the HOP.
- You receive a FISHING ROD (W).
- Take the PITCHFORK (X).
- Use the FISHING ROD to retrieve the GLASS CUTTER (Y).
- Place the TRIDENT, PITCHFORK and LIGHTNING on the statues. Rearrange from left to right; TRIDENT, LIGHTNING and PITCHFORK (Z).
- Enter the library.
- Select the Dragonfly.
- Take the LAMP (A) and TIN SOLDIER 2/3 (B).
- Use the GLASS CUTTER on the display; take the NUMBERED CRYSTAL (C) and CROWN (D).
- Back out twice; go forward.
- Use the FISHING ROD to retrieve the ROYAL ORB (E).
- Back out.
- Place the VALVE on the stem; turn it (F).
- Place the CROWN on the statue and the ROYAL ORB in her hand; take the DOLPHIN EYE (G).
- Use the LAMP in the shaft (H).
- Go right through the gates.
- Place the DOLPHIN EYE in the socket; take the TIN SOLDIER 3/3 (I).
- Back out.
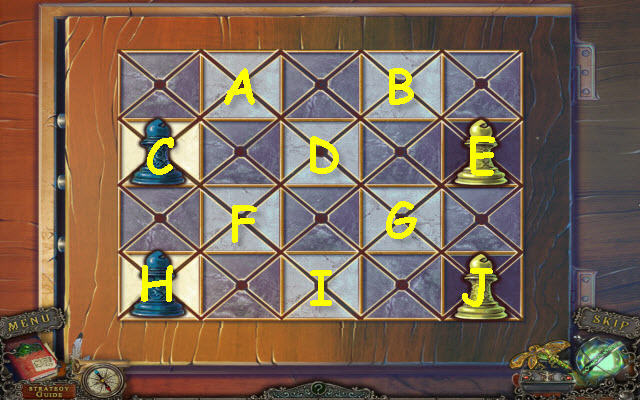
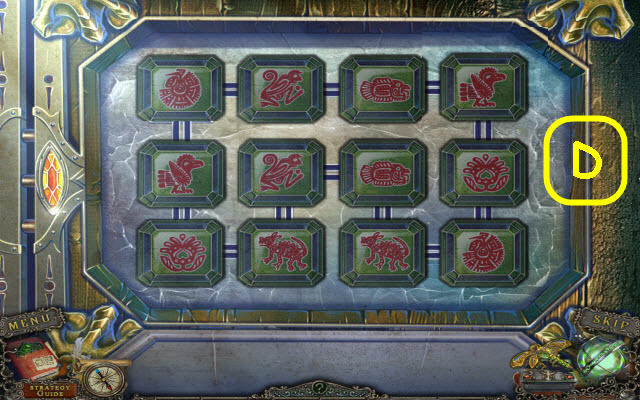
- Place the 3 TIN SOLDIERS on the diorama to trigger a puzzle (J).
- Place the items where they belong.
- See screenshot for solution (1-3).
- Go through the tunnel in the shaft.
- Select the Dragonfly.
- Open the tube; take the LIBRARY CARD (J).
- Place TIM'S MAGNIFIER on the light box; select the slides (K). Look at each slide to get a code; take the code (L).
- Move the bars to match the code (M).
- Take the 2nd NUMBERED CRYSTALS (N) and RED BOOK 1/3 (O).
- Examine the drawers to trigger a puzzle (P).
- Swap the pieces.
- Move the following: E-G, C-F, G-A, J-G, F-B, G-I, A-C, B-D-J, I-E, C-I, J-A, H-D-J, E-B-H, I-F, A-G-E and F-C.
- Take the RED BOOK 2/3.
- Back out; go right through the gates.
- Examine the shed to access a HOP.
- Play the HOP.
- You receive CLIPPERS (Q).
- Go forward.
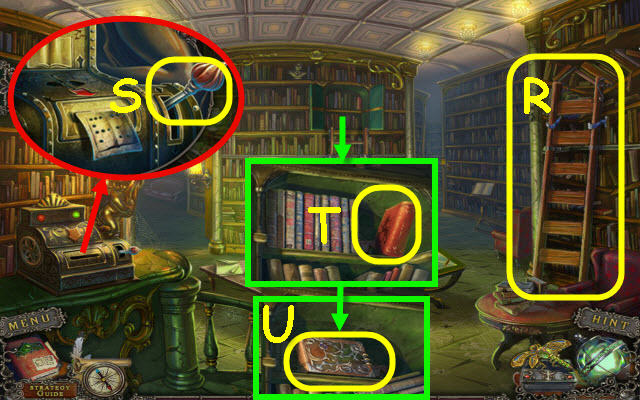
- Use the CLIPPERS on the wire; take the LADDER (R).
- Place the LIBRARY CARD in the machine; pull the handle (S).
- Take the RED BOOK 3/3 (T).
- Move the books; select the journal twice to trigger a puzzle (U).
- Select the colors so no two of the same touch.
- See screenshot for solution (V).
- Take the note and MINUTE HAND.
- Back out twice.
- Examine the carriage to access a HOP.
- Play the HOP.
- You receive a SKULL (W).
- Enter the fountain; go forward.
- Place the 3 RED BOOKS on the desk; select each one (X).
- Take the note, HOUR HAND (Y) and GOLEM-DESTROYER PART (Z).
- Back out; go forward.
- Place the MINUTE HAND and HOUR HAND on the clock. Turn the hands to 9:00 (A).
- Place the LADDER across the chasm; go across (B).
- Place the SKULL on the lock; turn it to trigger a puzzle (C).
- Find the matching pairs.
- The symbols will move in a chainlike manner after incorrect choice.
- See screenshot for order of images on chain (D).
- Go forward.
Chapter 7: Ghost Town Central Tower
- Select the Dragonfly.
- Take the GOLEM-HEAD HALF (E).
- Twist the clips 2x; take the PICKLOCK (F).
- Use the PICKLOCK on the chest to trigger a puzzle (G).
- Pull up all the pins.
- Select the pins: 2-5-4-1.
- Select the button to trigger a HOP in the doorway (H).
- Play the HOP.
- You receive a 2nd GOLEM-HEAD HALF (I).
- Place the 2 GOLEM-HEAD HALVES in the recess; press it (J).
- Examine the display to trigger a puzzle (K).

- Slide the pink brick to the edge.
- See screenshot for solution (1-5).
- Rotate the rings to complete the image.
- See screenshot for solution (L).
- Rotate and place the pieces to complete the image.
- See screenshot for solution (M).
- You will receive a BLACK CRYSTAL.
- Place the BLACK CRYSTAL and GOLEM-DESTROYER PART on the weapon; use the WEAPON (N).
- Select the Dragonfly.
- Take the JAR OF INK (O).
- Take the BIRD FOOD (P).
- Select the red stamper, then use the JAR OF INK on the jar and select the stamper. Take the CIPHERED MESSAGE (Q).
- Use the CIPHERED MESSAGE on the decoder and select the keys; take the code (R).
- Open the lock; enter the code 2346 on it (S).
- Go forward.
- Open the cage and place the BIRD FOOD in it; take the PORTAL SYMBOL (T).
- Pull up the rope (U); remove the items and take the RULER (V).
- Back out.
- Use the RULER on the drawer; take the CHISEL (W) and GENERATOR PART (X).
- Go forward.
- Push the rock; use the CHISEL to get the 2nd PORTAL SYMBOL (Y).
- Back out.
- Place the 2 PORTAL SYMBOLS in the slots and the GENERATOR PART on the mechanism; turn the handle (Z).
- Enter the portal.
- Examine the doorway to access a HOP.
- Play the HOP.
- You receive an ELEVATOR LEVER (A).
- Take the GOLEM-DESTROYER (B).
- Select the elevator mechanism and place the ELEVATOR LEVER on the mechanism; pull it (C).
- Go forward.

- Use the GOLEM-DESTROYER on the mad scientist (D).
- Select the grid to pop 2 crystals; place the 2 NUMBERED CRYSTALS on it to trigger a puzzle (E).
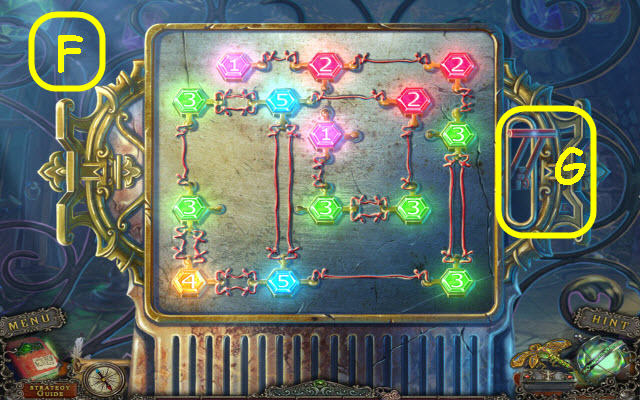
- Connect all the crystals.
- See screenshot for solution (F).
- Pull the lever (G).

- Press the balls in the correct order.
- See screenshot for order (1-6).
- Go forward.
- Congratulations! You have successfully completed Whispered Secrets: Into the Beyond.
Created at: 2013-12-11