

Walkthrough Menu
- General Tips
- Chapter 1: Rescue
- Chapter 2: The Fountain
- Chapter 3: The Workroom
- Chapter 4: The Studio
- Chapter 5: The House
- Chapter 6: The Balloon
- Chapter 7: The Throne Room
- Chapter 8: The Sword
General Tips
- This is the official guide for Whispered Secrets: Into the Wind.
- This guide will not mention each time you have to zoom into a location; the screenshots will identify each location.
- Hidden-object puzzles are referred to as HOPs. This guide will not show screenshots of the HOPs; however, it will mention when a HOP is available and the inventory item you'll collect from it.
- This guide will give step-by-step solutions for all puzzles which are not random. Please read the instructions in the game for each puzzle.
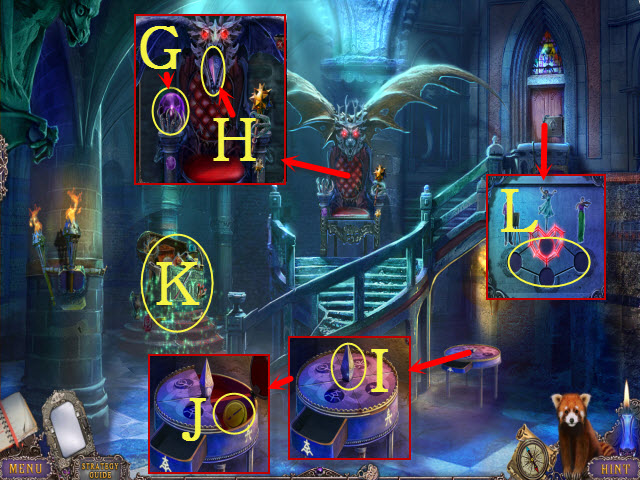
Chapter 1: Rescue
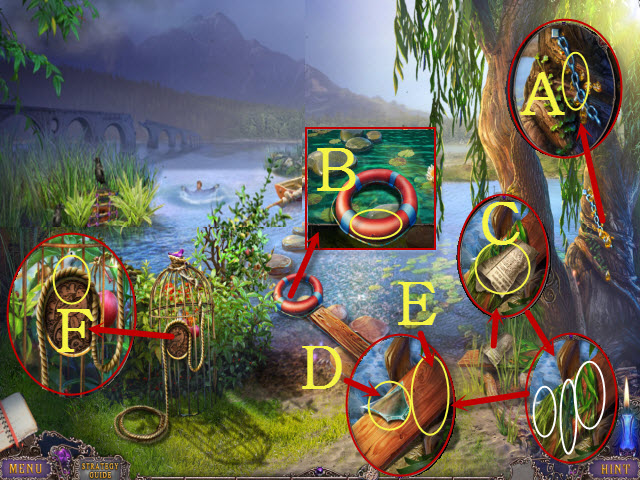
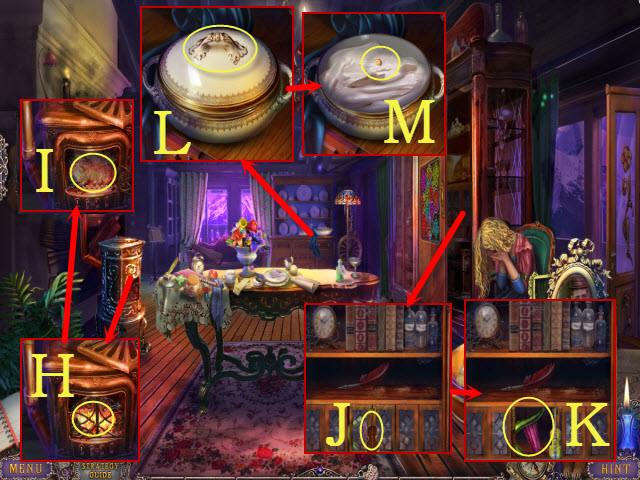
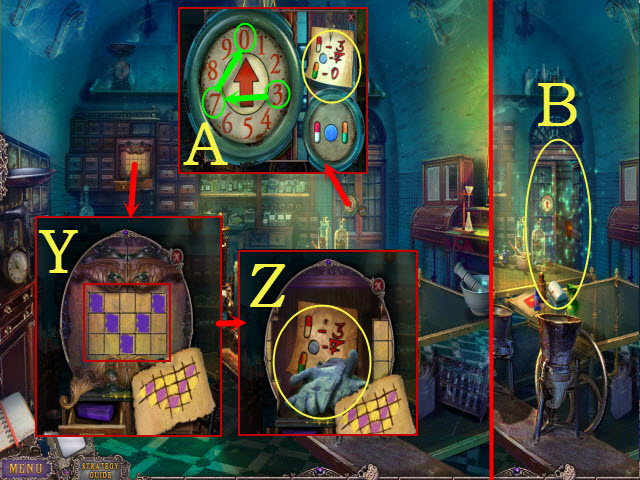
- Take the CHAIN (A) and LIFE BUOY (B).
- Read the newspaper (C) and move the seaweed (white); take the GLASS SHARD (D) and 1/2 PLANK (E).
- Use the GLASS SHARD; receive the ROPE (F).
- Place the ROPE with the LIFE BUOY; select rope 3x; receive the LIFE BUOY WITH ROPE (inventory).
- Use the LIFE BUOY WITH ROPE (I).
- Talk to the Policeman; receive the WHISTLE (J).
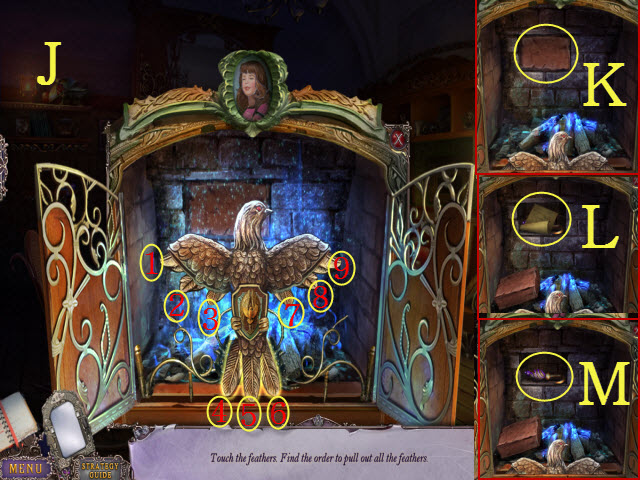
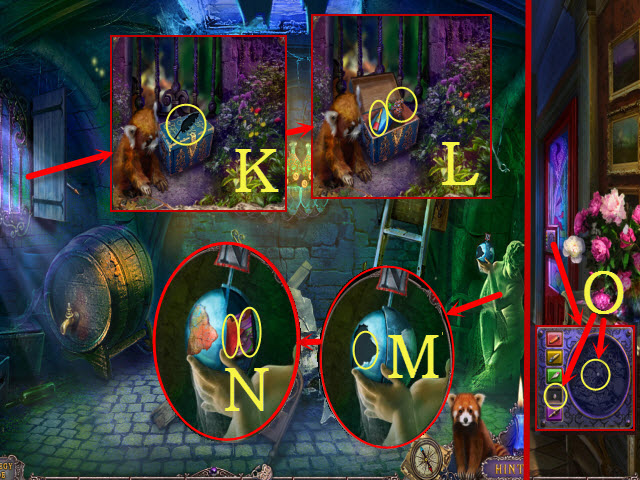
- Use the WHISTLE (K).
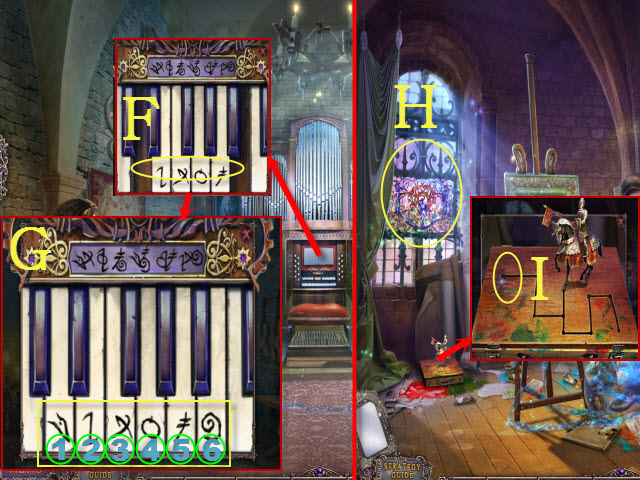
- Move the grass (white) for a mini-game.
- Solution: (L).
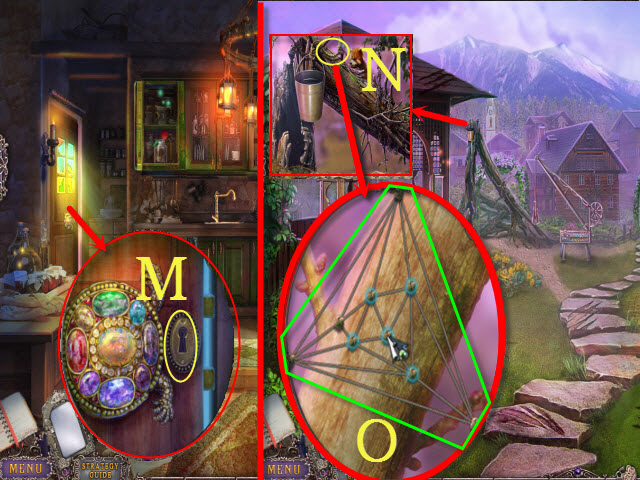
- Take the panda (M).
- Select the boards (N); receive the 2/2 PLANK.
- Place the 2/2 PLANK (O).
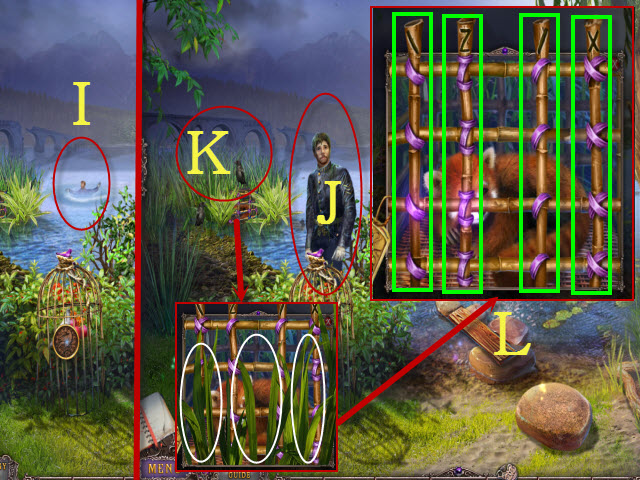
- Walk forward.
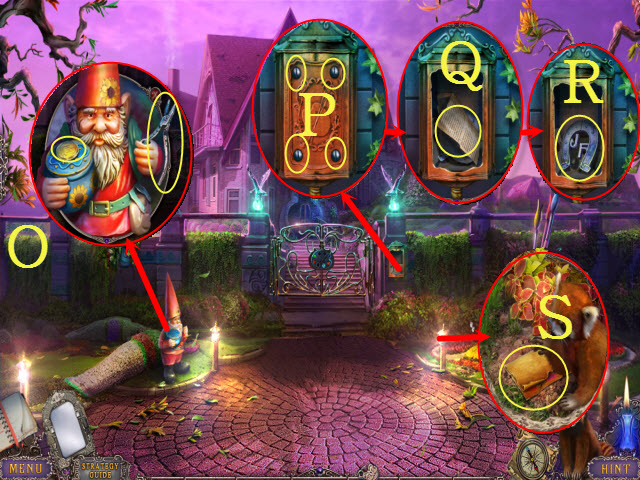
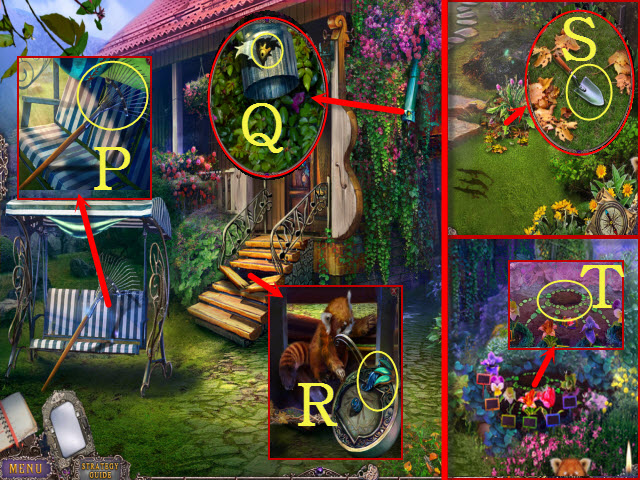
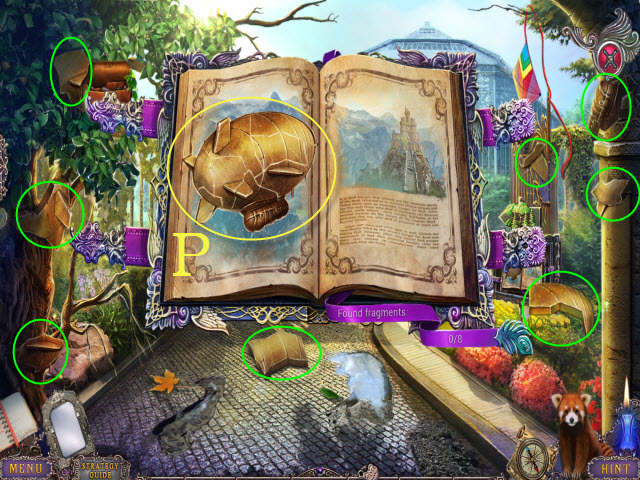
- Talk to the Policeman (P).
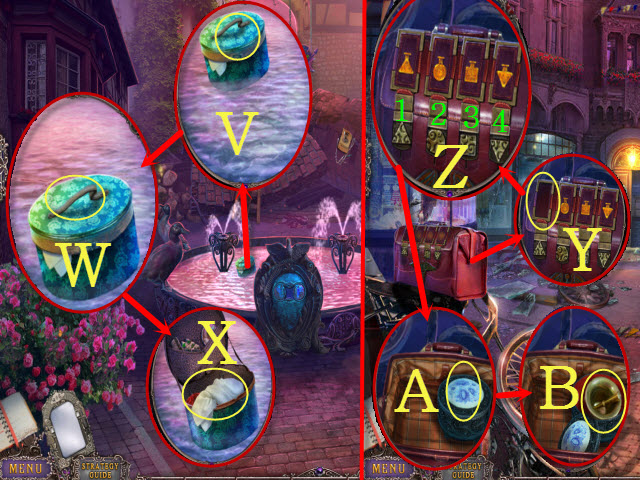
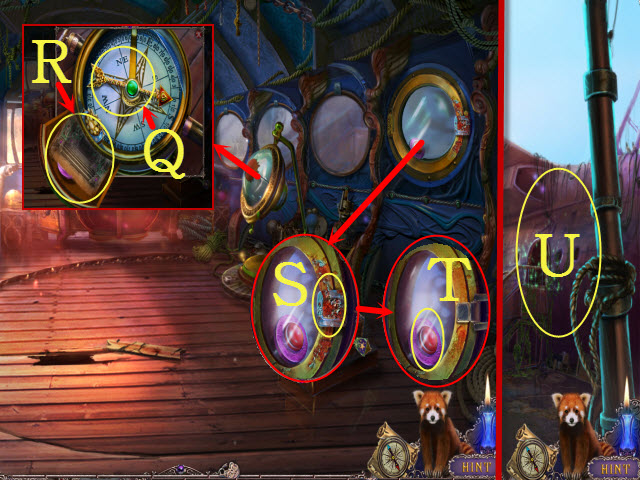
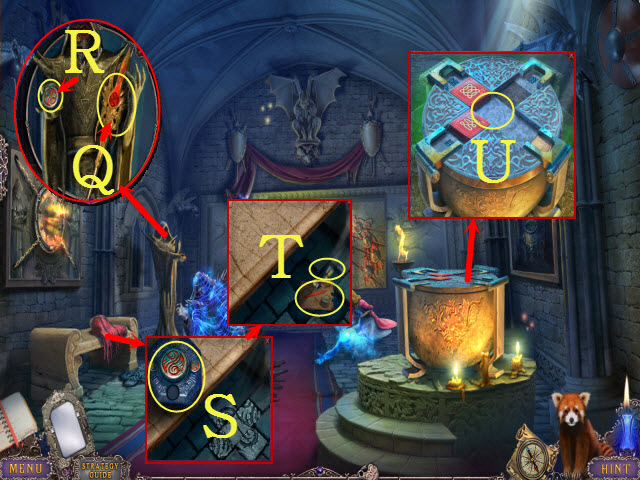
- Move the leaf; take the SPOON (Q).
- Use the LIFE BUOY WITH ROPE (R).
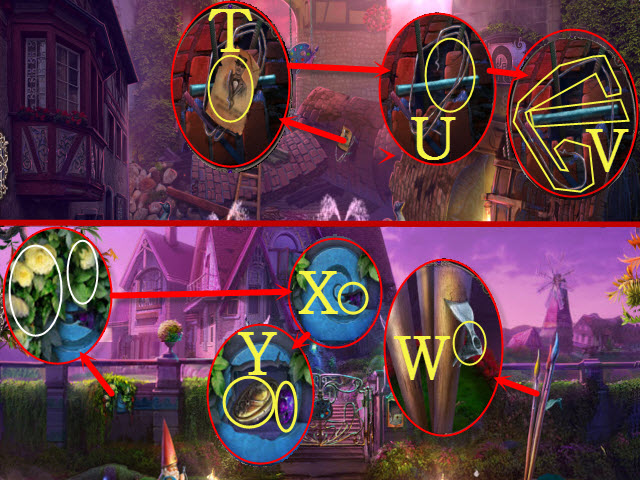
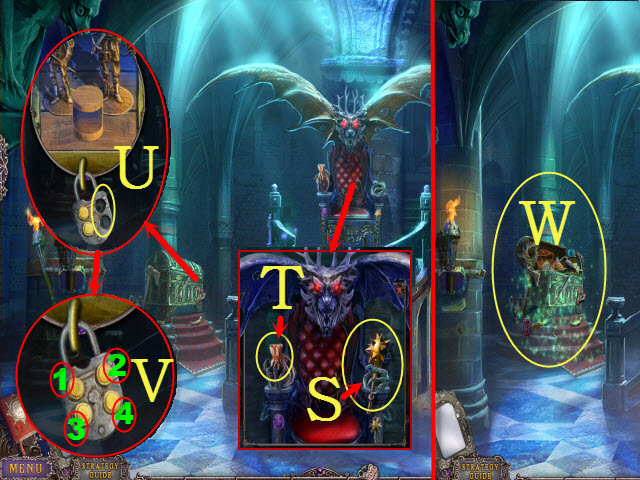
- Take the map (S) and BIRD EMBLEM HALF (T).
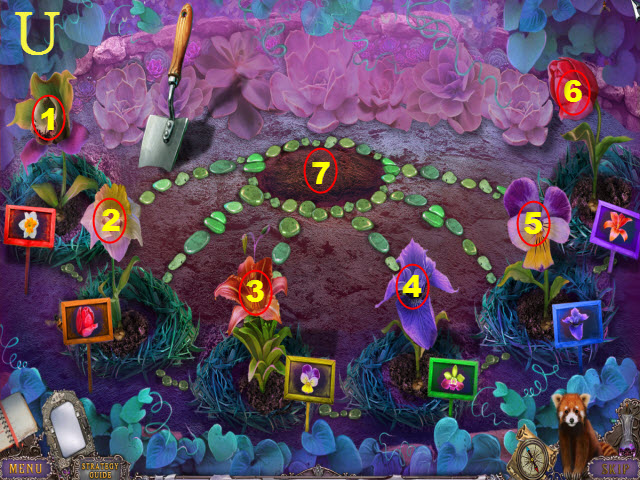
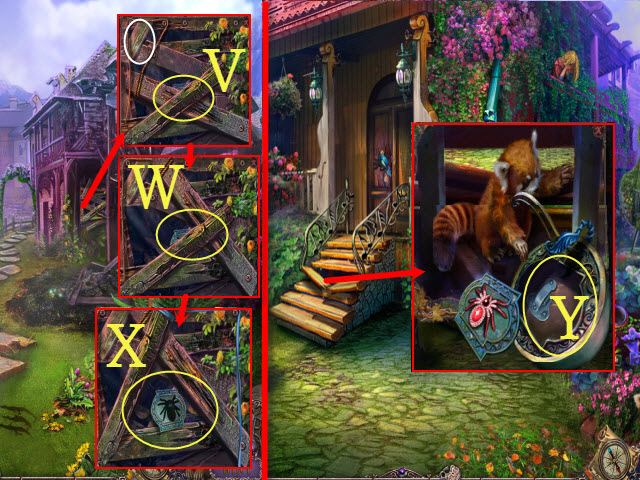
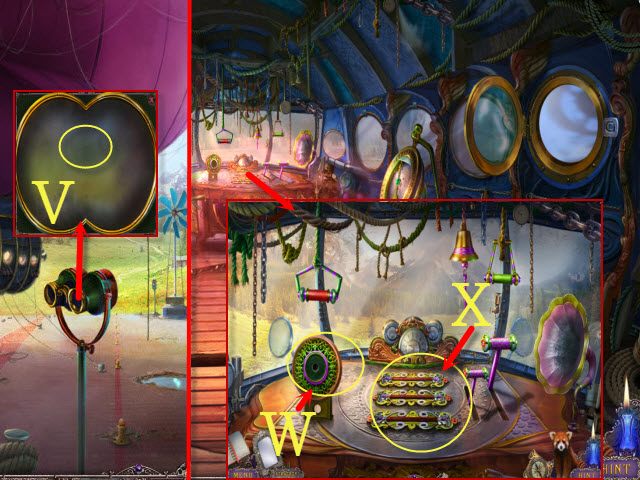
- Read the newspaper (U); move the strings (white).
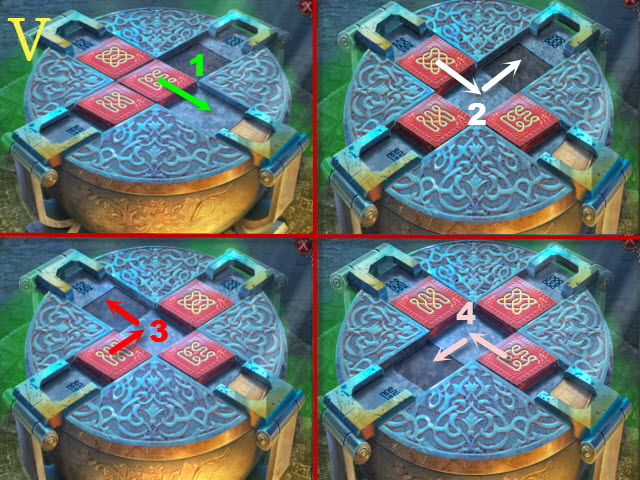
- Play the HOP (V); receive the BIRD EMBLEM HALF.
- Walk down.
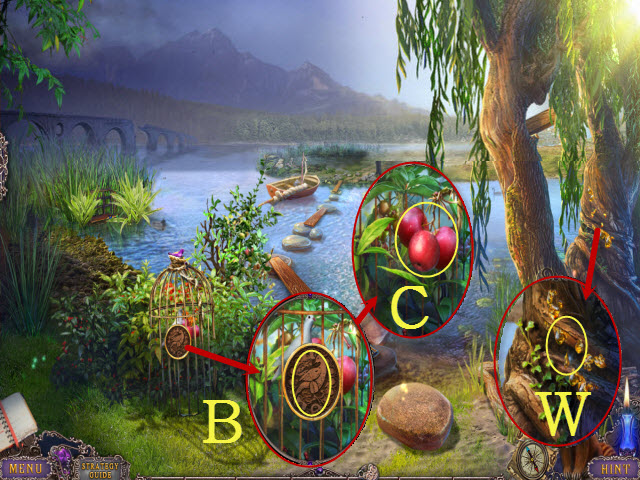
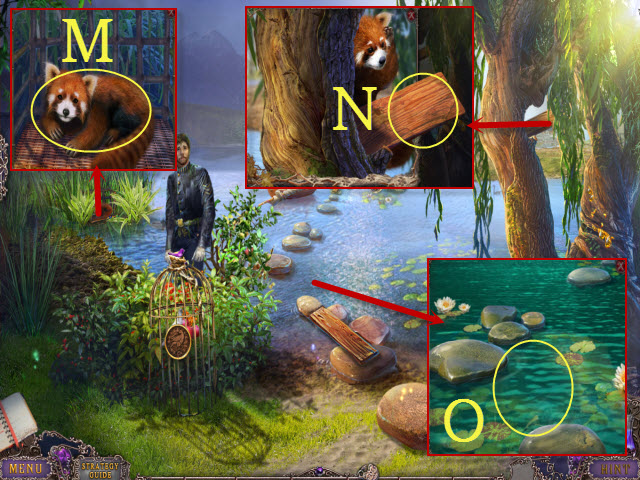
- Use the SPOON; receive the SPOON WITH RESIN (W).
- Place the BIRD EMBLEM HALFS together; select them and place the SPOON WITH RESIN. Select the emblems; receive the BIRD EMBLEM (inventory).
- Place the BIRD EMBLEM (B).
- Open the cage; take the APPLES (C).
- Walk forward.
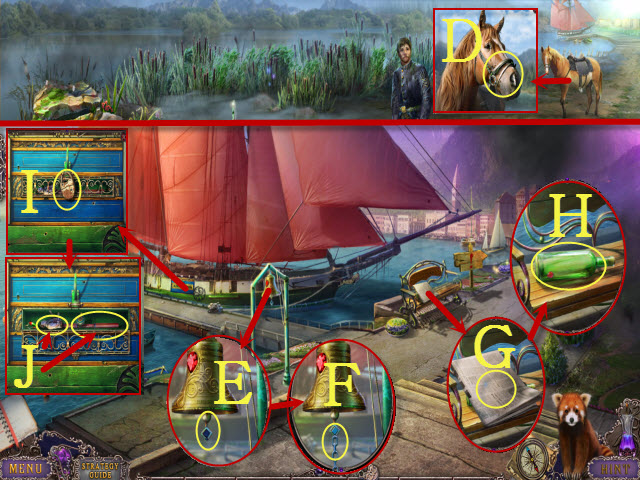
- Use the APPLES (D); speak with the Policeman to receive the GUN.
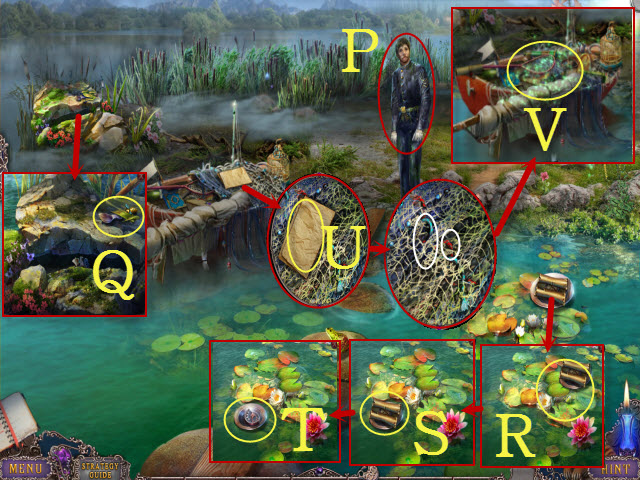
- Walk forward.
- Place the CHAIN (E); pull it twice (F) to receive the RED GEM.
- Read through the newspaper (G); take the CLOSED BOTTLE (H).
- Use the GUN (I).
- Take the STATUE PART and FOLDED FISHING ROD (J).
- Walk down.
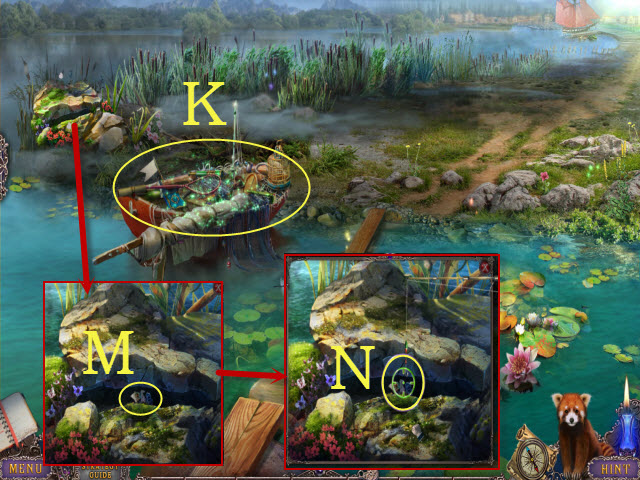
- Play the HOP (K); receive the BLUE SEASHELL.
- Select FOLDED FISHING ROD reel 4x; receive the FISHING ROD (inventory).
- Use the FISHING ROD (M); select the target when the reticle turns green (N).
- You receive the METAL SHIP.
- Walk forward.
- Place the METAL SHIP (O).
- Move the lid (P); take the CORKSCREW (Q).
- Use the CORKSCREW on the CLOSED BOTTLE; select the bottle and take the RED GEM (inventory).
- Place the BLUE SEASHELL (T) and two RED GEMS (U).
- Walk forward.
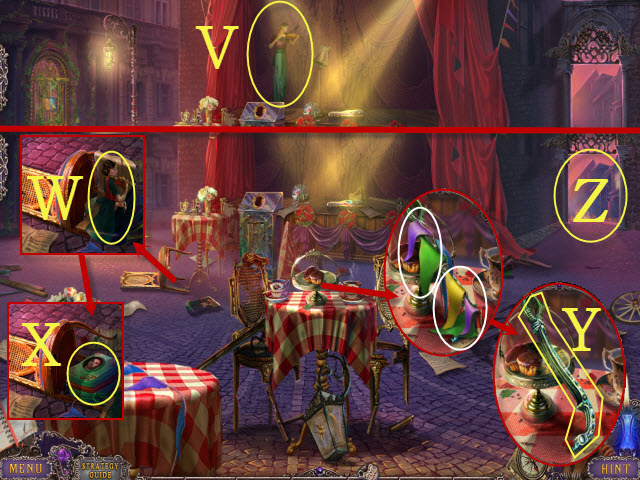
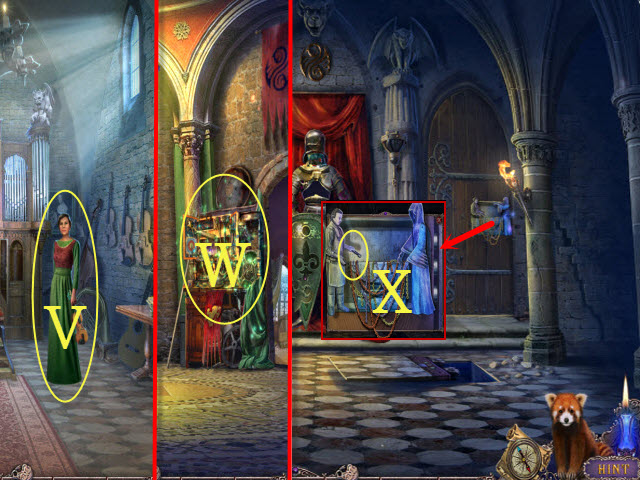
- Talk to the Musician (V).
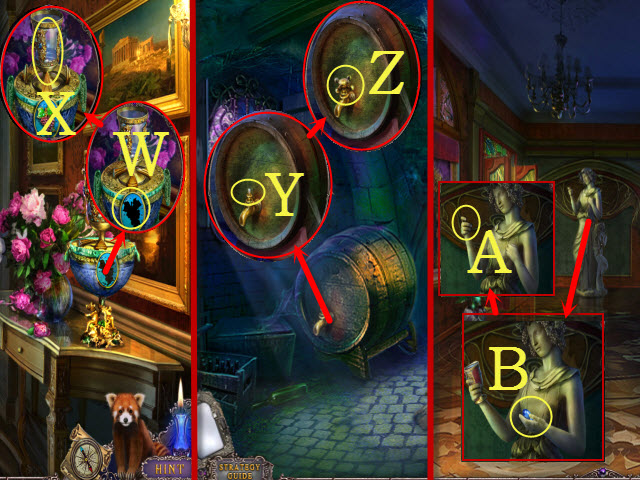
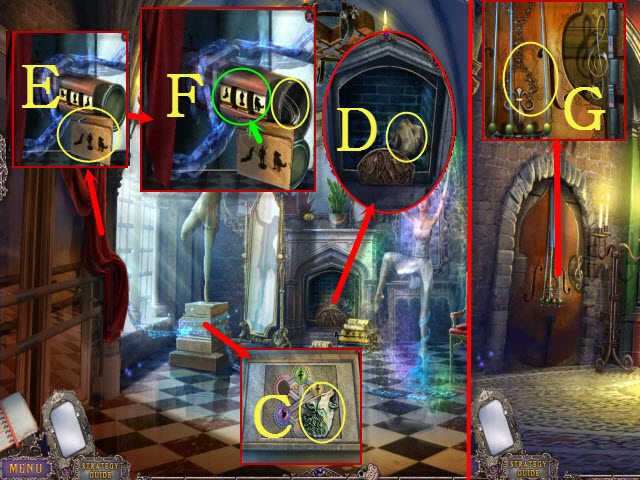
- Move the picture (W); take the BAG (X).
- Move the flags (white); take the PUMP HANDLE (Y).
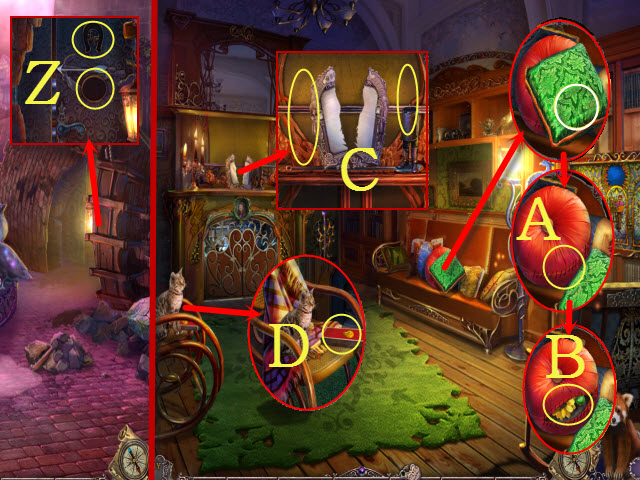
- Select the archway (Z).
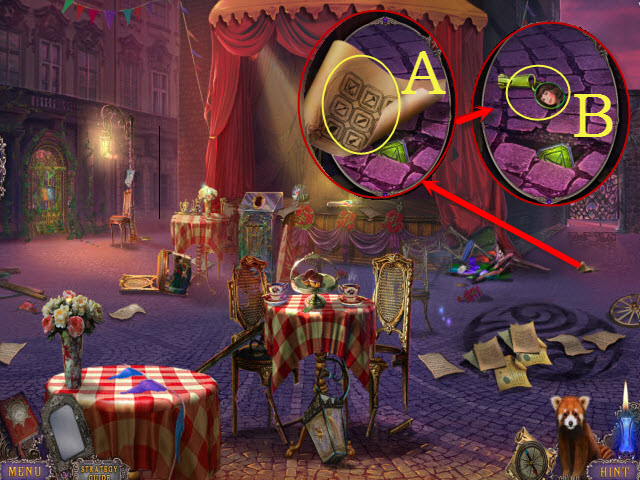
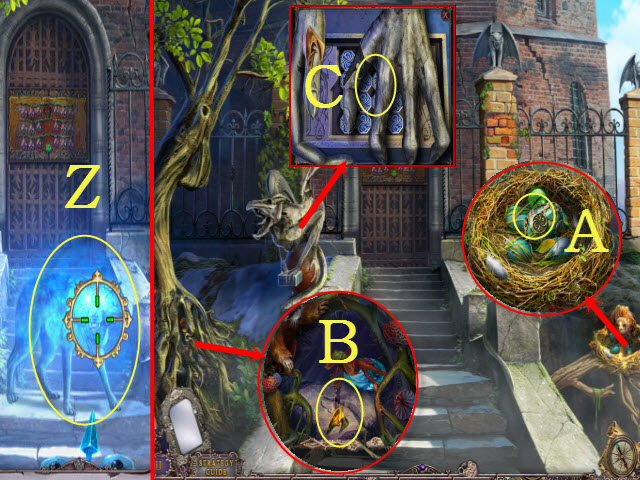
- Take the GATE CODE (A) and ZIPPER PULL (B).
- Place the ZIPPER PULL on the BAG. Select the zipper twice; take the MIRROR, MAGNET, and FILE (inventory).
- Return the pieces of the MIRROR; select it (inventory).
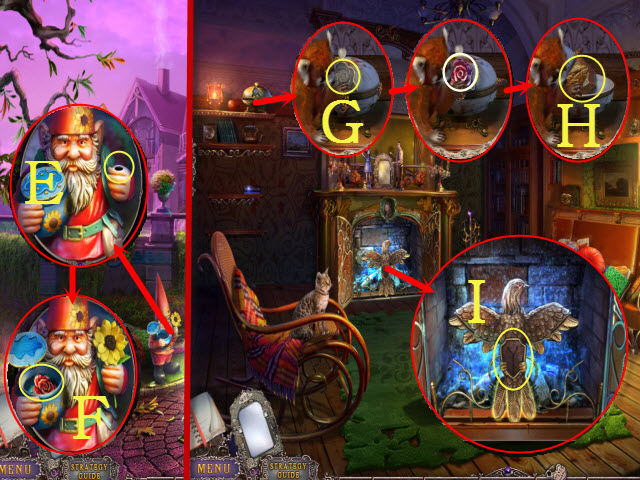
- Talk to the Huntress (G).
- Use the MAGNET (H); receive the GATE BUTTON.
- Place the GATE BUTTON (I).
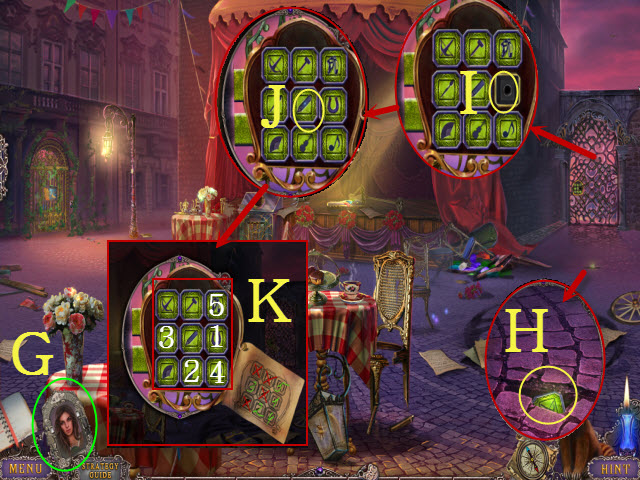
- Select the nine squares on the GATE CODE; take the GATE CODE (inventory).
- Place the GATE CODE (J); solution: 1-5 (K).
- Walk right to the City Square: Shops.
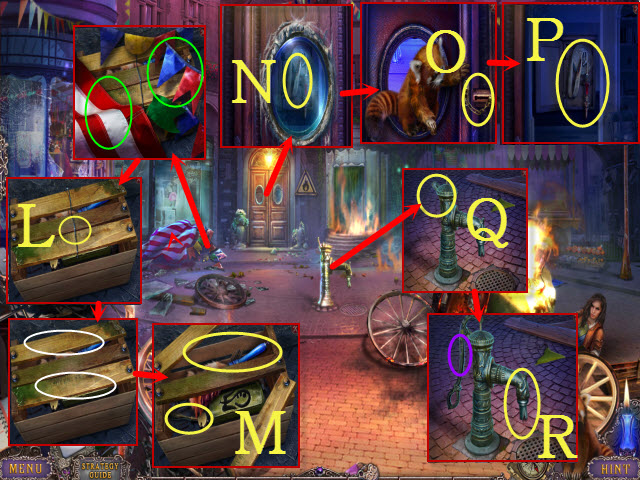
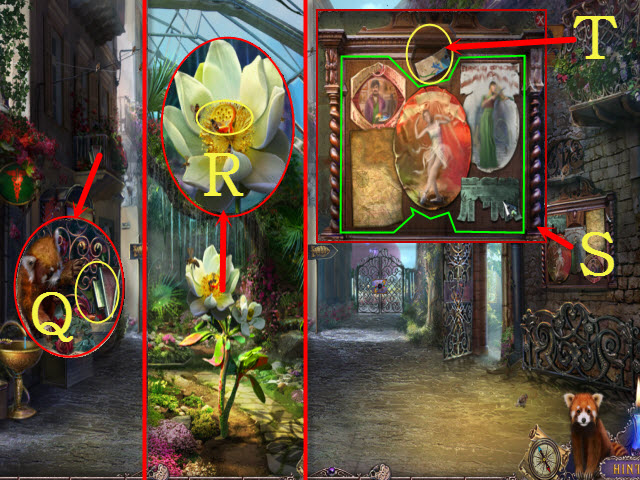
- Move the flags (green); use the FILE (L).
- Move the two boards (white); take the DUSTER and GLASS CUTTER (M).
- Use the GLASS CUTTER (N).
- Select the chain twice (O).
- Take the HOSE (P).
- Place the PUMP HANDLE (Q); select it (purple) and place the HOSE (R).
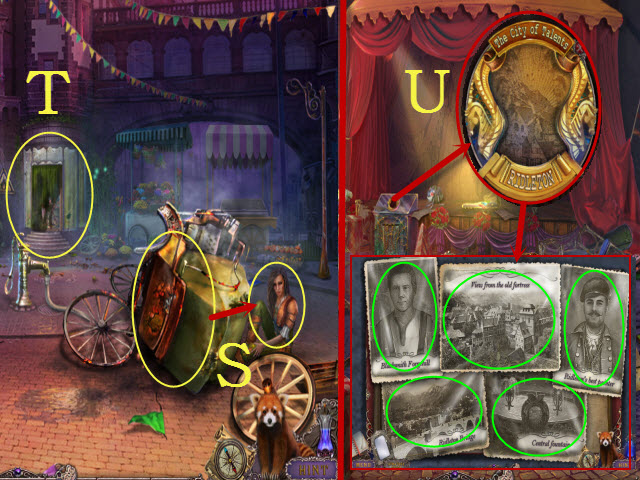
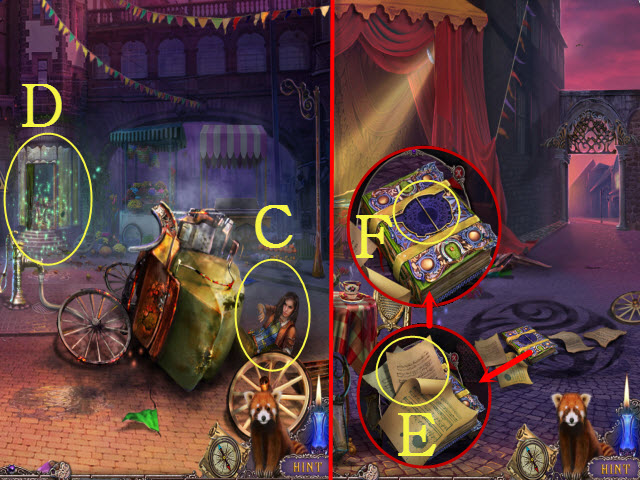
- Move the carriage; talk to the Huntress (S).
- Move the curtain to play the HOP (T); receive the PICTURE PIECES.
- Examine the PICTURE PIECES; select them twice and take the RIDLETON EMBLEM (inventory).
- Walk down.
- Place the RIDLETON EMBLEM (U).
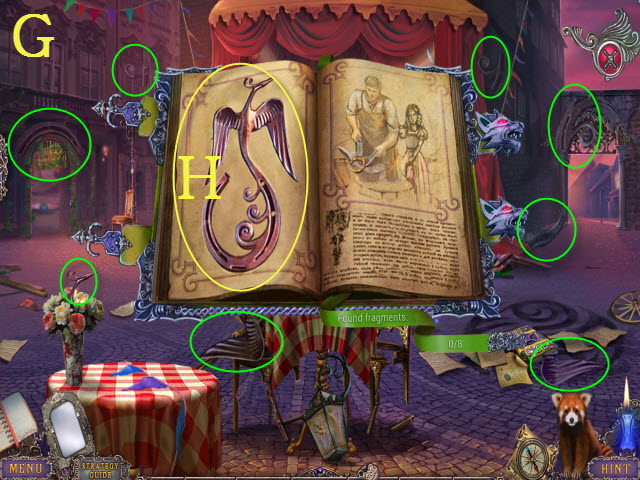
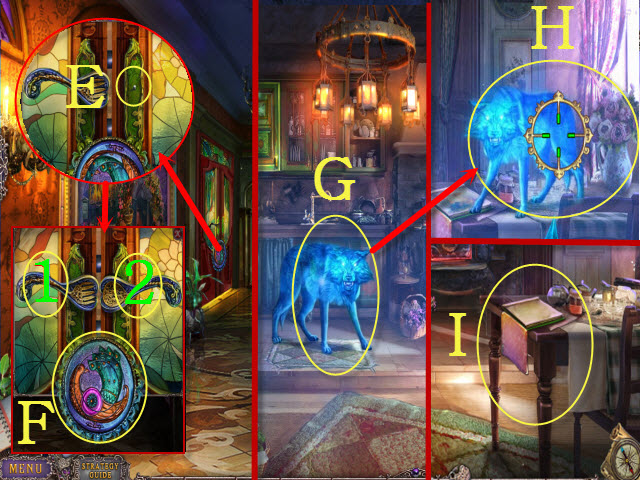
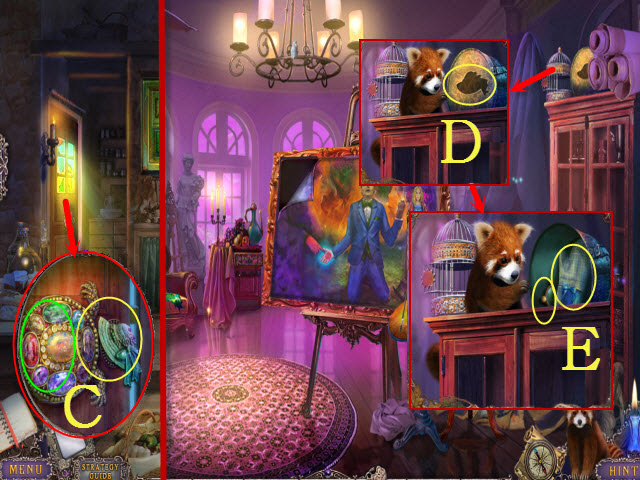
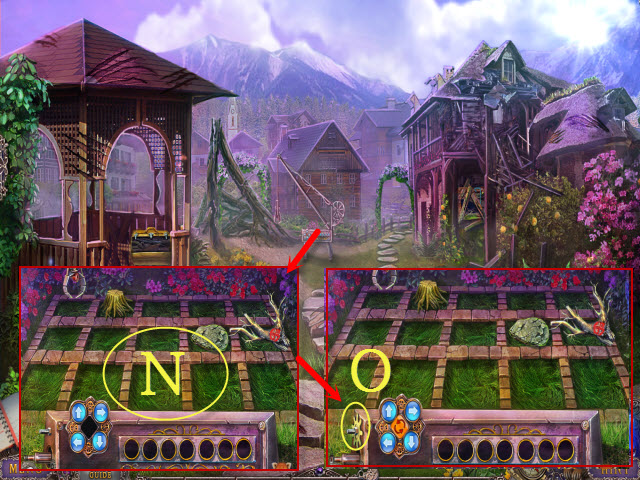
- Clear the photos (green).
- Play the HOP; receive the ANVIL PART and WOLF EMBLEM.
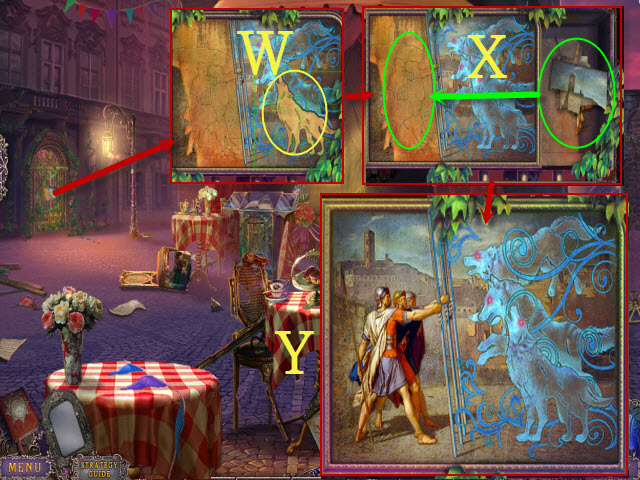
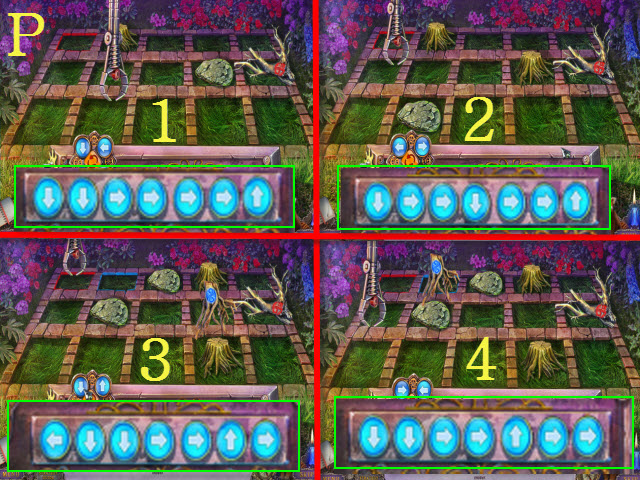
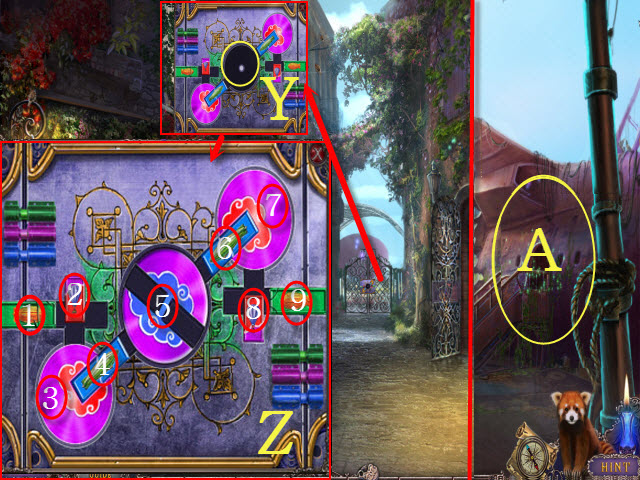
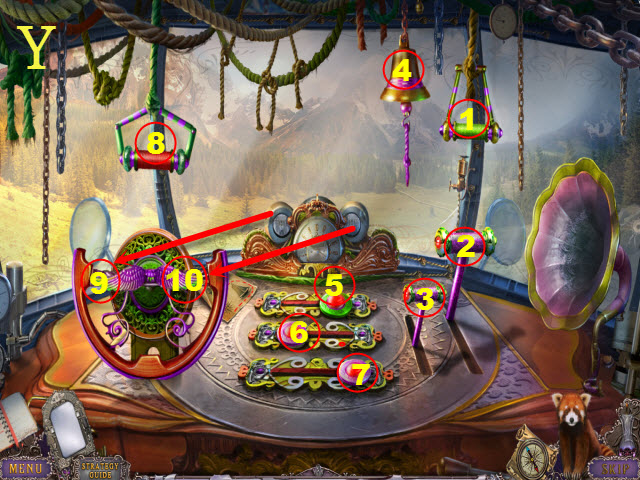
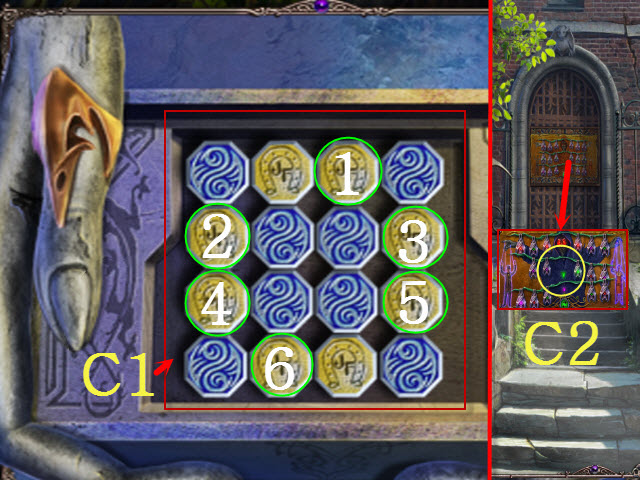
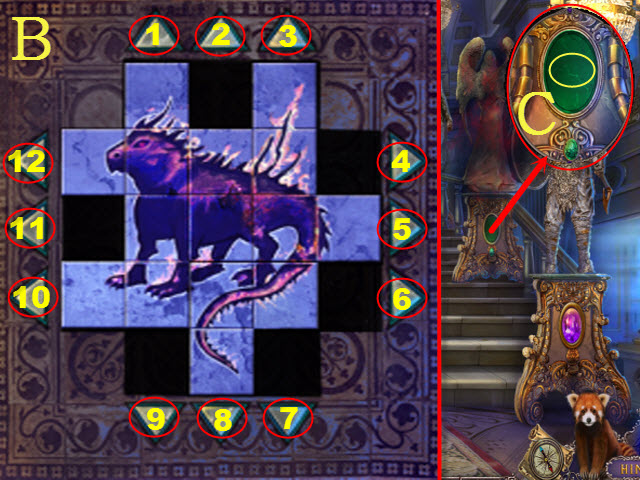
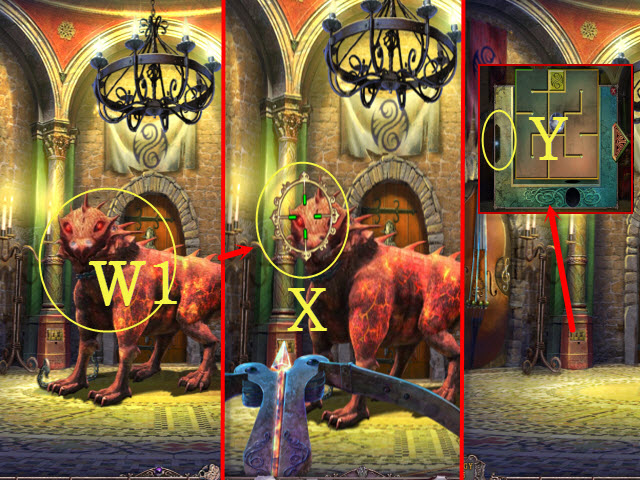
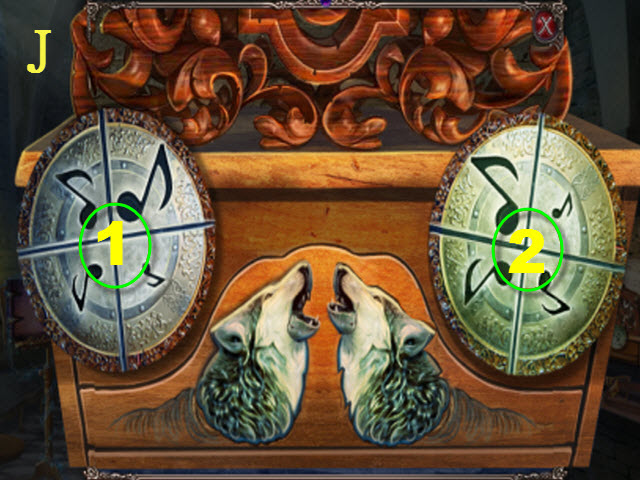
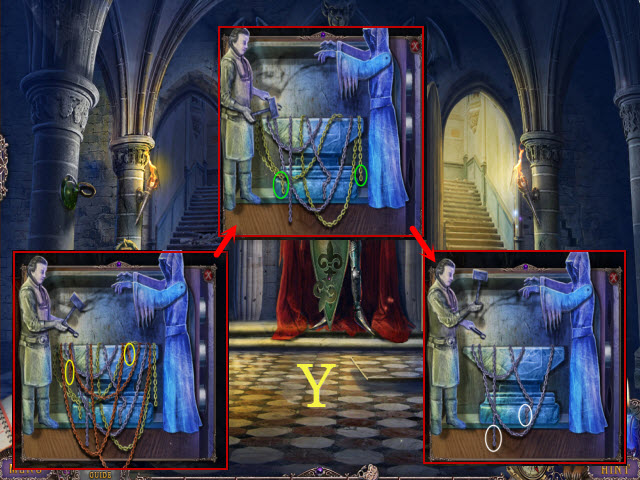
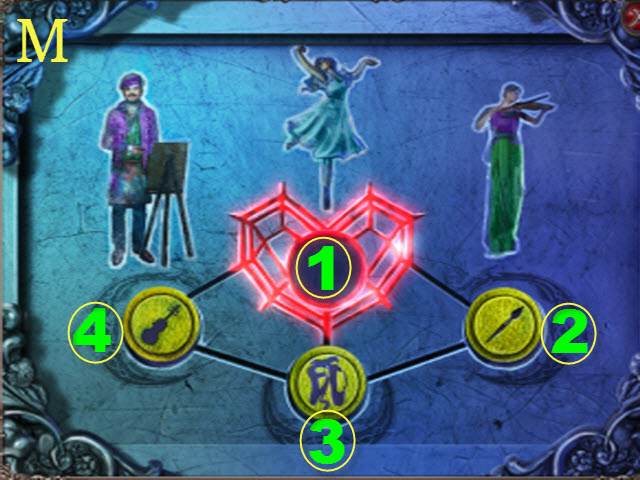
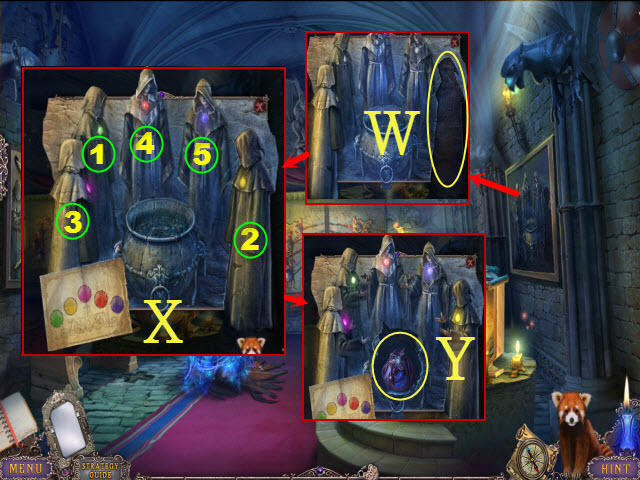
- Place the WOLF EMBLEM (W) for a mini-game (X).
- Solution: (Y).
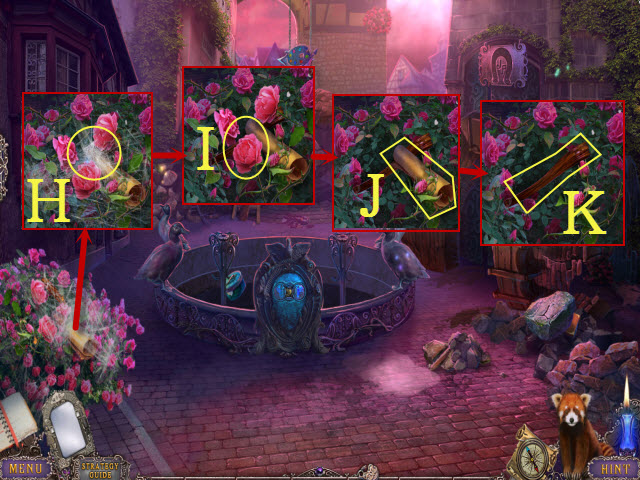
- Walk left to the Fountain Courtyard.
Chapter 2: The Fountain
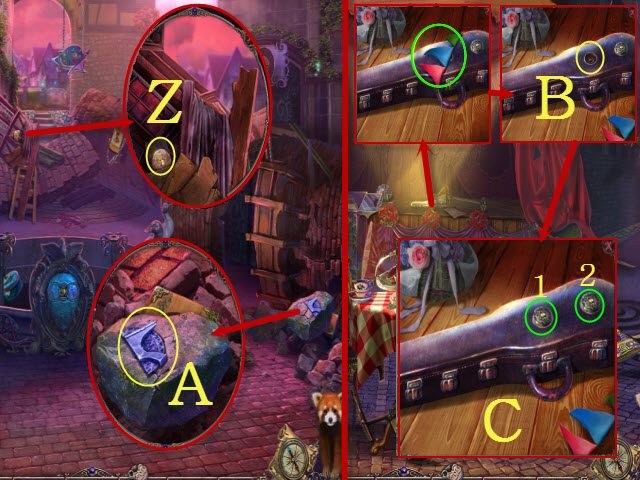
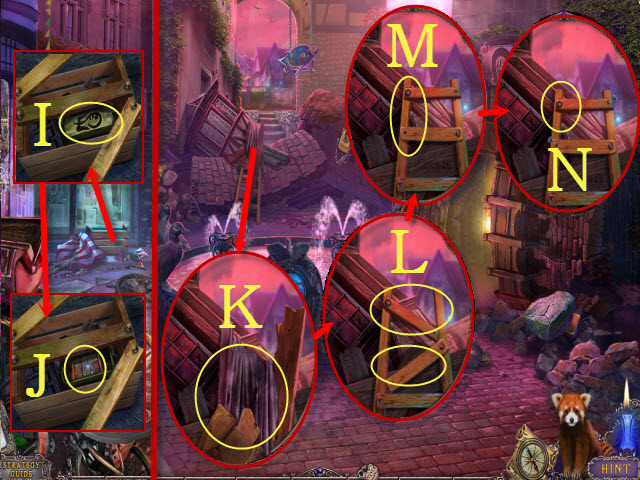
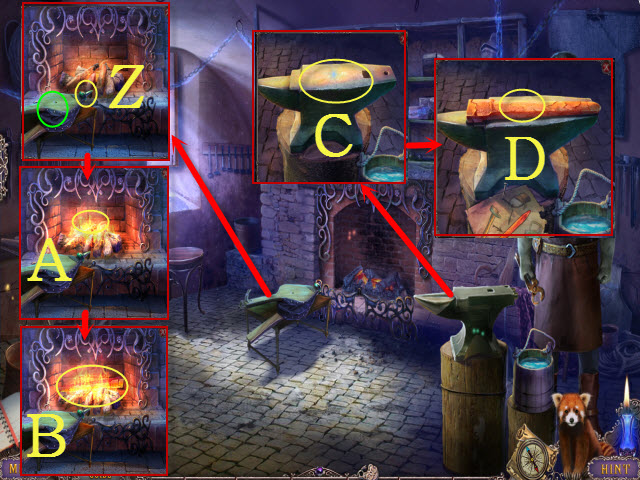
- Take the CASE BUTTON (Z).
- Take the ANVIL PART (A).
- Walk down.
- Move the flag (green); place the CASE BUTTON (B) for a mini-game.
- Solution: 2-2-1-2-1 (C).
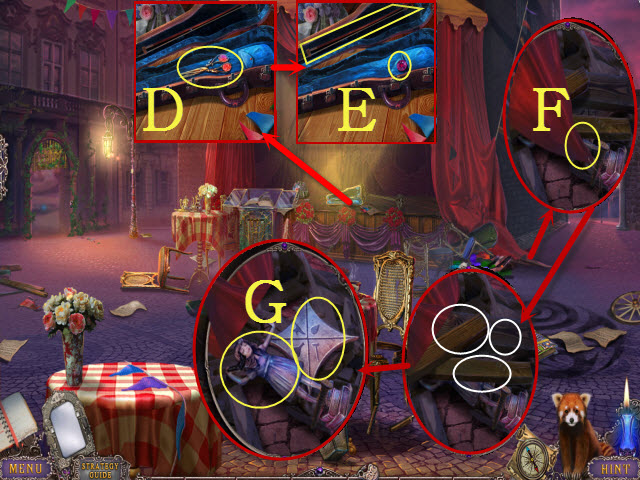
- Take the SCISSORS (D).
- Open the bag; take the 1/3 GEMS and FIDDLESTICK (E).
- Use the SCISSORS (F).
- Move the boards 3x (white); take the STATUE and TILE (G).
- Walk left.
- Use the DUSTER (H).
- Use the SCISSORS (I); receive the ROSES.
- Select the recipe twice (J).
- Take the CHAIR LEG (K).
- Select the ROSES 4x to receive the ROSE PETALS (inventory).
- Walk down.
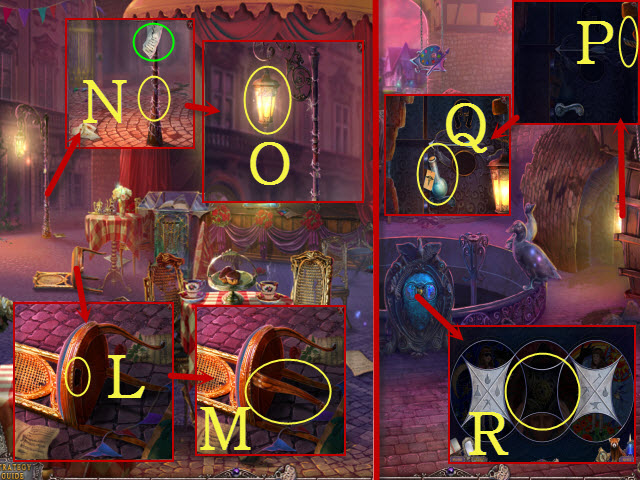
- Place the CHAIR LEG (L); take the CHAIR (M).
- Read the paper (green); place the CHAIR (N).
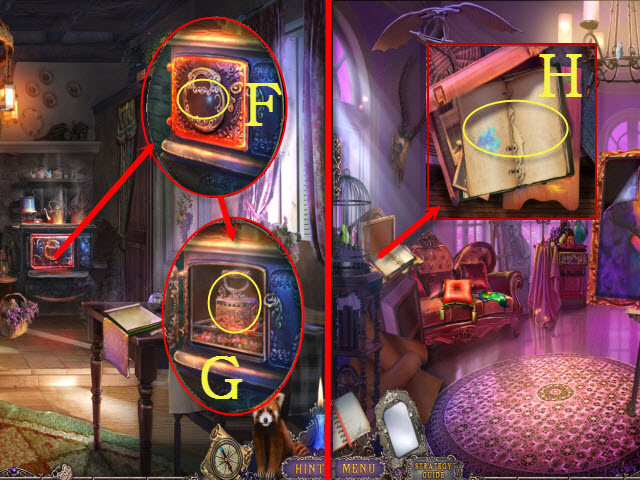
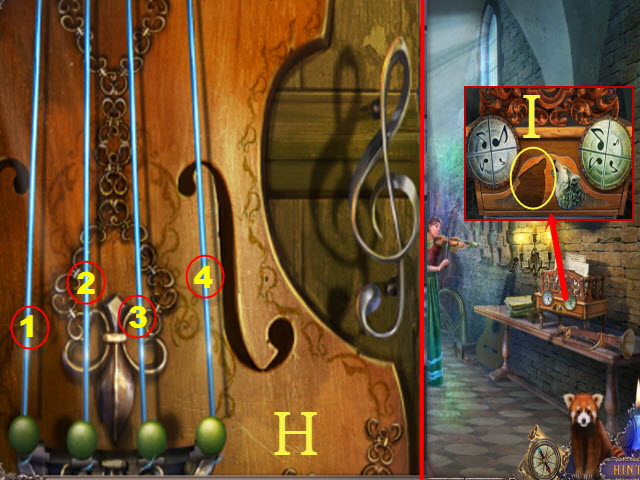
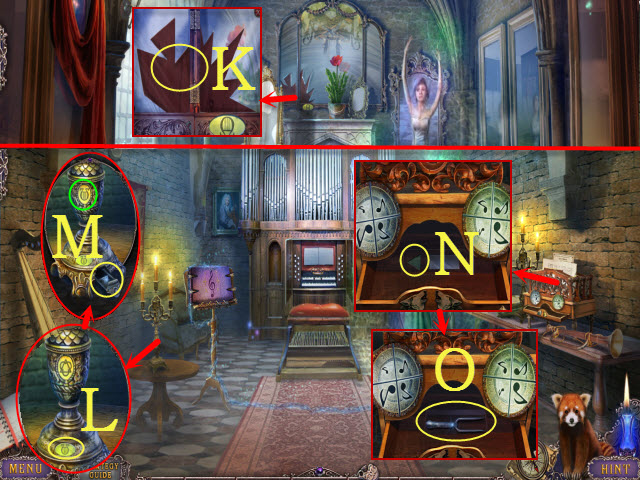
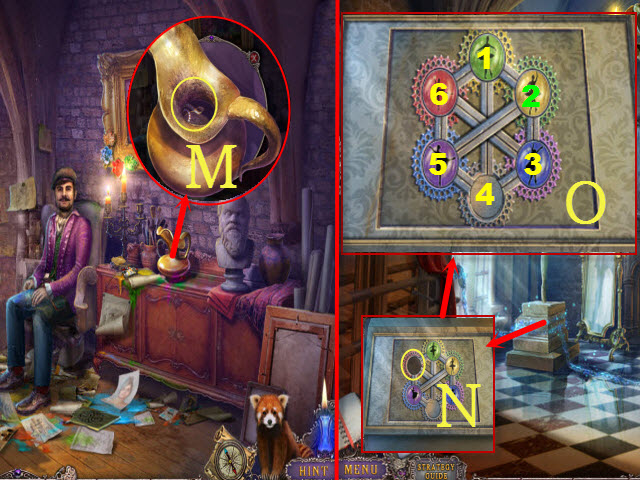
- Use the FIDDLESTICK (O); receive the LANTERN.
- Walk left.
- Place the LANTERN (P); take the MEDICINE BOTTLE (Q).
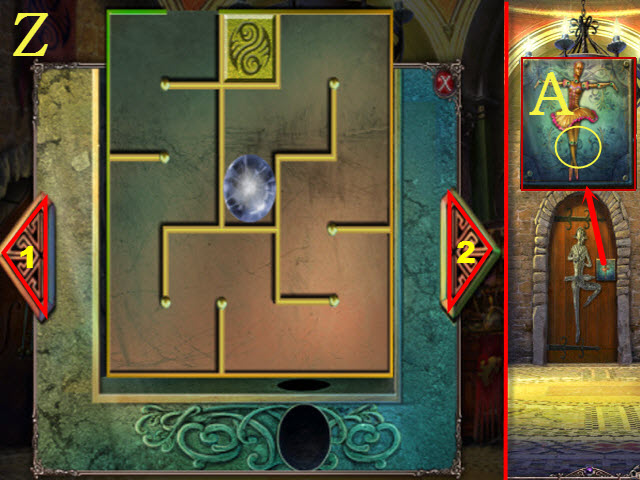
- Place the TILE for a puzzle (R).
- Solution: (S); 2-2-2-1-1-2-2-3 (T).
- Take the BAG BUTTON.
- Use the FIDDLESTICK (V).
- Open the lid (W); take the SCARF (X).
- Go to the City Square: Shops.
- Place the BAG BUTTON (Y); enter: 4-2-1 (Z).
- Open the lid (A); take the MORTAR AND PESTLE (B).
- Place the ROSE PETALS in the MORTAR AND PESTLE; select it twice and take the GROUND ROSE PETALS (inventory).
- Open the MEDICINE BOTTLE; place the GROUND ROSE PETALS. Select the bottle 4x to receive the MEDICINE (inventory).
- Select the SCARF 3x and use the MEDICINE on it; take the BANDAGE WITH MEDICINE (inventory).
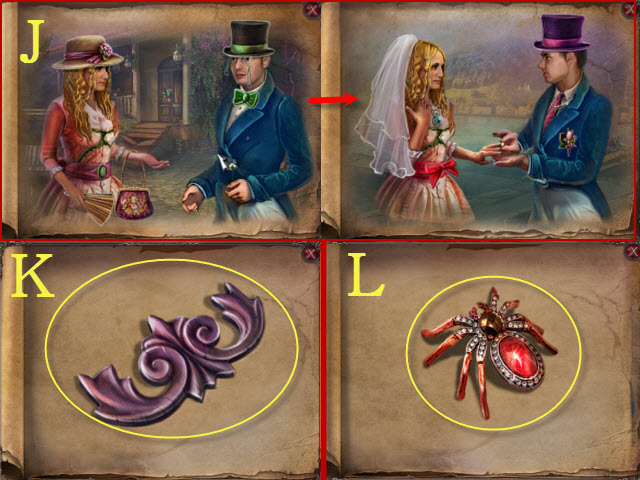
- Give the BANDAGE WITH MEDICINE to the huntress (C); receive the BROKEN CROSSBOW.
- Play the HOP (D); receive the SHOE.
- Walk down.
- Move the music sheets (E); place the two ANVIL PARTS (F).
- Find the fragments (G); take the BIRD SYMBOL (H).
- Walk right.
- Place the BIRD SYMBOL (I); take the PLATE WITH NAILS (J).
- Select the PLATE WITH NAILS 5x; receive the NAILS (inventory).
- Go to the Fountain Courtyard.
- Clear the debris (K); select the rungs twice (L).
- Place the NAILS (M); use the SHOE (N).
- Climb up to the Painter's House Entrance.
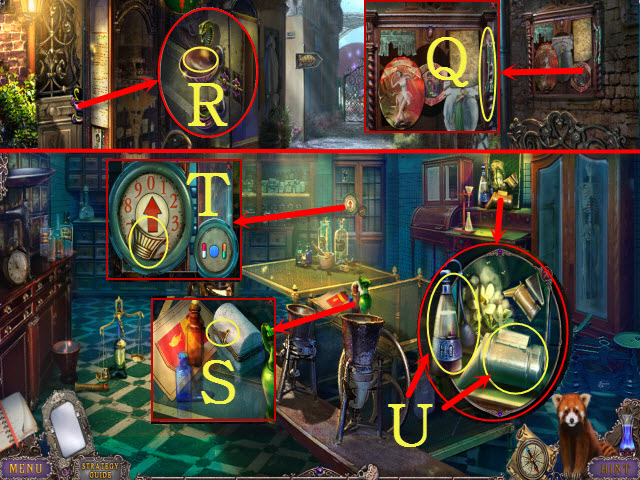
- Take the COIN and PLIERS (O).
- Use the COIN 4x (P).
- Read the paper; take it (Q) and the BLACKSMITH FIGURE (R).
- Select the note (S); receive the GEM PALLET CODE.
- Walk down.
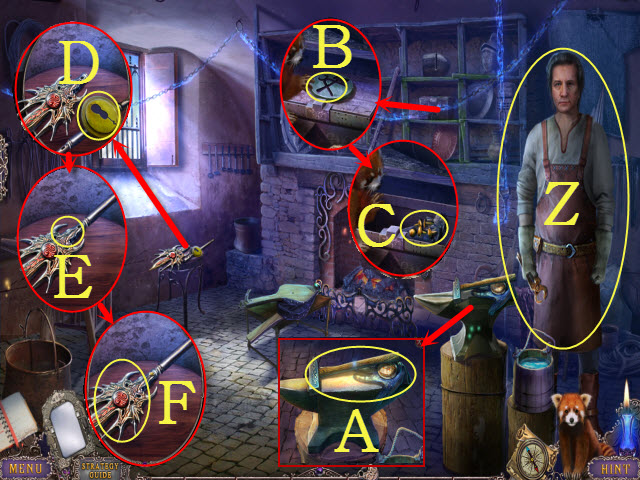
- View the poster (T); use the PLIERS twice (U).
- Take the WIRE and AX HANDLE (V).
- Climb up.
- Place the AX HANDLE (W); receive the BROKEN AX.
- Place the WIRE with the BROKEN AX; select the ax 3x to receive the AX (inventory).
- Move the two leaves (white); use the AX (X); take the VESSEL KEY and 2/3 GEMS (Y).
- Walk down.
- Place the BLACKSMITH FIGURE and VESSEL KEY (Z).
- Enter John's Place.
- Move the pillow (white); use the SCISSORS (A).
- Take the FLOWER (B).
- Place the STATUE PART and STATUE (C).
- Take the MATCHBOX (D).
- Go to the Painter's House Entrance.
- Place the FLOWER (E).
- Take the ROSE FIGURE and BOW (F).
- Return to John's Place.
- Place the ROSE FIGURE (G).
- Select the lid (white); take the SHIELD (H).
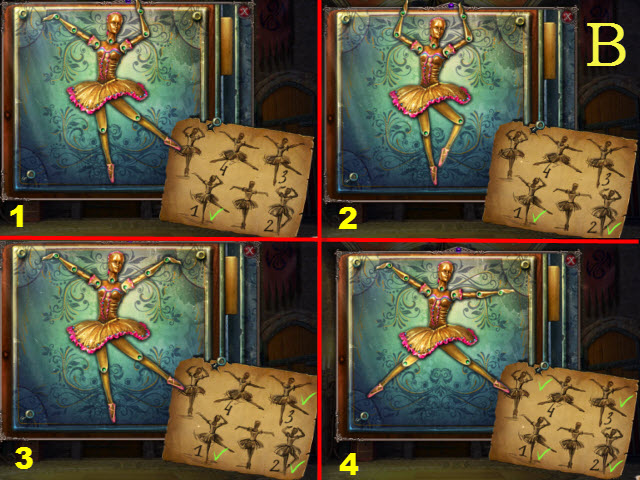
- Place the SHIELD for a mini-game (I).
- Solution: 4-6-9-5-2-6 (J).
- Move the brick (K); select the note (L).
- Take the LEVER HANDLE (M).
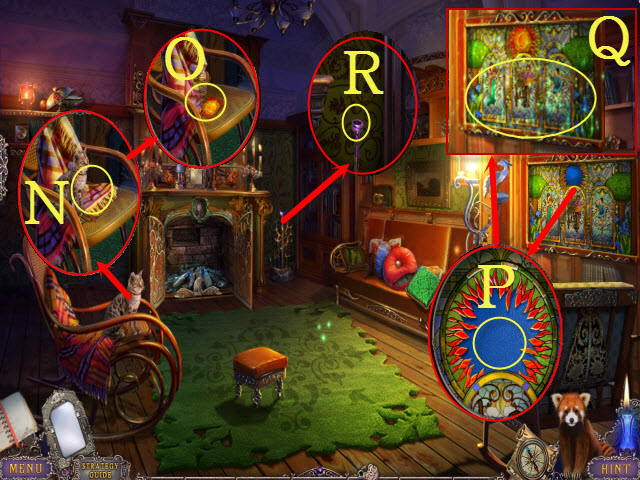
- Place the BOW (N).
- Move the blanket; take the SUN (O).
- Place the SUN (P); play the HOP (Q) to receive the MOLECULE TOKEN.
- Place the LEVER HANDLE; pull it (R).
- Enter John's Workroom.
Chapter 3: The Workroom

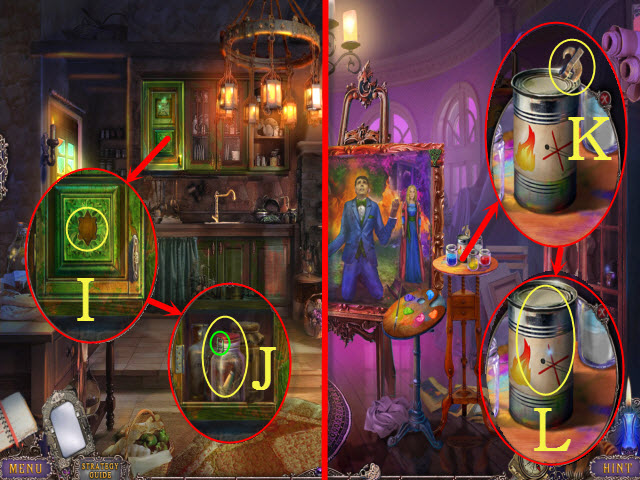
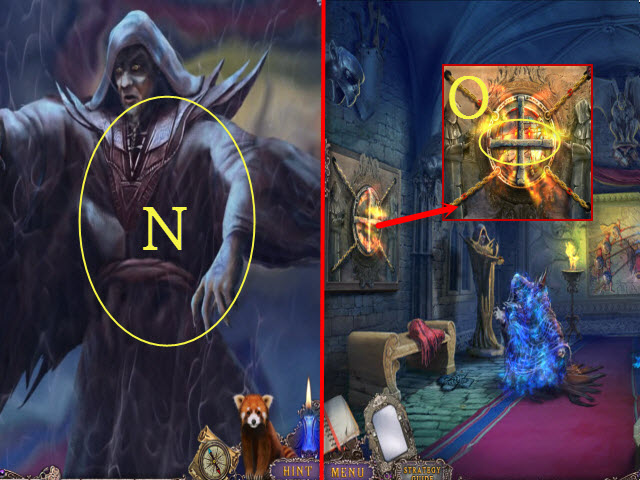
- Use the MATCHBOX (S); select the lantern.
- Select the door; use the FIDDLESTICK to take VAAL SYMBOL (T).
- Return to the Painter's House Entrance.
- Move the soil (U); place the VAAL SYMBOL (V); take the POCKET WITH STONES (W).
- Select the POCKET WITH STONES twice; take the COLORED BUTTONS and ORIGAMI (inventory).
- Fold the ORIGAMI 7x; take the ORIGAMI BIRD (inventory).
- Walk down.
- Use the AX (X); move the rocks (Y).
- Place the MOLECULE TOKEN (Z); take the 3/3 GEMS and DRAGONFLY (A).
- Go to John's Workroom.
- Place the DRAGONFLY (B).
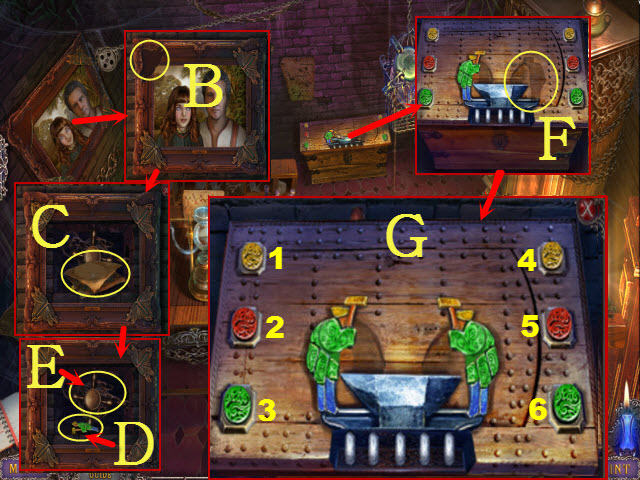
- Select the note and take it (C); take the GREEN MAN (D) and select the handle (E).
- Place the GREEN MAN for a mini-game (F).
- Solution: 1-3-2-5-4-6-3-1-6-3-2-4 (G).
- Take the 1/3 TUBE OF PAINT (H).
- Open the bag; select the pocket (I); take the TONGS (J).
- Walk down.
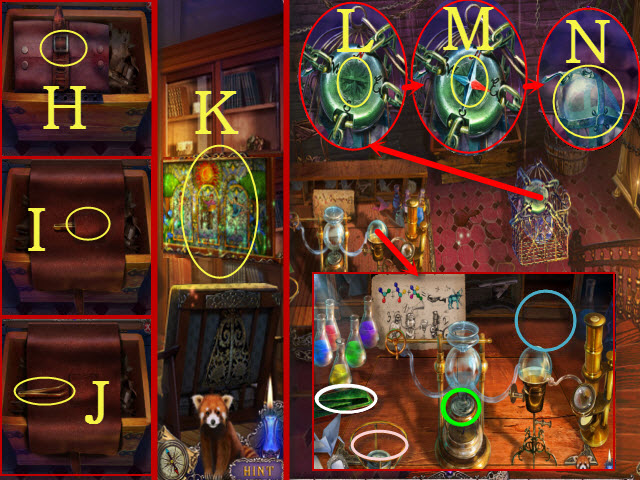
- Play the HOP (K); receive the COMPASS NEEDLE.
- Walk forward.
- Place the COMPASS NEEDLE (L); select it 3x (M) and take the CROSSBOW VESSEL (N).
- Use the MATCHBOX (green); place the ORIGAMI BIRD (blue), TONGS (white), and CROSSBOW VESSEL (pink) for a puzzle.
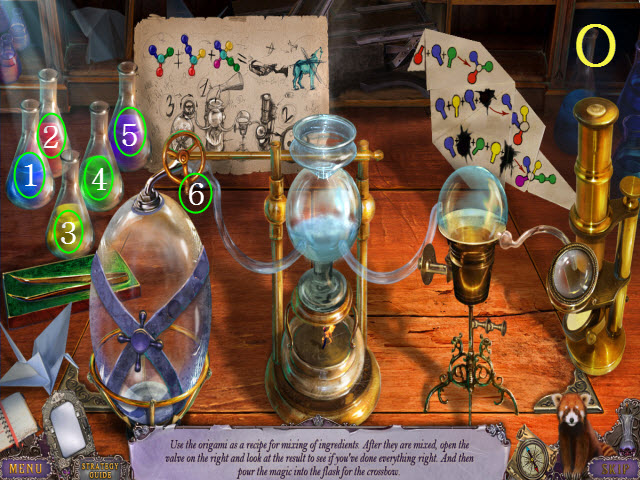
- Complete the recipe.
- Solution: 2-1-4-6-1-3-1-2-6-1-5-4-3-4-6 (O).
- You receive the FULL CROSSBOW VESSEL.
- Place the COLORED BUTTONS (P).
- Select the image (Q); take the ARROW (R).
- Place the ARROW and FULL CROSSBOW VESSEL with the BROKEN CROSSBOW; take the CROSSBOW (inventory).
- Return to the Painter's House Entrance.
- Place the 3/3 GEMS and GEM PALLET CODE for a mini-game (S).

- Solution: 1-4-7-3-2-1-2-5-6-7 (T).
- Walk forward.
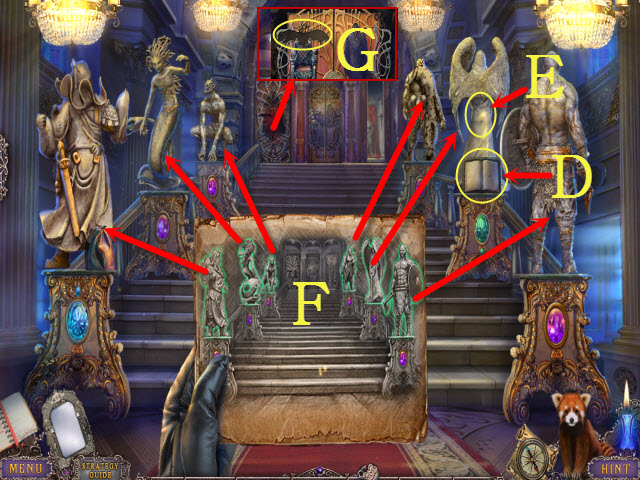
- Use the CROSSBOW; when the reticle turns green, select the target (U).
- Talk to the Huntress (V).
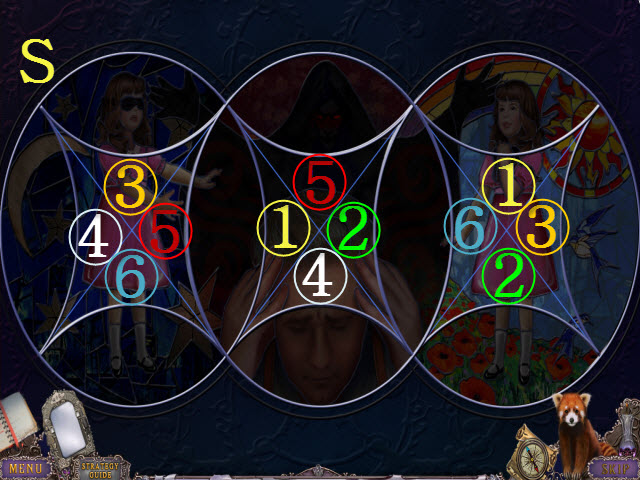
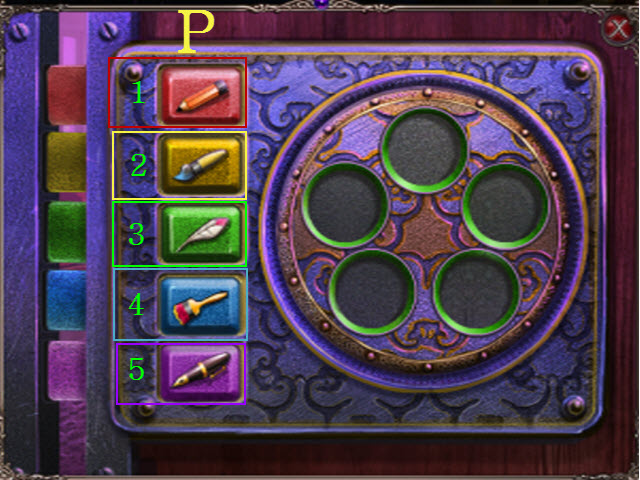
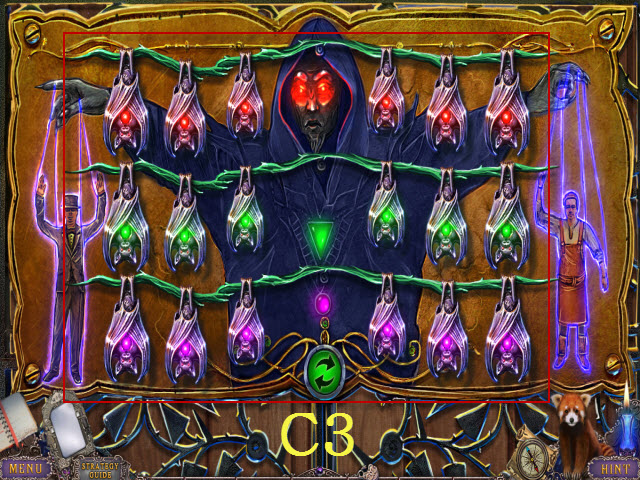
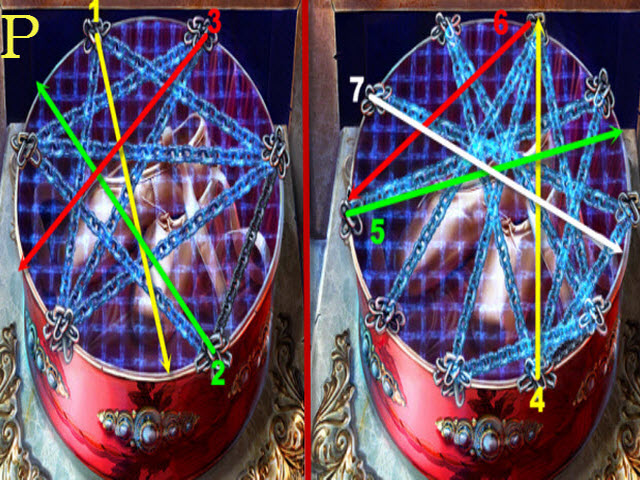
- Align the icons (W) for a mini-game.
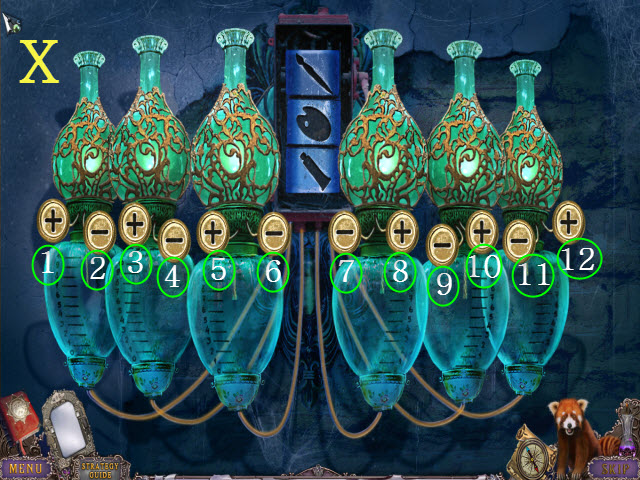
- Please see the screenshot (X).
- Solution: 1-1-2-2-1-1-2-3-3-3-3-4-3-3-5-5-5-6-5-6-5-8-8-8-7-8-10-10-10-9-12-12-11-12.
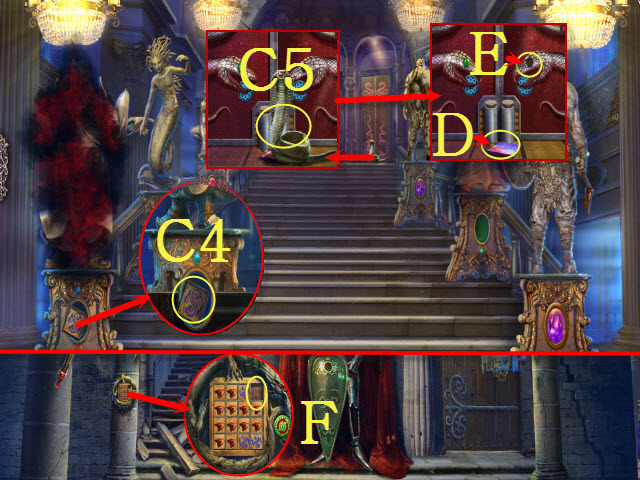
- Take the PALETTE (Y).
- Place the PALETTE; select it (Z).
- Take the MAGNIFYING GLASS and CANE (A).
- Play the mini-game (B).
- This puzzle is random.
- Here is one possible solution: 10-9-5-1-6-7-11-8-4-3-2-5-1-6-9-10-7-12-15-16-15-4-9-10-11-10-13 (C).
- Use the CANE (D).
- Climb the ladder to the Painter's House: Corridor.
- Use the MAGNIFYING GLASS (E); set to: 4-9-2 (F) and take the FEATHER (G).
- Play the HOP (H); receive the METAL CIRCLE.
- Take the AFRICA (I).
- Take the 2/3 TUBE OF PAINT (J).
- Walk down.
- Place the FEATHER (K).
- Take the BLUE BUTTON and GRAPES (L).
- Place the AFRICA (M); take the METAL STAR and PUZZLE PART (N).
- Climb up.
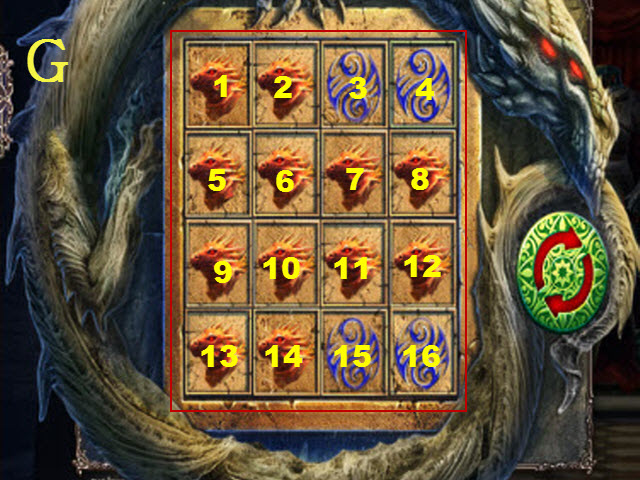
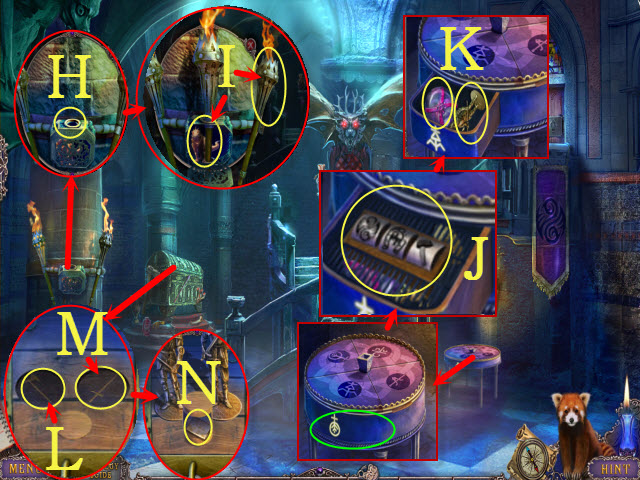
- Place the BLUE BUTTON and METAL CIRCLE for a mini-game (O).
- Solution: 1-5-3-3-2-4-4-1-3-5-4-2-1-1-5-2-4-3 (P).
- Walk right to the Painter's House: Studio.
Chapter 4: The Studio
- Place the METAL STAR (Q); open the cage.
- Take the DOOR HANDLE (R).
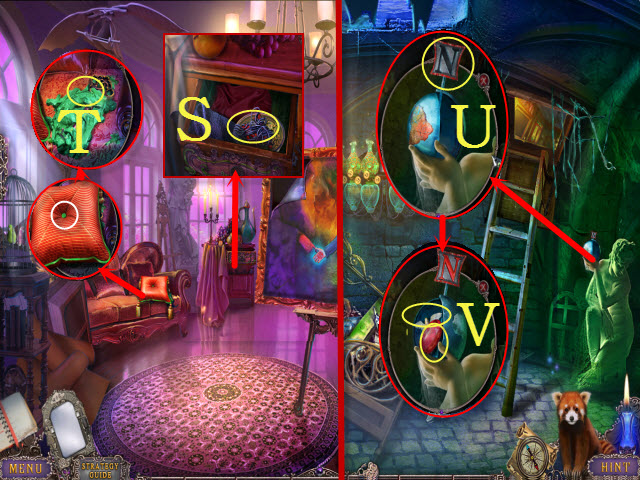
- Take the FLATIRON (S); open the book and take BUTTERFLY (T).
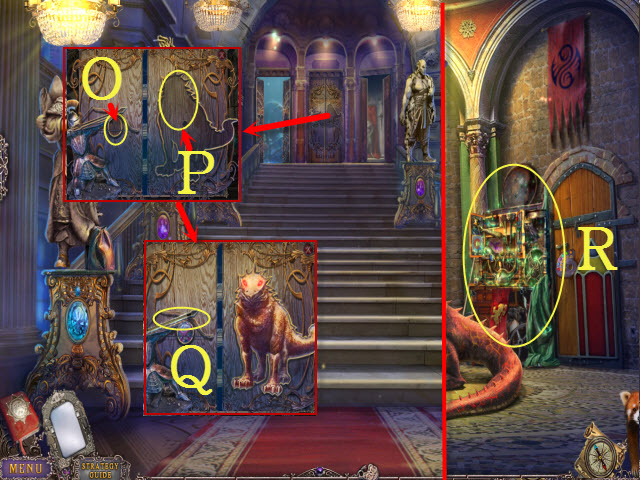
- Place the PUZZLE PART for a mini-game (U).
- Solution: (V).
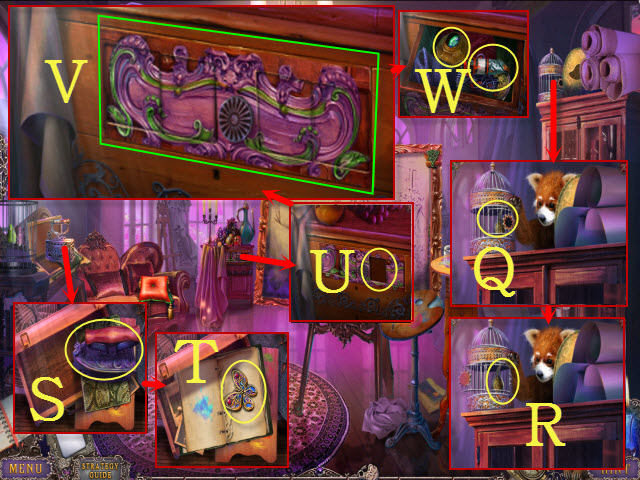
- Take the 3/3 TUBE OF PAINT and CHEST (W).
- Walk down.
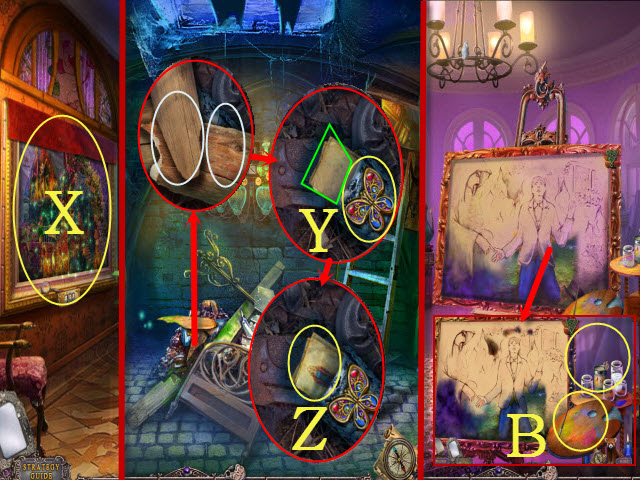
- Play the HOP (X); receive the 1/4 ARTIST'S PAGE.
- Walk down.
- Move the boards (white); place the BUTTERFLY (Y) and open the lid.
- Read the note (green); take the SKETCH (Z).
- Return to the Painter's House: Studio.
- Place the 3/3 TUBE OF PAINT and SKETCH for a puzzle (B).

- Solution: (C).
- Take the 2/4 ARTIST'S PAGE.
- Walk down.
- Place the DOOR HANDLE for a mini-game (E).
- Solution: 1-2-2-1-2-2-2-2 (F).
- Enter the Painter's House: Kitchen.
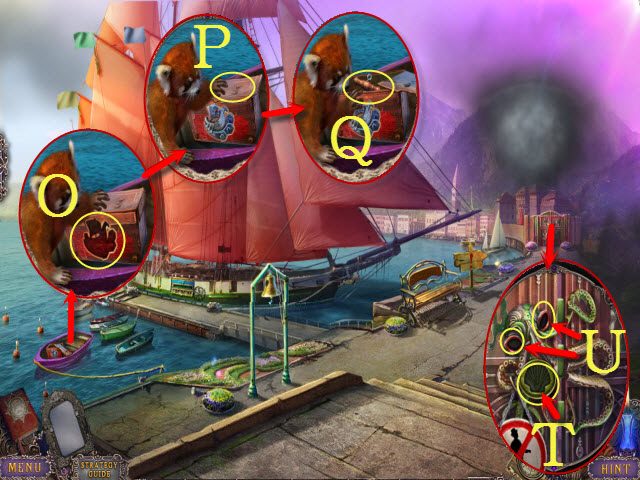
- Select anywhere and use the CROSSBOW; when the reticle turns green (G, H), select it.
- Play the mini-game (I).
- Solution: (J).
- Take the CREST (K) and SPIDER (L).
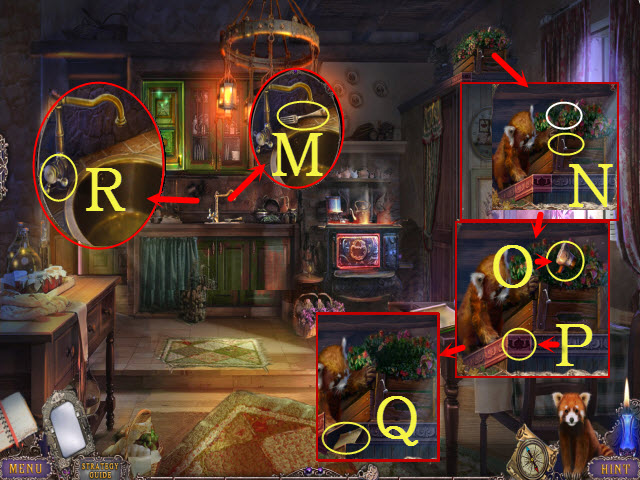
- Take the FORK (M).
- Select the shrub (white); use the FORK (N) to receive the NAIL.
- Take the MEAT HAMMER (O) and place the CREST (P); take the 3/4 ARTIST'S PAGE (Q).
- Use the MEAT HAMMER (R); receive the FAUCET HANDLE.
- Return to the Painter's House: Studio.
- Use the NAIL (S); take the NORTH.
- Move the pillow (white); use the FORK (T) to receive the KEY IN PAINT.
- Walk down twice.
- Place the NORTH (U); take the RED JEWEL and ANGEL (V).
- Open the CHEST; take the GREEN JEWEL. Place the ANGEL in the slot. Select the locket 3x to receive the JENNIFER'S MEDALLION. Select the page 3x to receive the 4/4 ARTIST'S PAGE (inventory).
- Climb up.
- Place the GRAPES (W); take the GOBLET (X).
- Walk down.
- Place the FAUCET HANDLE (Y).
- Use the GOBLET (Z); receive the GOBLET WITH WINE.
- Climb up.
- Place the GOBLET WITH WINE (A); take the BLUE JEWEL (B).
- Walk left.
- Place the RED JEWEL, GREEN JEWEL, and BLUE JEWEL (green); take the HAT (C).
- Go to the Painter's House: Studio.
- Move the paper; place the HAT (D).
- Take the SIDEBOARD HANDLE and OVEN MITT (E).
- Return to the Painter's House: Kitchen.
- Use the OVEN MITT; place the FLATIRON (F).
- Use the OVEN MITT (G); receive the HOT FLATIRON.
- Return to the Painter's House: Studio.
- Place the 4/4 ARTIST'S PAGE; use the HOT FLATIRON. Take the LATCH (H).
- Return to the Painter's House: Kitchen.
- Place the SIDEBOARD HANDLE; open the cabinet (I).
- Place the LATCH (green); open the jar. Take the CAN OPENER HANDLE (J).
- Return to the Painter's House: Studio.
- Use the CAN OPENER HANDLE (K); open the lid. Take the SOLVENT (L).
- Use the SOLVENT on the KEY IN PAINT; select it and receive the KEY (inventory).
- Return to the Painter's House: Kitchen.
- Use the KEY; turn it (M).
- Walk left to the Street.
- Zoom in for a mini-game (N).
- Solution: (O); take the BUCKET WITH ROPE.
- Examine the BUCKET WITH ROPE; select the bucket 4x to receive the ROPES. Take the 1/2 LATCH and BUCKET (inventory).
- Walk right.
- Take the RAKE (P).
- Use the MEAT HAMMER; take the COGWHEEL (Q).
- Move the boards twice; select the wing twice to receive the BLUE WING (R).
- Walk down.
- Use the RAKE; take the SHOVEL (S).
- Walk right.
- Use the SHOVEL for a mini-game (T).
- Solution: 1-2-3-7-6-5-4-3-2-7-6-5-4-3-7-5-4-7-6-5-7 (U).
- Move the lid; take the PIECE OF ARMOR and RIBBON.
- Walk down.
- View the poster and attach the ROPES (V); select the rope (white).
- Place the RIBBON; pull it (W).
- Take the PANEL and YELLOW WING (X).
- Walk right.
- Place the PANEL and SPIDER; take the PHOTO and 2/2 LATCH (Y).
- Walk down.
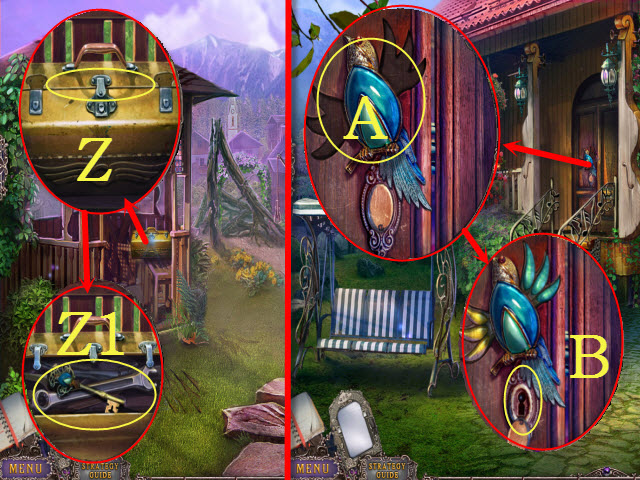
- Place the 2/2 LATCH (Z); take the BIRD KEY and WRENCH (Z1).
- Walk right.
- Place the BLUE WING and YELLOW WING (A).
- Use the BIRD KEY; turn it (B).
- Enter the Henry House: Living Room.
Chapter 5: The House
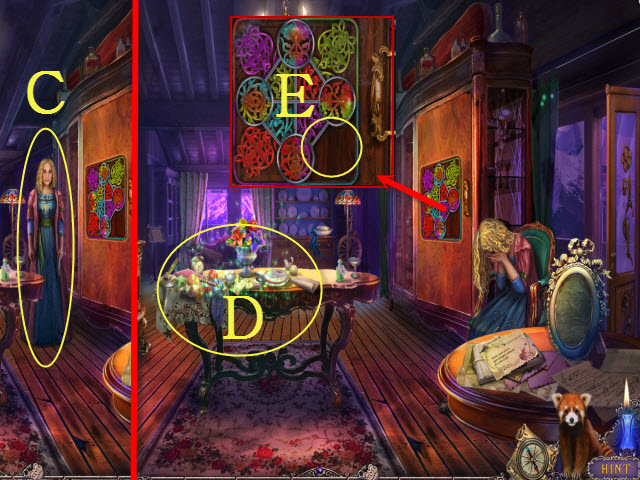
- Give the woman JENNIFER'S MEDALLION (C).
- Play the HOP (D); receive the CERAMIC HANDLE.
- Place the PIECE OF ARMOR (E) for a mini-game.
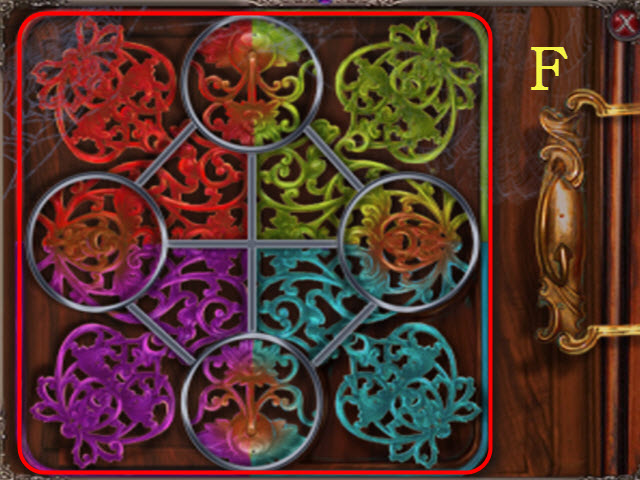
- Solution: (F).
- Take the POKER.
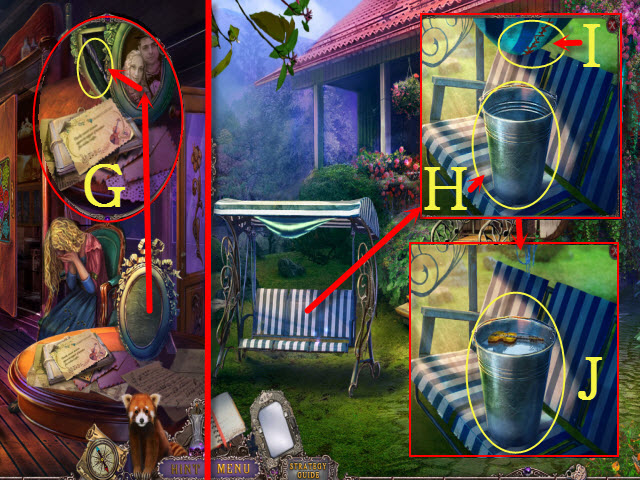
- Place the PHOTO; take the LETTER OPENER (G).
- Walk down.
- Place the BUCKET (H); use the LETTER OPENER (I).
- Take the VIOLIN and BUCKET WITH WATER (J).
- Walk forward.
- Play the HOP; receive the SKIMMER.
- Use the BUCKET WITH WATER; open the stove (H).
- Use the POKER; take the WINCH HANDLE (I).
- Place the VIOLIN (J); take the GREEN HANDLE (K).
- Place the CERAMIC HANDLE (L); open the lid and use the SKIMMER to receive the BUTTON (M).
- Walk down twice.
- Place the BUTTON, WINCH HANDLE, and COGWHEEL (N).
- Use the WRENCH for a puzzle (O).
- Solution: 1-4 (P).
- Walk left to the Old City Street.
- Take the TONGS (Q).
- Place the GREEN HANDLE (R).
- Walk left to the Abandoned Pharmacy.
- Move the bottles twice; use the TONGS to receive the WINGS (S).
- Take the GONDOLA (T).
- Take the SMOKER TUBE and SPRAY (U).
- Walk down.

- Move the balloon (green); place the GONDOLA and WINGS (V).
- Walk right to the Air Balloon Gates Airport.
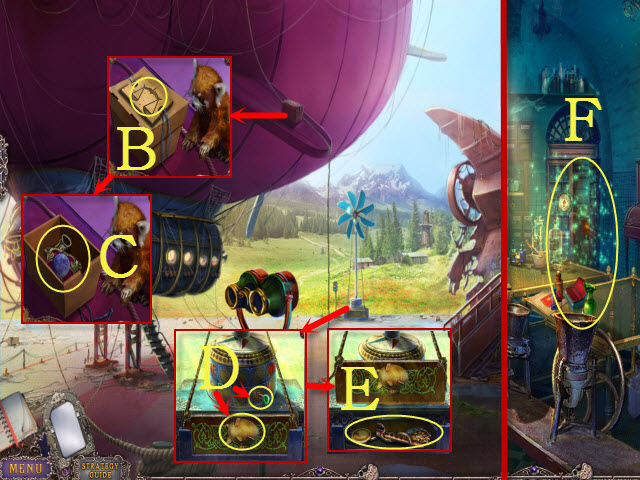
- Take the NOTE FOR PHARMACIST and CRANE HANDLE (W).
- Talk to the Huntress (X).
- Select the four spaces on the NOTE FOR PHARMACIST (inventory).
- Go to the Abandoned Pharmacy.
- Place the NOTE FOR PHARMACIST for a mini-game.
- Solution: (Y).
- Take the GARDEN GLOVE and RECIPE CODE (Z).
- Place the RECIPE CODE; select 3-7-0 (A).
- Play the HOP; receive the ALCOHOL (B).
- Walk down.
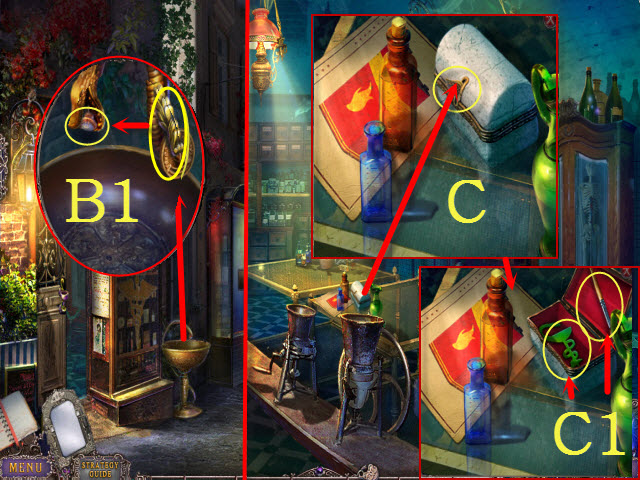
- Place the CRANE HANDLE; turn it and take the HANDLE (B1).
- Walk left.
- Place the HANDLE. Select it and open the lid (C).
- Take the BRUSH and MEDICAL SIGN (C1).
- Return to the Air Balloon Gates Airport.
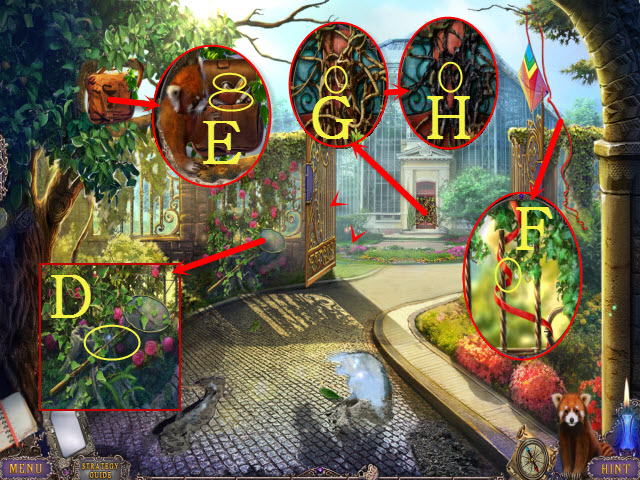
- Use the GARDEN GLOVE (D); take the NET.
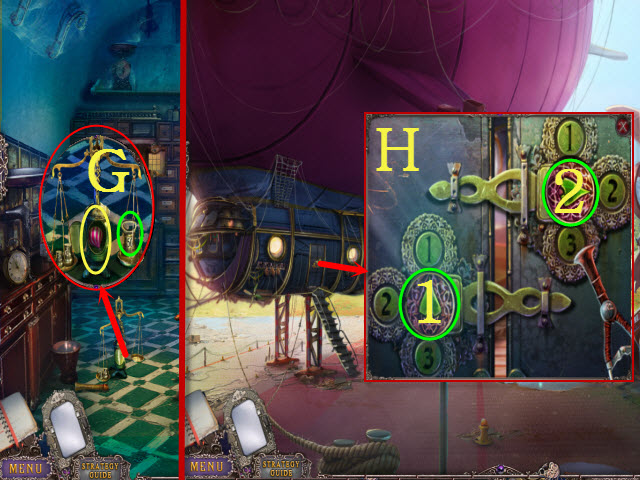
- Place the MEDICAL SIGN; take the SCALPEL and FLINT (E).
- Use the SCALPEL; receive the RIBBON (F).
- Use the ALCOHOL and FLINT (G).
- Clear the branches (H); receive the SMOLDERING COALS.
- Open the door; enter the Greenhouse.
- Use the SCALPEL (I); receive the VINES.
- Use the GARDEN GLOVE (J); receive the HATCHET.
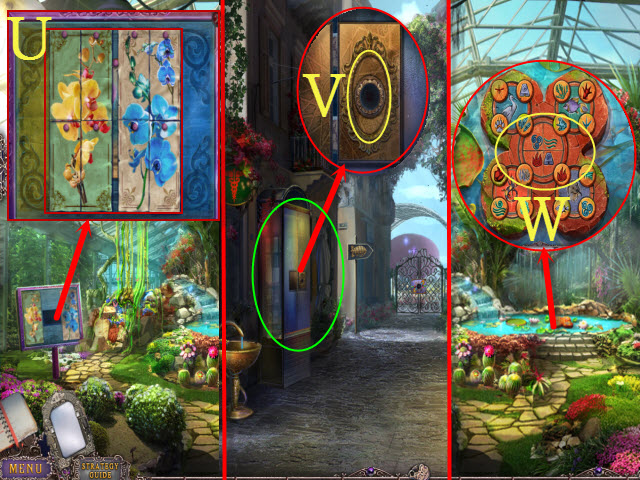
- Use the SPRAY; take the WATER SYMBOL (K).
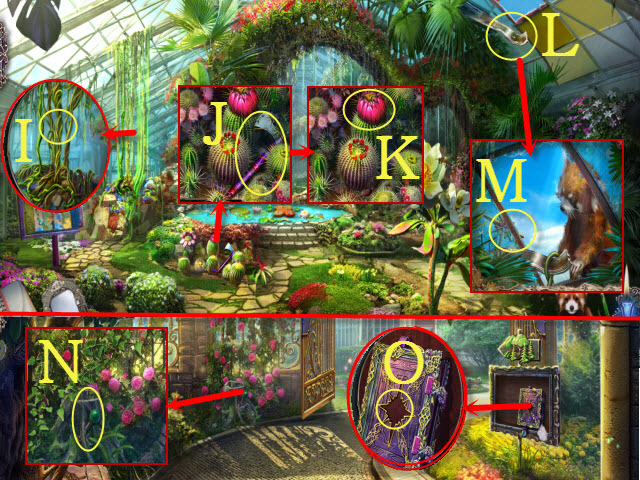
- Place the VINES (L); take the WIND ROSE (M).
- Walk down.
- Use the HATCHET; take the LEVER (N).
- Place the WIND ROSE (O).
- Find the fragments; take the AIRSHIP (P).
- Walk down.
- Use the NET (Q); receive the BELLOWS.
- Place the SMOLDERING COALS and BELLOWS with the SMOKER TUBE. Select the coal and bellows. Take the SMOKER (inventory).
- Return to the Greenhouse.
- Use the SMOKER and BRUSH; receive the BRUSH WITH GLUE (R).
- Walk down twice.
- Use the SPRAY and BRUSH WITH GLUE for a mini-game (S).
- Solution: (green); take the POSTER FRAGMENT (T).
- Return to the Greenhouse.
- Place the POSTER FRAGMENT for a mini-game; solution: (U).
- Select the note twice; take the HANDLE and LIGHTNING PLATE.
- Walk down twice.
- Place the HANDLE (V).
- Select the door (green); play the HOP and take the SCALES, STAR PLATE, and FROG SYMBOL.
- Return to the Greenhouse.
- Place the WATER SYMBOL and FROG SYMBOL for a mini-game (W).
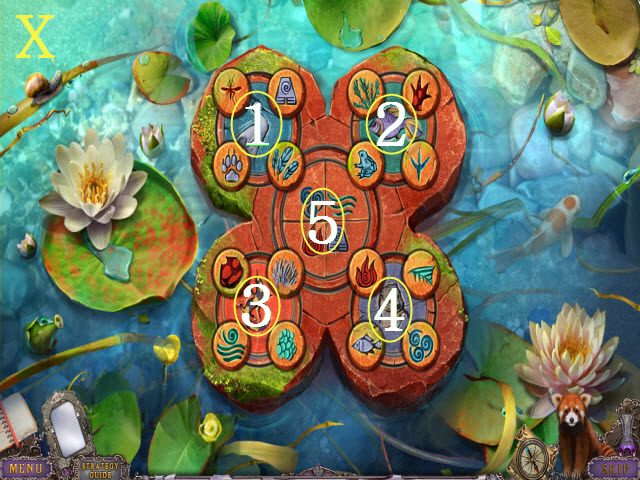
- Solution: 1-5-3-3-5-4-4-5-1-2-4-5-1-5-5-4-3-2-5-5-3-2-2-5-5-1-1-1-2-5-5-2-2-2-5-5 (X).
- Take the VIOLET CIRCLE.
- Walk down twice.
- Place the VIOLET CIRCLE for a mini-game (Y).
- Solution: 5-4-6-3-3-3-3-3-7-7-7-7-7-8-2-1-9 (Z).
- Walk forward to the Air Balloon Landing Field.
- Play the HOP (A); receive the PIN.
Chapter 6: The Balloon
- Use the RIBBON on the PIN; select the pin twice to take the PIN WITH RIBBON (inventory).
- Place the SCALES and open the lid (B).
- Take the MOON PLATE and WEIGHT (C).
- Place the AIRSHIP and LEVER; select the lever twice (D).
- Take the SNAKE FLUTE, OILCAN, and SUN AND MOON (E).
- Return to the Abandoned Pharmacy.
- Play the HOP (F); receive the STETHOSCOPE.
- Place the WEIGHT (green); take the HOT AIR BALLOON (G).
- Go to the Air Balloon Landing Field.
- Use the STETHOSCOPE for a mini-game.
- Solution: 1-1 (H).
- Enter the Air Balloon.
- Use the HATCHET (K); take the ARROW.
- Place the STAR PLATE; turn the key (green). Take the VIOLET BAT WEIGHT (L).
- Place the MOON PLATE; turn the key. Take the MAP (M).
- Place the LIGHTNING PLATE; turn the key. Take the EGG and GREEN BUTTON (N).
- Place the HOT AIR BALLOON for a mini-game (O).
- Solution: (P).
- Take the BINOCULARS.
- Place the SUN AND MOON and ARROW (Q).
- Select the sketch twice; receive the SKETCH and take the BUTTON (R).
- Use the OILCAN (S); select the porthole twice to take the PURPLE BUTTON (T).
- Walk down.
- Play the HOP (U); receive the AIRSHIP WHEEL.
- Place the BINOCULARS and MAP (V); receive the MAP.
- Enter the Air Balloon.
- Place the AIRSHIP WHEEL and MAP (W).
- Place the GREEN BUTTON, PURPLE BUTTON, and BUTTON for a puzzle (X).
- This puzzle is random. One possible solution: 1-2-2-3-3-3-4-5-6-6-7-7-8-10-10-9-10-10-9-10-9-9 (Y).
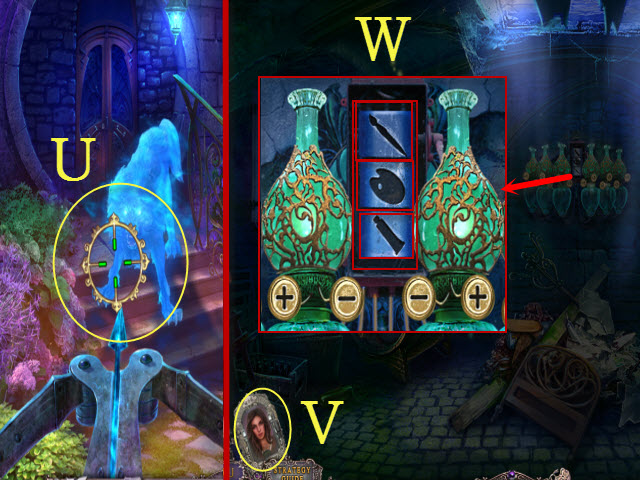
- Select anywhere; use the CROSSBOW twice for a mini-game.
- When the reticle turns green, select the target (Z).
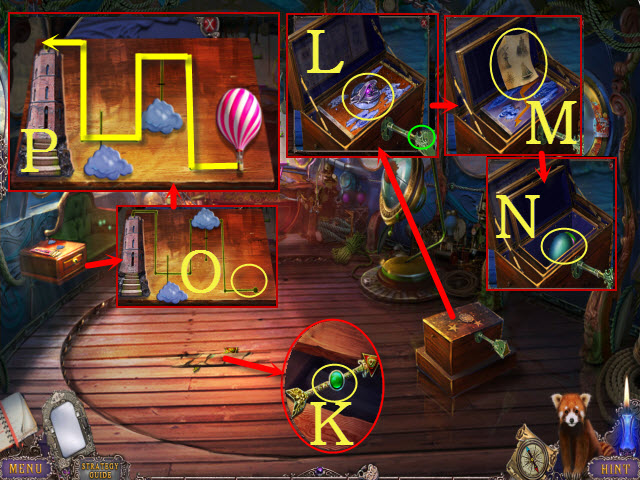
- Place the EGG; move the leaves to take the SNAKE EYE (A).
- Use the PIN WITH RIBBON (B); receive the RING.
- Place the RING for a mini-game (C).
- Solution: 6-4-3-1-5-6-2-1 (C1).
- Take the GREEN BAT WEIGHT and 1/3 DRAGON TILE.
- Place the GREEN BAT WEIGHT and VIOLET BAT WEIGHT for a puzzle (C2).
- Solution: (C3).
- Walk forward to the Fortress: Stairs.
- Take the VAAL TILE (C4).
- Use the SNAKE FLUTE (C5).
- Take the 2/3 DRAGON TILE (D); place the SNAKE EYE (E).
- Walk right to the Fortress: Hall.
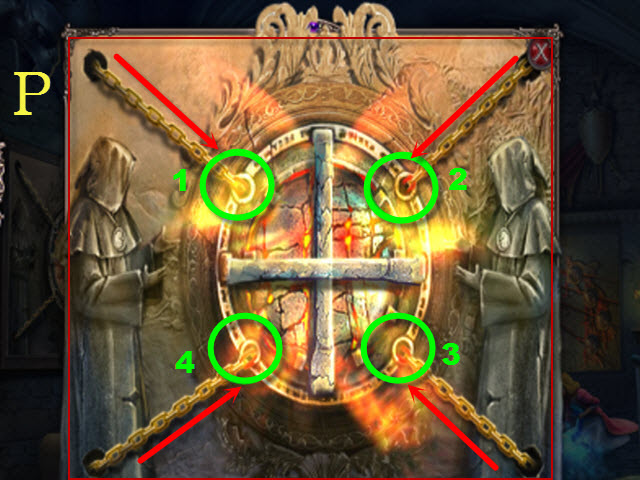
- Place the VAAL TILE for a mini-game (F).
- Solution: 2-3-4-8-15-14-14-13-13-9-16-15 (G).
- Take the BRICK.
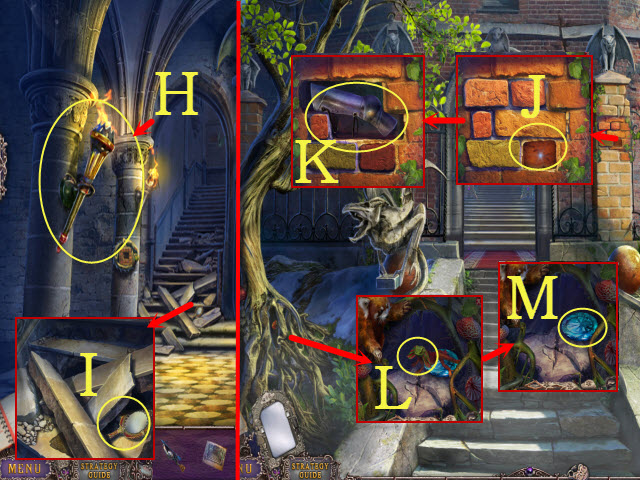
- Take the TORCH (H).
- Take the HAND MIRROR (I).
- Walk down twice.
- Place the BRICK; clear the bricks (J).
- Take the PIECE OF ARMOR (K).
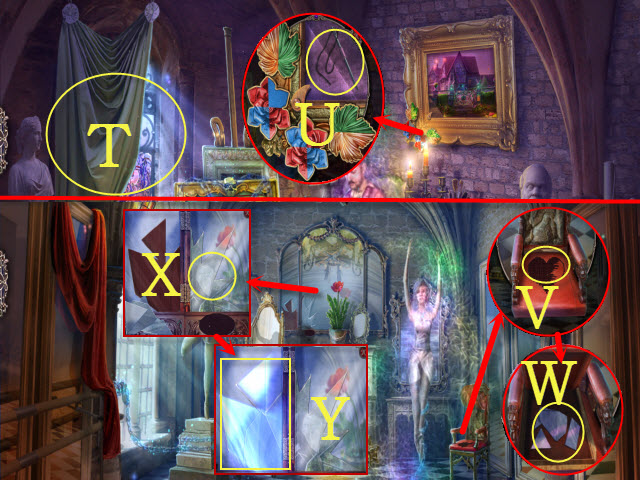
- Use the HAND MIRROR (L); take the CRYSTAL (M).
- Walk forward.
- Place the CRYSTAL (N); take the BAMBOO STICK (O).
- Walk right.
- Use the BAMBOO STICK (P); take the CHEST (Q).
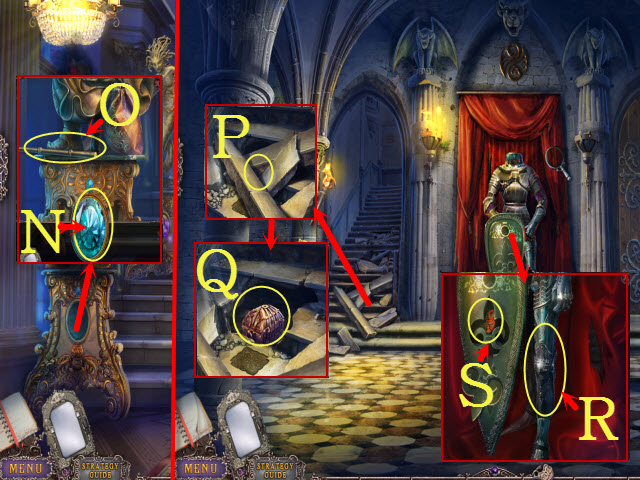
- Place the PIECE OF ARMOR (R); take the SYMBOL (S).
- Walk down twice.
- Place the SYMBOL; take the RING (T).
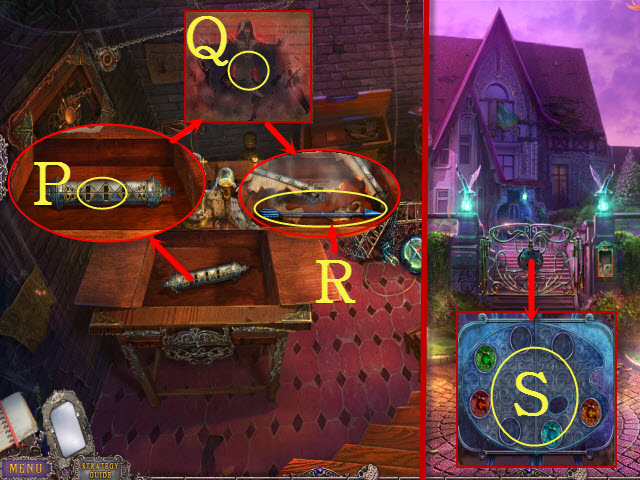
- Place the RING with the CHEST. Select the ring and open the chest; take the GOLD SYMBOL and FIERY ARROW CONVERTER (inventory).
- Return to the Fortress: Hall.
- Place the GOLD SYMBOL (U); take the DAGGER (V).
- Walk down.
- Use the DAGGER (W); take the SWORDSMAN and KNIGHT'S HELMET (X).
- Walk right.
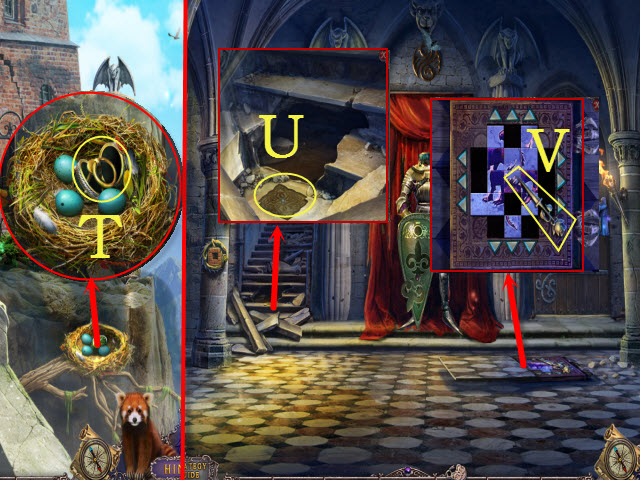
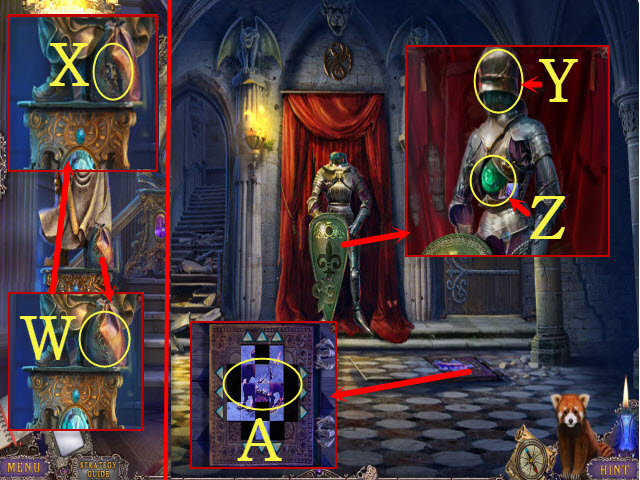
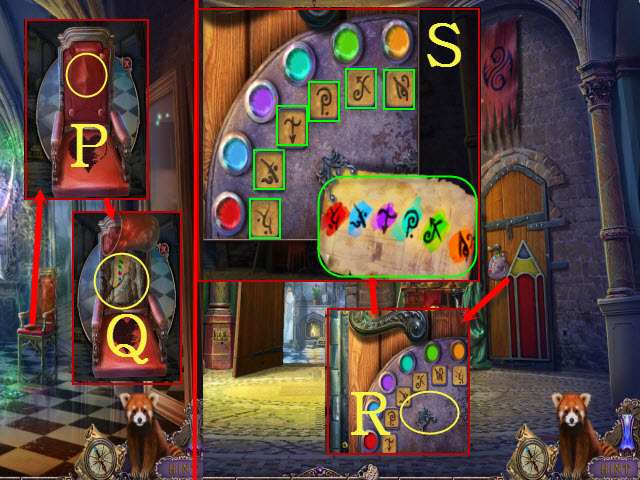
- Look up; place the KNIGHT'S HELMET (Y).
- Take the 3/3 DRAGON TILE, CRYSTAL ANGEL, and TRIANGULAR BUTTON (Z).
- Place the 3/3 DRAGON TILE for a mini-game (A).
- Solution: 9-5-12-1-11-4-7-5-3-12 (B).
- Take the FUNNEL and WINGED DRAGON.
- Walk down.
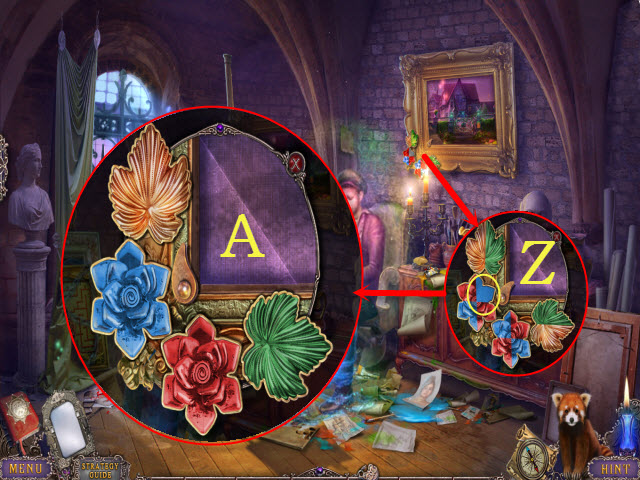
- Place the CRYSTAL ANGEL (C).
- Play the HOP; take the GLASS TUBE (D).
- Use the SKETCH (E) to arrange the statues (F).
- Place the WINGED DRAGON (G).
- Walk left to the Fortress: Throne Room.
Chapter 7: The Throne Room
- Talk to the Huntress.
- Place the TORCH (H); take the DRAGON and TORCH (I).
- Move the disc 3x (green).
- Enter the code (J).
- Take the WARRIOR WITH AX and ROUND FLASK (K).
- Place the WARRIOR WITH AX (L) and SWORDSMAN (M).
- Select the note twice and take the BUTTON (N).
- Walk down.
- Place the ROUND FLASK (O) and DRAGON (P).
- Select the arrow (Q).
- Walk forward to the Fortress: Guard's Room.
- Play the HOP (R); receive the MACE.
- Return to the Fortress: Throne Room.
- Place the MACE (S); take the POUCH (T).
- Select the POUCH twice. Select the paper 3x; take the BUTTON. Select the note twice; take the POWDER (inventory).
- Place the two BUTTONS for a mini-game (U).
- Solution: 1-4-2-3 (V).
- Play the HOP (W); receive the EMPTY FLASK.
- Open the FIERY ARROW CONVERTER; place the FUNNEL, GLASS TUBE, and EMPTY FLASK on it. Use the POWDER. Turn the handle; take the FIERY VESSEL (inventory).
- Place the CROSSBOW with the FIERY VESSEL. Replace the crossbow vessel with the FIERY VESSEL; take the DRAGON CROSSBOW (inventory).
- Return to the Fortress: Guard's Room.
- Select the dragon and use the DRAGON CROSSBOW (W1); select the reticle when it turns green 3x (X).
- Place the TRIANGULAR BUTTON for a mini-game (Y).
- Solution: 2-2-1-2-1-1-1-2-2-1-1-1-2-2-1-1-1-2-2-1-1-2 (Z).
- You receive the MAGIC SPHERE. Take the BALLERINA DANCE DIAGRAM.
- Place the BALLERINA DANCE DIAGRAM for a mini-game (A).
- Solution: 1-4 (B).
- Walk forward to the Fortress: Dancer's Hall.
- Take WOLF TILE (C).
- Select and take the NOTE (D).
- Move the curtain; place the NOTE (E).
- Align the symbols (green); take the STRING (F).
- Walk down.
- Place the STRING for a mini-game (G).
- Solution: 1-2-3-4-2-3-1-4-2-2-1-2-1-4-1 (H).
- Walk left to the Fortress: Violinist's Hall.
- Place the WOLF TILE for a mini-game (I).
- Solution: 1-2-2-1 (J).
- Select the note twice; take the MIRROR.
- Return to the Fortress: Dancer's Hall.
- Place the MIRROR (K); receive the SYMBOL.
- Go to the Fortress: Violinist's Hall.
- Place the SYMBOL (L).
- Select the symbol x2 (green); take the TRIANGLE (M).
- Place the TRIANGLE (N); take the TUNING FORK (O).
- Return to the Fortress: Dancer's Hall.
- Use the TUNING FORK (P).
- Take the ARTIST'S PAINTING DIAGRAM (Q).
- Walk down.
- Place the ARTIST'S PAINTING DIAGRAM for a mini-game (R).
- Solution: (S).
- Walk right to the Fortress: Painter's Hall.
- Move the curtain; play the HOP and receive the 1/2 KEY ORGAN (T).
- Take the NEEDLE WITH THREAD (U).
- Go to the Fortress: Dancer's Hall.
- Use the NEEDLE WITH THREAD (V); take the MIRROR SHARDS (W).
- Place the MIRROR SHARDS for a mini-game (X).
- Solution: (Y).
- Take the HARP STRING and ROSE PART.
- Go to the Fortress: Painter's Hall.
- Place the ROSE PART for a mini-game (Z).
- Solution: (A).
- Take the SHEET MUSIC.
- Return to the Fortress: Violinist's Hall.
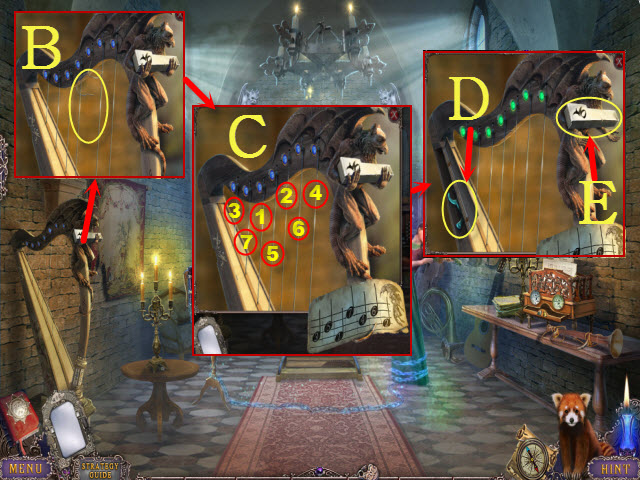
- Select the string; place the HARP STRING and SHEET MUSIC for a mini-game (B).
- Solution: 1-2-3-4-5-6-7 (C).
- Take the HAMMER AND TONGS (D) and 2/2 KEY ORGAN (E).
- Place the 2/2 KEY ORGAN for a mini-game (F).
- Solution: 1-3-2-4-5-6-1-5-6-2-4-5-2-3-6 (G).
- Take the KNIGHT and HOOK.
- Return to the Fortress: Painter's Hall.
- Play the HOP (H); receive the PALETTE.
- Place the KNIGHT for a mini-game (I).

- Solution: (J).
- Take the BALLERINA BUTTON and TONGS.
- Place the PALETTE and view the easel for a puzzle (K).
- Solution: 1-4 (L).
- Talk to the Artist.
- Use the HOOK; take the TREBLE CLEF (M).
- Return to the Fortress: Dancer's Hall.
- Place the BALLERINA BUTTON for a mini-game (N).
- Solution: 1-2-3-4-5-2-3-4 (O).
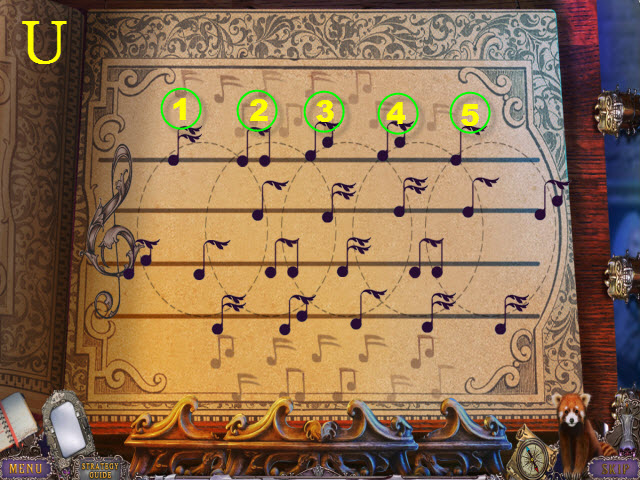
- Select the drum for a mini-game.
- Please see the screenshot for the solution.
- Solution: 1-7 (P).
Chapter 8: The Sword

- Talk to the Ballerina (Q).
- Use the TORCH (R).
- Place the TONGS and MAGIC SPHERE (S); receive the MAGIC SPHERE.
- Go to the Fortress: Violinist's Hall.
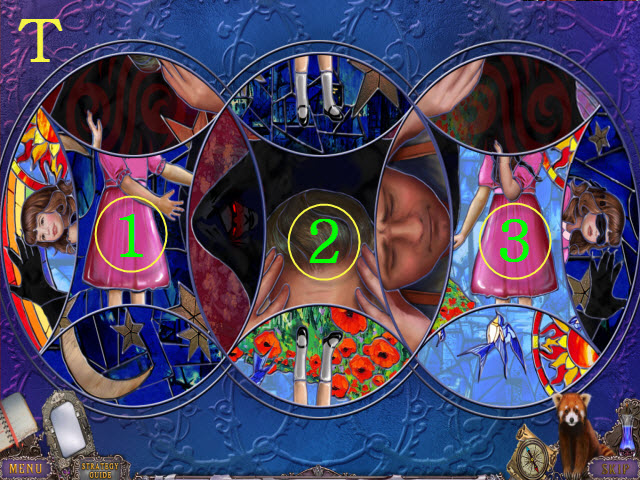
- Place the TREBLE CLEF for a mini-game (T).
- Please see the screenshot for the solution.
- Solution: 1-2-3-4-5-1-2-3-4-5 (U).
- Talk to the Musician (V).
- Walk down.
- Play the HOP (W); receive the HAMMER.
- Return to the Fortress: Hall.
- Place the HAMMER for a mini-game (X).
- Solution: (Y).
- Walk upstairs.
- Talk to the Blacksmith twice; receive the NET (Z).
- Take the HAMMER and FIRE-RETARDANT GLOVE (A).
- Place the HAMMER AND TONGS; open the lid (B).
- Take the RIVETS and MAGICIAN SILHOUETTE (C).
- Take the VIOLIN DISK; select the handle (D).
- Place the RIVETS; use the HAMMER (E). Take the STAFF (F).
- Return to the Fortress: Throne Room.
- Place the MAGIC SPHERE (G); take the PYRAMID (H).
- Place the PYRAMID (I); turn it and take the PAINTBRUSH DISK (J).
- Play the HOP (K); receive the BALLERINA DISK.
- Place the VIOLIN DISK, PAINTBRUSH DISK, and BALLERINA DISK for a mini-game (L).
- Solution: 4-3-2-1-4-3-4-3-2-1-4-3-2-1-3-4-3-2-1-3 (M).
- Select the knocker; walk upstairs to the Fortress Heart.
- Use the NET (N).
- Use the FIRE-RETARDANT GLOVE for a mini-game (O).
- Solution: 4-1-3-2 (P).
- You receive the METAL.
- Place the STAFF (Q); take the VAAL KEY (R).
- Move the blanket; take the CHEST (S).
- Place the VAAL KEY in the CHEST; take the SWORD HILT and BAR (inventory).
- Rotate the two stones; take the BLADE FORGING DIAGRAM and BELLOWS NOZZLE (T).
- Place the BAR for a mini-game (U).
- Solution: 1-4 (V).
- Select paper twice; receive the MAGIC SOLUTION.
- Place the MAGICIAN SILHOUETTE and MAGIC SOLUTION (W).
- Select the statues: 1-5 (X).
- Take the MAGIC SACK (Y).
- Return to the Fortress: John's Dungeon.
- Place the BELLOWS NOZZLE (Z); select the bellows (green).
- Place the METAL (A). Use the TONGS (B); receive METAL VAAL SYMBOL.
- Place the BLADE FORGING DIAGRAM, METAL VAAL SYMBOL, and MAGIC SACK (C).
- Use the HAMMER (D); receive the BLADE.
- Place the SWORD HILT with the BLADE; select it twice to receive the SWORD (inventory).
- Return to the Fortress Heart.
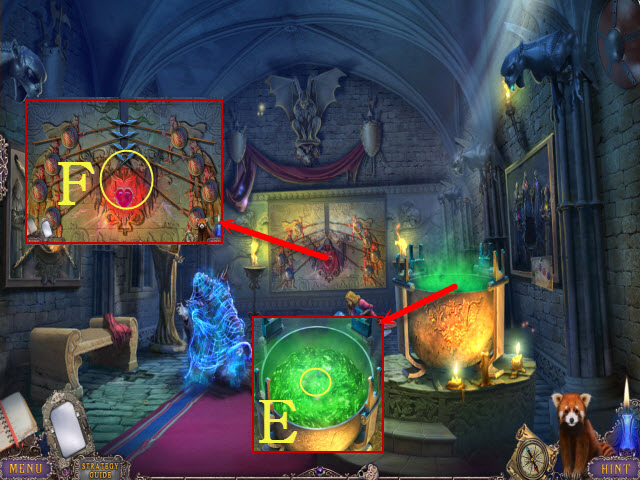
- Open the cauldron; use the SWORD to receive the PUNISHMENT SWORD (E).
- Use the PUNISHMENT SWORD for a mini-game (F).
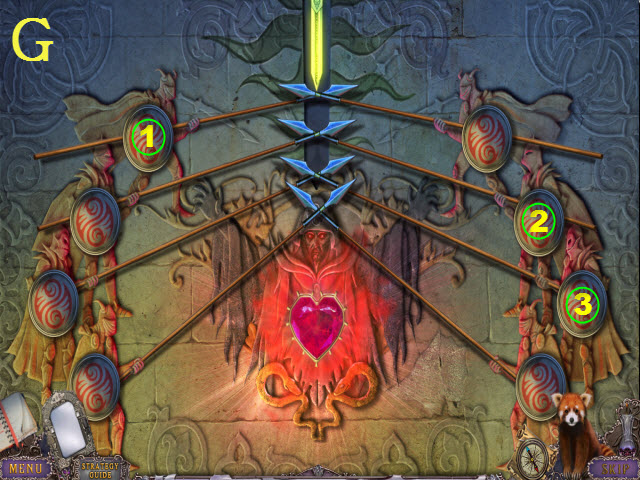
- Please see the screenshot for the solution.
- Solution: 1-2-3 (G).
- Congratulations, you've completed Whispered Secrets: Into the Wind.
Created at: 2014-11-02