

Walkthrough Menu
- General Tips
- Chapter 1: The Hunt Begins
- Chapter 2: Reveal Power
- Chapter 3: The Kitchen
- Chapter 4: Freeze Motion Power
- Chapter 5: Tame Power
- Chapter 6: Turn Good Power
- Chapter 7: Animate Power
- Chapter 8: Defeat Flemet
General Tips
- This is the official guide for Witch Hunters: Stolen Beauty Standard Edition.
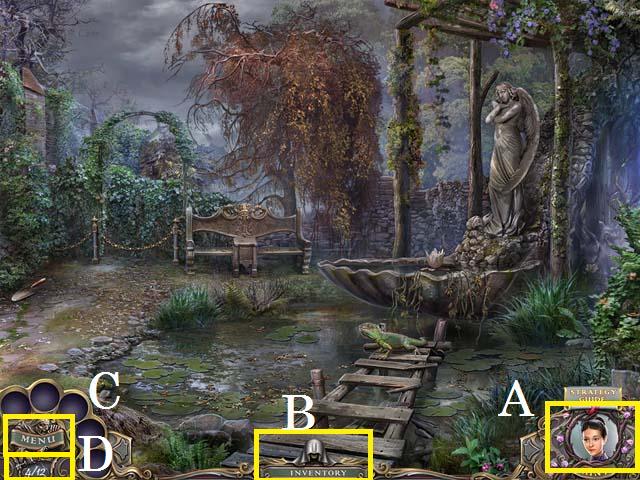
- Once you collect it, you can use the Hint Button (A) if you get stuck.
- Your inventory bar (B) will hold items until they are needed.
- Zoom into sparkling scenes to trigger Hidden Object Scenes. In this guide we will use the acronym 'HOS' for Hidden Object Scenes.
- The items in the HOS are random.
- Click on the Menu (C) button to exit, pause, or resume the game. You can also adjust your options (sound, music, and screen size).
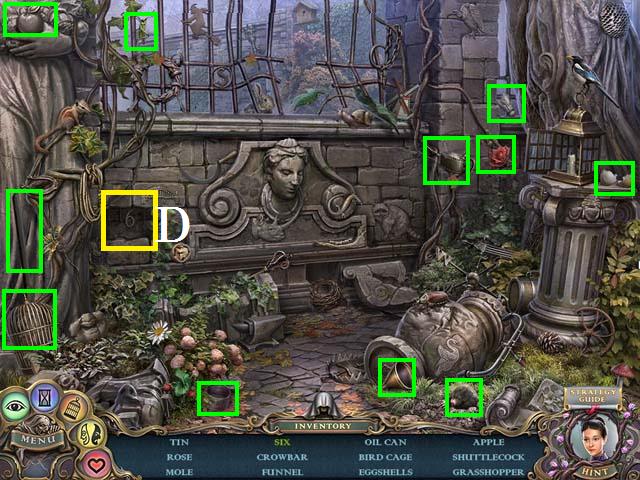
- Collect 12 Snake Keys throughout the game; you can view the number of keys you've collected below the Main Menu (D). The locations of the Keys can be found throughout the guide.
- You will not need to follow the exact path of this guide; however some actions are required before HOS are available.
Chapter 1: The Hunt Begins
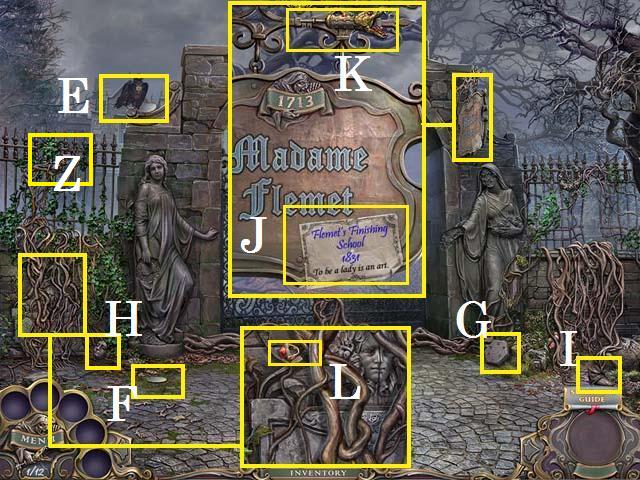
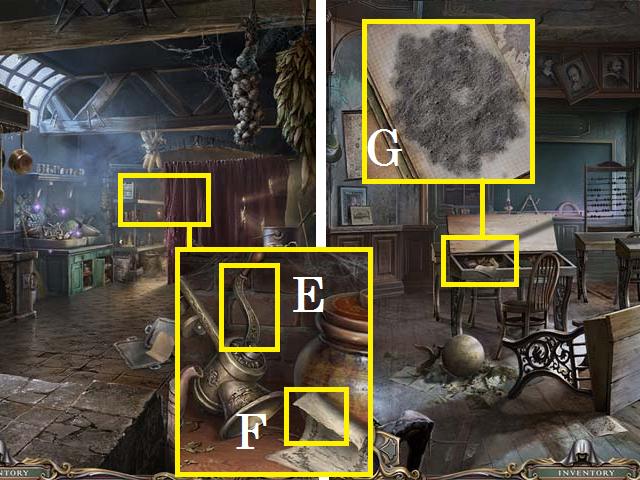
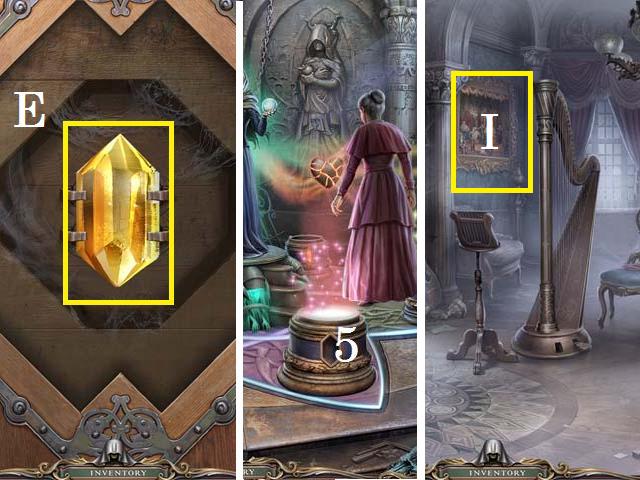
- Shoo away the bird (E) and pick up the Hint Button (F).
- Pick up the first HEXAGON (G), STATUE FACE (H), STATUE'S HAND (Z), and the STATUE FOOT (I).
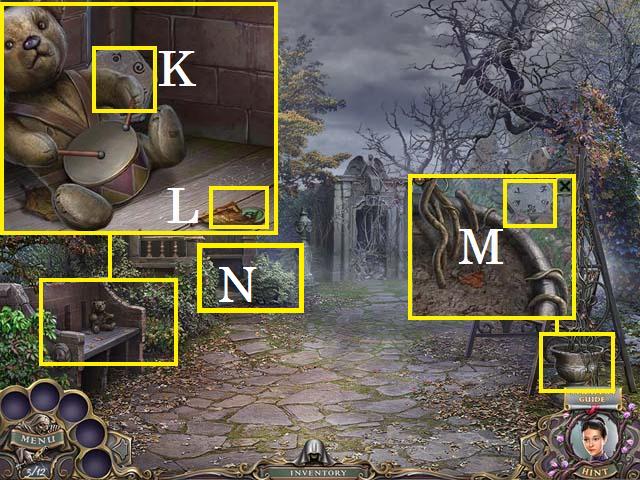
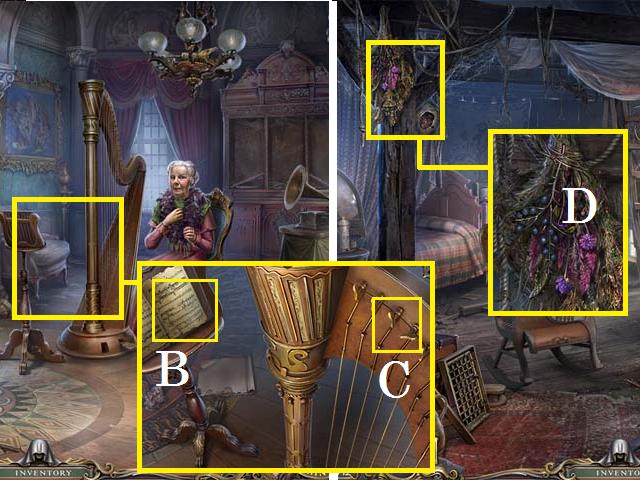
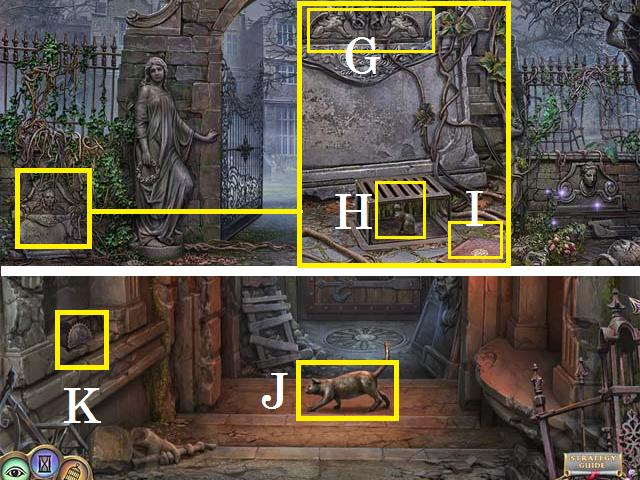
- Zoom into the sign; pick up the note (J) and the second SNAKE KEY (K).
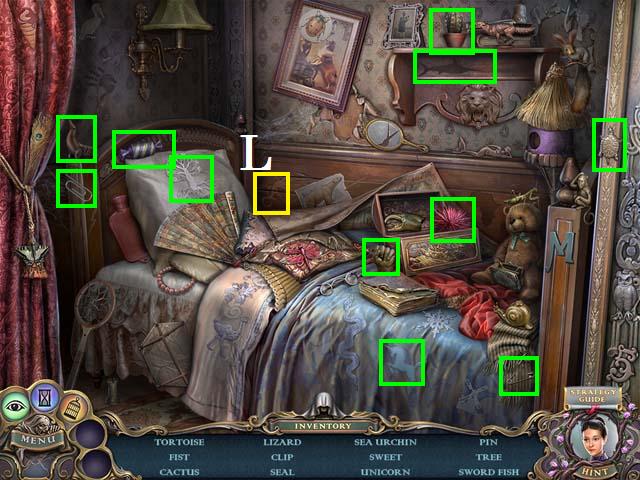
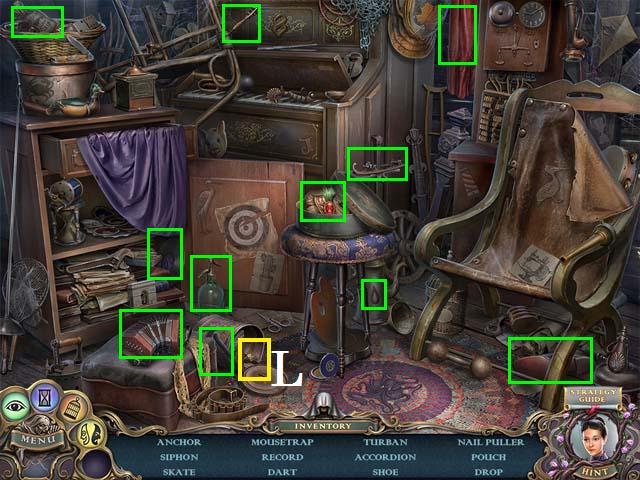
- Zoom into the plaque; pick up the RED RING (L).
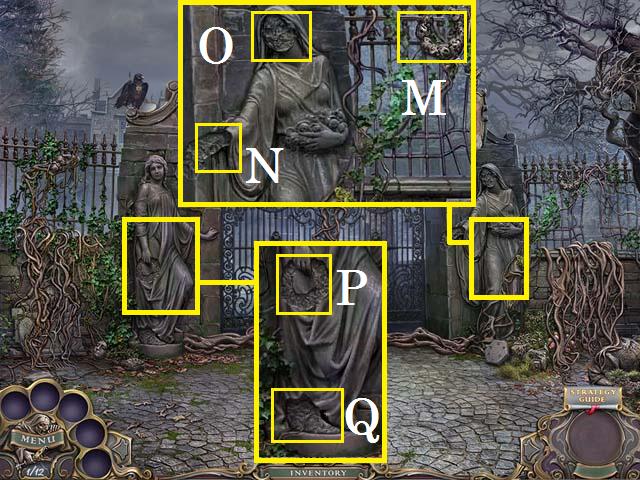
- Zoom into the right statue; pick up the STATUE WREATH (M). Place the STATUE'S HAND (N) and the STATUE FACE (O).
- Zoom into the left statue; place the STATUE WREATH (P) and the STATUE FOOT (Q).
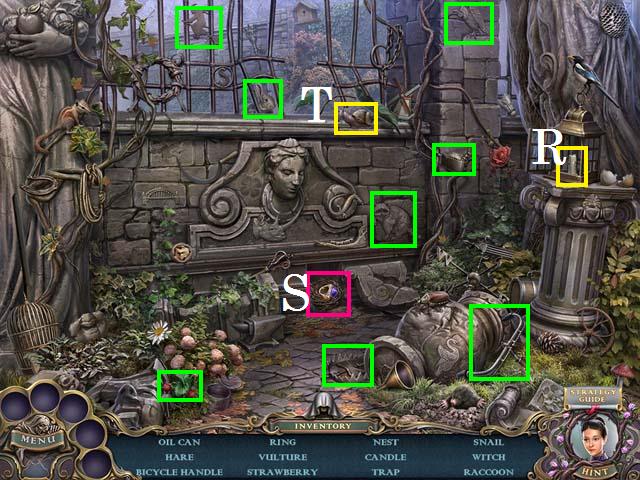
- Zoom into the sparkles to trigger a HOS.
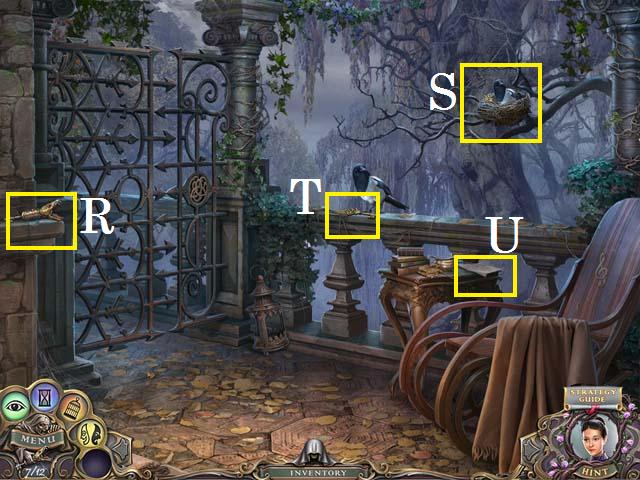
- Open the lamp to reveal the Candle (R).
- Move the stone to reveal the Ring (S) and the Nest (pink).
- Move the leaf to reveal the Snail (T).
- Collect the remaining items (green) to receive the BLUE RING.
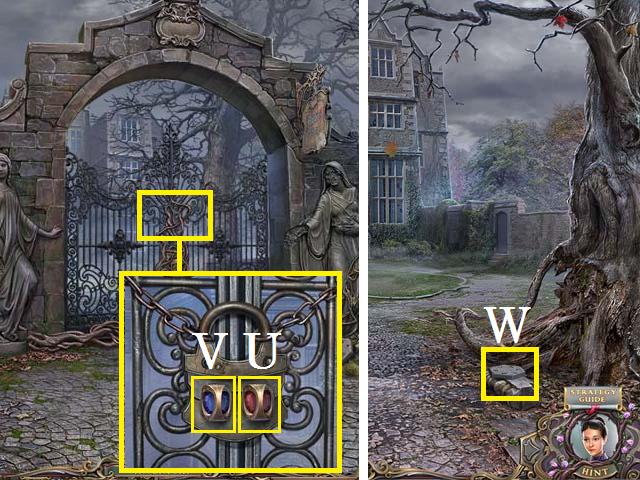
- Zoom into the gate; place the RED RING (U) and the BLUE RING (V) on the door and enter the gate to the school grounds.
- Pick up the second HEXAGON (W).
- Take a right to the garden gate.
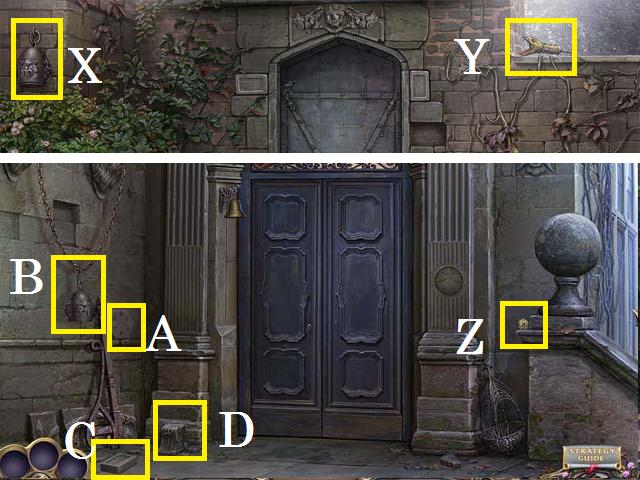
- Pick up the WEIGHT (X) and the third SNAKE KEY (Y).
- Back up one scene and move forward to the front door.
- Pick up the first BUTTON (Z), the third HEXAGON (A).
- Hang the WEIGHT on the chain (B) and pick up the BRICK (C).
- Move the stone (D) and zoom into the revealed hole.
- Return to the garden gate.
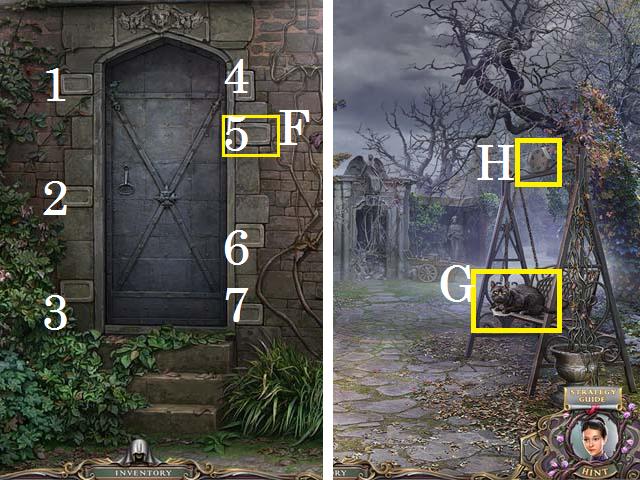
- Place the BRICK in the slot (F). Use the following sequence to open the gate: 1, 7, 3, 2, 5, 4, and 6.
- Enter the garden.
- Shoo the cat away and examine the note (G).
- Pick up the fourth HEXAGON (H).
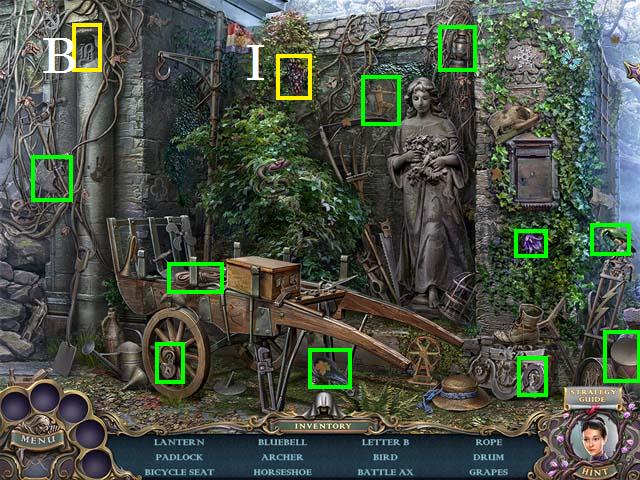
- Zoom into the sparkles to play a HOS.
- Move the vine to reveal the Grapes (I).
- Move the stone to reveal the Letter B (J).
- Collect the remaining items (green) to receive the TOY DRUM.
- Zoom into the teddy bear; place the TOY DRUM with the bear and move the leaf. Pick up the fifth HEXAGON (K) and the second BUTTON (L).
- Zoom into the planter; pick up the sixth HEXAGON (M).
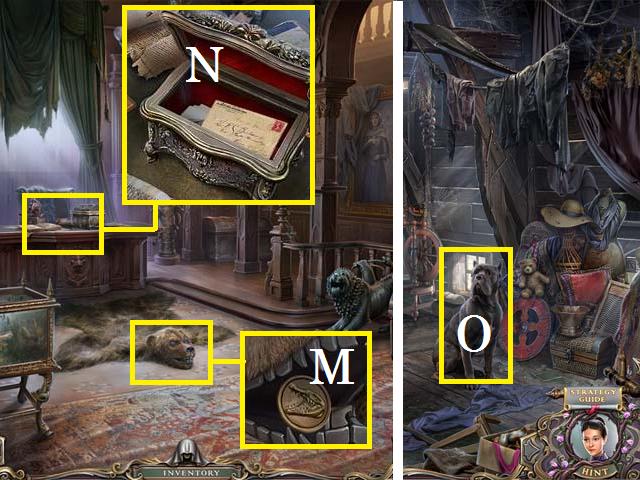
- Enter the gazebo (N).

- Examine the card (O).
- Pick up the fourth SNAKE KEY (P) and seventh HEXAGON (Q).
- Exit the gazebo and move forward to the fountain.
- Pick up the TROWEL (R).
- Zoom into the valve housing; pick up the eighth HEXAGON (S).
- Return to the gazebo.
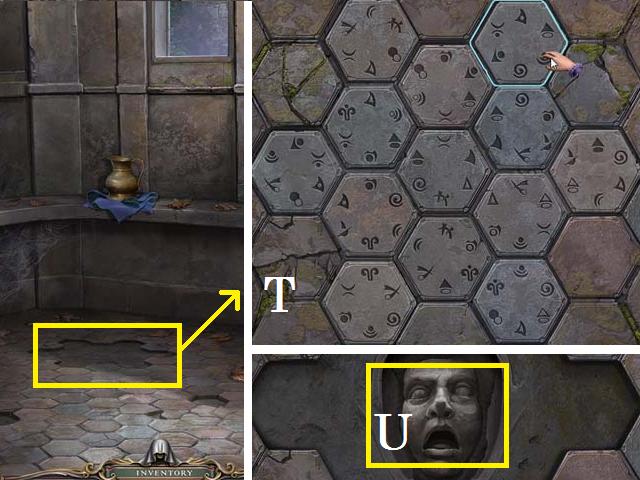
- Zoom into the floor; add the eight HEXAGONS to the rest.
- Use the screenshot (T) as a key for this puzzle.
- Pick up the ORNAMENT PIECE (U).
- Exit the gazebo.
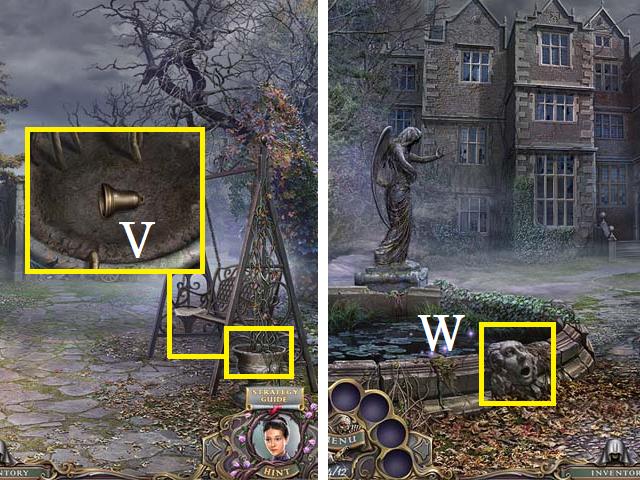
- Zoom into the planter; use the TROWEL to dig out the BELL (V).
- Return to the school grounds just inside the gate.
- Place the ORNAMENT PIECE on the pool (W) and zoom into the sparkles to trigger a HOS.
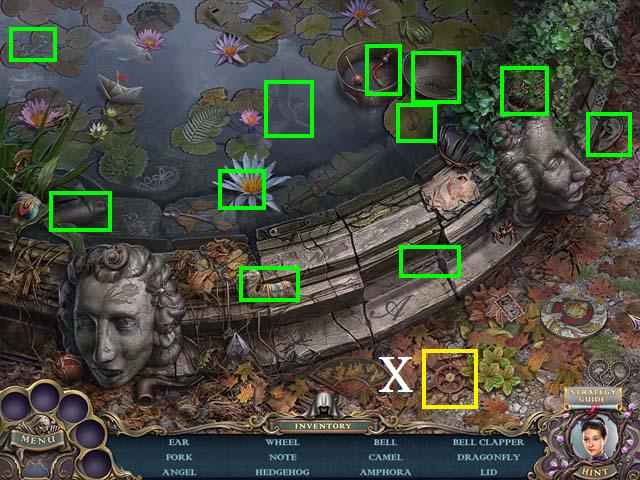
- Move the leaves to reveal the Wheel (X).
- Collect the remaining items (green) to receive the BELL CLAPPER.
- Return to the front door.
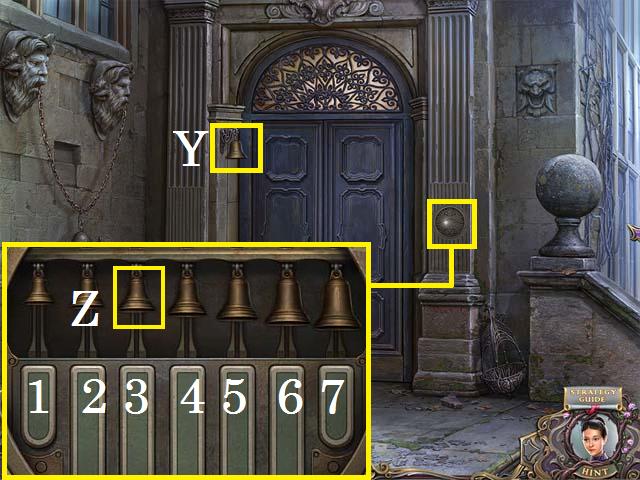
- Hang the BELL CLAPPER in the bell (Y). Ring the bell.
- Zoom into the lock; place the BELL (Z) and press the bars in the following order: (3, 5, and 2); (2, 1, 7, and 4); (4, 2, 3, 7, and 1); (2, 1, 2, 6, 5, and 4).
- Enter the door to the foyer.
Chapter 2: Reveal Power
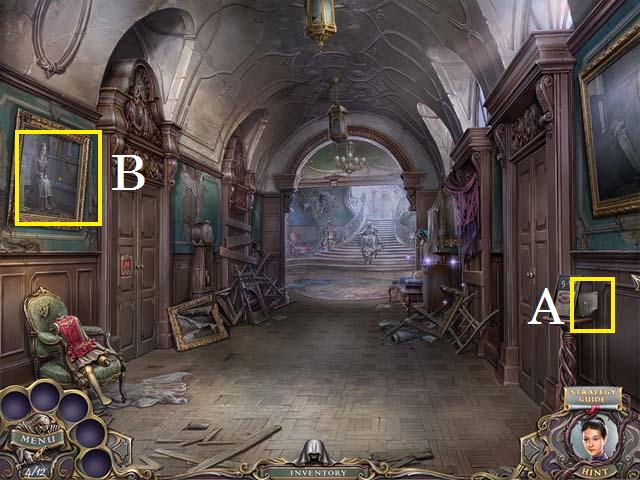
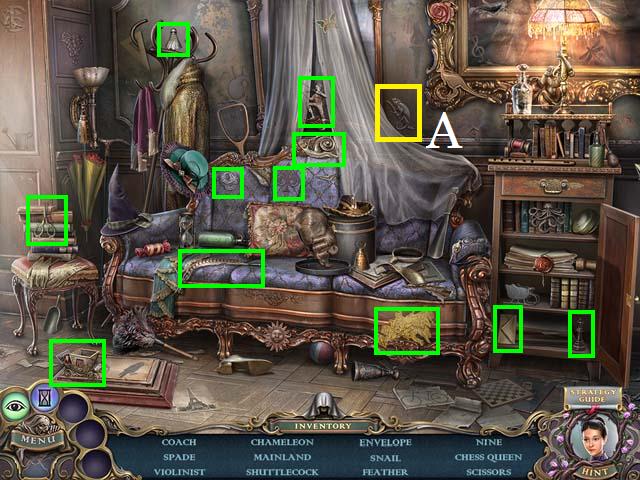
- Examine the note (A).
- Examine the painting (B) and speak with the woman.
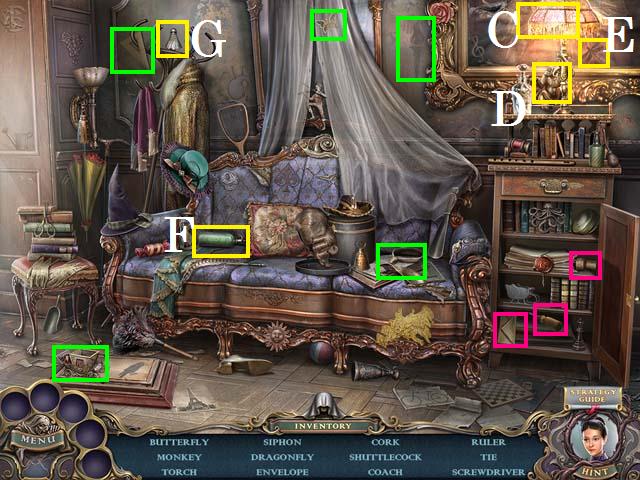
- Zoom into the sparkles to play a HOS.
- Open the cabinet to reveal the Envelope, Cork, and Screwdriver (pink).
- Turn on the lamp (C) to reveal the Monkey (D) and the Dragonfly (E).
- Move the pillow to reveal the Siphon (F).
- Move the hat to reveal the Shuttlecock (G).
- Collect the remaining items (green) to receive the SCREWDRIVER.
- Return to the fountain.
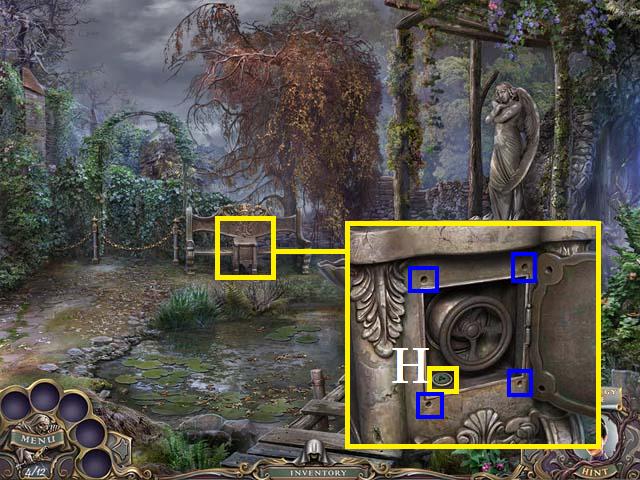
- Zoom into the valve housing; remove the four screws (blue) with the SCREWDRIVER; pick up the third BUTTON (H).
- Return to the foyer and move forward to the staircase. Move forward one more time and try to climb the staircase.
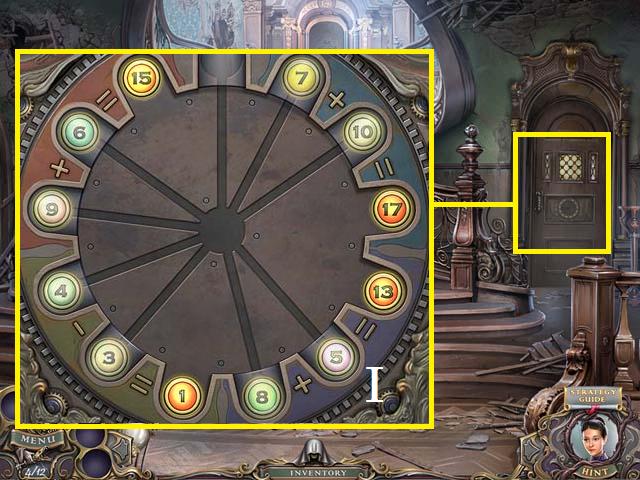
- Zoom into the door; place the BUTTONS on the lock, you can use the screenshot (I) as a key to unlock the door.
- Enter the classroom.
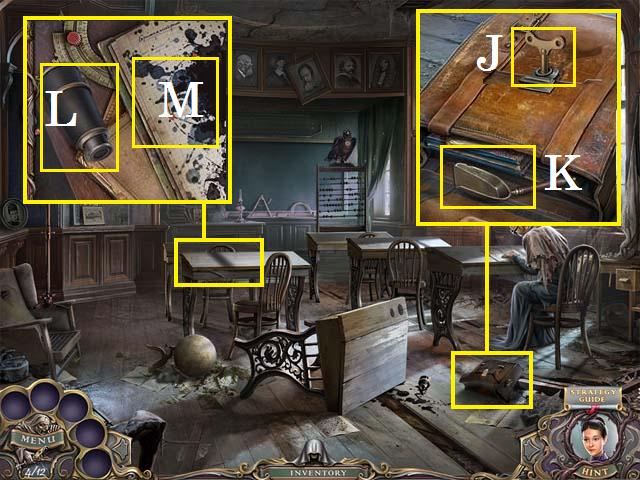
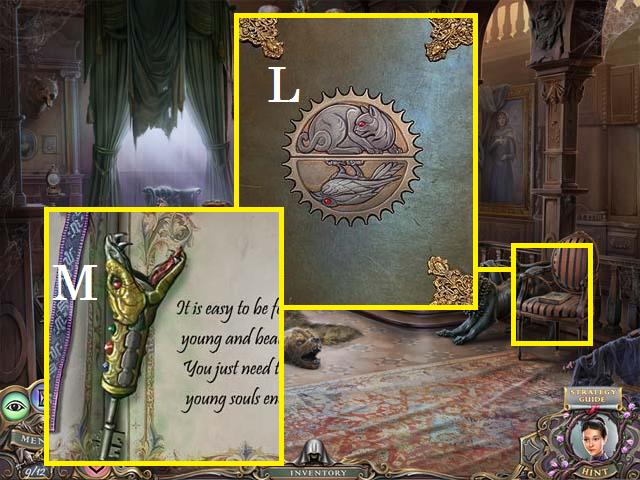
- Zoom into the briefcase; pick up the CLOCK KEY (J). Open the case and pick up the SCOOP (K).
- Zoom into the desk; pick up the SPYGLASS (L) and examine the notebook (M).
- Speak with the woman, and then return to the foyer.
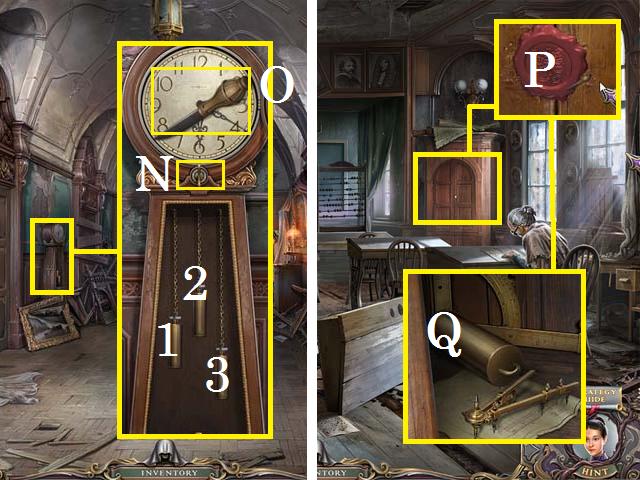
- Zoom into the clock and use the CLOCK KEY (N) to open the face; collect the KNIFE (O).
- Return to the classroom.
- Zoom into the cabinet; remove the seal (P) with the KNIFE.
- Pick up the CLOCK WEIGHT (Q).
- Return to the foyer.
- Place the CLOCK WEIGHT in the clock; use the following sequence to set the weights properly: 1, 1, and 3.
- Go through the open door to the dining room.
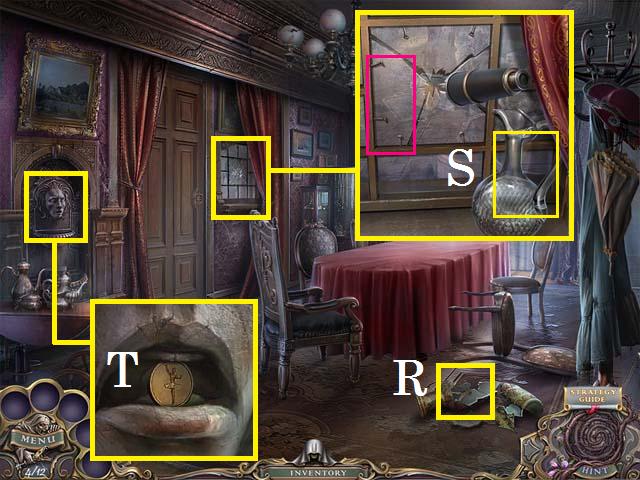
- Remove the broken piece from the vase; pick up the NIPPERS (R).
- Open the curtain and zoom into the window; pick up the PITCHER (S) and place the SPYGLASS in the window.
- Remove the nails (pink) with the NIPPERS.
- Zoom into the SPYGLASS to see the clue.
- Zoom into the fountain; remove the COIN (T) with the NIPPERS.
- Put the PITCHER in the fountain to get the PITCHER WITH WATER.
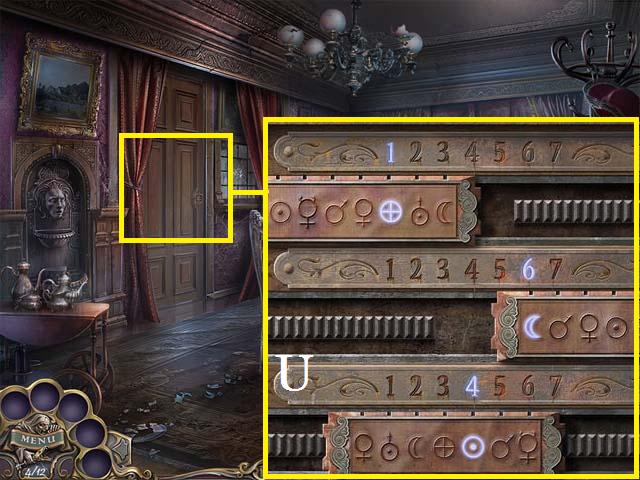
- Zoom into the door; use the screenshot (U) as a key to set the lock.
- Enter the Kitchen.
- Zoom into the cupboard; open the latch with the KNIFE; pick up the CHALK (V) and the OIL CAN (W).
- Zoom into the oven; use the SCOOP to receive the SCOOP WITH ASH (X).
- Return to the foyer.
- Zoom into the door lock; place the COIN in the slot (Y).
- Return to the fountain.
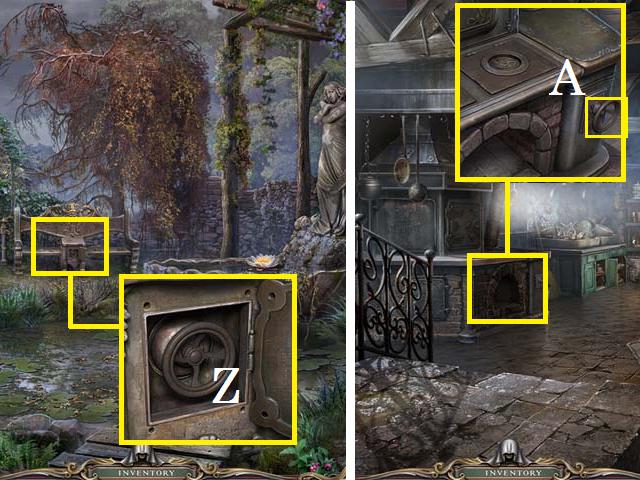
- Zoom into the valve housing; use the OIL CAN on the VALVE (Z) and then pick it up.
- Return to the kitchen.
- Zoom into the oven; place the VALVE (A).
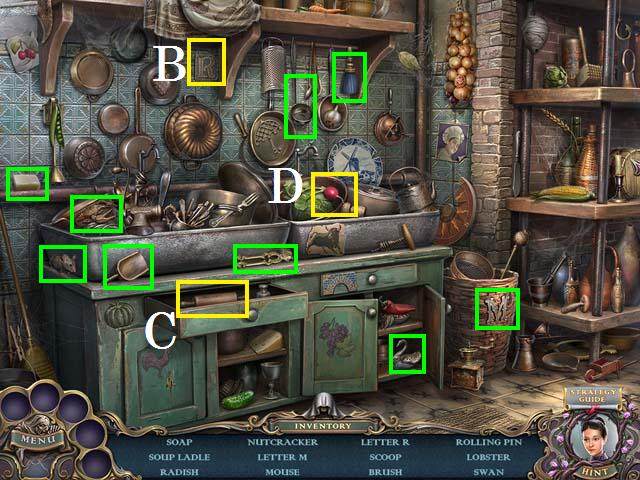
- Zoom into the sparkles to play a HOS.
- Move the towel to reveal the Letter R (B).
- Open the drawer to reveal the Rolling pin (C).
- Move the pot lid to reveal the Radish (D).
- Collect the remaining items (green) to receive the BRUSH.
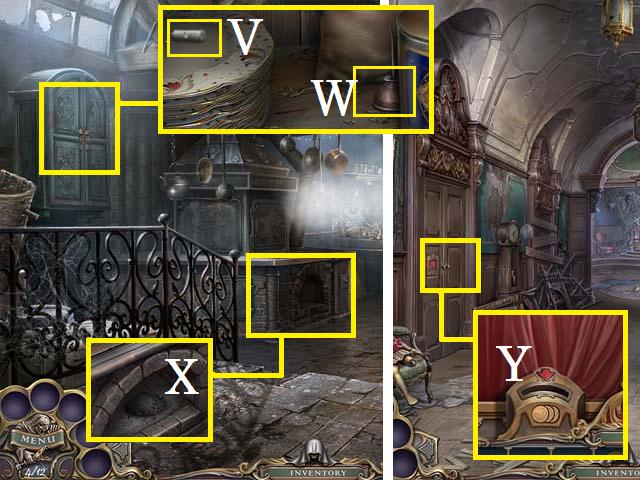
- Open the curtain and zoom into the back shelf; pick up the HANDLE (E) and examine the note (F).
- Return to the classroom.
- Zoom into the desk; place the ASH on the paper (G) and remove with the BRUSH.
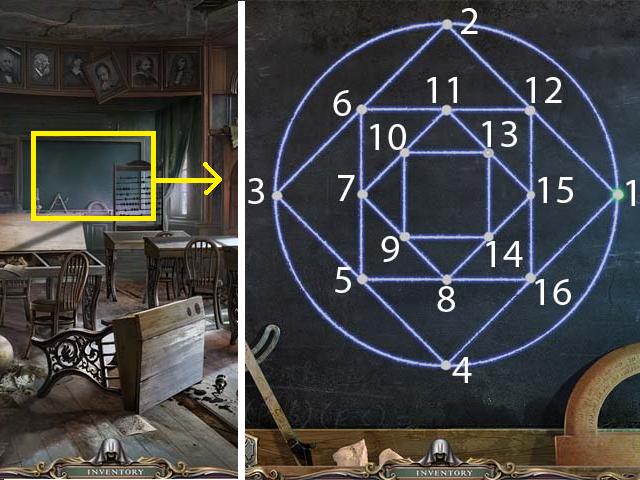
- Zoom into the chalkboard.
- Use the CHALK to trace the design in the following order: 1, 2, 3, 4, 5, 3, 6, 7, 5, 8, 9, 7, 10, 11, 6, 2, 12, 11, 13, 10, 9, 14, 13, 15, 14, 8, 16, 15, 12, 1, 16, 4, and 1.
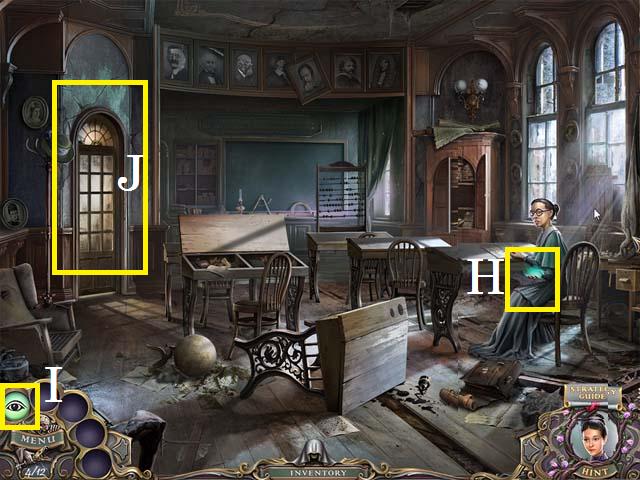
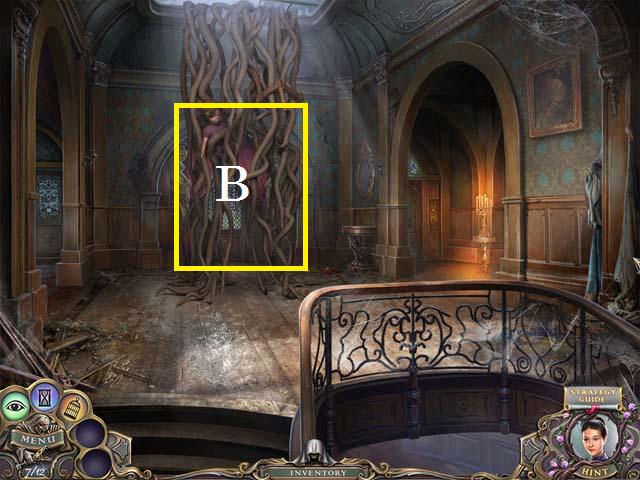
- Take the Reveal Power (H) from the lady.
- Highlight the Reveal Power Button (I), and use it on the wall (J) to reveal a hidden doorway.
- Return to the gazebo.
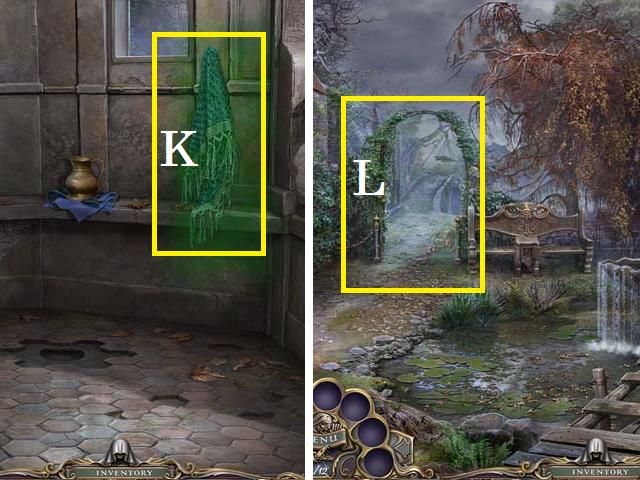
- Use the Reveal Power on the Shawl and then take the SHAWL (K).
- Move to the fountain.
- Use the Reveal Power on the overgrown path (L).
- Move forward to the bridge.
Chapter 3: The Kitchen
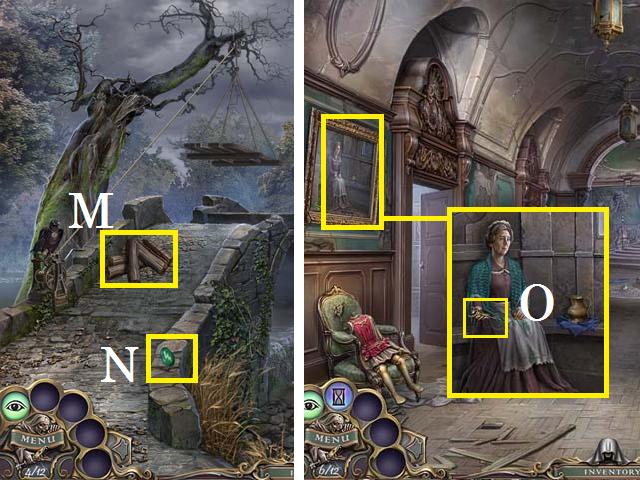
- Pick up the FIREWOOD (M) and the SWORD GEM (N).
- Return to the foyer.
- Zoom into the painting; give the SHAWL to the lady and collect the fifth SNAKE KEY (O).
- Return to the dining room.
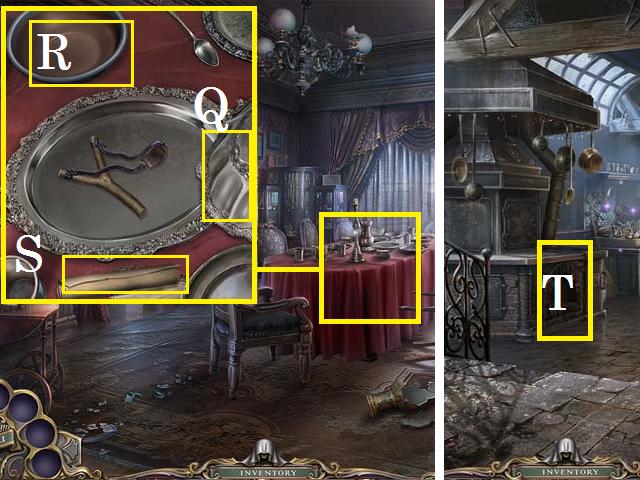
- Use the Reveal Power on the table and zoom in; move the lid (Q) to reveal the slingshot.
- Pick up the first PLATE (R) and read the note (S).
- Enter the kitchen.
- Place the FIREWOOD in the oven (T).
- Return to the staircase.
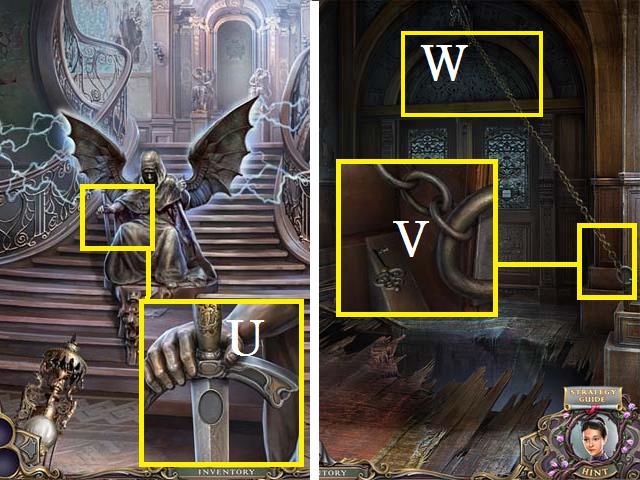
- Zoom into the statue; place the SWORD GEM (U).
- Climb to the top of the stairs and take a left.
- Zoom into the chain; pick up the POTTERY ROOM KEY (V).
- Use the Reveal Power over the door (W).
- Return to the classroom.
- If you haven't already, use the Reveal Power on the door; unlock it with the POTTERY ROOM KEY, and enter the pottery room.
- Scare the cat away and speak with the old woman.
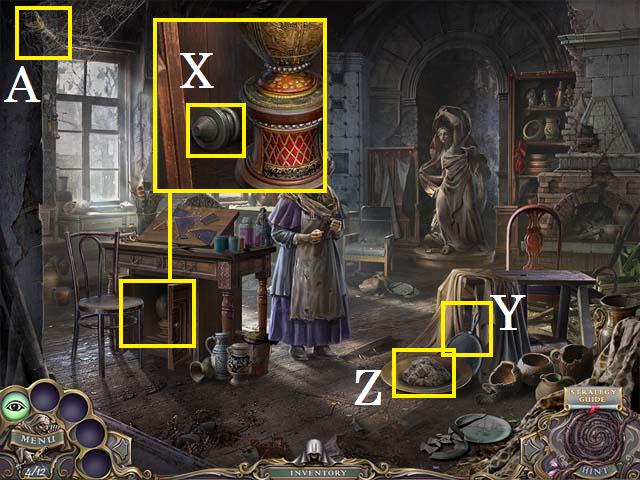
- Use the reveal on the desk and zoom in; pick up the OVEN HANDLE (X).
- Move the sheet; pick up the BAKER'S PADDLE (Y).
- Pour the PITCHER WITH WATER on the CLAY (Z) and pick it up.
- Pick up the sixth SNAKE KEY (A).
- Return to the kitchen.
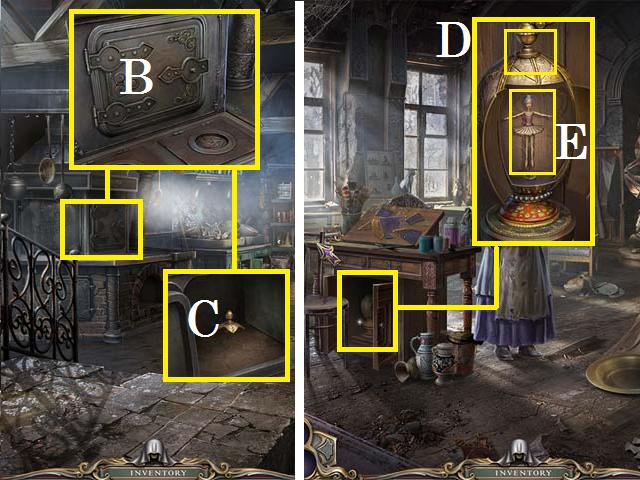
- Zoom into the oven; place OVEN HANDLE (B) to open the door and pick up the MUSIC BOX TOP (C).
- Return to the pottery room.
- Zoom back into the desk; place the MUSIC BOX TOP (D) and then pick up the BALLET DANCER (E).
- Return to the foyer.
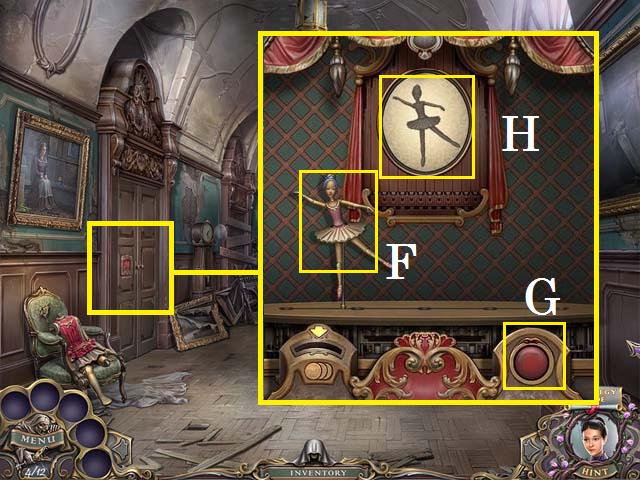
- Zoom into the door lock and place the BALLET DANCER (F).
- Press the button (G) when the ballerina's position mirrors that shown in the window (H) until the door opens.
- Enter the salon.
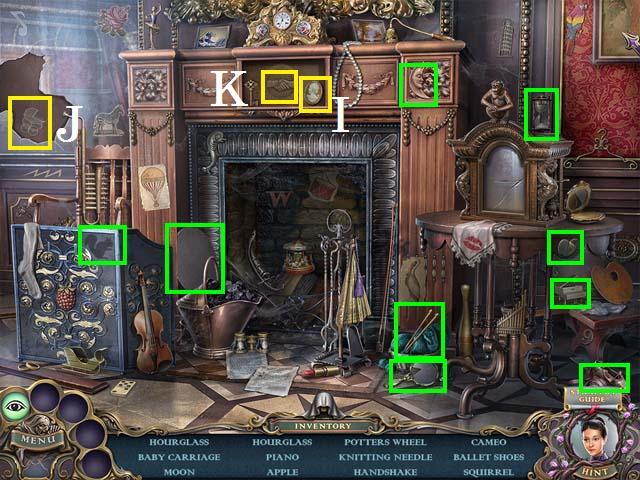
- Zoom into the sparkles to play a HOS.
- Open the fireplace panel to reveal the Handshake (K) and Cameo (I).
- Tear down the wallpaper to reveal the Baby carriage (J).
- Collect the remaining items (green) to receive the POTTER'S WHEEL.
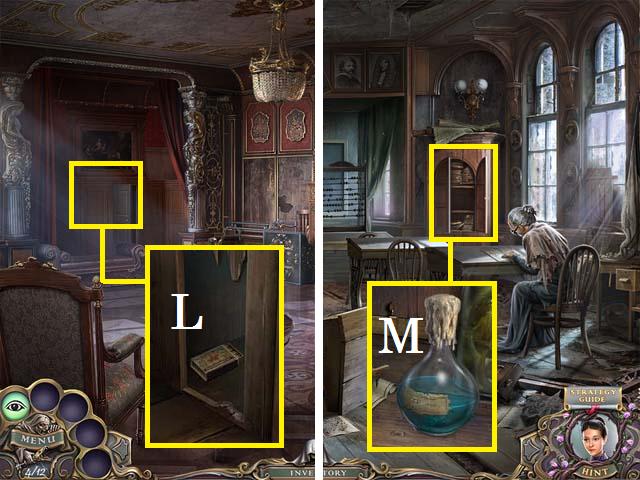
- Zoom into the doorway; use the KNIFE to remove the wood and pick up the MATCHES (L).
- Return to the classroom.
- Zoom into the cabinet; use the MATCHES to melt the candle wax and pick up the ACID (M).
- Enter the pottery room.
- Zoom into the table; place the POTTER'S WHEEL and CLAY.
- Spin the clay until it forms the CLAY POT (N); place the BAKER'S PADDLE under the CLAY PLATE and pick it up.
- Return to the kitchen.
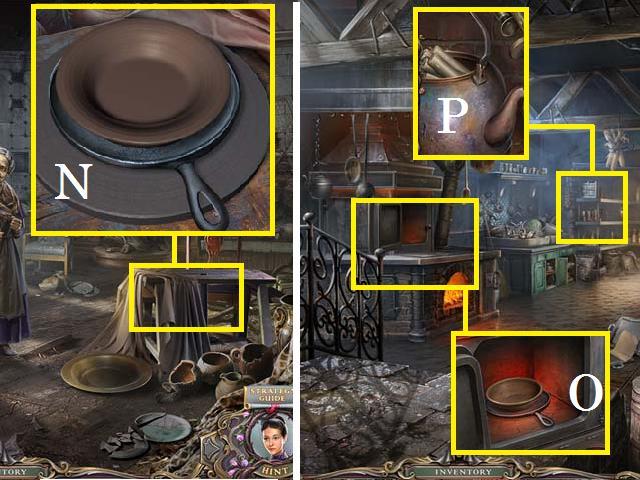
- Zoom into the oven; light the firewood with the MATCHES and place the CLAY POT in the oven (O) and pick it up as the second PLATE.
- Zoom into the shelf; pour the ACID on the teapot and pick up the CANDLES (P).
- Return to the top of the stairs and take a right.
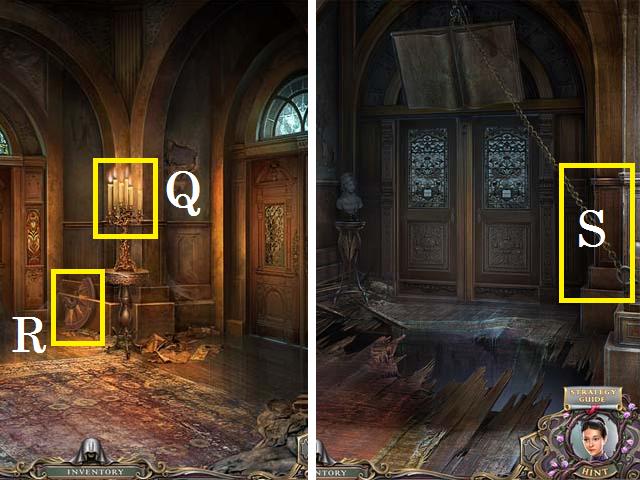
- Place the CANDLES in the candelabra (Q) and light with the MATCHES.
- Pick up the first COMPASS PARTS (R).
- Exit back one scene and take a left.
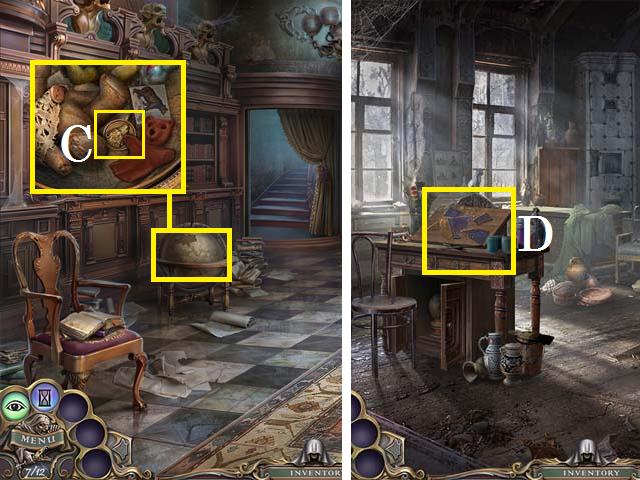
- Pour the ACID on the chain (S) and enter the library.
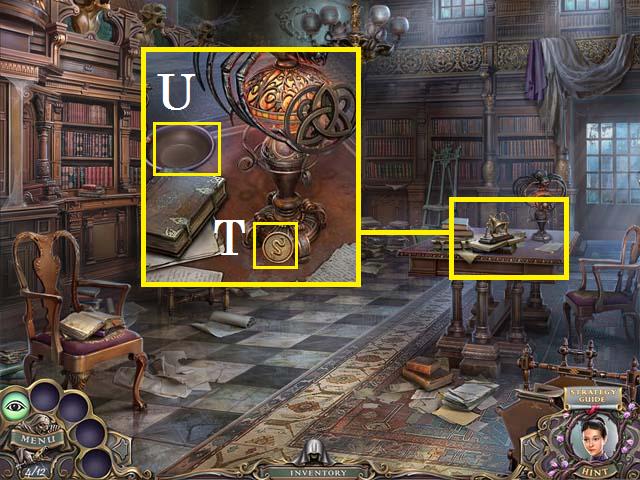
- Zoom into the desk; pick up the SNAKE MEDALION (T) and the third PLATE (U).
Chapter 4: Freeze Motion Power
- Return to the pottery room.
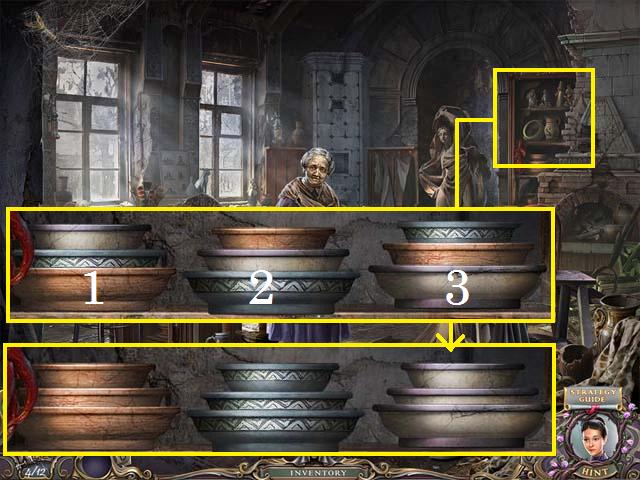
- Zoom into the shelf; place the three PLATES in it and use the following sequence to solve the puzzle:
- Move the small plates from 1, then 2 to tower 3, then the medium plate from tower 1 to 2.
- Move all of the small plates to tower 2 and the medium plate from tower 3 to 1. Move all three small plates to tower 3 and the medium plate from 2 to 1.
- Move all three small plates to tower 1 and the medium plate from 2 to 3. Move the first small plate to tower 2, the second one to tower 3, and then place the small plate from 2 to 3 followed by the small plate from 1 to 3.
- Place the medium plate from tower 1 to 2 then place the last two small plates to complete the puzzle.
- Pick up the Freeze Motion Power from the woman.
- Return to the kitchen.
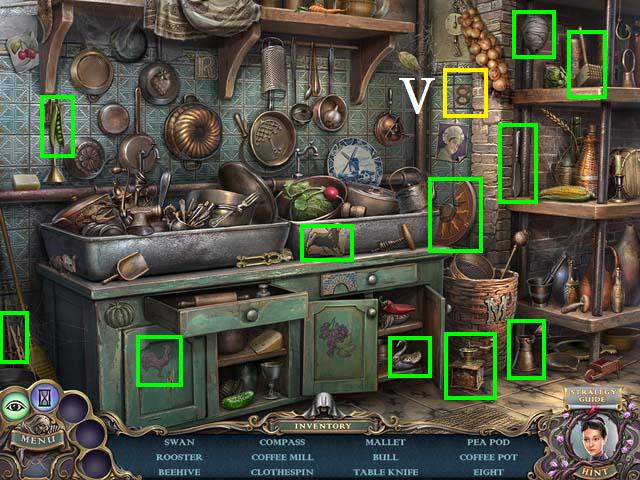
- Zoom into the sparkles to play a HOS.
- Move the garlic to reveal the Eight (V).
- Collect the remaining items to receive the second COMPASS PART.
- Return to the top of the stairs and take a left.
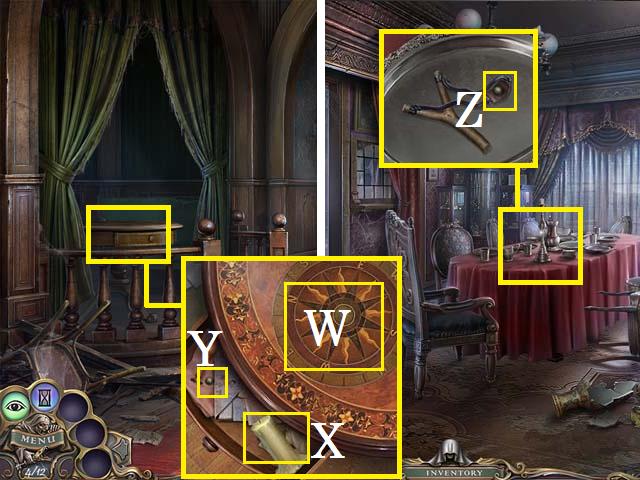
- Open the curtain and then zoom into the table; place both COMPASS PARTS (W) and pick up the CANDLE (X) and PEA (Y).
- Return to the dining room.
- Zoom into the table; place the PEA (Z) and pick up the SLINGSHOT.
- Return to the bridge.
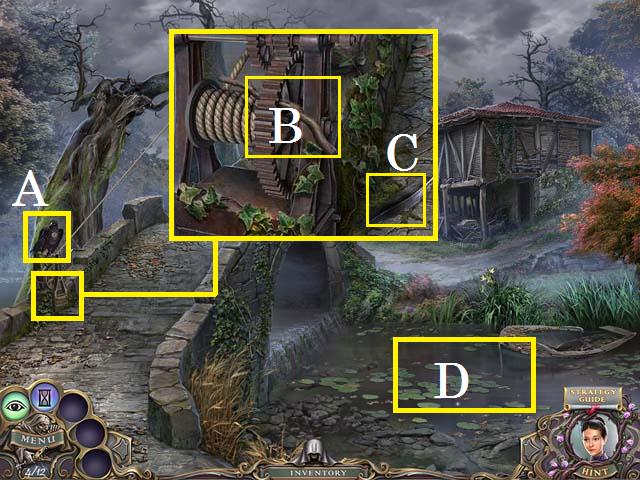
- Use the SLINGSHOT on the bird (A).
- Zoom into the crank; after pulling out the stick (B), use the OIL CAN on the crank and then pick up the first FEATHER (C).
- Use the Freeze Motion Power on the water (D).
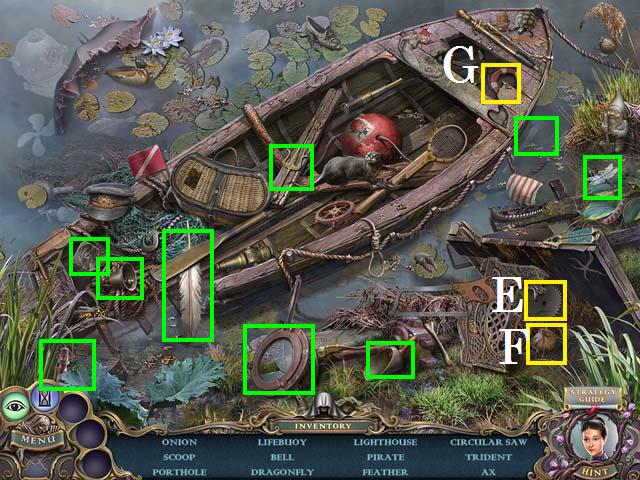
- Zoom into the sparkles to play a HOS.
- Move the grate to reveal the Circular saw (E) and Onion (F).
- Move the boards to reveal the Lifebuoy (G).
- Collect the remaining items (green) to receive the second FEATHER.
- Cross the bridge to the shack exterior.
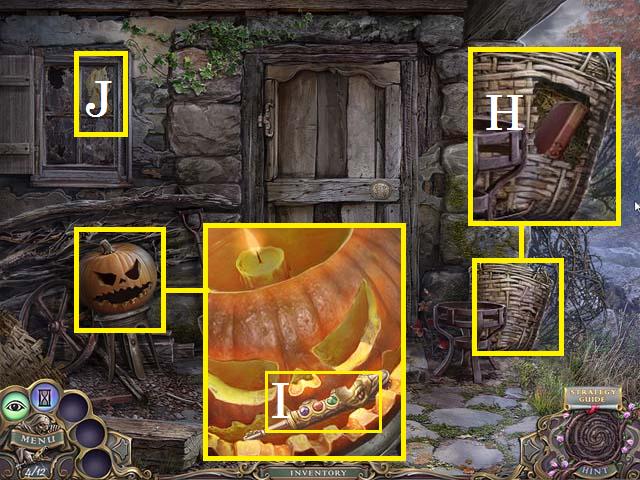
- Zoom into the basket; use the KNIFE to reveal the first BOOK (H).
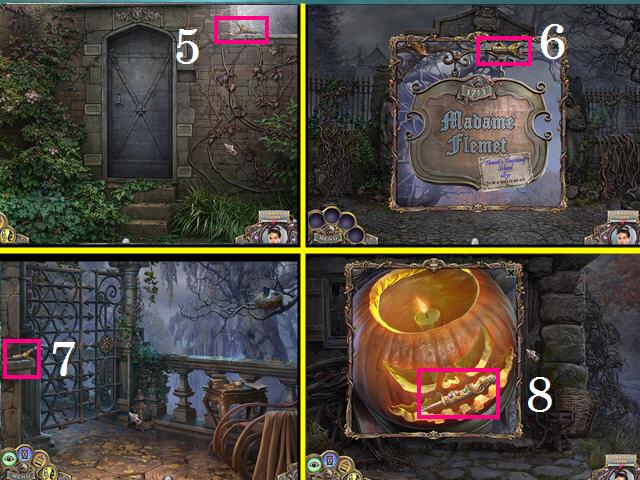
- Zoom into the pumpkin; remove the top and place the CANDLE inside. Light the candle with the MATCHES and pick up the seventh SNAKE KEY (I).
- Pick up the first PIECE OF GLOBE (J).
- Return to the school grounds.
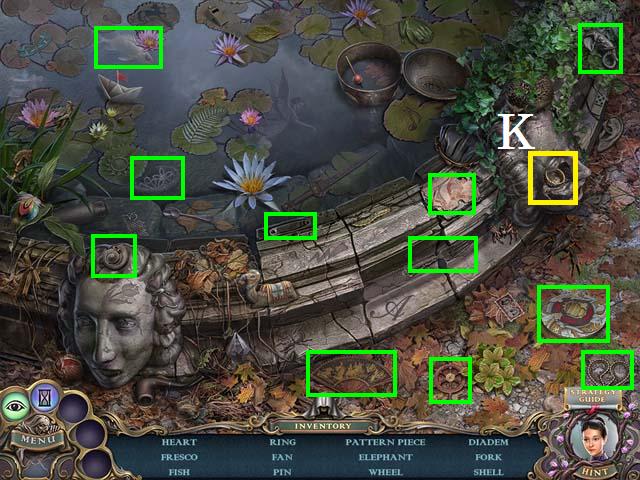
- Zoom into the sparkles to play a HOS.
- Move the piece of statue to reveal the Ring (K).
- Collect the remaining items (green) to receive the PATTERN PIECE.
- Return to the Shack exterior.
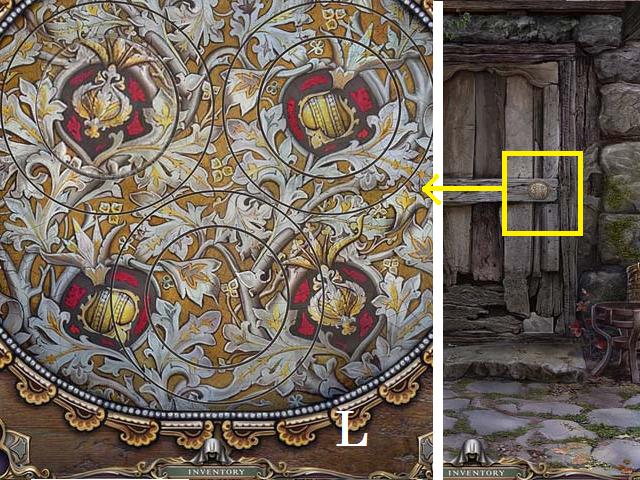
- Zoom into the door lock; place the PATTERN PIECE and spin the pieces as shown in the screenshot (L).
- Enter the shack.
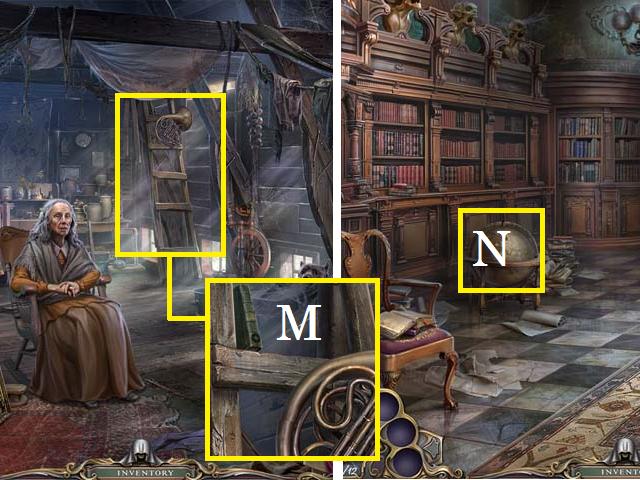
- Speak with the woman.
- Use the Reveal Power on the ladder and zoom in; pick up the second BOOK (M).
- Return to the library.
- Place the first PIECE OF GLOBE (N).
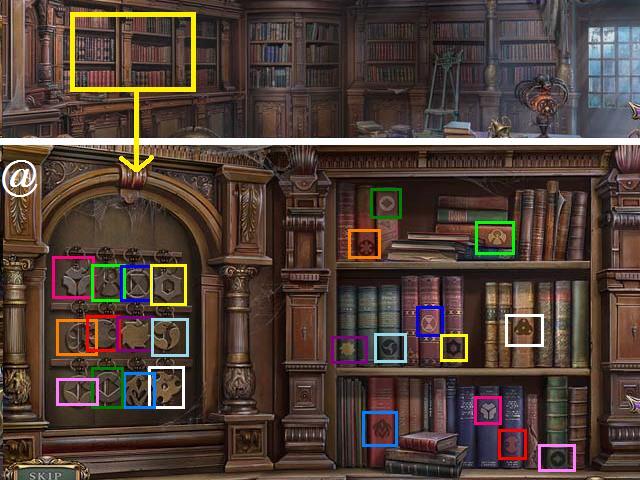
- Zoom into the shelf; place the two BOOKS on the shelf.
- Place the matching keys on the appropriate books (color coded) to open the attic door (@).
- Enter the attic.
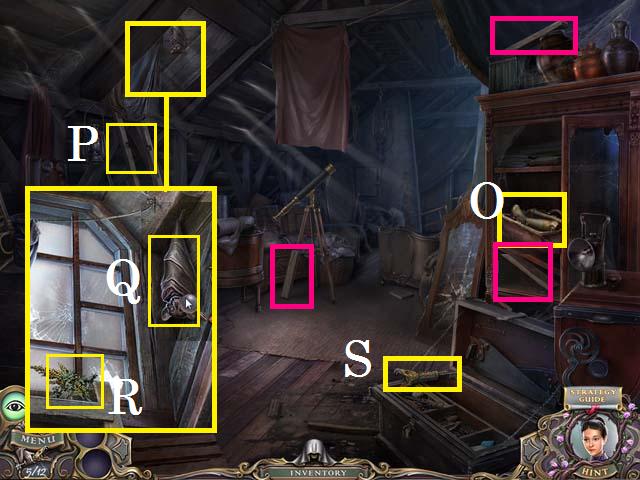
- Open the bag; pick up the PUPPET LEG (O).
- Pick up the three STEPS (pink) and the eighth SNAKE KEY (S).
- Place the STEPS on the ladder (P).
- Zoom into the window; open the curtain to move the bat (Q) and then pick up the SAGEBRUSH (R).
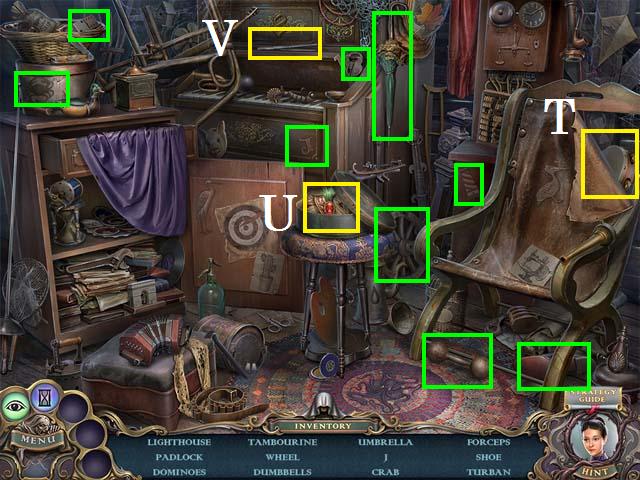
- Zoom into the sparkles to play a HOS.
- Tear the chair to reveal the Tambourine (T).
- Open the hat box to reveal the turban (U).
- Move the piano cover to reveal the Forceps (V).
- Collect the remaining items (green) to receive the UMBRELLA.
- Move to the foyer.
Chapter 5: Tame Power
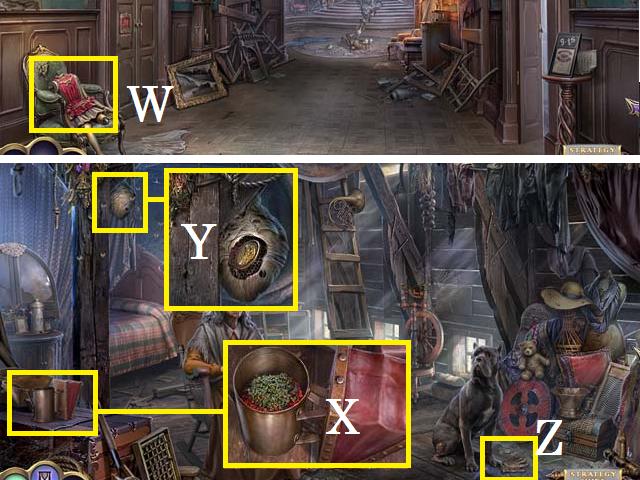
- Place the PUPPET LEG on the doll (W).
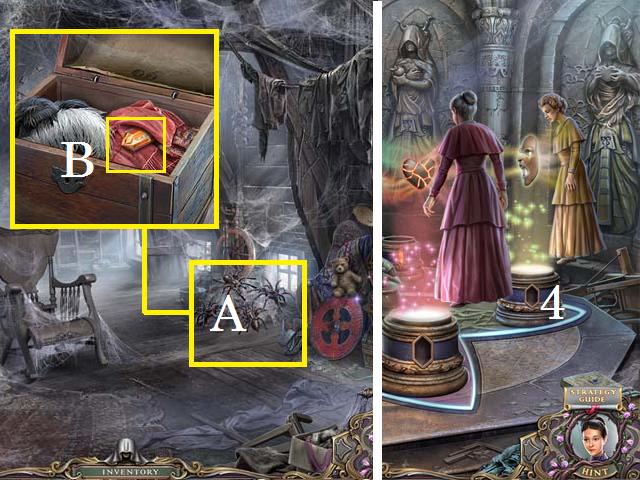
- Return to the Shack.
- Zoom into the chest; place the SAGEBRUSH in the BEE SMOKER (X). Close the lid and pick it up.
- Use the BEE SMOKER on the beehive and zoom in; remove the side of the beehive with the KNIFE, and pick up the EAGLE MEDALLION (Y).
- Use the UMBRELLA to move the GLOVE (Z) and pick it up.
- Return to the Foyer.
- Zoom into the sparkles to play a HOS.
- Move the curtain to reveal the Chameleon (A).
- Collect the remaining items (green) to receive the second PIECE OF GLOBE.
- Return to the Library.
- Place the second PIECE OF GLOBE on the globe and then zoom into the globe; pick up the (C) BEAR MEDALLION.
- Return to the pottery room.
- Use the GLOVE to pick up the STAINED-GLASS PIECE (D).
- Exit back two scenes.
- Zoom into the door; place the STAINED-GLASS PIECE (E) and pull the handle (F).
- Enter the Study.
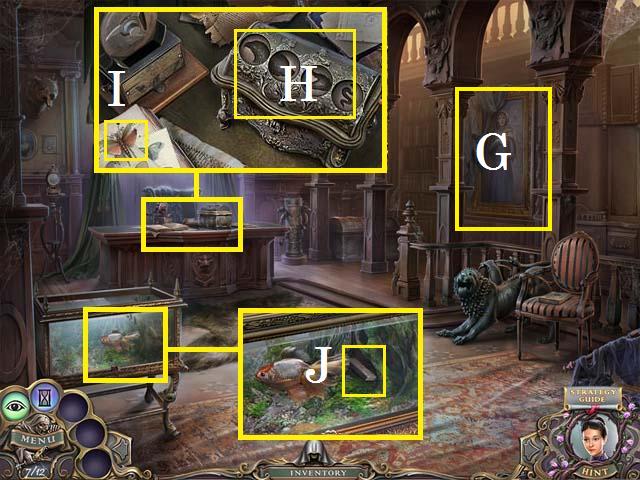
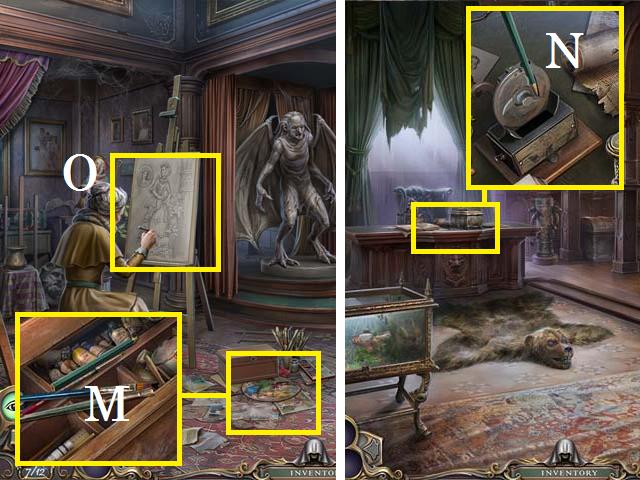
- Zoom into the painting (G) and then back out.
- Use the Reveal Power on the desk and zoom in; place the EAGLE MEDALLION, BEAR MEDALLION, and SNAKE MEDALLION (H) in the slots.
- Pick up the BAIT (I).
- Zoom into the fish tank; place the BAIT in the tank and pick up the PIANO KEY (J).
- Return to the salon.

- Zoom into the sparkles to play a HOS.
- Open the clock to reveal the Cat (K).
- Tear the painting to reveal the Joker (L).
- Collect the remaining items (green) to receive the BEAR KEY.
- Return to the study.
- Zoom into the bear rug; unlock the bear with the BEAR KEY and pick up the CROCODILE MEDALLION (M).
- Zoom into the desk; place the CROCODILE MEDALLION in the last slot and pick up the LETTERS (N).
- Return to the shack.
- Give the LETTERS to the woman and take the Tame Power from her.
- Use the Tame Power on the dog (O).
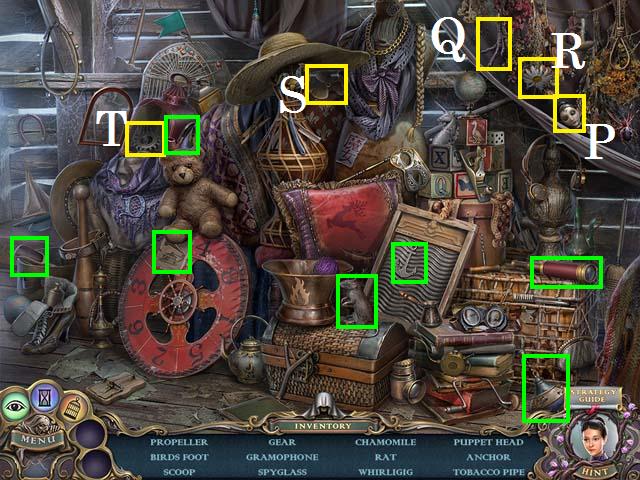
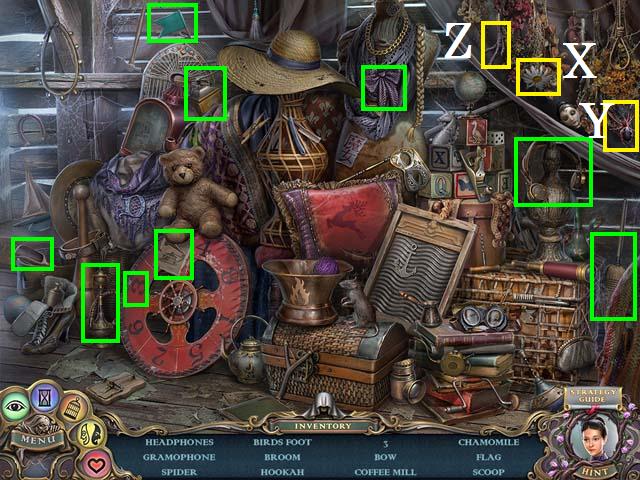
- Zoom into the sparkles to play a HOS.
- Move the cloth to reveal the Puppet Head (P), Bird's foot (Q), and Chamomile (R).
- Move the hat to reveal the Propeller (S).
- Open the lantern to reveal the Gear (T).
- Collect the remaining items (green) to receive the PUPPET HEAD.
- Exit back to the fountain.
- Use the Tame Power on the lizard (U).
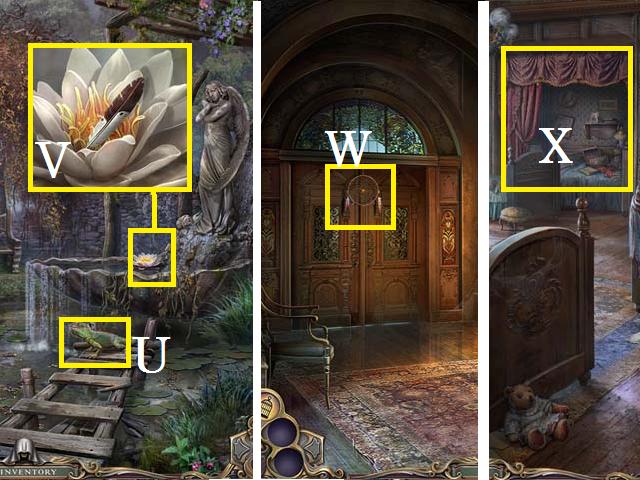
- Zoom into the fountain and pick up the third FEATHER (V).
- Stop in the foyer and place the PUPPET HEAD on the doll.
- Climb the stairs and take a right.
- Place the three FEATHERS on the dream catcher (W) and enter the dormitory.
- Use the Reveal Power on the wall to see the curtain (X).

- Zoom into the sparkles to play a HOS.
- Move the frame to reveal the Cactus (Y).
- Collect the remaining items (green) to receive the PUPPET ARM.
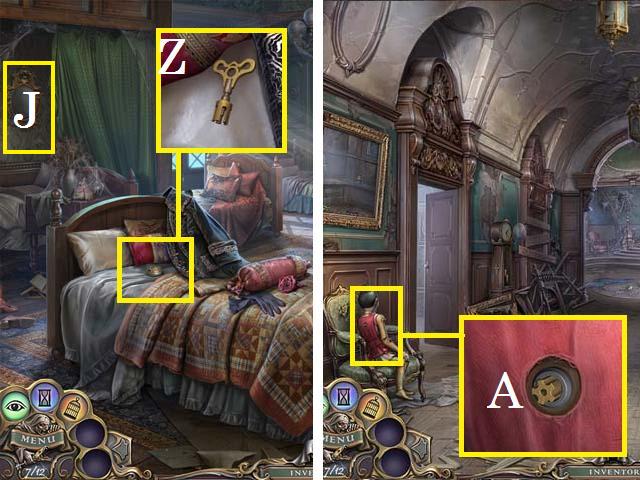
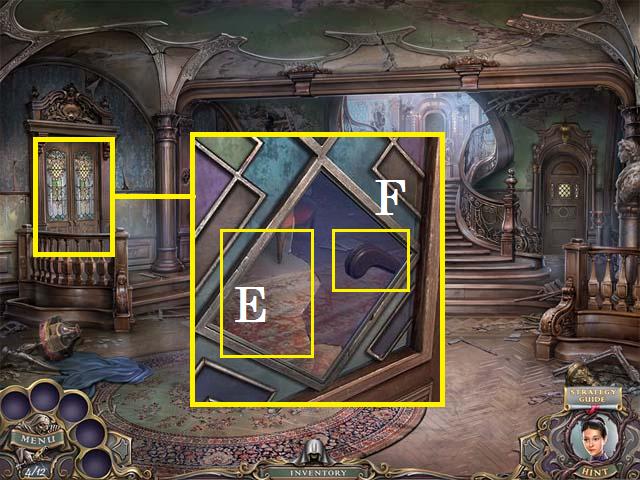
- Open the curtain (J) and zoom into the mirror.
- Zoom into the bed; pick up the PUPPET KEY (Z).
- Return to the foyer.
- Place the PUPPET ARM on the puppet and zoom in; use the PUPPET KEY (A) in the lock.
- Pick up the PUPPET.
- Climb the stairs.
- Place the PUPPET in the vines (B) and enter the Master Suite.
- Return to the bridge.
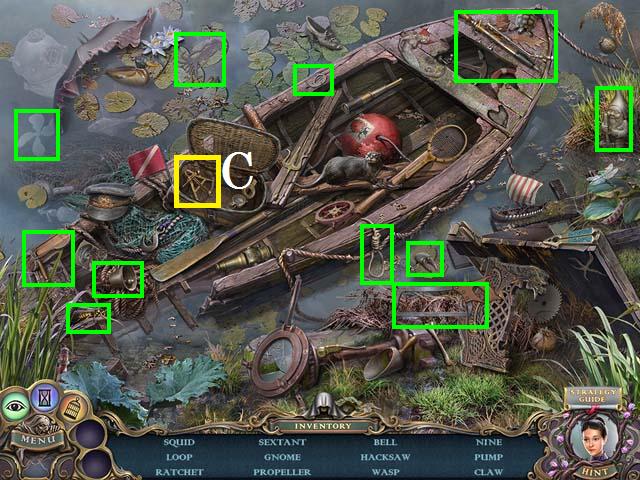
- Zoom into the sparkles to play a HOS.
- Open the basket to reveal the Sextant (C).
- Collect the remaining items (green) to receive the HACKSAW.
- Enter the shack.

- Zoom into the ladder; use the HACKSAW on the French Horn and take the FRENCH HORN (D).
- Return to the salon.
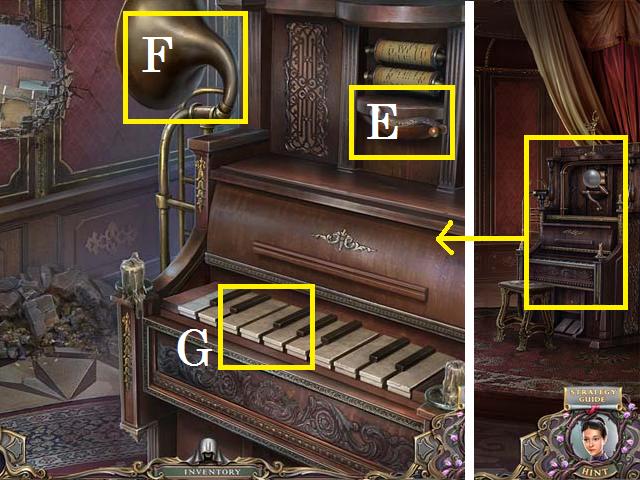
- Zoom into the piano; place the HANDLE (E), the FRENCH HORN (F), and the PIANO KEY (G) on the piano.
- Spin the HANDLE and replay the sequences in this Simon Says style puzzle to bust down the wall.
- Enter the art room.
- Speak with the woman.
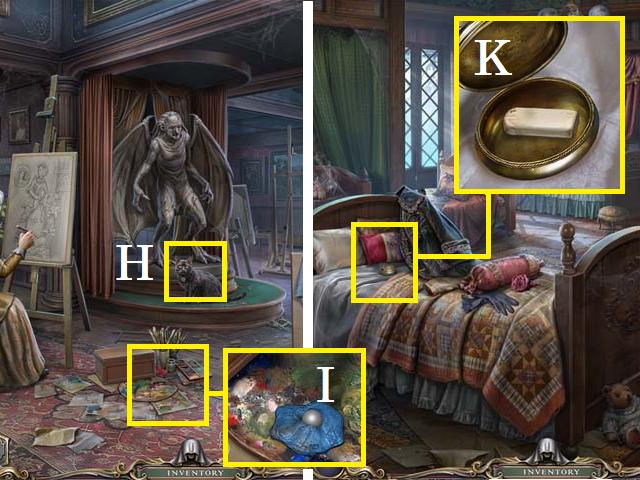
- Open the curtain and then use the Tame Power on the cat (H).
- Zoom into the art supplies; use the KNIFE to break the paint and pick up the PEARL (I).
- Return to the dormitory.
- Zoom into the bed; place the PEARL on the case top and then pick up the ERASER (K).
- Zoom into the sparkles to play a HOS.
- Move the sheet to reveal the Lizard (L).
- Collect the remaining items (green) to receive the CLIP.
Chapter 6: Turn Good Power
- Return to the art room.
- Zoom back into the art supplies; use the CLIP to open the case and pick up the BROKEN PENCIL (M).
- Return to the study.
- Zoom into the desk; place the BROKEN PENCIL in the sharpener and spin the blades (N). Pick up the PENCIL.
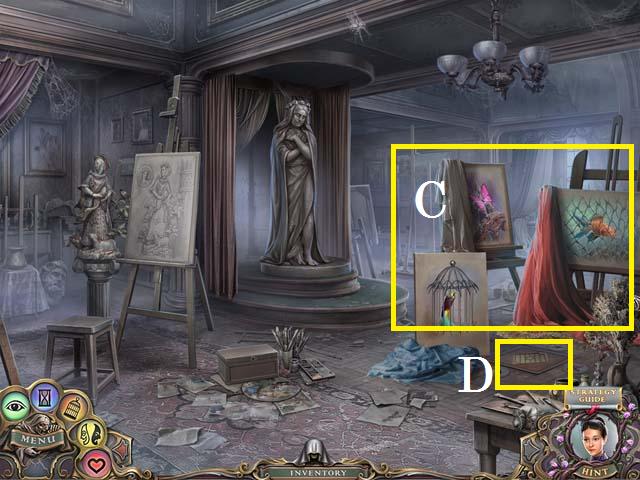
- Return to the art room.
- Zoom into the easel (O); place the ERASER and the PENCIL on the picture.
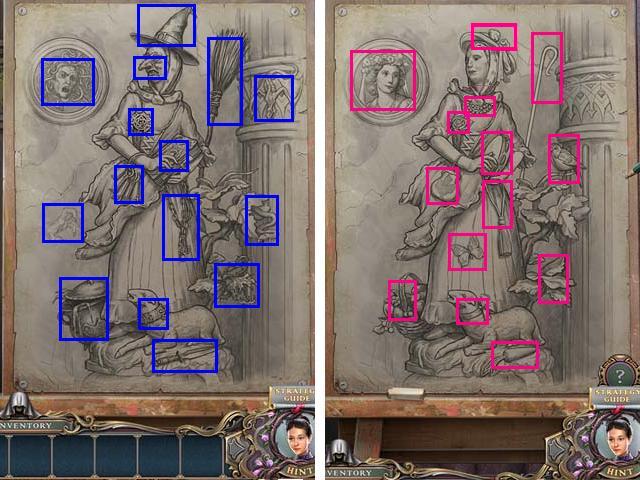
- Remove all of the wrong items (blue) with the ERASER.
- Add in all of the correct items (pink) with the PENCIL.
- Take the Turn Good Power from the woman.
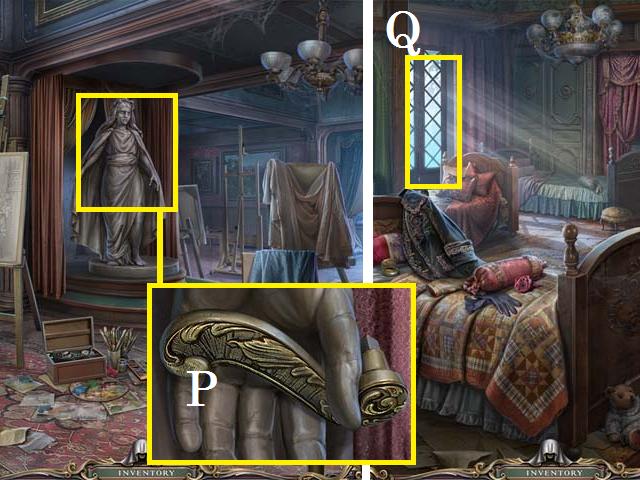
- Use the Turn Good Power on the statue and zoom in; pick up the DOOR HANDLE (P).
- Return to the dormitory.
- Open the door (Q) using the DOOR HANDLE.
- Exit to the balcony.
- Pick up the ninth SNAKE KEY (R).
- Use the Tame Power on the bird (S) and pick up the MUSIC ROOM KEY (T).
- Pick up the RECIPE PART (U).
- Exit the dormitory.
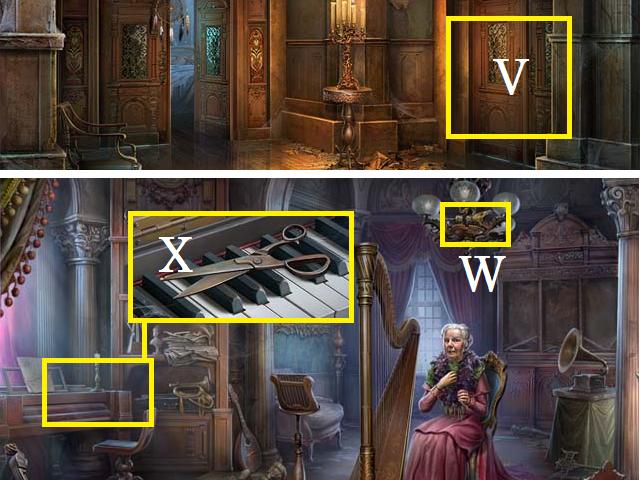
- Use the MUSIC ROOM KEY to open the door (V) and enter the music room.
- Pick up the tenth SNAKE KEY (W).
- Zoom into the piano; pick up the SCISSORS (X).
- Return to the dormitory.
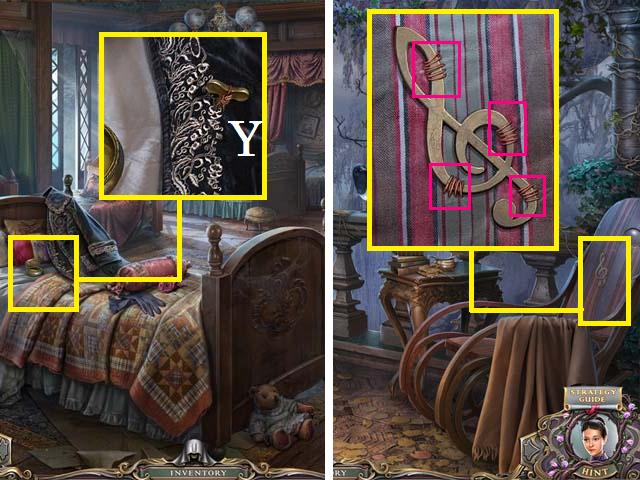
- Zoom into the bed; remove the PEG (Y) with the SCISSORS.
- Exit to the balcony.
- Zoom into the chair; remove the threads (pink) and pick up the TREBLE CLEF.
- Return to the Music room.
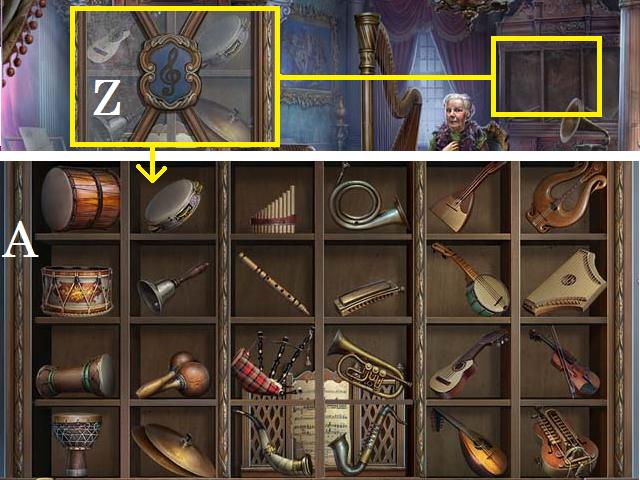
- Zoom into the shelf; use the Reveal Power and place the TREBLE CLEF in the lock (Z).
- Use screenshot (A) as a key to arrange the instruments correctly.
- You will receive the SHEET MUSIC.
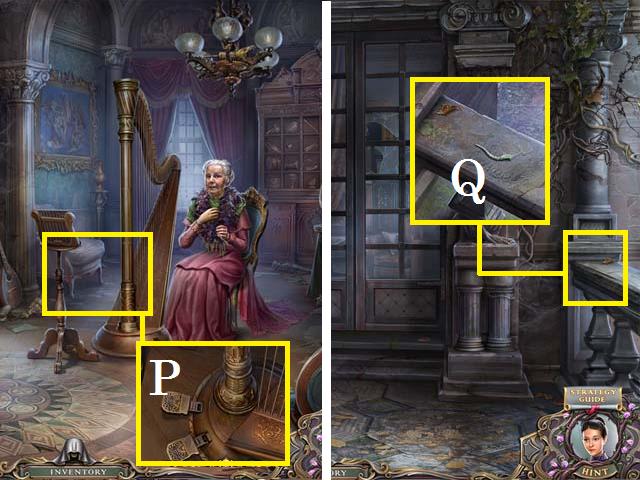
- Zoom into the harp; place the SHEET MUSIC (B), and the PEG (C).
- Return to the shack.
- Zoom into the dried plants; use the SCISSORS to remove the BLACKTHORN (D).
- Exit the shack.
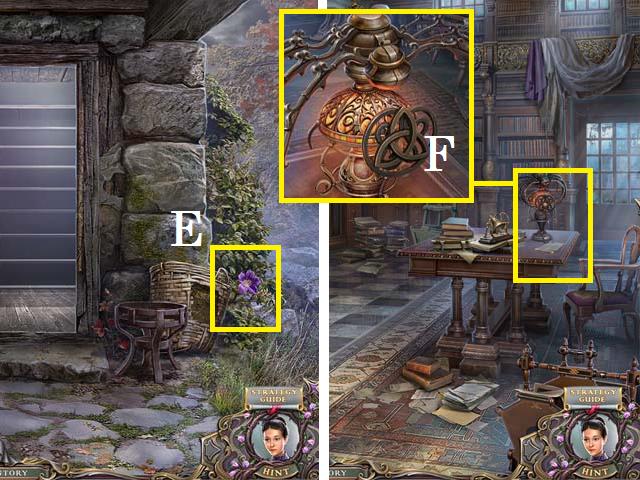
- Use the Turn Good Power on the bush and pick up the FLOWER (E).
- Return to the library.
- Zoom into the desk; use the Turn Good Power on the spider and pick up the ORNAMENT PIECE (F).
- Return to the balcony.

- Place the ORNAMENT PIECE in the gate (G) and move to the back balcony.
- Zoom into the banister; burn the vines with the MATCHES and pick up the FLASK (H).
- Return to the study.
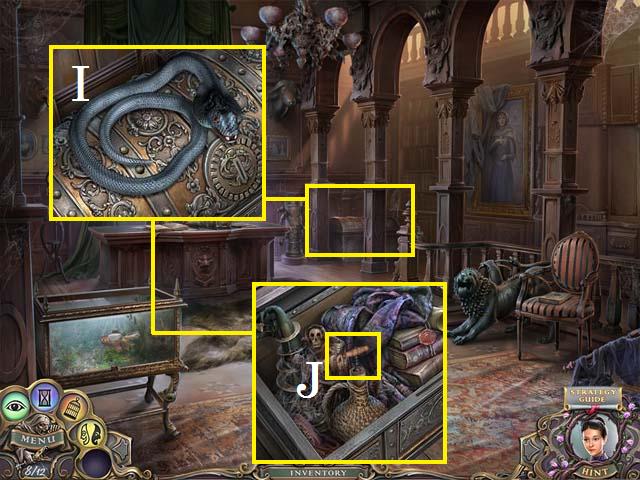
- Zoom into the chest; use the Tame Power on the snake (I).
- Open the chest and pick up the CORKSCREW (J).
- Move to the attic.
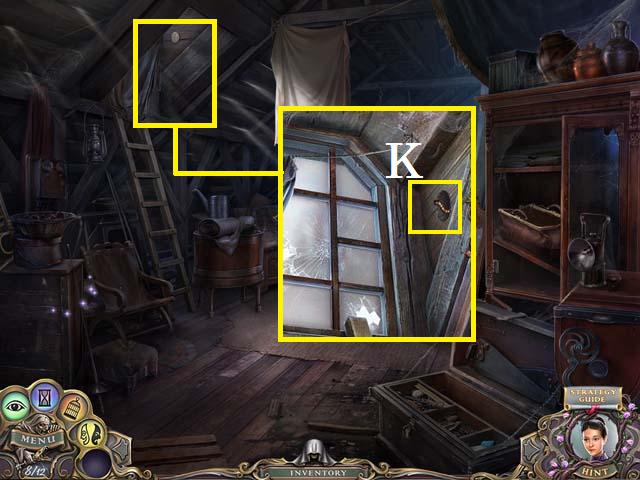
- Zoom into the window.
- Remove the cork with the CORKSCREW and pick up the CATERPILLAR (K).
- Zoom into the sparkles to play a HOS.
- Open the can to reveal the Mousetrap (L).
- Collect the remaining items (green) to receive the NAIL PULLER.
- Return to the back balcony.
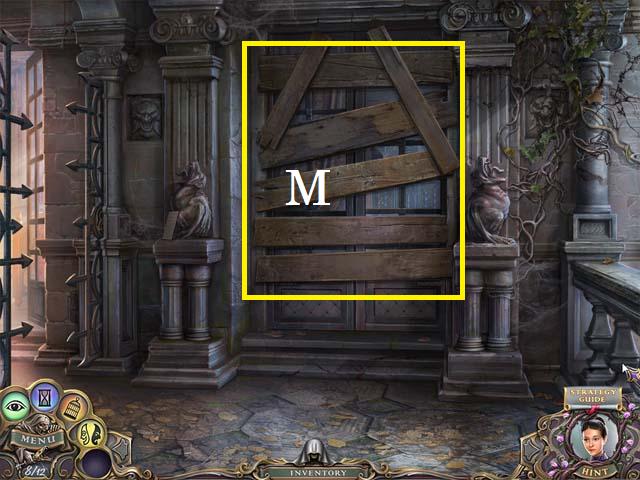
- Remove the boards (M) with the NAIL PULLER.
- Return to the top of the stairs and enter the master bedroom.
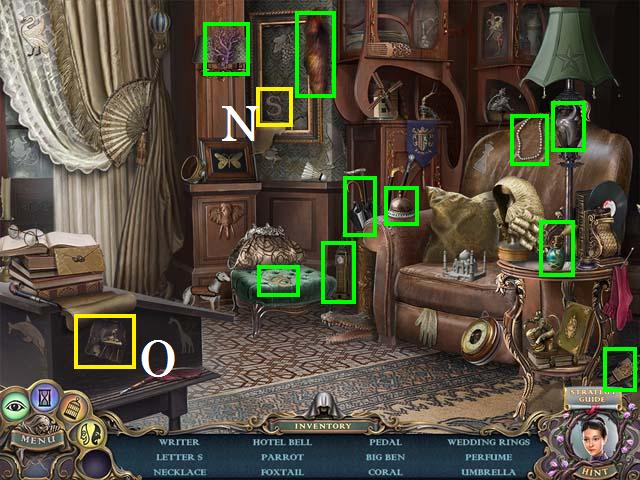
- Zoom into the sparkles to play a HOS.
- Tear the painting to reveal the Letter S (N).
- Move the paper to reveal the Writer (O).
- Collect the remaining items (green) to receive the PEDAL.
Chapter 7: Animate Power
- Return to the music room.
- Zoom into the harp; place the PEDAL (P).
- Take the Animate Power from the woman.
- Return to the back balcony.
- Zoom into the banister; use the Animate Power on the lizard and pick up the TAIL (Q).
- Return to the master bedroom.
- Zoom into the table.
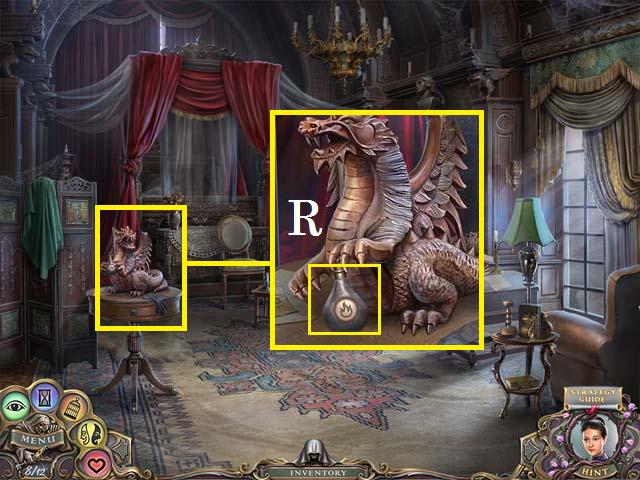
- Use the Animate Power on the statue and pick up the BOTTLE OF FUEL (R).
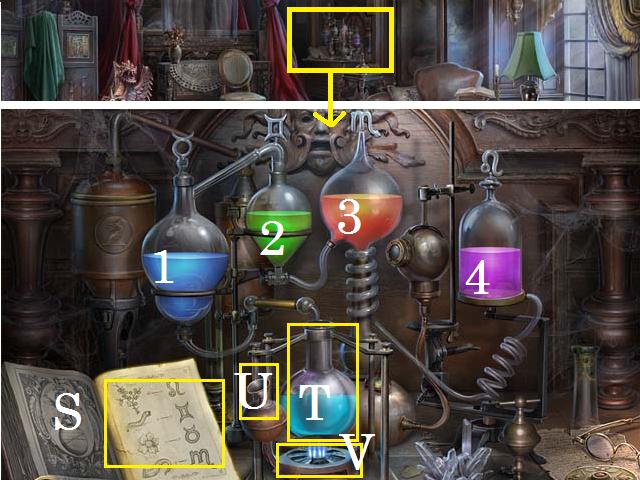
- Zoom into the desk; place the RECIPE PART (S), the FLASK (T), and the BOTTLE OF FUEL (U) on the device.
- Place the FLOWER in the first vial 1, the CATERPILLAR in vial 2, the TAIL in vial 3, and the BLACKTHORN in vial 4.
- Light the burner (V) with the MATCHES.
- Pick up the flask with the POTION.
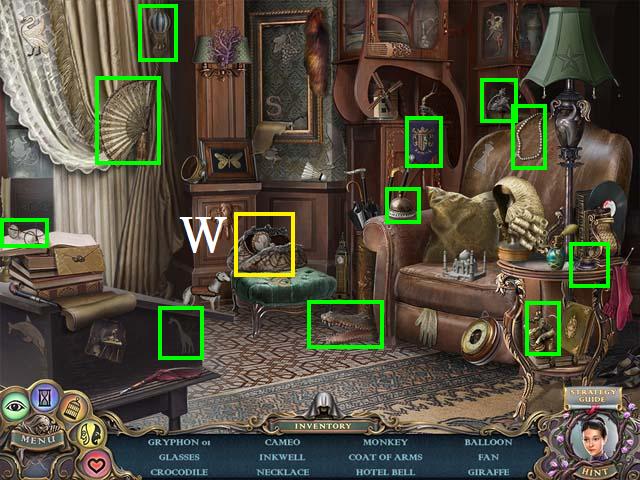
- Zoom into the sparkles to play a HOS.
- Open the purse to locate the Cameo (W).
- Collect the remaining items (green) to receive the first GRYPHON.
- Move to the art room.

- Use the Animate Power on the statue (X).
- Pick up the eleventh SNAKE KEY (Y) and enter the secret passage.
- Light the torch (Z) with the MATCHES.
- Pick up the STATUETTE (A).
- Exit back to the salon.
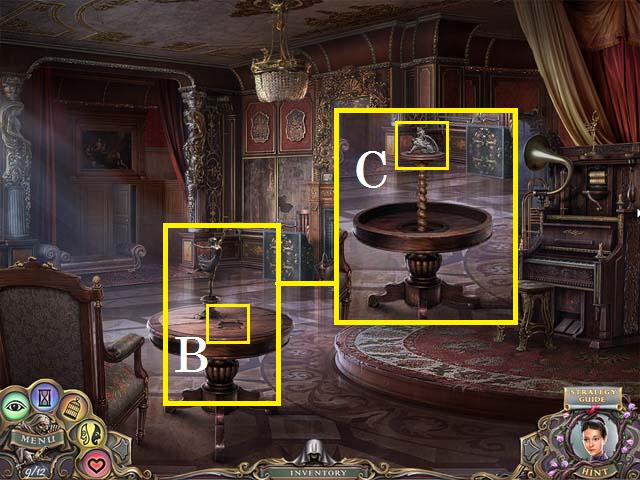
- Place the STATUETTE on the table (B) and pick up the second GRYPHON (C).
- Return to the front gate.
- Zoom into the sparkles to play a HOS.
- Move the bricks to reveal the Six (D).
- Collect the remaining items (green) to receive the CROWBAR.
- Zoom into the plaque; place both GRYPHONS (G) on it and pick up the CAT (H).
- Review the file (I).
- Return to the secret passage.
- Place the CAT (J) and use the Animate Power on it to scare the rats.
- Use the CROWBAR on the alcove and pick up the BOOK SYMBOL (K).
Chapter 8: Defeat Flemet
- Return to the Study.
- Zoom into the chair; place the BOOK SYMBOL (L) to open the book.
- Use the Reveal Power on the page and pick up the twelfth SNAKE KEY (M) to receive all of the SNAKE KEYS in your inventory.
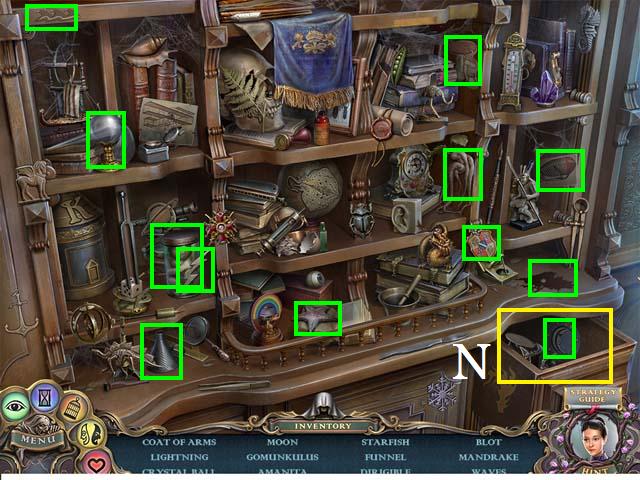
- Zoom into the sparkles to play a HOS.
- Open the drawer (N) and all the doors to reveal all of the hidden items.
- Collect the items (green) to receive the LIGHTNING.
- Return to the school grounds.
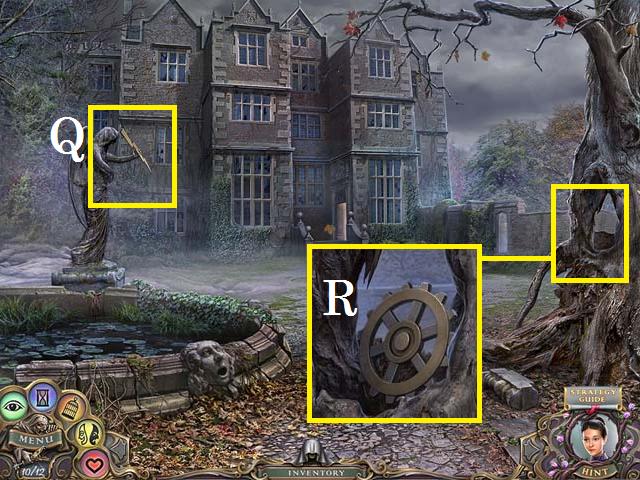
- Place the LIGHTNING in the statue's hands (Q) and use the Animate Power on her.
- Zoom into the tree; pick up the GEAR (R).
- Return to the secret passage.
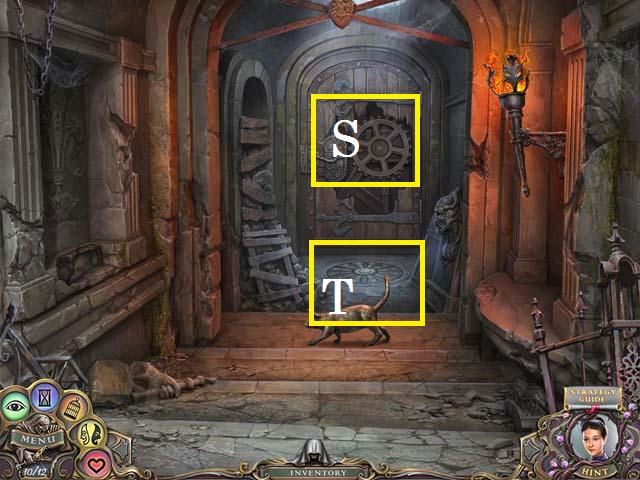
- Zoom into the door (S); place the GEAR.
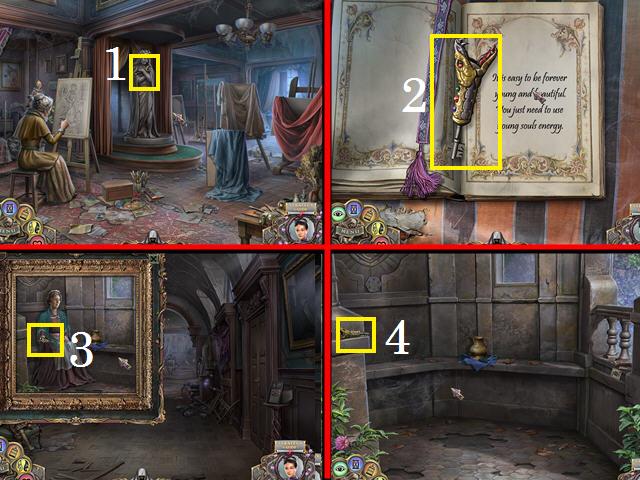
- You will get the first Snake Key automatically, the rest of the keys can be found in these locations: Art Room (1), Office (2), Foyer Painting (3), Gazebo (4).
- Garden Gate (5), Front Gates (6), Balcony (7), Shack Exterior (8).
- Attic (9), Music Room (10), and the Pottery Room (11).
- Zoom into the ground (T); place the twelve SNAKE KEYS in the lock.
- Enter the secret chamber.
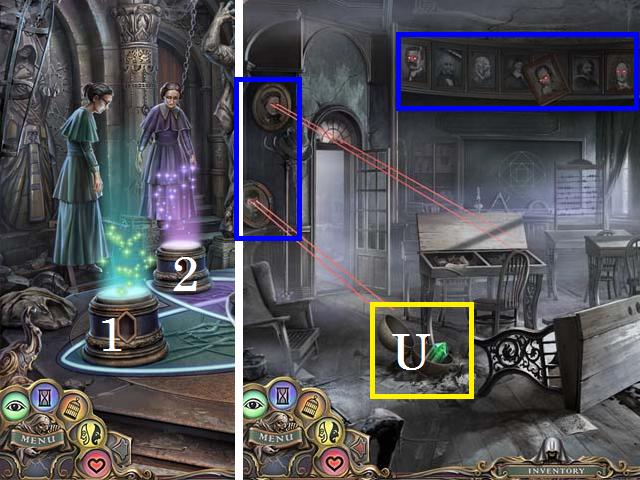
- Zoom into the first pillar (1).
- Use the Reveal Power on all of the frames (blue).
- Aim all of the lasers at the globe and pick up the FIRST PORTAL STONE (U).
- Place the FIRST PORTAL STONE in the first portal and zoom into the second portal (2).
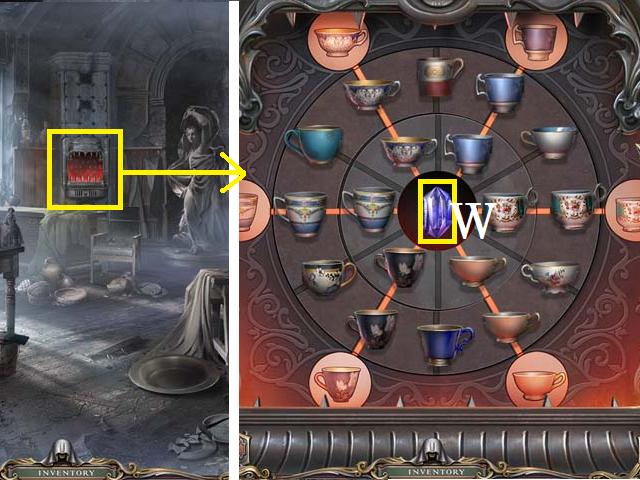
- Zoom into the kiln; use the Freeze Motion Power on the bars. Arrange the tea cups as shown in the screenshot.
- Pick up the SECOND PORTAL STONE (W).
- Place the SECOND PORTAL STONE in the second portal and zoom into the third portal (3).
- Zoom into the sparkles to play a HOS.
- Move the sheet to reveal the Chamomile (X), Bird's foot (Y), and Spider (Z).
- Collect the remaining items (green) to receive the BROOM.
- Use the Tame Power on the spiders (A) and zoom in.
- Use the BROOM to remove the spider webs. Open the chest and pick up the THIRD PORTAL STONE (B).
- Place the THIRD PORTAL STONE in the third portal and zoom into the fourth portal (4).
- Remove the sheets from the three paintings (C). Use the Turn Good Power on all three canvases.
- Zoom into the floor (D).
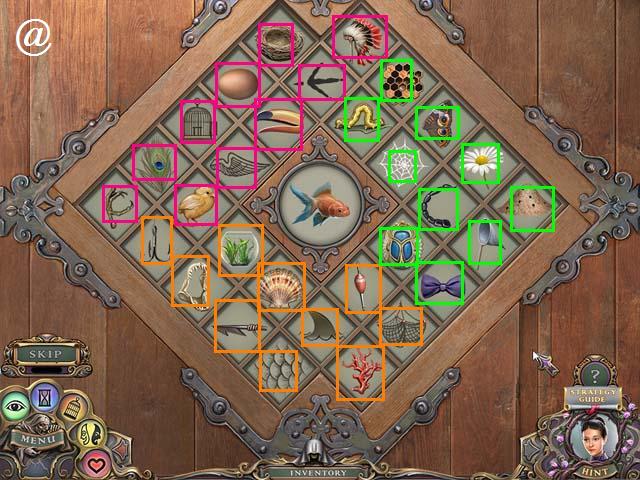
- Highlight all of the items (orange) that match the fish.
- Continue with the items (pink) that match the bird.
- Finish with the items (green) that match the butterfly (@).
- Collect the FOURTH PORTAL STONE (E).
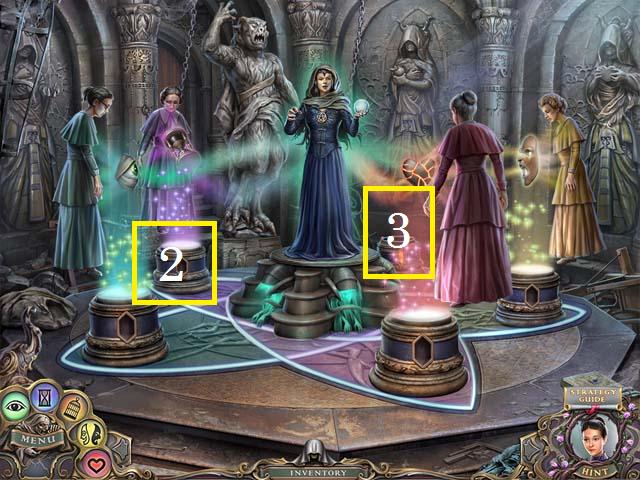
- Place the FOURTH PORTAL STONE in the fourth portal and zoom into the fifth (5) portal.
- Zoom into the painting (I).
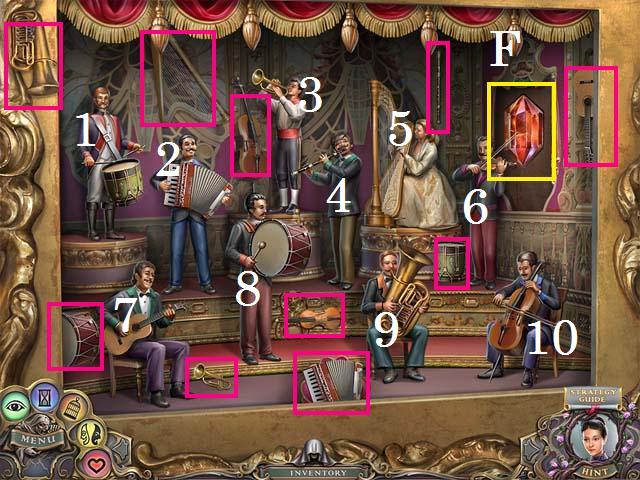
- Place the instruments (pink) in the correct musician's hands.
- Use the Animate power on the players.
- Play the instruments in the following order: 6, 2, 8, 10, 7, 1, 3, 4, 5, and 9.
- Pick up the FIFTH PORTAL STONE (F).
- Place the FIFTH PORTAL STONE in the fifth portal.
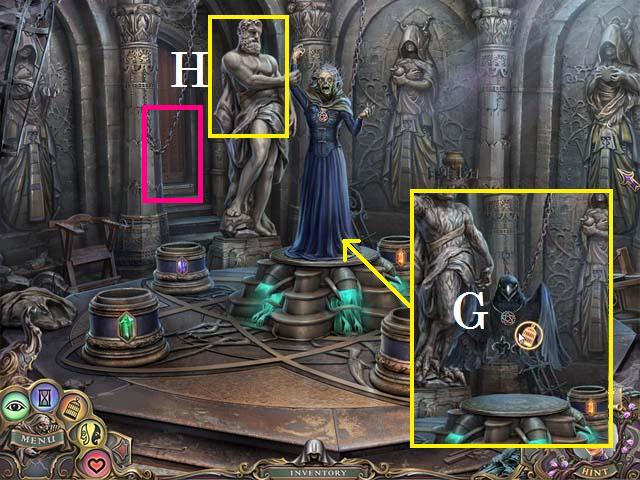
- Use the Tame Power on the bird (G).
- Use the Turn Good Power on the statue (H), followed by the Animate Power.
- Use the Freeze Motion Power followed by the POTION on Flemet.
- Exit through the open door (pink).
- Congratulations, you have completed Witch Hunters: Stolen Beauty!
Created at: 2012-09-15