

Walkthrough Menu
General Tips
- This is the official guide for Witches Legacy: Secret Enemy.
- This guide will not show when you have to zoom into a location; the screenshots will show each zoom scene.
- Hidden-object puzzles are referred to as HOPs. This guide will not show screenshots of the HOPs, however, it will mention when an HOP is available and the inventory item you'll collect from it.
- Use the Map to fast travel to a location.
Chapter 1: The Witches' Coven
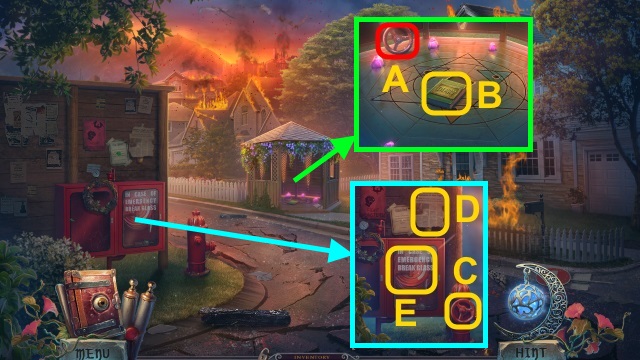
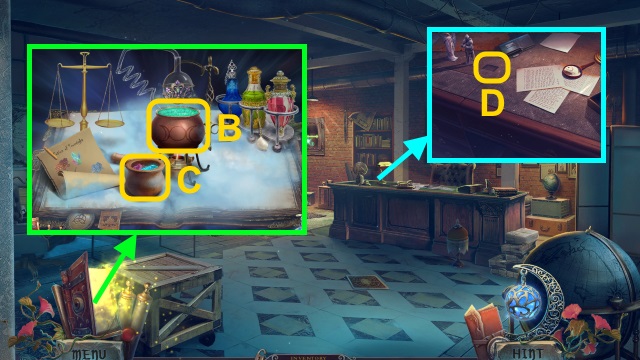
- Take VALVE (A). Read diary (B); take ANABEL'S MEDALLION.
- Place VALVE (C). Read newspaper (D); use hammer on glass (E). Attach hose.
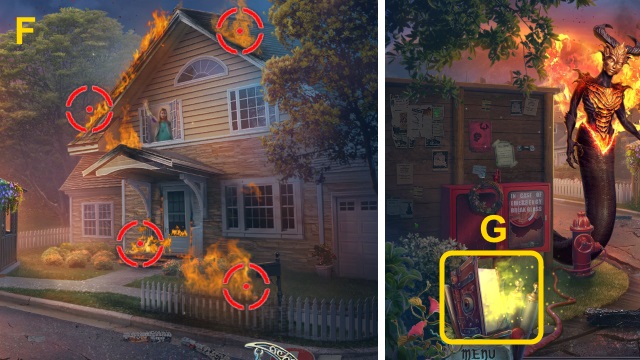
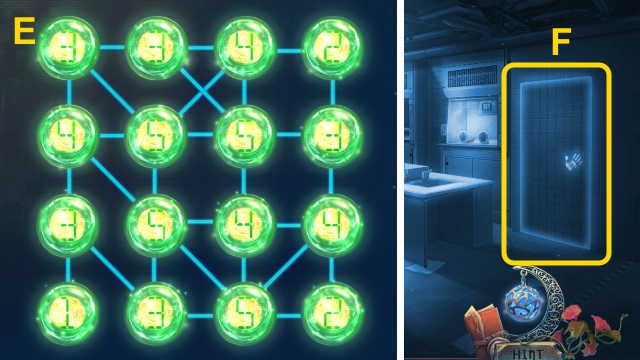
- Solution (F).
- Examine scene.
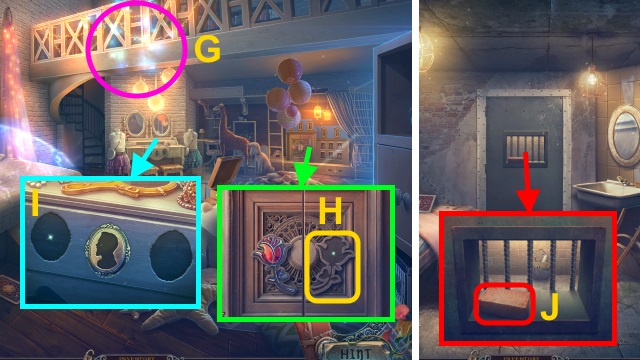
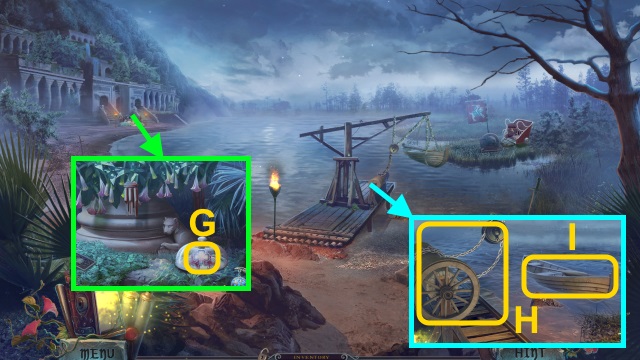
- Read Grimoire (G).
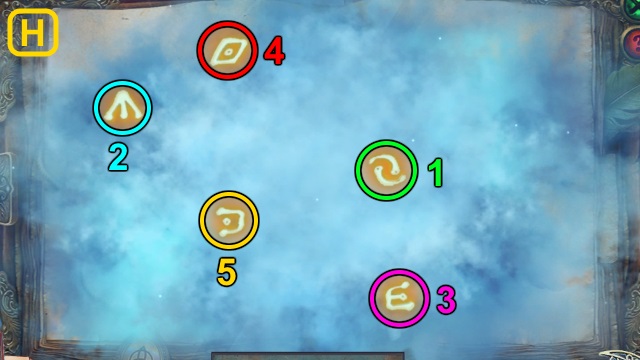
- Solution (H).
- Receive Master of Flame.
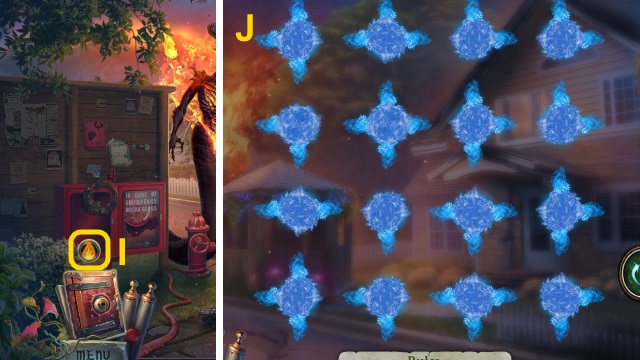
- Use Master of Flame (I).
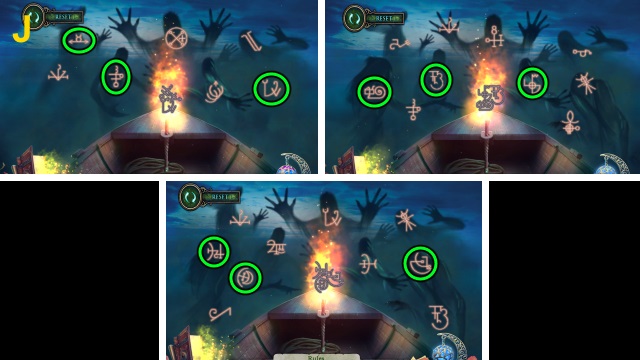
- Solution (J).
- Walk right.

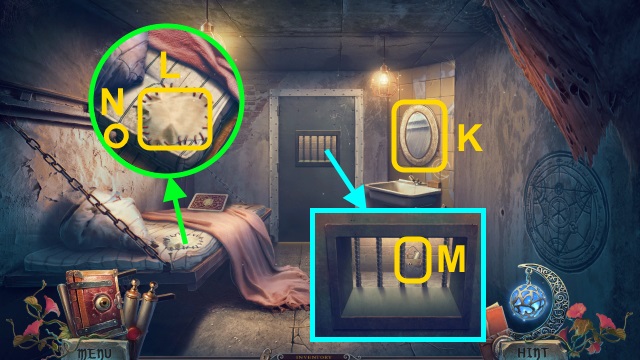
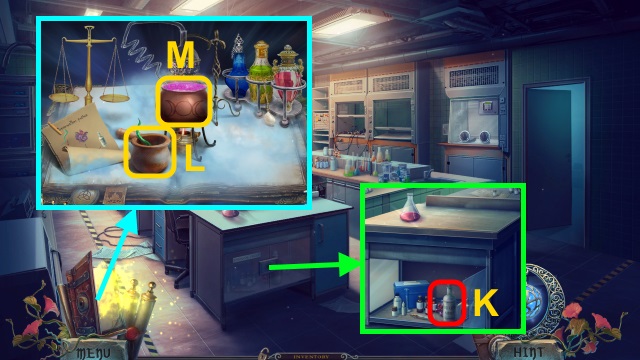
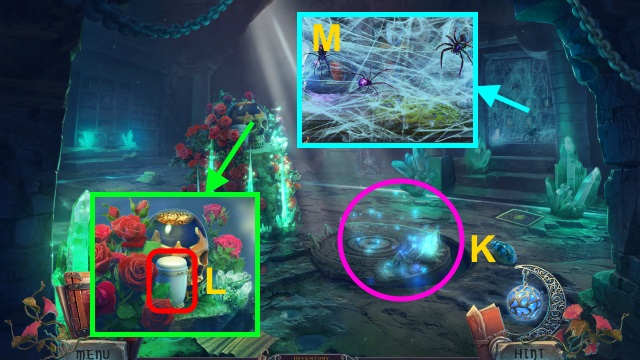
- Play HOP; receive WINDING KEY (K).
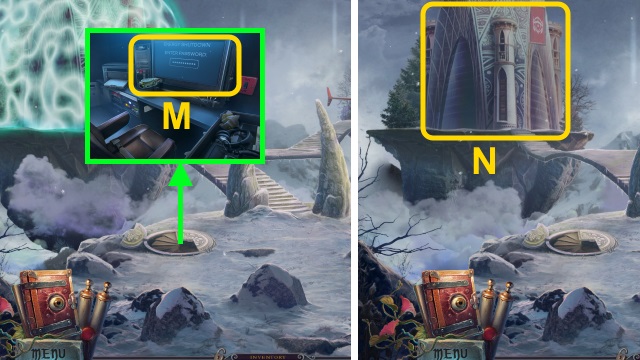
- Use WINDING KEY; take Map and EMBLEM OF MAGIC (L). Take BRUSH (M); read letter. Take CHARGING RITUAL.
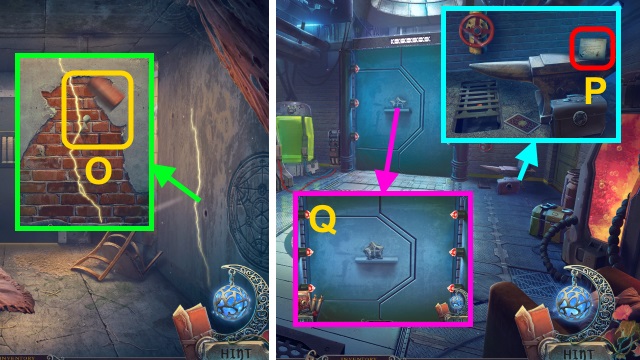
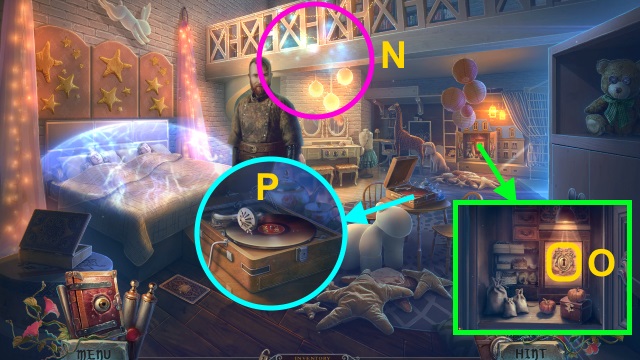
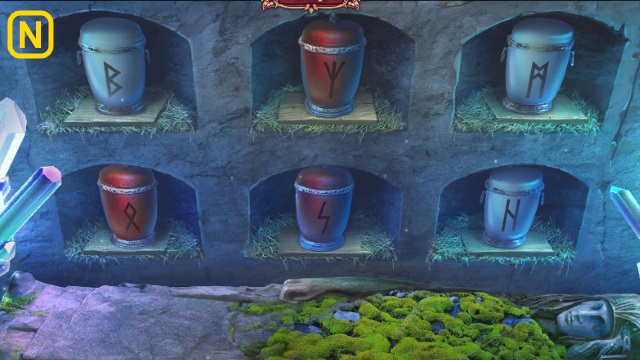
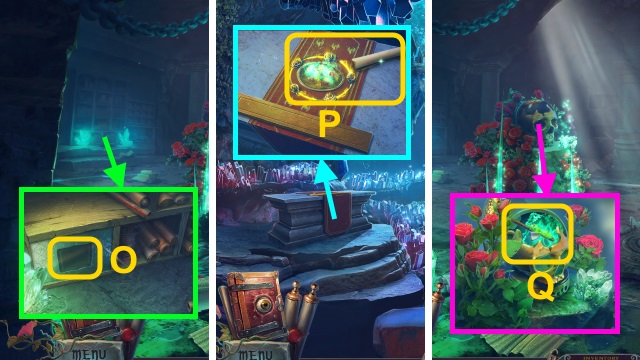
- Use EMBLEM OF MAGIC; take LEVITATION WAND (N). Remove glass; take MAGIC CRYSTALS. Read note (O); take MONSTER TRAP.
- Walk down.
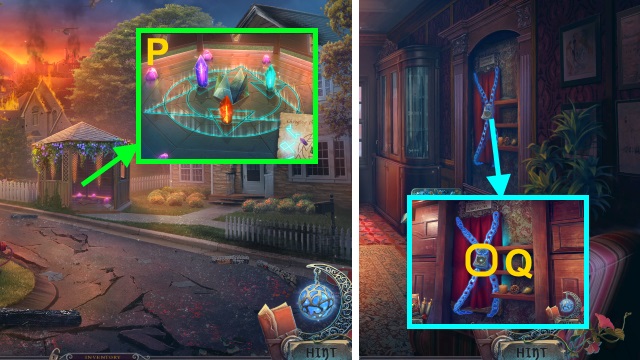
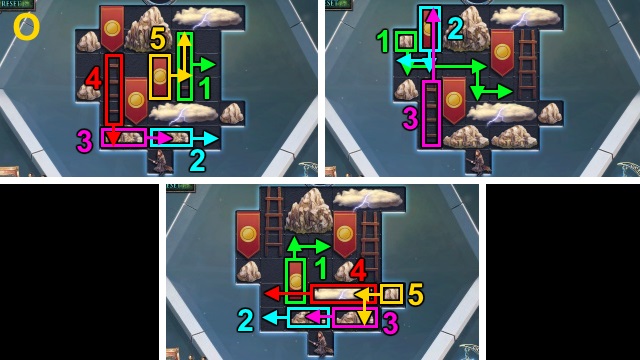
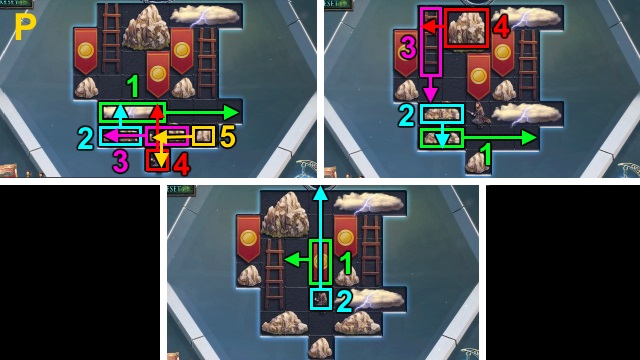
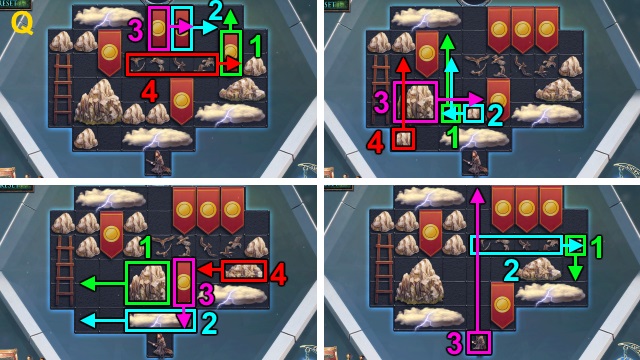
- Place MAGIC CRYSTALS, MONSTER TRAP, and CHARGING RITUAL (P); take CHARGED MONSTER TRAP.
- Walk right.
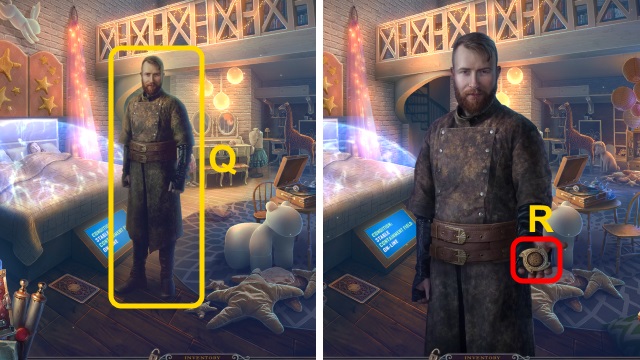
- Place ANABEL'S MEDALLION (Q); remove curtain.
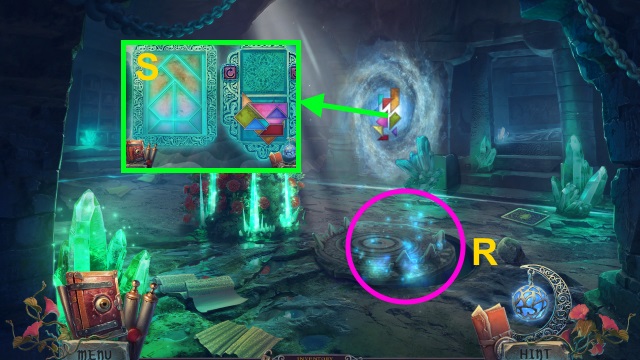
- Use CHARGED MONSTER TRAP on scene.
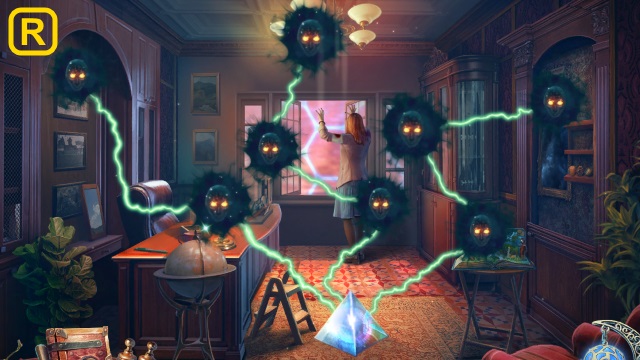
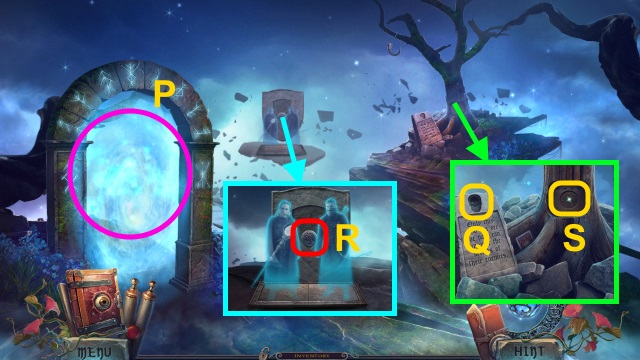
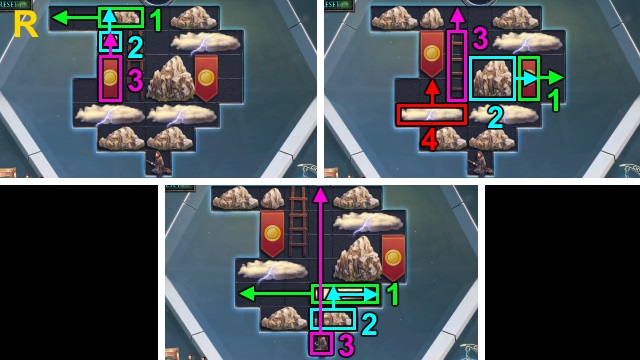
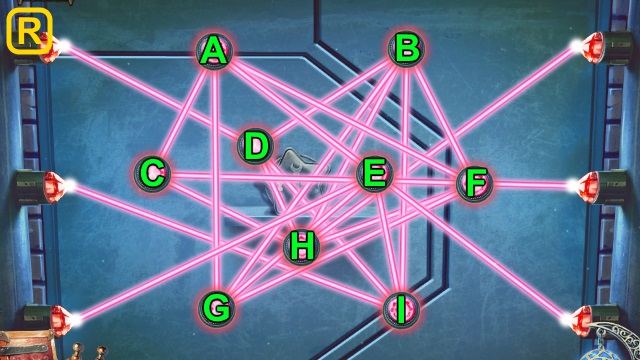
- Solution (R).
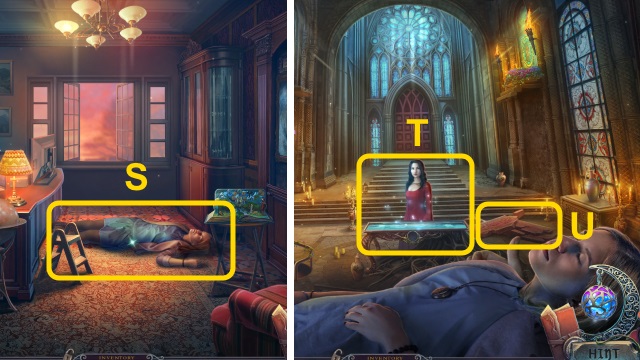
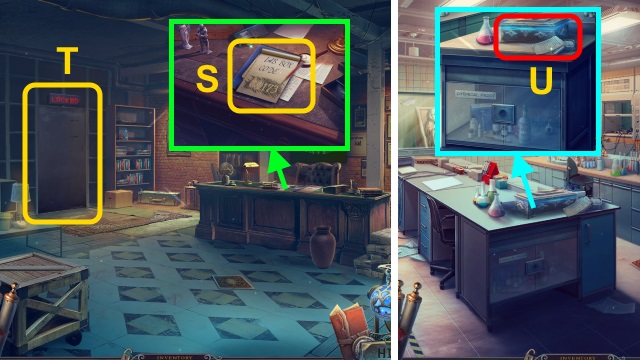
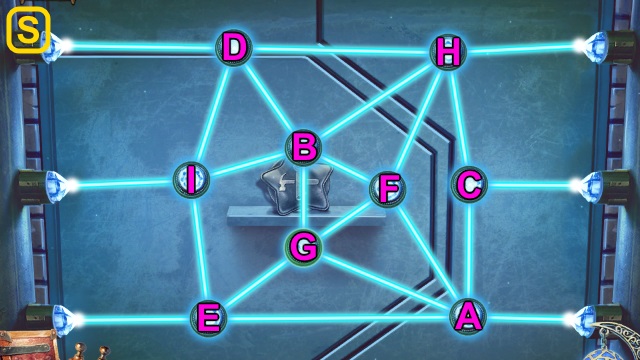
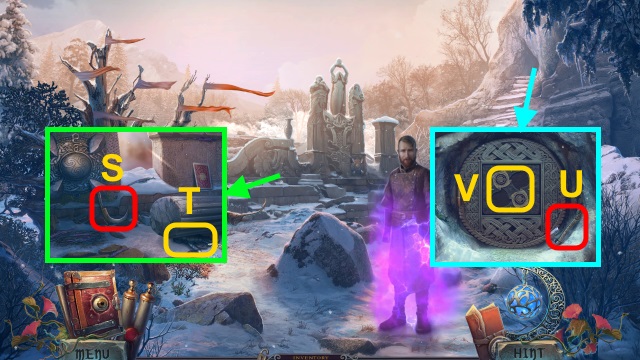
- Examine (S).
- Walk right.
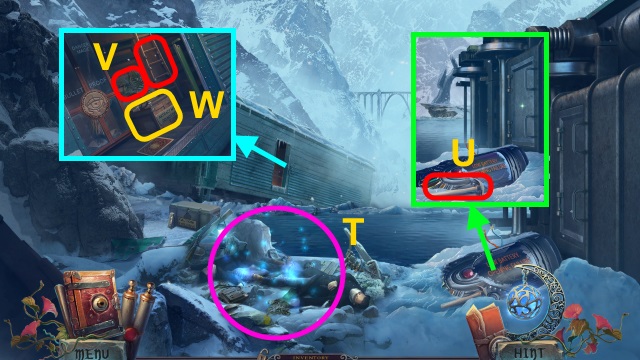
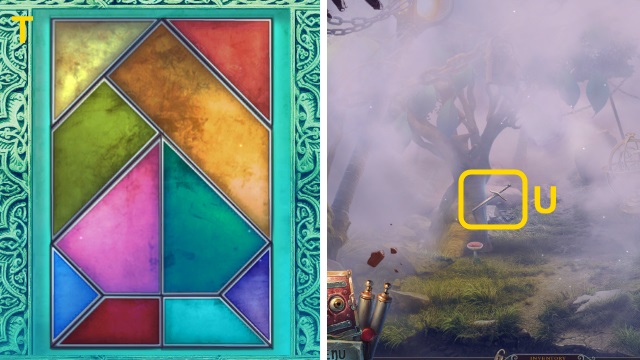
- Examine (T); play HOP.
- Use LEVITATION WAND (U).
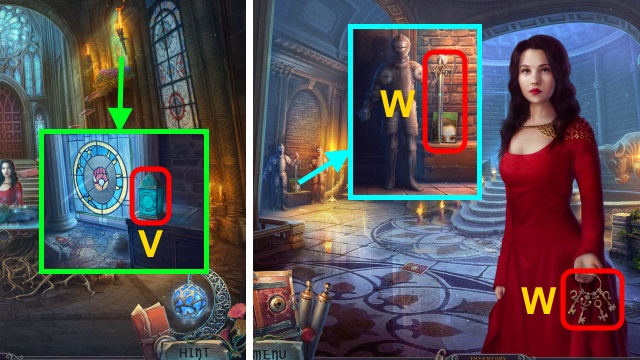
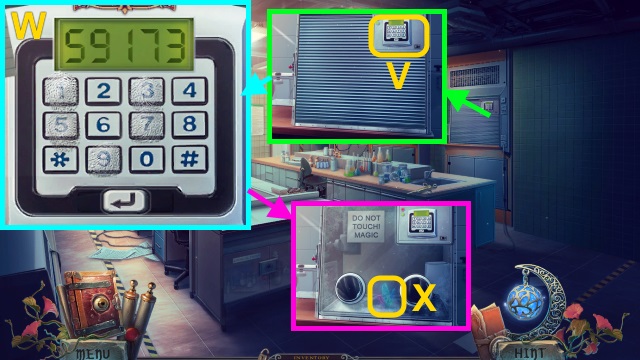
- Take LANTERN (V).
- Open LANTERN; take STAR DUST.
- Go left.
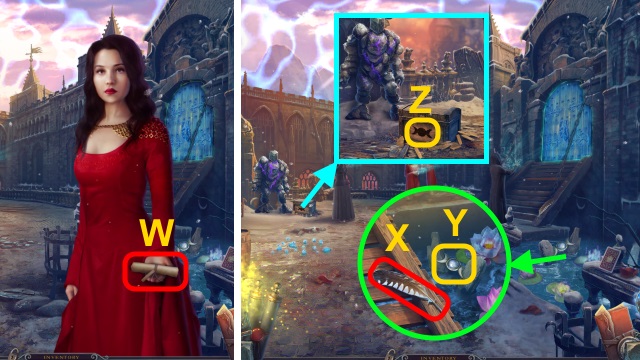
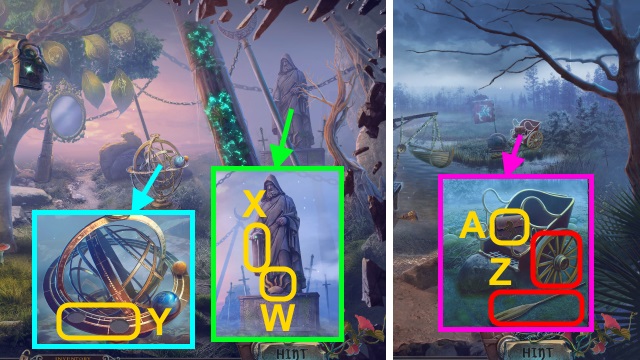
- Take KEYS, SWORD, and PORTRAIT PART (1/2) (W).

- Take STAINED-GLASS DISC (X).
- Walk down.
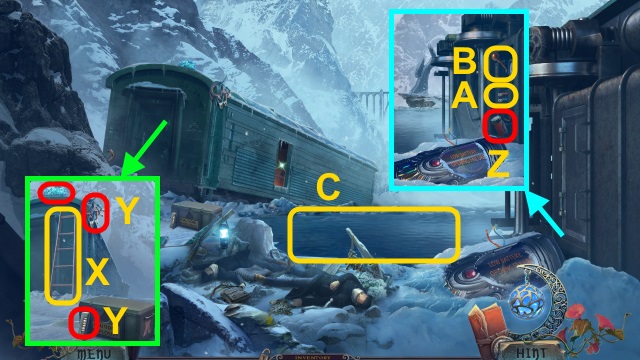
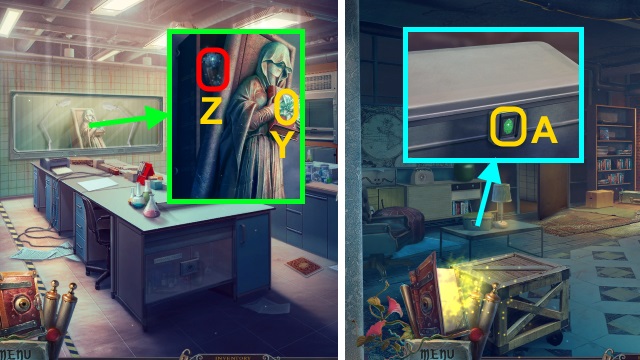
- Place STAINED-GLASS DISC; take BIRD CLAW and PORTRAIT PART (2/2) (Y).
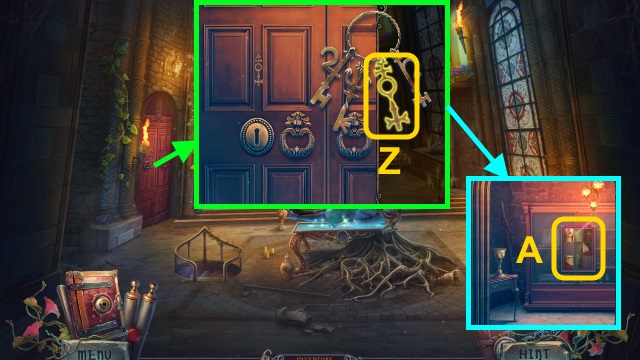
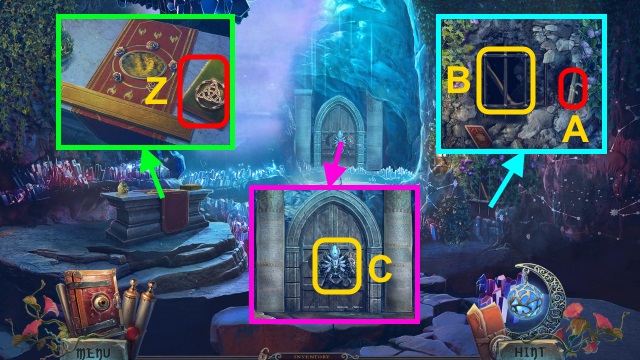
- Use KEYS; select (Z).
- Examine (A); place PORTRAIT PART (2/2).
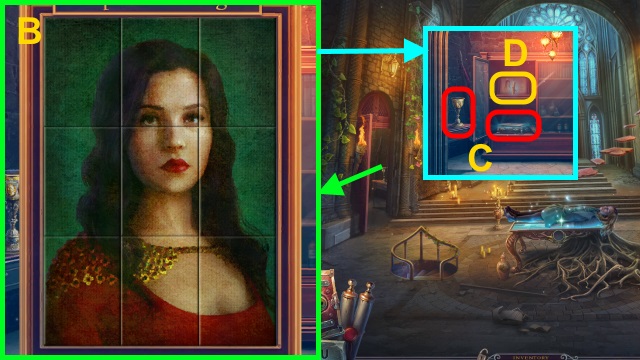
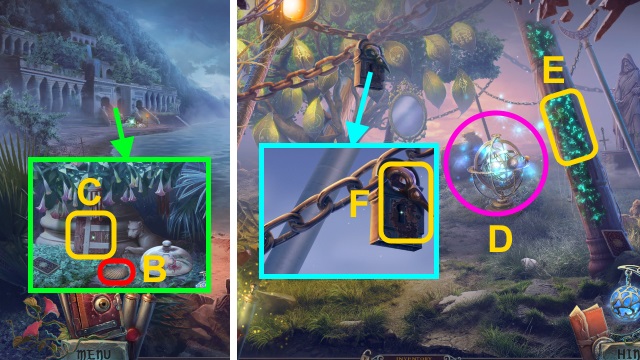
- Solution (B).
- Take ALCHEMICAL CASE and GOBLET (C). Read book (D); take DUSTY PAGE.
- Open ALCHEMICAL CASE. Play HOP; receive RAINBOW DROPS.
- BRUSH on DUSTY PAGE; receive POTION OF PURITY RECIPE.
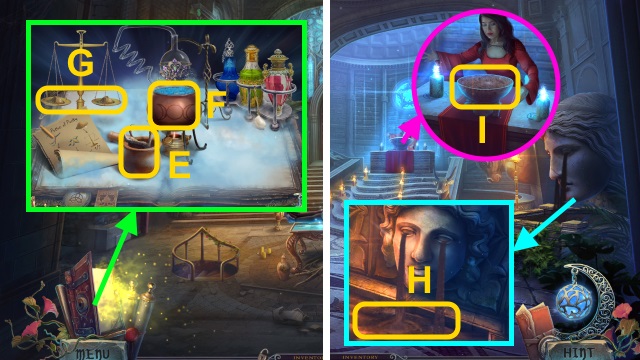
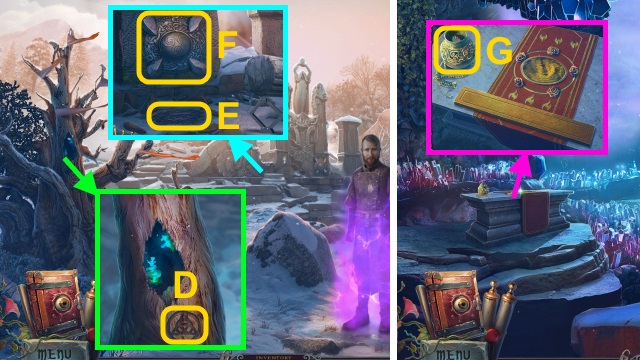
- Read Grimoire. Place POTION OF PURITY RECIPE; place BIRD CLAW (E), RAINBOW DROPS (F), and STARDUST (G). Examine claw; pour powder. Examine stardust; take POTION OF PURITY.
- Go left.
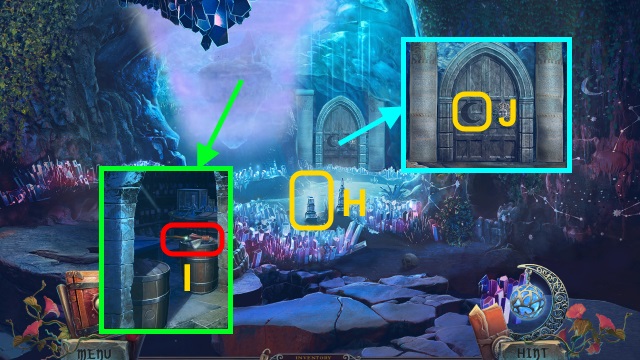
- Pour POTION OF PURITY (H). Use GOBLET; receive URD WATER.
- Pour URD WATER (I).
- Go left.
- Examine scene.
- Read Grimoire.
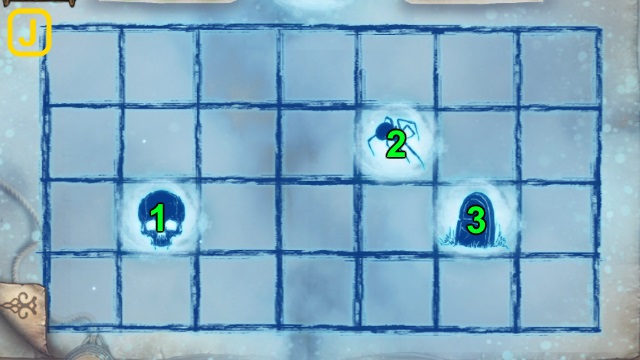
- Solution (J-K).
- Receive Guide of Souls.
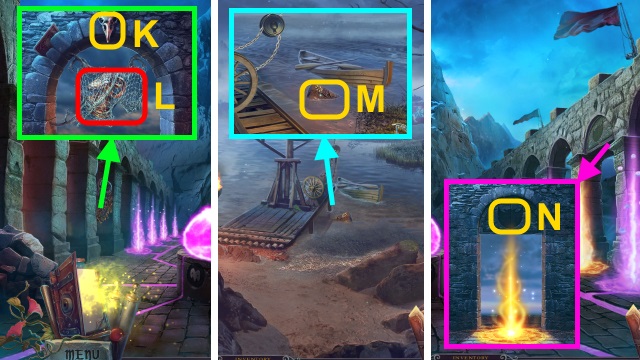
- Use Guide of Souls (L).
- Take HUNTERS' EMBLEM (M). Use SWORD (N); take HOURGLASS and CANDLE.
- CANDLE on LANTERN; use Master of Flame. Receive LANTERN.
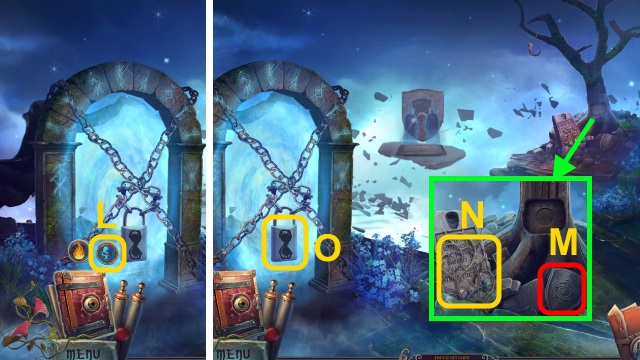
- Place HOURGLASS (O).
- Play HOP; receive SKULL (P).
- Place SKULL (Q).
- Take WOODEN DISC (R).
- Place WOODEN DISC and LANTERN (S); take CLAW KEY.
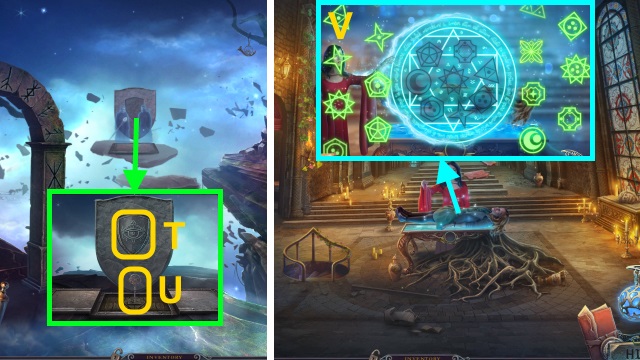
- Place HUNTERS' EMBLEM (T); use CLAW KEY (U). Take SPELL FRAGMENT.
- Give SPELL FRAGMENT.
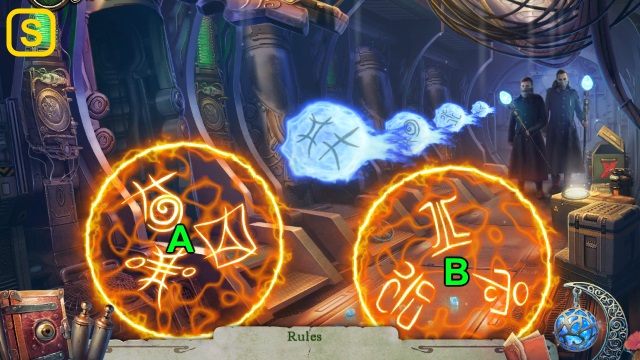
- Walk down.
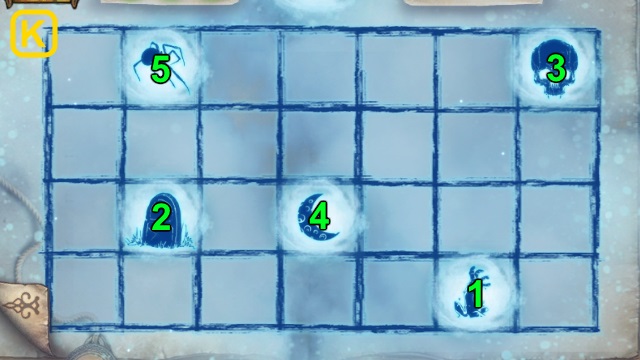
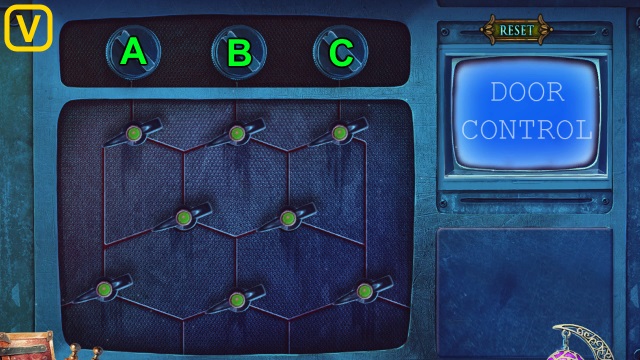
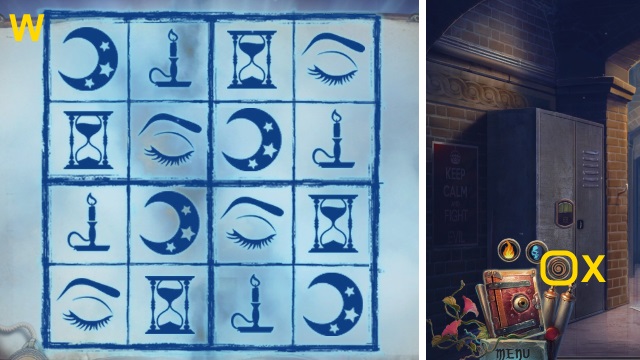
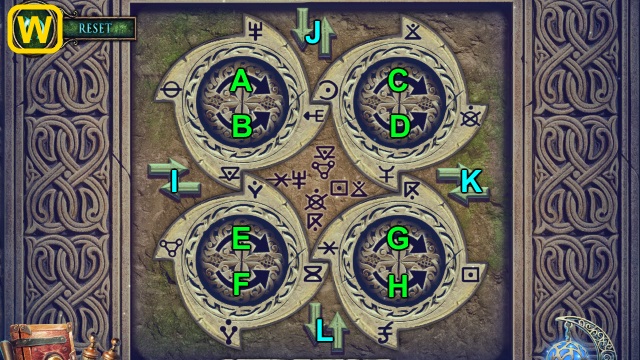
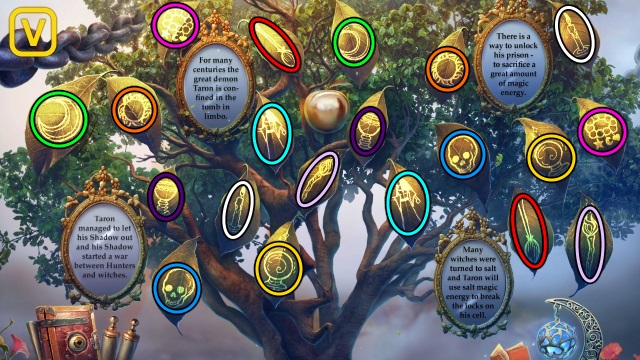
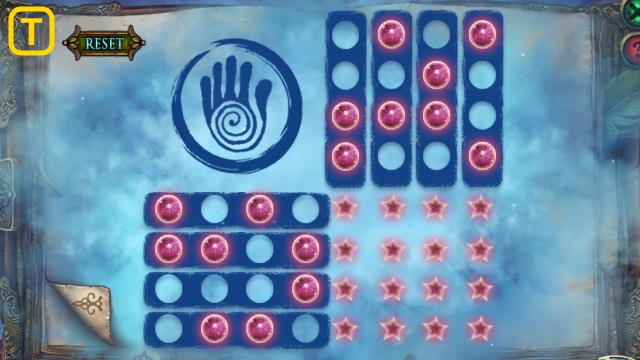
- Solution (V): Place symbols in circle.
- Take AWAKENING POTION RECIPE (W).
- Take OWL FEATHER (X). Use LEVITATION WAND (Y); receive DOUBLE CRESCENT.
- Place DOUBLE CRESCENT (Z); take CRYSTAL BALL and HERBS.
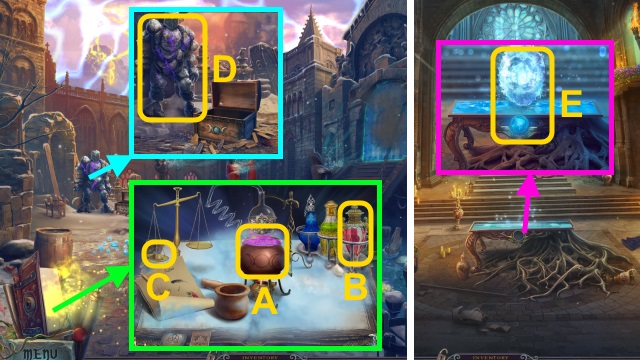
- Read Grimoire, use AWAKENING POTION RECIPE. Place HERBS and OWL FEATHER (A). Pour red potion (B); examine dust (C). Take AWAKENING POTION.
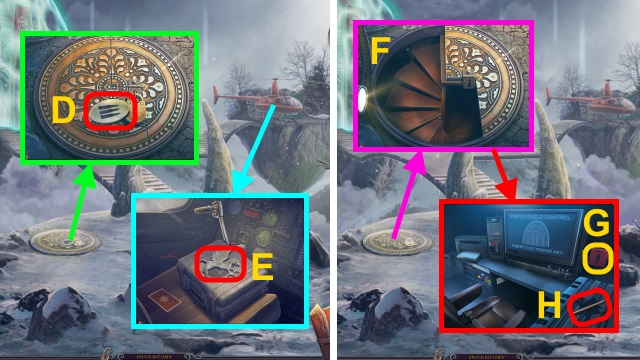
- Use AWAKENING POTION (D).
- Walk down.
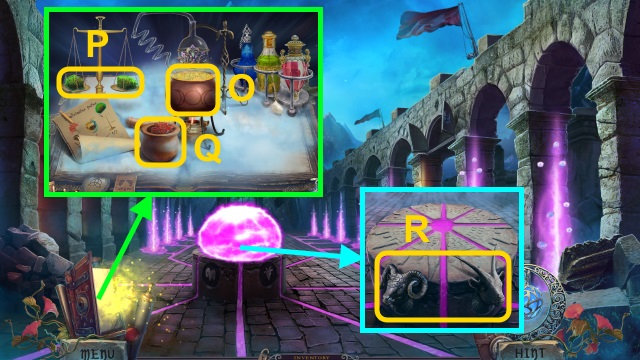
- Place CRYSTAL BALL; examine (E).
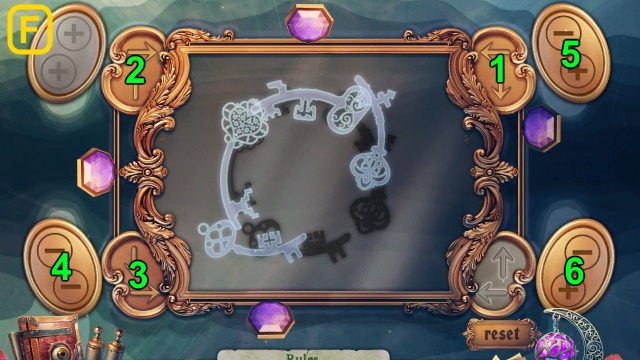
- Solution (F).
- Take MAGIC SICKLE.
- Walk forward.
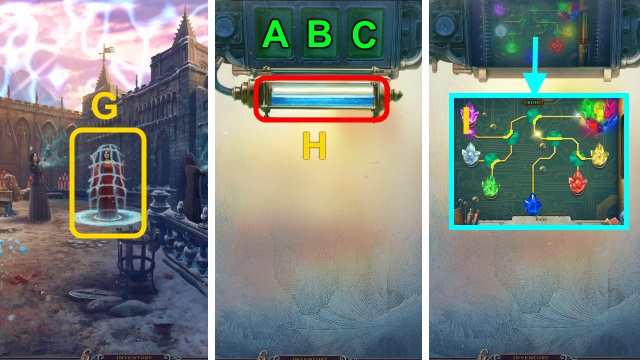
- Use MAGIC SICKLE (G).
- Take FREEZING ELEMENT (H).
- Solution (A-C-B)-(C-A-B).
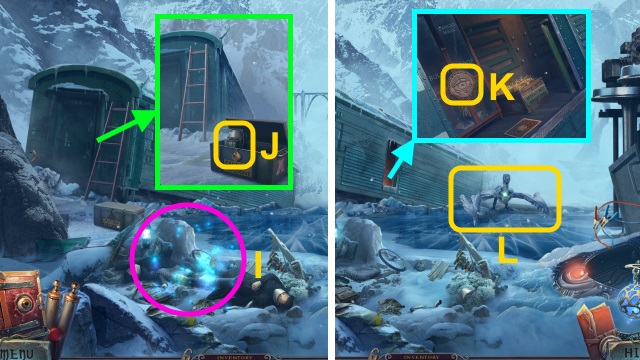
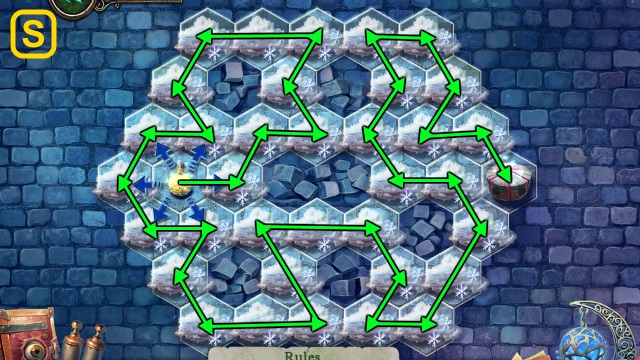
- Solution (I): guide lights into matching crystals.
- Go forward.
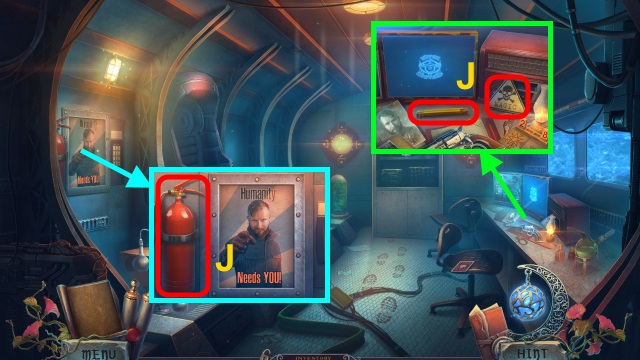
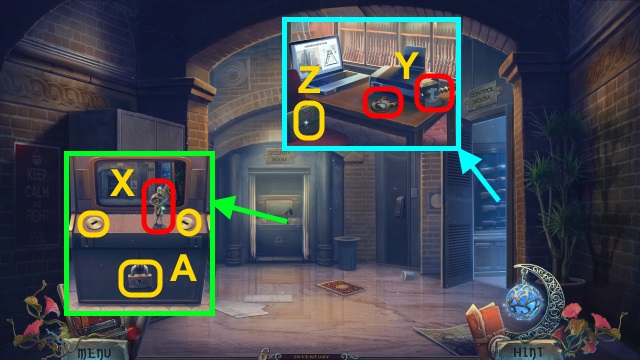
- Take FOLDABLE RULER, DANGER SIGN, FIRE EXTINGUISHER (J).
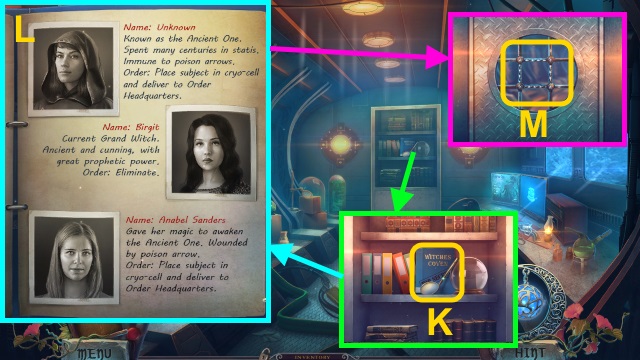
- Take MIRROR; read binder (K). Place photos (L); turn page. Read letter; take ring.
- Take WOODEN PLAQUE; pull lever (K).
- Use FREEZING ELEMENT, FIRE EXTINGUISHER, MIRROR, and FOLDABLE RULER (M).
- Go forward.
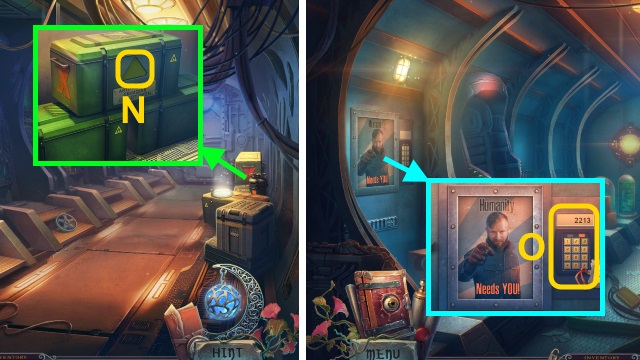
- Place DANGER SIGN (N); take Grimoire and CODE.
- Walk down.
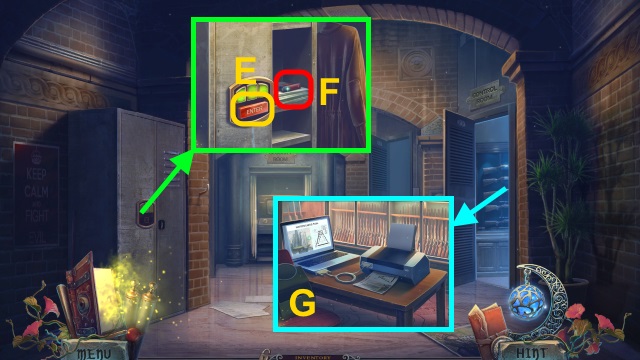
- Use CODE (O). Take note, ELECTRONIC KEY, and CASSETTE.

- Place CASSETTE (P).
- Play HOP; receive ACCESS CARD (Q).
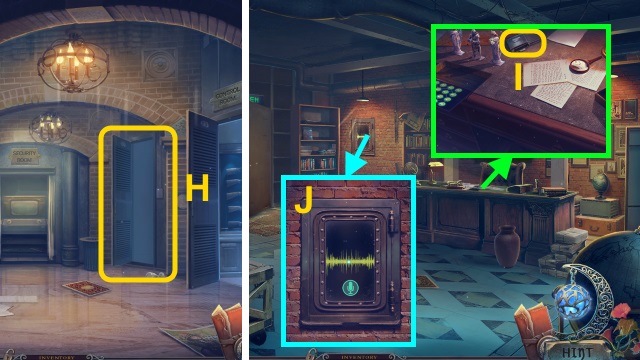
- Walk forward.
- Take CRYSTAL KEY (R); use ACCESS CARD.
- Use Master of Flame.
- Solution (S): Ax2-B-A-Bx2-A-B-Ax2.
Chapter 2: The Order
- Play HOP; receive SCEPTER SHAFT (T).
- Take HAMMER (U).
- Take GRIFFIN (1/2) and LADDER (V). Use HAMMER (W); take note and METAL EATER.
- Place LADDER (X); take ICE CRYSTAL, JUMPER CABLES, and MAGAZINE (Y).
- Use METAL EATER; take FLASHLIGHT (Z). Place JUMPER CABLES (A); pull lever (B). Take SCEPTER TOP.
- SCEPTER TOP and ICE CRYSTAL on SCEPTER SHAFT; receive FREEZING SCEPTER.
- Use FREEZING SCEPTER (C).
- Walk forward.
- Take BULLET EMBLEM (D).
- Take GRIFFIN (2/2) (E); place BULLET EMBLEM. Take BOMB EMBLEM; place MAGAZINE. Receive GUN.
- Use GUN; open. Use FLASHLIGHT (F).
- Flip switch (G). Take PENCIL (H); place GRIFFIN (2/2). Take DAGGER and HUNTERS' SYMBOL.
- Walk down.
- Play HOP; receive PASSWORD (I).
- Place BOMB EMBLEM; take SMOKE BOMB (J).
- Place HUNTERS' SYMBOL (K); take FLYING BROOM.
- Use SMOKE BOMB (L).
- Walk forward.
- Use ELECTRONIC KEY and PASSWORD (M).
- Use FLYING BROOM (N).
- Solution (O-P).
- Solution (Q).
- Solution (R).
- Use PENCIL (S); take INCOMPLETE CODE. Examine folder; use DAGGER. Read papers; take KEY FOB.
- Use KEY FOB (T).
- Walk left.
- Take note, TALCUM, and ALCHEMICAL CASE (U).
- Examine ALCHEMICAL CASE. Play HOP; receive ACID.
- Examine (V); place INCOMPLETE CODE and TALCUM.
- Solution (W).
- Examine (X); take MEMORY CRYSTALS.
- Use CRYSTAL KEY (Y); take FORGET-ME-NOTS (Z). Examine book; use WOODEN PLAQUE. Take TRUESIGHT POTION RECIPE.
- Walk down.
- Pour ACID (A); take note, AMBER, and ANGEL.
- Read Grimoire; place TRUESIGHT POTION RECIPE. Place FORGET-ME-NOTS (B), MEMORY CRYSTALS, and AMBER (C). Crush crystals; examine. Take TRUESIGHT POTION.
- Place ANGEL (D).
- Solution (E).
- Take DIARY KEY and ROSE.
- Walk left.
- Use TRUESIGHT POTION on scene; examine (F).
- Walk right.
- Play HOP; receive CAMEO (1/2) (G).
- Place ROSE (H); take CAMEO (2/2).
- Place CAMEO (2/2) (I). Examine book; place DIARY KEY. Read; take PHOTO.
- Take BRICK (J).
- Use BRICK (K); receive MIRROR SHARD.
- Use MIRROR SHARD (L); take RAG. Take note and LONG WIRE.
- Use LONG WIRE (M); receive NAIL PULLER and SPRAY.
- Use NAIL PULLER (N); receive NAIL.
- Examine wall 2x; use NAIL, RAG, and BRICK (O).
- Enter Storage.
- Take note and CALIBRATOR (P).
- Use SPRAY (Q).
- Solution (R-S).
- Take WRENCH EMBLEM.

- Place WRENCH EMBLEM (T); take SWITCHES.
- Place SWITCHES (U).
- Solution (V): B-A-Bx4-C.
- Take SECURITY KEY (1/2) and LEVER SWITCH.
- Walk right.
- Use CALIBRATOR on scene; read Grimoire.
- Solution (W).
- Receive Hypnosis.
- Use Hypnosis (X); take SECURITY KEY (2/2).
- Take KNIGHT (X).
- Take SLEDGEHAMMER and CONTROL UNIT (Y). Place KNIGHT (Z); take EMERALD HORN and LOCKPICKS.
- Use SECURITY KEY (2/2) and LOCKPICKS (A); take BLOWTORCH, JACK, and PRINTER CABLE.
- Walk down.

- Place LEVER SWITCH and CONTROL UNIT (B); pull lever.
- Use Guide of Souls; receive DREAMWALKER POTION RECIPE.
- Walk down.
- Use BLOWTORCH (C); receive BENT ROD.
- Walk right.
- Use BENT ROD and SLEDGEHAMMER (D); examine. Take BUTTON.
- Walk right.
- Place BUTTON (E); take BATTERIES and PAPER (F).
- Examine screen; place PRINTER CABLE and PAPER (G). Examine screen; take BLUEPRINTS.
- Use BLUEPRINTS (H).
- Enter Elliot's Study.
- Use BATTERIES (I); receive VOICE RECORDER.
- Use VOICE RECORDER (J); take note, MAGNETIC KEY, and RECORD.
- Walk left.
- Use MAGNETIC KEY; take URD SAMPLE and FUCHSIA (K).
- Examine Grimoire; use DREAMWALKER POTION RECIPE. Use EMERALD HORN (L), URD SAMPLE and FUCHSIA (M). Examine horn 2x; take DREAMWALKER POTION.
- Walk right.
- Give PHOTO.
- Play HOP; receive TOY KEY (N).
- Use TOY KEY (O); take OIL and PHONOGRAPH PART.
- Place RECORD and PHONOGRAPH PART (P).
- Use DREAMWALKER POTION (Q). Play HOP; receive MEMORY BALL.
- Give MEMORY BALL; take ANCIENT MECHANISM (1/2) (R).
Chapter 3: Limbo
- Take STUN GUN.
- Take SICKLE (S). Use JACK (T); take GAUNTLET and ANCIENT MECHANISM (2/2).
- Take AXE (U); place ANCIENT MECHANISM (2/2) (V).
- Solution (W): B-J-B-I-H-L-K-Cx2-K-G-D-K-E-I-E-L-B-F-I-D-H-F.

- Use AXE; take ANCIENT COIN and HUNTING HORN (X).
- Use HUNTING HORN (Y).
- Enter Crystal Cave.
- Take TRIQUETRA and MAGIC BOOK (Z).
- Open MAGIC BOOK. Play HOP; receive GLASS TIP.
- Use SICKLE 3x; examine (A). Take RIBBON; read scroll. Use ANCIENT COIN (B); take PICKAXE.
- Use STUN GUN (C); take LIMB.
- Walk down.
- Place TRIQUETRA (D); take note and WIND TRAP BAG.
- Place RIBBON (E). Play HOP; take LAVENDER. Use PICKAXE (F); take CRESCENT and SCARLET URN.
- Walk right.
- Open; place LAVENDER (G). Use Master of Flame; receive CENSER.
- Place GLASS TIP (H).
- Use WIND TRAP BAG; receive BAG OF WIND. Take TORCH (I).
- Place CRESCENT (J).
- Go forward.
- Use BAG OF WIND on scene.
- Play HOP; receive CORKSCREW (K).
- Take WHITE URN (L). Use GAUNTLET; play HOP. Take SACRIFICIAL ROSES.
- Use CENSER and LIMB (M); place SCARLET URN and WHITE URN.
- Solution (N).
- Take SHADOW SPHERE and BOOK EMBLEM.
- Place BOOK EMBLEM (O); take LEATHER TUBE.
- CORKSCREW on LEATHER TUBE; take note and FLAME RITUAL.
- Walk down.
- Place FLAME RITUAL; use Master of Flame. Place SACRIFICIAL ROSES; use TORCH (P). Receive SPECTRAL FLAME.
- Walk forward.
- Open; use SPECTRAL FLAME (Q). Play HOP.
- Play HOP; receive MIRROR SHARD (R).
- Place MIRROR SHARD (S).
- Solution (T).
- Take STONE SWORD (U).
- Solution (V).
- Take GOLDEN APPLE.
- Examine (W). Play HOP; receive SUN. Give STONE SWORD (X); take MYSTERIUM SPHERE.
- Place SHADOW SPHERE and MYSTERIUM SPHERE (Y). Play HOP; receive HORSE.
- Walk forward.
- Take PADDLE and WHEEL (Z). Place HORSE (A); take RUSTY KEY.
- Take SHARP SHELL (B). Read (C); take DESALINIZATION POTION RECIPE.
- Walk down.
- Play HOP; receive GOAT HEAD (D).
- Use SHARP SHELL (E); receive MOSS. Take CLOVER.
- Use OIL and RUSTY KEY (F); take RAVEN SKULL. Receive CHAIN.
- Walk forward.
- Place CLOVER (G); take LYCORIS.
- Place WHEEL and CHAIN; examine (H). Use PADDLE (I); enter boat.
- Use Guide of Souls.
- Solution (J).
- Place RAVEN SKULL (K); take NET and RAM HEAD (L).
- Walk down.
- Use NET (M). Place SUN; take DEMON HEAD.
- Enter Temple Ruins.
- Place DEMON HEAD (N); take UNICORN HORN.
- Read Grimoire; use DESALINIZATION POTION RECIPE. Place GOLDEN APPLE, UNICORN HORN (O), MOSS (P), and LYCORIS (Q). Examine flower 2x; examine moss. Take DESALINIZATION POTION.
- Place GOAT HEAD and RAM HEAD (R); pour DESALINIZATION POTION.
- Solution (S).
- Play HOP.
- Read Grimoire.
- Solution (T).
- Receive Magic Sealing.

- Use Magic Sealing (U).
- Solution is random (V).
- Congratulations! You have completed Witches Legacy: Secret Enemy.
Created at: 2018-10-22