

Walkthrough Menu
- General Tips
- Chapter 1: The Circus
- Chapter 2: The Sorcerer's Area
- Chapter 3: The Dungeon
- Chapter 4: The Witches' Crossroads
- Chapter 5: Morgana's House
- Chapter 6: The Secret Room
- Chapter 7: The Bridge
General Tips
- This is the official guide for Witches' Legacy: Slumbering Darkness.
- This guide will not mention each time you have to zoom into a location; the screenshots will show each zoom scene.
- Hidden-object puzzles are referred to as HOPs.This guide will not show HOP solutions. It will identify the location of the HOP and the inventory item acquired.
- This guide will show solutions for non-random puzzles. Please read the in-game instructions for each puzzle.
Chapter 1: The Circus
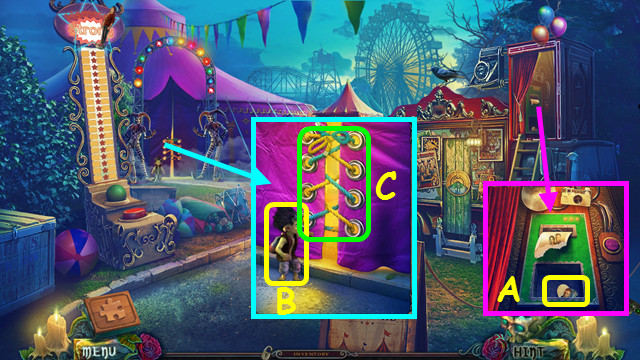
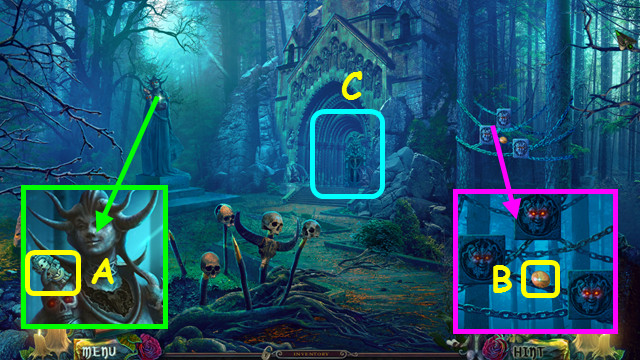
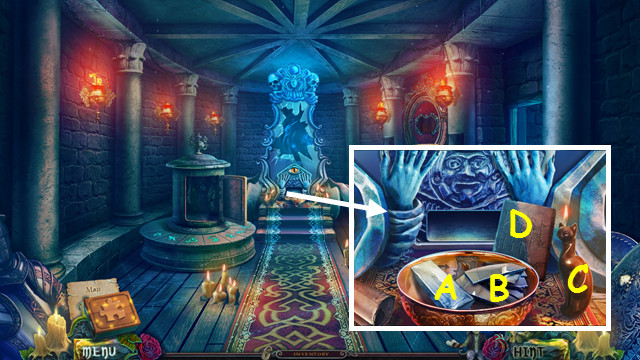
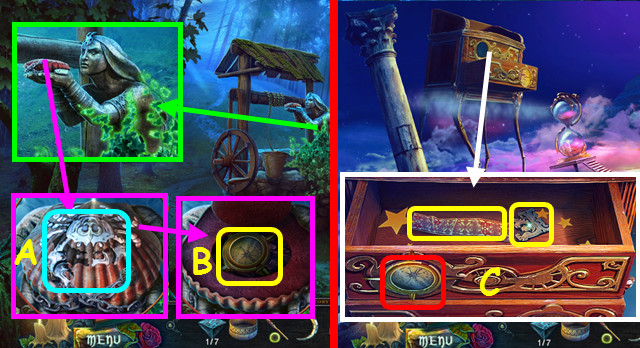
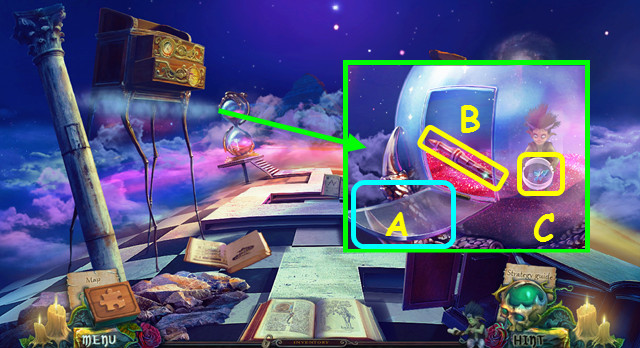
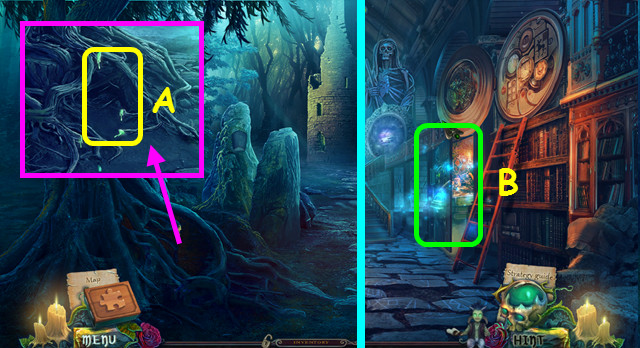
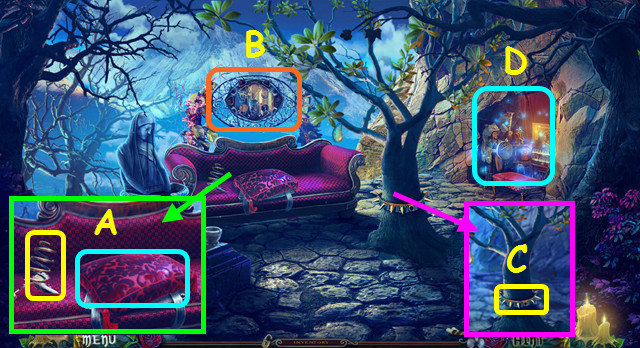
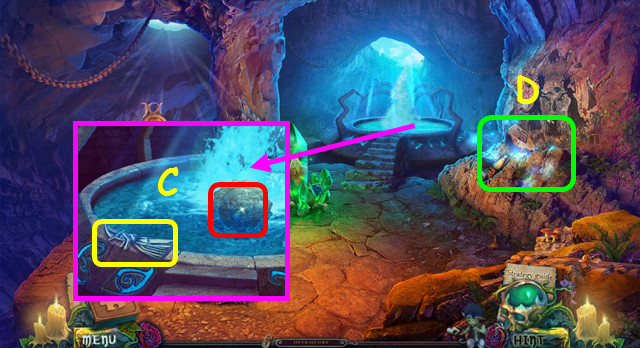
- Take EDWARD'S PHOTO (A).
- Take the IMP (B).
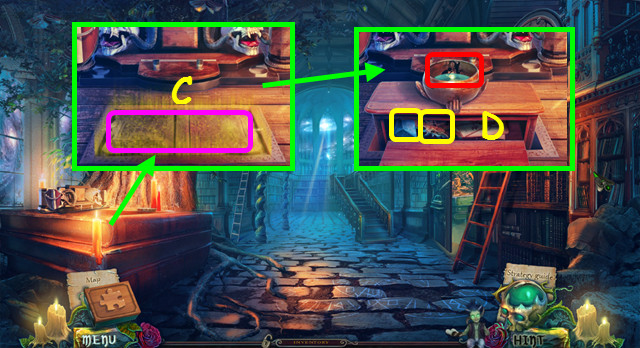
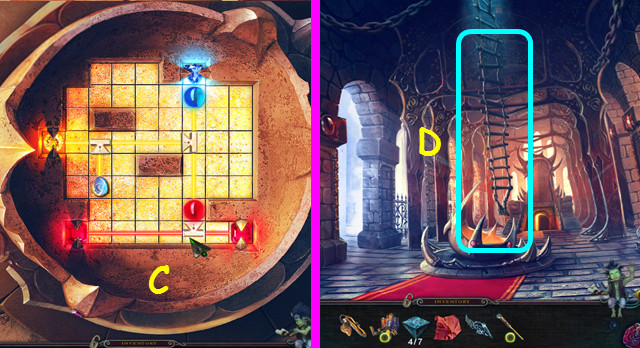
- Untie and remove the rope (C).
- Walk forward.
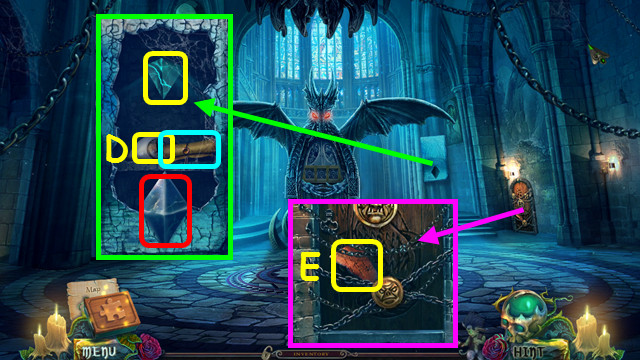
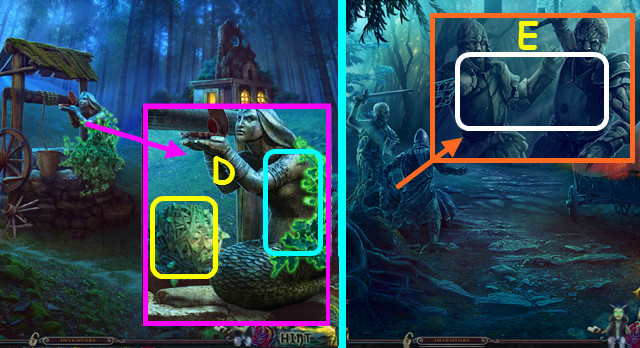
- Take LYNN'S PENDANT (D).
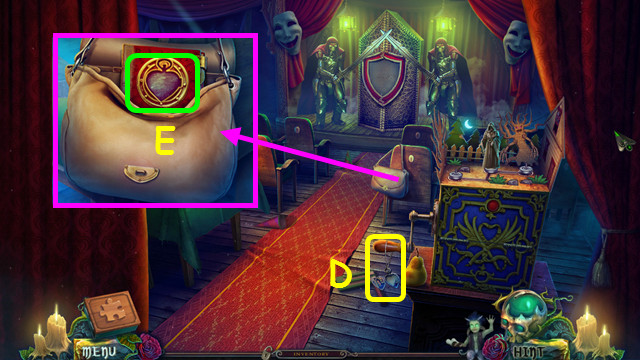
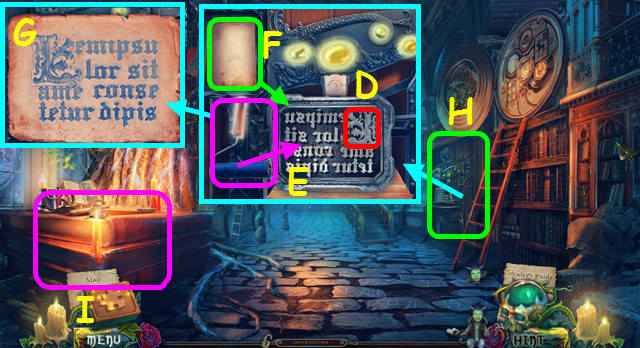
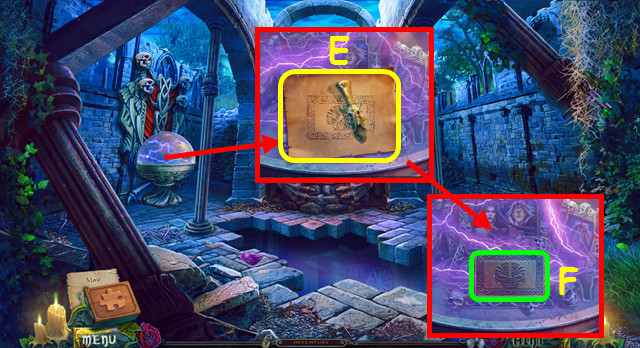
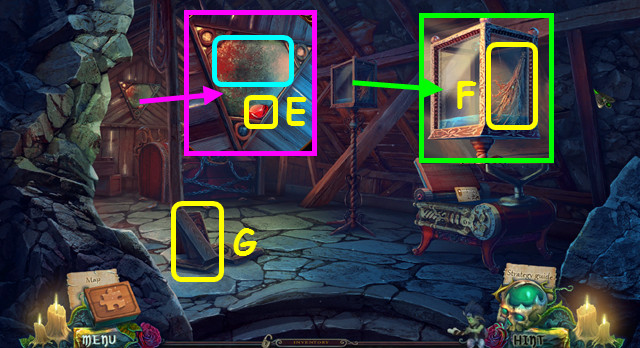
- Combine LYNN'S PENDANT and EDWARD'S PHOTO (inventory).
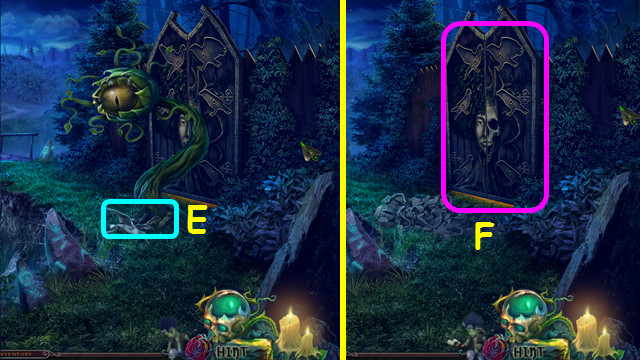
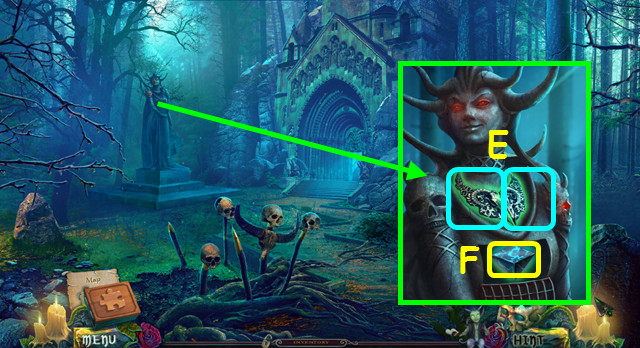
- Open the bag; place LYNN'S PENDANT (E).
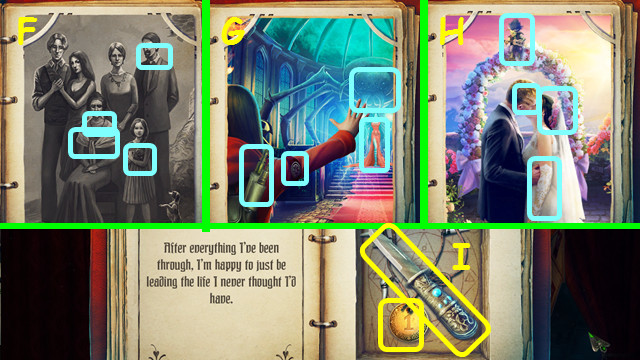
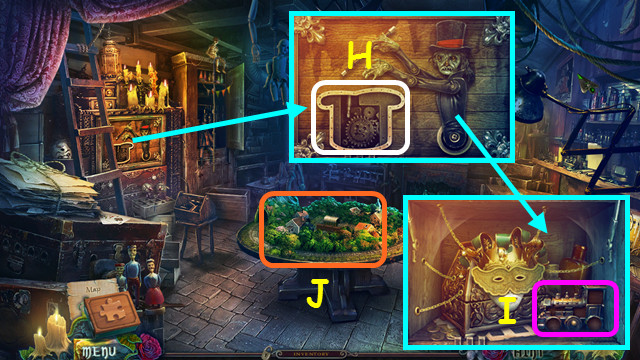
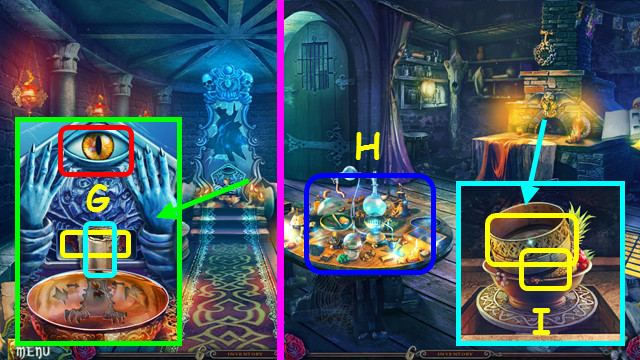
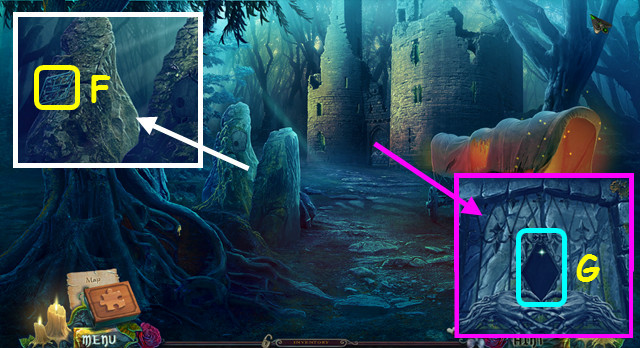
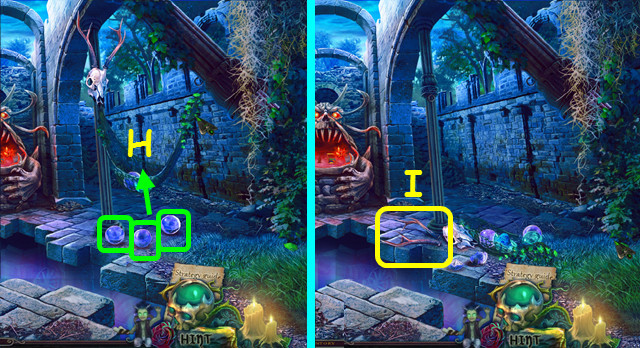
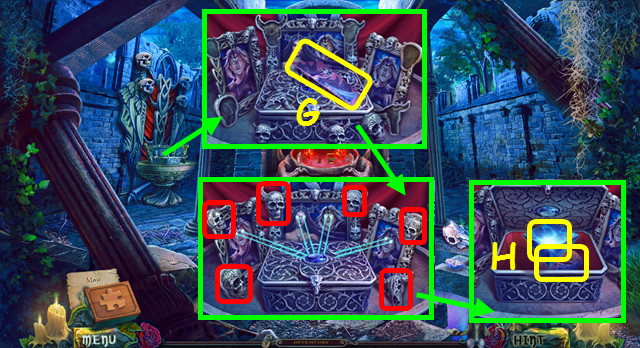
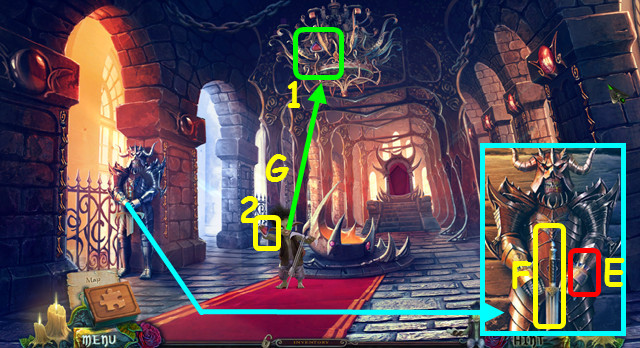
- Find the differences (F-H).
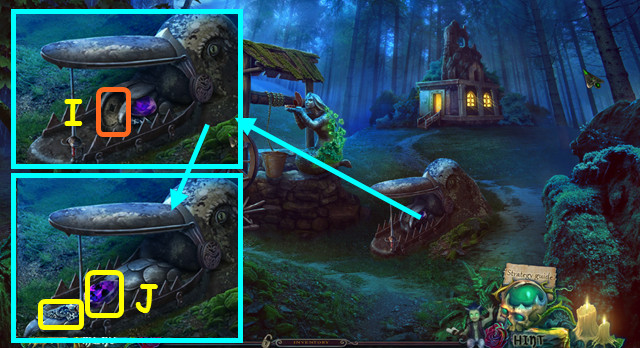
- Take the KNIFE and COIN (I).
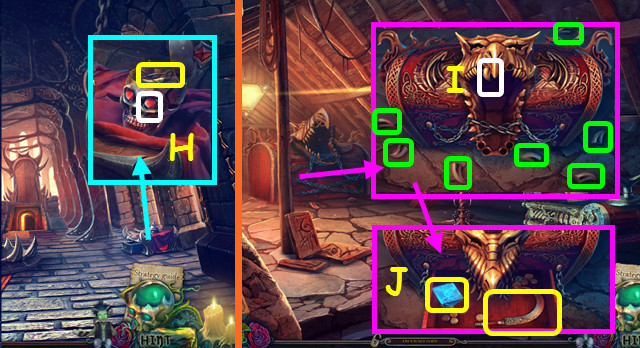
- Walk down.
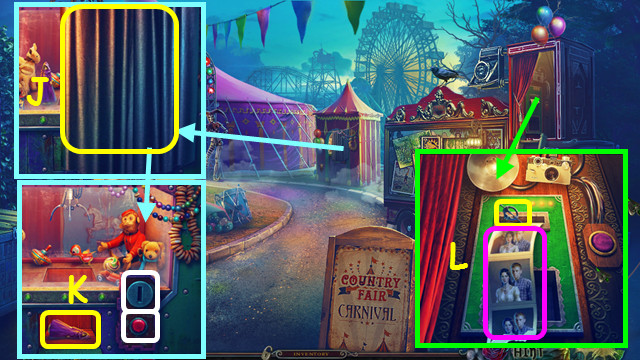
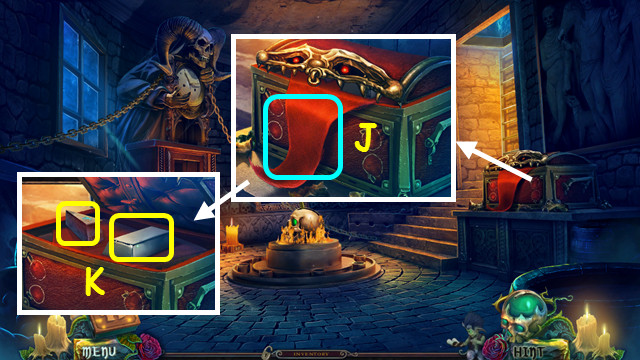
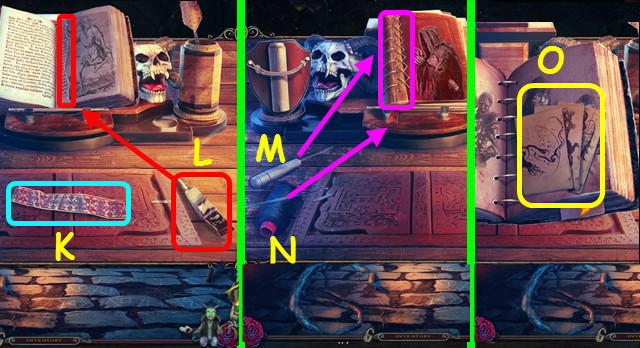
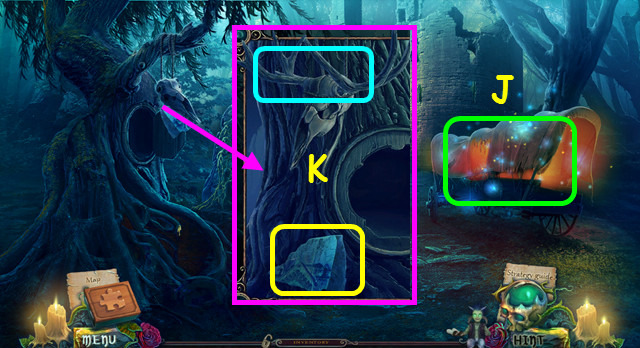
- Take the RAG (J).
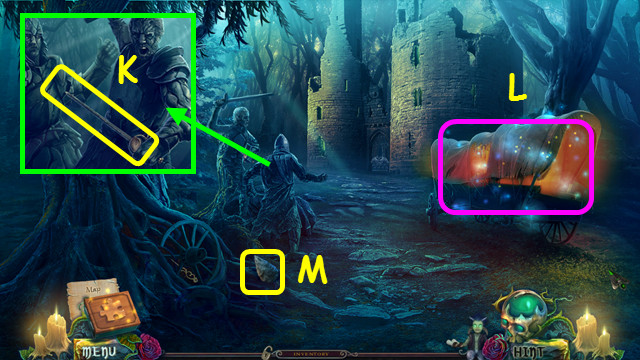
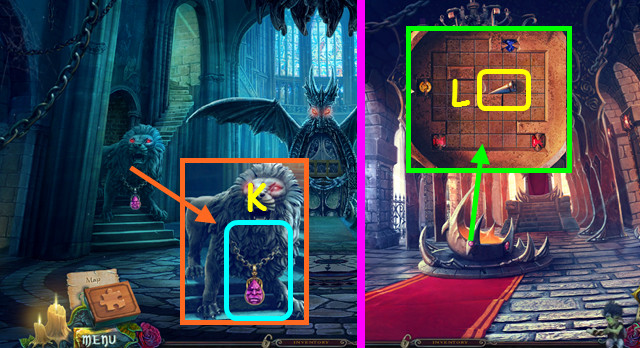
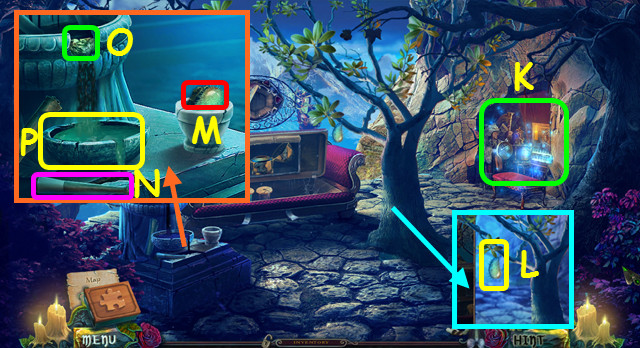
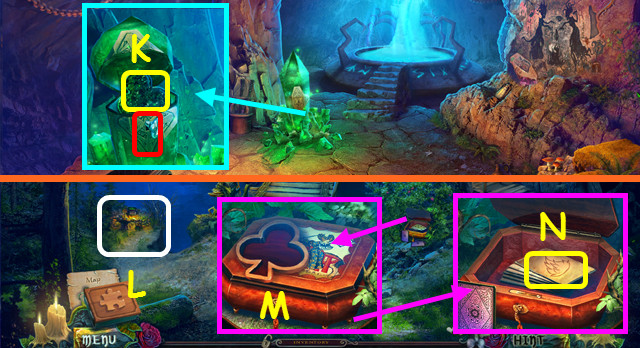
- Place the COIN and press the button; take the HOODED FIGURINE (K).
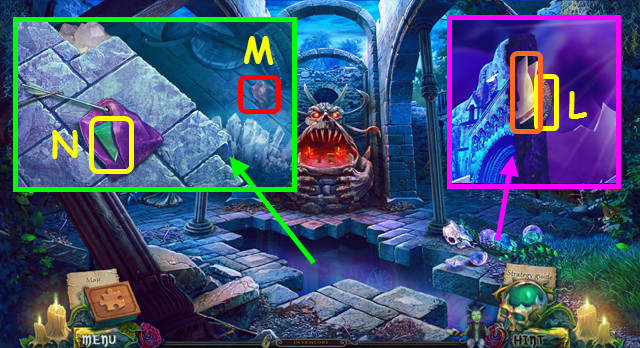
- Use the KNIFE; take the photo and PIN (L).
- Bend the PIN twice to make the LOCKPICK (inventory).
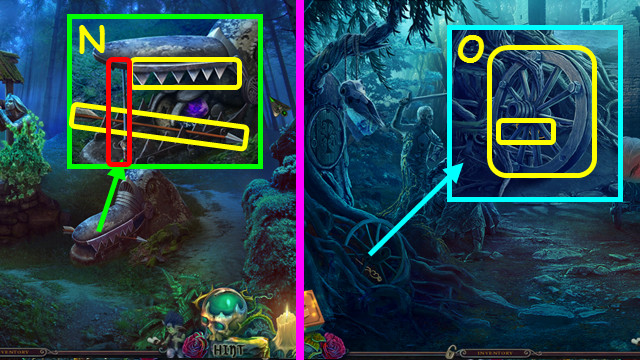
- Walk forward.
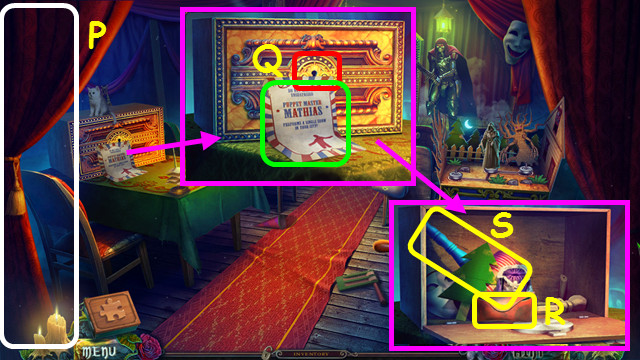
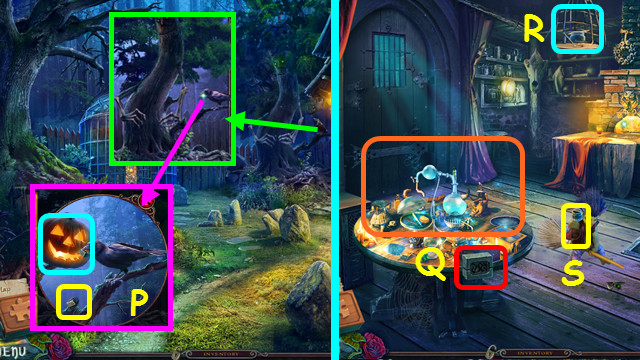
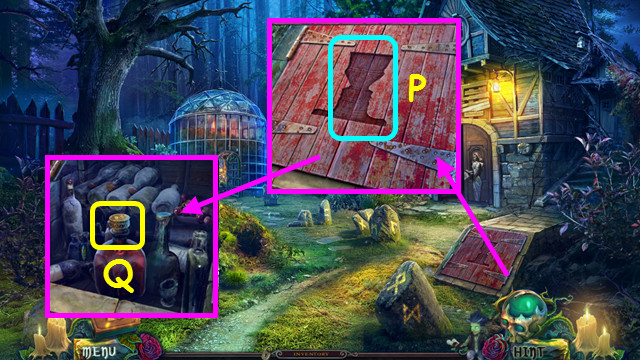
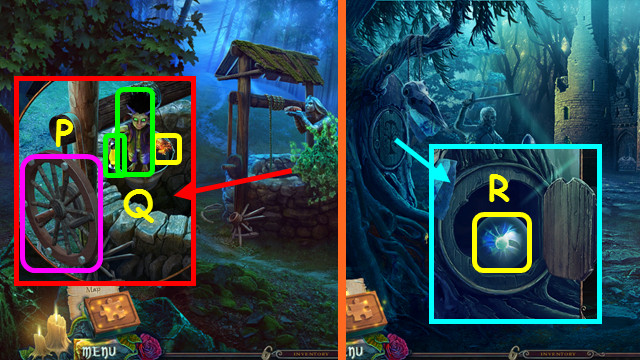
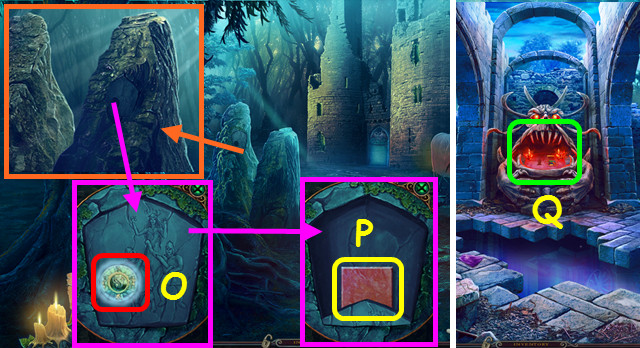
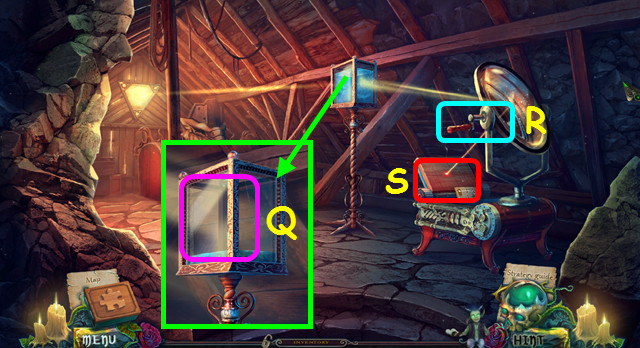
- Move the curtain (P).
- Read the poster; use the LOCKPICK (Q).
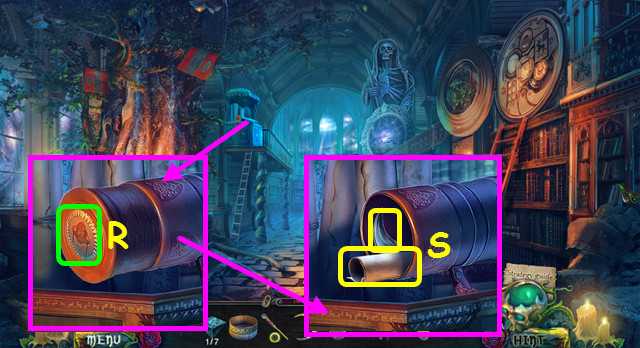
- Take the CASE WITH GLASSES (R).
- Move the items; take the RUBBER MALLET (S).
- Walk down.
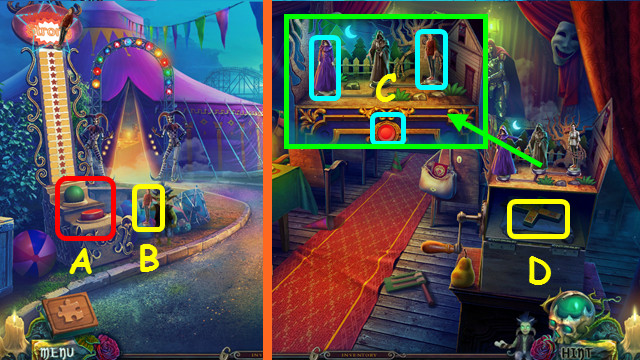
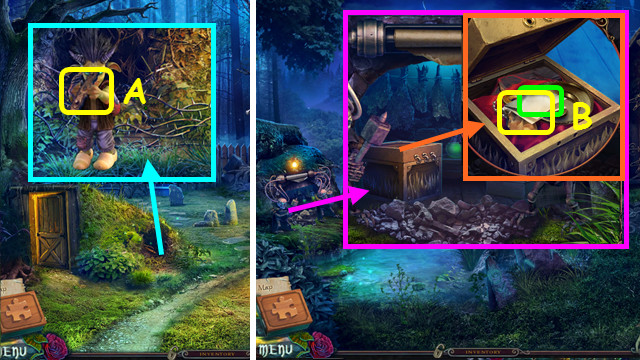
- Select in the scene to use the IMP; use the RUBBER MALLET (A).
- Take the WOMAN FIGURINE (B).
- Walk forward.
- Place the HOODED FIGURINE and WOMAN FIGURINE; press the button (C).
- Take the CROSS (D).
- Walk down.
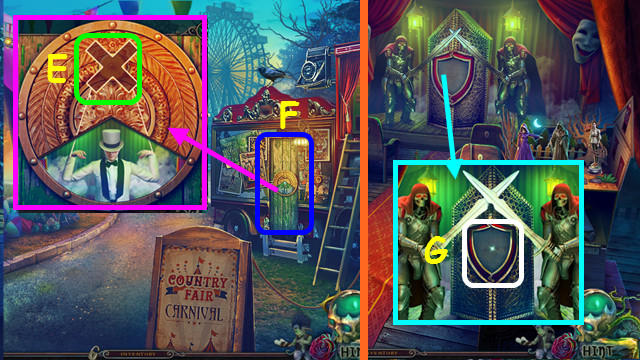
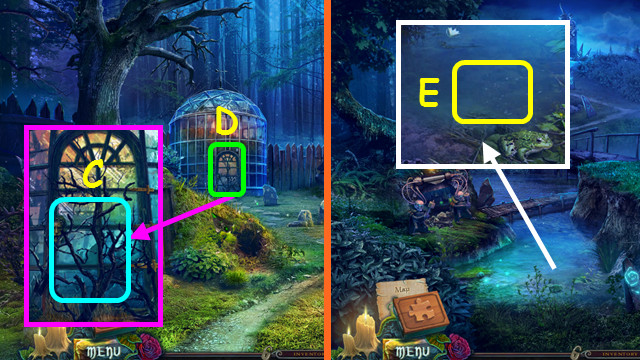
- Place the CROSS (E).
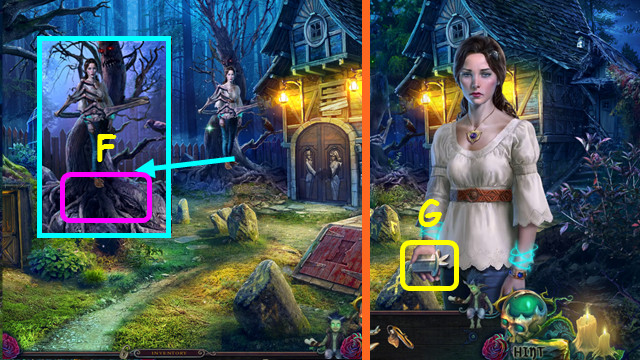
- Play the HOP; earn the SHIELD EMBLEM (F).
- Walk forward.
- Place the SHIELD EMBLEM (G).
- Walk forward.
Chapter 2: The Sorcerer's Area
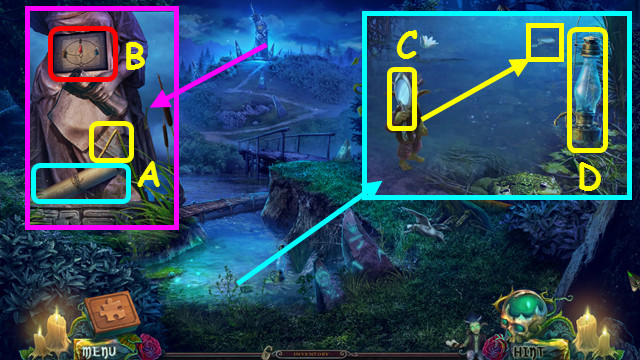
- Take the map; use the KNIFE to take the STRAW (A).
- Combine the CASE WITH GLASSES and STRAW to make the TINY DIVING GEAR (inventory).
- Note the statue mini-game (B).
- Select in the scene to use the IMP; use the TINY DIVING GEAR; take the MIRROR (C).
- Take the OIL LAMP (D).
- Use the MIRROR (E).
- Play the HOP (F).
- Walk right.
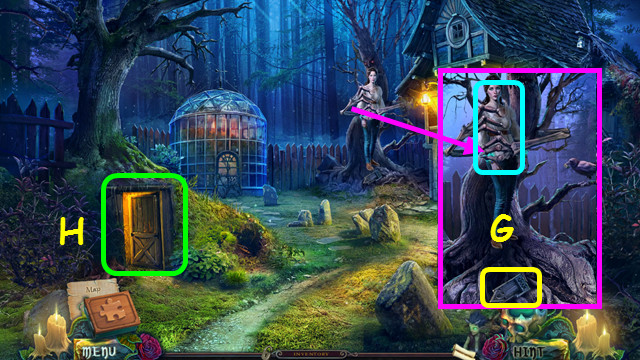
- Talk to Lynn; take the THRONE EMBLEM (G).
- Walk left (H).
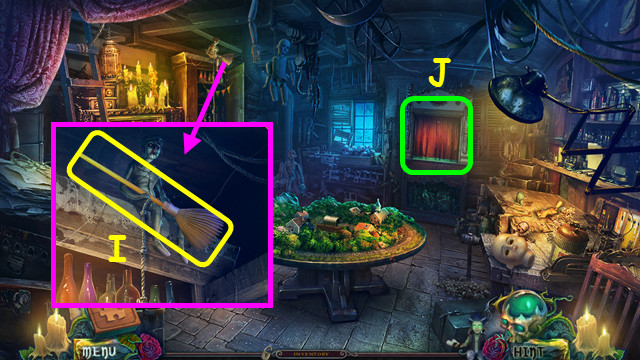
- Select in the scene to use the IMP; take the BROOM (I).
- Note the puppet stage (J).
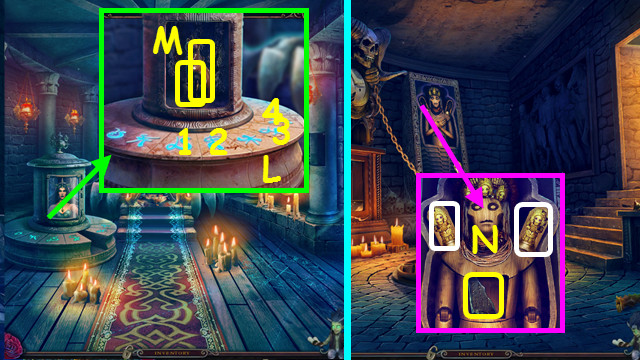
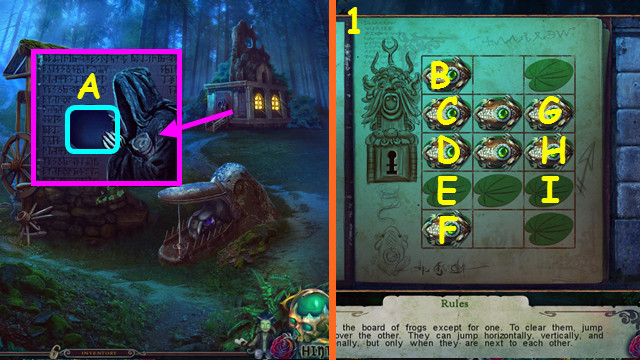
- Walk down 2x; select the statue mini-game.
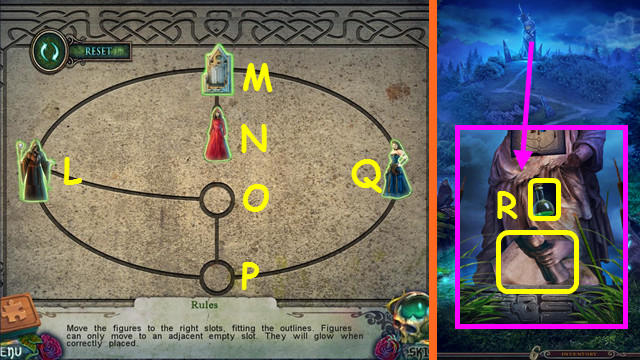
- Place the THRONE EMBLEM on the board.
- Solution: Q-P, L-O, M-Q, N-M, M-L, Q-M, M-N, P-Q, Q-M, O-P, P-Q.
- Take the HAND WITH SCROLL and PAINT THINNER (R).
- Walk right.
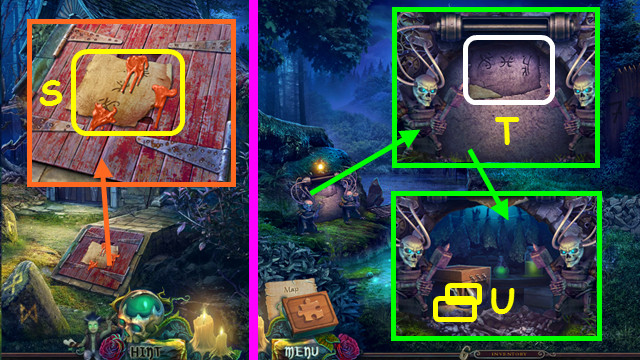
- Use the PAINT THINNER; take the WITCHES' SCROLL (S).
- Walk down.
- Place the WITCHES' SCROLL (T).
- Take the BROKEN HOOK and WOODEN SHOES (U).
- Walk right.
- Select in the scene to use the IMP; use the WOODEN SHOES; take the HANDLE (A).
- Walk down.
- Place the HANDLE; read the note and take the FLINT (B).
- Walk right.
- Use the FLINT (C).
- Play the HOP to earn the EMPTY WATERING CAN (D).
- Walk down.
- Use the EMPTY WATERING CAN to take the FULL WATERING CAN (E).
- Walk right.
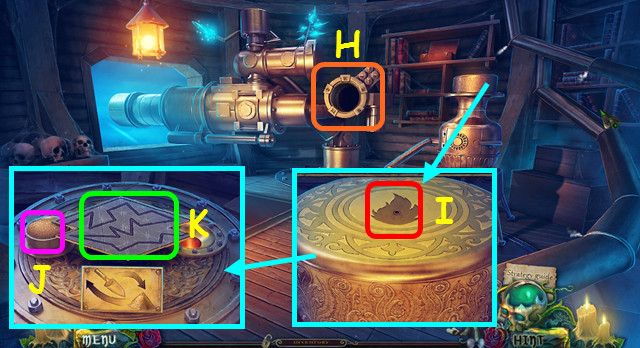
- Use the FULL WATERING CAN (F).
- Take the HAT EMBLEM (G).
- Walk left.
- Place the HAT EMBLEM (H).
- Play the HOP to earn the MODEL TRAIN (I).
- Select the train mini-game (J).
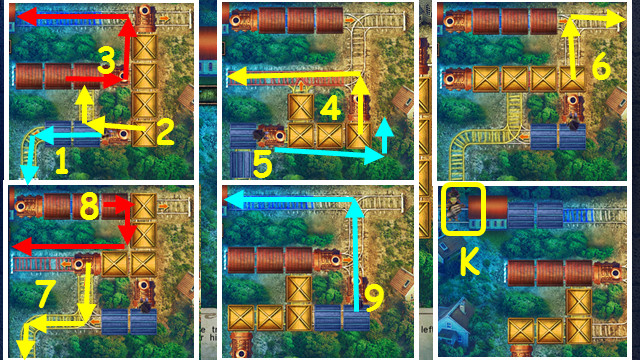
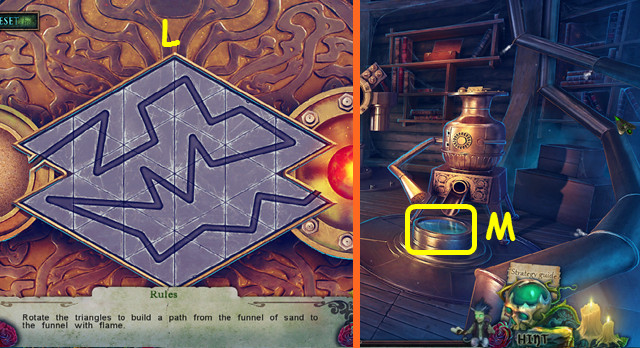
- Place the MODEL TRAIN on the board.
- Move the trains as shown 1-9.
- Take the HAND WITH FEATHER (K).
- Walk down.
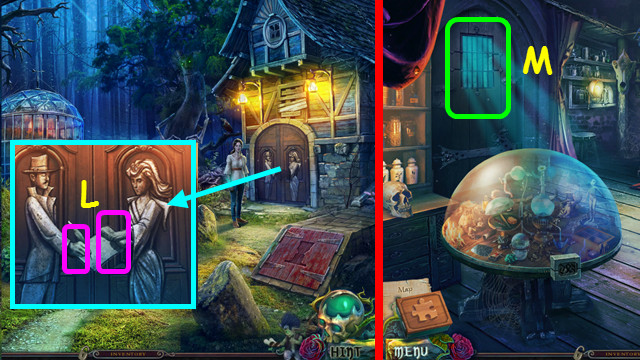
- Place the HAND WITH SCROLL and HAND WITH FEATHER (L).
- Walk right.
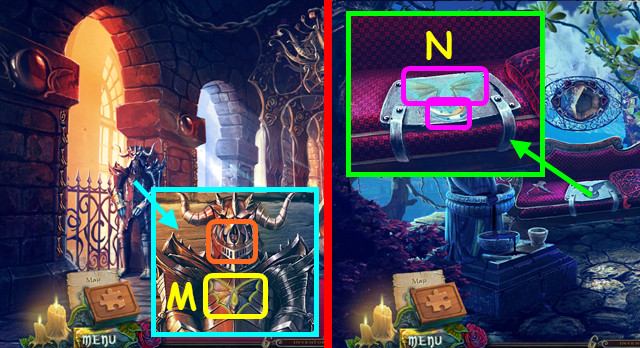
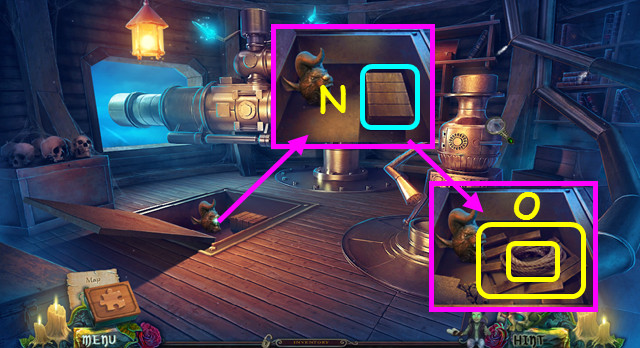
- Look at the door (M).
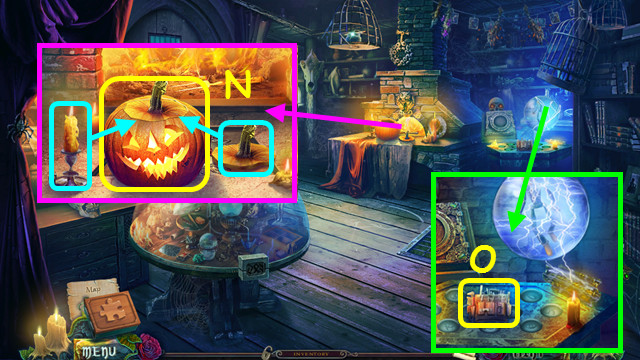
- Use the KNIFE 3x; add the candle and lid, and then take the PUMPKIN (N).
- Take EDWARD'S BAG (O).
- Walk down.
- Use the PUMPKIN; take the SORCERER'S RING (P).
- Walk right.
- Use the SORCERER'S RING; play the HOP to earn the POTION OF LEVITATION (Q).
- Combine the BROOM and the POTION OF LEVITATION to make the FLYING BROOM (inventory).
- Select in the scene to use the IMP; use the FLYING BROOM (R). Take the PAINT AND BRUSH (S).
- Walk down and left.
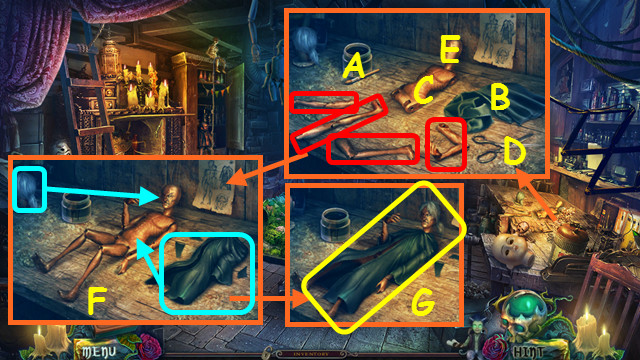
- Place the PAINT AND BRUSH (A) and the RAG (B).
- Place the limbs (red) on the body (C).
- Use the scissors (D) on the rag to make the robe.
- Use the brush in the paint, and then on the head (E).
- Place the wig and robe on the doll (F).
- Take the SORCERER DOLL (G).
- Select the puppet stage.
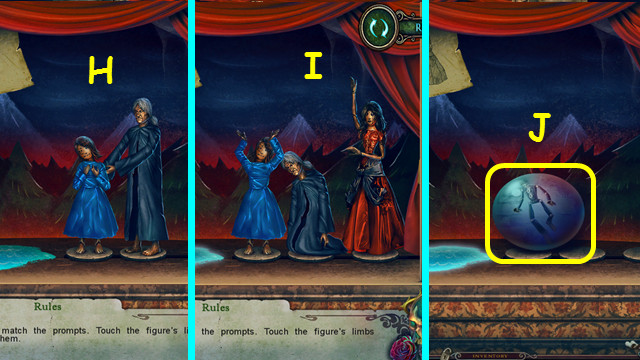
- Open the curtains; place the SORCERER DOLL.
- Arrange the figures as shown (H-I).
- Take the SPHERE EMBLEM (J).
- Walk down and right.
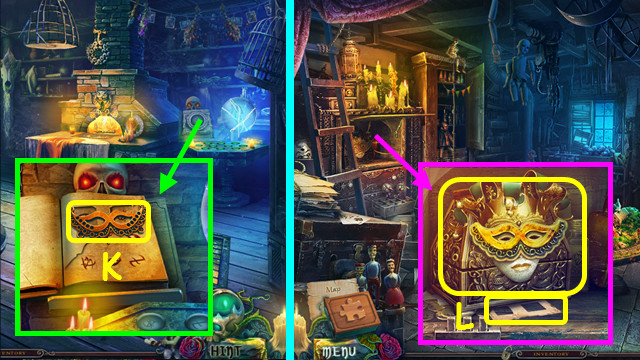
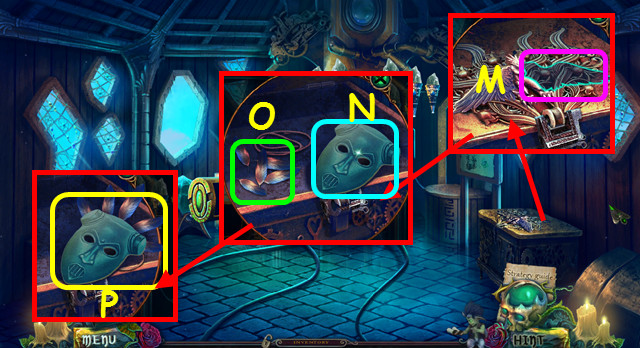
- Place the SPHERE EMBLEM; take the MASK (K).
- Walk down and left.
- Place the MASK; take the CHEST and CUTOUT PAGE (L).
- Walk down and right.
- Place the CUTOUT PAGE (M).
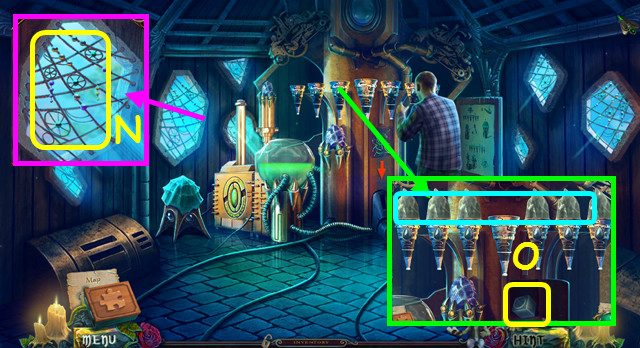
- Press the 5 symbols (green); take the PUPPET EDWARD (N).
Chapter 3: The Dungeon
- Take the RECIPE (A).
- Combine the CHEST, RECIPE (B), and PUPPET EDWARD (C).
- Place the ingredients (red) into (D).
- Pour (E) on Puppet Edward.
- Use (F) on Puppet Edward to earn MASTER EDWARD.
- Combine MASTER EDWARD, EDWARD'S BAG, and the BROKEN HOOK to make the HOOK (inventory).
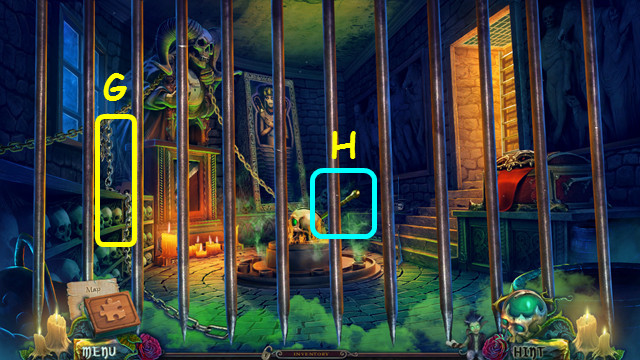
- Take the CHAIN (G).
- Combine the CHAIN and HOOK to make the CHAIN WITH HOOK (inventory).
- Use the CHAIN WITH HOOK (H).
- Walk right.
- Take the FORK (I).
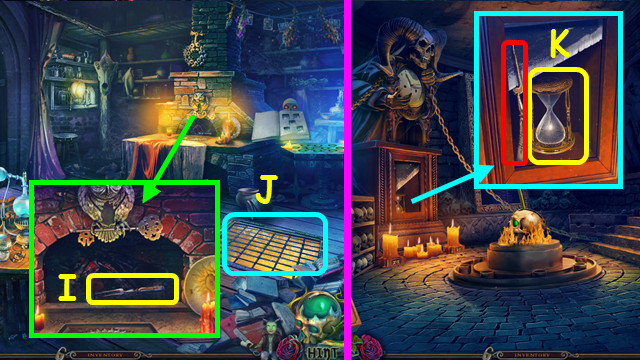
- Enter the Dungeon (J).
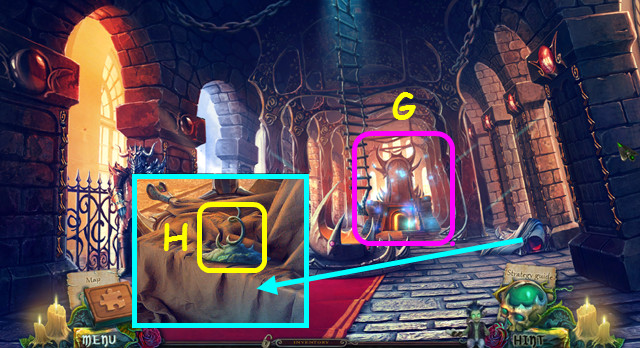
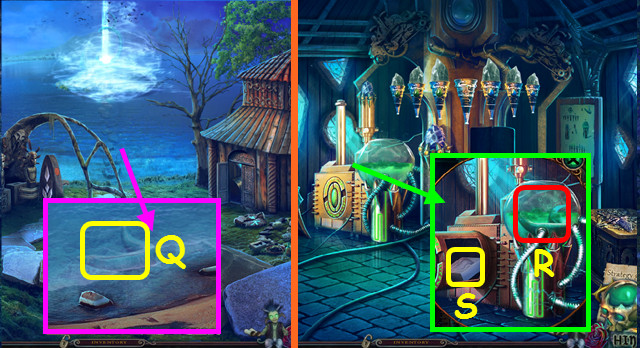
- Place the FORK; take the HOURGLASS (K).
- Walk right and left.
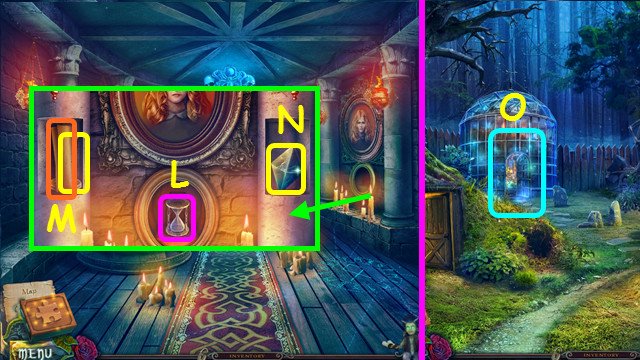
- Place the HOURGLASS (L).
- Read the instructions; take the GOBLET SILHOUETTE (M).
- Take the FRESCO PART (N).
- Walk down 2x.
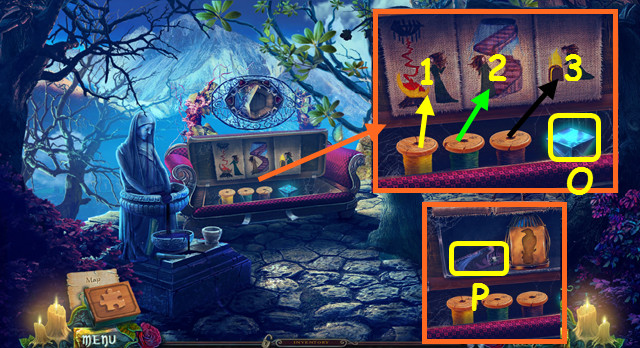
- Play the HOP to earn the POLLEN (O).
- Place the GOBLET SILHOUETTE (P).
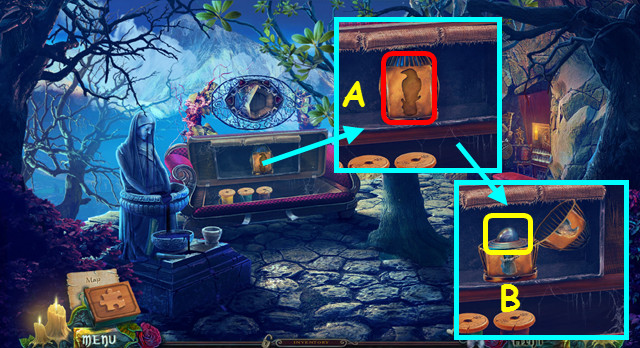
- Take the CORK (Q).
- Walk right and left.

- Use the POLLEN and CORK (R).
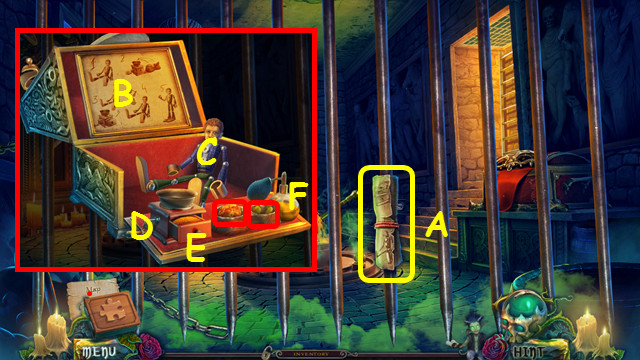
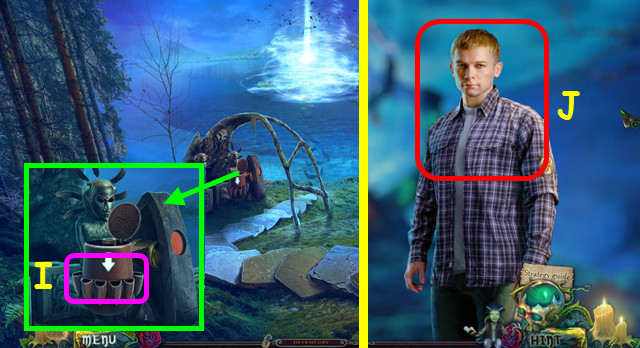
- Select the painting (S).
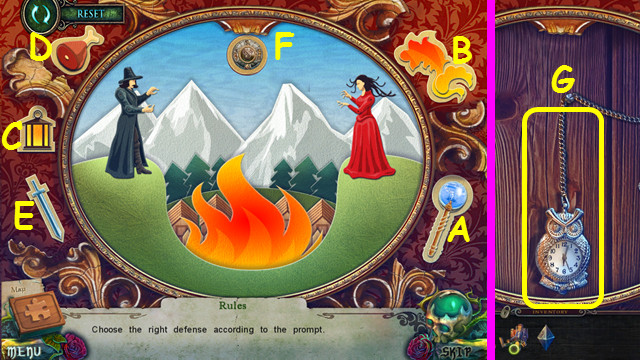
- Give the items to the man after each prompt (A-F).
- Take the WATCH ON A CHAIN (G).
- Walk down.
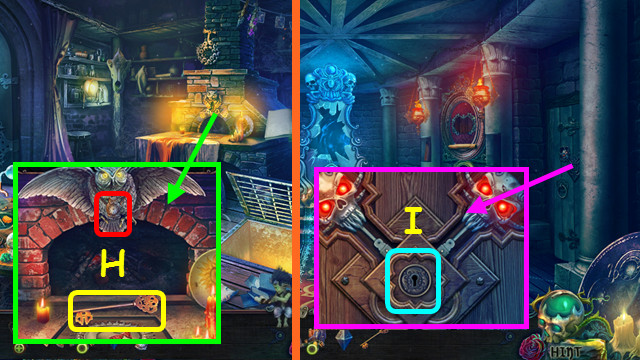
- Place the WATCH ON A CHAIN; take the KEY (H).
- Walk left.
- Use the KEY (I).
- Walk right.
Chapter 3: The Witches' Crossroads
- Take the 1st IDOL (A).
- Take the YELLOW NUGGET (B).
- Play the HOP (C).
- Walk forward.
- Place the FRESCO PART and push 3x; take the scroll, 1/7 KEY, and GLASS EYE (D).
- Take the RED PLATE (E).
- Walk down 2x.
- Place the GLASS EYE; read the ingredients and take the APPLE PART (G).
- Walk down.
- Play the HOP for the MIRROR SHARDS (H).
- Place the APPLE PART; take the SIEVE and MAGIC APPLE (I).
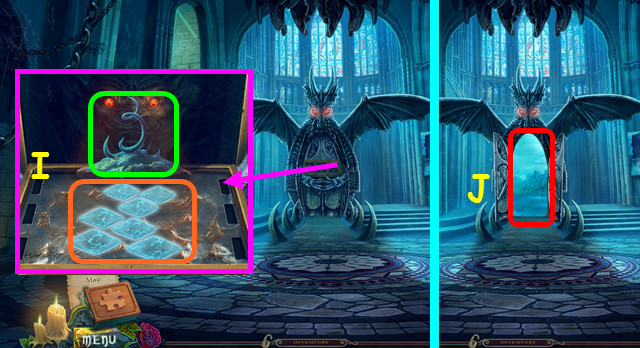
- Enter the Dungeon.
- Use the MAGIC APPLE (J).
- Take the KEY WITH RUNE and SILVER INGOT (K).
- Walk right and left.
- Place the KEY WITH RUNE (L).
- Press 1-4; take the BLACK CANDLE and 2nd IDOL (M).
- Walk down and enter the Dungeon.
- Place the 2 IDOLS; take the BLACK PLATE (N).
- Combine the RED PLATE and BLACK PLATE to make the SPELL (inventory).
- Walk right and left.
- Place the SILVER INGOT (A), MIRROR SHARDS (B), BLACK CANDLE (C), and SPELL (D).
- Use the FLINT on (C); use (C) on (A).
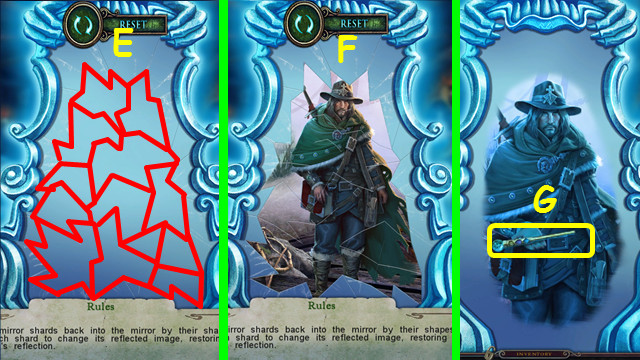
- Restore the mirror (E).
- Restore the picture (F).
- Take the DEAD STAFF (G).
- Combine the DEAD STAFF and YELLOW NUGGET to make the MAGIC STAFF (inventory).
- Walk right and forward.
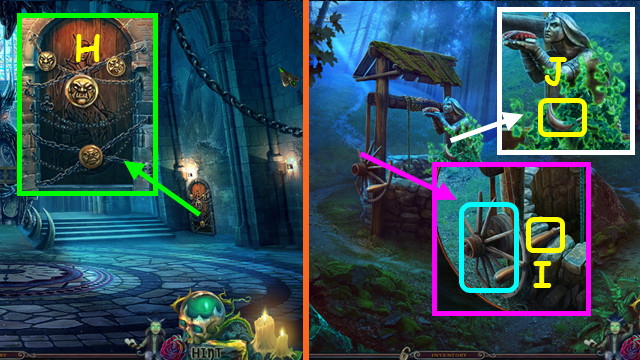
- Use the MAGIC STAFF (H).
- Walk right.
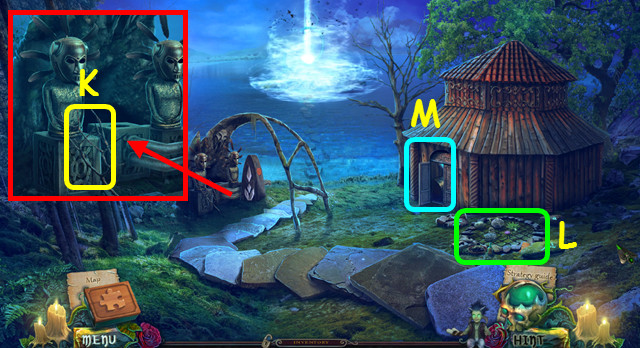
- Pull the wheel; take the WELL HANDLE (I).
- Take the METAL MOON (J).
- Walk forward.
- Take the SHORT SWORD (K).
- Play the HOP to earn the LAMP OIL (L).
- Combine the OIL LAMP, LAMP OIL, and FLINT to make the LIT LAMP (inventory).
- Take the STONE (M).
- Walk down.
- Use the SHORT SWORD; take the ARROW and MONSTER'S JAW (N).
- Walk forward.
- Use the MONSTER'S JAW; take the WHEEL and MINUTE HAND (O).
- Combine the WHEEL and WELL HANDLE to make the HANDLE WHEEL (inventory).
- Walk down.
- Place the HANDLE WHEEL (P).
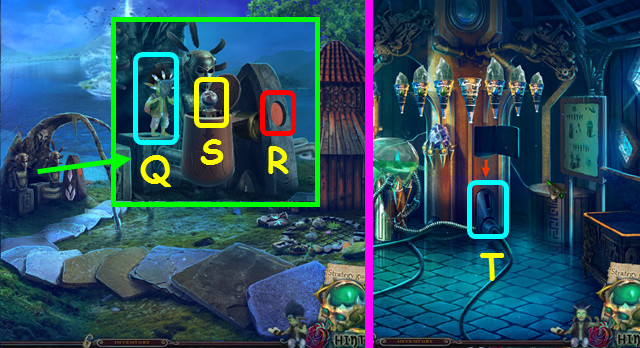
- Select in the scene to use the IMP; use the LIT LAMP; take the WILLOW EMBLEM (Q).
- Walk forward.
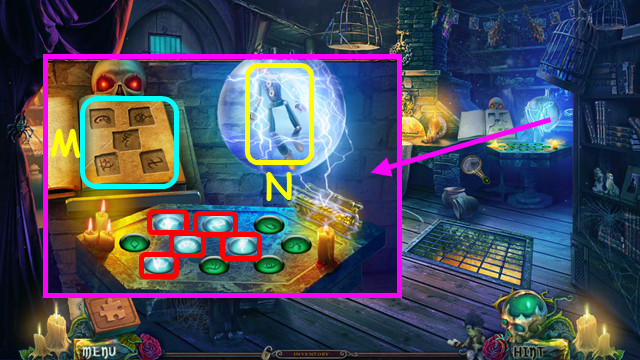
- Place the WILLOW EMBLEM; take the MAGIC SPHERE (R).
- Walk down.
- Place the MAGIC SPHERE (A).
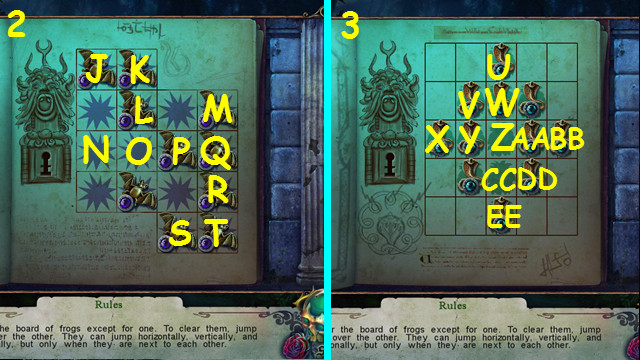
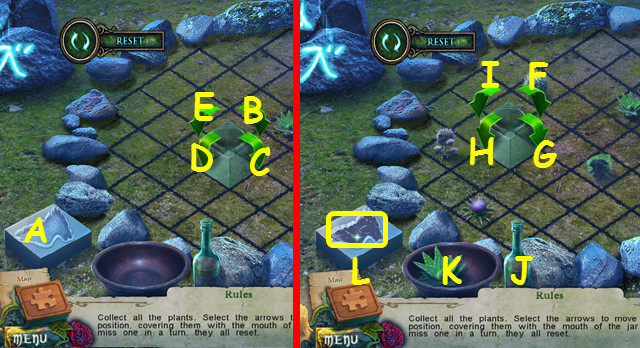
- Solution 1: G-I, D-H, B-D, I-G, G-C, C-E, F-D.
- Solution 2: S-N, Q-O, J-P, R-L, N-P, K-O, O-Q, M-R, T-Q.
- Solution 3: X-Z, U-X, AA-Y, X-Z, W-CC, EE-Z, BB-U, DD-V, U-X, X-EE.
- Walk forward.
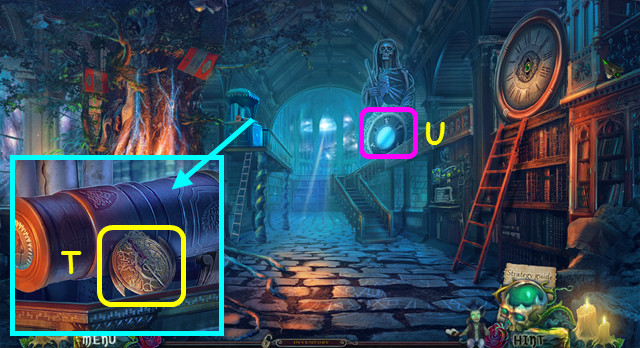
- Take the ASTROLABE (T).
- Play the HOP (U).
- Walk forward.
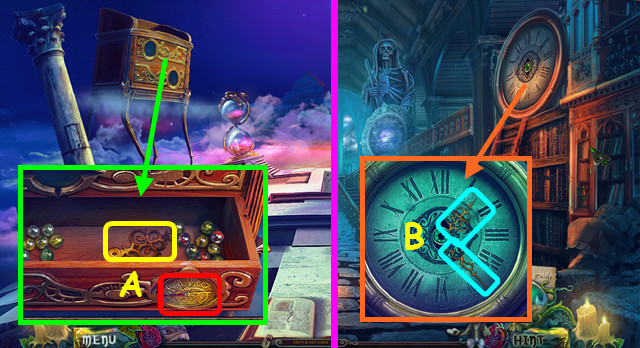
- Place the ASTROLABE; move the marbles and take the HOUR HAND (A).
- Walk down.
- Place the MINUTE HAND and HOUR HAND (B).
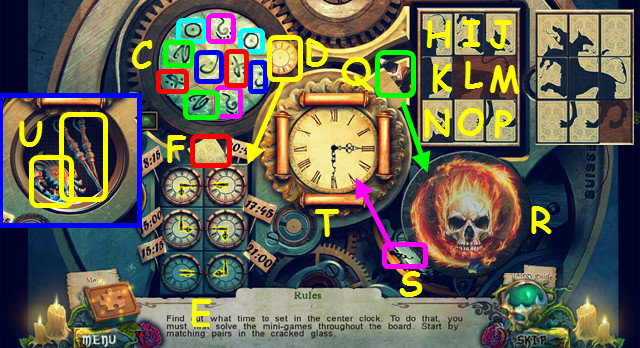
- Find the pairs (color-coded) (C).
- Move the clock face to the opening (D); set the clocks as shown (E).
- Move the tile (F) to the opening (L).
- Select L-I-H-K-N-O-P-M-J-I-H-K-L-I-J-M-P-O-N-K-L-I-J-M-L-K-N-O-P.
- Move the wedge (Q) to the opening; restore the skull (R).
- Place the hand on the clock face (S); set the clock to 15:30 (T).
- Take the SILVER CRAB and MAGIC NEEDLES (U).
- Walk down.
- Place the SILVER CRAB (A).
- Remove the eyeball; take the COMPASS (B).
- Walk right and forward.
- Place the COMPASS; move the stars and take the BOOKMARK and CAPITAL LETTER (C).
- Walk down.
- Place the CAPITAL LETTER (D).
- Use the roller on the typeset (E).
- Place the paper on the typeset (F).
- Select the paper (G).
- Play the HOP to earn the PULLED-OUT PAGE (H).
- Select the desk (I).
- Place the BOOKMARK (K).
- Use the glue on the book (L).
- Place the PULLED-OUT PAGE on the book; add the bookmark and close the book.
- Use the awl (M), and then the needle and thread (N) on the book.
- Open the book; turn the pages to find the STAR MAP (O).
- Walk forward and select the globes.
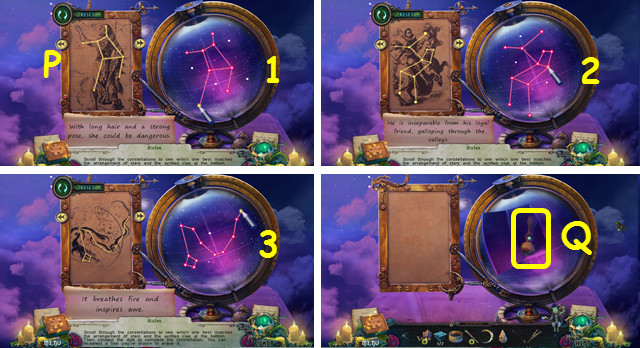
- Place the STAR MAP (P).
- Solutions (1-3).
- Take the BIRCH PRINT (Q).
- Walk down.
- Use the BIRCH PRINT (R).
- Move the 2 scrolls; take the PARCHMENT and CLAW (S).
- Walk forward.
- Place the CLAW; open the panel (A).
- Take the SPINDLE WITH NOTCHES (B).
- Select in the scene to use the IMP; use the SIEVE; take the MALACHITE BEADS (C).
- Combine the SPINDLE WITH NOTCHES and MALACHITE BEADS to make the MAGIC SPINDLE (inventory).
- Walk down twice.
- Use the MAGIC SPINDLE; take the MAGIC BALL (D).
- Combine the MAGIC BALL and MAGIC NEEDLE to make the MAGIC GARMENTS (inventory).
- Walk forward.
- Place the MAGIC GARMENTS (E).
- Take the FORGED DIAMOND (F).
- Place the FORGED DIAMOND (G).
- Walk forward.
Chapter 5: Morgana's House
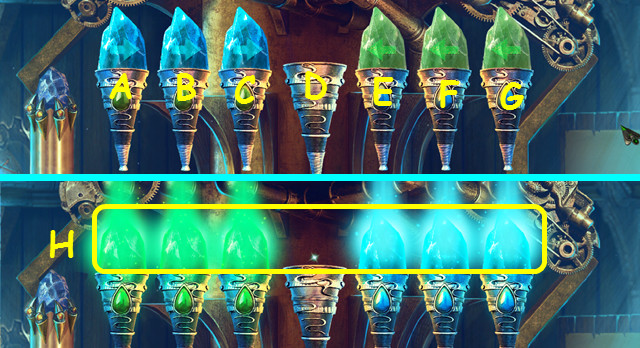
- Place the 3 balls (green) in the sling (H).
- Take the DEER HORNS (I).
- Walk down.
- Play the HOP to earn the CROSSBOW (J).
- Combine the CROSSBOW and ARROW to make the CROSSBOW AND ARROWS (inventory).
- Place the DEER HORNS; take the ROCK TOP (K).
- Walk forward.
- Place the ROCK TOP; take the note and ARTIFACT FIGURINE (L).
- Use the CROSSBOW AND ARROWS (M).
- Use the STONE; take the TRIANGLE TANAGRAM (N).
- Walk down.
- Place the ARTIFACT FIGURINE (O).
- Take the SQUARE TANAGRAM (P).
- Walk forward.
- Select the mini-game (Q).
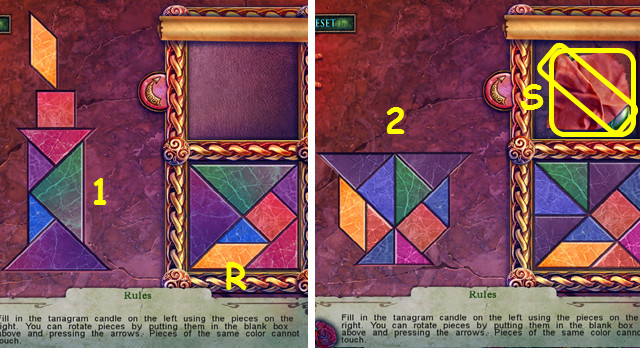
- Place the TRIANGLE TANAGRAM and SQUARE TANAGRAM (R).
- Solutions (1-2).
- Take the SHAWL and VIAL (S).
- Walk down.
- Use the VIAL to take the WILLOW SAP (A).
- Walk down and right.
- Play the HOP to earn the PRESS (B).
- Push the panel (C).
- Place the WILLOW SAP; take the 2/7 KEY and GRAPHITE (D).
- Walk down and forward 2x.
- Use the PARCHMENT and GRAPHITE; take the KEY (E).
- Combine MASTER EDWARD, the PRESS, and KEY to make the KEY (inventory).
- Use the KEY (F).
- Take the 1st QUEEN'S MURAL PIECE (G).
- Restore the skulls (red).
- Take the 3/7 KEY and MONSTER'S TONGUE (H).
- Walk down 2x.
- Place the MONSTER'S TONGUE (I).
- Take the LILAC NUGGET and 1st NECKLACE PART (J).
- Combine the DEAD STAFF and the LILAC NUGGET to make the MAGIC STAFF (inventory).
- Walk down.
- Use the MAGIC STAFF (K).
- Walk left.
- Take the SPIKES and note the gems mini-game (L).
- Walk left.
- Take the SPRING and move the pillow (A).
- Note the picture mini-game (B).
- Place the SPIKES; take the BRACELET WITH SPIKES (C).
- Play the HOP to earn the ORGAN PEDAL (D).
- Walk down.
- Place the BRACELET WITH SPIKES (E).
- Take the BROKEN SWORD (F).
- Combine MASTER EDWARD, the SPRING, ORGAN PEDAL, and BROKEN SWORD to make the POGO STICK (inventory).
- Select in the scene to use the IMP (1); use the POGO STICK (2); take the RED ARROW BUTTON (G).
- Walk left; select the picture mini-game.

- Place the RED ARROW BUTTON.
- Solution: J-H-I-K-H-H-K-K-H-H.
- Take the VISOR (L).
- Walk down.
- Place the VISOR; take the METAL BAT (M).
- Walk left.
- Place the METAL BAT and METAL MOON (N).
- Take the 4/7 KEY (O).
- Use the threads (1-3).
- Take the 2nd QUEEN'S MURAL PIECE (P).
- Walk down.

- Place the 1st and 2nd QUEEN'S MURAL PIECES for a HOP (Q).
- Play the HOP to earn MORGANA'S BROOCH (R).
- Place MORGANA'S BROOCH; take the STEEL RAVEN (S).
- Walk left.
- Place the STEEL RAVEN (A).
- Open the dolls; take the MOONSTONE (B).
- Walk down; select the gems mini-game.
- Place the MOONSTONE on the board.
- Solution (C).
- Climb up the ladder (D).
Chapter 6: The Secret Room
- Take the RUBY and use the SHAWL (E).
- Take the BUNCH OF STRAW (F).
- Take the PLANK (G).
- Combine the PLANK and FLINT to make CHARCOAL (inventory).
- Walk down.
- Place the RUBY; take the TOOTH NECKLACE (H).
- Remove the beads and lace from the TOOTH NECKLACE to make the GOLDEN CANINE (inventory).
- Go up the ladder.
- Restore the teeth (green); place the GOLDEN CANINE (I).
- Take the 5/7 KEY and SICKLE (J).
- Walk down and left.
- Play the HOP; earn the HANDLE (K).
- Use the SICKLE to take the STRANGE FRUIT (L).
- Place the CHARCOAL and STRANGE FRUIT (M).
- Use the pestle (N) on (M).
- Move M-O.
- Take the CLEAR WATER (P).
- Walk down; go up the ladder.
- Use the CLEAR WATER (Q).
- Place the HANDLE; turn it 3x (R).
- Select the board (S).
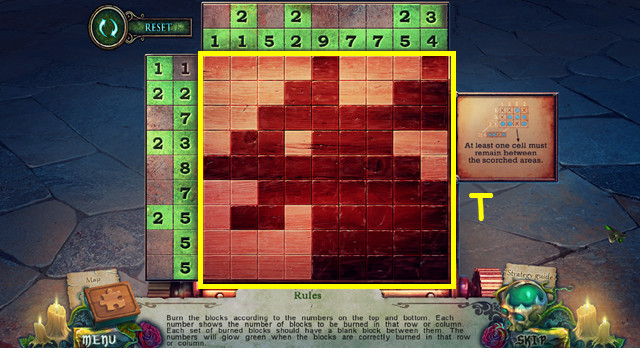
- Solution (T).
- Take the BURNED IMAGE.
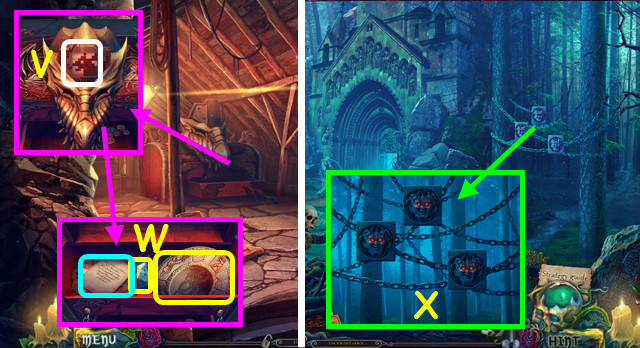
- Place the BURNED IMAGE (V).
- Take the 1st ARTIFACT PART, note, and BLUE NUGGET (W).
- Combine the DEAD STAFF and BLUE NUGGET to make the MAGIC STAFF (inventory).
- Walk down 3x.
- Use the MAGIC STAFF (X).
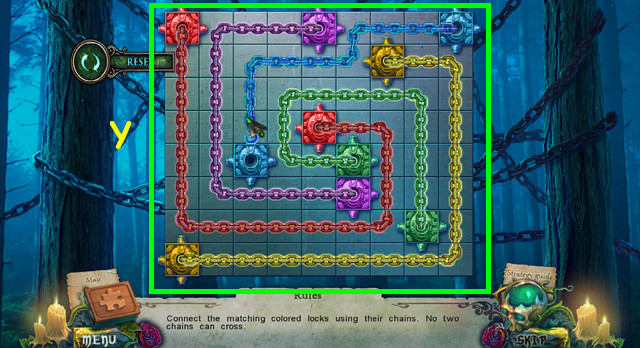
- Solution (Y).
- Walk right.
Chapter 7: The Bridge
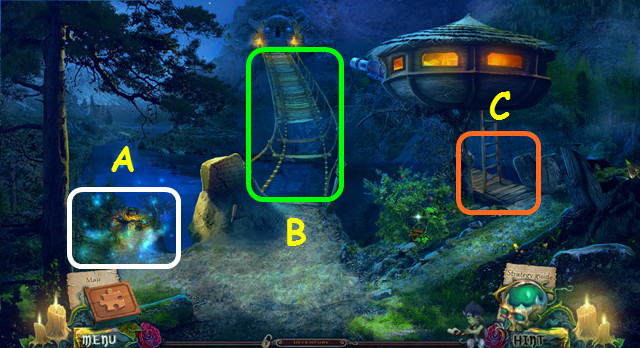
- Play the HOP; earn the WITCHES AMULET (A).
- Note the bridge (B).
- Enter the Treehouse (C).
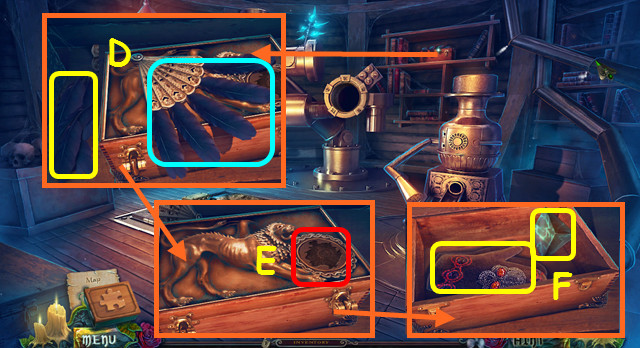
- Remove the feathers; take the CROW FEATHERS (D).
- Place the WITCHES AMULET (E).
- Take the 6/7 KEY and MITTENS (F).
- Walk down.
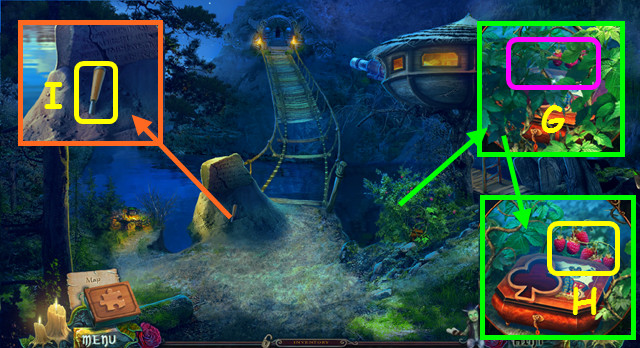
- Use the MITTENS (G).
- Take the RASPBERRIES (H).
- Take the CHISEL (I).
- Enter the Treehouse.
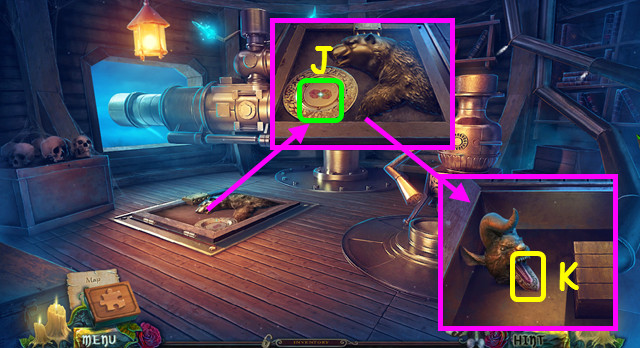
- Place the RASPBERRIES (J).
- Take the DEMON'S TONGUE (K).
- Walk down.

- Use the DEMON'S TONGUE to get the SHOVEL WITH SAND (L).
- Take the FLAGSTONE (M).
- Enter the Treehouse.
- Use the FLAGSTONE (N).
- Take the ROPE and BOARDS (O).
- Walk down; select the bridge.
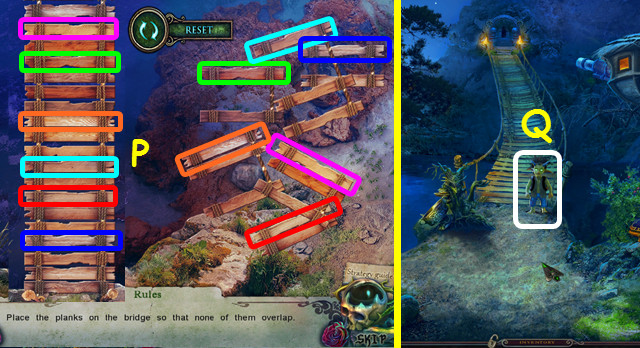
- Place the BOARDS on the bridge.
- Color-coded solution (P).
- Select in the scene to use the IMP; use the ROPE (Q).
- Walk forward.
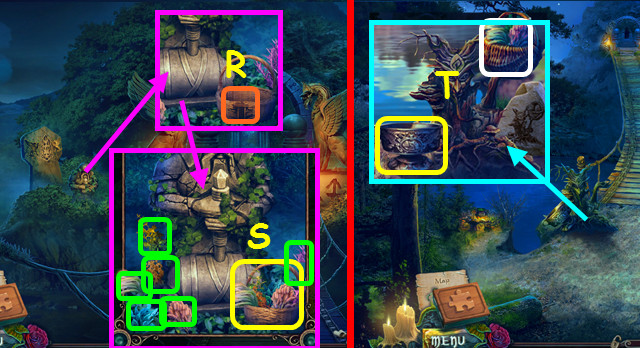
- Use the BUNCH OF STRAW (R).
- Collect 6 herbs; take the BASKET WITH HERBS (S).
- Walk down.
- Place the BASKET WITH HERBS; take the GRAIL (T).
- Walk forward.
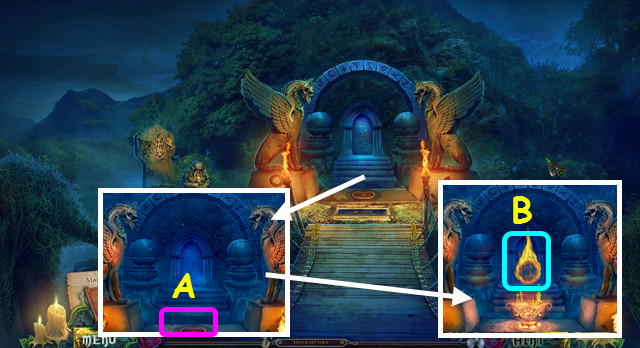
- Place the GRAIL for a HOP (A).
- Touch the ring (B); walk forward.
- Touch the symbol; take the 1st STONE WITCH (C).
- Play the HOP; earn the 2nd STONE WITCH (D).
- Walk down.
- Place the 2 STONE WITCHES (E).
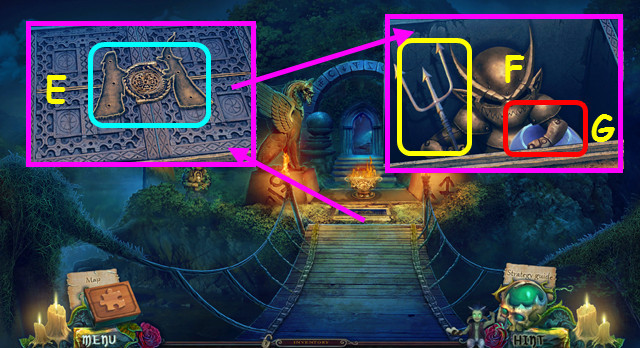
- Take the TRIDENT (F).
- Note the orb mini-game (G).
- Combine MASTER EDWARD and the TRIDENT to make the FORK (inventory).
- Walk forward.
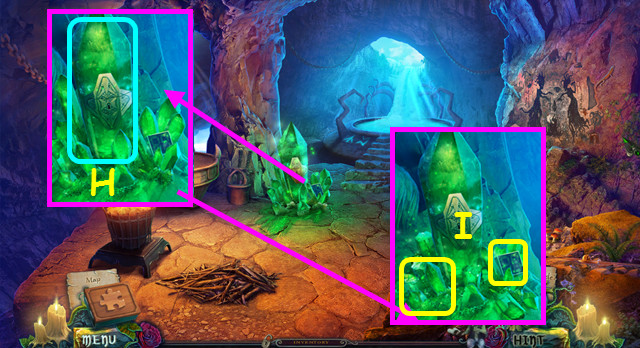
- Use the FORK (H).
- Take the CRYSTALS and COUNTER PART (I).
- Walk down; select the orb mini-game.
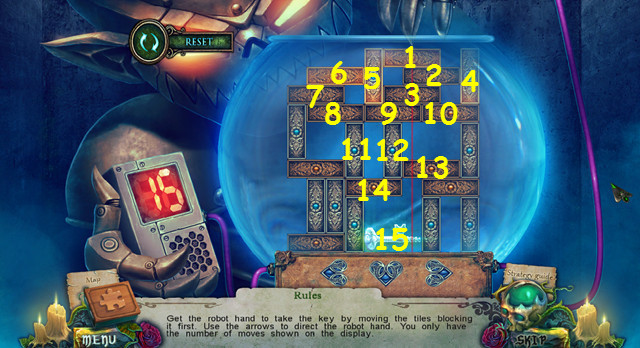
- Place the COUNTER PART (J).
- Remove the pieces in order (1-15).
- You earn the CRYSTAL KEY.
- Walk forward.
- Use the CRYSTAL KEY; take the CLUB SYMBOL (K).
- Walk down 2x.
- Play the HOP; earn the GROWTH POTION (L).
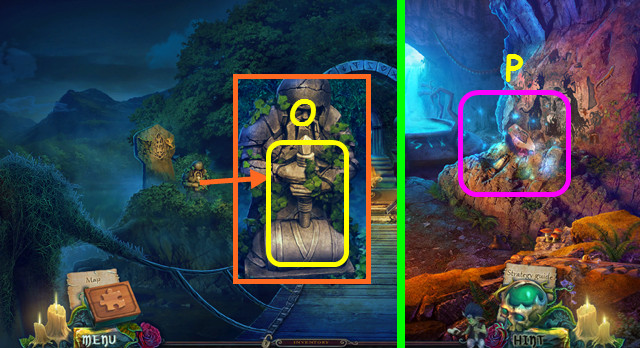
- Place the CLUB SYMBOL (M).
- Remove 3 cards; take the FLAME SIGN (N).
- Walk forward.
- Use the GROWTH POTION; take the SLEDGEHAMMER (O).
- Walk forward.
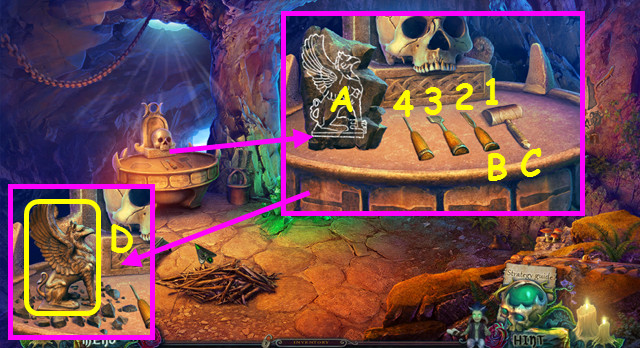
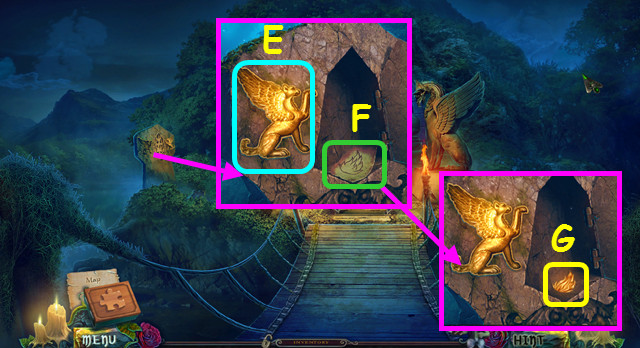
- Play the HOP; earn the STONE WITH GRIFFIN (P).
- Place the STONE WITH GRIFFIN (A), CHISEL (B), and SLEDGEHAMMER (C).
- Use the instruments in order on the griffin (1-4).
- Take the GRIFFIN (D).
- Walk down.
- Place the GRIFFIN (E).
- Read the note; place the FLAME SIGN (F).
- Take the FLAME EMBLEM (G).
- Walk down; enter the Treehouse.
- Note the eyepiece (H).
- Place the FLAME EMBLEM (I).
- Use the SHOVEL WITH SAND (J).
- Select the board (K).
- Solution (L).
- Take the LENS (M).
- Select the eyepiece.
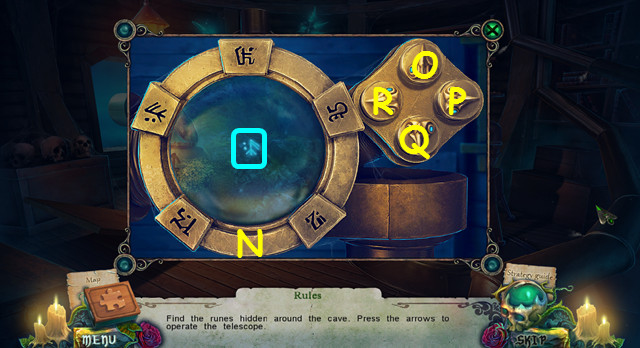
- Place the LENS (N).
- Press P-O-R-R-R-Q-P-Q; take the runes when centered in the lens.
- You earn the LENS WITH RUNES.
- Walk down; go forward 2x.
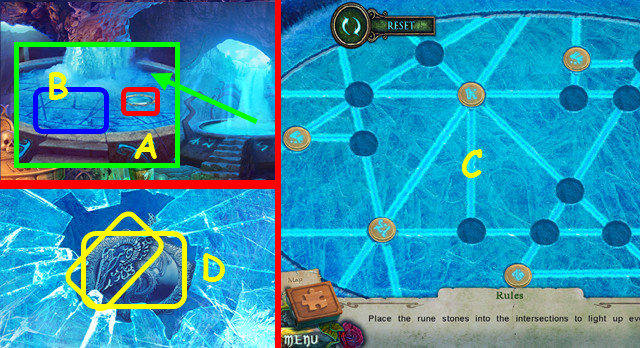
- Place the LENS WITH RUNES (A).
- Select the ice (B).
- Solution (C).
- Take the 2nd NECKLACE PART and the 2nd ARTIFACT PART (D).
- Combine the 1st and 2nd ARTIFACT PARTS to make the ARTIFACT (inventory).
- Walk down 3x.
- Place the 2 NECKLACE PARTS (E).
- Take the 7/7 KEY (F).
- Walk forward and left.
- Play the HOP; earn the GOLDEN SPUR (G).
- Take the ALTAR FIGURINE (H).
- Walk down.
- Open the panel; place the 7 KEYS and ALTAR FIGURINE (I).
- Walk forward (J).
- Take the BRANCH (K).
- Note the circle of stones mini-game (L).
- Walk right (M).
- Use the GOLDEN SPUR; take the NET (N).
- Combine the BRANCH with the NET to make the NET (inventory).
- Place the CRYSTALS; take the HERB JAR (O).
- Walk down.
- Use the NET; take the ELECTRIC EEL (Q).
- Walk right.
- Place the ELECTRIC EEL (R).
- Take the FORM FOR WING (S).
- Walk down; select the ring of stones mini-game.
- Place the FORM FOR WING (A).
- Place the HERB JAR on the grid.
- Level 1: B-C-B-B-E-D.
- Level 2: F-I-F-H-G-Fx3-G-Hx5-G-G-F-I-F-G-F-G-I-H-I-H-G-G-F-G-F-G.
- Use the bottle (J) on the bowl (K).
- Pour the bowl into the mold; take the RUBBER WING (L).
- Walk right.
- Place the RUBBER WING (M).
- Use the GOLDEN SPUR (N).
- Place the CROW FEATHERS; use the feathers and string on the mask (O).
- Take the TERRIBLE MASK (P).
- Walk down.
- Select in the scene to use IMP; use the TERRIBLE MASK (Q).
- Press the button (R).
- Take the ACTIVATION LEVER (S).
- Walk right.
- Place the ACTIVATION LEVER (T).
- Solution: C-E-F-D-B-A-C-E-G-F-D-B-C-E-D.
- Take the CHARGED CRYSTALS (H).
- Walk down.
- Place the CHARGED CRYSTALS (I).
- Use the ARTIFACT (J).
- Congratulations! You have completed Witches' Legacy: Slumbering Darkness!
Created at: 2015-03-27