

Walkthrough Menu
- General Tips
- Chapter 1: Sallenvile
- Chapter 2: The Boarding School
- Chapter 3: The Slums
- Chapter 4: The Cursed Inhabitants
- Chapter 5: The Wasteland
General Tips
- This is the official guide for Witches' Legacy: The City That Isn't There.
- This guide will not show when you have to zoom into a location; the screenshots will show each zoom scene.
- Hidden-object puzzles are referred to as HOPs. This guide will not show screenshots of the HOPs, however, it will mention when an HOP is available and the inventory item you'll collect from it.
- Use the Map to fast travel to a location.
Chapter 1: Sallenvile
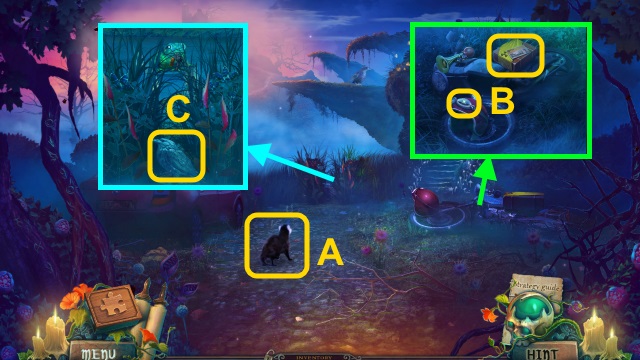
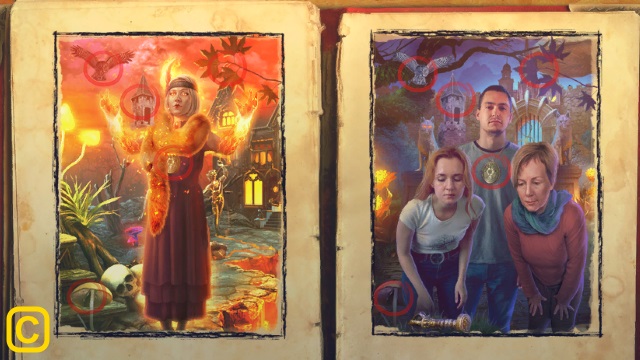
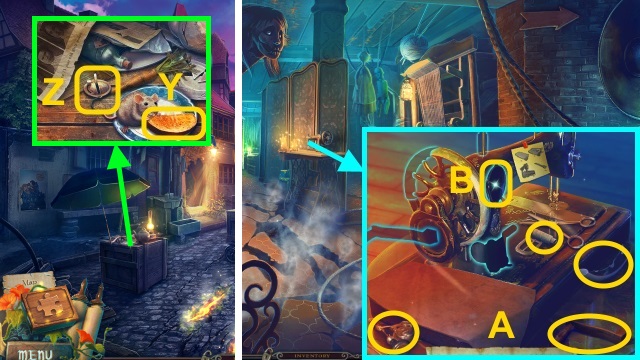
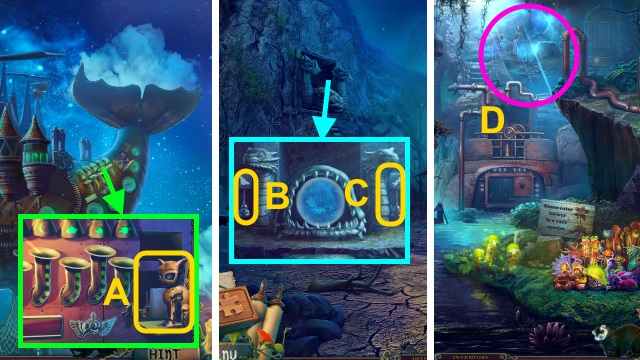
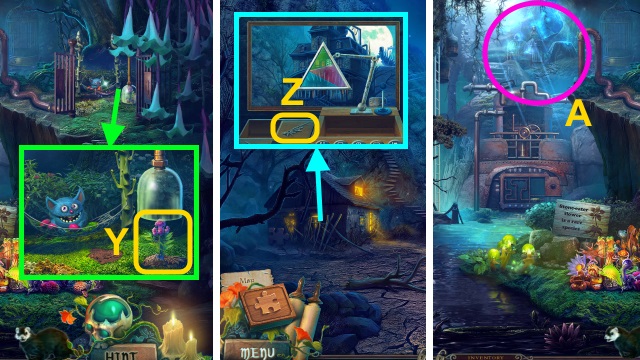
- Examine Bertha (A).
- Examine the ID; take the YELLOW CLOTH, CHEMIST'S KIT, and HELMET LENS (B).
- Examine the YELLOW CLOTH; place the HELMET LENS. Receive the HAZARD SUIT.
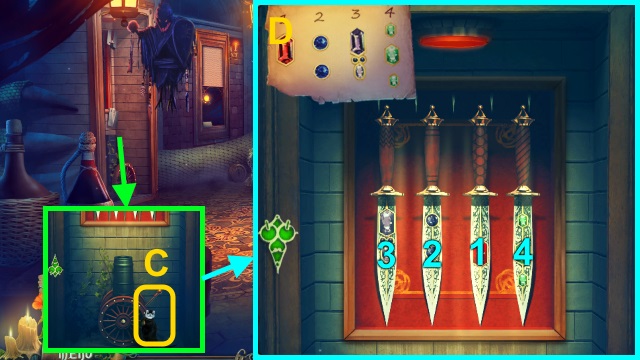
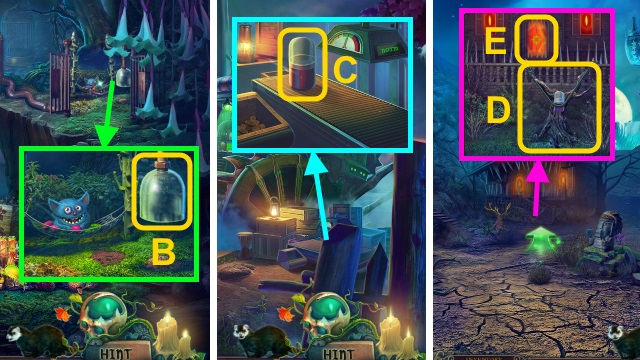
- Take the RAVEN FIGURINE (C); examine the reeds and frog.
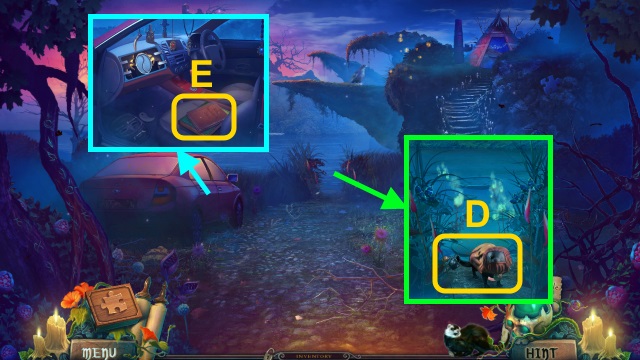
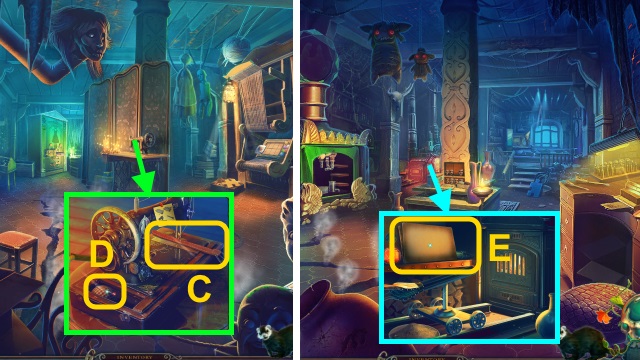
- Give the HAZARD SUIT; take JULIA'S CAR KEY (D).
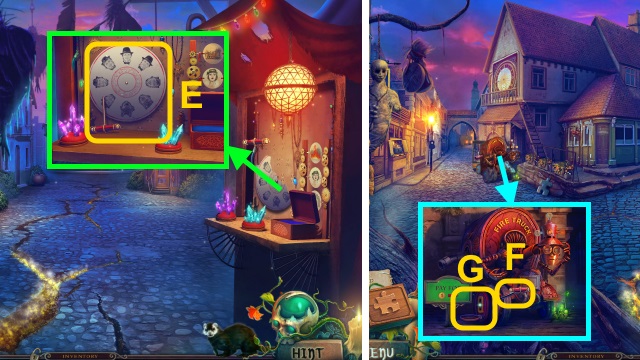
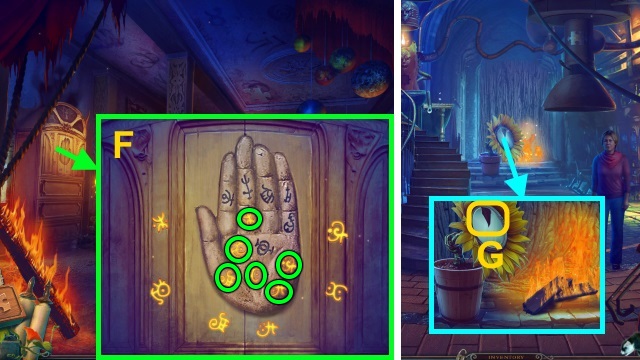
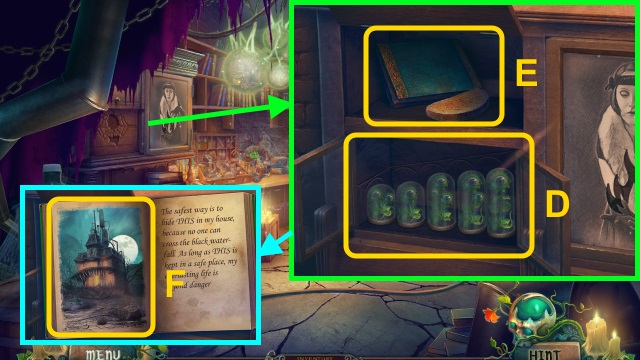
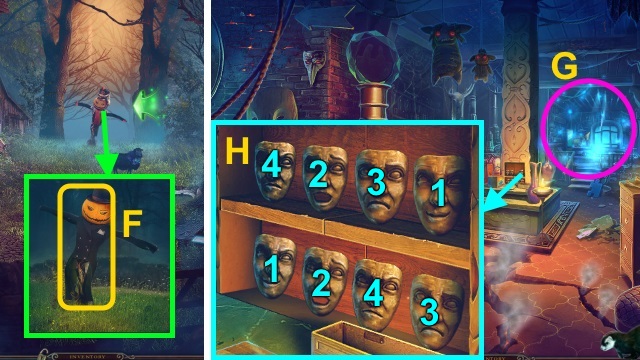
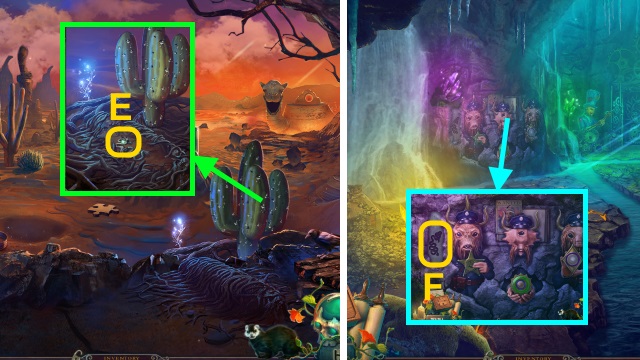
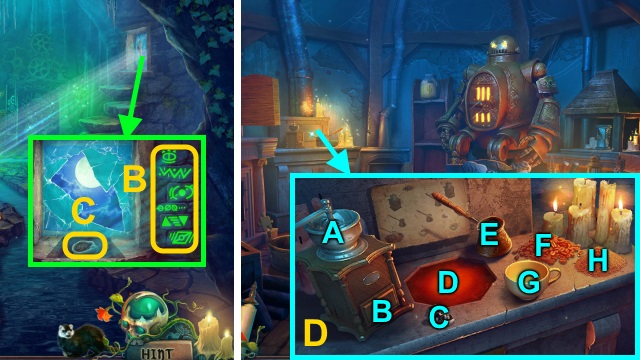
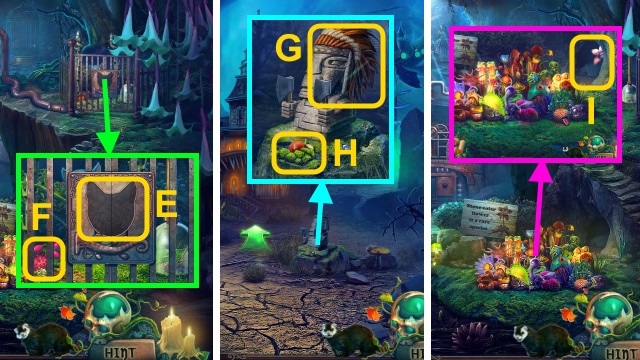
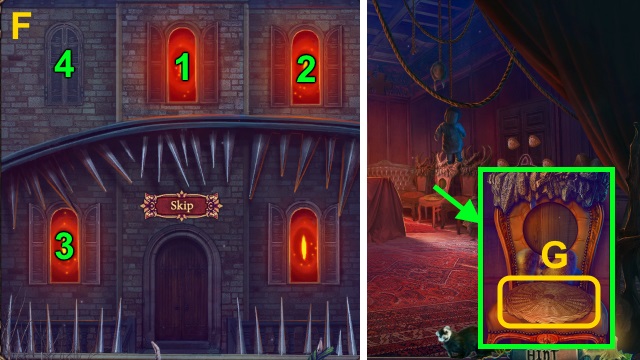
- Use JULIA'S CAR KEY; read the diary for a mini-game (E).
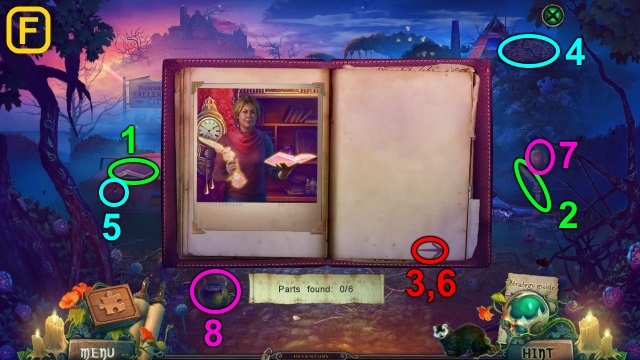
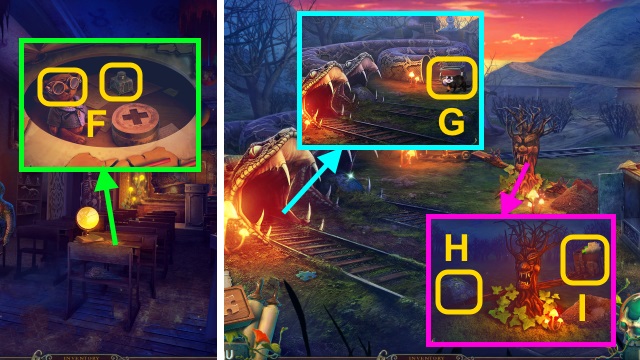
- Solution (F).
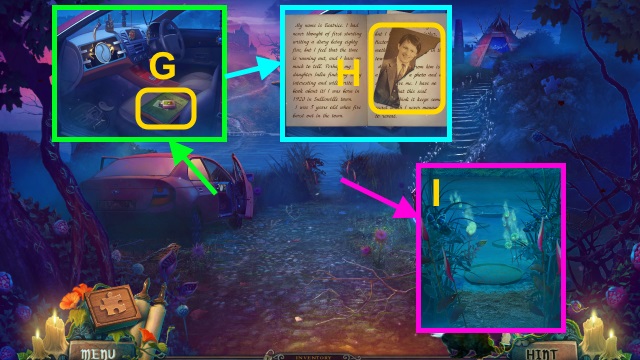
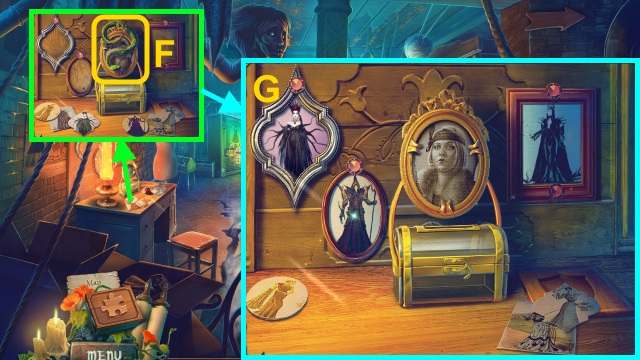
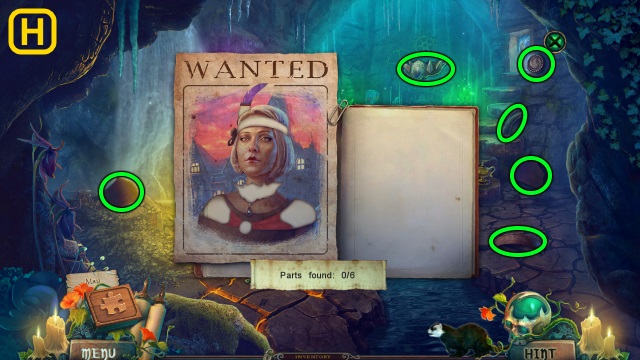
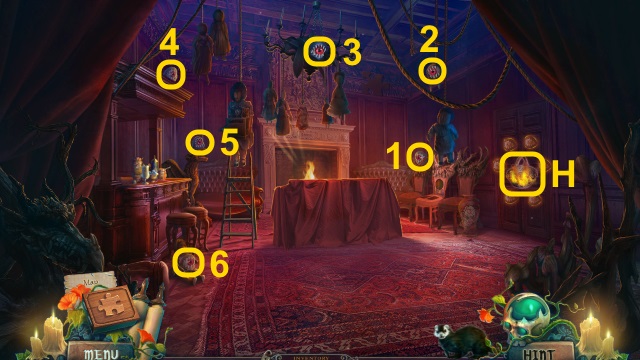
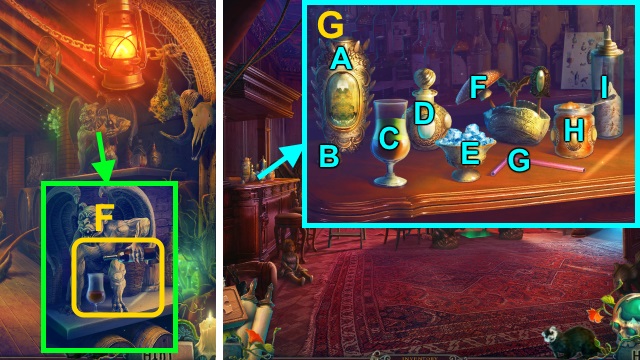
- Take the NAIL POLISH REMOVER; read the note and diary (G).
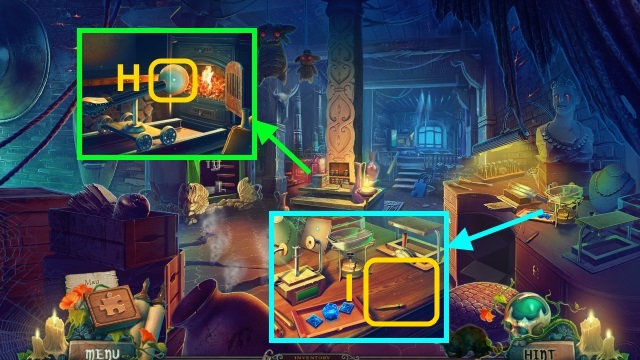
- Take the PHOTO HALF (H); turn the page. Examine the photo; take the MAGIC RECIPES and COLD STONE.
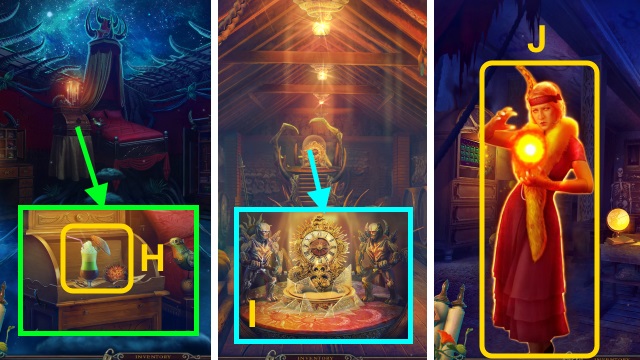
- Combine the CHEMIST'S KIT, MAGIC RECIPES, and COLD STONE. Open the book; place the stone in the beaker on the right. Use the spoon to stir the mixture; take the FREEZING POTION.
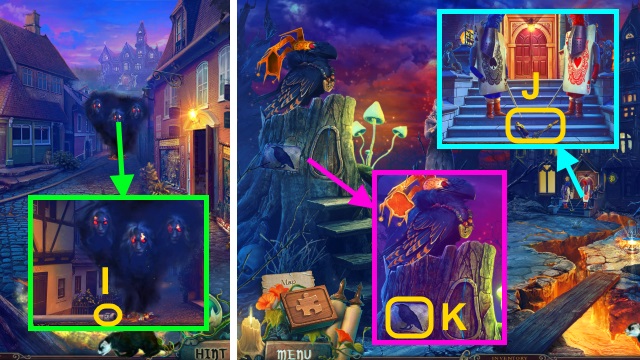
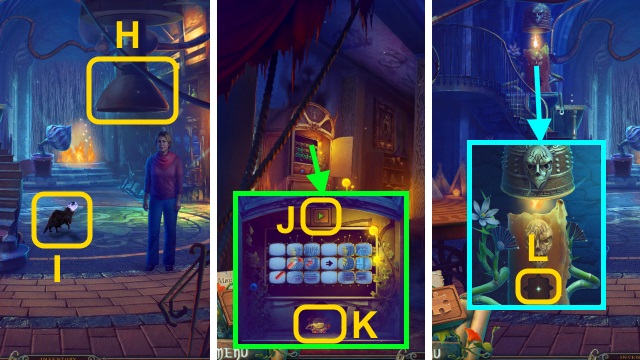
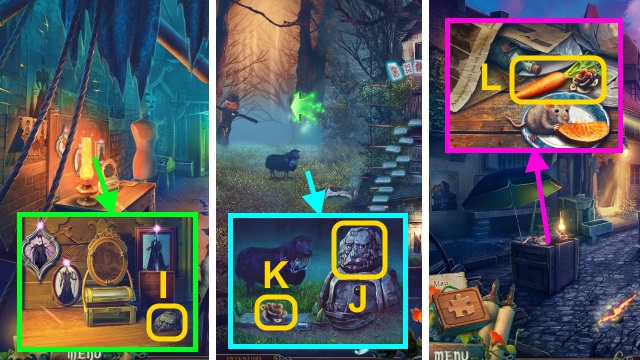
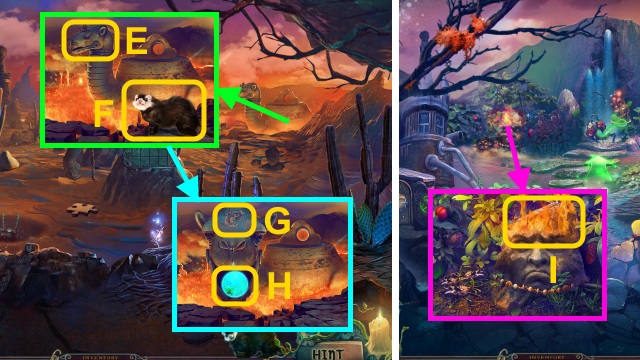
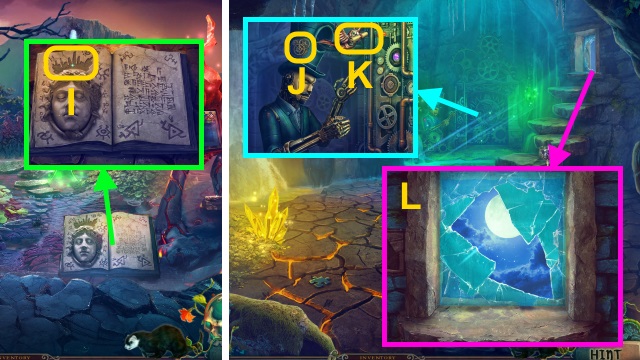
- Use the FREEZING POTION (I).
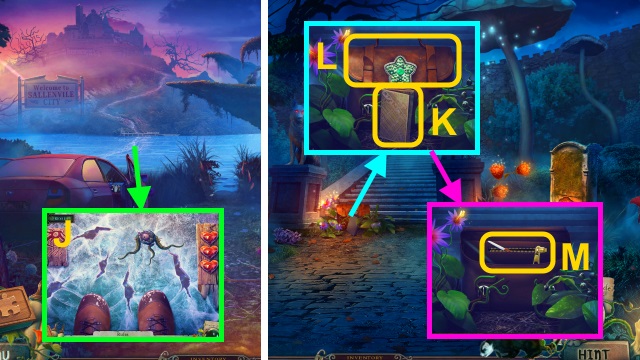
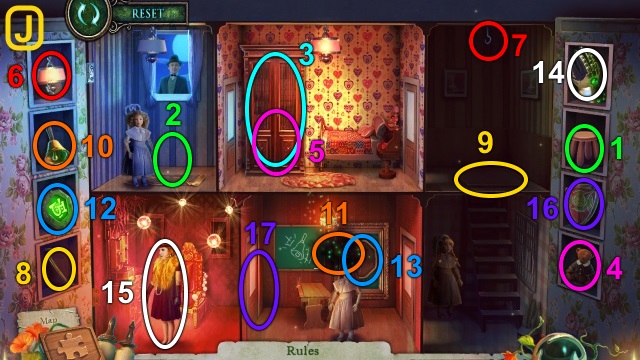
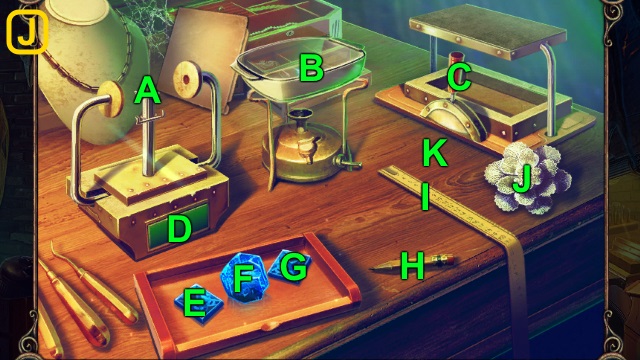
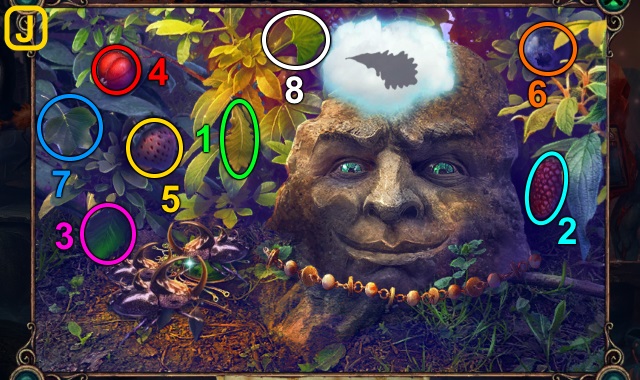
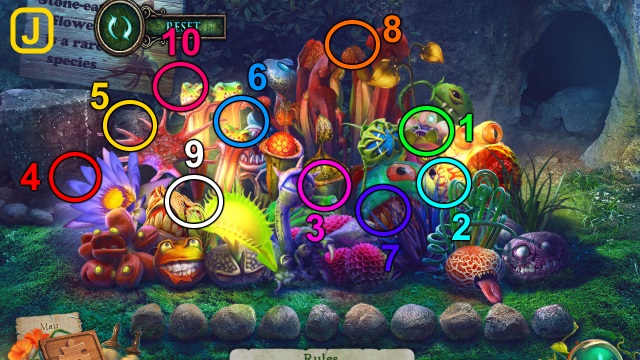
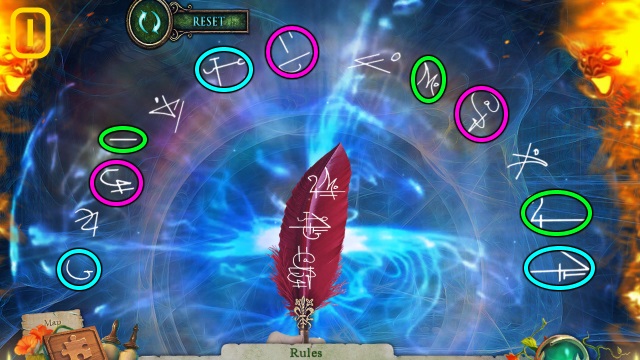
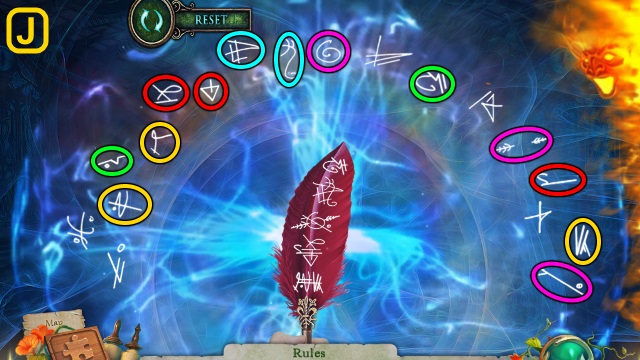
- Examine the ice for a mini-game.
- Solution (J): stomp the plants.
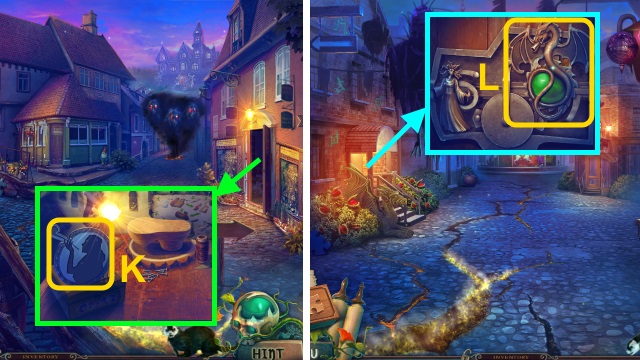
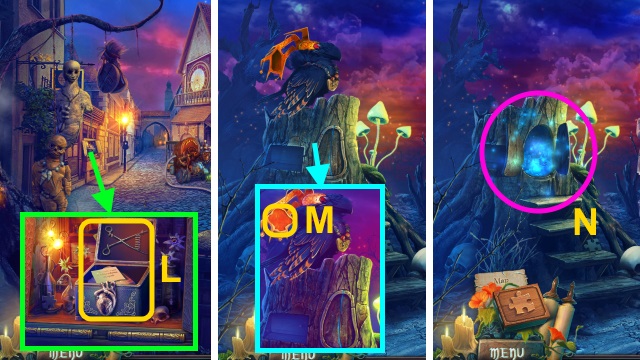
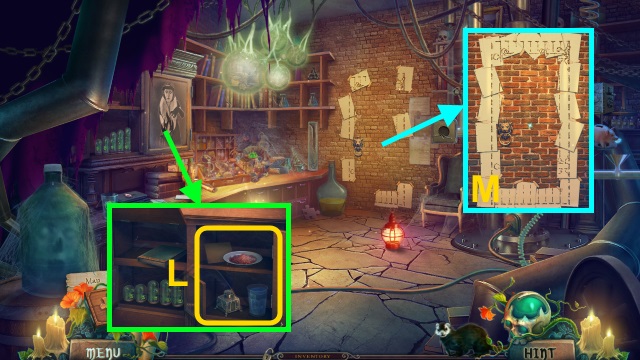
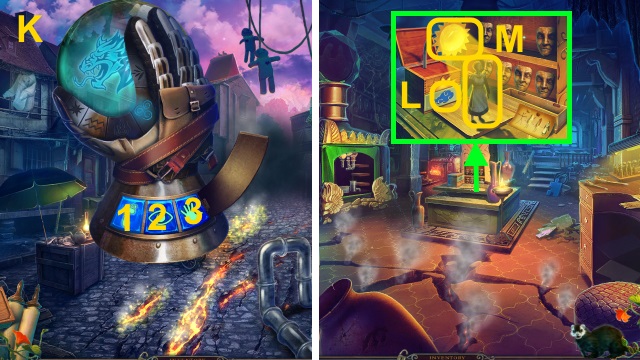
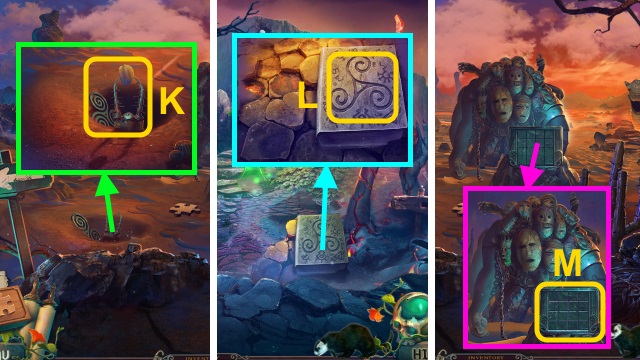
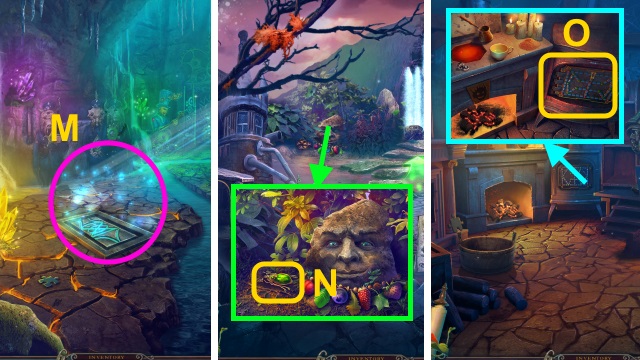
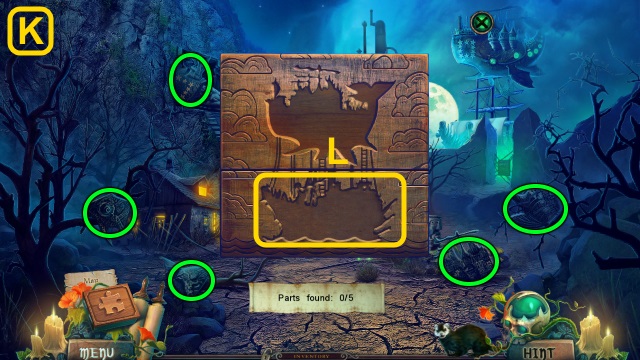
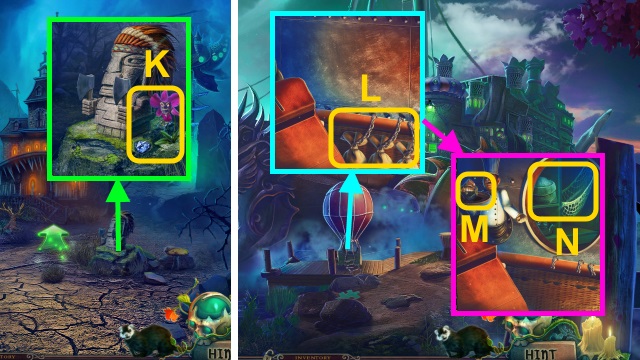
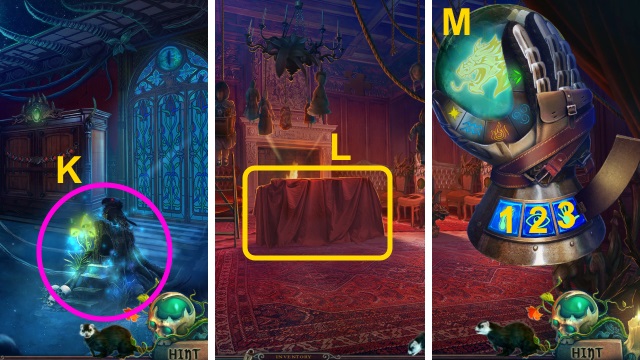
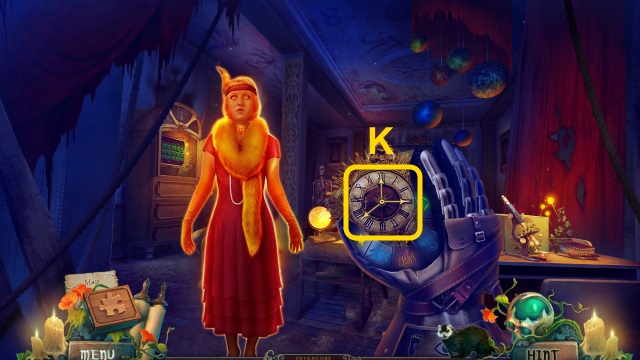
- Take the map (K); open the bag (L). Take the recorder and YIN SYMBOL.
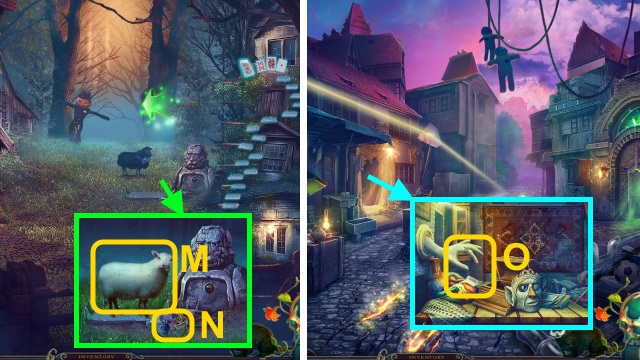
- Unzip the pouch; take the NAIL FILE (M).
- Walk down.
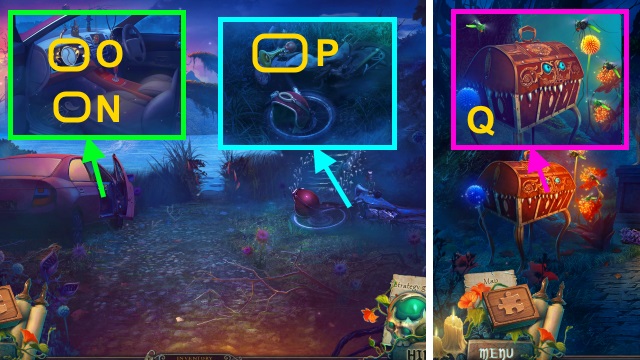
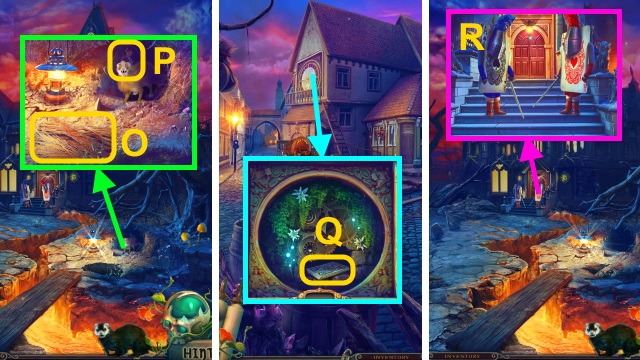
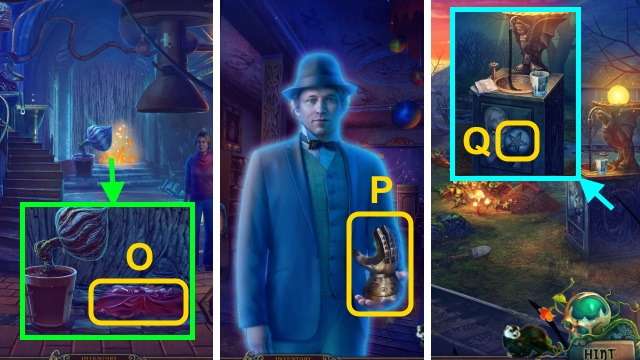
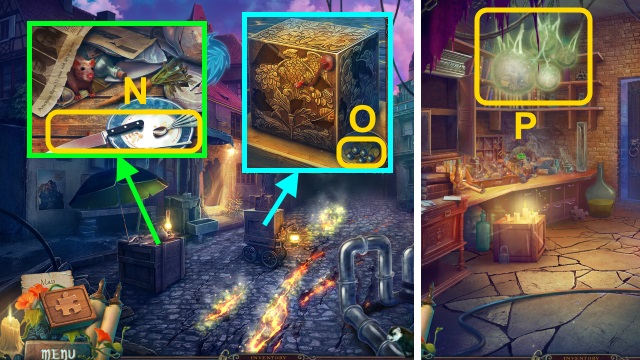
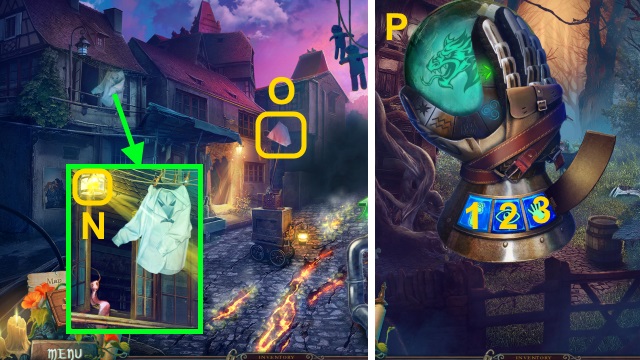
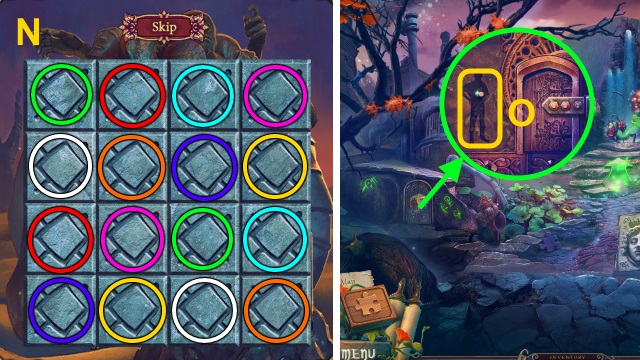
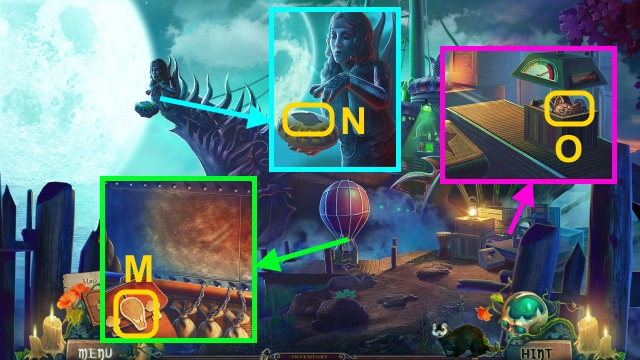
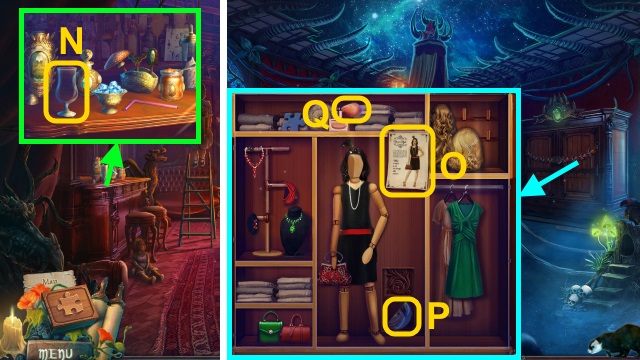
- Place the symbol (N) and YIN SYMBOL on the compartment (O). Move the items; take the STICKY TOFFEES and HANDHELD VACUUM.
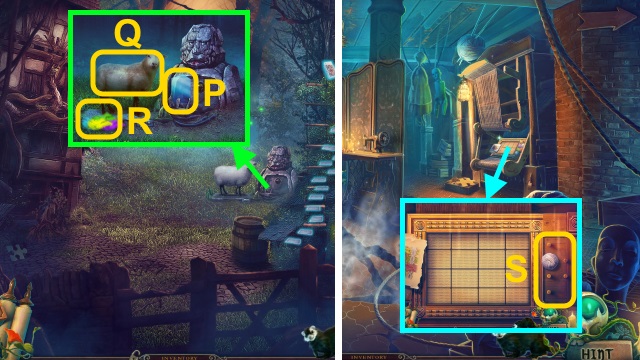
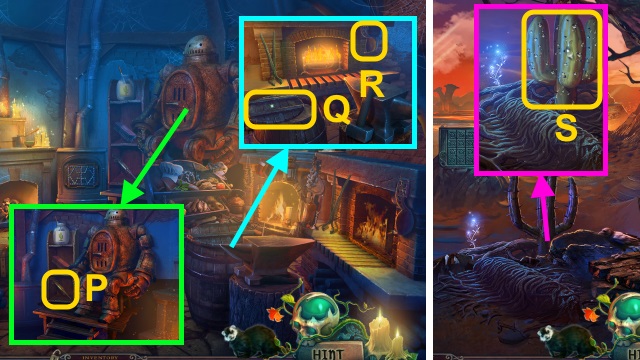
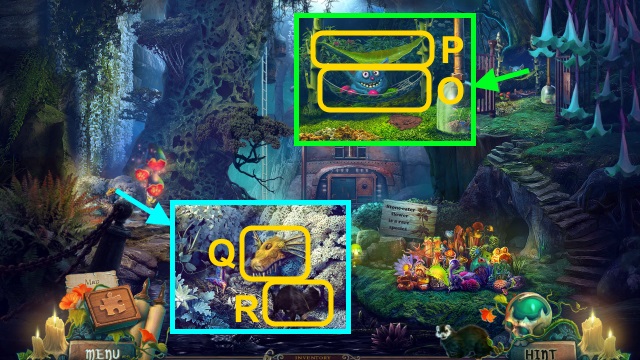
- Use the NAIL FILE (P); receive the HORN.
- Walk forward.
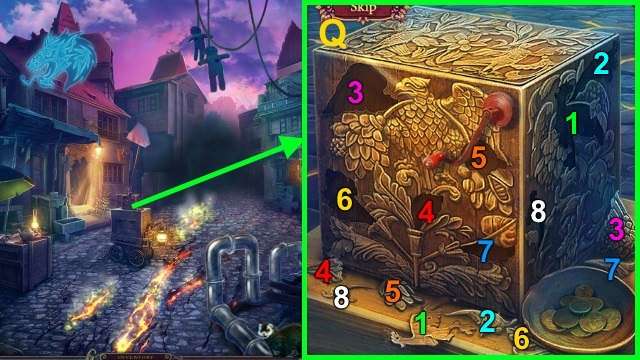
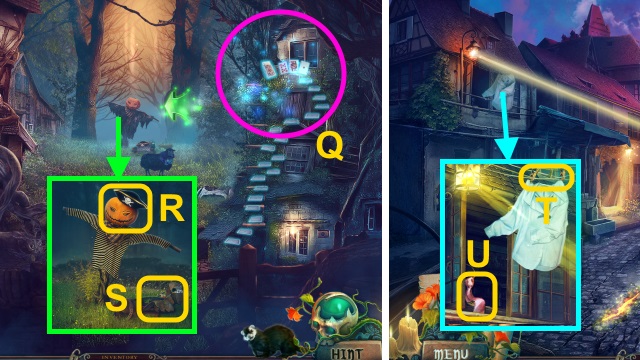
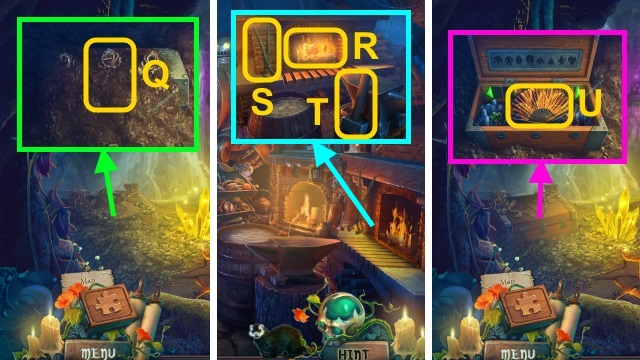
- Use the HANDHELD VACUUM (Q).
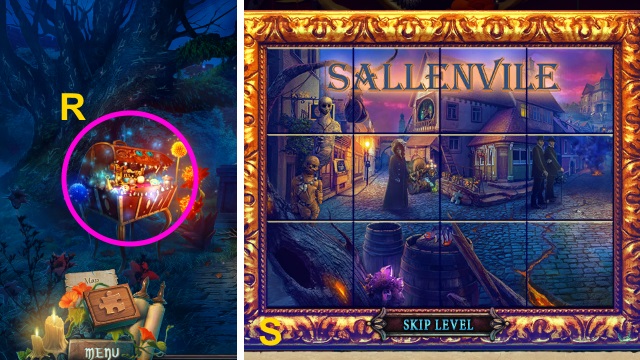
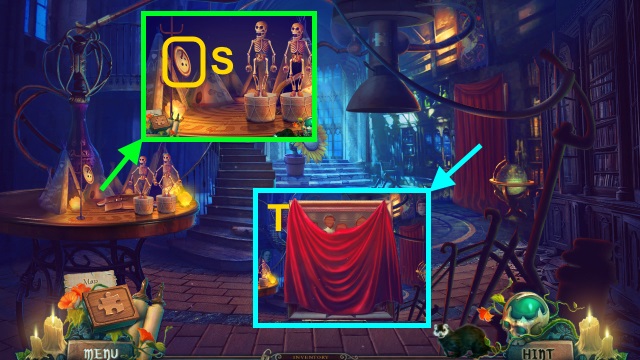
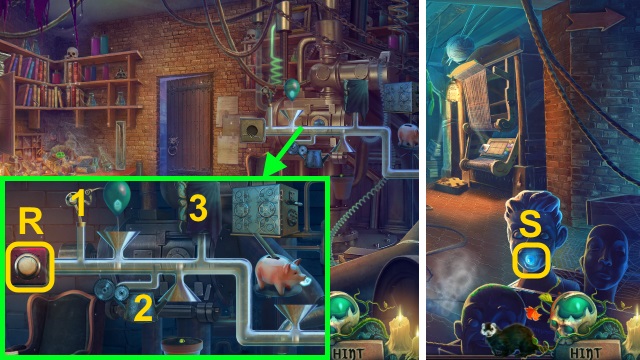
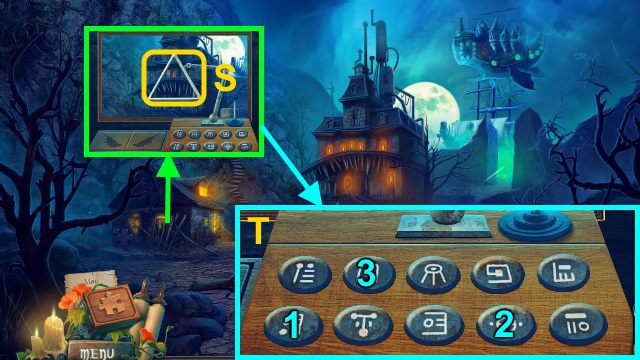
- Play the HOP; receive the SWAN FIGURINE (R).
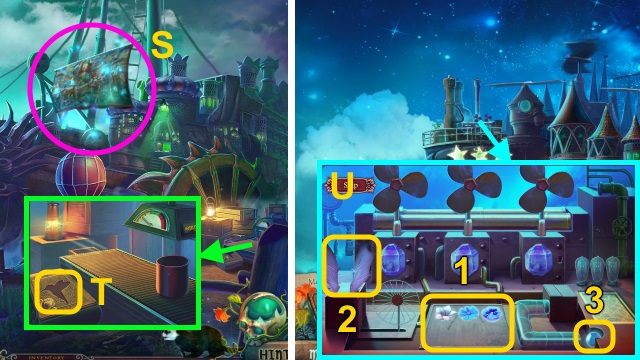
- HOP mini-game solution (S).
- Walk down.
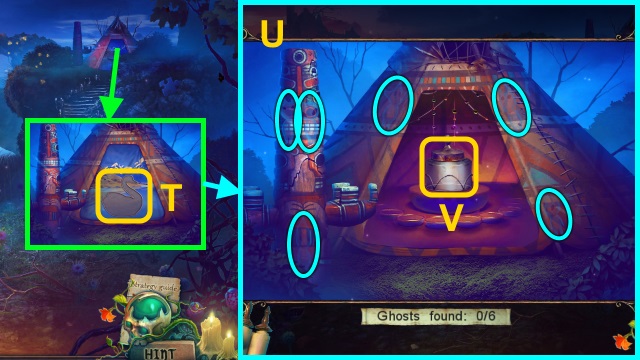
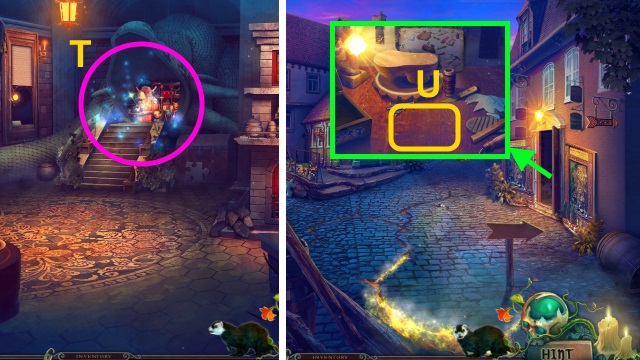
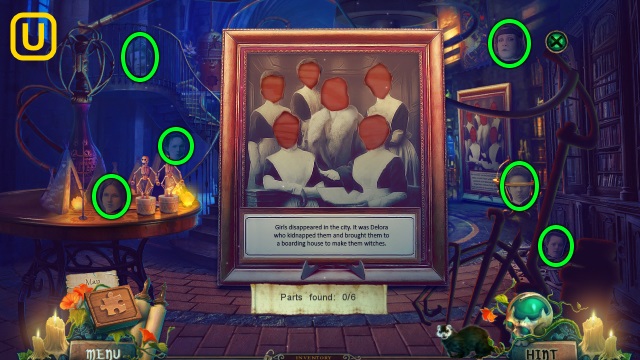
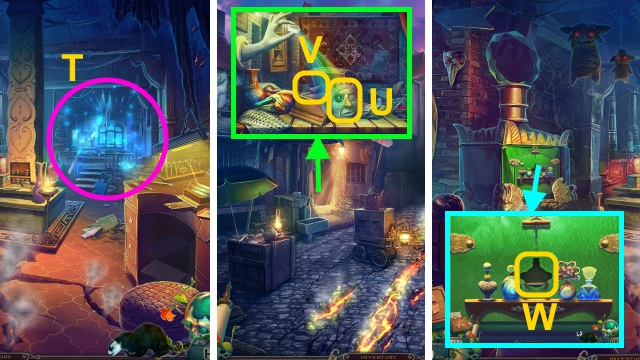
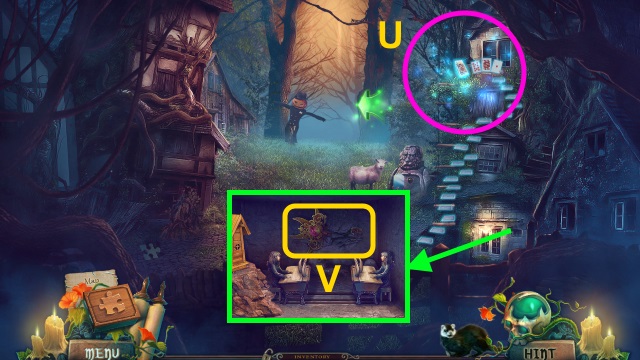
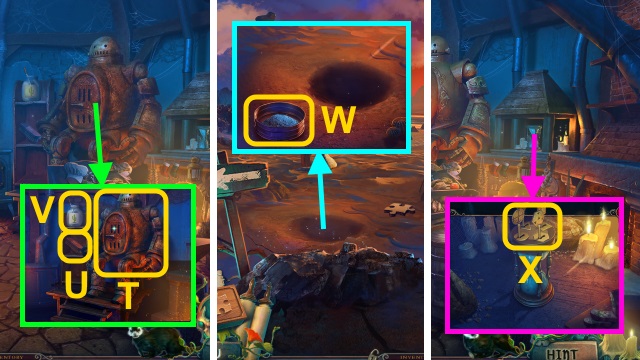
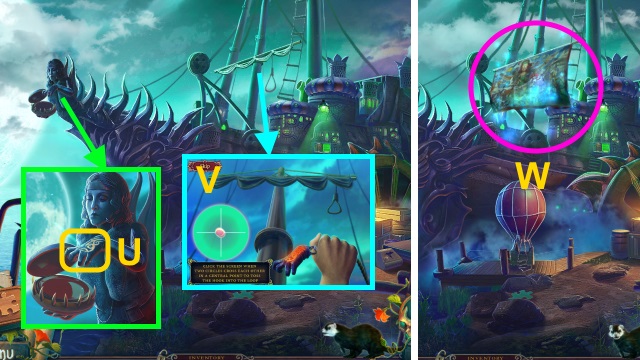
- Place the SWAN FIGURINE for a mini-game (T).
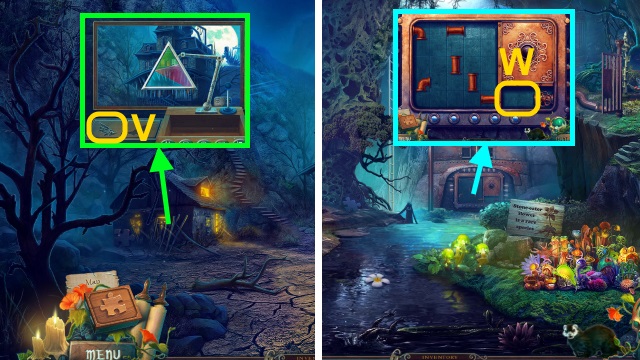
- Solution (U).
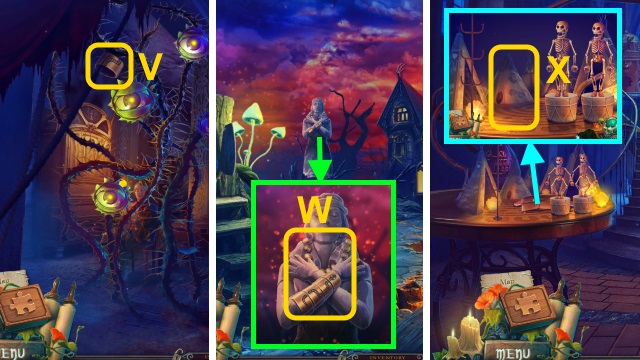
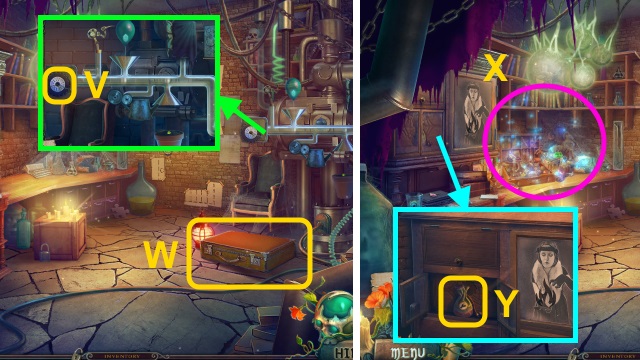
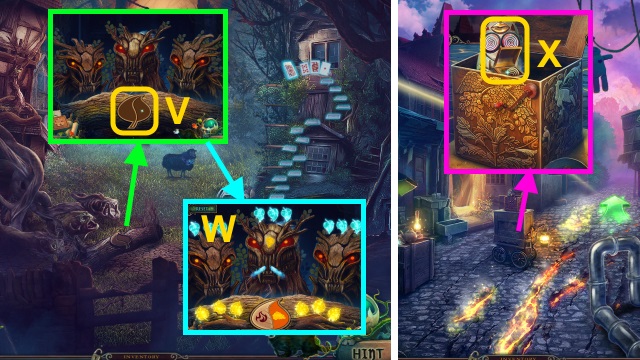
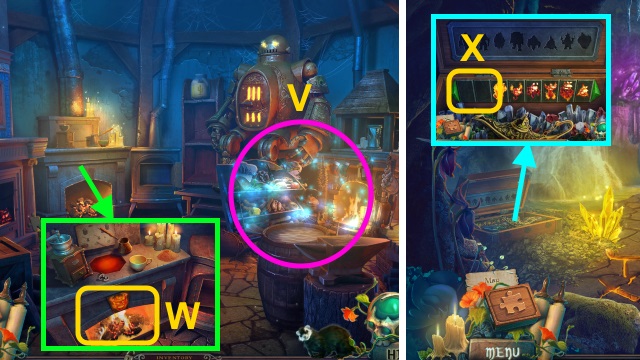
- Take the LANTERN (V).
- Walk forward.
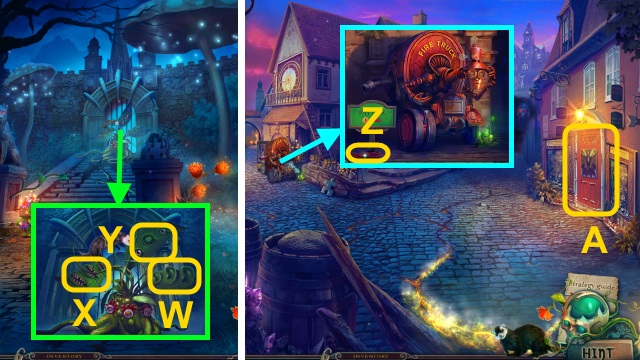
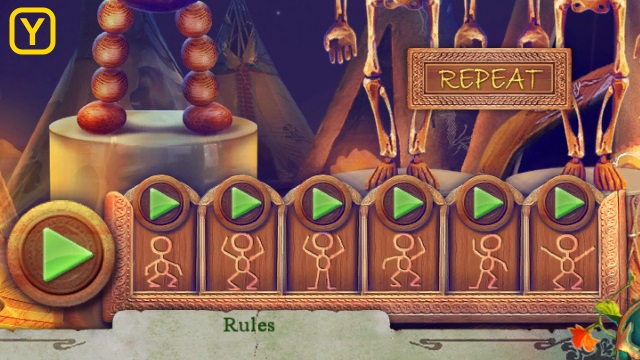
- Use the HORN (W), STICKY TOFFEES (X), and LANTERN (Y).
- Walk forward.
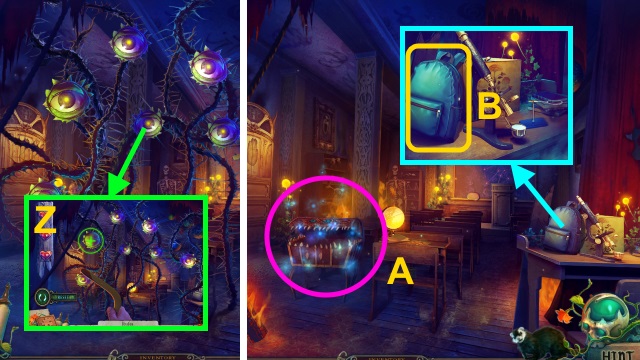
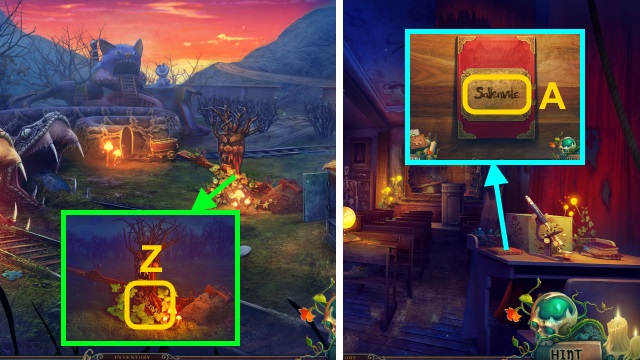
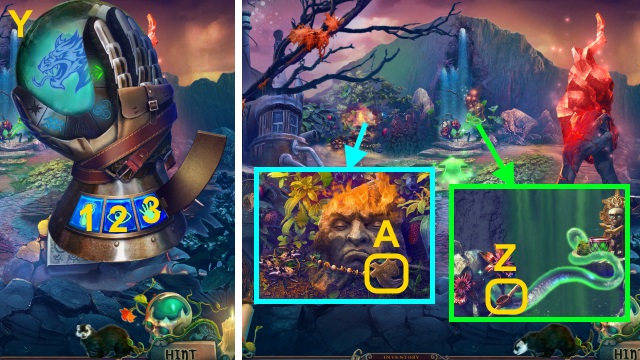
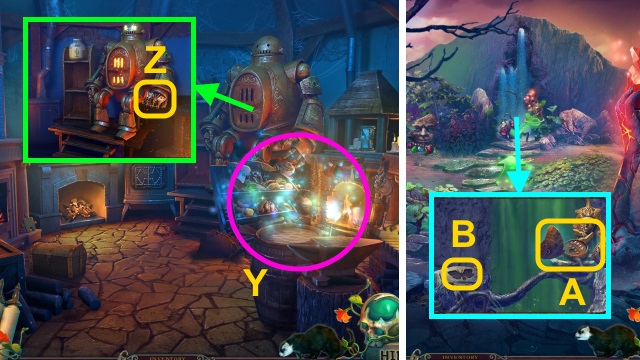
- Take the SHOELACES (Z).
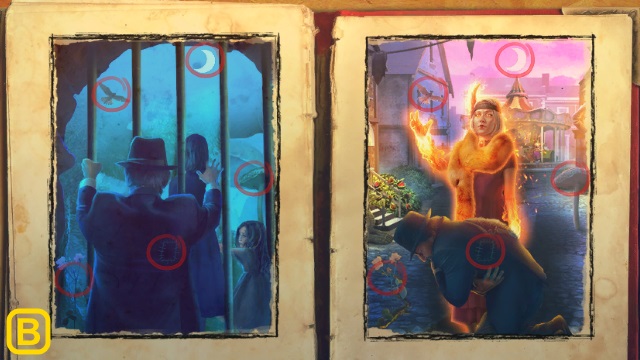
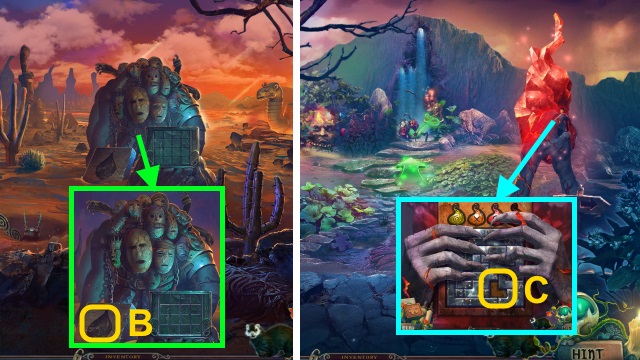
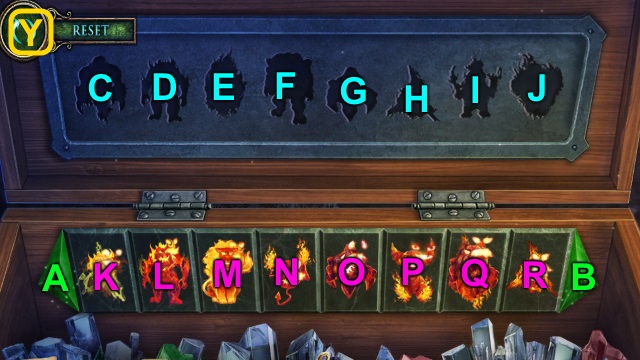
- Examine the door for a mini-game (A).
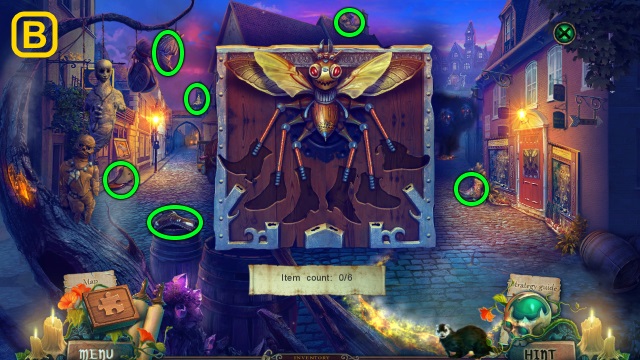
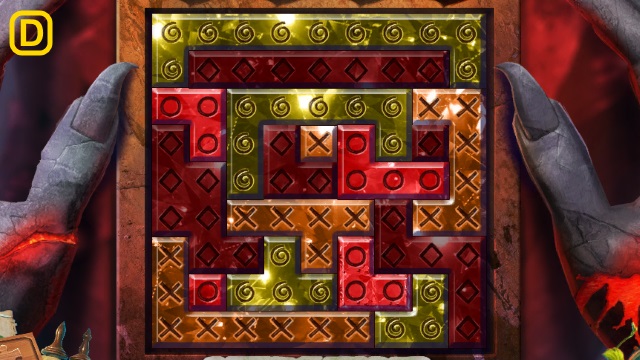
- Solution (B).
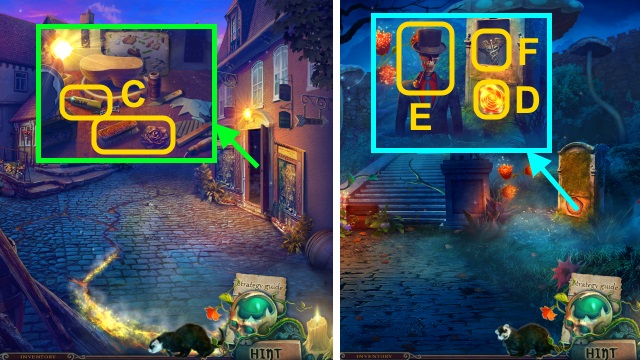
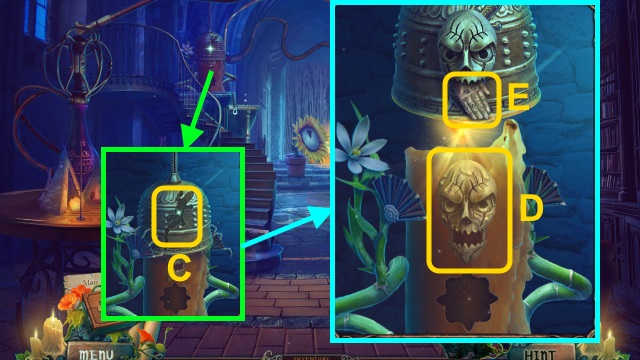
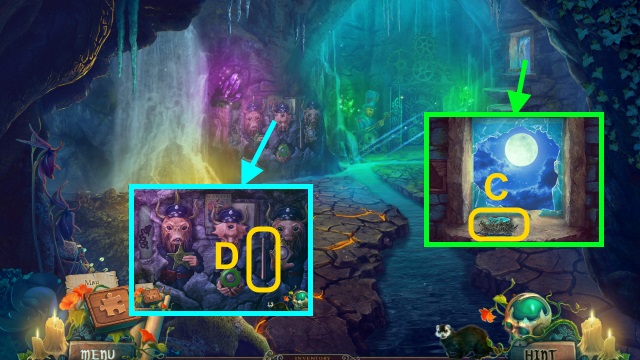
- Take the BLACK ROSE, SHOE BRUSH, and GLUE (C).
- Walk down.
- Place the BLACK ROSE (D); take the TOP HAT and PIPE (E).
- Use the SHOE BRUSH; examine the portrait 2x. Take the CADUCEUS (F).
- Walk forward.
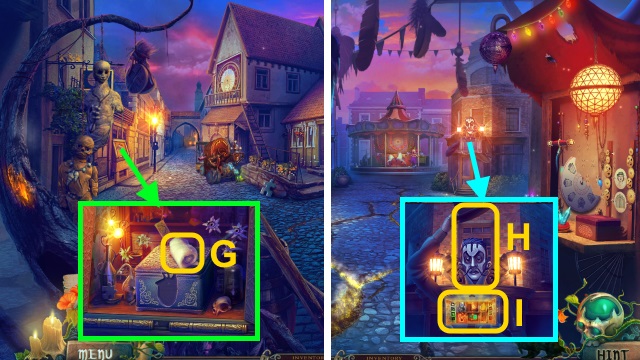
- Read the newspaper; place the CADUCEUS. Take the COTTON WOOL (G).
- Walk right.
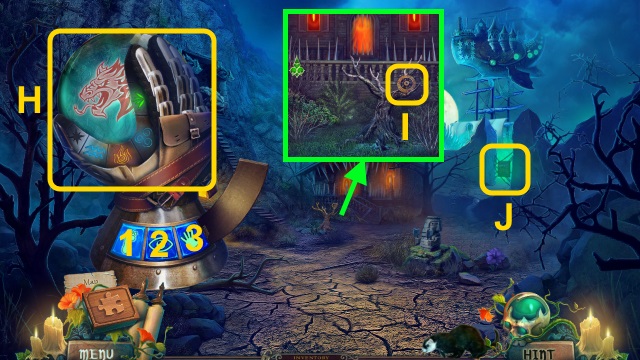
- Give the TOP HAT (H); examine the house for a mini-game (I).
- Solution (J).
- Take the DELORA EMBLEM.
- Walk left.
- Place the PIPE and DELORA EMBLEM (K); take the VINTAGE LIGHTER.
- Walk right.
- Examine the dragon and lighter (L); place the VINTAGE LIGHTER.
- Enter Hector's House.
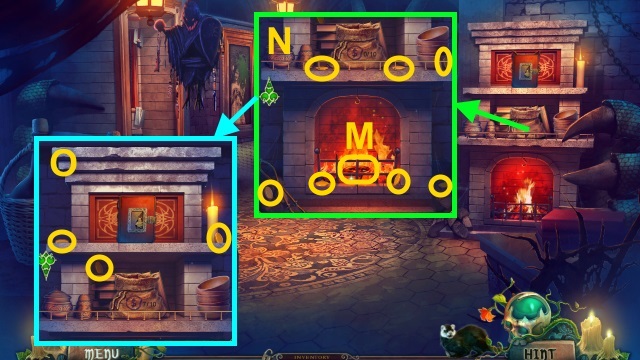
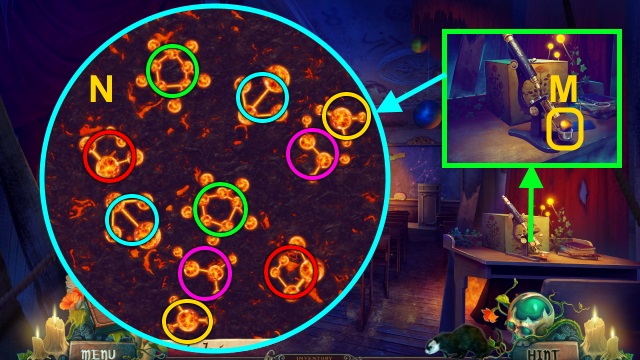
- Use the tongs (M); take the VALVE.
- Collect the coins (N); scroll up.
- Collect the coins (O); receive the COINS.
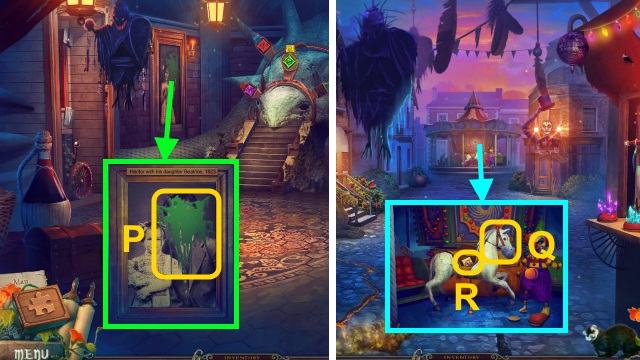
- Use the NAIL POLISH REMOVER and COTTON WOOL (P); take the SCHOOL PIN and HORSE'S HEAD.
- Walk down.
- Place the HORSE'S HEAD (Q); take the DRAGON TILE (R).
- Go to Hector's House.
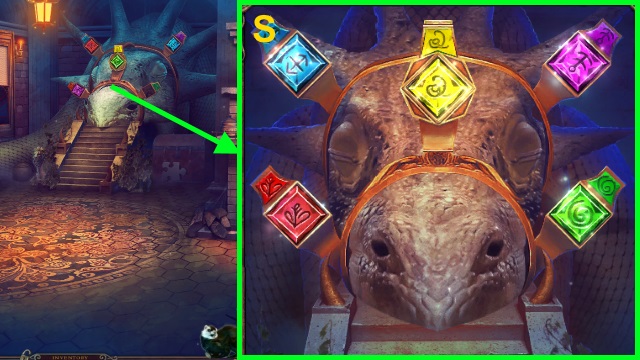
- Place the DRAGON TILE for a mini-game; solution (S).
- Play the HOP; receive the LEATHER VEST (T).
- Walk down, then left.
- Place the LEATHER VEST for a mini-game (U).
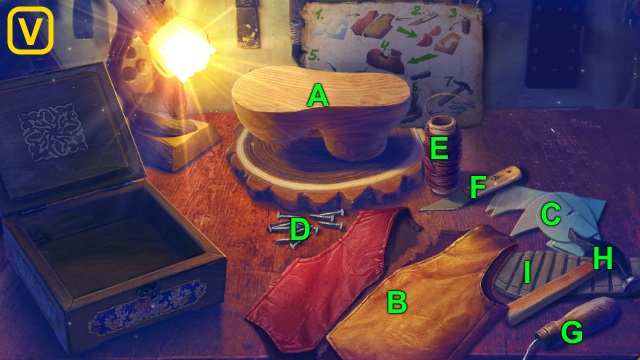
- Solution (V): (C-B)-(F-B)-(E-B)-(B-A).
- (I-A)-(G-A)-(I-A)-(H-A).
- Take the CLOWN SHOE.
- Walk right.
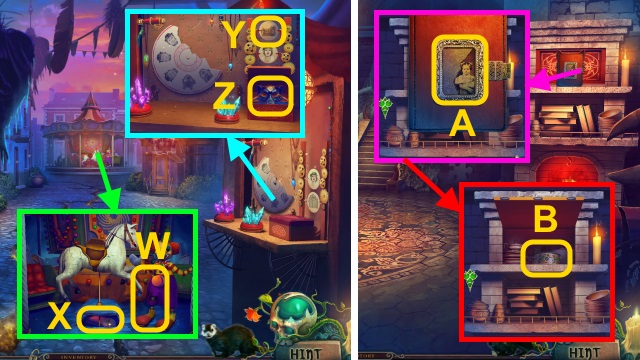
- Place the CLOWN SHOE; press the button (W). Take the FIRE PIN and PUPPETEER BOOK (X).
- Examine the SCHOOL PIN use the GLUE, FIRE PIN, and SHOELACES. Receive the MYSTERIOUS PIN.
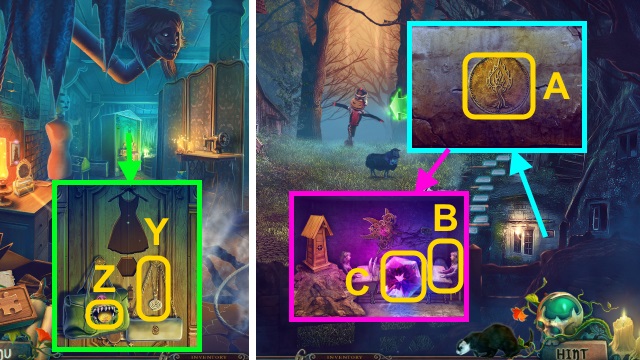
- Place the MYSTERIOUS PIN (Y); take the ELASTIC BAND and WOLF MASK (Z).
- Go to Hector's House.
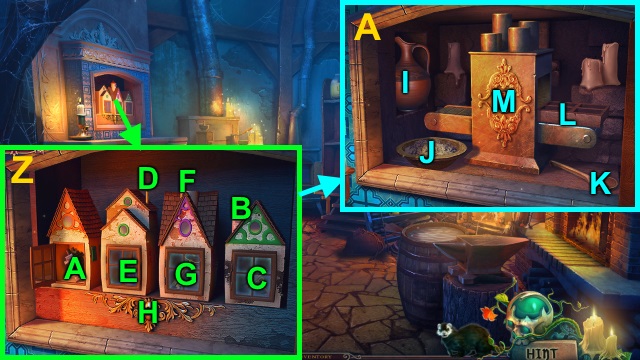
- Examine the diary; place the PHOTO HALF (A). Read the diary. Place the WOLF MASK; take the POT (B).
- Combine the POT and ELASTIC BAND; receive BERTHA'S HELMET.
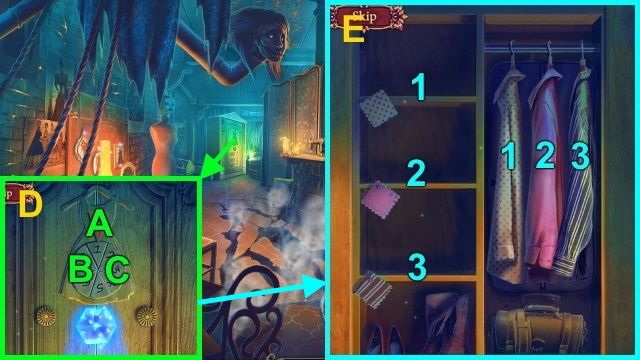
- Examine the cannon. Give BERTHA'S HELMET; pull the lever for a mini-game (C).
- Solution (D).
- Take the UNLOADED GUN and PHENAKISTOSCOPE HALF.
- Walk down.
- Place the PHENAKISTOSCOPE HALF; take the LEVER (E).
- Walk left.
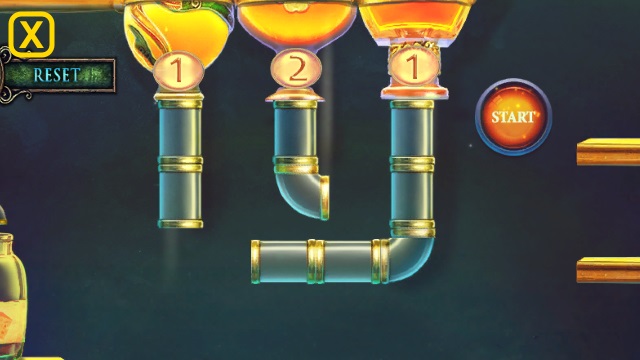
- Place the LEVER (F) and COINS (G); examine the machine for a mini-game.
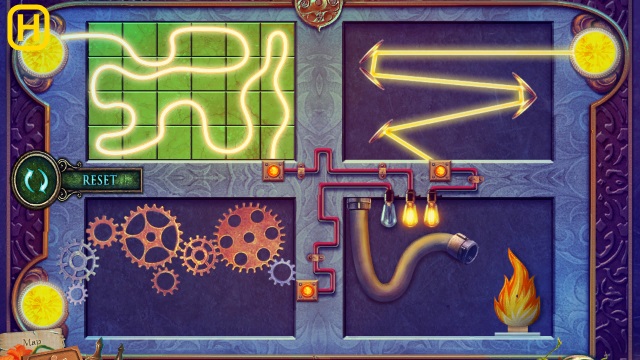
- Solution (H).
- Use the VALVE (I).
- Walk forward.
- Take the DELORA CLOCK HAND (J).
- Place the RAVEN FIGURINE (K); take the ANATOMICAL HEART and SPOOL OF THREAD.
- Walk down.
- Place the ANATOMICAL HEART; take the note, BANDAGE, POWDER OF FREEDOM, and SPRING (L).
- Combine the CHEMIST'S KIT, SPOOL OF THREAD, and POWDER OF FREEDOM. Turn the page. Combine the thread and wire; place the wire in the beaker. Pour the powder and salt; take the FREEDOM CRYSTAL.
- Walk forward.
- Place the FREEDOM CRYSTAL (M).
- Play the HOP; receive the CHICKEN LEG (N).
- Place the plants (O); use the CHICKEN LEG. Take the HECTOR CLOCK HAND (P).
- Walk down.
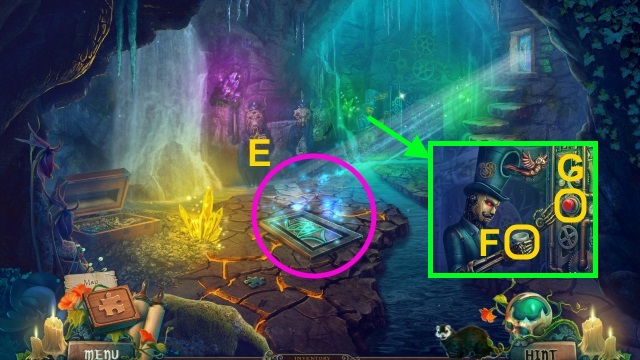
- Place the DELORA CLOCK HAND and HECTOR CLOCK HAND; examine the cards. Take the INCOMPLETE DECK (Q).
- Walk forward.
- Use the INCOMPLETE DECK (R); receive the MAGIC CARDS.
- Walk forward.
Chapter 2: The Boarding School
- Take the BUTTON (S).
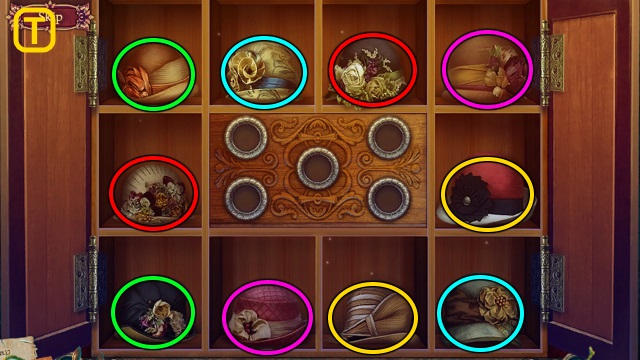
- Take the DRAPERIES for a mini-game (T).
- Solution (U).
- Walk right.
- Take the LARGE BRACELET (V).
- Walk down twice.
- Place the LARGE BRACELET; take the BEADS (W).
- Open the PUPPETEER BOOK; examine the parts. Use the SPRING, SPOOL OF THREAD, BEADS, and BUTTON; receive THE PUPPET.
- Walk forward.
- Place THE PUPPET for a mini-game (X).
- Solution (Y).
- Take the SATCHEL OF ARTIFACTS and BOOMERANG.
- Walk right.
- Use the BOOMERANG for a mini-game. Solution (Z): shoot the eyes when they close.
- Play the HOP; receive the SALAMANDER FIGURINE (A).
- Take the CHILD'S BACKPACK (B).
- Walk down.
- Place the SALAMANDER FIGURINE (C).
- Arrange the skull (D); take the PALM WITH RUNES (E).
- Walk right.
- Place the PALM WITH RUNES for a mini-game (F).
- Solution (G). Take the PICTURE and MIRROR SHARD.
- Walk down.
- Place the MIRROR SHARD (G); take the FUEL CANISTER.
- Combine the CHILD'S BACKPACK, FUEL CANISTER, and BANDAGE; take the TURBO BACKPACK.
- Examine the pipe (H); give the TURBO BACKPACK (I). Receive the INDICATORS.
- Walk right.
- Place the INDICATORS; press the button 3x (J). Take the SUN SYMBOL (K).
- Walk down.
- Place the SUN SYMBOL (L); take the PIECE OF MAGMA.
- Walk right.
- Place the PIECE OF MAGMA (M); examine it for a mini-game (M).
- Solution (N). Take the LIQUID MAGMA.
- Combine the CHEMIST'S KIT and LIQUID MAGMA; turn the page. Open the case; use the dropper. Take the FIERY ACID.
- Walk down.
- Use the DRAPERIES (O); use the FIERY ACID.
- Take the DAMAGED GLOVE (P).
- Open the DAMAGED GLOVE; take the GLOBE STAR.
- Walk down, then forward.
- Place the GLOBE STAR (Q); take the CLUE SCRAP, DOOR SCRAPS, and CHALK.
- Walk down, then right.
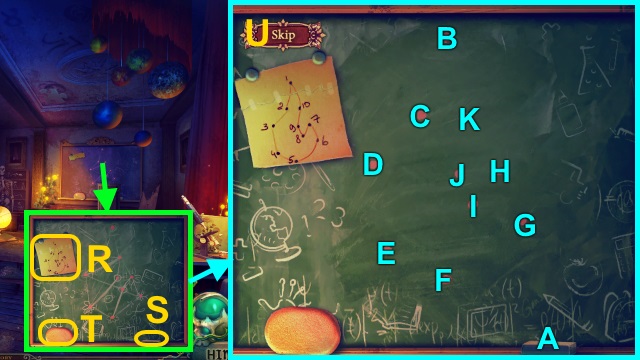
- Use the CLUE SCRAPS (R) and CHALK (S); use the sponge (T) on the board for a mini-game.
- Solution (U): A-B-C-D-E-F-G-H-I-J-K-B.
- Walk forward.
- Take the WHEEL (V).
- Examine the suitcase (W).
- Play the HOP; receive the ANTIDOTE (X).
- Open the CUPBOARD; take the GUNPOWDER (Y).
- Go to the Backyard.
- Use the ANTIDOTE; take the SALLENVILE LABEL (Z).
- Walk down, then right.
- Place the SALLENVILE LABEL for a mini-game (A).
- Solution (B-C).
- Take the CURSED EMBLEM.
- Walk forward.
- Place the CURSED EMBLEM for a mini-game; solution (D).
- Take the BREAD; read the book (E).
- Arrange the pieces (F); take the RAZOR and GLASS CUTTER.
- Walk down.
- Move the clay; use the GLASS CUTTER. Remove the glass; take the INKWELL and PROTECTIVE GOGGLES (F).
- Walk down, then forward.
- Place the WHEEL; examine the cart. Give the PROTECTIVE GOGGLES; receive the FLAME EMBLEM (G).
- Place the stone (H). Remove the roots; open the bag (I). Take the DOOR SCRAPS and GREEN CROSS.
- Walk down, then right.

- Place the GREEN CROSS (J); open the box. Move the bandage; take the ABSORBENT CARBON.
- Walk down, then forward.
- Place the ABSORBENT CARBON; tie the cloth. Place the cloth; use the glass (K). Receive the CLEAN WATER.
- Go to the Witch's Lab.
- Place the FLAME EMBLEM; place the CLEAN WATER and INKWELL (L). Read the note; pour the water and powder into the inkwell. Take the ENCHANTED INK.
- Use the 2 DOOR SCRAPS and ENCANTED INK (M); open the door.
- Walk forward.
Chapter 3: The Slums
- Examine the scene.
- Take the CUTLERY (N).
- Take the PELLETS (O).
- Combine the UNLOADED GUN, GUNPOWDER, and PELLETS; receive the LOADED GUN.
- Walk down.
- Use the LOADED GUN (P); take the HURDY-GURDY PARTS.
- Walk forward.
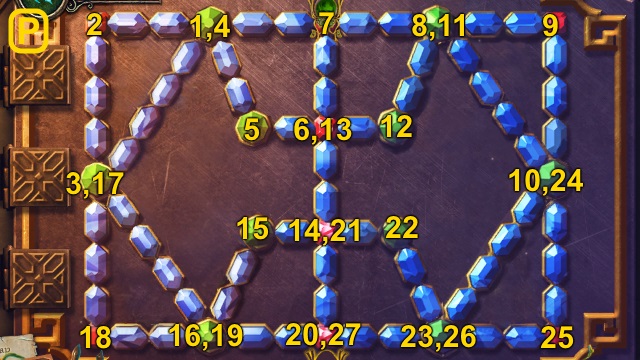
- Place the HURDY-GURDY PARTS for a mini-game; solution (Q).
- Turn the handle; take the GENERATOR BUTTON.
- Walk down.
- Place the GENERATOR BUTTON; press the button (R). Examine the machine parts (1-3).
- Walk right.
- Take the GLASS EYE (S).
- Walk right.
- Play the HOP; receive the WOODEN NOSE (T).
- Walk left, then down.
- Move the clothes; place the GLASS EYE and WOODEN NOSE (U). Read the paper (V); take the SILVER BROOCH, PERFUME BOTTLE, and GLOVE SKETCH.
- Walk right twice.
- Place the PERFUME BOTTLE for a mini-game (W).
- Solution (X).
- Take the CHEESE SAUCE.
- Walk left, then down.
- Use the BREAD and CHEESE SAUCE (Y).
- Take the SEAM REGULATOR (Z).
- Walk right.
- Collect the parts (A); place the SEAM REGULATOR (B).
- Use the scissors on the cloth. Place the cloth and buckle; take the LEATHER BELT (C).
- Examine the sewing machine; take the PIN (D).
- Walk right.
- Use the PIN. Take the note, GLASS SHARD (1/4), and GLASS FLUTE (E).
- Walk left.
- Examine the tape measure; use the GLASS FLUTE (F). Take the TAPE MEASURE for a mini-game.
- Solution (G).
- Examine Delora's portrait; take the PORTRAIT SCRAPS.
- Walk right.
- Open the furnace; place the powder, PORTRAIT SCRAPS, and potion on the fire. Take the WATCHER ORB (H).
- Use the SILVER BROOCH and TAPE MEASURE for a mini-game (I).
- Solution (J): (J-B)-(B)-(Cx2)-(H-I)-(I)-(F-A)-(D)-(A-K)-(E-K)-(G-K).
- Take the GEMSTONE PLATE.
- Combine the DAMAGED GLOVE, GLOVE SKETCH, SATCHEL OF ARTIFACTS, LEATHER BELT, WATCHER ORB, and GEMSTONE PLATE; receive the WATCHER'S GLOVE.
- Walk left, then down.
- Use the WATCHER'S GLOVE (K); press the buttons (1-3). Take the CLOUD EMBLEM.
- Walk right twice.
- Place the clay on the frame; examine it 3x. Place the CLOUD EMBLEM (L); take the SCHOOLGIRL FIGURINE and SUN LAMP (M).
- Walk left, then down.
- Place the SUN LAMP (N).
- Examine the mirror (O).
- Walk forward.
- Use the WATCHER'S GLOVE (P); press the buttons (1-3). Take the LEAF OF SMOKE.
- Examine the cards; use the MAGIC CARDS. Play the HOP; receive the ACID (Q).
- Examine the hat (R); take the CATERPILLAR (S). Place the clothes; take the COMBINATION LOCK.
- Walk down.
- Pour the ACID (T); take the LEAF OF FIRE (U).
- Walk forward.
- Place the LEAF OF SMOKE and LEAF OF FIRE for a mini-game (V).
- Solution (W): defeat the monsters. Take the STONE LIPS.
- Walk down.
- Place the STONE LIPS; take the HYPNOTIC PENDANT (X).
- Walk right.
- Examine the green bag; place the HYPNOTIC PENDANT (Y). Take the FIERY EMBLEM (Z).
- Walk down, then forward.
- Place the FIERY EMBLEM (A). Take the WINDMILL BLADES; move the windmill.
- Place the SCHOOLGIRL FIGURINE (B); take the ULTRAVIOLET CRYSTAL (C).
- Walk down, then right.
- Place the COMBINATION LOCK and ULTRAVIOLET CRYSTAL for a mini-game.
- Solution (D): A-Cx4-A-B-A.
- Solution (E).
- Unzip the case; take the FANCY SUIT.
- Walk down, then forward.
- Place the FANCY SUIT (F); take the CLAY MASK.
- Go to the Handicraft Workshop.
- Play the HOP; receive the FLOWER OF DEATH (G).
- Place the CLAY MASK for a mini-game; solution (H).
- Take the note and HUNTER'S INSIGNIA.
- Walk left.
- Place the HUNTER'S INSIGNIA; take the IDOL HEAD (I).
- Walk down, then forward.
- Place the IDOL HEAD (J). Read the note; place the FLOWER OF DEATH. Take the FLOWER OF REBIRTH (K).
- Walk down.
- Place the FLOWER OF REBIRTH; take the CARROT (L).
- Walk forward.
- Place the CARROT (M); take the HUGE RING (N).
- Walk down.
- Place the HUGE RING; take the MAGIC PRISM (O).
- Walk forward.
- Place the MAGIC PRISM (P); use the RAZOR (Q). Examine the wool (R); take the COLORED YARN.
- Walk down, then right.
- Place the COLORED YARN for a mini-game (S).

- Solution (T).
- Receive the CARPET FRAGMENT. Open the compartment; take the GAVEL.
- Walk down, then forward.
- Play the HOP; receive the EMERALD KEY (U).
- Use the GAVEL; take the RUBY KEY (V).
- Walk down.

- Place the CARPET FRAGMENT; use the RUBY KEY and EMERALD KEY (W). Receive the FLYING CARPET.
- Walk forward.
- Use the FLYING CARPET (X).
- Walk forward.
Chapter 4: The Cursed Inhabitants
- Use the WATCHER'S GLOVE (Y); press the buttons (1-3). Take the DROP OF WONDER.
- Take the WOODEN HANDLE (Z).
- Take the RUNE OF ALTERATION (A).
- Walk right.
- Place the DROP OF WONDER (B); take the FIERY CRYSTAL.
- Walk left.
- Place the FIERY CRYSTAL for a mini-game (C).
- Solution (D).
- Take the PERFECT DIAMOND and BOTTOMLESS BASKET.
- Combine the PERFECT DIAMOND, WOODEN HANDLE, and WINDMILL BLADES; receive the FERRET-COPTER.
- Walk right.
- Examine the statue (E); give the FERRET-COPTER (F).
- Take the NIGHT SENTRY and CATERPILLAR; place the RUNE OF ALTERATION (G). Take the FROZEN SPHERE (H).
- Walk left.
- Use the FROZEN SPHERE for a mini-game (I).
- Solution (J).
- Take the MAGIC BERRY.
- Walk right.
- Give the MAGIC BERRY; take the ANCIENT AMULET (K).
- Walk left.
- Place the ANCIENT AMULET (L); take the SPELL TILES.
- Walk right.
- Place the SPELL TILES for a mini-game (M).
- Solution (N).
- Take the REPAIRMAN FIGURINE.
- Walk left.
- Place the REPAIRMAN FIGURINE (O).
- Walk left.
- Take the SYRINGE (P).
- Take the BARREL COVER (Q). Use the ladle (R) on the barrel; receive the LADLE WITH WATER.
- Walk down, then right.
- Use the LADLE WITH WATER; use the SYRINGE (S). Receive the CACTUS OIL.
- Walk left twice.
- Examine Stoveman (T); use the brush (U).
- Use the CACTUS OIL (V); use the oil on Stoveman. Take the MAGIC SIEVE.
- Walk down, then right.
- Use the MAGIC SIEVE; take the MAGICAL SAND (W).
- Walk left twice.
- Use the keys; place the MAGICAL SAND (X).
- Play the HOP; receive the PUMPKIN (Y).
- Take the CRYSTAL BUTTERFLY (Z).
- Combine the PUMPKIN and CUTLERY; use the knife. Use the BARREL COVER; place the fork and spoons on the cover. Receive the PUMPKIN KALIMBA.
- Walk down.
- Use the 2 CATERPILLARS; move the drum (A). Give the PUMPKIN KALIMBA; place the CRYSTAL BUTTERFLY (B).
- Walk forward.
- Take the SHIP EMBLEM (C).
- Take the NIGHTSTICK (D).
- Walk down, then right.
- Use the NIGHTSTICK; take the SILVER SNAKE (E).
- Walk left, then forward.
- Place the SILVER SNAKE for a mini-game (F).

- Solution (G).
- Examine the diary for a mini-game.
- Solution (H).
- Take the STONE DIADEM and GLASS SHARD (2/4).
- Walk down.
- Place the STONE DIADEM (I); take the GLASS SHARD (3/4) and GEARS.
- Walk forward.
- Place the GEARS (J). Read the note (K); take the GLASS SHARD (4/4).
- Place the GLASS SHARD (4/4); assemble the window (L).
- Play the HOP; receive the CAUSTIC LICHENS (M).
- Walk down.
- Use the CAUSTIC LICHENS; take the PRECIOUS BEETLE and BROKEN BRONZE STEM (N).
- Walk left.
- Examine the door (O); place the PRECIOUS BEETLE for a mini-game.
- Solution (P).
- Take the SILVER FISH and SHOVEL.
- Walk down, then forward.
- Use the SHOVEL; receive the CLAY (Q). Take the BROKEN METAL ROSE.
- Walk down, then left.
- Place the BROKEN BRONZE STEM and BROKEN METAL ROSE (R); use the tongs (S) to place them on the anvil.
- Use the hammer (T); use the tongs to place the rose in the water. Take the ORNAMENTAL ROSE.
- Walk down, then forward.
- Place the ORNAMENTAL ROSE; take the FAN OF FLAMES (U).
- Walk down, then left.
- Play the HOP; receive the FIRE SPIRIT (V).
- Use the FAN OF FLAMES; take the FIRE SPIRIT (W).
- Walk down, then forward.
- Place the 2 FIRE SPIRITS for a mini-game (X).
- Solution (Y): (L-D)-(N-G)-(P-H)-(P-J)-(P-I)-(R-E)-(R-F)-(R-C).
- Take the MINIATURE HOUSE.
- Walk down, then left.
- Place the MINIATURE HOUSE for a mini-game.
- Solution (Z): (A-B)-(C-D)-(E-F)-(G-H).
- Use the CLAY for a mini-game.
- Solution (A): (I-J)-(K-J)-(J-L)-(M).
- Take the BRICKS.
- Walk down, then forward.
- Place the BRICKS; examine each brick (B). Take the COFFEE BEANS (C).
- Walk down, then left.
- Use the LADLE WITH WATER and COFFEE BEANS for a mini-game.
- Solution (D): (F-A)-(B-E)-(E-D)-(D-G)-(H-G)-(C-G).
- Take the IRON COFFEE.
- Walk down, then forward.
- Play the HOP; receive the BUTTON (E).
- Give the IRON COFFEE (F); place the BUTTON (G).
- Walk forward.
Chapter 5: The Wasteland
- Use the WATCHER'S GLOVE (H); press the buttons (1-3). Take the FIERY LEAF.
- Take the SHIP WHEEL (I).
- Examine the board for a mini-game (J).
- Solution (K).
- Place the SHIP EMBLEM (L); take the scroll and BALLOON EMBLEM.
- Walk right.
- Place the BALLOON EMBLEM (M); take the BUTTERFLY BELL and ROPE.
- Place the FIERY LEAF (N); take the IRON CLOUD.
- Take the MENACING VISAGE (O).
- Go up.
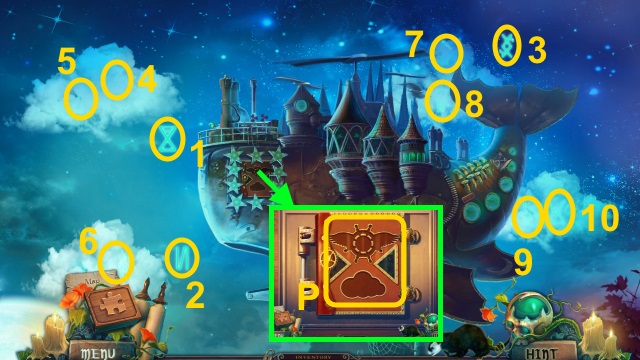
- Collect the symbols (1-3). Move the clouds; collect the symbols (4-10).
- Place the IRON CLOUD and CHIP WHEEL for a mini-game (P).
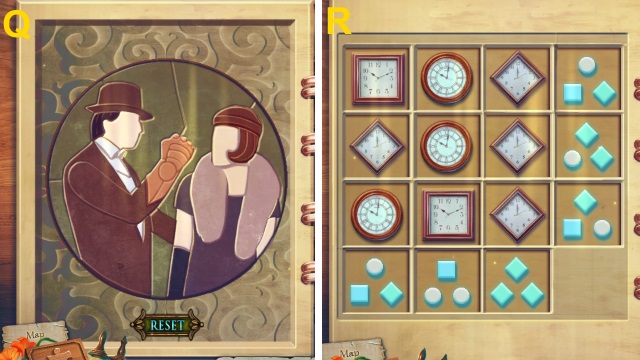
- Solution (Q-R).
- Take the PRISMATIC LENS.
- Walk down twice.
- Place the PRISMATIC LENS for a mini-game (S).
- Solution (T).
- Take the FASHION LEAFLET, note, and WITCH'S SYMBOL.
- Walk right.
- Place the WITCH'S SYMBOL; take the METAL HAND (U).
- Combine the METAL HAND and ROPE; receive the ROPE WITH HAND.
- Use the ROPE WITH HAND for a mini-game.
- Solution (V): stop the balls in the center of the circle.
- Play the HOP; receive the AIRSHIP WINGS (W).
- Go up.
- Place the AIRSHIP WINGS; press the button for a mini-game (X).
- Solution (D-E)-(D-A)-(B-C).
- Take the photo, notes, and FAMILIAR SCHEMATIC.
- Walk down.
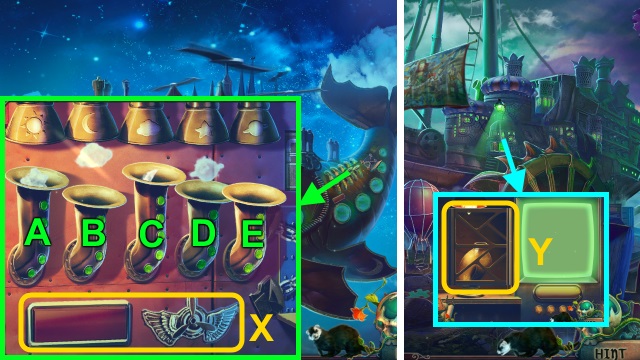
- Place the FAMILIAR SCHEMATIC for a mini-game (Y).
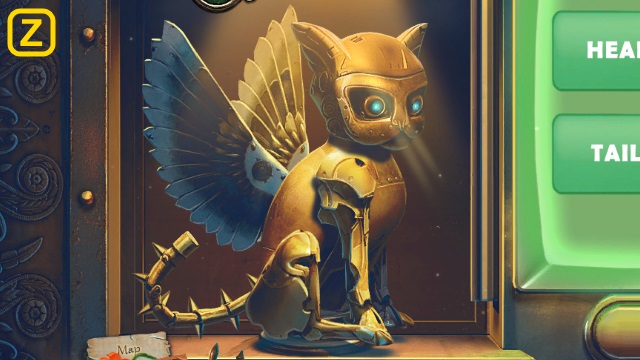
- Solution (Z).
- Take the MECHANICAL FAMILIAR.
- Go up.
- Place the MECHANICAL FAMILIAR; take the note and DRAGONFLY BELL (A).
- Walk down twice.
- Place the BUTTERFLY BELL (B) and DRAGONFLY BELL (C).
- Go through the portal.
- Play the HOP; receive the HEADDRESS (D).
- Place the MENACING VISAGE (E); take the WITCH'S FRUIT (F).
- Walk down.
- Place the HEADDRESS (G); take the MOSSY ROCKS and APPLE (H).
- Walk left.
- Use the MOSSY ROCKS for a mini-game (I).
- Solution (J).
- Take the STONE-EATER.
- Walk down.
- Use the STONE-EATER; take the DIAMOND NUGGET (K).
- Walk right.
- Use the DIAMOND NUGGET (L).
- Place the SILVER FISH (M). Place the APPLE; remove the apples. Take the HAMMOCK and FLOUR (N).
- Walk down, then left.
- Place the HAMMOCK; place the moss and berries (O). Take the ELASTIC VINE (P).
- Examine the snake (Q); use the FLOUR (R). Take the HUMMINGBIRD EMBLEM.
- Walk down, then right.
- Play the HOP; receive the PROPELLER (S).
- Place the HUMMINGBIRD EMBLEM (T); take the ROZE QUARTZ.
- Go up.
- Place the PROPELLER and ROSE QUARTZ for a mini-game; solution (U).
- Take the BAT WING.
- Walk down twice.
- Place the BAT WING (V); take the FERTILIZER.
- Walk left.
- Place the FERTILIZER for a mini-game (W).
- Solution (X).
- Move the case; take the VALERIAN and BAT WING (Y).
- Walk down.
- Place the BAT WING (Z); take the WRENCH.
- Walk left.
- Play the HOP; receive the MOTHERWORT (A).
- Use the WRENCH (B); receive the CAPSULE LID.
- Walk down, then right.
- Place the VALERIAN and MOTHERWORT. Place the CASULE LID (C); take the JUMBO SEDATIVE.
- Walk down.
- Remove the branches; use the ELASTIC VINE and JUMBO SEDATIVE (D). Shoot the door for a mini-game (E).
- Solution (F).
- Walk forward.
- Take the BASKET BOTTOM (G).
- Combine the BOTTOMLESS BASKET and BASKET BOTTOM; receive the BLAZING BASKET.
- Place the BLAZING BASKET (H); collect the eyes (1-6).
- Walk right for a mini-game.
- Solution (I-J).
- Play the HOP; receive the SCISSORS (K).
- Walk down.
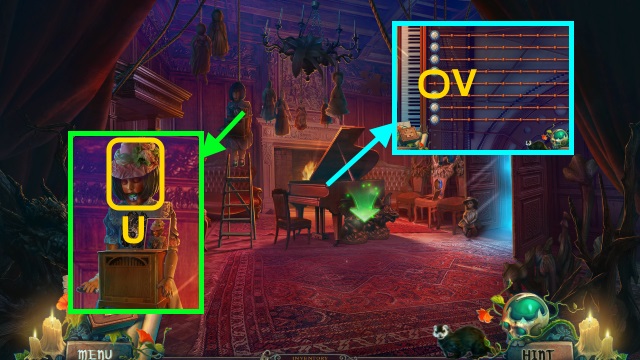
- Use the SCISSORS (L); open the piano.
- Use the WATCHER'S GLOVE (M); press the buttons (1-3). Take the SOLAR STONE.
- Take the EMPTY GLASS (N).
- Walk right.
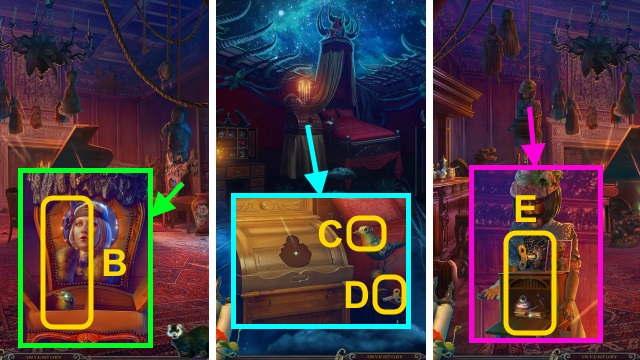
- Place the SOLAR STONE. Place the FASHION LEAFLET (O); dress the doll. Take the FACEPLATE HALF (P) and PUMP (Q).
- Walk down.

- Place the FACEPLATE HALF; take the FEATHER (R).
- Walk right.
- Place the FEATHER for a mini-game (S).
- Solution (T).
- Take the note and DOLL'S HAT.
- Walk down.
- Place the DOLL'S HAT; take the PIANO TUNER (U).
- Place the PIANO TUNER for a mini-game (V).
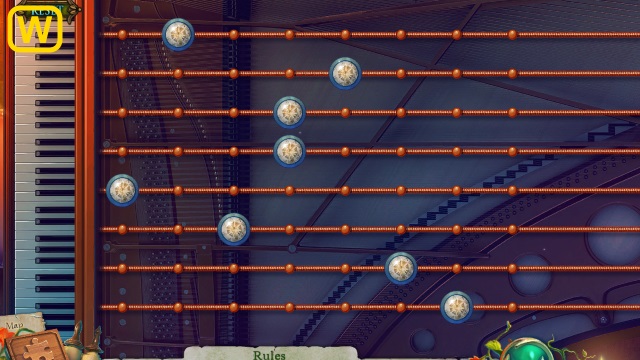
- Solution (W).
- Walk forward.

- Examine the lantern (X).
- Examine the tube; give the PUMP (Y). Take the POTION (Z).
- Take the FACEPLATE HALF (A).
- Walk down.
- Place the FACEPLATE HALF; take the CLOCKWORK-BIRD HEAD (B).
- Walk right.
- Place the CLOCKWORK-BIRD HEAD (C); take the WINDER (D).
- Walk down.
- Place the WINDER; take the note, CORKSCREW, and WITCHLY CUPCAKE (E).
- Walk forward.
- Use the CORKSCREW and EMPTY GLASS; pour the wine. Take the GLASS OF WINE (F).
- Walk down.
- Use the GLASS OF WINE and POTION for a mini-game.
- Solution (G): (D-A)-(E-A)-(H-A)-(B)-(A-C)-(I-C)-(G)-(F).
- Take the WITCH'S COCKTAIL.
- Walk right.
- Place the WITCHLY CUPCAKE; place the WITCH'S FRUIT and WITCH'S COCKTAIL (H). Take the DAY SENTRY.
- Walk down, then forward.
- Place the NIGHT SENTRY and DAY SENTRY; take DELORA'S CLOCK (I).
- Use DELORA'S CLOCK and the WATCHER'S GLOVE (J).
- Examine the clock 3x (K).
- Congratulations! You have completed Witches' Legacy: The City That Isn't There.
Created at: 2017-02-05