

Walkthrough Menu
- General Tips
- Chapter 1: Find Death
- Chapter 2: Cardinal's Past
- Chapter 3: Sepulchre
- Chapter 4: Puppet Master
- Chapter 5: Save Dupin
General Tips
- This is the official guide for Worlds Align: Beginning.
- This guide won't tell you when to zoom into a location; the screenshots show each zoom scene.
- Hidden-object puzzles are referred to as HOPs. Only the locations of the HOPs will be shown.
- Use the Map to fast travel to a location.
Chapter 1: Find Death
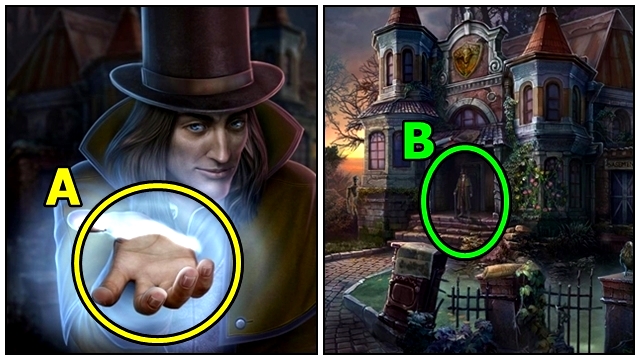

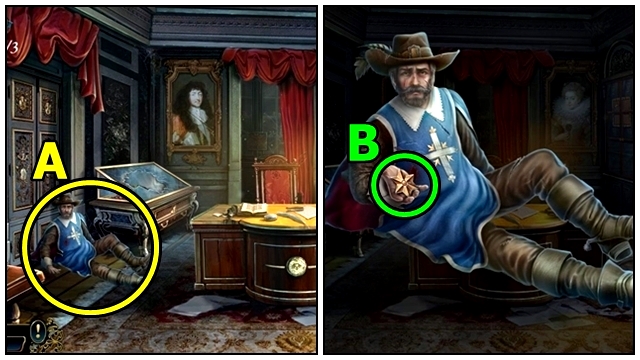
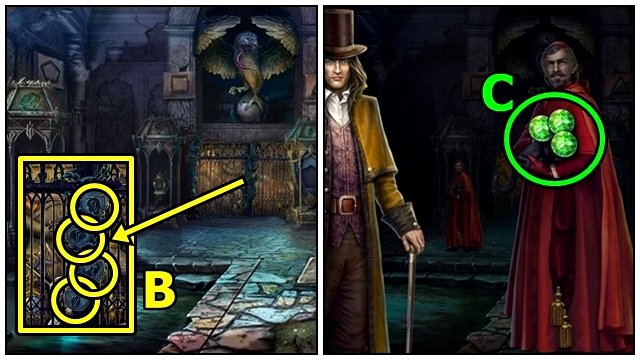
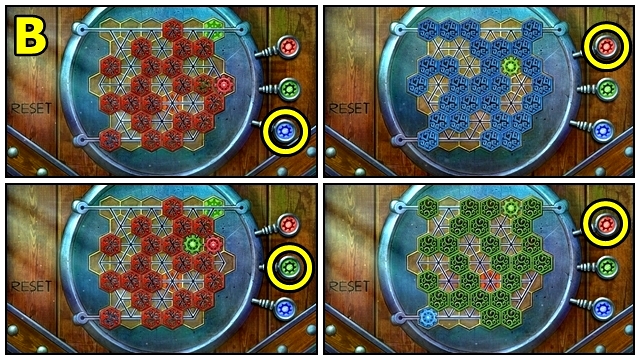
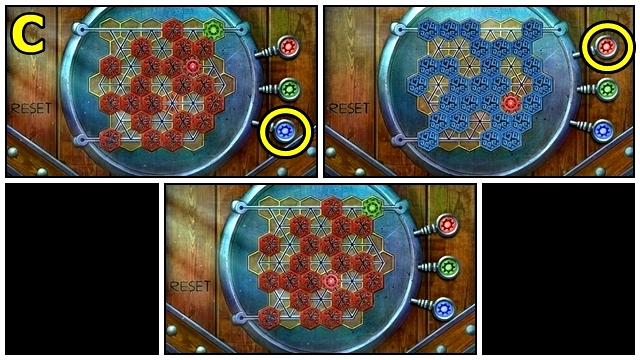
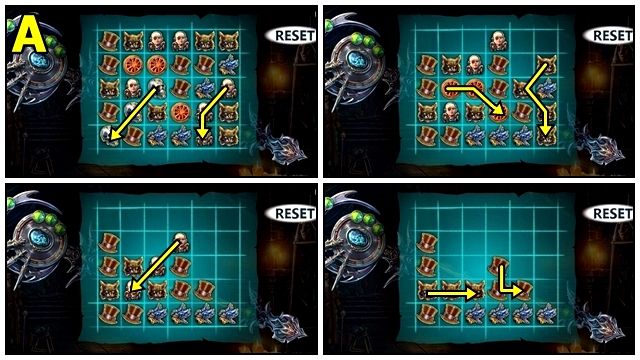
- Touch (A).
- Talk (B).
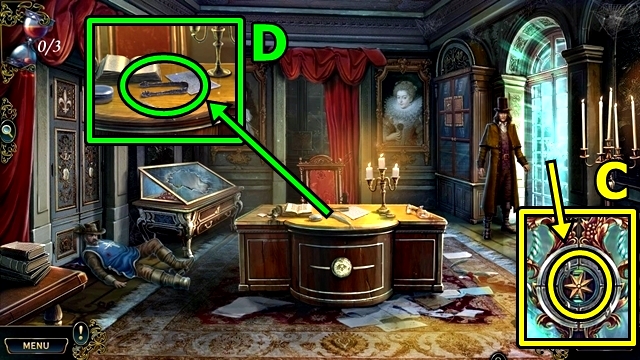
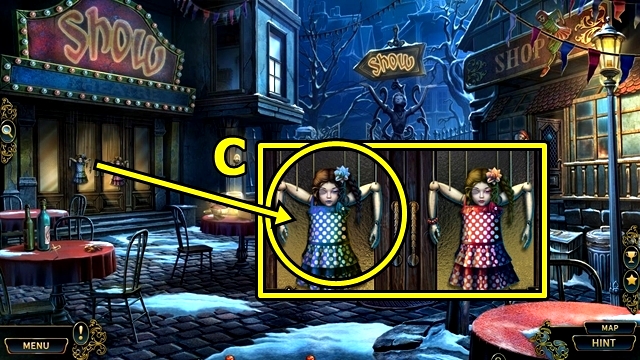
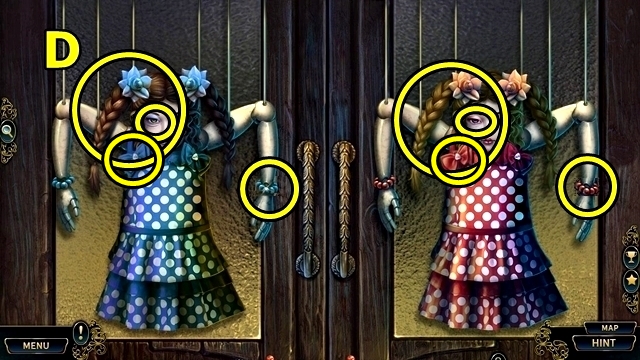
- Find items (C).
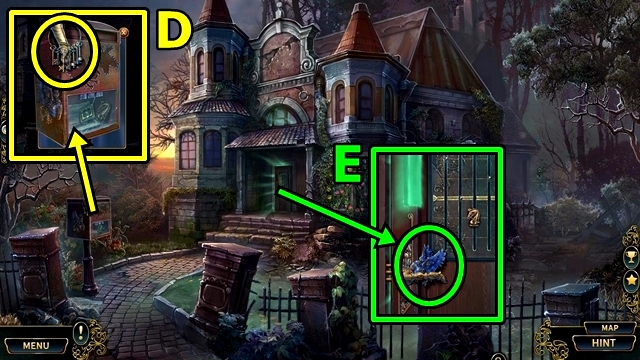
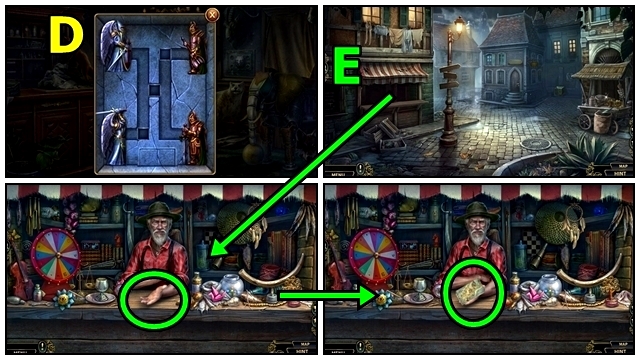
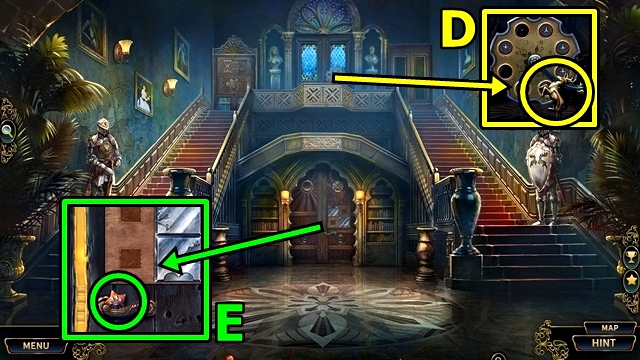
- Take KEYS (D).
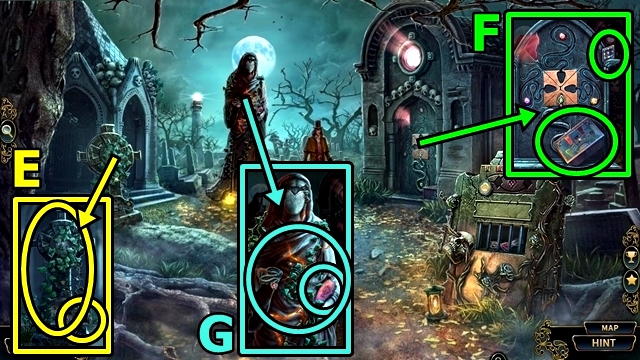
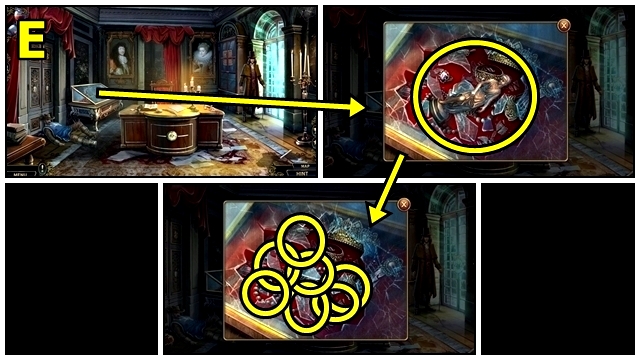
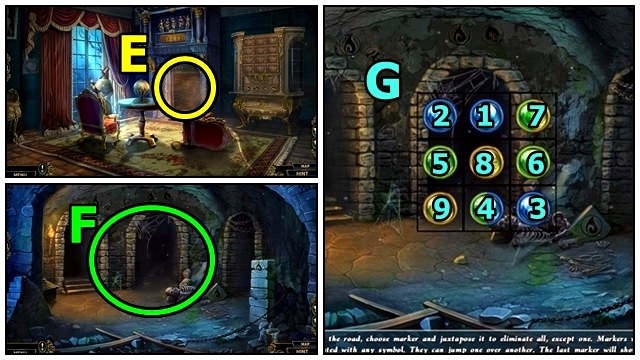
- Take CROW 1/2 (E).
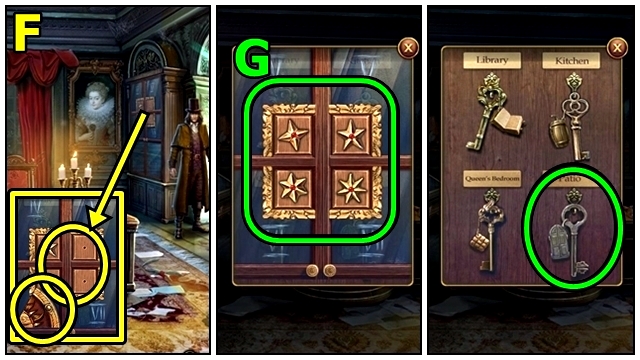
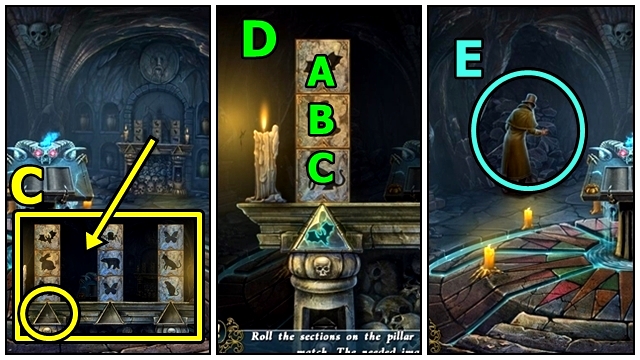
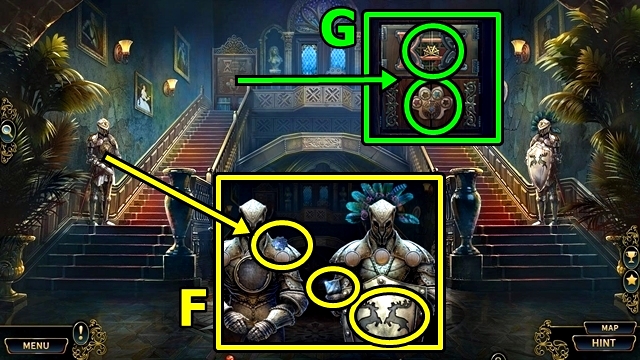
- Take GLOVES (F). Fill meter by punching door. Examine. Use KEYS.
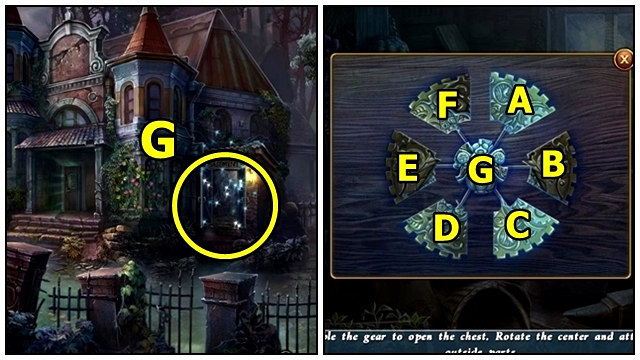
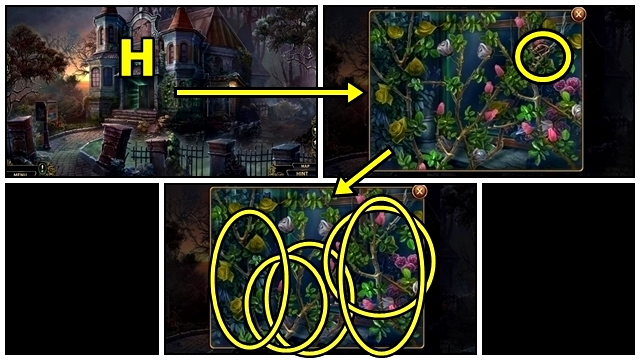
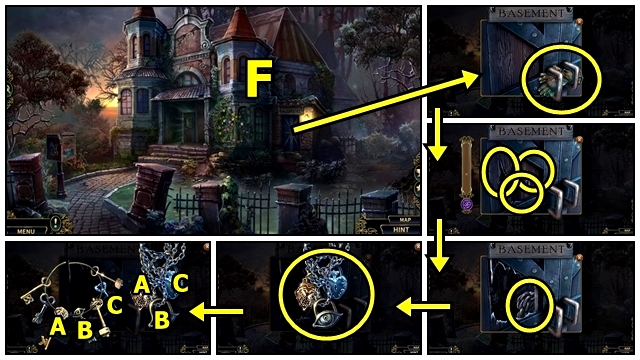
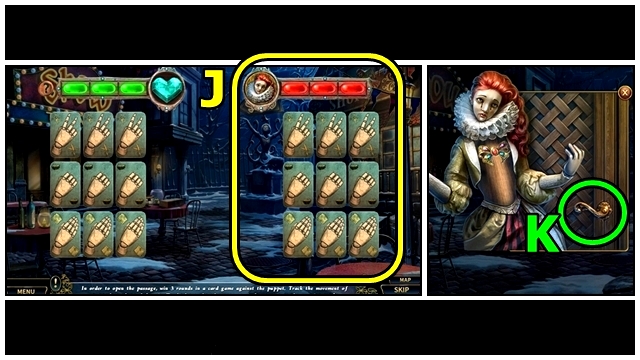
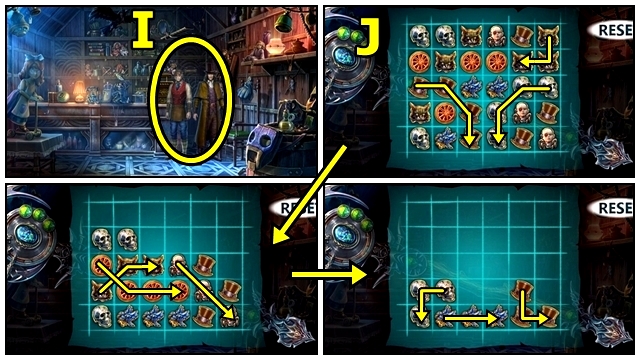
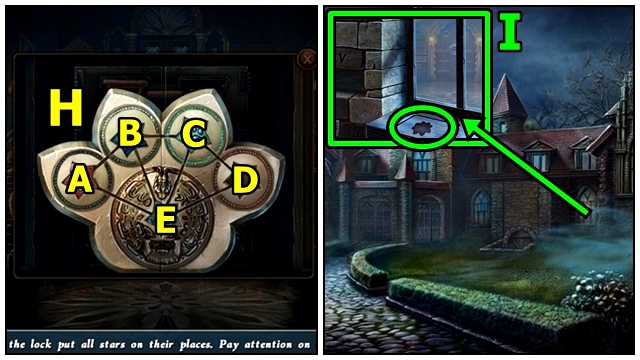
- Play HOP (G); solve puzzle: G-A-E-G-C-Gx2-F-G-B-D; receive METAL HORSE 1/3.
- Take METAL HORSE 2/3 (H). Use GLOVES; find items; receive PARTS OF A CROW.
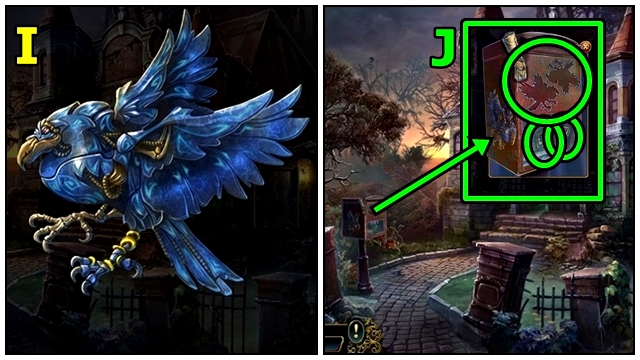
- Reassemble PARTS OF A CROW; take CROW 2/2 (I).
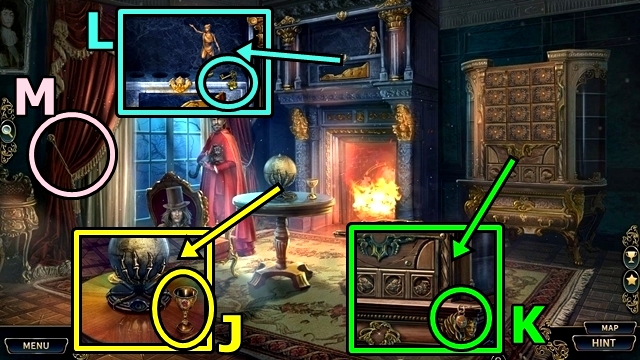
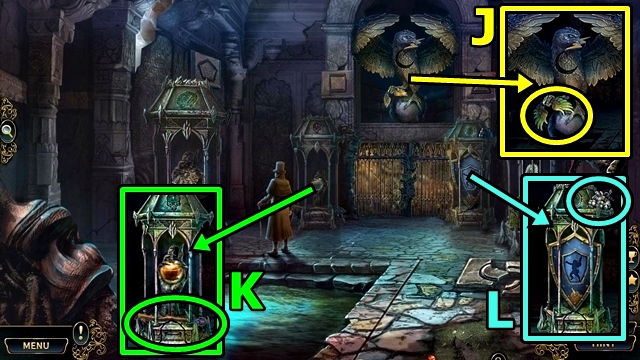
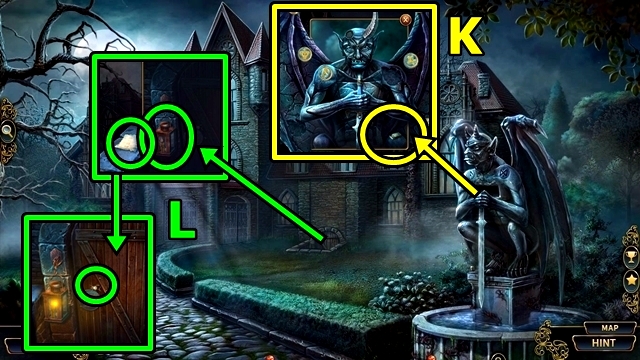
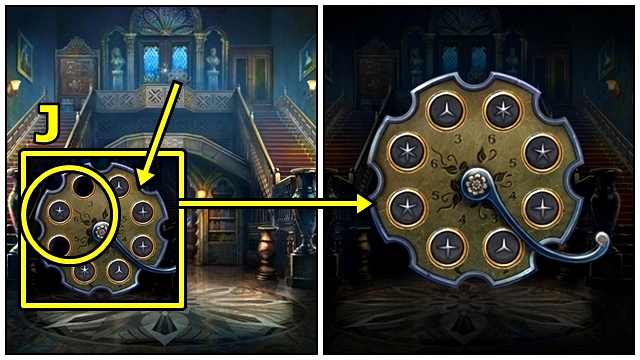
- Insert CROW (J); take GOLDEN RHOMBUS 1/3 and METAL HORSE 3/3.
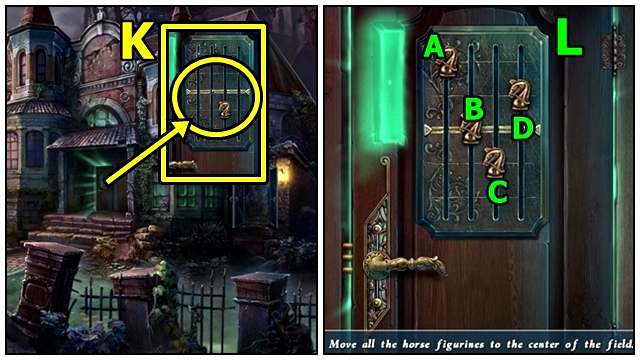
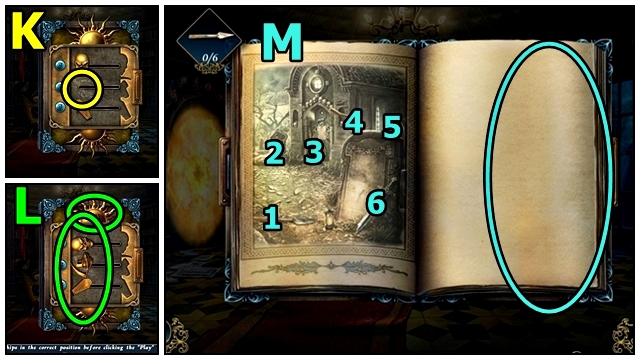
- Add METAL HORSE (K).
- Solution: (L) Ax2-Bx3-C.
- Enter.
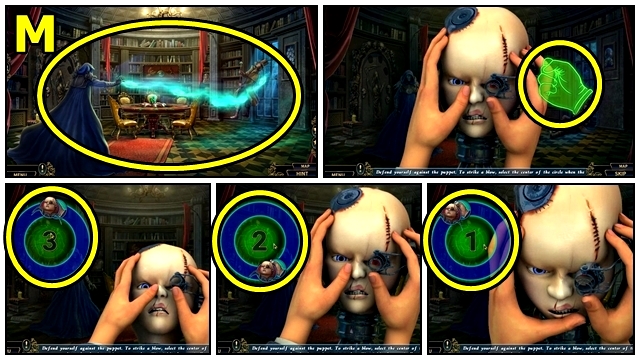
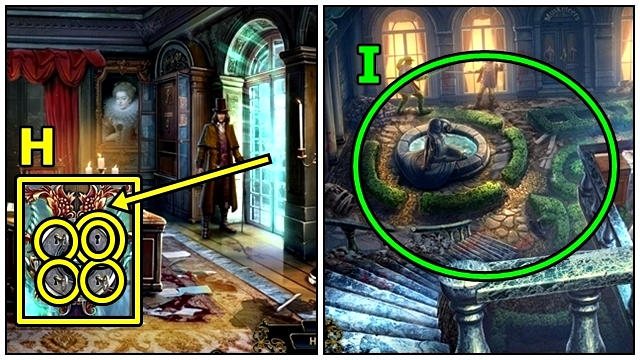
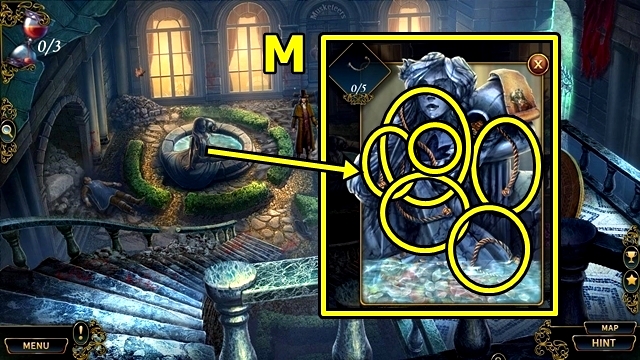
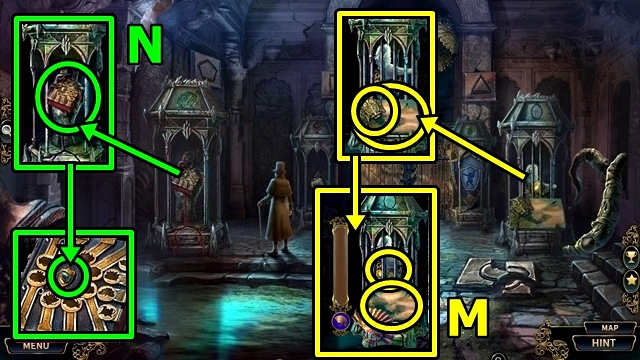
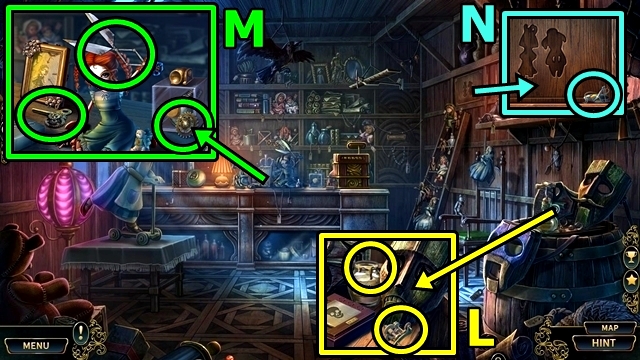
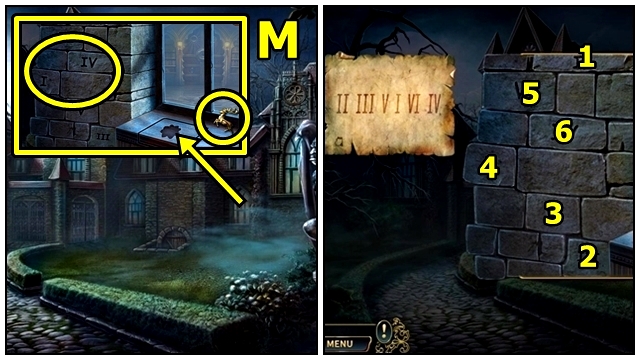
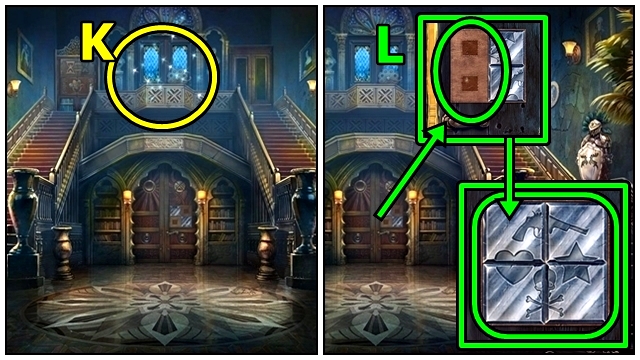
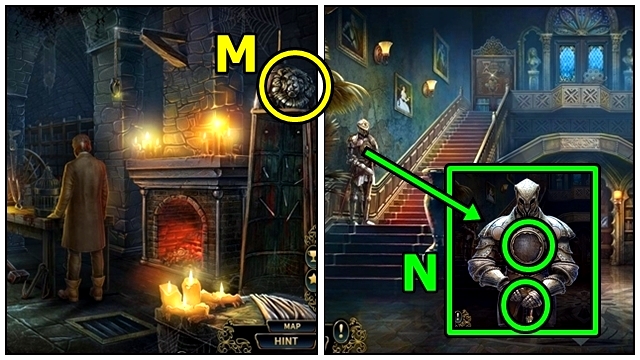
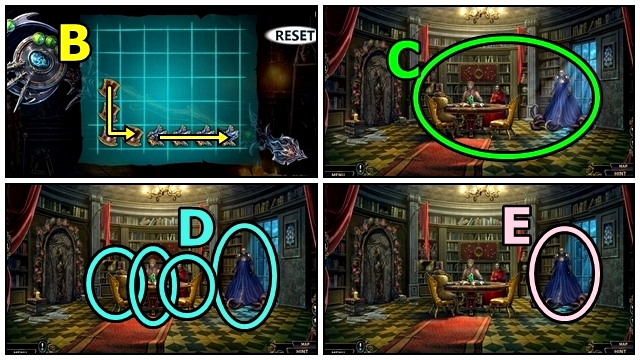
- Examine (M). Solution.
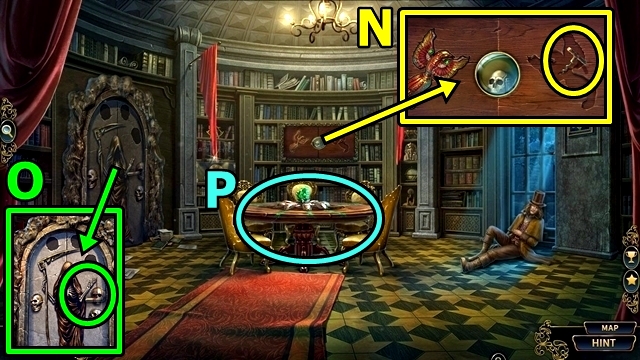
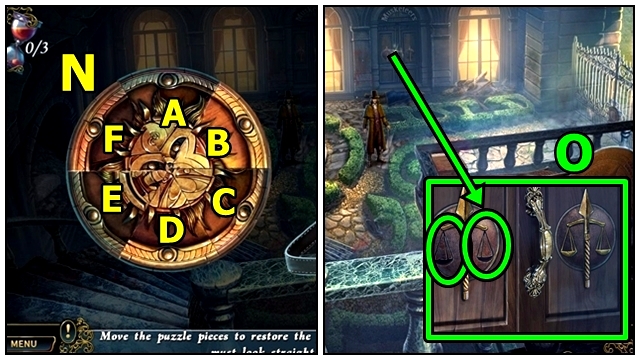
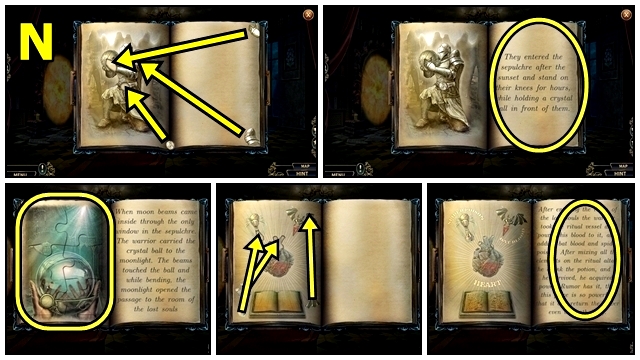
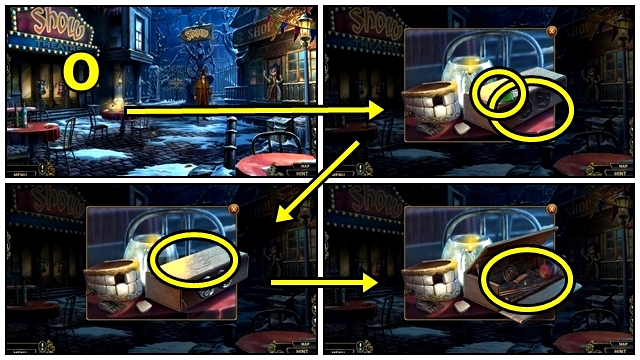
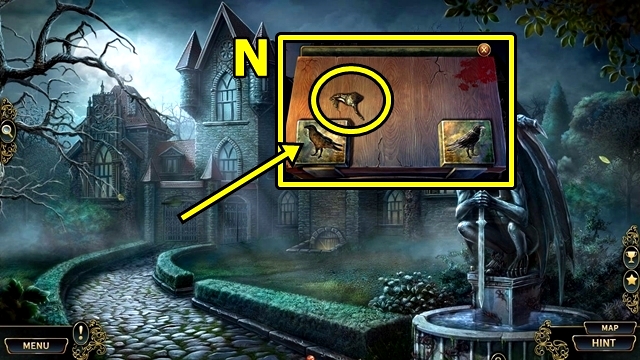
- Take CORKSCREW (N).
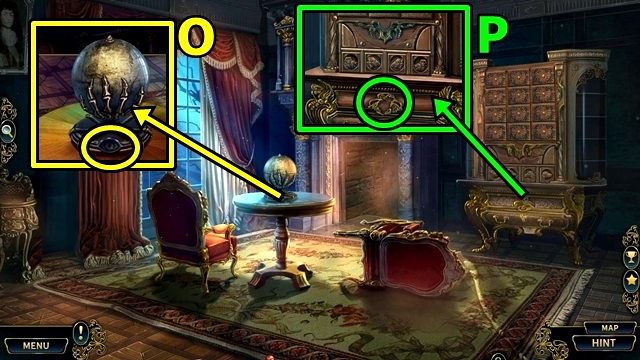
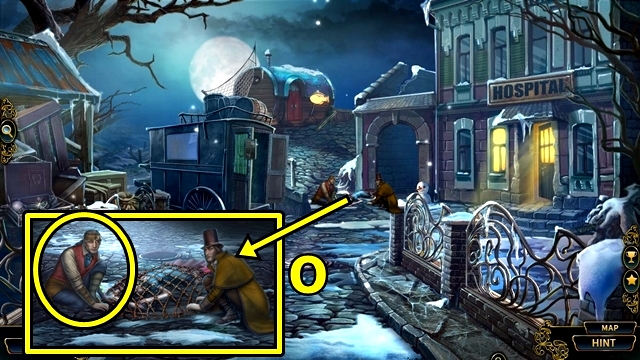
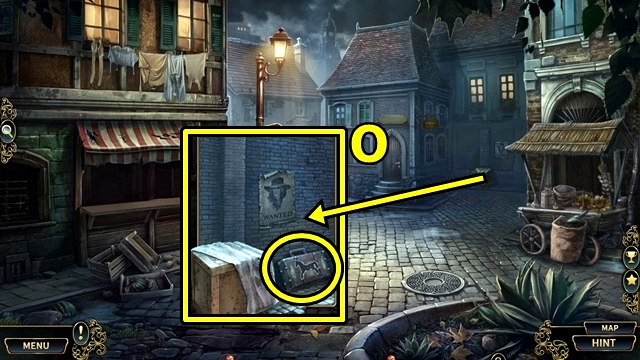
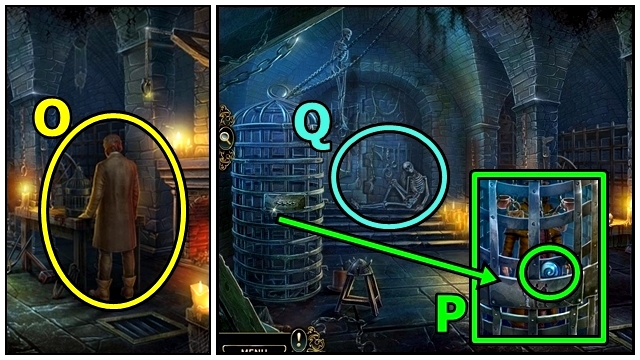
- Take SECRET CLUE (O).
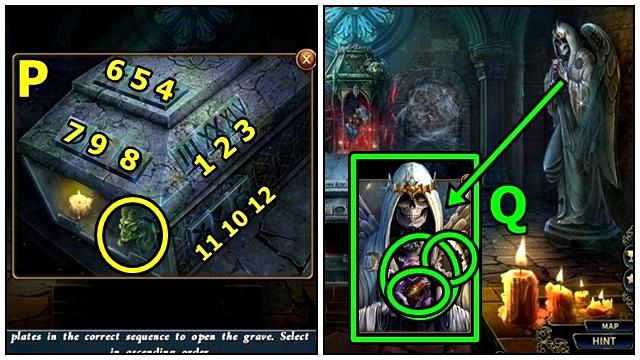
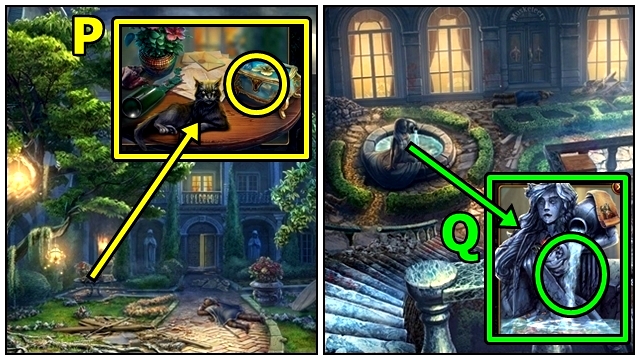
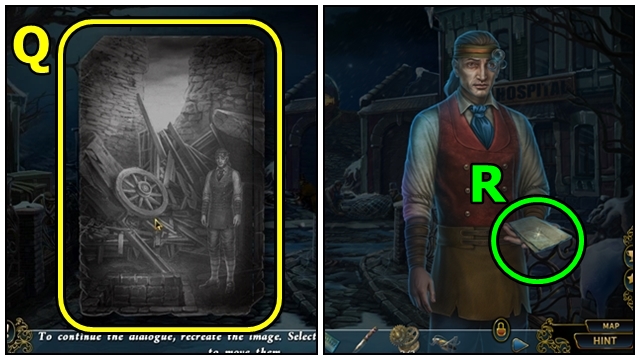
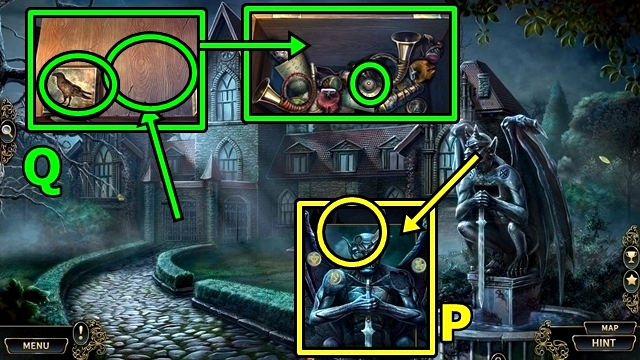
- Examine (P).
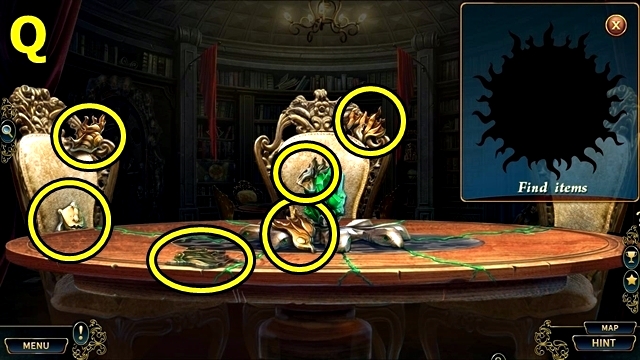
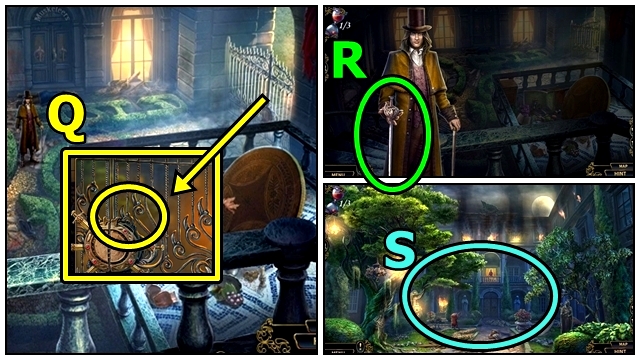
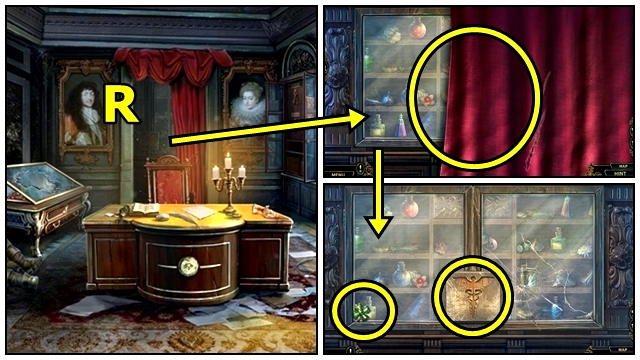
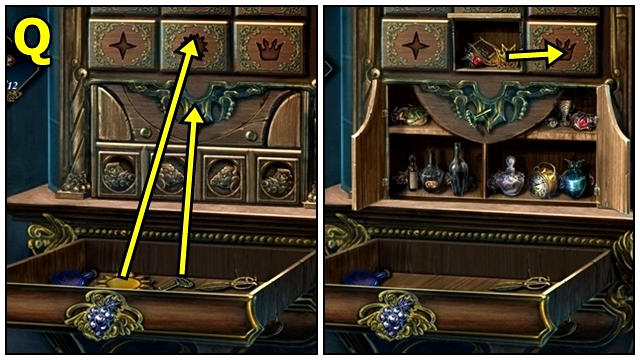
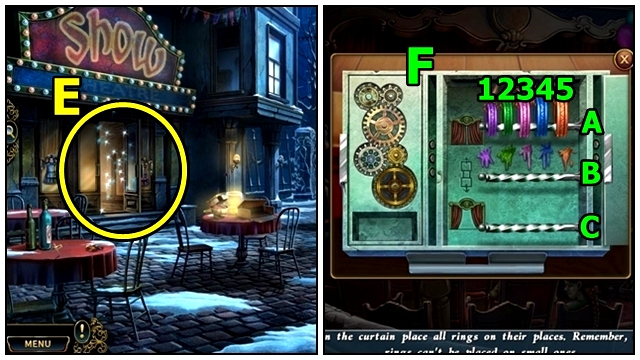
- Find items (Q); receive GOLDEN SUN.

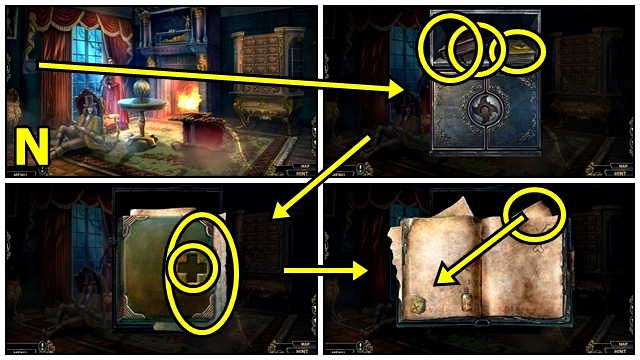
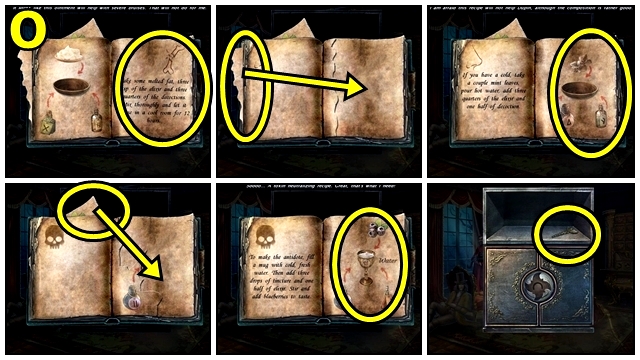
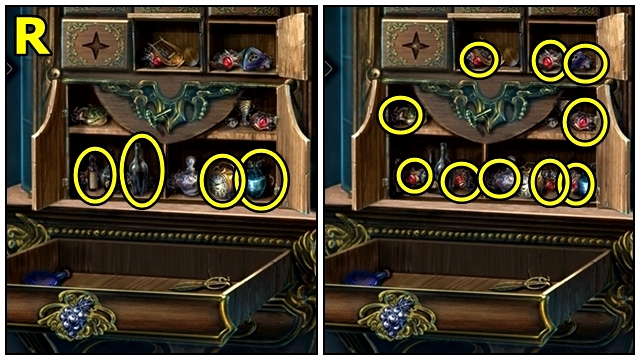
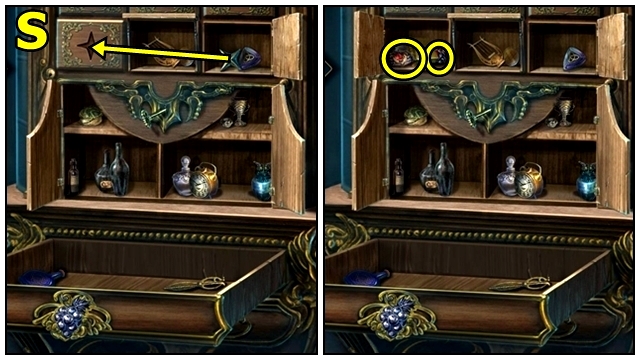
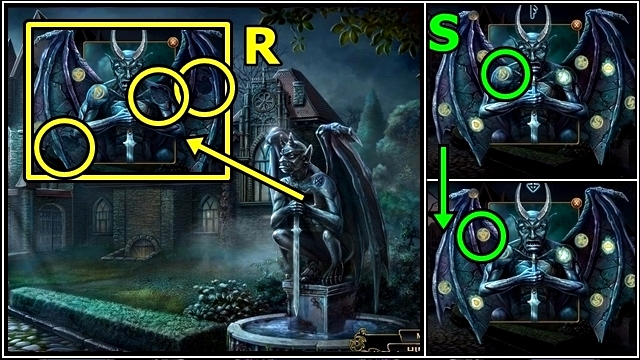
- Insert GOLDEN SUN (R); open; take GLASS, then STASIS WATER. Add SECRET CLUE; press runes; examine book; read notes; take SKULL 1/3.
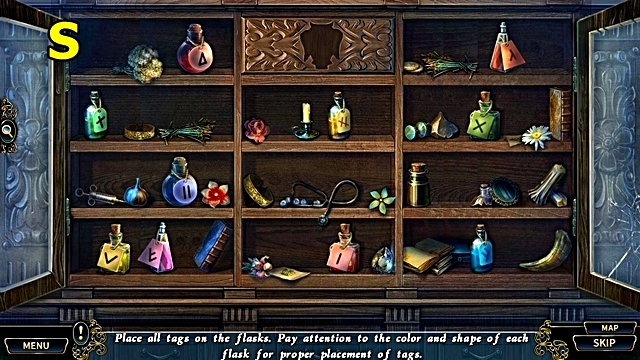
- GLASS and CORKSCREW on STASIS WATER; receive FILLED GLASS.
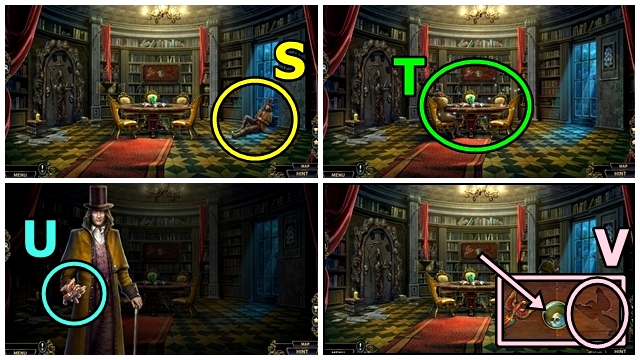
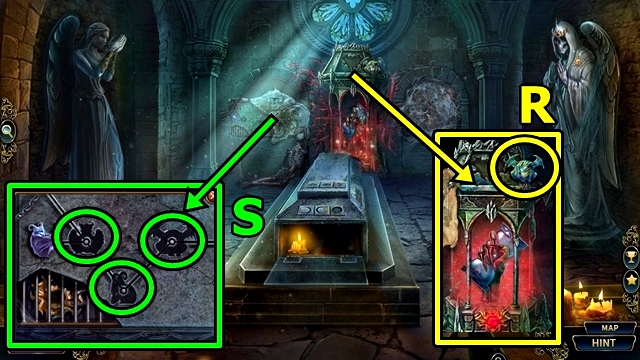
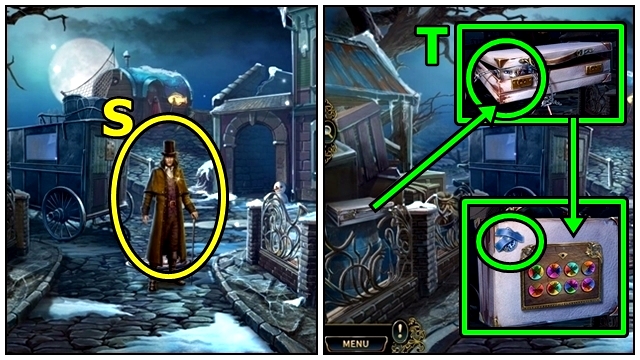
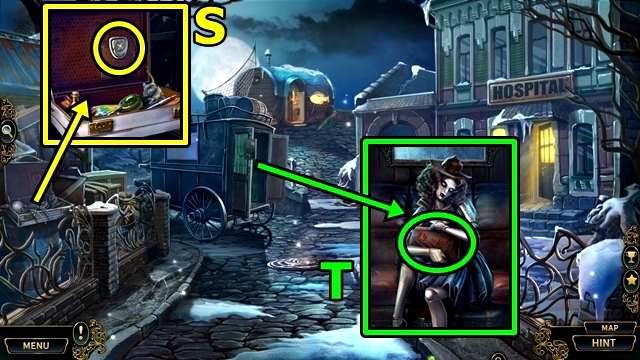
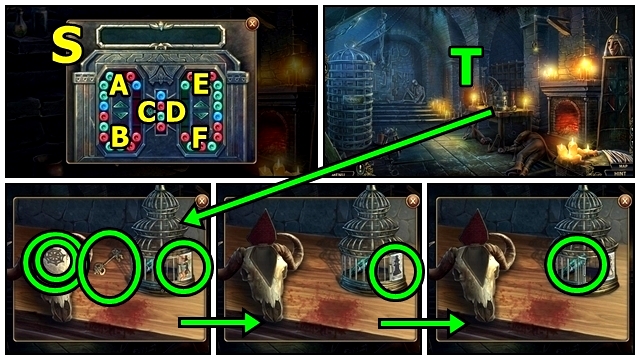
- Offer FILLED GLASS (S).
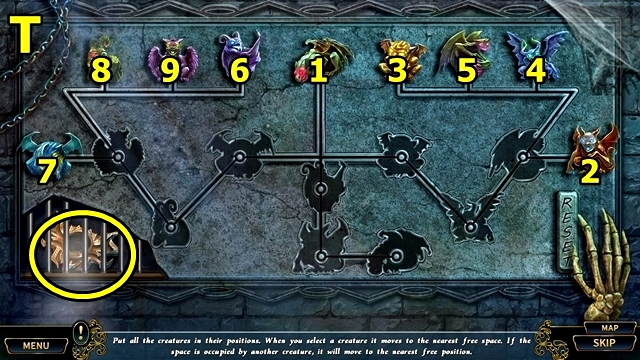
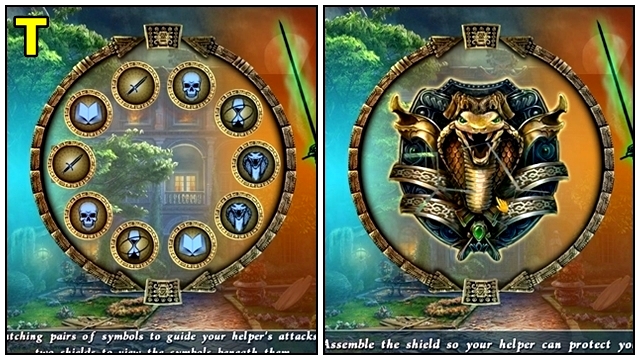
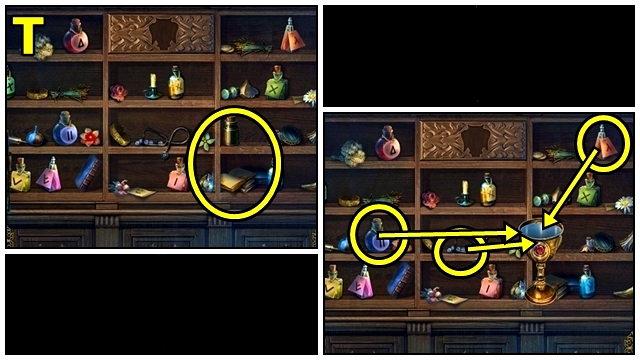
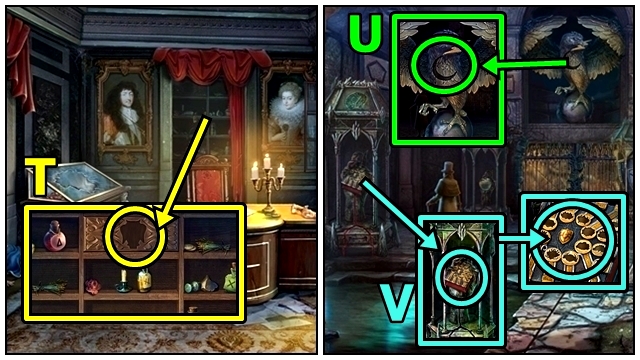
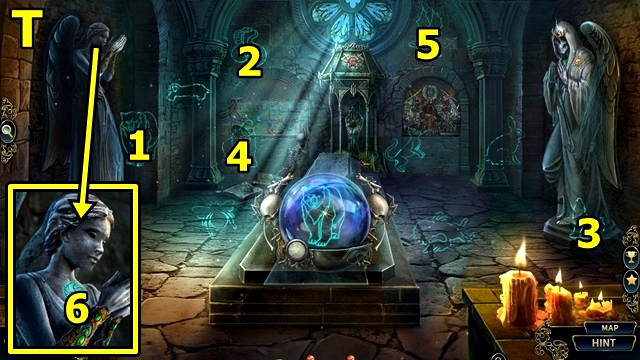
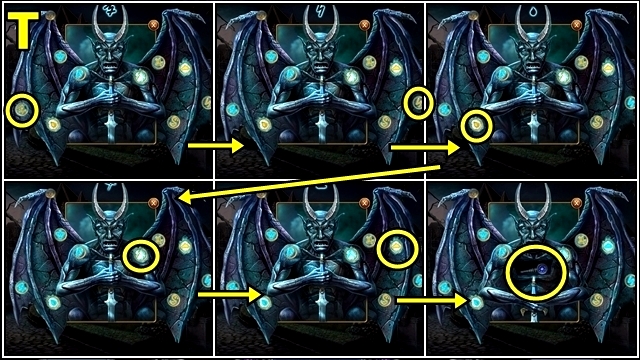
- Play HOP (T); take SKULL 2/3.
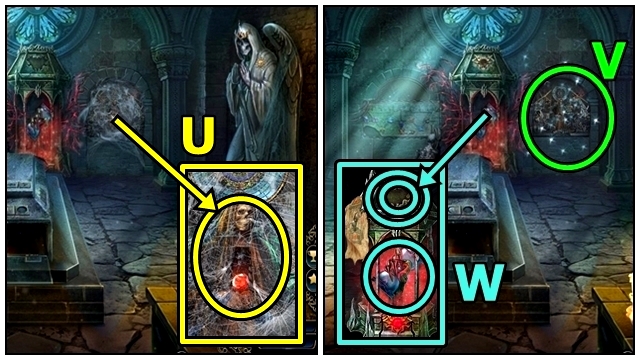
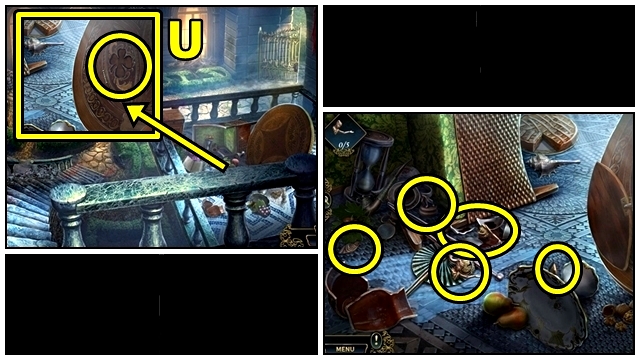
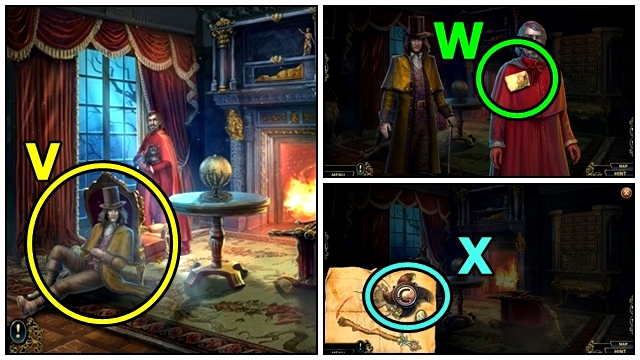
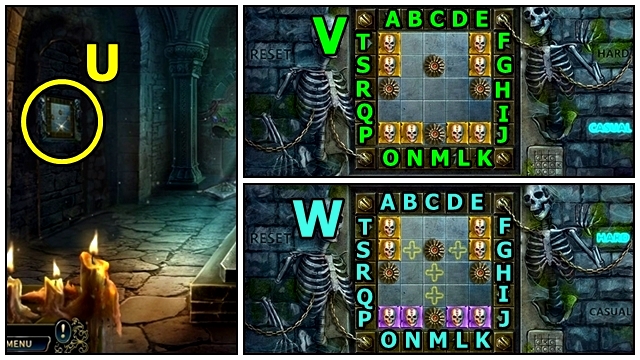
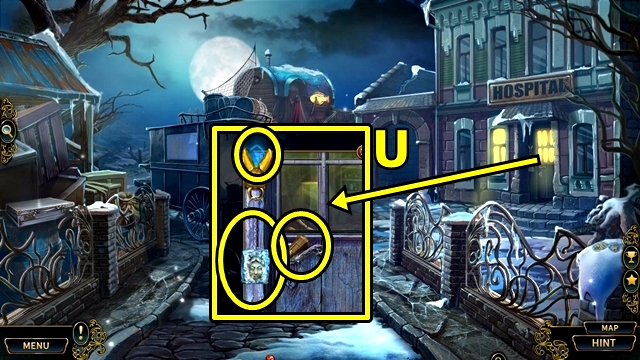
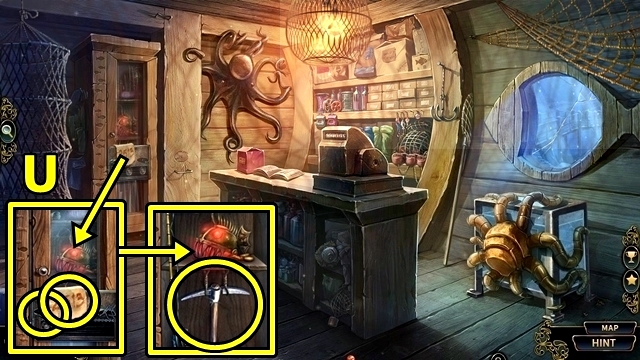
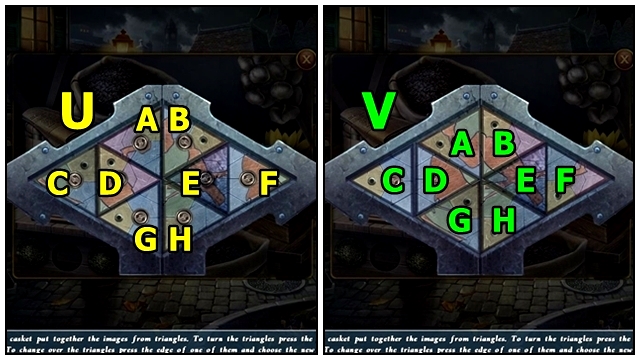
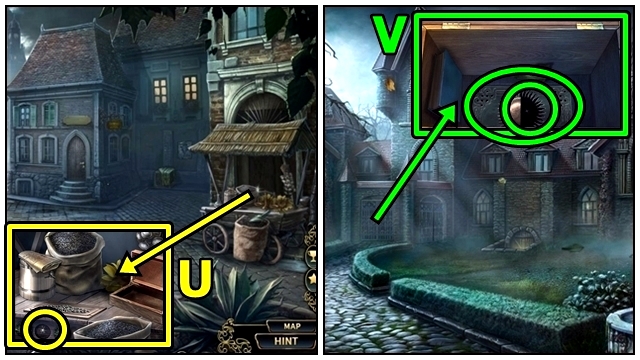
- Take PHOENIX (U).
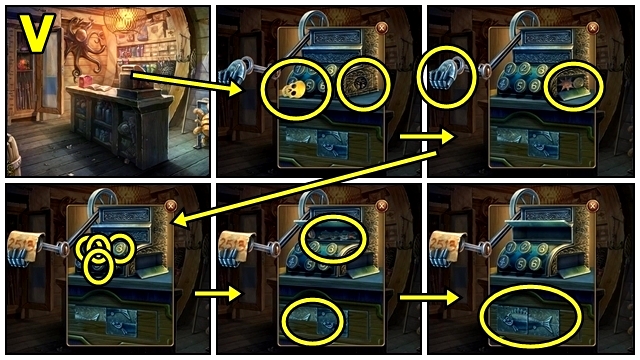
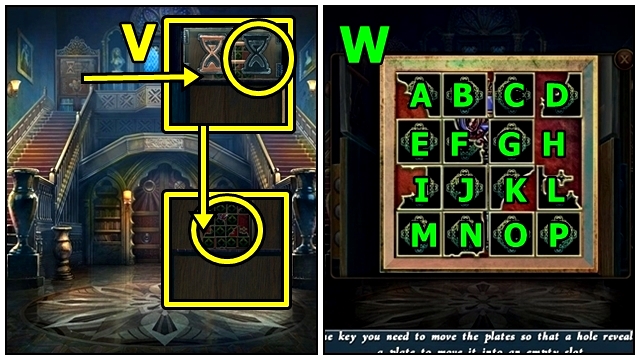
- Insert PHOENIX (V).
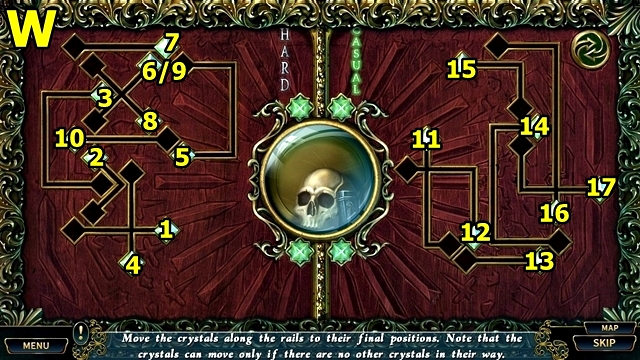
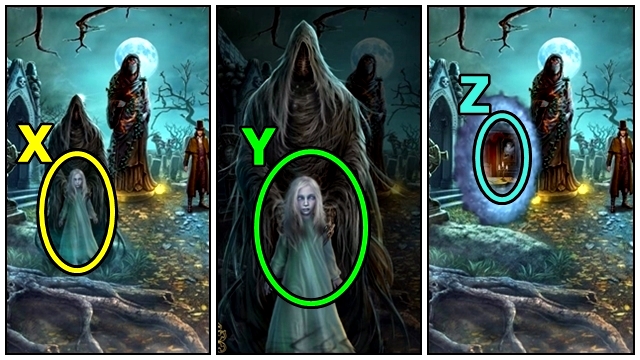
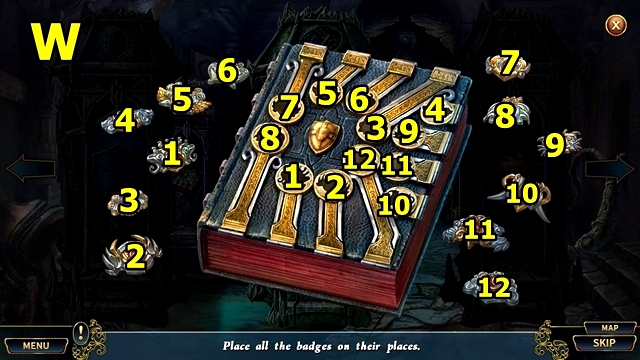
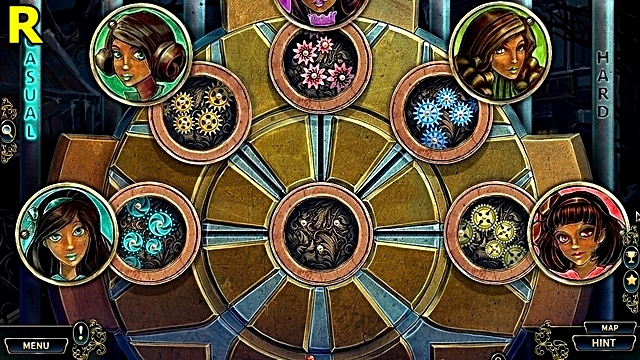
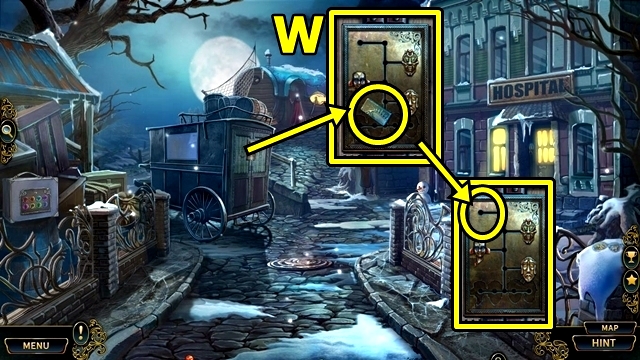
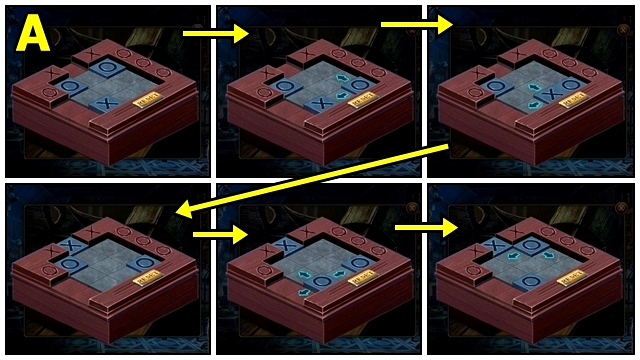
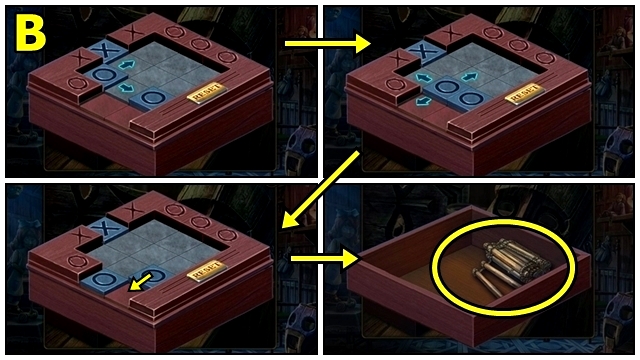
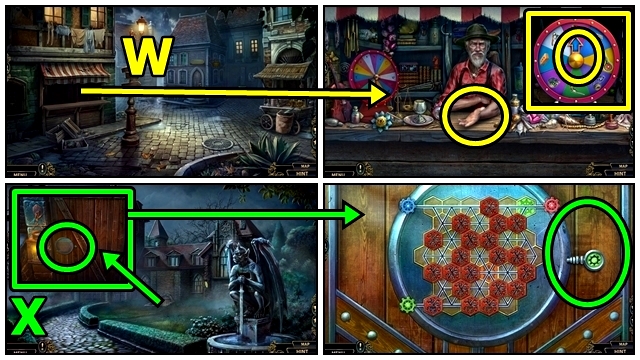
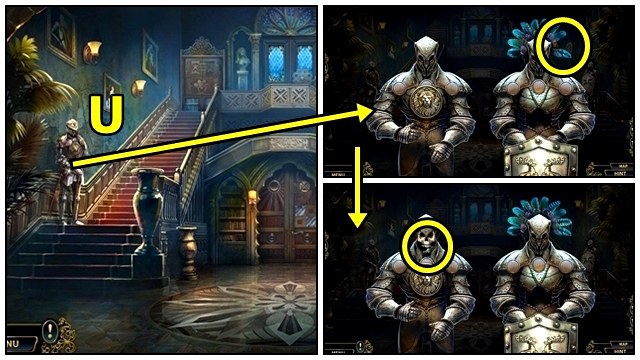
- Solution: Casual (W) 1-17.
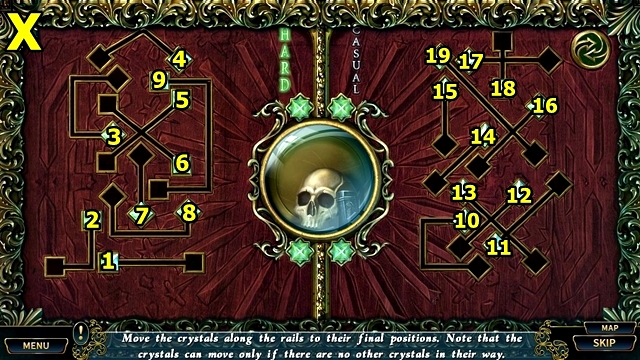
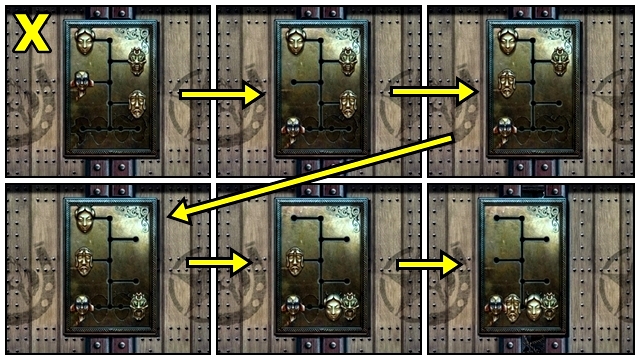
- Solution: Hard (X) 1-19.
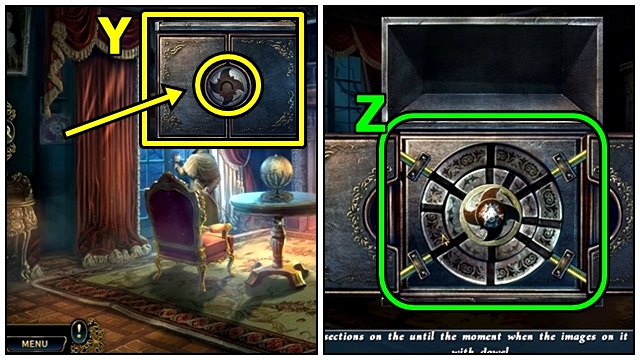
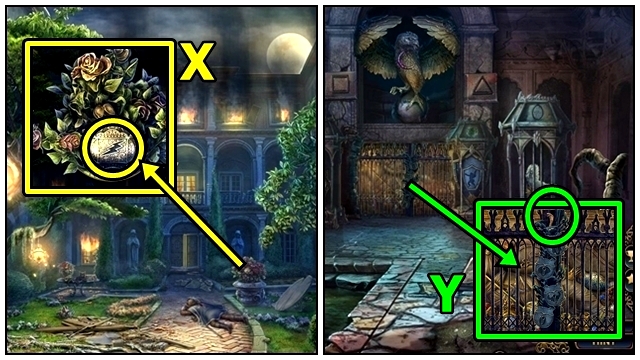
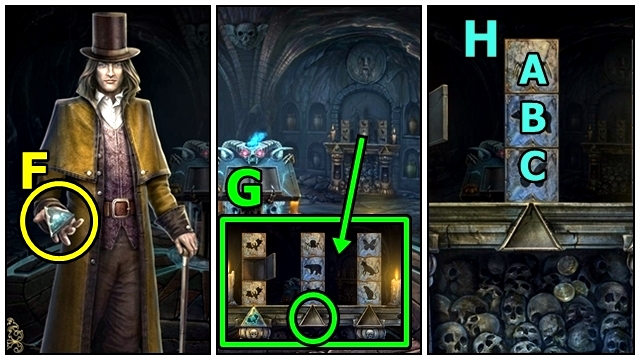
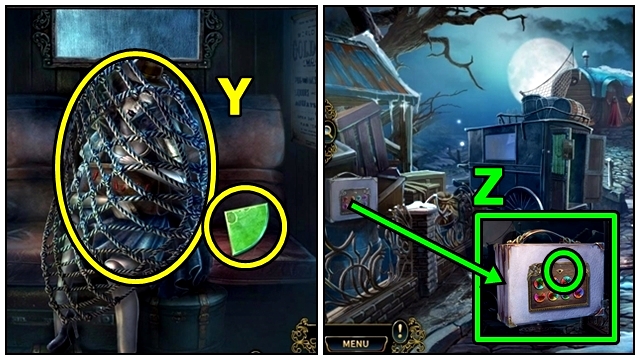
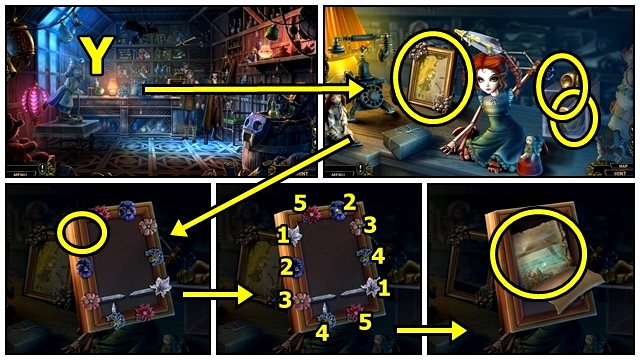
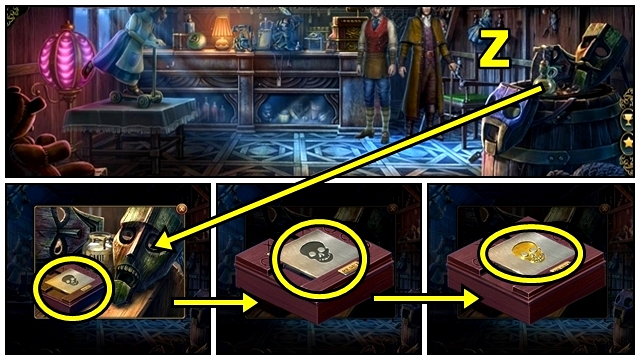
- Take LIGHTER and SKULL 3/3.
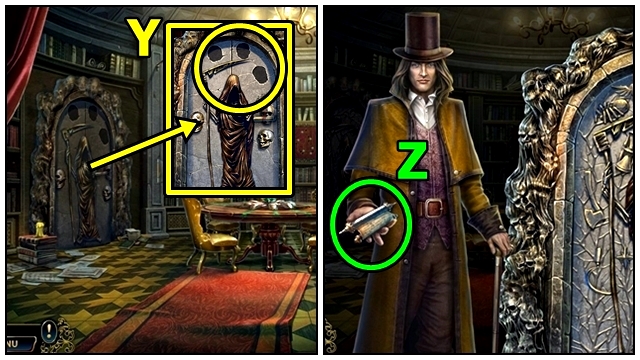
- Insert SKULL (Y).
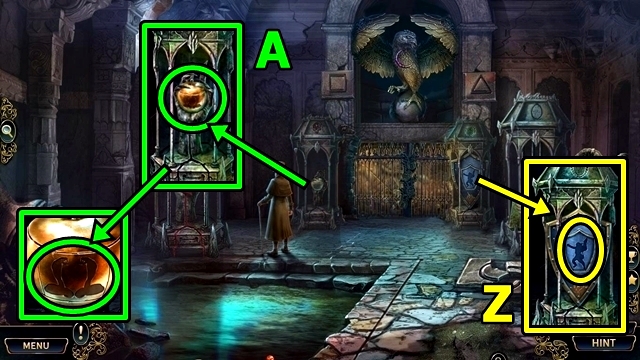
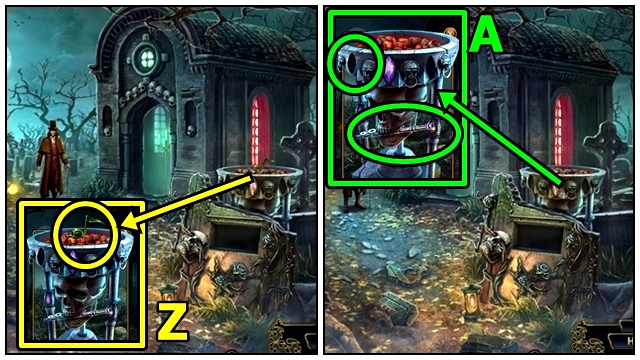
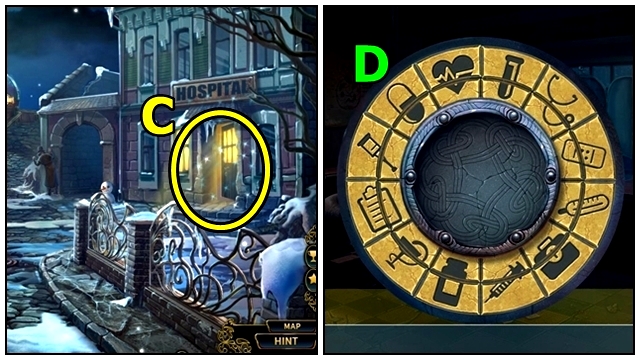
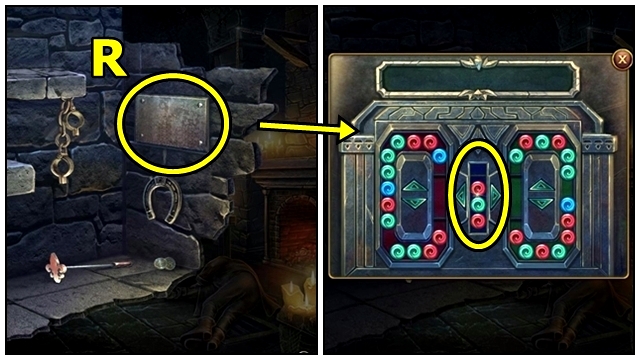
- Take scroll (Z).
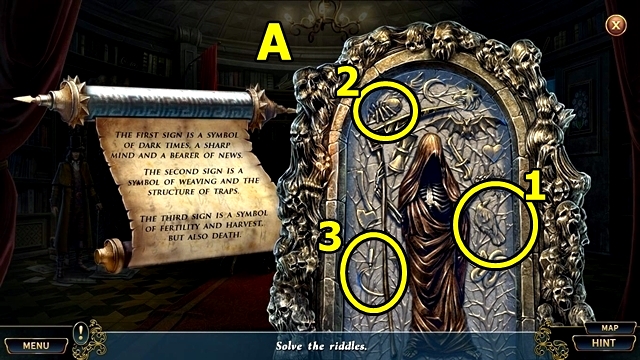
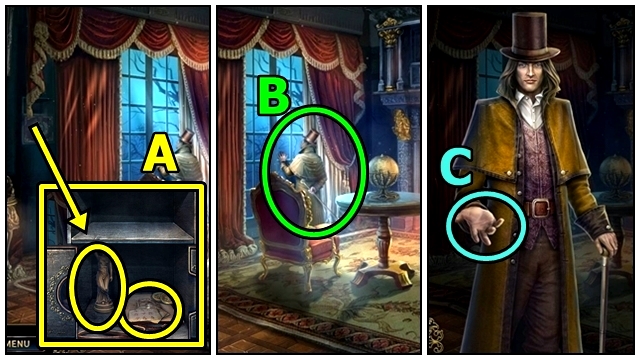
- Press symbols 1-3 (A).
- Enter.
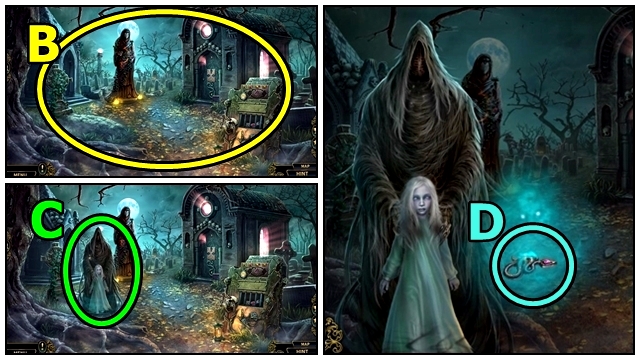
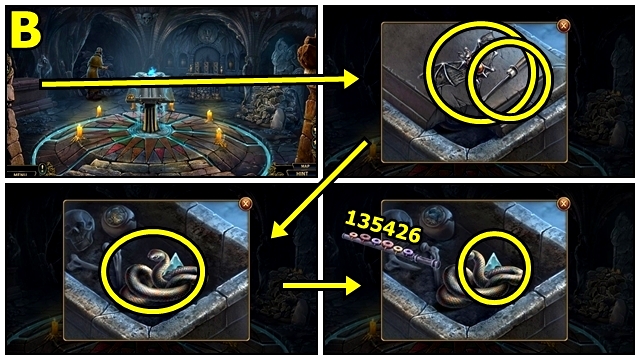
- Examine (B).
- Talk (C).
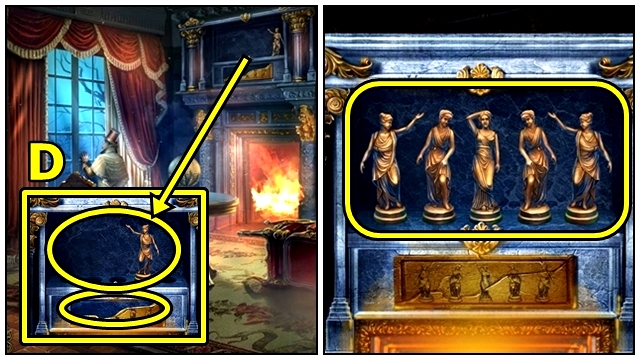
- Take SNAKE 1/3 (D).
- Remove (E). Take COFFIN 1/2.
- Take GLASS BOX (F) and GOLDEN RHOMBUS 2/3.
- Touch (G). Take COFFIN 2/2.
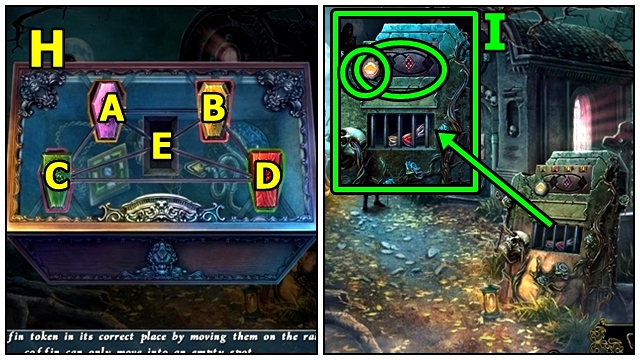
- COFFIN on GLASS BOX.
- Solution: (H) C-A-B-D-E. Take GOLDEN RHOMBUS 3/3 and SNAKE 2/3.
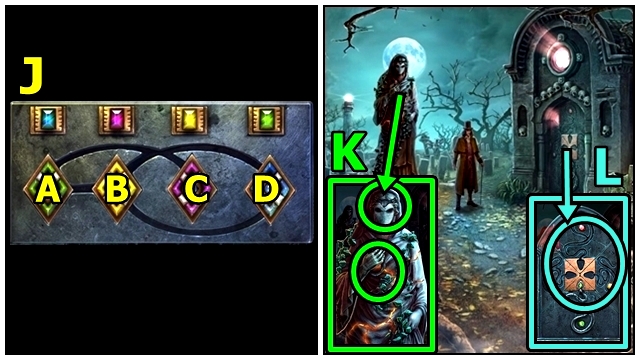
- Take CLOUD TOKEN (I). Insert GOLDEN RHOMBUS.
- Solution: (J) (A-B)-(A-C)-(B-D)-(A-B). Take CROWN.
- Insert CROWN (K); take SNAKE 3/3.
- Insert SNAKE (L).
- Go right.
- Take BRACELET (M).
- Take STONE PLAQUE (N). Add BRACELET; take SUN.
- Take FAN (O). Insert STONE PLAQUE.
- Solution: (P) 1-12. Take GREEN CREATURE.
- Take OILER (Q). Add SUN; receive PURPLE CREATURE.
- Take BLUE CREATURE (R).
- Add GREEN CREATURE (S), PURPLE CREATURE and BLUE CREATURE.
- Solution: (T) 1-9. Take GOLDEN TOKEN.
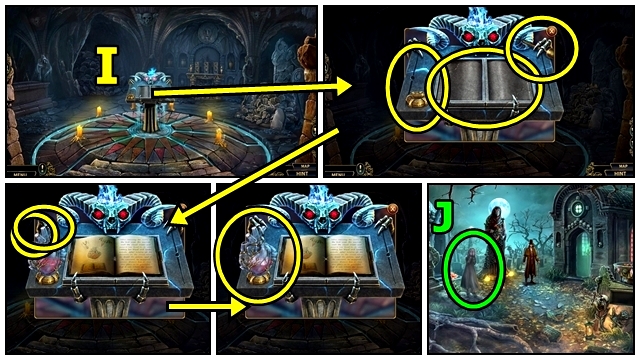
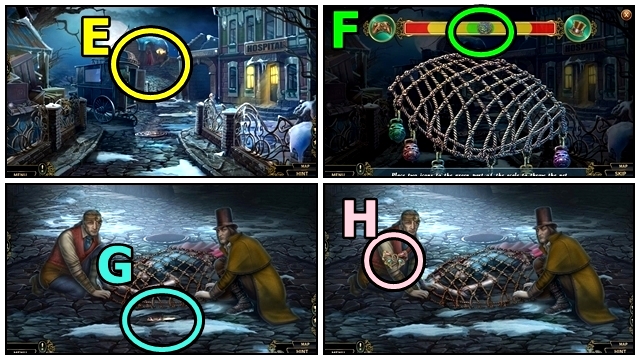
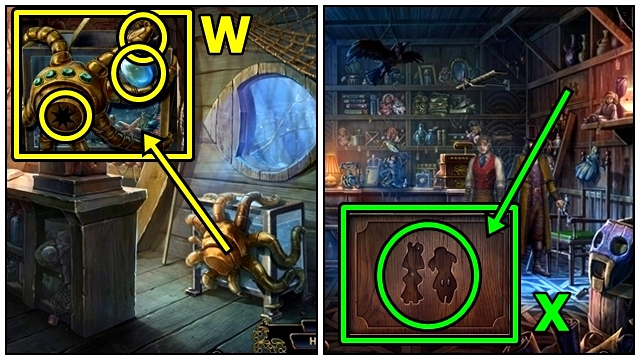
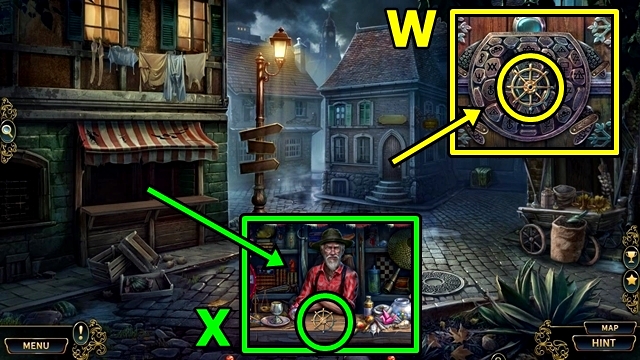
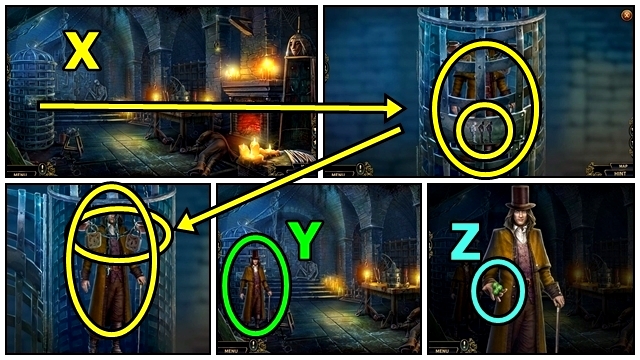
- Use LIGHTER (U).
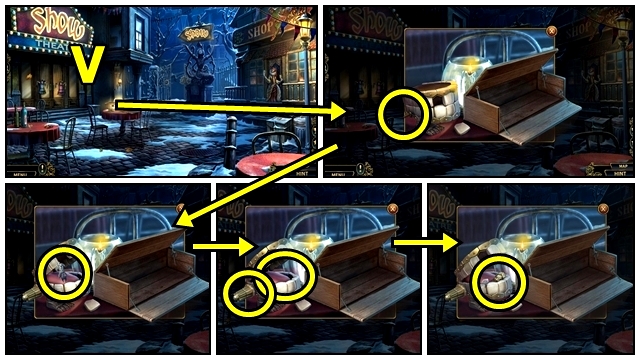
- Play HOP (V); take RUBY.
- Insert GOLDEN TOKEN (W), then RUBY. Take HOURGLASS OF DEATH.
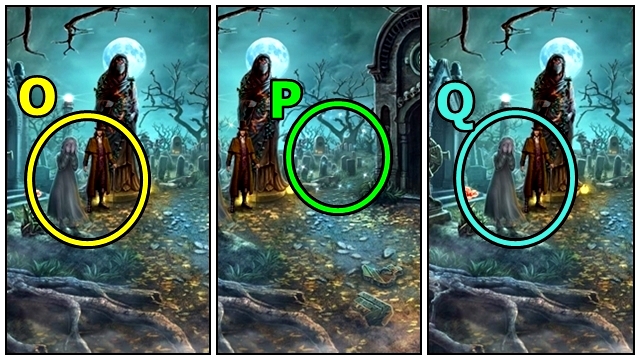
- Move down.
- Talk (X).
- Offer HOURGLASS OF DEATH (Y).
- Enter Portal (Z).
Chapter 2: Cardinal's Past
- Talk (A).
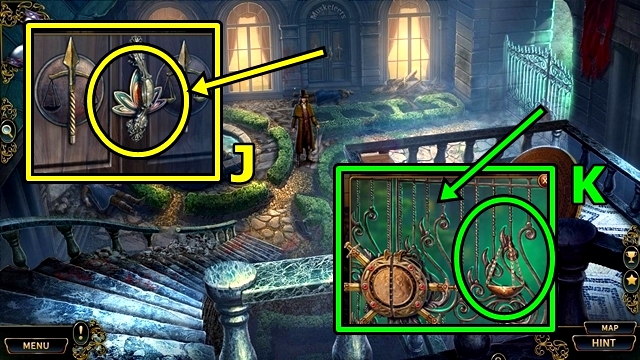
- Take STAR 1/3 (B).
- Take STAR 2/3 (C).
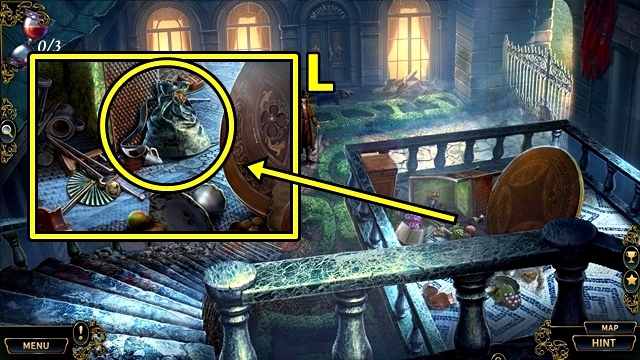
- Take TWEEZERS (D).
- Take STATUETTE 1/4 (E). Use TWEEZERS. Find items; take STAR 3/3.
- Take PATTERN 1/2 (F); add STAR.
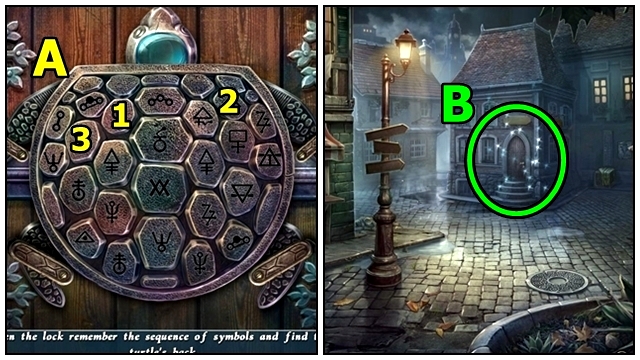
- Rearrange stars (G). Take DOOR KEY.
- Insert DOOR KEY (H); turn all keys.
- Go right.
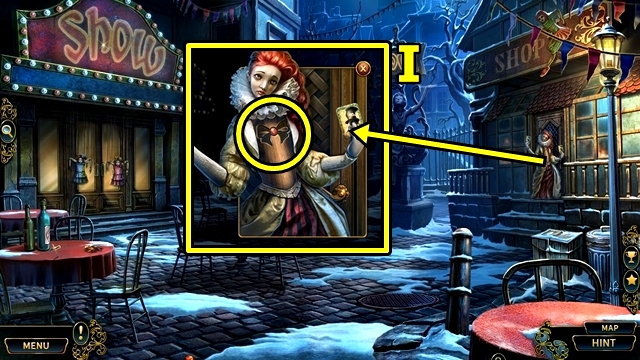
- Examine (I).
- Take NYMPH HEART (J).
- Take EMBLEM (K).
- Take BAG (L).
- Find items (M); receive ROPE. Insert NYMPH HEART; take PATTERN 2/2.

- PATTERN on BAG.
- Solution: (N) (F-C)-(A-E)-(A-D)-(A-B). Open bag; take TREBLE CLEF and EMBLEM.
- Add EMBLEMS (O).
- Play HOP (P); assemble Deer; receive GOLDEN SWORD.
- Insert GOLDEN SWORD (Q).
- Take RAPIER (R).
- Go right.
- Examine (S).
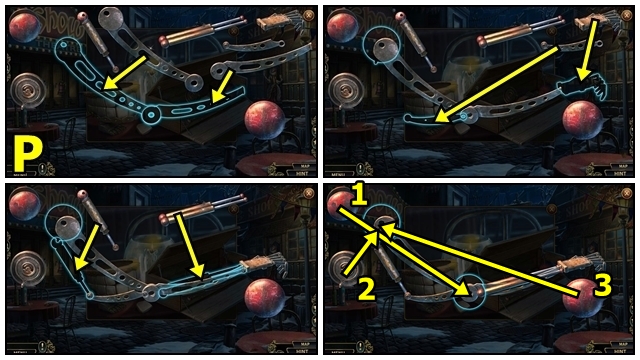
- Solution: (T).
- Solution: (U).
- Examine (V).
- Take HOOK (W).
- ROPE on HOOK; reassemble rope; connect; take ROPE WITH HOOK.
- Use ROPE WITH HOOK (X); take TREE and GOLDEN TRIANGLE 1/2.
- Unassemble (Y); find items. Press arrow; unassemble (4x); find items. Receive CATNIP.

- Give CATNIP (Z); take GOLDEN TRIANGLE 2/2.
- Insert GOLDEN TRIANGLE (A); receive HALBERD.
- Use HALBERD (B); fill meter by breaking boards.
- Enter.
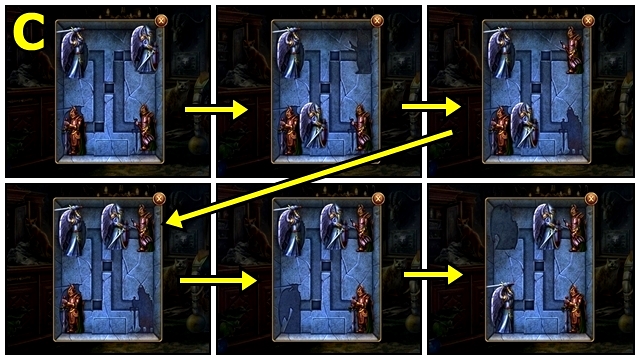
- Solution: (C).
- Solution: (D).
- Solution: (E).
- Examine (F).
- Solution: (G).
- Talk (H).
- Take CROSS (I).
- Take CUP (J).
- Take BULL KEY (K).
- Take FLOWER KEY (L).
- Move curtains (M).
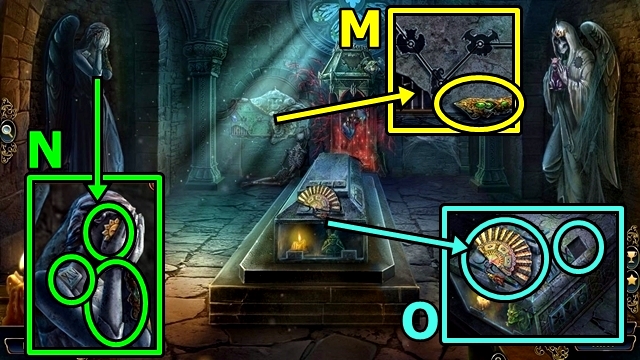
- Examine books (N). Add CROSS; open book. Add and turn page.
- Add and turn pages (O); take HEALING POTIONS. Take CADUCEUS.
- Move down.
- Insert and turn FLOWER KEY (P); take STATUETTE 2/4.
- Move down.
- Use CUP (Q); receive WATER.
- Move down.
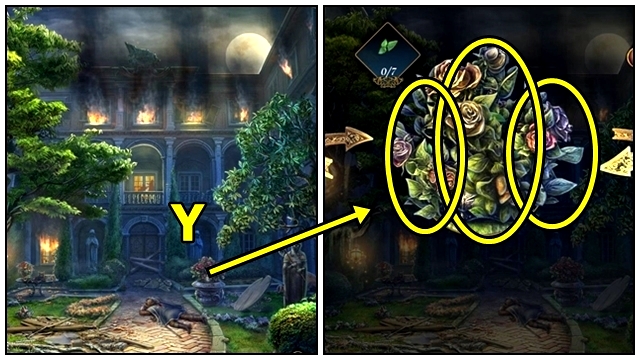
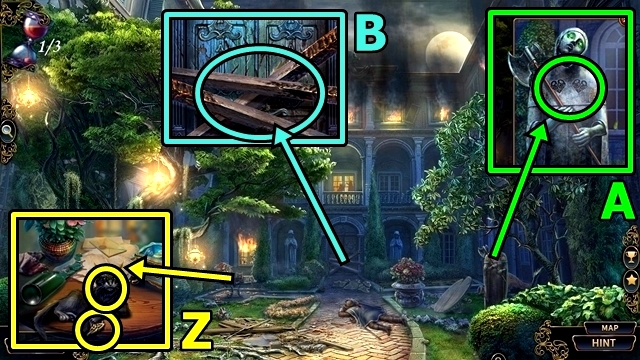
- Move curtain (R). Take CLOVER. Add CADUCEUS.
- Solution: (S).
- Add WATER (T). Add ingredients; take ANTIDOTE.
- Move right.
- Insert CLOVER (U). Find pieces; receive STATUE PARTS.
- Return to Cardinal's Chamber.
- Offer ANTIDOTE (V).
- Take STAFF INSTRUCTIONS (W).
- Open STAFF INSTRUCTIONS (X); take SAFE KEY.
- Insert SAFE KEY (Y).
- Solution: (Z).
- Take STATUETTE 3/4 (A) and DUNGEON MAP.
- Reassemble STATUE PARTS; take STATUETTE 4/4.
- Talk (B).
- Take SIGN (C).
- Add STATUETTE (D), then SIGN. Rearrange statuettes.
- Examine (E).
- Use DUNGEON MAP (F).
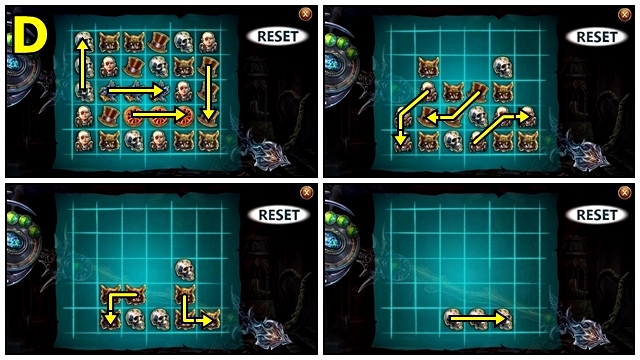
- Solution: (G) 1-9.
- Take left path, then forward.
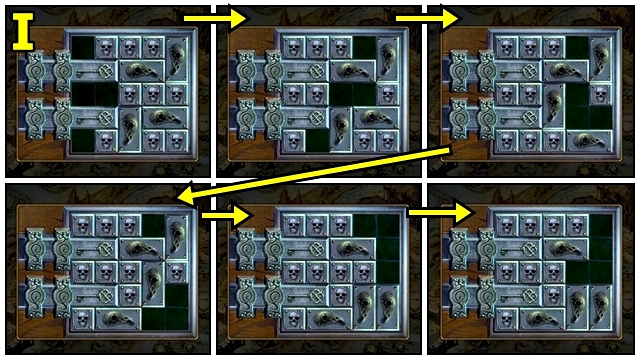
- Solution: (H) 1-16.
- Go forward twice.
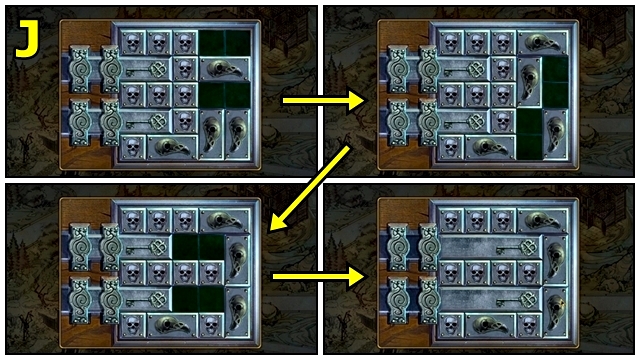
- Solution: (I) 1-24.
- Move right.
Chapter 3: Sepulchre
- Take WINGS (J).
- Take STAFF HILT (K).
- Take GRAPES (L).
- Take OWL (M). Use FAN; fill meter. Add WINGS; take EGG KEY.
- Take EYE KEY (N).
- Move down.
- Insert EYE KEY (O); take SNAKE 1/2.
- Insert GRAPES (P); open drawer.
- Insert sun (Q); insert and turn key. Insert crown.
- Move items (R). Find items.
- Insert star (S). Find items. Receive BADGES.
- Return to Cardinal's Office.
- Insert OWL (T); take MOON.
- Return to Dungeon.
- Insert MOON (U); receive LIGHTNING.
- Insert BADGES (V).
- Solution: (W). Take BRAIN KEY.
- Return to Castle Patio.
- Insert LIGHTNING (X); take ZEUS.
- Return to Dungeon.
- Take SNAKE 2/2 (Y).
- Insert ZEUS (Z); take CRYSTAL.
- Insert SNAKE (A); take SKULL KEY.
- Insert SKULL KEY (B), BRAIN KEY, BULL KEY and EGG KEY.
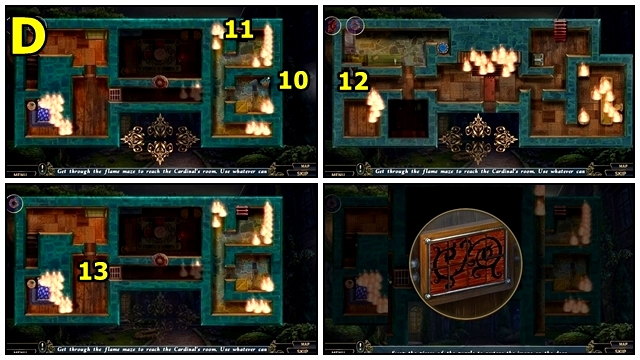
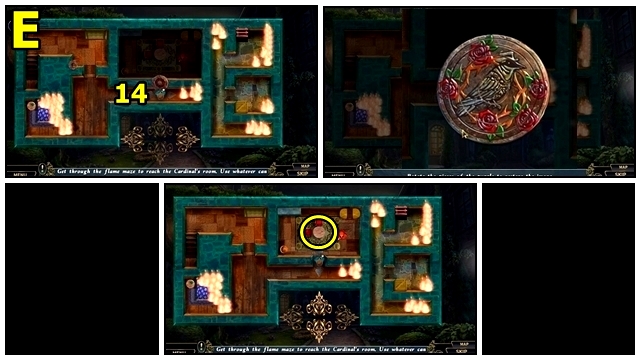
- Play HOP; take STAFF PIECE.
- Take TIME CRYSTALS (C).
- STAFF HILT, STAFF PIECE, CRYSTAL and TIME CRYSTALS on STAFF INSTRUCTIONS.
- Solution: (D).
- Enter Portal.
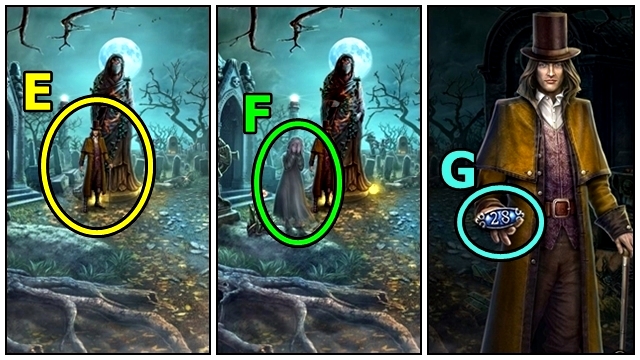
- Examine (E).
- Talk (F).
- Take SIGN (G).
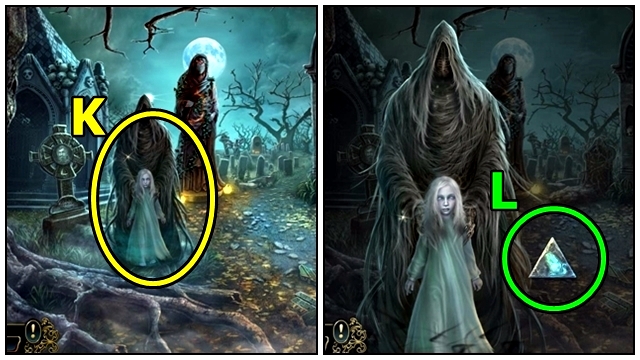
- Take DEATH (H).
- Move down.
- Add SIGN (I).
- Solution: (J). Take CEMETERY SECRETS.
- DEATH on CEMETERY SECRETS (K).
- Solution: (L).
- Find items (M); turn page.
- Replace items (N); turn page; complete puzzle; turn page; replace items; turn page; take CRYSTAL 1/2.
- Go left.
- Talk (O).
- Play HOP (P); take HEART.
- Talk (Q).
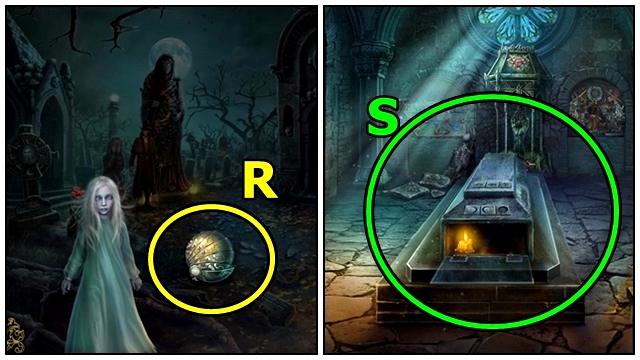
- Take BALL OF DEATH (R).
- Enter Cemetery Tomb.
- Use BALL OF DEATH (S).
- Find items (T).
- Examine (U).
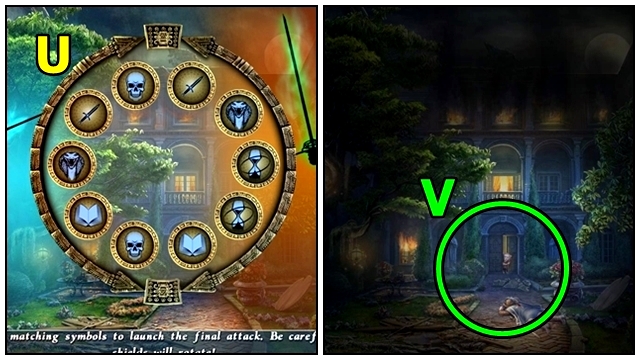
- Solution: Casual (V) F-G-L-J-I-Dx2-S-T-B-R-Bx2-N-L-P-N.
- Solution: Hard (W) F-G-Dx2-H-I-L-J-Tx3-Dx2-L-N-P-D-N-S-L.
- Move left.

- Take MUSIC BOX (X).
- Take SHOVEL (Y).
- Return to Cemetery of Eternity.
- Use SHOVEL (Z); receive MUSIC NOTE.
- TREBLE CLEF and MUSIC NOTE on MUSIC BOX; take CRYSTAL 2/2.
- Insert CRYSTAL (A); take FLUTE.
- Return to Sepulchre.
- Take SCREWDRIVER (B). Lift; use FLUTE; press keys 1-6; take BAT.
- Insert BAT (C).
- Solution: (D) Ax2-Bx2. Take BAT BLOOD.
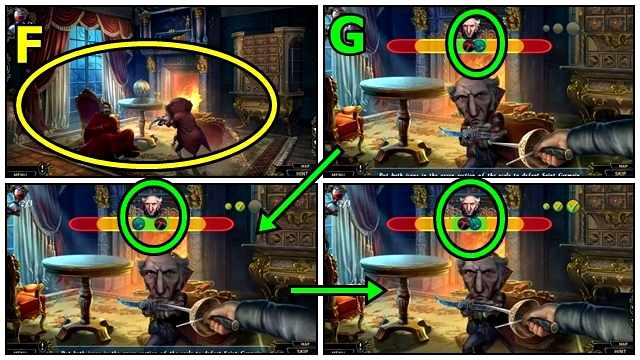
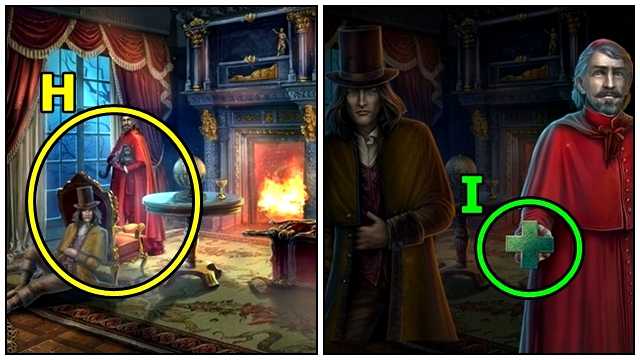
- Talk (E).
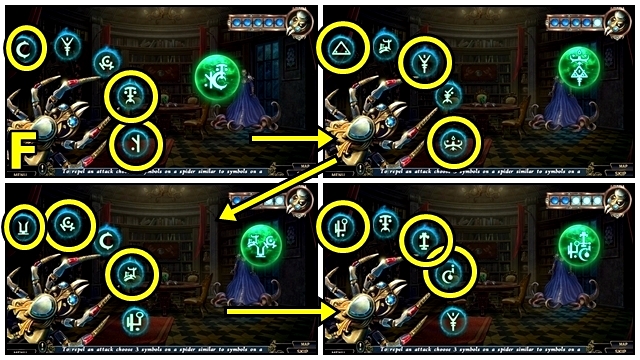
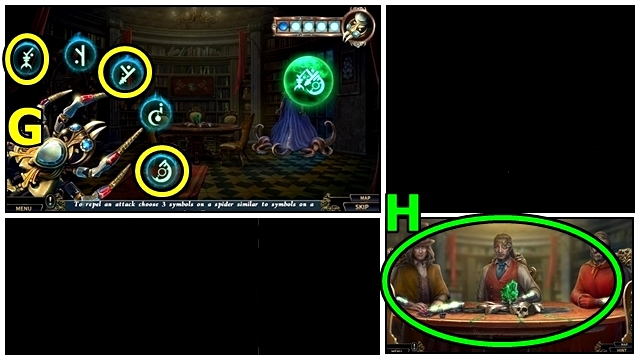
- Take SPIDER (F).
- Insert SPIDER (G).
- Solution: (H) A-Bx2-C. Take SPIDER POISON.
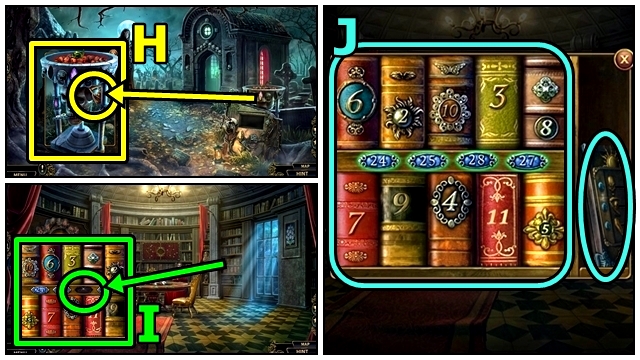
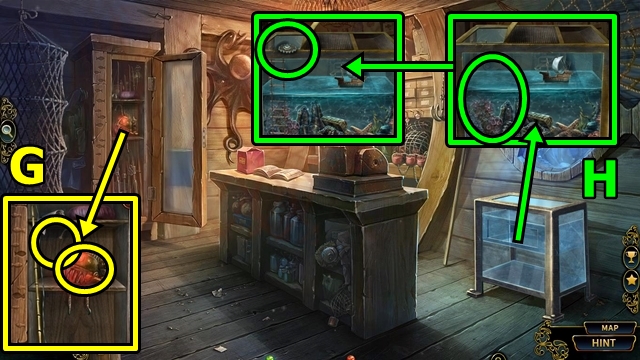
- Take DIPPER (I). Add CEMETERY SECRETS and HEART. Add BAT BLOOD and SPIDER POISON. Take CRYSTAL HEART.
- Return to Cemetery of Eternity.
- Offer CRYSTAL HEART (J).
- Enter Portal.
Chapter 4: Puppet Master

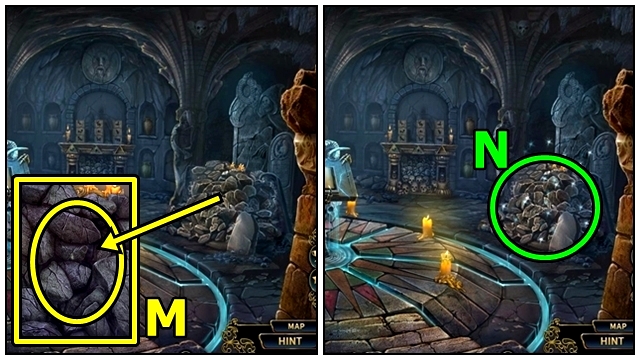
- Examine (K).
- Take HAT (L).
- Take MASK 1/2 (M).
- Examine (N). Take MASK 2/2.
- Take PUZZLE PART 1/2 (O). Insert MASK; open; examine.
- Reassemble (P); take ARM.

- Add ARM (Q) and HAT. Examine.
- Solution: Casual and Hard (R).
- Move forward.
- Talk (S).
- Examine (T). Take CRYSTAL.
- Take KNOB (U). Add CRYSTAL; receive ICE.
- Move down.
- Insert and turn KNOB (V); take CLOWN 1/2. Add ICE; turn knob; take FACE.
- Move forward.
- Take FISH PART (W). Add FACE.
- Solution: (X).
- Take PUZZLE 2/2 (Y) and FISHNET.
- Move down.
- Add PUZZLE PART (Z).

- Solution: (A). Take HOSPITAL KEY.
- Insert HOSPITAL KEY (B).
- Play HOP (C).
- Solution (D); receive WEIGHTS.
- WEIGHTS on FISHNET; take NET.
- Throw NET (E).
- Solution: (F).
- Take KNIFE (G).
- Take BOW (H).
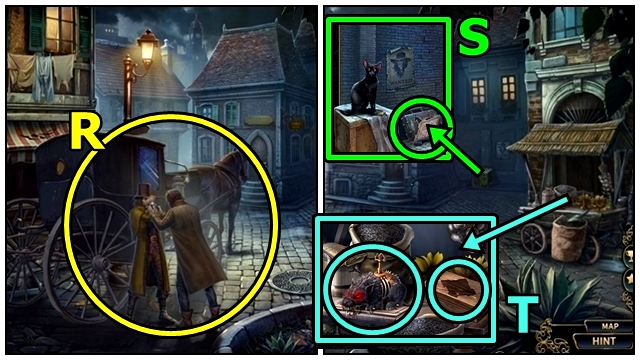
- Return to Town Center.
- Insert BOW (I).
- Solution: (J) puzzle is random, screenshot shows starting position; take note of movement of cards. Rock beats scissors, scissors beats paper, paper beats rock.
- Turn knob (K). Enter.
- Take GEARWHEEL 1/3 (L); insert DIPPER; receive GLUE.
- Take GEARWHEEL 2/3 (M). Add GLUE. Take WINDING KEY.
- Take GRASSHOPPER (N).
- Move down, then move forward.
- Give WINDING KEY (O).

- Solution: (P). Find items.
- Solution: (Q).
- Take SPIDER INSTRUCTIONS (R).
- Examine SPIDER INSTRUCTIONS; take BUTTON.
- Insert BUTTON (S); open; take KEY.
- Use KNIFE (T); take HELMET.
- Move forward.
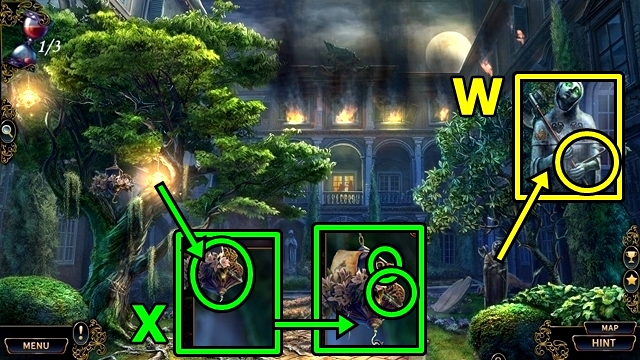
- Take PASSWORD (U). Insert GRASSHOPPER; take PICKAXE.
- Take SKULL (V). Insert TREE; take STARFISH. Add PASSWORD; push 2-5-1-3. Take CLOWN 2/2. Add FISH PART; reassemble. Take DOLL.
- Take GLASS (W). Insert STARFISH. Take HAND.
- Return to Shop.
- Add CLOWN (X); find items; receive DOLL PIECES. Insert and turn KEY; take FUEL.
- Examine DOLL; take FLOWER.
- Add HAND (Y); open; take BULB. Add FLOWER; select matching flowers; take DIVER'S INSTRUCTION.
- Insert SKULL (Z); press skull.
- Solution: (A).
- Solution: (B). Take LADDER.
- Move down.
- Add DOLL PIECES (C).
- Rearrange pieces (D).
- Play HOP (E).
- Solution: (F) (1-B)-(2-C)-(1-C)-(3-B)-(1-A)-(2-B)-(1-B)-(4-C)-(1-C)-(2-A)-(1-A)-(3-C)-(1-B)-(2-C)-(1-C)-(5-B)-(1-A)-(2-B)-(1-B).
- (3-A)-(1-C)-(2-A)-(1-A)-(4-B)-(1-B)-(2-C)-(1-C)-(3-B)-(1-A)-(2-B)-(1-B).
- Receive SPIDER BODY.
- Return to Fishing Hut.
- Add BULB (G); take DIVER'S SUIT.
- DIVER'S INSTRUCTION, HELMET, LADDER and DIVER'S SUIT on DOLL; remove broken glass; add; GLASS. Take DIVER.
- Add DIVER (H); take GEARWHEEL 3/3.
- Return to Shop.
- GEARWHEEL on SPIDER INSTRUCTIONS. Attach gears. Add SPIDER BODY, then add gears. Open panel; add FUEL. Close panel. Take SPIDER.
- Offer SPIDER (I). Receive SPIDER and TIME CRYSTALS.
- TIME CRYSTALS on STAFF OF TIME.
- Solution: (J).
- Enter Portal.
- Talk (K).
- Take MOUSE (L).
- Enter Cemetery Tomb, go left.
- Use PICKAXE (M).
- Play HOP (N); take TIME CRYSTALS 1/3.

- Insert MOUSE (O).
- Solution: (P) Ax2-C. Take TIME CRYSTALS 2/3.
- Return to Cemetery of Eternity.
- Talk (Q).
- Enter Portal.
Chapter 5: Save Dupin
- Examine (R).
- Take BOX PLATE (S).
- Take MOUSE (T). Insert BOX PLATE.
- Solution: (U) move tiles - (A-B)-(C-G)-(D-F)-(B-F).
- Solution: (V) rotate tiles - Ax2-F-Gx2. Take TURTLE PART 1/2.
- Take WHEEL 1/2 (W).
- Take WHEEL 2/2 (X), then LIST.

- WHEEL on MOUSE.
- Use MOUSE (Y); take TURTLE PART 2/2.
- Add TURTLE PART (Z).
- Solution: (A) This puzzle is random; screenshot shows one possible solution.
- Play HOP (B).
- Solution (C); take MONSTER.
- Solution: (D).
- Take MONSTER (E); take MAP.
- Use MAP (F). Play HOP.
- Solution: (G-H).
- Solution: (I).
- Solution: (J).
- Take MATCHES (K).
- Take CODE (L). Use MATCHES. Take HORSE 1/2.
- Take DEER 1/2 (M). Add CODE; press bricks in order shown. Take WATER TOKEN.
- Take HORSE 2/2 (N).
- Move down.
- Add HORSE (O); open; take HORN.
- Move forward.
- Add HORN (P); receive RAVEN.
- Add RAVEN (Q); open. Take DECORATIVE DISK. Find items; take SPROUT TOKEN.
- Add CLOUD TOKEN (R), WATER TOKEN and SPROUT TOKEN.
- Press symbols (S).
- Press symbols (T); take KEY 1/2.
- Move down.
- Insert DECORATIVE DISK (U); take SUN.
- Move forward.
- Insert SUN (V); open; take MONSTER.
- Move down.
- Give MONSTER (W); play HOP; take arrow; spin; take KEY 2/2.
- Move forward.
- Examine (X); add KEY.
- Solution: (Y) Move gears to match screenshot; press highlighted button.
- Solution: (Z).
- Solution: (A).
- Solution: (B).
- Solution: (C).
- Move forward.
- Take DEER 2/2 (D).
- Take PAW 1/2 (E).
- Take FLOWER (F) and LOCK PART 1/2. Insert DEER; take PAW 2/2.
- Take SPIDERWEB (G). Insert PAW.
- Solution: (H) E-A-B-C-D-E-B-C-E. Take BULLET 1/2.
- Move down.
- Insert FLOWER (I); take BULLET 2/2.
- Enter Mansion.
- Insert BULLET (J). Rearrange bullets.
- Play HOP (K); take LOCK PART 2/2.
- Add LOCK PART (L); arrange tiles.
- Move forward.
- Take LION (M).
- Move down.
- Insert LION (N); take CANE.
- Move forward.
- Use CANE (O).
- Take BEAD (P).
- Examine (Q).
- Play HOP; take FIGURE.
- Use SCREWDRIVER (R); add BEAD.
- Solution: (S) C-Ax2-Dx2-Ex3-Cx2-Bx5-Dx2-Ex2-Cx2-Ax7-Dx2-Ex7-Cx2-Bx2-Dx2-Ex5.
- Cx2-Bx8-Dx2-Ex2-Cx2-Bx5-Dx2-Fx8-Cx2-Ax3-Dx2-Ex10-Cx2.
- Ax2-Dx2-Fx2-Cx2-B-Dx2-Ex4-Cx2-Bx2-Dx2-Ex6-C. Take PRISONER 1/2.
- Take CAGE KEY 1/2 (T). Insert SPIDERWEB; open; take HOURGLASS. Use OILER; insert FIGURE. Take FEATHER.
- Move down.
- Add FEATHER (U); take PRISONER 2/2.
- Add HOURGLASS (V); examine.
- Solution: (W) D-C-B-F-G-C-B-A-E-F-G-K-J-I-E-F-G-C-B-F-G-H-D-C-G-K-L-H-G.
- C-D-H-L-P-O-K-J-N-O-K-L-H-D-C-G-K-L-H-G-C-D. Take CAGE KEY 2/2.
- Move forward.
- Insert PRISONER (X); open; talk. Use CAGE KEY.
- Talk (Y).
- Take TIME CRYSTALS 3/3 (Z).
- TIME CRYSTALS on STAFF OF TIME.
- Solution: (A).
- Solution: (B).
- Enter Portal.
- Talk (C).
- Talk (D).
- Use SPIDER (E).
- Solution: (F).
- Solution: (G).
- Talk (H).
- Congratulations! You've completed Worlds Align: Beginning.
Created at: 2019-11-02