

WALKTHROUGH MENU
- GENERAL TIPS
- SAILOR BOB’S BEDROOM
- J. DEAN’S GAME ROOM
- SANDY’S BEACH VERANDA
- R. MASTER’S NURSERY
- MISS KITTY’S DINING ROOM
- M.T. GRAVE’S UN-LIVING ROOM
- SIR LOIN’S HEROIC DEN
- T. HUGGER’S TREEHOUSE
GENERAL TIPS
- Yard Sale Hidden Treasures: Lucky Junction is a Hidden Object game, and has two modes of play. You can choose between Career mode and Lucky Junction Tour. Lucky Junction Tour is unlocked upon completing the Career mode.
- When starting in Career mode, you have the option of playing the game in either Relaxed or Timed mode. This walkthrough was compiled through playing the game on Relaxed mode. Keep in mind that playing the game on Timed mode will grade you on speed during certain sections of the game.
- When you begin each level, you will be given a list of items to find, as well as criteria from clients to be met in order to improve their rooms. To complete the criteria, you’ll need to find certain objects on the list and repurpose other items for use.
- For each customer, you’ll need to visit yard sales in the surrounding neighborhood to find items for use in their homes. Keep in mind that only a few yard sales will be available to you per level.
- If you get stuck, try using a hint to locate an object for you. Extra hints can be found throughout the game disguised as stars.
- If you’re having trouble seeing, you can make use of the magnifier located on the left side of the screen above your object list.
- As you play the game, more items will appear on your list as you find others. Please note that some items noted in the walkthrough may not be on your list when you begin a level.
SAILOR BOB’S BEDROOM
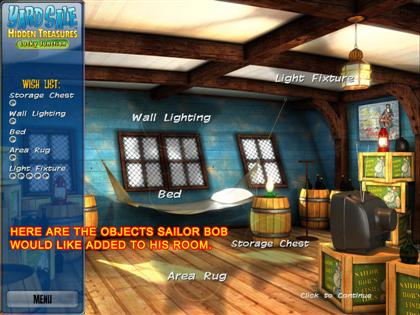
- The above screenshot shows the parts of Sailor Bob’s bedroom he’d like improved.
- Start by visiting Rick Hoffen’s yard sale.
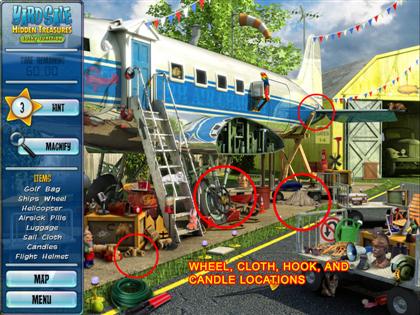
- Click on the ship’s wheel hidden near the landing gear of the plane, as well as the pirate’s hook located towards the rear of the plane body, for use later at Sailor Bob’s.
- Also pick up the sail cloth hidden beneath the luggage carts and the candles to left of the stairs.

- Next, visit Robort’s house. Here you’ll need to find a set of tools for Rick Hoffen. The tools will be silhouetted on your list.
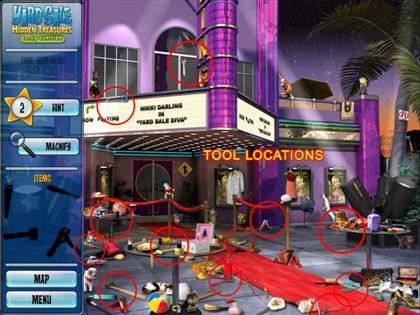
- Now go visit Nikki Darling’s yard sale.
- As you did at Robort’s house, find all of Rick Hoffen’s tools.
- Once you’ve found all of Rick’s tools, he’ll give you another item for use in Sailor Bob’s bedroom.
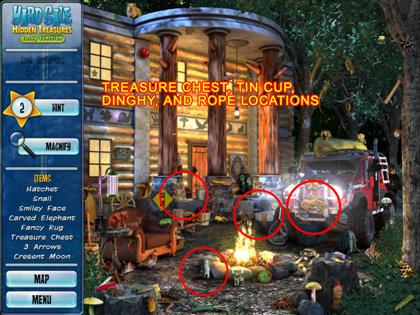
- Visit Grizzly Jones next.
- Pick up the piece of rope sitting on the front of the truck, and the dinghy sitting just to the left of the truck.
- Grab the tin cups sitting near the fire, as well as the treasure chest hidden near the cabin door.

- Next up is your first restoration activity. After finding all the objects needed to complete a client’s request, you’ll play a mini-game to put them together into a new piece for their home.
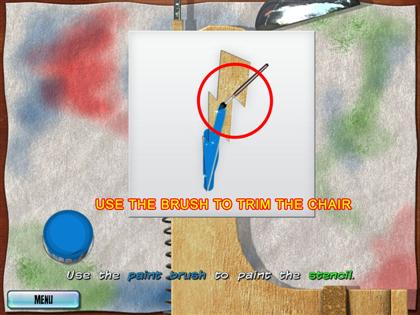
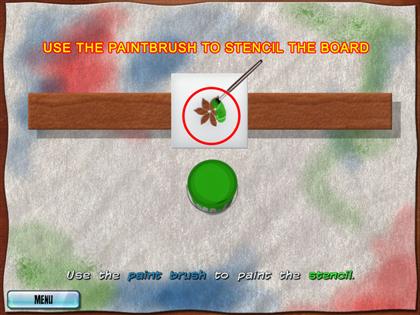
- First, you’ll need to sand the ship’s wheel.
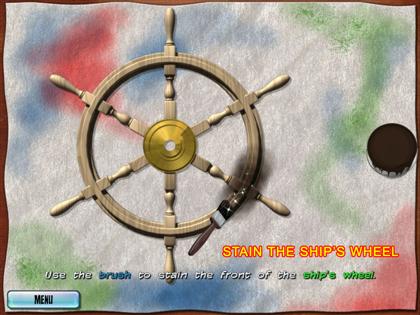
- Then, you’ll need to stain the ship’s wheel. When your brush goes dry, refill it by clicking on the can of stain to the right of the wheel. After that, use the rag to remove the excess stain. Repeat both steps on the other side of the wheel.
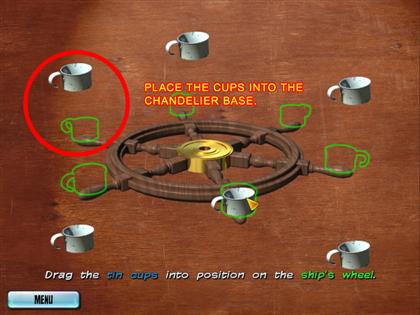
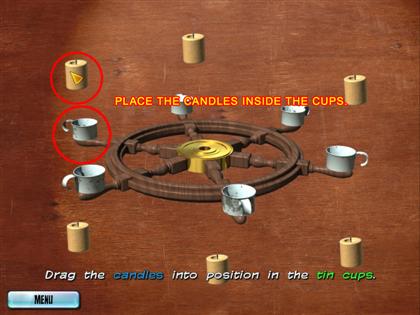
- Now, attach the tin cups to the ship’s wheel, and then place a candle inside each cup.
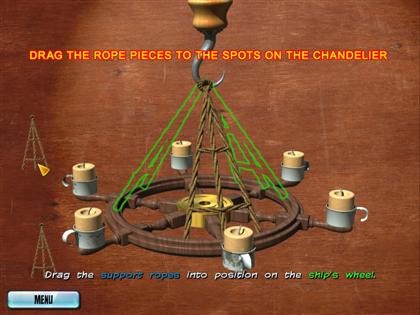
- After that, attach the chandelier to the hook with the rope.
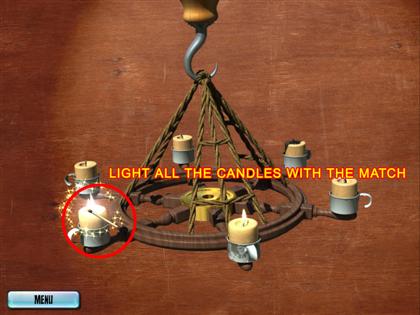
- Use the match to light all of the candles.
- Finally, place all the objects you collected for Sailor Bob in their proper places in his bedroom.
J. DEAN’S GAME ROOM
- For J. Dean’s wish list, let’s start at S. Keymo’s yard sale.
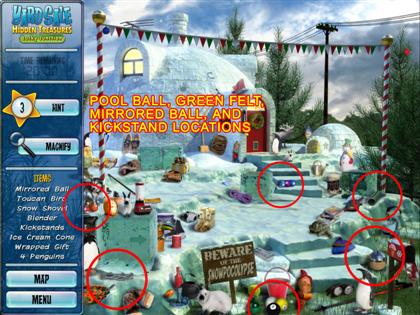
- Pick up the mirrored ball near the mailbox, and the motorcycle kickstands sitting near the bottom left corner of the screen.
- Take the green felt, placed near the candy-striped pole on the right side of the screen, and the three sets of pool balls scattered about.
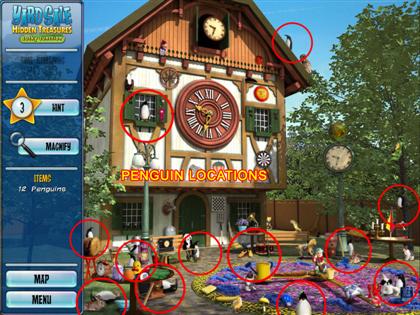
- Next, go visit Father Time.
- Find all the penguins running amok.
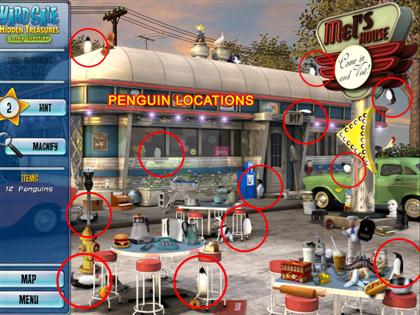
- Then, go visit Mel Cook and find all the penguins there.
- Once you’ve found all the penguins, S. Keymo will give you an item for use in J. Dean’s room.
- Following that, go take a look through Faye Rowe’s yard sale.
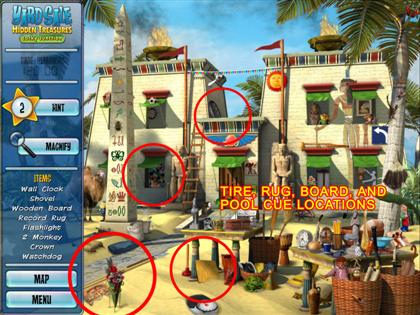
- Take the wooden board sitting beneath the table in the middle, and the pool cues sitting on the walkway.
- Also grab the record rug sitting in the window, on the bottom floor to the left of the door, as well as the motorcycle tire sitting above the door.
- Up next, go browse Mother Goose’s yard sale.
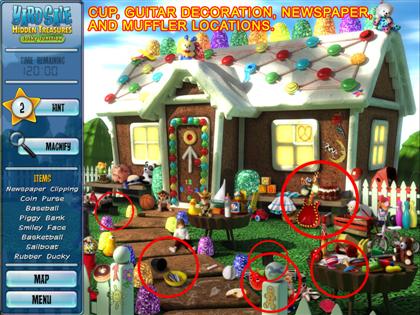
- Pick up the newspaper clipping hidden on the chocolate table to the right.
- Take the guitar decoration sitting near the bench to the right of the front door, the exhaust pipe hidden towards the bottom of the screen, and the plastic cups scattered about the lawn.
- Now it’s time to build the pool ball clock for J. Dean.
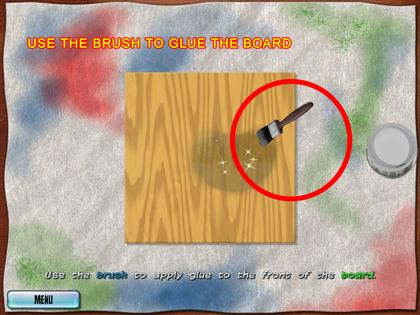
- First, coat the wooden board with glue, and then drag the felt onto it.
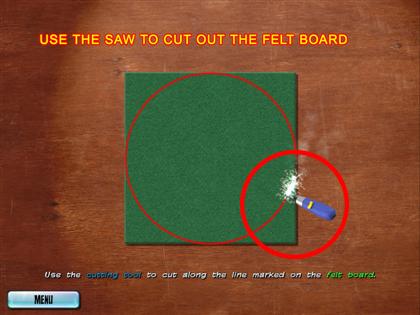
- Cut the board along the red line, and then do the same on the pool cues.
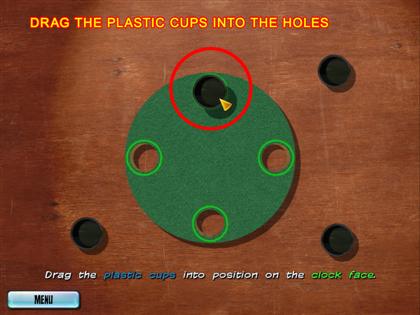

- Next, drag the plastic cups into the holes you cut in the board, and then drag the pool balls and cue tips onto the clock face.
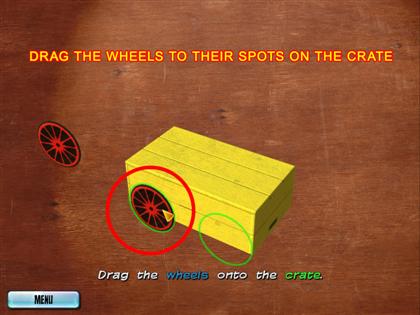
- After that, it’s time to build the motorcycle table.
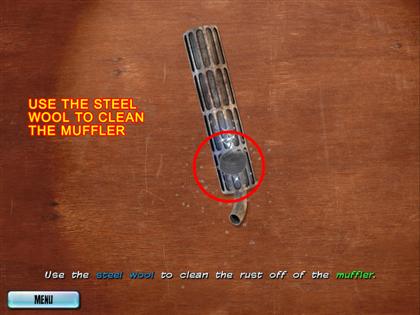
- Start by using the steel wool to clean off the muffler.
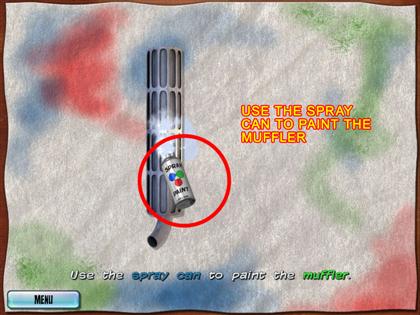
- Use the spray can to paint the newly cleaned muffler.
- Then, use the cleaning rag to clean the glass table top.
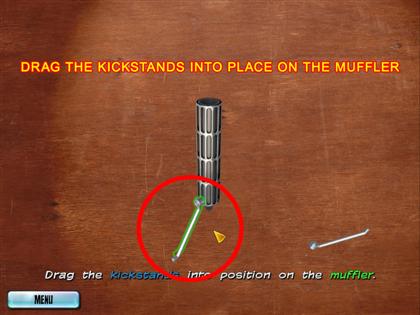
- Now drag the kickstands to their places on the muffler, and use the torch to weld them in place on the red lines.
- Finally, drag the wheel and glass top to the top of the table stand.
- Once that’s done, place all of J. Dean’s objects in his room to complete the task.
SANDY’S BEACH VERANDA
- Next on the list is Sandy’s Beach Veranda.
- Start by heading over to Father Time’s house.
- Pick up the three colorful fish scattered around the area, as well as the two carved tiki.
- Take the wooden gear sitting below the table on the left, and the old photograph hidden on the streetlight.
- Find the rest of the objects on your list.
- When you’re finished, head over to Mel Cook’s joint.
- Take the wicker chair situated towards the middle of the screen, and the beach towel sitting below the table on the left.
- Pick up the bamboo pole hidden near the roof of the diner in addition to the finial sitting on the table to the right.
- Go visit Trish Thrasher.
- Here you’ll need to find 10 hidden cook books for Mel Cook.
- Repeat the same process at Rick Hoffen and Grizzly Jones’ house.
- Once you’ve found all the cook books, Mel Cook will give you an item for use in Sandy’s room.
- Next up, go searching for items at Nikki Darling’s house.

- Locate the second wicker chair beneath the marquee, and the surfboard sitting on the red carpet.
- Pick up the five hand fans scattered about the scene.
- Now it’s time to restore the ceiling fan.
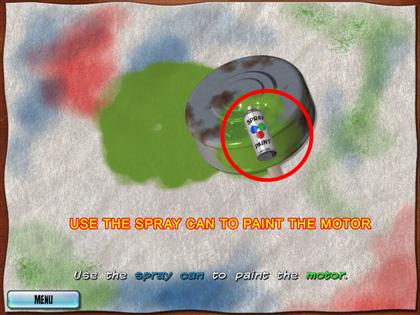
- Start by painting the motor with the spray can.
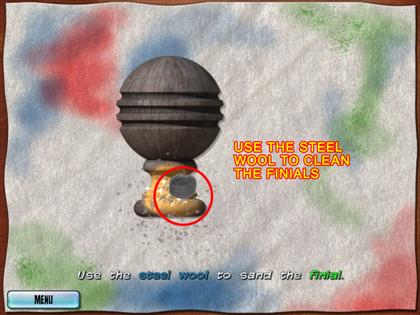
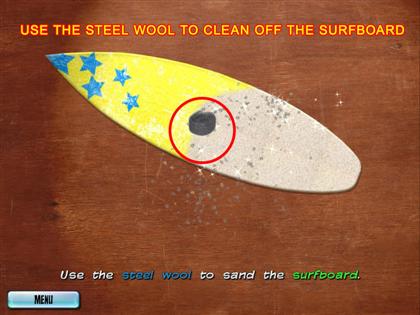
- Take the steel wool to sand the finial, and then stain it.
- Then, use the rag to remove the excess stain.
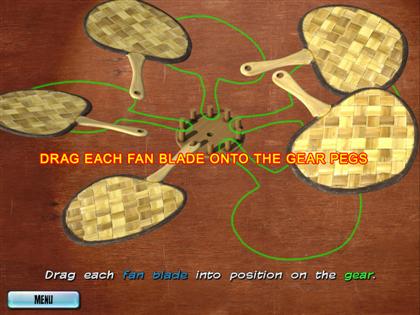
- Next, attach the fan blades to the gear. After that, connect the rest of the various pieces together to finish the fan.
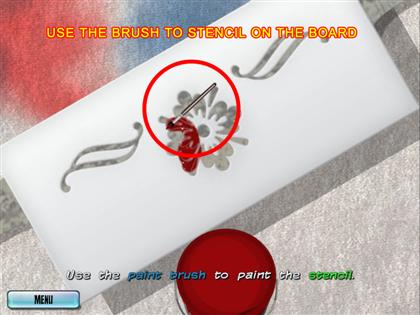
- Now you’ll prepare the surfboard table.
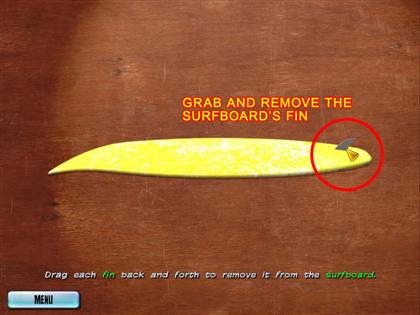
- Start by removing the fins from the surfboard, and then sand both sides of the board.
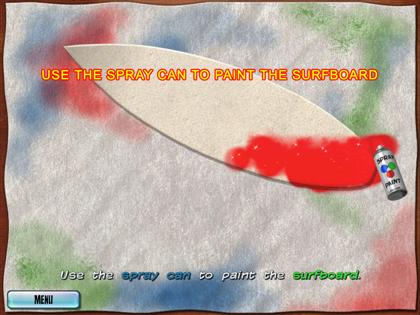
- Using the spray can, paint both sides of the board.

- Take the stencils and brush to detail the surfboard, and then coat the board with the spray can.
- Finally, arrange the objects in Sandy’s room.
R. MASTER’S NURSERY
- Start out by visiting Robort.
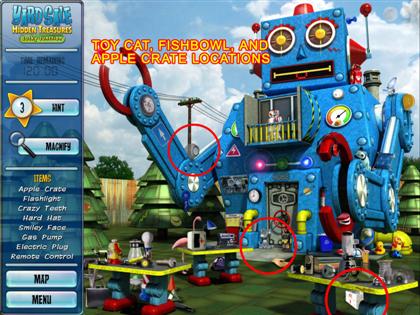
- Grab the apple cart hidden beneath the table on the right, and the fish bowl sitting on the robot’s raised arm.
- Pick up the toy cat sitting near the front door.
- Next up, go to Rick Hoffen’s sale.
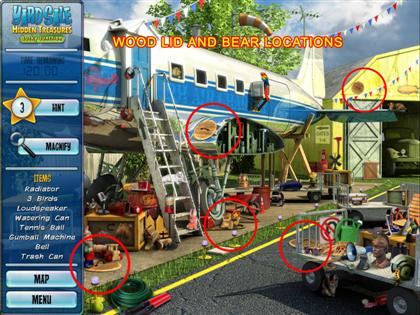
- Take the four barrel lids scattered around the area, and the toy bear sitting at the base of the stairs, to the plane.
- After you’re done there, go and see Trish Thrasher.
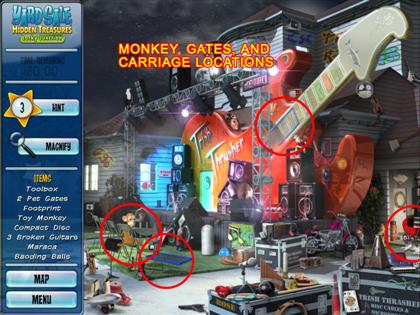
- Locate the toy monkey sitting in the front row, as well as the two pet gates.
- You’ll find the baby carriage near the garage.
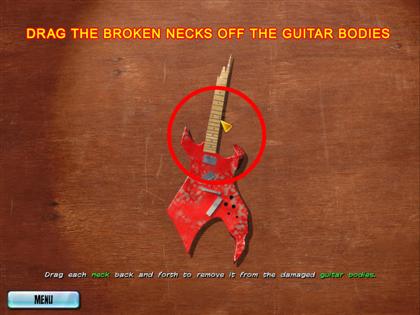
- Now you’ll need to disassemble the broken guitars.
- First take the necks and move them back and forth until you can remove them from the guitar bodies.
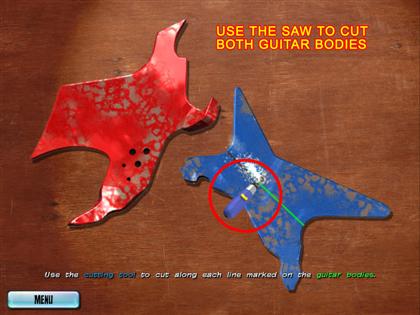
- Now you’ll need to cut the guitar bodies along the green lines.
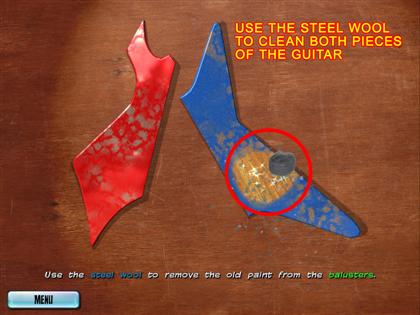
- Then, remove the old paint with the steel wool.
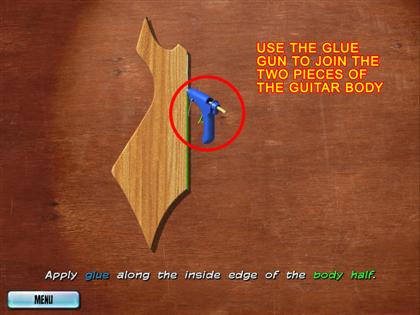
- Once that’s done, take the glue and connect the two pieces of the guitar body.
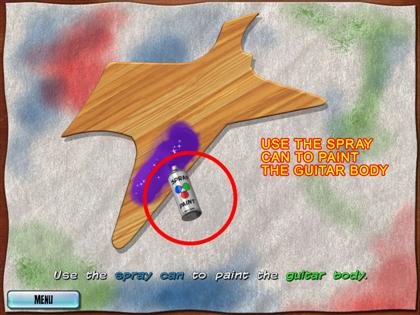
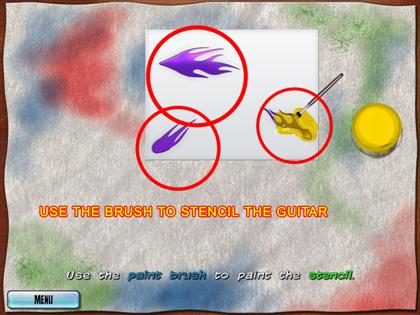
- Next, you’ll need to paint the newly formed guitar body.
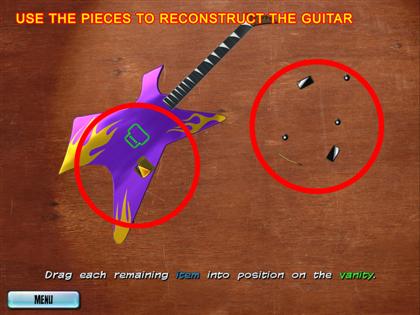
- And finally, reassemble the guitar neck and attach it to the body. Once you’ve fully repaired the guitar, Trish will give you an item for the room you’re working on.
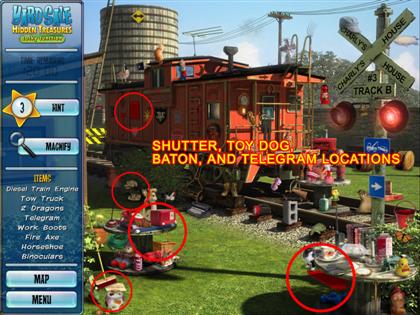
- Last up, go and see Charly Pullman’s wares.
- Take a look at the telegram sitting at the bottom left corner of the screen, and the twirler’s baton resting on the table just above it.
- Pick up the toy dog hidden in the bushes next to the train, along with the two red shutters hidden in the area.
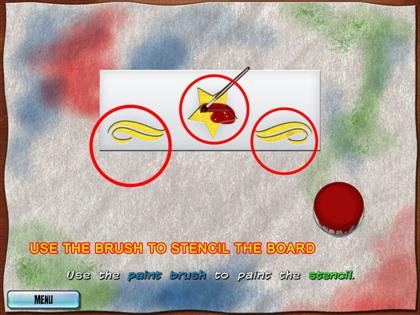
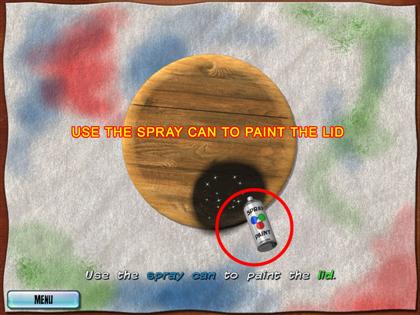
- Now you’ll begin repairing the baby crib. Start by painting the wood crate and stenciling it. Then, paint the lids and stencil them as well.
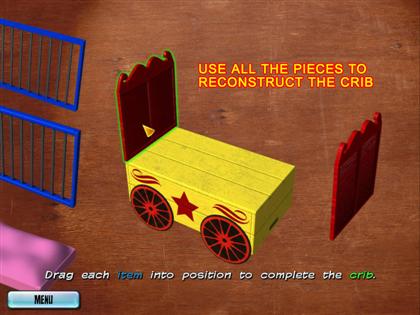
- Following that, begin assembling the crib.
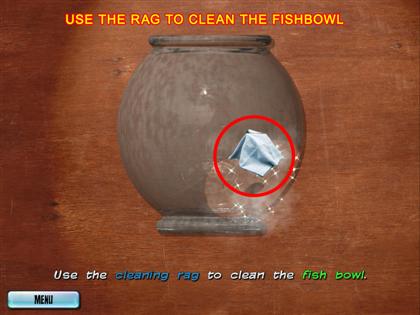
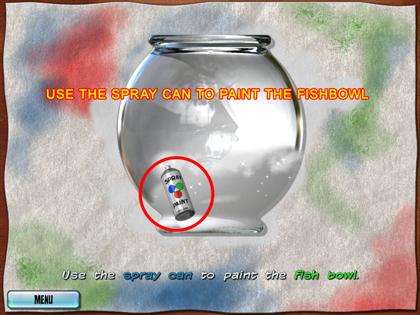
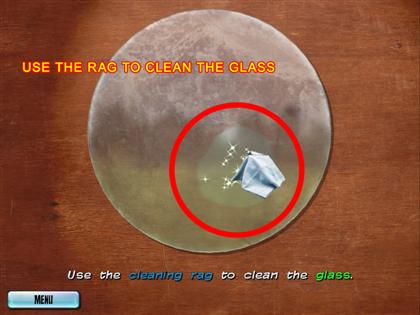
- Next up, you’ll restore the trapeze lamp. Begin by cleaning up the fishbowl with the rag, and then paint it.
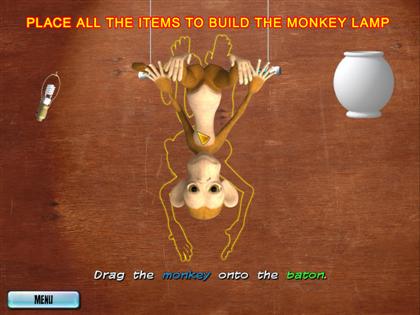
- Then, simply put all the pieces together.
- Finally, arrange all the items in the room.
MISS KITTY’S DINING ROOM
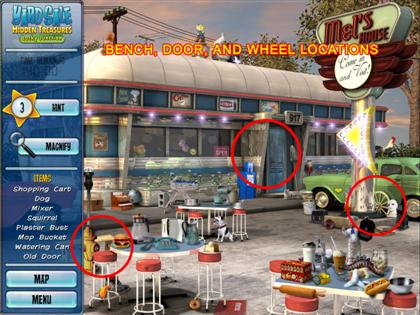
- Go and visit Mel Cook first.
- Take the old door resting on top of the diner’s door, and the wooden bench sitting off to the left side of the screen.
- Also pick up the wagon wheel propped up against the car.
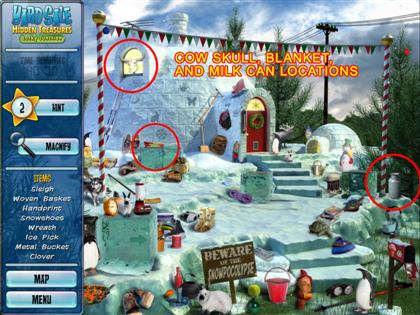
- Once you’re finished there, go and see S. Keymo.
- Grab the cow skull sitting in the igloo’s window, and the folded up blanket resting on top of two ice blocks.
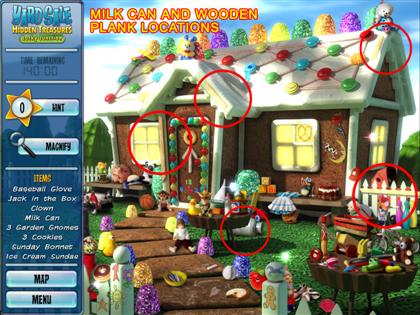
- Also look for the milk can next to the striped pole on the right.
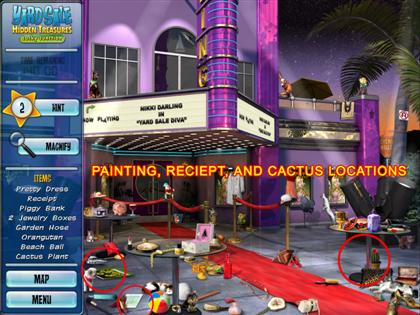
- Next, go see what you can find at Nikki Darling’s yard sale.
- Pick up the receipt sitting below the table near the front of the screen, as well as the cactus sitting beneath the table on the right.
- Also take the damaged painting hidden towards the right side of the screen.
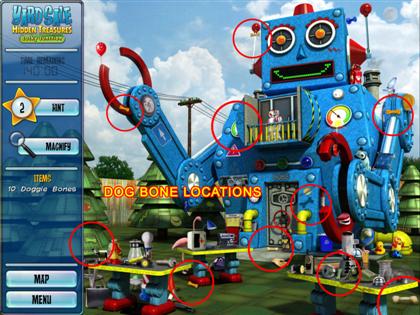
- Now go and visit Robort, Faye Rowe, and Father Time to locate the missing dog bones for Nikki’s puppies. Once you’ve found them all, she’ll give you an item for Miss Kitty’s dining room.
- Lastly, go see Mother Goose.
- Pick up the milk can sitting below the candy table towards the center of the screen, as well as the four wooden planks scattered about.
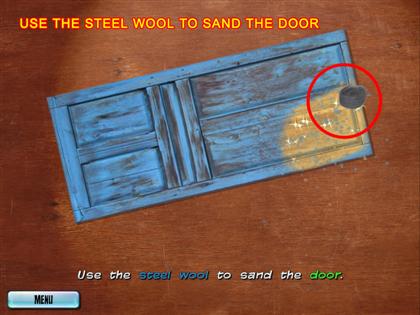
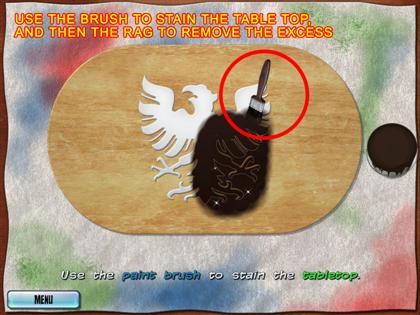
- Time to start restoring the mosaic table; begin by sanding the door.
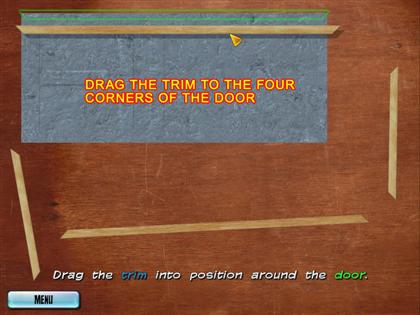
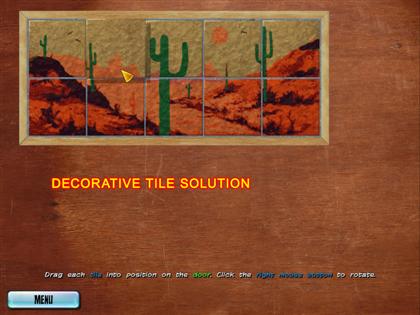
- Next, drag the trim around the door. Then attach the tiles; you can rotate them with the right mouse button.
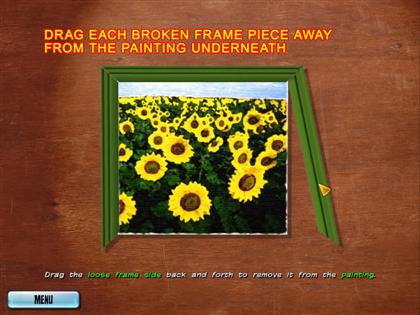
- Following that, you’ll restore the dish cabinet. Start by removing the loose frame sides, and then cutting the painting in half.
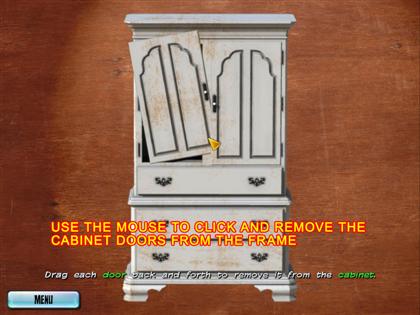

- After that, remove the cabinet doors by rocking them back and forth, and then cut the doors along the lines provided.
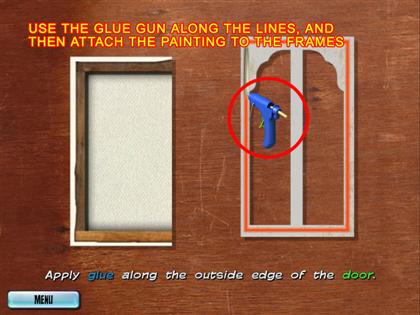
- Apply glue to the border of the cabinet doors to attach the painting pieces.
- Finally, drag the doors into place on the cabinet.
- Now, just rearrange the room.
M.T. GRAVE’S UN-LIVING ROOM
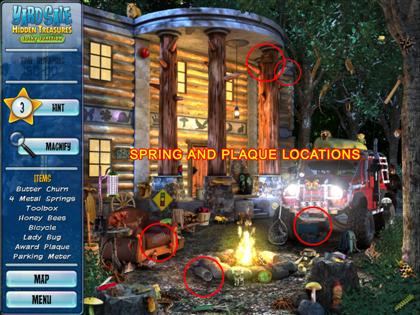
- For this next project, start by visiting Grizzly Jones.
- Grab the four hidden springs, and the award plaque attached to the rightmost wooden column.
- Up next, go see Father Time.
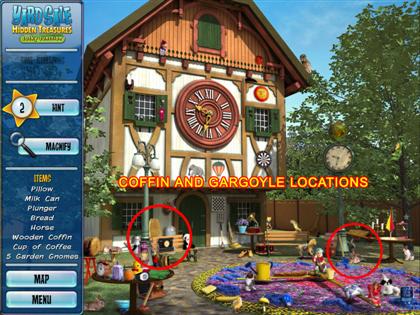
- Pick up the wooden coffin next to the front door, as well as the gargoyle sitting next to the standing clock on the right.
- After you’re done there, check out Charly Pullman’s yard sale.
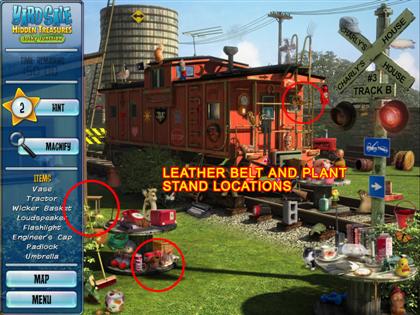
- Grab the two leather belts around the area, as well as the plant stand sitting over to the left side of the screen.
- Following that, go and check out Faye Rowe’s house.
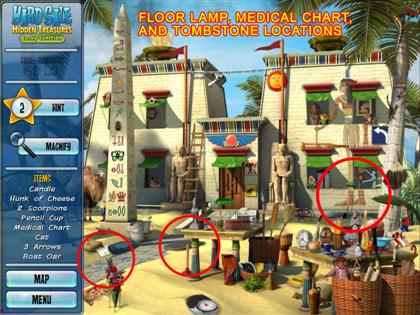
- Grab the medical chart at the bottom left corner of the screen, and then the tombstone sitting beneath the table at the middle of the screen.
- Pick up the floor lamp to the left of the palm tree on the right side of the screen.
- Next up is Robort’s house.
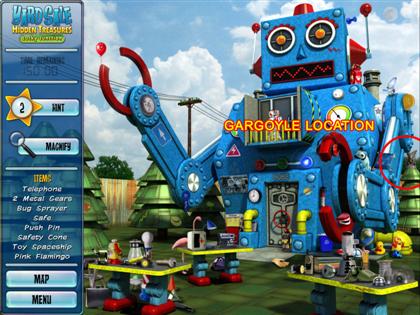
- Pick up the gargoyle sitting behind the robot house to the right.
- After this, you’ll need to visit three other locations to find all the oil for Robort. Once you’ve done this, he’ll give you an item for decorating.
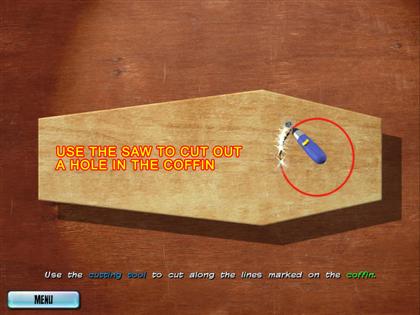
- Now you’ll begin restoring the items for the room, beginning with the coffin clock.
- Cut out the holes in the coffin with the saw.
- Next, grab the top of the table and drag it off, and then do the same with the supports.
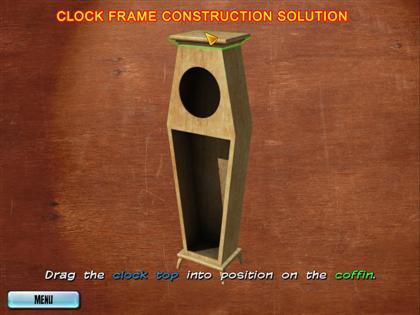
- Now, combine the wooden elements of the clock together.
- After that, you’ll need to stain the wood, and then remove the excess stain.
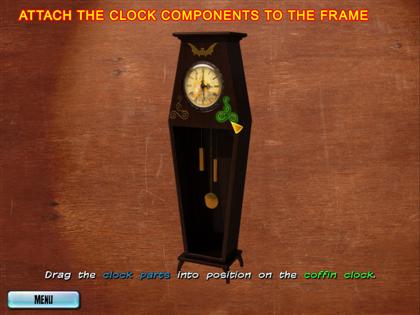
- Finally, connect the clock parts to the frame.

- Next up, you’ll create an electric wing chair for M. T. Graves.
- Begin by cutting out the lined section from the wood.
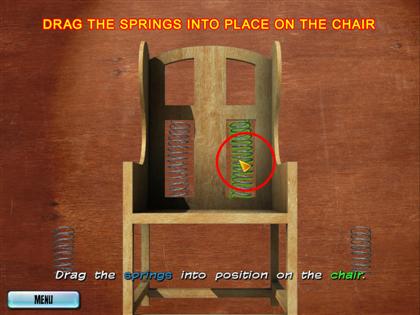
- Now, attach the springs to the back of the chair.
- Following that, spray-paint the lamp.
- Then, drag the wooden slats into place on the chair frame. After that, drag the other chair parts into place.
- After that, you’ll need to stencil the chair.
- All that’s left now is to decorate the room.
SIR LOIN’S HEROIC DEN
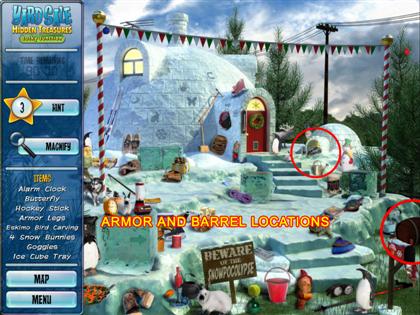
- Start this round off by visiting S. Keymo.
- Grab the armor legs sitting inside the tiny igloo door, and pick up the wooden barrel just above the mailbox.
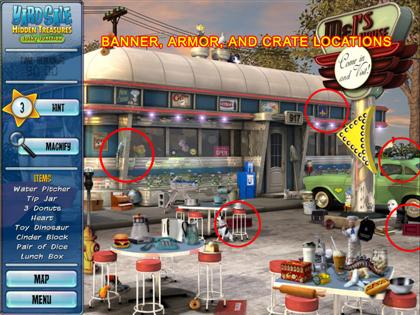
- Once you’re done over at S. Keymo’s, give Mel Cook a visit.
- Locate the banner with the fleur de lis on it just above the front door to the diner, as well as the two red crates.
- Pick up the two armor suit arms; one is on top of the car and the other is near the left corner of the diner.

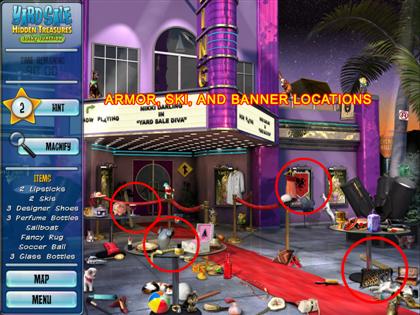
- Head on over to Trish Thrasher’s place next.
- Take the armor helmet near the base of the stage, as well as the hood ornament sitting near the motorcycle.
- Grab the colorful banner hidden up near the top of the large guitar.
- Once you’re finished, take a stroll on over to Nikki Darling’s yard sale.
- Find another colorful banner, draped over one of the movie posters, and the armor torso sitting on the glass table at the front.
- There are also two skis to find in the area.
- Next up, go and visit Mother Goose.
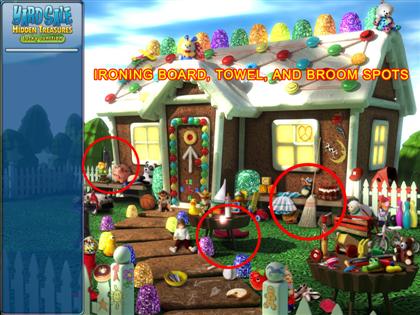
- Grab the bath towel hidden below the candy table at the center of the yard; then, grab the ironing board behind the fence at the back of the house on the left.
- You’ll find a broom sitting up against the wall of the house on the right.
- After you finish finding the rest of the items here, you’ll then have to visit three locations to find all of Mother Goose’s eggs. Doing so will get you another item to decorate Sir Loin’s home with.
- Now that you’re on to the restoration phase, you’ll begin with Sir Loin’s kingly desk.
- Start by stenciling the table with stain; then, remove the excess stain.
- After that, cut the barrel along the lines provided.

- Next, remove the broom head, and affix the three banners to the broomstick.
- Once that’s done, simply assemble the desk.
- Your next restoration is a chair for Sir Loin.
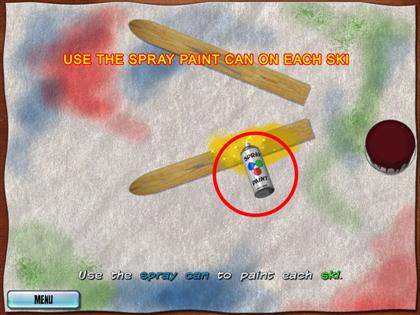
- Start by painting the wooden skis, and then stencil them.
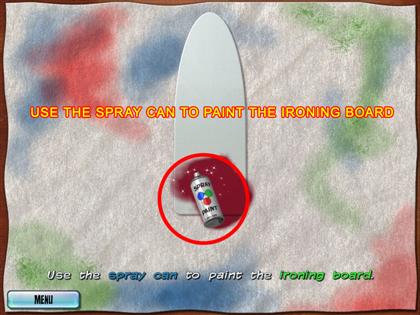
- Now, paint the ironing board, and stencil it too.
- Once it’s all painted, put the chair together.
- Finally, decorate Sir Loin’s room.
T. HUGGER’S TREEHOUSE
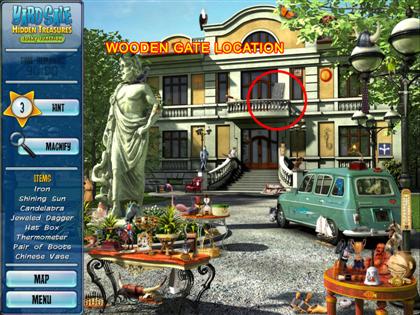
- Head over to Ebenezer’s house first.
- Take the wooden gate from the middle porch of the building.
- Once you’ve finished here, go and visit Nikki Darling, Mel Cook, S. Keymo, and Charly Pullman to find teddy bears for Ebenezer. Doing so will get you another item for use later in T. Hugger’s room.
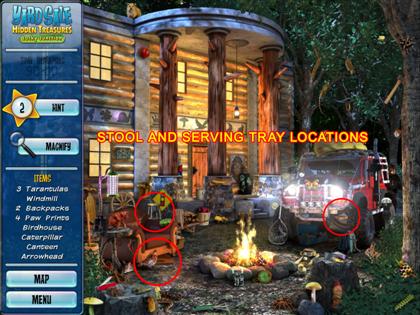
- Next up, go and visit Grizzly’s yard sale.
- Take the wooden stool near the left side column, as well as the two serving trays. One is under the couch on the left, and the other is under the truck on the right.
- Now go and see Rick Hoffen.
- Following that, go and see Trish Thrasher.
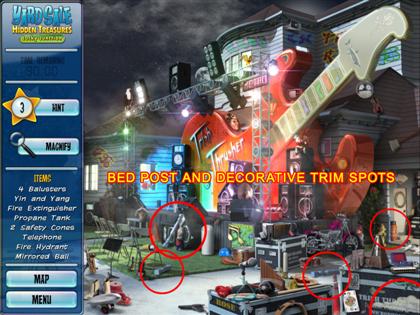
- Locate the four blue balusters scattered around the yard, and then the decorative trim at the bottom right corner of the screen.
- After you’ve finished up at Trish’s place, head on over to Faye Rowe’s next.
- Pick up the headboard resting against the tree on the right, as well as the broken piece leaning up against the pharaoh statue to the left of the front door.

- Once you’ve cleaned out Faye’s sale, go see Robort.
- Take the thermometer from the robot’s raised arm, as well as the broken arm chair behind the table on the left.
- Also, make sure to grab the four bed posts lying about.
- Now on to the restoration phase. You’ll begin by restoring the plant cart.
- First, stencil the sides of the tray.

- After that, take the wheels off the bike, as well as the office chair.
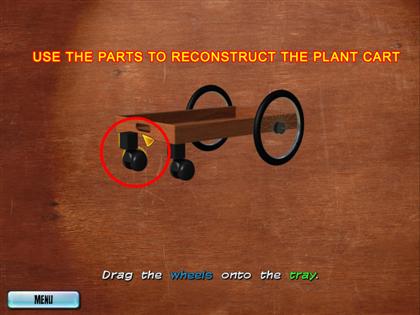
- Once that’s done, put the plant cart together.
- Next up, restore the potting bench.
- Begin by painting the trim and the headboard.
- Then, drag the legs onto the gate, as well as the headboard and trim.
- Finally, finish decorating T. Hugger’s greenhouse.
Created at: 2009-05-15