

Walkthrough Menu
- General Tips & Information
- July 27th
- July 28th
- July 29th
- July 30th - 31st
- August 1st
- August 2nd
- August 3rd
- August 4th
General Tips & Information
- This game may be played in full screen or windowed mode.
- There is a brief tutorial at the beginning of the game to explain how to play.
- This game is not timed and there are no penalties for missed clicks.
- Hints are unlimited, but you must wait for the hint to refill.
- To use a hint, click on the magic ring.
- During game play an eye icon or sparkles indicates that you can look or take action.
- A blue arrow indicates movement is possible in that direction.
- Selecting the target button will show your current task.
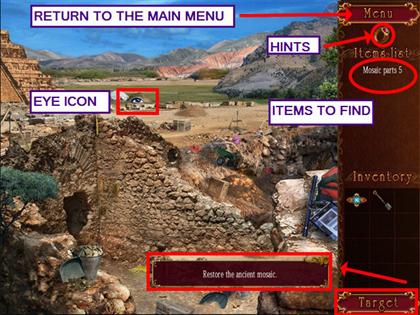
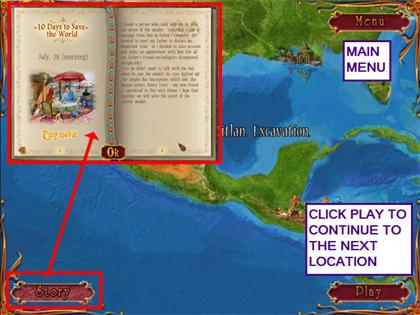
- From the map screen you can access the main menu.
- Click on play to advance to the next location.
- Select the story button to read the journal and replay the movies.
- You may also access the journal from the main menu.
- The Map screen is only accessible when changing locations.
July 27th
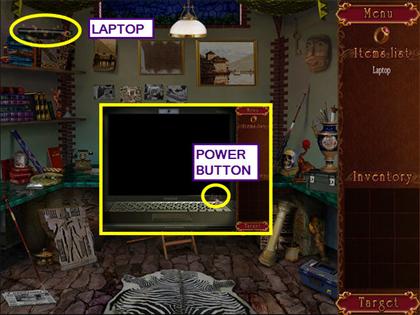
- Find the laptop on the upper left shelf.
- Click on the laptop for a close-up view.
- Press the power button to discover that the battery has been drained.
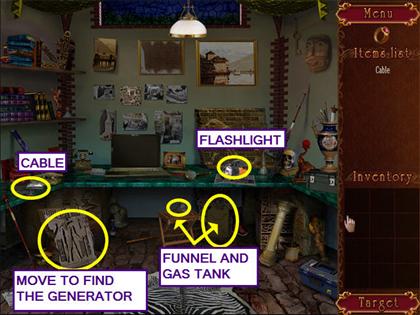
- Take the cable from the left side of the desk. It will go automatically into your inventory.
- Use the cable on the laptop.
- Click on the laptop and the power shorts out.
- Take the flashlight.
- Move the engraved panel on the bottom left to find the generator.
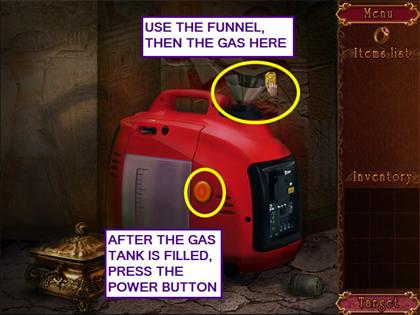
- Click on the generator for a close-up view.
- Take the funnel and the gas can.
- Click on the generator for a close-up view.
- Use the funnel on the gas cap.
- Use the gas can on the funnel.
- Press the power button.
- Look at the laptop and discover that a password is needed.
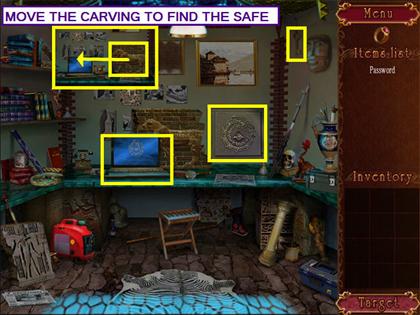
- Move the carved stone to the left and locate the safe.
- Click on the safe to find that a key is required.
- Take the key from the wall.
- Use the key on the safe.
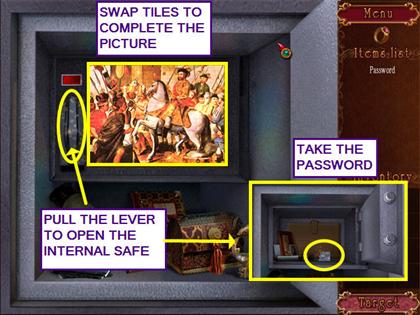
- Inside the safe is a picture puzzle.
- Click on two tiles to swap them and complete the picture.
- Pull the lever to open the internal safe.
- Take the password.
- Look at the laptop.
- Use the plus keys to enter the password.
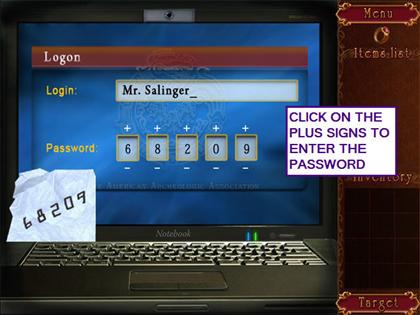
- An instant message arrives from Henry Frost.
- Click OK to acknowledge the message.
July 28th
- From the map screen, select 'Play' to travel to the next location.
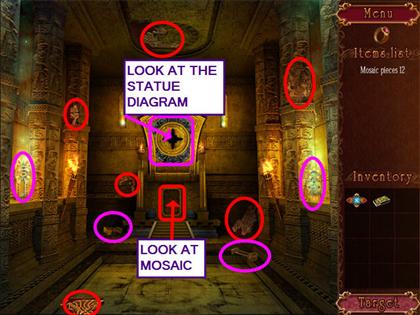
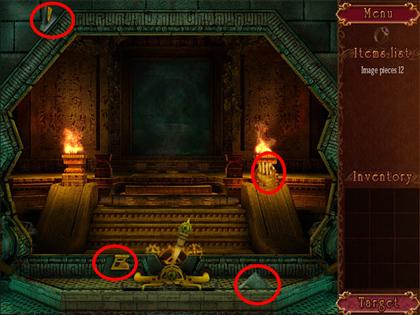
- Look at the stone idols to discover each is missing a piece.
- Walk up the steps to the next area.
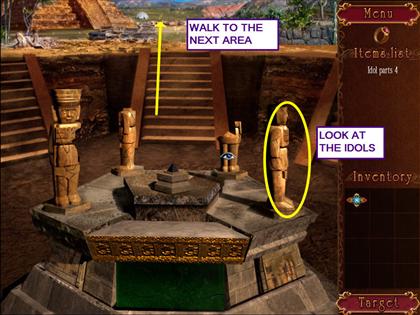
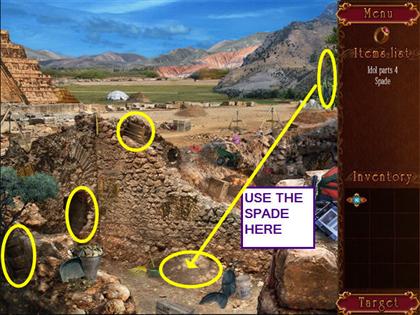
- Take the spade.
- Use the spade on the dirt pile.
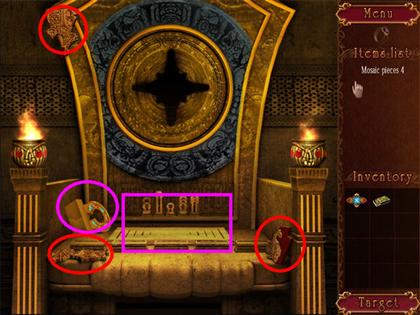
- Locate the four statue pieces.
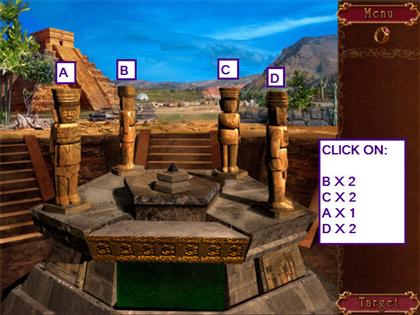
- Return to the stone idols.
- Replace the four missing pieces on the stone idols.
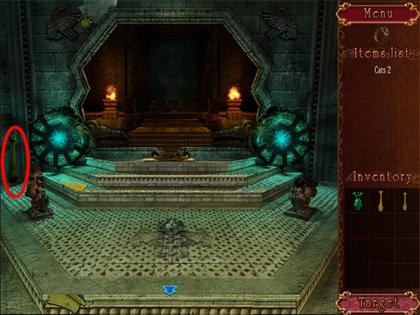
- After the pedestal rises, you have to turn the stone idols so they all are sending light to the center stone.
- From left to right, letter the statues A-D and click in the following order:Bx2 Cx2 Ax1 Dx2
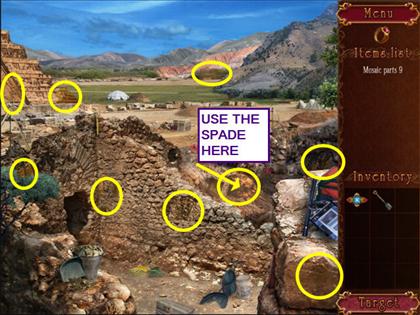
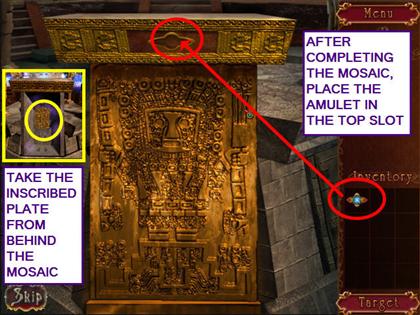
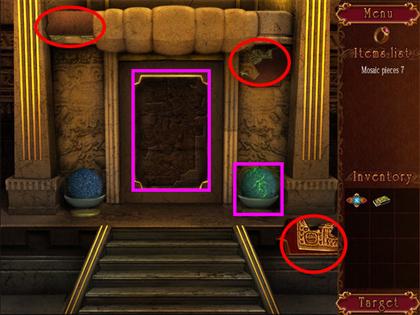
- Look at the green slab that rose from the pedestal to learn you need to find the missing mosaic pieces.
- Walk up the steps to the next area.
- Use the shovel on the dirt piles.
- Locate all the mosaic pieces.
- Return to the mosaic.
- Place the pieces on the mosaic to open the mini-game.
- Place the mosaic pieces into the grid to complete the picture.
- Place the amulet in the upper slot.
- Collect the items on the list.
- Click on the bureau for a closer look.
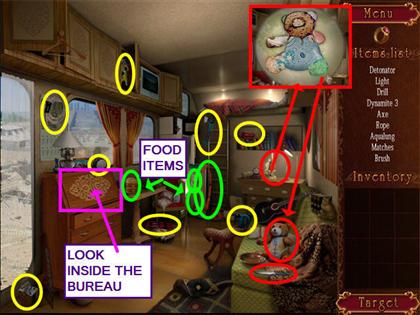
- Open the desk area and take the matches.
- The drawer is locked.
- Exit the close-up and look at the microscope.
- Look at the teddy bear. There is something inside the bear.
- Take the knife and use it on the teddy bear.
- Take the key.
- Return to the close-up of the bureau and use the key on the drawer.
- Take the brush and the dynamite.

- Locate the four food items.
July 29th
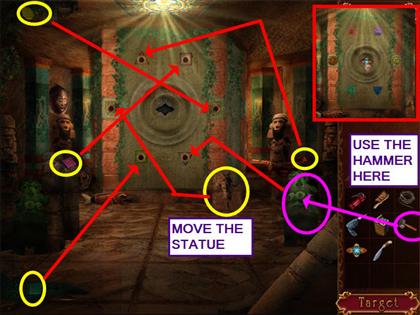
- Use the knife four times on the center growth and once on the left, to remove the plants.
- Use the hammer on the right statue.
- Take the key from inside the broken statue.
- Move the statue near the right bottom of the door and take the key.
- Locate the remaining four keys.
- Place the keys in the color corresponding hole on the door.
- Look at the center hole of the door.
- Use the brush to clear away the dust.
- Place the amulet in the center hole.
- The door mechanism breaks and you must blow up the door.
- Use the drill on the door to make holes for the dynamite.
- Place the dynamite in the holes.
- Place the detonator on the floor.
- Use the cord on the dynamite.
- Click on the detonator to blow up the door.
- Walk forward through the hole in the door.
- Take the pitcher with oil and use it on the wall lamps.
- Use the matches to light the wall lamps.
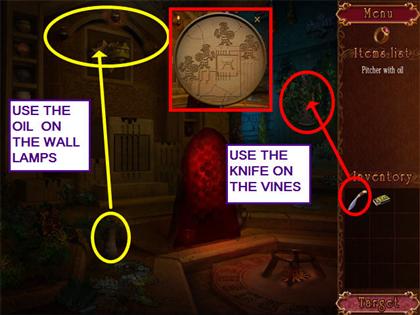
- Use the knife to cut away the vines from the wall carving.
- Look at the carving and make note of the statues.
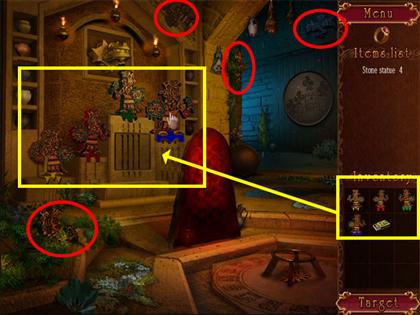
- Locate the four stone statues.
- Place them on the pedestals from left to right: yellow, red, green, and blue.
- Look at the new opening on the pedestal to learn how to perform the rite.
- Collect the items on the list.
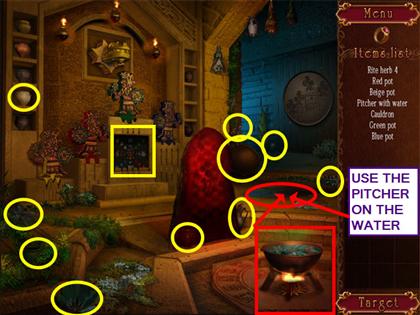
- Use the pitcher on the water.
- Place the cauldron on the stand.
- Use the matches to light the fire under the cauldron.
- Pour the water into the cauldron.
- Put the four herbs and then the four pots into the cauldron.
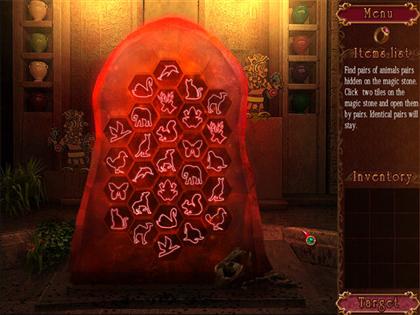
- Click on the center red stone to activate a mini-game.
- The object of this Memory style mini-game is to find animal pairs.
- Click on two tiles to view the animals. Matches will stay revealed.
- From the map, click play to travel to the next location.
July 30th - 31st
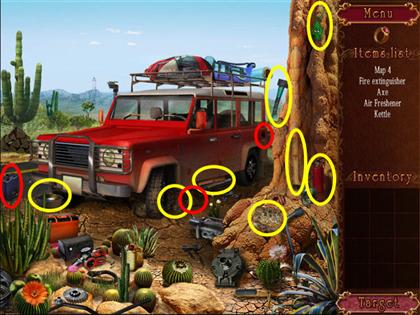
- Locate the items needed to repair the truck from the items list.
- Take the air pump and use it on the tire.
- Try to take the backpacks, but there are too many bugs.
- Click on the beehive, but there are too many bees.
- Take the logs and the water.
- Place the logs under the beehive.
- Use the matches to light the logs.
- Pour the water on the fire to make smoke.
- Wait for the bees to leave.
- Use the beehive on the ants covering the backpacks.
- Take the backpacks.
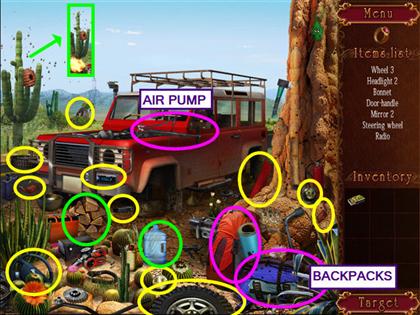
- Locate the hidden objects from the item list.
- Click on the truck to start it, but it needs fuel.
- Locate the funnel and the gas can.
- Place the funnel in the gas tank and pour in the gas.
- Click on the truck again, but there is still something wrong.
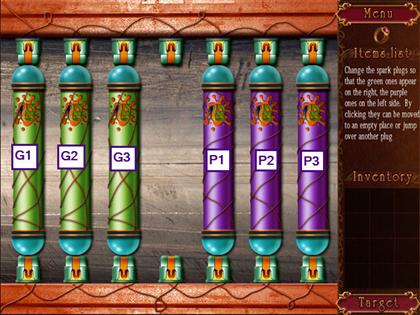
- In this mini-game, the object is to swap the places of the spark plugs.
- Numbering the spark plugs from left to right, the green ones will be G1, G2, G3, and the purple ones will be P1, P2, P3.
- Click on the following spark plugs: G3, P1, G3, P2, G3, P3, G1, P3, P2, G2, P1, G1, P1, G1, P2, G2, P3, G2, P3, G1, P2, P3, and G1.
August 1st
- Click play from the map to continue to the next location.
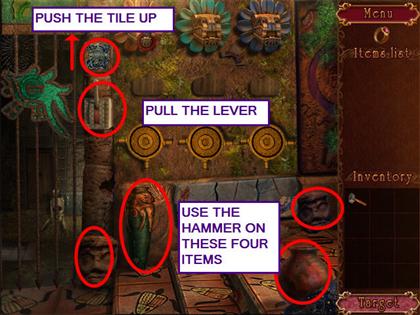
- Use the hammer on the four pottery items on the floor.
- Push up the movable tile.
- Pull the lever.
- Locate the snake tile pieces.
- Place the tile pieces into the mosaic.
- Find the three snake circles.
- Place the snake circle onto the wheels by color from left to right, red-green-blue.
- Turn each wheel to match the snake tiles below.
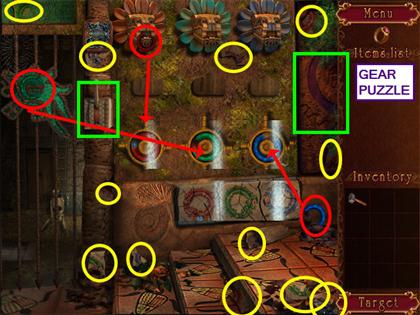
- Pull the door lever, but it is still not working.
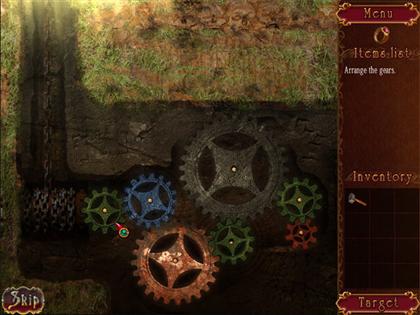
- Click on the right edge to reveal a gear puzzle mini-game.
- The object of this mini-game is to place all the gears so that they will pull the chain and open the door.
- Go through the gate to the next location.
- Look at the hanging stones and locate the 4 statues.
- Place each statue on its matching hanging stone.
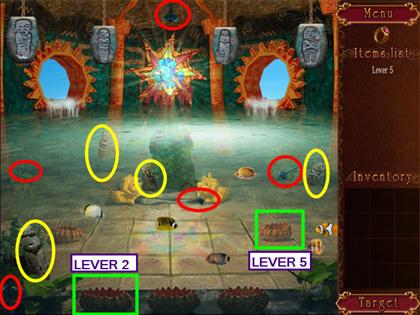
- Look at the five bowls on the ground.
- Find the five levers.
- Finding the fifth lever will activate a mini-game.
- The object of this mini-game is to darken the three-by-four grid on the floor.
- Numbering the levers 1-5, from left to right, click on levers 2 and 5.
- Locate the 15 “grits” or stained glass pieces.
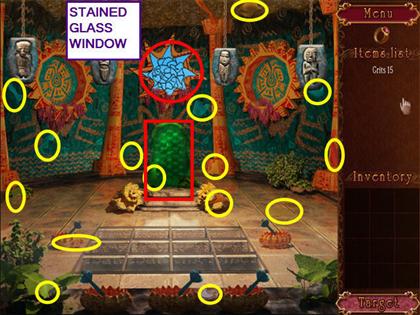
- Place the glass pieces on the window to activate a mini-game.
- The object is to place the glass pieces back into the picture.
- The window will glow when complete.
- Exit the close-up and return to the main scene.

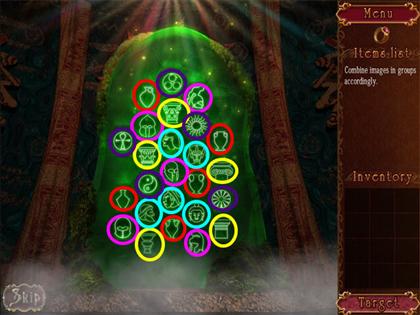
- Click on the activated center green monolith.
- The object of this mini-game is to match groups of similar items.
- Click on each set of 5.
- There are: 5 heads, 5 columns, 5 vases, 5 helmets, and 5 symbols.
- From the map, click play to move to the next location.
August 2nd
- Use the knife to cut away the excess foliage.
- Take the blue tarp and the backpack from the canoe.
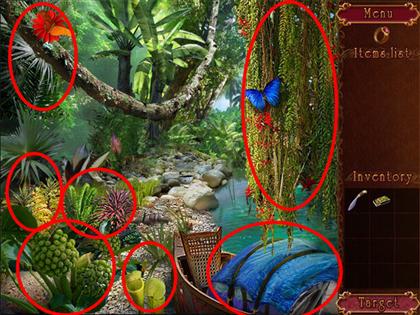
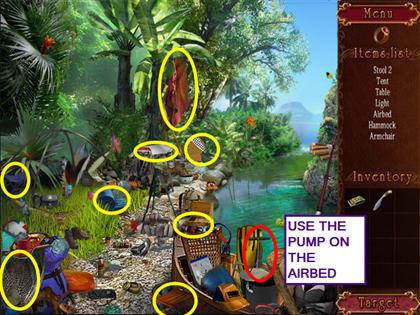
- Locate the hidden objects on the items list.
- Take the pump and use it on the air mattress.
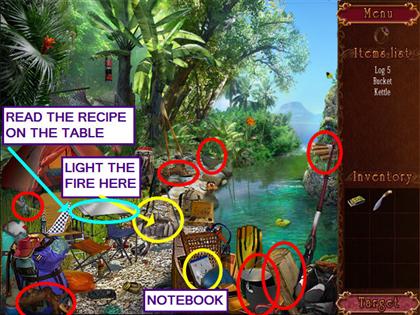
- Locate the logs, bucket and kettle.
- Light the fire under the kettle.
- Use the bucket on the river to get water.
- Pour the water into the kettle.
- Take the notebook from the canoe.
- Look at the recipe on the table.
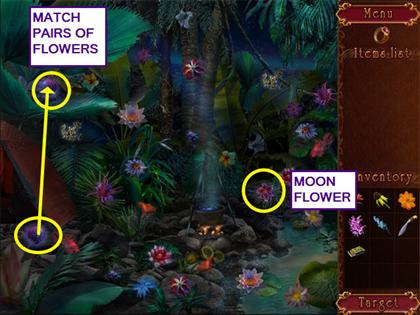
- Collect the 5 flowers.
- You can refer back to the recipe on the desk at any time.
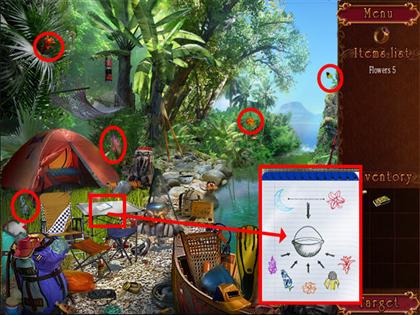
- The last flower can only be found at night.
- Place the 5 flowers into the kettle to trigger a mini-game.
- In this mini-game match pairs of flowers until only the moon flower remains.
- Take the moon flower and place it into the kettle.
August 3rd
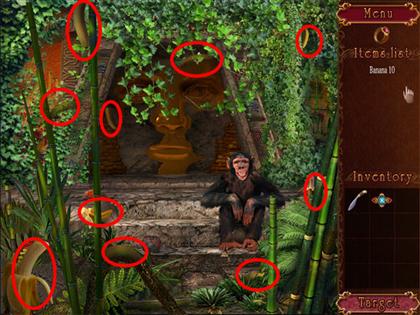
- Locate the 10 bananas.
- Give the bananas to the monkey.
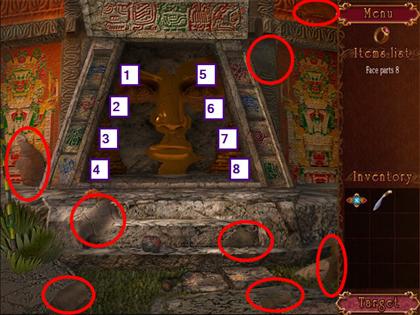
- Use the knife to cut away all the foliage.
- Locate the eight face parts.
- A Simon-like mini game will appear.
- Repeat the pattern by pressing on the blocks in the correct sequence.
- Numbering the symbols 1-8, the three sequences are:3-2-5-6 1-2-4-3-5 3-8-4-6-5-7-3
- Place the amulet in the mouth of the giant face.
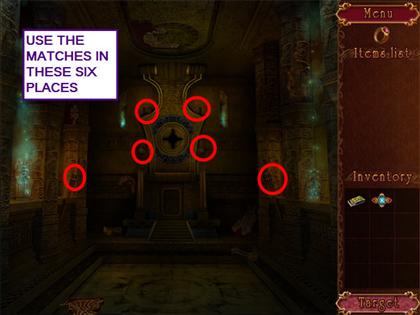
- Walk forward and enter the cavern.
- Use the matches on the two torches and the four lamps to illuminate the room.
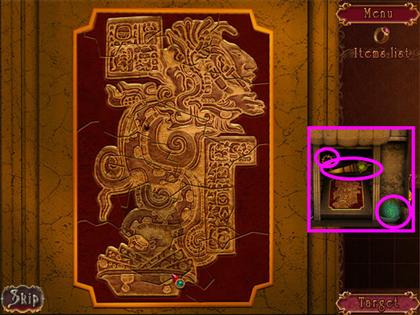
- Zoom in to look at the bottom half of the shrine.
- Collect the mosaic pieces.
- Look at the right glowing orb.
- Back out to the main scene.
- Zoom in to look at the upper half of the shrine.
- Look at the statue depiction.
- Take the statue and the mosaic pieces.
- Zoom into the lower half of the shrine.
- Place the mosaic pieces on the grid it activate a mini-game.
- Move the mosaic pieces to form a picture.
- Take the Atlantean rod and the star.
- Use the rod on the glowing blue orb.
- Take the crystal ball.
- Exit to the main scene.
- Zoom into the upper half of the shrine.
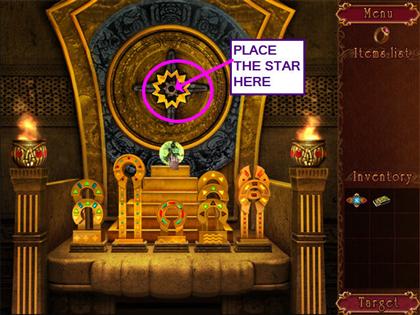
- Place the statues according to the diagram.
- Place the star in the center hole.
- Place the crystal ball below the star, on the steps.
- You are automatically returned to the main scene.
- Go down the newly appeared steps in the center of the room.
- Look at the shell impression on the steps.
- Locate the eight shells.
- Place the shells into the matching impressions.
- A piece of the right wall will fall, revealing a mini-game.
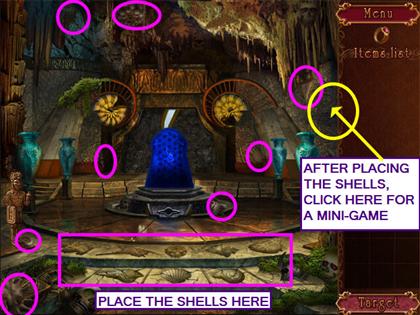
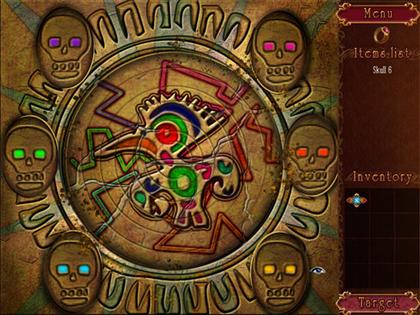
- Click on the wall mini-game.
- The object of this mini-game is to rotate the rings to form a picture.
- Once you complete the pattern, the skull's eyes will begin to glow.
- Exit the mini-game to the main scene.
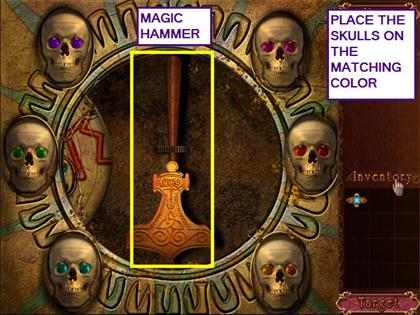
- Locate the six skulls.

- Return to the mini-game.
- Place the skulls on the color corresponding location.
- Take the Magic Hammer.
- Exit the mini-game to the main scene.
- Use the Magic Hammer to break the two back vases.
- Take the shell parts and place them on the two back shells on each side of the doors.
- Place the amulet at the base of the blue monument.
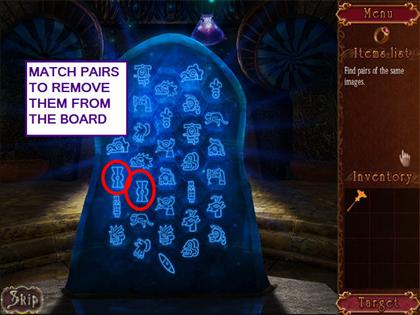
- Click on the monument to activate a mini-game.
- The object of this mini-game is to match pairs until the board is cleared.
- From the map, select play to travel to the next location.
August 4th
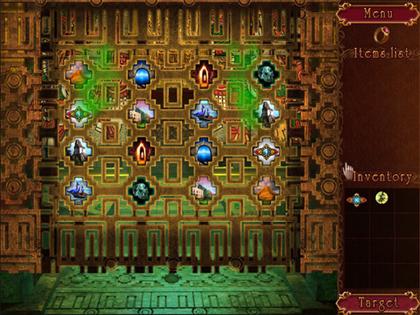
- To enter the temple, there is a mini-game.
- The object of this Memory mini-game is to match pairs until all are found.
- Click on the tile to turn over two at a time.
- Matching pairs will remain turned over.
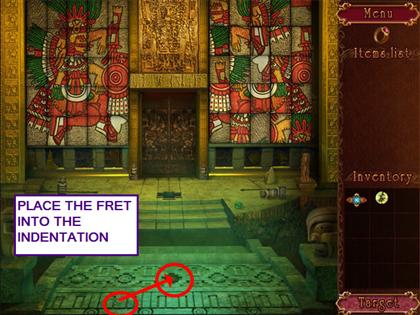
- Look at the indentation in the floor.
- Take the fret part and place it into the indentation to extend the walkway.
- Walk forward over the precipice.
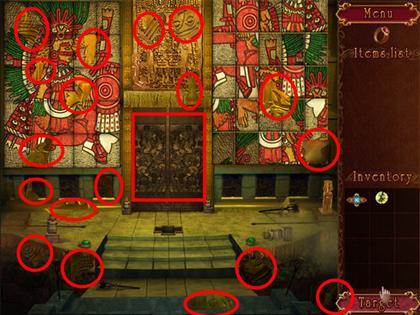
- Look at the double doors to discover you need to find the pieces.
- Locate the mosaic pieces.
- Place the pieces on the door to trigger a mini-game.
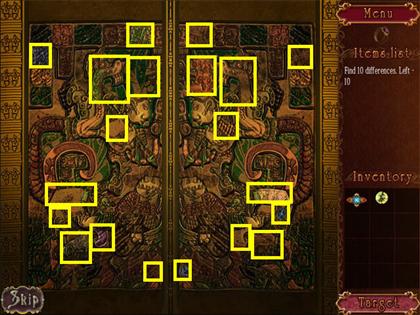
- Find the differences between the right and left pictures.
- Keep in mind that the images are reversed.
- You may click on the difference on either side of the images.
- Exit to the main scene.
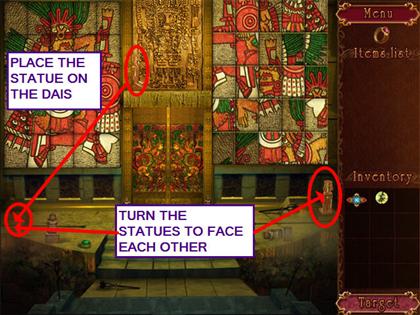
- Look at the left dais.
- Take the statue from over the double doors and place it on the dais.
- Turn the left and right statues to face each other.
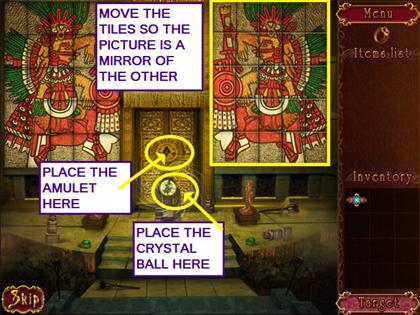
- Place the crystal ball into the center stand to unlock the right picture.
- Click on the tiles to swap until the picture is a reflection of the left picture.
- Place the amulet into the door.
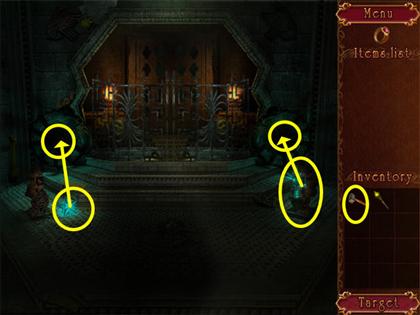
- Go forward through the door.
- Use the fire extinguisher on the flames.
- Look at the indentations on the statues on each side of the door.
- Walk forward into the next room.
- Clicking on a statue will cause a gate to raise.
- Use the hammer on the left statue.
- Take the two blue gems and place them in the wall recesses to light the room.
- Look at the upper right wall to see a figure is missing.
- Click on the center of the floor to open a secret compartment.
- Take the bird and place it into the indentation.
- Click to lower the secret compartment.
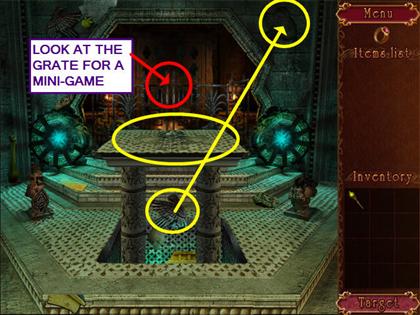
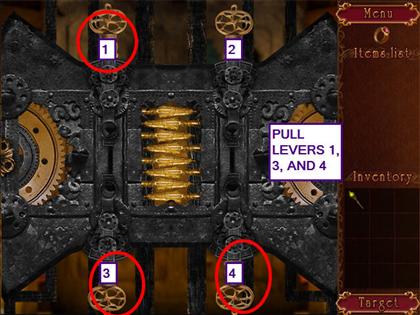
- Click on the grate to activate a mini-game.
- The object of this mini-game is to open the lock.
- Each lever controls a different amount of teeth.
- Pull levers 1, 3, and 4.
- Look at the gears controlling the dragons.
- Use the magic rod on the gears.
- Take the fish figurine.
- Look at the door.
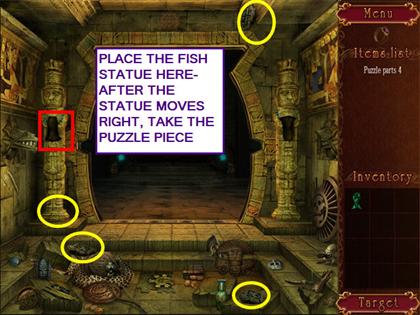
- Locate the 12 puzzle parts.
- There are 4 in this scene.
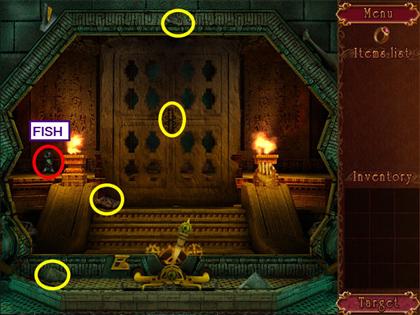
- Return to the previous room and locate the 4 pieces.
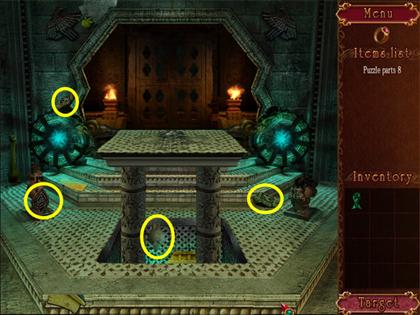
- Return to the first room and place the fish in the left statue.
- Locate the 4 remaining pieces.
- Walk forward twice and return to the door.
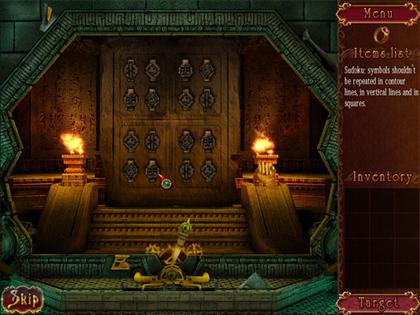
- Place the puzzle pieces on the door to trigger a mini-game.
- This is a Sudoku style game.
- There needs to be one of each piece in each column, row, and square.
- Click on an empty space and chose the piece you want.
- Walk forward into the fourth room.
- Take the crystal cat.
- Look at the mirror and discover that statues are needed.
- Take the cat statue.
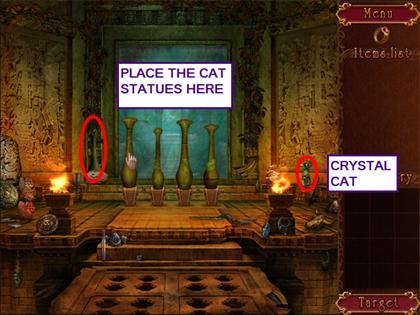
- Walk down to the third room and take the cat statue.
- Walk to the second room and take the cat statue.
- Walk to the first room.
- Place the crystal cat into the right column.
- After the column moves to the left, take the cat statue.

- Walk forward three times to the fourth room.
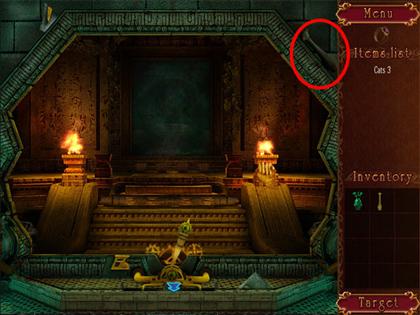
- Place the cat statues in front of the mirror on the pedestals.
- Look at the mosaic behind the broken mirror.
- Locate the four image pieces.
- Return to the third room.

- Locate the four image pieces.
- Return to the second room.
- Locate the four image pieces.
- Return to the first room.

- Take the four image pieces.
- Return to the fourth room.

- Place the image pieces on the mosaic behind the broken mirror.
- The object of this jigsaw type mini-game is to piece together the mosaic.

- The Atlantean Elder appears and beckons you forward.
- Walk forward and you are entrusted with a great task.
Created at: 2009-09-28