

Walkthrough Menu
- General Tips
- Chapter 1: The Magic Gems
- Chapter 2: The Penguin
- Chapter 3: The Castle
- Chapter 4: The Generator
- Chapter 5: The Dinosaur
- Chapter 6: The Donkey
General Tips
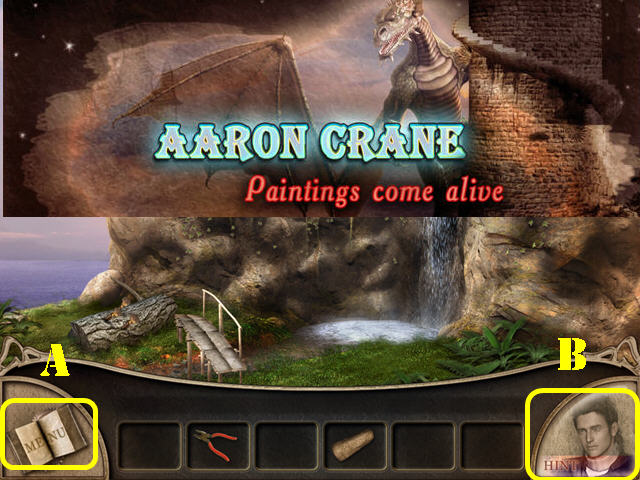 • Aaron Crane: Paintings Come Alive is an Adventure game. •
The best way to use this walkthrough is by clicking on the
“CTRL” and “F”
keys on your keyboard simultaneously to bring up a search box.
•
Type the keyword into the search box
at the bottom of your screen and click on “NEXT”
to find the section you need help with.
Clicking “NEXT” again
will bring up all instances in which that keyword was
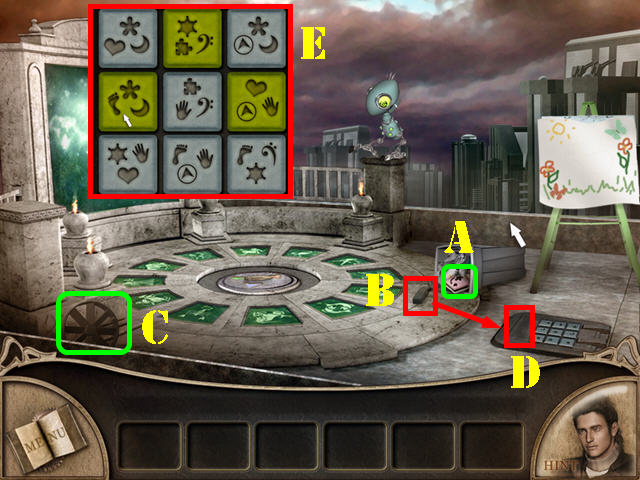
mentioned in the guide. • Select the Menu Button (A) to access
the volume, screen size and cursor. • The Hint is in the lower
right corner (B). • All puzzles can be skipped once the hint
button refills. • Items will stay in inventory until they are
no longer needed.
• Aaron Crane: Paintings Come Alive is an Adventure game. •
The best way to use this walkthrough is by clicking on the
“CTRL” and “F”
keys on your keyboard simultaneously to bring up a search box.
•
Type the keyword into the search box
at the bottom of your screen and click on “NEXT”
to find the section you need help with.
Clicking “NEXT” again
will bring up all instances in which that keyword was
mentioned in the guide. • Select the Menu Button (A) to access
the volume, screen size and cursor. • The Hint is in the lower
right corner (B). • All puzzles can be skipped once the hint
button refills. • Items will stay in inventory until they are
no longer needed.
Chapter 1: The Magic Gems
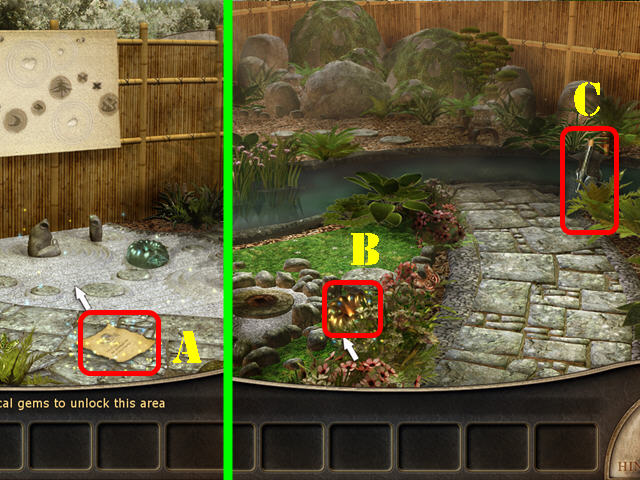 • Read the note (A). • Go left. • Take the first GEM (B). •
Grab the SHOVEL (C). • Go right twice.
• Read the note (A). • Go left. • Take the first GEM (B). •
Grab the SHOVEL (C). • Go right twice.
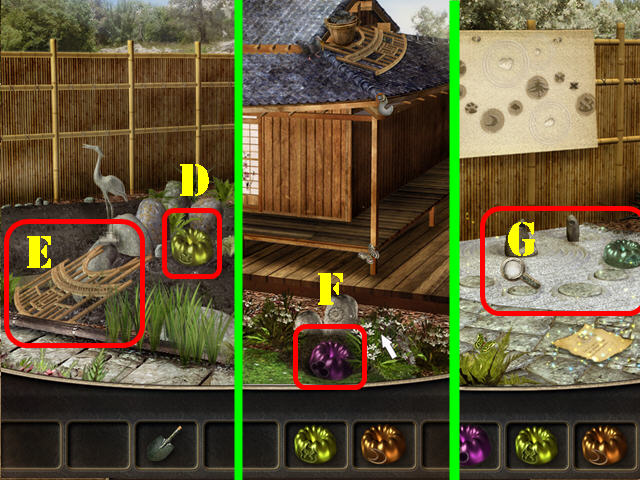 • Take the second GEM (D) and the BRIDGE SIDE (E). • Go right.
• Use the SHOVEL to dig up the plant and take the third GEM
(F). • Go left twice. • Zoom into the ground (G).
• Take the second GEM (D) and the BRIDGE SIDE (E). • Go right.
• Use the SHOVEL to dig up the plant and take the third GEM
(F). • Go left twice. • Zoom into the ground (G).
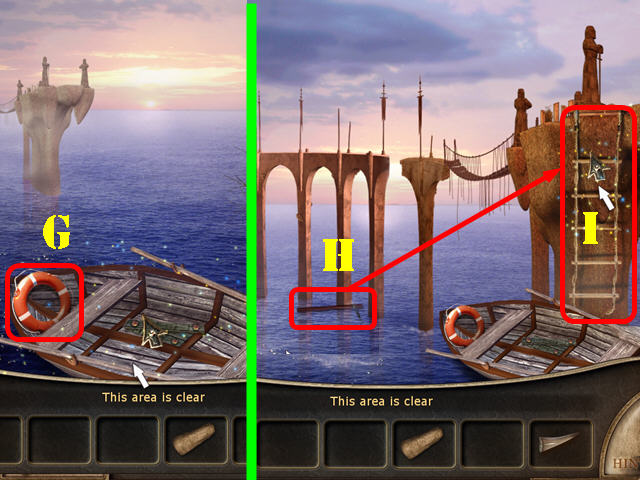
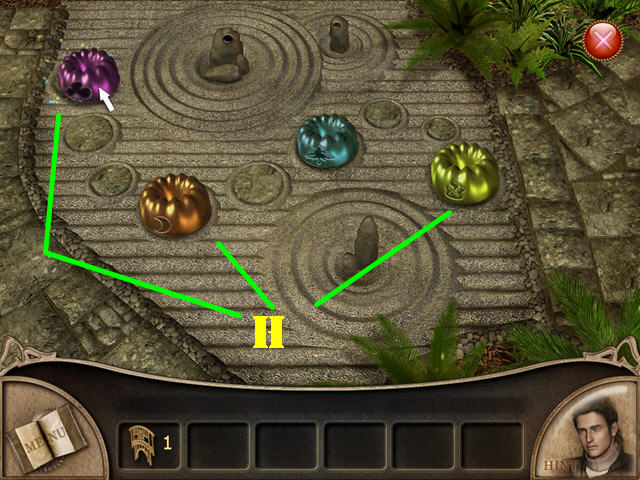 • Place the 3 GEMS as shown in the screenshot (H).
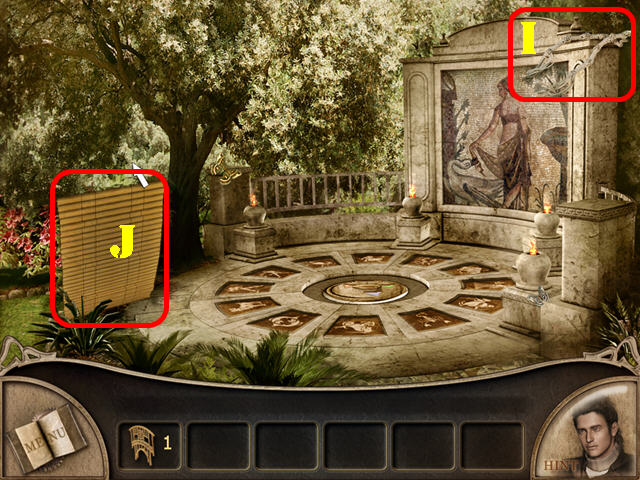 • Exit the close-up scene. Open the doors and go through them.
• Take the ROPE (I) and the BRIDGE PART (J). • Walk down and
go right twice.
• Exit the close-up scene. Open the doors and go through them.
• Take the ROPE (I) and the BRIDGE PART (J). • Walk down and
go right twice.
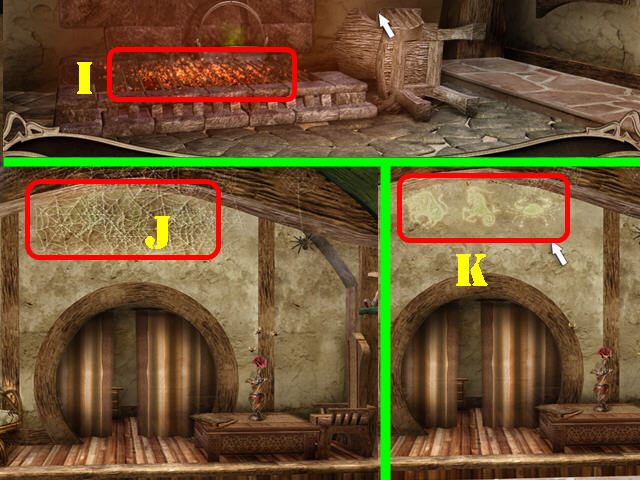
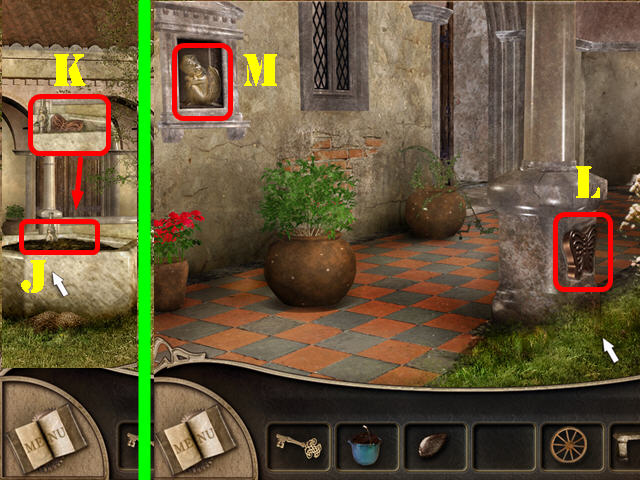
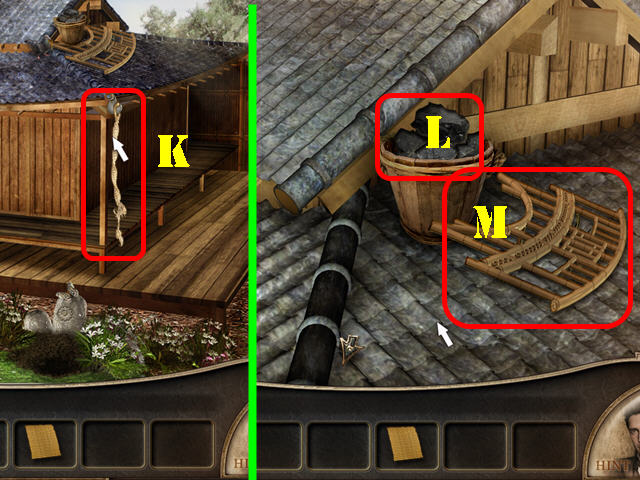 • Put the ROPE on the hook on the roof of the house (K). •
Zoom into the roof; take the PIECE OF COAL (L) and the second
BRIDGE SIDE (M). • Exit the roof and go left three times.
• Put the ROPE on the hook on the roof of the house (K). •
Zoom into the roof; take the PIECE OF COAL (L) and the second
BRIDGE SIDE (M). • Exit the roof and go left three times.
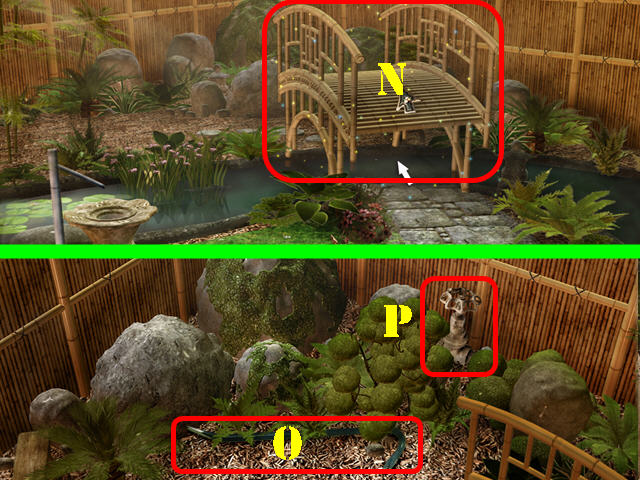 • Put the 2 BRIDGE SIDES and the BRIDGE PART in the water to
complete the bridge (N). • Cross the bridge. • Take the
CROWBAR (O) and the FAUCET (P).
• Put the 2 BRIDGE SIDES and the BRIDGE PART in the water to
complete the bridge (N). • Cross the bridge. • Take the
CROWBAR (O) and the FAUCET (P).
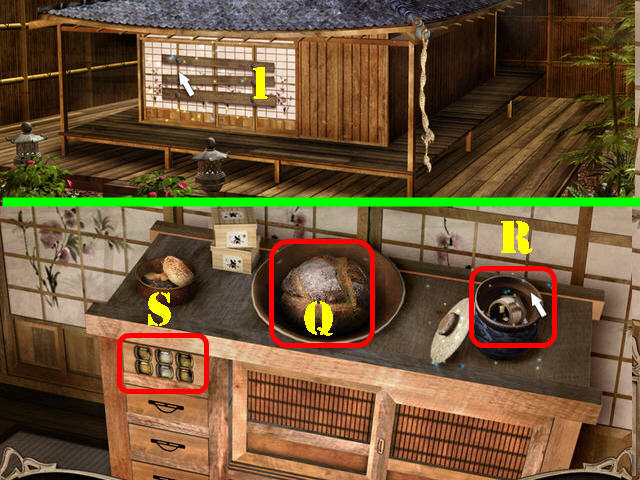 • Go back to the house. • Remove the boards with the CROWBAR
(1). Open the door and enter the house. • Zoom into the
cabinet; take the BREAD ( Q). • Open the lid and take the NUTS
(R). • You need the code to open the drawers (S).
• Go back to the house. • Remove the boards with the CROWBAR
(1). Open the door and enter the house. • Zoom into the
cabinet; take the BREAD ( Q). • Open the lid and take the NUTS
(R). • You need the code to open the drawers (S).
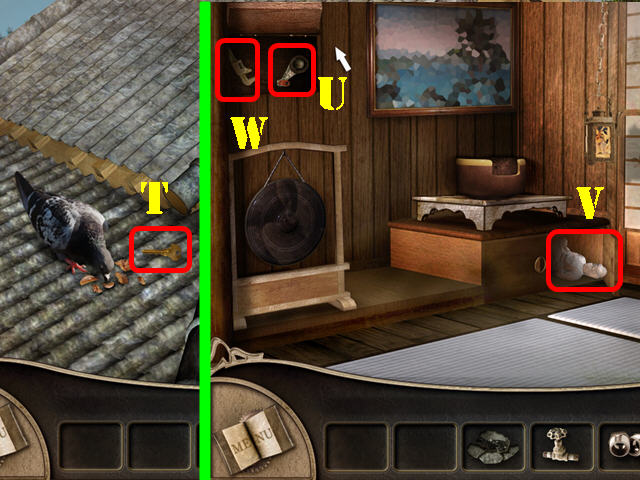 • Return to the roof. • Give the BREAD to the bird and take
the KEY (T). • Go back into the house. • Use the KEY in the
keyhole in the upper left. • Click on the lever (U) to open
the lower right door; take the STATUE (V). • Grab the WRENCH
(W).
• Return to the roof. • Give the BREAD to the bird and take
the KEY (T). • Go back into the house. • Use the KEY in the
keyhole in the upper left. • Click on the lever (U) to open
the lower right door; take the STATUE (V). • Grab the WRENCH
(W).
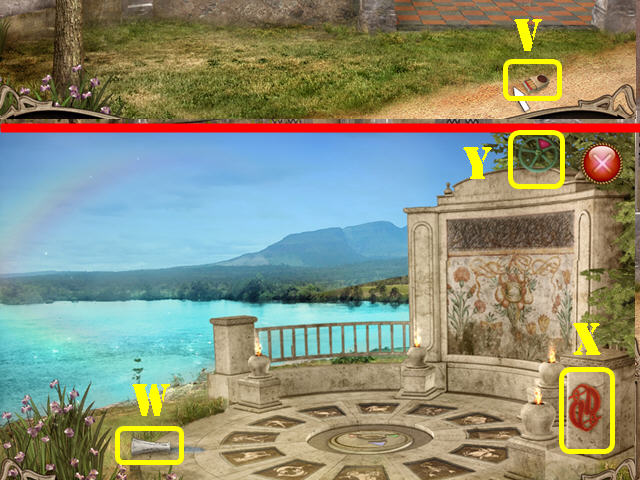
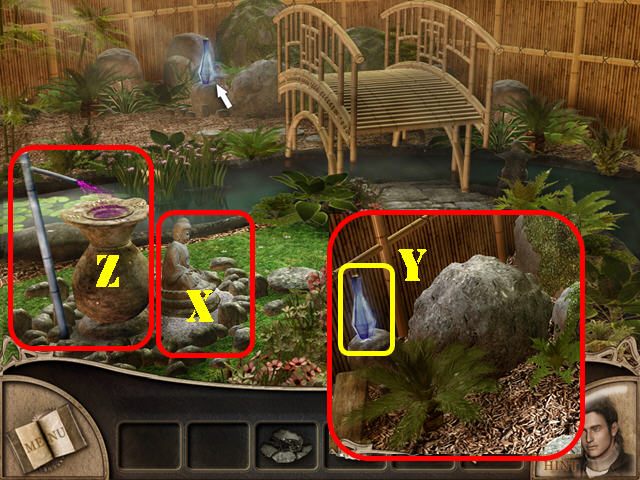 • Go back to the bridge. • Put the STATUE (X) next to the pump
and a vial will appear by the bridge. • Cross the bridge and
take the EMPTY VIAL (Y). • Walk down. • Tap the pump to make
the water flow (Z). • Put the EMPTY VIAL below the water to
obtain the FILLED VIAL. • Go right twice.
• Go back to the bridge. • Put the STATUE (X) next to the pump
and a vial will appear by the bridge. • Cross the bridge and
take the EMPTY VIAL (Y). • Walk down. • Tap the pump to make
the water flow (Z). • Put the EMPTY VIAL below the water to
obtain the FILLED VIAL. • Go right twice.
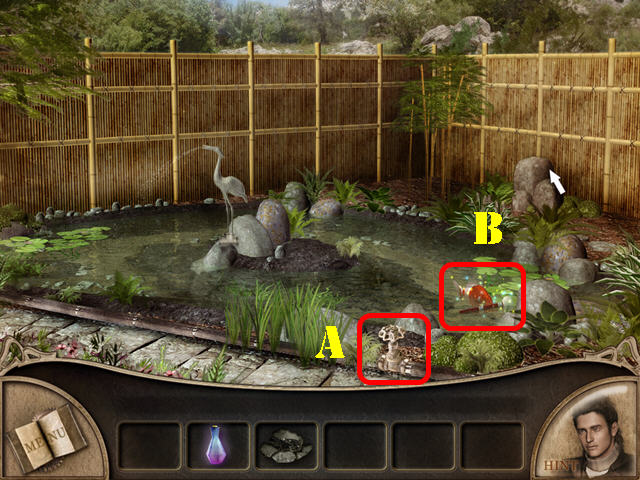 • Put the NUTS on the pipe and then add the FAUCET to the pipe
(A). • Use the WRENCH on the faucet. • Click on the fish twice
and take the GONG STICK (B).
• Put the NUTS on the pipe and then add the FAUCET to the pipe
(A). • Use the WRENCH on the faucet. • Click on the fish twice
and take the GONG STICK (B).
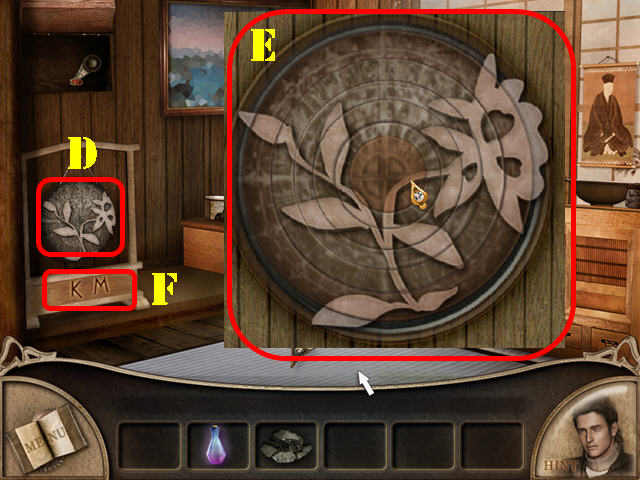 • Go back in the house. • Use the GONG STICK on the gong and
press on the gong to activate a puzzle (D). • Rotate the rings
until you form the correct image. • Please look at the
screenshot for the solution (E). The letters “K and M” appear
on the gong stand (F).
• Go back in the house. • Use the GONG STICK on the gong and
press on the gong to activate a puzzle (D). • Rotate the rings
until you form the correct image. • Please look at the
screenshot for the solution (E). The letters “K and M” appear
on the gong stand (F).
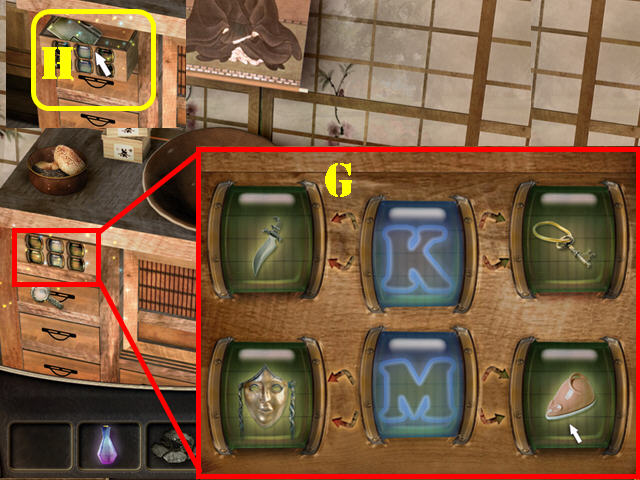 • Zoom into the cabinet; select the top drawer to activate a
puzzle. • Change the letters in the center to K (top) and M
(bottom). • Now you must press on the barrels next to each
letter and place the items that belong with that letter. •
Please see screenshot for solution (G). K is for Knife and
Key. M is for Mask and Mouse. • Take the LIGHTER (H) from
inside the drawer. Exit this close-up scene.
• Zoom into the cabinet; select the top drawer to activate a
puzzle. • Change the letters in the center to K (top) and M
(bottom). • Now you must press on the barrels next to each
letter and place the items that belong with that letter. •
Please see screenshot for solution (G). K is for Knife and
Key. M is for Mask and Mouse. • Take the LIGHTER (H) from
inside the drawer. Exit this close-up scene.
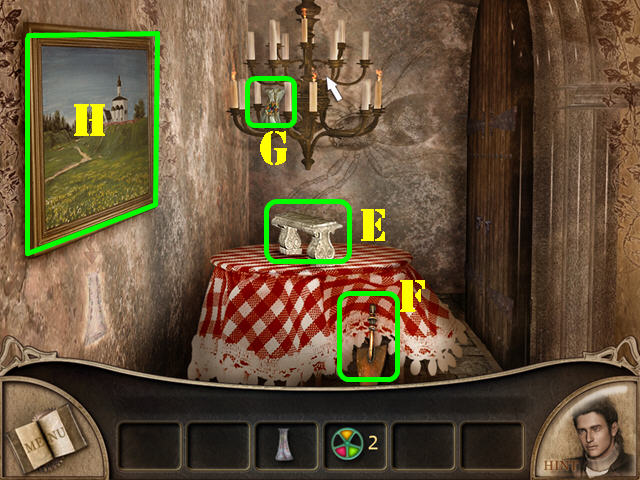
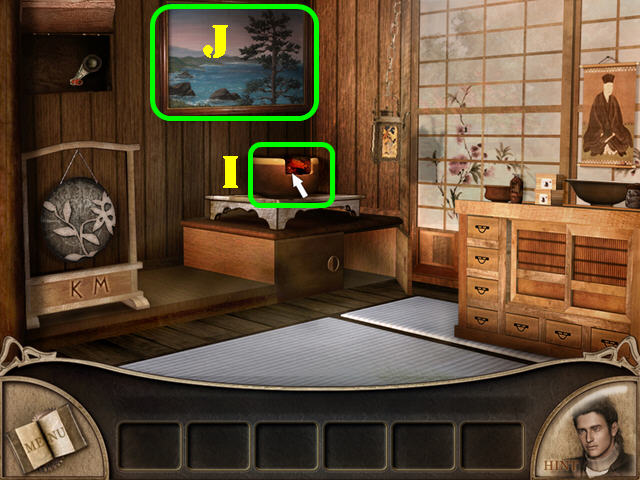 • In this order, put the PIECE OF COAL, LIGHTER and the FILLED
VIAL in the bowl (I). • Zoom into the picture to activate a
puzzle (J).
• In this order, put the PIECE OF COAL, LIGHTER and the FILLED
VIAL in the bowl (I). • Zoom into the picture to activate a
puzzle (J).
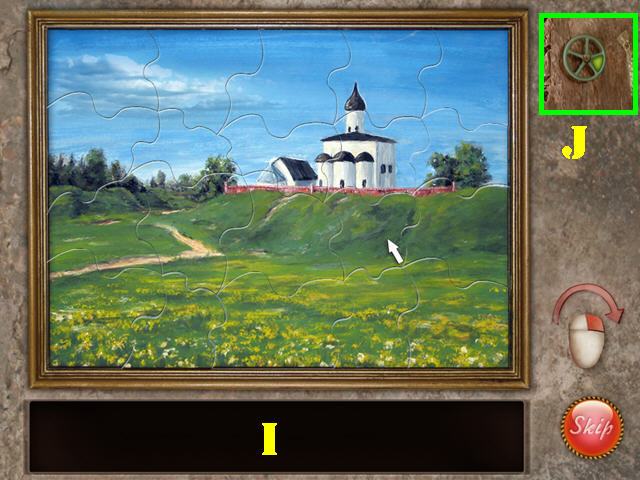
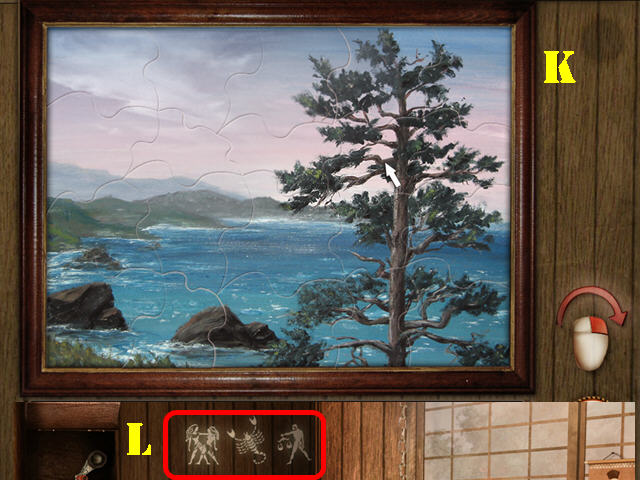 • Right-click on a puzzle piece to rotate it. • Arrange the
jigsaw puzzle as shown in the screenshot (K). • Note the
symbols on the wall (L).
• Right-click on a puzzle piece to rotate it. • Arrange the
jigsaw puzzle as shown in the screenshot (K). • Note the
symbols on the wall (L).
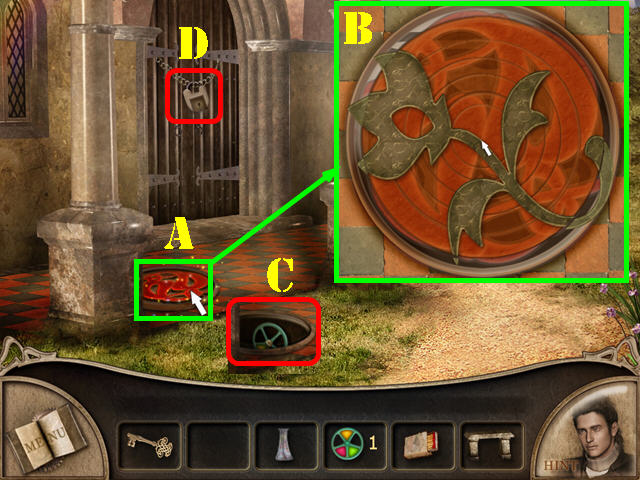
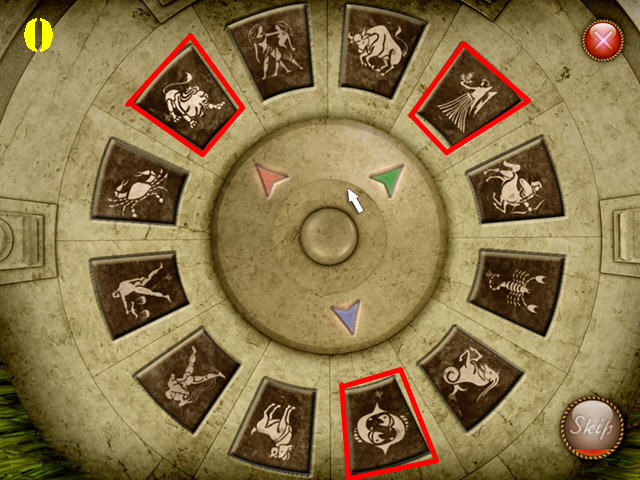
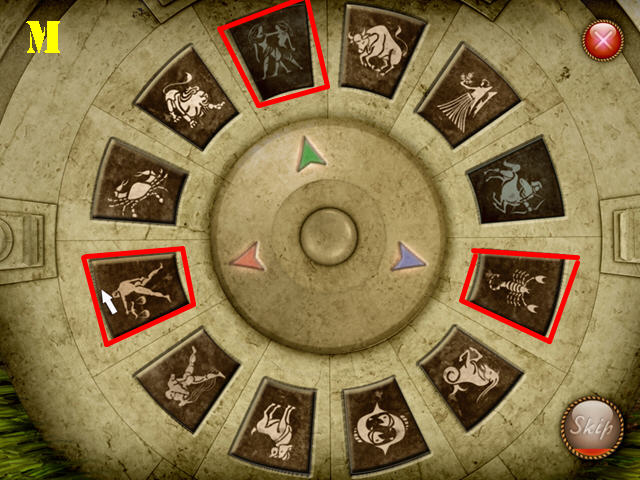 • Go back to the first scene and go through the doors. • Zoom
into the ground to activate a puzzle. • Move the arrows as
shown in the screenshot and then press on the Zodiac symbols
marked in red (M). • Press on the ground to end the chapter.
• Go back to the first scene and go through the doors. • Zoom
into the ground to activate a puzzle. • Move the arrows as
shown in the screenshot and then press on the Zodiac symbols
marked in red (M). • Press on the ground to end the chapter.
Chapter 2: The Penguin
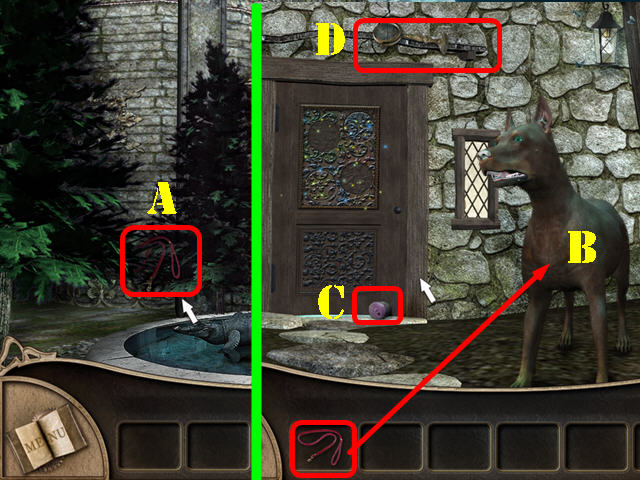 • Go right twice. • Take the LEASH (A). • Go left twice; open
the fence door and go through it. • Put the LEASH on the dog
(B). • Take the BUTTON (C) and the MIRROR (D). • Walk down and
go right twice.
• Go right twice. • Take the LEASH (A). • Go left twice; open
the fence door and go through it. • Put the LEASH on the dog
(B). • Take the BUTTON (C) and the MIRROR (D). • Walk down and
go right twice.
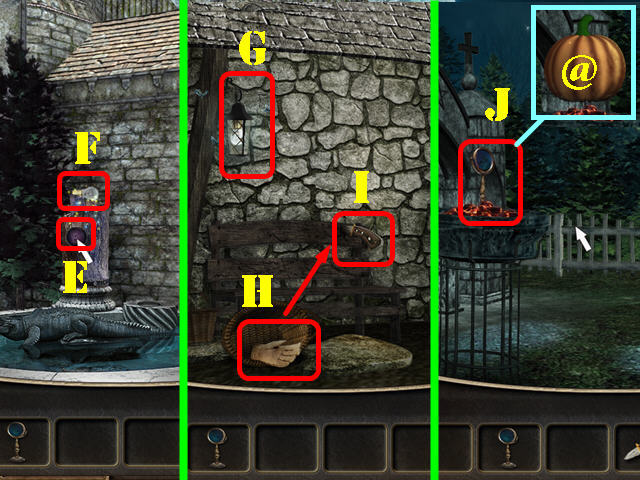 • Put the BUTTON in the center of the log (E). • Press the
button and take the BULB (F). • Go back to the house where the
dog was located and go left. • Put the BULB in the lantern
(G). • Knock over the basket and take the GLOVE (H). • Use the
GLOVE to retrieve the KNIFE (I). • Go left. • Use the KNIFE on
the pumpkin (@) and take the second MIRROR (J). • Go right
twice; walk down and go right twice.
• Put the BUTTON in the center of the log (E). • Press the
button and take the BULB (F). • Go back to the house where the
dog was located and go left. • Put the BULB in the lantern
(G). • Knock over the basket and take the GLOVE (H). • Use the
GLOVE to retrieve the KNIFE (I). • Go left. • Use the KNIFE on
the pumpkin (@) and take the second MIRROR (J). • Go right
twice; walk down and go right twice.
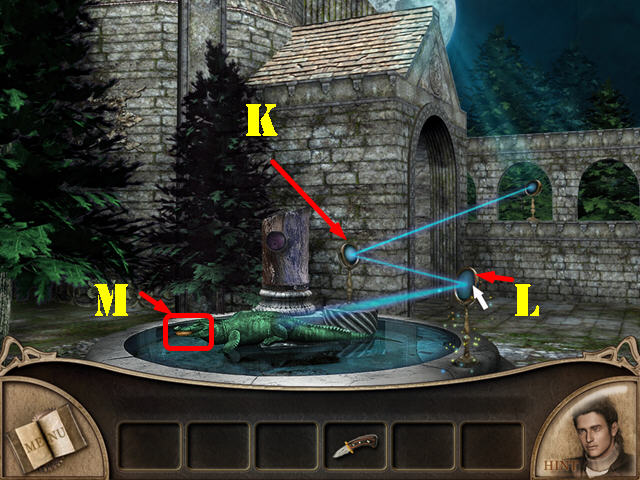 • Place the 2 MIRRORS around the alligator as shown in the
screenshot (K and L). • Arrange the mirrors as shown in the
screenshot so the light shines on the alligator. Start with
the “K” mirror first. • Take the COIN from alligator’s mouth
(M).
• Place the 2 MIRRORS around the alligator as shown in the
screenshot (K and L). • Arrange the mirrors as shown in the
screenshot so the light shines on the alligator. Start with
the “K” mirror first. • Take the COIN from alligator’s mouth
(M).
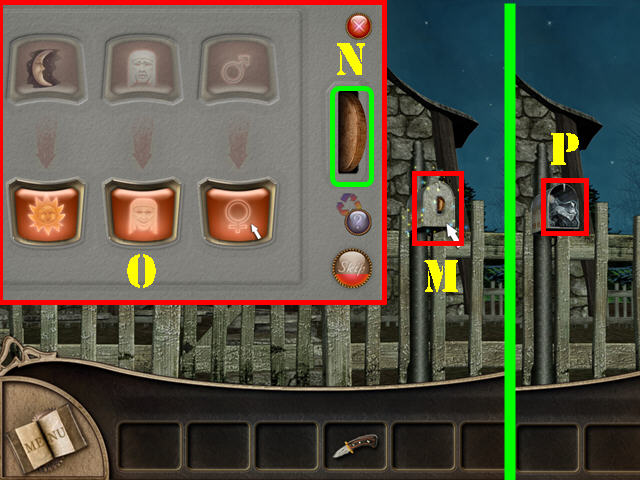 • Go back to the mailbox; insert the COIN in the slot (M). •
Press on the coin to activate a puzzle. • Change the images on
the lower rollers so that it is the opposite symbol of the
image directly above it. • If you cannot find the right
images, click on the coin (N). • Please see the screenshot for
the solution (O). • Take the PUZZLE PIECE from inside the
mailbox (P).
• Go back to the mailbox; insert the COIN in the slot (M). •
Press on the coin to activate a puzzle. • Change the images on
the lower rollers so that it is the opposite symbol of the
image directly above it. • If you cannot find the right
images, click on the coin (N). • Please see the screenshot for
the solution (O). • Take the PUZZLE PIECE from inside the
mailbox (P).
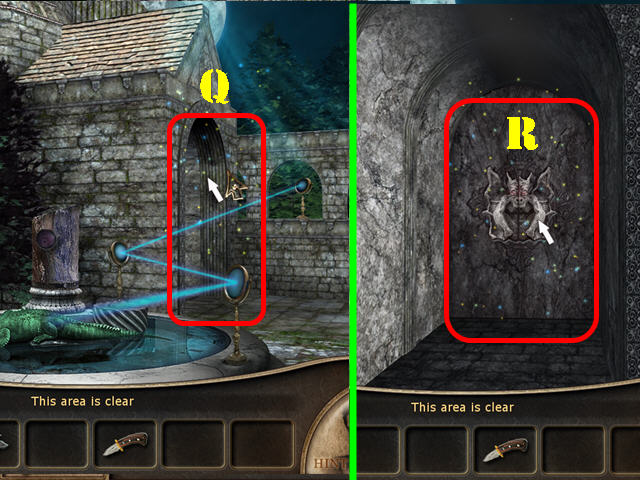 • Go right twice and enter the building (Q). • Put the PUZZLE
PIECE in the slot to unlock the door (R). Go through the door.
• Go right twice and enter the building (Q). • Put the PUZZLE
PIECE in the slot to unlock the door (R). Go through the door.
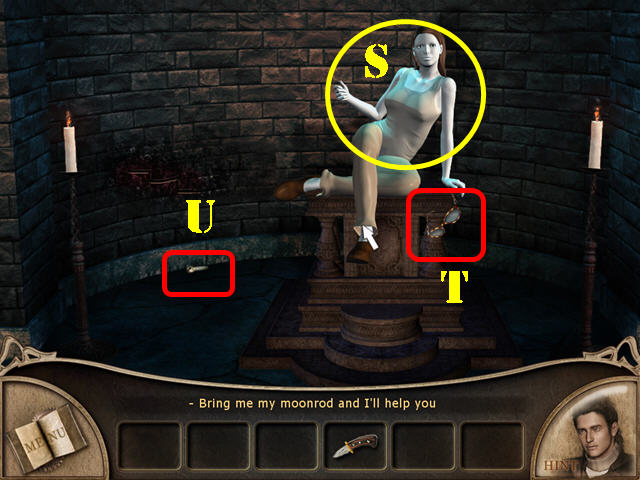 • Select the lady and she will ask you for a moon rod (S). •
Take the GLASSES (T) and the LEVER (U).
• Select the lady and she will ask you for a moon rod (S). •
Take the GLASSES (T) and the LEVER (U).
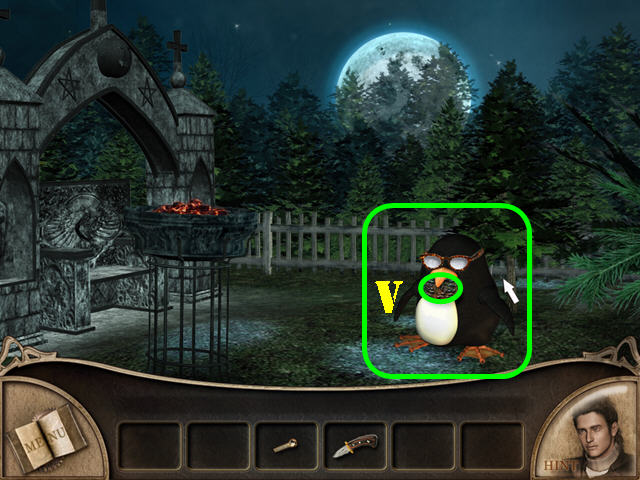 • Go back to the penguin; give him the GLASSES. • Take the
first PUZZLE PIECE from the penguin’s mouth (V).
• Go back to the penguin; give him the GLASSES. • Take the
first PUZZLE PIECE from the penguin’s mouth (V).
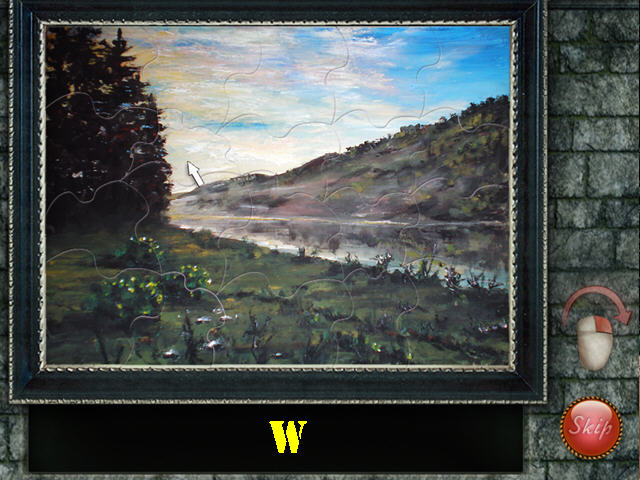 • Go to the main gate and turn right. • Use the KNIFE on the
painting and select it to activate a puzzle. • Right-click on
a puzzle piece to rotate it. • Arrange the jigsaw puzzle as
shown in the screenshot (W).
• Go to the main gate and turn right. • Use the KNIFE on the
painting and select it to activate a puzzle. • Right-click on
a puzzle piece to rotate it. • Arrange the jigsaw puzzle as
shown in the screenshot (W).
 • Put the LEVER in the slot and press on the lever (X). • Take
the second PUZZLE PIECE (Y). • Go back to the front door and
insert both PUZZLE PIECES in the door to activate a puzzle
(Z).
• Put the LEVER in the slot and press on the lever (X). • Take
the second PUZZLE PIECE (Y). • Go back to the front door and
insert both PUZZLE PIECES in the door to activate a puzzle
(Z).
 • Select any 2 puzzle pieces to swap their positions. Place
the colored circles next to the matching arrow. • Press on the
arrows to rotate the images. • Please see screenshot for
solution (A). • Open the door and go through it.
• Select any 2 puzzle pieces to swap their positions. Place
the colored circles next to the matching arrow. • Press on the
arrows to rotate the images. • Please see screenshot for
solution (A). • Open the door and go through it.
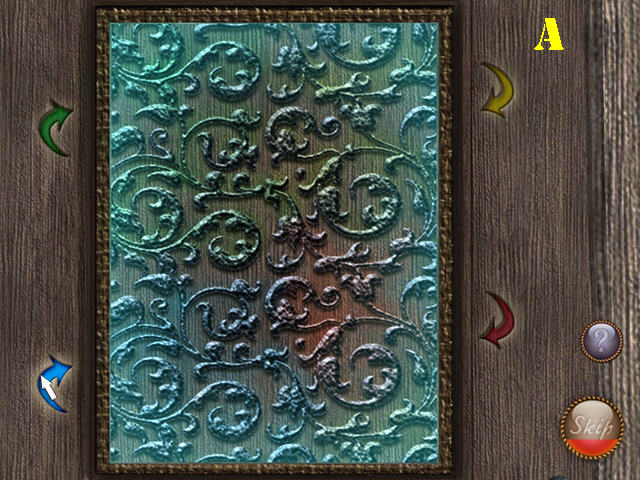
 • Examine the candle next to the bench to activate a puzzle. •
Rotate the rings until you form the pattern shown on the right
side of the puzzle. • Please see screenshot for solution (B).
• Examine the candle next to the bench to activate a puzzle. •
Rotate the rings until you form the pattern shown on the right
side of the puzzle. • Please see screenshot for solution (B).
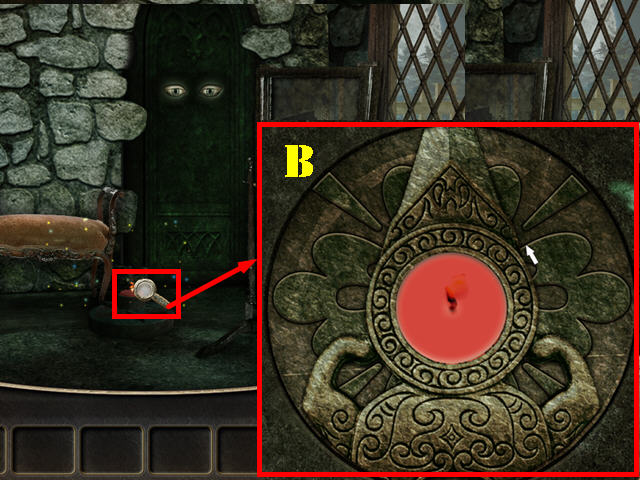
 • Touch the statue and it will ask you for a mace (C). • Take
the RAG (D). • Go back to the penguin and use the RAG on the
penguin’s glasses (E). • Go in the direction the penguin is
pointing to (F).
• Touch the statue and it will ask you for a mace (C). • Take
the RAG (D). • Go back to the penguin and use the RAG on the
penguin’s glasses (E). • Go in the direction the penguin is
pointing to (F).
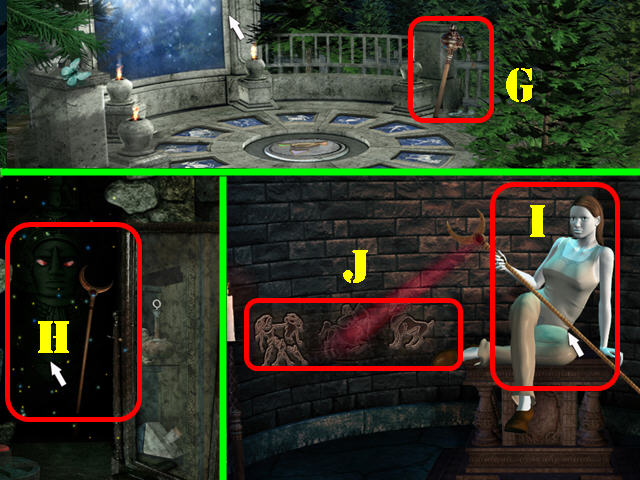 • Take the MACE (G). • Go back into the house. • Give the MACE
to the statue to get the MOON ROD (H). • Go back to the secret
passage. • Give the MOON ROD to the lady (I) and note the
Zodiac symbols on the wall (J).
• Take the MACE (G). • Go back into the house. • Give the MACE
to the statue to get the MOON ROD (H). • Go back to the secret
passage. • Give the MOON ROD to the lady (I) and note the
Zodiac symbols on the wall (J).
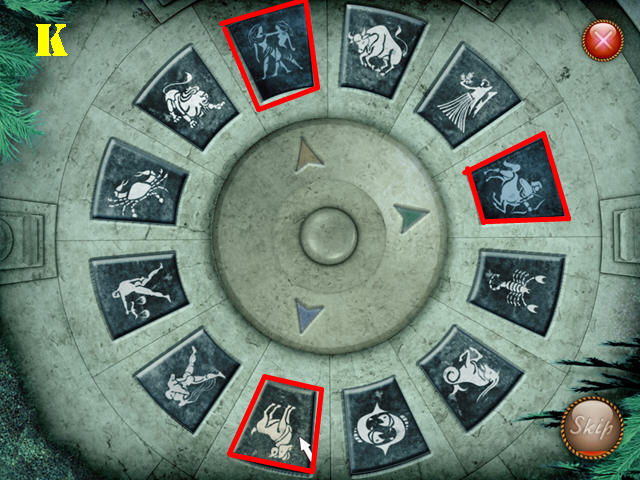 • Go back to the portal. • Examine the ground to activate a
puzzle. • Move the arrows as shown in the screenshot and then
press on the Zodiac symbols marked in red (K). • Press on the
ground to end the chapter.
• Go back to the portal. • Examine the ground to activate a
puzzle. • Move the arrows as shown in the screenshot and then
press on the Zodiac symbols marked in red (K). • Press on the
ground to end the chapter.
Chapter 3: The Castle
 • Open the curtain and take the PUZZLE PIECE (A). • Go left.
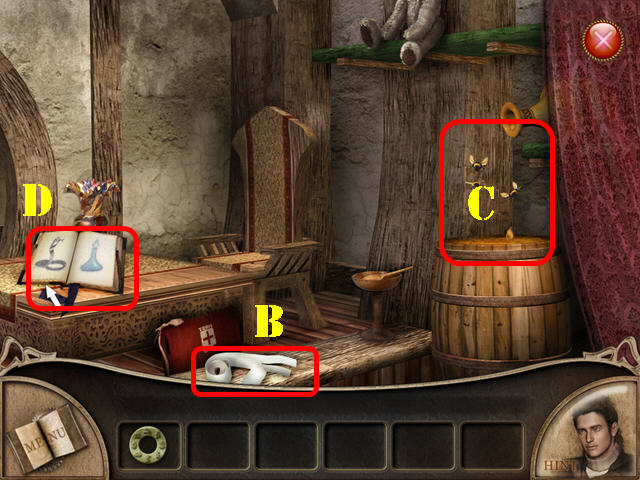 • Examine the table area and take the BANDAGE (B). • Open the
curtain to reveal the bees (C), • Open the book and look at
the images (D). • Exit this scene and go left.
• Examine the table area and take the BANDAGE (B). • Open the
curtain to reveal the bees (C), • Open the book and look at
the images (D). • Exit this scene and go left.
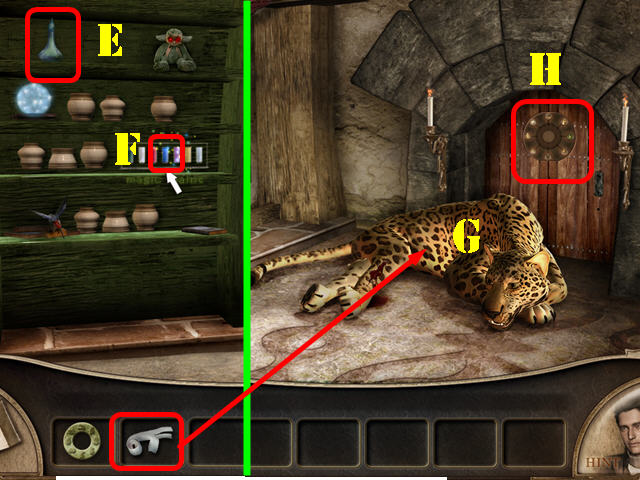 • Take the EMPTY FLASK (E) and the MAGIC PAINT (F). • Go back
to the leopard. • Put the BANDAGE on the leopard (G). • Put
the PUZZLE PIECE on the door (H) to activate the puzzle.
• Take the EMPTY FLASK (E) and the MAGIC PAINT (F). • Go back
to the leopard. • Put the BANDAGE on the leopard (G). • Put
the PUZZLE PIECE on the door (H) to activate the puzzle.
 • Rotate the inner ring to the right spot. • Select any 2
tokens to swap their positions. • See screenshot for solution
(I). • Open the door and go through it.
• Rotate the inner ring to the right spot. • Select any 2
tokens to swap their positions. • See screenshot for solution
(I). • Open the door and go through it.
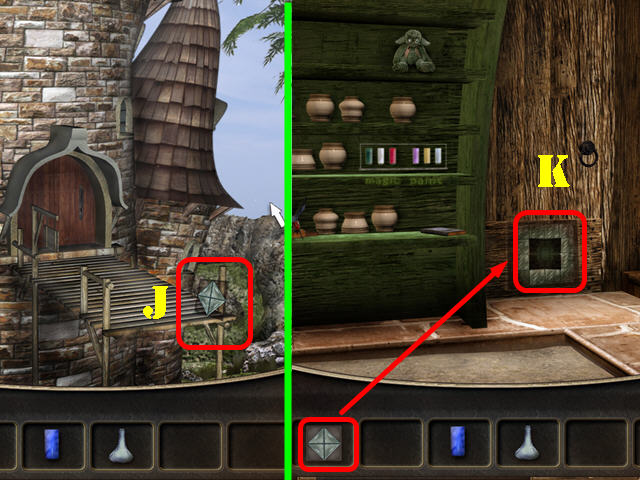 • Take the PUZZLE PIECE (J). • Go through the door and then go
left twice. • Put the PUZZLE PIECE on the puzzle on the back
wall to activate a puzzle (K).
• Take the PUZZLE PIECE (J). • Go through the door and then go
left twice. • Put the PUZZLE PIECE on the puzzle on the back
wall to activate a puzzle (K).
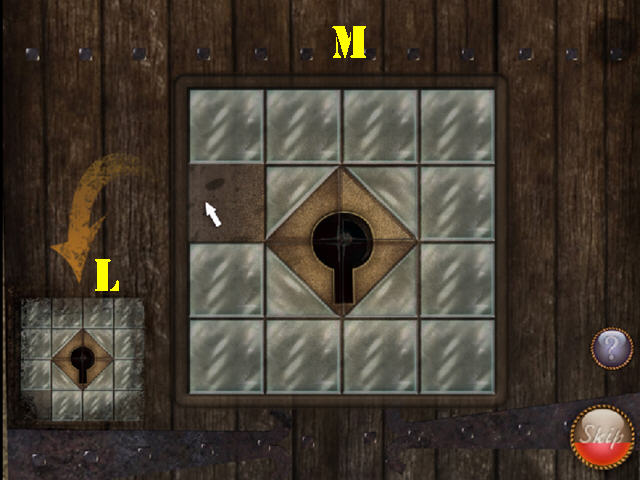 • Slide the pieces into the right spots until they form the
image shown in the lower left side of the puzzle (L). • Please
look at the screenshot for the solution (M).
• Open the door and go through it.
• Slide the pieces into the right spots until they form the
image shown in the lower left side of the puzzle (L). • Please
look at the screenshot for the solution (M).
• Open the door and go through it.
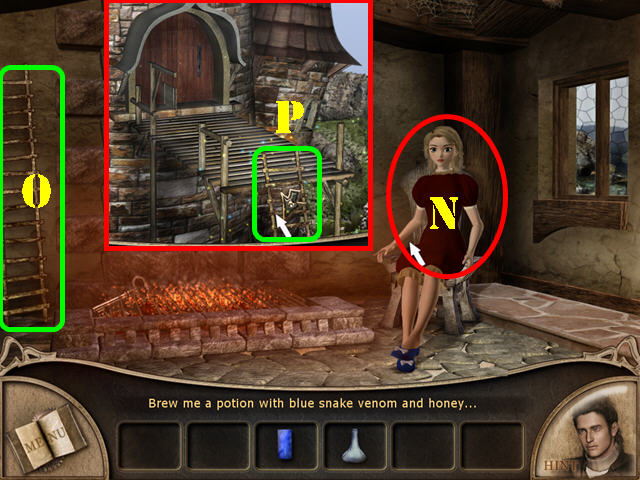 • Talk to the lady; she wants a potion with the blue snake
venom and the honey (N). • Take the LADDER (O). • Go back
outside; put the LADDER at the bottom of the bridge and go
down (P). • Head left.
• Talk to the lady; she wants a potion with the blue snake
venom and the honey (N). • Take the LADDER (O). • Go back
outside; put the LADDER at the bottom of the bridge and go
down (P). • Head left.
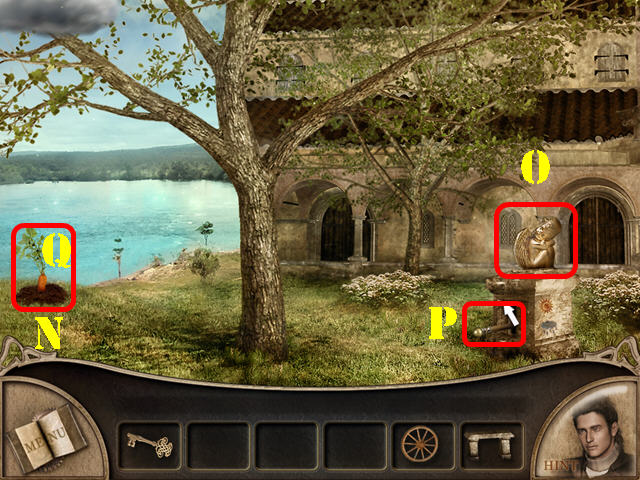
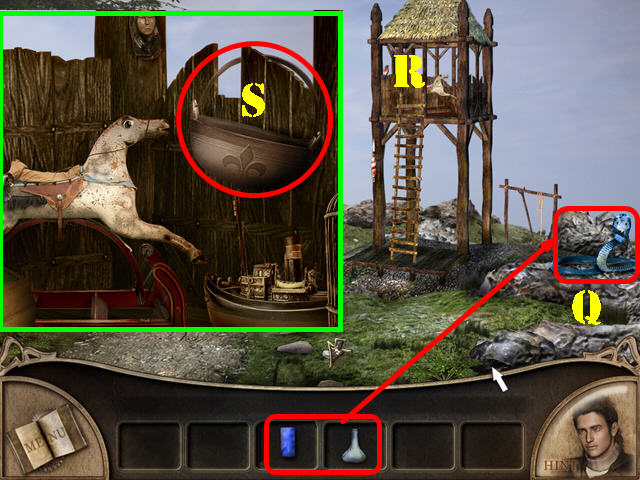 • Put the MAGIC PAINT on the snake to turn it blue (Q). • Put
the EMPTY FLASK on the snake to get the FILLED FLASK. • Zoom
into the tree house (R). • Take the EMPTY POT (S).
• Put the MAGIC PAINT on the snake to turn it blue (Q). • Put
the EMPTY FLASK on the snake to get the FILLED FLASK. • Zoom
into the tree house (R). • Take the EMPTY POT (S).
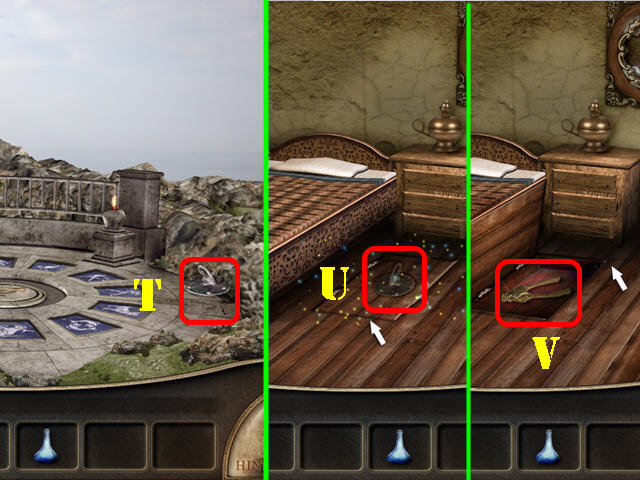 • Leave the tree house and go left to the portal. • Take the
HANDLE (T). • Go back into the castle. Go left and go through
the door to access the bedroom. • Put the HANDLE on the
trapdoor (U) and take the TONGS (V).
• Leave the tree house and go left to the portal. • Take the
HANDLE (T). • Go back into the castle. Go left and go through
the door to access the bedroom. • Put the HANDLE on the
trapdoor (U) and take the TONGS (V).
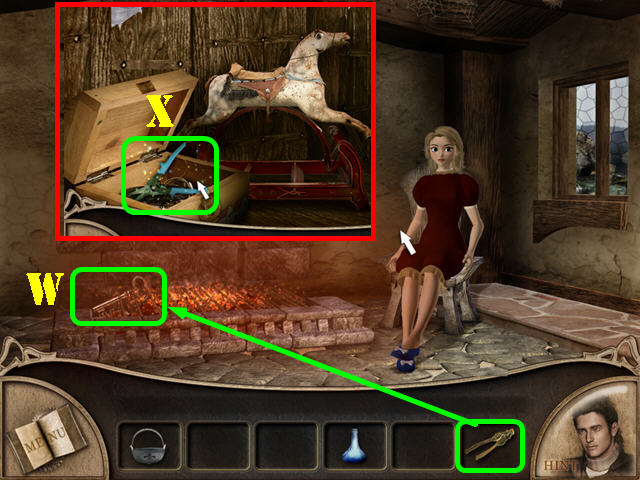 • Go back to the secret passage. • Use the TONGS to retrieve
the KEY in the fire (W). • Go back to the tree house. • Use
the KEY to open the chest and take the SHEARS (X). • Leave the
tree house and walk down.
• Go back to the secret passage. • Use the TONGS to retrieve
the KEY in the fire (W). • Go back to the tree house. • Use
the KEY to open the chest and take the SHEARS (X). • Leave the
tree house and walk down.
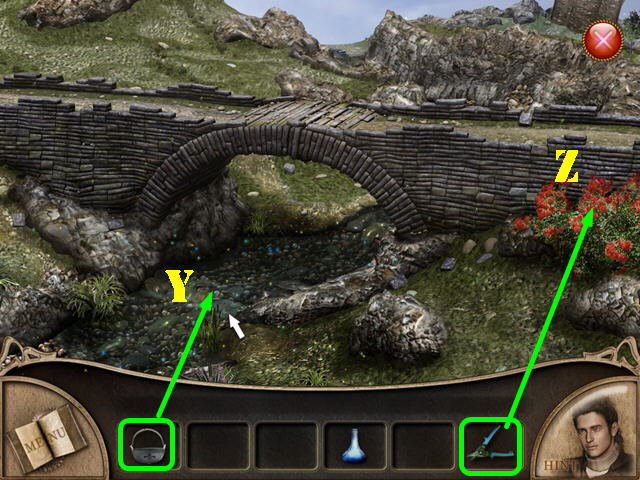 • Zoom into the bridge; put the EMPTY POT in the water to get
the POT WITH WATER (Y). • Use the SHEARS on the rose bush to
get the ROSE (Z).
• Zoom into the bridge; put the EMPTY POT in the water to get
the POT WITH WATER (Y). • Use the SHEARS on the rose bush to
get the ROSE (Z).
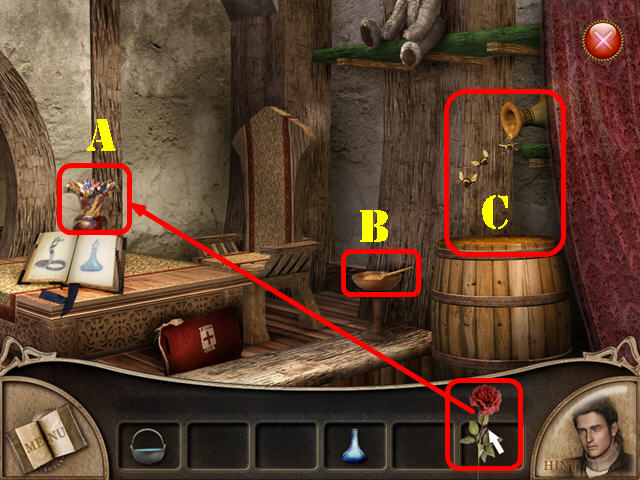 • Go back to the living room and zoom into the table. • Open
the curtain, if you haven’t done so already to reveal the
bees. • Put the ROSE in the vase to lure the bees away from
the barrel (A). • Take the EMPTY SPOON (B). • Put the EMPTY
SPOON below the dripping the pot to get the SPOON WITH HONEY
(C).
• Go back to the living room and zoom into the table. • Open
the curtain, if you haven’t done so already to reveal the
bees. • Put the ROSE in the vase to lure the bees away from
the barrel (A). • Take the EMPTY SPOON (B). • Put the EMPTY
SPOON below the dripping the pot to get the SPOON WITH HONEY
(C).
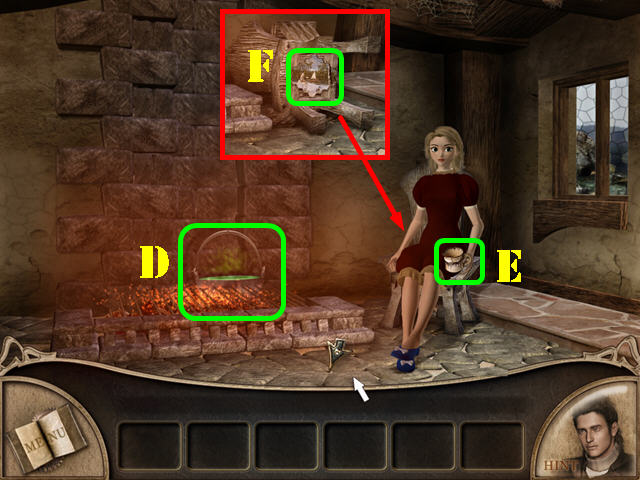 • Go back to the secret passage. • Put the POT WITH WATER over
the fire (D). • Add the SPOON WITH HONEY and the FILLED FLASK
to the pot for the lady to have a cup in her hand. • Take the
CUP from her hand (E) and put it in the potion to create the
FILLED CUP. • Give her the FILLED CUP. • Knock the chair over
and take the PUZZLE PIECE (F).
• Go back to the secret passage. • Put the POT WITH WATER over
the fire (D). • Add the SPOON WITH HONEY and the FILLED FLASK
to the pot for the lady to have a cup in her hand. • Take the
CUP from her hand (E) and put it in the potion to create the
FILLED CUP. • Give her the FILLED CUP. • Knock the chair over
and take the PUZZLE PIECE (F).
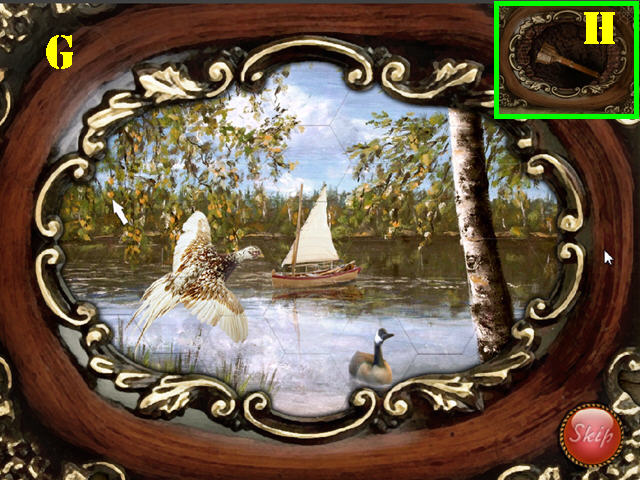 • Go back to the bedroom. • Put the PUZZLE PIECE on the
painting to activate a puzzle. • Select any two tiles to swap
their positions. • Form the image shown in the screenshot (G).
• Take the UNLIT TORCH after the puzzle has been solved (H).
• Go back to the bedroom. • Put the PUZZLE PIECE on the
painting to activate a puzzle. • Select any two tiles to swap
their positions. • Form the image shown in the screenshot (G).
• Take the UNLIT TORCH after the puzzle has been solved (H).
 • Go to the secret passage. • Put the UNLIT TORCH in the fire
to create the LIT TORCH (I). • Walk down and go right. • Burn
the spider web with the LIT TORCH (J). • Note the symbols on
the wall (K).
• Go back to the portal. • Examine the ground to activate a
puzzle. • Move the arrows as shown in the screenshot and then
press on the Zodiac symbols marked in red (L). • Press on the
ground to end the chapter.
• Go to the secret passage. • Put the UNLIT TORCH in the fire
to create the LIT TORCH (I). • Walk down and go right. • Burn
the spider web with the LIT TORCH (J). • Note the symbols on
the wall (K).
• Go back to the portal. • Examine the ground to activate a
puzzle. • Move the arrows as shown in the screenshot and then
press on the Zodiac symbols marked in red (L). • Press on the
ground to end the chapter.
Chapter 4: The Generator
 • Knock over the trashcan; take the CANDY (A) and the HANDLE
(B). • Take the WHEEL (C). • Put the HANDLE on the hatch (D)
and zoom into it to activate a puzzle. • Select the 3 squares
which contain only one of each symbol. • Please look at the
screenshot for the solution (E).
• Knock over the trashcan; take the CANDY (A) and the HANDLE
(B). • Take the WHEEL (C). • Put the HANDLE on the hatch (D)
and zoom into it to activate a puzzle. • Select the 3 squares
which contain only one of each symbol. • Please look at the
screenshot for the solution (E).
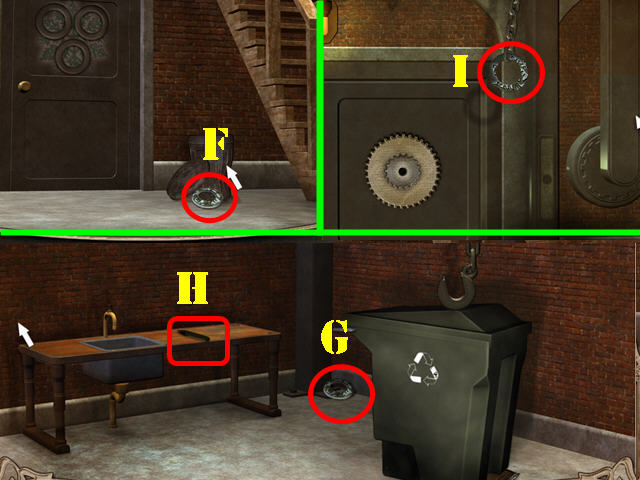 • Go through the hatch after the puzzle has been solved and
walk down. • Press on the trash can lid; pick up the first
PUZZLE PIECE (F). • Go left. • Pick up the second PUZZLE PIECE
(G) and the MARKER (H). • Go right twice. • Take the third
PUZZLE PIECE (I). • Go left.
• Go through the hatch after the puzzle has been solved and
walk down. • Press on the trash can lid; pick up the first
PUZZLE PIECE (F). • Go left. • Pick up the second PUZZLE PIECE
(G) and the MARKER (H). • Go right twice. • Take the third
PUZZLE PIECE (I). • Go left.
 • Put the 3 PUZZLE PIECES on the door to activate a puzzle. •
Rotate the rings until you form the correct image. • Please
look at the screenshot for the solution (J). • Open the door
and go through it.
• Put the 3 PUZZLE PIECES on the door to activate a puzzle. •
Rotate the rings until you form the correct image. • Please
look at the screenshot for the solution (J). • Open the door
and go through it.
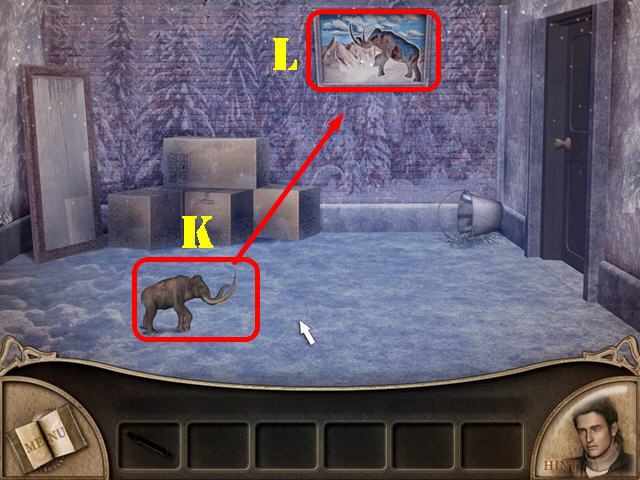 • Give the CANDY to the ELEPHANT and take it after it shrinks
(K). • Put the ELEPHANT on the painting to activate a puzzle
(L).
• Give the CANDY to the ELEPHANT and take it after it shrinks
(K). • Put the ELEPHANT on the painting to activate a puzzle
(L).
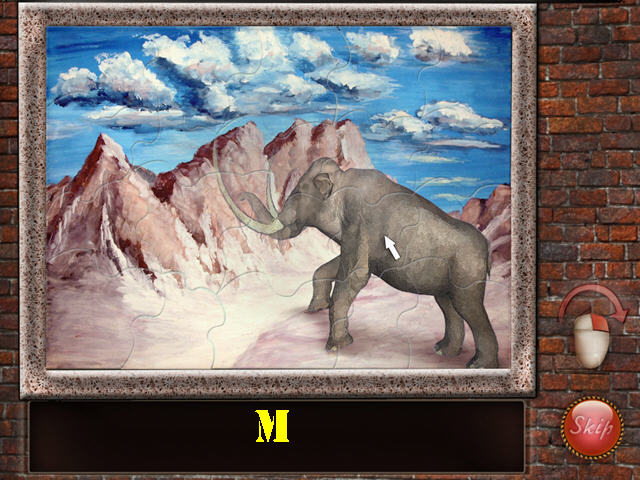 • Right-click on a puzzle piece to rotate it. • Arrange the
jigsaw puzzle as shown in the screenshot (M).
• Right-click on a puzzle piece to rotate it. • Arrange the
jigsaw puzzle as shown in the screenshot (M).
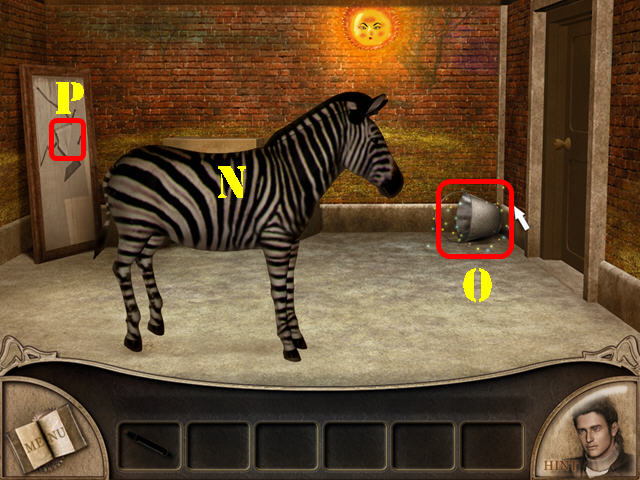 • Use the MARKER on the zebra (N). • Take the EMPTY BUCKET
(O). • Put the EMPTY BUCKET on the mirror to break it. • Take
the MIRROR SHARD from the mirror (P).
• Use the MARKER on the zebra (N). • Take the EMPTY BUCKET
(O). • Put the EMPTY BUCKET on the mirror to break it. • Take
the MIRROR SHARD from the mirror (P).
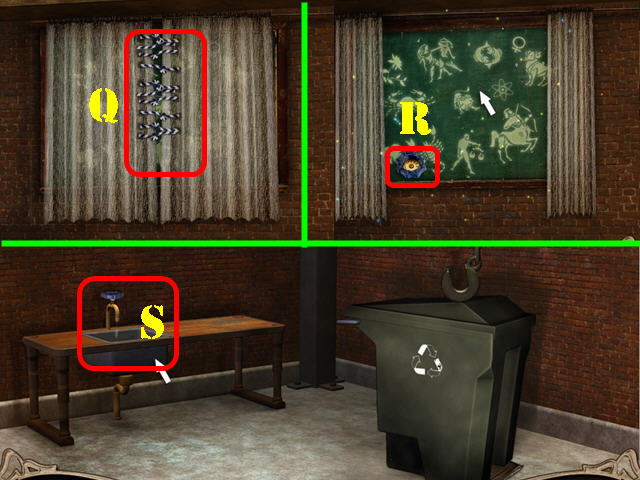 • Go back upstairs. • Use the MIRROR SHARD to cut the stitches
on the curtain (Q). • Open the curtain and take the FAUCET
HANDLE (R). • Go back down and head left. • Put the FAUCET
HANDLE on the faucet (S). • Put the EMPTY BUCKET on the water
to create the FILLED BUCKET.
• Go back upstairs. • Use the MIRROR SHARD to cut the stitches
on the curtain (Q). • Open the curtain and take the FAUCET
HANDLE (R). • Go back down and head left. • Put the FAUCET
HANDLE on the faucet (S). • Put the EMPTY BUCKET on the water
to create the FILLED BUCKET.
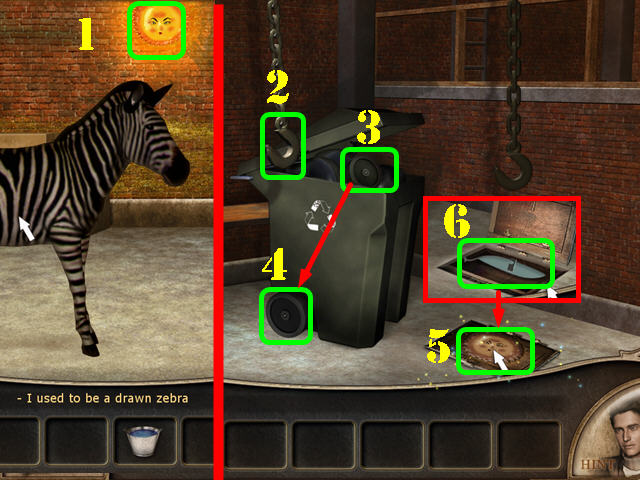 • Go back to the zebra room. • Put the FILLED BUCKET on the
SUN and take the SUN to add it to inventory (1). • Go back to
the sink room. • Put the FILLED BUCKET on the left hook (2) to
open the trashcan. • Take the WHEEL in the trashcan (3) and
place it at the bottom of the trashcan (4). • Move the
trashcan and place the SUN in the recess (5). • Open the hatch
and take the WING (6).
• Go back to the zebra room. • Put the FILLED BUCKET on the
SUN and take the SUN to add it to inventory (1). • Go back to
the sink room. • Put the FILLED BUCKET on the left hook (2) to
open the trashcan. • Take the WHEEL in the trashcan (3) and
place it at the bottom of the trashcan (4). • Move the
trashcan and place the SUN in the recess (5). • Open the hatch
and take the WING (6).
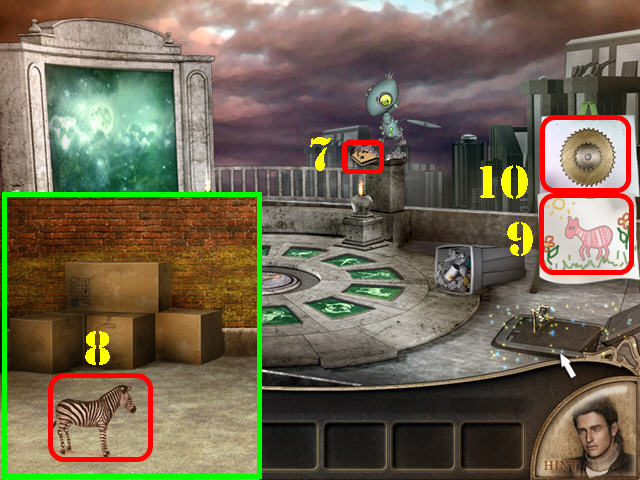 • Go back outside. • Put the WING on the ant and take the
CANDY (7). • Go back to the zebra room and give the CANDY to
the zebra. Take the ZEBRA (8). • Go back outside and put the
ZEBRA on the painting (9) and take the GEAR (10).
• Go back outside. • Put the WING on the ant and take the
CANDY (7). • Go back to the zebra room and give the CANDY to
the zebra. Take the ZEBRA (8). • Go back outside and put the
ZEBRA on the painting (9) and take the GEAR (10).
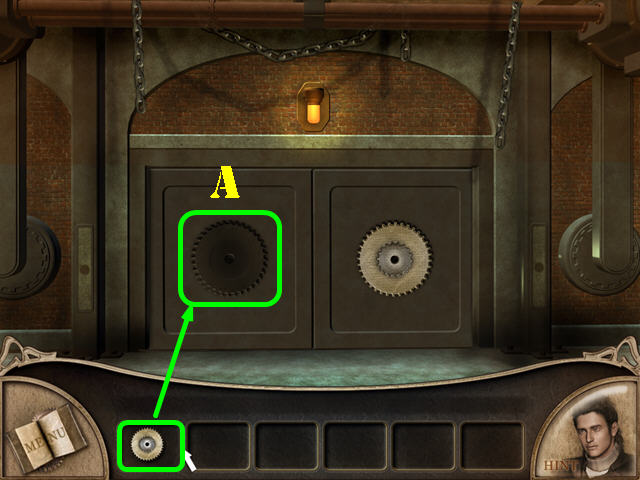 • Go to the basement and go right. • Put the GEAR on the door
(A). • Open the door and go through it.
• Go to the basement and go right. • Put the GEAR on the door
(A). • Open the door and go through it.
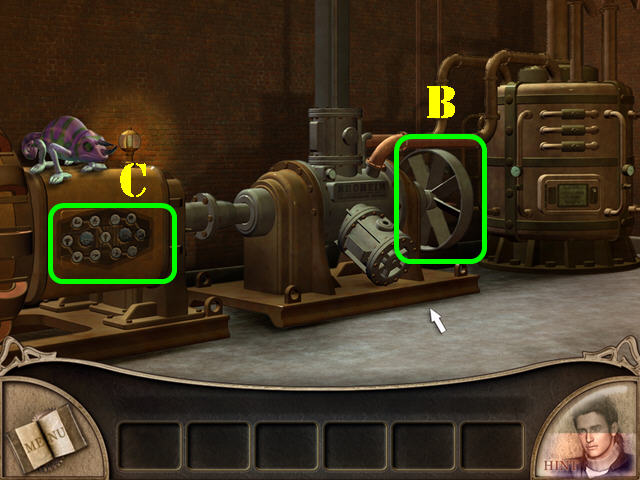 • Put the WHEEL on the side of the generator (B). • Examine
the device below the chameleon for a puzzle to appear (C).
• Put the WHEEL on the side of the generator (B). • Examine
the device below the chameleon for a puzzle to appear (C).
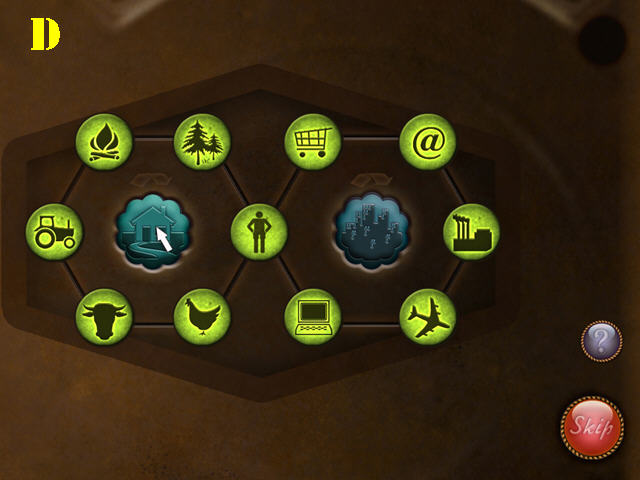 • Press on the center pieces to rotate the items. • Arrange
the icons as shown in the screenshot (D). On the left put all
the items that belong in the country and on the right, put the
items that belong in the city.
• Press on the center pieces to rotate the items. • Arrange
the icons as shown in the screenshot (D). On the left put all
the items that belong in the country and on the right, put the
items that belong in the city.
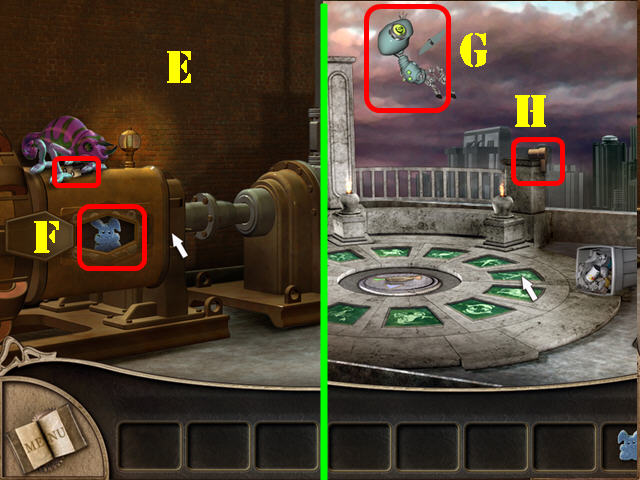 • Take the BATTERY CELLS from the chameleon (E). • Take the
SPONGE (F). • Go back to the portal. • Give the BATTERY CELLS
to the ant (G) and take the FAUCET HANDLE (H).
• Take the BATTERY CELLS from the chameleon (E). • Take the
SPONGE (F). • Go back to the portal. • Give the BATTERY CELLS
to the ant (G) and take the FAUCET HANDLE (H).
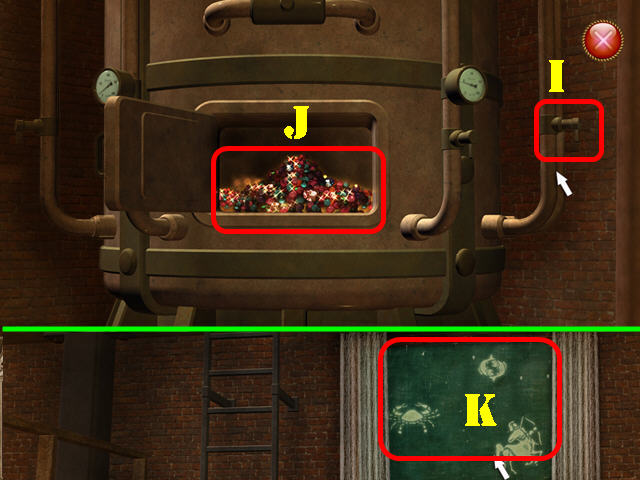 • Go back to the generator room. • Zoom into the generator. •
Put the FAUCET HANDLE on the side (I). • Put the SPONGE in the
magic dust to create the MAGIC SPONGE (J). • Go back to the
blackboard upstairs. • Put the MAGIC SPONGE on the blackboard
and note the symbols (K).
• Go back to the generator room. • Zoom into the generator. •
Put the FAUCET HANDLE on the side (I). • Put the SPONGE in the
magic dust to create the MAGIC SPONGE (J). • Go back to the
blackboard upstairs. • Put the MAGIC SPONGE on the blackboard
and note the symbols (K).
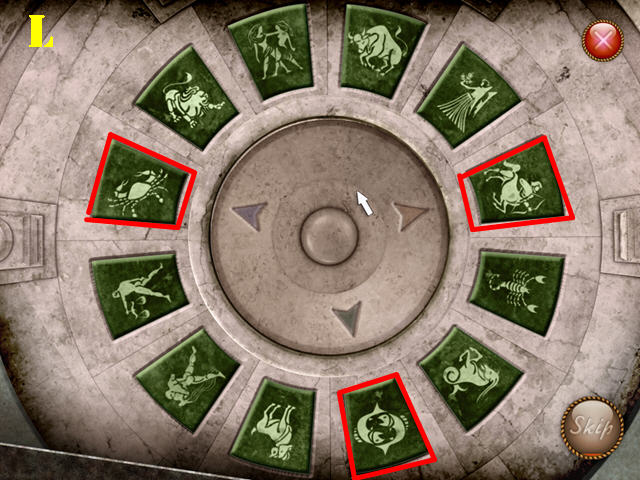 • Go back to the portal. • Examine the ground to activate a
puzzle. • Move the arrows as shown in the screenshot and then
press on the Zodiac symbols marked in red (L). • Press on the
ground to end the chapter.
• Go back to the portal. • Examine the ground to activate a
puzzle. • Move the arrows as shown in the screenshot and then
press on the Zodiac symbols marked in red (L). • Press on the
ground to end the chapter.
Chapter 5: The Dinosaurs
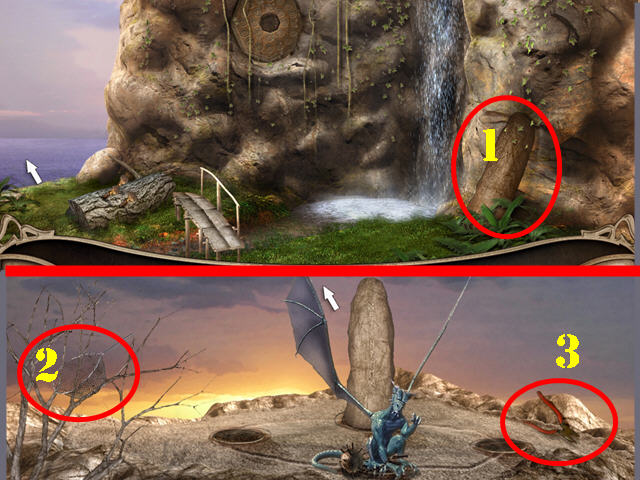 • Go left. • Take the STONE (1). • Go right twice and go up to
the mountain. • Take the NET (2). • Grab the PLIERS (3). •
Walk down and go left twice.
• Go left. • Take the STONE (1). • Go right twice and go up to
the mountain. • Take the NET (2). • Grab the PLIERS (3). •
Walk down and go left twice.
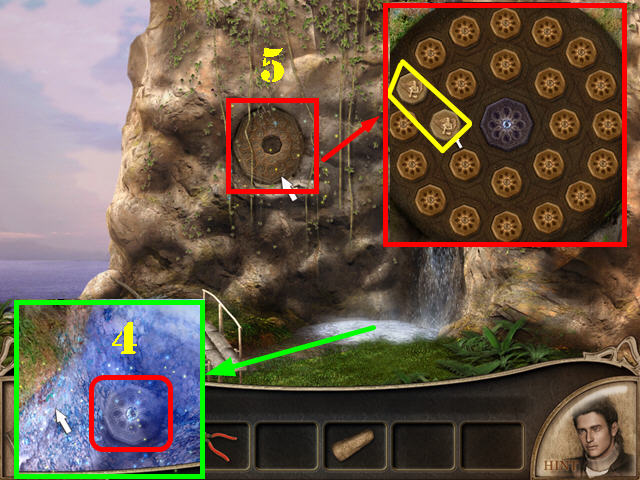 • Zoom into the waterfall; take the PUZZLE PIECE with the NET
(4). • Leave the waterfall. • Put the PUZZLE PIECE on the
puzzle and zoom into it (5). • Find the matching pairs. Select
any 2 pieces to view what is behind them.
• Zoom into the waterfall; take the PUZZLE PIECE with the NET
(4). • Leave the waterfall. • Put the PUZZLE PIECE on the
puzzle and zoom into it (5). • Find the matching pairs. Select
any 2 pieces to view what is behind them.
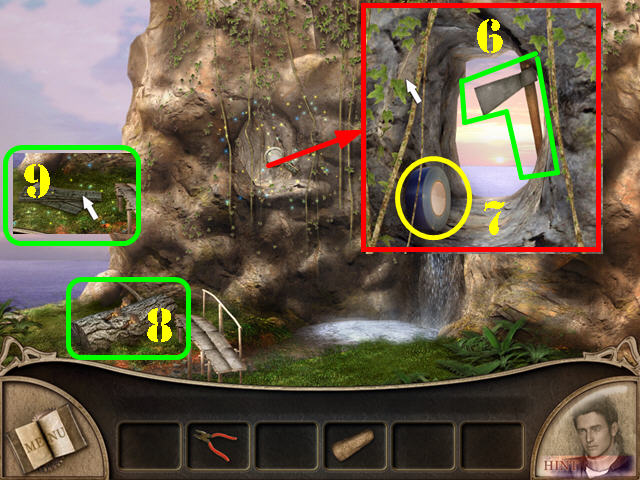 • Zoom into the area behind the puzzle; take the AXE (6) and
the TAPE (7). • Exit the close-up. • Use the PLIERS on the log
to remove the NAILS (8). • Use the AXE on the log; take the
WOOD BOARDS (9). • Go right twice.
• Zoom into the area behind the puzzle; take the AXE (6) and
the TAPE (7). • Exit the close-up. • Use the PLIERS on the log
to remove the NAILS (8). • Use the AXE on the log; take the
WOOD BOARDS (9). • Go right twice.
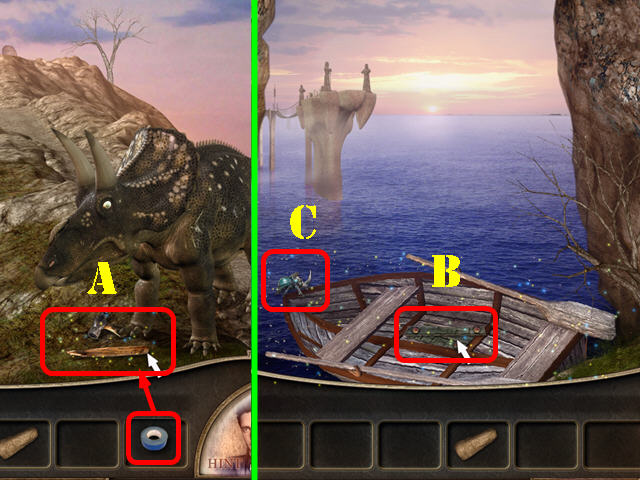 • Use the TAPE on the broken hammer (A) and take the HAMMER. •
Go left. • Put the WOOD BOARDS and the NAIL on the hole on the
boat (B). • Use the HAMMER on the nails. • Take the BEETLE
(C). • Go right.
• Use the TAPE on the broken hammer (A) and take the HAMMER. •
Go left. • Put the WOOD BOARDS and the NAIL on the hole on the
boat (B). • Use the HAMMER on the nails. • Take the BEETLE
(C). • Go right.
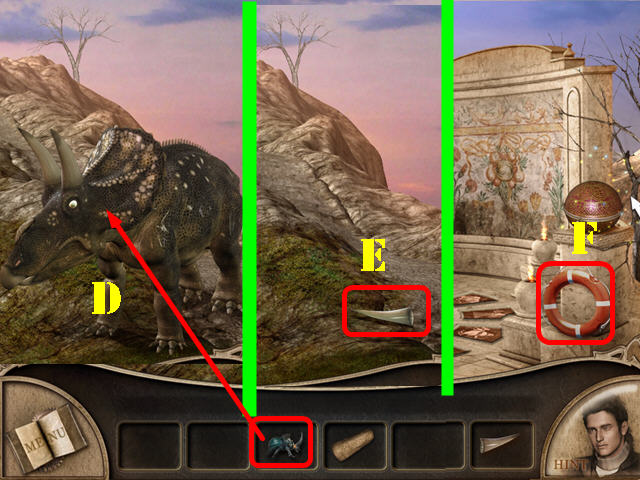 • Give the BEETLE to the dinosaur (D). • Take the HORN (E). •
Go right. • Take the SAFETY RING (F).
• Give the BEETLE to the dinosaur (D). • Take the HORN (E). •
Go right. • Take the SAFETY RING (F).
 • Go back to the boat and put the SAFETY RING on it (G). •
Take the boat to the other side. • Take the STICK (H) in the
water. • Use the STICK to pull down the ladder (I). Go up the
ladder.
• Go back to the boat and put the SAFETY RING on it (G). •
Take the boat to the other side. • Take the STICK (H) in the
water. • Use the STICK to pull down the ladder (I). Go up the
ladder.
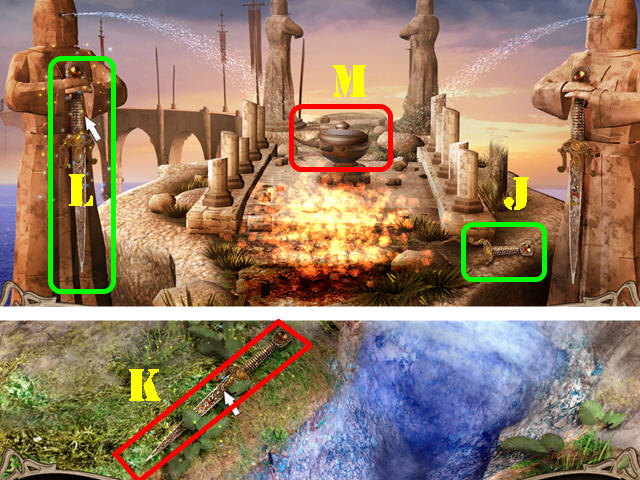 • Take the SWORD HANDLE (J). • Go back to the waterfall and
zoom into it. • Put the SWORD HANDLE on the SWORD and take it
(K). • Take the boat back to the other side and go up the
ladder. • Give the SWORD to the left statue (L) and water will
come out of both statues to put out the fire. • Zoom into the
artifact (M).
• Take the SWORD HANDLE (J). • Go back to the waterfall and
zoom into it. • Put the SWORD HANDLE on the SWORD and take it
(K). • Take the boat back to the other side and go up the
ladder. • Give the SWORD to the left statue (L) and water will
come out of both statues to put out the fire. • Zoom into the
artifact (M).
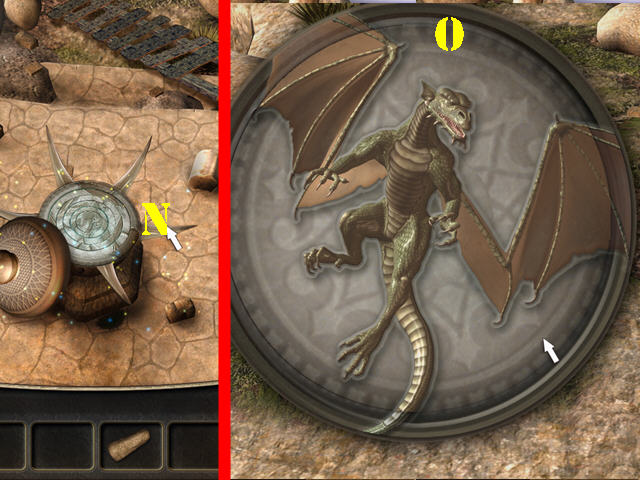 • Put the HORN on the artifact (N) and zoom into the puzzle. •
Rotate the rings to form the correct image (O).
• Put the HORN on the artifact (N) and zoom into the puzzle. •
Rotate the rings to form the correct image (O).
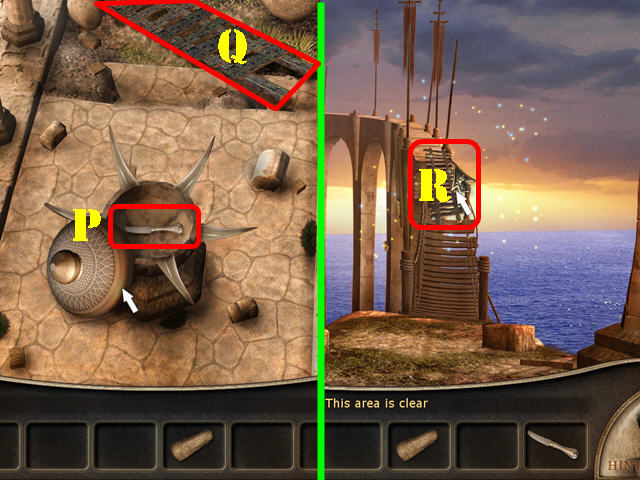 • Take the KNIFE (P) and the LADDER (Q). • Exit this area and
go forward. • Put the LADDER down on the broken bridge and go
forward (R).
• Take the KNIFE (P) and the LADDER (Q). • Exit this area and
go forward. • Put the LADDER down on the broken bridge and go
forward (R).
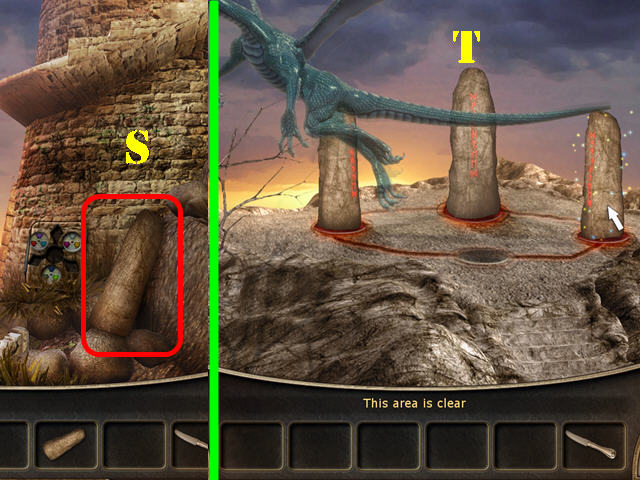 • Go left and take the second STONE (S). • Take the boat back
to the other side; go right and then up the mountain. • Put
the 2 STONES on the ground. • Rotate both stones until the
symbols on the left and right stones are facing the center one
(T). • Solving this puzzle, allows you to get past the dragon
guarding the tower door.
• Go left and take the second STONE (S). • Take the boat back
to the other side; go right and then up the mountain. • Put
the 2 STONES on the ground. • Rotate both stones until the
symbols on the left and right stones are facing the center one
(T). • Solving this puzzle, allows you to get past the dragon
guarding the tower door.
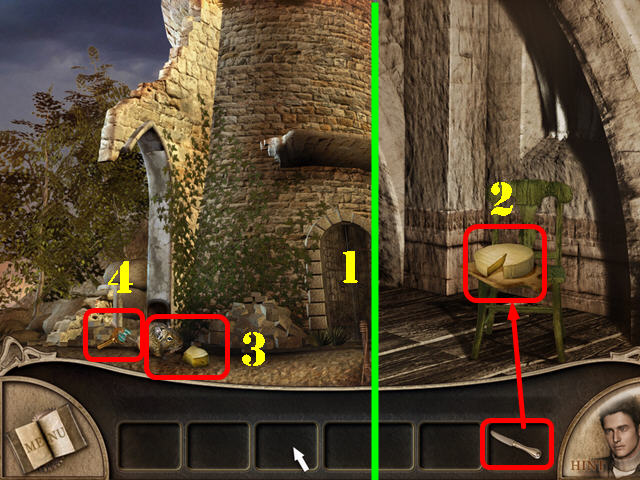 • Take the boat back to the other side and go to the tower. •
Open the door and go through it (1). Go left once inside. •
Cut a PIECE OF CHEESE with the KNIFE (2). • Go outside. • Give
the PIECE OF CHEESE to the mouse (3). • Take the KEY (4).
• Take the boat back to the other side and go to the tower. •
Open the door and go through it (1). Go left once inside. •
Cut a PIECE OF CHEESE with the KNIFE (2). • Go outside. • Give
the PIECE OF CHEESE to the mouse (3). • Take the KEY (4).
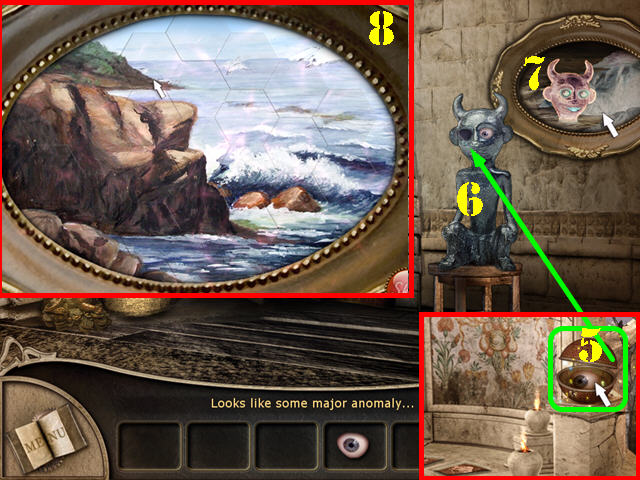 • Go back to the portal. • Use the KEY to unlock the sphere;
take the EYE (5). • Go back to the inside of the tower. • Put
the EYE on the one-eyed monster (6). • Zoom into the picture
to activate a puzzle (7). • Arrange the puzzle as shown in the
screenshot (8).
• Go back to the portal. • Use the KEY to unlock the sphere;
take the EYE (5). • Go back to the inside of the tower. • Put
the EYE on the one-eyed monster (6). • Zoom into the picture
to activate a puzzle (7). • Arrange the puzzle as shown in the
screenshot (8).
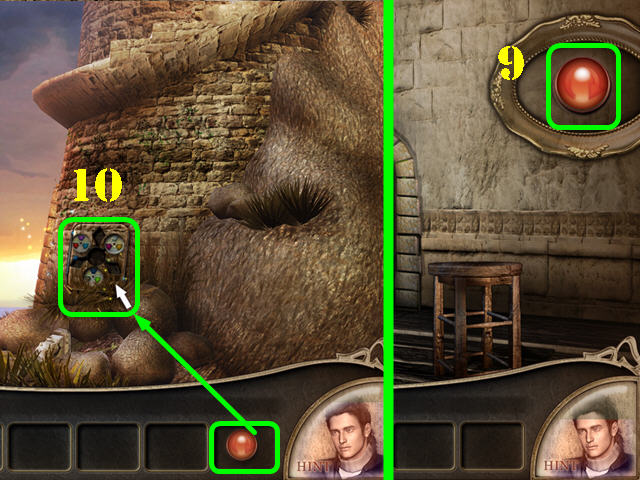 • Take the BUTTON (9). • Exit the tower and go left. • Put the
BUTTON on the puzzle and zoom into it to activate a puzzle
(10).
• Take the BUTTON (9). • Exit the tower and go left. • Put the
BUTTON on the puzzle and zoom into it to activate a puzzle
(10).
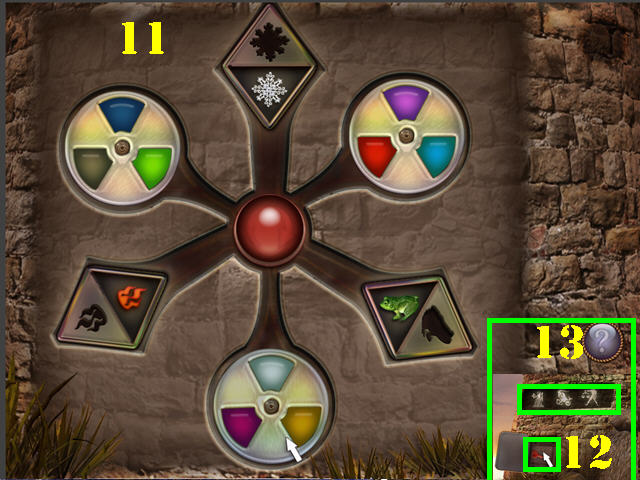 • Find the images of the item in silhouette by pressing on the
symbols directly below it. Find the snowflake, flame, and the
frog. • Use the red button to rotate the positions of the
circles with the triangles. • Click on the circles themselves
to rotate the triangles. Face the colored triangle on the
opposite side of the color of the item. For example, put the
green triangle opposite of the frog. • Please see the
screenshot for the solution (11). • Press on the red key (12)
and note the Zodiac symbols on the wall (13).
• Find the images of the item in silhouette by pressing on the
symbols directly below it. Find the snowflake, flame, and the
frog. • Use the red button to rotate the positions of the
circles with the triangles. • Click on the circles themselves
to rotate the triangles. Face the colored triangle on the
opposite side of the color of the item. For example, put the
green triangle opposite of the frog. • Please see the
screenshot for the solution (11). • Press on the red key (12)
and note the Zodiac symbols on the wall (13).
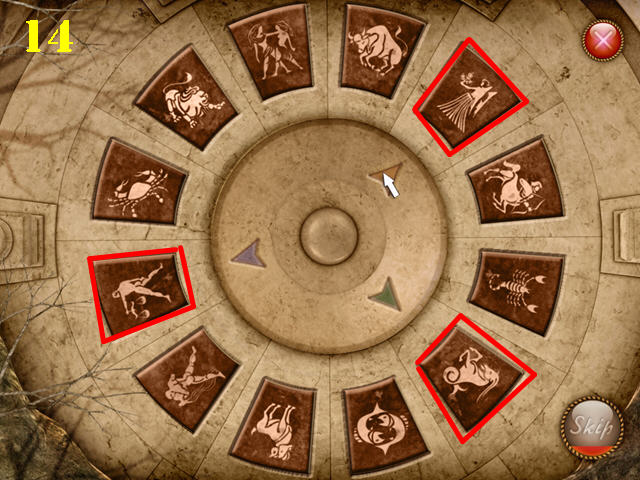 • Go back to the portal. • Examine the ground to activate a
puzzle. • Move the arrows as shown in the screenshot and then
press on the Zodiac symbols marked in red (14). • Press on the
ground to end the chapter.
• Go back to the portal. • Examine the ground to activate a
puzzle. • Move the arrows as shown in the screenshot and then
press on the Zodiac symbols marked in red (14). • Press on the
ground to end the chapter.
Chapter 6: The Donkey
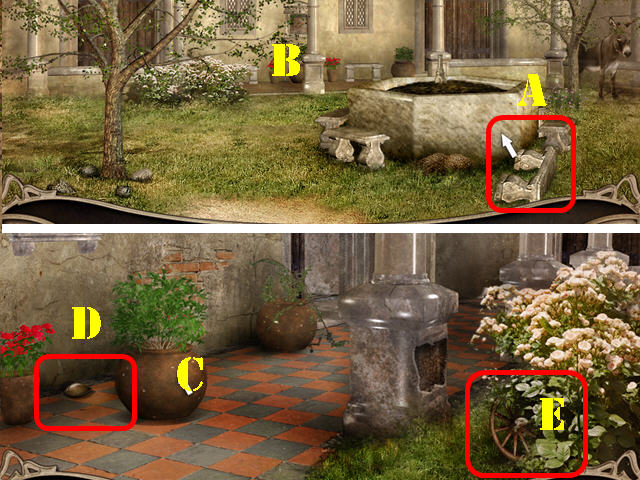 • Move the BENCH and take it (A). • Examine the back wall (B).
• Move the pot (C) and take the SEED (D). • Take the WHEEL
(E). • Leave the area and go left.
• Move the BENCH and take it (A). • Examine the back wall (B).
• Move the pot (C) and take the SEED (D). • Take the WHEEL
(E). • Leave the area and go left.
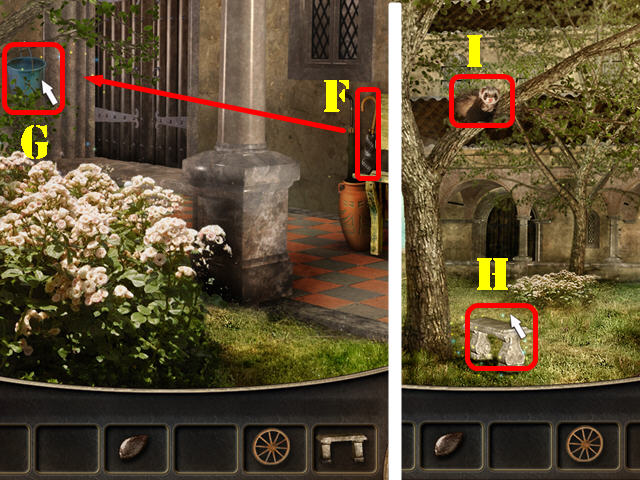 • Examine the back wall. • Take the UMBRELLA (F). • Pull down
the branch with the UMBRELLA and take the EMPTY BUCKET (G). •
Leave the area. • Put the BENCH below the tree (H). • Touch
the raccoon twice (once in the tree and once on the ground) to
take the KEY (I). • Take the BENCH back. • Go right.
• Examine the back wall. • Take the UMBRELLA (F). • Pull down
the branch with the UMBRELLA and take the EMPTY BUCKET (G). •
Leave the area. • Put the BENCH below the tree (H). • Touch
the raccoon twice (once in the tree and once on the ground) to
take the KEY (I). • Take the BENCH back. • Go right.
 • Put the EMPTY BUCKET in the fountain to get the FILLED
BUCKET (J). • Take the PUZZLE PIECE in the fountain (K). •
Examine the back wall. • Put the PUZZLE PIECE in the niche (L)
and take the STATUE (M). • Leave this area and go left.
• Put the EMPTY BUCKET in the fountain to get the FILLED
BUCKET (J). • Take the PUZZLE PIECE in the fountain (K). •
Examine the back wall. • Put the PUZZLE PIECE in the niche (L)
and take the STATUE (M). • Leave this area and go left.
 • Put the SEED and the FILLED BUCKET in the hole in the ground
(N). • Put the STATUE on the pedestal (O) and pull on the
lever (P) to make it rain. • Take the CARROT (Q). • Go right
twice.
• Put the SEED and the FILLED BUCKET in the hole in the ground
(N). • Put the STATUE on the pedestal (O) and pull on the
lever (P) to make it rain. • Take the CARROT (Q). • Go right
twice.
 • Put the WHEEL on the wagon for the reins to appear (R). •
Take the REINS (S). • Put the REINS on the donkey (T). • Give
the CARROT to the donkey (U).
• Put the WHEEL on the wagon for the reins to appear (R). •
Take the REINS (S). • Put the REINS on the donkey (T). • Give
the CARROT to the donkey (U).
 • Take the MATCHES on the ground that appears after the donkey
moves (V). • Go right and take a close look at the portal. •
Take the EMPTY VIAL (W). • Take the PUZZLE PIECE (X). • Take
the first FAUCET HANDLE (Y). • Leave this area.
• Take the MATCHES on the ground that appears after the donkey
moves (V). • Go right and take a close look at the portal. •
Take the EMPTY VIAL (W). • Take the PUZZLE PIECE (X). • Take
the first FAUCET HANDLE (Y). • Leave this area.
 • Put the PUZZLE PIECE in the recess on the ground (A). •
Rotate the rings as shown in the screenshot (B). • Take the
second FAUCET HANDLE (C). • Use the KEY in the lock (D). •
Open the door and go through it.
• Put the PUZZLE PIECE in the recess on the ground (A). •
Rotate the rings as shown in the screenshot (B). • Take the
second FAUCET HANDLE (C). • Use the KEY in the lock (D). •
Open the door and go through it.
 • Put the BENCH on the table (E) and touch the chandelier to
lower it. • Light the candles with the MATCHES. • Take the
SHOVEL (F). • Take the MAGIC DUST (G). • Select the painting
to activate a puzzle (H).
• Put the BENCH on the table (E) and touch the chandelier to
lower it. • Light the candles with the MATCHES. • Take the
SHOVEL (F). • Take the MAGIC DUST (G). • Select the painting
to activate a puzzle (H).
 • Arrange the picture as shown in the screenshot (I). • Take
the third FAUCET HANDLE on the wall (J).
• Arrange the picture as shown in the screenshot (I). • Take
the third FAUCET HANDLE on the wall (J).
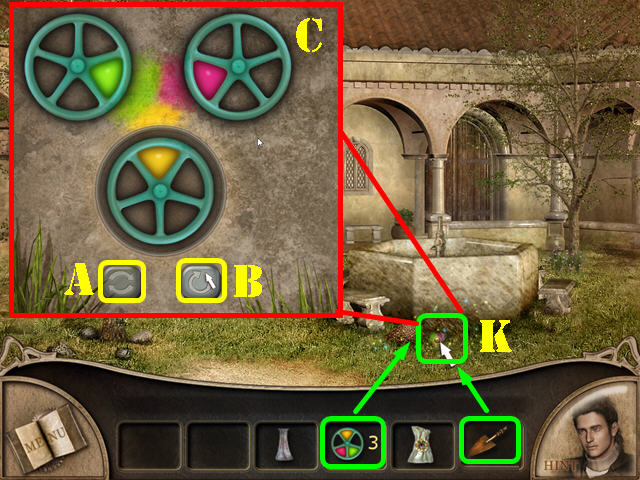 • Go back to the fountain. • Use the SHOVEL to dig up the dirt
(K). • Put the 3 FAUCET HANDLES in the spot you dug up to
activate a puzzle (K). • Use the left button to move the
locations of the wheels (A). • Use the right button to rotate
the lower wheel (B). • Your goal is to rotate the wheels so
you can have the colors inside the wheel next to the same
color on the background. • Please look at the screenshot for
the final solution (C). The starting position for this puzzle
is random.
• Go back to the fountain. • Use the SHOVEL to dig up the dirt
(K). • Put the 3 FAUCET HANDLES in the spot you dug up to
activate a puzzle (K). • Use the left button to move the
locations of the wheels (A). • Use the right button to rotate
the lower wheel (B). • Your goal is to rotate the wheels so
you can have the colors inside the wheel next to the same
color on the background. • Please look at the screenshot for
the final solution (C). The starting position for this puzzle
is random.
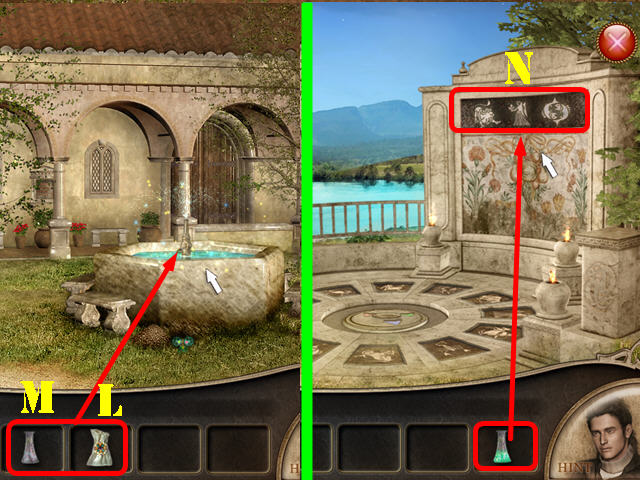 • Put the MAGIC DUST in the fountain (L). • Put the EMPTY VIAL
in the fountain to get the FILLED VIAL (M). • Go back to the
portal; put the FILLED VIAL on the wall and note the Zodiac
symbols (N).
• Put the MAGIC DUST in the fountain (L). • Put the EMPTY VIAL
in the fountain to get the FILLED VIAL (M). • Go back to the
portal; put the FILLED VIAL on the wall and note the Zodiac
symbols (N).
 • Examine the ground to activate a puzzle. • Move the arrows
as shown in the screenshot and then press on the Zodiac
symbols marked in red (O). • Press on the ground.
• Examine the ground to activate a puzzle. • Move the arrows
as shown in the screenshot and then press on the Zodiac
symbols marked in red (O). • Press on the ground.
 • Arrange the mirror pieces as shown in the screenshot (P). •
Congratulations, you have completed Aaron Crane: Paintings
Come Alive!
• Arrange the mirror pieces as shown in the screenshot (P). •
Congratulations, you have completed Aaron Crane: Paintings
Come Alive!
Created at: 2012-02-22