

Walkthrough Menu
- General Tips
- Chapter 1: The Tavern
- Chapter 2: The Palace
- Chapter 3: Dressing Room
- Chapter 4: Golden Palace
- Chapter 5: Market Square
- Chapter 6: Turret Hall
- Chapter 7: The Kitchen
General Tips
- This is the official guide for Amaranthine Voyage: The Living Mountain!
- This guide will not mention each time you have to zoom into a location; the screenshots will show each zoom scene.
- Hidden-object puzzles are referred to as HOPs in this guide. Items listed in purple are hidden or require additional actions to locate. Interactive items in HOPs are color-coded.
- Mini-games and HOPs are sometimes randomized; your solution may vary.
- In HOPs, groups of items will be marked in the same color. Listed items will be marked in yellow and interactive items will be color-coded.
- This guide will give step-by-step solutions for all puzzles which are not random. Please read the instructions in the game for each puzzle.
- You can play a Bubbles Shoot game instead of a Hidden-object puzzle, by selecting the Bubble shoot button in the lower-left corner.
- Use Bonnie the dog to help you reach hard to reach areas.
- Use the Bow and Arrow to shoot at far away targets. It is best to shoot when the red ball is in the center of the target. If there are several red balls, then shoot once all of them are in the center.
Chapter 1: The Tavern
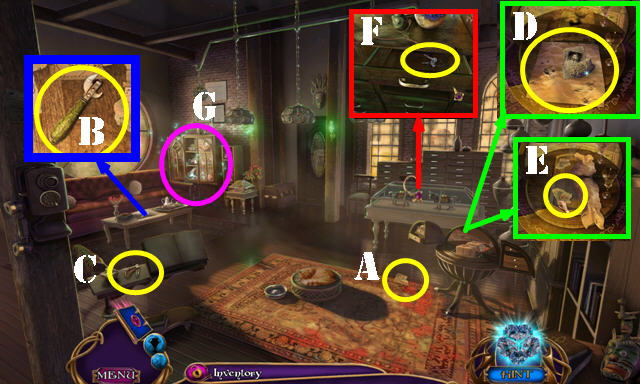
- Talk to Professor Burns.
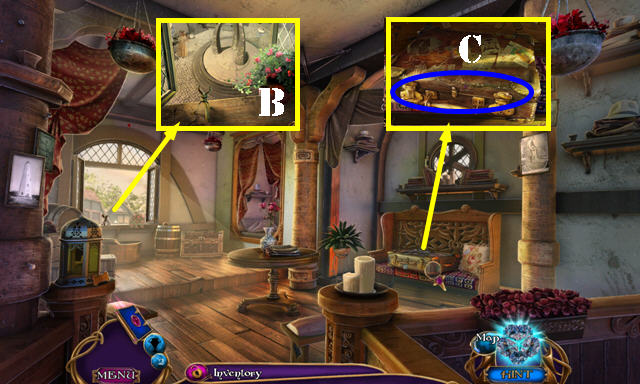
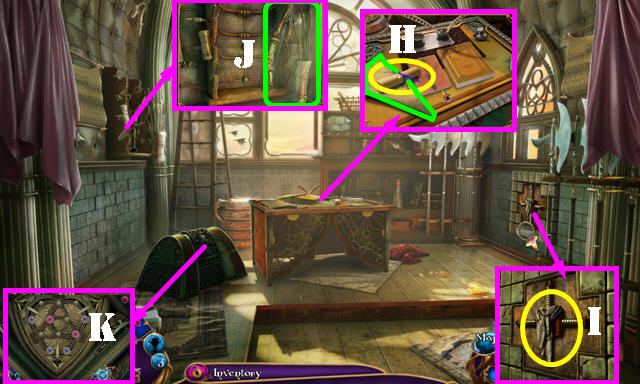
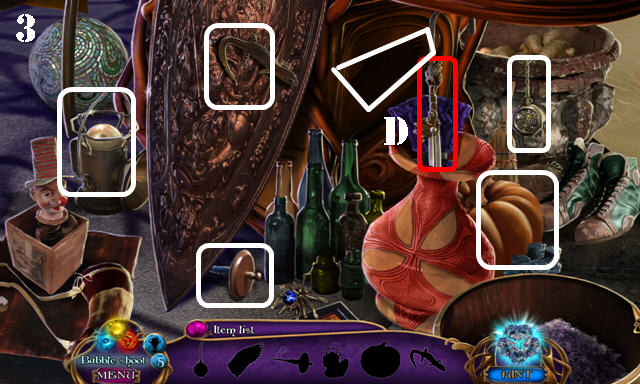
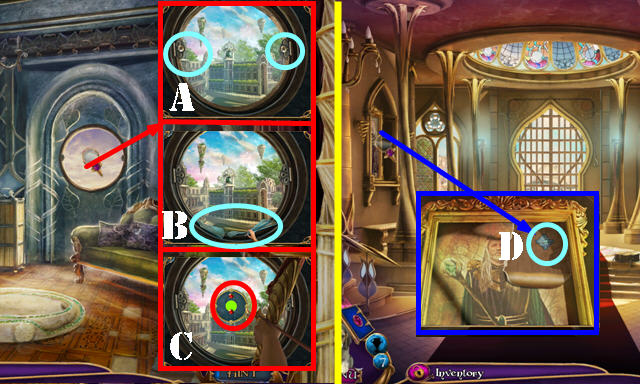
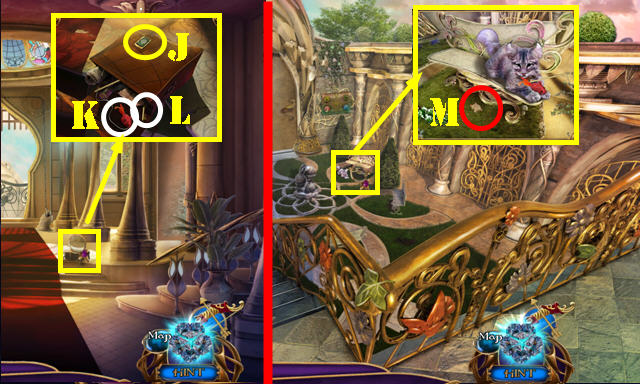
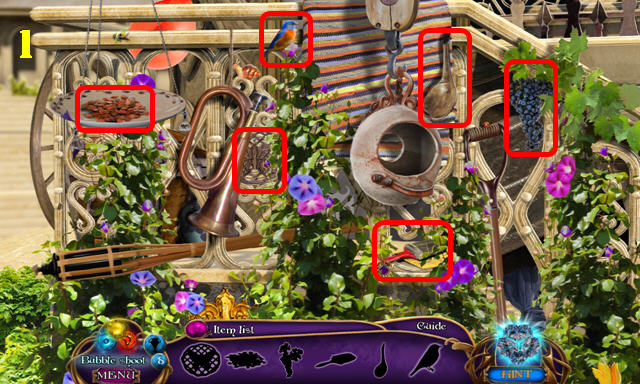
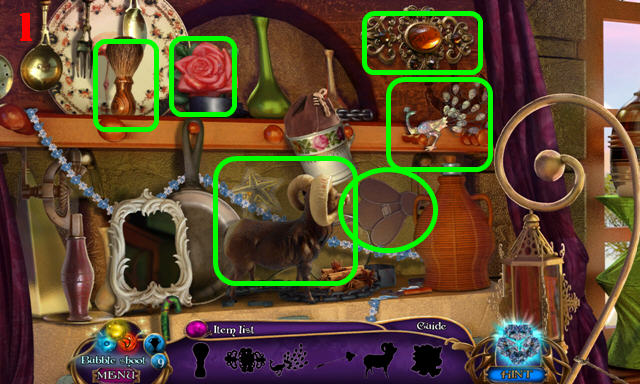
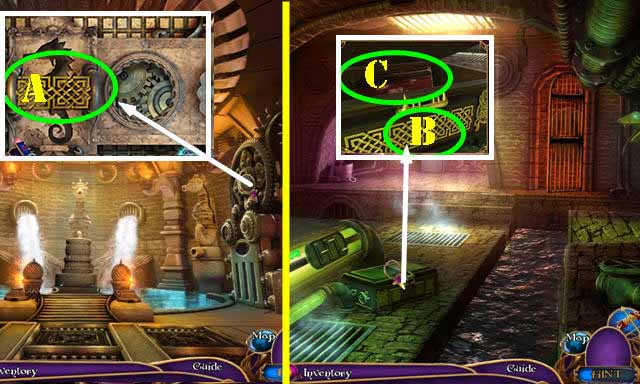
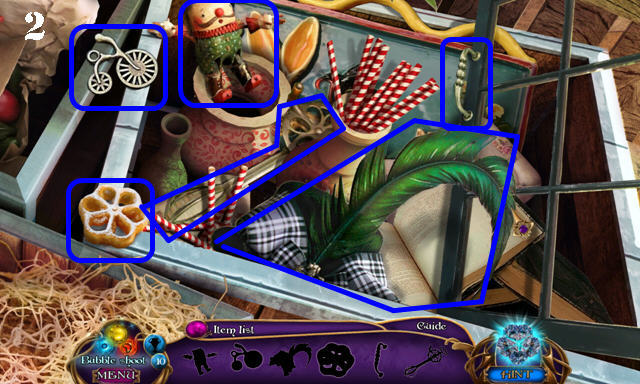
- Take the MAP PIECES 1/5 (A), CAN OPENER (B), and POCKET KNIFE (C).
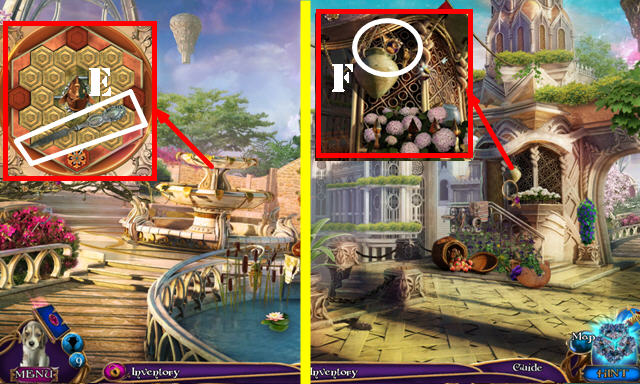
- Use the POCKET KNIFE on the package; take the STRANGE STONE and PHOTOGRAPH (D), then take the Note. Remove the paper and take the MAP PIECES 2/5 (E).
- Use the POCKET KNIFE on the drawer and take the CAR KEYS (F).
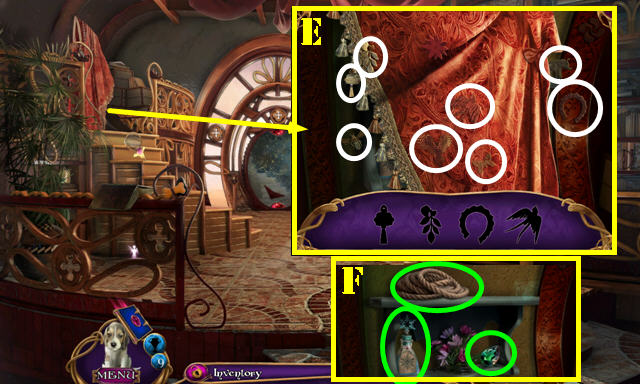
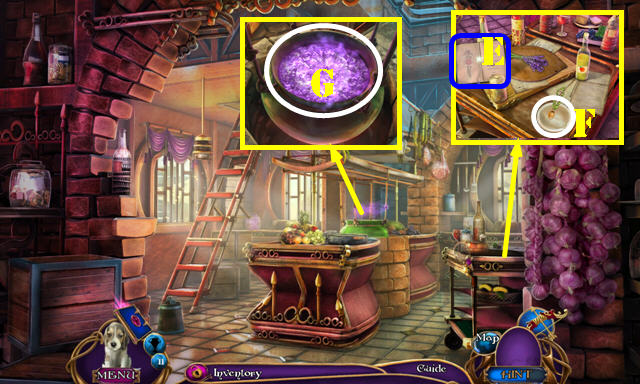
- Open the cabinet to activate a HOP (G).
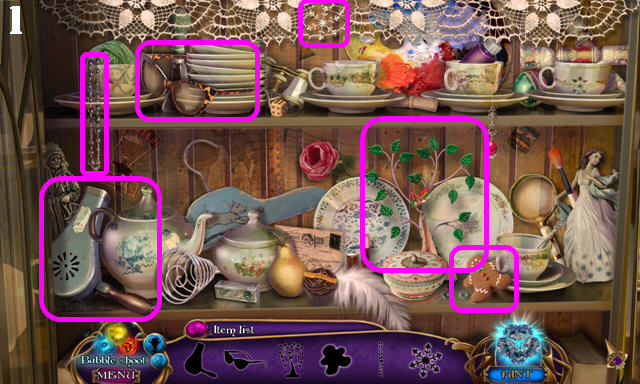
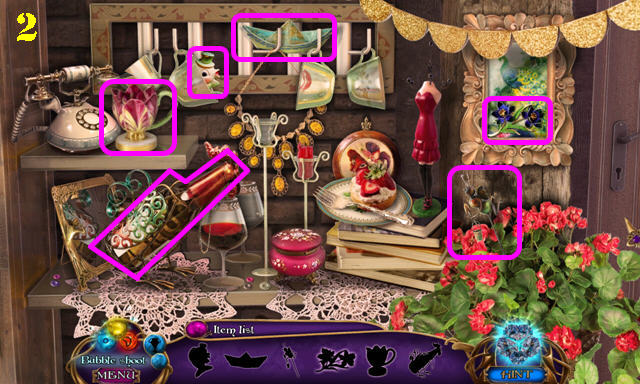
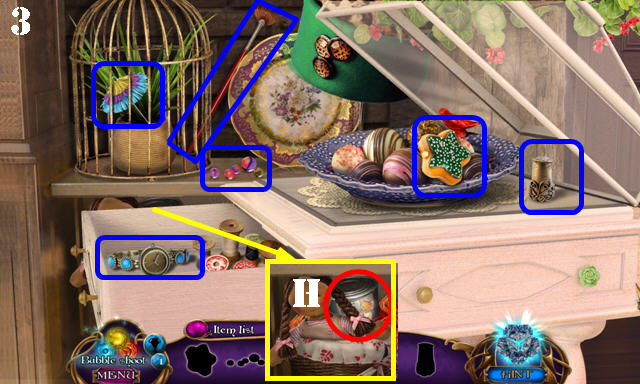
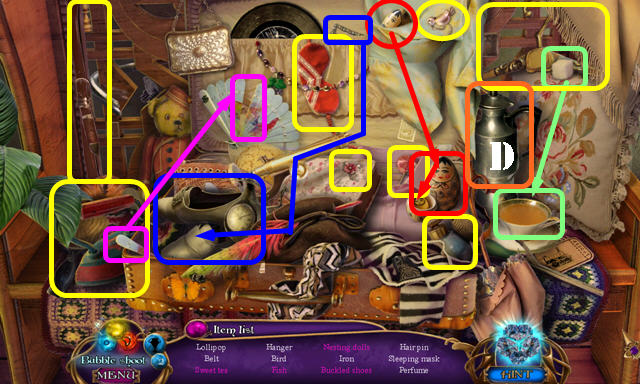
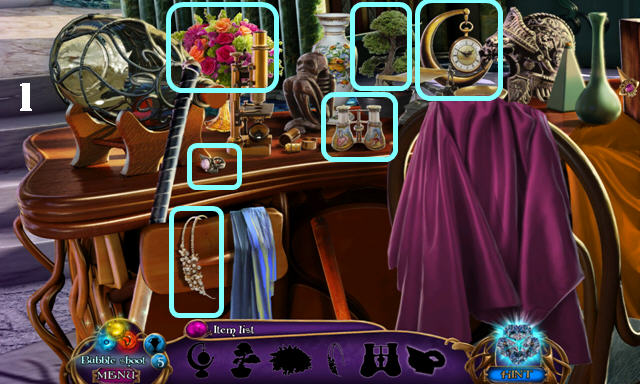
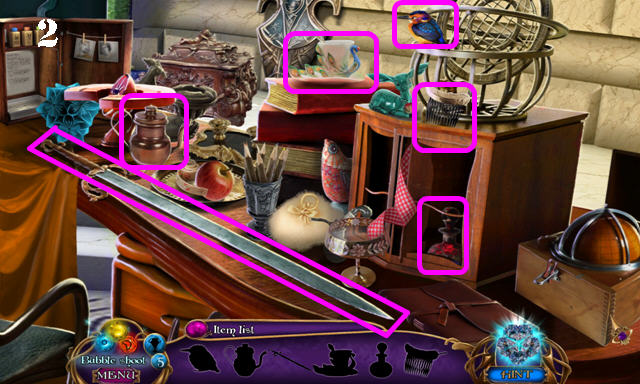
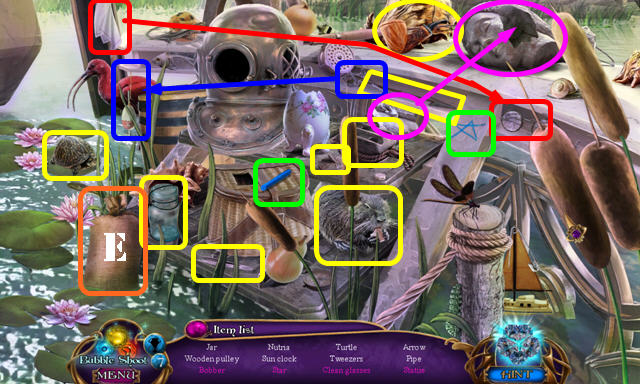
- Play the HOPs (1, 2, 3).
- In the third scene, open the glass case and the drawer to find all items.
- Take the CAT FOOD (H).
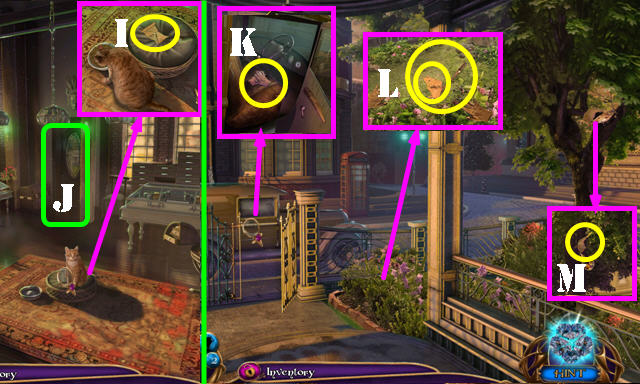
- Place the CAT FOOD on the bowl and it will land on the floor. Use the CAN OPENER on the can; take the MAP PIECES 3/5 (I).
- Go to the Front yard (J).
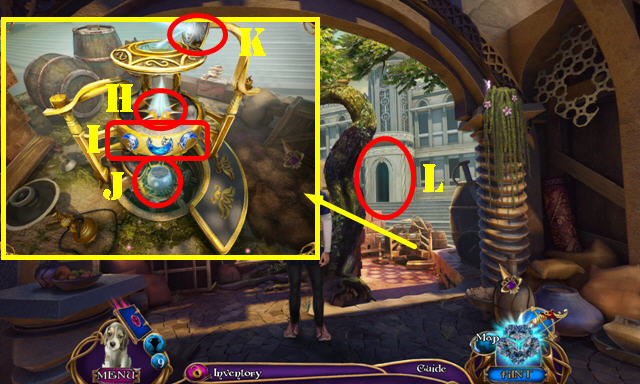
- Open the door; take the GLOVES (K).
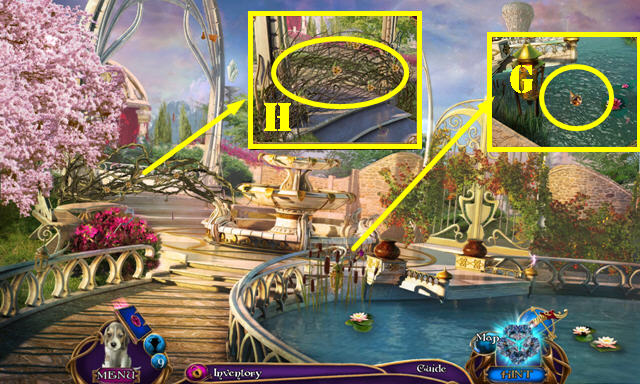
- Use the GLOVES on the thorns; take the MAP PIECES 4/5 and the STICK (L).
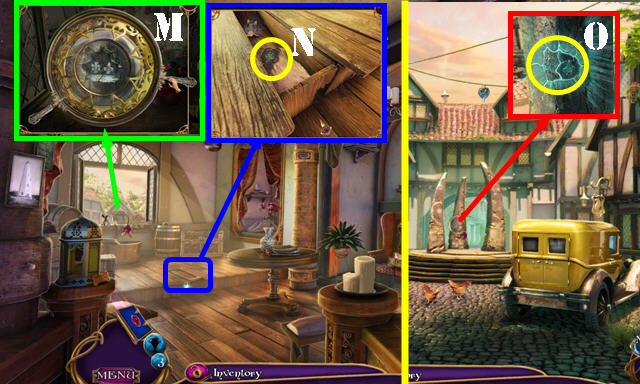
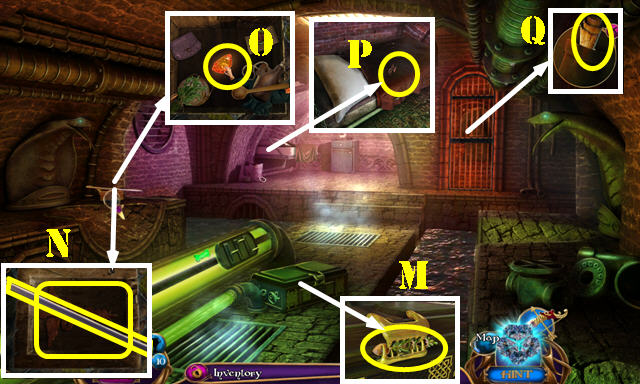
- Use the STICK to get the MAP PIECES 5/5 (M).
- Walk down.
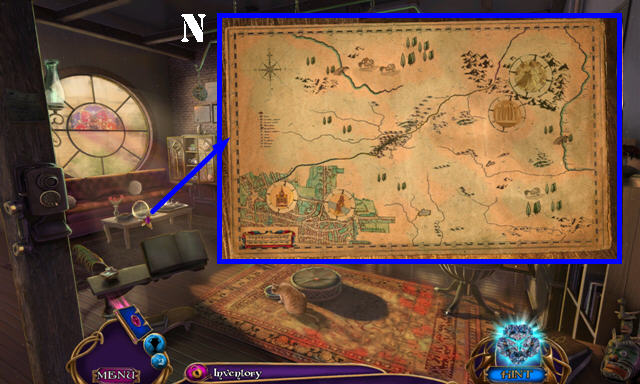
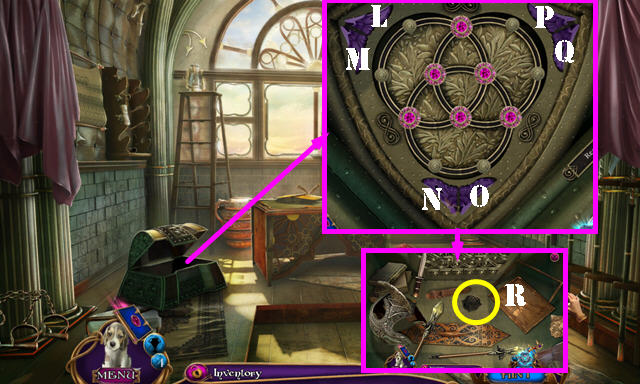
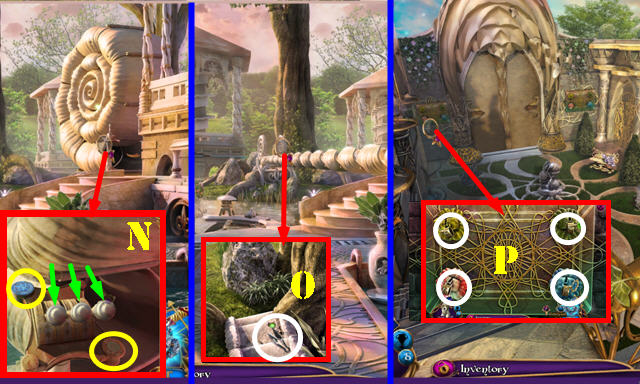
- Place the 5 MAP PIECES on the table to activate a puzzle.
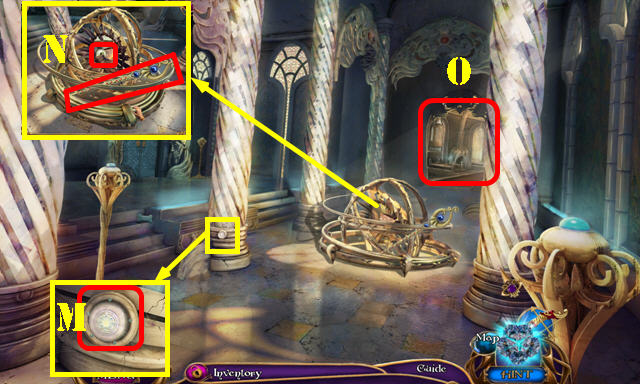
- Rotate the pieces and drag them into place (N). Take the MAP TO THE VILLAGE.
- Return to the Front yard.
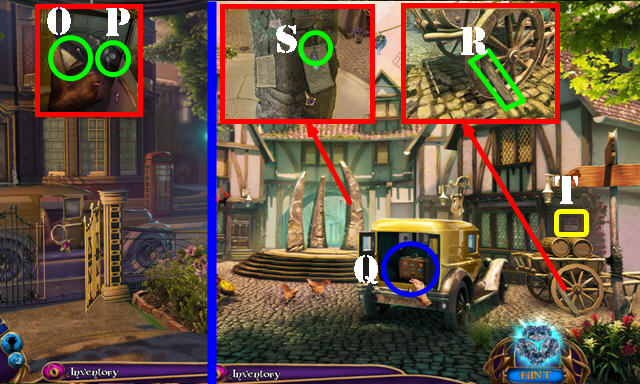
- Put down the MAP TO THE VILLAGE (O). Place the CAR KEYS in the ignition and turn it (P).
- Open the door; take the SUITCASE (Q).
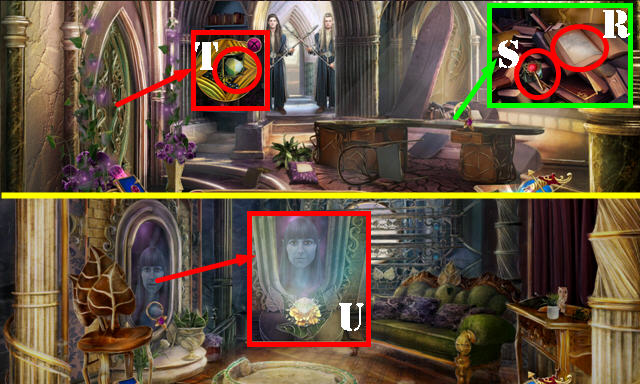
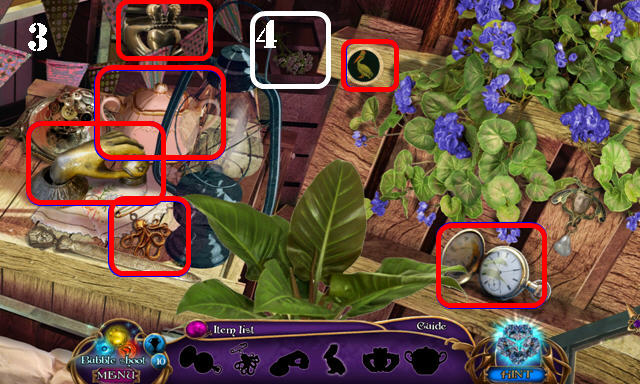
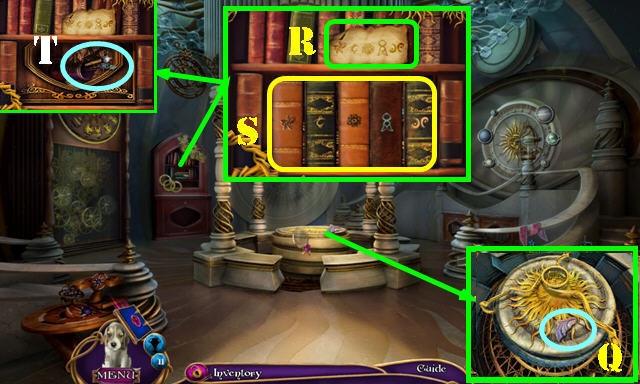
- Remove the board (R).
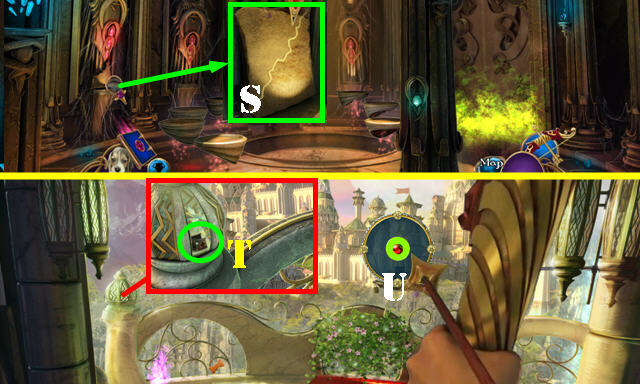
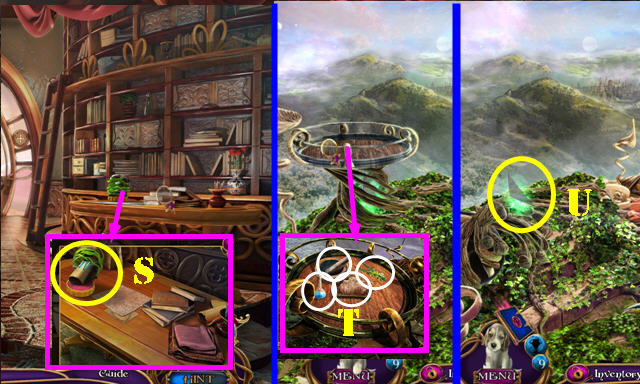
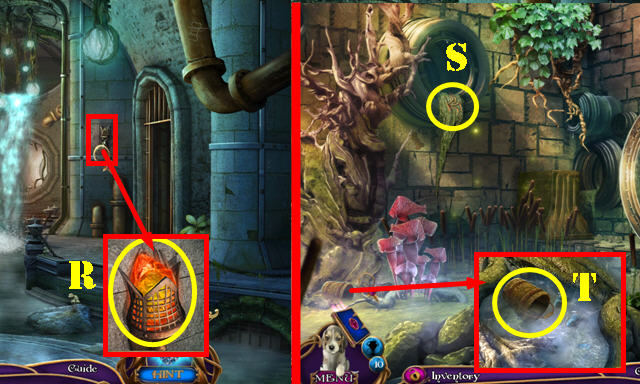
- Take the NAIL (S) and then the Note.
- Enter the Tavern (T).
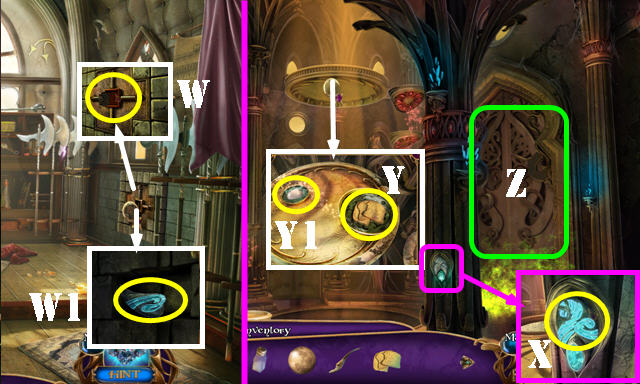
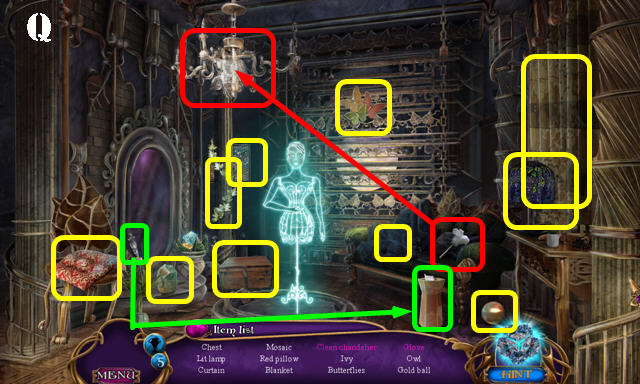
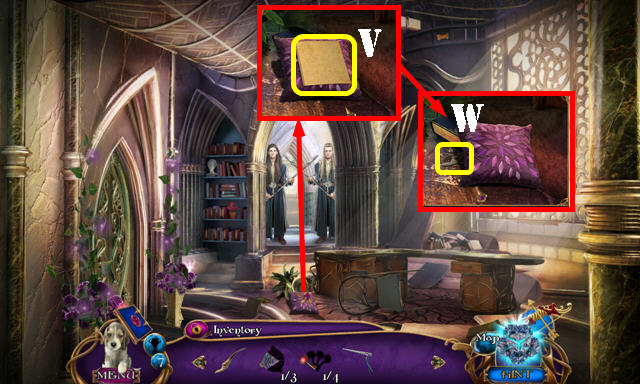
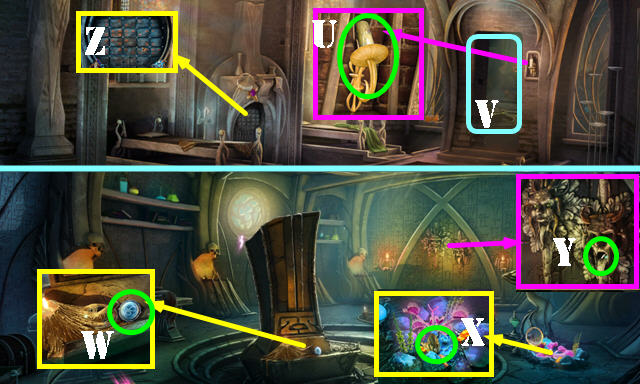
- Take the SLICE OF CHEESE (U), SALT SHAKER (V), and Map (W).
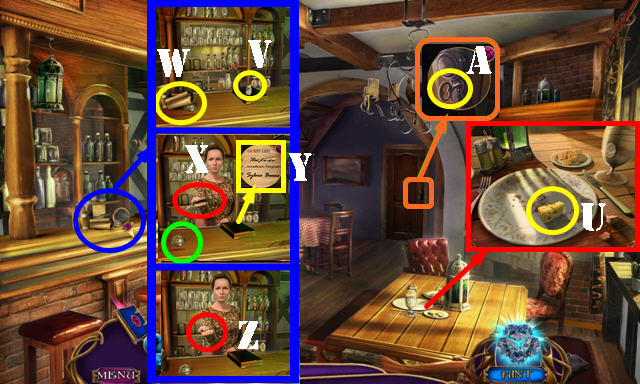
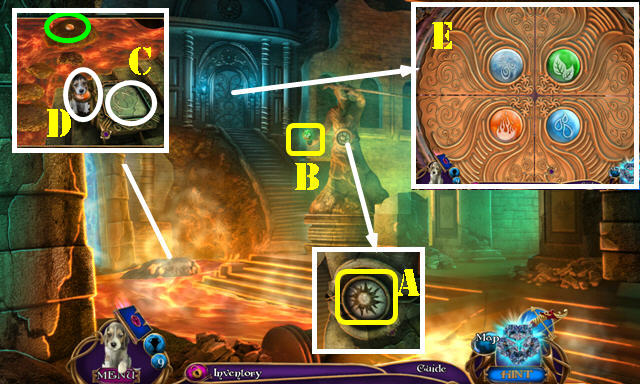
- Ring the bell (green) and talk to Lily. Show her the PHOTOGRAPH; talk to her and take the QUILL (X).
- Open the book and sign it with the QUILL (Y). Take the ROOM KEY from Lily (Z).
- Use the ROOM KEY in the lock and turn it (A). Go through the door.
- Look out the window (B).
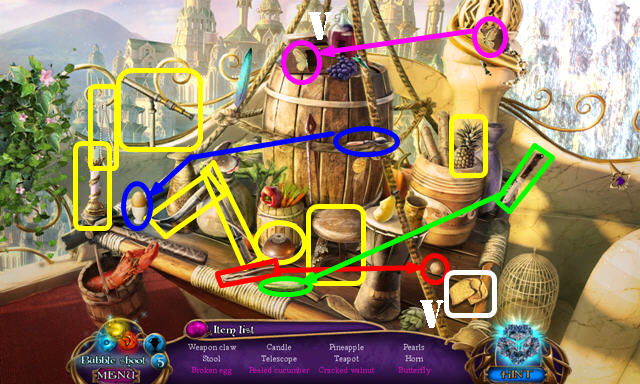
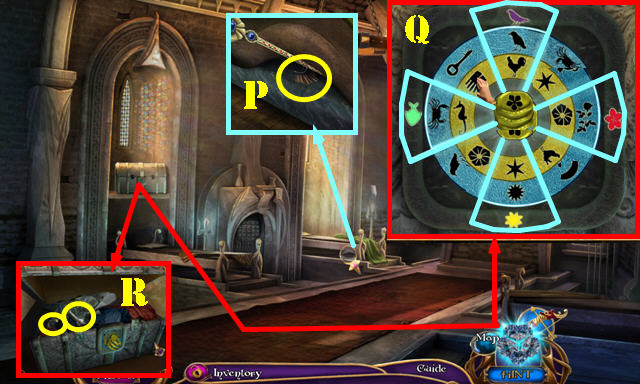
- Put down the SUITCASE. Use the NAIL on the locks to activate a HOP (C).
- Play the HOP.
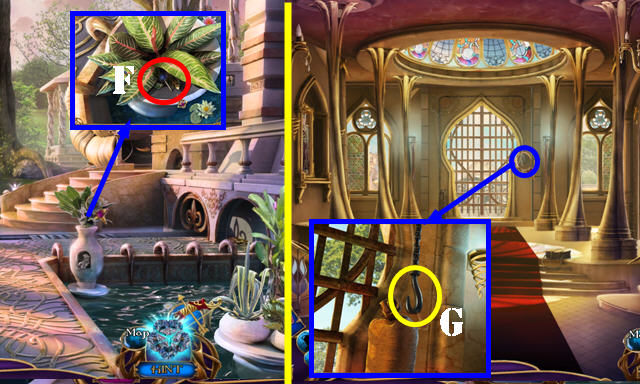
- Take the COFFEE POT (D).
- Return to the Village center.

- Talk to Grace, then take the WHISTLE (E).
- Move the papers; take the SCISSORS (F).
- Enter the Constable's office (G).
- Use the WHISTLE on the man at the desk (H) and then give him the COFFEE POT.
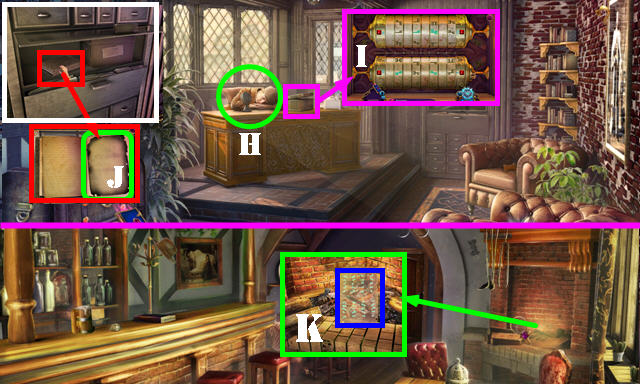
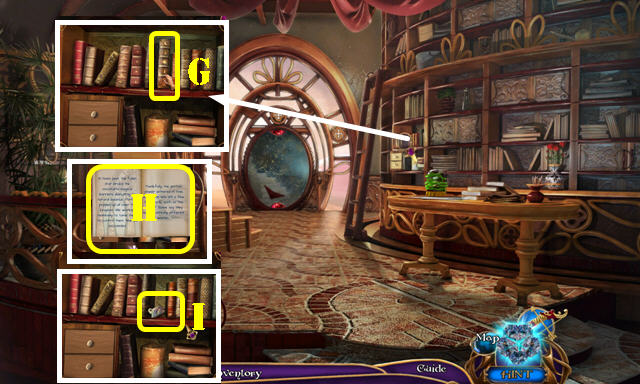
- Open the box (I) and look in it.
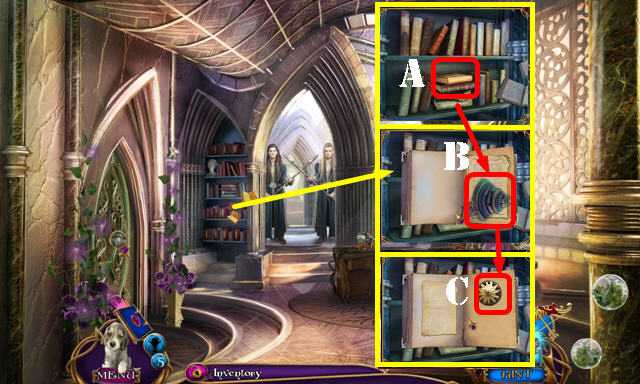
- Open the case and then look at the book; flip the page and take the PAPER (J).
- Return to the Tavern.
- Use the PAPER in the fireplace to get the STRANGE PAPER (K).
- Return to the Constable's office.
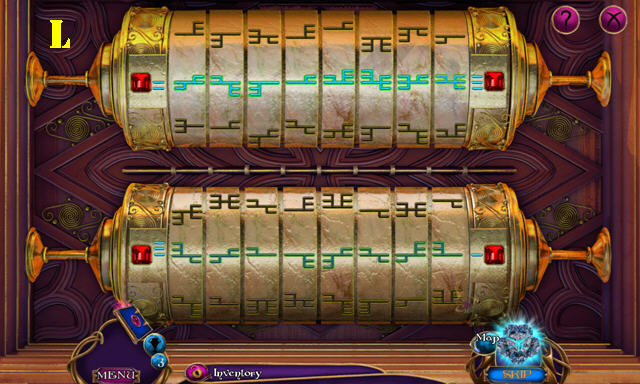
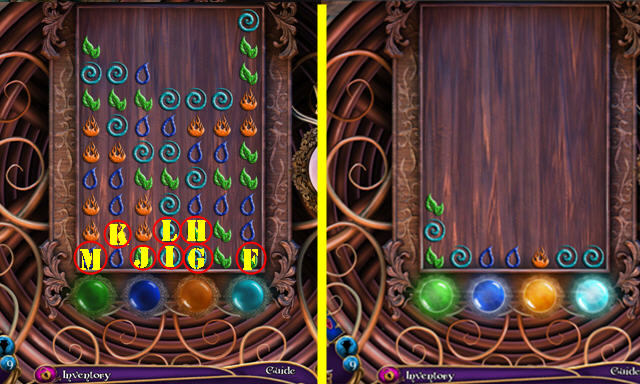
- Look at the box and place the STRANGE PAPER to activate a puzzle.
- Spin the cylinders on both barrels until all the symbols are in the right spots (L).
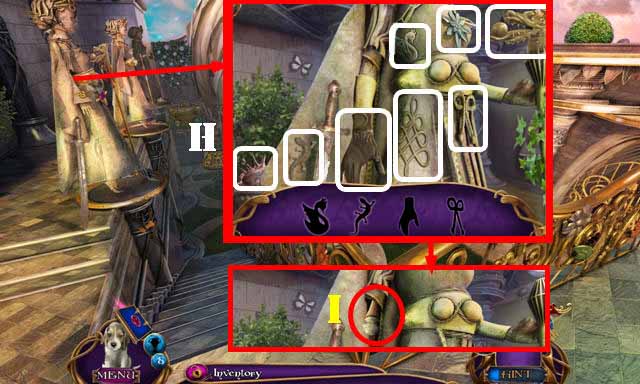
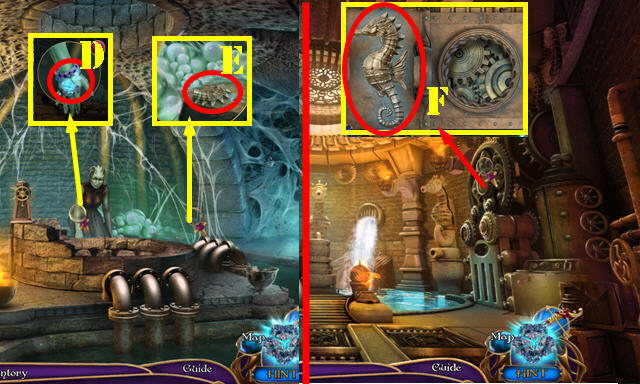
- Take the SPYGLASS and STRANGE MEDALLION 1/2. Take the Note and then the CAT PAW.
- Return to the Tavern room.
- Place the SPYGLASS on the stand, then drag the levers into the positions shown (M) to receive a clue.
- Use the CAT PAW on the board; give the SLICE OF CHEESE to the mouse. Use the SCISSORS on the package; take the STRANGE STONE (N).
- Return to the Village center.
- Place the 2 STRANGE STONES in the niche (O).
Chapter 2: The Palace

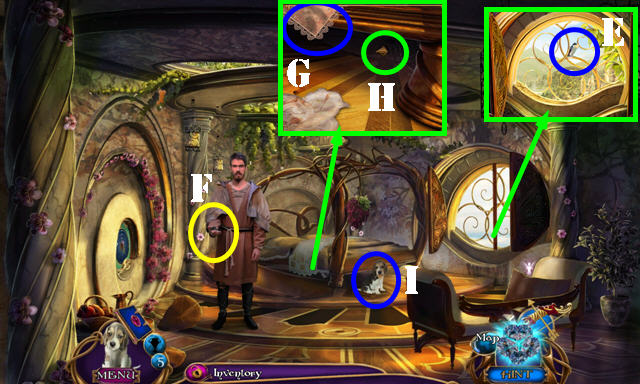
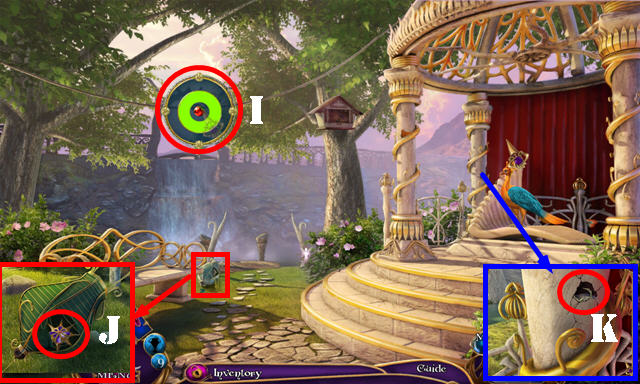
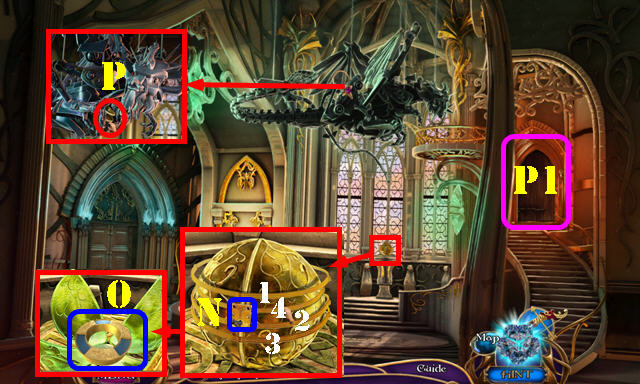
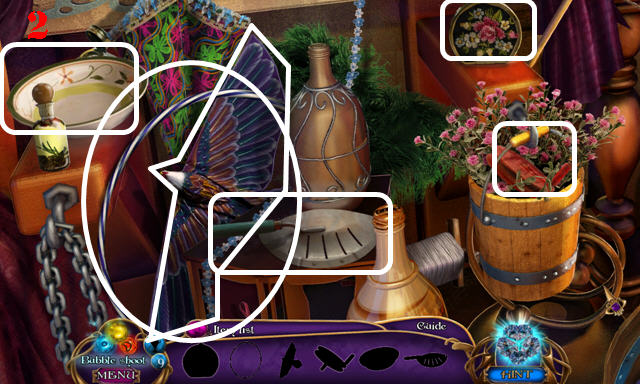
- Follow the dog (P) into to the Balcony (Q).
- Use the WHISTLE on the dog to get Bonnie (R). Bonnie will help you get out of reach items.
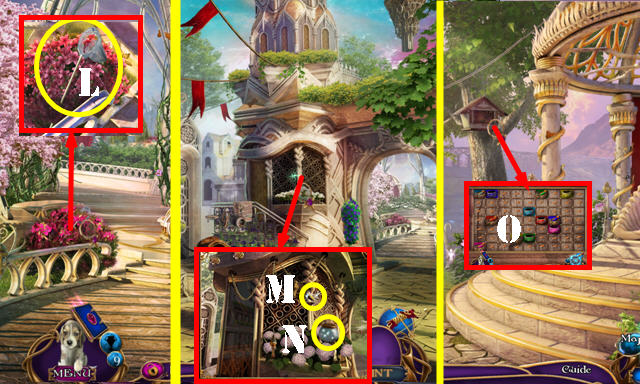
- Touch the bird and then take the FEATHER (S). Grab the POINTY LANTERN PIECE (T).
- Walk down.
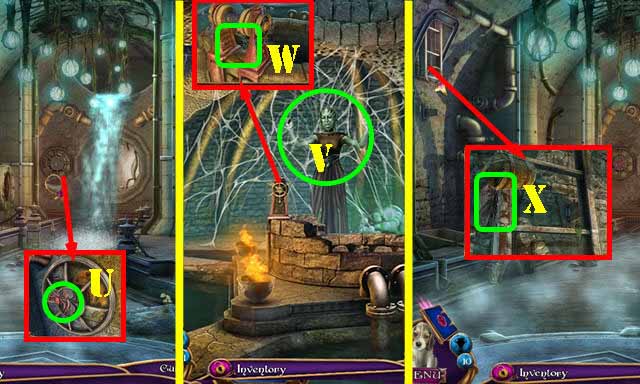
- Open the compartment; take the ORANGE MOON MODEL (U).
- Take the Note and then use the POINTY LANTERN PIECE to get the CHEST BADGE 1/2 (V).
- Pull the rope (W) and use Bonnie in the niche; take the TROWEL (X).
- Return to the Balcony.
- Take the HALF OF PINCERS (A). Use the TROWEL on the dirt; take the GOLDEN COG (B).
- Walk down.
- Place the GOLDEN COG in the mechanism (C) and pull the lever (D).
- Go to the Visitor's hall (E).
- Use the FEATHER on the cobwebs; take the CHEST BADGE 2/2 (F).
- Enter the Guard post (G).
- Open the scroll and take the STONE PART (H).
- Take the SCARF (I).
- Take the Bow and Arrow (J); you can use it to shoot at distant objects.
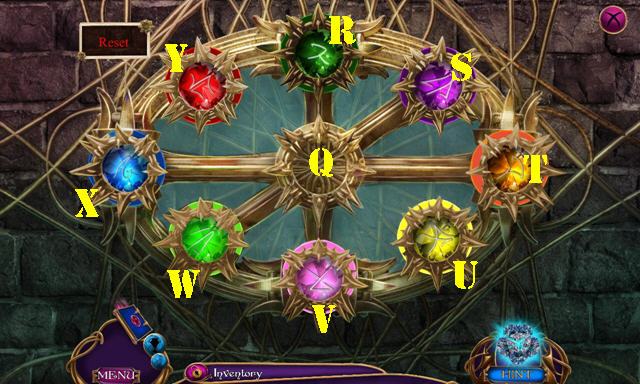
- Place the CHEST BADGE on the chest to activate a puzzle (K).
- Push the wings to rotate the gems.
- Solution: Mx3, Qx1, Nx4.
- Move the items out of the way and take the VAULT SWITCH 1/2 (R).
- Walk down.
- Place the STONE PART on the other to get a clue (S).
- Return to the Balcony.
- Use the SCARF on the glass and take the VAULT SWITCH 2/2 (T).
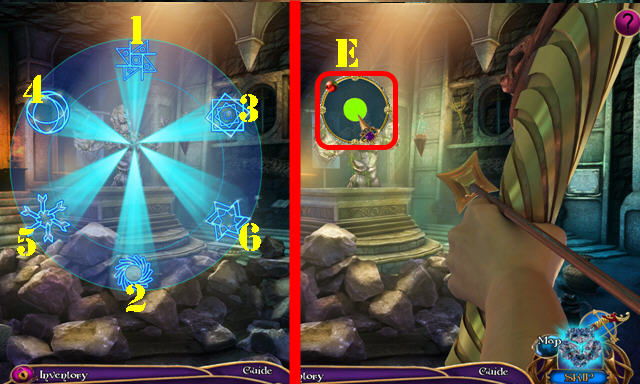
- Use the Bow and Arrow on the target (U) to activate a HOP.
- Play the HOP.
- Take the BREAD (V).
- Return to the Guard post.
- Place the 2 VAULT SWITCHES on the vault (W) and spin them; take the STRANGE MEDALLION 2/2 (W1).
- Walk down.
- Place the 2 STRANGE MEDALLIONS in the slot (X).
- Place the BREAD on the plate (Y). Use the SALT SHAKER on the small plate (Y1).
- Enter the Drawing room (Z).
- Talk to King Demario.
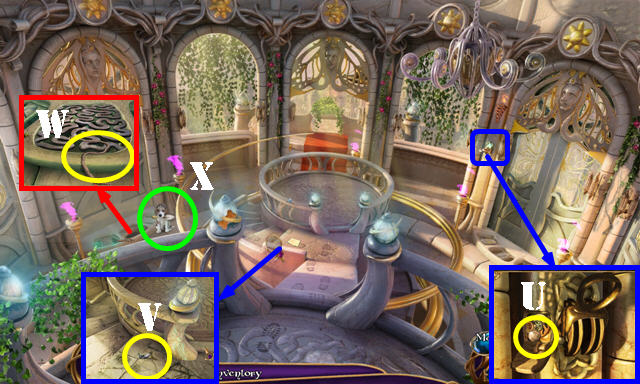
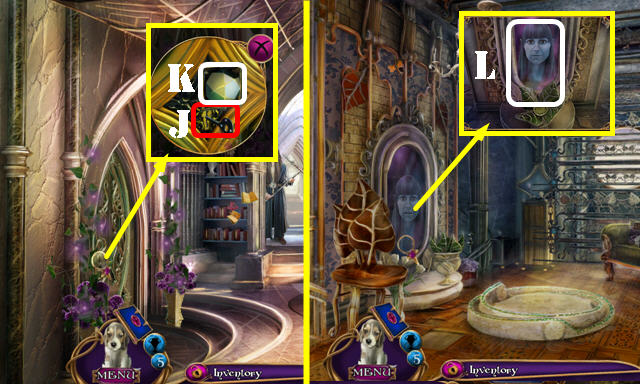
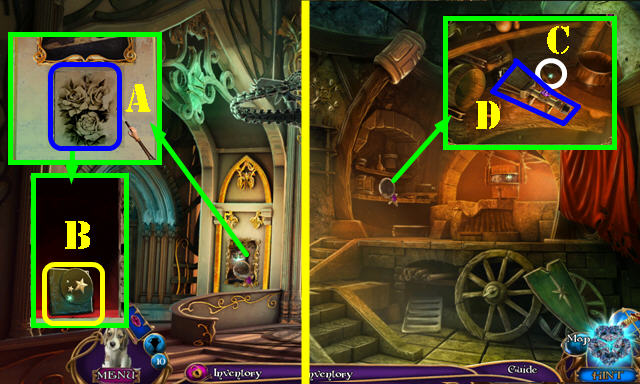
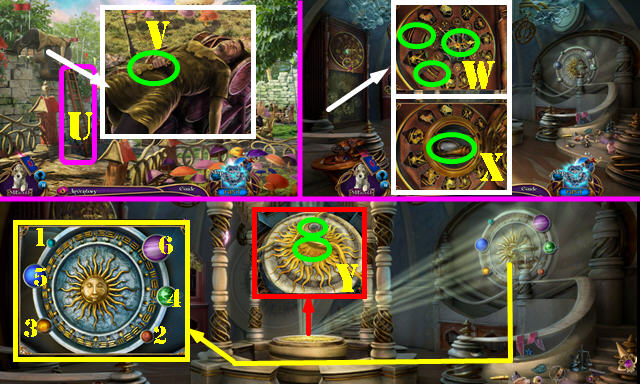
- Open the book (A). Take the MOON DIAMOND 1/3 (B). Flip through all the pages and take the SUN EMBLEM (C).
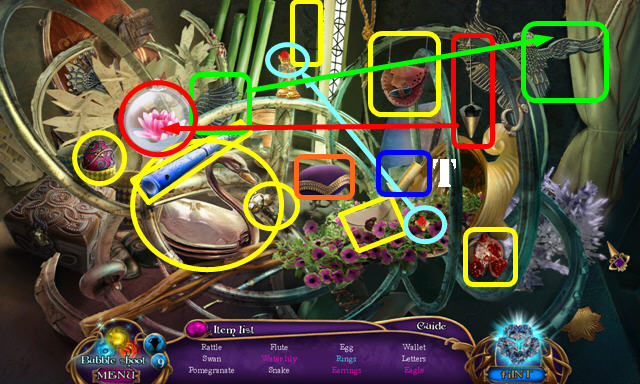
- Play the HOPs (1, 2, 3).
- Take the DAGGER (D).
- Go through the right door.
Chapter 3: Dressing Room
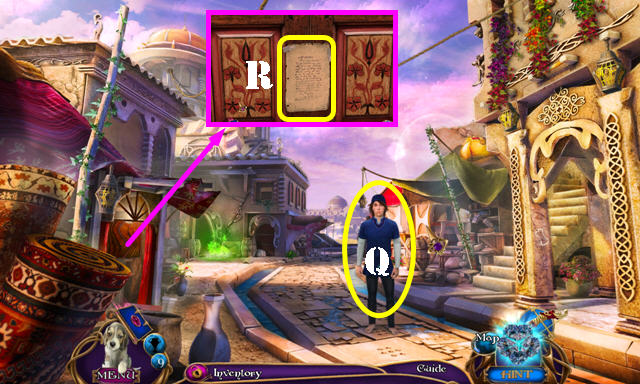
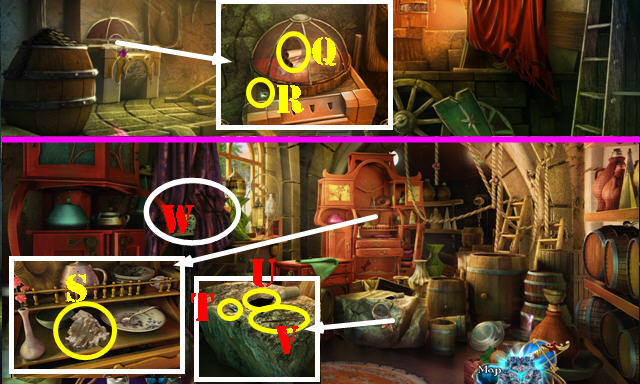
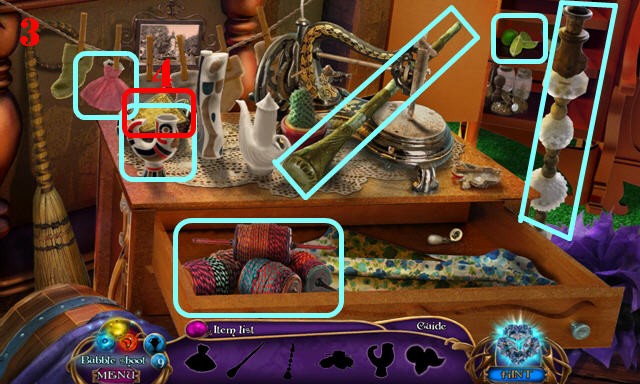
- Use the DAGGER on the shutters. Take the MESSAGE (E).
- Talk to Jonathan. Give him the MESSAGE and take the DRESSING ROOM KEY (F).
- Pull the cloth on the bed (G); use Bonnie under the bed (H) and take the AMBER CRYSTAL (I).
- Walk down.
- Use the DRESSING ROOM KEY in the lock (J) and turn the doorknob (K).
- Enter the Dressing room.
- Talk to the Lady in Waiting (L).
- Play the HOP (M).
- Take the GREEN MOON MODEL (N).
- Return to the Bed chamber.
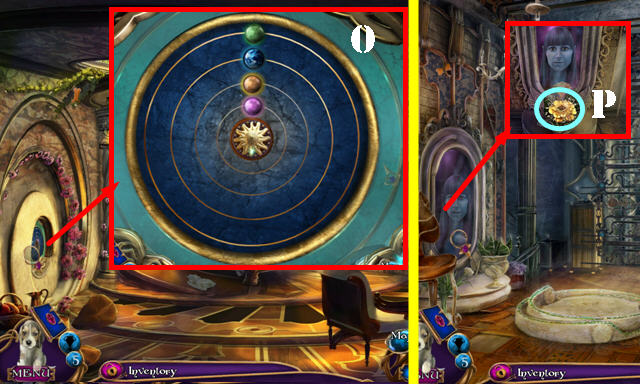
- Place the SUN EMBLEM, ORANGE MOON MODEL, and GREEN MOON MODEL to activate a puzzle.
- Align the planets correctly. Rotating one planet affects another.
- The screenshot shows the final image (O).
- Take the GOLDEN FLOWER.
- Return to the Dressing room.
- Place the GOLDEN FLOWER and AMBER CRYSTAL to activate a HOP (P).
- Play the HOP.
- Completing this HOP allows you to get dressed (Q).
- Read the note (R). Move the items aside; take the DOOR KNOB and SMALL KEY 1/4 (S).
- Place the DOOR KNOB on the door (T) and turn it; enter the Dressing room.
- Talk to the Lady in Waiting (U).
- Walk down.
- Open the clue (V) and then take the NEEDLE AND THREAD below it.
- Move the pillow; place the HALF OF PINCERS over the other one; take the PINCERS (W).
- Return to the Dressing room.
- Use the PINCERS on the screws (A) and remove the glass.
- Take the GLASS SHARD (B).
- Use the Bow and Arrow on the target (C).
- Walk down and go through the back door to access the Entrance hall.
- Use the GLASS SHARD on the painting; take the WATER MEDALLION (D).
- Go through the right door.
- Play the HOP.
- Take the SANDBAG (E).
- Move the leaves; take the SMALL KEY 2/4 and BUCKLE PART (F).
- Walk down.
- Place the SANDBAG on the hook (G).
- Go forward.
- Play the HOP (H).
- Take the LEVER (I).
- Walk down.
- Place the BUCKLE PART on the lock (J) and touch it. Take the CAT TOY (K). Move the paper and take the SMALL KEY 3/4 (L).
- Go forward.
- Give the CAT TOY to the cat; take the WOOD MEDALLION (M).
- Return to the Pond.
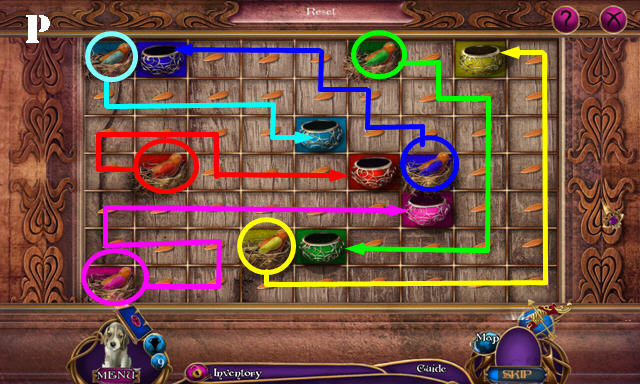
- Place the WATER MEDALLION, WOOD MEDALLION, and the LEVER in the slots (N).
- Place all the levers in the down position (green arrows).
- Take the GARDEN PRUNERS. Move the stone and take the SMALL KEY 4/4 (O).
- Return to the Courtyard.
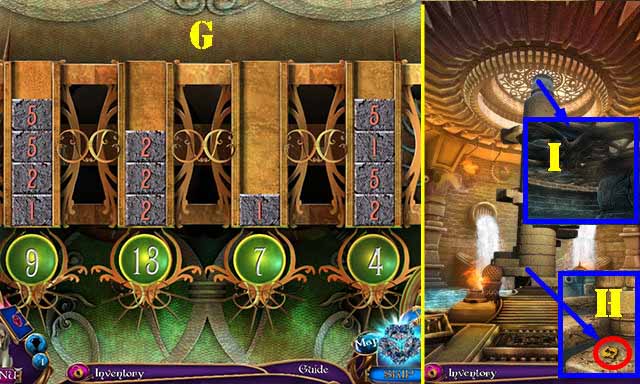
- Place the 4 SMALL KEYS in the locks; turn any key to activate a puzzle (P).
- Place the gems in their matching spots.
- Solution: R-Q, S-R, Q-S, T-Q, U-T, V-U, W-V, X-W, Y-X, R-Y, Q-R, W-Q, X-W, Y-X, R-Y, and Q-R.
- Go forward.
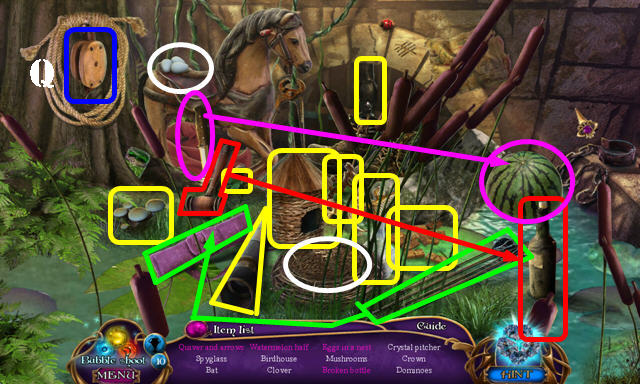
Chapter 4: Golden Park
- Talk to Ardent.
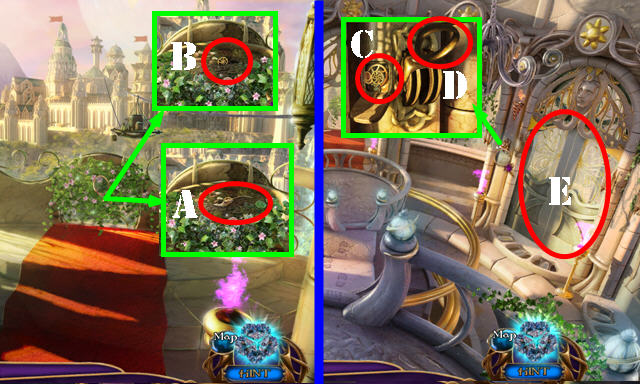
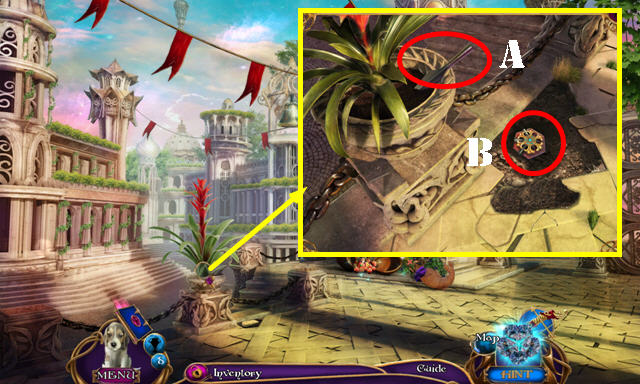
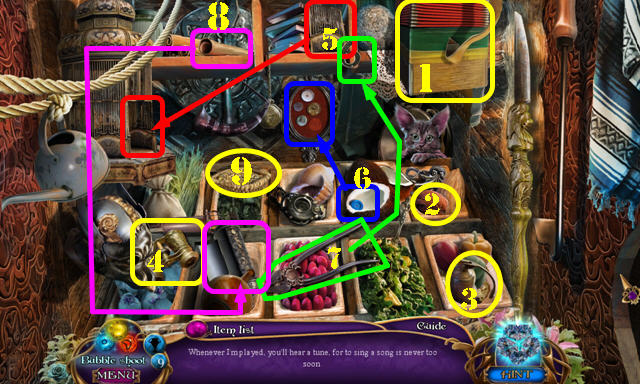
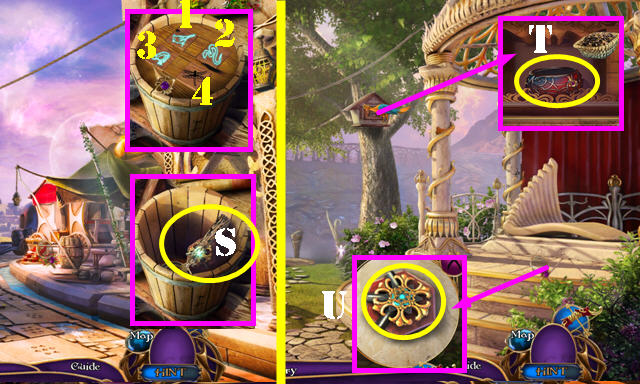
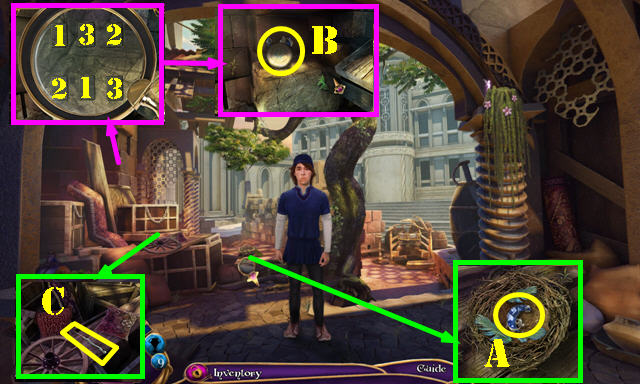
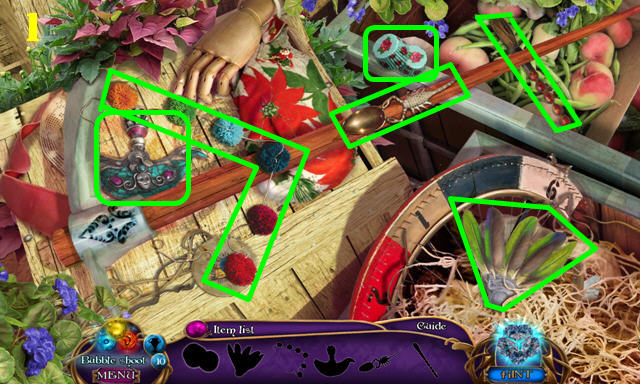
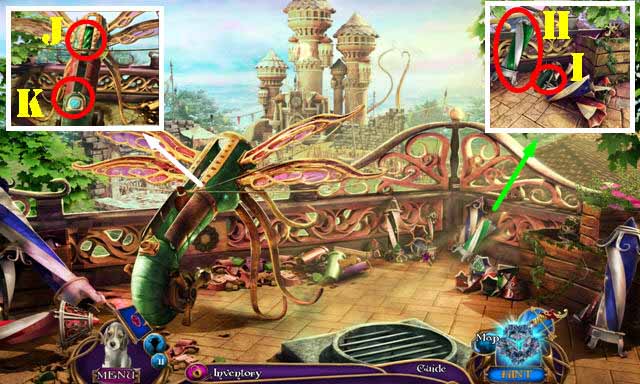
- Move the leaves and take the SPEARHEAD (A).
- Move the stone and use Bonnie in the dirt; take the FOUNTAIN PIECE 1/3 (B).
- Play the HOPs (1-3).
- Take the DANCING SLIPPERS (4).
- Go through the doorway on the right.
- Play the HOP (C).
- Move the sign (D); you need a key.
- Take the FILE (E).
- Walk down.
- Use the FILE on the chain (F); take the FLOWER POT.
- Return to Golden park.
- Use the FLOWER POT in the water to get the POT WITH WATER (G).
- Use the GARDEN PRUNERS on the dead flowers and then use the POT WITH WATER on them (H).
- Go to the Pavilion.
- Use the Bow and Arrow on the lantern (I). Take the SUN CRYSTAL (J).
- Use the SPEARHEAD in the crack; take the LOCKET CHAIN and FIREFLY CATCHER NET (K).
- Walk down.
- Place the FIREFLY CATCHER NET on the hoop and then use the NEEDLE AND THREAD on it. Take the FIREFLY CATCHER (L).
- Walk down.
- Use the FIREFLY CATCHER on the fireflies (M) and take the JAR OF FIREFLIES (N). Take the BIRD MINIATURE (M).
- Return to the Pavilion.
- Place the BIRD MINIATURE in the nest to activate a puzzle (O).
- Move the birds to the feeders of the same color. The birds must eat all seeds as they go through the path.
- Solution (P).
- Take the PARK KEEPER'S KEY.
- Return to Golden park.
- Use the PARK KEEPER'S KEY in the lock and turn it. Go through the gate.
Chapter 5: Market Square
- Talk to Ardent. Give him the DANCING SLIPPERS (Q).
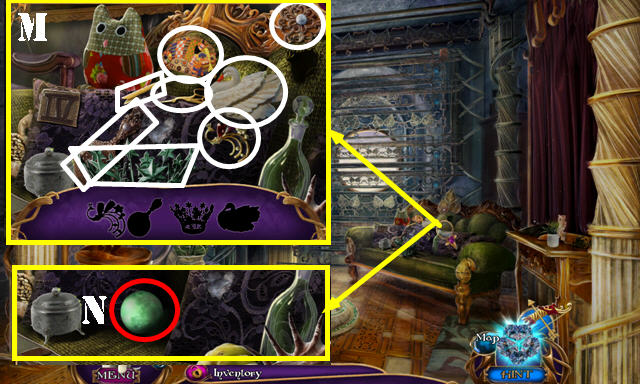
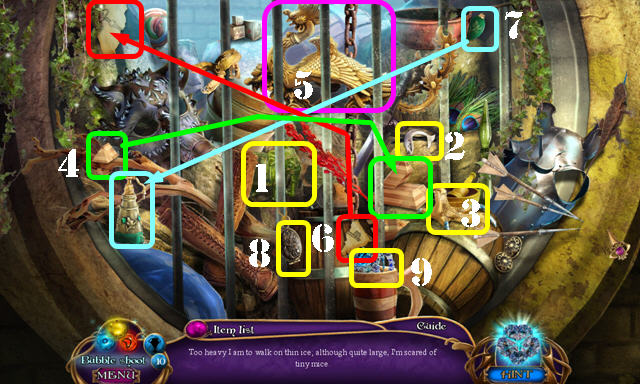
- Take the Note (R) and then open the door for a HOP.
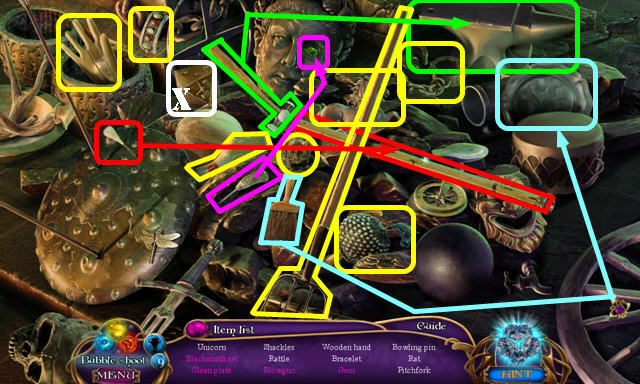
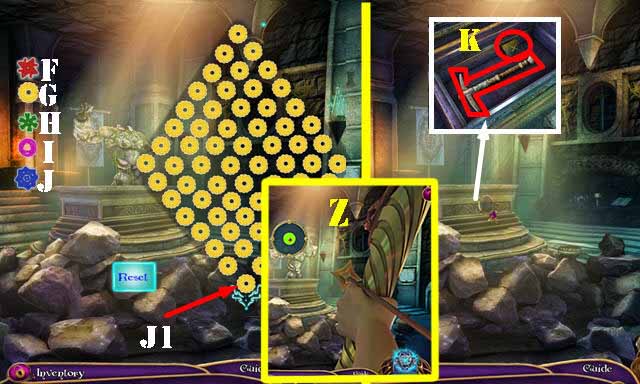
- Play the HOP (1-8).
- Take the BIRD SEEDS (9).
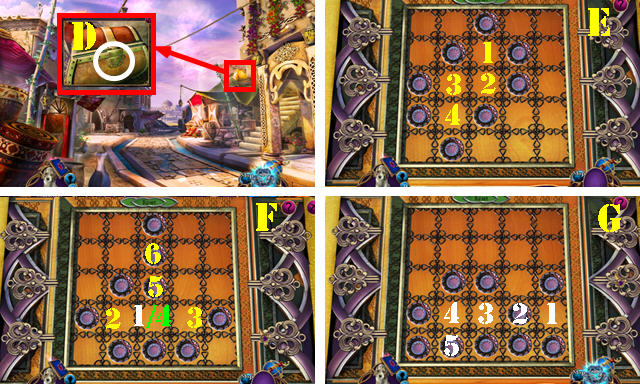
- Press the tiles from 1-4; remove the tiles and the lid. Take the MAGNIFIER and FOUNTAIN PIECE 2/3 (S).
- Return to the Pavilion.
- Place the BIRD SEEDS in the feeder (T).
- Take the FOUNTAIN PIECE 3/3 (U).
- Walk down.
- Place the 3 FOUNTAIN PIECES to activate a puzzle.
- Rotate the pieces into place (V).
- Take the RAINWATER GEM (yellow).
- Return to Market square.
- Use the RAINWATER GEM on the green flames (W).
- Talk to Ardent and then take the clue (X).
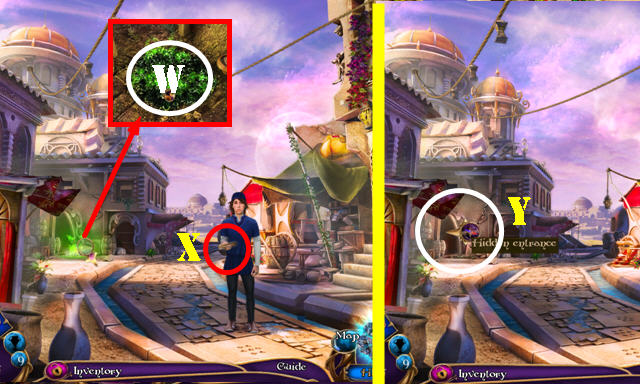
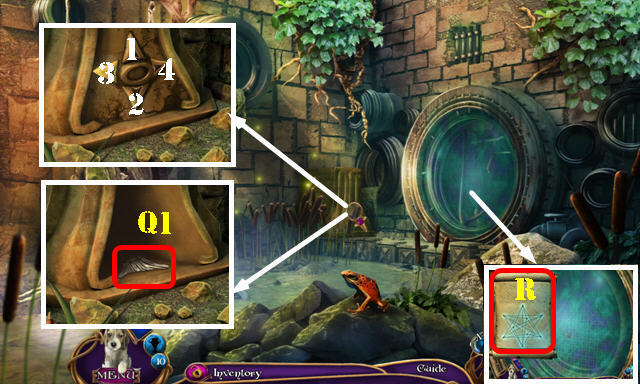
- Go to the Hidden entrance (Y).
- Talk to Ardent.
- Move the feathers; take the MOON CRYSTAL 1/3 (A).
- Use the MAGNIFIER on the brick. Find the matching pairs (1-3). Take the PILLAR SWITCH and MOON CRYSTAL 2/3 (B).
- Move the items out of the way and take the LOCKPICK TOOLS (C).
- Walk down.
- Use the LOCKPICK TOOLS on the lock and open the chest to activate a puzzle.
- Stack the coins by selecting the right spots to unify the chips.
- Solutions (E, F, G).
- Open the book. Take the MOON CRYSTAL 3/3 and SIGNET RING.
- Return to the Hidden entrance.
- Place the SUN CRYSTAL (H), 3 MOON CRYSTALS (I) and the JAR OF FIREFLIES (J) on the pedestal.
- Remove the lid on the jar of fireflies.
- Flip the mirror (K).
- Enter the Guardian's guild hall (L).
- Place the PILLAR SWITCH in the slot (M).
- Take the STAFF and MARBLE EYE 1/2 (N).
- Enter the Chamber of deep sleep (O).

- Use the STAFF on the mattress; take the SPHERE PART (P).
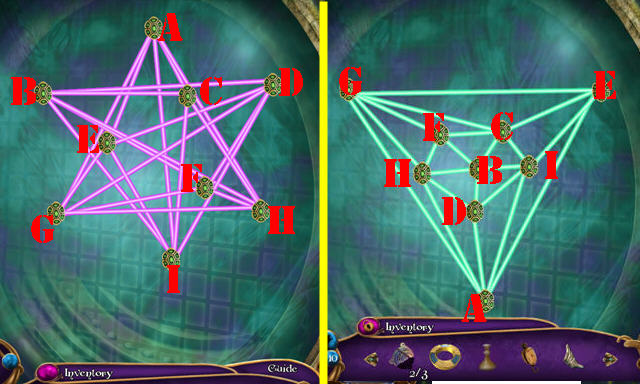
- Place the SIGNET RING on the lock to activate a puzzle. Rotate the rings so similar items are aligned.
- Solution (Q).
- Move the clothes; take the EMPTY VIAL and GUARDIAN'S LOCKET (R).
- Walk down.
- Place the SPHERE PART on the sphere (S).
- Play the HOP.
- Take the CANDLE HOLDER (T).
- Return to the Chamber of deep sleep.
- Place the CANDLE HOLDER on the stand and push it (U).
- Enter the Ceremonial ground (V).
- Take the TALISMAN OF WATER (W), CROWN (X), and CHALK (Y).
- Return to the Chamber of deep sleep.
- Use the CHALK on the bricks to activate a puzzle (Z).
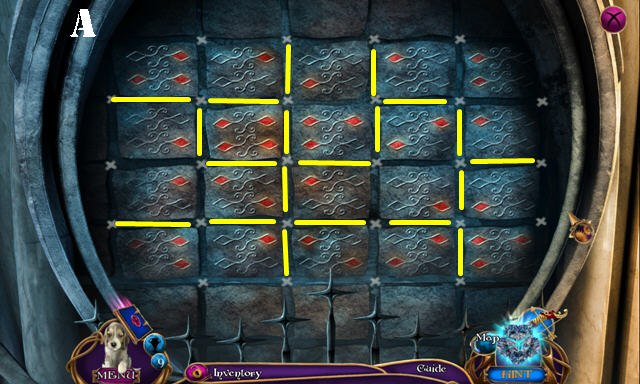
- Mark the lines in between the bricks with the chalk, so that each group contains four diamonds.
- Solution (A). Take the CROWN RUBY.
- Return to the Guardian's guild hall.
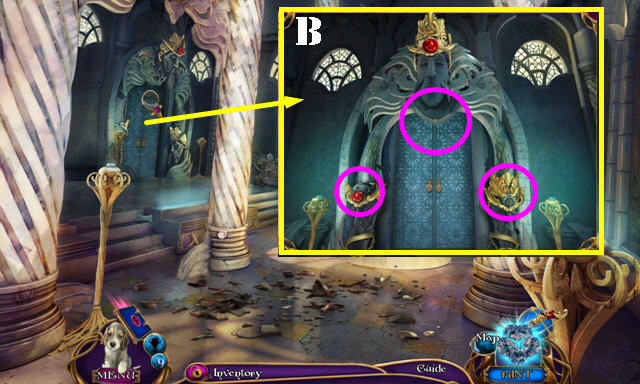
- Place the LOCKET CHAIN, GUARDIAN'S LOCKET, CROWN, and CROWN RUBY on the doorframe (B).
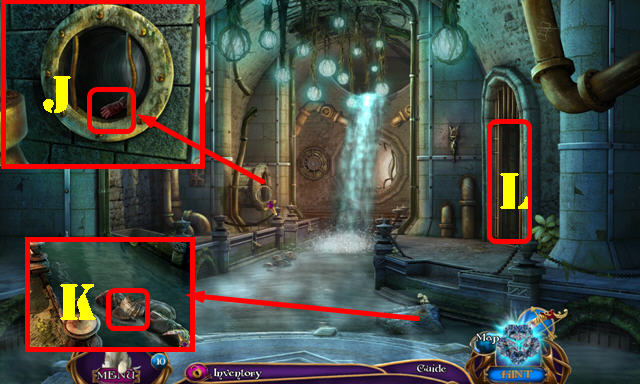
- Enter the Library tower.
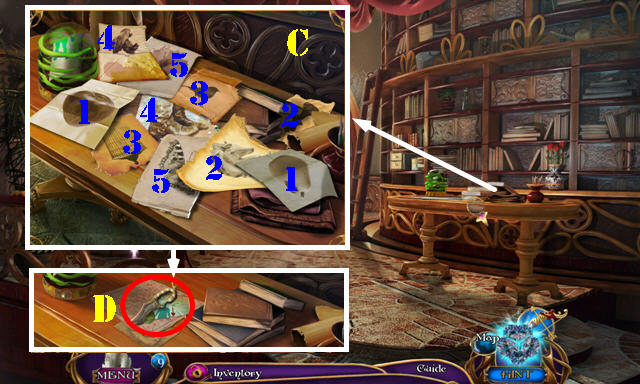
- Find matching pairs of papers (C).
- Take the RITUAL DAGGER, COIN, and the clue (D).
- Play the HOP (E).
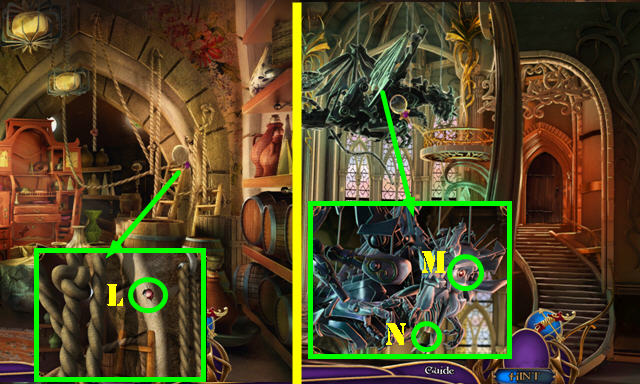
- Take the FREEZING POTION, ROPE, and TOPAZ (F).
- Take the book (G) and touch the pages (H). Grab the MOON DIAMOND 2/3 and MARBLE EYE 2/2 (I).
- Return to the Ceremonial ground.
- Play the HOP.
- Take the CLOTH (J).

- Use the RITUAL DAGGER to get the AGRIMONY (K).
- Place the 2 MARBLE EYES on the mask. Use the EMPTY VIAL on the tears to get the VIAL OF TEARS (L).
- Place the FREEZING POTION on the wax and it will land on the side (M). Drip the bottle over the wax until covered; touch the ice three times; take the MORTAR AND PESTLE (N).
- Attach the ROPE to the hook (O). Go to the Tower top.
- Take the BRUSH and CONTAINER ORNAMENT (P).
- Select the 5 sets of matching feathers (Q). Take the TALISMAN OF AIR (R).
- Return to the Library tower.
- Place the CONTAINER ORNAMENT; take the clue and MOUNTAIN STATUETTE (S).
- Return to the Tower top.
- Place the MOUNTAIN STATUETTE, MORTAR AND PESTLE, AGRIMONY, and VIAL OF TEARS on the stand (T).
- Touch the agrimony and vial of tears, then touch the pestle.
- Take the MIRROR SHARD (U).
- Return to the Library tower.
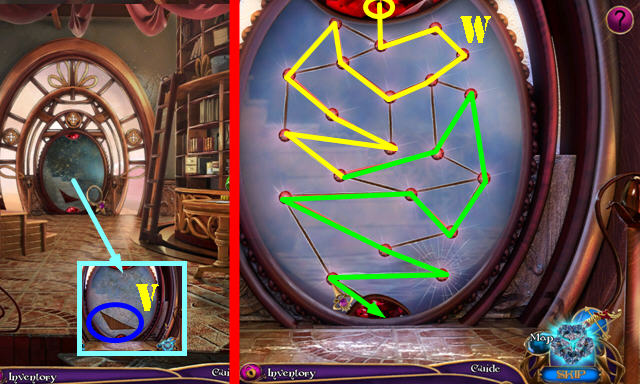
- Place the MIRROR SHARD on the glass and then wipe it with the CLOTH to activate a puzzle (V).
- Go through each spot only once.
- Solution (W). Start with the yellow lines and end with the green ones. Make sure you touch the red gem at the bottom to finish.
- Go forward.
- Play the HOP.
- Take the BUILDER'S EMBLEM (X).
- Go to the Crypt on the right side.
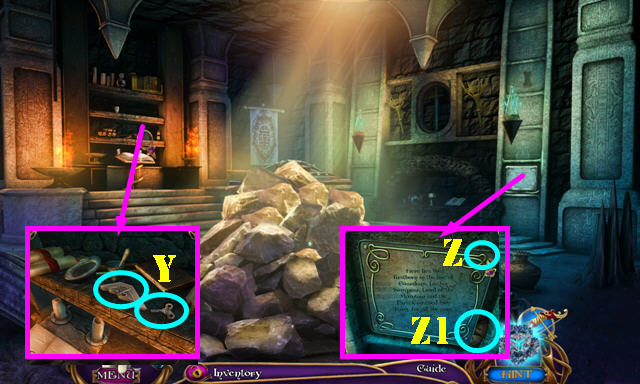
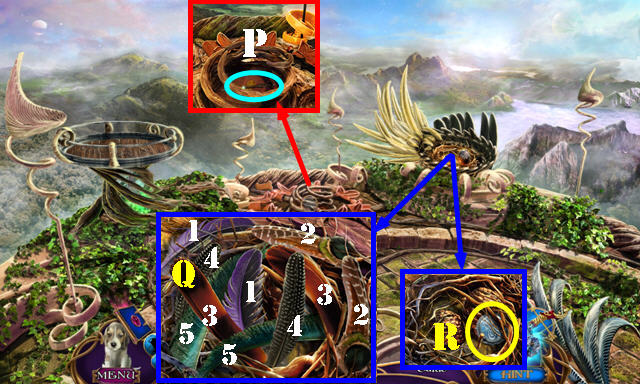
- Take the TILE PIECE and WIND-UP KEY (Y).
- Use the COIN to get the SCREW 1/4 (Z). Move the plaque and take the SUNBEAM FRAGMENT (Z1).
- Walk down.
- Place the SUNBEAM FRAGMENT in the slot (A); take the TALISMAN OF EARTH (B).
- Put the TILE PIECE in the slot and press it (C). Use Bonnie on the large stone (green) and take the TALISMAN OF FIRE (D).
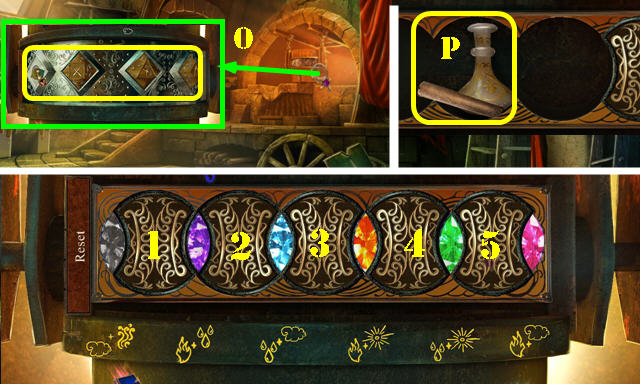
- Place the TALISMAN OF WATER, TALISMAN OF AIR, TALISMAN OF EARTH, and TALISMAN OF FIRE on the door to activate a puzzle (E).
- Eliminate the tokens until the ones at the bottom match the spheres below them.
- Solution: Fx5, Gx2, L, I, J, K, L, J, and M. The image on the right shows the final image.
- Go through the door.
Chapter 6: Turret Hall
- Use the WIND-UP KEY in the lock to activate a puzzle (N).
- Select the rings from 1-4.
- Take the INNER RING and SCREW 2/4 (O).
- Take the ROTATING BRUSH (P).
- Enter the Engineer's workshop (P1).
- Cut the glass with the TOPAZ. Pull the SEAL-BREAKING SCROLL (Q); take the SCREW 3/4 (R).
- Walk down and go through the left door.
- Take the Note and the CRYSTAL CLUSTER below it (S).
- Take the SCREW 4/4 (T). Use the BRUSH on the paint (U) and take the BRUSH WITH PAINT (V).
- Pull the curtain (W) to activate a HOP.
- Play the HOPs (1-3).
- Take the BELLOWS (4).
- Walk down.
- Slide the picture and drag the BRUSH WITH PAINT on the tile (A).
- Take the ASTRONOMER'S EMBLEM (B).
- Return to the Engineer's workshop.
- Put down the 4 SCREWS (C). Place the ROTATING BRUSH, BELLOWS, and CRYSTAL CLUSTER on the device. Touch the screws and take the WHIRLWIND CASTER (D).
- Return to the Crypt.
- Use the WHIRLWIND CASTER on the pile of rocks to activate a puzzle.
- Touch the symbols from 1-6.
- Use the Bow and Arrow on the target (E).
- Use the glyphs on the left (F-J) to turn the glyphs all the same color.
- The solution is random. Start by turning the color of the glyph at the very bottom and move your way up by changing the colors of the adjacent pieces.
- The puzzle will reset if you use more than 16 moves to complete the puzzle.
- Take the PICKAX and DEFENDER'S EMBLEM (K).
- Return to the Storage.
- Use the PICKAX on the crack and take the MECHANICAL EYE (L).
- Walk down.
- Place the MECHANICAL EYE (M) and take the ENGINEER'S EMBLEM (N).
- Return to the Engineer's workshop.
- Place the BUILDER'S EMBLEM, DEFENDER'S EMBLEM, ASTRONOMER'S EMBLEM and ENGINEER'S EMBLEM in the slots to activate a puzzle (O).
- Rotate the rings in this order: 3, 2, 1, 4, 3, 2, 5, 4, 3, and 5.
- Look at the notes and take the BOTTLE (P).
- Talk to Avelina.
- Play the HOP.
- Take the PULLEY (Q).
- Touch the arrows in this order: 2, 1, 4, 2,3 2, 3, 1, 2. The solution may be random.
- Take the PECTORAL FIN (Q1).
- Place the SEAL-BREAKING SCROLL to activate a puzzle (R).
- Untangle the knots. Purple lines are crossed and green lines are uncrossed.
- Solution (A-I). The image on the left shows the beginning of the puzzle and the right image shows the finished product.
- Enter the Tunnel.
- Use Bonnie in the hole; take the GLOVE (J).
- Move the stones and take the SEA HORSE PLATE (K).
- Go to the Shelter (L).
- Take the WOODEN SPOON (M).
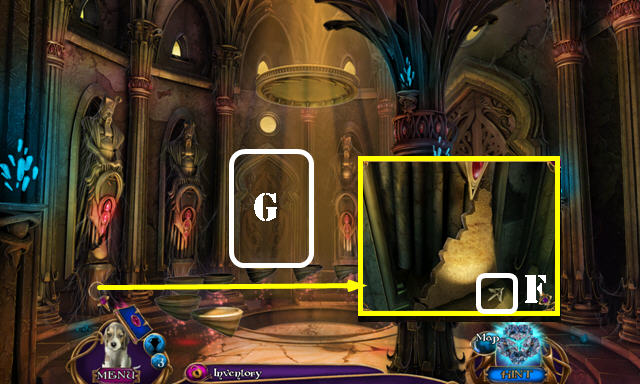
- Take the LONG PIPE (N) and remove the cover. Move the items out of the way and take the FIRESTONE (O). If something is touching the firestone, you will not be able to pick it up.
- Touch the bug and remove the sheet; take the SPIDER SYMBOL 1/2 (P).
- Open the door; take the Note and SEA HORSE HEAD (Q).
- Walk down.
- Place the FIRESTONE in the torch; take the LIT TORCH (R).
- Walk down.
- Pull the net. Use the LONG PIPE to get the SPIDER SYMBOL 2/2 (S).
- Use the GLOVE to grab the BUCKET (T).
- Return to the Tunnel.
- Place the 2 SPIDER SYMBOLS in the slot (U).
- Go forward.
- Use the LIT TORCH on the cobwebs (V).
- Place the PULLEY and then the BUCKET on the mechanism. Take the BUCKET OF GREASY LIQUID (W).
- Walk down.
- Use the BUCKET OF GREASY LIQUID on the ladder and the pull it (X).
- Go up the ladder.
- Play the HOP (1-8).
- Take the BRACELET (9).
- Take the LOCKER PART (A).
- Return to the Shelter.
- Place the LOCKER PART (B) and take the SEA HORSE TAIL (C).
- Return to the Arachnid den.
- Place the BRACELET on the wrist (D).
- Take the SEA HORSE NECK (E).
- Return to the Stair room.
- Place the SEA HORSE HEAD. PECTORAL FIN, SEA HORSE TAIL, SEA HORSE NECK, and SEA HORSE PLATE (F).
- Touch the sea horse to activate a puzzle.
- Move the numbers to the right tubes so they add up to the number at the bottom.
- Solution (G).
- Take PISCES (H).
- Look at the top of the pillar and go up (I).
Chapter 7: The Kitchen
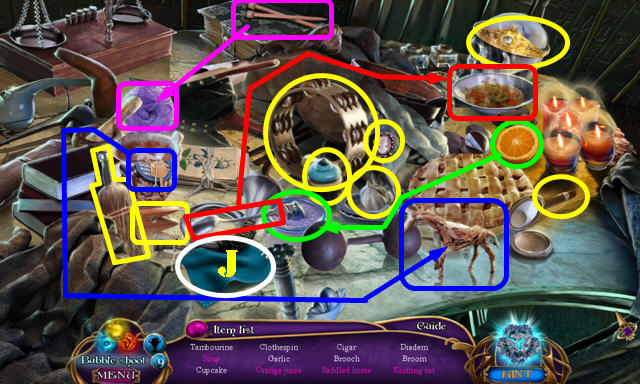
- Play the HOPs (1, 2, 3).
- Take the VALERIAN (4).

- Read the note and take the KNIFE EMBLEM (K).
- Remove the flowers; take the LAVENDER (L) and MIDDLE RING (M).
- Remove the stones and take the KITCHEN KEY (N).
- Read the Note (O). Use the KITCHEN KEY in the lock and go through the door (P).
- Take the FORK EMBLEM(Q).
- Go up to the Kitchen roof (R).
- Read the Note and take the EMPTY POUCH (S).
- Walk down twice and go forward.

- Use the Bow and Arrow on the target (T).
- Take the GLOW STONE (U).
- Place the KNIFE EMBLEM and FORK EMBLEM on the chest; take the APPLE CIDER VINEGAR and COOKBOOK (V).
- Pull the ropes from 1-5. Take the HATCHET (W).
- Walk down.
- Use the HATCHET on the roots; use Bonnie in the tree hole and open the purse (A); take the SCRAPER and HERBAL MIXTURE (B).
- Walk down.
- Put down the EMPTY POUCH (C).
- Use the SCRAPER on the stone (D) and take the POUCH OF DUST.
- Return to the Kitchen.
- Put down the COOKBOOK and flip all the pages (E). Put down the APPLE CIDER VINEGAR, LAVENDER, and WOODEN SPOON.
- Touch the lavender and then the apple cider vinegar. Mix the ingredients with the spoon and take the CREAMY PASTE (F).
- Put the CREAMY PASTE, HERBAL MIXTURE, and VALERIAN into the pot. Use the BOTTLE in the pot to get the SLEEPING POTION (G).
- Return to the Kitchen roof.
- Remove the top. Use the POUCH OF DUST and SLEEPING POTION in the rocket (H). Replace the cap (I) and take the FIREWORK ROCKET.
- Put the FIREWORK ROCKET (J) and GLOW STONE (K) into the slots.
- Take CAPRICORN (L).
- Return to the Feast ground.

- Take the NOTE WITH SYMBOLS and the OUTER RING (M).
- Place the INNER RING, MIDDLE RING, and OUTER RING on the door to activate a puzzle (N).
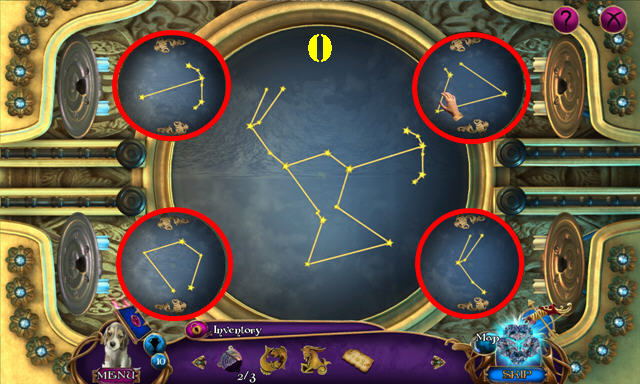
- Rotate the constellations (red) into place until they form the right image in the center (O).
- Go through the door.
- Play the HOP.
- Take the LADDER (P).
- Take the MOON DIAMOND 3/3 (Q).
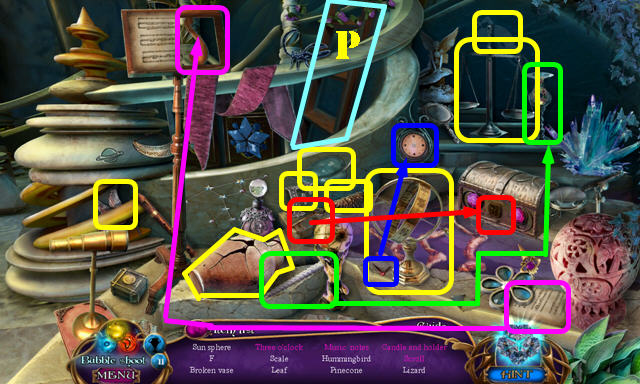
- Put down the NOTE WITH SYMBOLS to activate a puzzle (R).
- Swap the books as shown (S). Take the Note, Arrows for your bow and the FOCUS CRYSTAL (T).
- Walk down.
- Place the LADDER (U) and take the CLOCK HAND (V).
- Return to the Skyentist's tower.
- Place the CLOCK HAND, CAPRICORN, and PISCES on the clock (W); take the Note and OVAL SUN GLASS (X).
- Place the FOCUS CRYSTAL and OVAL SUN GLASS on the pedestal (Y).
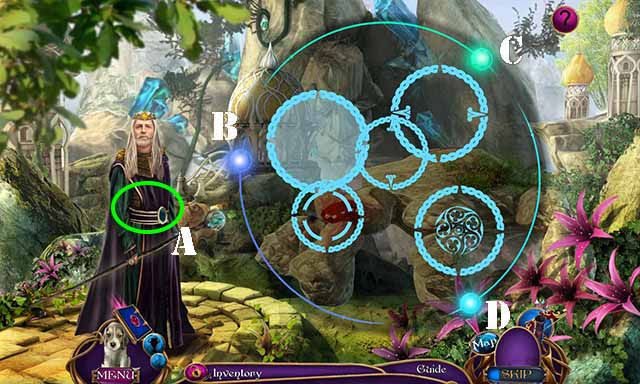
- Touch the planets from 1-6.
- Go forward to the Palace bridge.
- Give the 3 MOON DIAMONDS to the King (A).
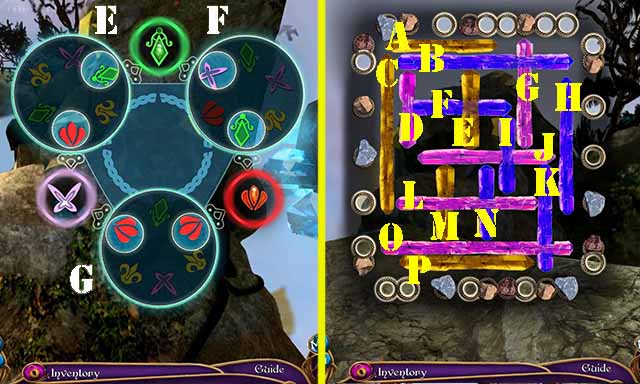
- Play puzzle by rotating buttons B, C and D until the rings match into one, forming one picture.
- Go forward.
- Play by rotating rings E, F and G in this order: G, G, E, F, F, F, F.
- Go forward.
- Play puzzle by moving the crystals into the holes on the side in this order: J, K, O, P, C, M, N, L, J, G, A, B, K, H, F, I, J, D, E, M, N.
- Congratulations, you've completed Amaranthine Voyage: The Living Mountain.
Created at: 2014-02-14