

WALKTHROUGH MENU
- INTRODUCTION
- COMMERCIAL BANK
- MONTPELIER NATIONAL BANK
- BLUFFTON BANK
- MASSACHUSETTS AVENUE STATE BANK
- DILLINGER'S HIDEOUT
- CENTRAL NATION BANK AND TRUST
- UNITY TRUST AND SAVINGS
- MERCHANT'S NATIONAL BANK
- AMERICAN BANK AND TRUST
INTRODUCTION
GENERAL TIPS
- After finding the five colored keys you earn an extra hint.
- Finding the hint object will also give you an extra hint.
- When you enter a location where you need to find a hidden object, you are given an extra hint. You can also quit to the main menu, and then click on “continue” to restart the level with an extra hint.
- You can't have more than three hints at any given time. So before finding the five keys, or before finding the hint object, try using a hint first.
- The men you set up to guard the Patrons can only turn away 38 people before they disappear.
- During the vault stages, the highest time limit that will ever be given is one minute.
- Clicking your mouse randomly too many times will result in a $10 deduction from your final score.
SCREENSHOT GUIDE
- The Dillinger Coins are highlighted in a Light-Blue color.
- The Vault Icons are highlighted in purple.
- The Wanted Posters have been highlighted in Yellow.
- The five Colored Keys have been highlighted in Red. When revisiting a Bank location, all of the randomly listed objects are highlighted in Red as well. There are no colored keys when revisiting a Bank location, so there should not be any confusion.
- The object that matches the clue given in the Green text, at the left side of the screen, has been highlighted in Green.
- In some levels there is a special object Dillinger needs; it is also highlighted in Green.
- The extra Cash and Coins have been highlighted in Dark Blue.
HIDDEN COLLECTABLES
- The collectable objects listed below are not randomized, except for the Clue objects.
- Dillinger Coins: collecting nine of these coins will spell out the name Dillinger. After finding these coins, you will be awarded with an extra $5000.
- Vault Icons: for every one of these that is collected, an extra 10 seconds is added to the Bank's vault time limit.
- Wanted Posters: collect all seven of these posters for an extra $5000.
- Five Colored Keys: after collecting these keys, you are given an extra hint. You will use these keys to open the Bank's vault.
- Clue object (object in green text): after finding this object, another hint is given to you.
- Dillinger's special object (the object Dillinger needs): This object will be on your list; it is not randomized, so you can use the screenshot to find this one easily.
- Cash and Coins: collect these to gain extra money.
BLOCKING BANK PATRONS
- A Patron is really a person who is trying to escape the bank in this situation.
- At the beginning of these sequences, you will be given a small number of Robbers to help you redirect the Patrons away from the Bank's exits.
- There are a small number of specific positions where these Robbers can stand up to guard the Patrons. By moving your mouse around the screen a little, you will start to see how the Robber will start to snap to certain positions like a magnet. Those are the available positions.
- Left-click your mouse when you are satisfied with where your Robber is, to make him stand guard on that position. Notice that these Robbers will disappear after blocking 38 Patrons.
- After setting all of your available Robbers around the Bank's lobby, people will start to run out of a number of doors to try, and make their way to the available exits. When this happens, you will be able to control the Robber who is standing near an exit.
- This special robber runs in four directions: up, down, left, and right. Click on any position in the bank to get him to move in your mouse's general direction. For example, clicking somewhere above his head makes him run upwards if there is nothing in his way.
- When any of your Robbers comes into contact with a Patron, the Patron runs in the opposite direction.
- While the Patrons are trying to escape, you will see some Gold Coins appear randomly along the Bank's exits. Collect these coins for extra money.
BANK VAULT
- This is where you will use those five keys that you will eventually have to pick up.
- There are five holes along the side of the Vault door; this is where you must place your five keys.
- If you place your Keys into the holes in the correct order, the Vault door will open.
- The order that the keys need to be in will be random in this event. Try out all the keys on all the holes until you find the correct key for each hole.
- When a key stays in a hole, that indicates that you used the correct key for that hole. If the wrong key is placed into a hole, all the correct keys that were already in their holes will be taken out, and you will have to start over again.
- Left-click on a key to grab it; then left-click on one of the five holes to put a key in.
- Initially, the Vault timer begins at 30 seconds, but if you have collected any of the Vault Icons there will be more than 30 seconds when you begin.
- When the Vault timer reaches 0 you will have to try again.
- The highest the Vault timer can be set to is 60 seconds, so there is really no need to pick up more than three Vault Icons.
REVISITING LOCATIONS
- Sometimes Dillinger will revisit a location to rob it twice.
- When this happens, there are no Posters, Dillinger Coins, Colored Keys, or Vault Icons to collect.
- There will only be Cash and Coins, along with the objects listed on the left side of your screen to collect.
- The Bank Vault cannot be robbed when revisiting it.
DILLINGER'S GANG
- After selecting the Bank you want to rob, you will have to select at least one of these Gang members to help you.
- Each of these six Gang members has a different special ability when it comes to robbing banks. The six Gang members have been listed below, along with their special abilities.
- Russel Clark: increases the speed of the Robber while blocking Bank Patrons by 1.
- Harry Pierpont: increases the time allotted in while breaking into the Vault by 10 seconds.
- Charles Makley: increases the speed of the Robber while blocking Bank Patrons by 2.
- Harry Copeland & Harry Pierpont: increase the time allotted in while breaking into the Vault by 20 seconds.
- John Hamilton: increases the speed of the Robber while blocking Bank Patrons by 2, and increases the time allotted in while breaking into the Vault by 10 seconds.
- Edward W. Shouse: increases the speed of the Robber while blocking Bank Patrons by 1, and increases the time allotted in while breaking into the Vault by 10 seconds.
COMMERCIAL BANK
OUTSIDE THE BANK
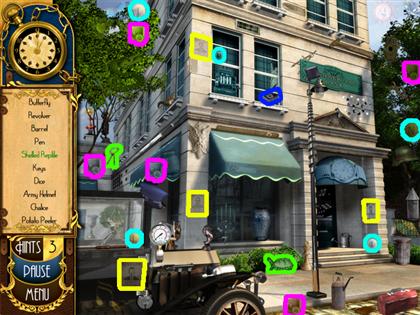
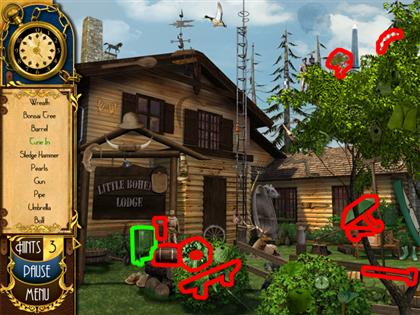
- Use this screenshot to find all of the special hidden objects in this location.
- The listed objects on the left side of the screen have not been highlighted in this shot, except for the Clue object, and Dillinger's special object. These two objects from the list have been highlighted in Green.
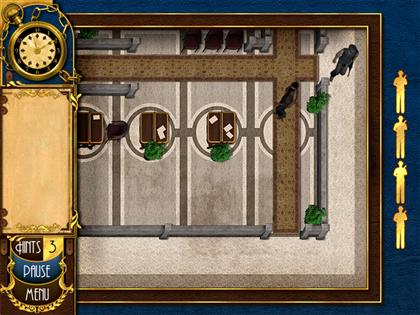
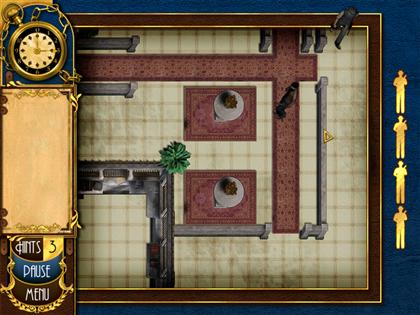
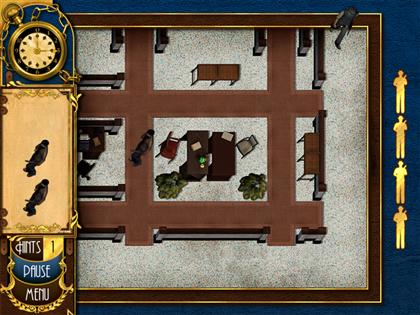
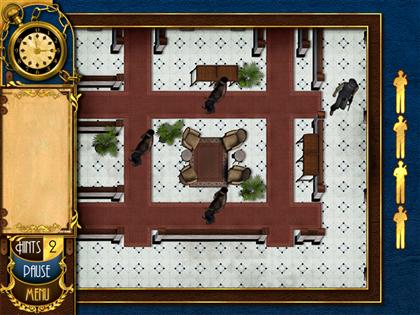
BLOCKING THE PATRONS
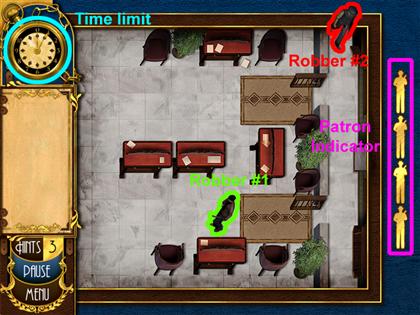
- In this screenshot the Time limit gauge shows how much time is left until your blocking mission is complete.
- The Patron indicator shows four gold icons in the beginning, but every time a Patron escapes, one of the gold icons turns Red.
- When all four gold icons turn Red, you will be forced to restart the mission.
- Robber #1 is the Robber you set to help you turn back the Patrons.
- Robber #2 is the Robber you control with your mouse clicks to collect coins and block Patrons.
- You cannot use hints here.
INSIDE THE BANK
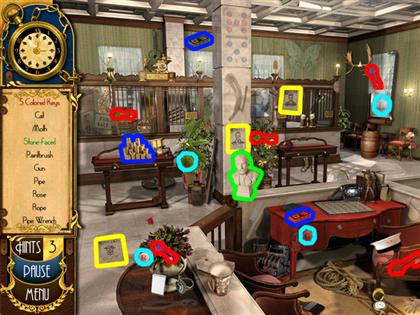
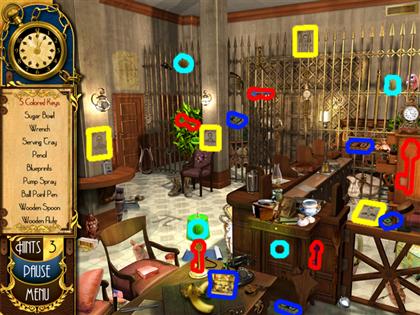
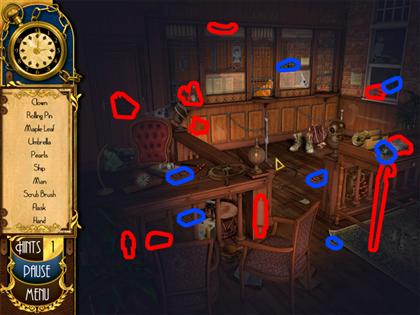
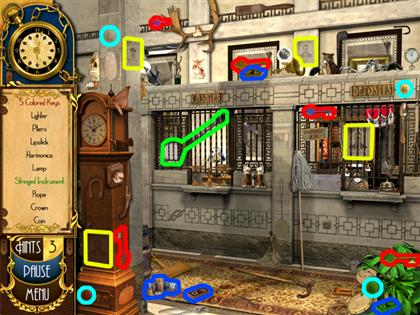
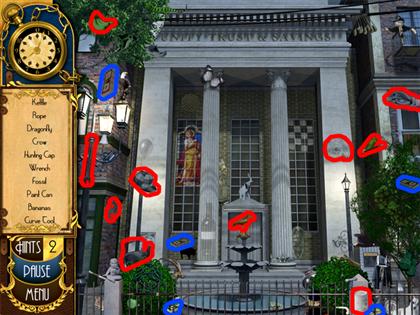
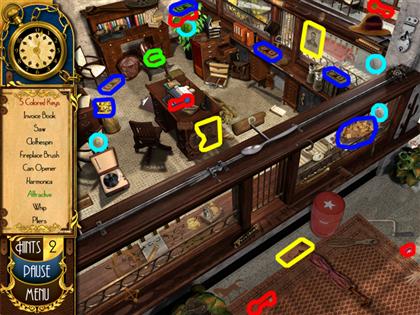
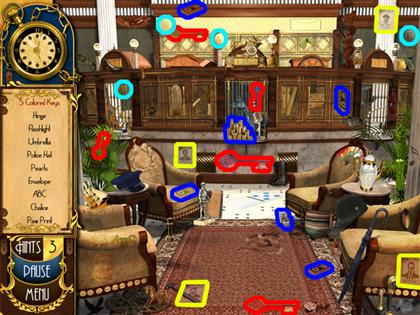
- Use this screenshot to find the five Colored Keys, along with the remaining special hidden objects.
- The listed objects on the left side of the screen have not been highlighted in this shot, except for the Clue object.
THE BANK VAULT
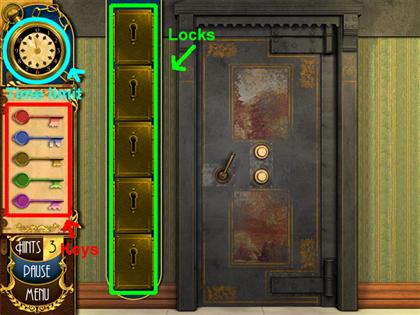
- The five Colored Keys you collected earlier are on the left side of your screen; use these keys to open the Vault.
- Each of your five Colored Keys fits into one of those locks.
- Find out which key goes in which lock before time runs out.
- All five keys must be inside the five locks for you to continue.
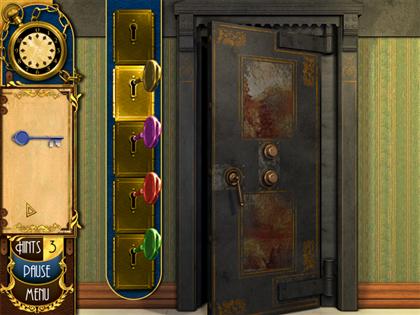
- In this screenshot, four of the keys were placed into four of the locks correctly.
- As you can see, the next thing to do is place the Blue key into the top lock in order to get the vault open.
- The correct pattern of the keys is always random; so you will have to experiment on your own.
MONTPELIER NATIONAL BANK
OUTSIDE THE BANK
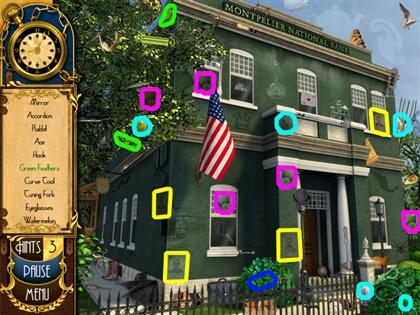
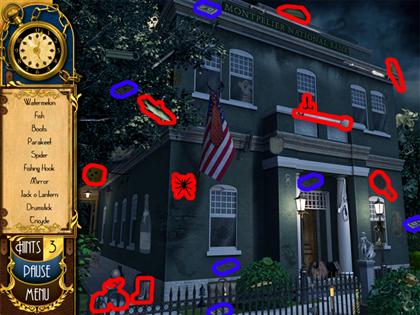
- Use this screenshot to find all of the special hidden objects in this location.
- The listed objects on the left side of the screen have not been highlighted in this shot, except for the Clue object, and Dillinger's special object. These two objects from the list have been highlighted in Green.
BLOCKING THE PATRONS
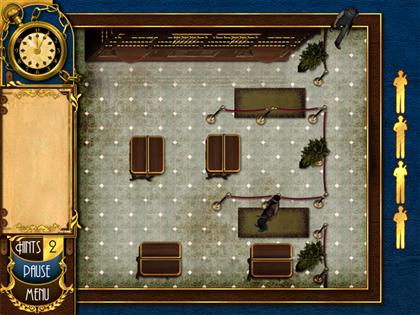
- This stage is just as easy as the first, just block off the Patrons from the exits until the time gauge reaches 0.
INSIDE THE BANK
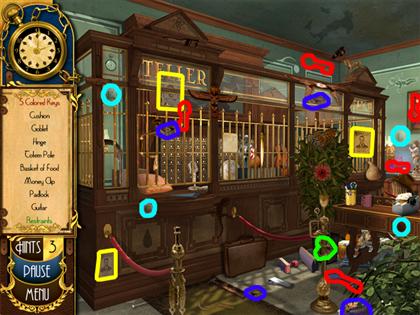
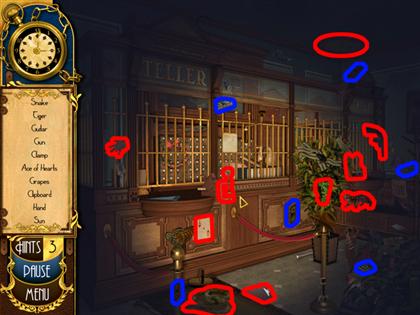
- Use this screenshot to find the five Colored Keys, along with the remaining special hidden objects.
- The listed objects on the left side of the screen have not been highlighted in this shot, except for the Clue object.
THE BANK VAULT
- All of the Bank Vault sequences are the same.
- You can use the same steps you used before to open this Vault.
OUTSIDE THE BANK 2
- This is your first time revisiting a location; there is not much to collect here.
- Use the screenshot to find the Cash and Coin objects, along with the objects from the object list.
- Note that the objects found on this list are totally random.
INSIDE THE BANK 2
- It is very dark in this area; use your mouse as a flashlight to find the hidden objects in this room.
- Use this screenshot to find the Cash and Coin objects. The objects from the object list have also been highlighted here.
- Note that the objects found on this list are totally random.
BLUFFTON BANK
OUTSIDE THE BANK
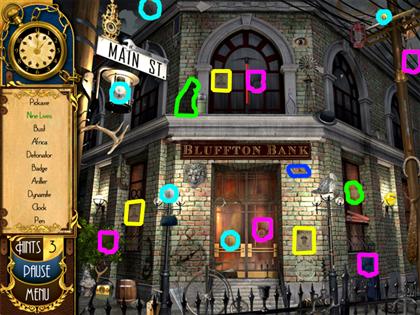
- Use this screenshot to find all of the special hidden objects in this location.
- The listed objects on the left side of the screen have not been highlighted in this shot, except for the Clue object, and Dillinger's special object. These two objects from the list have been highlighted in Green.
BLOCKING THE PATRONS
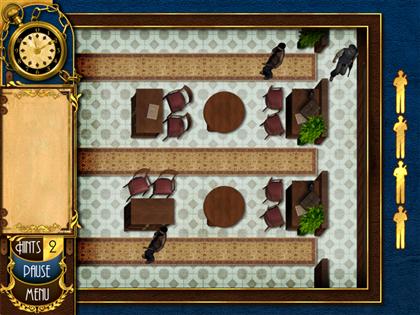
- This time you have two Robbers there to help you out.
- Be sure to place one in the top row, and one in the bottom row. That way if you feel like going after the coins, you won't have to stray far from the middle row to get them.
INSIDE THE BANK
- Use this screenshot to find the five Colored Keys, along with the remaining special hidden objects.
- The listed objects on the left side of the screen have not been highlighted in this shot, except for the Clue object.
THE BANK VAULT
- All of the Bank Vault sequences are the same.
- You can use the same steps you used before to open this Vault.
MASSACHUSETTS AVENUE STATE BANK
OUTSIDE THE BANK
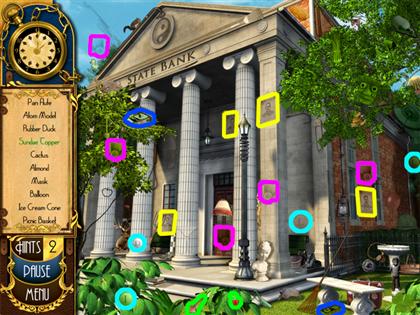
- Use this screenshot to find all of the special hidden objects in this location.
- The listed objects on the left side of the screen have not been highlighted in this shot, except for the Clue object, and Dillinger's special object. These two objects from the list have been highlighted in Green.
BLOCKING THE PATRONS

- This stage is basically the same as the one you completed prior to this one.
- You can use the same strategy, or invent your own.
INSIDE THE BANK
- Use this screenshot to find the five Colored Keys, along with the remaining special hidden objects.
- The listed objects on the left side of the screen have not been highlighted in this shot, except for the Clue object.
THE BANK VAULT
- All of the Bank Vault sequences are the same.
- You can use the same steps you used before to open this Vault.
OUTSIDE THE BANK 2
- Use the screenshot to find the Cash and Coin objects, along with the objects from the object list.
- Note that the objects found on this list are totally random.
INSIDE THE BANK 2
- It is very dark in this area; use your mouse as a flashlight to find the hidden objects in this room.
- Use this screenshot to find the Cash and Coin objects. The objects from the object list have also been highlighted here.
- Note that the objects found on this list are totally random.
DILLINGER'S HIDEOUT
OUTSIDE THE HIDEOUT
- The objects from the object list have been highlighted in this screenshot.
- Take caution; all of the objects on the list have been randomized.
INSIDE THE HIDEOUT

- The objects from the object list have been highlighted in this screenshot.
- Take caution; all of the objects on the list have been randomized, except for Dillinger's special object.
CENTRAL NATION BANK AND TRUST
OUTSIDE THE BANK
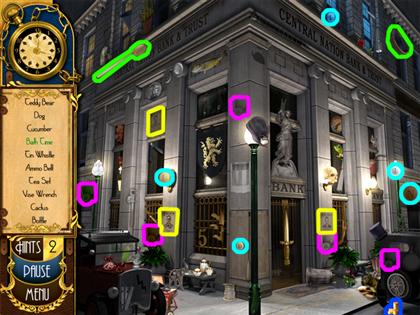
- Use this screenshot to find all of the special hidden objects in this location.
- The listed objects on the left side of the screen have not been highlighted in this shot, except for the Clue object, and Dillinger's special object. These two objects from the list have been highlighted in Green.
BLOCKING THE PATRONS
- This one looks easy, but there is a chance that the Robber you set up is going to disappear; so be on your guard with this one.
- If the situation gets too hard, focus on the Patrons and forget about collecting coins for a while.
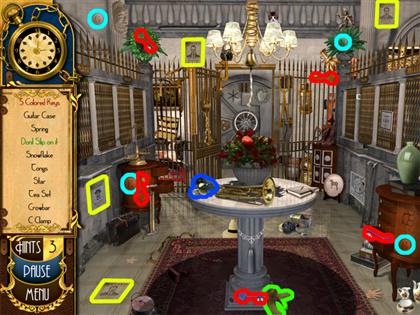
INSIDE THE BANK
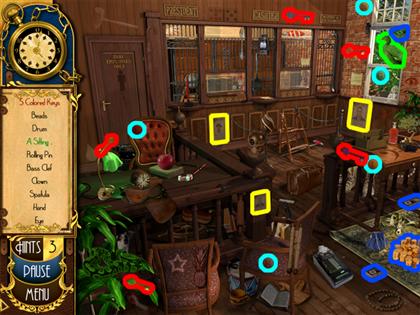
- Use this screenshot to find the five Colored Keys, along with the remaining special hidden objects.
- The listed objects on the left side of the screen have not been highlighted in this shot, except for the Clue object.
UNITY TRUST AND SAVINGS
OUTSIDE THE BANK
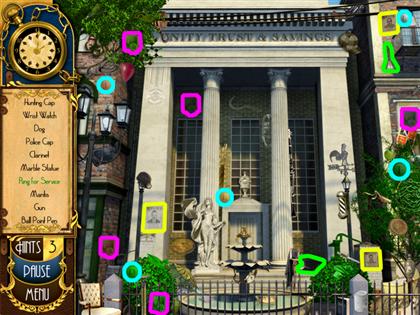
- Use this screenshot to find all of the special hidden objects in this location.
- The listed objects on the left side of the screen have not been highlighted in this shot, except for the Clue object, and Dillinger's special object. These two objects from the list have been highlighted in Green.
BLOCKING THE PATRONS
- This stage is going to be a little harder than the one you played before.
- After your Robber disappears, focus on blocking the Patrons, instead of trying to collect coins.
INSIDE THE BANK
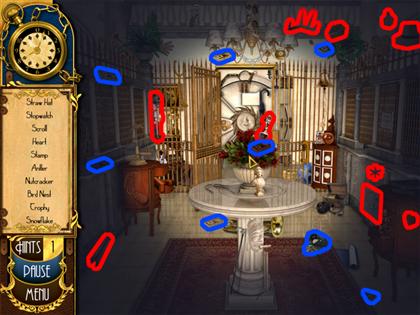
- Use this screenshot to find the five Colored Keys, along with the remaining special hidden objects.
- The listed objects on the left side of the screen have not been highlighted in this screenshot, except for the Clue object.
THE BANK VAULT
- All of the Bank Vault sequences are the same.
- You can use the same steps you used before to open this Vault.
OUTSIDE THE BANK 2
- Use the screenshot to find the Cash and Coin objects, along with the objects from the object list.
- Note that the objects found on this list are totally random.
INSIDE THE BANK 2
- It is very dark in this area; use your mouse as a flashlight to find the hidden objects in this room.
- Use this screenshot to find the Cash and Coin objects. The objects from the object list have also been highlighted here.
- Note that the objects found on this list are totally random.
MERCHANT'S NATIONAL BANK
OUTSIDE THE BANK
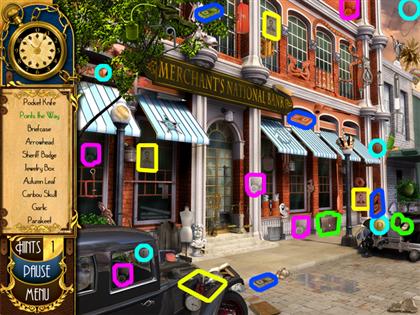
- Use this screenshot to find all of the special hidden objects in this location.
- The listed objects on the left side of the screen have not been highlighted in this shot, except for the Clue object, and Dillinger's special object. These two objects from the list have been highlighted in Green.
BLOCKING THE PATRONS
- This time you have three Robbers to set up before the Patrons come in.
- Even though you have three this time, you should still keep your guard up.
INSIDE THE BANK
- Use this screenshot to find the five Colored Keys, along with the remaining special hidden objects.
- The listed objects on the left side of the screen have not been highlighted in this shot, except for the Clue object.
AMERICAN BANK AND TRUST
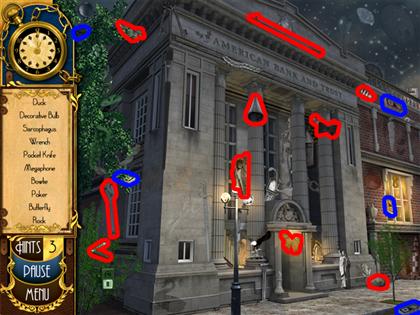
OUTSIDE THE BANK
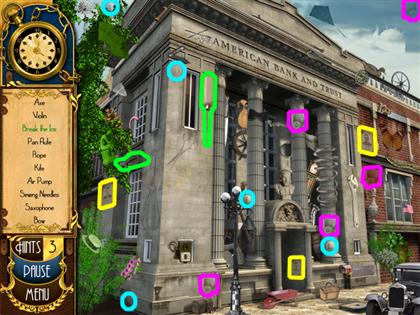
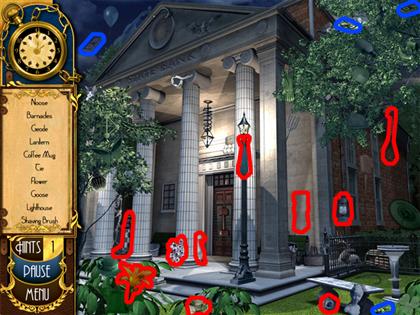
- Use this screenshot to find all of the special hidden objects in this location.
- The listed objects on the left side of the screen have not been highlighted in this shot, except for the Clue object, and Dillinger's special object. These two objects from the list have been highlighted in Green.
BLOCKING THE PATRONS
- This stage is the same as the last one, just a bit harder.
INSIDE THE BANK
- Use this screenshot to find the five Colored Keys, along with the remaining special hidden objects.
- The listed objects on the left side of the screen have not been highlighted in this shot, except for the Clue object.
THE BANK VAULT
- All of the Bank Vault sequences are the same.
- You can use the same steps you used before to open this Vault.
OUTSIDE THE BANK 2
- Use the screenshot to find the Cash and Coin objects, along with the objects from the object list.
- Note that the objects found on this list are totally random.
INSIDE THE BANK 2
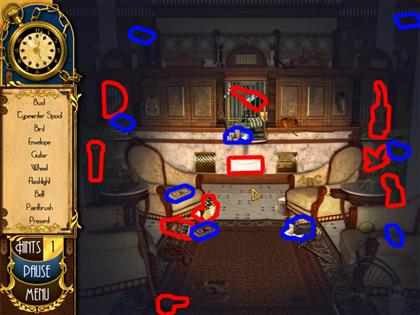
- It is very dark in this area; use your mouse as a flashlight to find the hidden objects in this room.
- Use this screenshot to find the Cash and Coin objects. The objects from the object list have also been highlighted here.
- Note that the objects found on this list are totally random.
OUTSIDE THE THEATRE
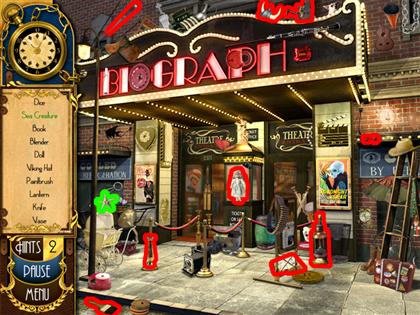
- The objects from the object list have been highlighted in this screenshot.
- All of the objects on this object list have been randomized.
Created at: 2009-07-26