

Walkthrough Menu
- General Tips
- Chapter 1: Mountain Outpost
- Chapter 2: The Dark Tower
- Chapter 3: The Fungal Forest
- Chapter 4: Return to Gobholme
- Achievements
General Tips
- Hidden Object Scenes and mini-games are often randomized - your solution may vary.
- Throughout this walkthrough, Hidden Object Scenes will be referred to as 'HOS'.
- Click on the question mark on the left side for your current goal – click on the tab again for more assistance with the goal (A).
- Your journal will document your journey and clues you find as well as list your goals (B).
- Use the pocket dragon when you need light or fire (C).
- Hints are unlimited but you must wait for Ran the Owl to recharge (H).
Chapter 1: Mountain Outpost
- Read 'The Story So Far...' Click on the arrow to advance the page (A).
- Select the 'Goals' tab to read the tasks you need to complete (B).
- Click on the 'Close' button to shut the journal (C).
- You will have the option of some interactive help.
- Click on the Owl - he will provide hints if you need them through the game (D).
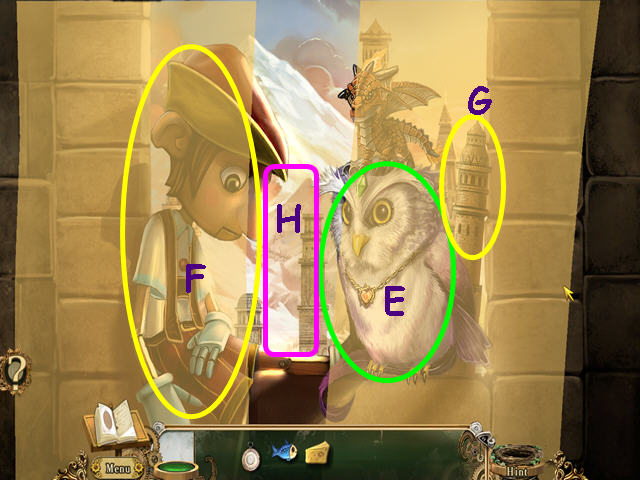
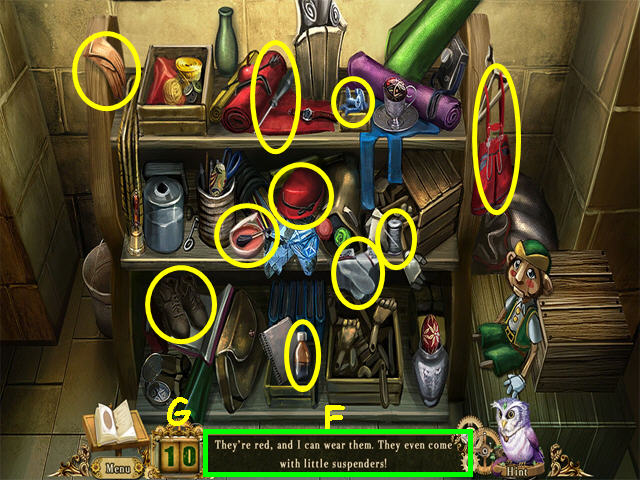
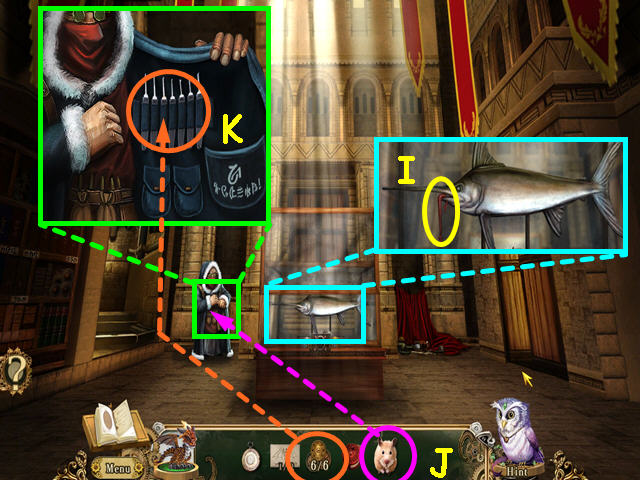
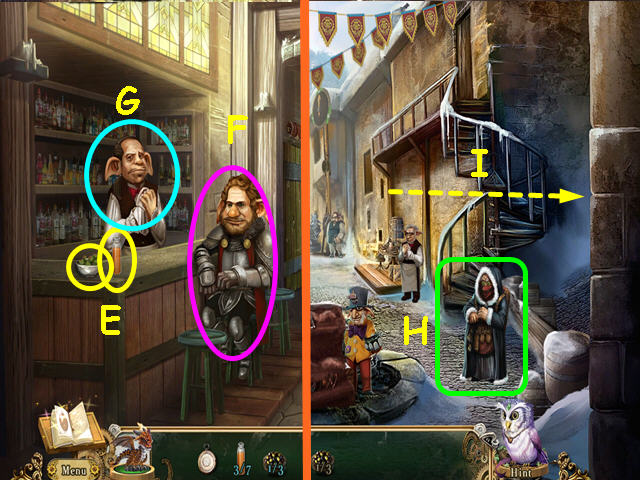
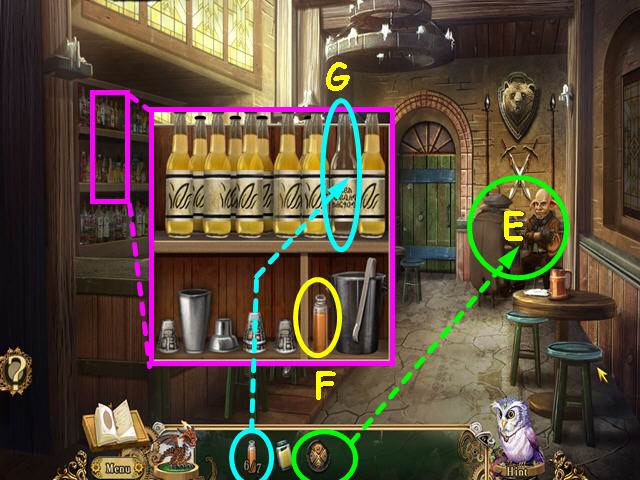
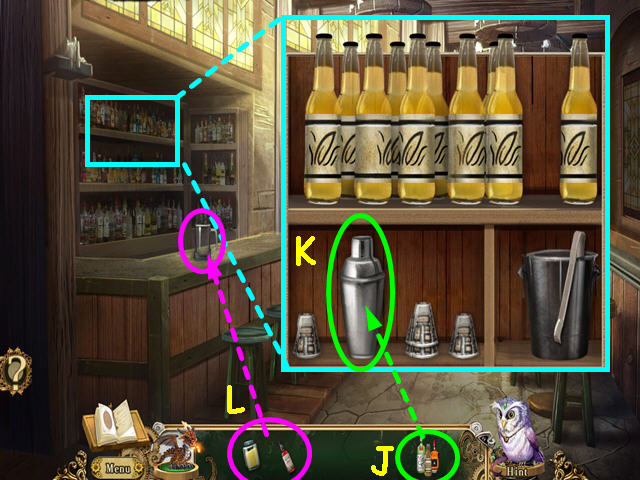
- Take the 3 MOSSFLOWERS (E).
- Look at the close-up of the pocket dragon and feed him the MOSSFLOWERS (F).
- Click on the pocket dragon to add him to your inventory.
- Walk forward through the entrance (G).
- Make note of the goblin armor (H).
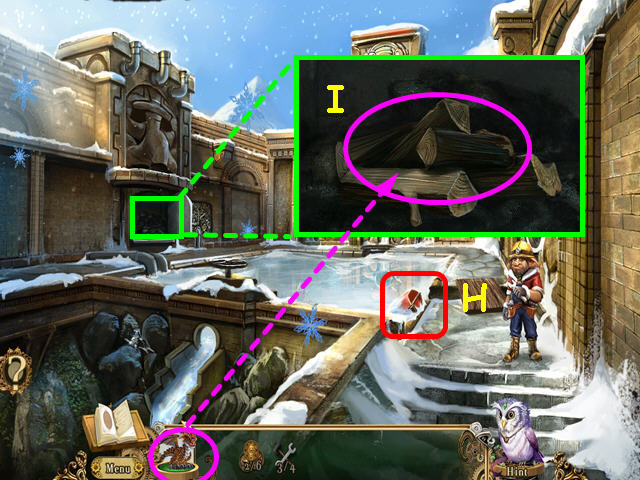
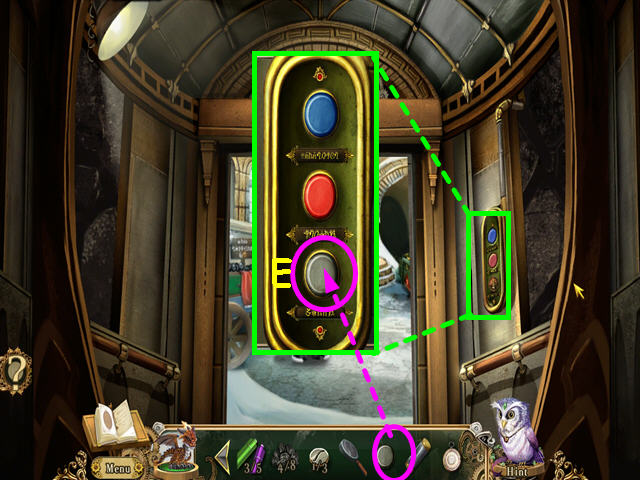
- Look at close-up of the ice patch and use the pocket dragon 3 times to melt the ice for a mini-game (I).
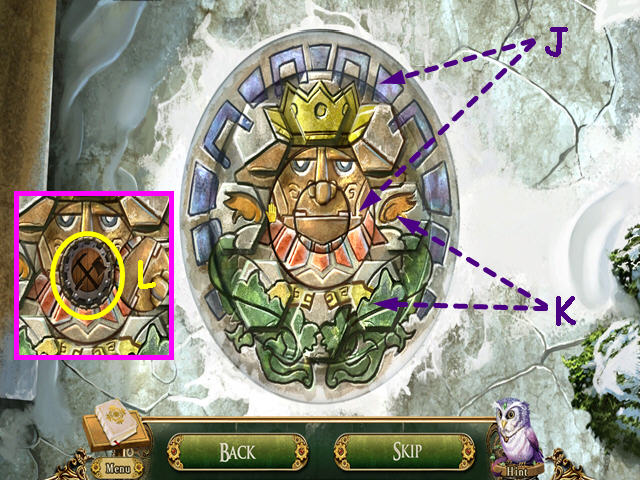
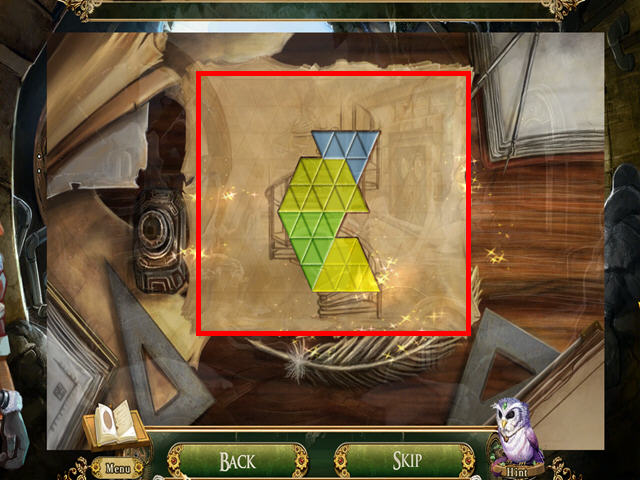
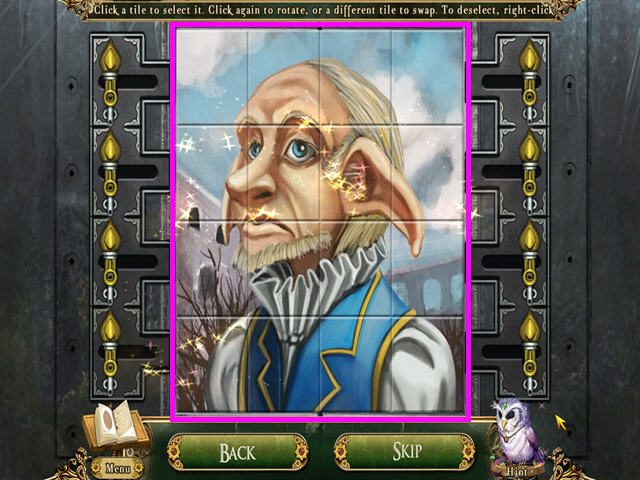
- Restore the picture.
- Rotate the inner and outer rings (J).
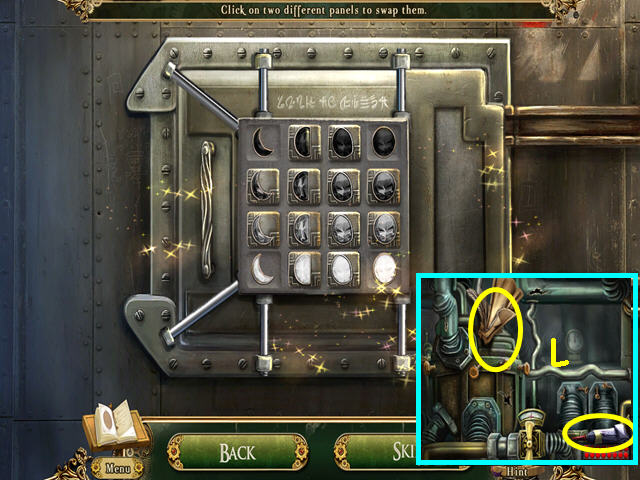
- Click and drag a tile over another tile to swap positions (K).
- Once the picture is complete, the center will open to reveal a GOBLIN SHIELD (L).
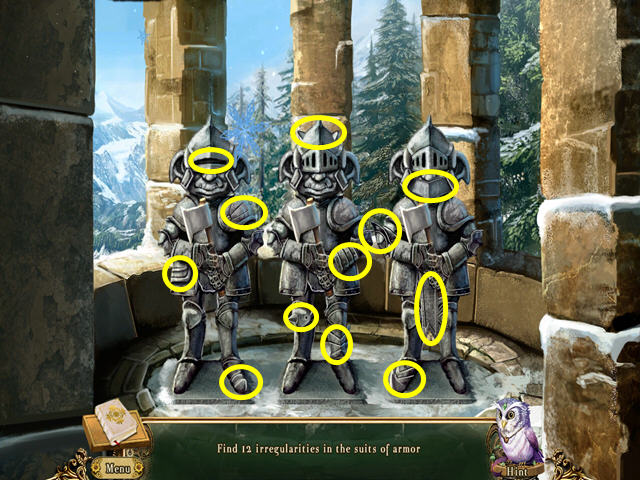
- Look at the goblin armor for a mini-game.
- Click on the 12 irregularities.
- Take the GOBLIN AXE that falls to the ground.
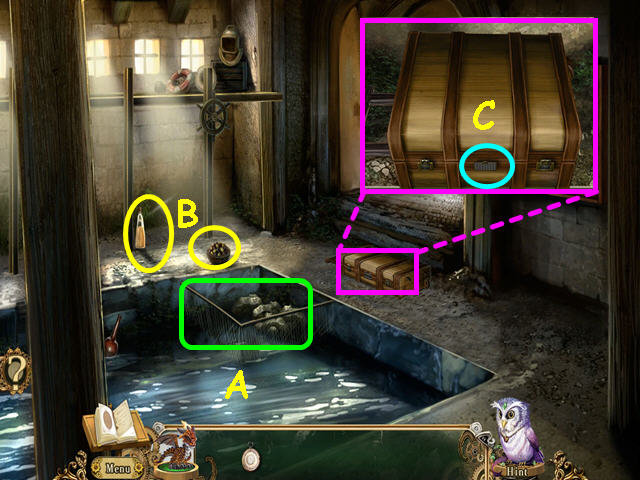
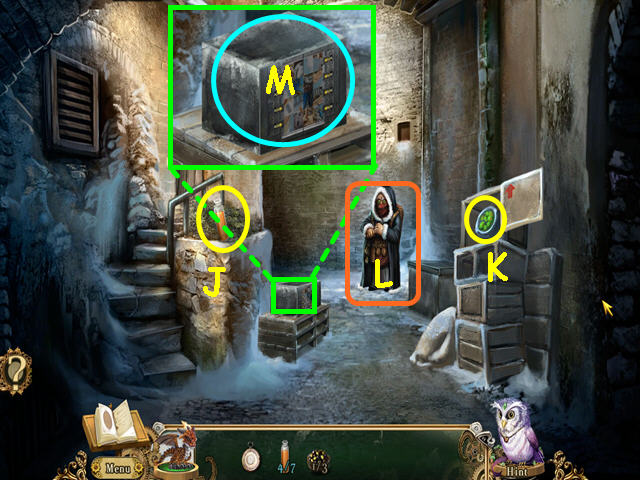
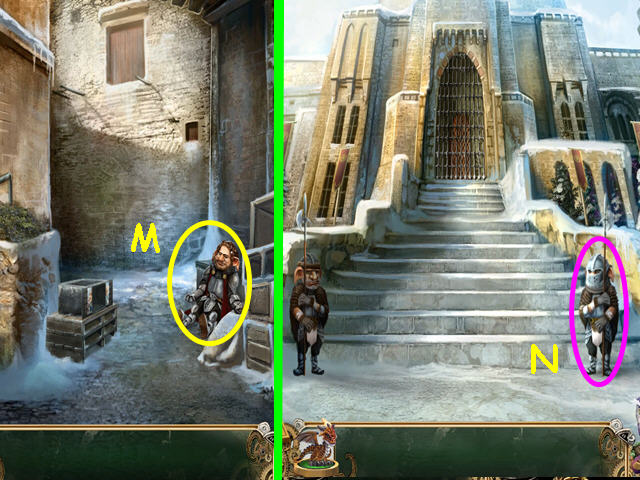
- Talk to the Goblin Guard and he will leave (M).
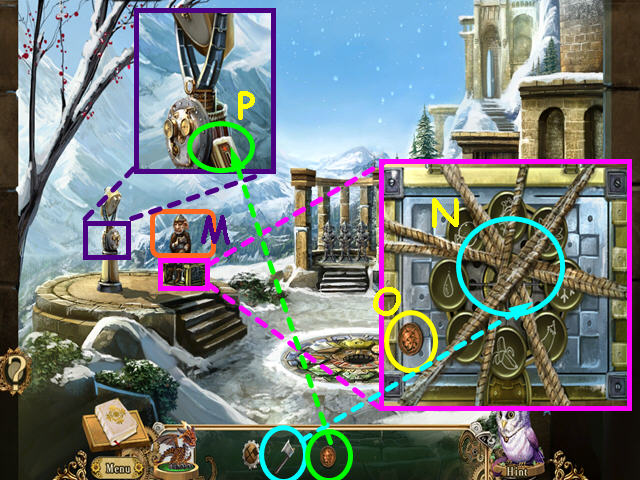
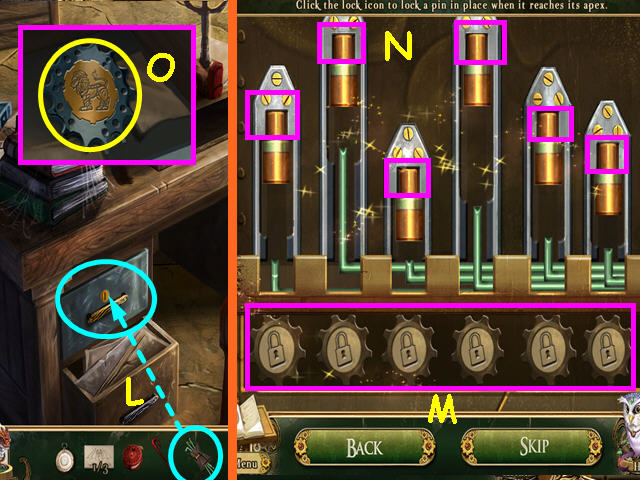
- Look at the strongbox and use the GOBLIN AXE 4 times to remove the ropes (N).
- Take the BOLGIN COIN then exit the close-up (O).
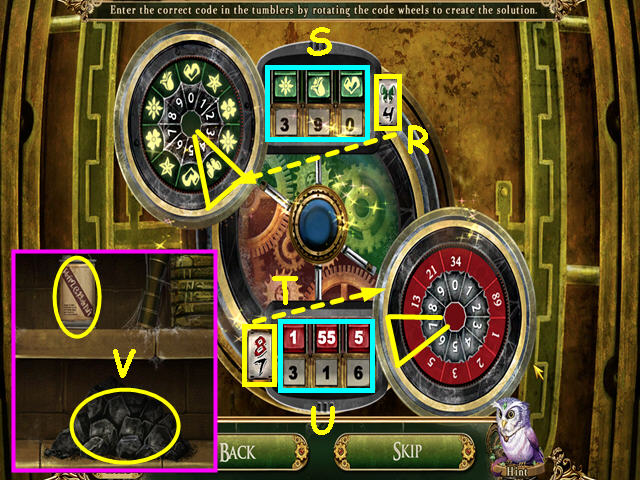
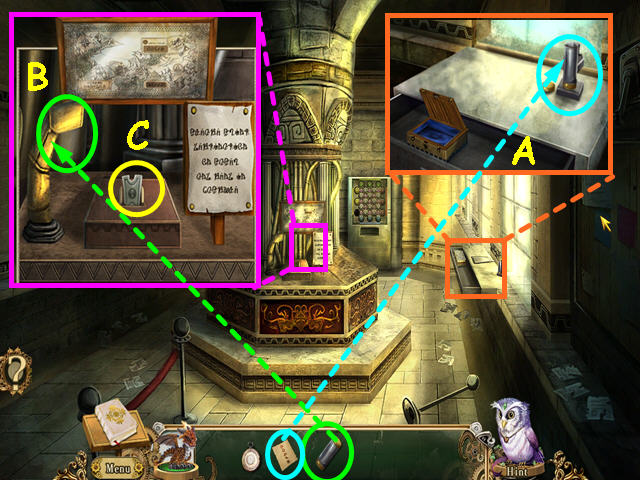
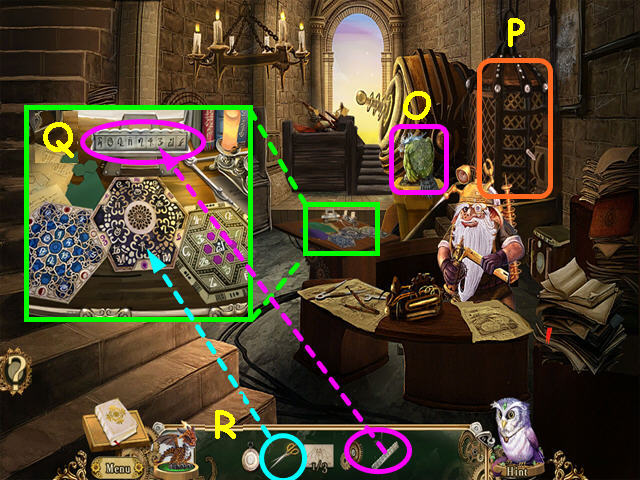
- Look at the telescope and use the BOLGIN COIN on the slot (P).
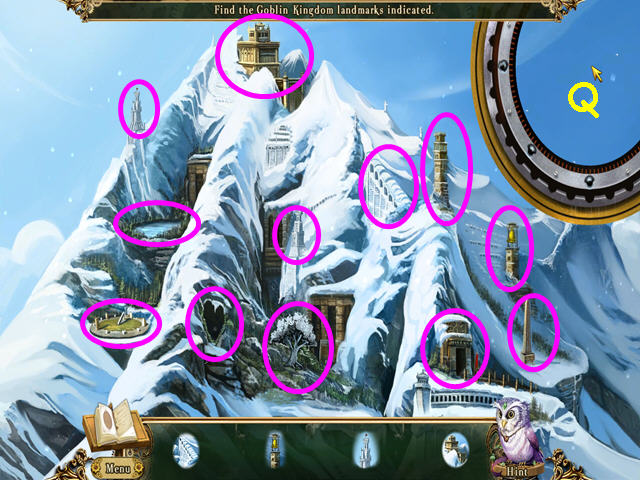
- Locate all the landmarks using the lens (Q).
- Move the lens over a landmark, then click.
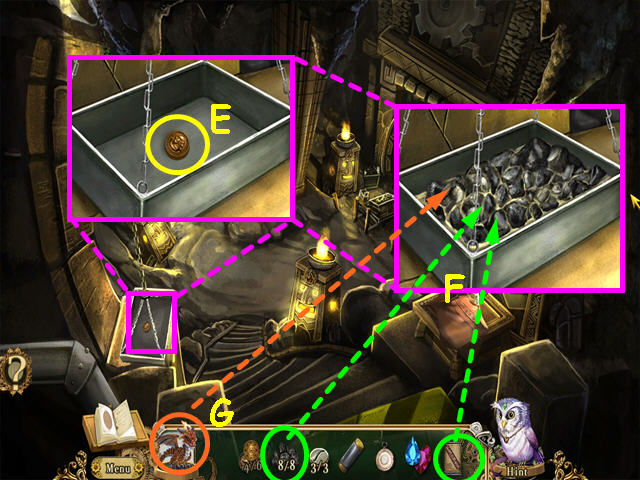
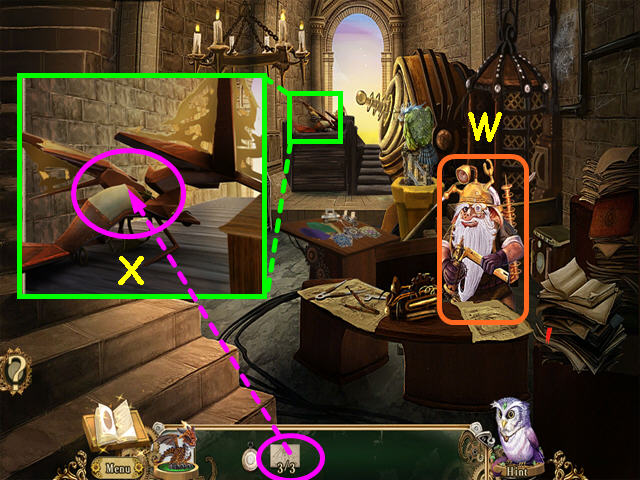
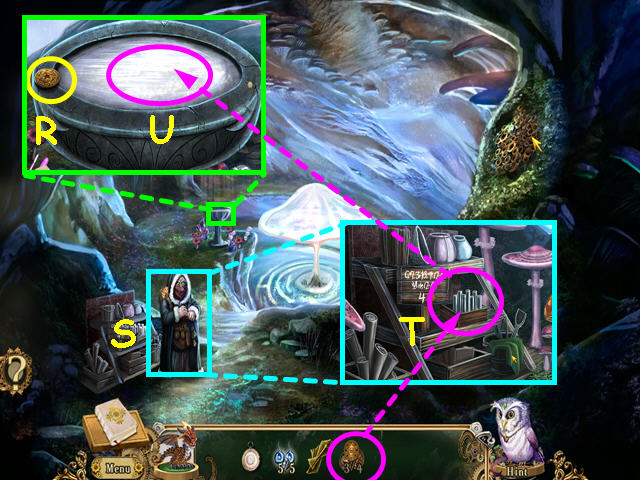
- Take the 8 PRISM SPHERES from the side of the telescope (R).
- Note the Goblin Gate (S).
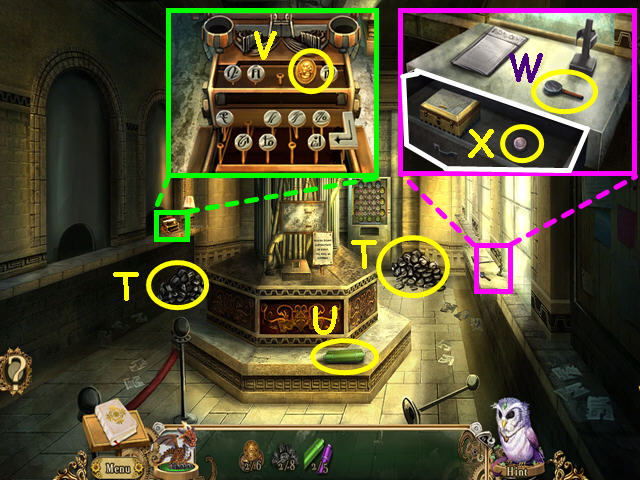
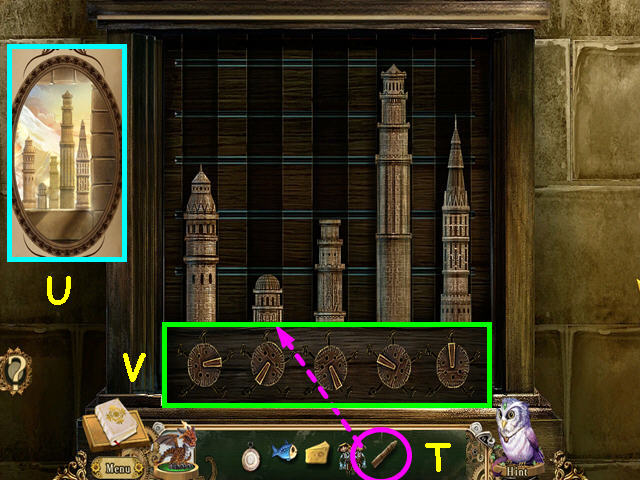
- Look at the strongbox and use the 8 PRISM SPHERES on the lid for a mini-game (T).
- Under the prisms are pictures (U).
- Click and drag the prisms over a picture that matches the color of the prism.
- For example, the yellow prism will go over the banana and the blue over the raindrop.
- Inside the strongbox, take the BOLGIN COIN, the PICKAXE and look at the Goblin crest and train schedule (V).
- Make sure the Goblin crest is noted in your journal.
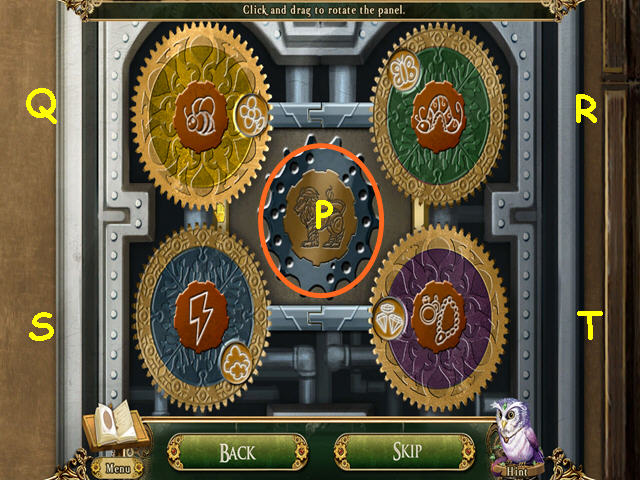
- Look at the Goblin Gate.
- You need to recreate the Goblin Crest on the gate; refer to the shield design in your journal (A).
- Place the GOBLIN SHIELD into the circle, then place the PICKAXE and the GOBLIN AXE onto the shield (B).
- Use the buttons on the left to change the gear shape and the ear position to match the Goblin Crest (C).
- The buttons on the left control the eyes and the mouth. Press them to match the Goblin Crest (D).
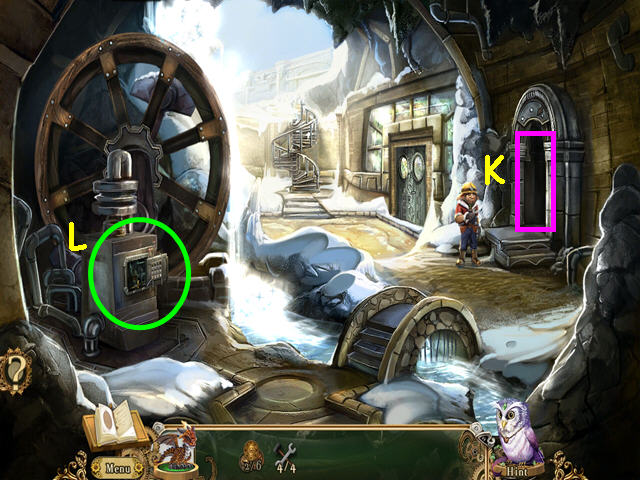
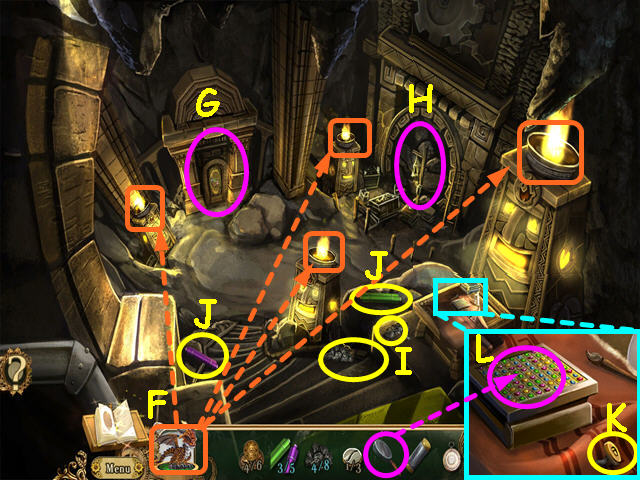
- Walk forward through the door, then go forward once more through the hall to the generator room.
- Talk to the Goblin Engineer to learn he needs blueprints (E).
- Look at the grating and use the pocket dragon twice to melt the ice (F).
- Take the Goblin Screwdriver which is 1/4 GOBLIN TOOLS (G).
- Take the 1/5 and 2/5 FIREWOOD (H).
- Note the staircase (I).
- Look at the close-up of the water wheel and take the BELLOWS and the 3/5 FIREWOOD (J).
- Exit the close-up, then select the engine box for a mini-game (K).
- Arrange the moons from quarter moon to full moon horizontally, and darkest to lightest vertically.
- Click on 2 moons to swap positions.
- Some moons are locked into place and cannot be moved.
- Once the panel opens, take the GOBLIN BLUEPRINTS and the Goblin Sealant which is 2/4 GOBLIN TOOLS (L).
- Exit the engine box.
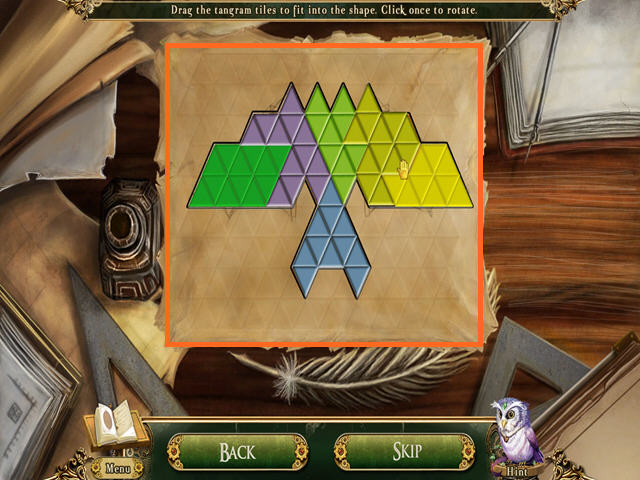
- Give the GOBLIN BLUEPRINTS to the Goblin Engineer for a mini-game.
- Fit the pieces into the shaded area.
- Left-click and hold to drag a piece into position, left-click to rotate a piece.
- Walk forward up the staircase.
- Talk to the Goblin Engineer again (M).
- Take the 4/5 and 5/5 FIREWOOD (N).
- Take the Goblin Hammer which is 3/4 GOBLIN TOOLS (O).
- Look at the carved totem (P).
- Select the furnace for a mini-game (Q).
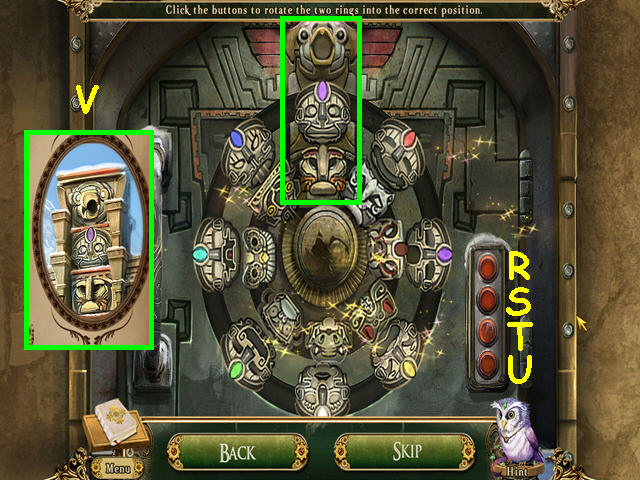
- Move the rings so the heads match the large carved totem.
- The top button moves the inner circle 3 places to the right (R).
- The second button moves the inner circle 2 places to the left (S).
- The third button moves the outer circle 2 places to the right (T).
- The bottom button moves the outer circle 3 places to the left (U).
- Refer to your journal for a picture of the carved totem (V).
- Use the BELLOWS on the soot 4 times (W).
- Take the 2/6 BOLGIN COIN and the GATE HANDLE (X).
- Place the 5 pieces of FIREWOOD into the furnace (Y).
- Exit the close-up, then walk down to the generator room.

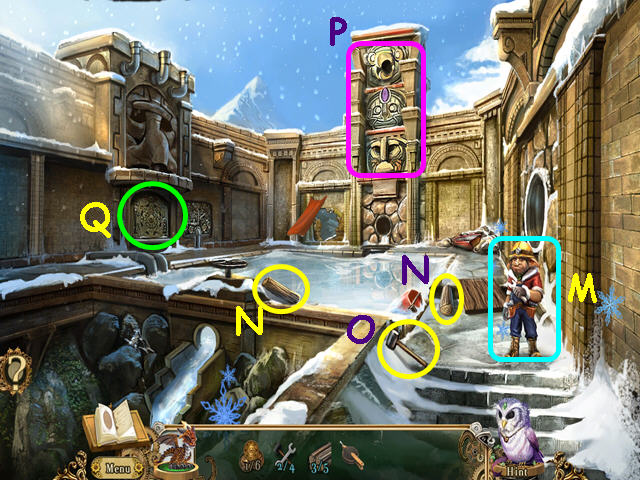
- Look at the greenhouse gate and use the GATE HANDLE on the door (Z).
- Click on the handle for a HOS.
- Locate all the items on the list.
- Items in yellow print can be found by looking at close-ups.
- You will earn the ICE PICK.

- Look at the close-up of the waterwheel and use the ICE PICK 3 times on the iced wheel (A).
- Take the WHEELBARROW WHEEL (B).
- Walk forward to the cistern (C).
- Walk forward to the wheelbarrow (D).
- Place the WHEELBARROW WHEEL onto the wheelbarrow (E).
- Click on the 3 broken wall pieces to place them in the wheelbarrow (F).
- Push the wheelbarrow to trigger a mini-game (G).
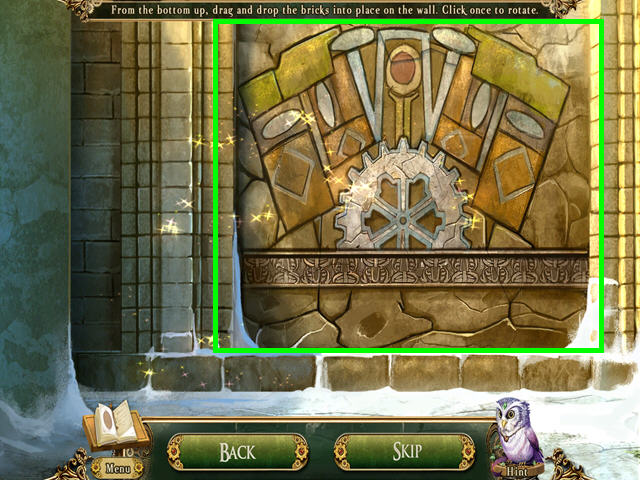
- Restore the wall.
- Rebuild the wall from the bottom to the top.
- Left-click, hold and drag pieces into place, left-click to rotate.
- Note the tool box (H).
- Look at the furnace; use the Pocket Dragon to light the logs on fire (I) and trigger a mini-game.
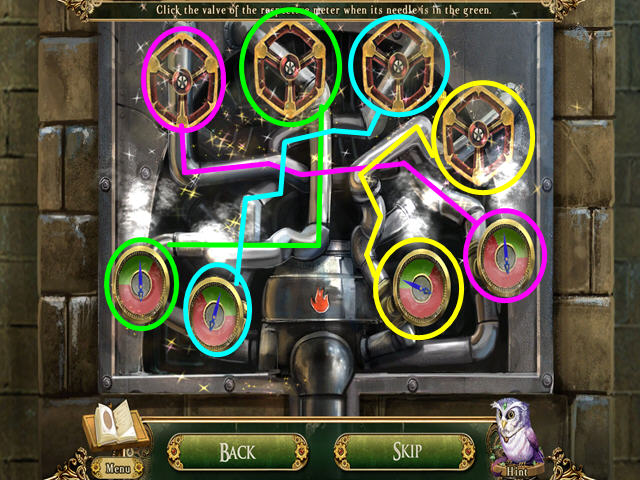
- Turn on all the valves when the needles are in the green.
- Follow a pipe from the meter to the valve, then click on the valve when the meter's needle is in the green.
- Repeat this for the other 3 valves.
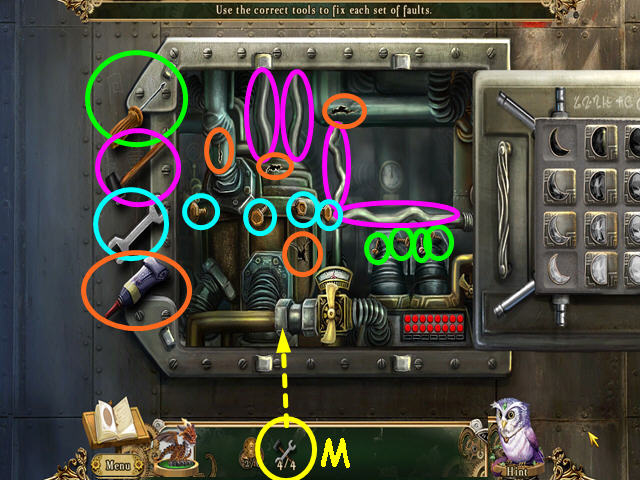
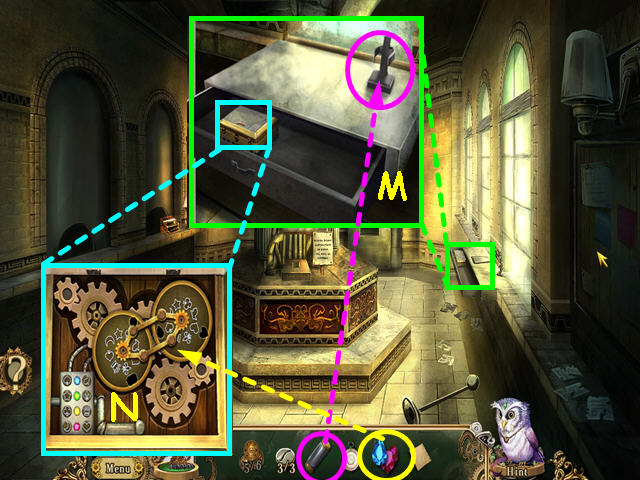
- Select the tool box for a mini-game.
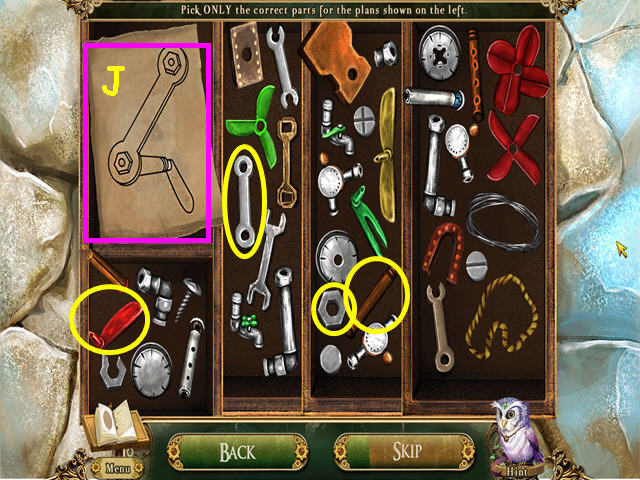
- Select the parts needed to create the item in the diagram (J).
- Click on the loose parts in the trays- correct items will color in on the diagram.
- The first item has 4 parts.
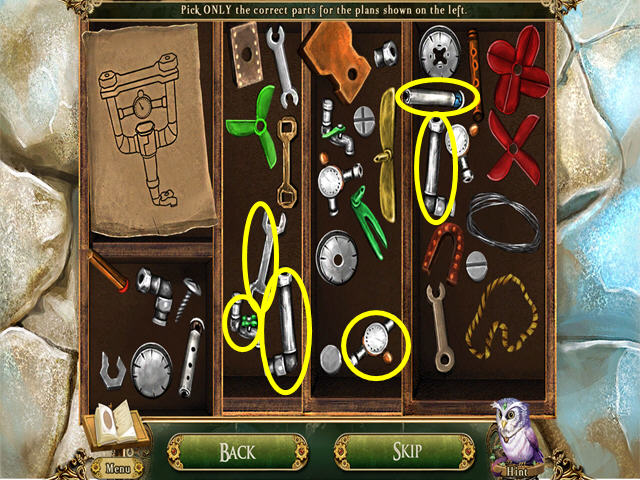
- Click on the parts needed to create the item in the diagram.
- This item requires 6 parts.

- Click on the parts needed to create the item in the diagram.
- This last item requires 5 parts.
- You will earn the Goblin Wrench which is 4/4 GOBLIN TOOLS.
- Note the elevator (K).
- Look at the engine box for a mini-game (L).
- Use the GOBLIN TOOLS on the engine box to trigger the mini-game (M).
- Repair the engine using the Goblin tools.
- Use each tool on the areas indicated by each color, each tool will be used 4 times.
- Enter the elevator.
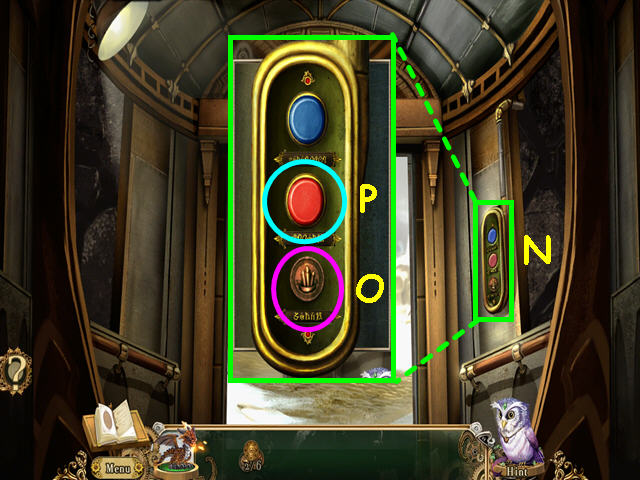
- Look at the elevator controls (N).
- Take the 3/6 BOLGIN COIN and note the missing button (O).
- Press the red button to travel to the train station (P).
- Walk forward to exit the elevator.
- Take the 1/8 and 2/8 CHARCOALS (Q).
- Take the 1/5 and 2/5 STEAM PIPES (R).
- Enter the ticket office (S).
- Take the 3/8 and 4/8 CHARCOALS (T).
- Take the 3/5 STEAM PIPE (U).
- Look at the typewriter and take the 4/6 BOLGIN COIN (V).
- Look at the clerk's desk and take the MAGNIFYING GLASS (W).
- Open the drawer and take the ELEVATOR BUTTON (X).
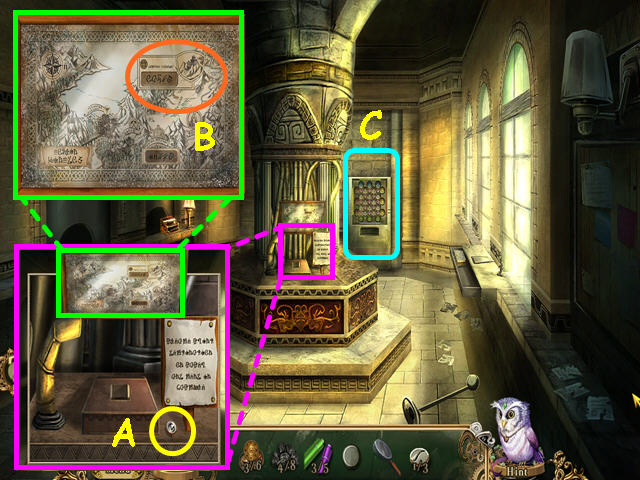
- Look at the ticketing machine and take the 1/3 TYPEWRITER KEY (A).
- Look at the map and click on the station code for the capitol (B).
- Look at the capsule dispenser for a mini-game (C).
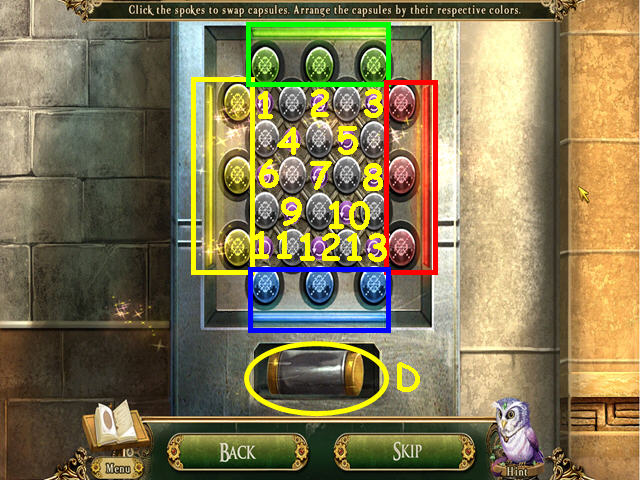
- Move all the colored capsules to the matching colored bar.
- Pressing the purple buttons will rotate the 4 capsules around that button.
- This mini-game is randomly generated - your solution may vary.
- Numbering the buttons from left to right, then down; our moves were: 8x3, 4x2, 6x3, 4x1, 1x2, 9x1, 12 x 1, 9x1, 4x3, and 9x3 (1-13).
- Take the message capsule (D).
- Exit the building, then talk to the mysterious peddler for a mini-game.
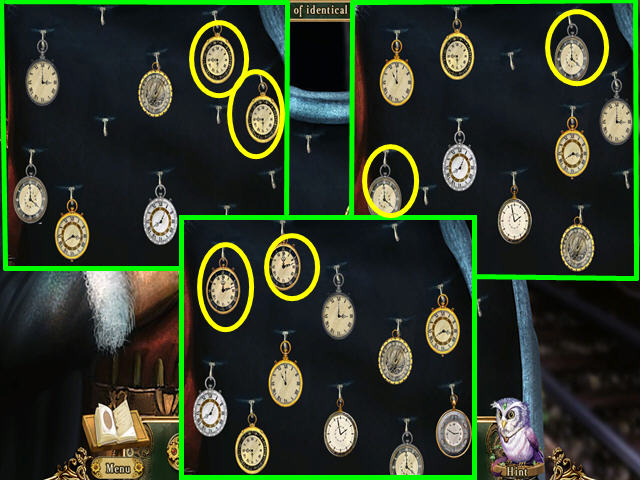
- Find the matching watches.
- Click on the pair of watches that are identical.
- You will have to find the pair 3 times.
- You will earn the POCKET WATCH.
- Exit the close-up, then walk down to the elevator.
- Look at the elevator control and use the ELEVATOR BUTTON in the bottom circle (E).
- Press the bottom button to travel to the mines.
- Walk forward to exit the elevator.
- Take the Pocket dragon and light the 4 lamps (F).
- Note the storeroom (G).
- Note the collapsed tunnel (H).
- Take the 5/8 and 6/8 CHARCOALS (I).
- Take the 4/5 and 5/5 STEAM PIPE (J).
- Look at the gem sorting table and take the 2/3 TYPEWRITER KEY (K).
- Use the MAGNIFYING GLASS on the unsorted gems for a mini-game (L).
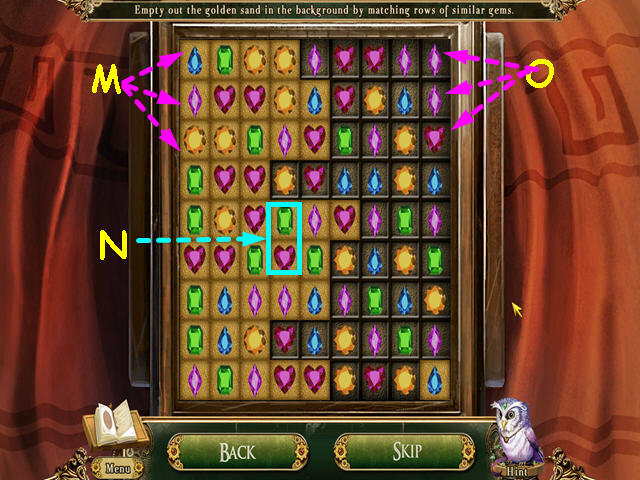
- Remove all the golden sand from behind the gems (M).
- This is done by creating chains of 3 or more matching gems over the sand.
- Click on 2 gems to swap position and form a chain of 3 or more like gems (N).
- Continue making matches until the background is all brown (O).
- You will earn the GEMSTONE COLLECTION.
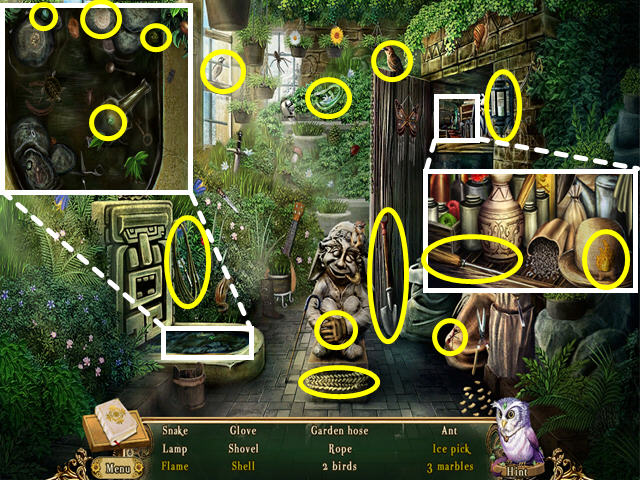
- Select the collapsed tunnel for a HOS.
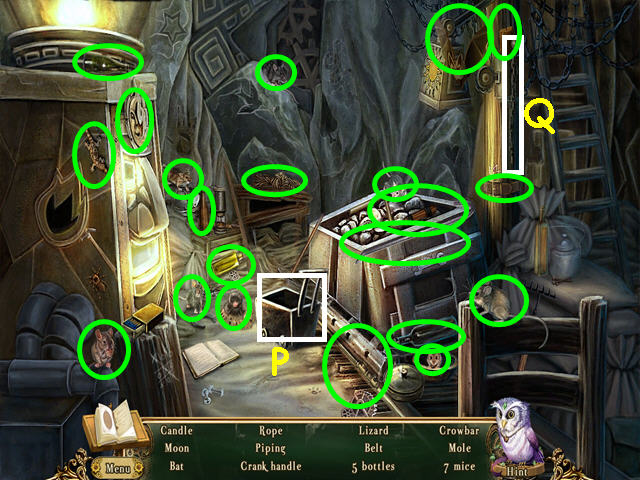
- Locate all the items on the list.
- Items in yellow print can be found by moving the small cart (P) and pulling the chain (Q).
- You will earn the CRANK HANDLE.
- Look at the storeroom for a mini-game.
- Enter the 2 correct codes.
- Rotate the upper dial so the 4 is next to the butterfly (R).
- Enter the symbols for the upper code that match the numbers in the wheel (S).
- Since the red 8 is missing on the lower dial, rotate it so that the space between the red 5 and 13 is over the white 7 (T).
- Click on the red numbers so that they match what is over the white numbers in the dial (U).
- Since the space over the white 1 in the dial is missing, you need to find a number between 34 and 89, which is 55.
- Take the FUEL OIL and the 7/8 CHARCOAL from inside the storeroom (V).
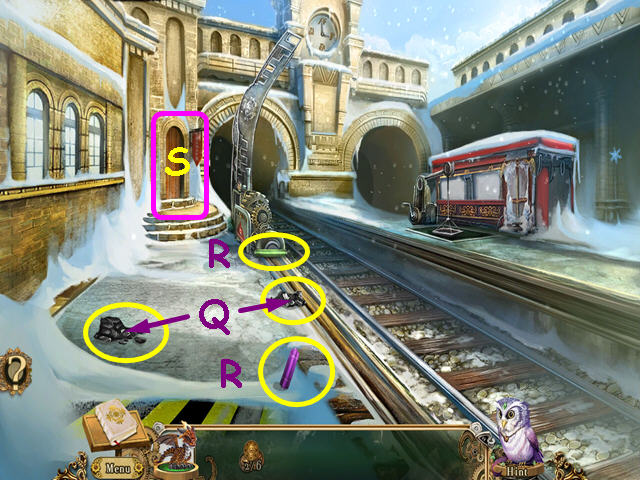
- Walk down to enter the elevator, look at the control and push the red button to return to the train station.
- Walk forward to exit the elevator, then look at the controls for the raised bridge (W).
- Take the 3/3 TYPEWRITER KEY (X).
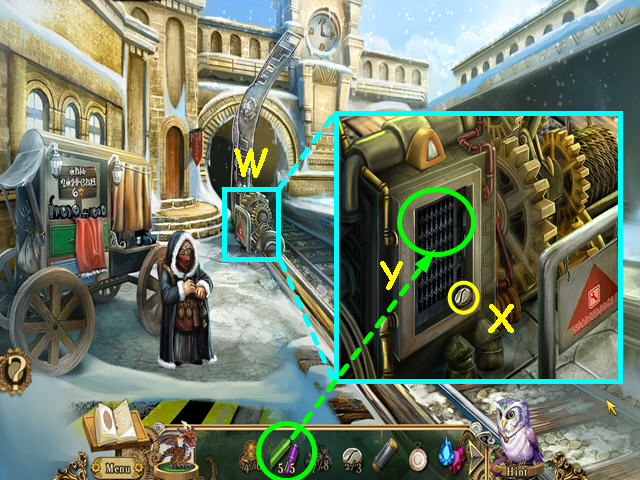
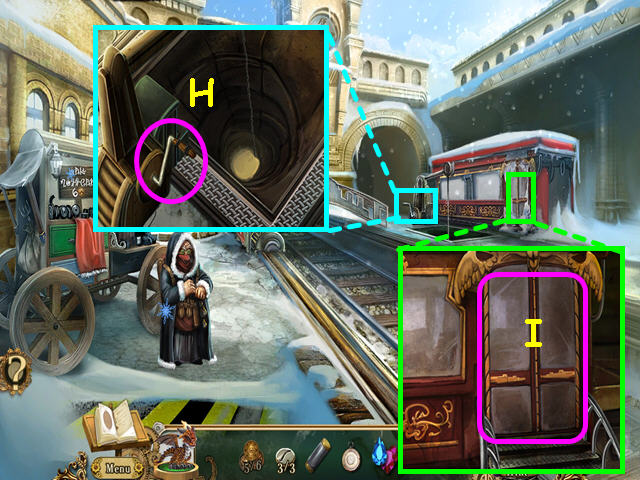
- Use the 5 STEAM PIPE on the grate for a mini-game (Y).
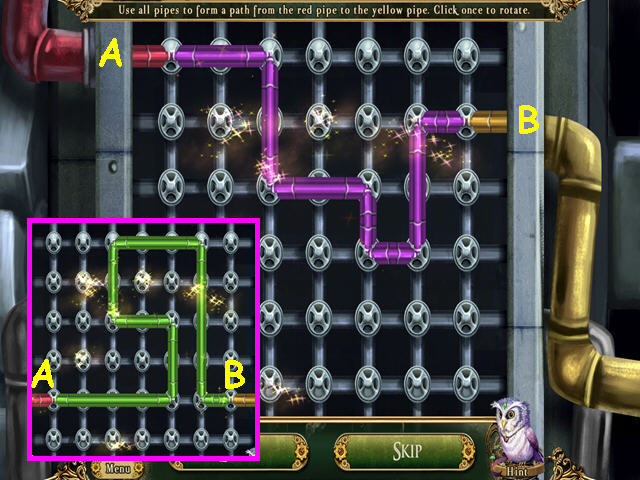
- Make a path from the red pipe (A) to the yellow pipe (B) using the loose pipes.
- Left-click to rotate a pipe, the drag and drop into position.
- There are two set of pipes to place.
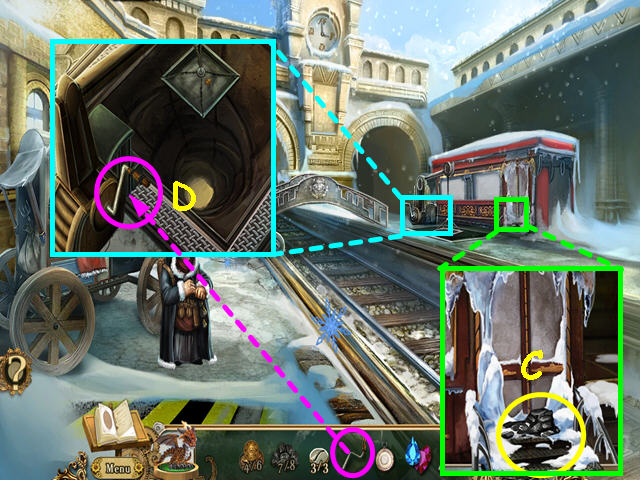
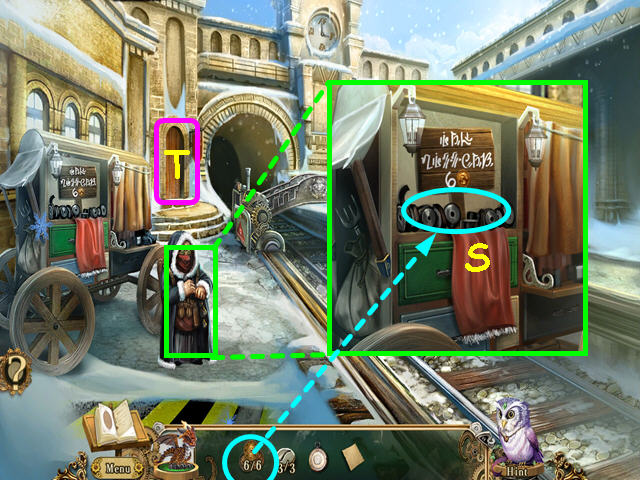
- Look at the carriage entrance and take the 8/8 CHARCOAL (C).
- Exit the close-up and look at the cargo crane and place the CRANK HANDLE in the hole (D).
- Click on the handle to lower the crane to the mine floor.
- Exit the close-up, walk down to the elevator and select the bottom button for the mines.
- Walk forward to exit the elevator.
- Look at the brazier and take the 5/6 BOLGIN COIN (E).
- Place the CHARCOAL, then the FUEL OIL into the brazier (F).
- Use the pocket dragon to light the charcoal (G).
- Enter the elevator and push the red button for the train station.
- Look at the cargo crane and click on the handle to raise the brazier (H).
- Look at the carriage entrance and click on the door for a HOS (I).
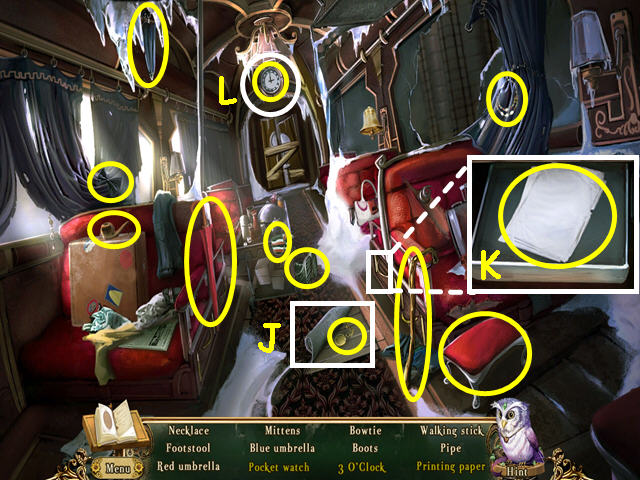
- Locate all the items on the list.
- Items in yellow print can be found by moving the carpet (J), looking in a drawer (K), and clicking on the clock several times to set the time to 3:00 (L).
- You will earn the PRINTING PAPER.
- Walk forward to enter the station.
- Look at the clerk's desk and place the MESSAGE CAPSULE in the stand (M).
- Look at the jeweled box and use the GEMSTONE COLLECTION on the box for a mini-game (N).
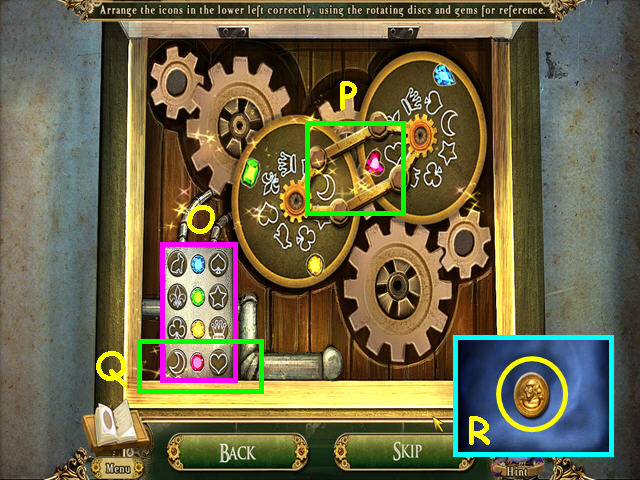
- Arrange the icons in the lower left correctly (O).
- Click on the dials until there is a gem in the inner section (P).
- Find that color gem on the lower left and arrange the icons to match the inner section of the upper dials (Q).
- Click on two icons to swap location.
- Take the 6/6 BOLGIN COIN (R).
- Exit the close-up and the station.
- Talk to the peddler and use the 6 BOLGIN COINS on the ribbon (S).
- You will receive the TYPEWRITER INK RIBBON.
- Enter the station (T).
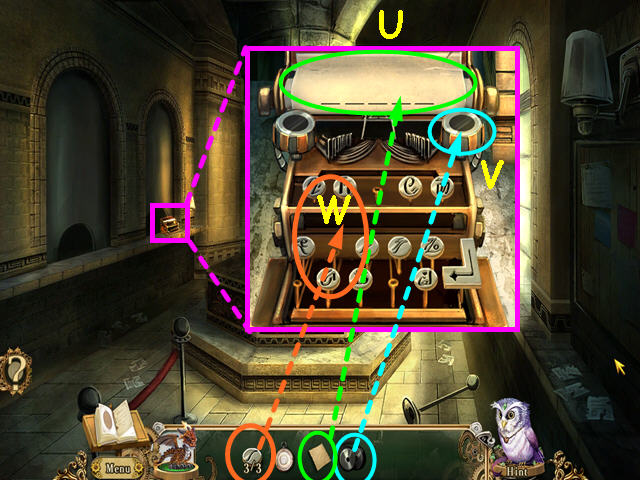
- Look at the typewriter and place the PRINTING PAPER into the top (U).
- Place the TYPEWRITER INK RIBBON onto the reel (V).
- Place the 3 TYPEWRITER KEYS onto the keyboard to trigger a mini-game (W).
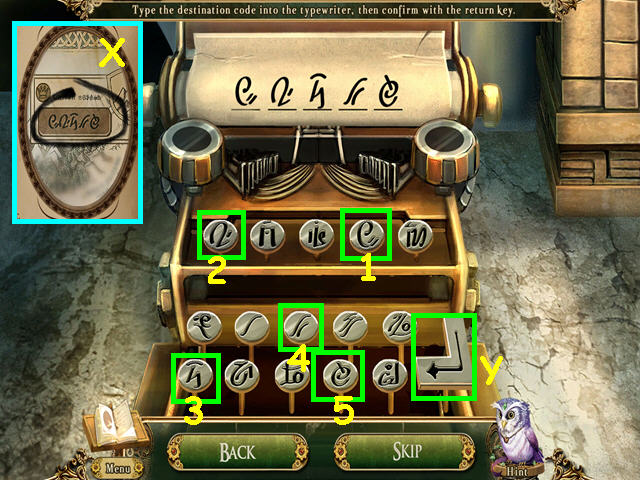
- Type in the station code for the capitol.
- Refer to your journal for the correct code (X).
- Type the symbols in numerical order (1-5).
- Press enter to confirm (Y).
- You will earn the PRINTED STATION CODE.
- Look at the clerk's desk and place PRINTED STATION CODE into the capsule (A).
- Take the COMPLETED MESSAGE CAPSULE.
- Look at the ticketing machine and place the COMPLETED MESSAGE CAPSULE into the tube (B).
- Take the TRAIN TICKET from the dispenser (C).
- Exit the station.
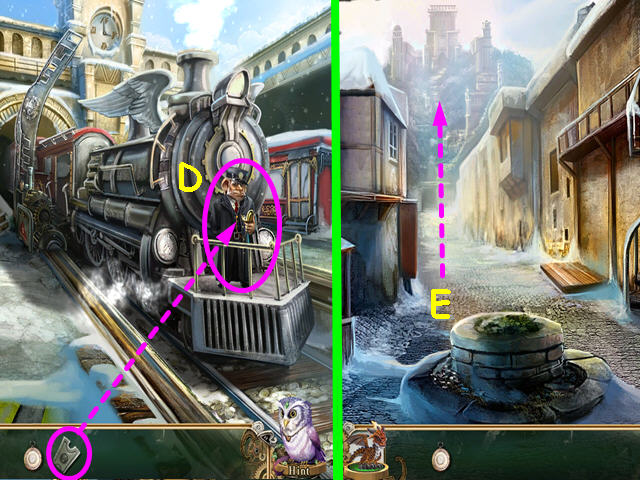
- Give the TRAIN TICKET to the conductor (D).
- Walk forward to the castle (E).
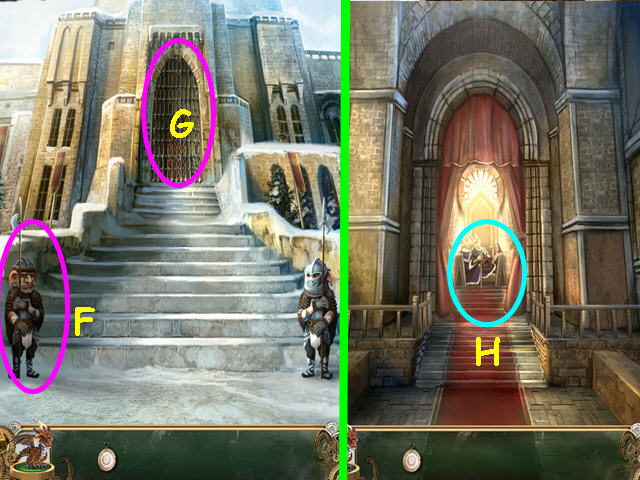
- Talk to the guards (F).
- Enter the castle (G).
- Talk to the King (H).
Chapter 2: The Dark Tower
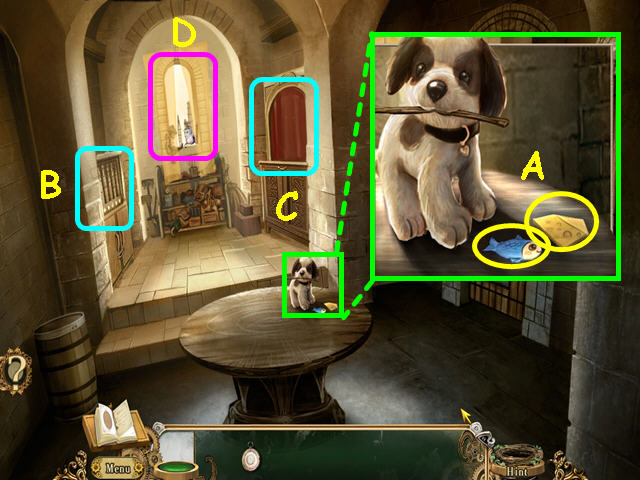
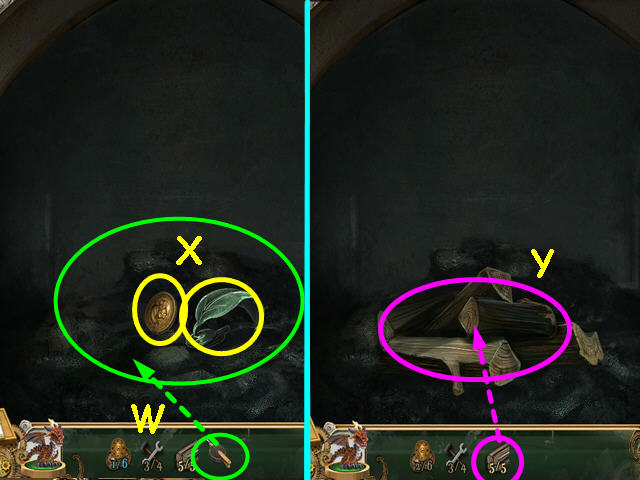
- Look at the toy dog and take the CARDBOARD FISH and the CARDBOARD CHEESE (A).
- Exit the close-up.
- Note the puppet rack on the left (B).
- Note the diorama on the right (C).
- Look at the window (D).
- Talk to Ran the Owl- he and the pocket dragon will rejoin you (E).
- Take the 1/3 WOODEN PUPPET (F).
- Take the REPLICA TOWER (G).
- Look out the window at the 5 towers so it is noted in your journal (H).
- Look at the diorama on the right.
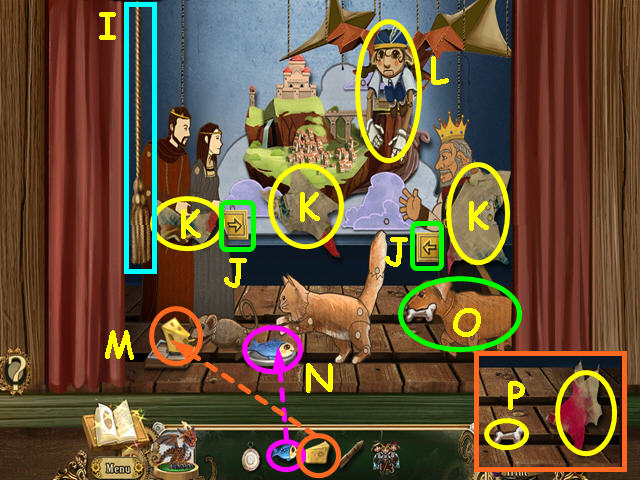
- Pull the cord to open the drapes and lower the scenery (I).
- Drag the 2 arrow tabs towards the center of the stage (J).
- Take the 1/4, 2/4, and 3/4 PICTURE SCRAPS (K).
- Take the 2/3 WOODEN PUPPET (L).
- Place the CARDBOARD CHEESE in the mousetrap (M).
- Place the CARDBOARD FISH in the DISH (N).
- Click on the dog so all the animals run away (O).
- Take the 4/4 PICTURE SCRAP and the TOY BONE that the dog drops (P).
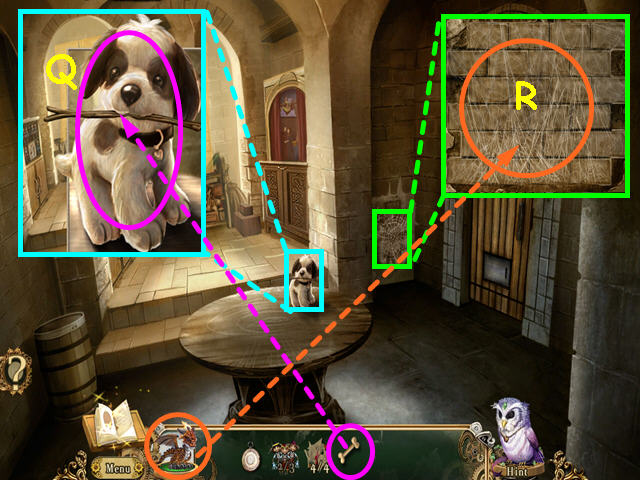
- Look at the dog on the table and give him the TOY BONE (Q).
- You will receive the FORKED STICK.
- Look at the cobwebbed corner and use the pocket dragon 3 times to burn away the cobwebs for a mini-game (R).
- Find bricks that have related pictures.
- Click on 2 bricks to reveal their pictures, if they are related, they will be removed.
- This mini-game is randomized - the locations of your pairs may differ.
- Some pairs are: bow and arrow, leaf and tree, boat and water, and sun and moon.
- Take the 3/3 WOODEN PUPPET and the PALETTE with PAINT that are behind the bricks (S).
- Look at the puppet rack on the left.
- Place the REPLICA TOWER into the empty slot to activate the mini-game (T).
- Refer to your journal for the correct tower heights (U).
- Click on the dials below the towers to move them to the correct height (V).
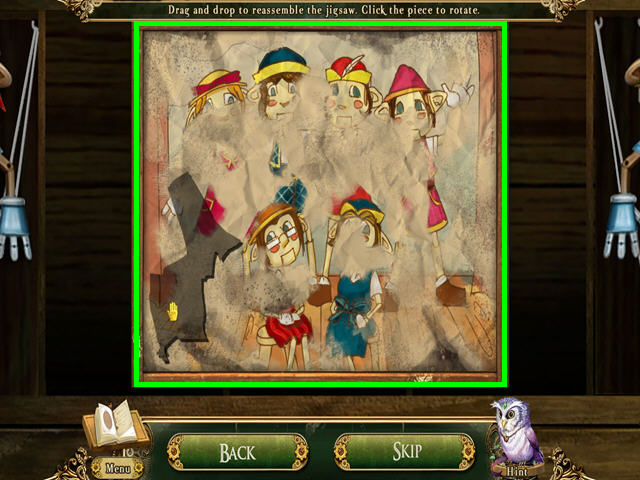
- Place the 4 PICTURE SCRAPS into the frame for a mini-game.
- Restore the picture in this jigsaw-like mini-game.
- Click on a piece to rotate it into position, then drag and drop the piece into place.
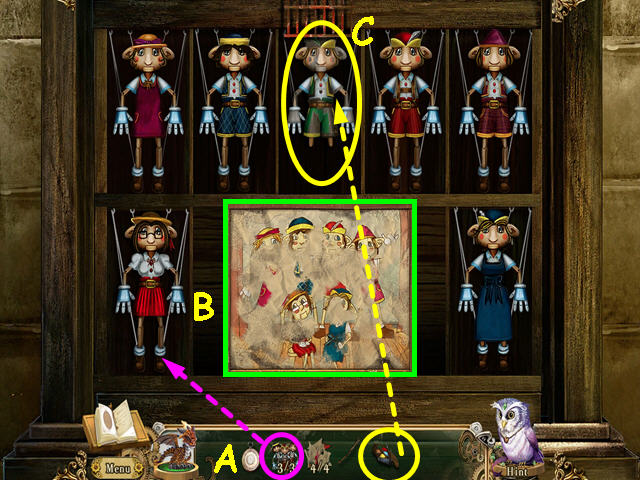
- Place the 3 WOODEN PUPPETS into the case (A).
- Using the clues in the picture, swap the puppets until their positions are the same as in the picture (B).
- Use the PALETTE with PAINT on the old puppet that was behind the bars (C).
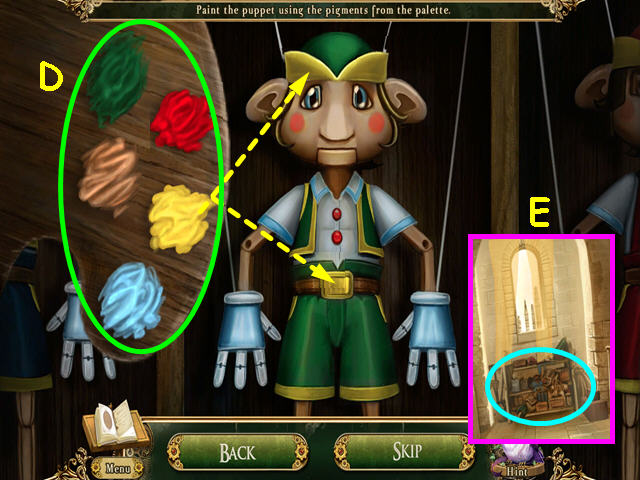
- Click on a color and paint all the missing spots (D).
- Click on another color to change the paint on your brush.
- You will earn XIM the MAGIC PUPPET.
- Use XIM the MAGIC PUPPET on the pile of puppet parts (E).
- Locate all the items from the clues at the bottom (F).
- There are 10 items to find (G).
- XIM the MAGIC PUPPET will return to you all repaired.
- Look at the door and use the FORKED STICK on the slot (H).
- Use XIM the MAGIC PUPPET on the slot to unlock the door (I).
- Walk through the door.
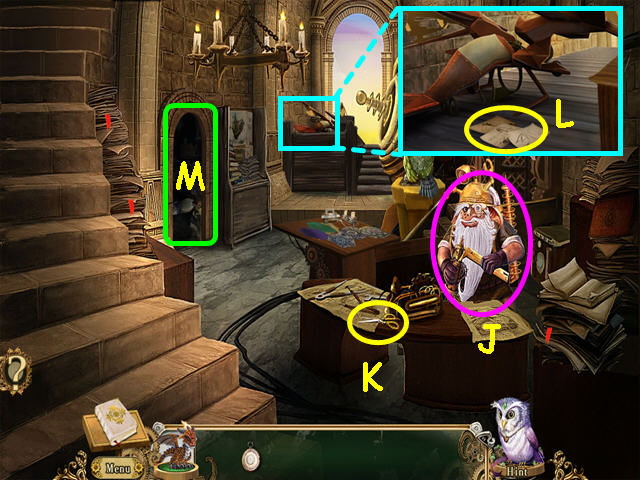
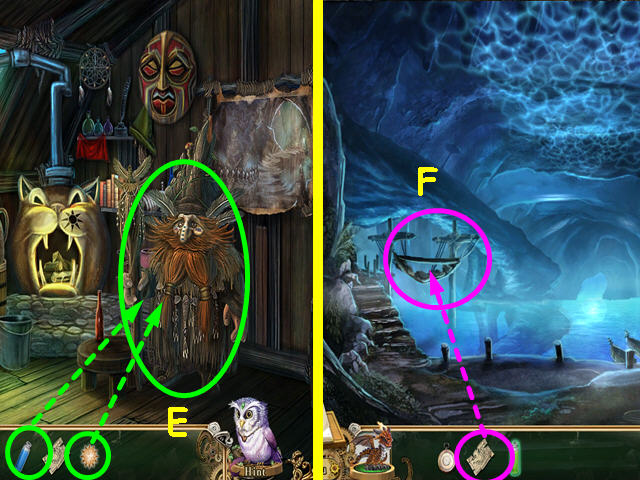
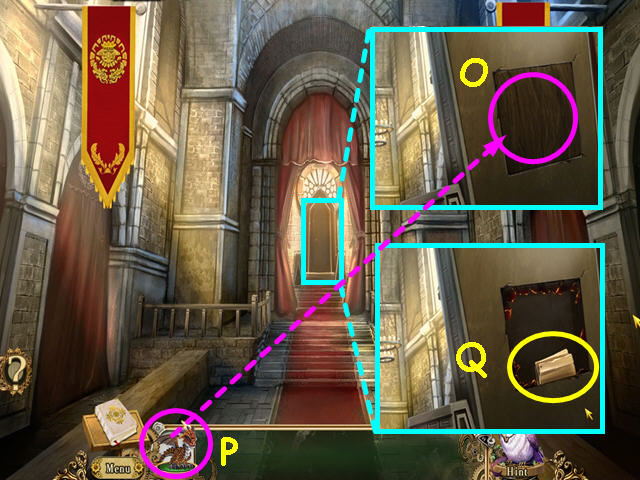
- Talk to the inventor (J).
- Take the SCISSORS (K).
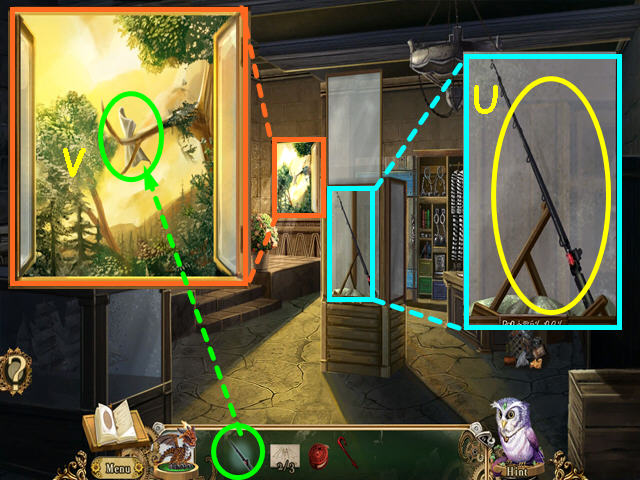
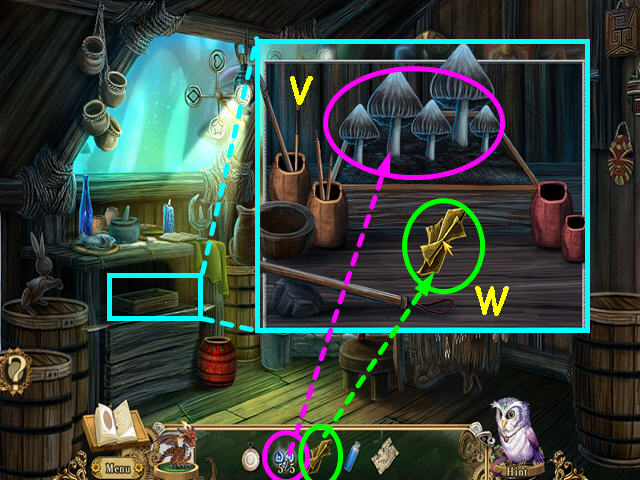
- Look at the balcony and take the 1/3 FLYING MACHINE BLUEPRINTS (L).
- Look in the storeroom (M).
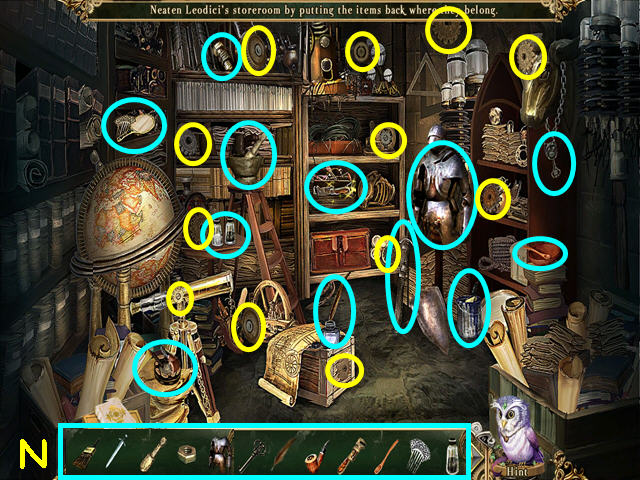
- Place all the items back where they belong.
- Move each item to another item it pairs with like lock and key, or comb and mirror (N).
- Locate 12 gears - circled in yellow.
- You will earn the GEAR ASSEMBLY.
- The inventor will give you the BRASS CIPHER PLATE.
- Note the elevator control (O).
- Note the elevator (P).
- Look at the drafting table and use the BRASS CIPHER PLATE on the stand (Q).
- Use the SCISSORS on the plates to trigger a mini-game (R).
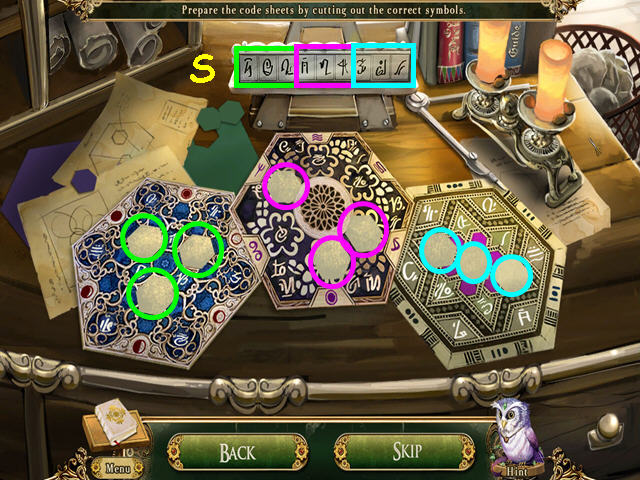
- Find the symbols from the cipher plate and cut them out (S).
- You will earn the CODE SHEETS.
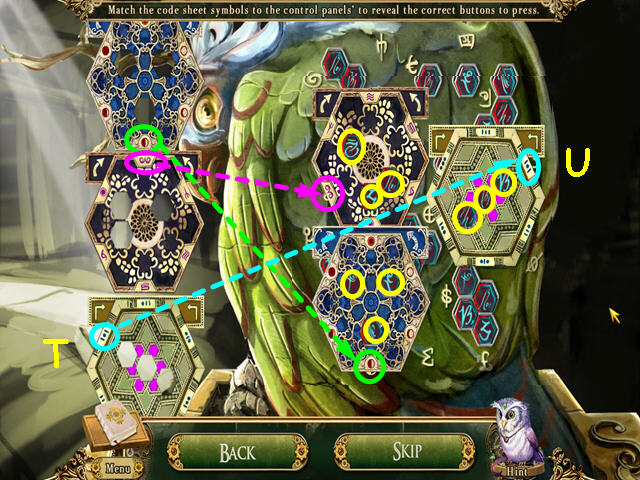
- Look at the elevator control panel and place the CODE SHEETS on the bird for a mini-game.
- Place the code sheets on the panel to learn what buttons need to be pushed.
- Note the symbols on the outer edge of each sheet (T).
- Find a matching symbol on the panel and rotate each sheet so the symbols have the same orientation, then place the sheet on the panel so the symbols match up (U).
- After placing all 3 sheets, press the 9 buttons that show through the sheets.
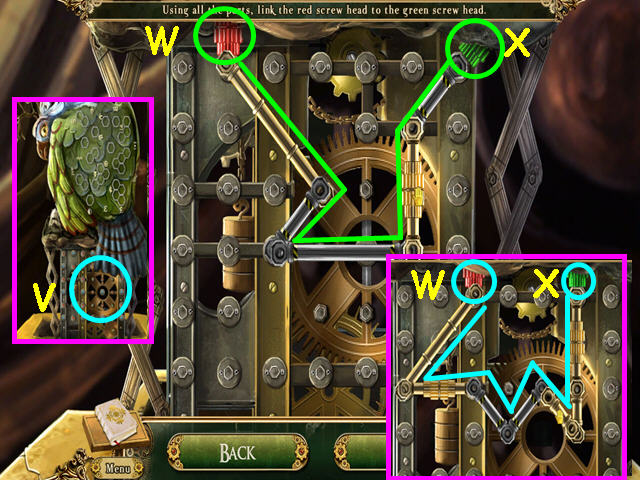
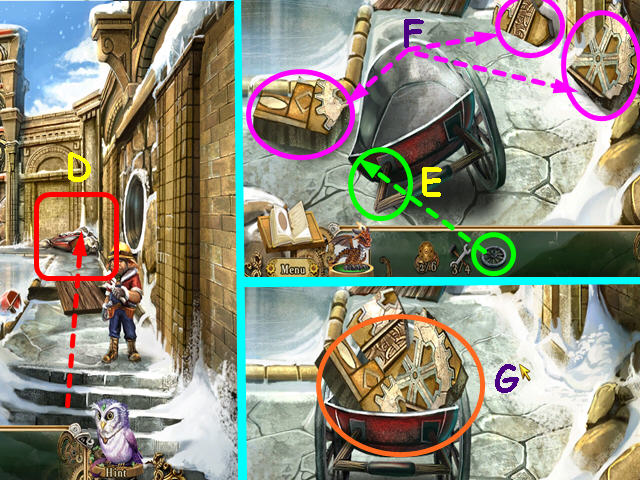
- Place the GEAR ASSEMBLY under the bird to trigger a mini-game (V).
- Connect the red screw head (W) to the green screw head (X) using all the parts.
- Click to rotate a piece, then drag and drop into position.
- You will have to perform this task twice.
- Pull the lever on the right side of the elevator, then enter the elevator.
- Talk to the peddler to learn about his missing hamster (A).
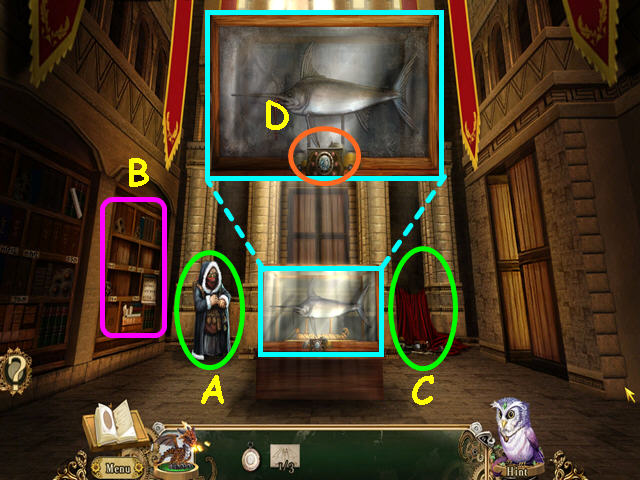
- Note the antique bookshelf on the left (B).
- Note the jumbled pile (C).
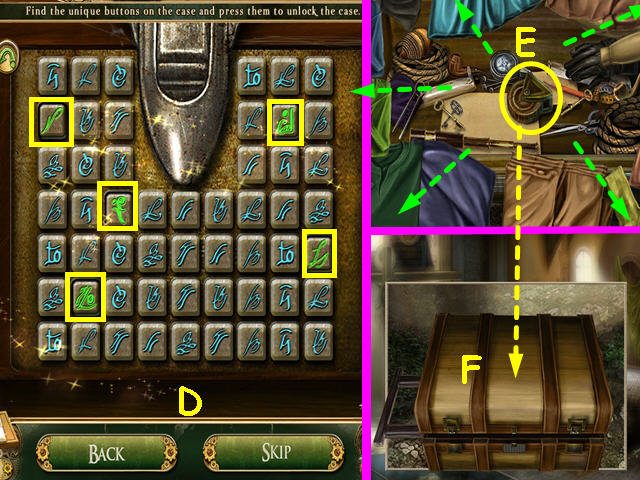
- Look at the display case and click on the lock for a mini-game (D).
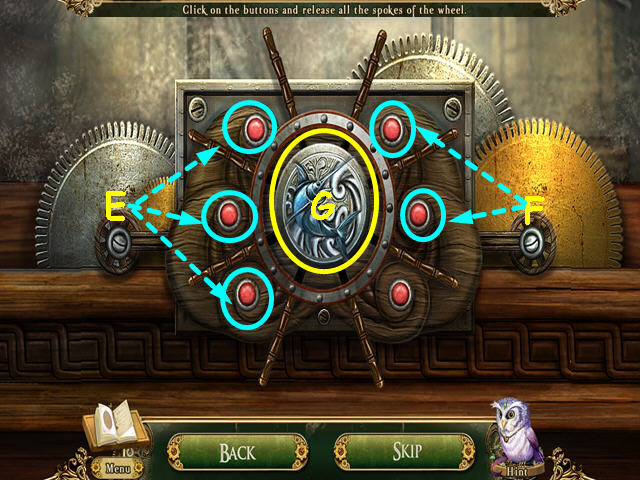
- Press the red buttons and release all the spokes.
- Each button controls 2 or more spokes.
- Our solution was to press all 3 red buttons on the left (E) and just the top 2 red buttons on the right (F).
- Take the SWORDFISH CREST (G).
- Exit the close-up, then select the jumbled pile for a HOS.
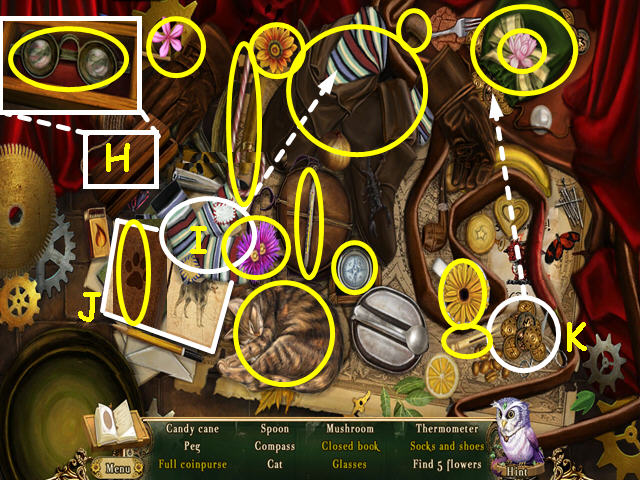
- Locate all the items on the list.
- Items in yellow print can be found by looking in the wooden box (H), dragging the sock to the shoes (I), closing the book (J), and dragging the coins to the coin purse (K).
- You will earn the 1/6, 2/6, 3/6 and 4/6 BOLGIN COINS and the 1/6 GOBLIN ENCYCLOPEDIA.
- Walk right to the gaoler's chambers.
- Move the potted plant and take the 2/6 GOBLIN ENCYCLOPEDIA (L).
- Note the trophy wall (M).
- Note the armoire (N).
- Look in the garbage can and drag all the trash aside to find the GOBLIN SUPERGLUE (O).
- Look at the display case, then use the GOBLIN SUPERGLUE on the broken trophy fish for a mini-game (P).
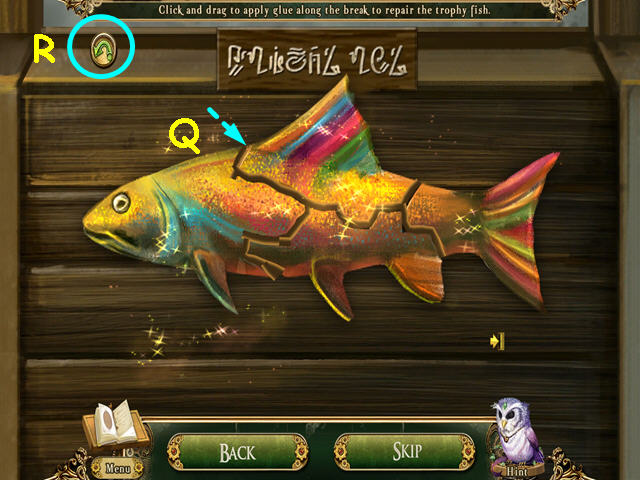
- Glue the pieces together.
- Drag your cursor over the cracks to repair the fish (Q).
- Make sure the majority of the crack is covered by glue.
- There is a reset button if you would like to start over (R).
- You will earn the TROPHY FISH.
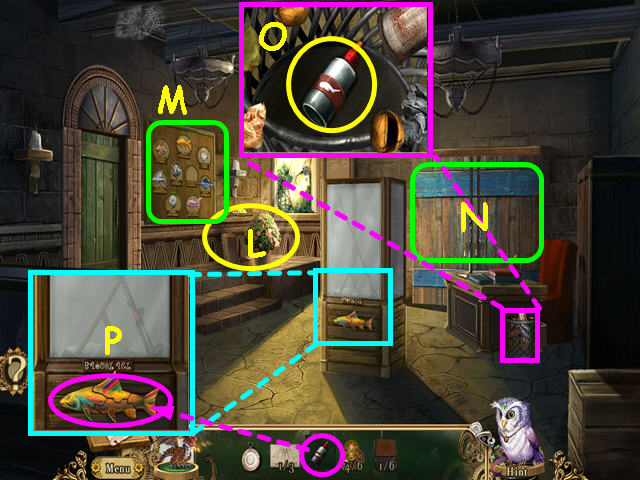
- Exit the close-up and look at the trophy wall.
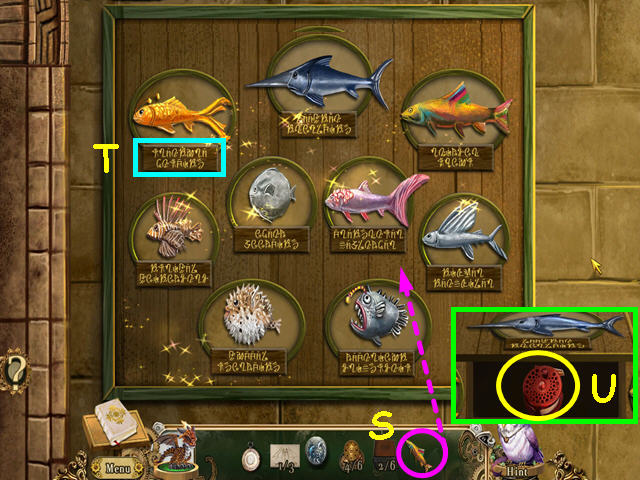
- Use the TROPHY FISH in the empty spot to trigger a mini-game (S).
- Place the fish over the correct plaque.
- Hover your mouse over the plaques to see the names of the fish (T).
- Click on 2 fish to swap positions.
- Take the PRIZE FISHING REEL from the compartment that opens under the top fish (U).
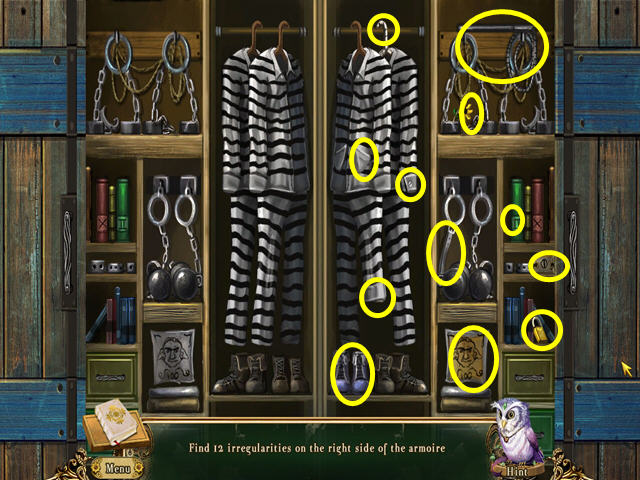
- Look at the armoire for a mini-game.
- Click on the differences between the 2 sides on the right side of the armoire.
- You will earn the 3/6 GOBLIN ENCYCLOPEDIA.
- Walk left into the registry room.
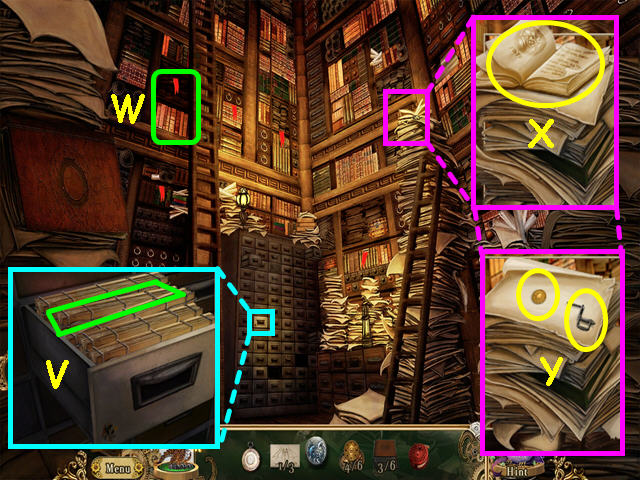
- Look in the filing drawer and read the files to find the location of a Goblin encyclopedia (V).
- Ours was listed in the 4th file.
- The location will be noted in your journal.
- Hover your mouse over the shelves to see the shelf designation.
- Note – your shelf designation and location may differ.
- Click on the correct shelf to get the 4/6 GOBLIN ENCYCLOPEDIA (W).
- Look at the stack of books and take the 5/6 GOBLIN ENCYCLOPEDIA (X).
- Take the 5/6 BOLGIN COIN and the TOY CRANK (Y).
- Exit the registry and look at the desk.
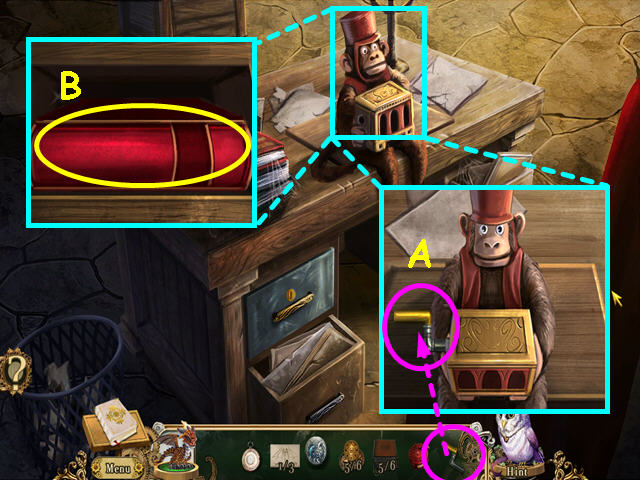
- Look at the monkey and use the TOY CRANK on the box (A).
- Click on the crank to activate the monkey.
- Take the 6/6 GOBLIN ENCYCLOPEDIA from the compartment (B).
- Walk down twice and look at the Antique Bookshelf.

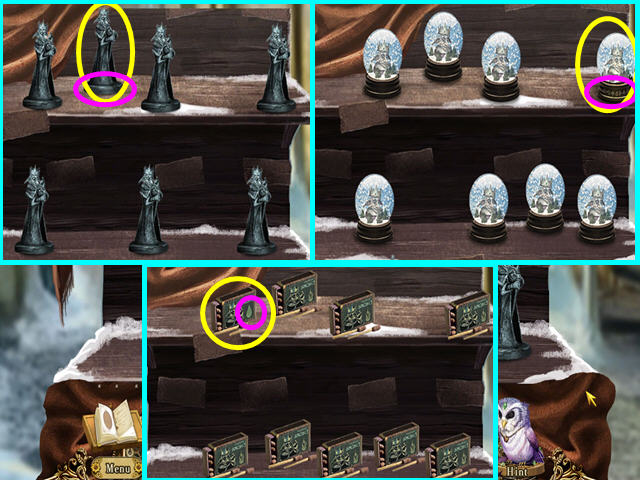
- Place the 6 GOBLIN ENCYCLOPEDIAS on the shelf to trigger the mini-game.
- Place the books in alphabetical order.
- Refer to the Goblin alphabet on the lower right (C).
- Start by finding the books that match the white tags (D).
- Click on 2 books to swap positions.
- Walk left into the secret chamber.
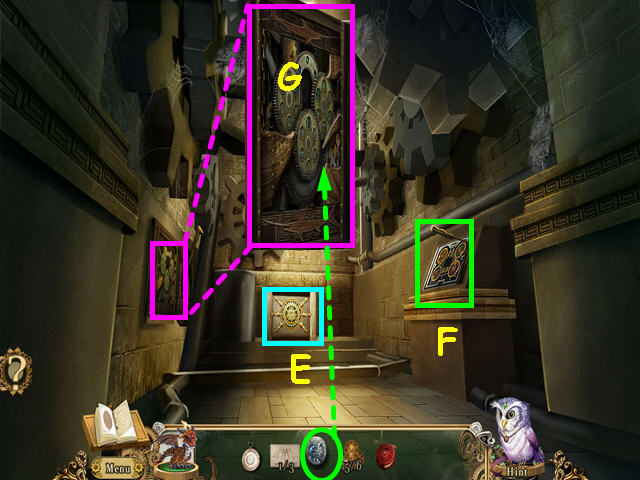
- Note the rat cage (E).
- Note the Golden gear lever (F).
- Look at the Silver gear lever and use the SWORDFISH CREST on the gears for a mini-game (G).
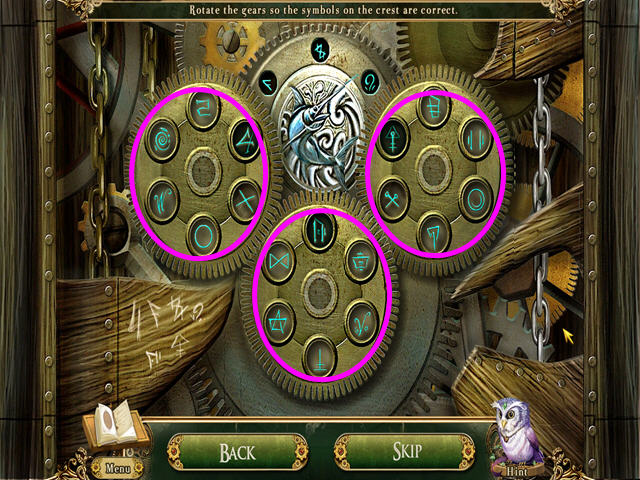
- Rotate each of the 3 dials so that the blue symbols on the dial are over the darker ones under the dials.
- When a dial is in the correct position, you cannot see other symbols under the blue symbols.
- Pull the lever.
- Look at the rat cage for a mini-game.
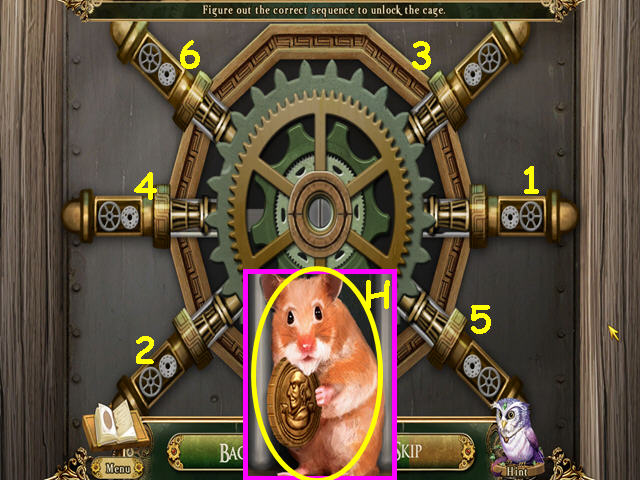
- Find the correct sequence to click on the locks.
- Click on the locks until you find one that stays open.
- Now you must find the second one – if you click a lock and the first one stays open, you are correct.
- Should the first lock close, you must start the sequence over until all stay open.
- Continue this process until all 6 locks are open.
- Click on the locks in numerical order (1-6).
- Take NIBBLES the HAMSTER and you will also get the 6/6 BOLGIN COIN (H).
- Walk down to exit the secret room.
- Look at the display case and take the PRIZE FISHING HOOK (I).
- Give NIBBLES the HAMSTER to the peddler (J).
- Use the 6 BOLGIN COINS to get the WRAPPED LOCK-PICKING SET (K).
- Walk right into the gaoler's chamber and look at the desk.
- Use the WRAPPED LOCK-PICKING SET on the locked drawer for a mini-game (L).
- Click on the lock symbol below (M) when a pin is at its highest to lock it in place (N).
- You find the 2/3 FLYING MACHINE BLUEPRINTS once you unwrap the lock-pick set.
- Take the LION CREST from the open drawer (O).
- Walk down, then left to enter the secret room.
- Look at the Golden gear lever on the right.
- Place the LION CREST into the center to trigger a mini-game (P).
- Rotate the dials to a picture that relates to the center picture on the dial.
- Turn the bee dial to the flower (Q), the caterpillar dial to the butterfly (R), the lightning dial to the cloud (S), and the jewelry dial to the gems (T).
- Pull the gold lever.
- Walk down, then walk right to the gaoler's chamber.
- Look at the display case and take the PRIZE FISHING ROD (U).
- The PRIZE FISHING ROD will automatically combine with the PRIZE FISHING REEL and the PRIZE FISHING HOOK to make the COMPLETED FISHING ROD.
- Look out the window and use the COMPLETED FISHING ROD to get the 3/3 FLYING MACHINE BLUEPRINTS (V).
- Walk down twice to return to the workshop.
- Talk to the inventor (W).
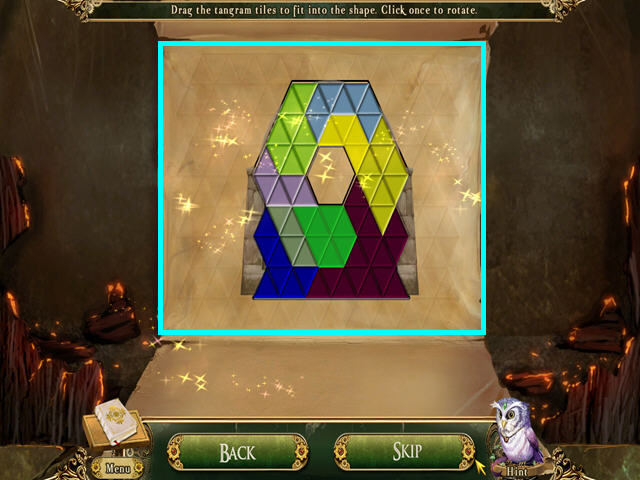
- Look at the flying machine and use the FLYING MACHINE BLUEPRINTS on the plane for a mini-game (X).
- Fit the pieces into the shaded area.
- Left-click and hold to drag a piece into position, left-click to rotate a piece.
Chapter 3: The Fungal Forest
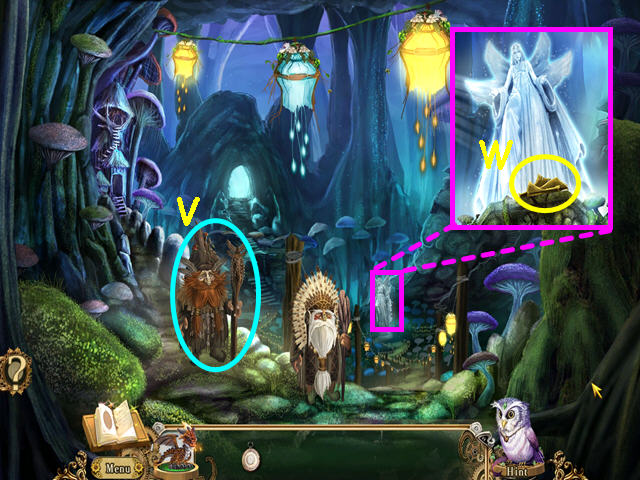
- Take the EMPTY GLOWSPORE LAMP (A).
- Walk forward to the village square (B).

- Talk to the Gnomish Elder (C).
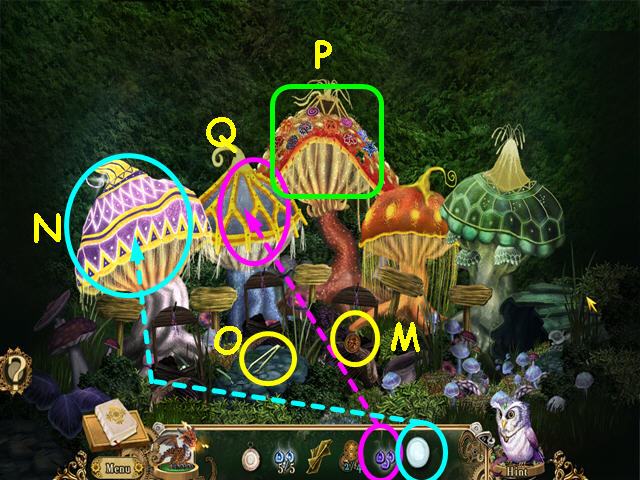
- Note the Ancient Shrine (D).
- Note the Statue of the Oracle (E).
- Note the Underground Lake Pier (F).
- Walk to the Wise One's hut (G).

- Talk to the Wise One (H).
- Look under the table and take the POTTING SOIL (I).
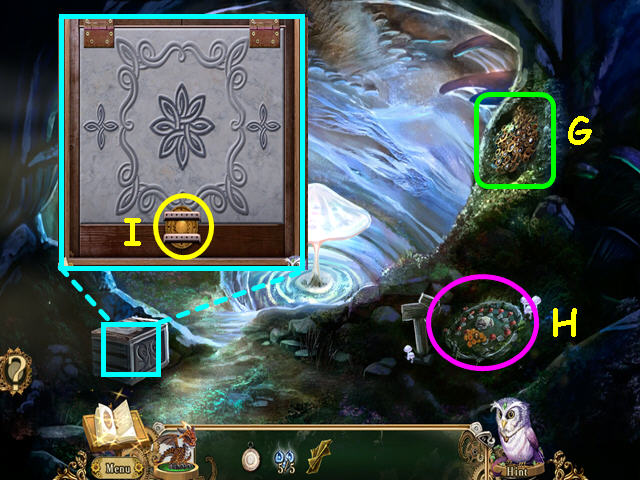
- Exit the hut, then walk right to the Ancient shrine.
- Note the Shrines to the Oracle (J).
- Note the Golden Needle Pine (K).
- Note the Gate to the Sacred Grove (L).
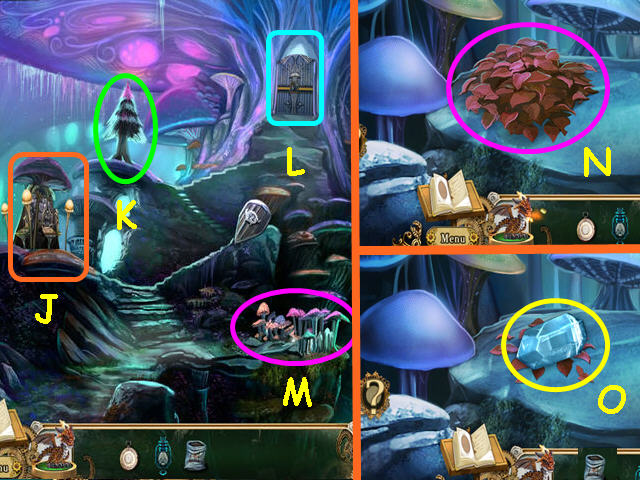
- Look at the Mushroom Hedgerow (M).
- Move the plant debris (N).
- Take the 1/3 GLITTERSTONES (O).
- Use the POTTING SOIL on the bare rock (P).
- Click on each of the mushroom heads, then collect the 5 INKCAP MUSHROOM SPORES (Q).
- One mushroom will turn silver – click on the head, then use the EMPTY GLOWSPORE LAMP to collect the glowspore (R).
- You now have the SILVER GLOWSPORE LAMP.
- Walk down, then enter the Wise One's hut.
- Give the SILVER GLOWSPORE LAMP to the wise one.
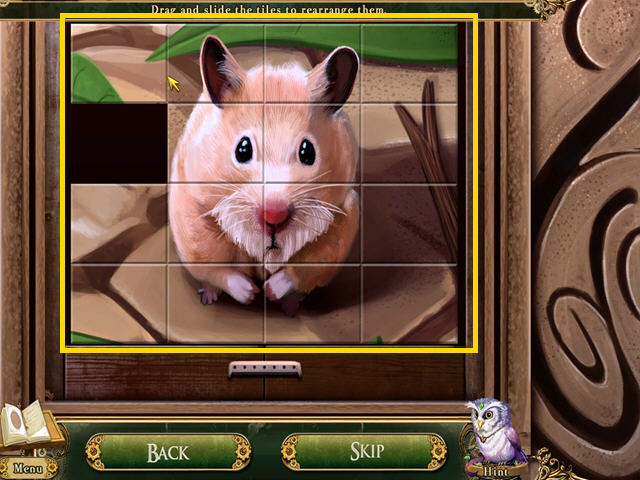
- Once he leaves, locate all the items on the list.
- Use the Pocket Dragon to light the stove (S).
- Rotate the eyes and the mouth on the mask to match the one in the list (T).
- Move the wings to the totem (U).
- Tip over the jar (V).
- Rotate the lenses so the moon is over the lamp (W).
- Move the crystal to the stand (X).
- You will earn the MOONGLEAM CRYSTAL.
- Talk to the Wise One, then exit the hut.
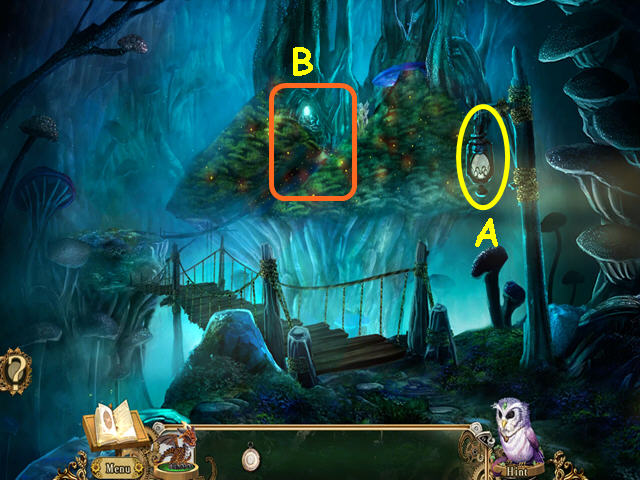
- Note the glowspore lantern (A).
- Take the RESIN TAPPING KNIFE (B).
- Talk to the Gnomish Elder for a mini-game (C).
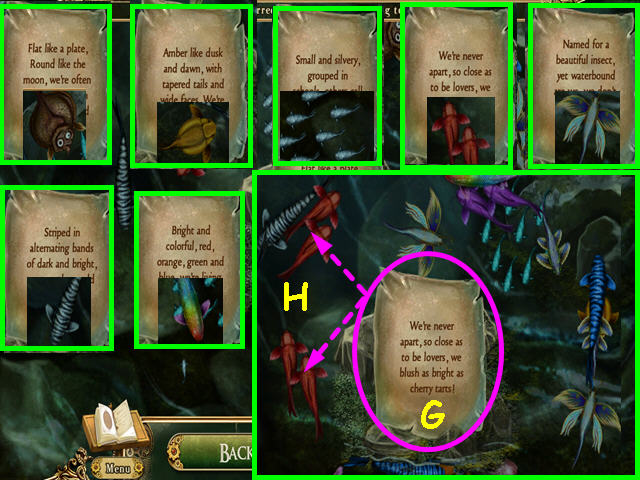
- Select the correct butterfly.
- Using the clues on the left, click on the correct butterfly on the right.
- There will be 3 sets of clues.
- You will earn the 2/3 GLITTERSTONE.
- Look at the glowspore lantern.
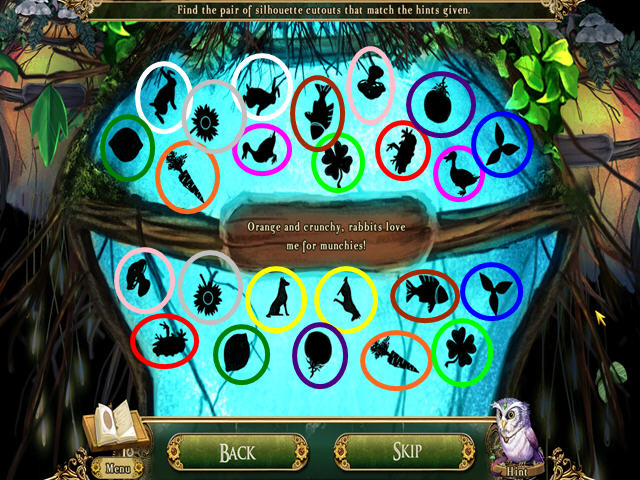
- Find the pair of items that match the clue in the center (D).
- Click on identical pairs of silhouettes.
- You will earn 3/3 GLITTERSTONE.
- Walk left to the Wise One's hut and look at the table under the window on the left.
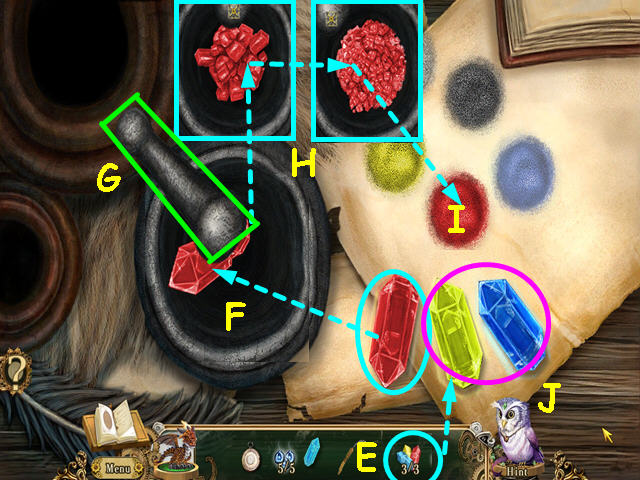
- Place the 3 GLITTERSTONES on the table (E).
- Drag one glitterstone to the mortar bowl (F).
- Click, hold and drag the pestle in a circular motion (G).
- You will see the the glitterstone gradually break into smaller pieces (H).
- When it is sufficiently ground, it will automatically move to the paper (I).
- Repeat this process for the other 2 glitterstones (J).
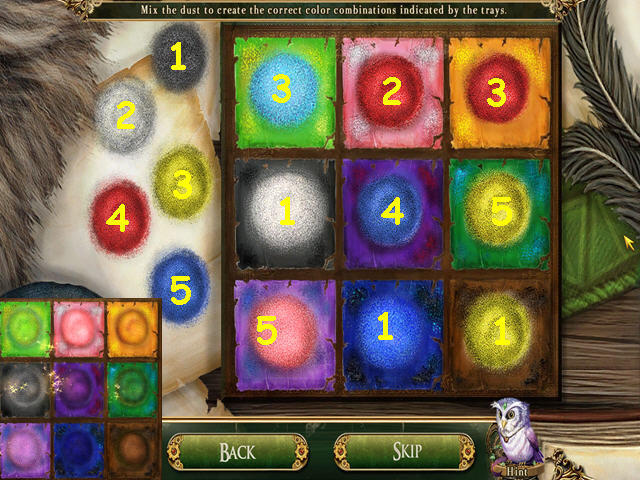
- Place the colored dust from the left into the squares and change the circle to match the border.
- Place the colored dust into each square per the number noted.
- You will earn the GLITTERSTONE DUST.
- Exit the hut and talk to the Gnomish elder to learn of the tools he hid.
- Walk right to the ancient shrine, then go to the Shrines to the Oracle.
- Note the Aspect of Courage on the left (K).
- Note the Aspect of wisdom in the center (L).
- Look at the Aspect of Faith's table on the right (M).
- Place the MOONGLEAM CRYSTAL into the slot (N).
- Restore the glass picture.
- Click on a piece to rotate it into position, then drag and drop the piece into place.
- Take the RESIN COLLECTION KIT that appears (O).
- Look at the Aspect of Wisdom's table in the center and use the GLITTERSTONE DUST in the receptacles for a mini-game.
- Restore the butterfly.
- Using the picture in the upper left as a color reference (P), take the colored dust from the left (Q) and use it on the butterfly.
- You may need to click several times in each section to fill in the color.
- Exit the shrines and look at the Golden Needle Pine.
- Place the RESIN TAPPING KNIFE on the bark, then drag the knife around until all the bark is removed (R).
- Place the RESIN COLLECTION KIT on the tree to trigger a mini-game (S).
- Using all the tubes, connect the resin tap (T) to the collection cup (U).
- Click on a piece to rotate it into position, then drag and drop the piece into place.
- You will earn the TROLLBANE RESIN.
- Walk to the Shrines of the Oracle and look at the table on the left.
- Use the TROLLBANE RESIN in the chess molds to trigger a mini-game.
- Untangle the threads, so that none cross each other.
- The red lines indicate that they are crossed somewhere, while the blue lines indicate that none cross that line.
- Drag the chess pieces to untangle the lines.
- You have 2 boards to untangle.
- Walk down to the village square and speak to the Wise One and he will give you the ENCRYPTION PLATE (V).
- Look at the Statue of the Oracle and take the BARK PAPER (W).
- Exit the close-up, then walk right to the Ancient Shrine.

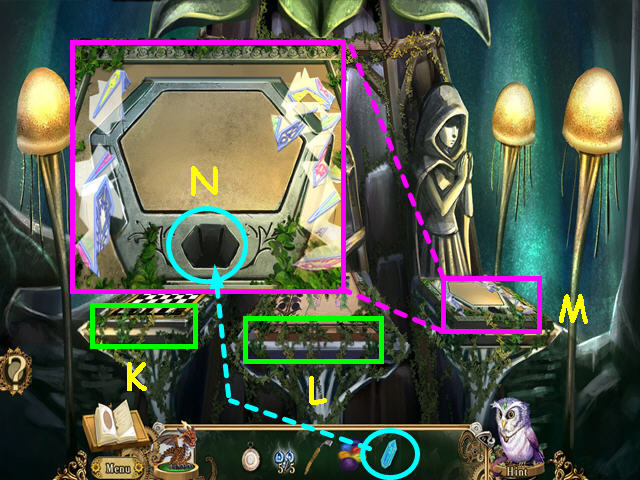
- Look at the Gate to the Sacred Grove and use the ENCRYPTION PLATE on the empty slot (A).
- Looking at the first spot on the encryption plate (B), turn the top wheel so the arrow points to the same symbol (C), and turn the bottom wheel so the arrow points to the same color (D).
- Take the symbol and color from between the 2 wheels (E) and enter it in the first place of the code on the lower right (F).
- Repeat this process with the remaining 3 symbols.
- Walk forward to enter the Sacred Grove.
- Note the lichen patch (G).
- Note the Fairy ring (H).
- Look at the ornate crate and take the 1/4 BOLGIN COIN (I).
- Click on the handle to open the crate for a mini-game.
- Restore the picture by dragging the tiles into position.
- Note – this mini-game is randomized, your solution will vary.
- Exit the Peddler's stand and look at the fairy ring.
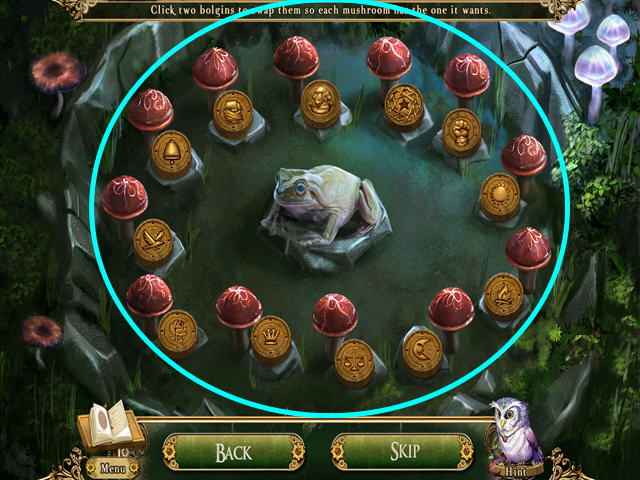
- Place the Bolgin coins next to the mushroom that wants them.
- Click on a mushroom to learn what it likes and find that coin.
- Click on 2 coins to swap position.
- Continue this process until all the mushrooms have the coins they want.
- You will earn the 2/4 BOLGIN COIN and FAIRY RING SPORES.
- Look at the Lichen patch for a mini-game.
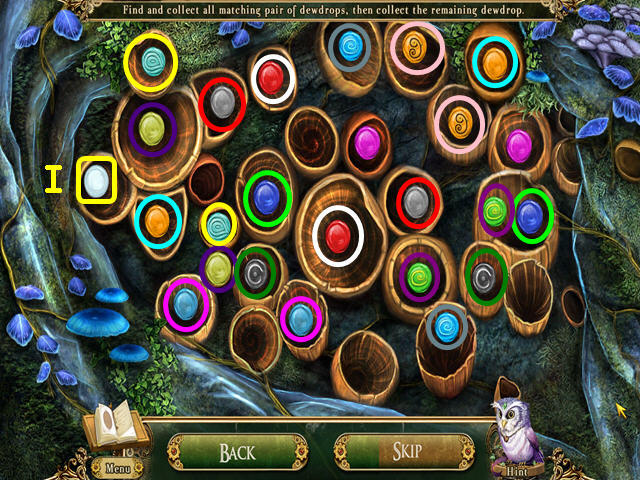
- Find the matching dewdrops.
- Click on matching pairs of dewdrops, then take the final dewdrop (I).
- You will earn PURE DEW-WATER.
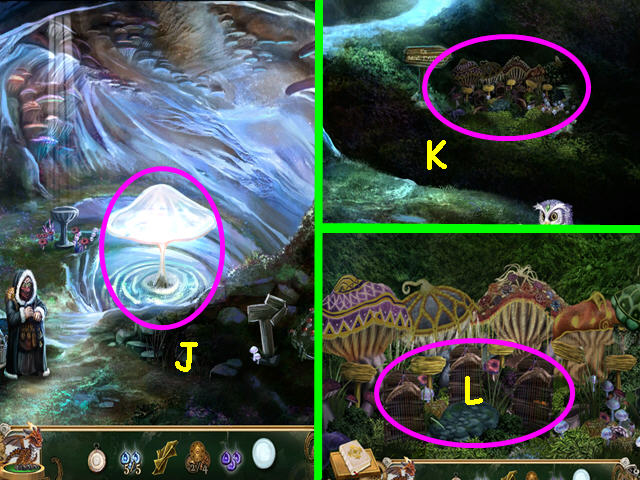
- Walk forward to the hedge maze (J).
- Select the Singing Shrooms on the right (K).
- Click on the glass chimes for a mini-game (L).
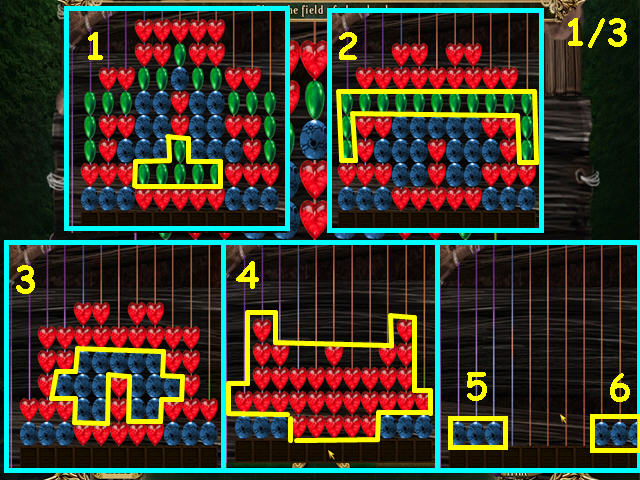
- Clear the field of glass beads by clicking on groups of 3 or more to remove them.
- Should you have any leftover beads you must start the screen again.
- There are 3 levels to this mini-game.
- Click on the indicated bead groupings in numerical order (1-6).
- There is the 2nd level to this mini-game.
- Click on the indicated bead groupings in numerical order (1-5).
- There is the 3rd level to this mini-game.
- Click on the indicated bead groupings in numerical order (1-6).
- Take the 3/4 BOLGIN COIN (M).
- Note – you can read the signs in front of each Shroom for a clue on how to help.
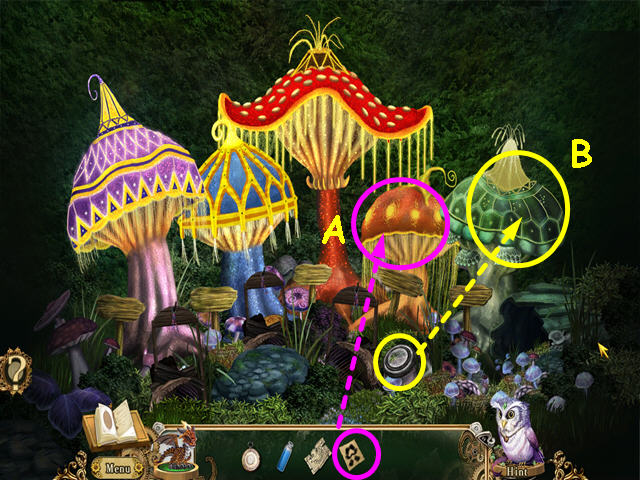
- Give the PURE DEW-WATER to the Tenor Shroom on the left (N).
- Take the FUNGAL TWEEZERS that appear (O).
- Note the Lead Shroom in the center (P).
- Give the FAIRY RING SPORES to the Bass Shroom for a mini-game (Q).
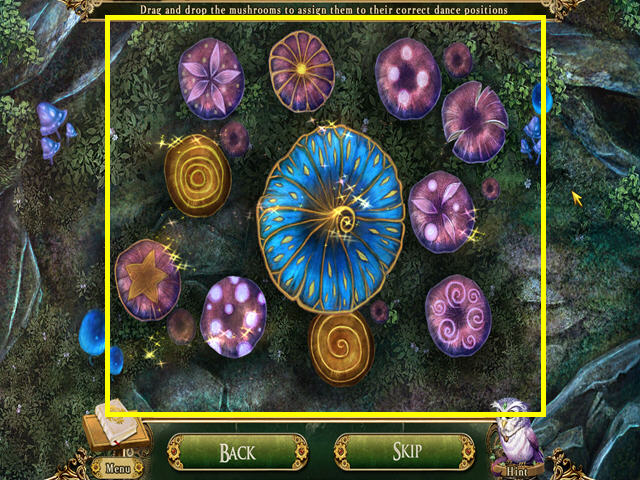
- Move the mushroom to the correct position.
- Look under a mushroom to see which mushroom belongs in that position.
- Drag a mushroom to another to swap positions.
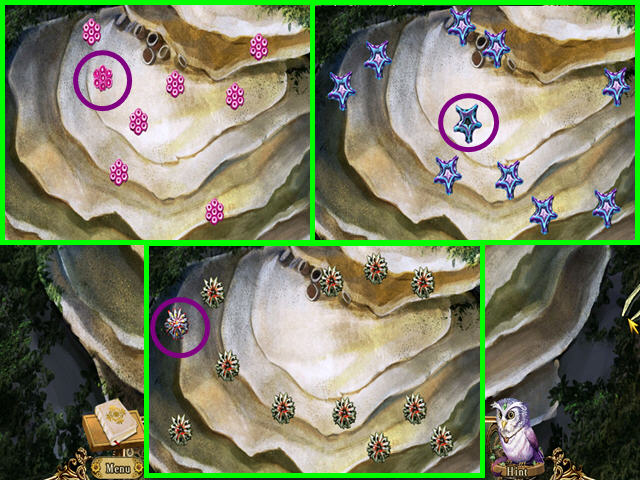
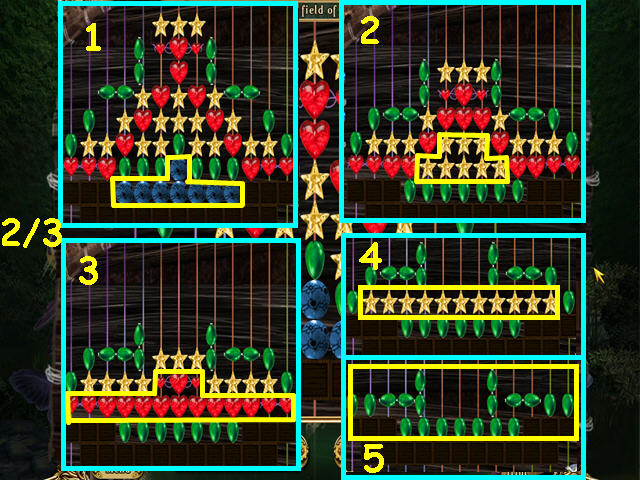
- Use the FUNGAL TWEEZERS on the center Lead Shroom for a mini-game.
- Find the fungus in each of the 6 groups that does not match.
- The first 3 are shown here.

- Find the fungus in each group that does not match.
- The last 3 are shown here.
- Walk down twice to return to the Sacred Grove.
- Look at the stone basin and take the 4/4 BOLGIN COIN (R).
- Exit the close-up and talk to the peddler (S).
- Use the 4 BOLGIN COINS to buy the CRYSTAL VIAL (T).
- Look at the stone basin again and use the CRYSTAL VIAL to gather a VIAL OF LIQUID MOJO (U).
- You find that TORN BOAT BLUEPRINTS were around the vial.
- Walk down twice, then go left to the Wise One's hut.
- Look at the planting trough and use the 5 INKCAP MUSHROOM SPORES on the soil (V).
- Place the BARK PAPER on the table to trigger a mini-game (W).
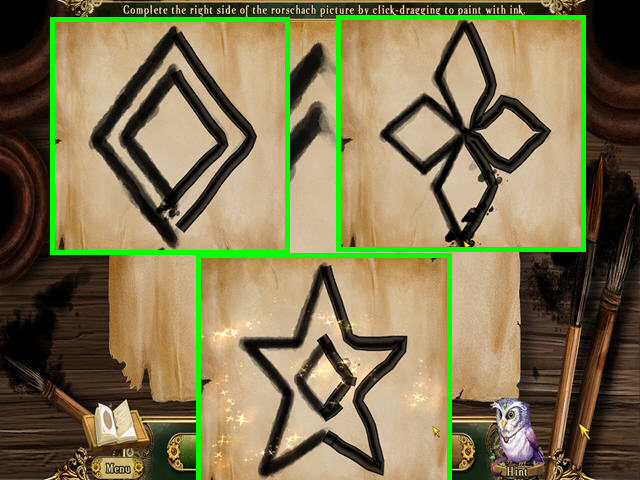
- Complete the ink drawings by dragging your mouse along the faint lines on the right side of each picture.
- Note – If your picture is not completing, try putting more ink at the corners or where you have missed the faint lines.
- You will earn the ABSTRACT DRAWINGS.
- Exit the hut, then go right to the Ancient Shrine.
- Walk forward twice, then look at the Singing Shrooms.
- Give the ABSTRACT DRAWINGS to the Baritone Shroom (A).
- Take the ROUND LENS that appears and use it on the Chorus Shroom for a HOS (B).
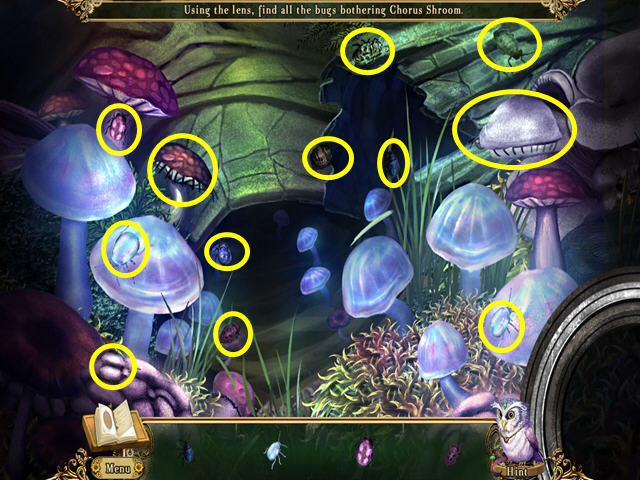
- Using the lens, locate all the bugs on the list.
- You will earn a song from the Singing Shrooms that gives you directions for the Hedge Maze.
- Exit the Singing Shrooms, then walk forward to the Hedge Maze.
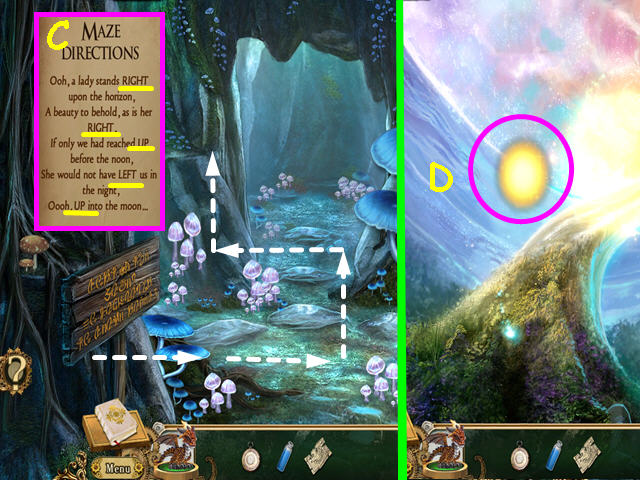
- Refer to your journal for the directions – right, right, up, left, up (C).
- Walk right, right, up, left, and up.
- Note – if you get lost in the maze, just walk down to exit.
- Take the SPORE OF THE VENERATED TOADSTOOL (D).
- Walk down 4 times, then go left to the Wise One's hut.
- Give the Wise One the SPORE OF THE VENERATED TOADSTOOL and the VIAL OF LIQUID MOJO (E).
- You will earn the POTION OF GOBLIN DISGUISE.
- Exit the hut and walk forward to the underground lake pier.
- Use the TORN BLUEPRINTS on the boat for a mini-game (F).
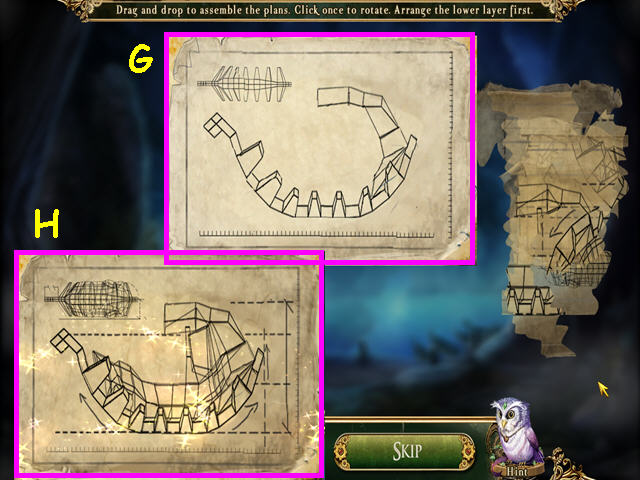
- Restore the plans.
- Click to rotate a piece if necessary, then drag it into position.
- There are 2 layers to this jigsaw-like mini-game.
- Place the lower white pieces first (G).
- Then place the vellum-like pieces over the first layer (H).
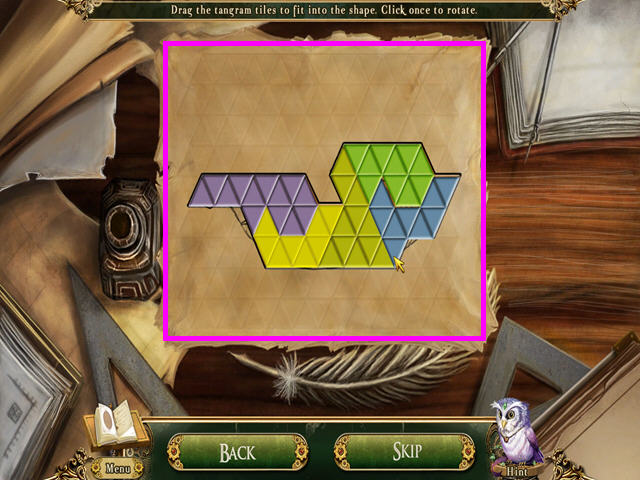
- Place all the pieces into the outline.
- Click to rotate a piece if necessary, then drag it into position.
- Select the finished boat to depart.
Chapter 4: Return to Gobholme
- Note the fishing net (A).
- Take the 1/7 MOONFLOWER NECTAR and the 1/3 DELICIOUS OLIVES (B).
- Look at the locked wheelie bag and click on the lock for a mini-game (C).
- Press the 5 buttons that have no matches on the lock.
- Push the 5 buttons (D).
- Click on the lid of the wheelie bag so it will open.
- Drag the clothes aside and take the WHEELIE BAG CASTER (E).
- Place the WHEELIE BAG CASTER on the wheelie bag (F).
- Click on the wheelie bag to move it under the wooden shelves.
- Look at the fishing net for a mini-game.
- Find the pair of fish that match the clue in the center (G).
- Click on the pair of fish (H), then repeat for the next clue until you earn the RAINBOW SCALES.
- The clues are shown with the fish that match the description.
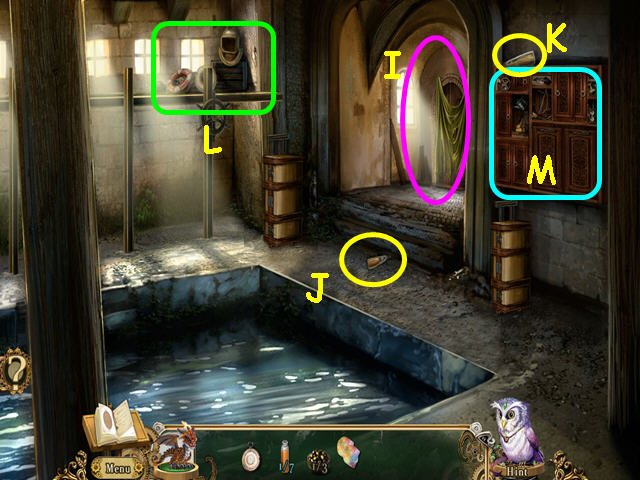
- Note the ragged curtains (I).
- Take the 2/7 MOONFLOWER NECTAR (J).
- Take the 3/7 MOONFLOWER NECTAR (K).
- Note the docking frame (L).
- Look at the wooden shelves for a HOS (M).
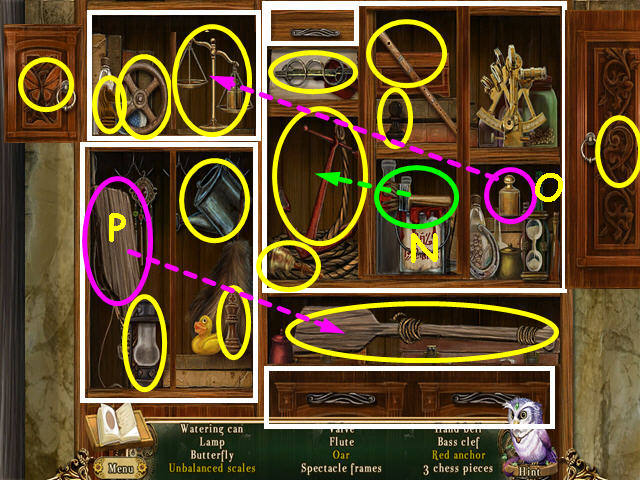
- Locate all the items on the list.
- You must open and close all the door and drawers to find all the items.
- The doors have been removed and drawers opened to show all the items.
- Take the paintbrush and paint the anchor red (N).
- Take the weight and use it on the scale (O).
- Take the oar paddle and move it to the oar handle (P).
- You will earn the SPECTACLE FRAMES.
- Click on the wheelie bag and look at the docking frame for a mini-game.
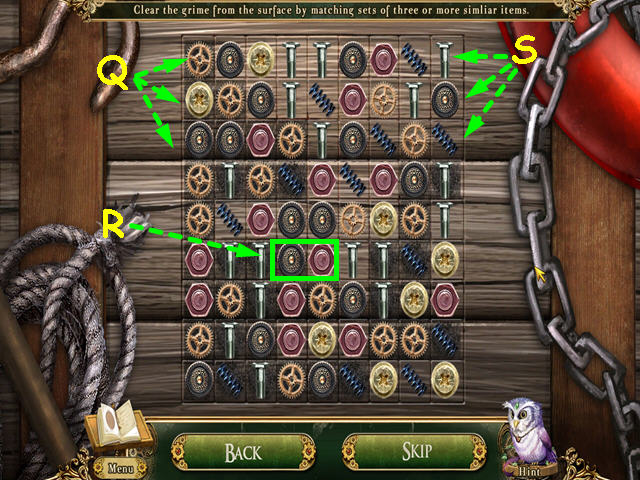
- Remove all the grime from behind the parts (Q).
- This is done by creating chains of 3 or more matching parts over the grime.
- Click on 2 parts to swap position and form a chain of 3 or more like parts (R).
- Continue making matches until the background is all clean (S).
- Exit the dirty work surface and look at the ragged curtains.
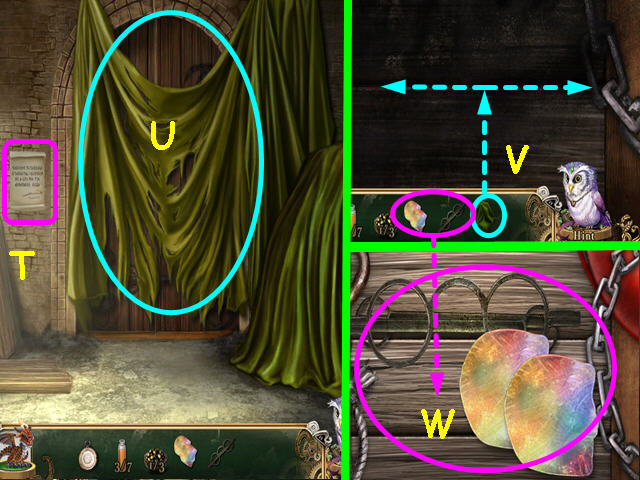
- Read the note to learn you need prismatic glasses to see the lock (T).
- Take the RAG CLOTH that is covering the door (U).
- Walk down, then look at the working surface.
- Use the RAG CLOTH on the working surface (V).
- Drag the rag cloth back and forth until the area is clean and the rag disappears.
- Place the RAINBOW SCALES and the SPECTACLE FRAMES onto the clean area for a mini-game (W).
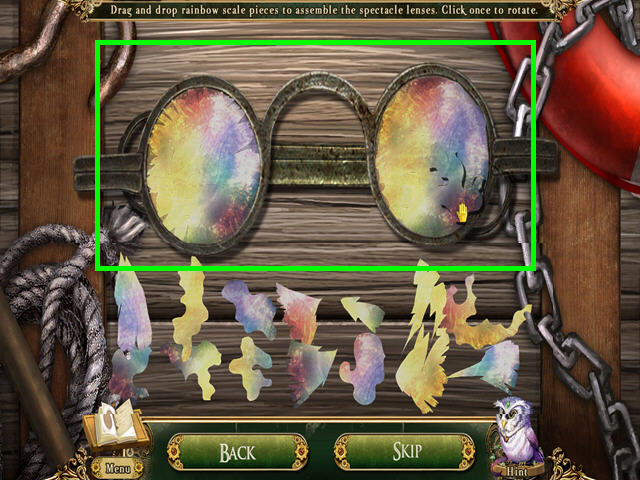
- Place all the pieces into the spectacle frames.
- Click to rotate a piece if necessary, then drag it into position.
- Note the pieces with jagged edges go in the left eyepiece and the round edge pieces go in the right.
- You will earn the PRISMATIC GLASSES.
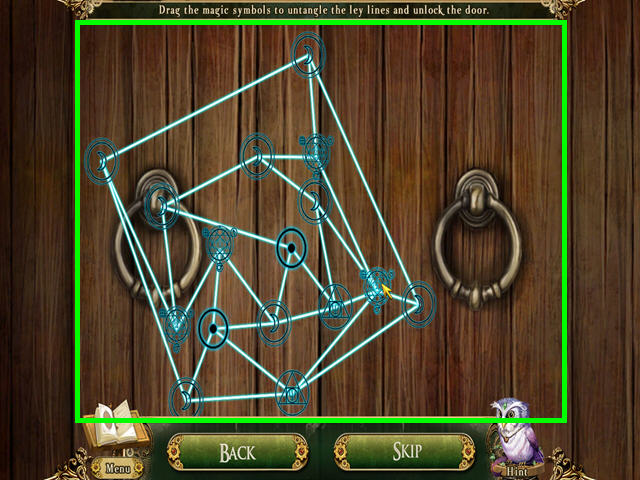
- Look at the wooden door and use the PRISMATIC GLASSES on the door for a mini-game.
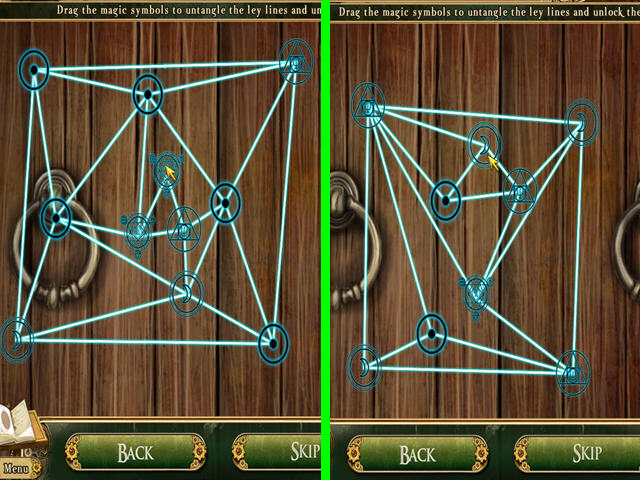
- Untangle the threads, so that none cross each other.
- The red lines indicate that they are crossed somewhere, while the white lines indicate that none cross that line.
- Drag the symbols to untangle the lines.
- You have 3 boards to untangle, the first 2 are shown here.
- Drag the symbols to untangle the lines.
- This is the third and final board.
- Walk forward to the town square.
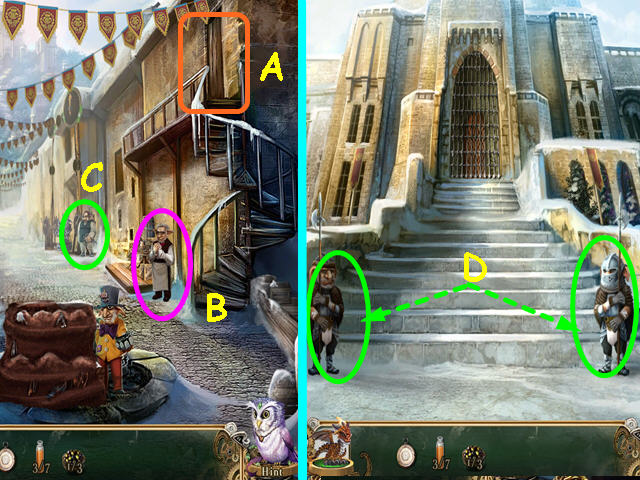
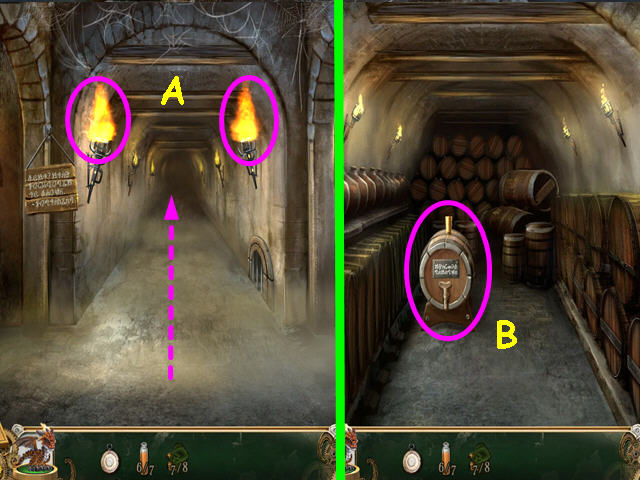
- Note the tavern entrance (A).
- Talk to the goblin at the refreshment stand to learn he needs olives (B).
- Talk to the stonemason to learn he needs a chain (C).
- Walk forward to the palace grounds talk to the guards to learn you will need a uniform to get in the palace (D).
- Return to the square and enter the tavern.
- Take the 4/7 MOONFLOWER NECTAR and the 2/3 DELICIOUS OLIVES (E).
- Talk to the guard to learn what he is drinking (F).
- Talk to the bartender (G).
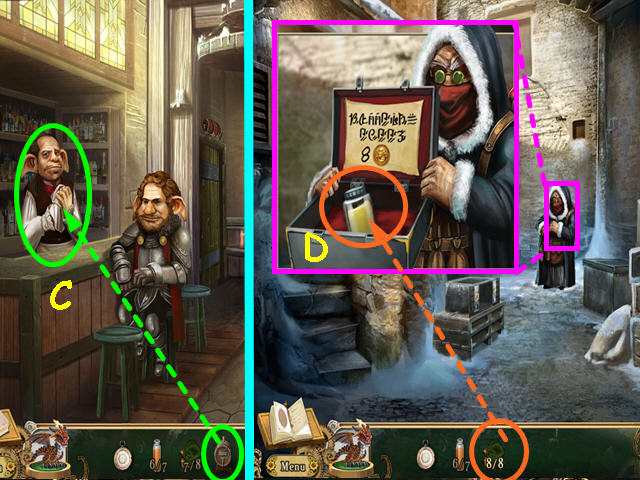
- Exit to the square and try to talk to the peddler (H).
- Walk right into the alley (I).
- Take the 5/7 MOONFLOWER NECTAR (J).
- Open the box and take the 3/3 DELICIOUS OLIVES (K).
- Talk to the peddler to learn about the sap of sleeping poppy he is selling (L).
- Look at the close-up of the pallets and select the secure container for a mini-game (M).
- Restore the picture.
- Click on a tile to select it, click again to rotate, or click on another tile to swap positions.
- Right-click to deselect a tile.
- Once a tile is correctly placed, it will lock.
- Take the 6/7 MOONFLOWER NECTAR from inside the container.
- Walk down to return to the town square.
- Note the location of the fruit vendor (N).
- Note the location of the shipwright (O).
- Note the location of the souvenir stand (P).
- Give the 3 DELICIOUS OLIVES to the goblin at the refreshment stand for a HOS (Q).
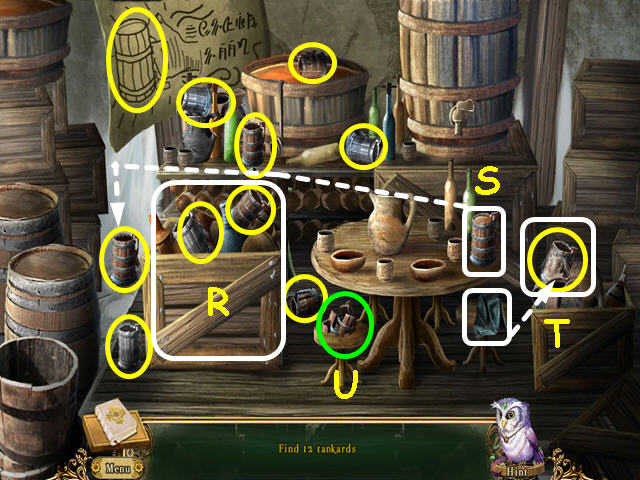
- Locate the 12 tankards.
- Remove the drape over the crate (R).
- Dump the full tankard in the grate (S).
- Use the dishcloth on the dirty tankard (T).
- Select the broken tankard for a mini-game (U).
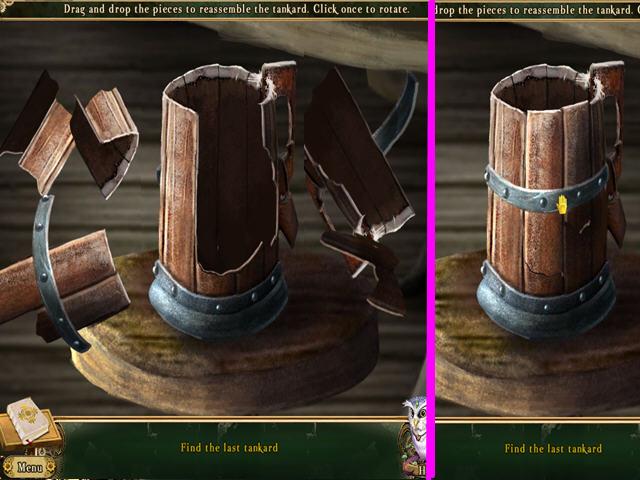
- Repair the tankard.
- Drag and drop the pieces into place; click once to rotate if necessary.
- Take the last tankard and you will earn 1/8 and 2/8 BOLGIN COINS.
- Select the fruit vendor for a mini-game.
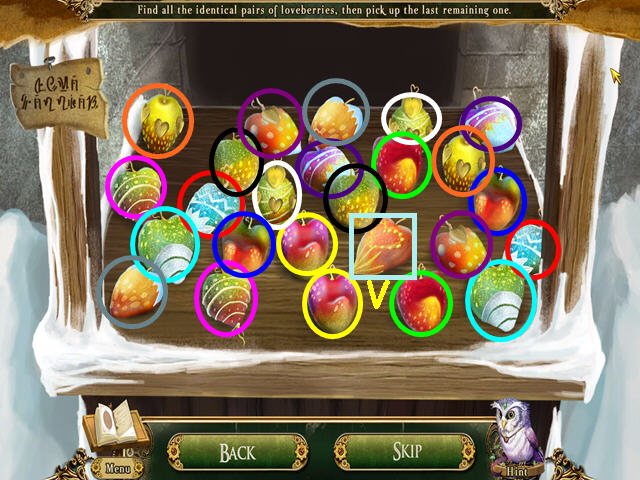
- Select matching pairs of loveberries.
- Take the remaining unmatched loveberry (V).
- You will earn the 3/8 BOLGIN COIN.
- Select the shipwright for a mini-game.
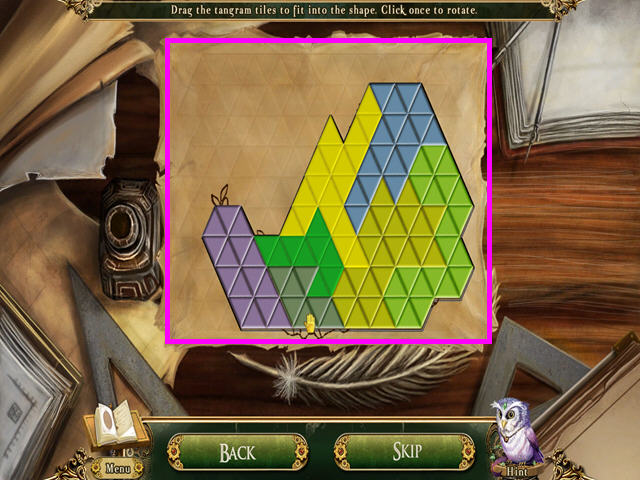
- Place all the pieces into the outline.
- Click to rotate a piece if necessary, then drag it into position.
- You will earn the HEAVY DUTY CHAINS.
- Select the souvenir stand for a mini-game.
- Select the souvenir that is not like the others.
- You will have 6 sets to solve; these are the first three.
- The area with the difference is circled in pink.

- Select the souvenir that is not like the others.
- You will have 6 sets to solve; these are the last three.
- The area with the difference is circled in pink.
- You will earn the 4/8 and 5/8 BOLGIN COINS.
- Give the HEAVY DUTY CHAIN to the stonemason for a mini-game.
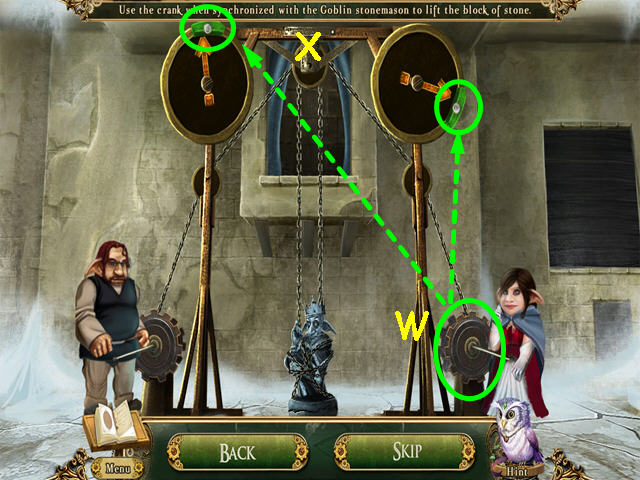
- Raise the statue to the window.
- Click on Princess Sophia's crank (W) when both arrows are in the green section (X).
- You must do this 3 times; each time the position of the green section and the speed of the arrows will change.
- You will earn 6/ 8 and 7/8 BOLGIN COINS.
- Enter the tavern and talk to the bartender for a maze.
- Each flame means something different – blue flames mean you have gone the wrong way.
- Walk backwards to return to the beginning of the maze.
- Orange means go forward, green means walk to the right, and red means go to the left (A).
- Our path was: forward-right-forward-left-right-forward-left.
- Take the CASK OF ALEX'S FINEST 100 YEAR SPECIAL (B).
- Walk down to return to the tavern.
- Give the CASK OF ALEX'S FINEST 100 YEAR SPECIAL to the bartender and you will earn the 8/8 BOLGIN COIN (C).
- Walk down to exit the tavern, then walk to the right.
- Talk to the peddler and give the 8 BOLGIN COINS for the SAP OF SLEEPING POPPY (D).
- The peddler tells you about a CLIPPED COIN in your watch for the resistance.
- Walk down, then enter the tavern.
- Give the CLIPPED COIN to the goblins sitting in the back (E).
- Once the tavern is empty, look at the liquor shelves behind the bar and take the 7/7 MOONFLOWER NECTAR (F).
- Place the 7 MOONFLOWER NECTARS into the empty bottle for a HOS (G).
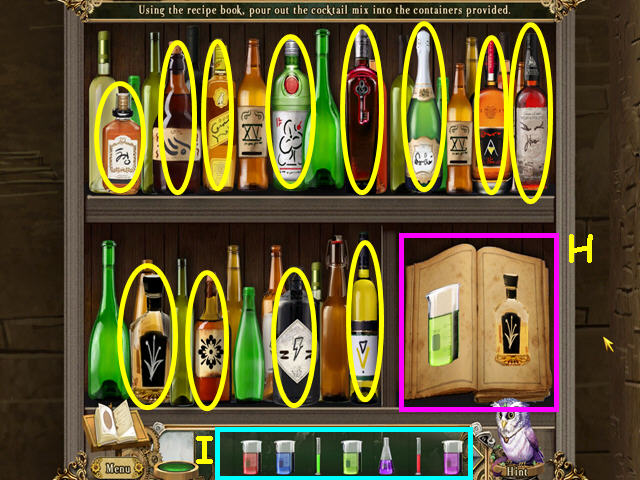
- Using the book, match the cocktail mix with the containers (H).
- Click on the pages in the book to see all the recipes.
- Take the containers from the bottom (I) and click on the paired bottle above.
- You will earn the UNMIXED COCKTAIL.
- Place the UNMIXED COCKTAIL in the cocktail shaker (J).
- Click, hold and shake the cocktail mixer until you receive the MOON ROCK SHOOTER COCKTAIL (K).
- Place the MOON ROCK SHOOTER COCKTAIL then the SAP OF SLEEPING POPPY into the empty glass on the bar (L).
- Click on the guard to take his uniform (M).
- Exit the alley and walk forward to the palace.
- Talk to one of the guards for a series of security questions (N).
- Read the security question then click in the box by the correct answer.
- There are 5 questions to answer.
- Walk forward to enter the palace.
- Look at the throne and click on the panel (O).
- Use the pocket dragon twice on the panel (P).
- Take the blueprints for a mini-game (Q).
- Place all the pieces into the outline.
- Click to rotate a piece if necessary, then drag it into position.
- Talk to the magician and Grimble to bring up a mini-game.
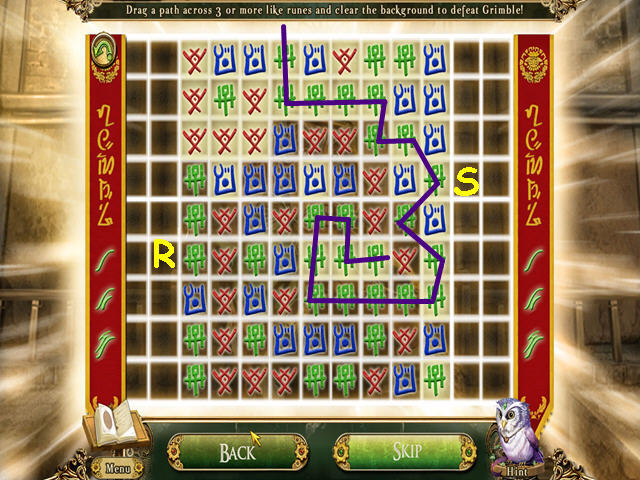
- Drag a path across 3 or more adjacent runes and clear the background (R).
- Click on a rune and drag a path through adjacent matching runes (S).
- You will need to complete 3 boards to beat Grimble.
- You can go diagonally in your rune chains.
- Congratulations! You have completed Awakenung: The Goblin Kingdom!
Achievements
- Who, What, Where? - Attempted to ignore Ran the Owl at the start.
- All Aboard! - Completed the Outpost.
- No Prison Big Enough – Completed the Dark Tower.
- Little Big Cavern – Completed the Fungal Forest.
- Savior of the Kingdom – Completed Awakening: The Goblin King.
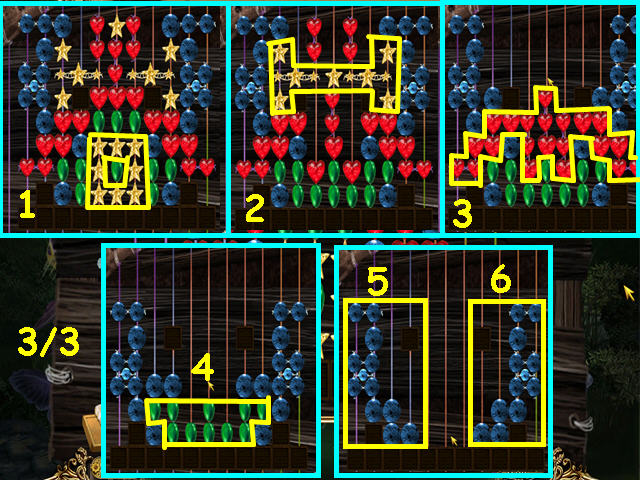
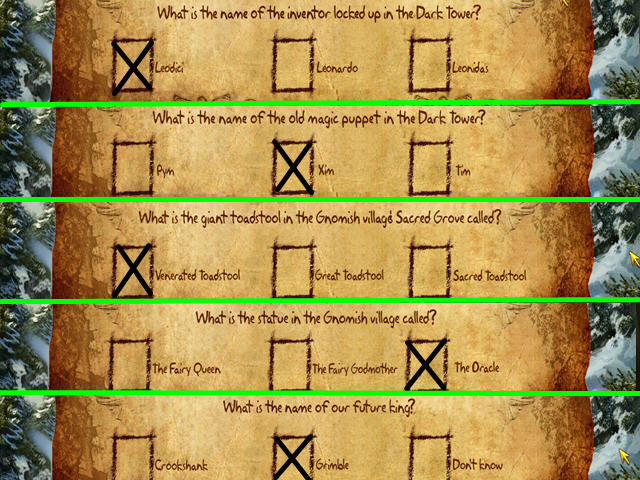
- Ace Gumshoe- Found all supplementary story-related items and events.
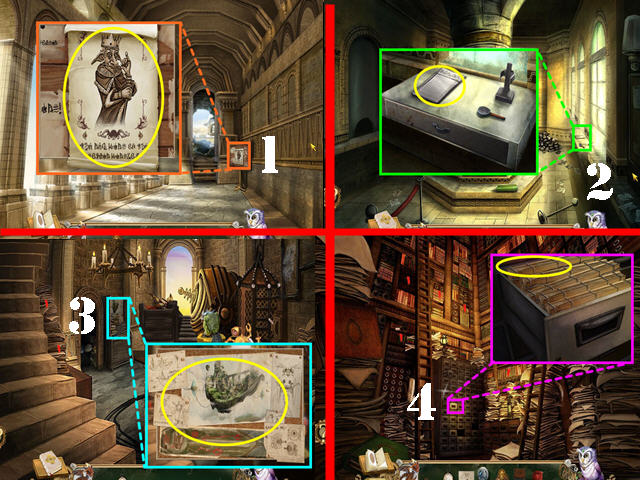
- Gumshoe items 1-4 are shown in the first screenshot.
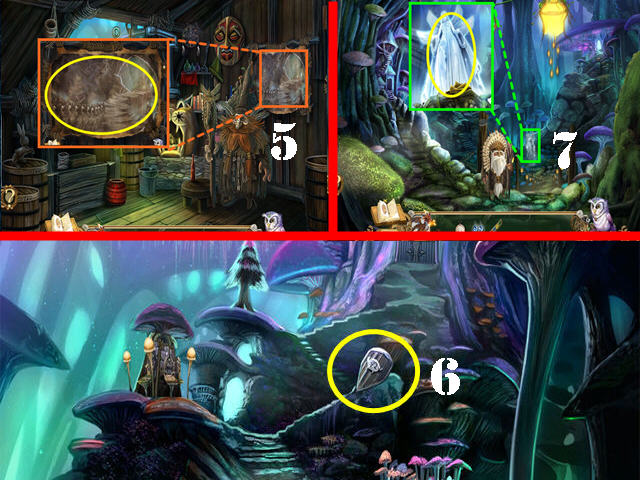
- Gumshoe items 5-7 are shown in the second screenshot.
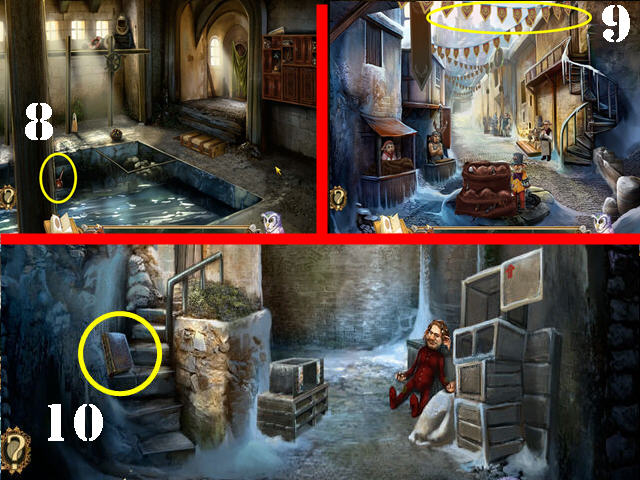
- Gumshoe items 8-10 are shown in the third screenshot.
- A Rapid Approach – completed the Outpost in an hour and a half or less.
- Prison Break – Completed the Dark Tower in an hour and a half or less.
- Fungus Frenzy – Completed the Fungal Forest in an hour and a half or less.
- Thy Kingmaker – Completed the return to the Goblin Kingdom in an hour and a half or less.
- My Kingdom for the Princess – Complete the game in 6 hours or less without using any hints or skips.
- Look Sharp – Completed 5 Hidden Object games in under 8 minutes each.
- An Eye for Detail – Complete all Hidden Object games in under 8 minutes each.
- A Beautiful Mind – Completed 20 mini-games without using hints.
- Puzzle Pro – Completed 40 mini-games without using hints.
- Unfettered Feathered Friend – Complete the game without using a single hint.
- Rapier Wit – Completed 20 mini-games without skipping.
- Puzzle Maestro – Completed 40 mini-games without skipping.
- Queen of Conquests – Complete the game without using any skips.
- Great Minds Think Alike – Discover the original solution for the links/pipes puzzles in one round.
- Calm Under Pressure – Did not make a single mistake while stabilizing the pressure valves in the cistern.
- Codebreaker – Broke the code to the storeroom door in the mines in under 5 minutes.
- What a Catch! - Solved the Swordfish Crest puzzle in 7 moves.
- Hamster Hero – Released Nibbles the hamster in the secret chamber of the Dark Tower in under 3 minutes.
- Grains of Wisdom – Completed the Aspect of Wisdom's puzzle in under 4 minutes.
- Unbreakable Faith - Completed the Aspect of Faith's puzzle in under 3 minutes.
- Courageous Checkmate - Completed the Aspect of Courage's puzzle in under 10 minutes.
- On the Dot – Did not make a single mistake while removing the spots from Lead Singing Shroom's cap.
- Regicide – Defeated Grimble without fumbling a single round.
- Goblin Kingdom Grandmaster – Acquired all other achievements in the game.
Created at: 2011-09-30