Welcome to the
Blood and RubyWalkthrough! Bring peace to a world on the edge of an evil destruction in Blood and Ruby!Whether you use this document as a reference when things get difficult or as a road map to get you from beginning to end, we're pretty sure you'll find what you're looking for here.
This document contains a complete Blood and Ruby game walkthrough featuring annotated screenshots from actual gameplay!
We hope you find this information useful as you play your way through the game. Use the walkthrough menu below to quickly jump to whatever stage of the game you need help with. Remember to visit the
Big Fish Games Forums if you find you need more help. Have fun!
This walkthrough was created by
Chie, and is protected under US Copyright laws. Any unauthorized use, including re-publication in whole or in part, without permission, is strictly prohibited.
Walkthrough Menu
General Tips
- From the main menu you can change players, play the game, see the help screen and adjust some options.
- The options are for screen modes, tutorial, custom cursors (turn this off if your computer is running slow), and the volume control.
- There are also brightness controls, but you should keep this in the middle unless you are having trouble seeing the objects.
- There are 6 cursors in the game: the normal cursor; the gears cursor, which tells you that you can use an item; the magnifying glass, which tells you that you can zoom in; the arrow cursor, which shows the direction you can move; the hand cursor, that shows you can pick something up; and the word bubble cursor, for talking to people.
- Your UI has a menu button at the left and your inventory in the middle.
- At the right of the inventory are a hint button and the fast travel map.
- If you hover you mouse over an inventory item you will get a description of that item.
- If you click too many times in a scene you will hear a slicing sound and see a red X near your cursor.
- Some things in the game are based on talking to the characters, so talk to every character that you see!
- Search every scene for sparkles; they tell you where the Hidden Object Scenes are and what can be interacted with.
- Click on the question mark if you have problems solving a puzzle. If you still can't figure it out, you can skip it after a certain amount of time has passed.
Chapter 1
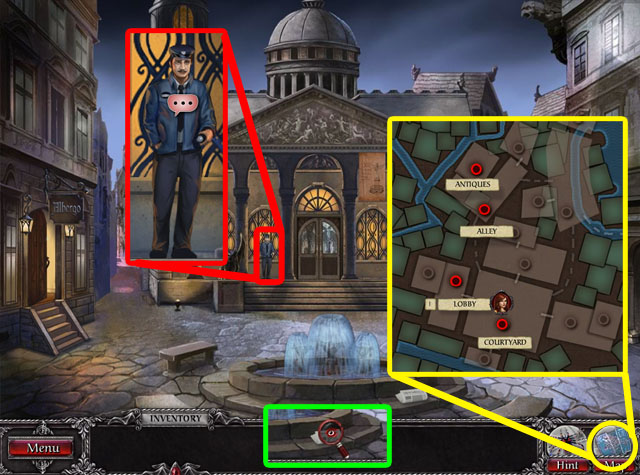
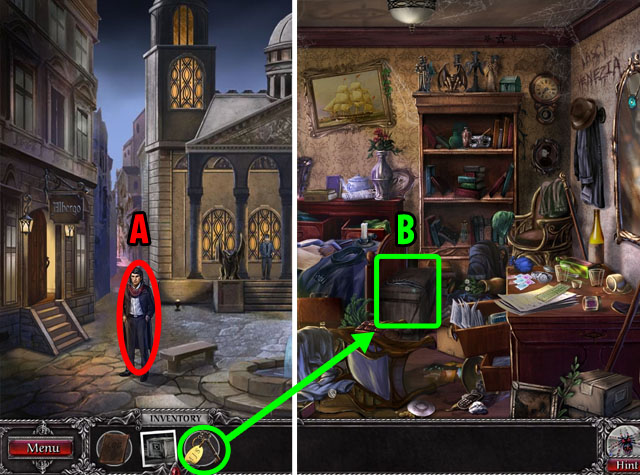
- Click on the man (A).
- Click the LETTER OPENER (B) to pick it up.
- When you see the red gears icon, you can use an inventory item at this location.
- Click the LETTER OPENER in your inventory and use it on the man at the top of the stairs (C).
- Click the top of the stairs to enter the next scene (D).
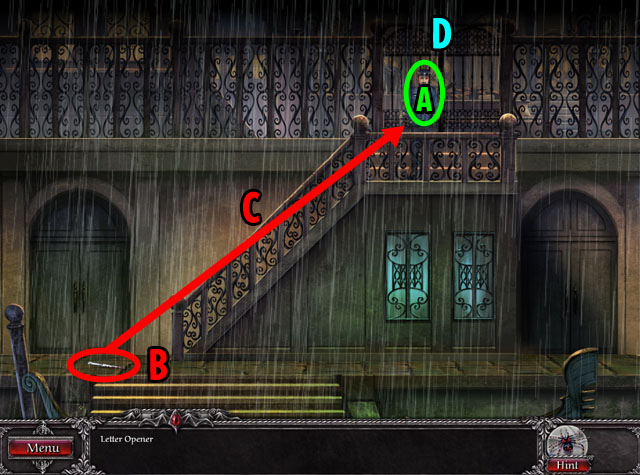
- Click the two people (E) to the side of the building and they will disappear.
- Click on the poster and the newspaper to zoom in (F) for more information.
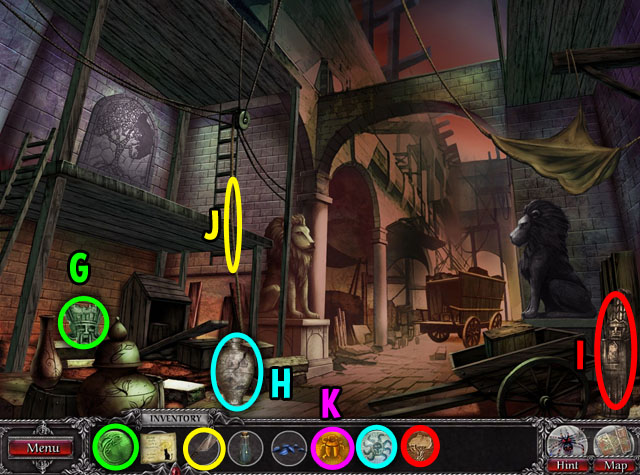
- Enter the store, Albargo, on the left side (G).
- When something sparkles, you can look closer by clicking on it.
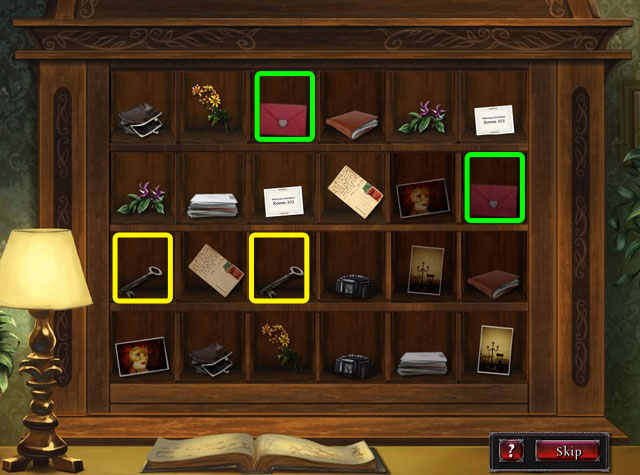
- Click on the shelf with sparkles in the middle of the scene.
- When you click the question mark button in the bottom right corner, you will receive a brief description of the mini-game.
- Find the matching pairs by clicking two boxes at a time.
- If the boxes match, they will stay open. If they do not match, they will close and you will have to try again.
- See the screenshot for two examples of a matched pair.
- You will receive the room number of your brother when you have completed the puzzle.
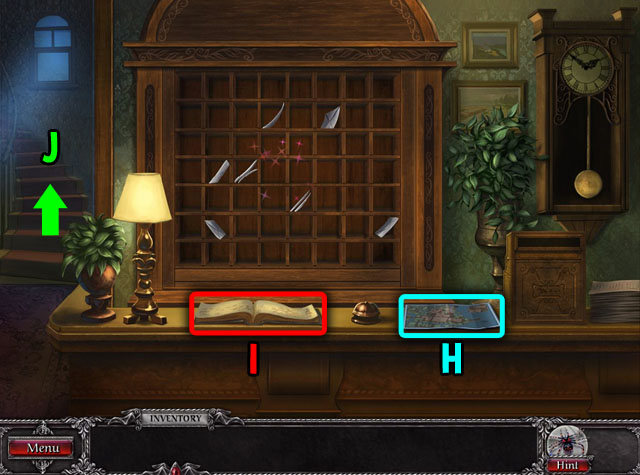
- Click on the map on the right (H). It will go into your inventory on the very right side.
- When you click the map, you will see the current locations.
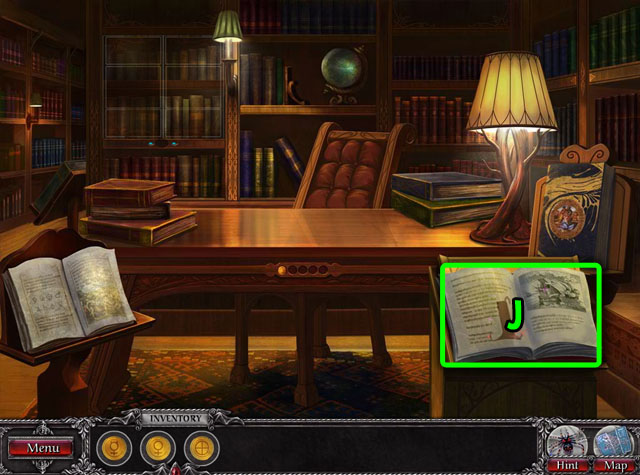
- Open the logbook (I) for more story information.
- Click on the stairs on the left side of the scene (J).

- Play the Hidden Object Scene once you enter the room.
- When you get stuck trying to find objects, you can use the hint button in the bottom right corner.
- You will receive RECEIPTS and KEYS once you find all of the objects.
- To exit the room, click just above the inventory panel.
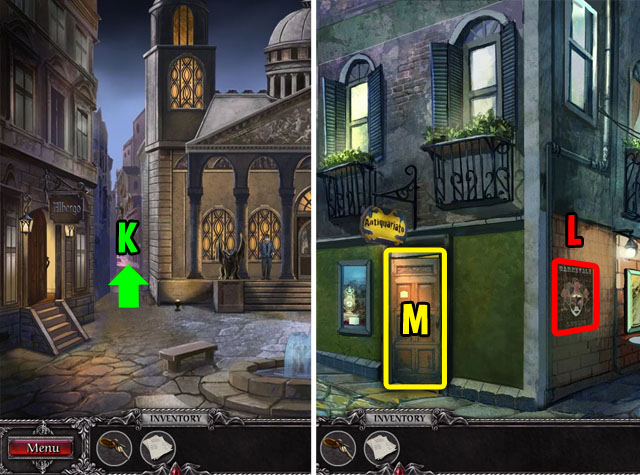
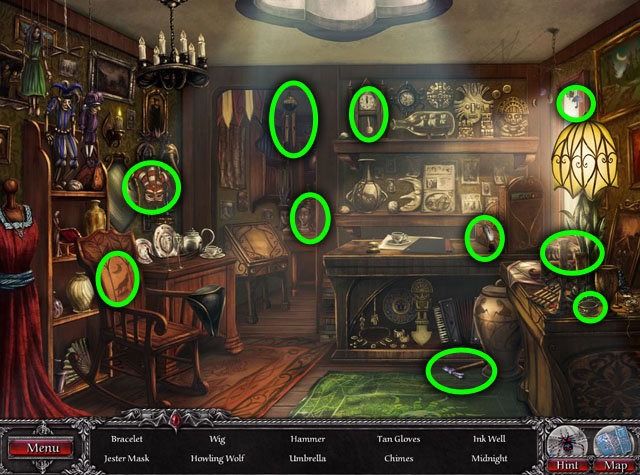
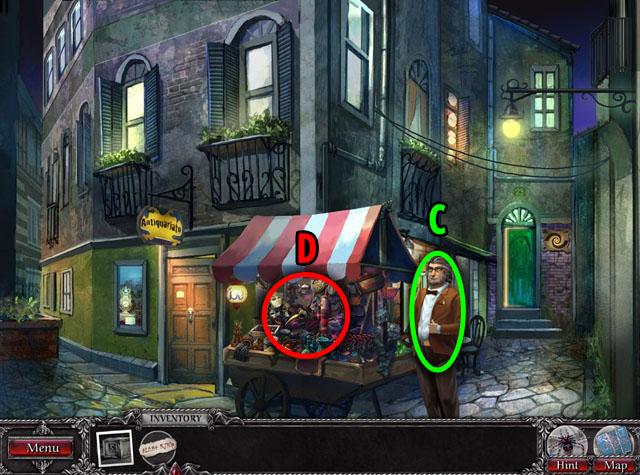
- Click on the street between the store, Albargo, and the museum (K).
- Click on the poster on the wall (L) to get some story information.
- Enter the antique shop on the left side (M).
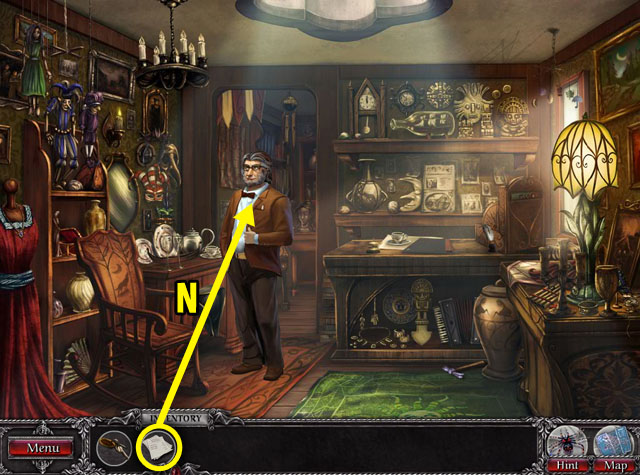
- Pick up the RECEIPTS from your inventory and use them on the man in the shop (N).
- Play the Hidden Object Scene after the man leaves.
- You will receive your brother's JOURNAL.
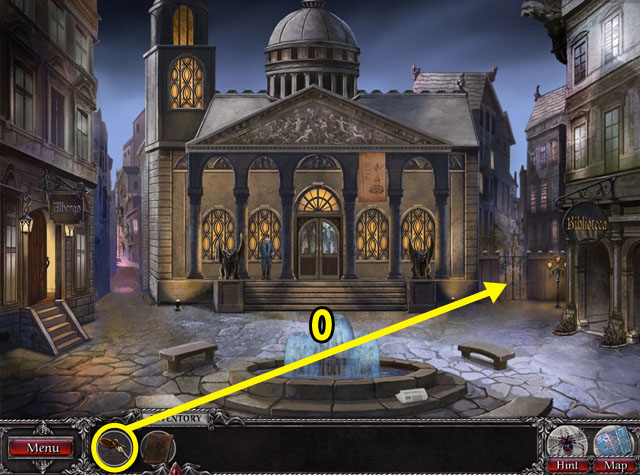
- Return to the courtyard. You can return there by clicking at the bottom of the screen twice, or you can use the map to fast travel.
- Click the KEYS and use them on the gate to open it (O).
- Enter the street from the gate that you just opened.
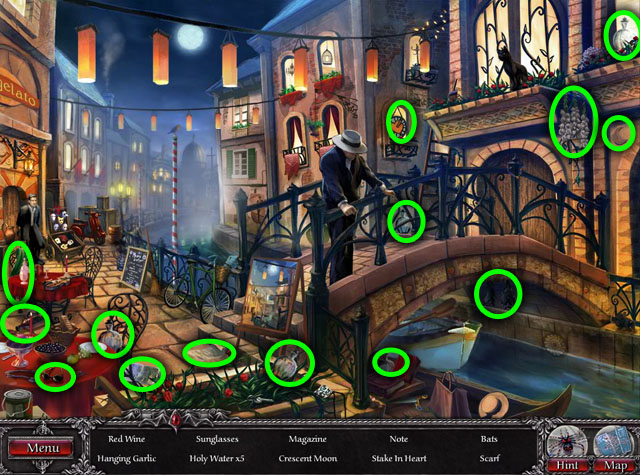
- Play the Hidden Object Scene.
- You will receive a SCARF.
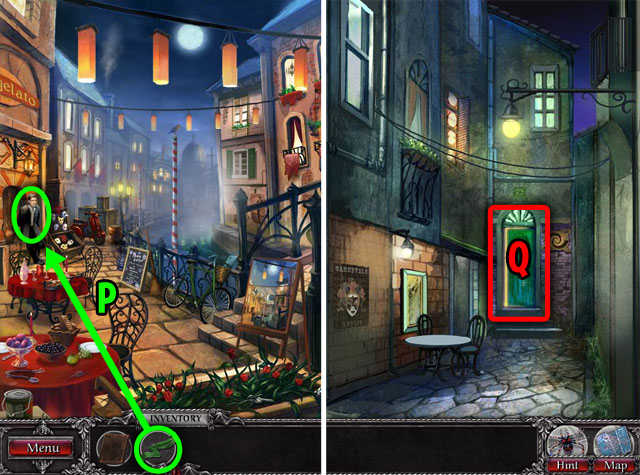
- Drag the SCARF on the man (P).
- After talking to him, you will receive the RECEIPT.
- Return to the alley using the map. Places that you can do something at will be marked with an exclamation point.
- Enter from the green door on the right (Q).
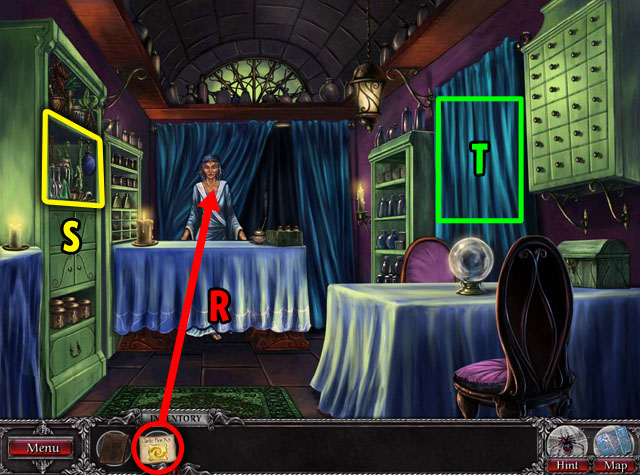
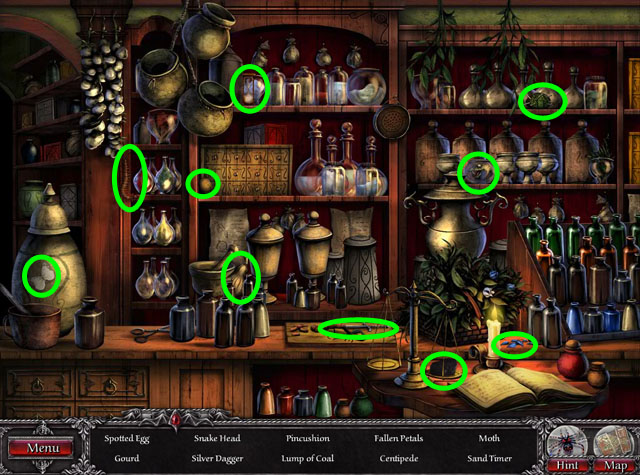
- Use the RECEIPT on the witch (R).
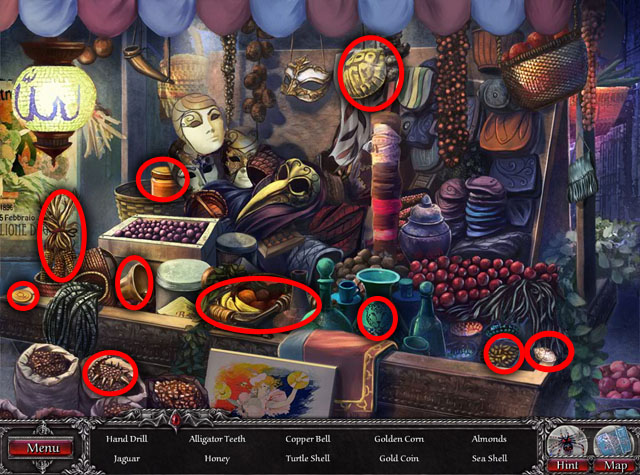
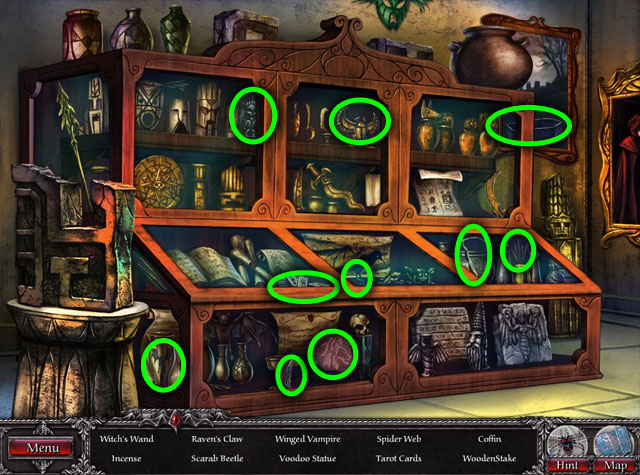
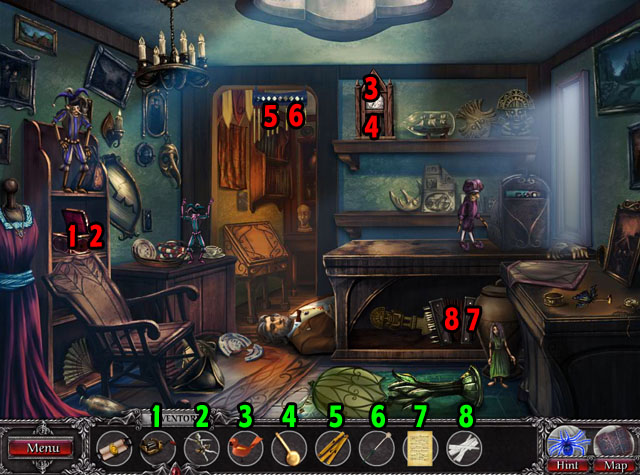
- Click on the shelf (S) to the left.
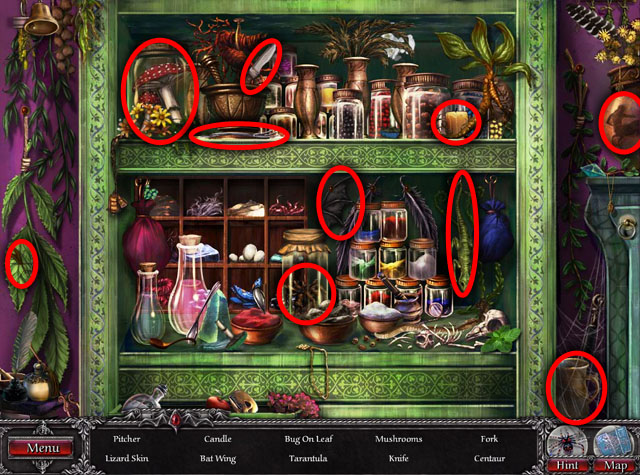
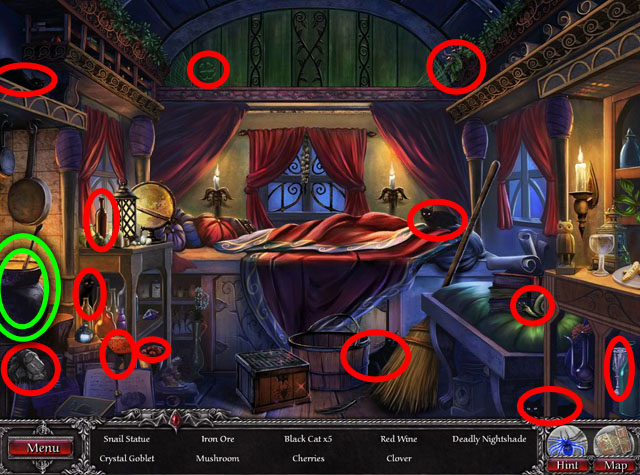
- Play the Hidden Object Scene.
- You will receive the INGREDIENTS for a potion.
- Enter the next room through the curtain on the right (T).
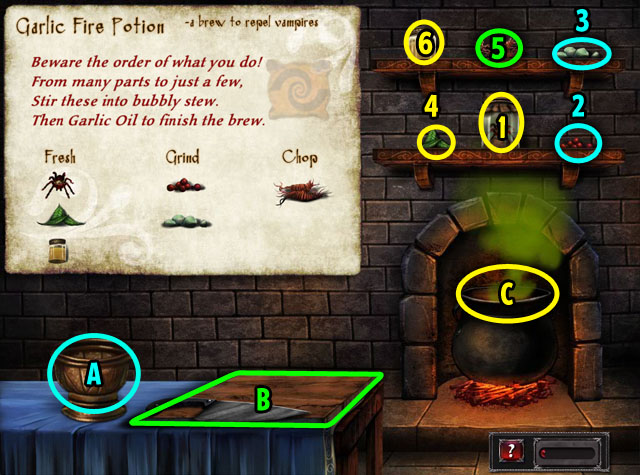
- This mini-game has you find out the order of parts to put into the potion and gives you a riddle clue.
- The clue tells you to start from things with many parts, to things with few. The recipe also tells you how to prepare the different parts.
- The fresh parts can be put straight into the pot, the parts labeled grind must be used on the mortar first and the chop parts must be used on the cutting board first.
- Start with the spider: it has the most parts with 8 legs.
- Add the 8-LEGGED TARANTULA (1) to the boiling pot (C).
- Place the 6 POISON BERRIES (2) in the mortar and pestle (A).
- Add the ground poison berries to the pot.
- Place the 4 OPAL ROCKS (3) in the mortar and pestle.
- Add the ground opal rocks to the pot.
- Add the 3 STINGING NETTLE LEAVES (4) to the pot.
- Chop the 2 BLOOD ROOTS (5) on the cutting board (B).
- Add the chopped blood roots to the pot.
- Add the JAR OF GARLIC OIL (6) to the pot for the last step, like it says in the recipe.
- You will receive the GARLIC FIRE POTION.
- Exit the room and return to the Canal.
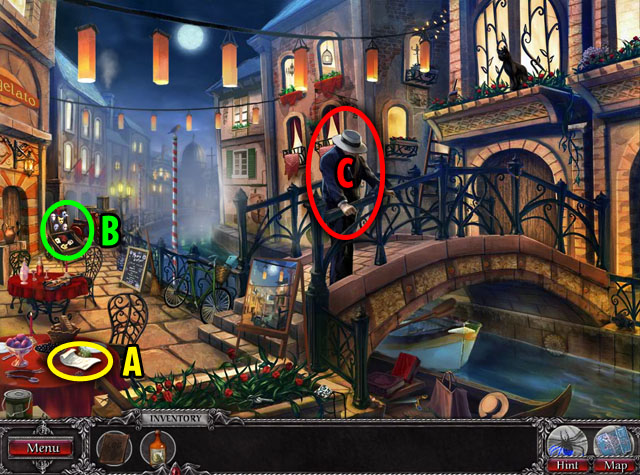
- Collect the letter from Stratton (A).
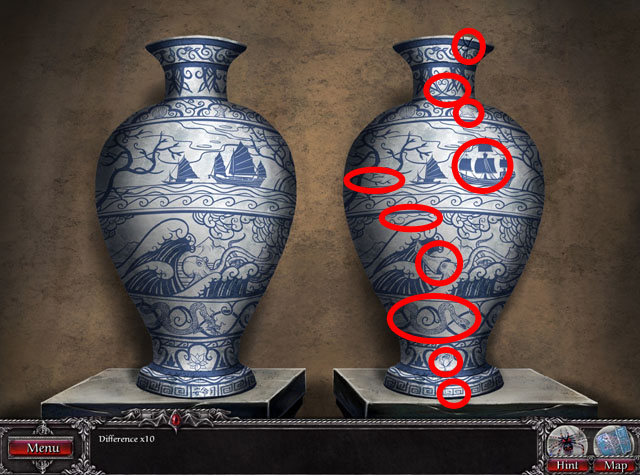
- Click on the masks (B).
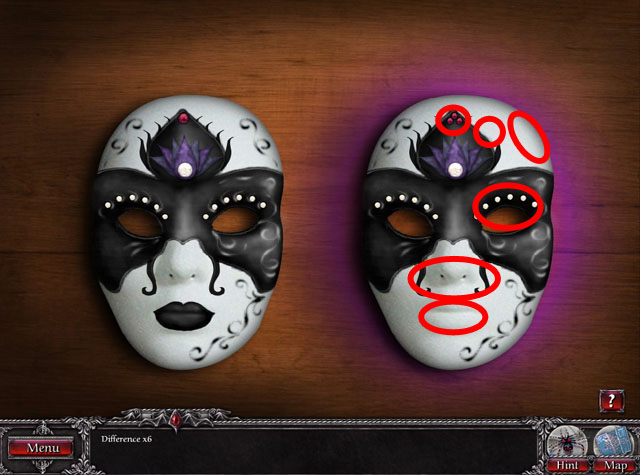
- Find 6 differences between two masks.
- Collect the GONDOLA TICKET behind the right mask.
- Give the TICKET to the man in the middle of the previous scene (C).
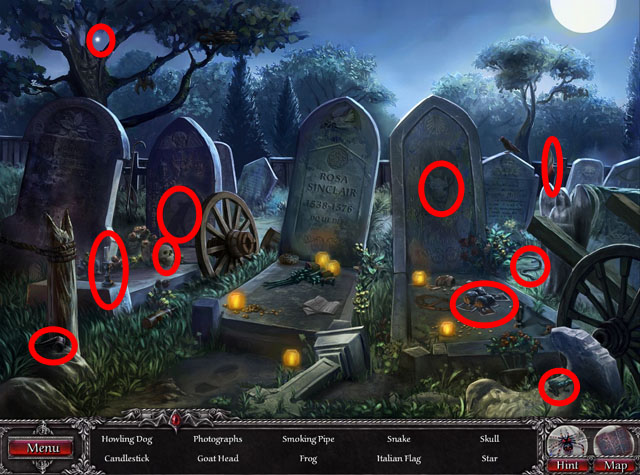
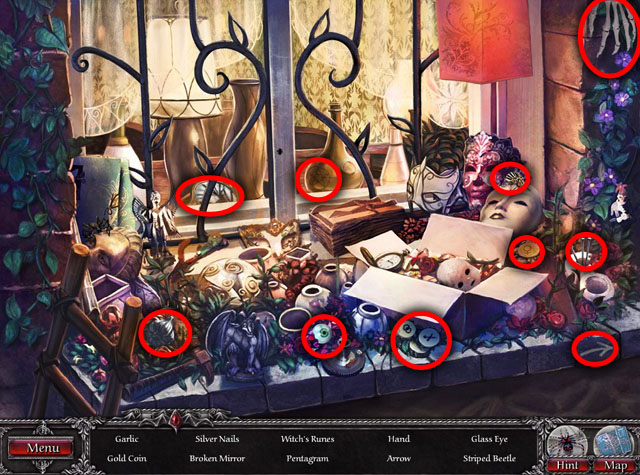
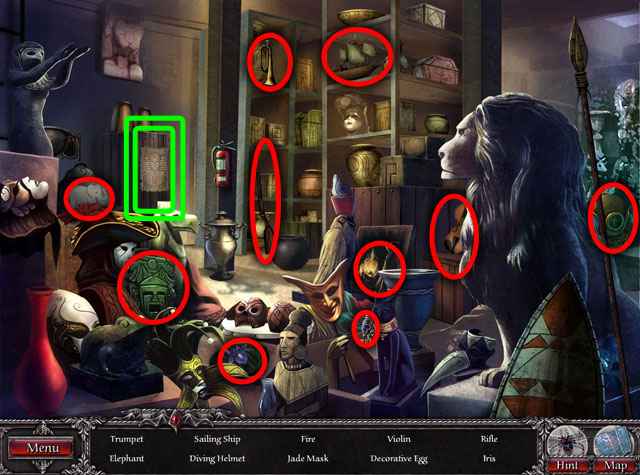
- Click on the sparkling area on the left side of the graveyard.
- Play the Hidden Object Scene.
- You will receive a PHOTO.
- Play the Hidden Object Scene to find objects to protect yourself.
- You will receive a BRICK, GARDEN SHEARS, OLD SHOVEL, and SHARPENED AXE.
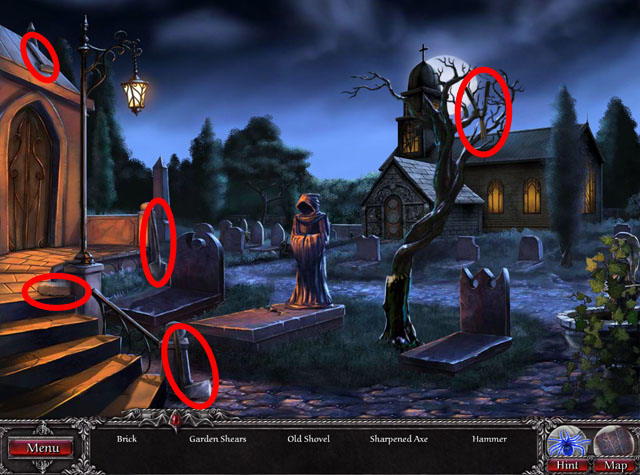
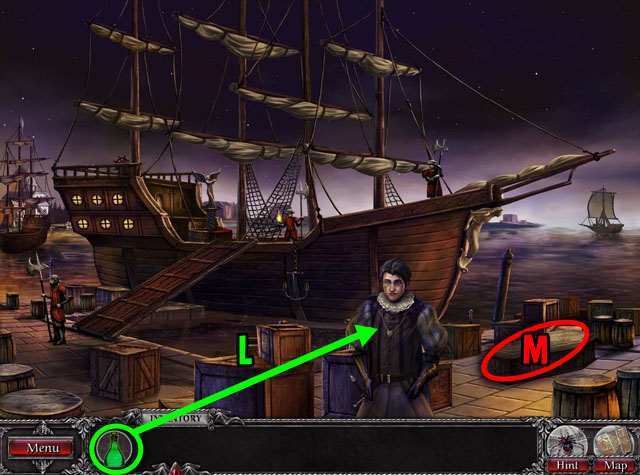
- Use the GARLIC FIRE POTION on the vampire to the right (1).
- Cut the tree with the AXE (2).
- Use the SHOVEL on the cracked tomb (3) to the left of the male vampire.
- Throw the BRICK at the lantern above the male vampire's head (4).
- Cut the ivy to the right of the female vampire with the GARDEN SHEARS (5).
- Use the HAMMER on the fountain that you just uncovered (6).
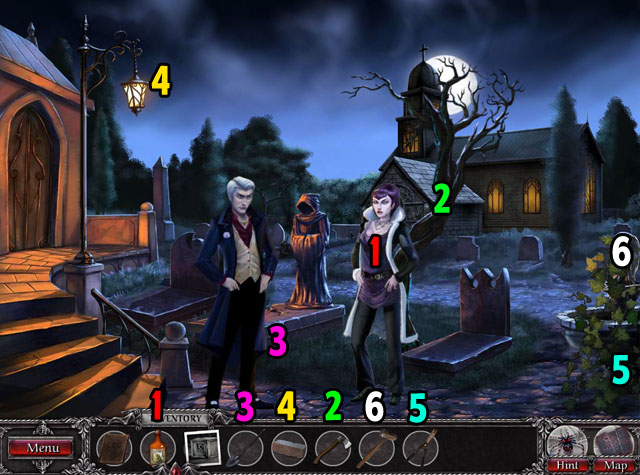
Chapter 2
- Talk with Stratton on the left (A).
- Return to the Hotel using the map. It will be marked with an exclamation point on the left.
- Open the trunk with your BROTHER'S KEY (B).
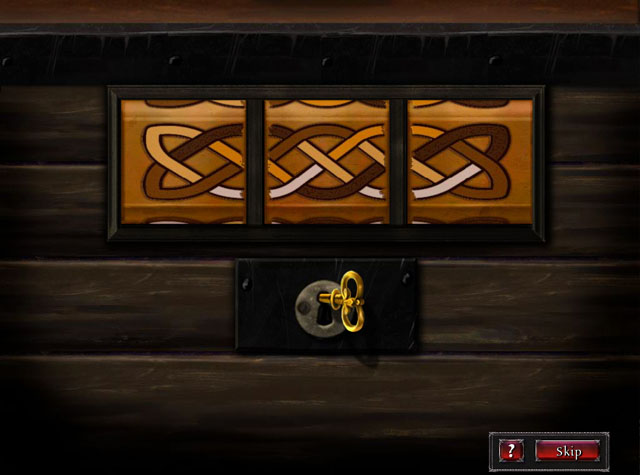
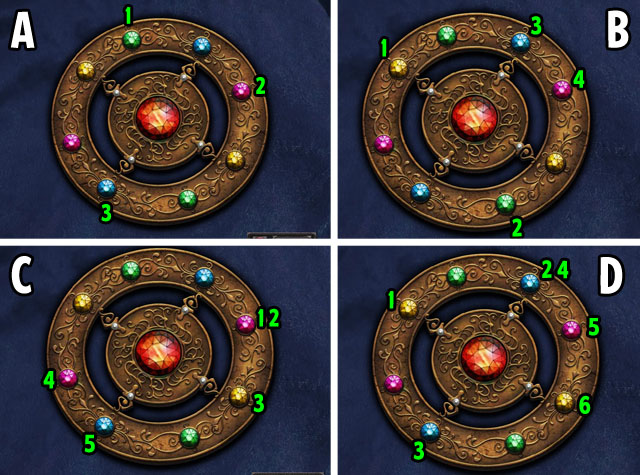
- Match the colors of the strands from left to right to finish this puzzle.
- Click each of the three boxes to rotate the image displayed.
- When the colors of the three images match, you will be able to open the chest.
- Click the key to open it.
- Click the trunk again.
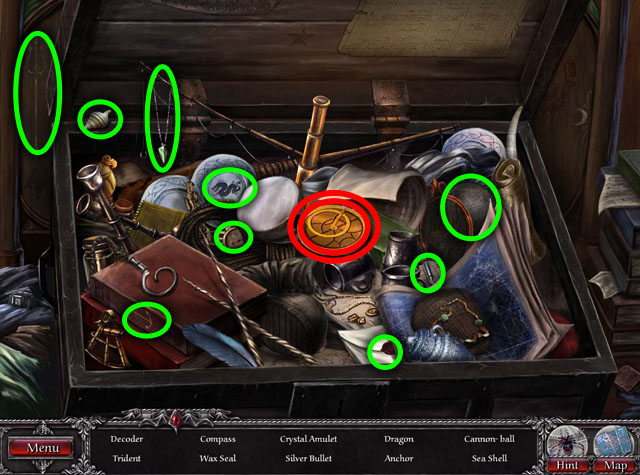
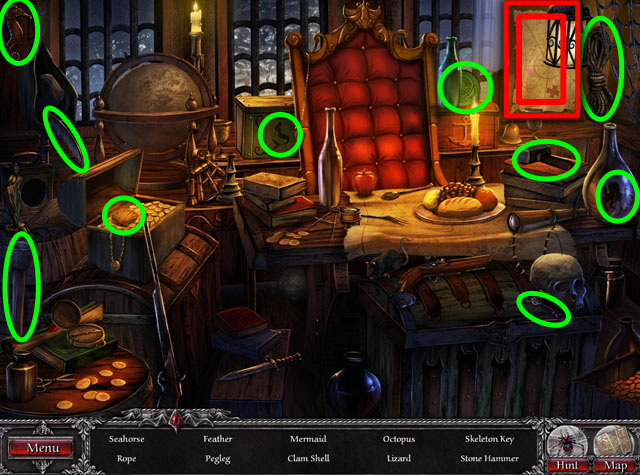
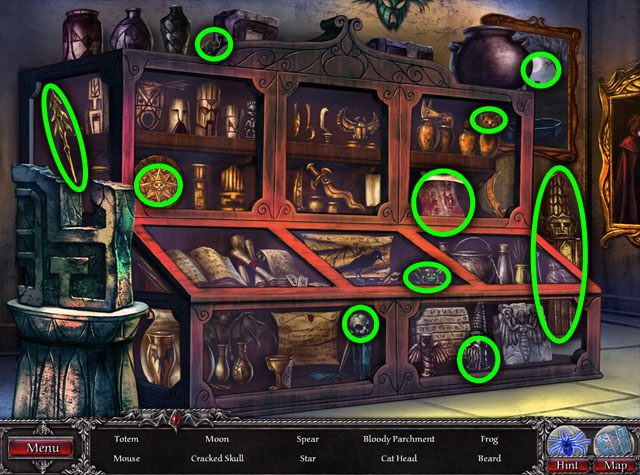
- Play the Hidden Object Scene by finding all of the items circled in green.
- Click the item in red to start the decoder puzzle.
- After finishing the puzzle and finding all the objects, you will receive the STRANGE CODE.
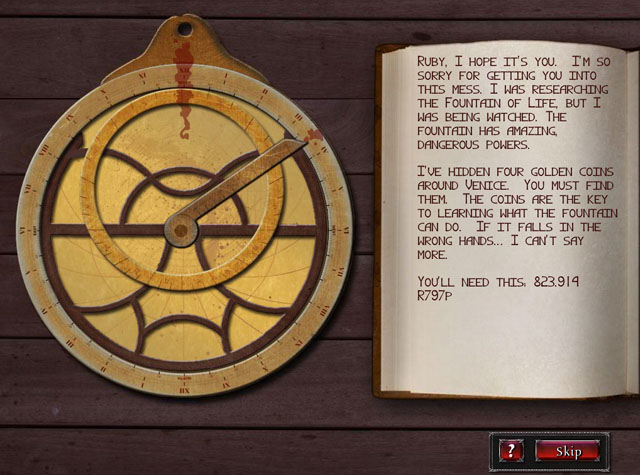
- The decoder puzzle will be solved when you can read the note on the right.
- There are three different pieces of the puzzle that can spin: the two large circles and the clock-like hand.
- Match the blood stain on the background to the two circles and then move the hand to the other blood stain to the right.
- See the screenshot for the correct solution.
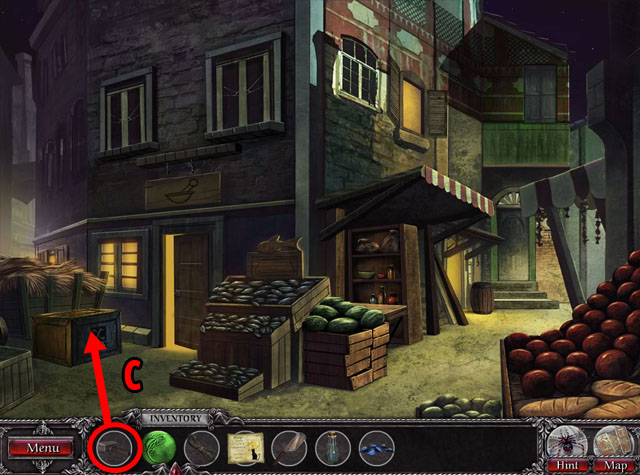
- Return to the Alley.
- Talk with the man (C).
- Click on the wagon beside him (D).
- Play the Hidden Object Scene.
- You will receive a GOLD COIN and TORN SCRAP OF MAP.
- Return to the Canal using the map.
- Click on the flowers and black cat with the sparkles.
- Play the Hidden Object Scene.
- You will receive another GOLD COIN.
- Move to the Dock by clicking the ship in the background.

- Click on the PHOTO and then use it on the matching box (E).
- Click on the box afterward.

- Play the Hidden Object Scene.
- You will receive anther GOLD COIN.
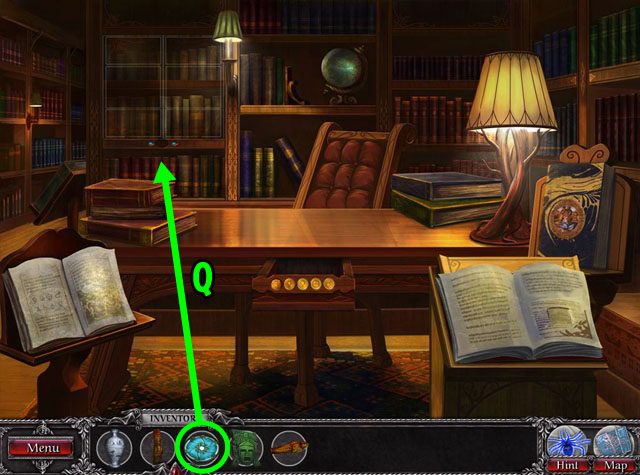
- Move to the Library.
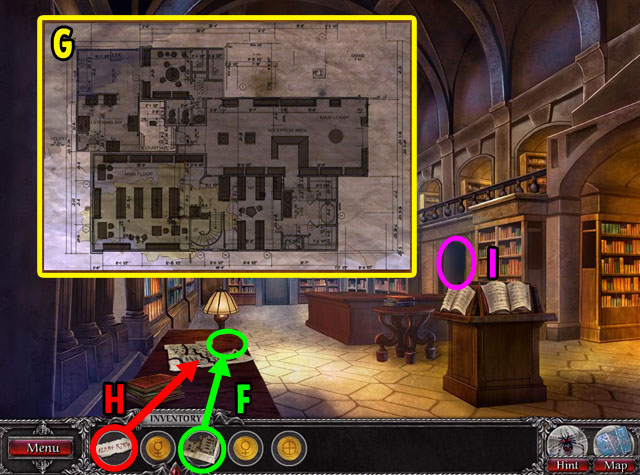
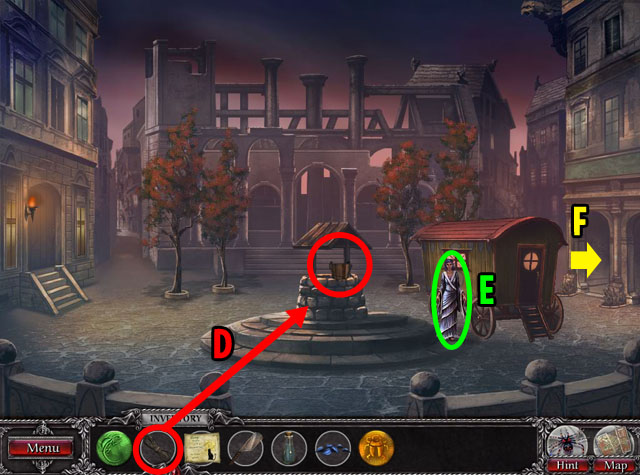
- Place the MAP PIECE on the torn up map on the desk (F).
- Assemble the pieces (G) by clicking and dragging them to the correct location.
- Some of the pieces are rotated in the wrong direction. Click them once to rotate them.
- Find the pieces with flat edges first and then work your way to the inside.
- After finishing, use the CODE from your inventory on the assembled map (H).
- Move to the next room from the glowing door to the right (I).

- Find 6 faces in the drawing.
- Collect the GOLD COIN that has been revealed underneath the page (K).
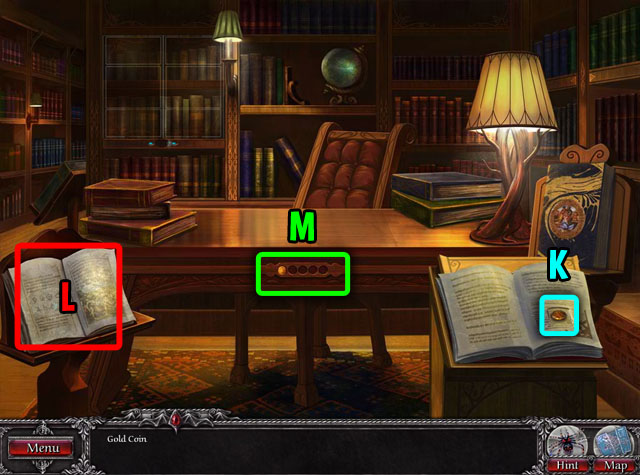
- Click on the book to the left to zoom in (L). This book has the answer written in it for the next puzzle.
- Click on the holes for gold coins on the front of the desk (M).
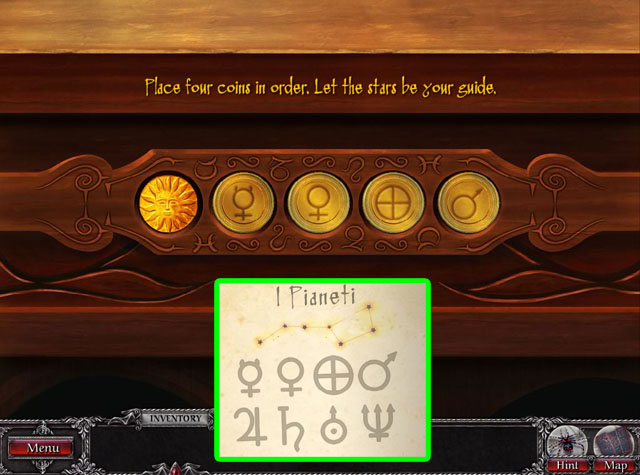
- Place four gold coins in correct order.
- The solution is from the book to the left. Match the symbols with the symbols on the gold coins.
- Collect the SCROLL and your BROTHER'S MUSEUM PASS.
- Click at the bottom of the screen twice to return to the Court yard.
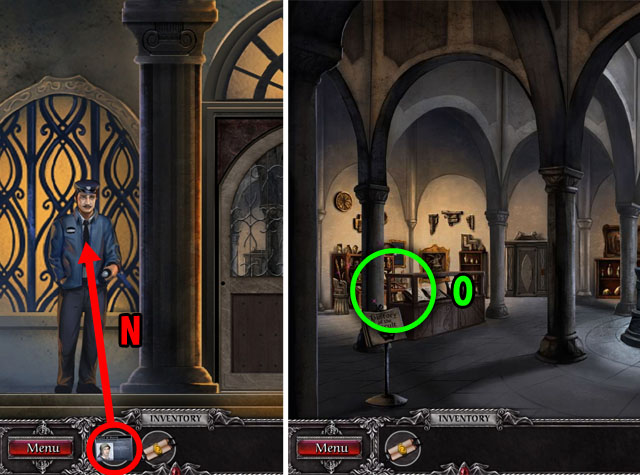
- Click on the museum door to go closer.
- Show the MUSEUM PASS to the guard, left of the entrance (N).
- Enter the museum.
- Click on the left side of the fountain (O).
- Play the Hidden Object Scene.
- You will receive an EMBLEM.
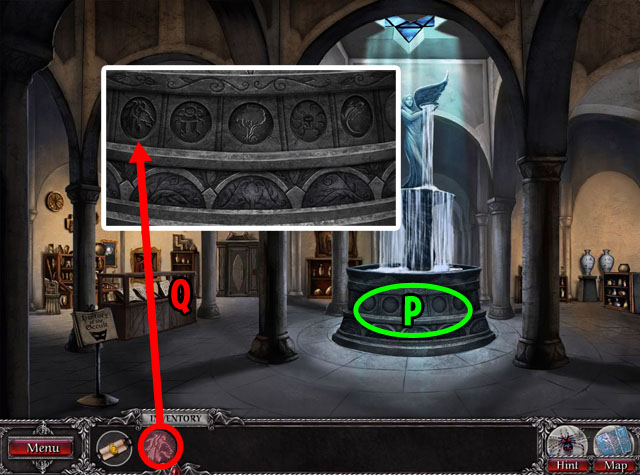
- Click on the fountain (P).
- Place the EMBLEM in the left-most spot that has the same icon on it(Q).
- Return to the Court yard.
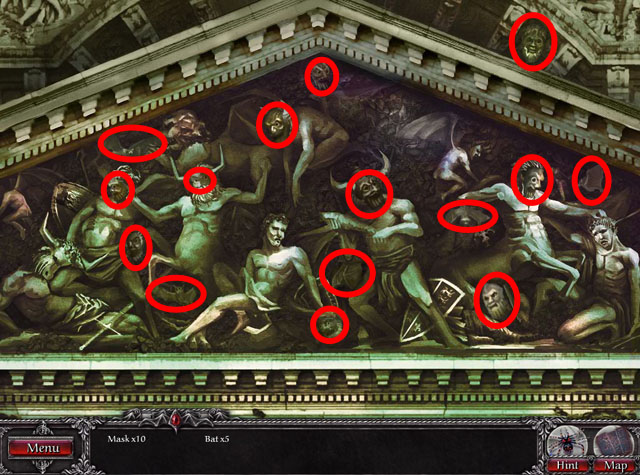
- Click the sparkling mural at the top of the museum.
- Play the Hidden Object Scene.
- Return to the Alley and enter the antique shop.
- You will find that the owner has been murdered!
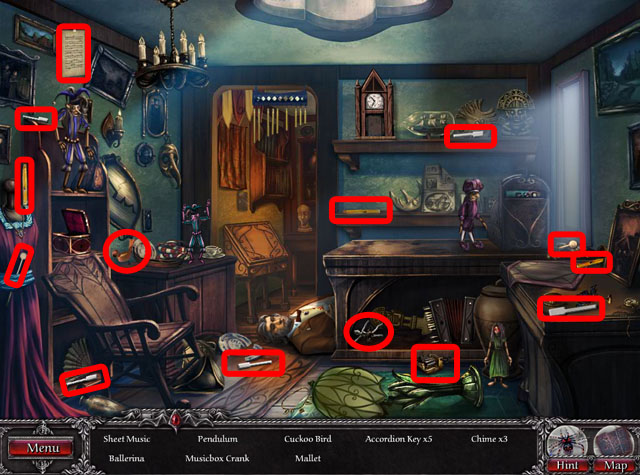
- Play the Hidden Object Scene.
- Assemble the various musical devices in the shop to disable the marionette.
- Place the MUSICBOX CRANK (1) on the broken music box (1).
- Place the BALLERINA on the music box (2). This will disable the first marionette.
- Place the PENDULUM on the broken clock (4).
- Place the BIRD on the clock (3). This will disable the second marionette.
- Place the CHIMES on the broken chimes (5).
- Place the MALLET on the chimes (6). This will disable another marionette.
- Place the accordion KEYS on the accordion (8).
- Place the SHEET MUSIC on the accordion (7) to disable the last marionette.
- Collect the AMULET from the chest of the owner on the floor.
Chapter 3
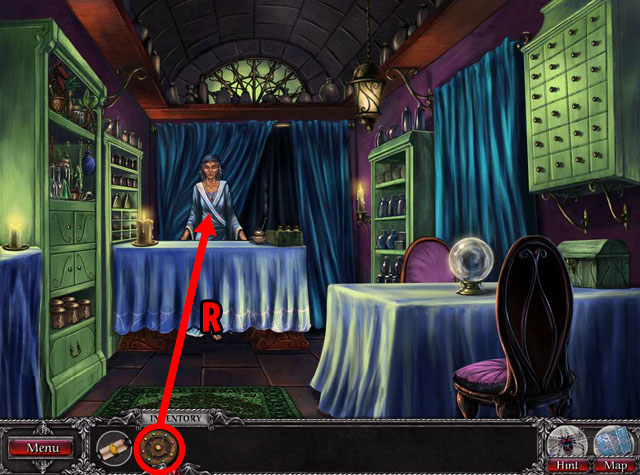
- Return to the Herbalist.
- Talk with her.
- Give the Amulet to her (R).
- Click on her again.
- Repeat the order of the colors that light up on the amulet by clicking on them after they finish animating.
- The first round will be 3 lights, the next 4 lights, then 5 and 6 lights.
- The lights can repeat later or also go twice in a row.
- See the screenshot for the 4 different patterns you must click.
- You will be transported back in time and will need to explore the areas again to be able to use your map.
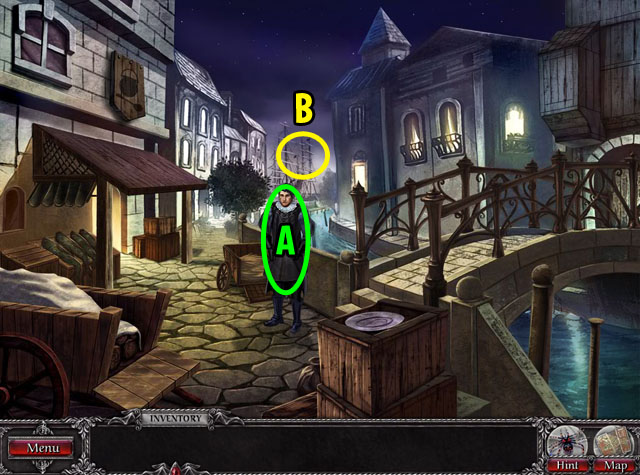
- Talk with the man (A) in the middle of the screen.
- Click on the ship behind him to visit the Dock (B).
- Click on the steps up to the ship to start the next mini-game.
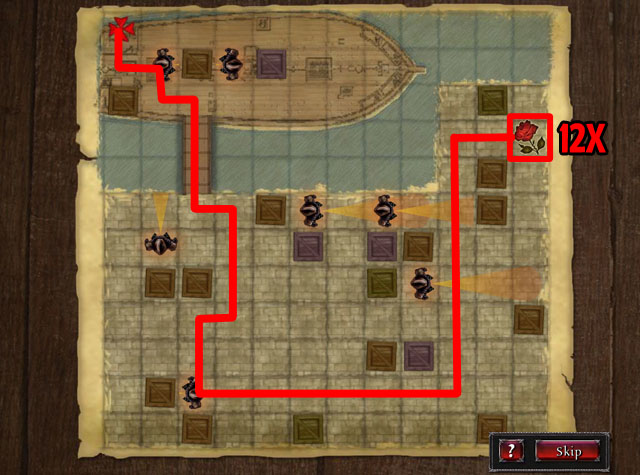
- Move the rose to the X goal without hitting guards or having their lights shined on you.
- You are the rose at the top right side of the screen.
- If you click in a box next to you, you will move forward.
- If you click on the rose, you will skip this turn and the guards will all move.
- Click on yourself if you get stuck with a guard about to turn your way next turn.
- To finish this puzzle, first click on the rose exactly 12 times. This will let the guards move ahead of you a little bit.
- Then follow the red line drawn in the screenshot to make it all the way to the end.
- The solution to this puzzle may be different in your play-through.
- After finishing the mini-game click on the steps with sparkles again.
- Play the Hidden Object Scene.
- You will receive the EMBLEM, ROPE, and STONE HAMMER.
- Click on the paper with sparkling in the right side highlighted in red.
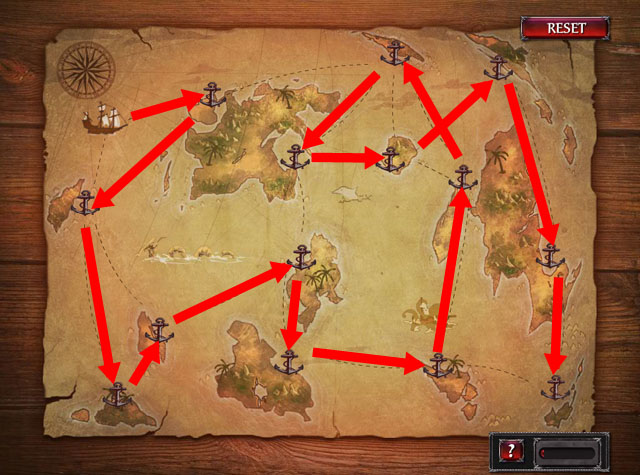
- Move the ship to all of the islands without going to any of the islands twice.
- Follow the path in the screenshot for the answer.
- You will receive a MESSAGE.
- Give the MESSAGE to the man outside the ship.
- You will receive the SLEEPING POTION RECIPE.
- Move to the Kitchen with the map.
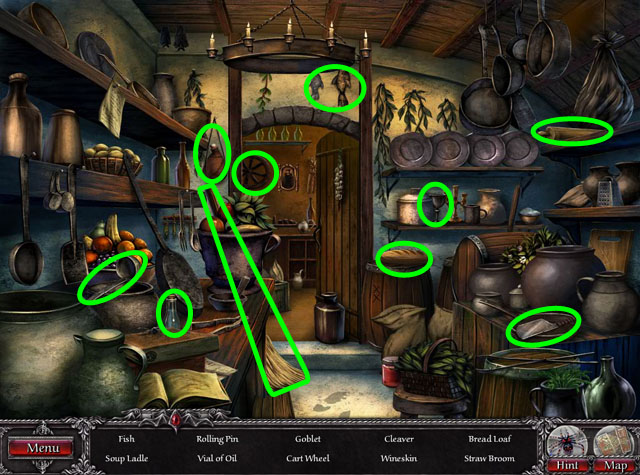
- Play the Hidden Object Scene.
- You will receive the VIAL OF OIL and SHARPENED CLEAVER.
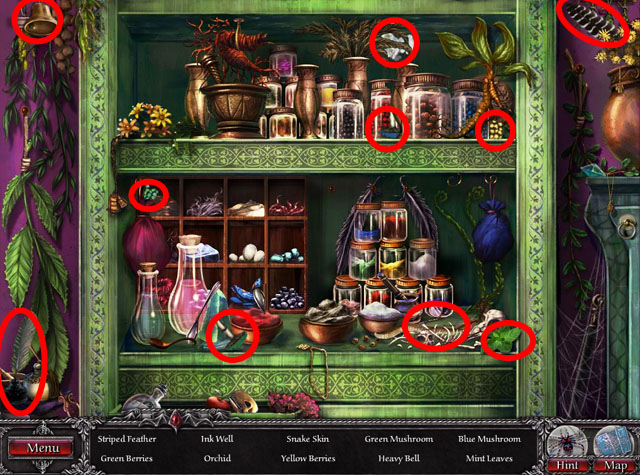
- Move to the Apothecary.
- Play the Hidden Object Scene.
- You will receive the BLUE FLOWER PETALS.
- Exit the room.
- Break the box with the STONE HAMMER (C).
- Collect the EMBLEM in the box.
- Return to the Courtyard.
- Fix the well with rope (D).
- Collect the emblem in the bucket.
- Talk with the witch, Orazia (E).
- Enter the Library (F).
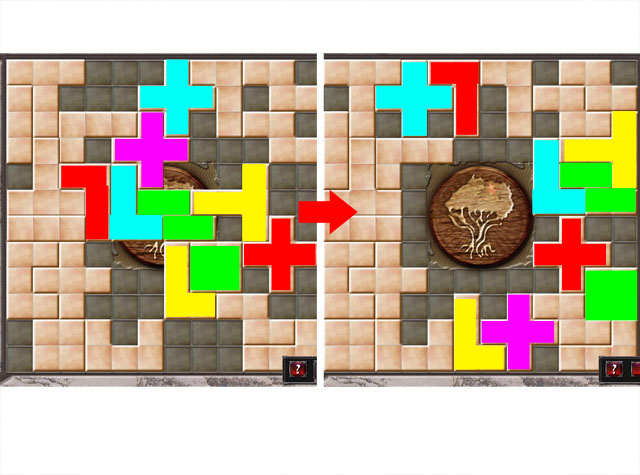
- Click on the broken tiles on the floor to start the next mini-game.
- Slide tiles until the emblem is uncovered.
- There are many possible answers; the screenshot shows one of them.
- Move the easy tiles first, like the square and the u-shape at the bottom.
- Use the S shapes to zigzag in and out of small spaces.
- The crosses are the hardest to get out of the way. You need to move one of the crosses from the top to the bottom.
- After completing the puzzle you will receive the EMBLEM.
- Return to the Museum.
- Place the JADE EMBLEM on the helmet (G).
- Place the CERAMIC EMBLEM on the vase (H).
- Place the WOODEN EMBLEM on the wooden totem pole (I).
- Cut the rope with the CLEAVER (J).
- The golden coffin will appear. Place the GOLD EMBLEM on the coffin (K).
- Exit the museum.

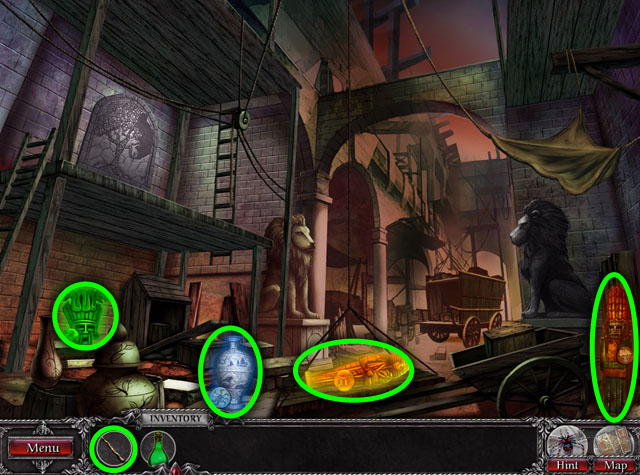
- Click on the witch's cart.
- Click on the wooden box with sparkles at the bottom of the screen before finding the hidden objects.
- In this puzzle you need to get the spider from the top left side of the box to the bottom right side.
- Rotate the tiles until they line up to make a white path for the spider to follow.
- Start from the spider's position and work towards the right side. If you are having trouble, work back from the end with the star as well.
- When you have finished the path like in the screenshot, the spider will follow the path to the end.
- You will receive the MAGIC WAND.
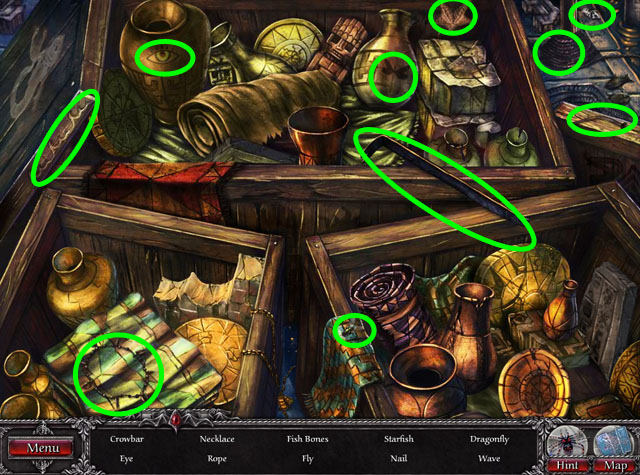
- Play the Hidden Object Scene.
- You will receive the CAT FUR.
- Click on the pot highlighted in green.
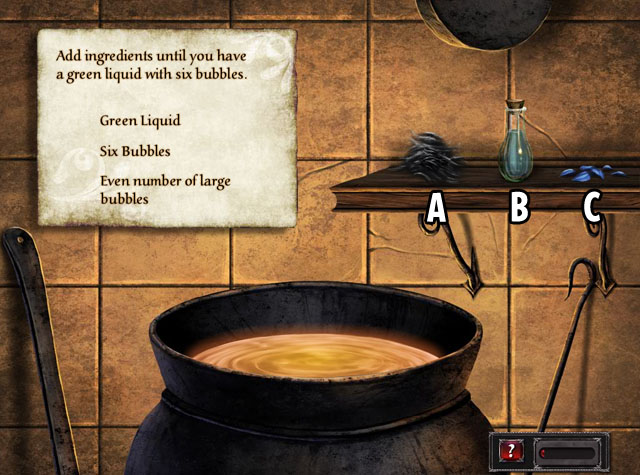
- This is another potion mixing mini-game.
- In this game you have a final state that you need to get to: green liquid, six bubbles, even number of large bubbles.
- The cat fur reduces the amount of bubbles.
- The oil makes the solution bluer and gives it more bubbles.
- The flower petals make the potion more yellow and reduce the number of bubbles while also increasing the size of the bubbles.
- To complete the potion with the least number of ingredients follow these instructions.
- Add OIL 4 times (B).
- Add the FLOWER PETALS 2 times (C).
- Add the CAT FUR 1 time (A).
- You will receive the SLEEPING DRAUGHT.
- Move to the Museum.
- Use the MAGIC WAND on 4 emblems.
- Return to the Dock.
- Give the POTION to the man (L).
- Click on the Coffin (M) to the right of the man to board the boat.
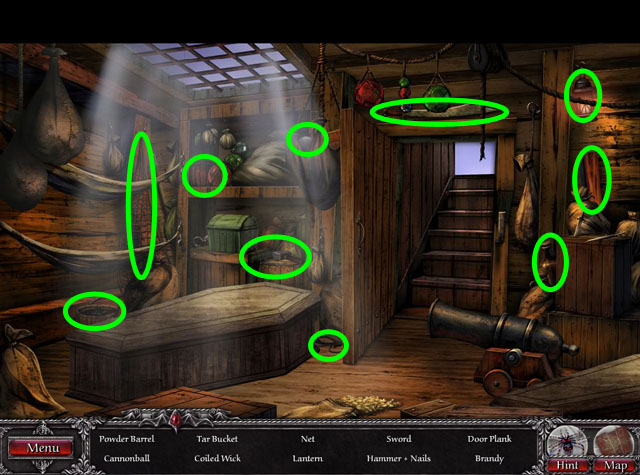
- Play the Hidden Object Scene to get weapons to stop the vampires.
- Click on the door to close it.
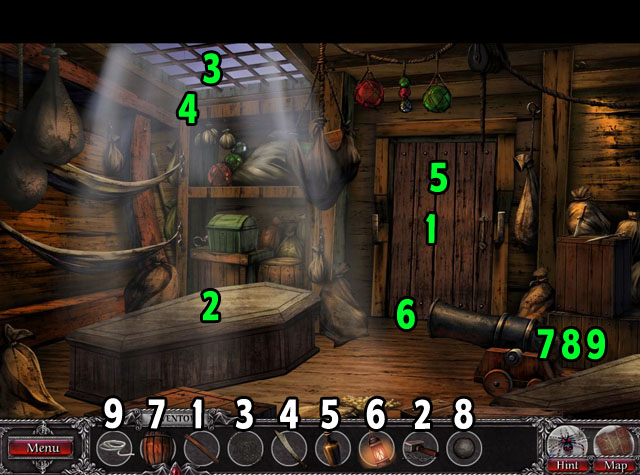
- Place the DOOR PLANK (1) on the door.
- Close the coffin with HAMMER AND NAILS (2).
- Put the Net (3) over the hand that comes through the grate.
- Fight the sword with your SWORD (4).
- Place the BRANDY (5) under the door.
- Use the fire from the LANTERN (6) on the brandy.
- Put the POWDER in the cannon (7).
- Set the CANNON BALL (8) into the cannon.
- Use the COILED WICK (9) to fire the cannon and sink the ship.
- You will be transported back to the present.
Chapter 4
- Return to the Dock.
- Click on the box with sparkles.
- Play the Hidden Object Scene.
- You will receive the CROWBAR.
- Return to the Museum.
- Click on the vases on the right side of the screen.
- Find 10 differences.
- You will receive the VASE RELIC.
- Click on the case to the left.
- Play the Hidden Object Scene.
- You will receive the TOTEM RELIC.
- Talk with Stratton.
- Return to the Hotel.
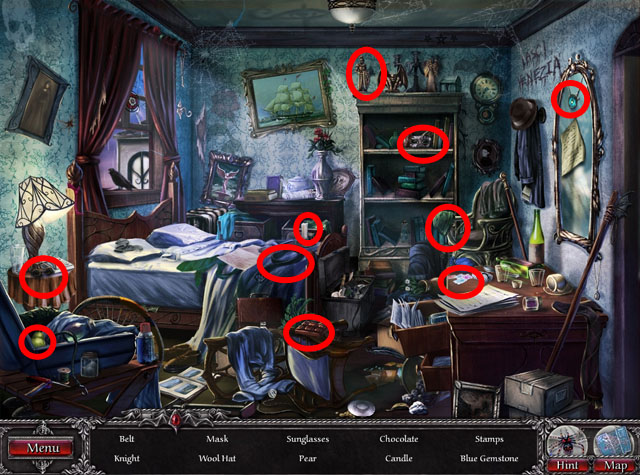
- Play the Hidden Object Scene.
- You will receive the NUMBER CODE and GEM.
- Return to the Museum.
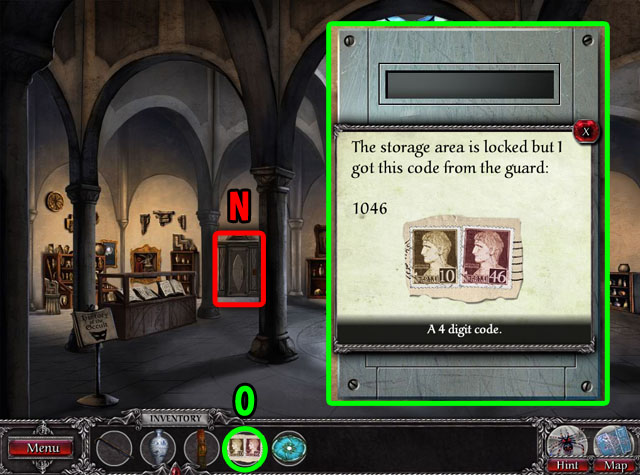
- Click on the door in the middle to zoom in (N).
- Click on the Number Code (O) supplied by the STAMPS you found.
- Enter "1046" and the STAMPS will disappear from your inventory.
- Enter the door.
- Play the Hidden Object Scene.
- You will receive the JADE MASK.
- Open the coffin highlighted in green with the CROWBAR.
- Collect the COFFIN RELIC.
- Return to the Library.
- Enter the room with the desk on the right side.
- Place the Gem into the missing spot (Q) in the bookcase.
- Click on the bookcase and finish a Hidden Object Scene.
- You will receive a BOOK.
- Return to the Courtyard.
- Talk with Stratton.
- Return to the Museum.
- Talk with Orazia.
- You will receive the ELIXIR OF RESTORATION RECIPE.
- Return to the Herbalist.
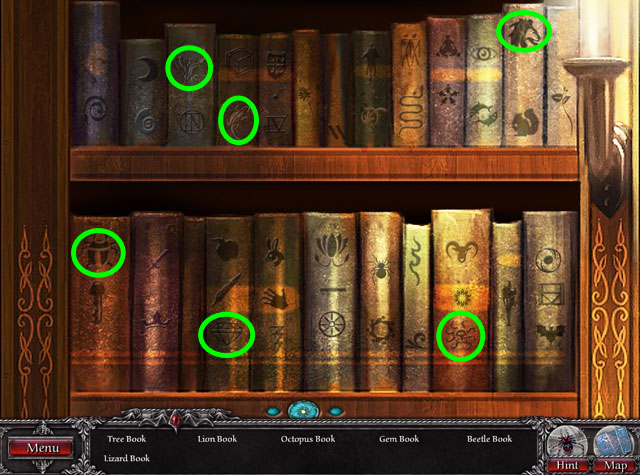
- Click on the shelf to the left with the sparkles.
- Play the Hidden Object Scene.
- You will receive the HEAVY BELL.
- Click on the drawer on the right side.
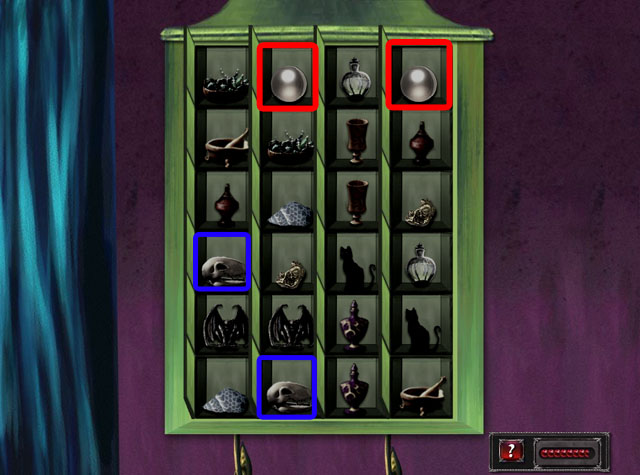
- Find the matching pairs by clicking two boxes at a time.
- If the boxes match, they will stay open. If they do not match, they will close and you will have to try again.
- See the screenshot for two examples of a matched pair.
- The answer to this puzzle is randomized.
- You will receive the PEARLS, SHELLS, and GOLD after finishing it.
- Enter the next room through the curtain to the right.
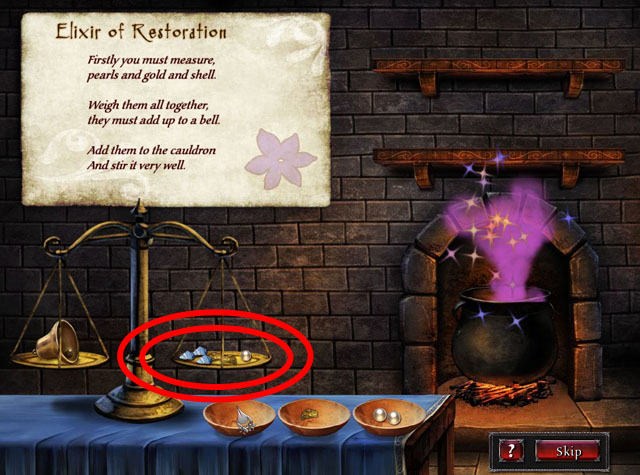
- The object of this mini-game is to get the right ingredients that match the weight of the heavy bell.
- The shells are the lightest, the gold the second heaviest, and the pearls the heaviest.
- Start by putting a pearl on the scale. Check to make sure that two pearls are too heavy.
- Next, place a few gold pieces on the scale, making sure not to go over.
- Lastly, place the shells on until the scale matches up.
- The solution to this puzzle may be different in your play-through.
- One possible solution is 1 pearl, 2 gold, and 3 shells.
- After finishing you will receive the ELIXIR OF RESTORATION.
- Return to the Museum.
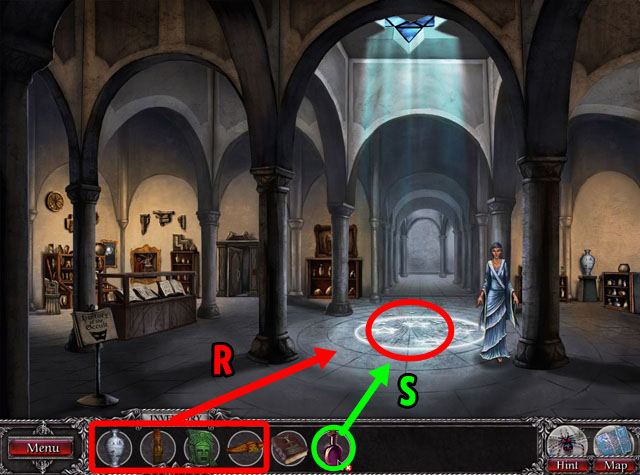
- Talk with Orazia.
- Set four RELICS on the circle on the floor (R).
- Use the POTION (S) on the relics.
- You will receive the FOUNTAIN EMBLEMS.
- Return to the Dock and click on the ship to enter it.
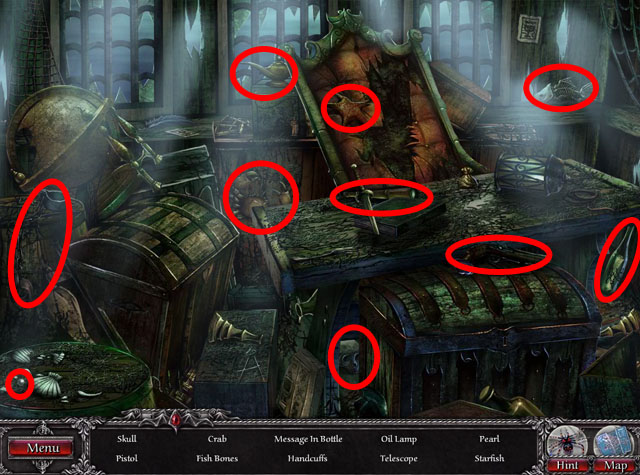
- Play the Hidden Object Scene.
- You will receive the EMPTY BOTTLE.
- Return to the Museum.
- Talk with Orazia.
- You will receive the TICKET.
- Return to the Canal.
- Give the TICKET to the man in the middle.
- After this point do not return to the main land via the map. You will be unable to finish the game if you do!
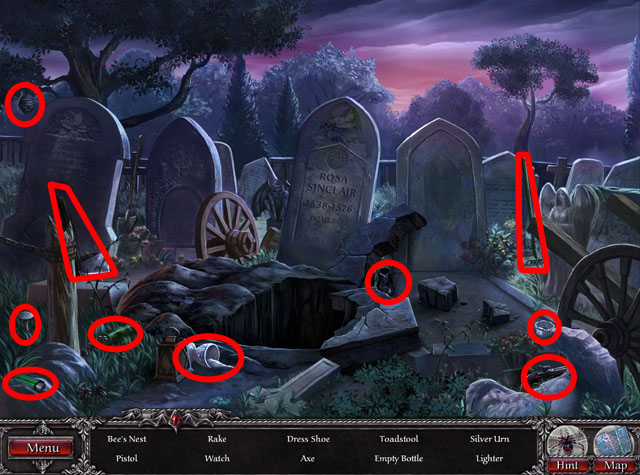
- Click on graves on the left side.
- Play the Hidden Object Scene.
- You will receive the LIGHTER.
- Click on the church in the middle.
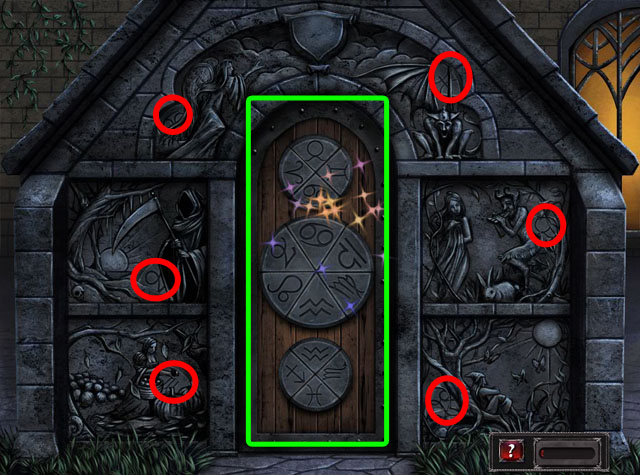
- Find missing pieces.
- Click dials to arrange symbols so that the symbols on the bottom of the top dials match the symbols below them.
- There is only one order that works, so look for symbols that are both on neighboring dials.
- See the screenshot for the solution.
- Enter the church.
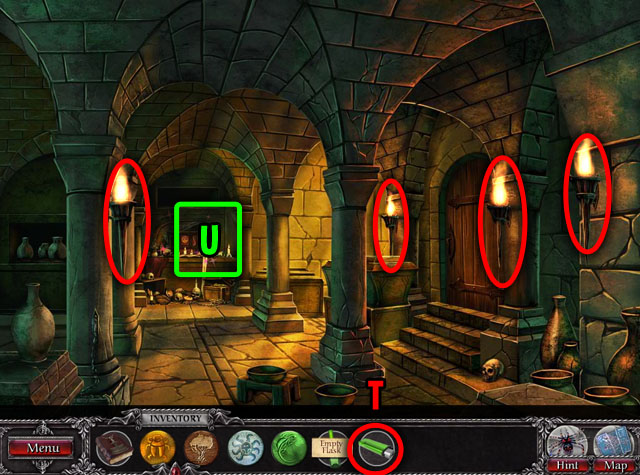
- Light up four torches with the LIGHTER (T). Once all of them are lit, the room will be available to you.
- Click on the shelf (U) to zoom in.
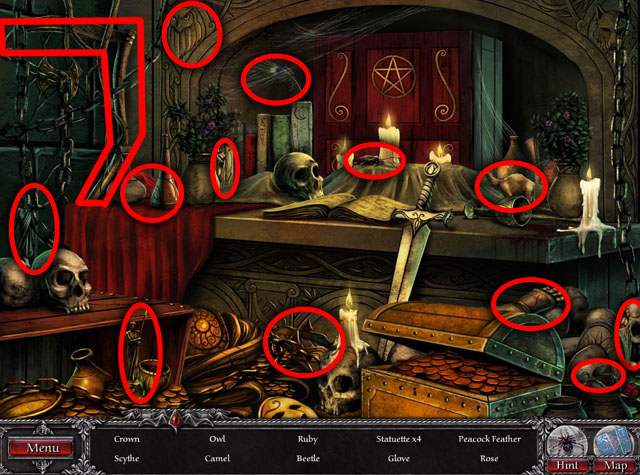
- Play the Hidden Object Scene.
- You will receive the LARGE RUBY and the METAL CHALICE.
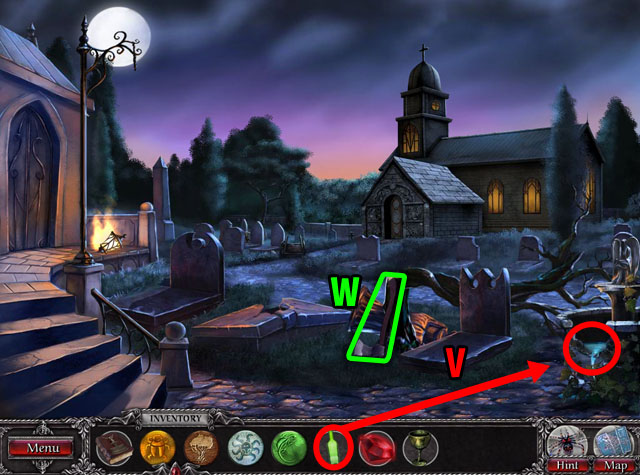
- Click the empty flask, and use it on the fountain to fill up the water (V).
- Collect the AXE (W) to the left of the grave.
- Return to the church.
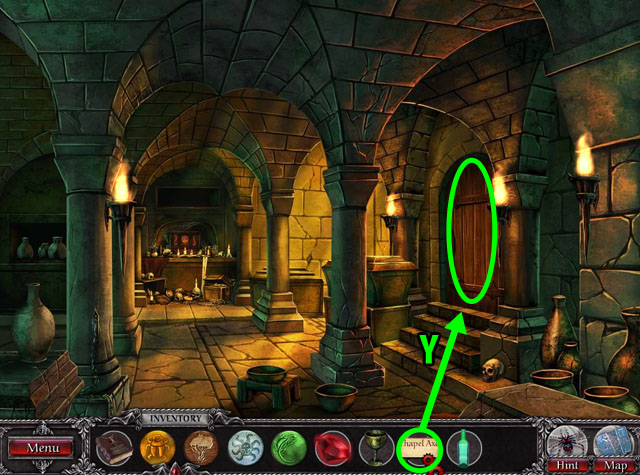
- Break the door with the AXE (Y).
- Enter the next room through the broken door.
- Talk with Ruby's brother.
- Use the BOTTLE with holy water (A) on her.
- Collect the WOODEN STAKE (B).
- Use the WOODEN STAKE on the Vampire.
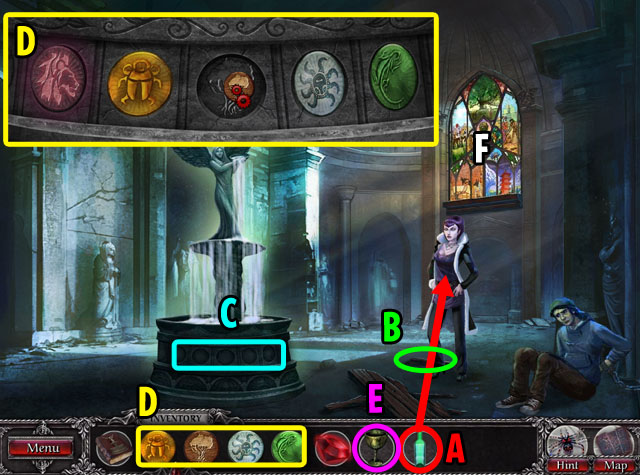
- Click on the fountain (C).
- Place four EMBLEMS (D) at the base of the fountain in the matching spaces.
- Drag the CHALICE to the fountain (E).
- Give the CHALICE WITH WATER to your brother at the right of the screen.
- Click on the window (F).
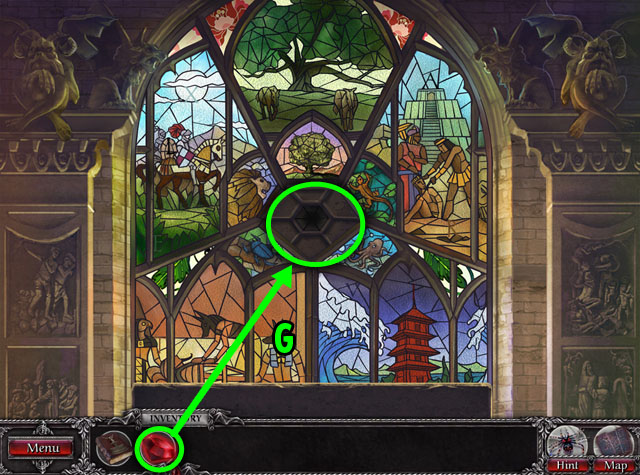
- Place the RUBY in the middle.
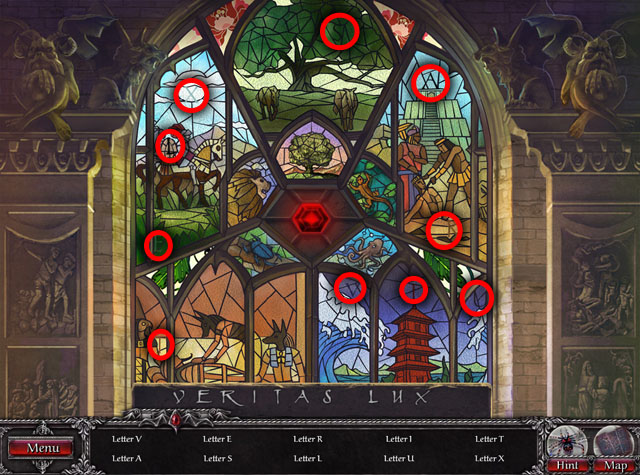
- Play the Hidden Object Scene that appears after inserting the ruby.
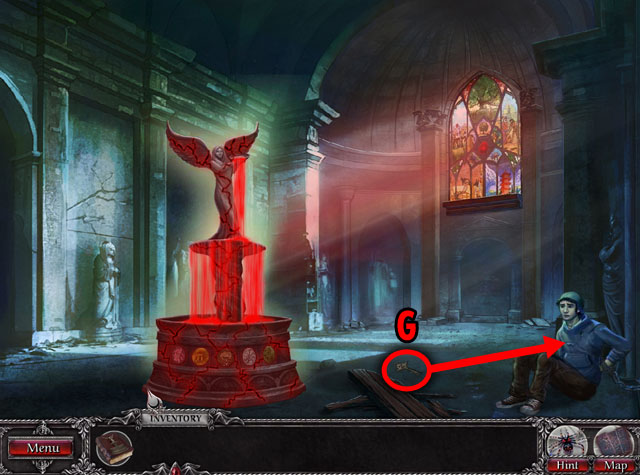
- Collect the KEY (G).
- Use the key to open your brother's handcuffs.
- Congratulations! You've Completed Blood and Ruby!