

Walkthrough Menu
- General Tips
- Chapter 1: Chestnut Street
- Chapter 2: Liberty Street
- Chapter 3: Rue d' Auseil
- Chapter 4: Mississippi Riverside
- Chapter 5: Mardi Gras Stage
- Chapter 6: The Zeppelin
- Chapter 7: Magnolia Square
General Tips
- This is the official guide for Cadenza: Music, Betrayal, and Death.
- This guide will not mention each time you have to zoom into a location; the screenshots will identify each location.
- Hidden-object puzzles are referred to as HOPs in this guide. Items listed in red are hidden or they require additional actions. Interactive items in HOPs are color-coded.
- Mini-games and HOPs are sometimes randomized; your solution may vary.
Chapter 1: Chestnut Street
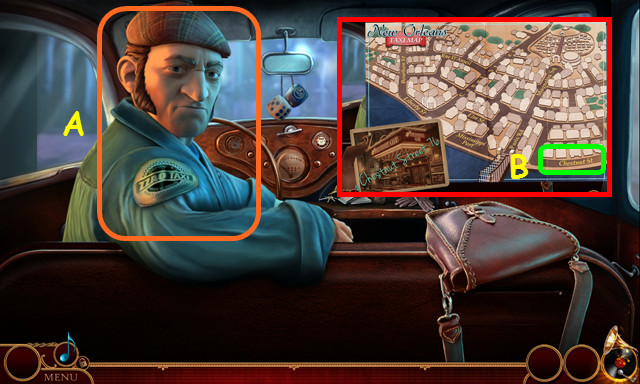
- Talk to the driver (A).
- Select Chestnut Street on the map (B).
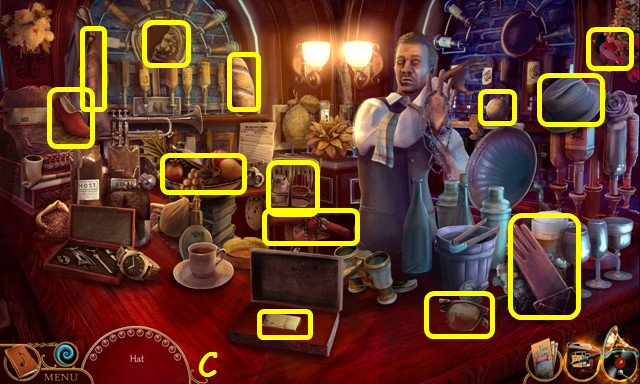
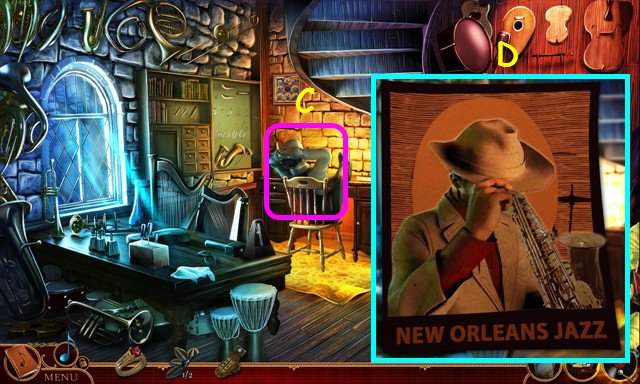
- Take the PURSE (C).
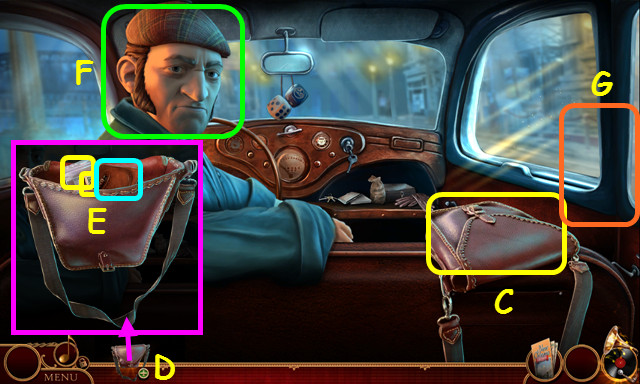
- Select and open the PURSE (D).
- Take the JOURNAL, MONEY, and PAIN MEDICINE (E).
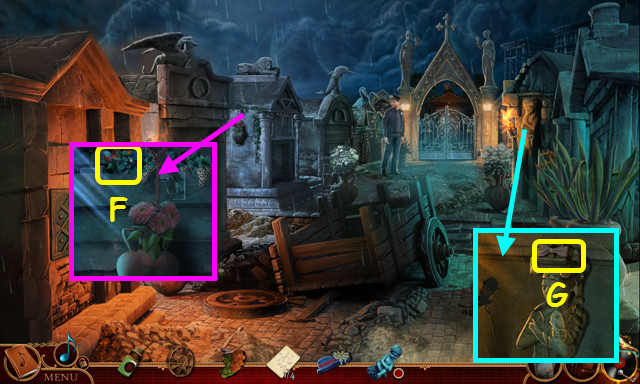
- Give the MONEY to the driver (F).
- Exit the taxi (G).
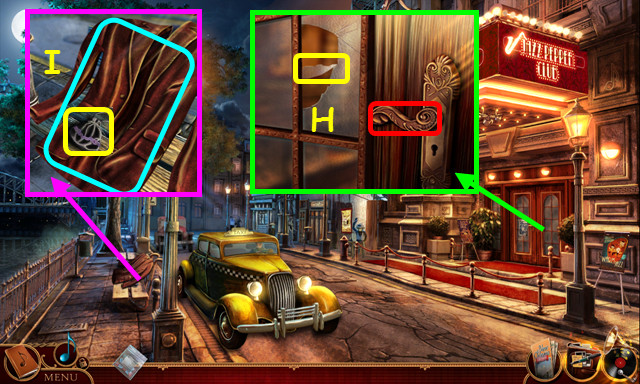
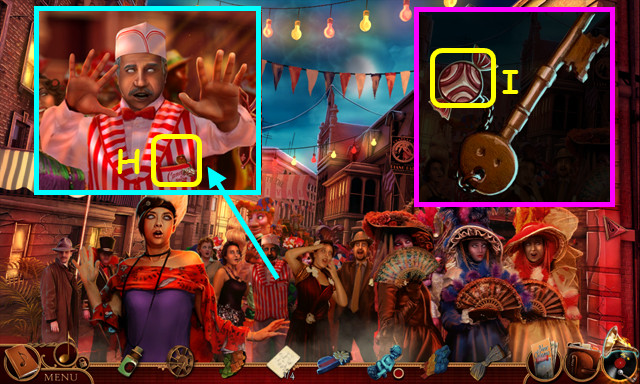
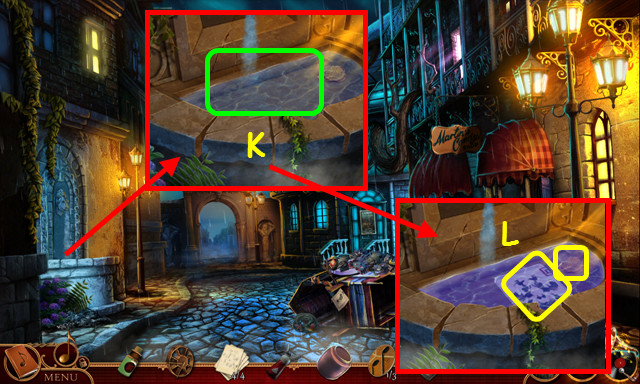
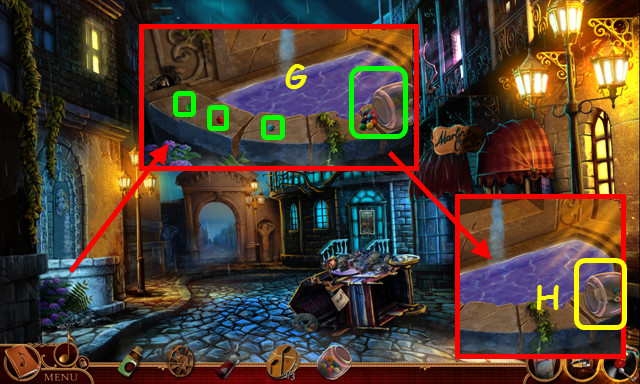
- Try the handle. After the poster falls, take the GLASS SHARD (H).
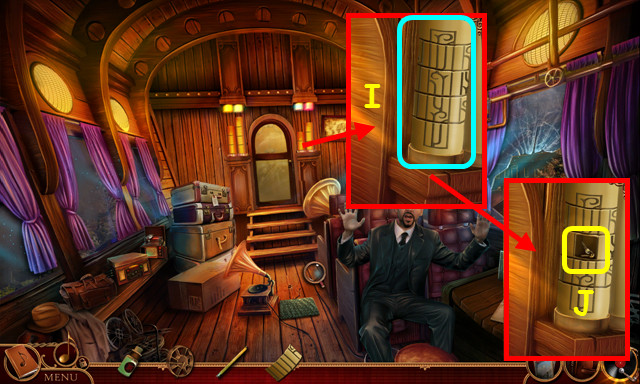
- Move the jacket; use the GLASS SHARD on the purse; take the COIN (I).
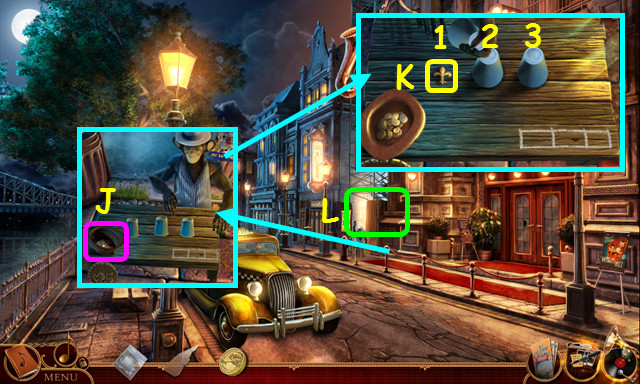
- Place the COIN in the hat (J).
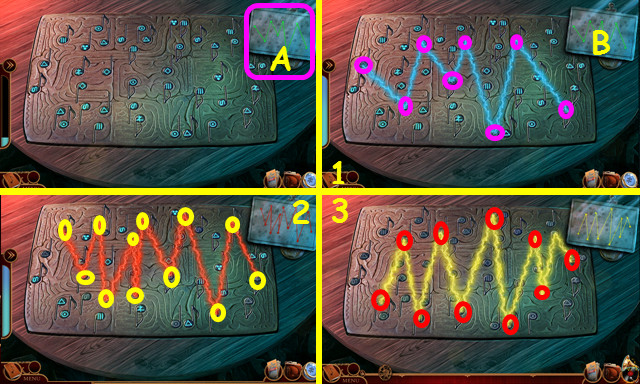
- Watch the cups and select where the Fleur-de-lis ends up 3 times.
- Solution: 1, 2, and 3.
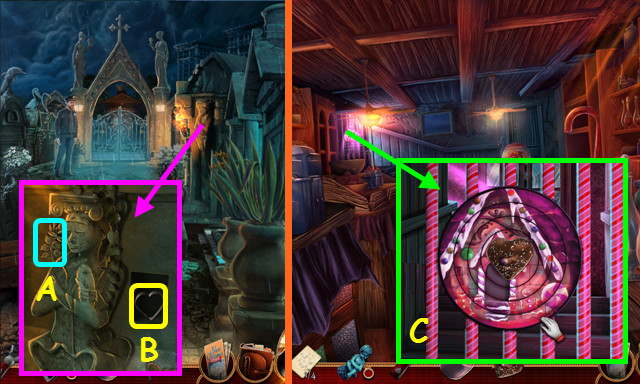
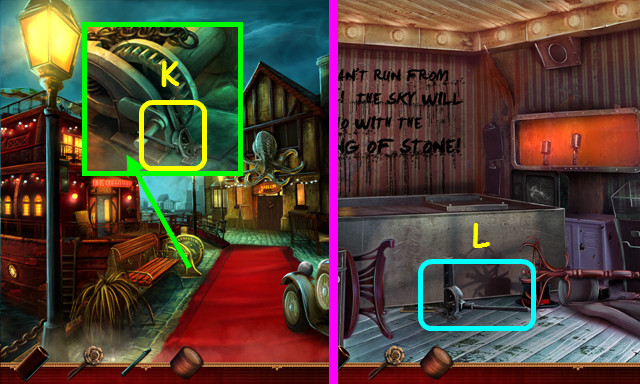
- Take the FLEUR-DE-LIS MEDALLION (K).
- Enter the Alley (L).
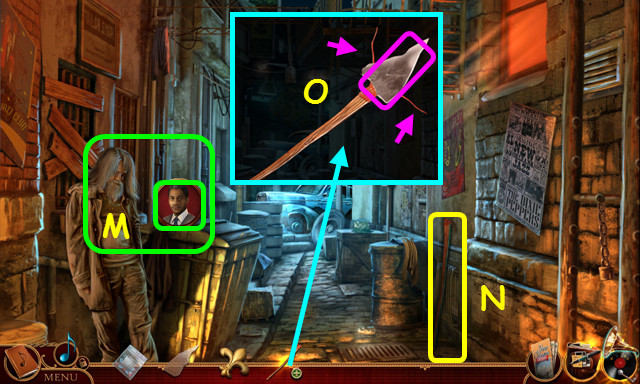
- Talk to the man; select topics, as they appear (M).
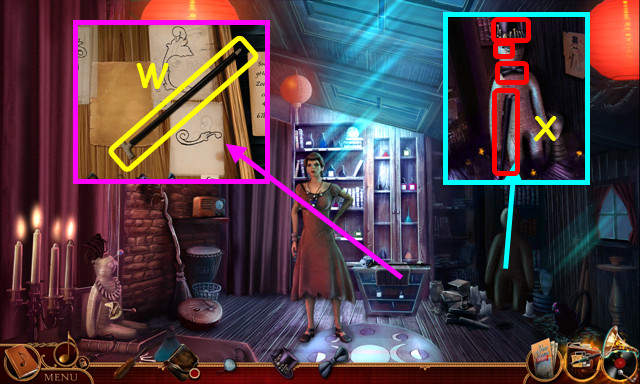
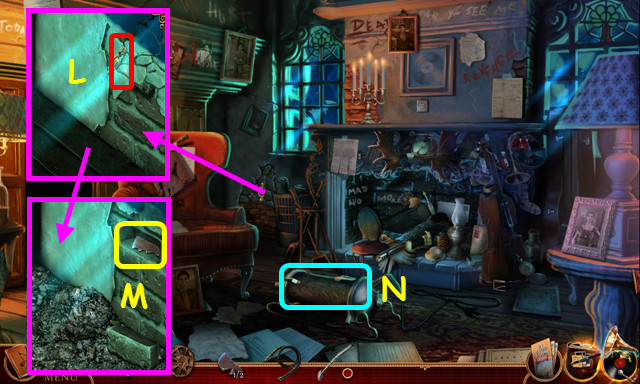
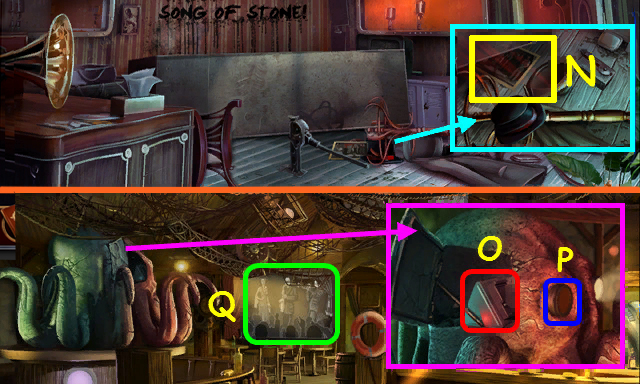
- Take the LONG STICK (N).
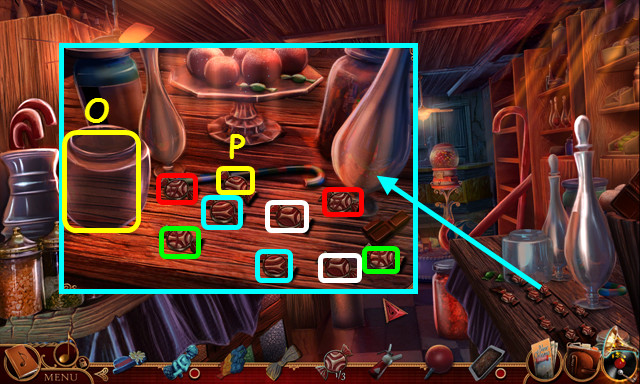
- Look at the LONG STICK; place the GLASS SHARD on the end and tie the 2 red strings to make the IMPROVISED SPEAR (O).
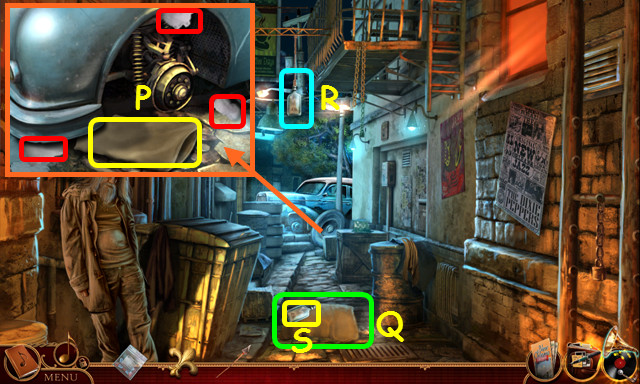
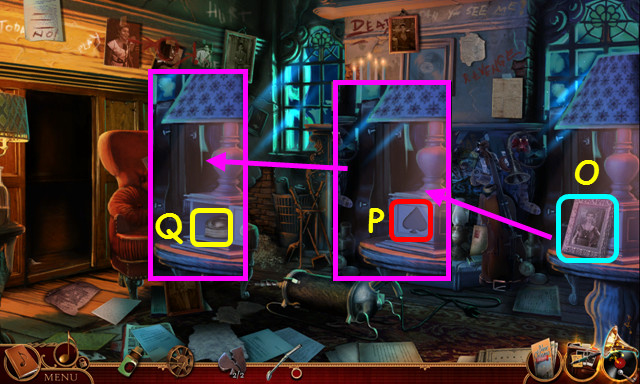
- Select the 3 pieces of stuffing (red); take the PILLOW (P).
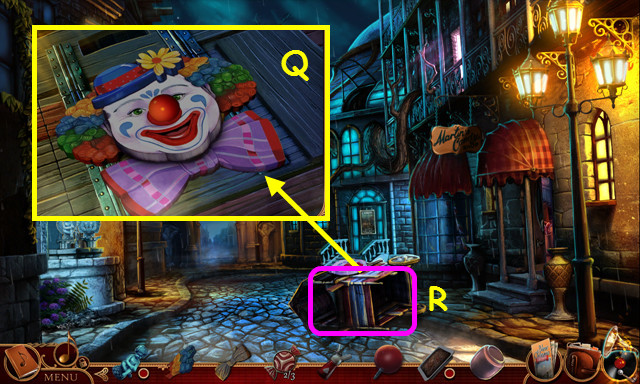
- Place the PILLOW on the ground (Q).
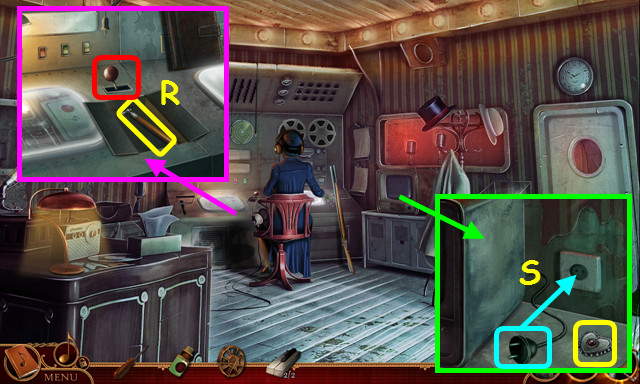
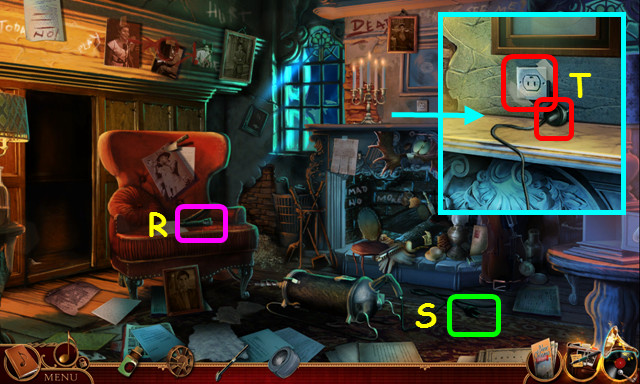
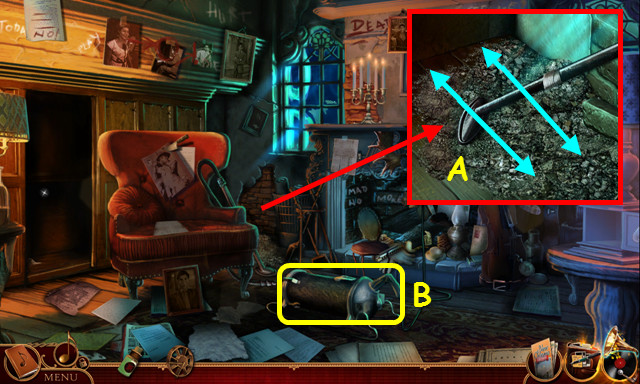
- Use the IMPROVISED SPEAR on the bottle (R).
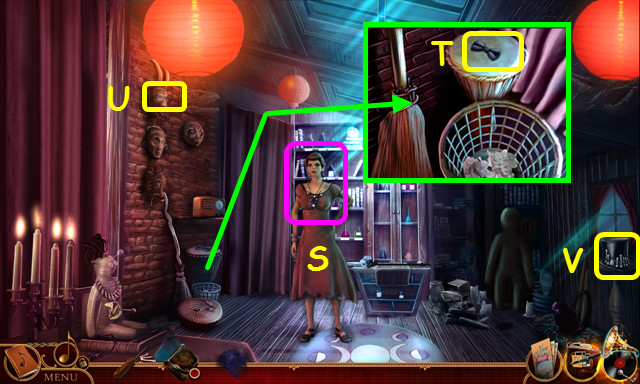
- Take the EMPTY BOTTLE (S).
- Walk down.
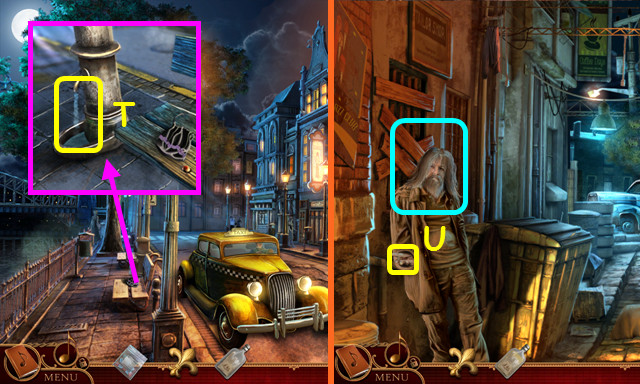
- Use the EMPTY BOTTLE on the fountain to get the BOTTLE OF WATER (T).
- Combine the BOTTLE OF WATER and the PAIN MEDICINE to make the HEADACHE TONIC.
- Return to the Alley.
- Give the HEADACHE TONIC to the man; take the OLD KEY (U).
- Walk down.
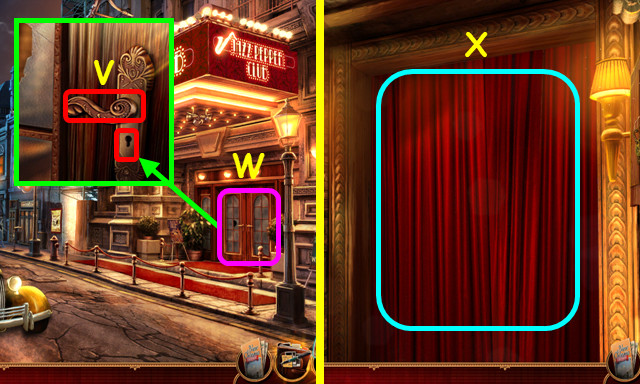
- Use the OLD KEY in the lock and open the door (V).
- Walk to the Club Entrance (W).
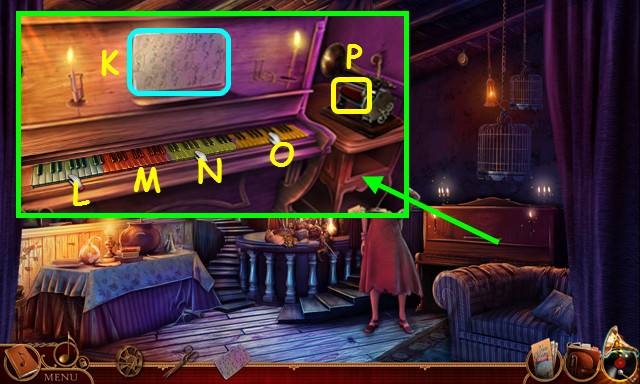
- Open the curtains and walk forward to the Jazz Pepper Club (X).

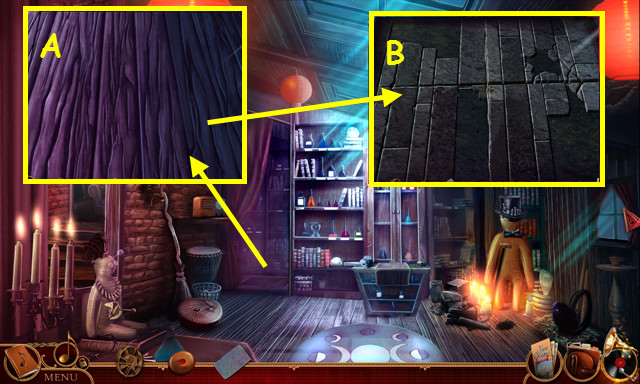
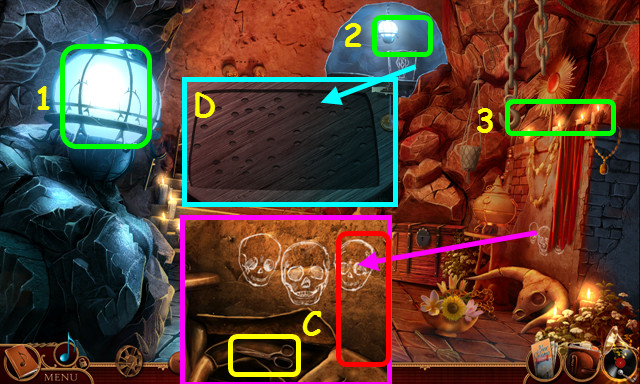
- Take the 1/2 METAL NOTES (A).
- Select the bar (B).
- Play the HOP to earn the LIGHTER (C).
- Open the LIGHTER and select it to make the LIT LIGHTER.
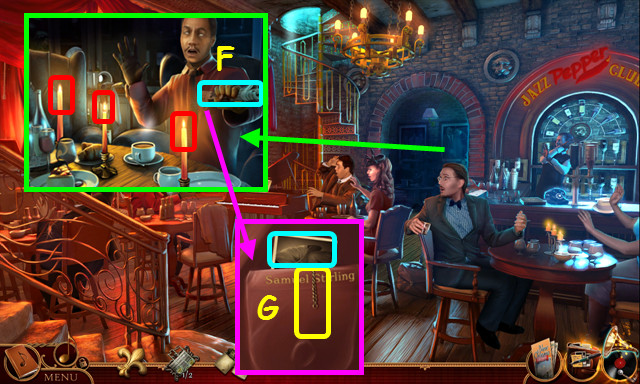
- Use the LIT LIGHTER on the 3 candles (red).
- Read the note and paper (F).
- Look at the photo; pull the chain and take DADDY'S RING (G).
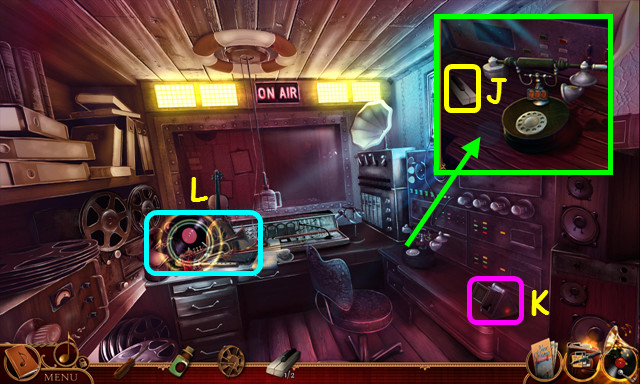
- Walk down.
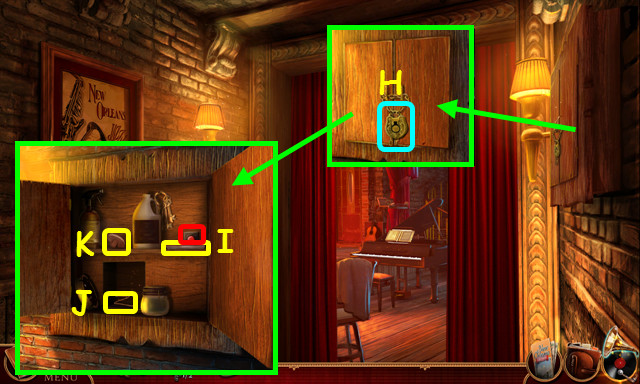
- Use DADDY'S RING on the lock; open the cabinet doors (H).
- Take the POCKET KNIFE and press the red button (I).
- Take the WIRE (J).
- Move the bottles; take the BROKEN HANDLE (K).
- Look at the POCKET KNIFE; press the button to open it.
- Look at the WIRE; bend it twice to make the WIRE HOOK.
- Walk forward.
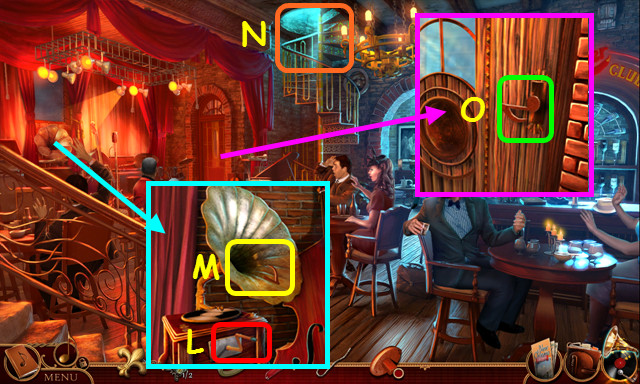
- Turn the handle (L).
- Use the WIRE HOOK on the opening; take the HANDLE PART (M).
- Look at the BROKEN HANDLE; add the HANDLE PART to it to make the NOTE HANDLE.
- Note the stairs to Daddy's Office (N).
- Use the NOTE HANDLE to open the door; enter the Backstage (O).
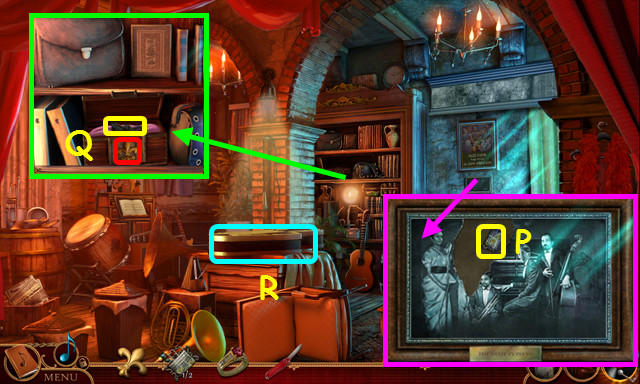
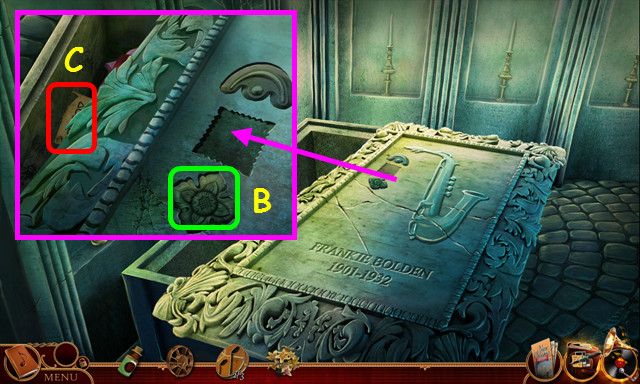
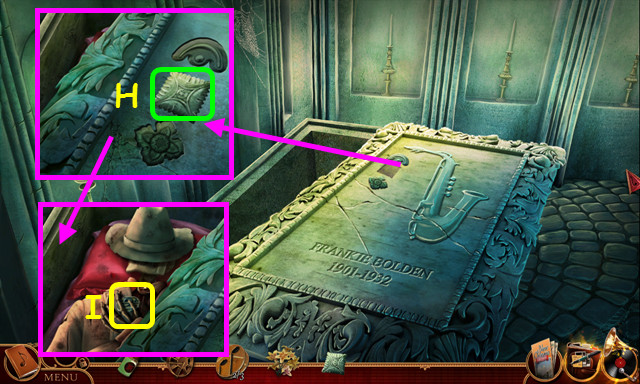
- Open the curtain, touch the photo 6 times, remove the photo piece, and take the 2/2 METAL NOTES (P).
- Place the FLEUR-DE-LIS MEDALLION in the lock, open the box and take the 1/2 ORNAMENT PIECE (Q).
- Select the box again to reveal the aquarium mini-game.
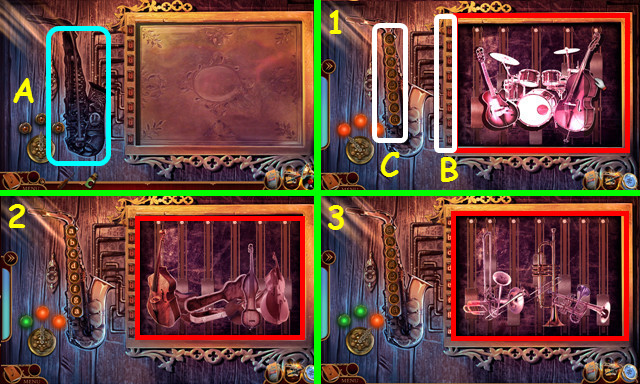
- Select the saxophone case (R).
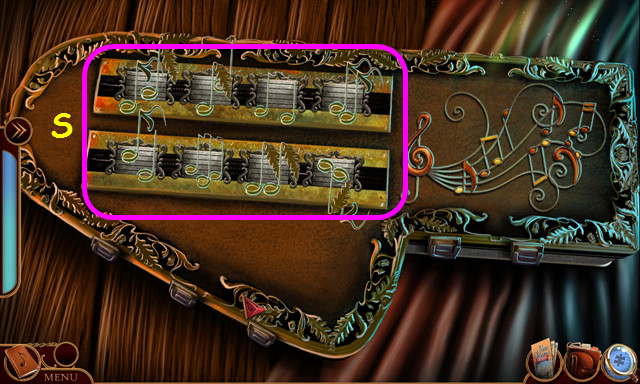
- Place the 2 METAL NOTES in the openings.
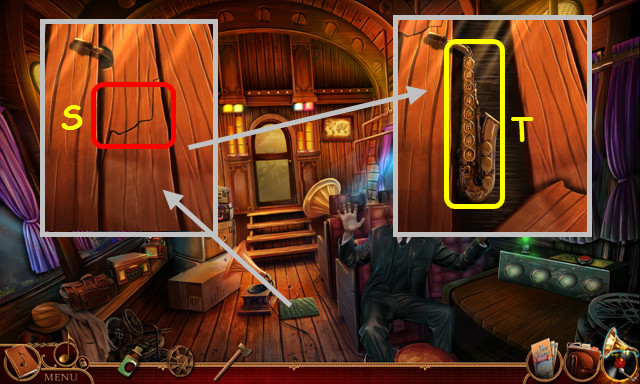
- Swap the pieces to complete all the notes (S).
- Take the SAXOPHONE CASE.
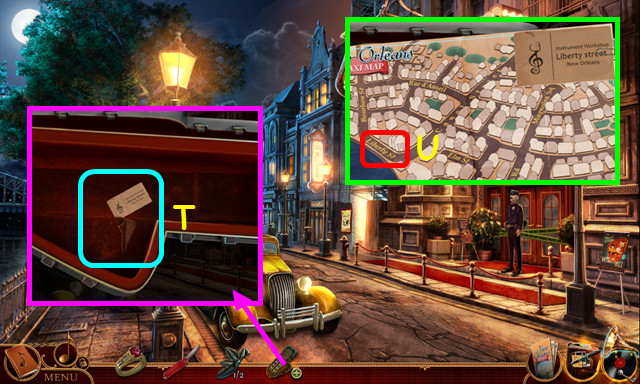
- Open the SAXOPHONE CASE; look at the clipping and photo.
- Use the POCKET KNIFE on the case; take the business card (T).
- Select Liberty Street on the map (U).
Chapter 2: Liberty Street
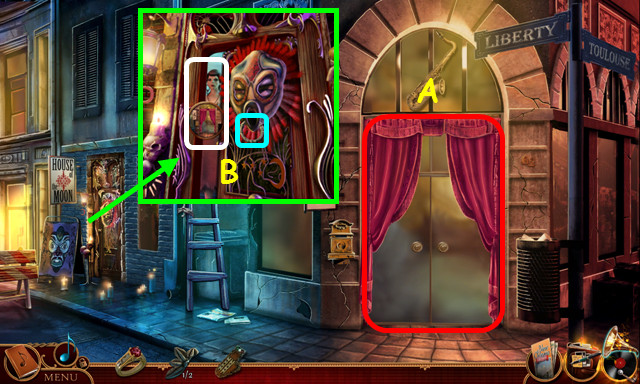
- Walk to the right.
- Try the doors (A).
- Use the doorknocker and ask about the doors (B).
- Select the doors in order: left, left, right, left, and right.
- Enter the Instrument Workshop.
- Talk to Curly; give him the SAXOPHONE CASE (C).
- Restore the poster (D).
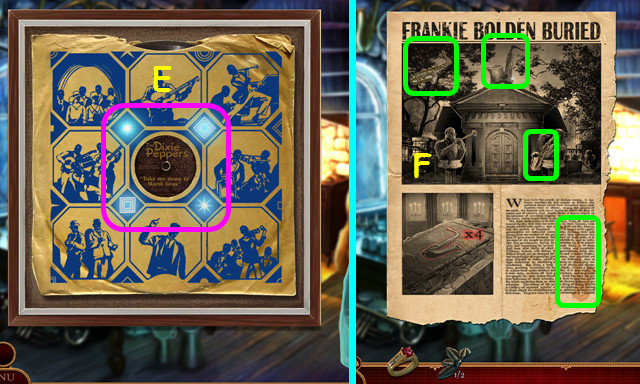
- Select the scenes to restore the symbols (E).
- Locate the 4 saxophones (F).
- Curly tells you the serial number SA001DP.
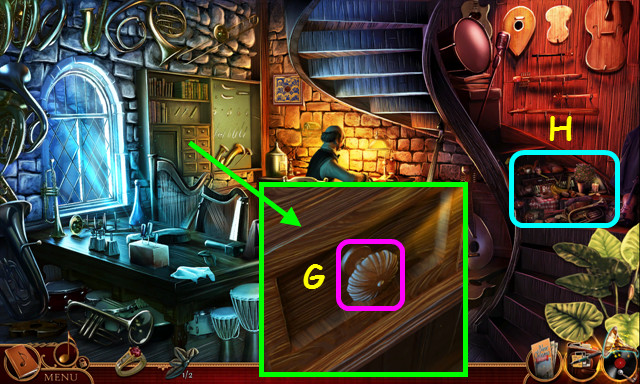
- Try to open the drawer (G).
- Select the stairs (H).
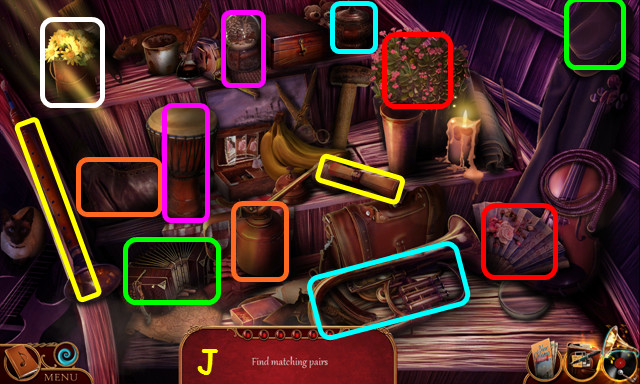
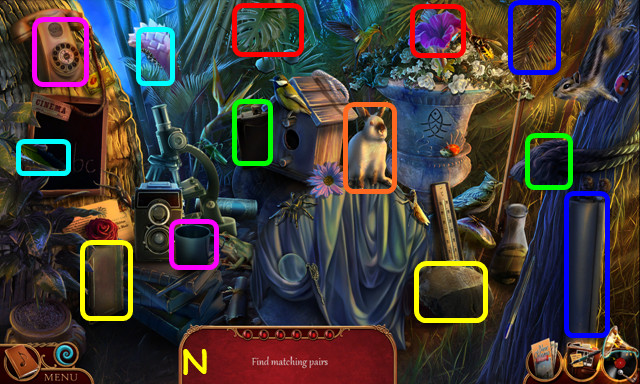
- Play the HOP to earn the PLIERS (J).
- Move items to find the matching pairs (color-coded).
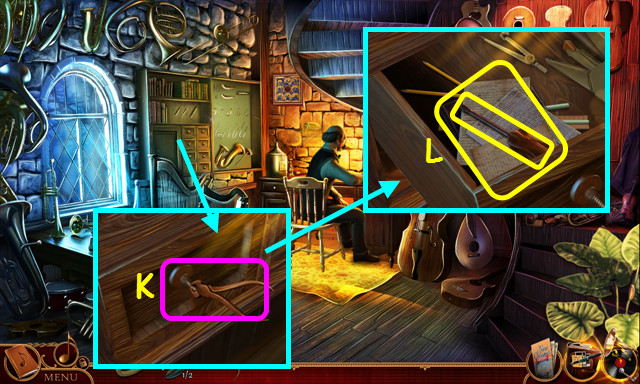
- Use the PLIERS to open the drawer (K).
- Take the SCREWDRIVER, move the papers, and take the RECORD BOOK (L).
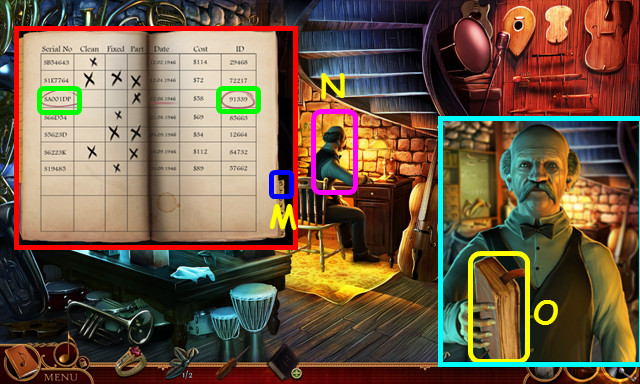
- Open the RECORD BOOK and select the 'S' tab (M).
- Turn the pages and then select SA001DP and the final entry in the row (green).
- Give the RECORD BOOK to Curly (N).
- Take the book (O).
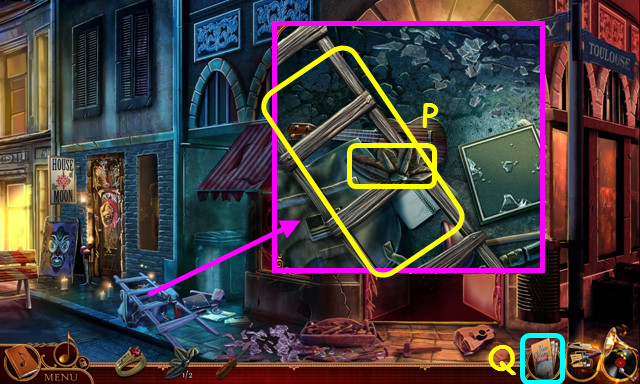
- Take the 2/2 ORNAMENT PIECE and LADDER (P).
- Select the map; return to the Alley (Q).
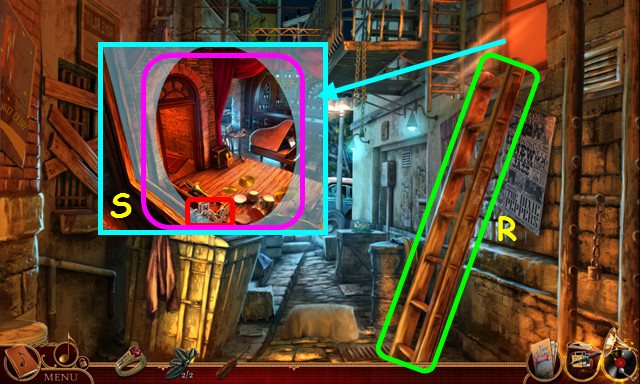
- Place the LADDER under the window (R).
- Use DADDY'S RING on the glass; open the latch (S).
- Enter the window and walk down.
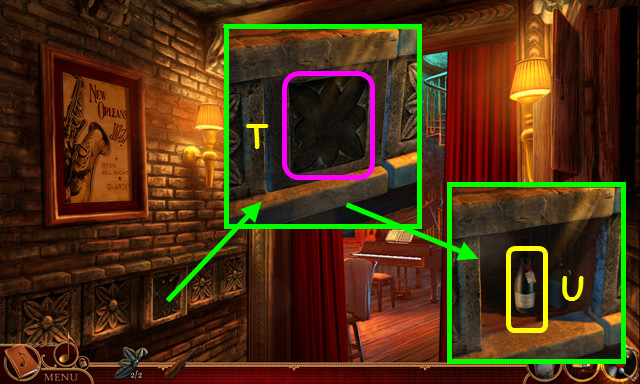
- Place the 2 ORNAMENT PIECES in the tile (T).
- Push the tile; take the WINE (U).
- Look at the WINE; read the tag to see the date July 15, 1931.
- Walk forward and go up the stairs.
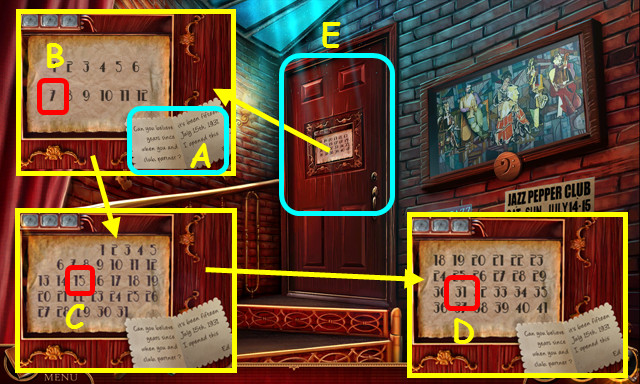
- Based on the date from the card (A), select the 7 (B), the 15 (C), and the 31(D).
- Enter Daddy's Office (E).
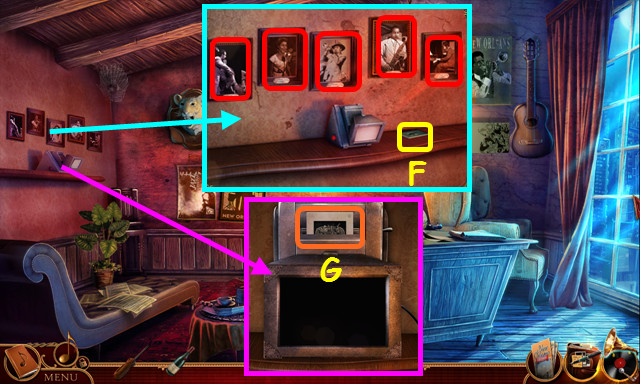
- Look at each of the photos (red).
- Select the slide (F).
- Select the projector and push the slide (G).
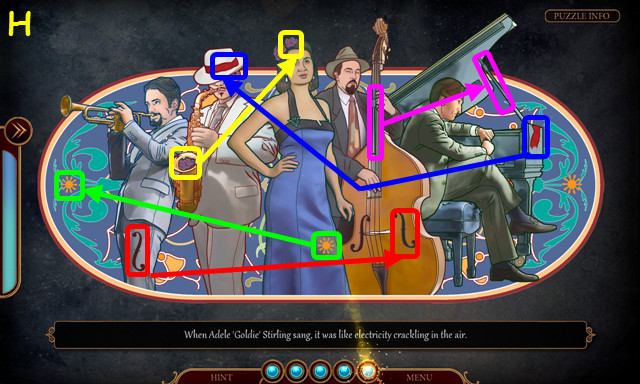

- Move the misplaced pieces to the correct locations (color-coded) (H-I).
- Take the 1/2 TIGER EYE that comes out of the projector.
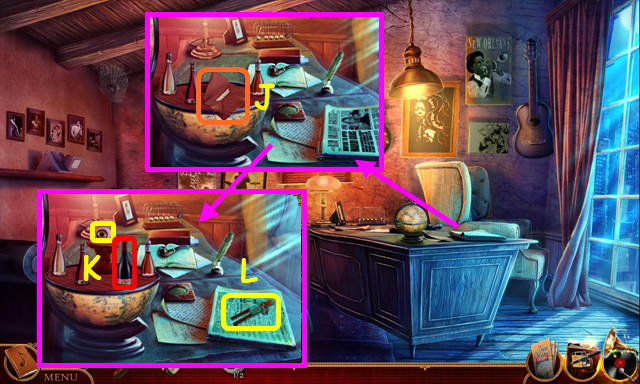
- Open the globe; read the note (J).
- Place the WINE in the globe; take the 2/2 TIGER EYE (K).
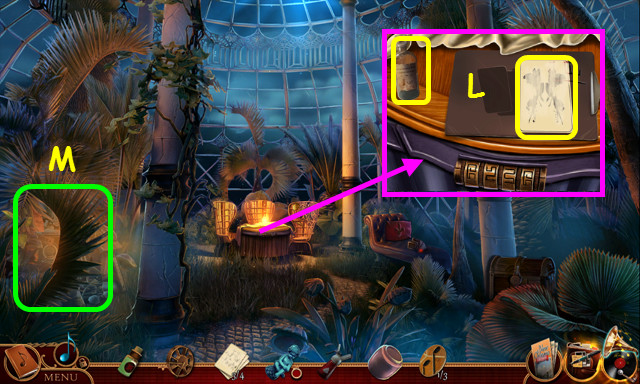
- Read the paper; take the MUSIC FIGURINE (L).
- Travel to the Backstage.
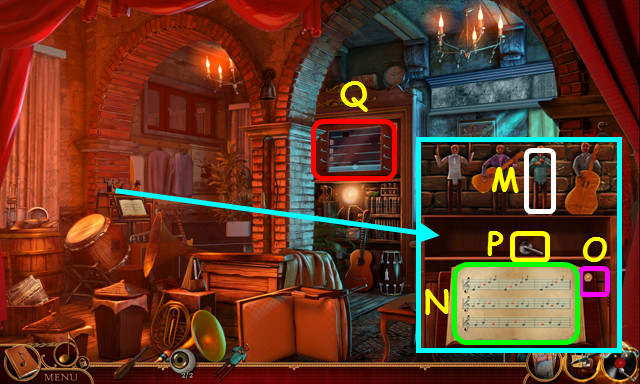
- Place the MUSIC FIGURINE on the shelf (M).
- Swap the notes as shown (N).
- Press the button (O).
- Take the AQUARIUM HANDLE (P).
- Select the aquarium (Q).
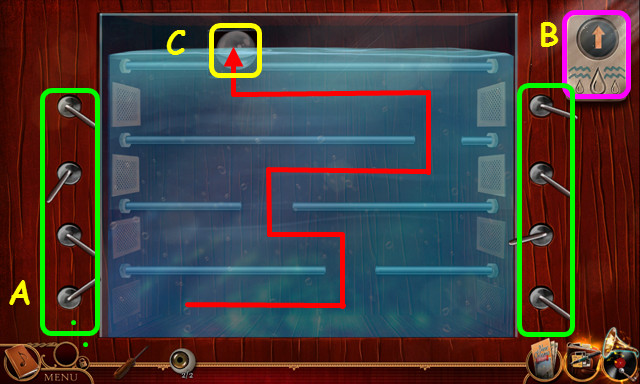
- Place the AQUARIUM HANDLE (A).
- Use the handles to move the glass ball to the opening (green), then push the button (B).
- Repeat the process to move the glass ball to the opening (C).
- Take the GLASS BALL.
- Open the GLASS BALL and take the GOLD CLEF.
- Walk down and go up the stairs.
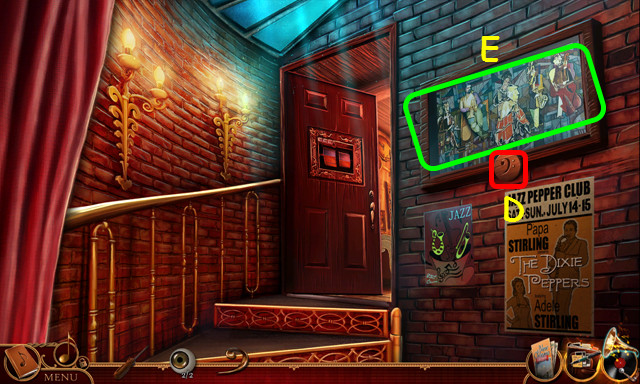
- Place the GOLD CLEF in the frame (D).
- Select the painting (E).
- Play the HOP to earn the DRAWER HANDLE (F).
- Walk forward.
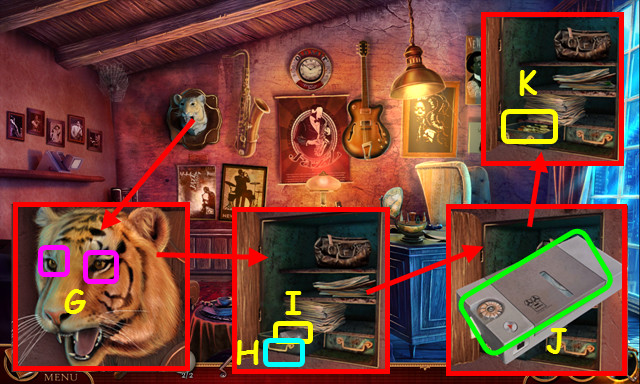
- Place the 2 TIGER EYES in the tiger's head (G).
- Move the tiger head and place the DRAWER HANDLE (H).
- Open the drawer; take the recorder (I) and select it (J).
- Take the PROTECTION AMULET (K).
- Travel to Liberty Street.
Chapter 3: Rue d' Auseil
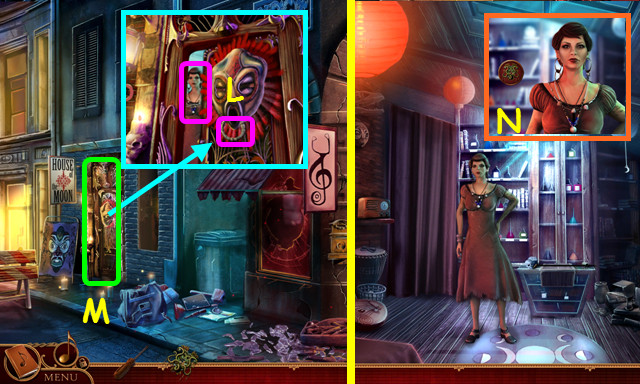
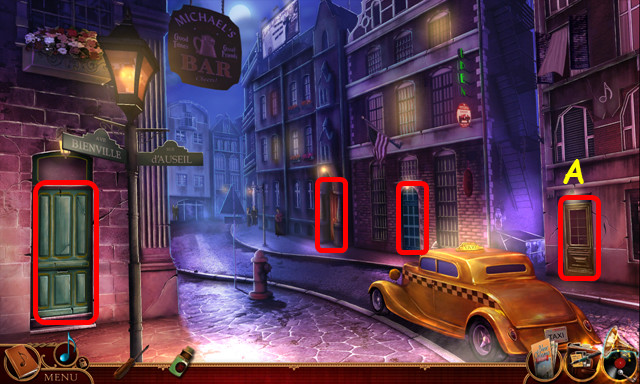
- Select the doorknocker; give the woman the PROTECTION AMULET (L).
- Enter the House of the Moon (M).
- Talk to Luna thoroughly (N).
- Return to the Instrument Workshop.
- Talk to Curly (Q).
- Take the BURNT BOOK and ASHES (R).
- Look at the BURNT BOOK to see the damage.
- Return to the House of the Moon.
- Give the ASHES to Luna, and talk to her (S).
- Take the BOW TIE (T), GLASSES (U), and TOP HAT (V).
- Take the CANE and note the amulet mini-game (W).
- Place the CANE, BOW TIE, GLASSES, and TOP HAT on the doll (X).
- Select the doll.
- Play the HOP (A).
- Place the 4 pieces on the wall; take the AMULET CLUES (B).
- Select the amulet mini-game.
- Place the AMULET CLUES on the right.
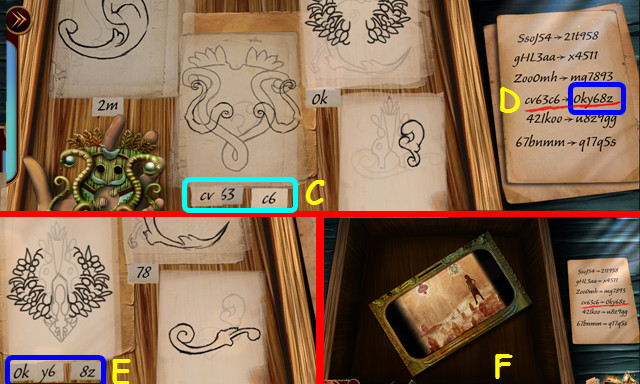
- Find the 3 pages that make the amulet (C).
- Look at the amulet code (D) and select the pages that make that code (E).
- Select the box (F).
- Select the red amulet (H) and green amulet (I).
- Talk to Luna; take the RESTORATION SOLUTION (J).
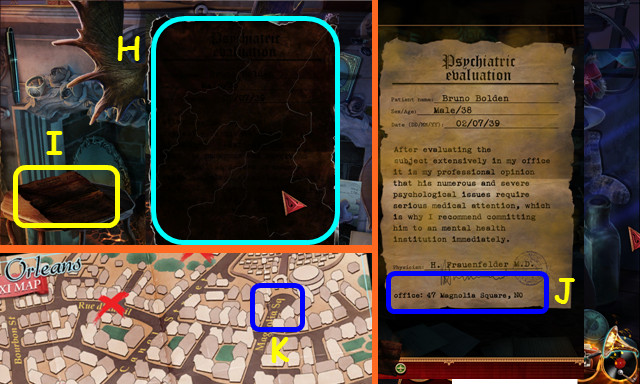
- Open the BURNT BOOK; use the RESTORATION SOLUTION on it; take the address (K).
- Select Rue d' Auseil (L).
- Select all the doors (red).
- Enter number 20 door (A). The 4th door you select will be #20.
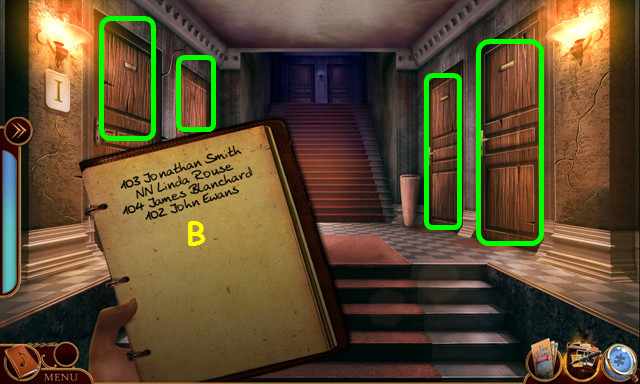
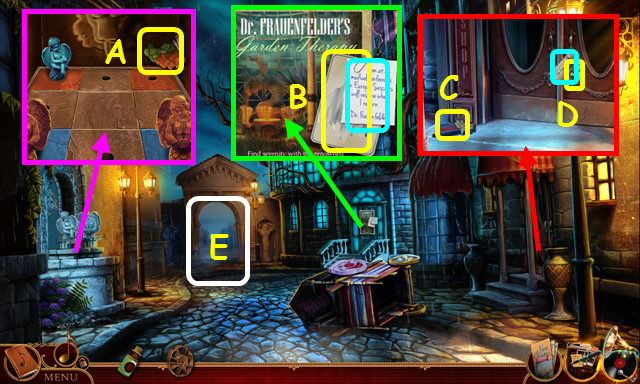
- Select the address.
- Select each door (green) to note the occupants on the paper (B).
- Go up the stairs and go left.
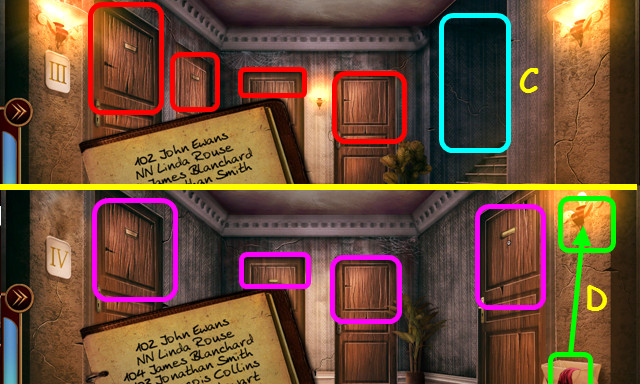
- Look at each of the doors (red).
- Go up the stairs (C).
- Look at each of the doors (pink).
- Use the rag to take the bulb (D).
- Walk down twice.
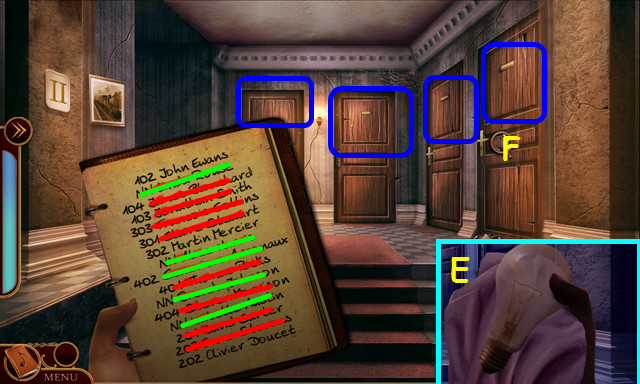
- Select the bulb (E).
- Look at each door (blue).
- Cross off apartments that not ending in 2 (red).
- Cross off all the women (green).
- Select 202 and look at the lock (F).
- Walk down.
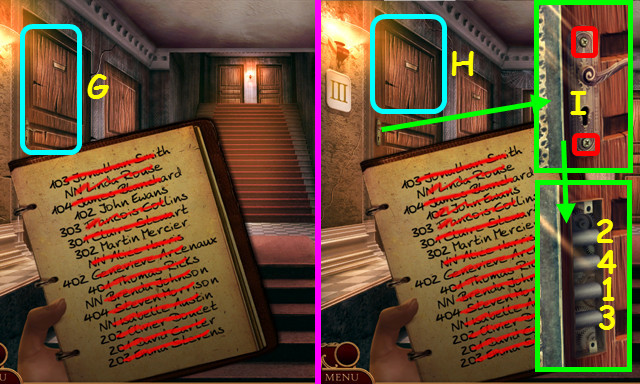
- Select 102 and look at the lock (G).
- Walk forward and left.
- Select 302 and listen at the lock (H).
- Select the lock again and use the SCREWDRIVER on the 2 screws (I).
- Remove the lock plate and select the bars in numerical order (1-4).
- Enter Frankie's Apartment.
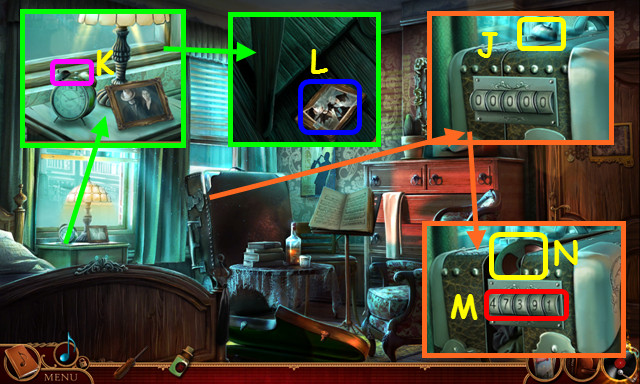
- Take the CLOCK BELL (J).
- Place the CLOCK BELL on the clock; select the clock (K).
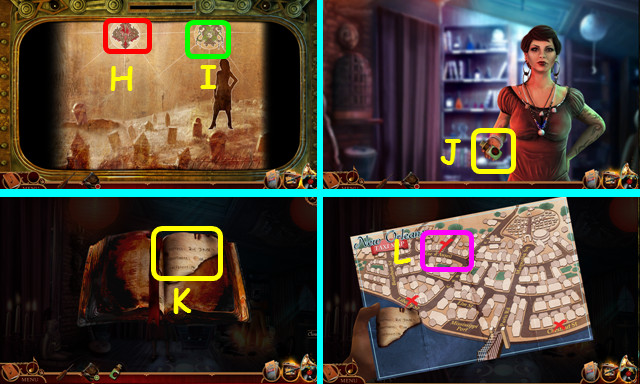
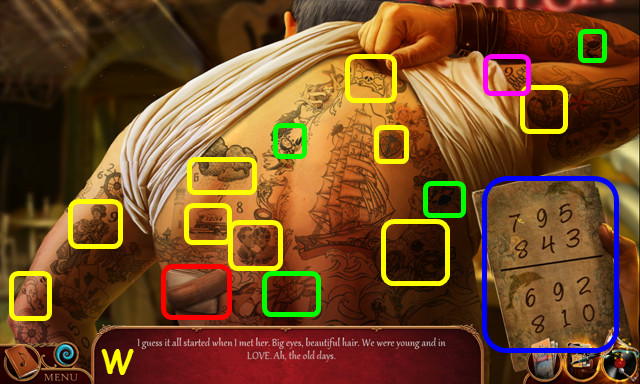
- Pan down and take the photo to find the code 47391 (L).
- Enter the code (M).
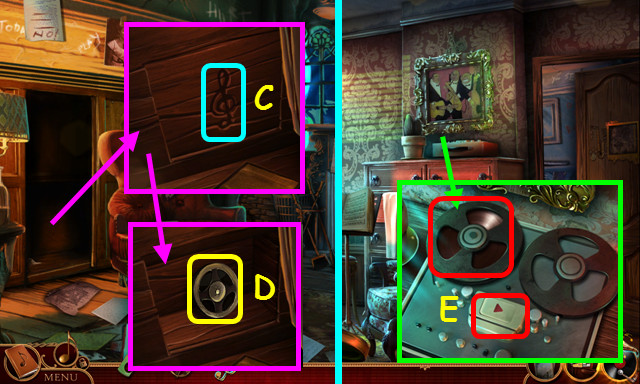
- Open the case and take the TAPE RECORDER REEL (N).
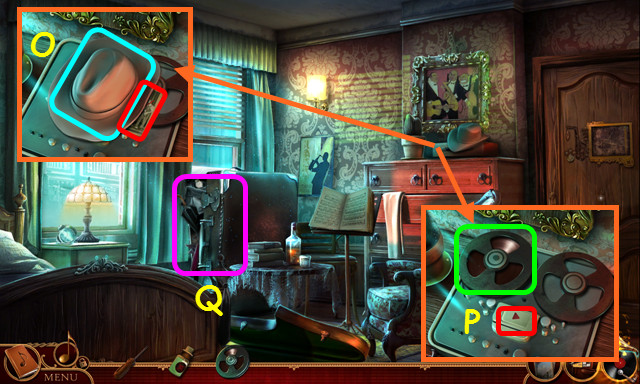
- Move the hat and look at the photo (O).
- Place the TAPE RECORDER REEL on the machine and press the play button (P).
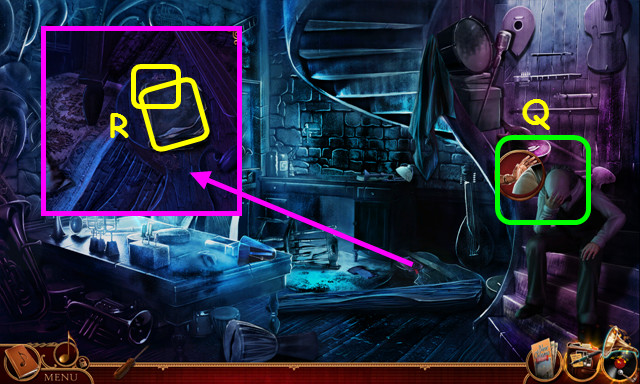
- Select the suitcase (Q).
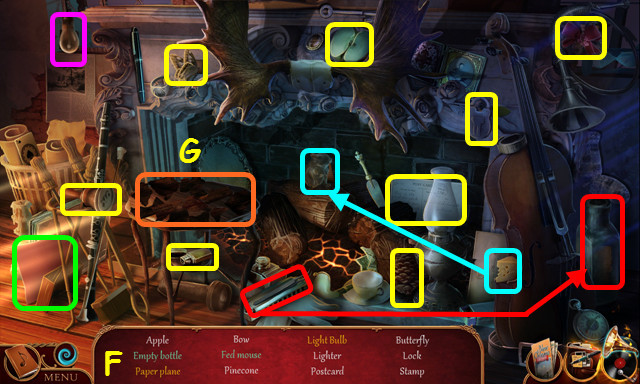
- Play the HOP to earn the MARDI GRAS PASS (R).
- Find the items using the clues.
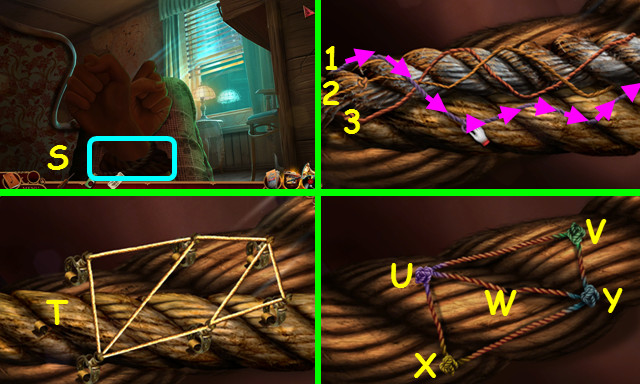
- Select the ropes (S).
- Slide the knots in numerical order (1-3).
- Select the ropes again.
- Move the clips so none of the strings cross each other (T).
- Select the ropes once more.
- Move the knots to the correct corner: Y, V, U, X, Y, W, U, V, Y, W.
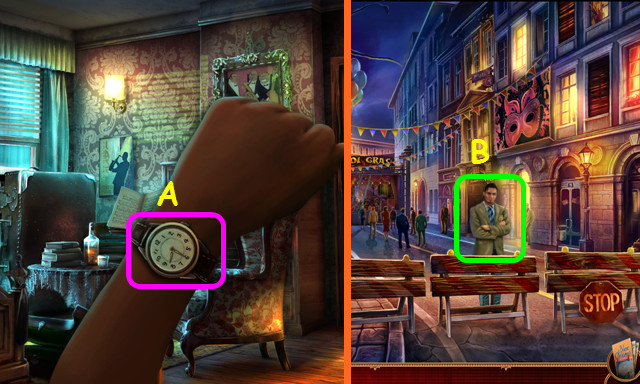
- Select the watch (A).
- Return to Liberty Street and walk left.
- Give the MARDI GRAS PASS to the guard (B).
- Walk forward. After the cut-scene, walk forward again.
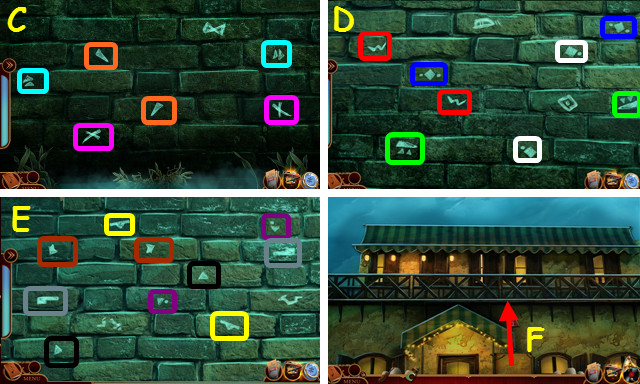
- Select the wall while underwater.
- Select matching pairs of symbols (color-coded) (C, D, E).
- Walk forward to climb out (F).
Chapter 4: Mississippi Riverside
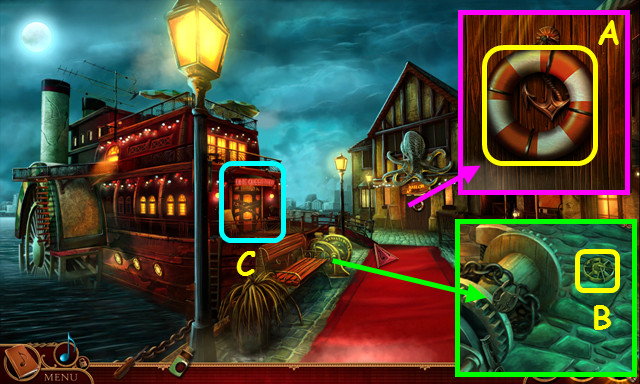
- Take the 1/2 LIFESAVER and knock on the door (A).
- Take the STEAMBOAT WHEEL (B).
- Climb aboard the steamboat (C).
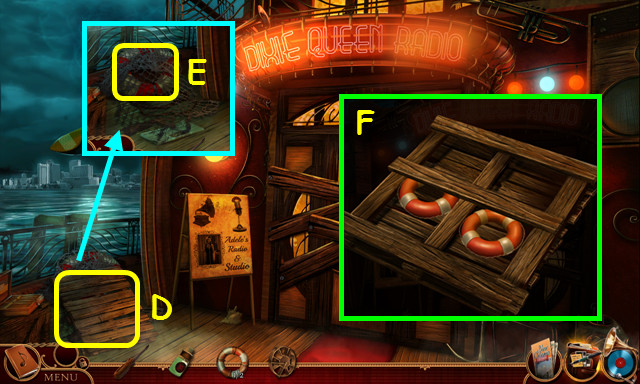
- Take the WOODEN PALLET (D).
- Move the net and take the 2/2 LIFESAVER (E).
- Place the 2 LIFESAVERS in the WOODEN PALLET to make the RAFT (F).
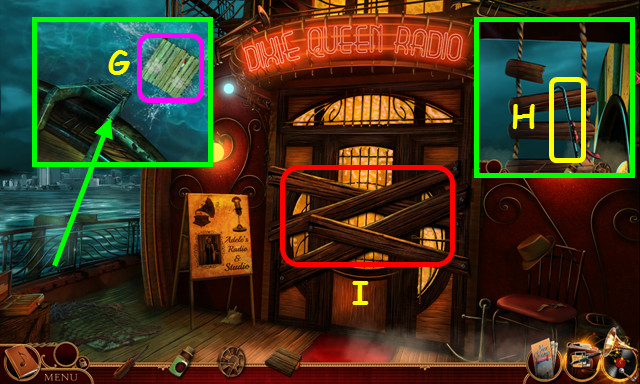
- Place the RAFT in the water (G).
- Walk left.
- Take the PRY BAR (H).
- Use the PRY BAR on the boards (I).
- Enter the Steamboat Lounge.
- Use the PRY BAR on the board; take the 1/2 PIANO KEYS (J).
- Note the door mini-game (K).
- Enter the Steamboat Studio (L).
- Take the 2/2 PIANO KEYS (M).
- Note the slide projector (N).
- Select the desk (O).
- Play the HOP to earn the TUNING FORK (M).
- Walk down and select the door mini-game.
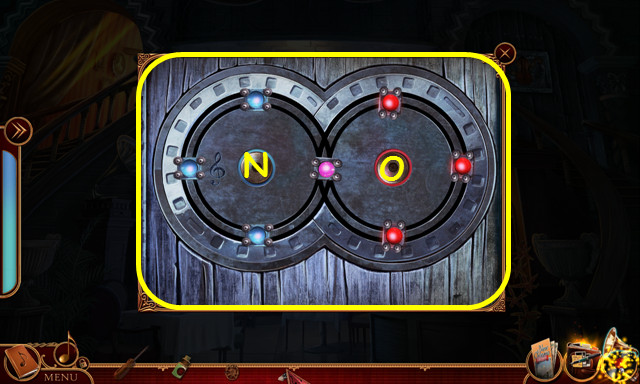
- Place the TUNING FORK in the violin.
- Solution: N, Ox2, Nx2, O, and N.
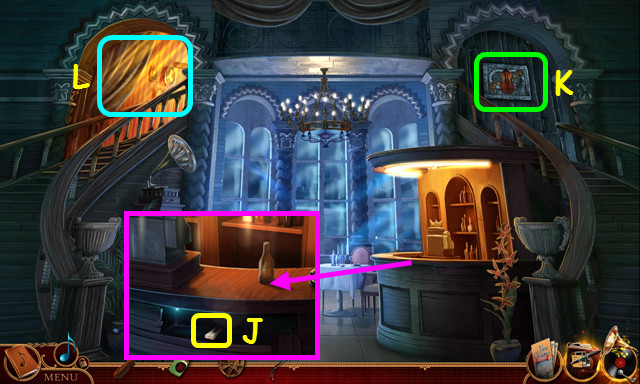
- Enter the Steamboat Radio.
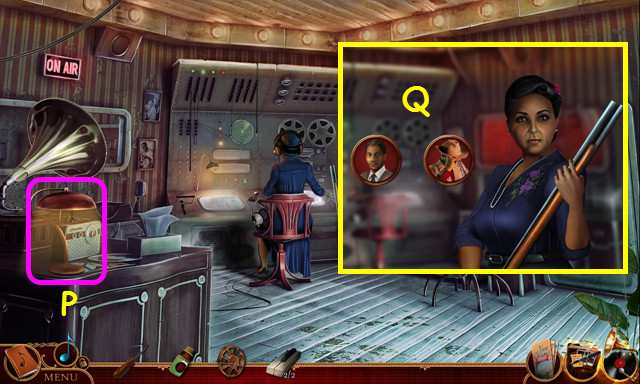
- Turn on the lamp (P).
- Talk to Aunt Adele (Q).
- Move the knob and take the TUNING HAMMER (R).
- Take the HEART MEDALLION and plug in the cord (S).
- Walk down.
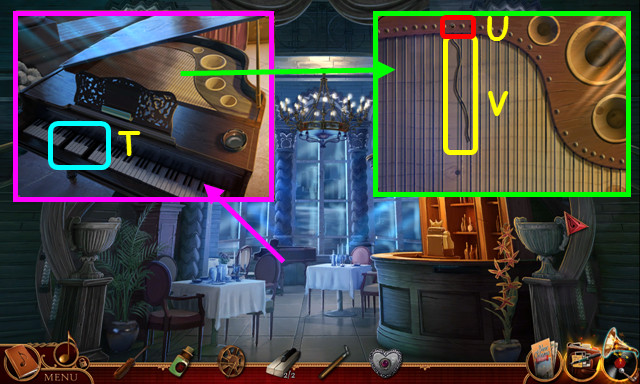
- Place the 2 PIANO KEYS on the piano (T).
- Use the TUNING HAMMER on the strings (U).
- Take the PIANO WIRE (V).

- Place the HEART MEDALLION in the opening (W).
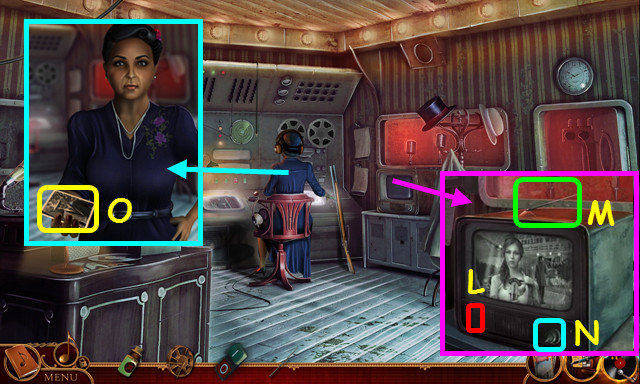
- Open the drawer, move the items, look at the photo, and take the TV KNOB (X).
- Enter the Steamboat Radio.
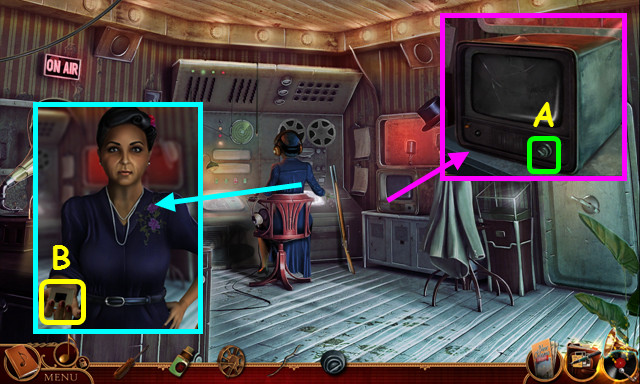
- Place the TV KNOB on the television (A).
- Talk to Aunt Adele and take ADELE'S SLIDE (B).
- Use the PIANO WIRE on the lever (C).
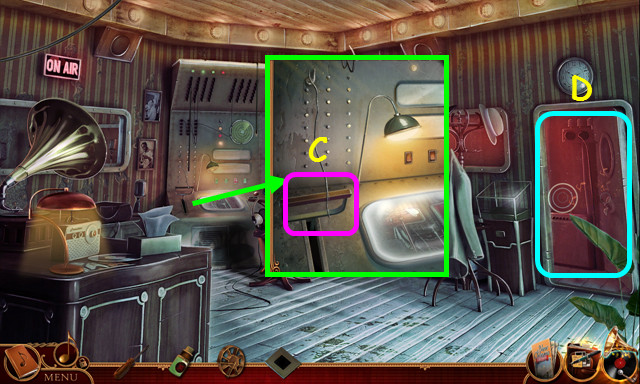
- Select the door (D).
- Play the HOP to earn the PORTABLE RADIO (E).
- Select the PORTABLE RADIO from your inventory.
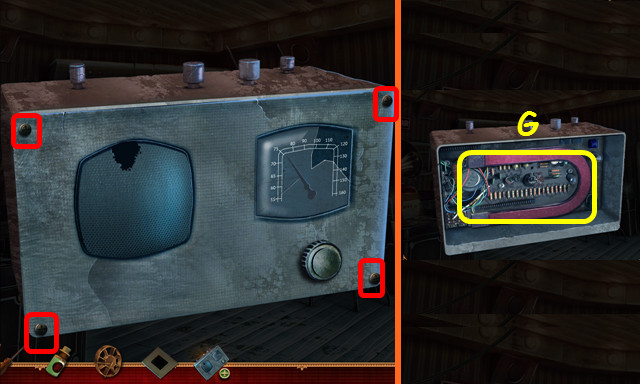
- Use the SCREWDRIVER on the 4 screws (red).
- Remove the cover and take the MAGNET (G).
- Return to the Steamboat Studio and select the projector.
- Place ADELE'S SLIDE in the top and push it into the projector (H).
- Move the items to the correct locations (color-coded).
- There are 2 scenes to complete (I, J).
- Take the TV BUTTON (K).
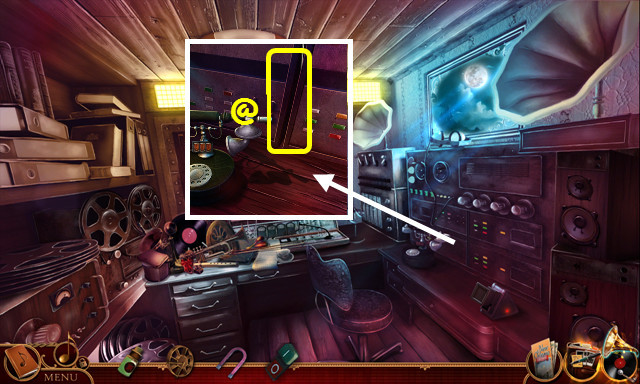
- Use the MAGNET on the crevice to get the MAGNET WITH ANTENNA (@).
- Look at the MAGNET WITH ANTENNA and take the ANTENNA.
- Return to Steamboat Radio.
- Place the TV BUTTON on the left and press it (L).
- Place the ANTENNA on the top (M).
- Turn the right knob 3 TIMES (N).
- Select the antenna 3 times.
- Talk to Aunt Adele to get the telephone number; look at the photo (O).
- Return to the Steamboat Radio.
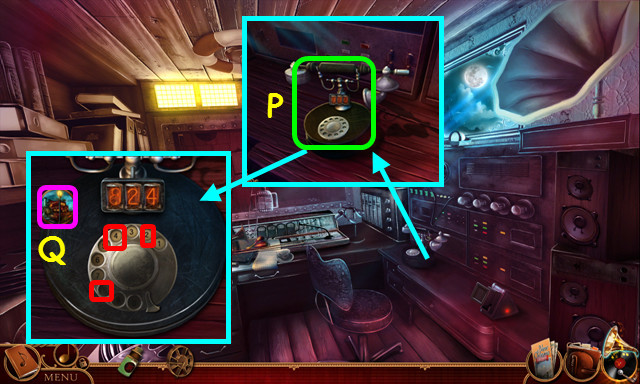
- Select the phone (P).
- Select 8, 2, and then 4 (red).
- Talk to the dispatcher (Q).
- Walk down twice and enter the taxi.
- Select Liberty Street on the map.
- Walk forward twice.
Chapter 5: Mardi Gras Stage
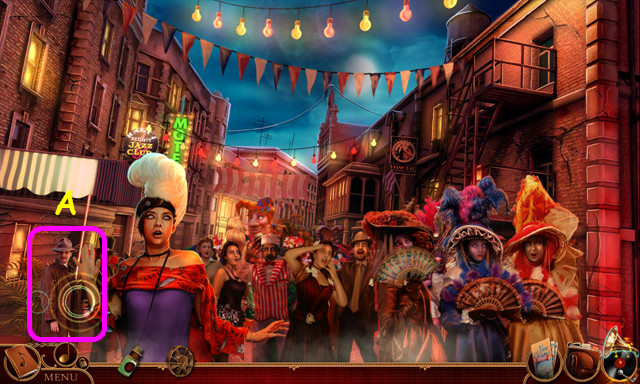
- Walk forward twice.
- After the cut-scene, pan left twice.
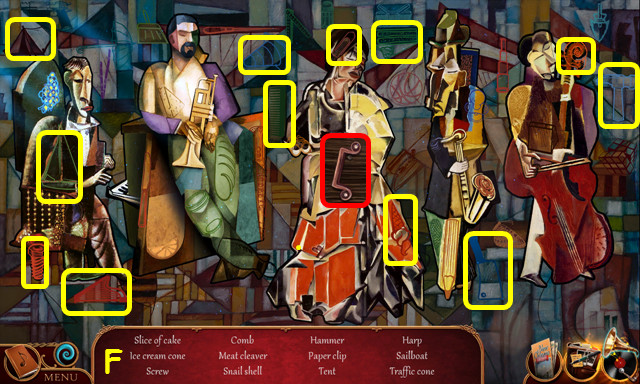
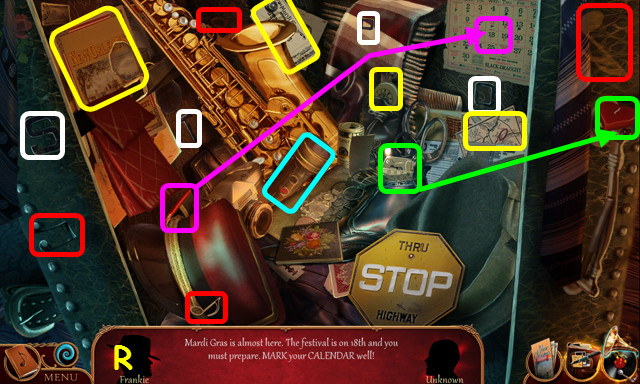
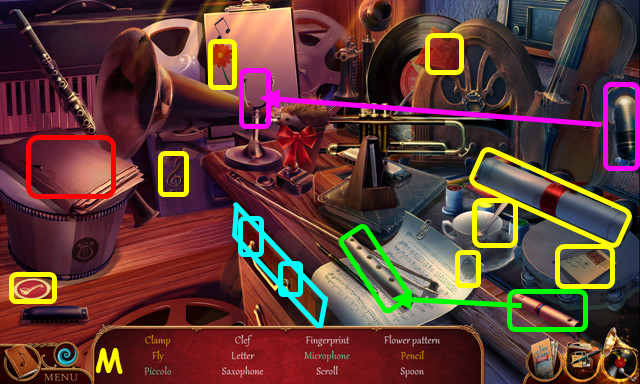
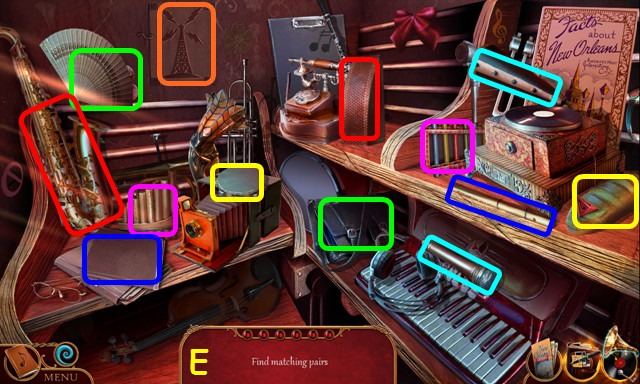
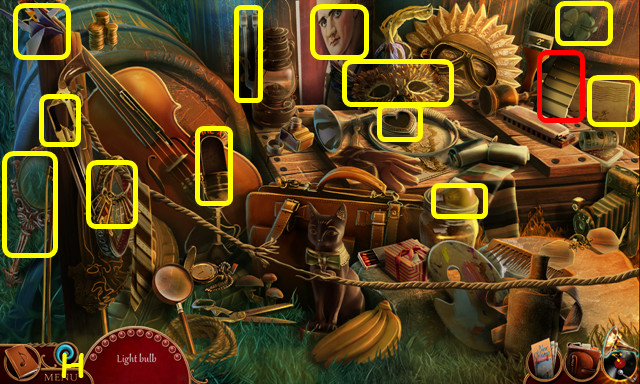
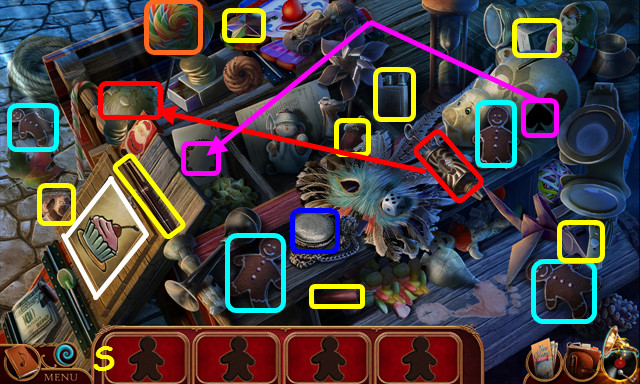
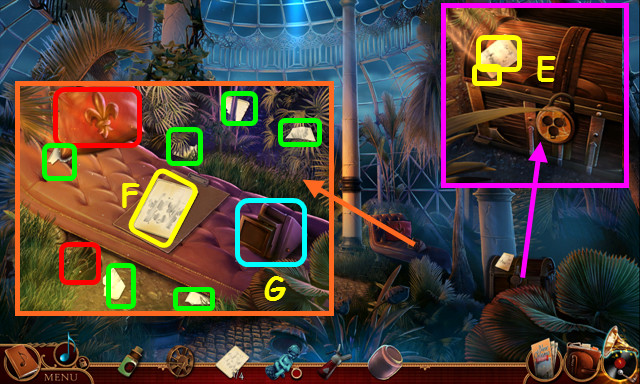
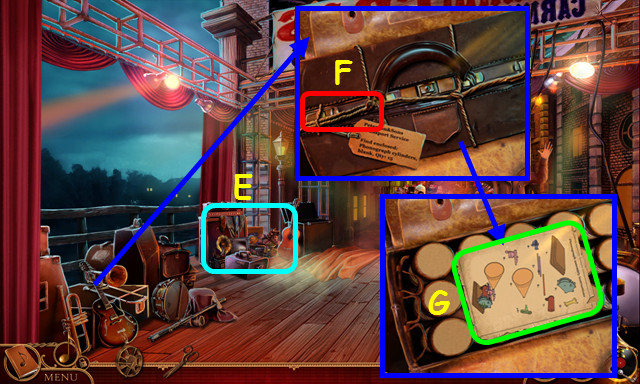
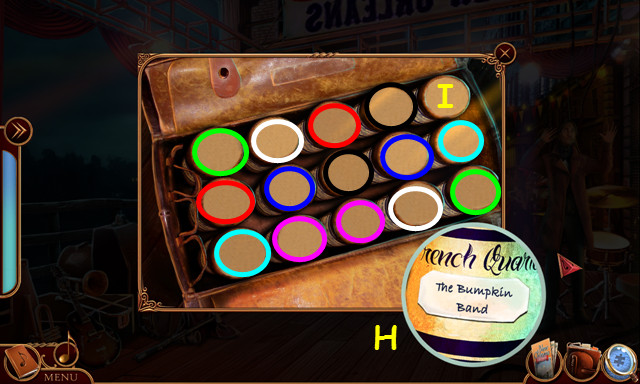
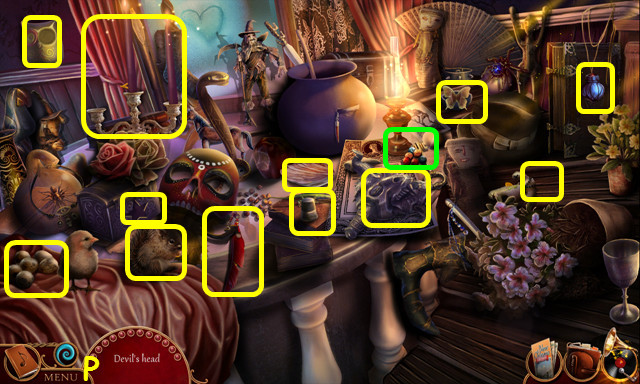
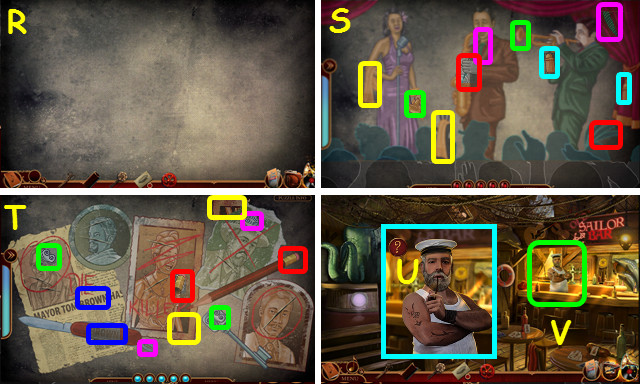
- Select the detective (A).
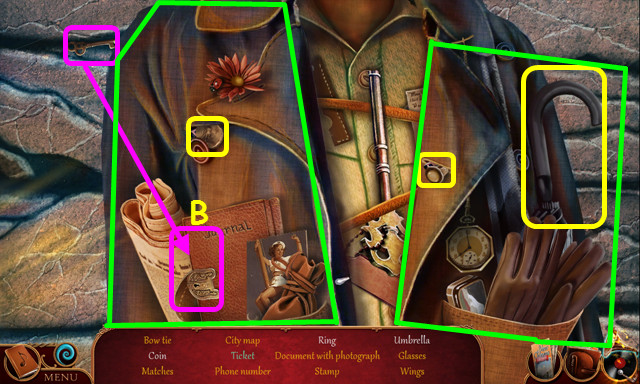
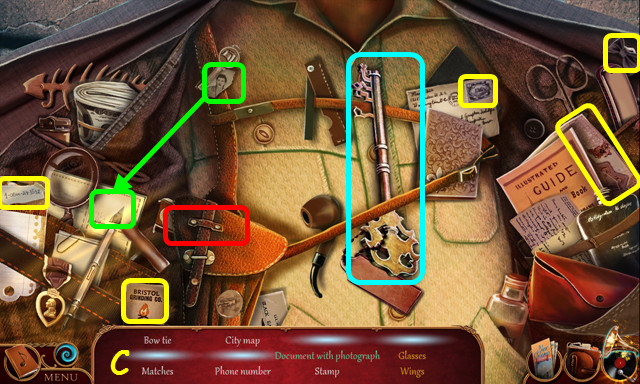
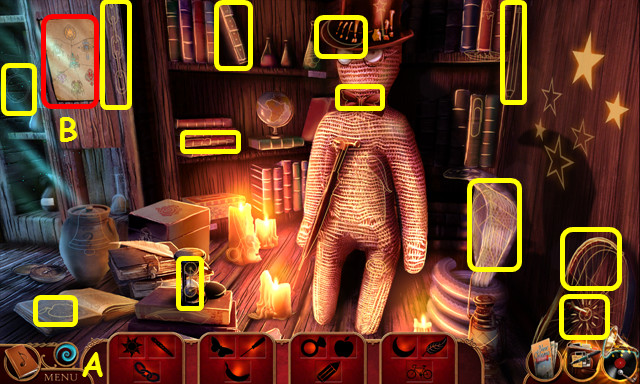
- Locate the items and the key fragments beneath them (yellow).
- Open the journal for the ticket (B).
- Open both sides of the jacket (green).
- Find the remaining items and key fragments (C).
- You will earn the DETECTIVE'S KEY.
- Look at the DETECTIVE'S KEY; read the address on the tag.
- Return to Rue d' Auseil.
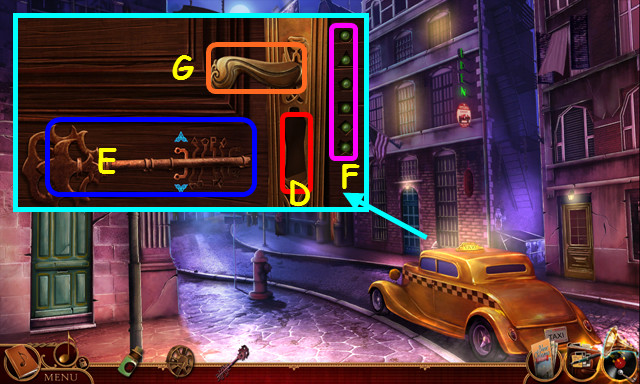
- Use the DETECTIVE'S KEY on the lock (D).
- Move the key fragments up or down to fit the lock (E).
- Once you have moved all 5, the key will try the lock.
- The green lights will indicate if all the fragments are correct (F).
- This mini-game is randomly generated.
- Pull the handle (G).
- Enter the Detective's Office.
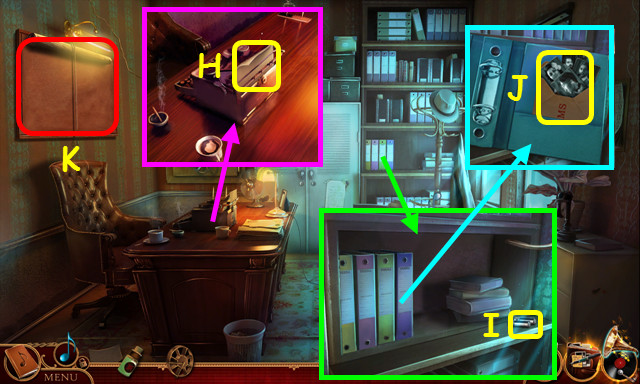
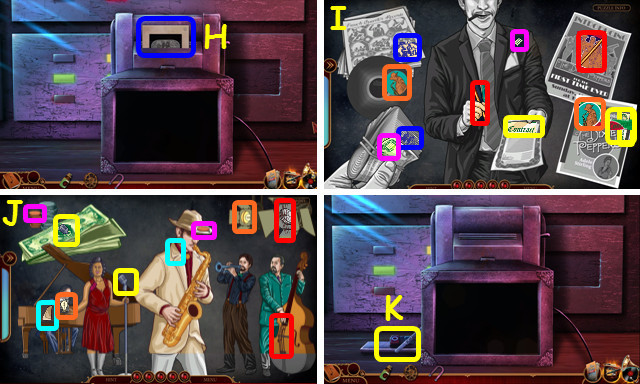
- Take the DETECTIVE'S NOTE (H).
- Take the BATTERIES (I).
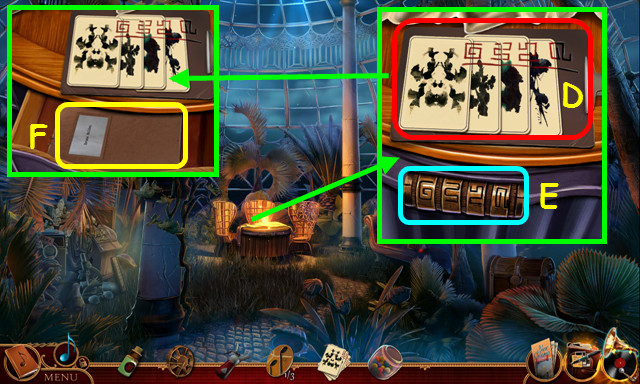
- Look at each folder and remove all the papers; take the VICTIM'S PHOTOS and the SUSPECT'S PHOTOS (J).
- Look at the DETECTIVE'S NOTES and tear them up to make the DETECTIVE'S NOTE PIECES.
- Select the bulletin board (K).
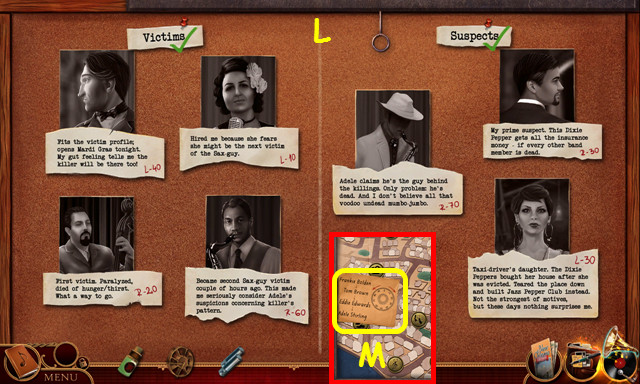
- Place the VICTIM'S PHOTOS, the SUSPECT'S PHOTOS, and the DETECTIVE'S NOTE PIECES on the board.
- Swap the photos and the notes to the correct locations (L).
- Look at the suspect photos.
- Take the safe combination and note the map (M).
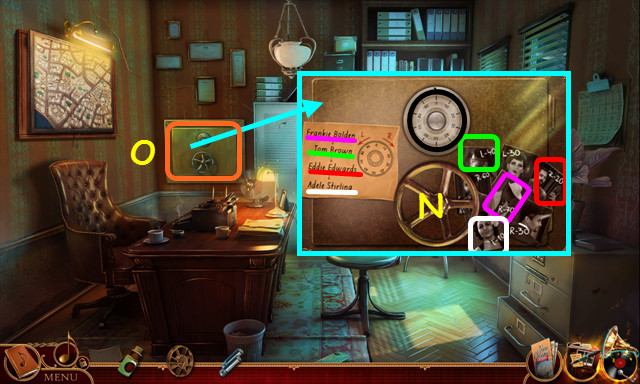
- Turn the safe dial (black) right to70, left to 40, right to 20, and left to 10.
- Turn the valve (N).
- Select the open safe (O).
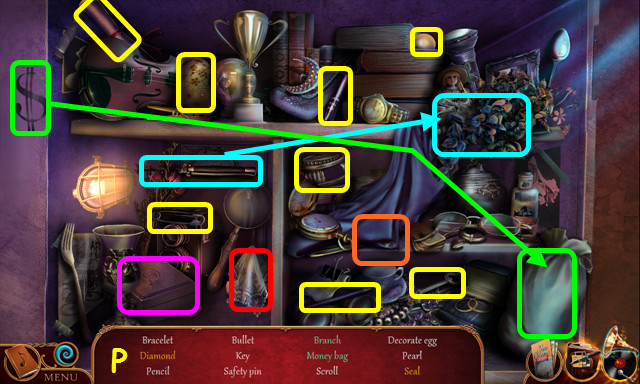
- Play the HOP to earn the DETECTIVE'S TOOLBOX (P).
- Open the DETECTIVE'S TOOLBOX; take the FINGERPRINT KIT and the DICTATION MACHINE.
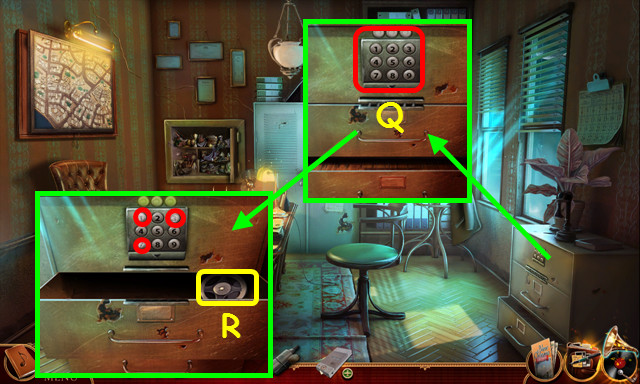
- Use the FINGERPRINT KIT on the keypad (Q).
- Use the 3 marked numbers for the combination. Solution: 7, 1, and 3.
- Open the drawer; take the DETECTIVE'S TAPE (R).
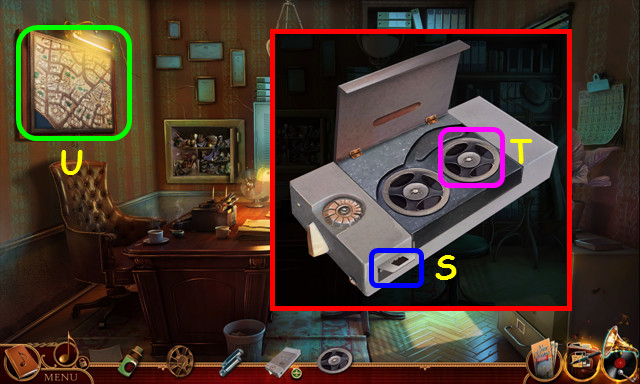
- Open the panel on the DICTATION MACHINE; insert the BATTERIES; close the panel (S).
- Open the cover; place the DETECTIVE'S TAPE inside and close the cover (T).
- Select the map (U).
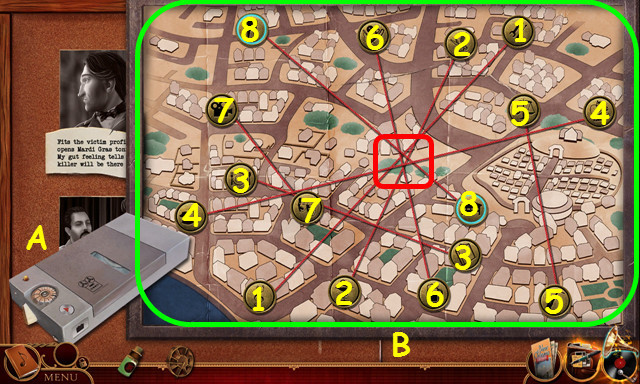
- Place the DICTATION MACHINE on the left (A).
- Connect the sets of locations (B) based on the clues (1-8), and then select the center (red).
Chapter 6: The Zeppelin
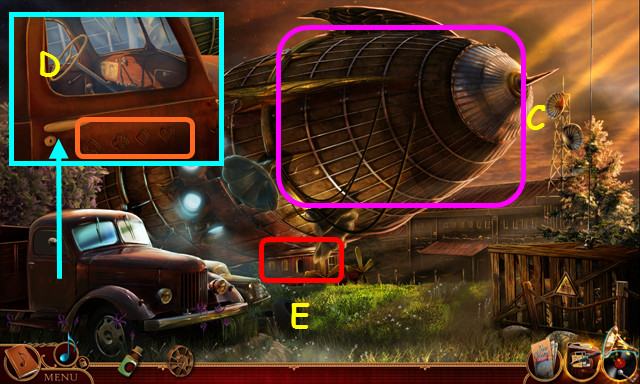
- Look at the zeppelin (C).
- Look at the symbols on the door (D).
- Enter the Zeppelin Interior (E).
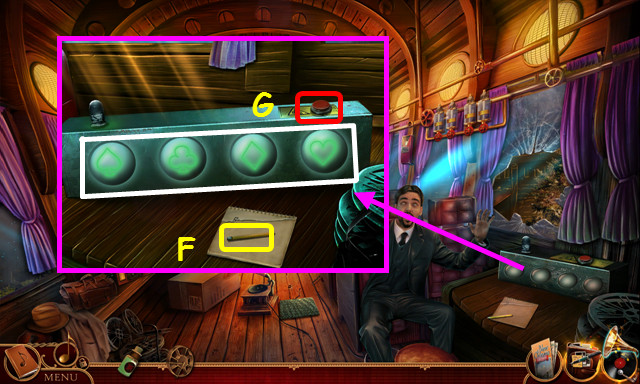
- Take the BROKEN PENCIL (F).
- Change the symbols to match the truck door; press the red button (G).
- Walk down and select the debris on the right.
- Play the HOP to earn the COLUMN TILE (H).
- Enter the Zeppelin Interior.
- Place the COLUMN TILE on the column; turn the rings to complete the pattern (I).
- Take the TRUCK KEYS (J).
- Walk down.
- Use the TRUCK KEYS in the lock; open the door (K).
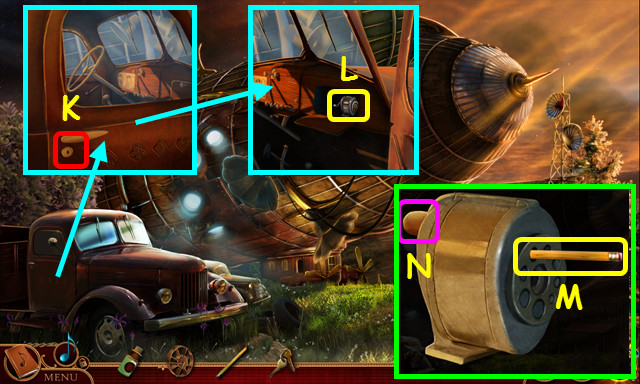
- Open the glove box; take the PENCIL SHARPENER (L).
- Look at the PENCIL SHARPENER, place the BROKEN PENCIL inside (M), and push the lever (N).
- Take the PENCIL.
- Walk forward.

- Look at the pad; use the PENCIL on the pad; take the address and note the code (P).
- Enter the code from the paper (Q).
- Open the compartment; take the AXE (R).
- Remove the mat; use the AXE on the crack 3 times (S).
- Take the MODEL SAXOPHONE (T).
- Travel to Frankie's Apartment and select the door on the right.
- Place the MODEL SAXOPHONE in the indentation (A).
- Restore the picture of the instruments (red) by sliding the pieces up, down, left, and right.
- Watch the sequence of 4 letters (notes) on the frame (B), and then replay them on the saxophone (C).
- The sequences are randomly generated. There are 3 levels to complete (1-3).
- Walk forward.

- Open the compartment; take the VACUUM CLEANER HOSE (I).
- Move the shirts aside; read the note and take the 1/2 SPADE EMBLEM (J).
- Replace the plug, look at the photo, and take the BROKEN VACUUM PIPE (K).
- Pull the clef (L).
- Remove the brick and take the 2/2 SPADE EMBLEM (M).
- Place the VACUUM CLEANER HOSE on the vacuum (N).
- Look at the photo (O).
- Place the 2 SPADE EMBLEMS on the lamp base (P).
- Take the DUCT TAPE (Q).
- Look at the BROKEN VACUUM PIPE, bend the pipe, and use the DUCT TAPE on the break to make the VACUUM CLEANER PIPE.
- Place the VACUUM CLEANER PIPE on the hose (R).
- Select the cord (S).
- Use the DUCT TAPE on the outlet; plug in the cord (T).
- Move the vacuum over the ashes (A).
- Take the FULL VACUUM CLEANER (B).
- Open the FULL VACUUM CLEANER; take the TREBLE CLEF.
- Place the TREBLE CLEF on the panel (C).
- Take the TAPE RECORDER REEL (D).
- Walk down.
- Remove the old tape; place TAPE RECORDER REEL on the player and push play (E).
- Walk forward and select the fireplace.
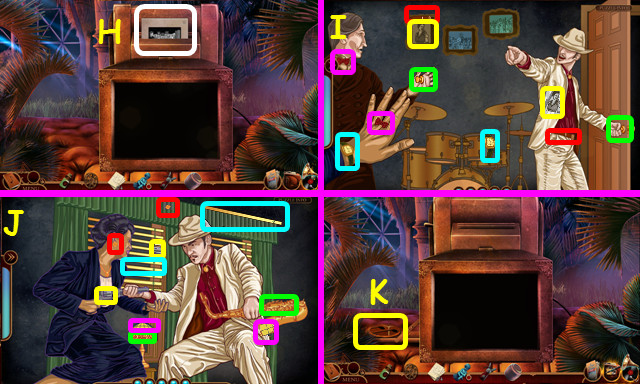
- Play the HOP (F).
- Select the pieces from the table (G).
- Assemble the burnt document (H).
- Take the BURNT DOCUMENT from the table (I).
- Look at the BURNT DOCUMENT; use the RESTORATION SOLUTION on it.
- Read the paper to find the address (J).
- Select Magnolia Square (K).
Chapter 7: Magnolia Square
- Take the 1st CLOWN'S HAIR and note the angels' mini-game (A).
- Read the note and take the 1/4 BLURRED RORSCHACH CARD (B).
- Take the CLOWN'S HAT (C).
- Read the note and take the STONE ANGEL FIGURINE (D).
- Walk forward to the Graveyard (E).
- Take the 2nd CLOWN'S HAIR (F).
- Take the CLOWN BOW TIE (G).
- Travel to the Mesmerized Crowd.
- Take the CANDY SHOP KEY (H).
- Look at the CANDY SHOP KEY and take the 1/3 CANDY EMBLEM (I).
- Return to Magnolia Square.
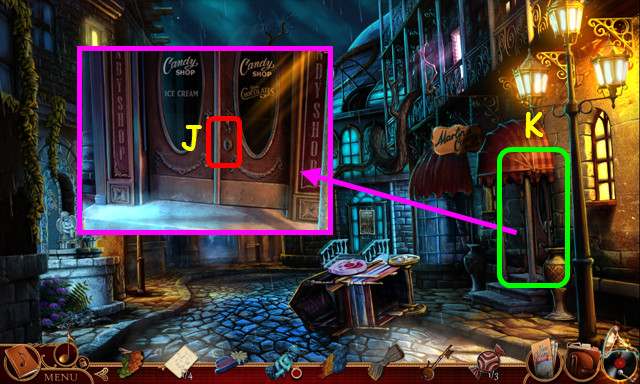
- Use the CANDY SHOP KEY on the lock; open the doors (J).
- Enter the Candy Shop (K).
- Turn on the lights (red).
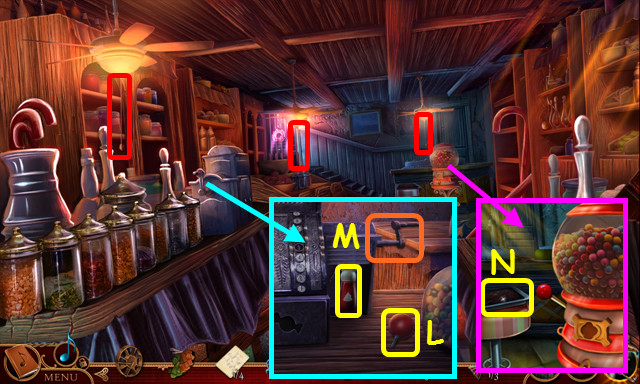
- Take the CLOWN'S NOSE (L).
- Turn the lever; take the WHIPPED CREAM (M).
- Take the CASSEROLE DISH WITH CANDY (N).
- Take the EMPTY JAR (O).
- Remove pairs of candies (color-coded).
- Take the 2/3 CANDY EMBLEM (P).
- Walk down.
- Place the 1st CLOWN'S HAIR, the 2nd CLOWN'S HAIR, the CLOWN'S HAT, the CLOWN'S NOSE, and CLOWN'S BOW TIE on the face (Q).
- Push the nose.
- After the fireworks, select the cart (R).
- Play the HOP to earn the 3/3 CANDY EMBLEM (S).
- Enter the Candy Shop.
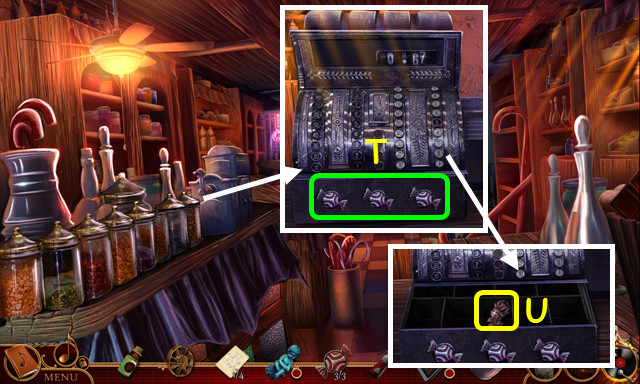
- Place the 3 CANDY EMBLEMS on the register (T).
- Open the drawer and take the ROSE ORNAMENT (U).
- Walk down and forward.
- Place the ROSE ORNAMENT on the wall (A).
- Take the HEART STENCIL (B).
- Look at the CASSEROLE DISH WITH CANDY and use the HEART STENCIL to make the CANDY HEART.
- Return to the Candy Shop.
- Place the CANDY HEART in the lock and rotate the rings to complete the picture (C).
- Go Upstairs.
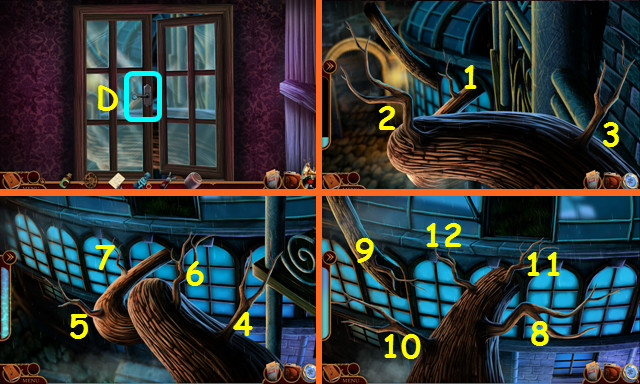
- Open the window (D).
- Select the branches (1-3), (4-7), (8-12).
- Take the 2/4 BLURRED RORSCHACH CARD and the PSYCHIATRIST'S SLIDE (E).
- Move the slippers and the pillow (red).
- Select the card pieces (green).
- Take the 3/4 BLURRED RORSCHACH CARD (F).
- Use the PSYCHIATRIST'S SLIDE on the projector; select the projector (G).
- Push the slide into the projector (H).
- Move the items to the correct locations (color-coded) (I, J).
- Take the 1/3 MEDALLION PART (K).
- Take the INK RESTORER and the 4/4 BLURRED RORSCHACH CARD (L).
- Look at the INK RESTORER; wipe the label.
- Move the branch; select the debris (M).
- Play the HOP to earn the HERBICIDE (N).
- Return to the Graveyard.
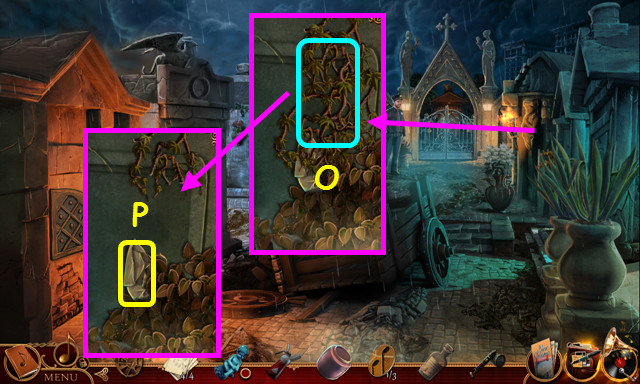
- Use the HERBICIDE on the vines (O).
- Take the WRAPPED STONE OBJECT (P).
- Open the WRAPPED STONE OBJECT to find the ANGEL WINGS.
- Look at the STONE ANGEL FIGURINE and attach the ANGEL WINGS to complete the STONE ANGEL FIGURINE.
- Walk down and select the angels' mini-game.
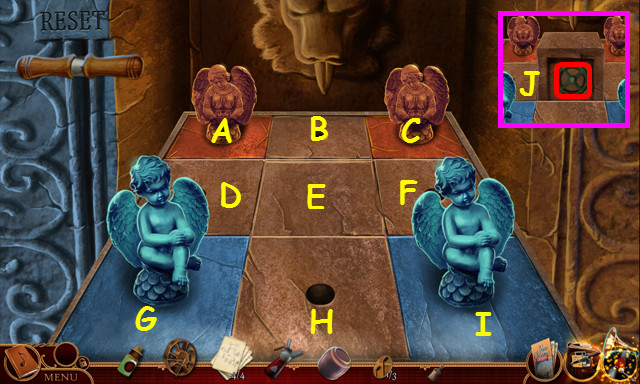
- Place the STONE ANGEL FIGURINE on the board.
- Solution: (A-F), (G-B), (F-G), (I-D), (C-H), (D-C), (B-I). (H-A), (G-B), (A-F), (F-G), (C-H), (H-A), (I-D), (D-C), and (B-I).
- Turn the wheel (J).
- Pour the INK RESTORER into the water; place the 4 BLURRED RORSCHACH CARDS in the water (K).
- Take the RORSCHACH CARDS and the COIN (L).
- Enter the Candy Shop.

- Place the EMPTY JAR in the holder (A).
- Place the COIN in the slot (B).
- Pull the lever; take the CANDY JAR (C).
- Go up the stairs.
- Place the RORSCHACH CARDS on the board; swap the cards to complete the code (D).
- Turn the dials to match the cards (E).
- Open the drawer; take BRUNO'S FILE (F).
- Open BRUNO'S FILE, read the evaluation and take the 2/3 MEDALLION PART.
- Walk down twice.
- Place the CANDY JAR on the fountain and move 3 pieces of candy (G).
- Take the MOUSE IN A JAR (H).
- Walk forward.
- Use the WHIPPED CREAM on the rope, followed by the MOUSE IN A JAR (I).
- Open the gates and walk forward (J).
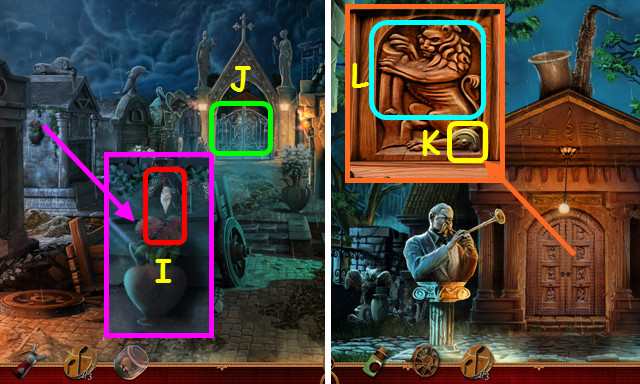
- Look at the door and pan left; take the 1st STONE CADENZA SYMBOL (K).
- Push the lion (L).
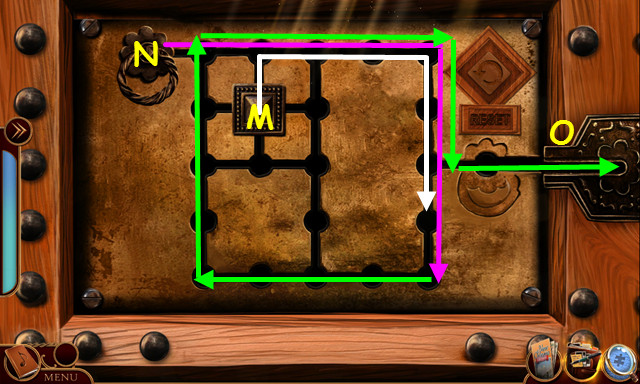
- Use the block (M) to guide the handle (N) to the slot (O).
- Move the handle right and down (pink).
- Move the block up, right, and down (white).
- Move the handle left, up, right, down, and right (green).
- Pan right and press the eagle.
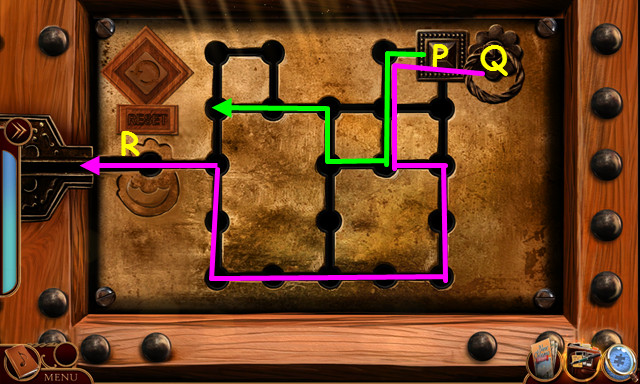
- Use the block (P) to guide the handle (Q) to the slot (R).
- Move the block left, down, left, up, and left (green).
- Move the handle left, down, right, down, left, up, and left (pink).
- Turn the 2 handles and go forward.
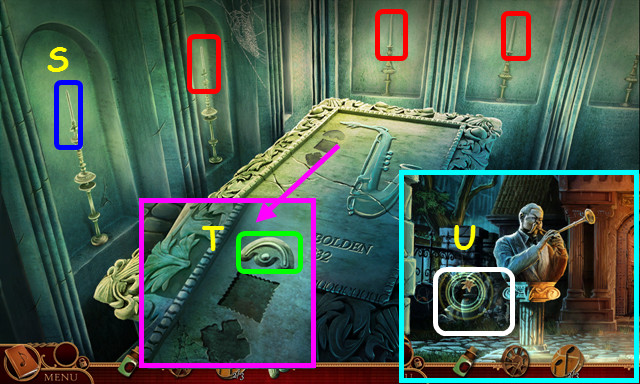
- Take the lit candle (S) and use it on the other candles (red).
- Place the 1st STONE CADENZA SYMBOL on the lid and push it (T).
- Select the shrine on the left (U).
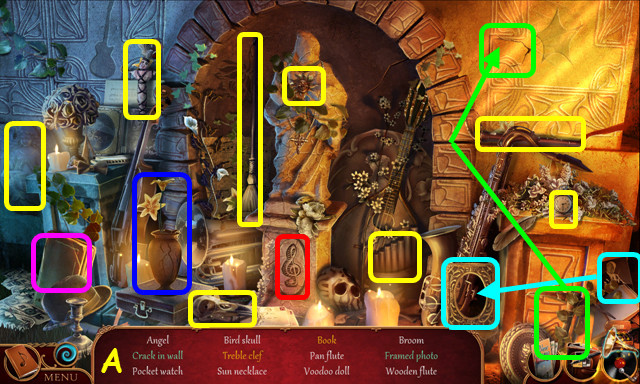
- Play the HOP to earn the STONE VASE (A).
- Collect the items and the flowers behind them.
- Look at the STONE VASE and take the YELLOW LILIES; take the 2nd STONE CADENZA SYMBOL from inside the vase.
- Walk forward.
- Place the 2nd STONE CADENZA SYMBOL on the lid and press (B).
- Read the code (C).
- Walk down twice.
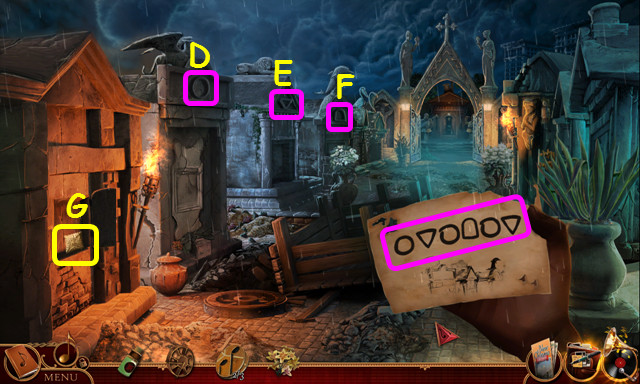
- Press the symbols: D, E, D, F, D, and E.
- Take the 3rd STONE CADENZA SYMBOL (G).
- Walk forward twice.
- Place the 3rd STONE CADENZA SYMBOL on the lid and press it (H).
- Take the 3/3 MEDALLION PART (I).
- Return to the Psychiatrist's Office.

- Place the 3 MEDALLION PARTS on the lock (J).
- Rotate the parts to complete the notes and rotate the dial (K).
- Open the chest and select the device (L).
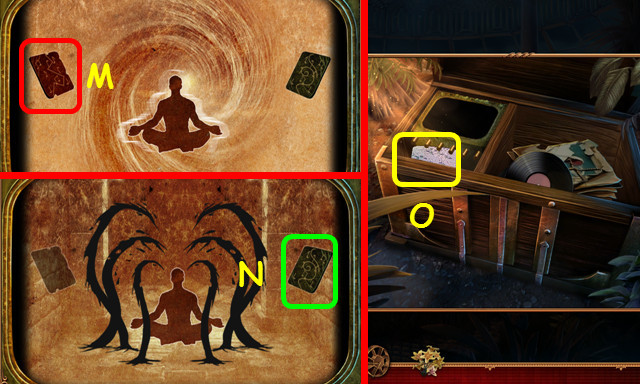
- Select the red card (M), and then the green card (N).
- Take the photo and the SONG OF STONE TABLET (O).
- Walk down.
- Remove the door panel.
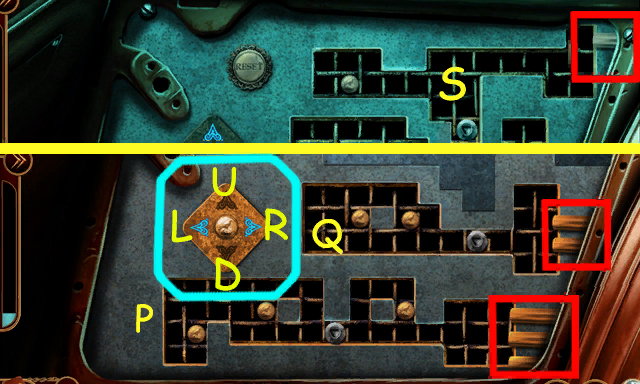
- Use the arrows (blue) to move the marked token; use it to guide the beads to the end points (red).
- Solution (P): Lx2, Ux3, Lx5, Dx3, Rx13, Dx1, Rx1, Ux1, Lx14, Ux1, Lx2,Dx1, Rx14, Ux1, Rx1, Dx1, Lx1, Dx1, Rx1, Ux1, Lx8, Ux3, Lx2, Ux3, Lx1, Dx5, Ux2, Lx2, Dx3, and Rx13.
- Solution (Q): Lx1, Dx1, Rx1, Dx1, Lx6, Dx2, Lx2, Ux2, Rx7, Dx1, Rx1, Ux1, Lx9, Ux2, Rx2, Dx1, Ux1, Lx2, Dx2, and Rx8.
- Solution (S): Ux2, Lx8, Ux1, Lx2, Dx1, Rx9, Dx1, Rx1, Ux1, Lx1, Ux1, Rx5, Dx1, Rx1, and Ux1.
- Return to the House of the Moon.
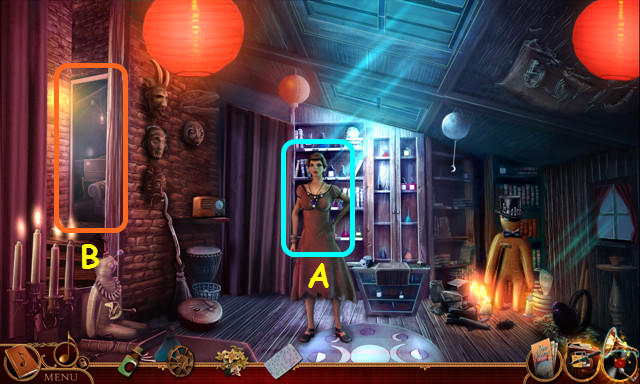
- Show Luna the SONG OF STONE TABLET and talk to her thoroughly (A).
- Walk to the Upper Floor (B).
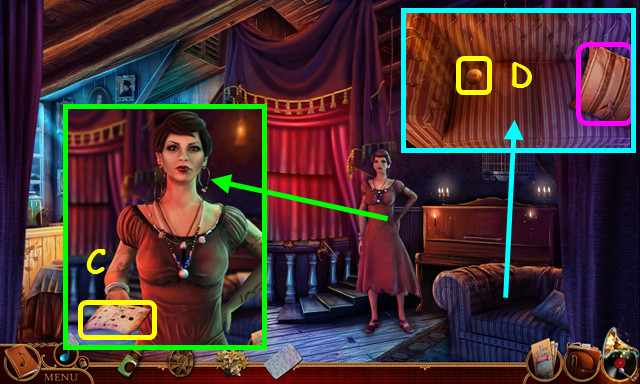
- Talk to Luna and take the recipe (C).
- Move the cushion and take the STONE EYE (D).
- Walk left to the Balcony.

- Move the flowers; take the ROSE EMBLEM (E).
- Walk down.
- Place the ROSE EMBLEM on the drawer (F).
- Open the drawer; take the MARBLE EGG and the 1/2 GOLD BIRD (G).
- Take the 2/2 GOLD BIRD and note the potions area (H).
- Walk to the Balcony.

- Place the 2 GOLD BIRDS on the cage (I).
- Open the cage and take the BLUE PALM LEAF (J).
- Walk down and select the potions area.
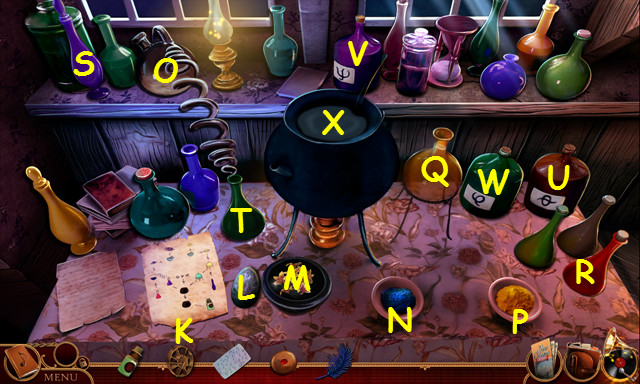
- Read the recipe (K).
- Place the STONE EGG (L).
- Place the YELLOW LILIES in the mortar (M) and use the stone egg on it.
- Place the BLUE PALM LEAF in the mortar and use the stone egg on it.
- Place the blue powder (N) in the flask (O).
- Place the yellow powder (P) in the flask (Q).
- Use the red bottle (R) on the blue flask (O).
- Use the purple bottle (S) on the yellow flask (Q).
- Select the bottle (T) and the former yellow flask (Q).
- Select the brown jug (U), the purple jug (V), and the green jug (W).
- Pour the RESTORATION SOLUTION in the cauldron (X).
- Dip the SONG OF STONE TABLET into the cauldron to make the SONG OF WATER TABLET.
- Walk down.
- Open the wood panel (A).
- Open the second panel (B).
- Enter the Cellar.
- Select the lights (1-3).
- Move the curtain, open the bone, and take the SCISSORS (C).
- Place the SONG OF WATER TABLET on the table (D).
- Travel to the Mardi Gras Stage.
- Note the upper-left corner of the stage (E).
- Use the SCISSORS on the twine (F).
- Open the case and read the instructions (G).
- Hover your mouse over a cylinder to read the name (H).
- Select matching pairs of cylinders (color-coded).
- Take the PHONOGRAPH RECORD (I).
- Open the PHONOGRAPH RECORD and take out the EMPTY PHONOGRAPH CYLINDER.
- Select the upper left corner of the stage.

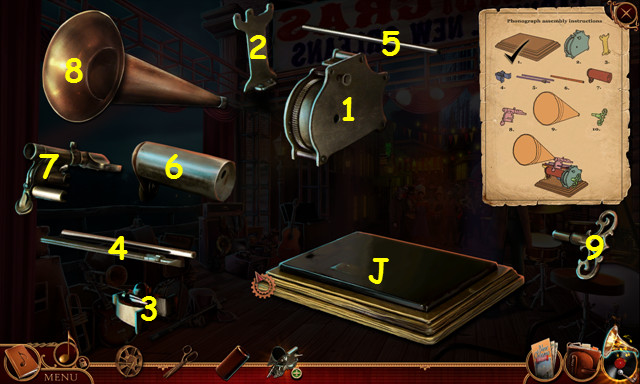
- Play the HOP to earn the PHONOGRAPH PARTS (J).
- Look at the PHONOGRAPH PARTS in your inventory.
- Place the parts in numerical order (1-9) on the platform (K).
- This will make the RECORDING EQUIPMENT.
- Travel to the Balcony.
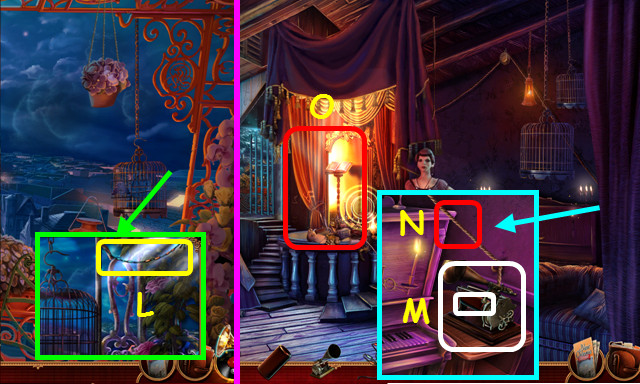
- Use the SCISSORS twice to take the COLORED STRING (L).
- Walk down.
- Place the RECORDING EQUIPMENT on the table; place the EMPTY PHONOGRAPH CYLINDER on the recording equipment (M).
- Use the SCISSORS on the rope (N).
- Select the platform (O).
- Play the HOP to earn the BEADS (P).
- Place the BEADS on the COLORED STRING to make the NECKLACE.
- Return to the Cellar.
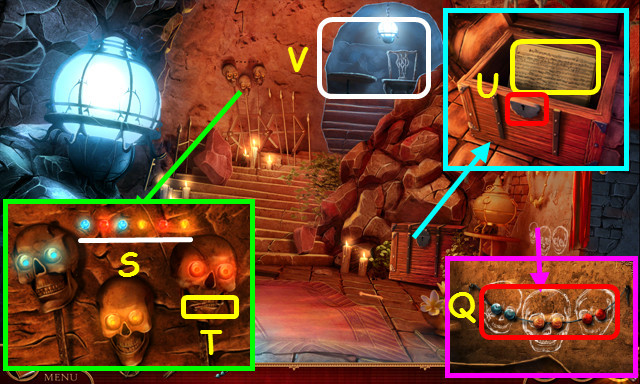
- Place the NECKLACE (Q) and STONE EYE (R).
- Swap the eyes to match the necklace (S). Press the eyes in the sequence on the wall.
- Take the CHEST KEY (T).
- Use the CHEST KEY in the lock, open the chest, move the papers, and take the NOTE SHEET (U).
- Select the alcove (V).
- Hang the NOTE SHEET on the clip (A).
- Select the notes on the tablet that correspond to the points on the paper (B).
- There are 3 patterns to complete.
- Take the SONG OF WATER TABLET.
- Walk to the Upper Floor.
- Place the SONG OF WATER TABLET on the music stand of the piano (K).
- Watch and repeat the sequences of piano keys.
- There are 3 sets of 4 keys.
- Sequences: (M, M, L. M), (M ,N, M, N), and (O, N, L, N).
- Take the RECORDED SONG OF WATER (P).
- After talking to Luna, walk down.
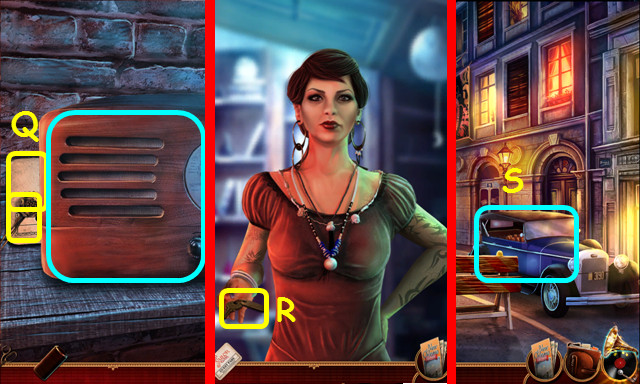
- Move the radio; take the HAIRPIN and the SAILOR'S CLUB PASS (Q).
- Take the CAR KEYS (R).
- Walk down and left.
- Use the CAR KEYS on the car (S).
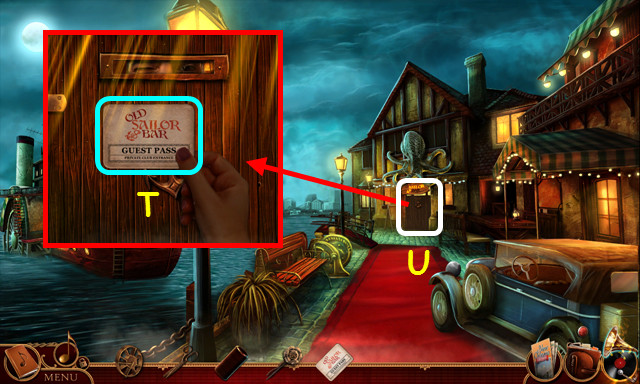
- Use the SAILOR'S CLUB PASS on the door (T).
- Enter the Old Sailor Bar (U).
- Talk to the sailor thoroughly.
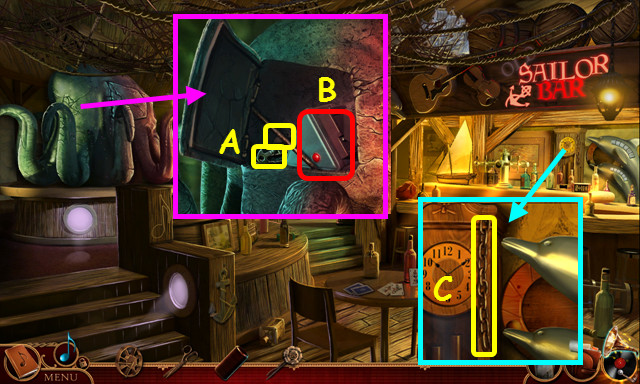
- Open the panel; take the WINCH KEY and the 1/3 CHAIN (A).
- Note the projector (B).
- Take the 2/3 CHAIN (C).
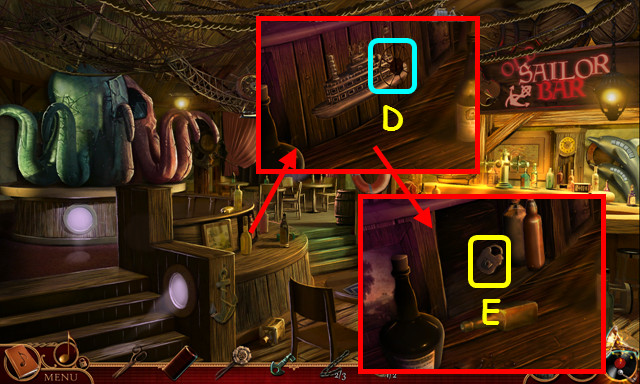
- Place the STEAMBOAT WHEEL on the steamboat (D).
- Move the bottles; take the 1/2 PADLOCK (E).
- Walk down.
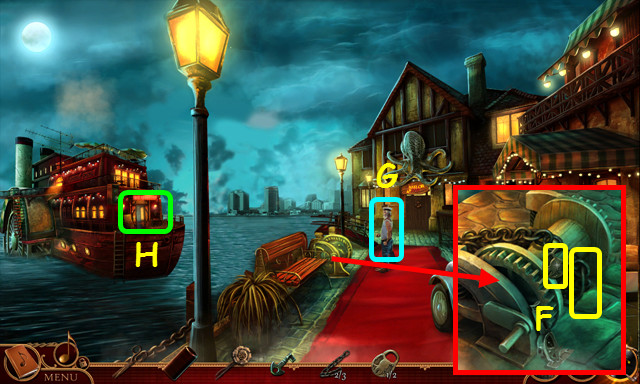
- Use the WINCH KEY on the lock; take the 3/3 CHAIN and the 2/2 PADLOCK (F).
- Use the 2 PADLOCKS on the 3 CHAINS to make the LONG CHAIN.
- Give the LONG CHAIN to the sailor (G).
- Enter the Steamboat Lounge (H).
- Walk up the right stairs to the Steamboat Radio.
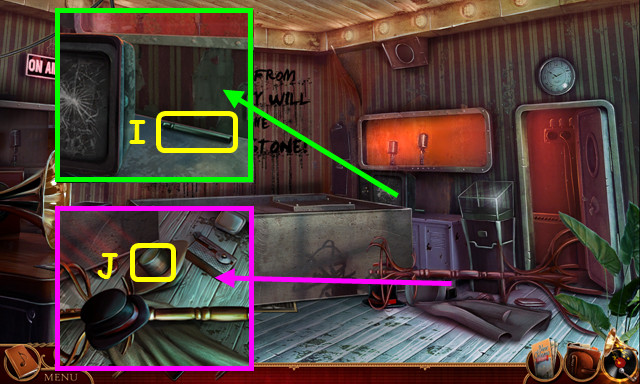
- Move the TV and take the JACK HANDLE (I).
- Move the hat and recorder; take the PROJECTOR LENS (J).
- Walk down twice.
- Place the JACK HANDLE on the jack part to make the JACK (K).
- Return to the Steamboat Radio.
- Place the JACK next to the console and use the handle twice (L).
- Take the DAMAGED PAPER, the VALVE, and the SAILOR SLIDES (N).
- Return to the Old Sailor Bar.
- Place the SAILOR SLIDES in the projector (O).
- Remove the burnt lens; place the PROJECTOR LENS in the opening (P).
- Pull down the screen, and then select the screen (Q).
- Select the blank screen (R).
- Move the items to the correct locations (color-coded) (S, T).
- Talk to the sailor (U).
- Select the sailor behind the bar (V).
- Play the HOP (W).
- You will earn the SAFE CODE.
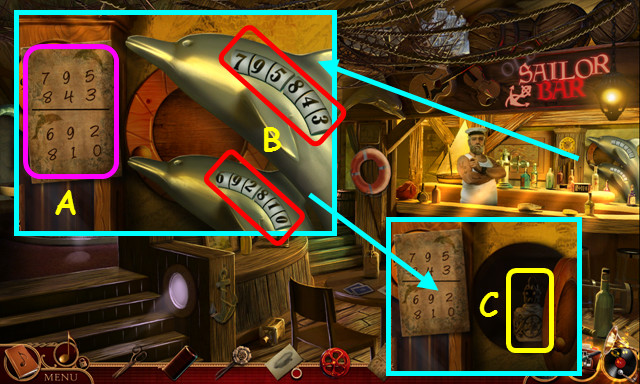
- Place the SAFE CODE next to the dolphins (A).
- Change the numbers to match the code (B).
- Open the door; take the INK RESTORATION SOLUTION (C).
- Look at the DAMAGED PAPER; use the INK RESTORATION SOLUTION on the smear.
- Travel to the Zeppelin Interior.
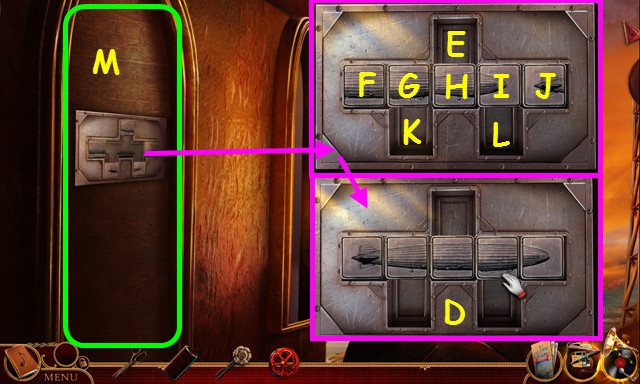
- Move the blocks to complete the zeppelin (D).
- Solution: (I-L), (H-E), (G-I), (E-K), (I-E), (J-G), (L-J), (E-L), (G-E), (F-I), (E-F), (K-G), (I-H), and (L-I).
- Open the door and walk left (M).
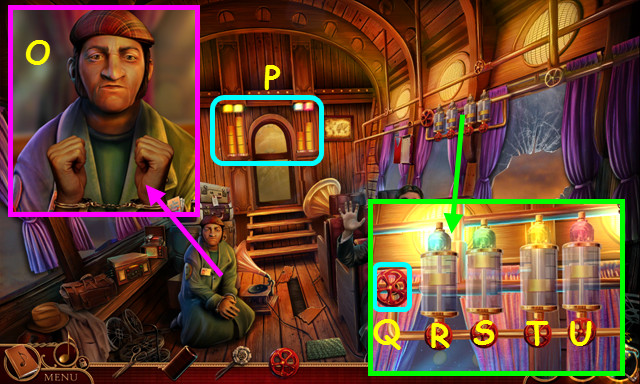
- Give the HAIRPIN to the Taxi Driver and talk to him (O).
- Note the cylinder's height and the color above each (P).
- Place the VALVE on the device and turn it (Q): Rx1, Sx3, Tx2, and Ux2.
- Walk forward.
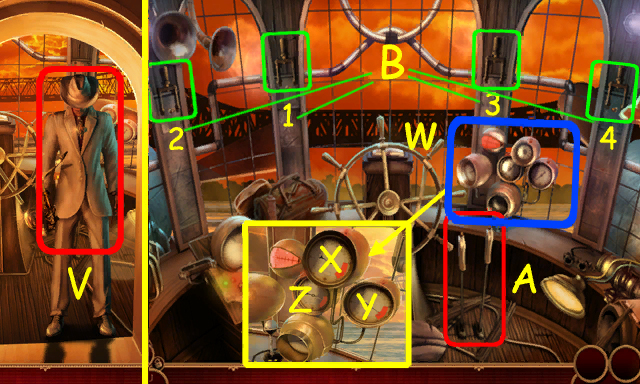
- Talk to the man in white (V).
- In the Zeppelin Cockpit (B), click on gauges (W): X, Y, Z.
- Work the levers (A) 4 times and pull down switches 1-4 (B).
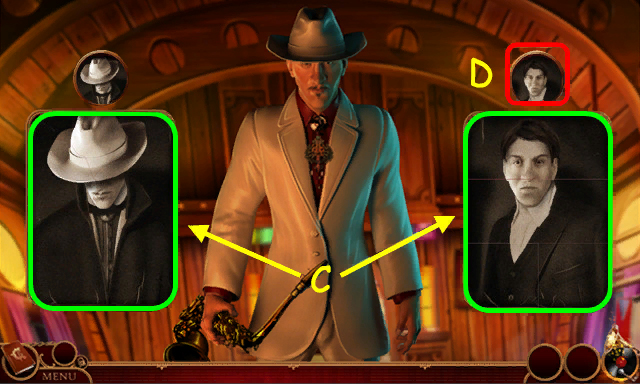
- Restore the 2 photos (C).
- Select the conversation icon on the right (D).
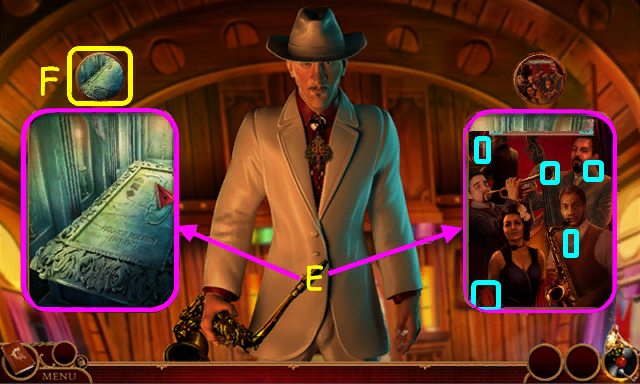
- Restore the 2 photos (E).
- Select the conversation icon on the right (F).
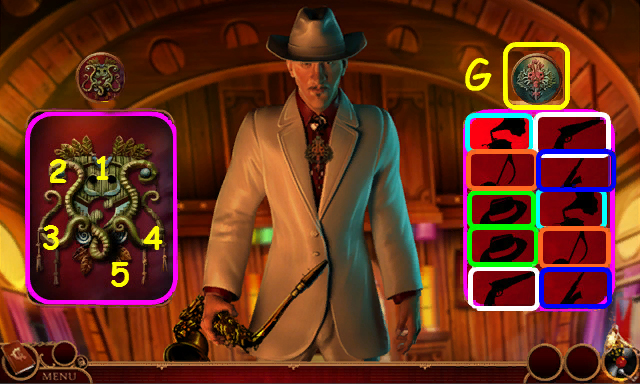
- Select the amulet pieces 1-4.
- Select matching pairs to uncover the amulet (color-coded).
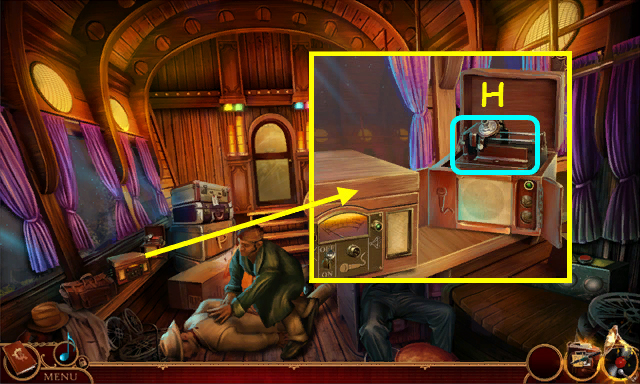
- Select the left speech icon (G).
- Place the RECORDED SONG OF WATER on the device (H).
- Congratulations! You have completed Cadenza: Music, Betrayal, and Death!
Created at: 2014-05-11