

Walkthrough Menu
- General Tips
- Chapter 1: Theater
- Chapter 2: Backstage
- Chapter 3: The Green Room
- Chapter 4: Stage Lift
- Chapter 5: The Garden
General Tips
- This is the official guide for Danse Macabre: The Last Adagio!
- This guide will not mention each time you have to zoom into a location; the screenshots will show each zoom scene.
- Hidden-object puzzles are referred to as HOPs in this guide. Items listed in green or red, are hidden or require additional actions to locate. Interactive items in HOPs are color-coded.
- Mini-games and HOPs are sometimes randomized; your solution may vary.
- In HOPs, groups of items will be marked in the same color. Listed items will be marked in yellow and interactive items will be color-coded.
- This guide will give step-by-step solutions for all puzzles which are not random. Please read the instructions in the game for each puzzle.
Chapter 1: Theater
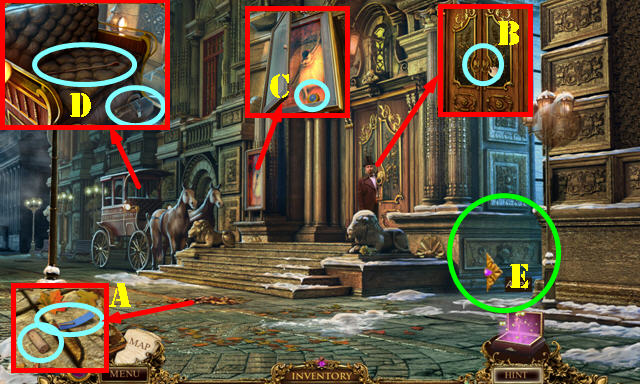
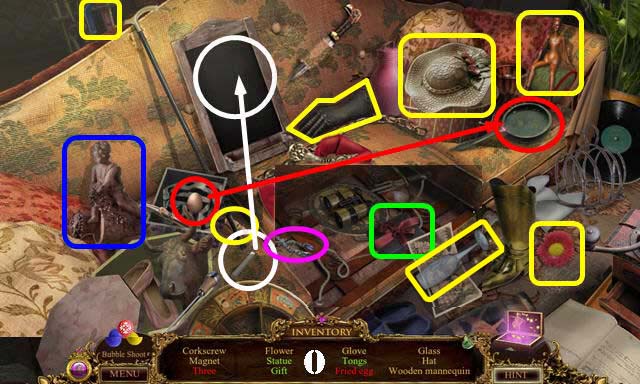
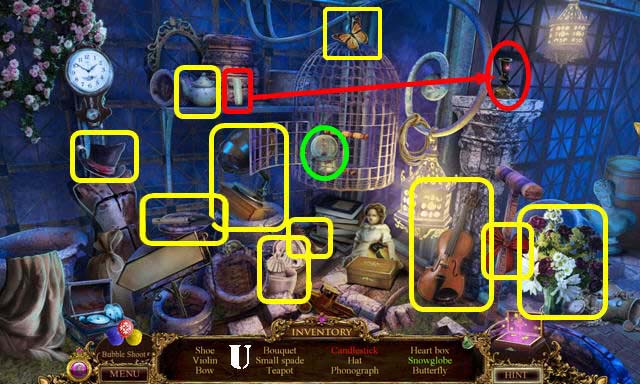
- Talk to the stage manager.
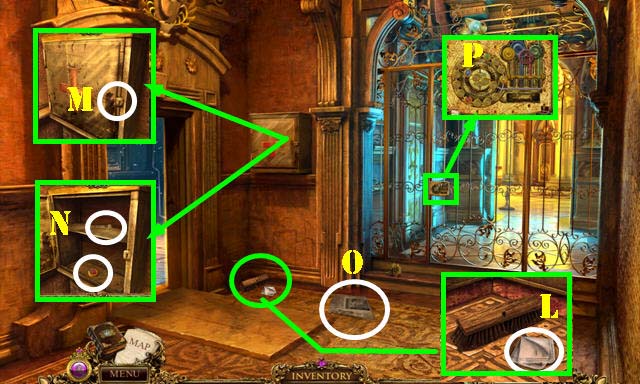
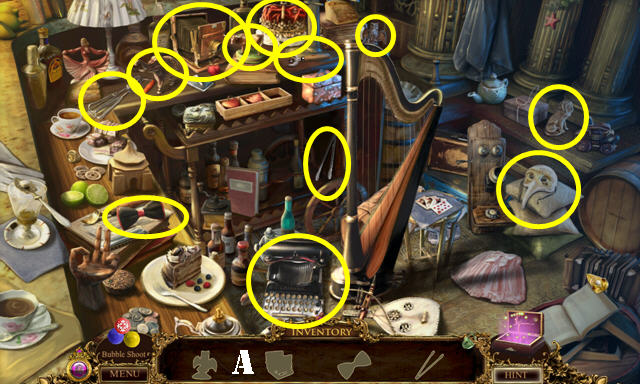
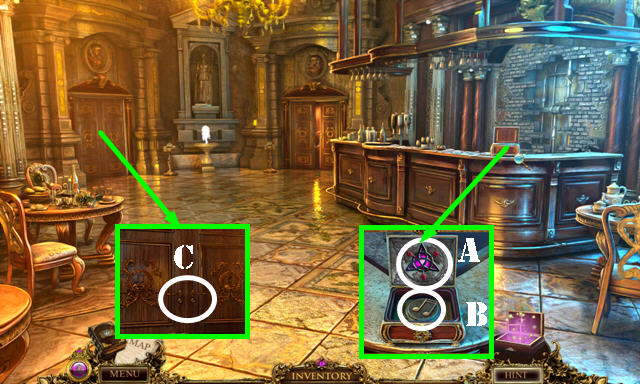
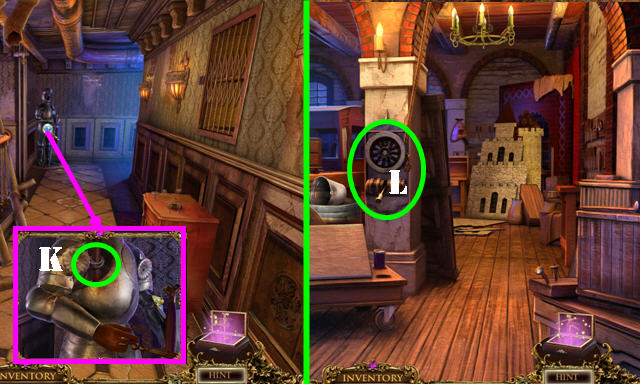
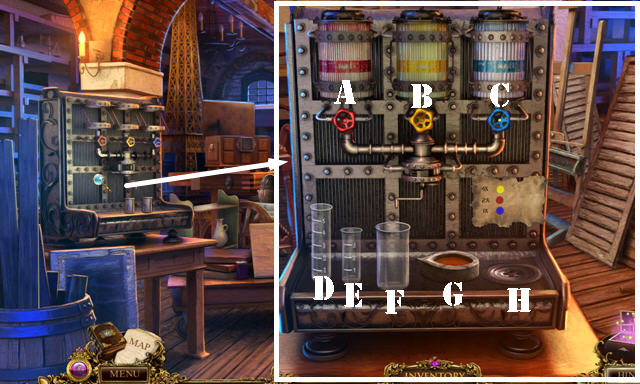
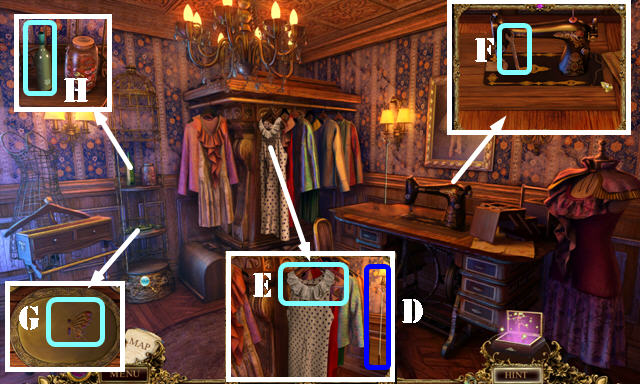
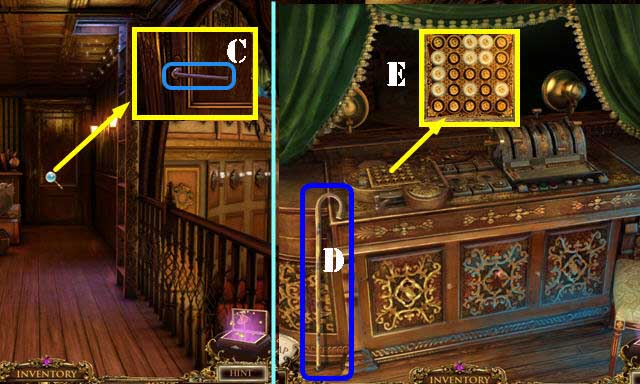
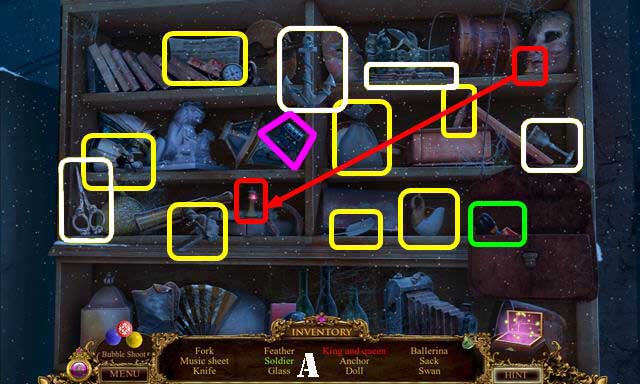
- Move the leaves; take the CORK and MATCHES (A).
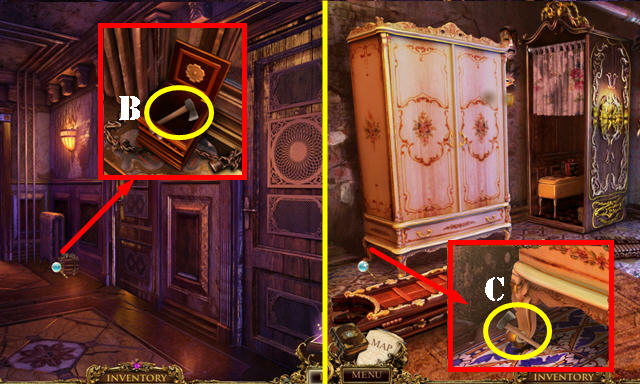
- Take the DOOR HANDLE (B).
- Place the CORK in the hole and take the TOKEN 1/3 (C).
- Take the RIDING CROP and EMPTY BAG (D).
- Go to the Alley (E).
- Place the DOOR HANDLE and take the TOKEN 2/3 (E).
- Use the MATCHES on the candle. You receive the MATCHBOOK COVER.
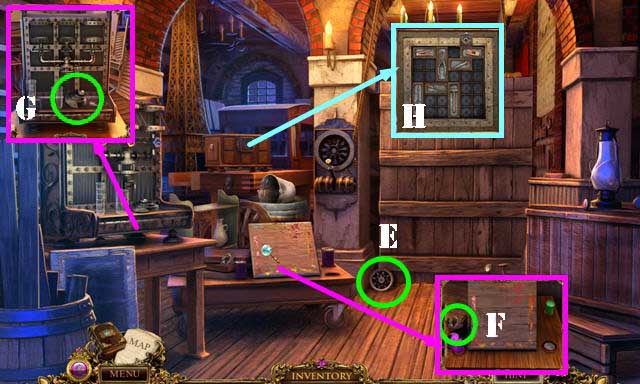
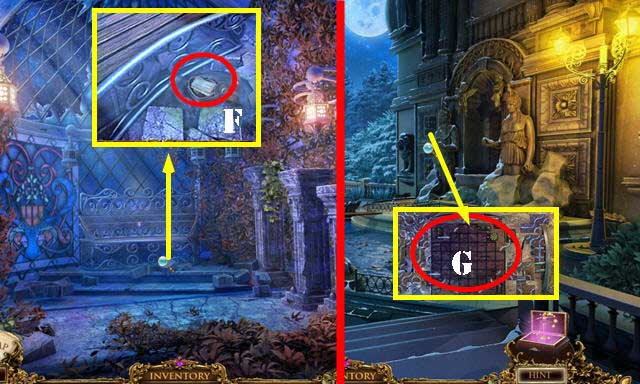
- Take the BRICKS (F).
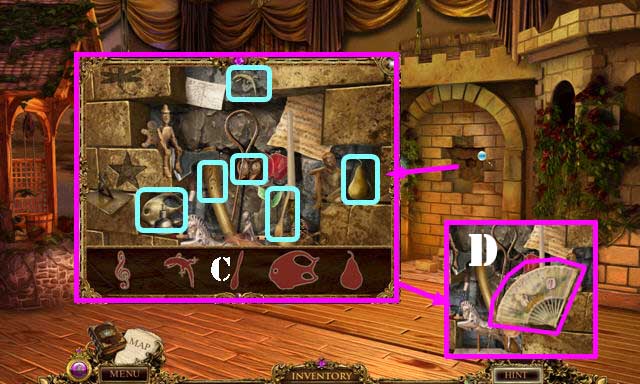
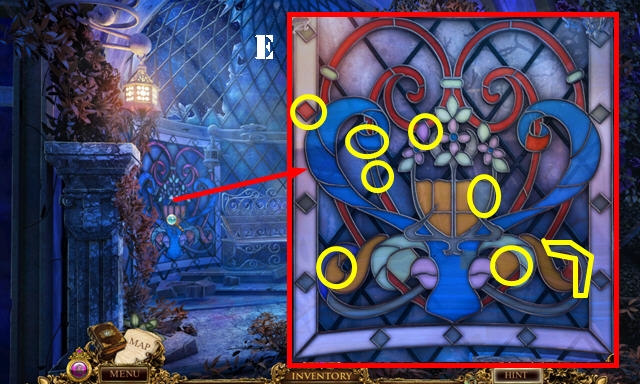
- Remove the cloth to activate a HOP (G).
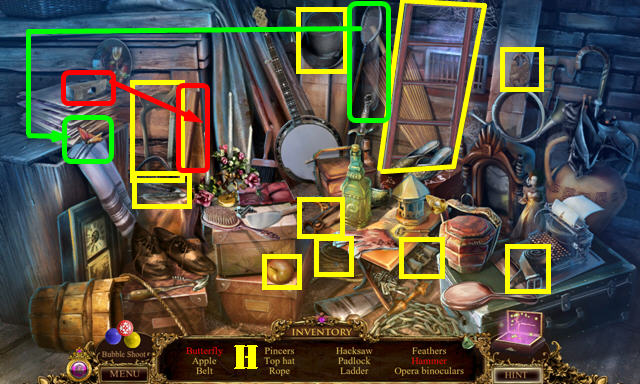
- Play the HOP (H).
- You receive the LADDER.
- Walk down.
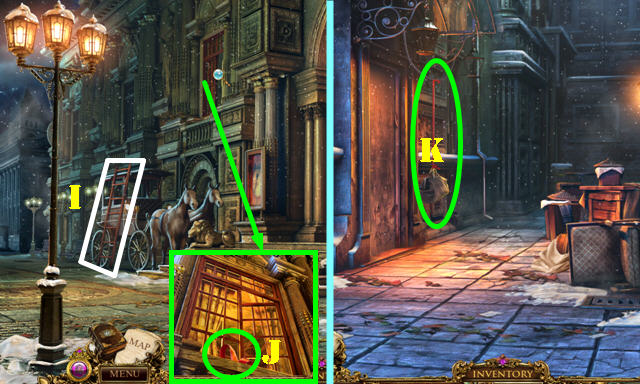
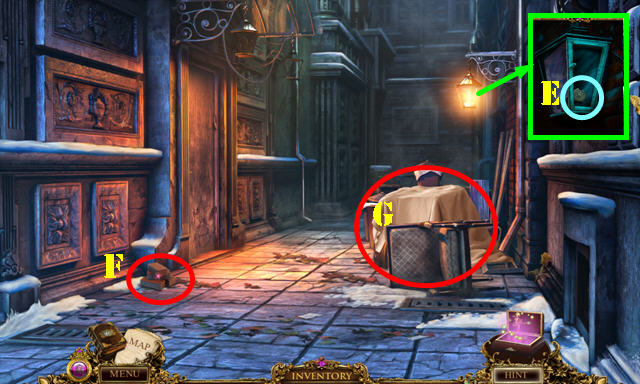
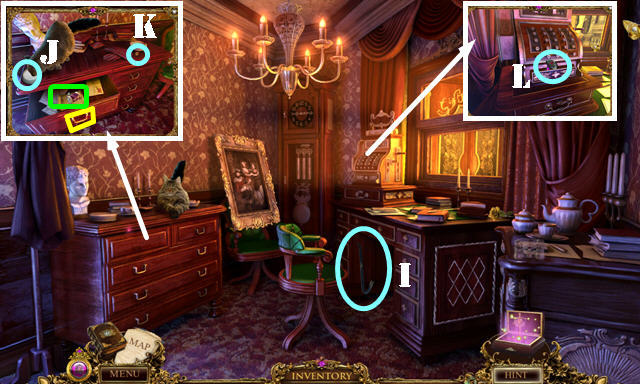
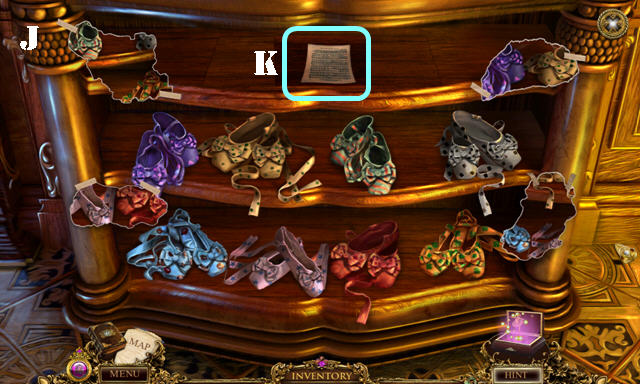
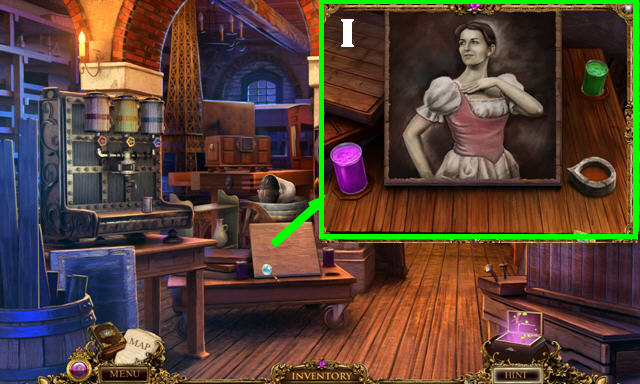
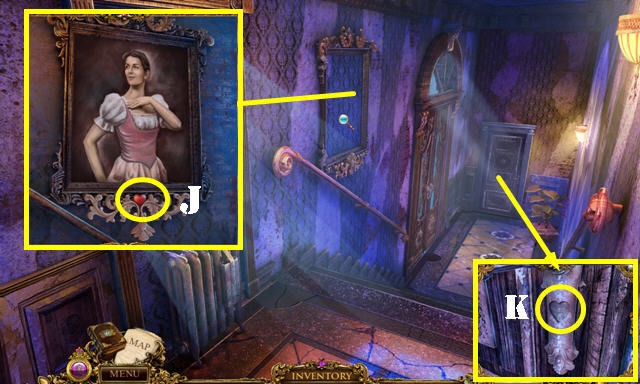
- Place the LADDER (I) on the carriage; use the RIDING CROP to get the RIBBON (J).
- Go to the Alley.
- Place the RIBBON on the rail and then hang the EMPTY BAG on it. Place the BRICKS in the empty bag (K).
- Swing the bag twice and go to the Side Entrance.
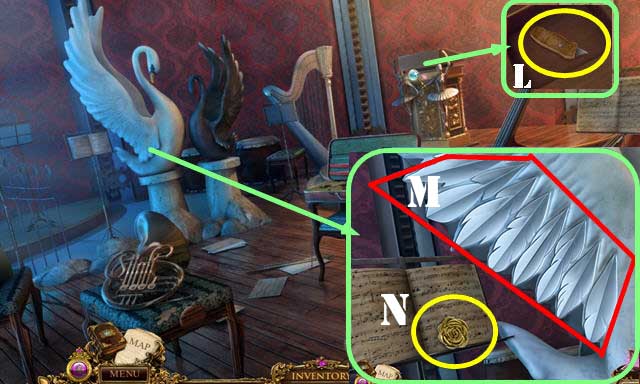
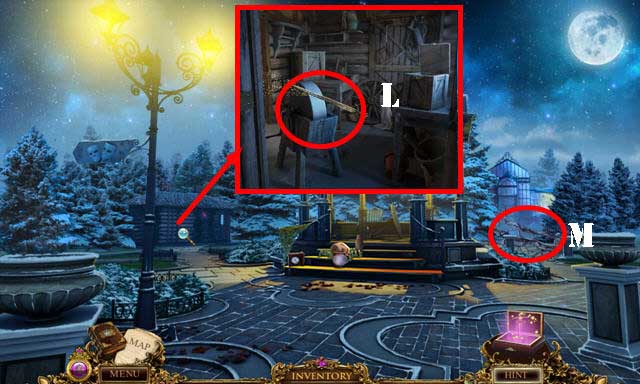
- Take the HANDKERCHIEF (L).
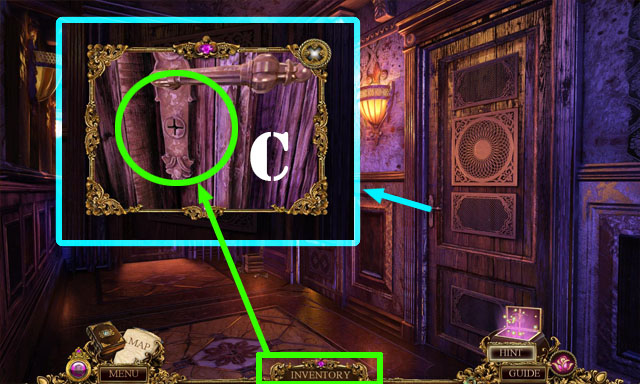
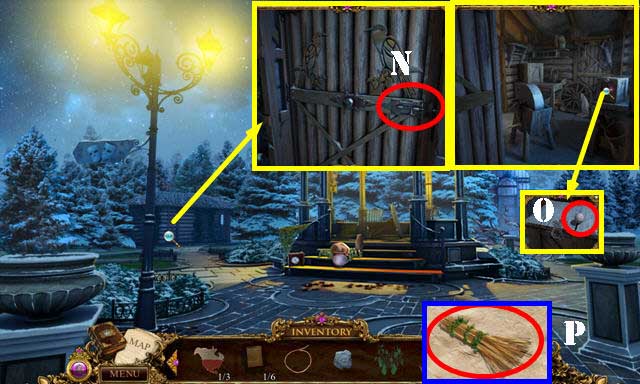
- Use the MATCHBOOK COVER on the latch (M); take the HAIR PIN and TOKEN 3/3 (N).
- Take the newspaper article (O).
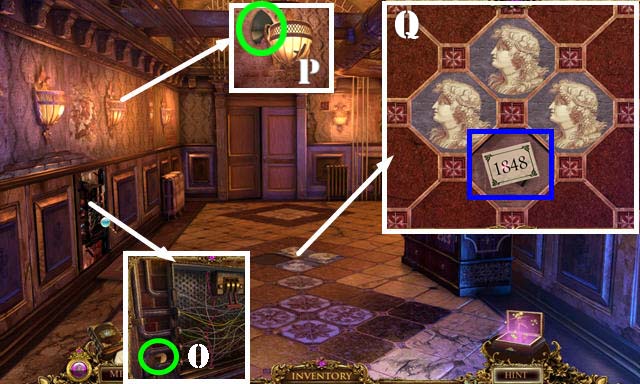
- Place the 3 TOKENS on the lock to activate a puzzle (P).
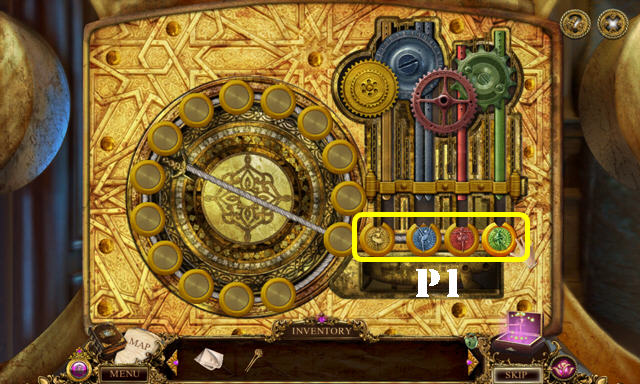
- Slide the tokens into the right slots. Start by placing the token on the right first, by placing them in this order: green, red, blue, and gold.
- The Solution (P1) is random.
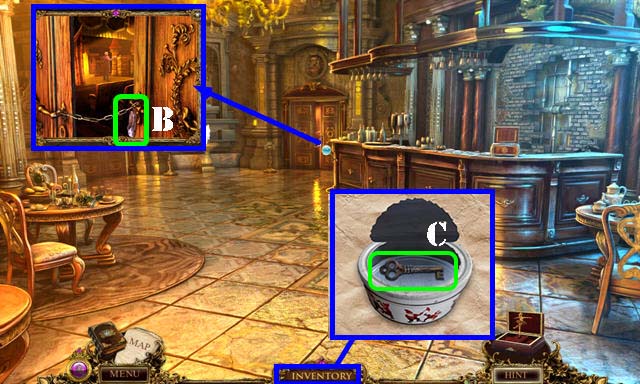
- Go to the Lobby Entrance.
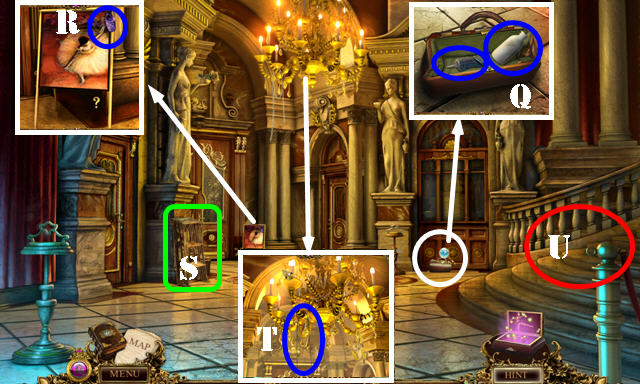
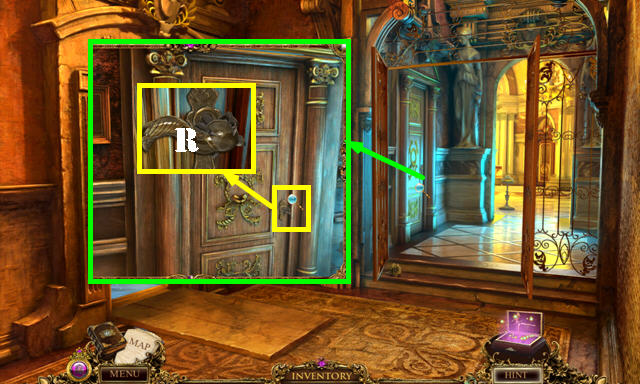
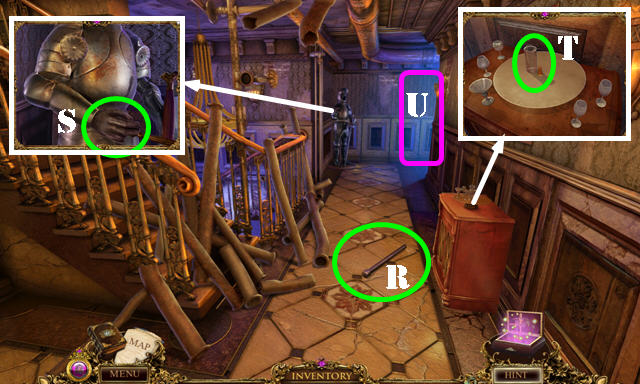
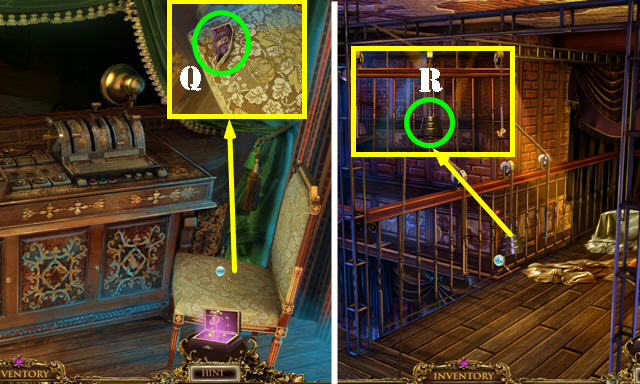
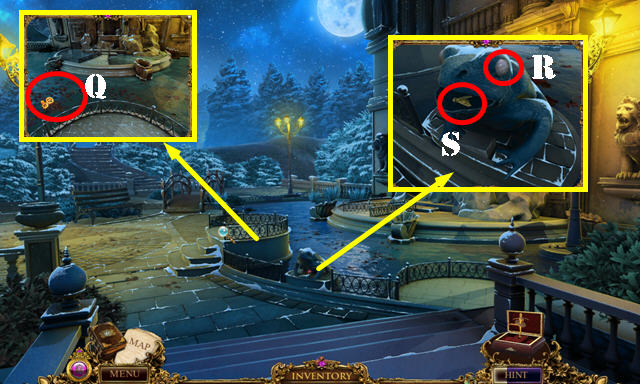
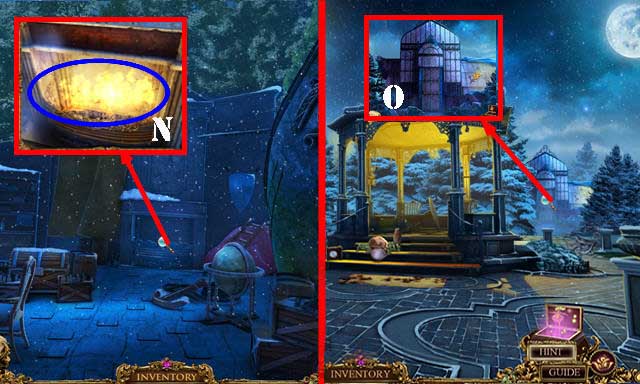
- Use the HAIR PIN in the lock; take the GLUE and MILK (Q).
- Take the BALLET SLIPPER 1/3 (R).
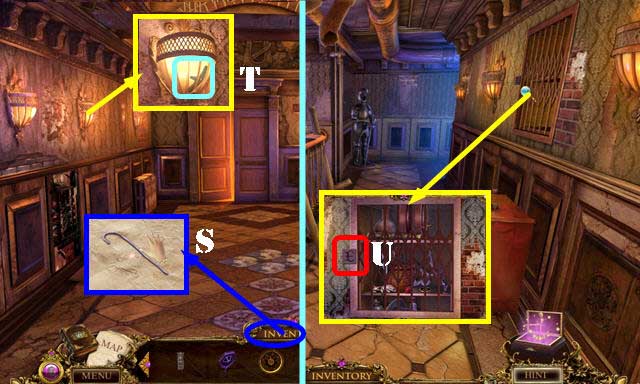
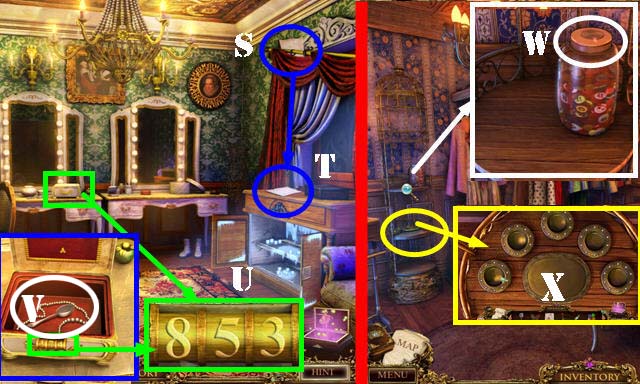
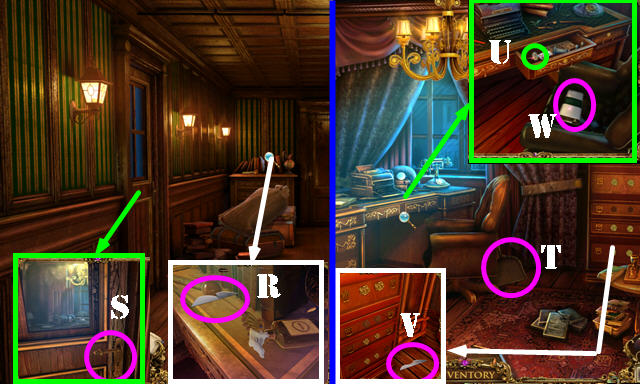
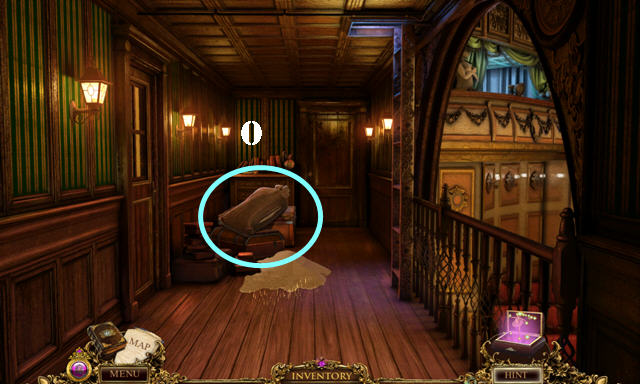
- Move the stepladder (S); take the PIANO WIRE (T).
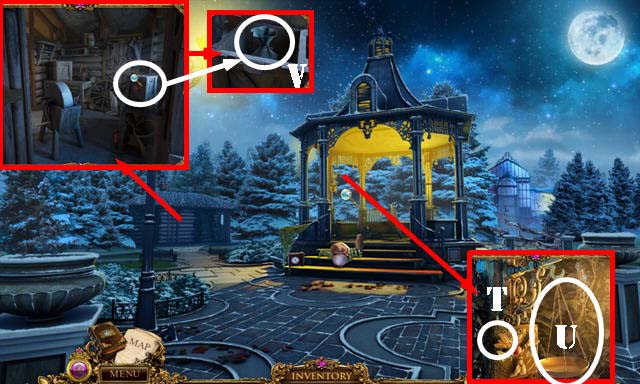
- Go to the Lobby (U).
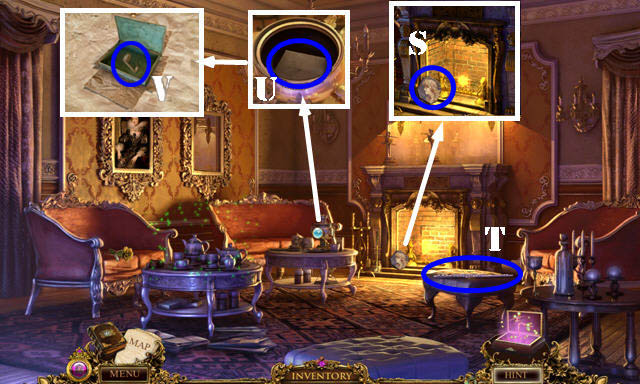
- Talk to Marie.
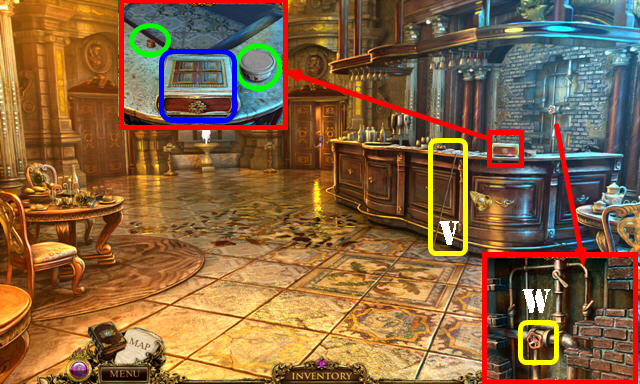
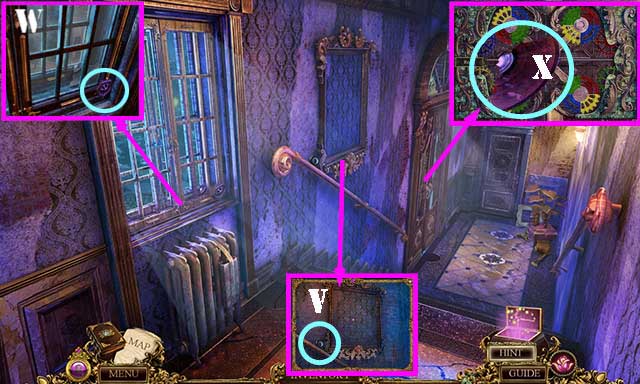
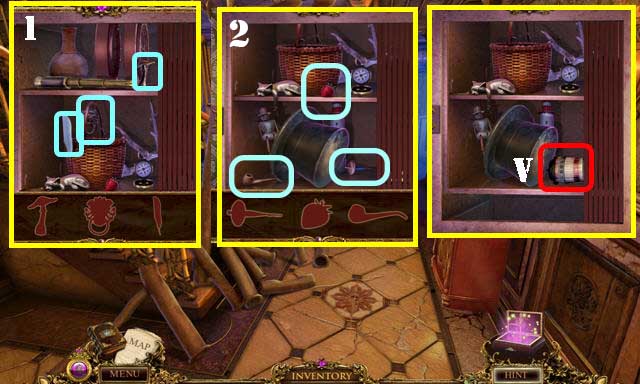
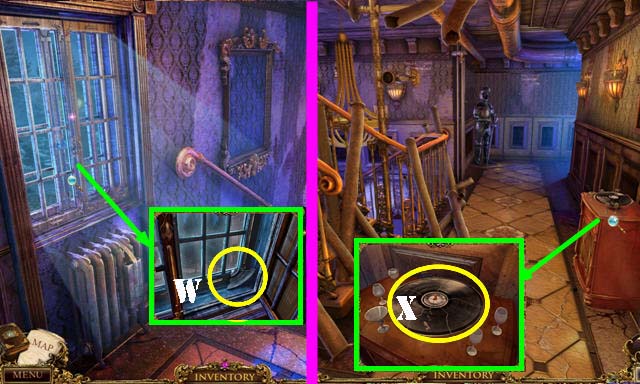
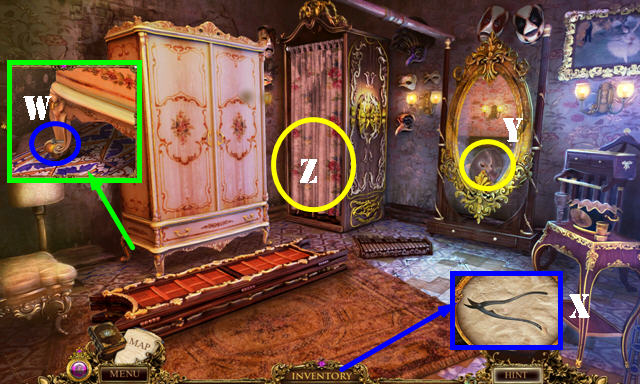
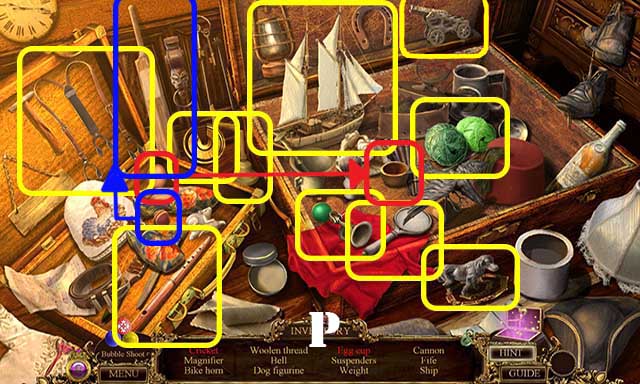
- Take the BROOM HANDLE (V) and the VALVE HANDLE (W).
- Take the TIN CAN and the CASH REGISTER BUTTON (green). Open the music box (blue).
- Return to the Side Entrance.

- Place the GLUE in the hole and then the BROOM HANDLE on the sweeper to get the BROOM (X). Take the TWEEZERS below it.
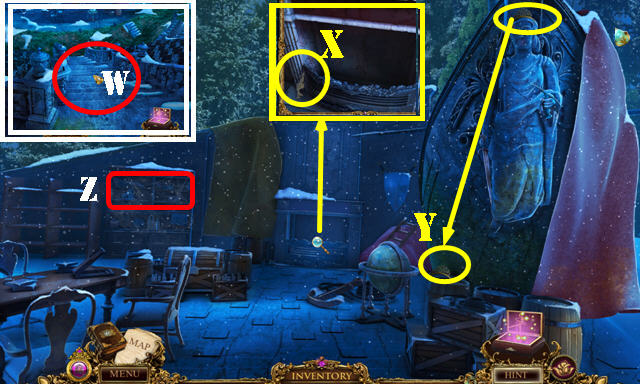
- Return to the Lobby.
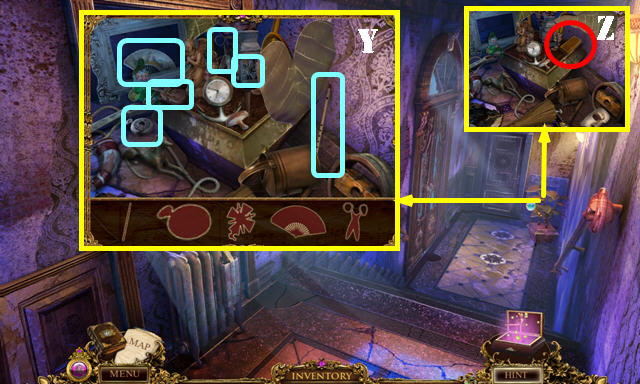
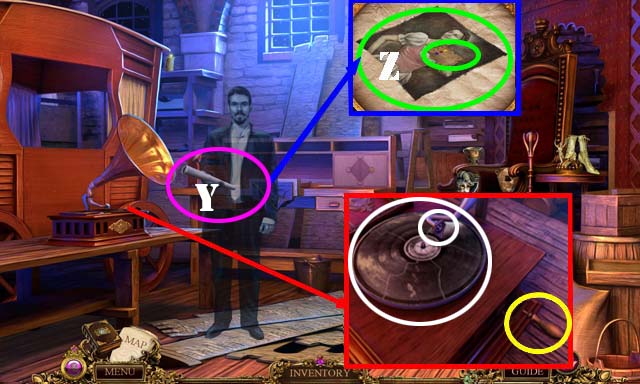
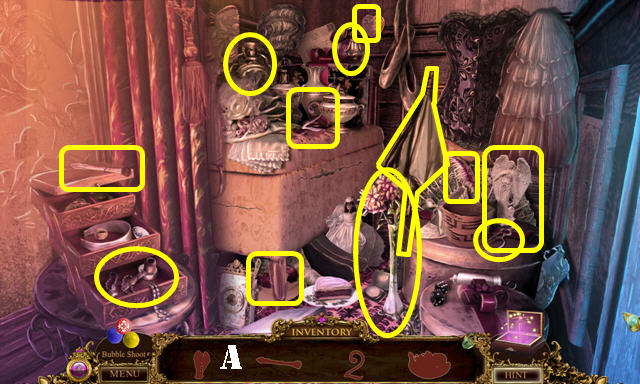
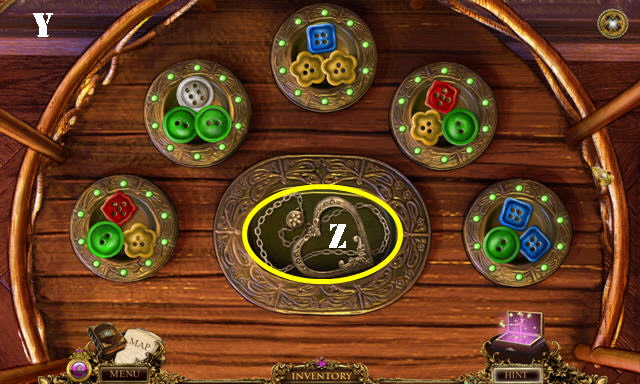
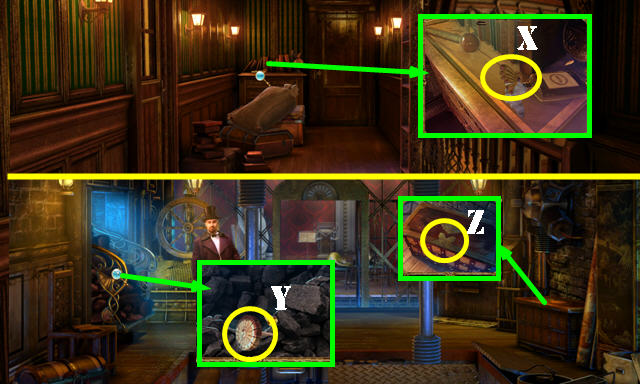
- Use the BROOM on the debris to activate a HOP (Y).
- Use the HANDKERCHIEF to get the SHARP SHARD (Z).
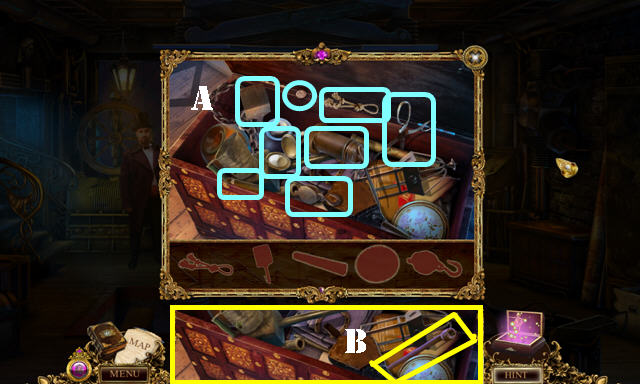
- Play the HOP (A).
- You receive the CAN OPENER.
- Take the BALLET SLIPPER 2/3 (B).
- Open the TIN CAN with the CAN OPENER; take the WARDROBE KEY (C).
- Walk down.
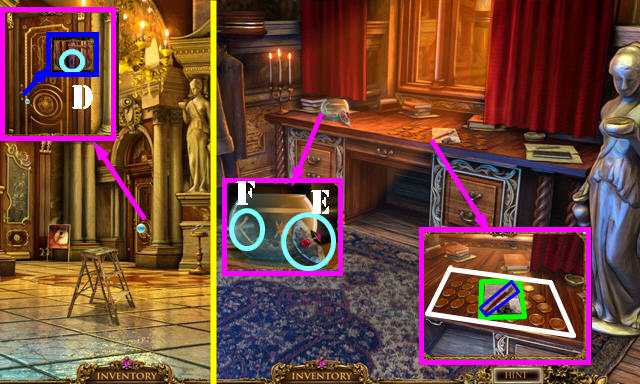
- Use the WARDROBE KEY in the lock (D); turn the key and enter the Coat Room.
- Take the MOSAIC PIECE 1/3 (E). Use the TWEEZERS to get the DRAWER HANDLE (F).
- Take the GLASS CUTTER (blue) and the newspaper article (green).
- Zoom into the tokens for a puzzle (white).
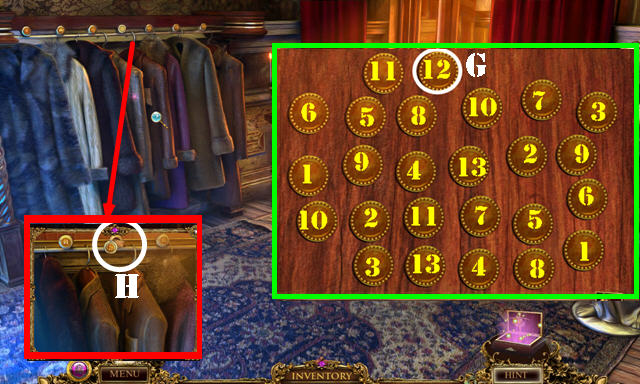

- Find the matching numbers. Take the NUMBER 12 TOKEN (G).
- Place the NUMBER 12 TOKEN in the slot; take the SAFE COMBINATION (H).
- Walk down.
- Use the GLASS CUTTER on the glass of the door on the left (W); pull the handle (X) and enter the Box Office.
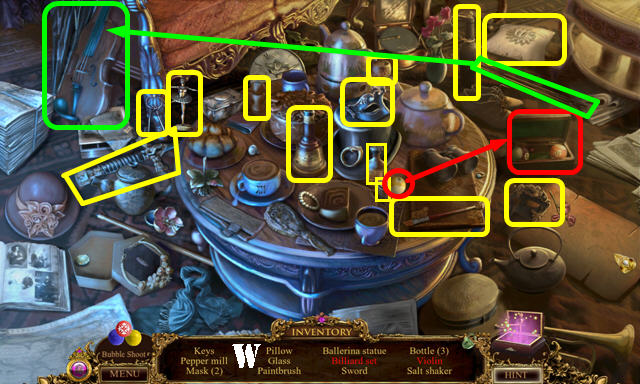
- Take the CROWBAR (I).
- Place the DRAWER HANDLE (yellow); take the THREAD and BALLERINA POSES (green).
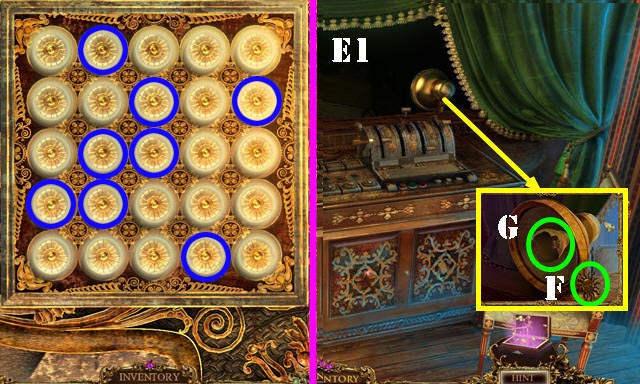
- Place the MILK in the saucer (J); take the CASH REGISTER BUTTON 2/2 (K).
- Place the 2 CASH REGISTER BUTTONS on the register; take the MOSAIC PIECE 2/3 (L).
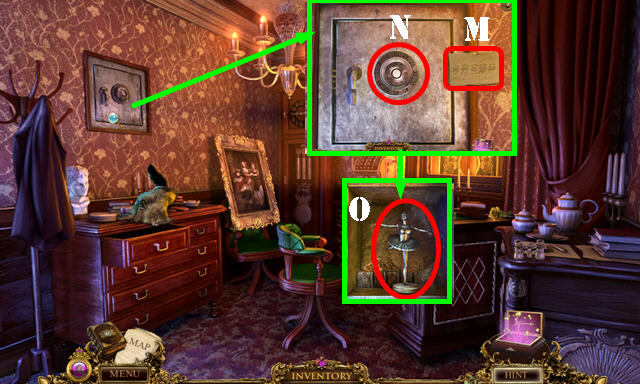
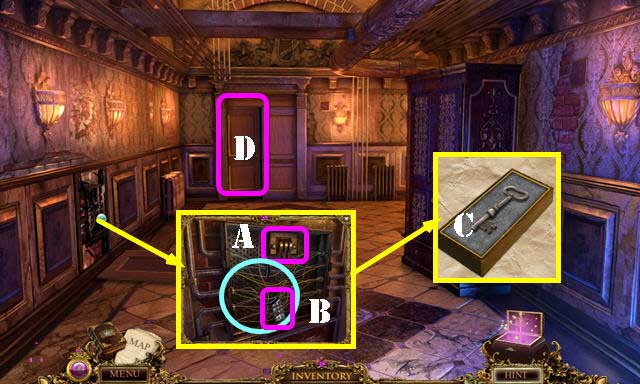
- Place the SAFE COMBINATION on the safe (M).
- Spin the dial (N) in the following order and stop after each number: counterclockwise to 15, clockwise to 55, counterclockwise to 10, counterclockwise to 35, and clockwise to 20.
- Take TROPHY 1/3 (O).
- Return to the Coat Room.
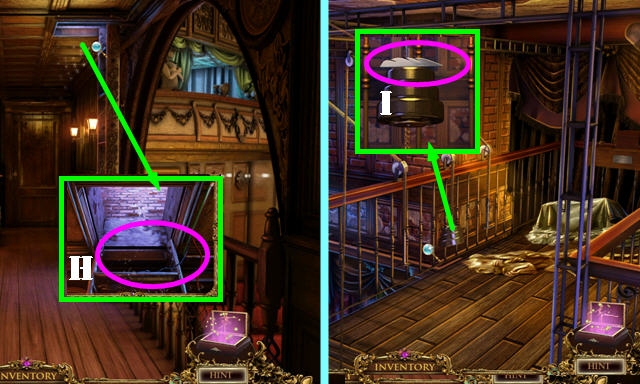
- Move the carpet; use the CROWBAR on the trapdoor.
- Take TROPHY 2/3 (P).
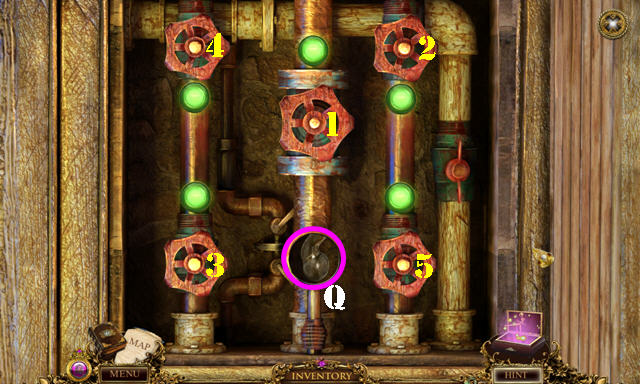
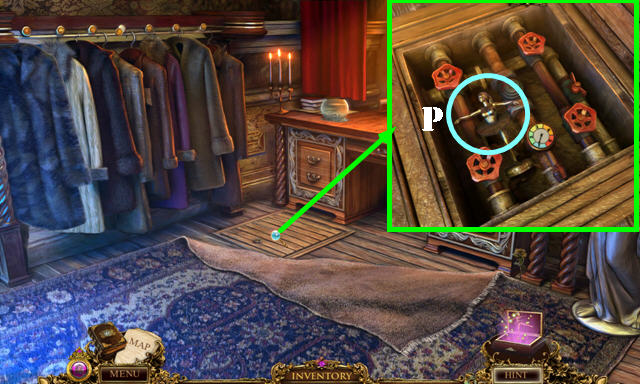
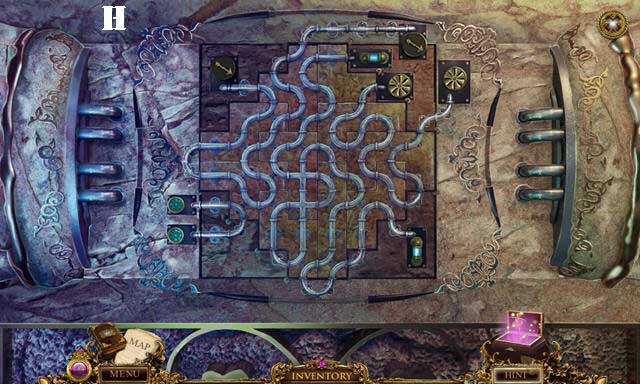
- Zoom into the pipes and place the VALVE HANDLE on the pipes for a puzzle.
- Select the pipes in order (1-5).
- Take the DOOR HANDLE (Q).
- Return to the Side Entrance.
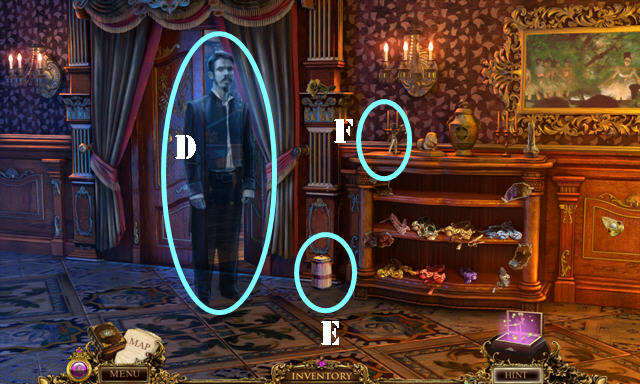
- Place the DOOR HANDLE on the door; enter the VIP Lounge (R).
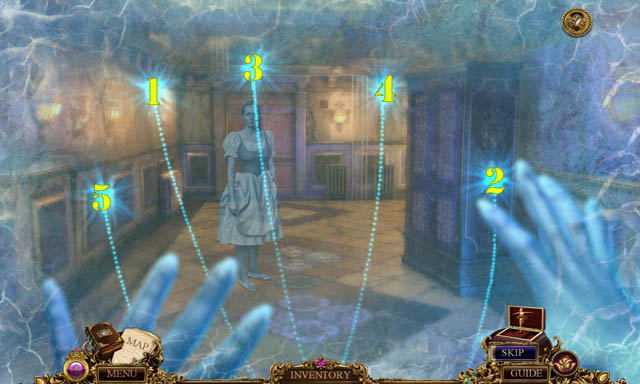
- Talk to the ghost.
- Take the DECORATIVE TILE (S) and FLUTE (T).
- Remove the lid; take the PACKAGE (U).
- Use the SHARP SHARD on the PACKAGE; take the NOTE SYMBOL 1/2 (V).
- Play the HOP (W).
- You receive the TROPHY 3/3.
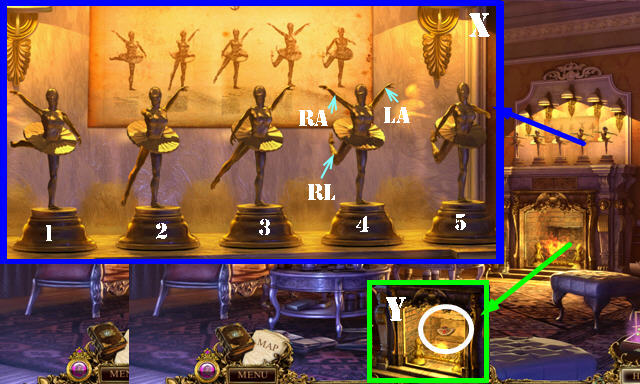
- Place the 3 TROPHIES and the BALLERINA POSES on the mantle for a puzzle.
- Arrange the ballerina poses as shown to complete the puzzle (X).
- Ballerina 1: RLx3 and LAx2.
- Ballerina 2: RAx1.
- Ballerina 3: RLx1 and RAx2.
- Ballerina 4: RLx2.
- Ballerina 5: RLx2, RAx2, and Lax1.
- Take the MOSAIC PIECES 3/3 (Y).
- Return to the Lobby.
- Place the 3 MOSAIC PIECES on the box (A); take the NOTE SYMBOL 2/2 (B).
- Place the 2 NOTE SYMBOLS on the door (C) and enter the Hallway.
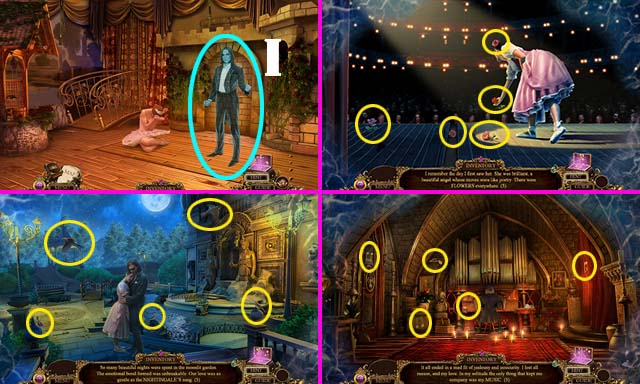
- Talk to Pierre and give him the FLUTE (D).
- Take the PAINT CANNISTERS 1/3 (E) and the SCISSORS (F).
- Enter the Practice Room.
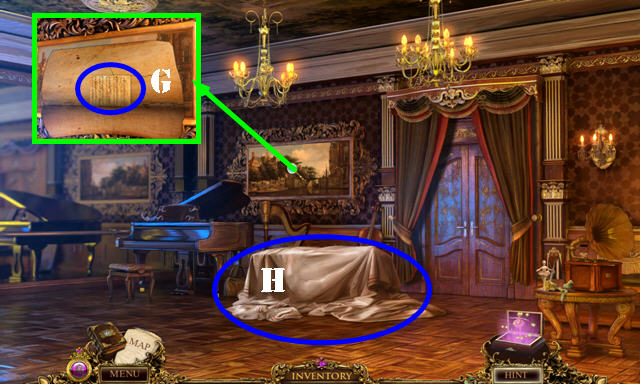
- Cut the painting with the SCISSORS; take the MUSIC SHEET 1/2 (G).
- Remove the cloth (H) to activate a HOP.
- Play the HOP (I).
- You receive the BALLET SLIPPERS 3/3.
- Walk down.
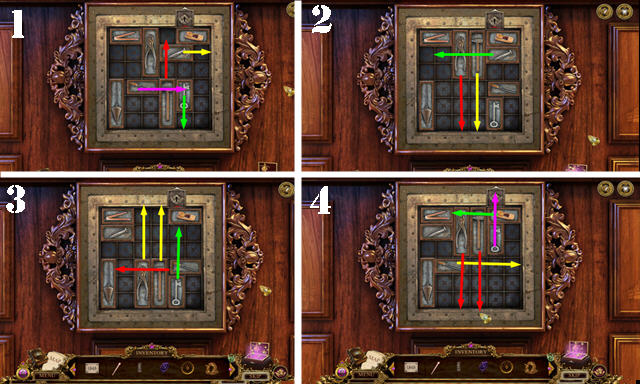
- Place the 3 BALLET SLIPPERS on the shelf for a puzzle.
- Select two slippers to swap their positions.
- Solution (J).
- Take the MUSIC SHEET 2/2 (K).
- Return to the Practice Room.
Chapter 2: Backstage
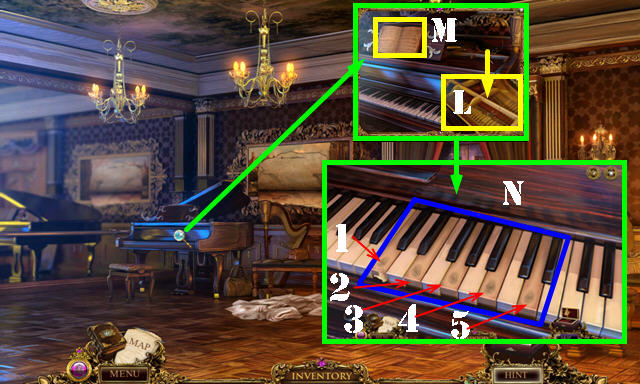
- Place the PIANO WIRE (L) and the 2 MUSIC SHEETS (M) on the piano and press the keys for a puzzle.
- Repeat the six sequences.
- Round one: 3.
- Round two: 3, 1.
- Round three: 3, 1, 4.
- Round four: 3, 1, 4, 2.
- Round five: 3, 1, 4, 2, 3.
- Round six: 3, 1, 4, 2, 3, 5.
- Complete the puzzle for a cut scene and another puzzle.
- Touch the lights in order (1-5).
- Open the panel and take the WOODEN DISC (O).
- Take the RECORD FRAGMENT 1/5 (P).
- Place the DECORATIVE TILE on the floor for a puzzle. Swap the tiles in each section as shown (Q).
- Take the LABEL and the RECORD FRAGMENT 2/5 below it (blue).
- Head right to the Backstage Hallway.
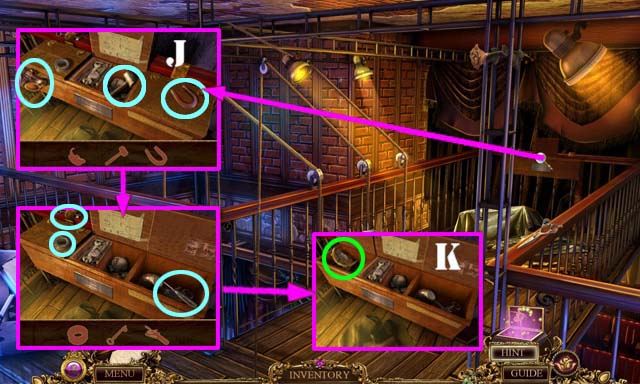
- Take the METAL ROD (R).
- Remove the sleeve and take the GLOVE (S).
- Move the glasses and take the MEASURING BEAKER (T).
- Go to the Passageway (U).
- Talk to the ghost.
- Take the ELECTRICAL TAPE (V), PHONOGRAPH NEEDLE (W), and RECORD FRAGMENT 3/5 (X).
- Play the HOP (Y).
- Take the WOODEN BLOCK (Z).
- Return to the Corridor.
- Use the GLOVE on the handle (A) and the ELECTRICAL TAPE on the wires (blue).
- Pull the handle and take the KEY PICTURE (B).
- Use the KEY PICTURE on the WOODEN BLOCK; take the KEY BLOCK (C).
- Enter the Scene Shop (D).
- Take the MACHINE WHEEL (E), GOLDEN EMBLEM (F), and RECORD FRAGMENT 4/5 (G).
- Place the KEY BOX in the slot to activate a puzzle (H).
- Slide the key plate into the lock.
- To solve the puzzle, follow the arrows in this order: yellow, red, green, and purple (1-4).
- Take the PAINTBRUSH (5).
- Walk down.
- Place the GOLDEN EMBLEM (I) and open the doors to activate a HOP.
- Play the HOP (J).
- Take the OIL CAN (@).
- Return to the Backstage Hallway.
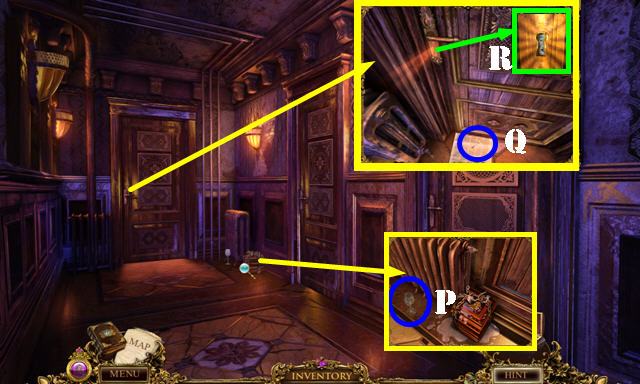
- Use the OIL CAN on the armor and take the PIECE OF ROPE (K).
- Return to the Scene Shop.
- Use the PIECE OF ROPE on the mechanism and pull the handle (L).
- Go forward to the Workshop.
- Take the METAL WIRE (M).
- Place the METAL ROD on the vise (N) and turn it; take the BOLT CUTTER PARTS (O).
- Take the BOTTLE OF GLUE (P).
- Place the WOODEN DISC in the slot. Arrange the discs as shown (Q) by pressing the discs in this order: 1, 1, 1, 2, 2, and 2.
- Take the LETTER E (green).
- Remove the wall to activate a HOP (Q1).
- Play the HOP (R).
- You receive the PAINT CANNISTER 2/3.
- Return to the Corridor.
- Bend the METAL WIRE three times and take the BENT WIRE (S).
- Use the BENT WIRE to get the WINDOW HANDLE (T).
- Return to the Backstage Hallway.
- Place the LETTER E in the slot (U) to activate a HOP.
- Play the HOPs (1and 2).
- Take the PAINT CANNISTER 3/3 (V).
- Return to the Passageway.
- Place the WINDOW HANDLE in the slot and turn it; take the RECORD FRAGMENT 5/5 (W).
- Walk down.
- Use the BOTTLE OF GLUE on the disc and then put down the 5 RECORD FRAGMENTS; take the GLUED RECORD (X).
- Return to the Workshop.
- Place the PHONOGRAPH NEEDLE on the arm and put down the GLUED RECORD (white).
- Turn the handle (yellow).
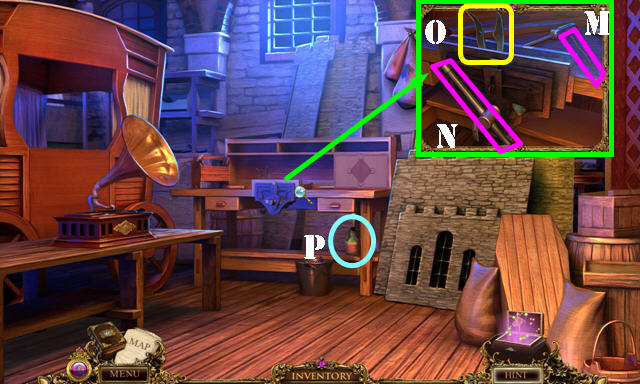
- Take the ROLLED PAINTING (Y) and unroll it completely; take the RECIPE and FADED PAINTING (Z).
- Walk down.
- Put down the MEASURING BEAKER. 3 CANNISTERS, and RECIPE for a puzzle.
- Solution: A, F-D, D-E, D-G.
- B, F-D, D-E, E-H, D-E, F-D, D-E, D-G.
- C, F-E, E-D, F-E, E-D, E-G.
- Take the MIXED COLOR (G).
- Put down the FADED PAINTING, MIXED COLOR, and PAINTBRUSH for a puzzle.
- Puzzle not working at time guide was written.
- Take the PAINTING (I).
- Return to the Passageway.
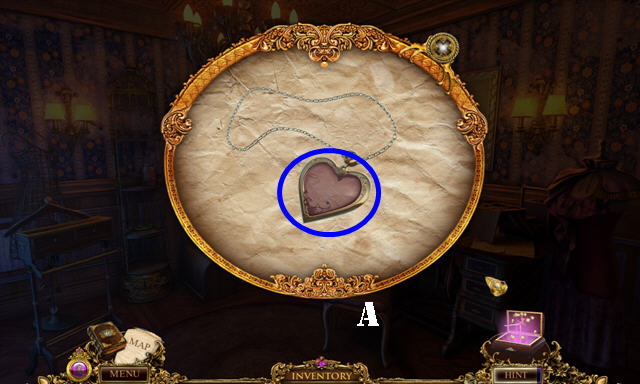
- Place the PAINTING in the frame; take the CRYSTAL HEART (J).
- Place the CRYSTAL HEART in the slot (K) and go into the Green Room.
Chapter 3: The Green Room
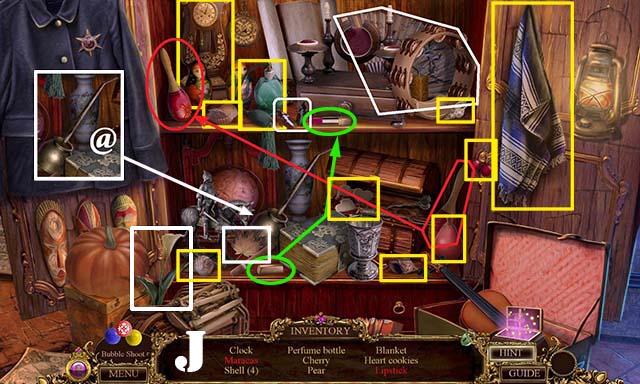
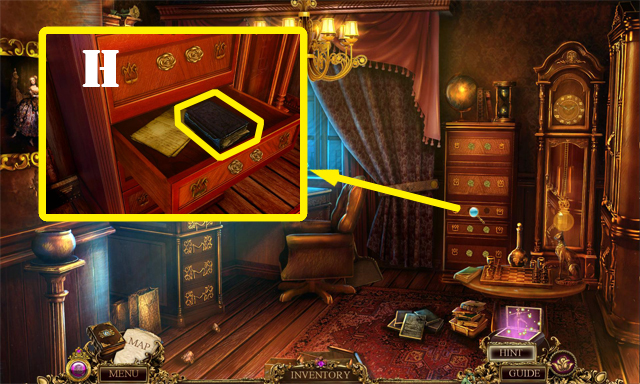
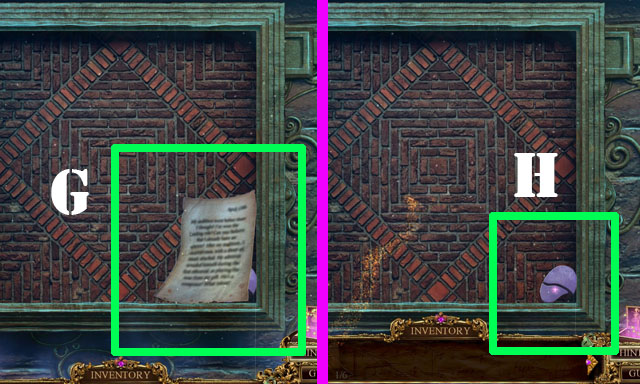
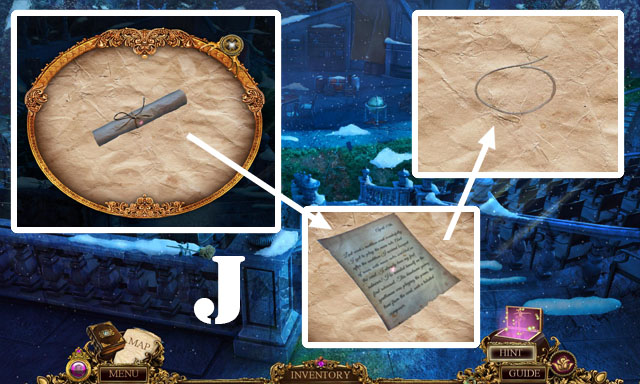
- Take the FOLDED NEWSPAPER (L); unfold it; take the clue and the NEWSPAPER (L1).
- Take the SAW HANDLE (M).
- Lower the cushion to activate a HOP (N).
- Play the HOP (O).
- Lift and lower the center cushion and move the left pillow to find all the items.
- You receive the ICE PICK.
- Take the stairs up to the Gallery Hallway.
- Take the WINE GLASS 1/2 (P).
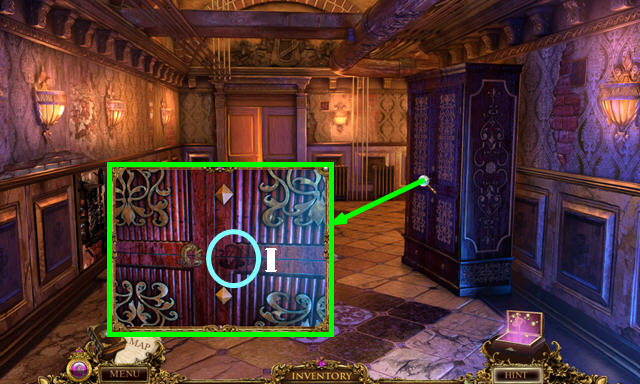
- Place the NEWSPAPER under the door (Q).
- Insert the ICE PICK through the keyhole (R) and take the BRASS KEY (Q).
- Use the BRASS KEY in the lock and enter the Makeup Room.
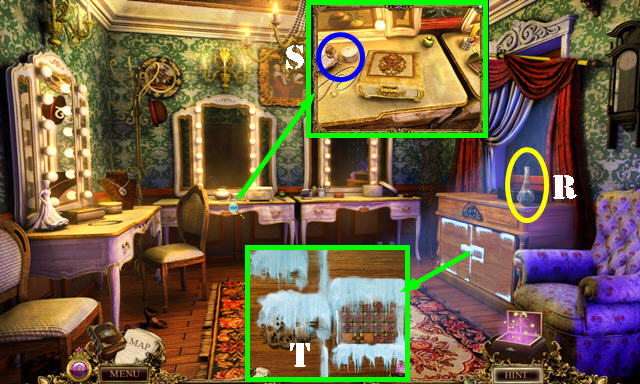
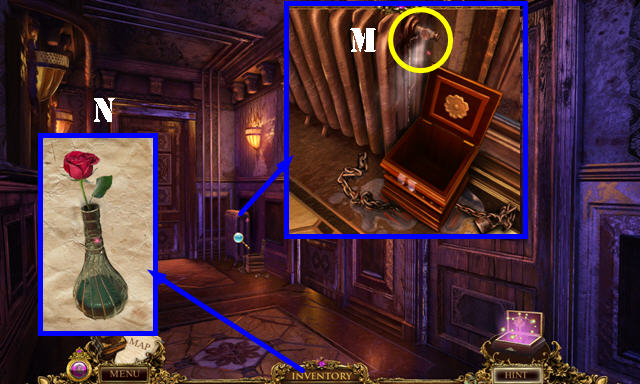
- Take the VASE WITH WATER (R) and the CROSS-SHAPED KEY (S).
- Use the ICE PICK on the ice for a puzzle (T).
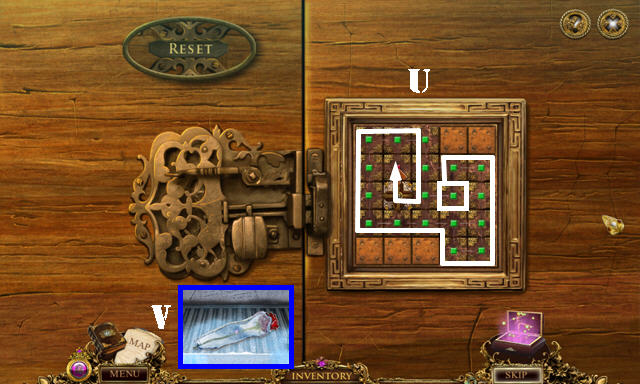
- The tile can initially be placed anywhere on the board. Place it on the area with the white square to begin.
- Solution (U). Take the FROZEN ROSE (V).
- Walk down.
- Use the CROSS-SHAPED KEY in the keyhole (C). Turn the key and enter the Dressing Room.
- Take the BOLT (W). Use the BOLT on the BOLT CUTTER PARTS; take the BOLT CUTTERS (X).
- Remove the partition; take the OVAL PHOTO (Y).
- Use the SCISSORS on the curtains (Z) to get the FABRIC STRIP 1/2 and to activate a HOP.
- Play the HOP (A).
- You receive the WINE GLASS 2/2.
- Walk down.
- Use the BOLT CUTTERS on the chain; open the box and take the SMALL HATCHET (B).
- Return to the Dressing Room.
- Use the SMALL HATCHET on the leg (C).
- Go through the hole in the wall.

- Take the GARMENT HOOK (D).
- Cut the FABRIC STRIP 2/2 with the SCISSORS (E).
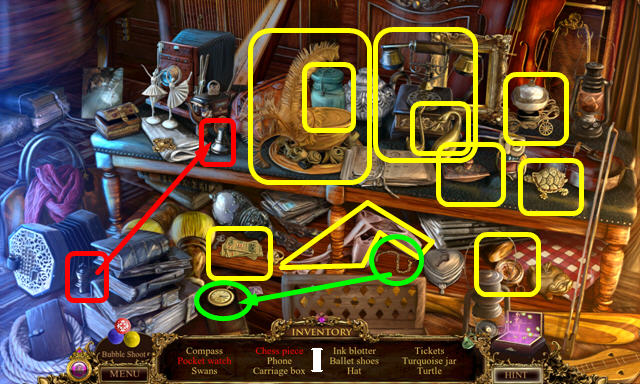
- Take the WRENCH (F), BUTTERFLY WINGS (G) and the UNMARKED WINE BOTTLE (H).
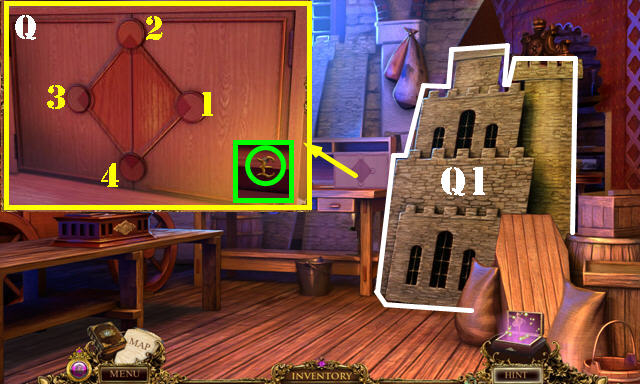
- Place the THREAD (I) and the MACHINE WHEEL (J) on the sewing machine.
- Put down the FABRIC (K) to get the TABLECLOTH.
- Place the LABEL on the UNMARKED WINE BOTTLE; take the WINE BOTTLE (L).
- Walk down twice.
- Use the WRENCH on the valve; place the FROZEN ROSE on the steam to acquire the ROSE (M).
- Place the ROSE in the VASE WITH WATER; take the ARRANGED VASE (N).
- Walk down.
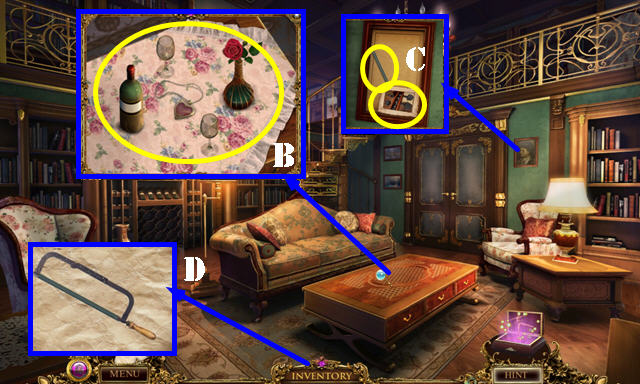
- Place the OVAL PHOTO in the frame for a puzzle.
- Swap the photos as shown. Take the note (O).
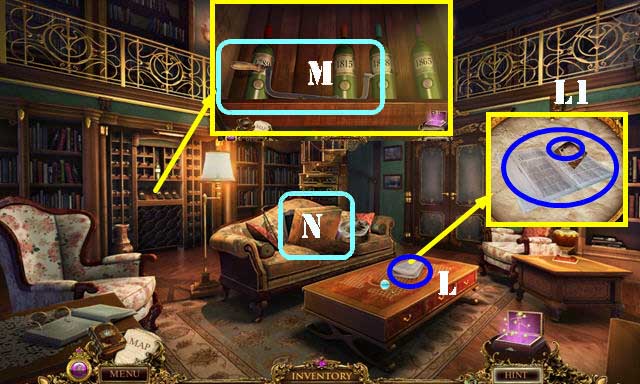
- Put down the WINE BOTTLE for a puzzle.
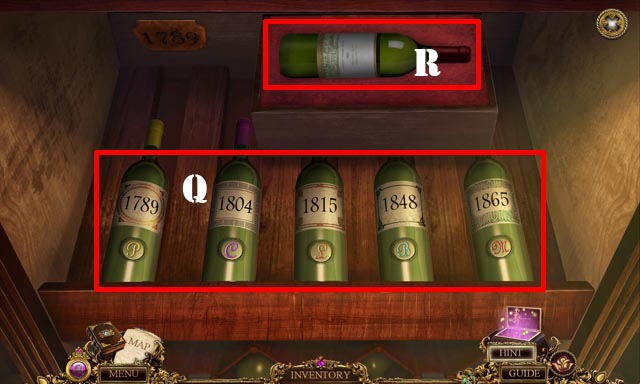
- Put the labels in place and then place the bottles in the right order. See the Journal for clues.
- Solution (Q).
- Take the AGED WINE (R).
- Return to the Makeup Room.
- Use the GARMENT HOOK on the note (S); take the note (T).
- Change the numbers to 853 (U); take the SILVER SPOON (V).
- Return to the Costume Shop.
- Use the SILVER SPOON on the lid; take the BUTTONS (W).
- Put down the BUTTONS on the tray for a puzzle (X).
- Place the buttons on the right dishes so the holes on the buttons match up to ten.
- Solution (Y).
- Take the LOCKET FRAME (Z).
- Place the CRYSTAL HEART in the LOCKET FRAME; take MARIE'S LOCKET (A).
- Return to the Green Room.
- Put down the TABLECLOTH, 2 WINE GLASSES, ARRANGED VASE, AGED WINE and MARIE'S LOCKET (B).
- Talk to Marie to get MARIE'S LOCKET back.
- Remove all the glass and the photo; take the clue and the METAL BLADE (C).
- Place the METAL BLADE on the SAW HANDLE; take the HACKSAW (D).
- Return to the Backstage Hallway.
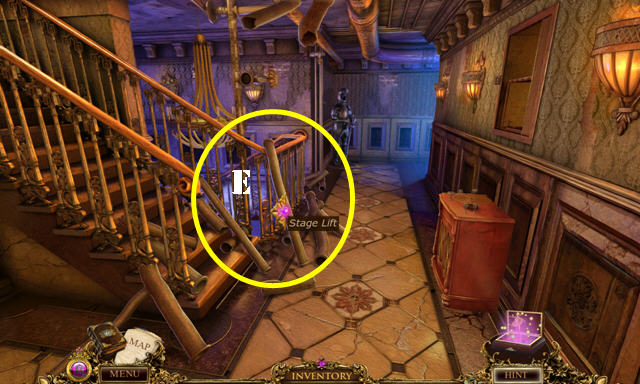
- Cut through the pipes with the HACKSAW (E). Go to the Stage Lift.
Chapter 4: Stage Lift
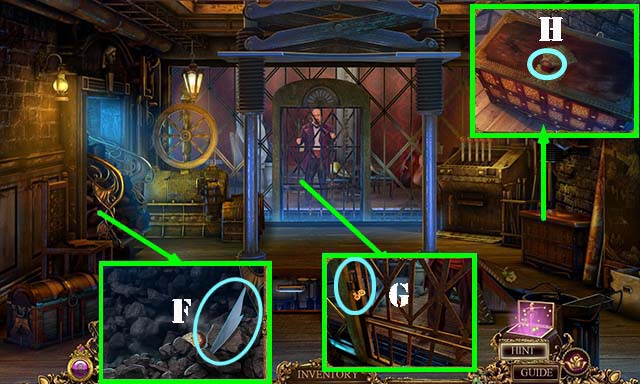
- Take the FEATHER 1/5 (F).
- Use the HACKSAW on the bars (G).
- Take the ROSIN (H).
- Go forward.
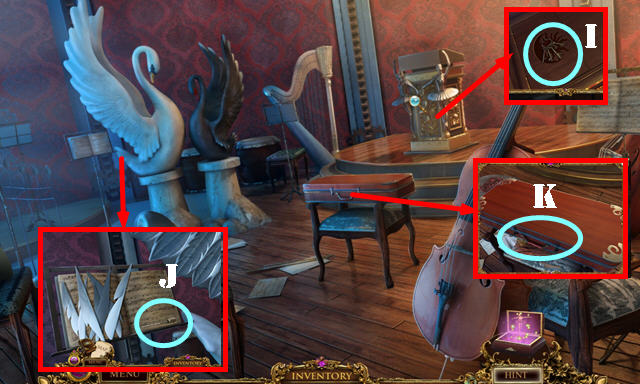
- Remove the music sheets and take the SET OF KEYS (I).
- Take the BOW SCREW (J).
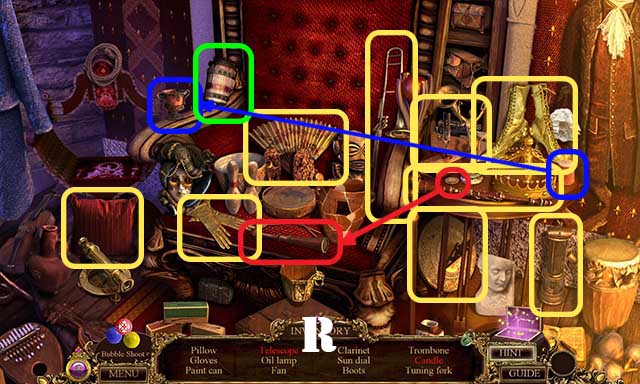
- Open the latches for a HOP (K).
- Play the HOP (L). The sections marked in purple must be opened.
- Take the BROKEN BOW (M).
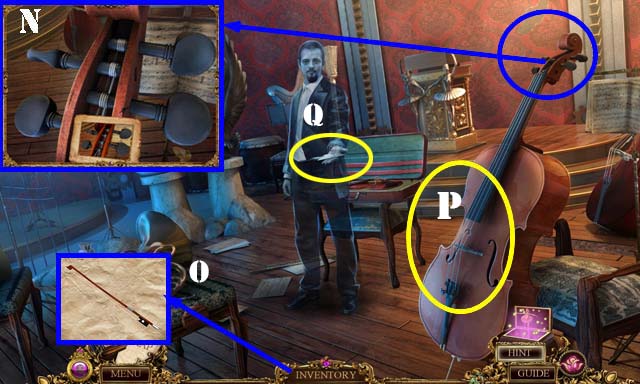
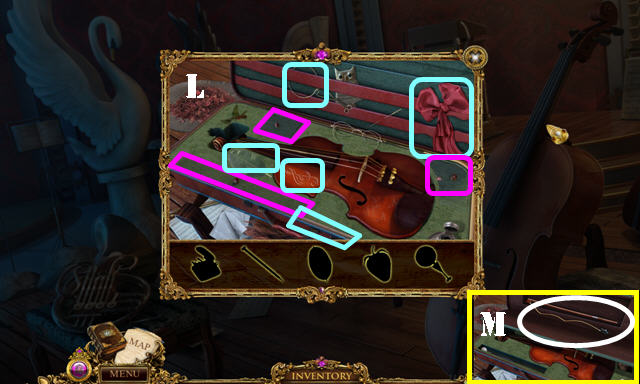
- Zoom into the top of the cello for a puzzle. Face the pegs correctly. Solution (N).
- Use the BOW SCREW on the BROKEN BOW. Use the ROSIN on the BOW and then take it (O). Place the BOW on the cello (P).
- Take the FEATHER 2/5 (Q).
- Return to the Backstage Hallway and go up to the Upper Hallway.
- Take the FEATHER 3/5 (R).
- Use the SET OF KEYS on the lock and go through the door (S).
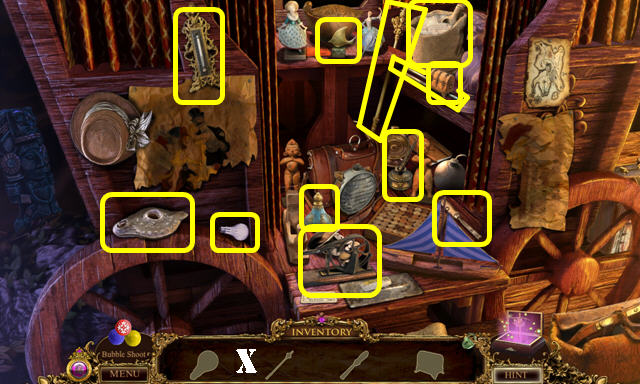
- Take the DUST PAN (T), FUSES 1/2 (U), FEATHER 4/5 (V), and PAINT THINNER (W).
- Walk down.
- Use the PAINT THINNER on the paint; take the BUTTERFLY WING 2/2 (X).
- Return to the Stage Lift.
- Use the DUST PAN on the stones; take the FUSE 2/2 (Y).
- Place the 2 BUTTERFLY WINGS on the trunk to activate a HOP (Z).
- Play the HOP (A).
- Take the HANDLE (B).
- Return to the Upper Hallway.
- Use the HANDLE on the door and then go through it (C).
- Take the WALKING CANE (D).
- Put down the 2 FUSES for a puzzle (E).
- Light up all the fuses.
- Press all the fuses marked in blue, in any order, and then select the one marked in red last to solve the puzzle (E1).
- Take the SUN (F) and remove the broken bulb (G).
- Walk down.
- Use the WALKING CANE on the wires; go up the ladder (H).
- Take the FEATHER 5/5 (I).
- Play the HOP (J).
- Take the MOON (K).
- Return to the Orchestra Pit.
- Place the MOON and the SUN in the slots; take the BOX CUTTER (L).
- Put down the 5 FEATHERS for a puzzle. Place the feathers in the right slots. Solution (M).
- Take the WOODEN ROSE 1/2 (N).
- Return to the Upper Hallway.
- Use the BOX CUTTER on the sandbag and open the trunk for a HOP (O).
- Play the HOP (P).
- You receive the WEIGHT.
- Return to the Lighting Booth.
- Use the BOX CUTTER on the chair; take the MASK PIECE (Q).
- Return to the Fly Gallery.
- Place the WEIGHT on the others to activate a puzzle (R).

- Place all the weights on the left bar.
- Solution: T-U, T-S, U-S, T-U, S-T, T-S, T-U.
- T-S, U-S, U-T, S-T, U-S, T-U, T-S, U-S. Puzzle stopped working, couldn't verify solution.
- Use the WALKING CANE on the ladder (V).
- Go Backstage.
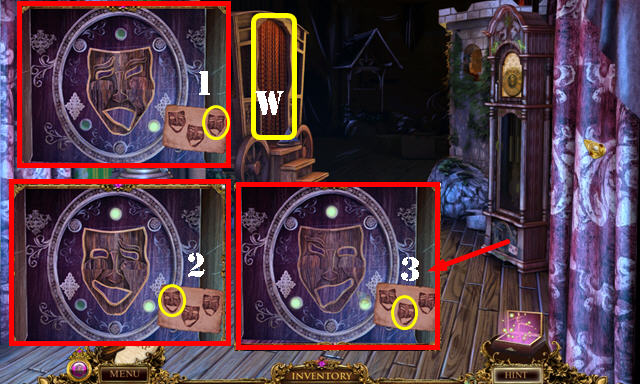
- Place the MASK PIECE to activate a puzzle.
- Recreate the 3 mask expressions (1-3).
- Take the STAR.
- Open the curtains to activate a HOP (W).
- Play the HOP (X).
- You receive the CLOCK HANDS 1/2.
- Return to the Lighting Booth.
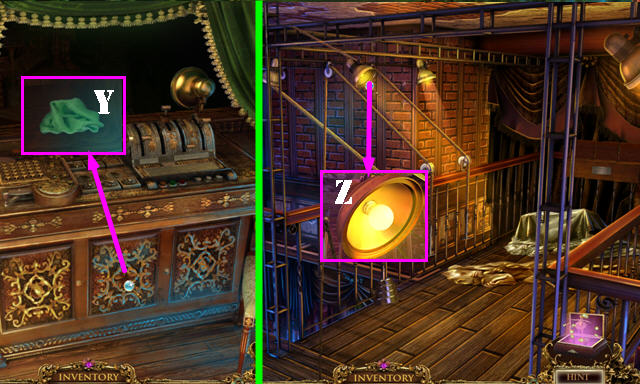
- Place the STAR in the slot and take the TOWEL (Y).
- Return to the Fly Gallery.
- Remove the LIGHT BULB with the TOWEL (Z).
- Return to the Lighting Booth.
- Place the LIGHT BULB in the lamp (A).
- Return to Backstage and go forward to the Stage.
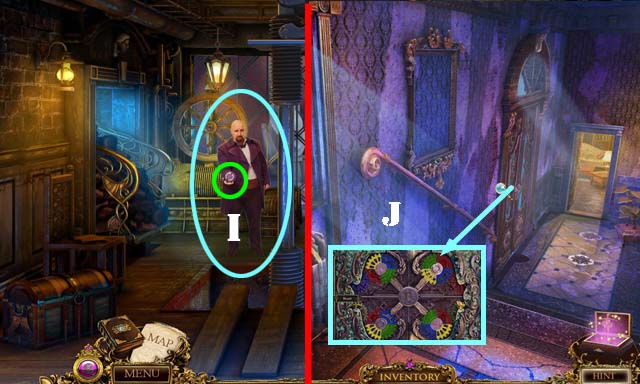
- Give MARIE'S LOCKET to Gaspar.
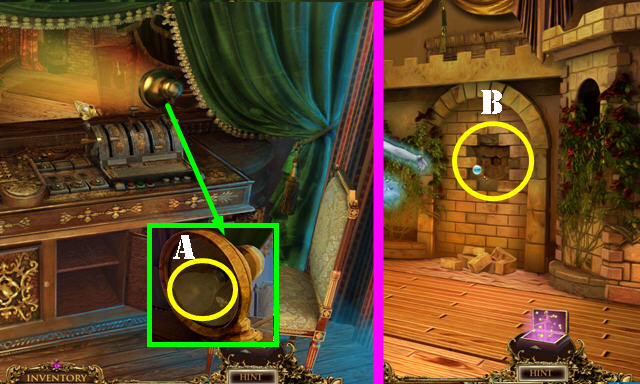
- Remove the bricks for a HOP (B).
- Play the HOP (C).
- Take the HAND FAN (D).
- Walk down.

- Use the HAND FAN on the ashes; take the CORKSCREW (D1).
- Go forward.
- Use the CORKSCREW on the board; take the REEDS () and the CLOCK HAND 2/2 below it (D2).
- Walk down.

- Place the 2 CLOCK HANDS on the clock for a puzzle.
- Solution: 1-8.
- Take the WOODEN ROSE 2/2.
- Go forward.
- Place the 2 WOODEN ROSES on the drawer; take the LEDGER (H).
- Return to the Stage Lift.
- Give the LEDGER to the manager (I).
- Take the GARDEN DOOR ACTIVATOR (green).
- Return to the Passageway.
- Place the GARDEN DOOR ACTIVATOR on the door for a puzzle (J).
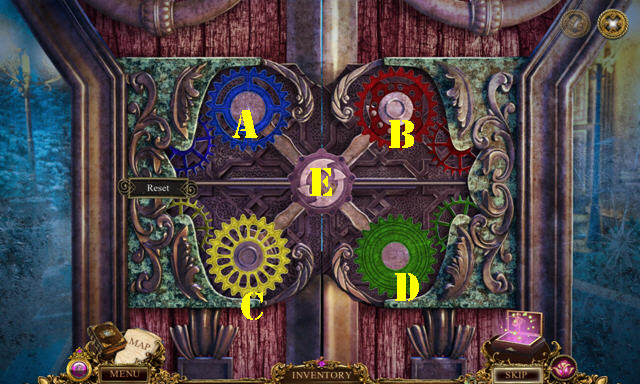
- Solution: Ax2, Bx3, C, D, E, Ax3, Bx2, Cx3, D, Ex3, Ax3, Bx3, Cx3, D, and Ex2.
- Go through the door.
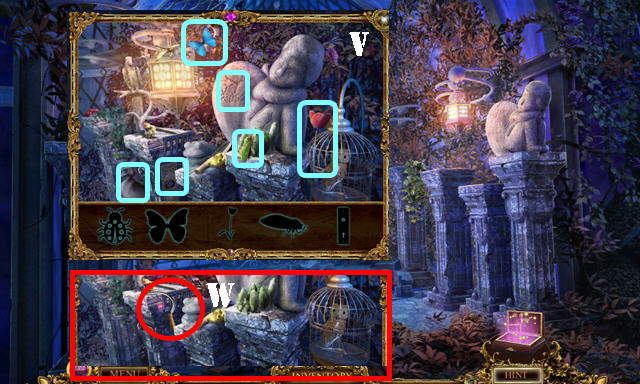
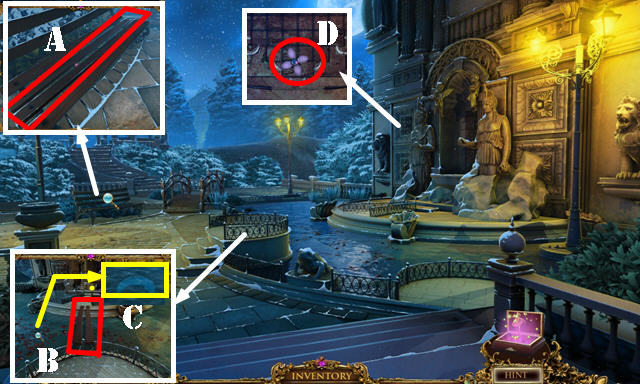
Chapter 5: The Garden
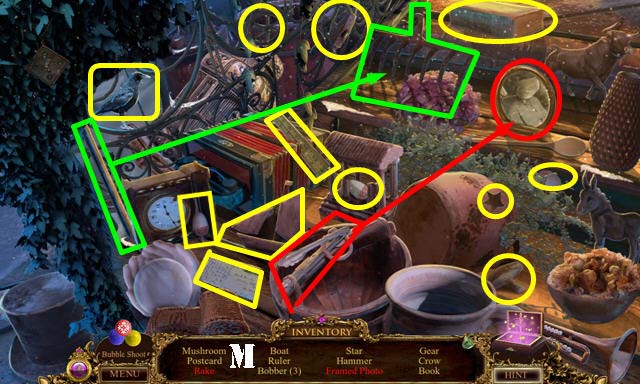
- Take the PICTURE TILE (A), STAINED GLASS 1/4 (B), and FLINT AND STEEL (C).
- Go forward.

- Take the CONTINENT PIECE 1/3 (E).
- Place the PICTURE TILE on the wall for a puzzle. Solution (F).
- Take MARIE'S DIARY 1/6 (H) and the STAINED GLASS 2/4 below it.
- Head left to the Garden Theater.
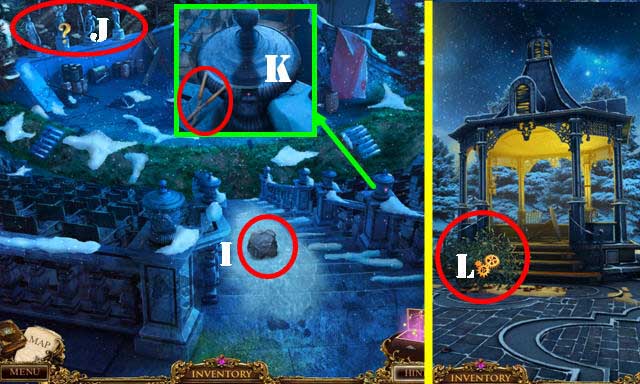
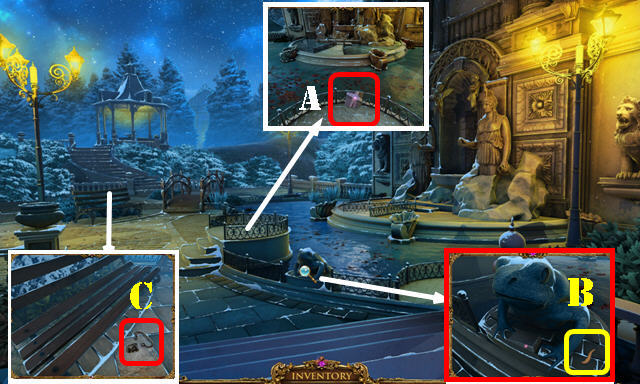
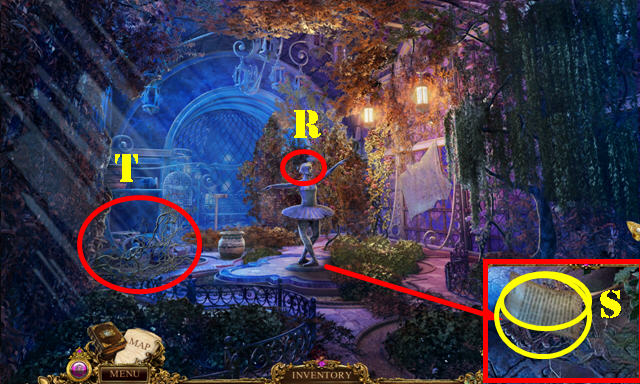
- Take the ROCK (I).
- Touch the statues for a clue (J).
- Take the SHEARS (K).
- Walk down.
- Use the SHEARS to get the VINES (L) and activate a HOP.
- Play the HOP (M).
- You receive the RAKE.
- Use the ROCK on the latch and then slide it (N).
- Take the MARBLE (O).
- Use the VINES on the REEDS; take the SMALL BROOM (P).
- Walk down.
- Use the RAKE on the leaves to get the SNOWFLAKE TOKEN (Q).
- Place the MARBLE in the slot (R); take the FLY (S).
- Return to the Gazebo.
- Place the FLY next to the others (T); take the SMALL SCALE 1/2 (U).
- Place the SNOWFLAKE TOKEN on the lock; take the BAG OF SALT (V).
- Return to the Garden Theater.
- Use the BAG OF SALT on the steps (W).
- Go forward.
- Take the CONTINENT PIECE 2/3 (X).
- Use the RAKE on the TIARA and then take it (Y).
- Use the SMALL BROOM on the bookcase to activate a HOP (Z).
- Play the HOP (A).
- You receive the COUNTER.
- Walk down.
- Place the COUNTER on the mechanism (B).
- Change the symbols as shown: Trident, Spear, Vase, and Wings (C).
- Take the SCROLL (D) and the IRON TOKEN below it.
- Open the SCROLL; take it and the CORD below it (J).
- Go forward.
- Place the IRON TOKEN on the lock to activate a HOP (E).

- Play the HOP (F).
- Take the TROWEL (G).
- Return to the Garden.
- Use the TROWEL on the brick; take the CONTINENT PIECE 3/3 (H).
- Return to the Outdoor Stage.
- Place the 3 CONTINENT PIECES on the globe. Press each of the three continents once; take MARIE'S DIARY 2/6 and the SMALL SCALES 2/2 (I).
- Place the 2 SMALL SCALES on the statue (J); take the DULL SWORD (K).
- Return to the Gazebo.
- Use the DULL SWORD on the grindstone to get the SHARP SWORD (L).
- Use the SHARP SWORD to get the TINDER (M).
- Return to the Outdoor Stage.
- Place the TINDER and then the FLINT AND STEEL in the fireplace to get a clue (N).
- Return to the Gazebo.
- Place MARIE'S LOCKET on the scene for a puzzle (O).
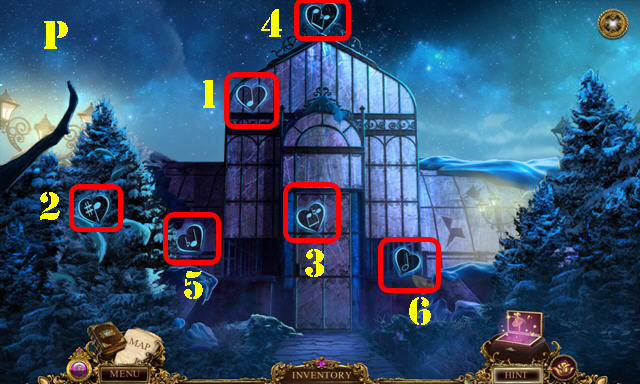
- Find all the hidden hearts in the scene and press on them (P).
- Select the hearts in the order shown (1-6).
- Enter the Greenhouse.
- Place the TIARA on the statue (R).
- Move the shards out of the way; take MARIE'S LOCKET 5/6 and the HAND MIRROR FRAME (S).
- Remove the vines to activate HOP (T).
- Play the HOP (U).
- You receive the SMALL SPADE.
- Go forward to the Romantic Spot.
- Play the HOP (V).
- Take the SICKLE (W).
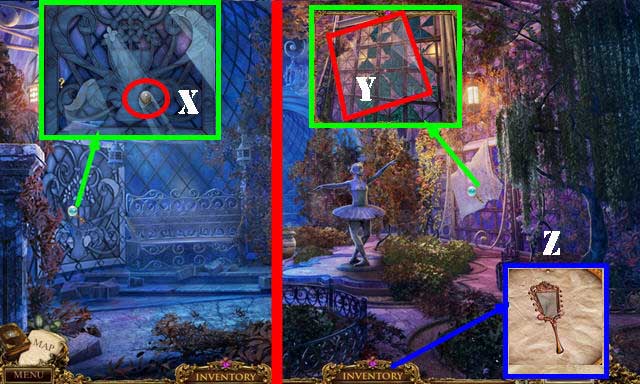
- Take the COIN (X).
- Walk down.
- Use the SICKLE to get the NETTING (Y).
- Place the NETTING in the HAND MIRROR FRAME; tie the CORD to it and take the SMALL NET (Z).
- Return to the Garden.
- Use the COIN to get the BOARDS (A).
- Put down the BOARDS (B). Use the SMALL NET to get the STAINED GLASS 3/4 (C).
- Take the STAINED GLASS 4/4 (D).
- Return to the Romantic Spot.
- Place the 4 STAINED GLASS pieces on the window for a puzzle.
- Find the differences (E).
- Use the SMALL SPADE on the ground; place MARIE'S LOCKET in the slot; take MARIE'S DIARY 5/6 and the FOUNTAIN PIECE (F).
- Return to the Garden.
- Place the FOUNTAIN PIECE to activate a puzzle (G).

- Place all the tiles correctly.
- Solution, part 1 (H).
- Solution, part 2: L, D, R, D, L, Dx2, Rx2, U, R, Dx2, L, D, L, Dx2, L, U, L, D, R, D, Lx2, R, U, R, D, Lx2.
- Take MARIE'S DIARY 6/6.
- Return to the Stage.
- Give the 6 MARIE'S DIARY pieces to Gaspar (I). Play the HOP.
- Congratulations, you have completed Danse Macabre: The Last Adagio!
Created at: 2014-03-21