

Walkthrough Menu
- General Tips
- Chapter 1: The Medical Clinic
- Chapter 2: The Garden Fork
- Chapter 3: The Basement Studio
- Chapter 4: The Mayor's Office
- Chapter 5: Under the Stage
General Tips
- This is the official guide for Dark Canvas: Blood and Stone.
- This guide will not mention each time you have to zoom into a location; the screenshots will show each zoom scene.
- We will use the acronym HOP for Hidden-object puzzles. Interactive items will be color-coded and some will be numbered; please follow the numbers in sequence.
- The HOP lists may be random; our lists may vary from yours.
- Use the map to travel to a location.
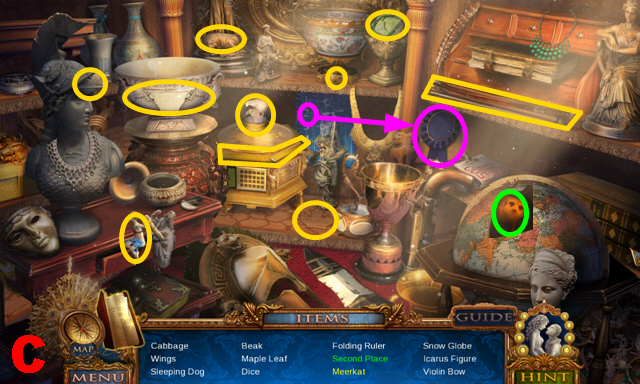
Chapter 1: The Medical Clinic
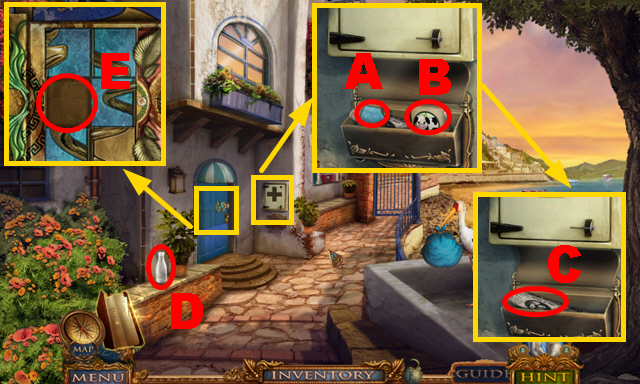
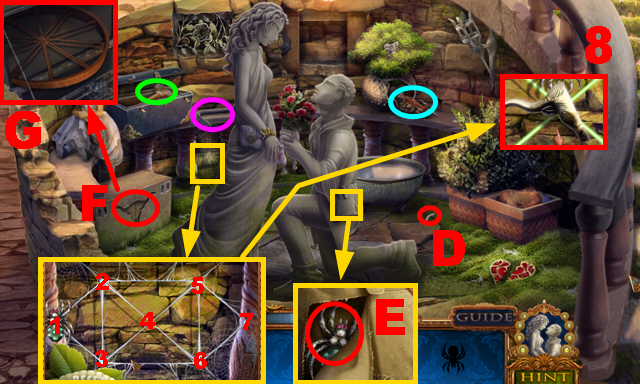
- Talk to the man.
- Open the box; take the SNAKE TILE (A) and the POWDERED MILK MIX (B).
- Read the newspaper (C).
- Take the MILK BOTTLE (D).
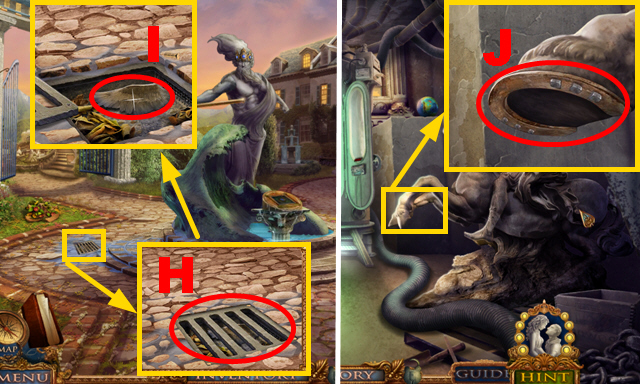
- Insert the SNAKE TILE into the niche (E).
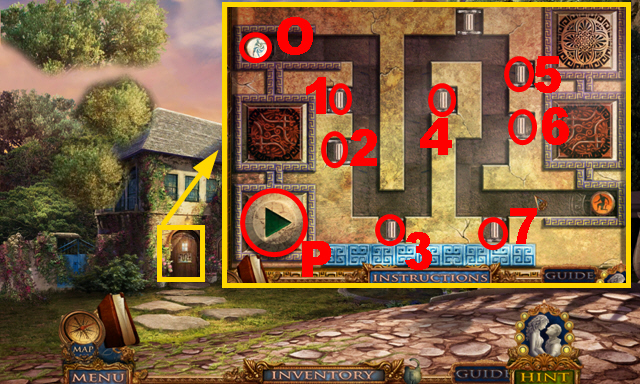
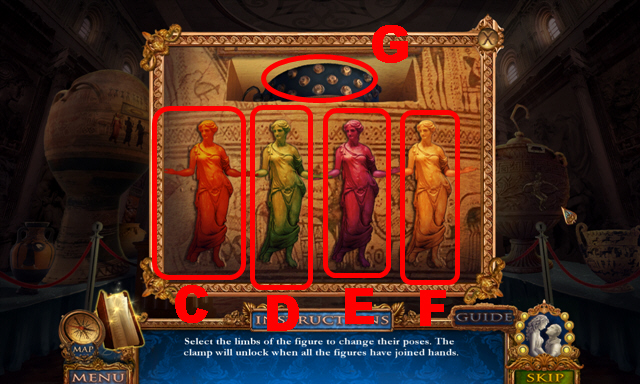
- Play the mini-game.
- Solution: 4, 5, 6, 3, 2, 1.
- Turn left.
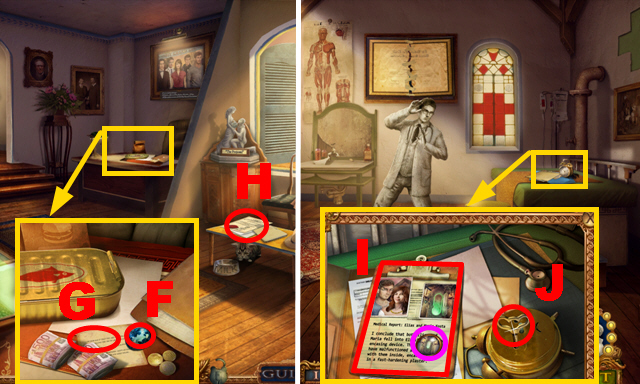
- Open the folder; take SAPPHIRE 1/2 (F) and read the note (G).
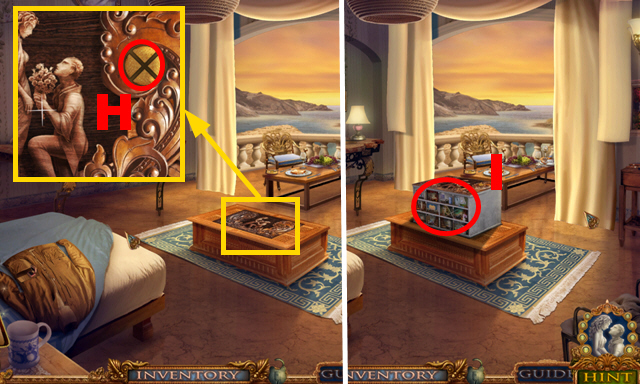
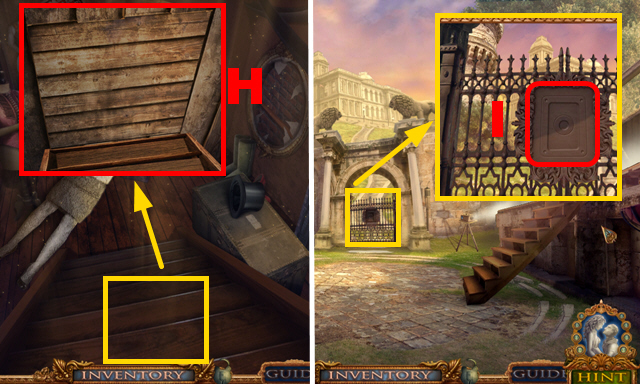
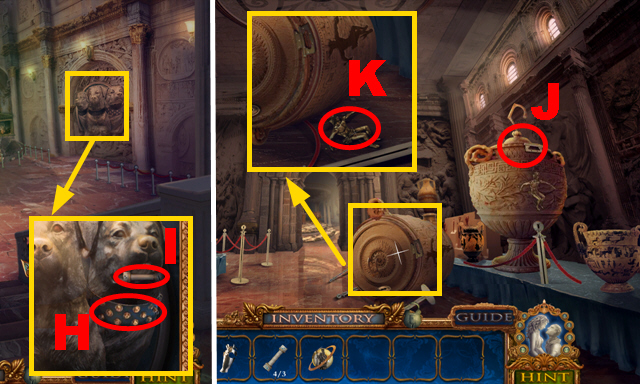
- Take the document (H).
- Move forward.
- Open the folder; take the DEVICE TOKEN (purple) and read the notes (I).
- Turn around the clock; take the WIND UP KEY (J).
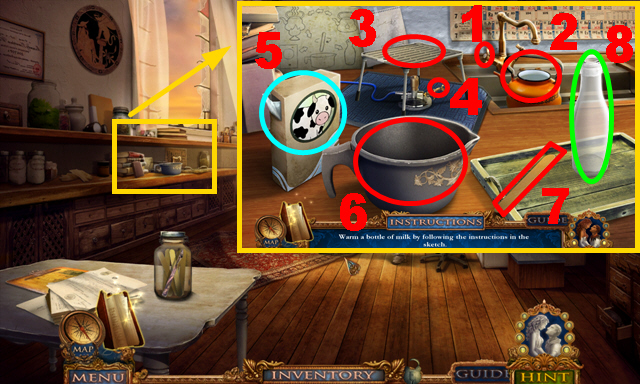
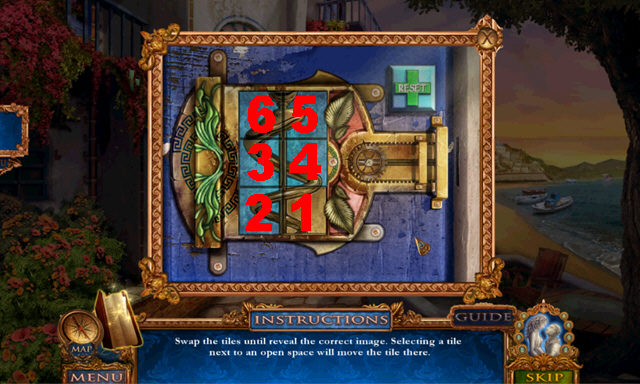
- Put down the BOTTLE (green) and the POWDERED MILK MIX (blue).
- Solution: 1, 2, 3, 4, 5, 6, 2, 6, 7, 6, 6, 8.
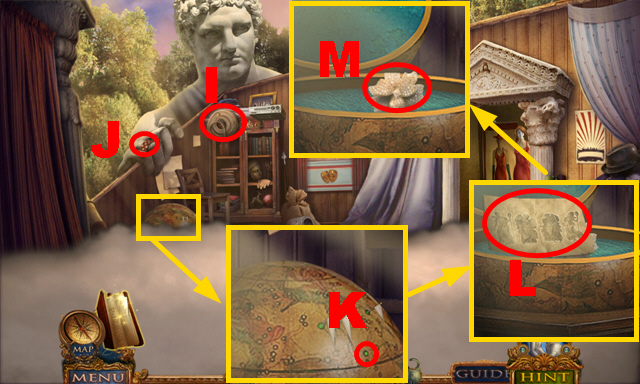
- Take the WARM MILK.
- Walk down.
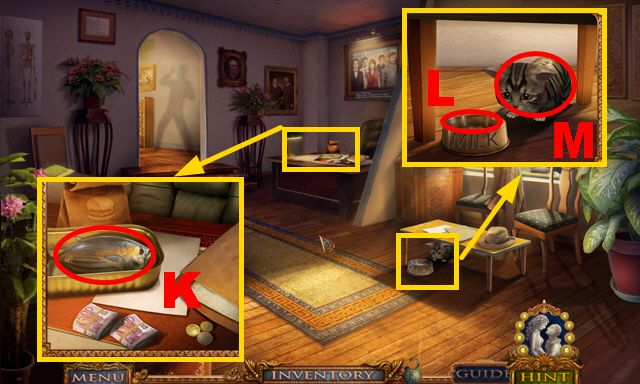
- Open the can with the WIND UP KEY; take the FISH (K).
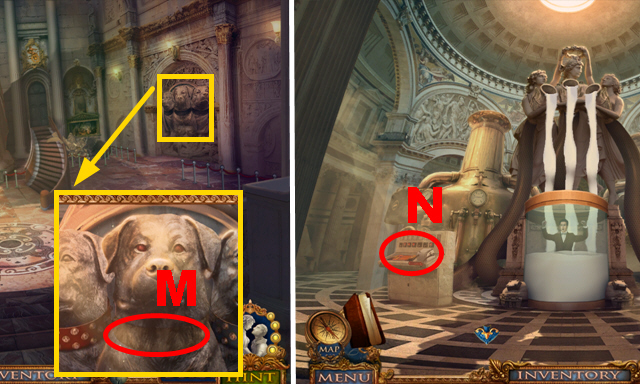
- Pour the WARM MILK into the bowl (L); take the KITTY (M).
- Walk down.
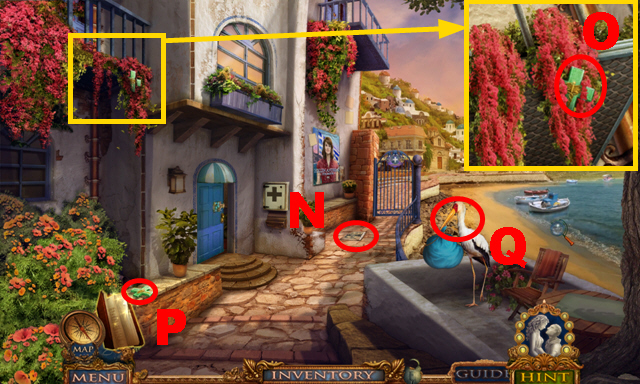
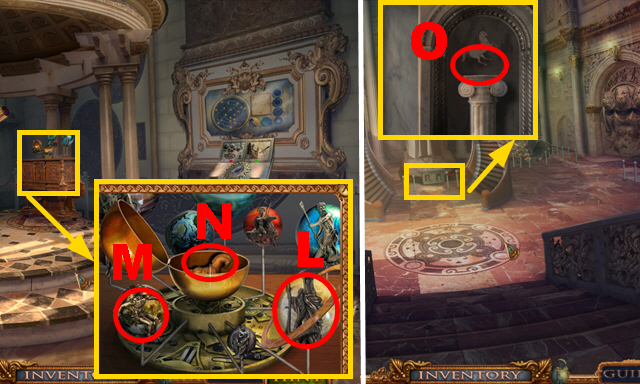
- Take the note (N).
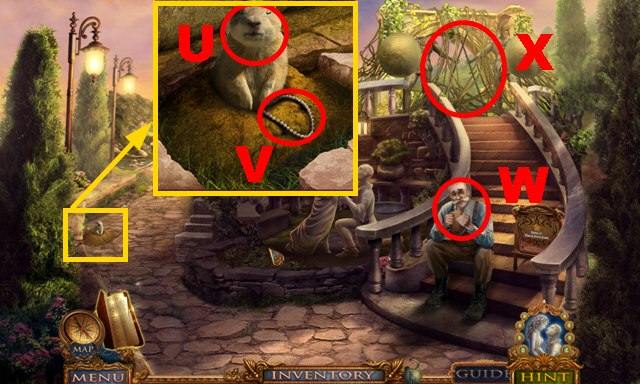
- Send the KITTY to the flowers (O).
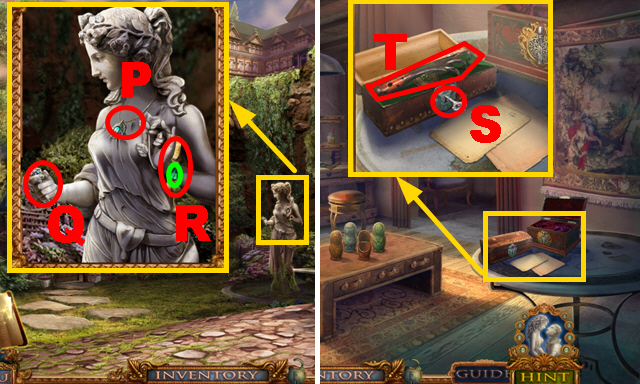
- Take the MEDICAL SYMBOL (P).
- Give the FISH to the stork (Q).
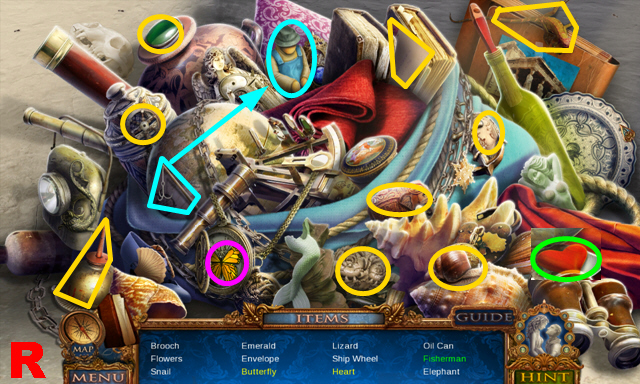
- Play the HOP.
- You receive the FISHERMAN TOY (R).
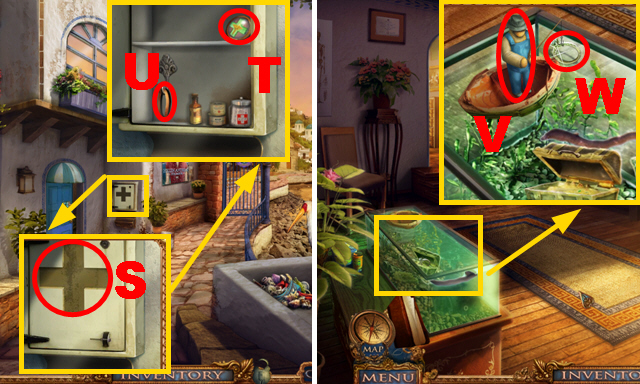
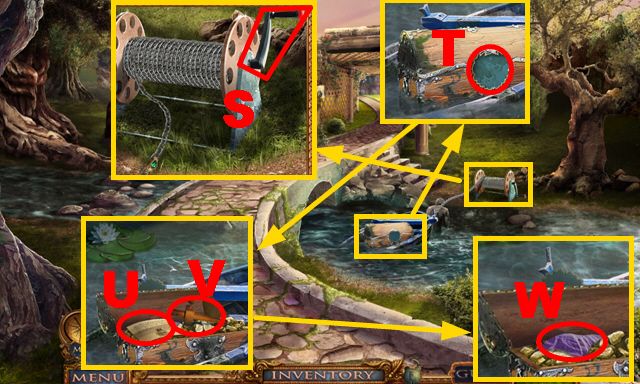
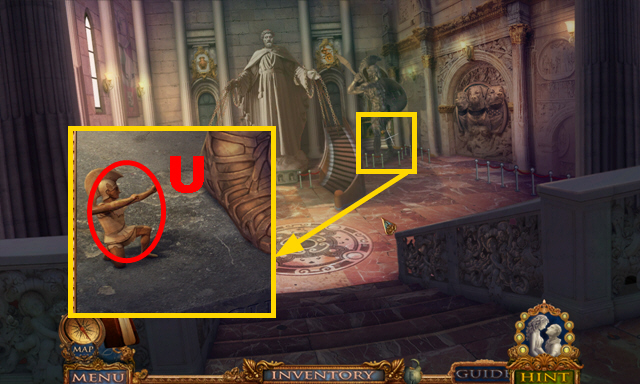
- Insert the MEDICAL SYMBOL into the niche (S); take the MEDICAL TOKEN (T) and ELASTIC BAND 1/2 (U).
- Turn left.
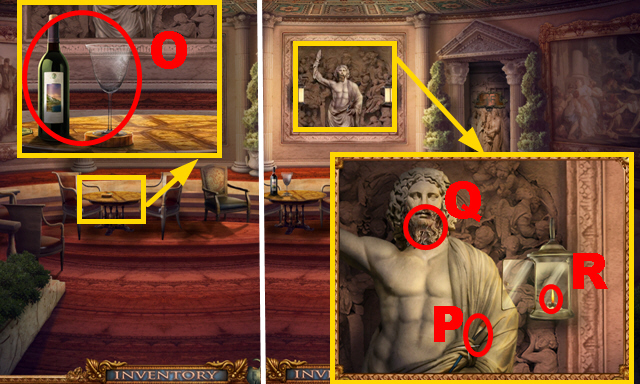
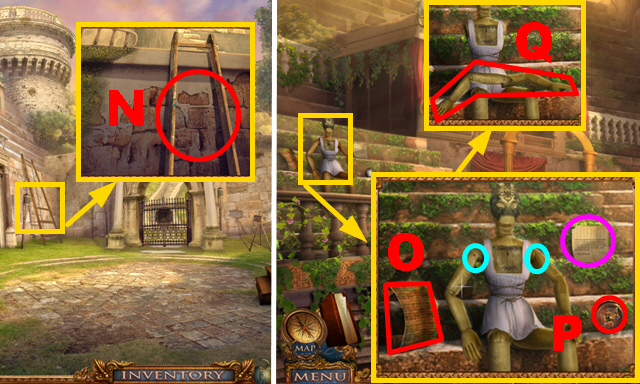
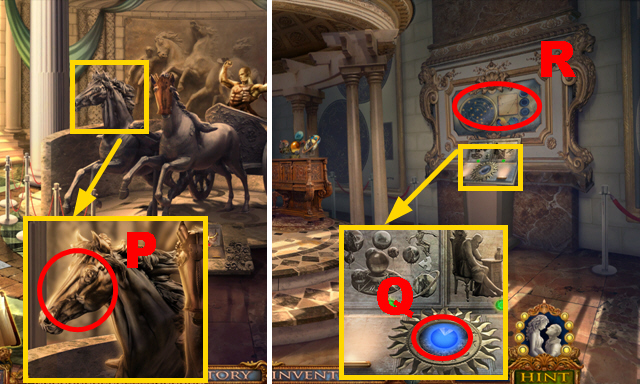
- Put down the FISHERMAN TOY (V); take the DIAMOND RING (W).
- Move forward.
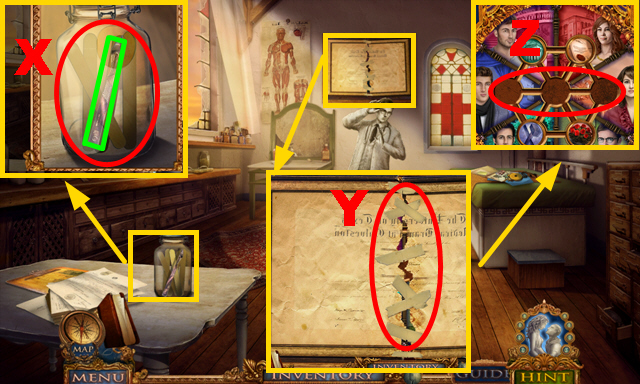
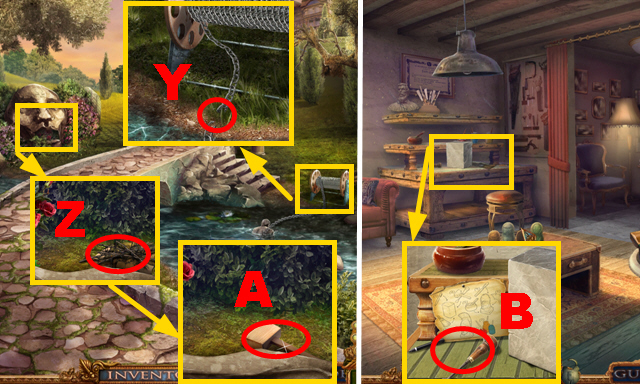
- Cut the glass jar with the DIAMOND RING (X); take the SCALPEL (green).
- Cut open the Diploma with the SCALPEL (Y); put down the MEDICAL and the DEVICE TOKEN (Z).
- Play the mini-game.
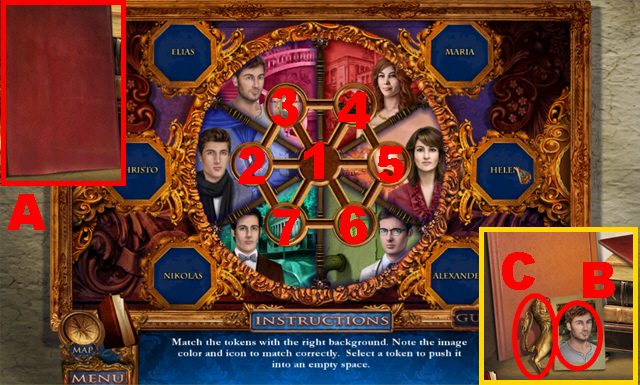
- Solution: 6, 5, 4, 1, 2, 7, 6, 1, 2, 7, 1, 3, 2, 7, 1.
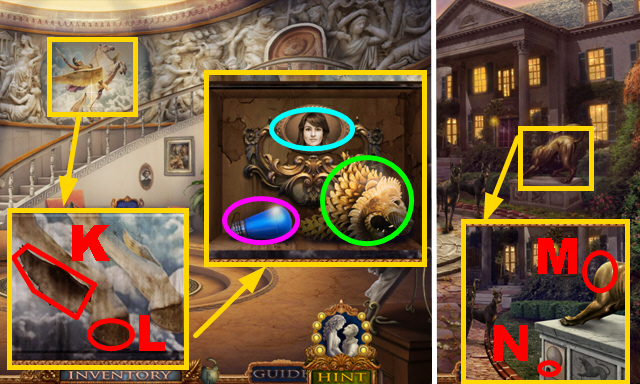
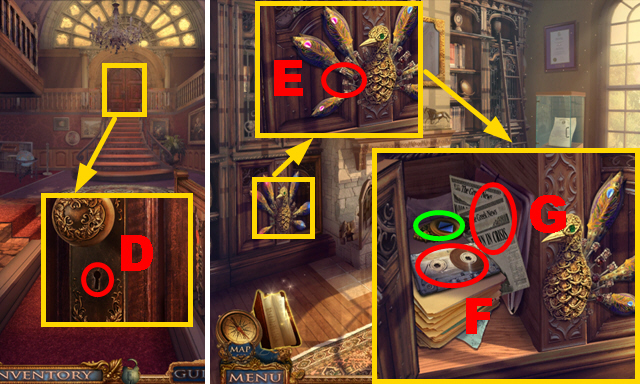
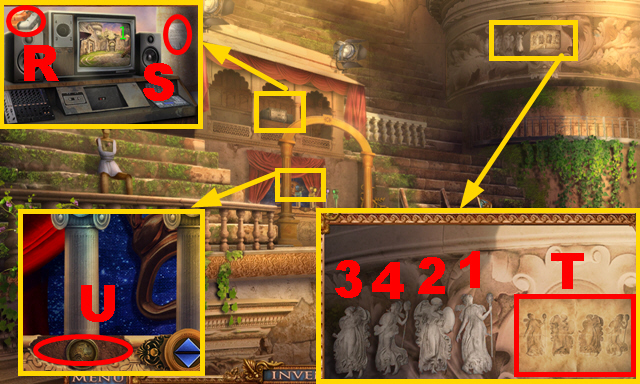
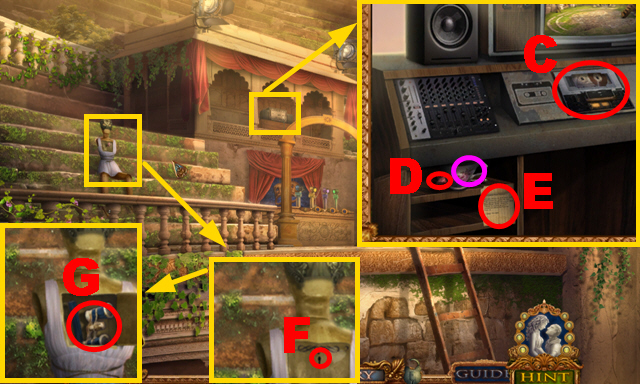
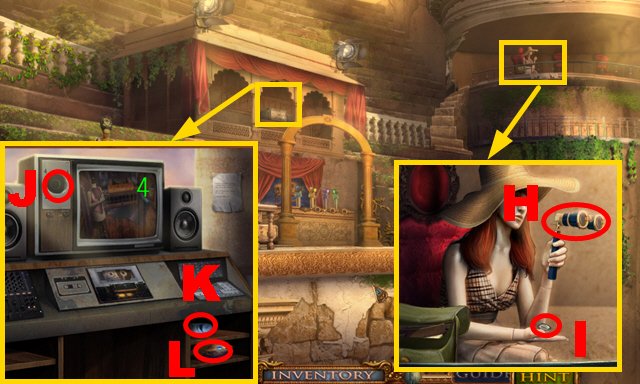
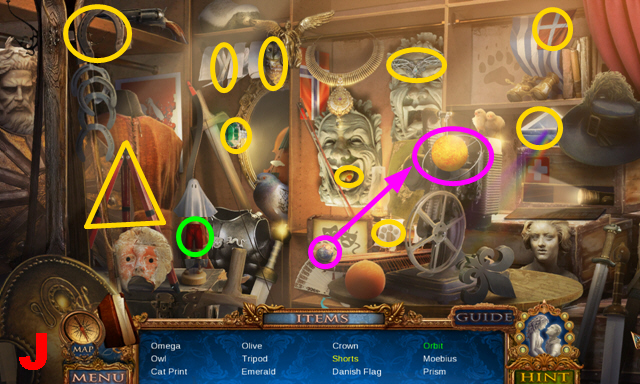
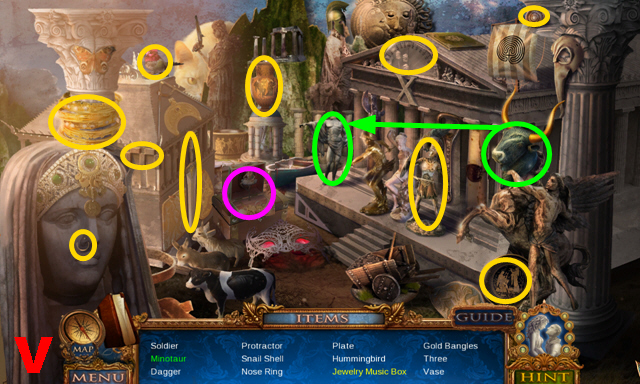
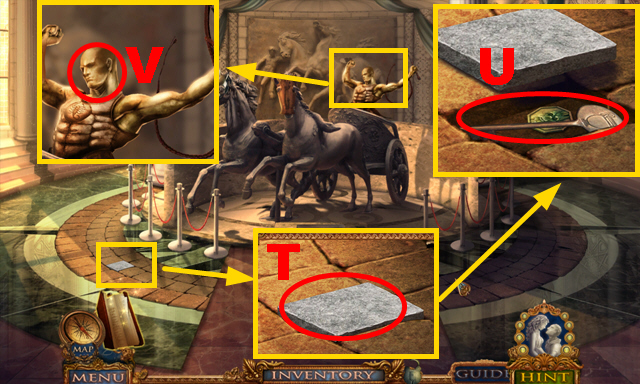
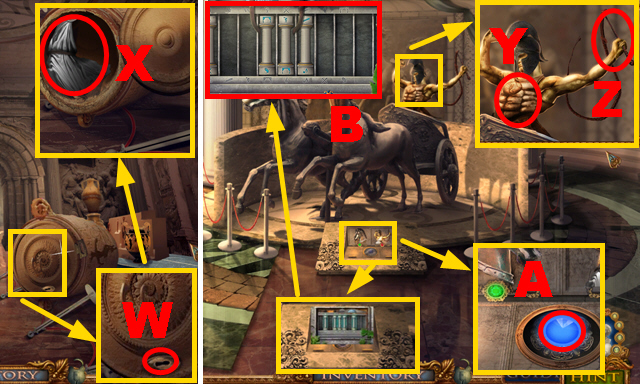
- Open the folder (A); take the SCULPTOR'S PHOTO (B) and the LION EMBLEM (C).
- Walk down twice.
- Play the HOP.
- You receive the CROWN (D).
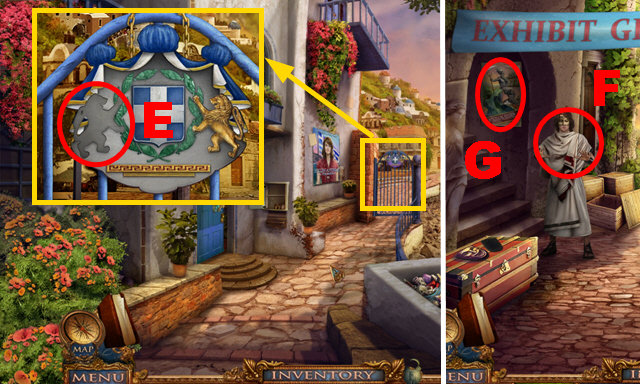
- Insert the LION EMBLEM into the niche (E).
- Move forward.
- Talk to the man (F).
- Look at the poster (G).
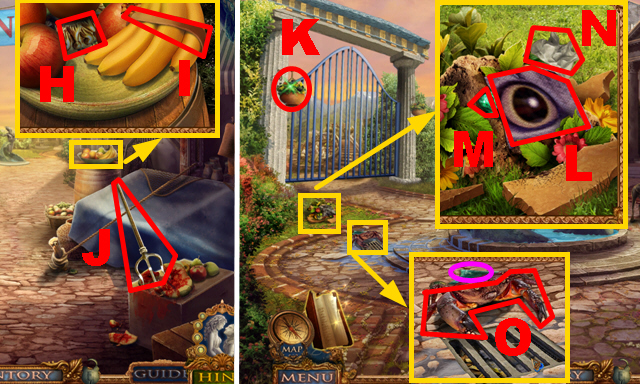
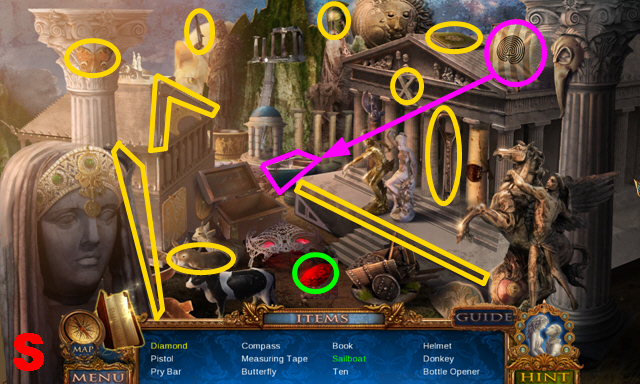
- Move aside the fruits; take the SUN CREST HALF (H) and ELASTIC BAND 2/2 (I).
- Take the TRIDENT (J).
- Move forward.
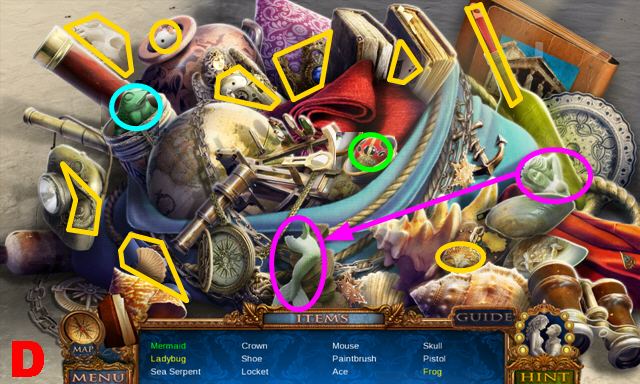
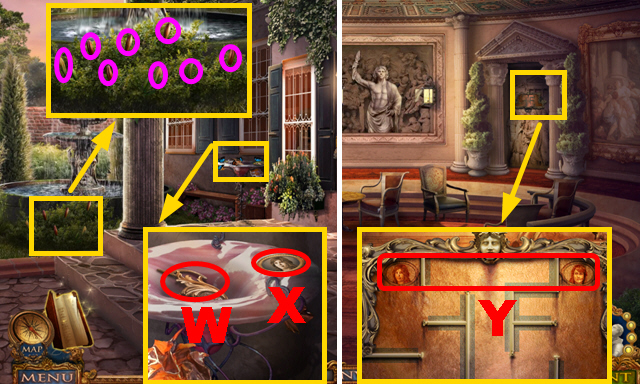
- Send the KITTY to the flower pot (K); take FABRIC 1/4 (L), the EMERALD (M), and the note (N).
- Tie the crab with 2 ELASTIC BANDS (O); take the CRAB and the GLASS SHARD (purple).
- Walk down.
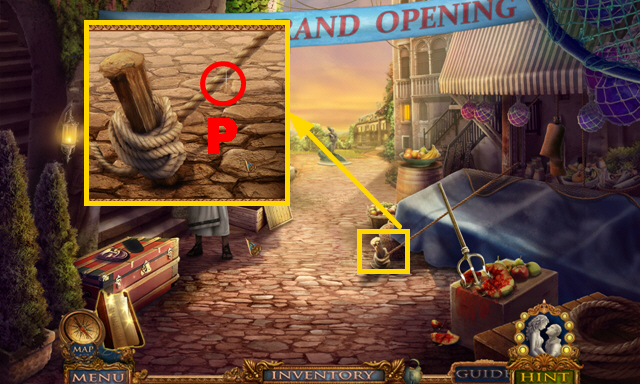
- Cut the rope with the GLASS SHARD (P).
- Play the HOP.
- You receive the TRAGEDY MASK(Q).
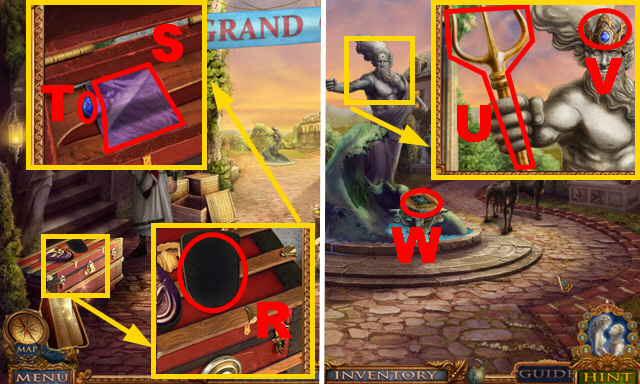
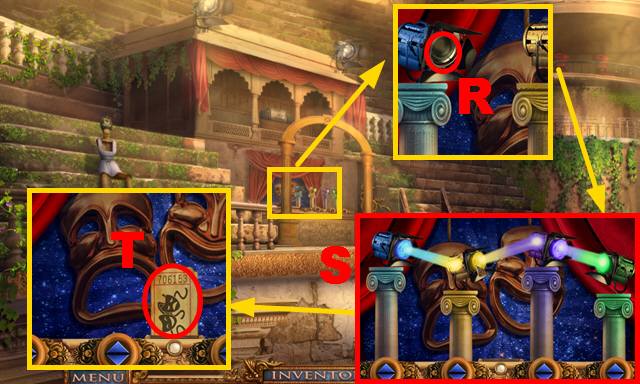
- Insert the TRAGEDY MASK into the niche (R); take FABRIC 2/4 (S) and SAPPHIRE 2/2 (T).
- Move forward.
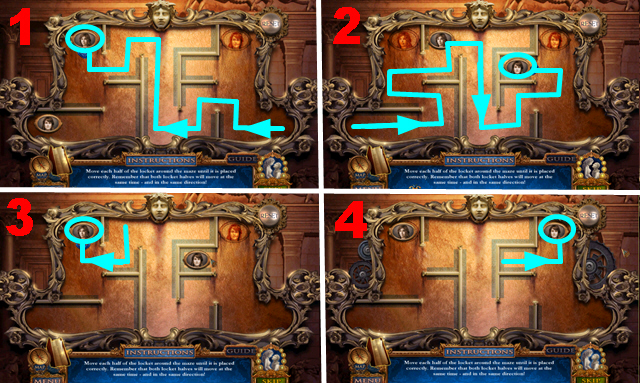
- Connect the TRIDENT (U) and the CROWN (V) to the statue; insert the 2 SAPPHIRES into the crown.
- Play the mini-game (W).
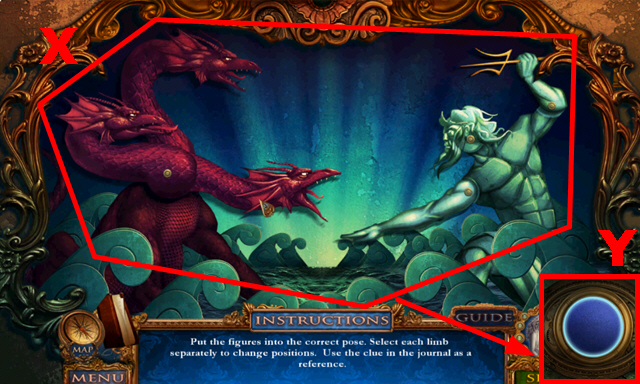
- Solution: (X).
- Push the button (Y).
- Turn left.
Chapter 2: The Garden Fork
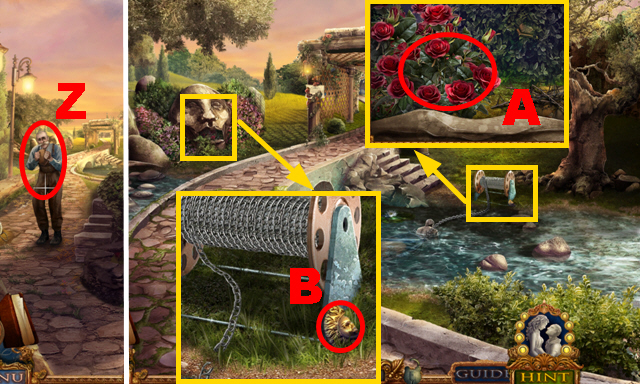
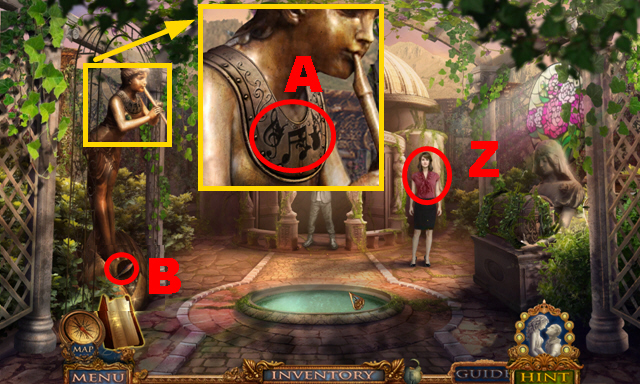
- Talk to the man (Z).
- Turn left.
- Send the CRAB to collect the ROSES (A).
- Take the SUN CREST HALF (B).
- Move forward.
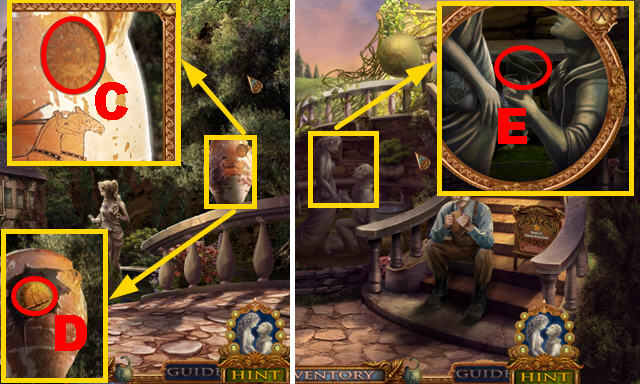
- Insert the 2 SUN CREST HALVES into the slot (C); take the BOAT EMBLEM (D).
- Walk down twice.
- Put the ROSES into the hands (E).
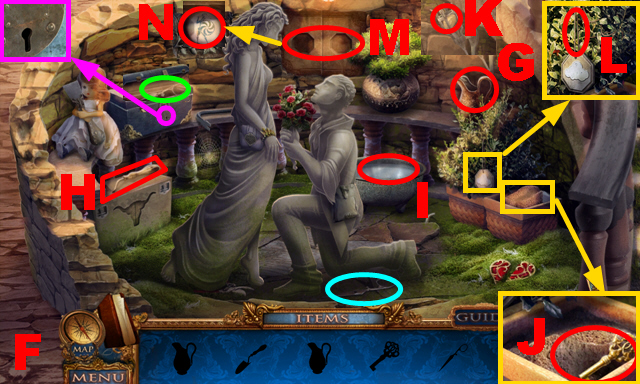
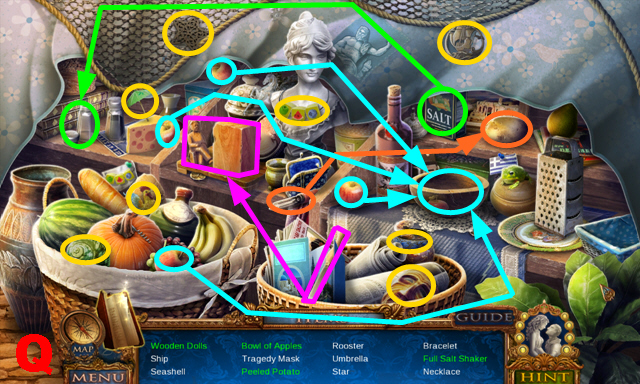
- Play the HOP (F).
- Collect the pitcher (G) and the spade (H).
- Put the pitcher into the water (I).
- Dig through the soil with the spade (J); take the key.
- Pour the pitcher over the torch; take the LIGHTNING EMBLEM (K).
- Insert the key into the padlock (purple) and turn the key; take the scissor half (green).
- Connect the scissor halves (blue).
- Cut the rope with the scissors (L).
- Insert the cloud and lightning emblems into the slots (M).
- Take the WARRIOR TOKEN (N).
- Move forward twice.
- Put down the WARRIOR TOKEN (O).
- Play the mini-game.
- Solution 1-7.
- Push the button (P).
- Move forward.
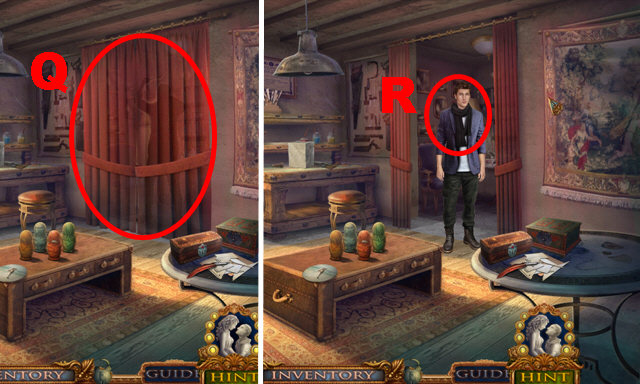
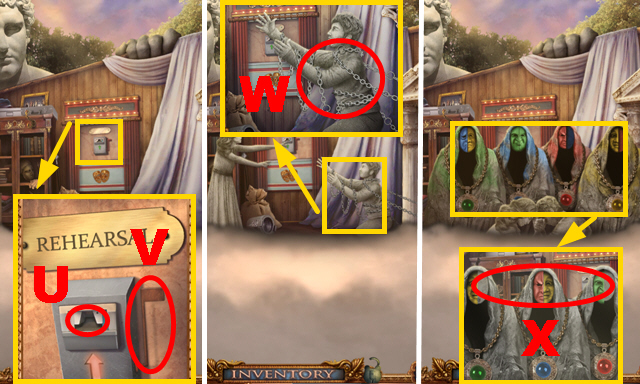
- Open the curtain (Q).
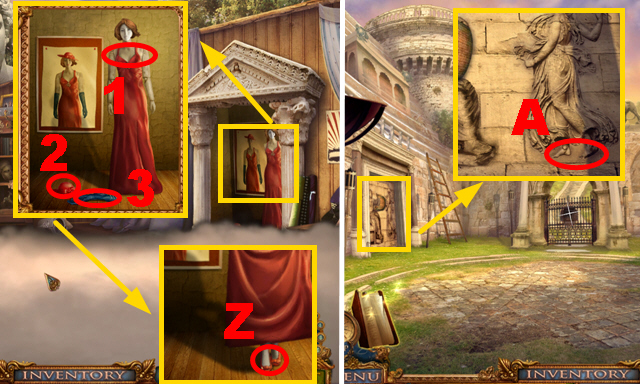
- Give the SCULPTOR'S PHOTO to the man (R).
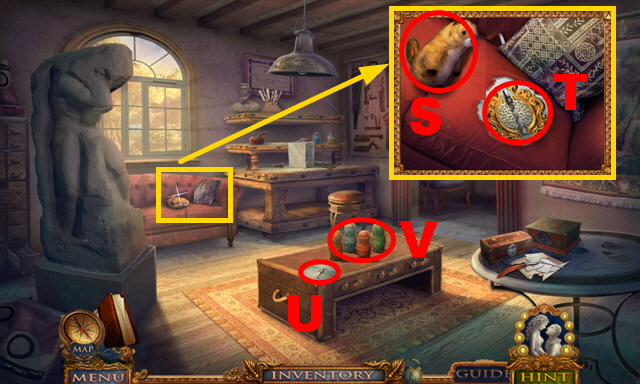
- Take the STUFFED GOPHER TOY (S); send the KITTY on the sofa and take the KNIFE EMBLEM (T).
- Take the MAKEUP KIT (U).
- Play the mini-game (V).

- Solution (W): F, I, Y, E, C x2, B, E, C, Z, A, X, C, E, C, B, E, C.
- Take the PENDANT (J).
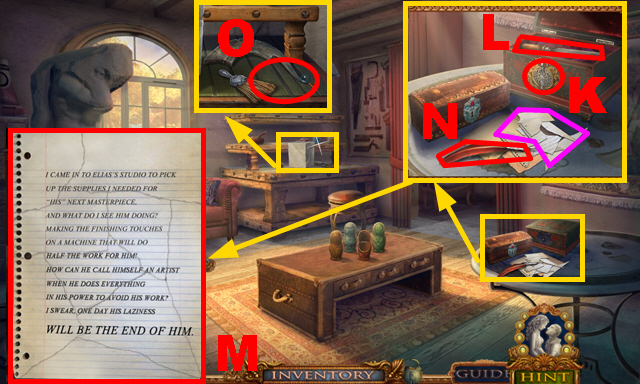
- Insert the KNIFE EMBLEM into the slot (K); take the FILE (L) and look at the paper pieces (purple).
- Assemble the note correctly (M); take it.
- Take the QUILL FEATHER (N).
- Put down the FILE (O).
- Walk down.
- Connect the EMERALD (green) and the PENDANT (P) to the statue; take the JEWELED KEY (Q) and the GOLD BANGLE (R).
- Move forward.
- Insert the JEWELED KEY into the lock (S); take the HAND RAKE (T).
- Walk down three times.
- Give the STUFFED GOPHER TOY to the gopher (U); take the NECKLACE (V).
- Give the NECKLACE to the man (W); you receive the SHEARS.
- Remove the vines with the SHEARS (X).
- Move forward.
- Repair the chain with the GOLD BANGLE (Y).
- Remove the thorny branches with the HAND RAKE (Z); take the HAMMER (A).
- Move forward twice.
- Put down the HAMMER (B).
- Play the mini-game.
- Solution: 1-2, 3-2, 4-2, 5-2, 6-2, 7-2, 8-2.
- Take the SOLDIER BUST (C).
- Walk down three times.
- Play the HOP.
- Take the hammer (green) and the crowbar (purple).
- Break the pot with the hammer; take the seam ripper (blue).
- Remove the tile with the crowbar; take the minotaur half (D).
- Cut open the pocket with the seam ripper; take the toy spider (E).
- Put the toy spider on the net; move it along the lines 2, 5, 4, 2, 3, 4, 6, 5, 7, 6, 3, 1 and take the minotaur half (8).
- Put the 2 minotaur halves into the niche (F).
- Take the SPINNING WHEEL (G).
- Connect the SOLDIER BUST to the statue (H).
- Turn right.
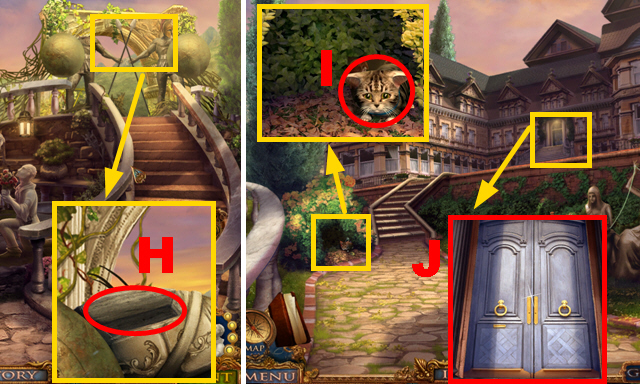
- Send the KITTY to its friend (I).
- Open the door (J).
- Enter the mansion.
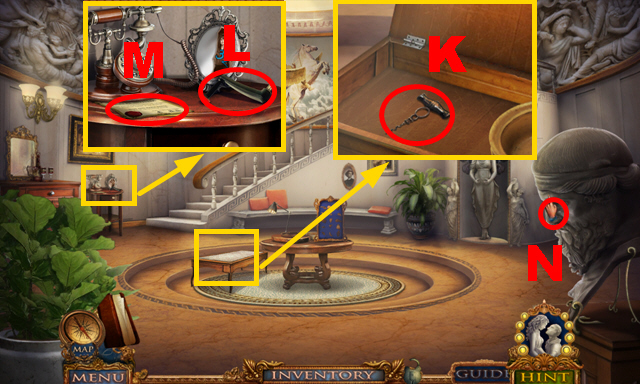
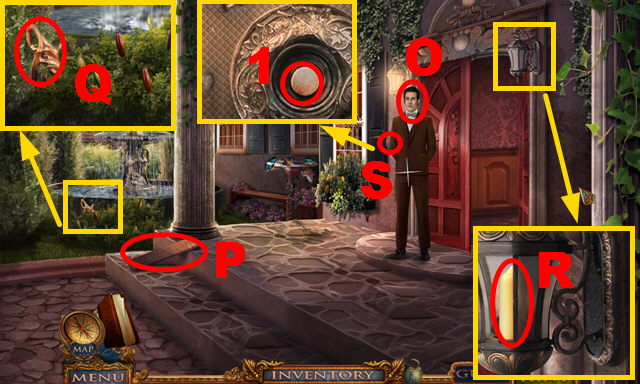
- Open the cover of the bench; take the CORKSCREW (K).
- Take the HANDLE (L) and the invitation (M).
- Take the NOSE (N).
- Move forward.
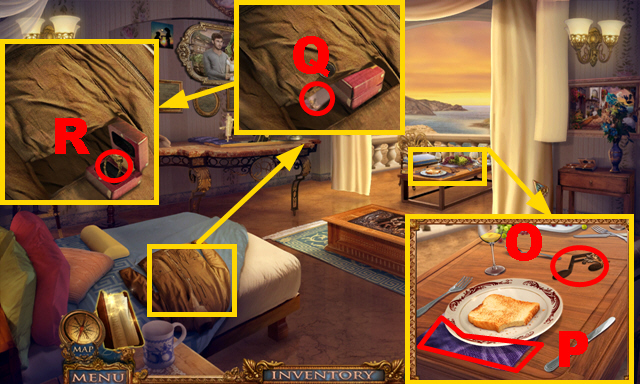
- Take the EIGHTH NOTE (O) and FABRIC 3/4 (P).
- Open the pocket and read the note (Q); open the case and take the UNPOLISHED RING (R).
- Go to the Garden Walkway.
- Connect the HANDLE to the device (S); pull the handle.
- Insert the BOAT EMBLEM into the niche (T) and read the note (U); take the MEASURING ROD (V) and FABRIC 4/4 (W).
- Walk down, turn right.
- Connect the SPINNING WHEEL to the device (X); hold the MEASURING ROD next to the thread (Y) to receive the THREAD.
- Move forward twice.
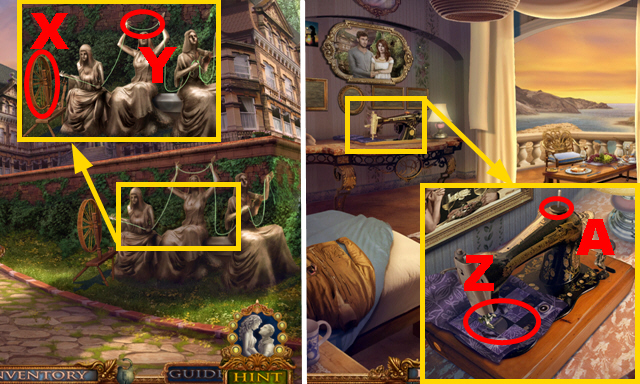
- Put down the 4 FABRICS (Z); insert the THREAD into the machine (A).
- Play the mini-game.
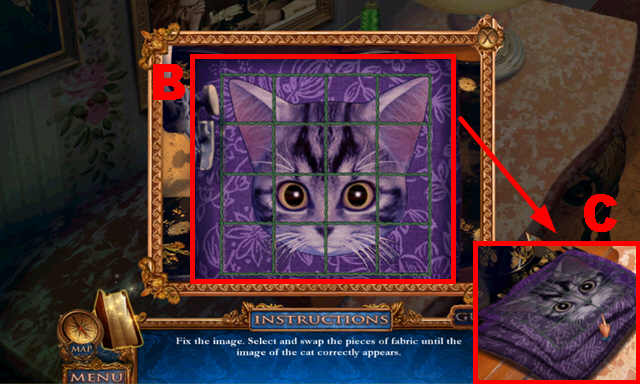
- Solution: (B).
- Take the BLANKET (C).
- Walk down twice.
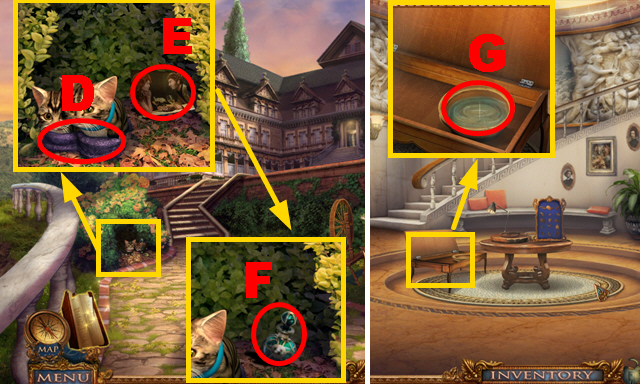
- Give the BLANKET to the kittens (D); take the DATE PHOTO (E) and the JEWELRY POLISH (F).
- Move forward.
- Pour the JEWELRY POLISH into the bowl (G); put the UNPOLISHED RING into the bowl to acquire the SIGNET RING.
- Move forward.
- Insert the SIGNET RING into the slot (H).
- Play the mini-game (I).
- Solution: 1-12.
- Take the MEETING PHOTO (J).
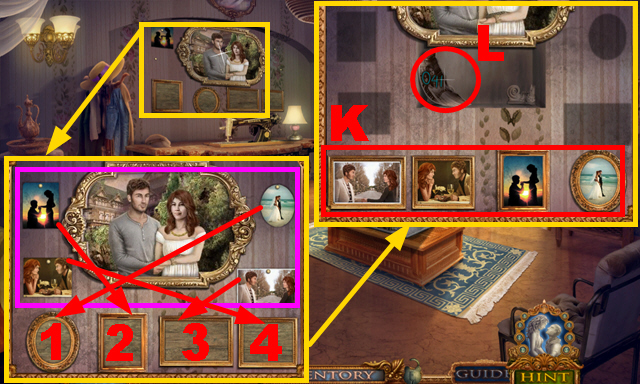
- Put the DATE PHOTO, the MEETING PHOTO, and the MAKEUP KIT on the wall (purple); insert the 4 photos into the correct frames (1-4).
- Arrange the photos in the correct order (K); take the NUMBERED PICTURE (L).
- Walk down.
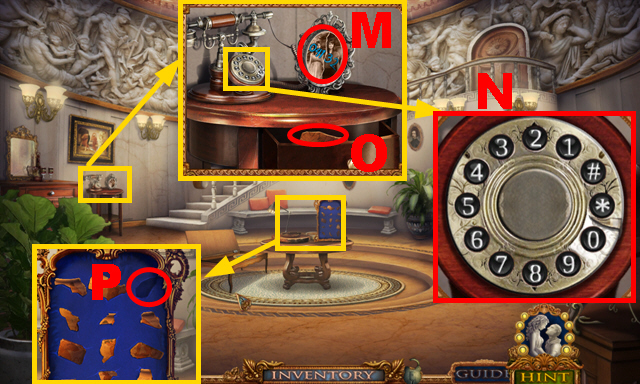
- Connect the NUMBERED PICTURE to the other half (M) and enter '04132' into the dials (N); take the PIECE OF VASE (O).
- Insert the PIECE OF VASE into the niche (P).
- Play the mini-game.
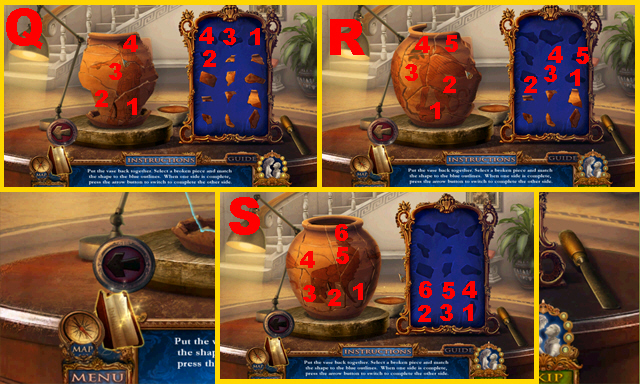
- Solution side (Q): 1-4.
- Solution side (R): 1-5.
- Solution side (S): 1-6.
- You receive the SPECIAL VASE.
Chapter 3: The Basement Studio
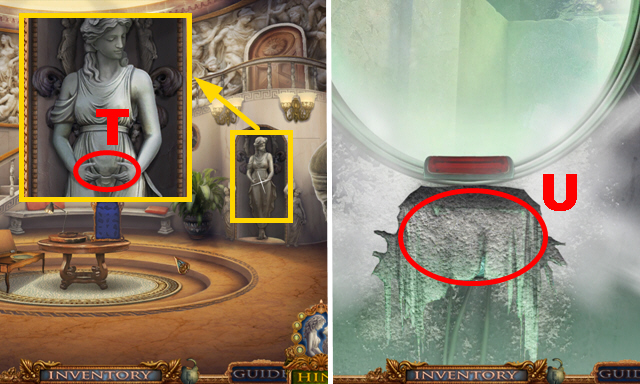
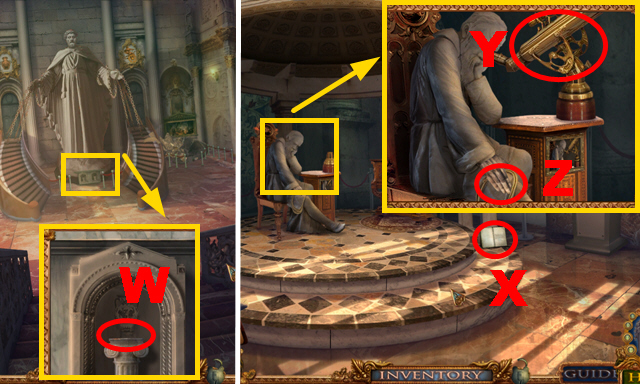
- Insert the SPECIAL VASE into the statue's hands (T).
- Go through the secret door.
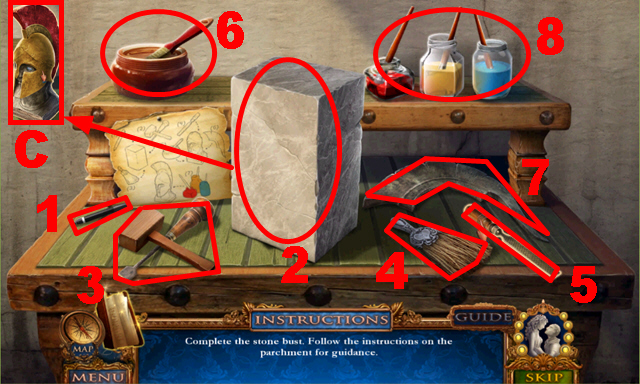
- Remove the plaster (U).
- Play the mini-game.
- Solution: V, B x3, A, C, Z, Y, Z x2, C, Z, A, B, X, C x2, A, C, Z, B, A, W, C x4, X, B, A x4, W, B x2, A x3, B, C, Z x2, A x2, B, A, Z, C, X, C x4, Z x2, A, B, C, B, A.
- You receive the SPEAKER BUTTON.
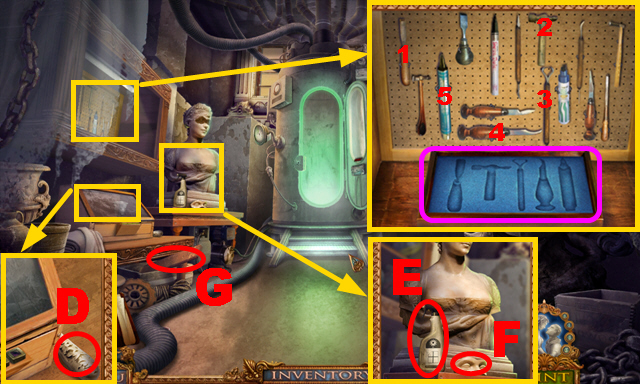
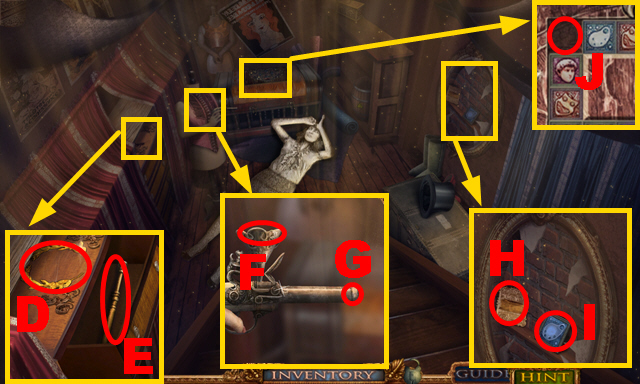
- Take the SCREWDRIVER (D).
- Take the DUST SPRAY (E) and the EYES (F).
- Take WOODEN PLANK 1/3 (G).
- Collect the correct tools (1-5); take the SCULPTOR'S TOOLS (purple).
- Walk down four times.
- Remove four screws with the SCREWDRIVER (H); take the WING (I).
- Go to the Basement Studio.
- Collect the HORSE SHOE (J) with the SCULPTOR'S TOOLS.
- Walk down.
- Insert the WING (K) and the HORSE SHOE (L) into the niches; take the SMALL BULB (purple), the LION HEAD (green), and FRIENDSHIP LOCKET 1/2 (blue).
- Walk down three times.
- Connect the LION HEAD to the statue (M) and the SPEAKER BUTTON to the wires (N); push the button.
- Move towards the house.
- Talk to the man (O).
- Take WOODEN PLANK 2/3 (P).
- Take the TREBLE CLEF (Q).
- Open the lantern; take the CANDLE (R). Insert the SMALL BULB into the niche (1).
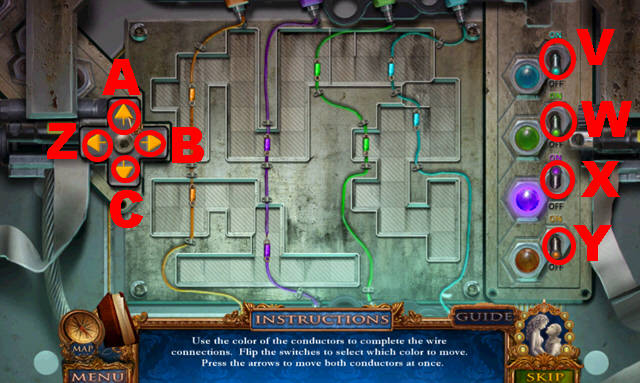
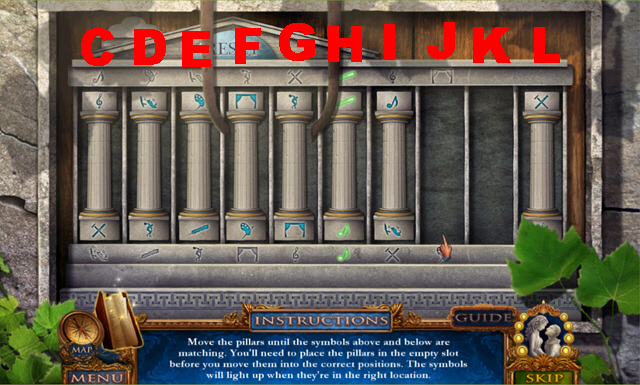
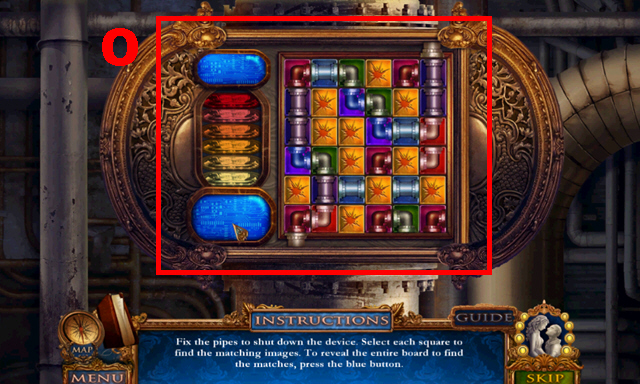
- Play the mini-game (S).
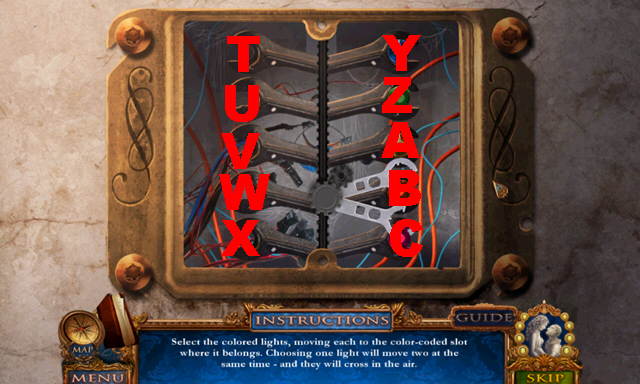
- Solution: VW-ZA, TU-BC, WX-YZ, ZA-VW, YZ-TU, UV-YZ, AB-VW, UV-AB, ZA-TU, UV-VW, WX-UV, TU-ZA, UV-BC.
- Go through the door.
- Read the note (D).
- Turn left.
- Take the RIBBON CUTTER (E) and the CLOTH (F).
- Go to the Basement Studio.
- Apply the DUST SPRAY to the cover (purple) and clean it with the CLOTH; push the buttons 1-4 and take the WINE GLASS (green).
- Go to the Mayor's Foyer.
- Cut the ribbon with the RIBBON CUTTER (G).
- Play the HOP.
- You receive the WINE BOTTLE (H).
- Go to the Garden Fork.
- Play the HOP.
- Take the clippers (green).
- Take the tiara (blue).
- Put the tiara on the doll (purple); take the scraper (orange).
- Cut the bush with the clippers; take the stone flower (I).
- Collect the gum with the scraper (J).
- Insert the stone flower into the slot (K).
- Repair the heart with the gum (L); take the heart.
- Insert the heart into the slot (white); take the portrait piece (M).
- Put down the portrait piece; assemble the portrait correctly (N) to acquire the PORTRAIT.
- Go to the Mayor's Conference Room.
- Put the WINE GLASS and the WINE BOTTLE on the table (O); open the wine bottle with the CORKSCREW.
- Open the lantern; take the BRUSH (P), collect the BEARD with the SCULPTOR'S TOOLS (Q) and hold the CANDLE next to the lantern (R) to acquire the LIT CANDLE.
- Walk down.

- Insert the PORTRAIT into the frame (S); connect the EYES, the NOSE, and the BEARD to the bust (T) and take the DECORATIVE BROOCH (U).
- Hold the BRUSH next to the flowers (V) to acquire the POLLINATED BRUSH.
- Walk down.
- Pollinate 8 flowers with the POLLINATED BRUSH (purple).
- Take the QUARTER NOTE (W) and FRIENDSHIP LOCKET 2/2 (X).
- Go to the Mayor's Conference Room.
- Put down the 2 FRIENDSHIP LOCKETS (Y).
- Play the mini-game.
- Solution: 1-4.
- Move forward.
- Talk to the woman (Z); you receive the MAYOR'S KEY.
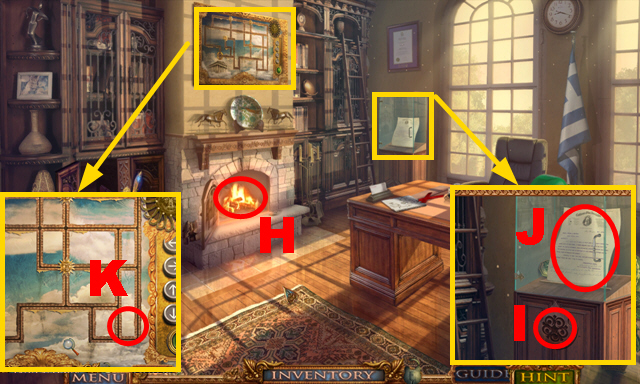
- Insert the EIGHTH NOTE, the TREBLE CLEF, and the QUARTER NOTE into the slots (A); take the RED FEATHER (B).
- Walk down twice.
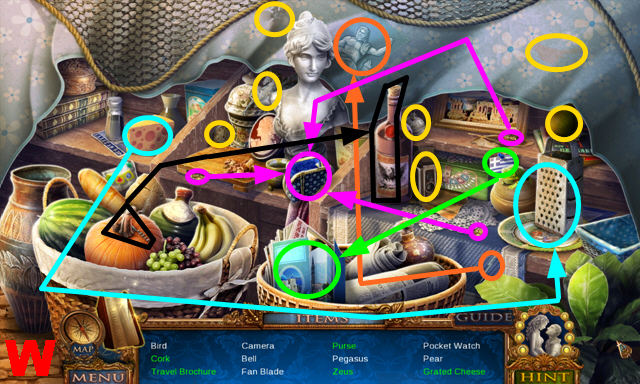
- Play the HOP.
- You receive the ICARUS FIGURE (C).
Chapter 4: The Mayor's Office
- Insert the MAYOR'S KEY into the lock (D); turn the key.
- Enter the Mayor's Office.
- Connect the RED FEATHER to the peacock (E); take the CASSETTE TAPE (F), the LIGHT SWITCH (green), and read the newspaper (G).
- Light the firewood with the LIT CANDLE (H).
- Insert the DECORATIVE BROOCH into the slot (I); take the PERMIT TEMPLATE (J).
- Put down the ICARUS FIGURINE (K).
- Play the mini-game.
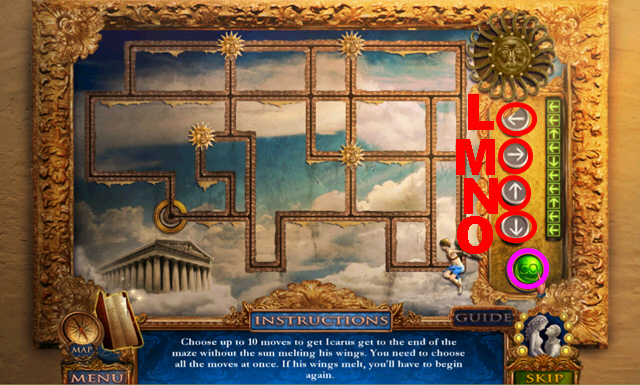
- Solution: L x2, N, L x2, O, L, N, L x2.
- Push the button (purple).
- You receive the STAMP.

- Put down the QUILL FEATHER (1), the PERMIT TEMPLATE (2), and the STAMP (3).
- Play the mini-game.
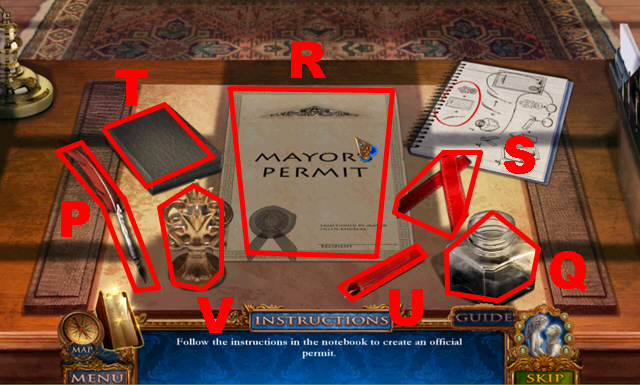
- Solution: P-Q, P-R, S-R, T, T-U, V-R.
- Take the PERMIT (R).
- Walk down four times.
- Play the HOP.
- You receive the FAN BLADE (W).

- Give the PERMIT to the man (X).
- Turn left.
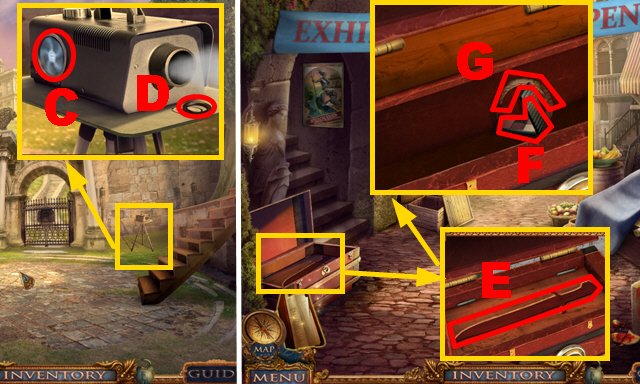
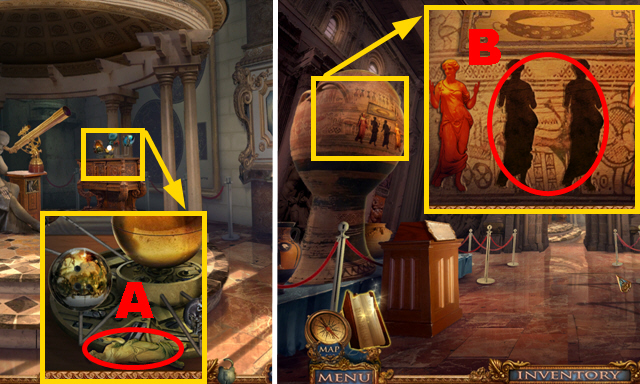
- Take the TELESCOPE (Y).
- Take the GLOBE PIN (Z).
- Take WOODEN PLANK 3/3 (A).
- Take the PROP SWORD (B).
- Insert the FAN BLADE into the slot (C); take MUSE EMBLEM 1/2 (D).
- Walk down.
- Insert the PROP SWORD into the slot (E); take the MAKE-UP PALLET (F) and MUSE EMBLEM 2/2 (G).
- Turn left.
- Put down the 2 MUSE EMBLEMS (H).
- Play the mini-game.
- Solution: 1, 2, 3, 2.
- Turn right.
- Take the ROPE (I).
- Take the RED COLLAR (J).
- Put the GLOBE PIN on the globe (K); take the PLAYBILL (L) and the JEWELED FLOWER (M).
- Walk down.
- Connect the 3 WOODEN PLANKS to the ladder (N); fix them with the ROPE.
- Turn left.
- Take the SCROLL (O), the CODE KEY (P), read the note (purple), and remove the arms with the SCREWDRIVER (blue); take the ARMS (Q).
- Take the BATTERY (R); read the note (S).
- Insert the PLAYBILL into the niche (T); push the figurines in numerical order 1-4.
- Insert the LIGHT SWITCH into the gap (U).

- Take MASK HALF 1/2 (V) and insert the JEWELED FLOWER into the bag (W); take the BRASS BALL (green) and the POWDER PUFF (X).
- Walk down.
- Insert the SCROLL into the figurines hands (Y).
- Turn right.
- Connect the ARMS (1), the hat (2), and the gloves (3) to the mannequin; apply the MAKE-UP PALLET and the POWDER PUFF to its face and take the DANCE SHOES (Z).
- Walk down.
- Connect the DANCE SHOES to the figurine (A).

- Play the HOP.
- You receive the CASSETTE PLAYER (B).
- Turn left.
- Insert the CASSETTE PLAYER into the device (C) and put the CASSETTE TAPE into the cassette player.
- Take the TEA CUP (purple), the HEART-SHAPED KEY (D), and read the note (E).
- Insert the HEART-SHAPED KEY into the lock (F); take the BINOCULARS (G).
- Put the BINOCULARS into the mannequin's hands (H); take the DIAL (I).
- Connect the DIAL to the device (J) and turn the dial three times; take MASK HALF 2/2 (K) and the BLUE FEATHER (L).
- Go to the Mayor's Office.

- Connect the BLUE FEATHER to the peacock (M); take the TERRACOTTA FIGURE (N).
- Go to the Gazebo.
- Insert the BATTERY into the saw (O), remove the vines with the saw, and open the chest; take the LIGHT COVER (P) and the note (Q).
- Go to the Theater Seats.
- Insert the LIGHT COVER into the stage light (R).
- Play the mini-game.
- Solution: (S).
- Take the TICKET (T).
- Walk down, turn right.
- Insert the TICKET into the slot (U); turn the handle (V).
- Remove the chains with the SCULPTOR'S TOOLS four times (W).
- Put down the 2 MASK HALVES (X).
- Play the mini-game.
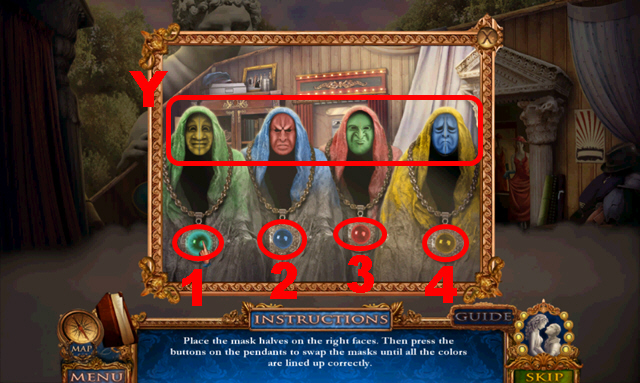
- Assemble the masks correctly (Y); push the pendants: 1, 2, 3, 2, 3.
- Go through the trapdoor.
Chapter 5: Under the Stage
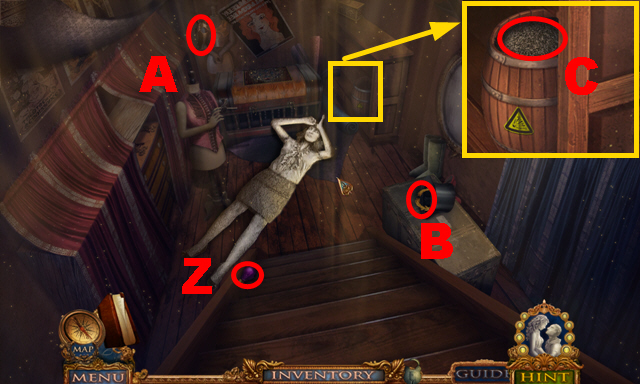
- Take the BLACKLIGHT (Z).
- Take the HORSE ARMOR (A).
- Turn around the top hat; take the LAUREL (B).
- Put the TEA CUP into the barrel (C) to acquire the GUN POWDER.
- Insert the LAUREL into the slot (D); take the RAMROD (E).
- Pour the GUN POWDER into the gun (F) and insert the BRASS BALL into it (G); push the brass ball with the RAMROD.
- Take the PARTHENON EMBLEM (H) and the CHEST TILE (I).
- Put down the CHEST TILE (J).
- Play the mini-game.
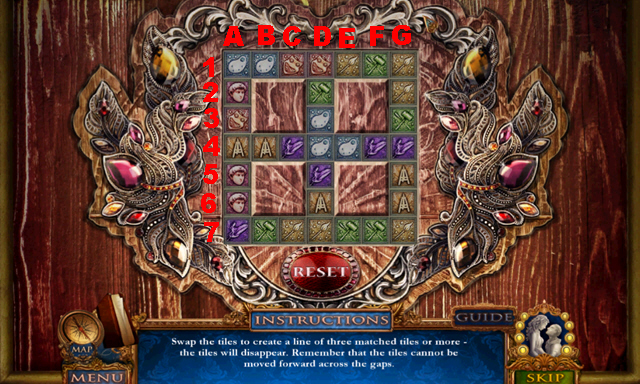
- Solution: A4-A5, A5-A6, A6-A7, A7-B7, B7-C7, B4-A4, A4-A5, A5-A6, A6-A7, A7-B7, G6-G7, G7-F7, F7-E7, G5-G6, G6-G7, G7-F7, D5-D6, D6-D7, D5-D6, D3-D2, D2-D1.
- D1-E1, E1-F1, D4-D3, D3-D2, D2-D1, D1-E1, B1-C1, A1-B1, E4-D4, D4-D3, D3-D2, C4-D4, D4-D3, D3-D2, D2-D1, D3-D2, C4-D4, D4-E4, E4-F4, F4-G4, E4-D4, D4-D5, A5-A4.
- A4-B4, B4-C4, C4-D4, D4-D3, A2-A1, B4-A4, A4-A3, A3-A2, C4-B4, B4-A4, A5-A4, A4-A3, A3-A2, A6-A5, C4-B4, B4-A4, D2-D1, D6-D7, A4-A3, D4-C4, C4-B4, E4-D4, D4-C4.
- A5-A4, G5-G4, E4-F4, D4-E4, G4-G3, G5-G6.
- You receive the AXE.
- Hit the trapdoor with the AXE three times (H).
- Walk down twice.
- Insert the PARTHENON EMBLEM into the niche (I).
- Play the HOP.
- You receive the TRIPOD (J).
- Move forward.
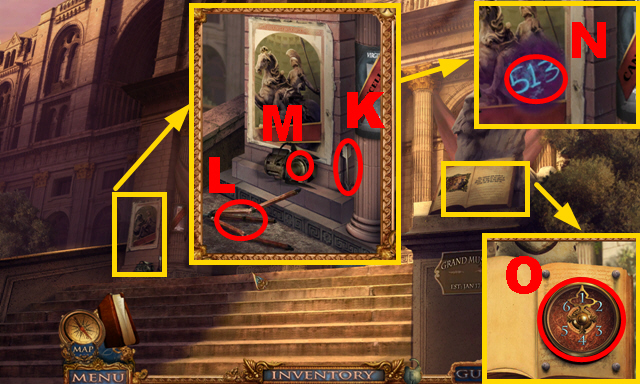
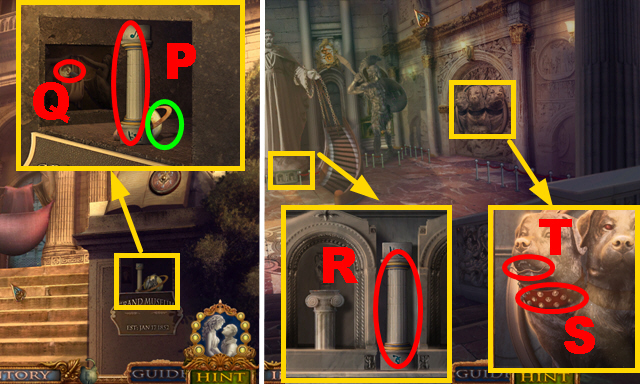
- Take the ARROW (K) and put down the TRIPOD (L); insert the BLACKLIGHT into the stage light (M), connect the stage light to the tripod, and make note of the code (N).
- Turn the pages twice and put the CODE KEY into the book (O); enter the code '513'.
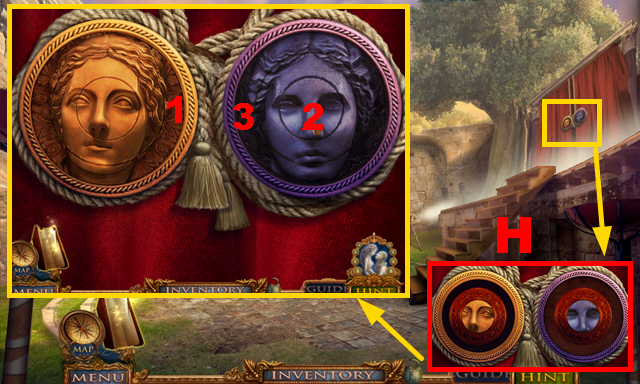
- Take PILLAR 1/3 (P), the SATURN (green), and push the switch (Q).
- Move forward.
- Take PILLAR 2/3 (R).
- Connect the RED COLLAR to the statue (S); take the BOW (T).
- Connect the BOW and the ARROW to the figurine (U).
- Play the HOP.
- You receive the TERRACOTTA VASE (V).
- Put down the TERRACOTTA VASE (W).
- Turn left, move forward.
- Take the book (X).
- Put down the TELESCOPE (Y); take the LASSO (Z).
- Take the TERRACOTTA FIGURE (A).
- Walk down.
- Insert the 2 TERRACOTTA FIGURES into the niches (B).
- Play the mini-game.
- Solution: F x2, D x2, C x2, E x2.
- Take the BLUE COLLAR (G).
- Walk down.
- Put down the BLUE COLLAR (H); take PILLAR 3/3 (I).
- Turn left.
- Throw the LASSO at the vase (J); take HERMES (K).
- Move forward.
- Connect the SATURN (L) and HERMES (M) to the planetary system; take the HORSE (N).
- Walk down twice.
- Put down the HORSE (O).
- Turn right.
- Put down the HORSE ARMOR (P).
- Go to the Galileo Exhibit.
- Push the button (Q).
- Play the mini-game (R).

- Solution: 1-4.
- You receive the HELMET.
- Walk down twice.
- Play the HOP.
- You receive the PRY BAR (S).
- Turn right.
- Remove the brick with the PRY BAR (T); take the KEY (U).
- Connect the HELMET to the statue (V).
- Walk down, turn left.
- Insert the KEY into the lock (W); take the TOGA (X).
- Walk down, turn right.
- Connect the TOGA to the statue (Y); take the WHIP (Z).
- Push the button (A).
- Put down the 3 PILLARS (B).
- Play the mini-game.
- Solution: CD-JK, IJ-CD, DE-IJ, JK-DE, FG-JK, KL-FG.
- You receive the GOLD COLLAR.
- Walk down.
- Connect the GOLD COLLAR to the statue (M).
- Turn right.
- Throw the LASSO at the machine (N).
- Play the mini-game.
- Solution: (O).
- Congratulations, you have completed Dark Canvas: Blood and Stone.
Created at: 2013-11-24