

WALKTHROUGH MENU
- GENERAL TIPS
- CHAPTER 1: TARA
- CHAPTER 2: RAHUL
- CHAPTER 3: MAYA
- CHAPTER 4: MEETING PLACE
- CHAPTER 5: MAYA’S CASTLE JOURNEY
- CHAPTER 6: RAHUL’S CASTLE JOURNEY
- CHAPTER 7: REUNITED
GENERAL TIPS
- This walkthrough was written using Relaxed Mode. Gameplay may vary a little when playing in Timed Mode.
- You can choose the play the game in either Timed of Untimed Mode. The game will ask you to choose which mode you want to play at the beginning of the game.
- The Timed Mode is like a reverse timer, it doesn’t count down the time instead, it counts how long you’ve been playing.
- If you decide to skip a puzzle in Timed Mode 5 minutes will be added to your clock.
- Click on the map button in the lower right to toggle back and forth between locations.
- The Grandha (Journal) is located in the lower right side of the screen. You can use the Journal to read more information about the story and to obtain clues for the game.
- There are 3 main characters in the game. Each character will have their own section in the Journal.
- You can switch between characters by clicking on their icons above each scene.
- Click on the Golden Butterflies in the scene to reveal stories about Cherai.
- You will collect magic herbs at the end of each Hidden Object scene. These herbs will not come into play until much later in the game and are stored separately from your inventory.
- Click on the Symbols that you find throughout the game. They are always rounded and will light up after you press them. These Symbols give you access to other areas in the game.
HINT CHAKRA & INVENTORY ITEMS
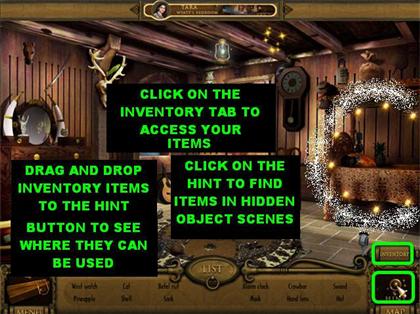
- Click on the Hint Chakra in the lower right corner to obtain a hint in the Hidden Object scenes. The game will show you the location of one random item.
- You can pick up an inventory item and place it on the Hint Chakra to find out where it can be used. You will see a brief image of where the item can be used. This is a very helpful tool if you get stuck in the game.
- Hints are unlimited but they have to recharge before you can use them again.
- Inventory items can usually be found in the Hidden Object scenes. Each time you pick up one up your inventory tray will open up.
- If you want to use an inventory item, click on the “Inventory” tab in the lower right. Drag the inventory item to the spot you wish to use it in and click it into place.
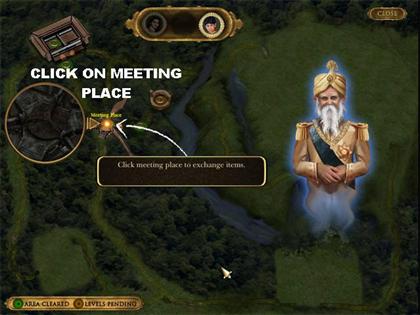
MEETING PLACE

- The Meeting Place is the location in which you can meet up with all the characters to exchange items found throughout the game.
- Tara and Rahul can access the Meeting Place by going through the Map button in the lower right side of each scene.
- Maya can only access the Meeting Place by going on the upper left side of the Path to Wayside.
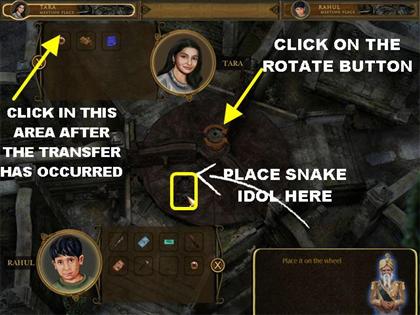
- Place items you want to exchange with other characters on the large wheel in the middle of the scene.
- Use the Rotating button in the middle of the wheel to deliver the inventory items.
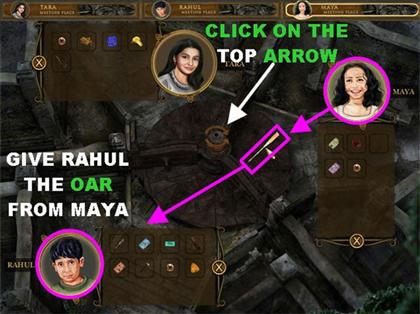
- There are 2 arrows on top of the wheel. The top arrow will move the wheel clockwise and the bottom arrow will move the wheel counter-clockwise.
- If you deliver the wrong items to a character, use the wheel to send it to the right person.
MINI-GAMES
- There are 25 mini-games in Dark Hills of Cherai. The mini-games are never repeated in the game.
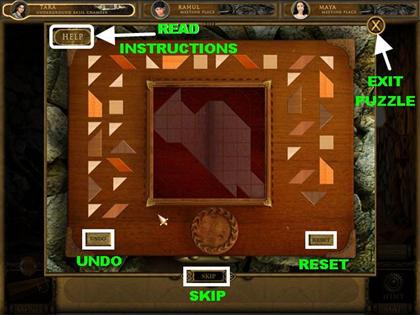
- You can skip a mini-game once the Skip button has been activated.
- If you’re playing a mini-game in Timed Mode, 5 minutes or more will be added to your overall time.
- In certain puzzles there is an Undo button which allows you to undo the last move you made.
- You can click on the Help Button in the upper left if you need to read the mini-game’s instructions over.
CHAPTER 1: TARA
PATH TO WYATT’S HOUSE
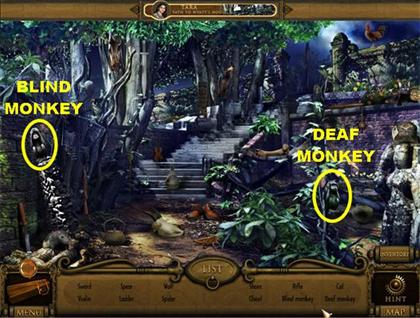
- Pick up the Blind Monkey on the left.
- Pick up the Deaf Monkey in the lower right.
- This area is now clear; place your cursor above the steps to enter the next area.
WYATT’S HOUSE GATE
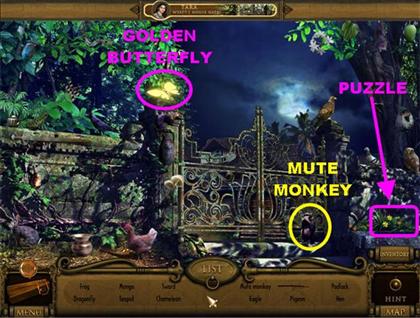
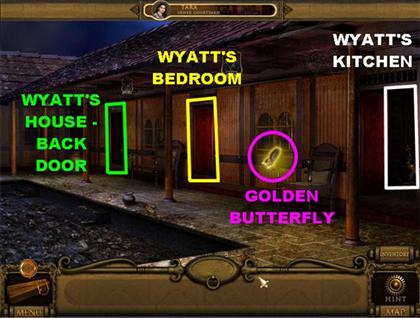
- Click on the Golden Butterfly to reveal the stories of Cherai.
- The Mute Monkey is on the lower right side of the gate.
- Click on the sparkly spot in the lower right to trigger a puzzle.
MONKEY PUZZLE
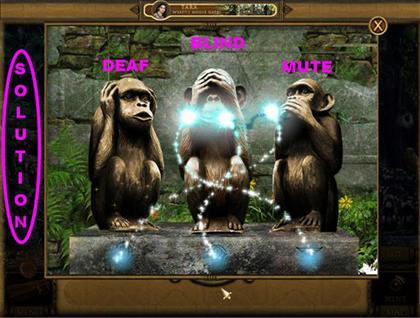
- Place the Deaf Monkey in the first spot, above the ear symbol.
- Place the Blind Monkey on the middle spot, above the eye symbol.
- The Mute Monkey goes on the last spot, above the mouth symbol.
- The gate will open after the puzzle has been cleared, go through it.
WYATT’S HOUSE ENTRANCE

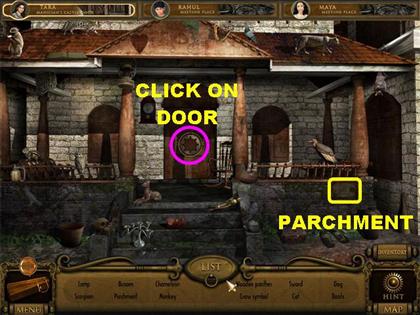
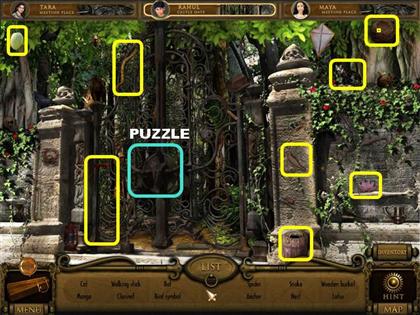
- In this section you have to find 6 Parchments and 6 Gems in the scene.
- The Parchments are highlighted in green.
- The Gems are circled in yellow.
GEM PUZZLE

- Once all the Gems and Parchments have been collected, click on the door for a closer view.
- Place the Gems in the slots of a matching color.
- Please look at the screenshot for the solution.
- Pick up the Key inside the Gargoyle’s mouth after the puzzle has been solved.
DOOR PUZZLE AT WYATT’S HOUSE ENTRANCE

- Place the Key on the door to trigger a mini-game.
- Click on any 2 symbols and they will swap places.
- Your goal is to match the symbols on the parchment in the upper left with the symbols on the door.
- When a piece is in the right spot it will turn dark.
- When a piece is in the wrong spot it will stay lit.
- Please look at the screenshot for the solution.
- This area is now clear. Go through the door after the puzzle has been solved.
INNER COURTYARD
- Click on the Golden Butterfly on the right.
- There are several locations you can reach from the Inner Courtyard.
- The left door leads to Wyatt’s House Back Door.
- The middle door leads to Wyatt’s Bedroom.
- The right door leads to Wyatt’s Kitchen.
- Let’s go to Wyatt’s Bedroom through the door in the middle.
WYATT’S BEDROOM
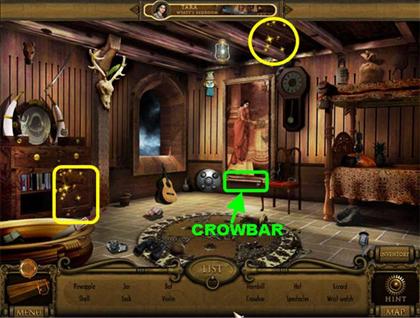
- Pick up the Crowbar below the large painting.
- Click on the cabinet in the lower left to trigger a puzzle.
CLOCK PUZZLE IN WYATT’S BEDROOM
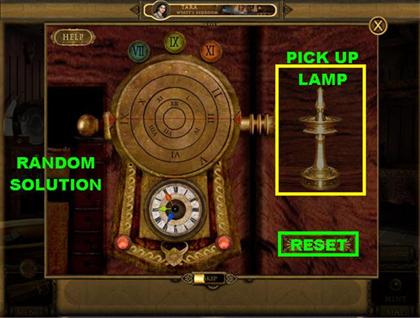
- Your goal is to arrange the clock correctly by doing it in 2 different steps.
- The first step is to rotate the concentric circles so the numbers and the red lines are in the right spots.
- The second step is to place the hands of the clock in the right positions according to the random numbers you receive.
- Drag the concentric circles around so you can line up the red lines correctly. When the red lines are lined up correctly the Roman numerals should be in the same position as that of a clock.
- You will see a yellow sparkly light appear when all the circles are in the right spot.
- Once the top part of the clock is set, you will see three colored numbers appear above the puzzle.
- Your goal is to change the clock hands at the bottom of the clock to the times shown above.
- Move the hands of the clock to the times shown on the number that has the matching color.
- The solution to this puzzle is random, use the numbers you are given to position the hands.
- Once all parts of the puzzle have been solved, the cabinet will open.
- Pick up the Lamp inside the cabinet.
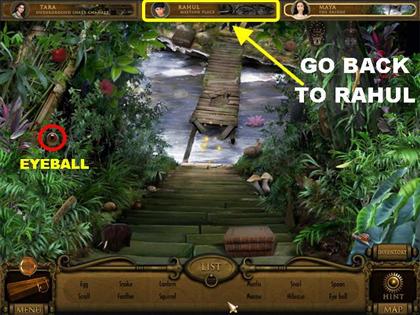
LOOSE BOARD IN WYATT’S BEDROOM
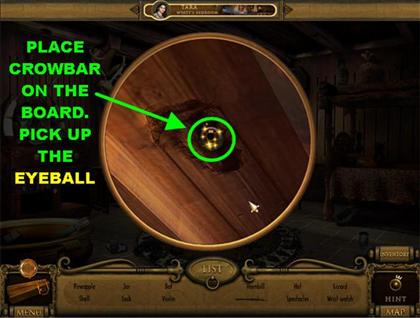
- Click on the Loose Board in the upper right side of the ceiling for a closer view.
- Place the Crowbar on the Loose Board.
- Pick up the Eyeball inside the ceiling.
- The area is now clear, go back to the Inner Courtyard and enter the door on the right.
WYATT’S KITCHEN
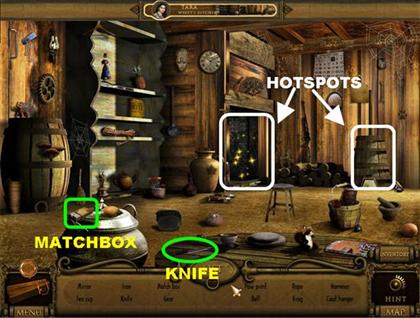
- Pick up the Knife in the lower left side.
- Pick up the Matchbox in the lower left.
- Click on the sparkly spot on the right side of the scene to trigger a puzzle.
WYATT’S KITCHEN COIN PUZZLE
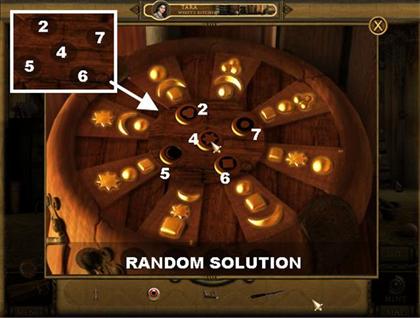
- Your goal is to place the coins in the right spots on top of the drum so that all the symbols will light up.
- When you place a coin in the right spot, all the symbols the coin affects will light up.
- The numbers on the slots on top of the drum represent the number of each symbol. For example, there are 7 square symbols on top of the drum. Place the coin with the square on top of the number 7 slot.
- The numbers move around with each game but the solutions is always the same.Clover = 2 Star= 4 Half Moon =5 Square = 6 Circle = 7
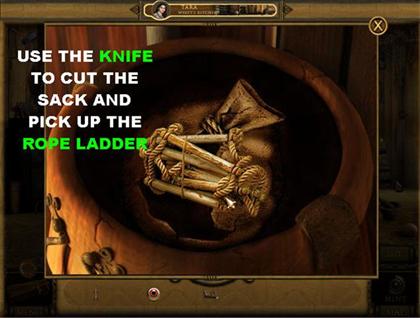
- Use the Knife to cut open the bag inside the drum after the puzzle has been solved.
- Pick up the Rope Ladder inside the bag.
FIREPLACE IN WYATT’S KITCHEN
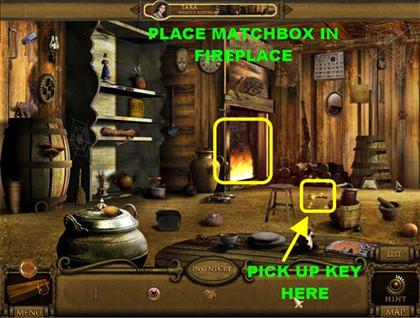
- Place the Matchbox inside the fireplace and a Key will land on the carpet.
- Pick up the Key on the right side of the carpet.
- The area is now clear, go back to the Inner Courtyard and enter the door on the left.
WYATT’S HOUSE BACK DOOR
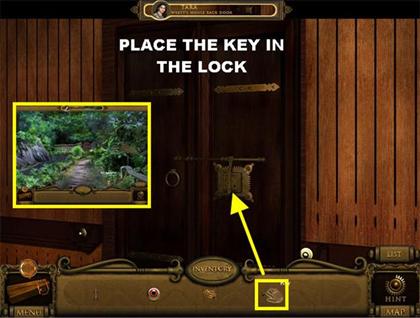
- Place the Key in the Back Door to open it, go through the door to access the next area.
SNAKE TEMPLE GATE
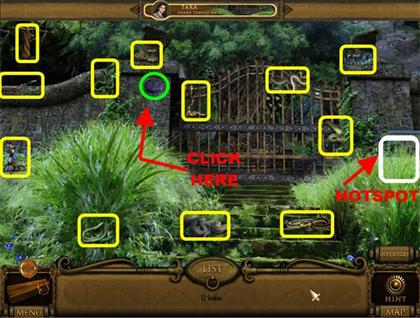
- Click in the back of the scene to access the Snake’s Temple.
- Find the 12 Snakes in the scene. Please look at the screenshot for the locations of all the Snakes.
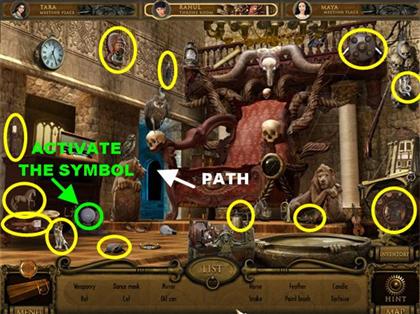
- Click on the symbol next to the gate to activate it.
- Click on the right side of the bushes to activate the next puzzle.
SNAKE TILE PUZZLE BEHIND WYATT’S HOUSE
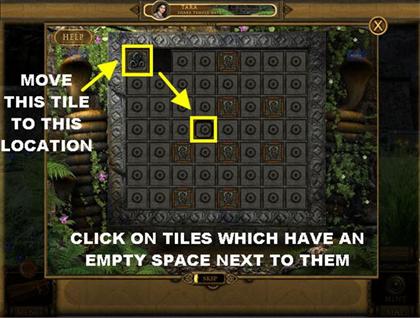
- Your goal is to move the glowing snake tile in into the glowing spot in the center of the board.
- The starting position for the snake tile always changes, please look at the screenshot to see what the snake tile looks like.
- Click on a tile that is adjacent to the empty slot and the tile will move to the empty slot.
- Keep moving the pieces around until you can place the snake tile into the glowing spot close to the center of the scene.
- This area is now clear. Go through the gate after the puzzle has been solved.
SNAKE TEMPLE
- Look for the items on the list. There are no inventory items to pick up in this scene.
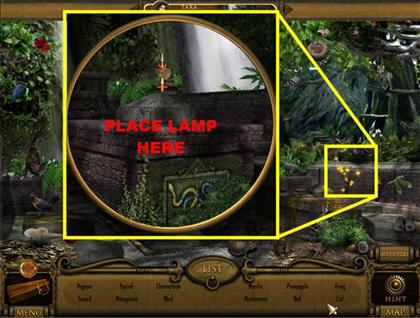
- Click on the sparkly spot on the right.
- Place the Lamp by the idols.
- Click on the new sparkly spot in the lower right to trigger a mini-game.
SNAKE TILE PUZZLE
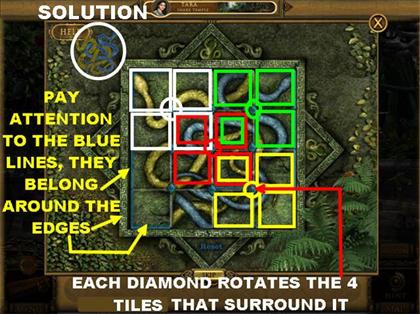
- Please watch the video for a step-by-step solution for this puzzle.
- Your goal is to click on the blue diamonds in between the tiles to rotate them.
- Each diamond in the center rotates the 4 tiles that are attached to it.
- Use the image in the top left corner to guide you in your solution.
- The best solution is to make it in 3 moves. Use the blue edges of the tiles to help you place the pieces.
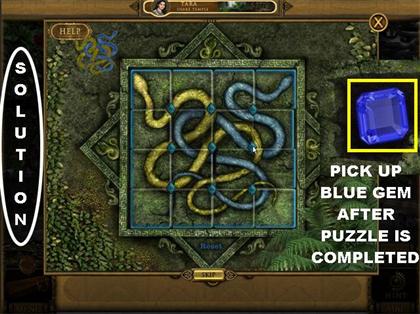
- Pick up the Blue Gem that appears on the screen after the puzzle has been solved.
- There are 2 sparkly spots in the scene but you cannot continue in this section until other tasks have been performed.
- Click on the sparkly spot in the center of the scene to trigger Rahul’s icon to appear.
- Click on Rahul’s icon in the upper right side of the scene.
CHAPTER 2: RAHUL
RAHUL’S BEDROOM
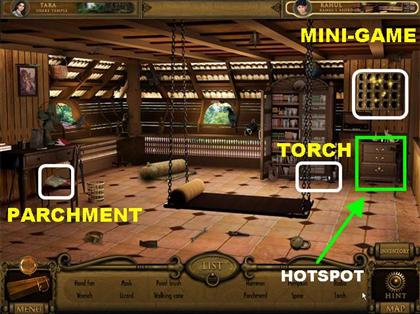
- Pick up the Parchment on the chair on the left side of the scene.
- Pick up the Torch in the far right side of the scene.
- Click on the sparkly spot in the upper right to trigger a mini-game.
MATCHING SCROLLS MINI-GAME
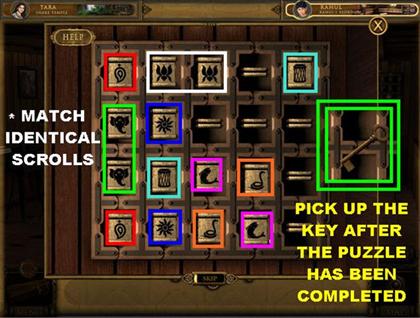
- Your goal is to find all the matching pairs of parchment papers and eliminate them from the board.
- Click on two scrolls to open them. If the scrolls match they will be eliminated from the list.
- Pick up the Key that appears in the center of the board once all the matches have been eliminated.
CAT FOOD
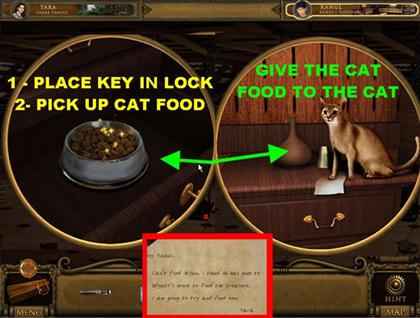
- Click on the sparkly spot in the lower right for a closer view of the cabinet’s lock.
- Place the Key in the lock to open the drawer.
- Pick up the Cat Food inside the drawer.
- Click on the Cat on top of the drawer for a closer view.
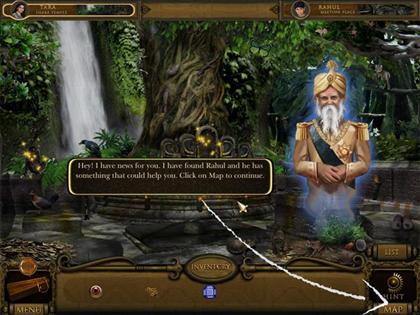
- Give the Cat Food to the Cat and a message from Tara will appear on the screen.
- This area is now clear, click at the bottom of the screen to enter the next location.
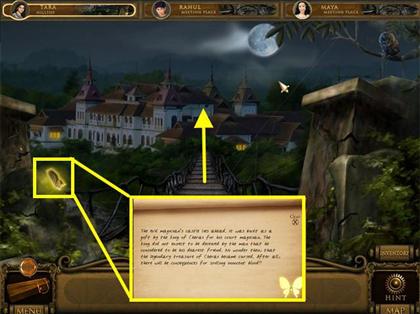
GRANDMA’S HOUSE - FOREST
- You will be taken to Grandma’s House. Click on the Golden Butterfly to read a message.
- Click in the back of the scene to enter the Forest.
- If you click on the left side of the scene Rahul can access the Meeting Place. You will come back to that area later.
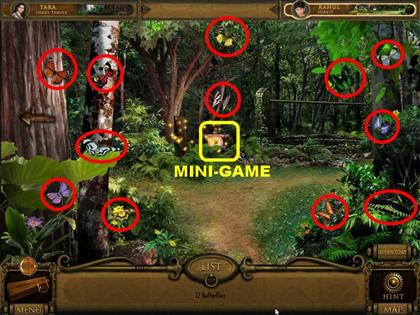
- Once you get to the Forest you will be asked to find 12 butterflies.
- Please look at the screenshot for the locations of all the butterflies.
- Click on the Wooden Plank to the left of the target and it will go into inventory.
- Click on the sparkly target in the back of the scene to trigger a mini-game.
TARGET MINI-GAME

- Your goal is to position the knife in the correct position to score the most points.
- You have to score 120 points in 4 tries or less to beat the game.
- Click and hold the knife to pick it up.
- Drag the knife to the right spot and release it.
- It is better to place the Knife in the lower center of the scene for a better chance to hit the target. Place it a little above the center of the skip button for the best score.
- The red circle gives you 10 points.
- The white circle gives you 20 points.
- The yellow circle gives you 50 points.
- The brown circle in the center gives you 100 points.
- Pick up the Blue Gem that appears once the puzzle has been solved.
- This area is now clear, click on the right side of the Forest to access the Abandoned Well.
ABANDONED WELL
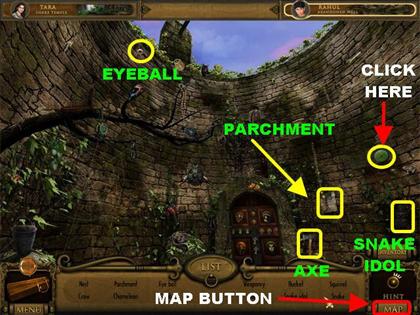
- Click on the symbol in the upper right side to activate it.
- Pick up the Eyeball in the upper left side.
- Pick up the Parchment in the lower right.
- Pick up the Axe in the lower right, next to the door.
- Pick up the Snake Idol in the lower right corner.
- Click on the Map Button in the lower right after all the items have been found on the list. You receive a message that the Snake Idol goes to Tara.
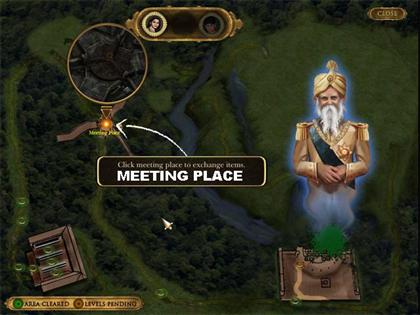
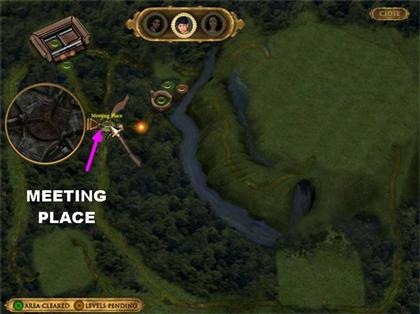
MEETING PLACE
- Click on the area on the Map called “Meeting Place”.
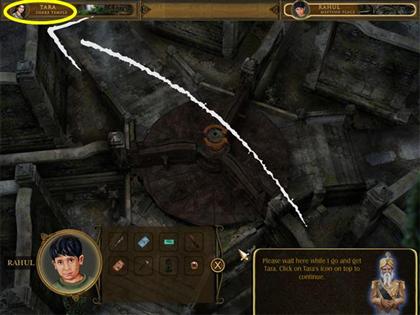
- Click on Tara’s icon in the upper left side of the Meeting Place.
- You are taken back to the Snake Temple scene. You’ve just alerted Tara to come with you to the Meeting Place.
- Click on the Map Button in the lower right.
- From the Map, click on “Meeting Place” again.
- You are now back at the Meeting Place.
- Note - If you’re playing in Timed Mode, Tara has to go Behind Wyatt’s House and hang a right to go to the Meeting Place.
- Pick up the Snake Idol next to Rahul’s icon.
- Place the Snake Idol on the lower left side of the wheel.
- Click on the Rotate Button in the UPPER center of the wheel to exchange the item.
- The Snake Idol has now been transferred to Tara and it will now be a part of her inventory.
- Click in the upper left t side of the scene to access Behind Wyatt’s House. If you can’t access Wyatt’s House, click on Tara’s SMALL icon in the upper left first, then try to access it.
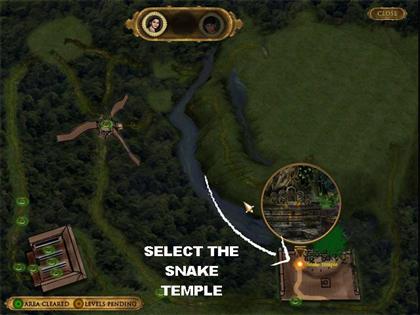
- Click on the Map Button in the lower right t to access the Map.
- Click on the Snake Temple in the lower right side of the Map to go back there.
SNAKE TEMPLE
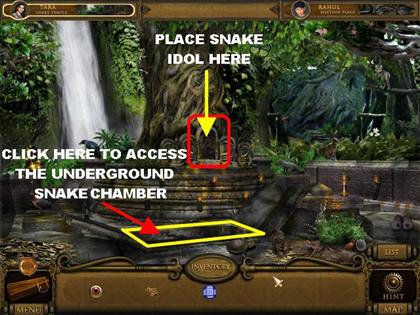
- Place the Snake Idol in the center of the row of deities and a trap door will open in the center of the ground.
- Go through the trap door to access the Underground Snake Chamber.
UNDERGROUND SNAKE CHAMBER
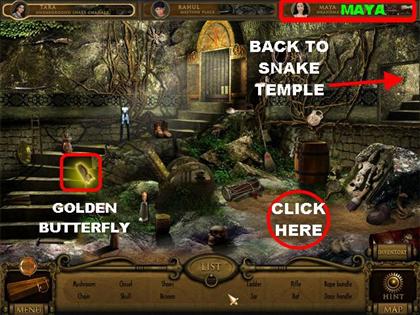
- Click on the Golden Butterfly by the steps on the left.
- Look for all the items on the list. No special items will be found in this section.
- Click on the sparkly spot in the lower right to trigger the appearance of a new character called Maya.
- Click on Maya’s icon in the top right side of the scene to continue the quest with her.
CHPATER 3: MAYA
MAYA’S GRANDMAS BEDROOM
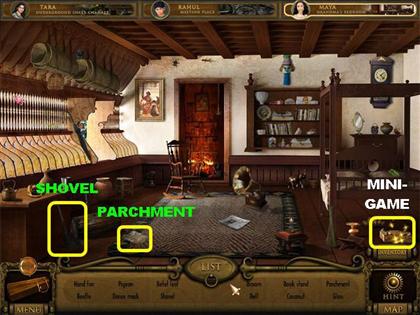
- Pick up the Parchment on the lower left corner of the rug.
- Pick up the Shovel in the lower left. You receive a message that the Shovel can be used by Tara in the Underground Snake Chamber.
- Click on the twinkling logs in the lower right to trigger a mini-game.
SHELL MINI-GAME
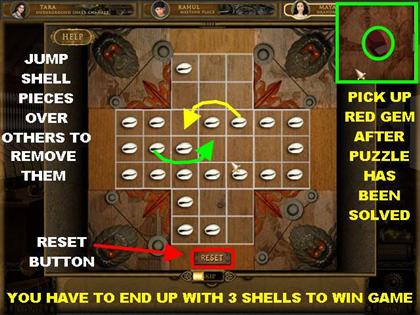
- Please watch the video for a step-by-step solution for this puzzle.
- Your goal is to remove the shells from the board until only 3 are left.
- Jump shells over others to remove them from the board.
- Click on the RESET button if you want to start from the beginning.
- If you run out of moves in the game, you will be given the choice to Skip or Reset the game.
- This area is now cleared, click at the bottom of the scene to access Grandma’s House.
- Click on the doorway to access the Path to the Wayside Shed.
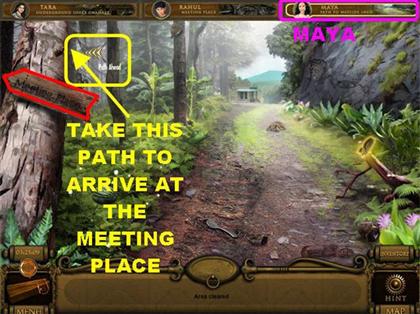
PATH TO WAYSIDE SHED
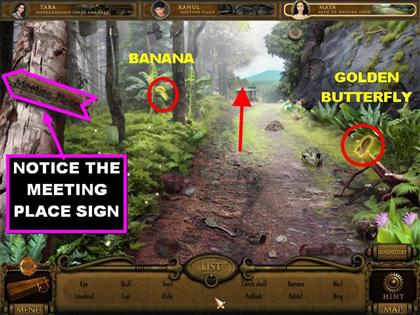
- Notice the sign in the upper left, it says Meeting Place. This is how Maya can gain access to the Meeting Place. You will come back to this area later.
- Click on the Golden Butterfly in the lower right.
- Pick up the Banana in the banana tree on the left side of the scene. You receive a message that Tara can use the Banana to distract the monkey at the Snake Temple.
- Click on the back of the scene to access the Wayside Shed.
WAYSIDE SHED
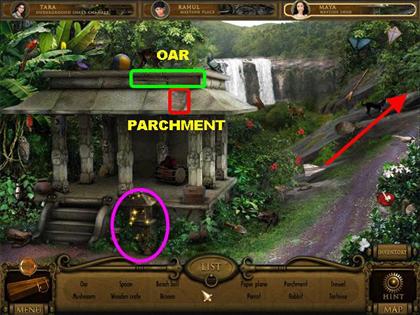
- Pick up the Oar on the roof of the temple.
- Pick up the Parchment on the roof of the temple.
- Click on the sparkly spot in the lower center and you will be told that you need a Key.
- Click on the right side of the scene to access the next area.
THE BRIDGE
- Pick up the Eyeball on the left side of the scene.
- Click on Rahul’s icon in the upper center after all the items have been found and you will be taken back to the Meeting Place.
- Click in the lower left side of the Meeting Place to go back to the Forest. Enter the Well on the right side.
ABANDONED WELL
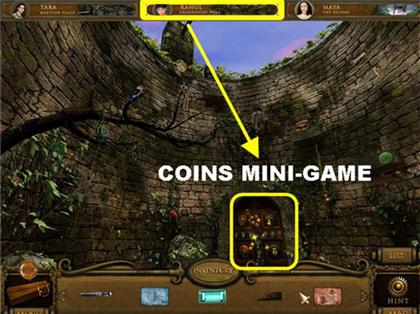
- Click on the sparkling door in the Abandoned Well to trigger a mini-game.
ANIMAL COINS MINI- GAME
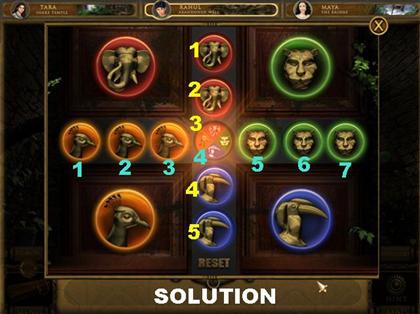
- Please watch the video for a step-by-step solution for this puzzle.
- Your goal is to click on the coins into the right spots.
- Coins can only be moved in one direction.
- Coins can jump over a single coin as long as there is an empty space next to it.
- Please follow these steps for the solution:
- For the vertical coins, I will label them 1 to 5, from top to bottom. Please click on the coins in the following order:2-4-5- 3-1 -2-4 -3
- For the horizontal coins, I will label them from 1 to 7, from left to right. Please click on the coins in the following order:3-5-6-4-2-1-3 5-7-6-4-2-3-5-4
- This area is now clear, go through the entryway to access the Tunnel.
THE TUNNEL/ THE RIVERSIDE
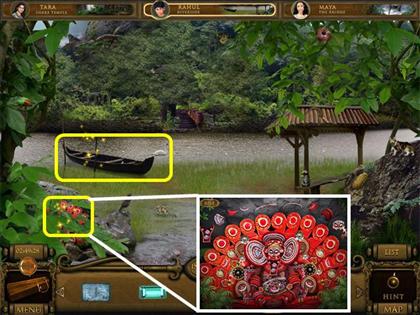
- Click on the Golden Butterfly in the Tunnel. Then proceed to the back of the path to reach the Riverside.
- Pick up all the items from the list. There are no inventory items to pick up in this Hidden Object scene.
- After all the items have been picked up the boat in the water will begin to sparkle.
- Click on the sparkly boat and you will receive a message that you need the Oar. If you’re playing in Timed Mode, Maya may appear at this point.
- Click on the sparkly flowers in the lower left.
SHAPES MINI-GAME
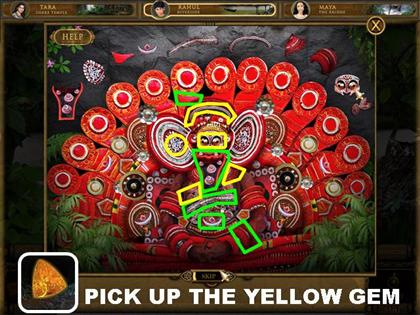
- Your goal is to find all the items shown on top of the puzzle.
- The pieces you need to pick up will glow.
- Drag the pieces to the appropriate area above the puzzle and click them into place.
- Please look at the screenshot for the solution.
- Click on the yellow gem after the puzzle has been solved.
- Click on the Map Button in the lower right.
- Click on the Meeting Place section in the Map.
- Click on Tara’s Icon in the upper left side and you will be taken back to the Underground Snake Chamber.
- Click on the Map Button in the lower right corner.
- Click on the Meeting Place spot on the Map.
- You now have Rahul and Maya at the Meeting Place but you still need Maya.
- Click on Maya’s icon in the upper right side of the Meeting Place and you will be taken back to the Bridge.
- Click downwards twice so you can go back to the Path to Wayside Shed.
- Click on the upper left side of the Wayside Path to reach the Meeting Place.
CHAPTER 4: MEETING PLACE
MAYA TO TARA
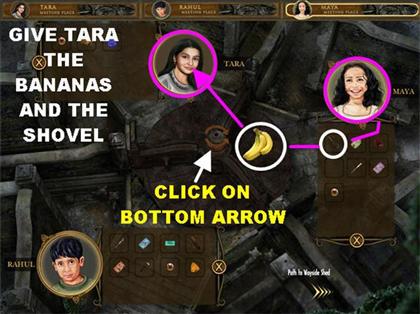
- You now have to exchange items between all the parties so you can continue on your journey.
- Please follow the next set of instructions carefully.
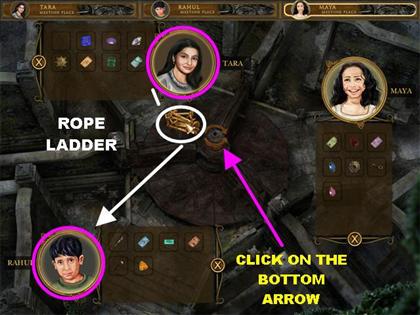
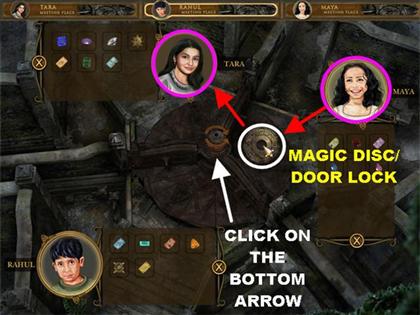
- Grab the Banana from Maya’s inventory and place it on the upper right side of the wheel.
- Click on the BOTTOM arrow so the wheel will spin towards Tara and the Banana will go into Tara’s inventory.
- Click on Maya’s LARGE icon on the right to open up the inventory items again.
- Grab the Shovel from Maya’s inventory and place it on the upper right side of the wheel.
- Click on the BOTTOM arrow so the wheel will spin towards Tara and the Shovel will go into Tara’s inventory.
TARA TO RAHUL
- Click on Maya’s LARGE icon on the right to open up the inventory items again.
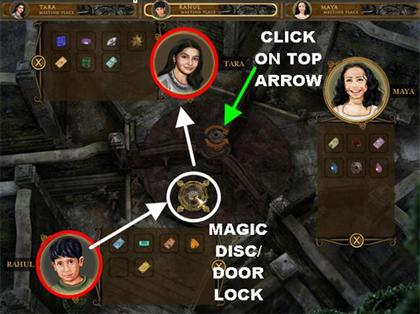
- Grab the Oar from Maya’s inventory and place it on the upper right side of the wheel.
- Click on the UPPER arrow so the wheel will spin towards Rahul and the Shovel will go into Rahul’s inventory.
RAHUL TO TARA
- Click on Rahul’s LARGE icon on the lower left to open up the inventory items.
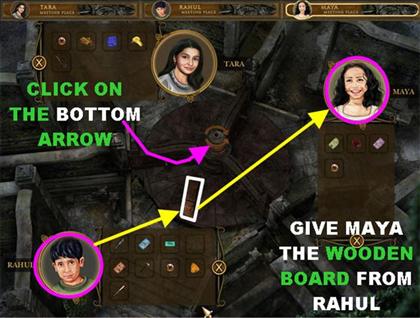
- Grab the Plank from Rahul’s inventory and place it on the lower left side of the wheel.
- Click on the BOTTOM arrow so the wheel will spin towards Maya and the Plank will go into Maya’s inventory.
- You can go in several directions at this point. For the purposes of the walkthrough we will go back to the Snake Temple.
- Click on Tara’s SMALL icon in the upper left to trigger the way to the path.
- Click in the upper left side of the scene to go Behind Wyatt’s House. Click in the back of the scene 2 times so you can reach the Snake’s Temple.
SNAKE TEMPLE
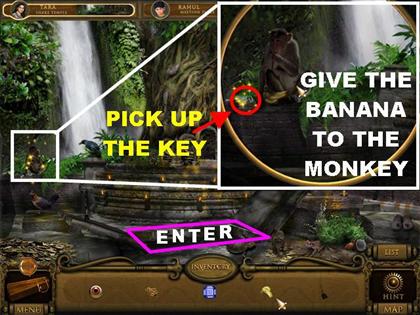
- Click on the monkey on the left for a closer view.
- Give the Bananas to the Monkey.
- Pick up the Key that appears next to the Monkey. You receive a message that Maya can use the Key at the Wayside Shed.
- Click on the hatch on the ground to go back to the Underground Snake Chamber.
UNDERGROUND SNAKE CHAMBER
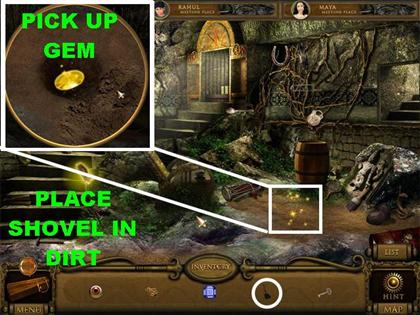
- Click on the sparkly spot on the right side of the ground for a closer view.
- Place the Shovel on the ground.
- Pick up the Yellow Gem in the ground.
- The door in the back of the scene will begin to sparkle after the Gem has been picked up.
- Click on the sparkly door to trigger a mini-game.
WEIGHT PUZZLE
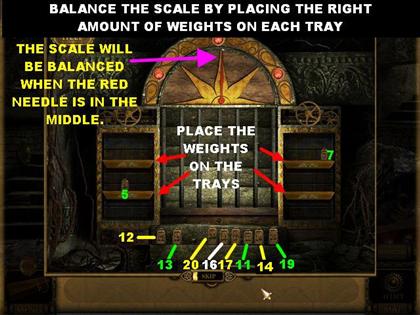
- Your goal is to place the weights in the right order on the trays until the weights are all balanced.
- The trays will be balanced when the red needle falls in the middle of the board.
- All weights must be used to balance the scales.
- Each weight has a number next to it. On the left side, there is a 5 pound weight. On the right side, there is a 7 pound weight.
- The locations of the weights at the beginning of each game vary but the solution will always be the same.
- If you add up all the numbers you come out with a sum of 134. To balance out the scales you each side must weigh 67 pounds.
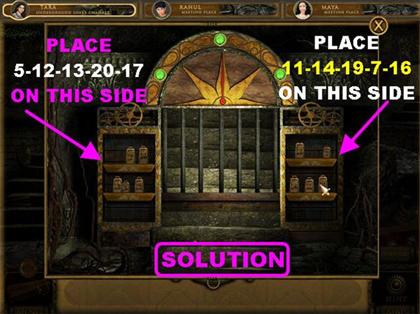
- Please divide the weights in the following manner to solve the puzzle.Left Tray: 5-12-13-20-17 Right Tray: 11-14-19-7-16
- Go through the door once the scales have been balanced to reach the Valley.
VALLEY
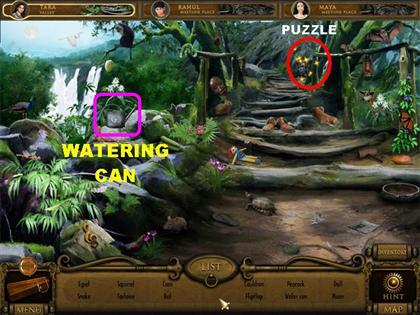
- Pick up the Watering Can on the left side of the scene.
- Click on the sparkly spot in the back of the scene to trigger a mini-game.
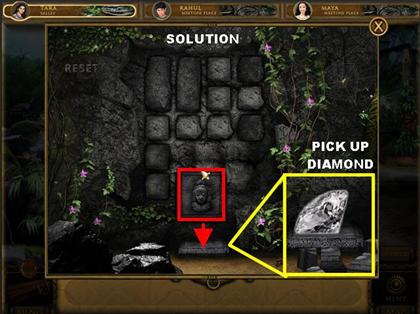
PICTURE ENGRAVING MINI-GAME
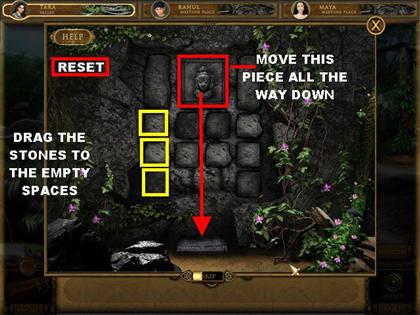
- Please watch the video for a step-by-step solution for this puzzle.
- Your goal is to click and drag the stones until the picture engraving reaches the bottom.
- This puzzle will take several steps to accomplish. Start by moving all the stones directly below the engraving all the way down.
- Then move the 2 small stones on the left and right side directly below the engraving.
- Move the 4 small stones on the left and right edge of the puzzle upwards.
- Move the last 2 stones at the bottom to the left and right side.
- Keep moving the engraving all the way to the right first and then start moving it downwards.
- Once it is on the lower right side, start moving the stone pieces out of the way so you can move the engraving to the center.
- Once the piece is in the lower center with no obstructions it will fall on the pedestal below.
- Pick up the diamond that appears after the engraving falls to the pedestal.
- Click on the back of the path to reach the Hilltop.
HILLTOP
- Click on the Golden Butterfly on the left side of the scene.
- Click in the back of the path to reach the Castle Gate.
CASTLE GATE
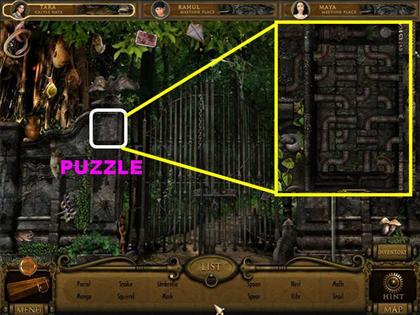
- Look for the items on the list. There are no inventory items to pick up in this section.
- Click on the sparkly mailbox on the left side of the gate after all the items have been found.
PIPE PUZLE
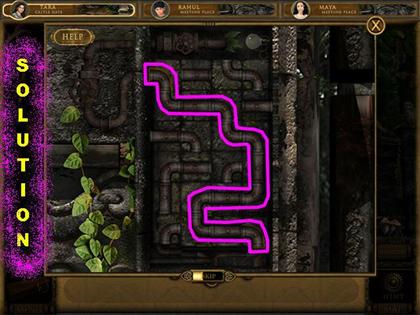
- Your goal is to connect the pipes in such a manner in which a connection is made from the pipe at the top left corner to the one in the bottom right corner.
- Click on a pipe to rotate it.
- All pipes do not have to be used to solve the puzzle.
- Please look at the screenshot for the solution.
- This area is now clear, go through the gate to reach the Path to Basil Platform. Click by the steps to reach the Basil Platform.
BASIL PLATFORM
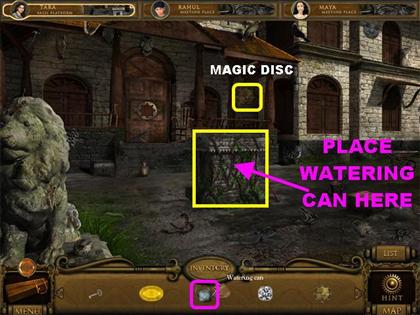
- Click on the Magic Disc in the upper center.
- Place the Watering Can on the sparkly basil plant in the center of the scene.
- The basil plant will take a few seconds to grow.
- Click on the sparkly spot below the basil plant to trigger a puzzle.
JIGSAW PUZZLE
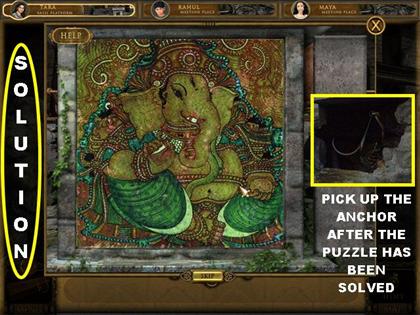
- Drag the pieces in the center of the board until you form the correct image.
- When a piece is in the right spot, it will lock itself in.
- Only 5 pieces will be visible at one time. You will get a new piece after one has been placed correctly.
- Please look at the screenshot for the solution.
- Pick up the Anchor after the puzzle has been solved.
- As soon as the puzzle is completed a hole will open up in the ground and Tara will fall into a secret room.
UNDERGROUND BASIL CHAMBER
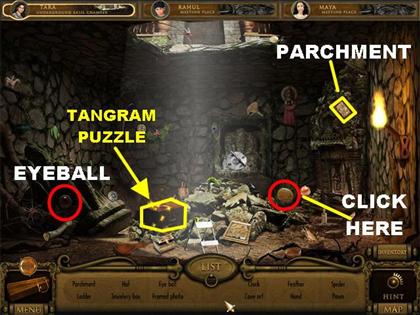
- Pick up the Eyeball in the lower left.
- Pick up the Parchment in the upper right.
- Click on the round symbol on the far right side.
- Click on the sparkly box in the lower left to trigger a puzzle.
TANGRAM PUZZLE
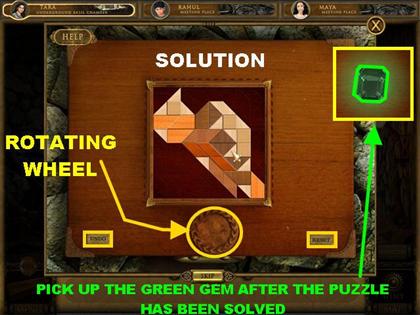
- Your goal is to place the tangram pieces in the right places.
- Use the rotating wheel at the bottom of the puzzle to change the position of the positions.
- You don’t have to click on the pieces when they are in the rotating wheel, they will swap position on their own. Remove the piece immediately after it is in the position you seek.
- Use the UNDO button in the lower left to remove the last piece you placed.
- Click on the RESET button in the lower right to remove all the pieces from the board.
- There is more than one solution for this puzzle. Please look at the screenshot for one possible way to complete it.
- Pick up the Green gem after the puzzle has been solved.
- A sparkling spot appears by the wall.
- Place the Anchor on the sparkling spot to climb out of the room.
MAGICIAN’S CASTLE DOOR
- Pick up the Parchment in the lower right.
- After all the items have been picked up from the list, the door will begin to sparkle.
- Click on the door and you will be told that you need to find 3 Magic Disks. One should already be in your inventory.
- You have to go and search for the Magic Discs.
- Click on the Map button in the lower right.
- Select the Meeting Place on the map.
MEETING PLACE - TARA TO MAYA
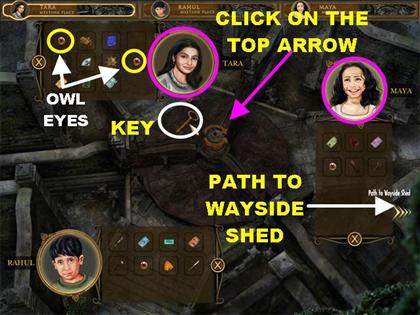
- When you return to this spot you should still have all 3 icons visible.
- In this go around you need to give Maya the Key and the 2 Owl Eyes that Tara has in her inventory.
- Grab the Key from Tara’s inventory and place it on the upper left side of the wheel.
- Click on the UPPER arrow so the wheel will spin towards Maya and the Key will go into Maya’s inventory.
- Grab the Owl Eye from Tara’s inventory and place it on the upper left side of the wheel.
- Click on the UPPER arrow so the wheel will spin towards Maya and the Owl Eye will go into Maya’s inventory.
- Click on Tara’s Large Icon to open up her inventory.
- Grab the SECOND Owl Eye from Tara’s inventory and place it on the upper left side of the wheel.
- Click on the UPPER arrow so the wheel will spin towards Maya and the SECOND Owl Eye will go into Maya’s inventory.
FROM RAHUL TO MAYA
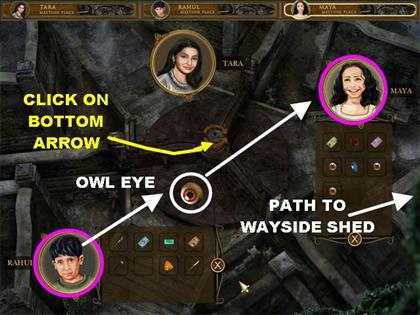
- Grab the Owl Eye from Rahul’s inventory and place it on the lower left side of the wheel.
- Click on the BOTTOM arrow so the wheel will spin towards Maya and the Owl Eye will go into Maya’s inventory.
- Click on Maya’s SMALL icon in the upper right side of the Meeting Place.
- Click on the center right edge of the Meeting Place to go to the Path to Wayside Shed.
CHAPTER 5: MAYA’S CASTLE JOURNEY
WAYSIDE SHED
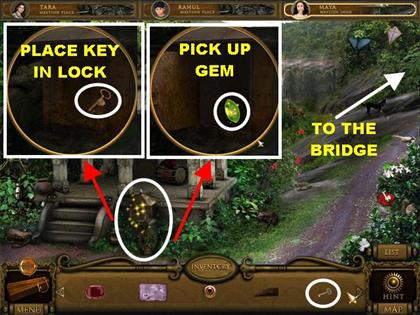
- Click in the back of the Path to Wayside Shed.
- Click on the sparkling spot for a closer view.
- Place the Key in the lock to open it.
- Pick up the Green Gem inside the box.
- This area is now clear, click in upper right side to access the Bridge.
THE BRIDGE
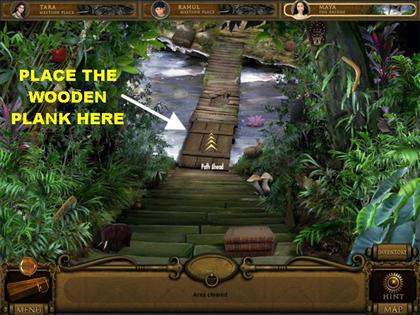
- Place the Wooden Plank on the sparkly part of the bridge to repair it.
- This area is now clear, go across the Bridge.
VALLEY
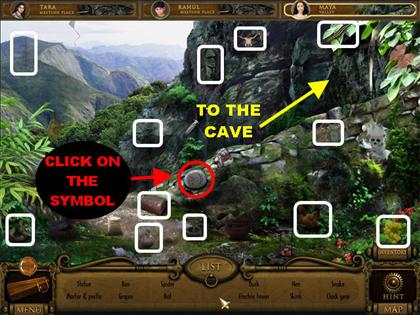
- Look for all the items on the list. There are no inventory items to pick up in this scene.
- Click on the Symbol button in the lower center of the scene.
- Go the path in the upper right after all the items have been found to enter the Cave area.
UNTANGLE LINES MINI-GAME
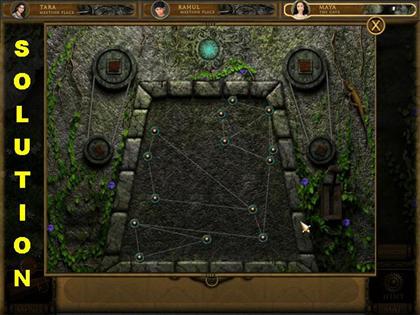
- Click on the sparkly spot in the center of the scene to trigger a puzzle.
- Your goal is to untangle the lines by pushing the lines apart using the golden nodes.
- It is best to pull as many lines as you can to the corners first.
- The tangled lines are blue.
- The untangled lines are in gray.
- There are many ways to solve this puzzle, please look at the screenshot for one way to solve it.
- Once the puzzle has been solved the Cave will be unlocked. Go through the Cave opening.
CASTLE VIEW
- Click on the Golden Butterfly on the right.
- Proceed to the back of the scene.
CASTLE GATE
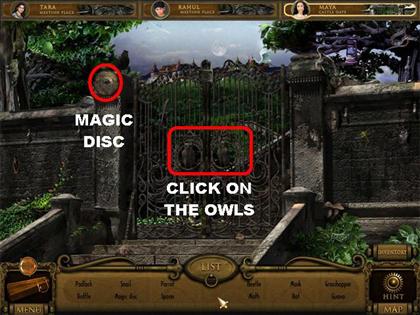
- Click on the Magic Disc in the upper left side. You will receive a message that Maya could use this item.
- Click on the Gate after all the items have been found.
OWL EYES PUZZLE
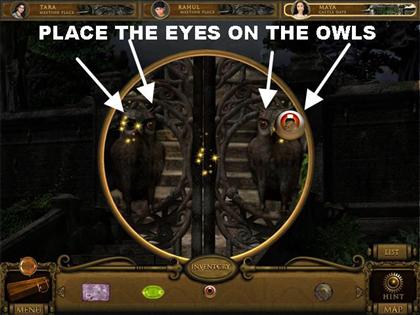
- Place the 4 Owl Eyes on the 2 Owls on the gate to unlock it.
- This area is now clear, go through the gates. Go through the next few paths to reach the Gate’s Door.
CASTLE DOOR

- Look for all the items on the list. There are no inventory items to pick up in this scene.
- Click on the door to trigger a puzzle after all the items have been found.
CASTLE DOOR LOCK PUZZLE
- Please watch the video for a step-by-step solution for this puzzle.
- Your goal is to unlock the door by moving the discs on the right to the rod on the left in the same order.
- A larger disc cannot go on top of a smaller disc.
- Use the rods on all sides to stack the discs.
- Once the puzzle has been solved, the door will be unlocked.
- This area is now clear, proceed through the door.
INNER HALL
- Click on the Golden Butterfly on the left.
- Take the Path on the left to access the Castle Hall.
CASTLE HALL
- Look for all the items on the list. There are no inventory items to pick up in this scene.
- This area is now clear. Click on the upper right to access the Magician’s Bedroom.
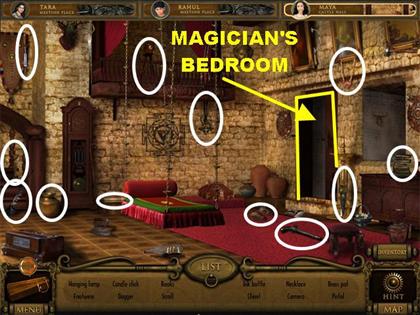
MAGICIAN’S BEDROOM
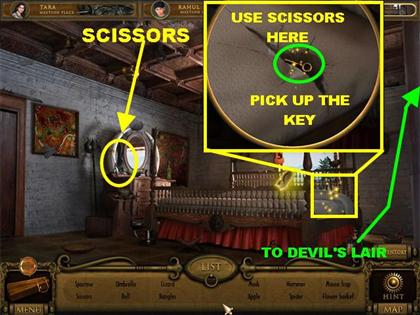
- Pick up the Scissors on the left side of the scene.
- Click on the sparkly area on the bed for a closer view.
- Place the Scissors on the mattress.
- Pick up the Key inside the mattress.
- Click on the right side of the room to access the Evil’s Lair.
EVIL’S LAIR
- Look for all the items on the list. There are no inventory items to pick up in this scene.
- Click on the right side of the scene after all the items have been found.
PRISM PUZZLE
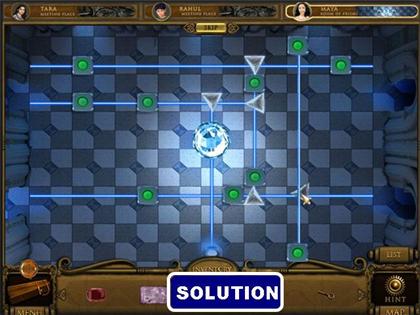
- Your goal is to align the prisms in the right order to unlock the crystal ball.
- The rays of light will split when they hit the narrow edges of the prisms.
- Drag the pieces to the spot you want to use it in and click it into place.
- Please look at the screenshot for the solution.
- Click on the path that opens up in the center of the scene. You receive a message that is something is incomplete at Evil’s Lair.
- Go back to the Evil’s Lair by clicking on the left side of the screen.
EVIL’S LAIR
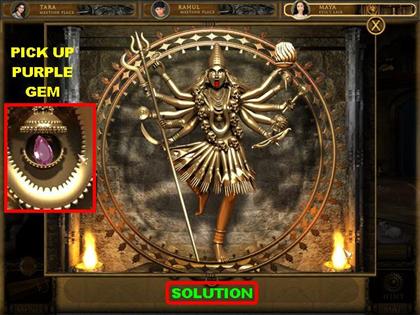
- Click on the sparkly goddess in the back of the scene.
- Your goal is to place the items in the appropriate hands of the goddess.
- Pick up the pieces at the bottom of the scene and place them in the correct hand.
- When placing items in a hand, place the tip of your cursor in the hand to make it stick.
- When a piece is in the right place, it will light up and lock itself in.
- Please look at the screenshot for the solution.
- Pick up the Purple Gem after the puzzle has been completed.
- Leave the Castle. Go back to the Path to Wayside Shed and hang a left to return to the Meeting Place.
MEETING PLACE – TARA TO RAHUL
- Grab the Rope Ladder from Tara’s inventory and place it on the upper left side of the wheel.
- Click on the LOWER arrow so the Rope Ladder goes directly to Rahul’s Inventory.
MAYA TO RAHUL

- Grab the Key from Maya’s inventory and place it on the upper right side of the wheel.
- Click on the UPPER arrow so the Key goes directly to Rahul’s Inventory.
- Click on Rahul’s SMALL icon in the upper center of the Meeting Place.
- Click on the lower left corner to go back to the Forest. Go through the Well and the Tunnel until you reach the Riverside.
CHAPTER 6: RAHUL’S CASTLE JOURNEY
RIVERSIDE
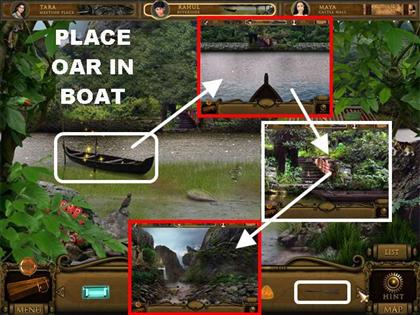
- Place the Oar in the boat and you will be taken through the River Bane.
- Go through the path until you reach the Valley.
VALLEY
- Find all the items on the list. There are no inventory items to find in this scene.
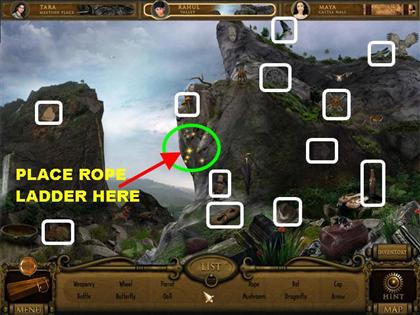
- Place the Rope Ladder on the sparkly spot on the mountain to gain access to the next area.
- Keep going through the path until you reach the Castle Gate.
CASTLE GATE
- Look for the items on the list. There are no inventory items to pick up in this scene.
- Click on the sparkly gate after all the items have been found to trigger a puzzle.
OIL VESSELS
- Click on the empty container in the upper center and it will drop down below.
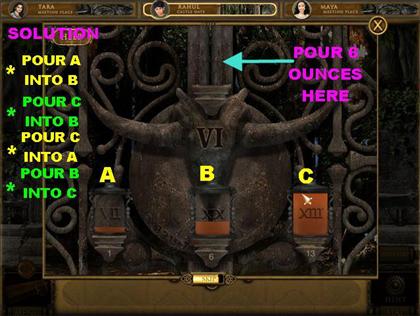
- Your goal is to pour the liquids into the containers until the one in the middle has 6 ounces.
- The left container holds 7 liters of oil.
- The middle container holds 19 liters of oil.
- The right container holds 13 liters of oil.
- Drag the container to another one to pour the oil in.
- For the solution I will label the containers, A, B, and C. Please click on the containers in the following order:POUR A INTO B POUR C INTO B POUR C INTO A POUR B INTO C
- The middle container now has 6 ounces.
- Drag the middle container with 6 ounces into platform on top.
- Go through the gate and follow the path until you get to the Castle Gate.
CASTLE DOOR
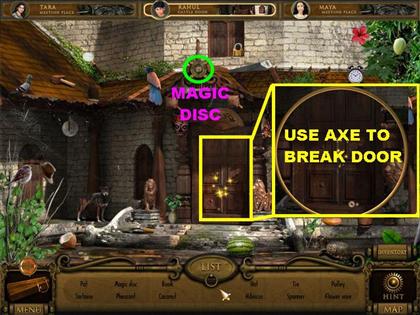
- Pick up the Magic Disc above the door. You will receive a message that Tara can use that Magic Disc at the Magician’s Castle Door.
- Click on the door after all the items have been found for a closer look.
- Place the Axe on the door to break through it.
- This area is now clear. Follow the path until you get to the Storage Room.
STORAGE ROOM
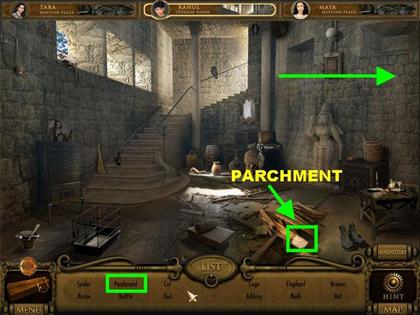
- Pick up the Parchment in the lower right, on top of the pile of wood.
- This area is now clear; proceed to the upper right side to access the next location.
WAY TO DURBAR HALL
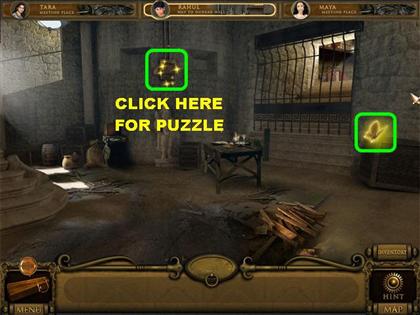
- Click on the Golden Butterfly on the right.
- Click on the sparkly spot on the left to trigger a puzzle.
COMBINATION PUZZLE
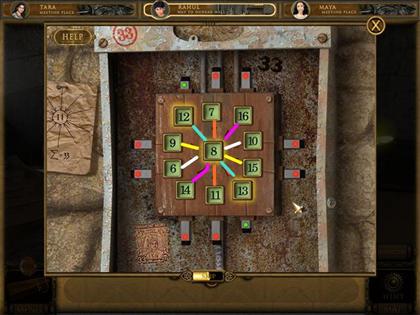
- Please watch the video for a step-by-step solution for this puzzle.
- Your goal is to place all the numbers so that each line adds up to 33.
- The numbers that are placed correctly will light up and so will the arrows attached to them.
- You can only move pieces from the corner into the center.
- Use the button in the middle to help you transfer numbers around.
- If you look at the diagram on the left side of the page you will notice it looks similar to the puzzle. Make note of the number 11 in the middle of the diagram.
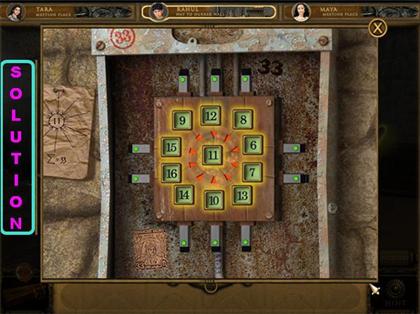
- Starting from the top and moving clockwise the solution is as follows:12-8-6-7-13-10-14-16-15-9 (The middle number is 11).
- Once the puzzle has been solved, the gate will lift on the right. Go through it.
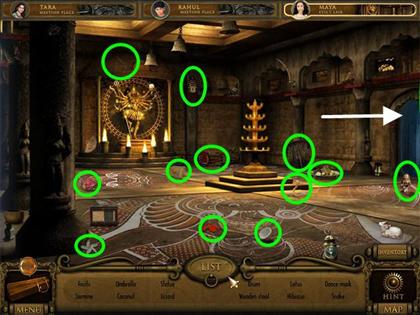
DURBAR HALL
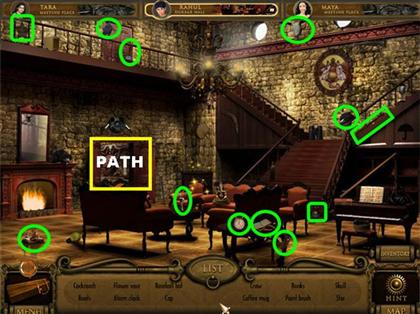
- Look for all the items on the list. There are no inventory items to pick up in this scene.
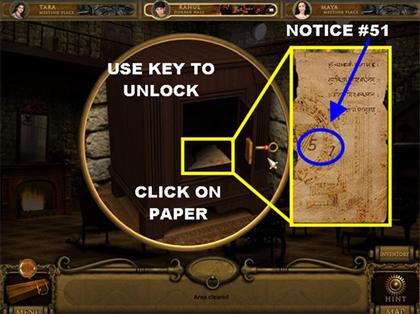
- Click on the sparkly bureau by the red chairs.
- Use the Key in the lock.
- Click on the paper inside the bureau and it will appear on your screen.
- Click on the paper on the screen and it will be entered into jour journal in the lower left. Make note of the number 51 written on the page.
- Go through the door on the left side to access the next area.
THRONE ROOM
- Look for all the items on the list. There are no inventory items to pick up in this scene.
- Click on the Symbol in the lower left to activate it.
ROOM OF DARNESS (MAZE)
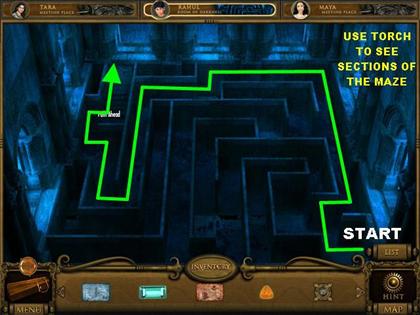
- Go through the entryway on the left side of the Throne Room to access the maze.
- Grab the Torch and place it anywhere on the scene.
- Pick up the footsteps very carefully and drag them around the maze,
- Once you get to the end of the maze it will light up.
- You will be told not to enter the Evil’s Lair until all your cousins arrive.
MEETING PLACE

- Click on the Map Button in the lower right to go to the Map.
- Click on the Meeting Place section of the map.
- You have to transfer the Magic Discs to Tara. They will be called Door Locks in everyone’s inventory.
MAYA TO TARA
- Grab the Door Lock/ Magic Disc from Maya’s inventory and place it on the upper right side of the wheel.
- Click on the BOTTOM arrow to transfer the Magic Disc/ Door Lock to Tara.
RAHUL TO TARA
- Grab the Door Lock/ Magic Disc from Rahul’s inventory and place it on the lower left side of the wheel.
- Click on the UPPER arrow to transfer the Magic Disc/ Door Lock to Tara.
- Click on Tara’s SMALL icon in the upper left side of the Meeting Place.
- Click on the upper left side of the Meeting Place to go back Behind Wyatt’s House.
- You have to get back to the Castle Door. Follow these steps to do so. Go to the Snake Temple, enter the Snake Chamber. Take the left door and follow the path all the way to the Castle Door.
CHAPTER 7: REUNITED
CASTLE DOOR
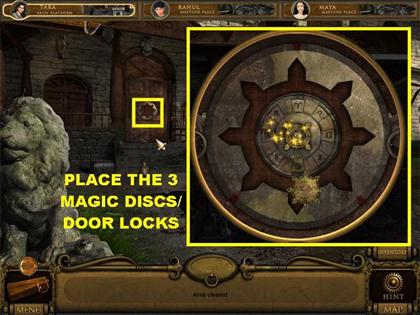
- Click on the door for a closer view.
- Place the 3 Magic Discs/ Door Locks on the door to trigger a puzzle.
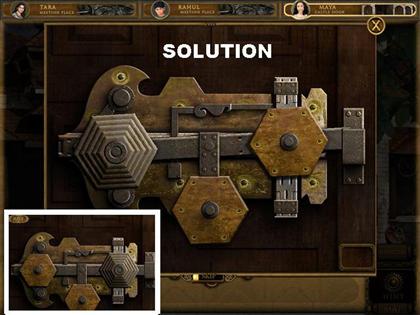
CASTLE DOOR LOCK PUZZLE

- Your goal is to place the discs in the right place.
- Drag the circles around to rotate them.
- The diagram in the lower left will help you solve the puzzle.
- Please look at the screenshot for the solution.
- Go through the door and click on the Golden Butterfly on the right.
- Go straight ahead and enter the Castle Visiting Room
CASTLE VISITING ROOM
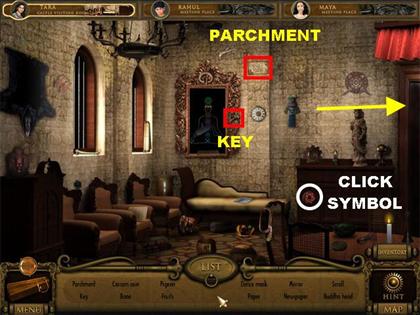
- Pick up the Parchment in the upper center part of the wall.
- Click on the Symbol on the cabinet on the far right.
- Pick up the Key on the right side of the picture frame.
- A Blank Paper goes into your inventory after the search is completed.
- This area is now clear, proceed to the right.
MAGICIAN’S LIBRARY
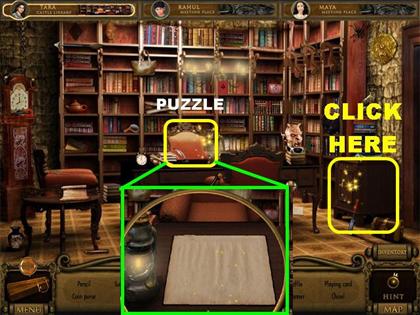
- Look for all the items on the list. There are no inventory items to be found in this Hidden Object scene.
- Click on the sparkly area on the desk for a closer view.
- Grab the Blank Paper from inventory and place it on the desk to trigger a mini-game.
CIPHER
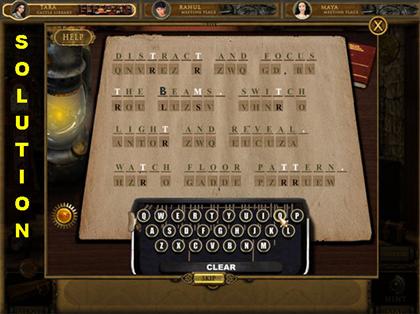
- Click on a letter on the page and then click on the letter on the keyboard you think belongs to that letter.
- If the letter you chose is correct, it will turn gray on the page.
- If the letter you chose is incorrect, it will be yellow on the page.
- You get a few hints to help you solve the puzzle. Click on the hint button in the lower left and one letter will be placed for you.
- The solution is:DISTRACT AND FOCUS THE BEAMS SWITCH LIGHT AND REVEAL WATCH FLOOR PATTERN.
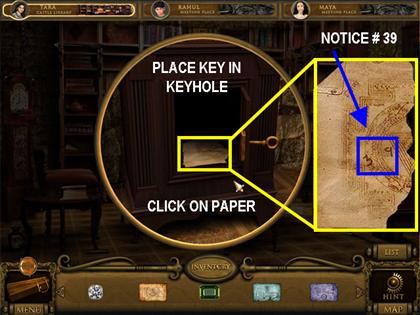
- Click on the bureau on the right for a closer view.
- Use the Key on the keyhole to unlock it.
- Click on the paper inside the bureau and it will appear on the screen. Notice the number 39 on the page. That page will be entered into your Journal.
- Proceed to the right to reach the Prison.
PRISON
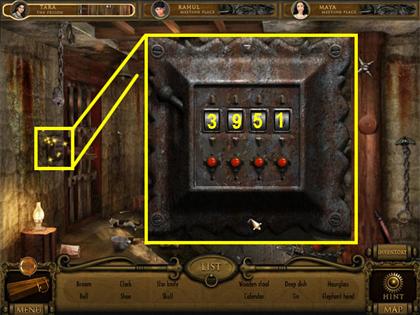
- Click on the sparkly lock on the left to trigger a puzzle.
- Enter the combination of the 2 pieces of paper that you found earlier. You can look in your journal for the number.
- Click on the arrows below and above the numbers to rotate them.
- The solution is: 3951.
- The cell door will lift after the combination has been entered. You will be taken to a cut scene which shows Arjun being released from prison.
- Take the path on the upper right to reach the Room of Patterns.
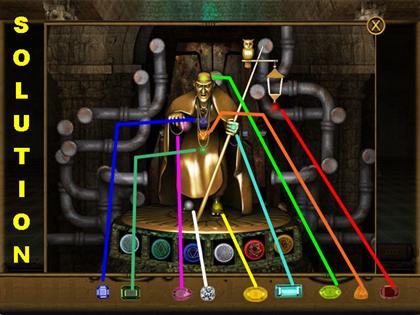
ROOM OF PATTERNS
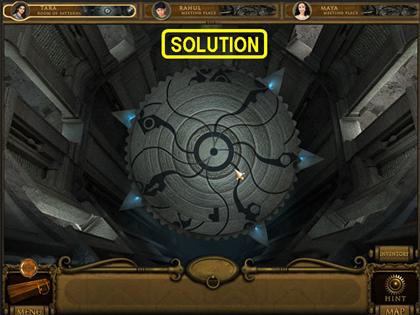
- Your goal is to align the discs in the correct pattern.
- Drag each disc around to reposition them.
- When certain parts of the pattern are correct, one of the blue arrows will light up.
- Please look at the screenshot for the solution.
- Click on the top of the column to view a cut scene in which the cousins are reunited in the Magician’s Lair.
MAGICIAN’S LAIR
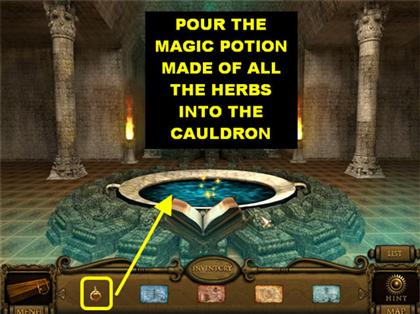
- Pour the Magic Potion made of all the herbs into the cauldron.
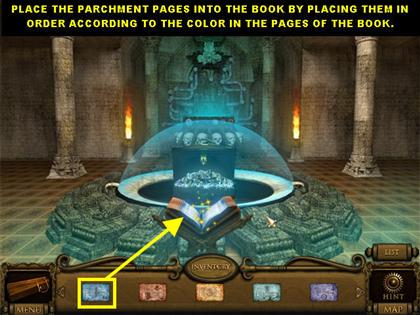
- Place the 8 Parchment papers you’ve collected into the book on the stand.
- Notice the color on the page of the book. Place the papers according to current color of the page in the book.
- Click on the statue in the back of the room for a closer view.
- Place the Gems that you’ve collected along the way into the right spots on the statue.
- Please look at the screenshot for the solution.
- Watch the ending scenes!
Created at: 2009-12-05