

Walkthrough Menu
- General Tips
- Chapter 1: Halward Manor
- Chapter 2: The Manor Grounds
- Chapter 3: Baltoun Village
- Chapter 4: England
- Chapter 5: The Halward Estate
- Chapter 6: France
- Chapter 7: Fairing Point
General Tips
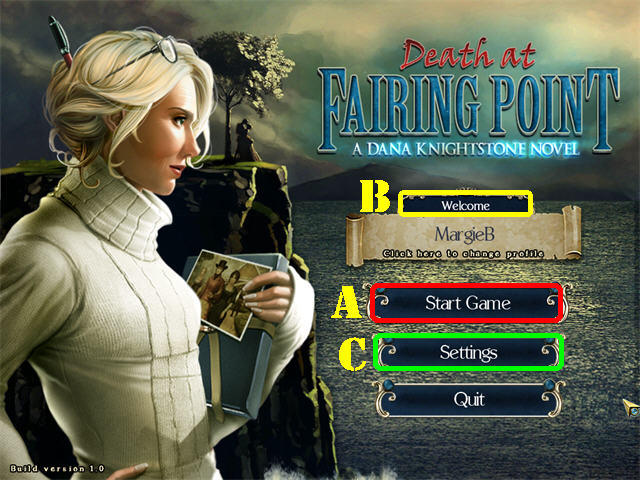
- Click on Start Game (A) to begin your adventure.
- To manage Player Profiles, click on the “Welcome” (B) tab.
- Click on Settings (C) to adjust language, sound, screen, music, and cursor.
- All puzzles in the game can be skipped once the skip button refills.
- The Magnifying Glass Icon grants a closer look at items.
- The Hand Icon allows you to pick up items in the scene.
- You will obtain one inventory item at the end of each search scene.
- The ghosts in the game will show you what needs to be done next.
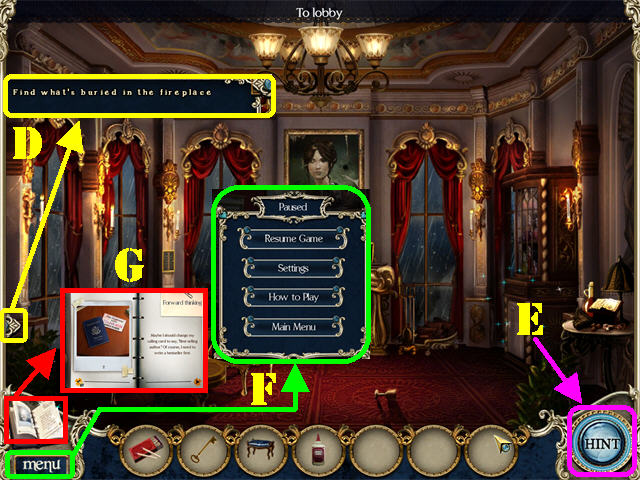
- Click on the arrow (D) on the left side of the scene to view your chapter objectives.
- Hints (E) can be used in Hidden Object Scenes to find an item or in regular scenes to find out the next step.
- Pause the game by clicking on the Menu (F) Button in the lower left corner.
- The lists in the Hidden Object Scenes may vary from the ones in your game.
- There are unlimited hints in the game but you have to wait for the button to refill between uses.
- The Notebook (G) contains clues and goals for the game.
Chapter 1: Halward Manor
- Talk to the Concierge on the left.
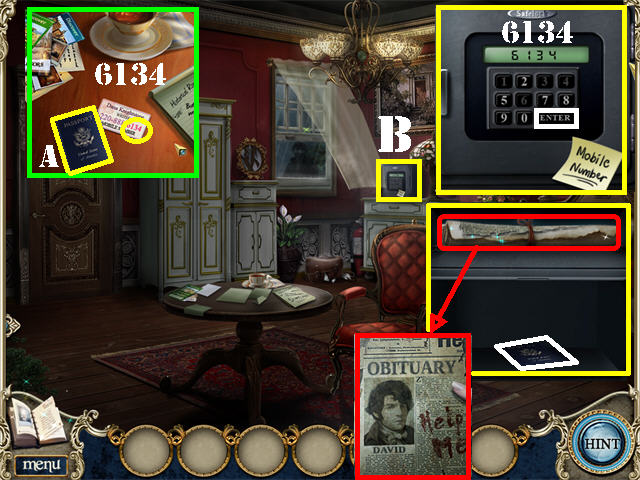
- Zoom into the table; take the PASSPORT (A).
- Note the red mobile numbers “6134” on the card.
- Click on the safe (B) in the back of the room.
- Enter the numbers “6134” into the keypad and then press “ENTER.”
- Place the PASSPORT into the safe; a rolled up newspaper will then appear.
- Click on the rolled up newspaper to see David’s obituary; zoom out of the pop-up window.
- Close the open window.
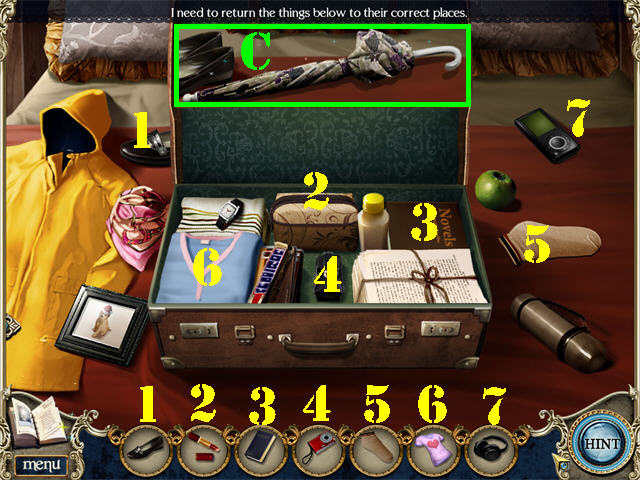
- Zoom into the bed to trigger a puzzle.
- Place the items from the inventory tray into their appropriate sections in the scene, as shown in the screenshot.
- Take the UMBRELLA (C) that appears after the puzzle has been solved.

- Look below the bed; grab the LATCH (D) with the UMBRELLA.
- Examine the armoire; take the DUST PAN (E) and the SCREWDRIVER (F).
- Open the window; place the LATCH on the window (G).
- Tighten the LATCH with the SCREWDRIVER.
- Close the window.
- Zoom into the area below the mirror (H).
- Place the DUST PAN on the 6 MIRROR PIECES marked in red to pick them up.
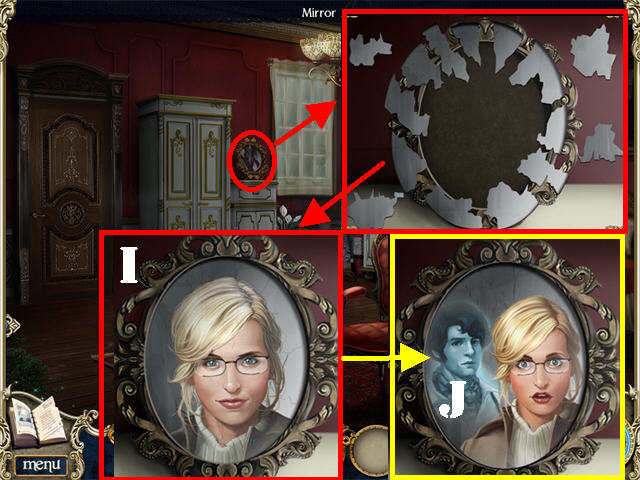
- Place the 6 MIRROR PIECES on the broken mirror to trigger a puzzle.
- Click on a mirror piece to rotate it.
- Place the pieces back in the mirror as shown in the screenshot (I).
- Click on David’s picture (J).
- Click on David’s ghost and follow him through the door to the Second Floor Hallway.
- Talk to the Concierge.
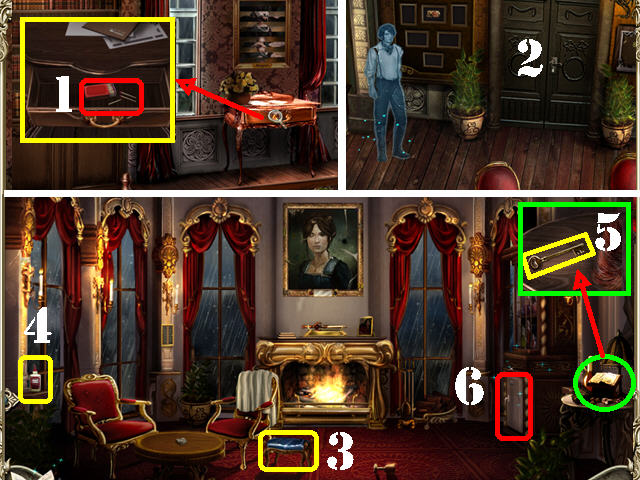
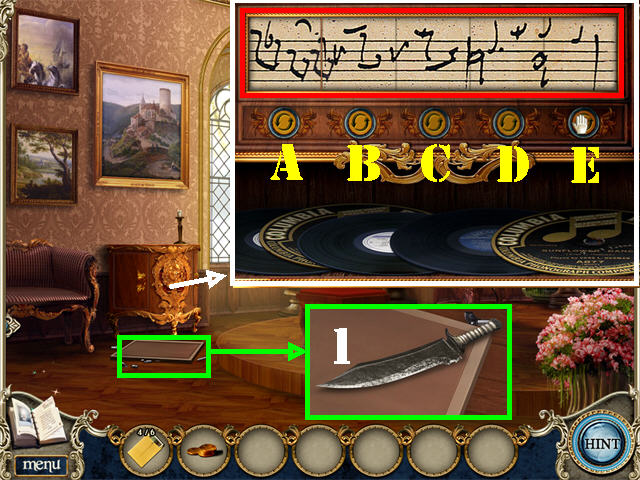
- Examine the side table; take the MATCHES (1).
- Go down the right steps to reach the Lobby.
- Click on David’s ghost and he will point to the door.
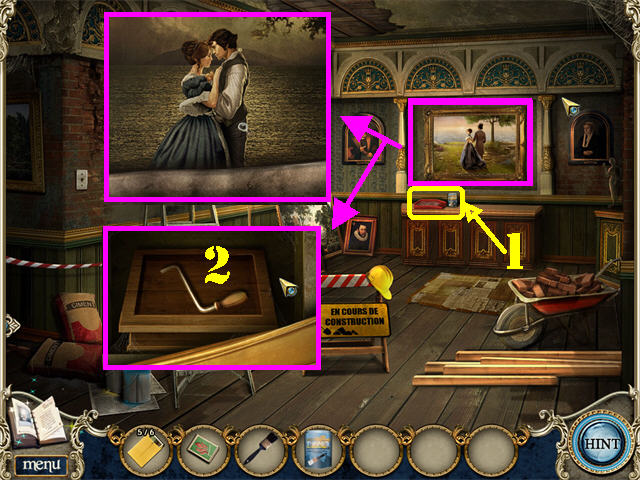
- Go through the door to reach the Parlor (2).
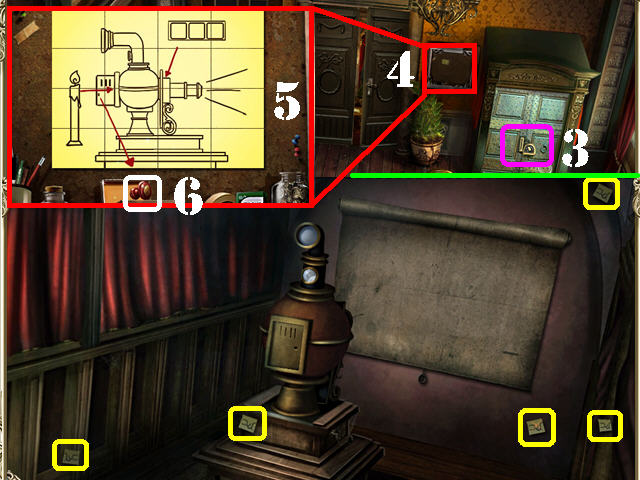
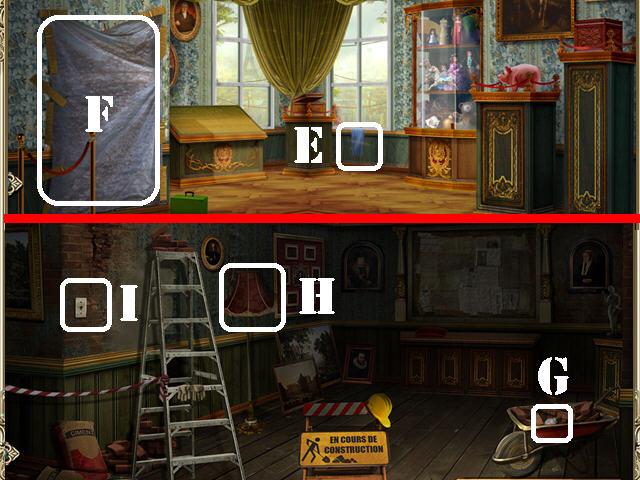
- Click on David’s ghost inside the Parlor; he will point to the sheet above the fireplace.
- Remove the sheet to reveal a painting.
- Grab the FOOTSTOOL (3) on the ground.
- Take the GLUE (4) in the lower left.
- Look at the side table in the lower right; take the METAL KEY (5).
- Examine the fridge (6) in the lower right corner to trigger a search scene.
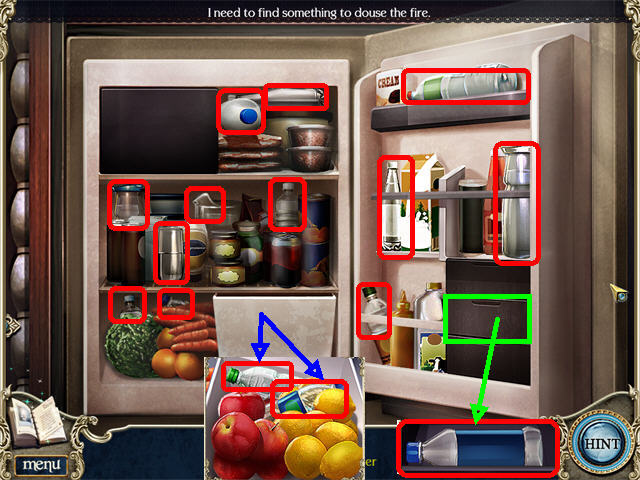
- Find the 15 WATER BOTTLES marked in red.
- Open the lower right and lower left drawers to access the bottles.
- Return to the Second Floor Hallway.
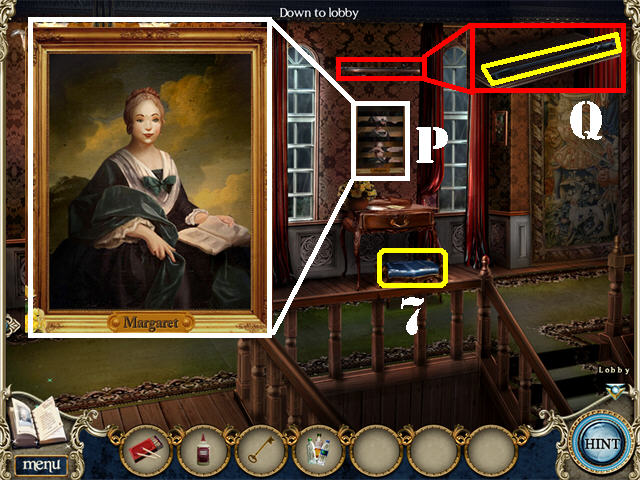
- Zoom into the painting to trigger a puzzle.
- Swap the strips to restore the painting as shown in the screenshot (P).
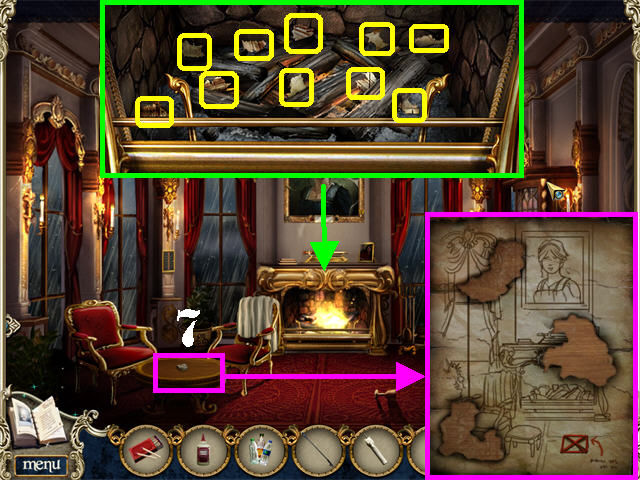
- Place the FOOTSTOOL below the side table (7).
- Zoom into the area above the painting; take the FIRE POKER (Q).
- Return to the Lobby.
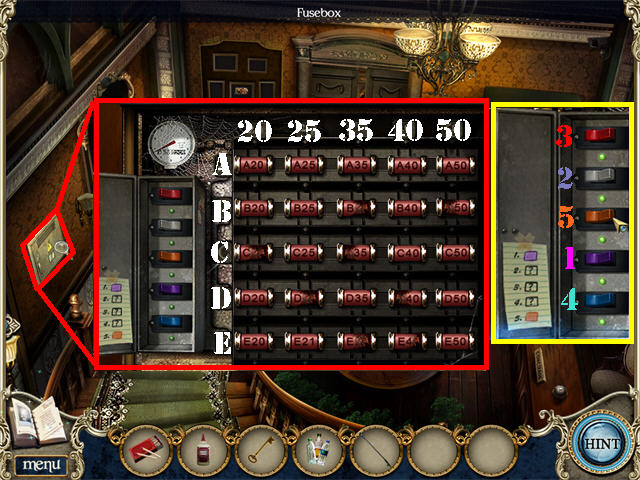
- Zoom into the fuse box in the lower left (R).
- Put the METAL KEY in the keyhole to trigger a puzzle.
- Place all the fuses in the correct order.
- The rows from top to bottom should have fuses A through E.
- The columns from left to right should feature numbers: 20, 25, 35, 40, and 50.
- The solution is as follows:
- First Row: A20, A25, A35, A40, A50.
- Second Row: B20, B25, B35, B40, B50.
- Third Row: C20, C25, C35, C40, C50.
- Fourth Row: D20, D25, D35, D40, D50.
- Fifth Row: E20, E25, E35, E40, E50.
- Zoom into the switches.
- Looking at the piece of paper in the lower left, flip the switches in this order: PURPLE, GRAY, RED, BLUE, ORANGE.
- The light in the Atrium has been restored. Enter the Atrium through the left door.
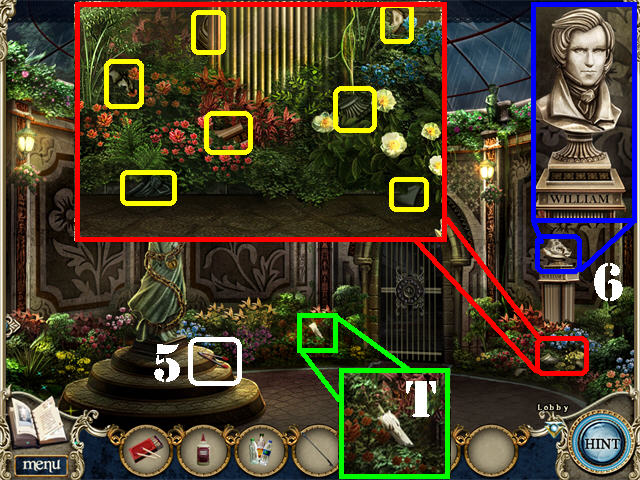
- Take the TONGS (S) below the statue.
- Zoom into the bushes close to the gate; take the CANDLE (T).
- Zoom into the bushes below the broken bust; take the 7 STONE PIECES marked in yellow.
- Examine the bust stand on the right; place the GLUE on the broken bust (6).
- Place the 7 STONE PIECES on the bust to repair it.
- Return to the Parlor.
- Place the WATER BOTTLES and the FIRE POKER in the fireplace.
- Zoom into the fireplace; take the 10 PIECES OF PAPER marked in yellow with the TONGS.
- Examine the round table on the left; place the 10 PIECES OF PAPER on the table (7).
- Assemble the papers as shown in the screenshot; note the marked spot on the Parlor’s ground.
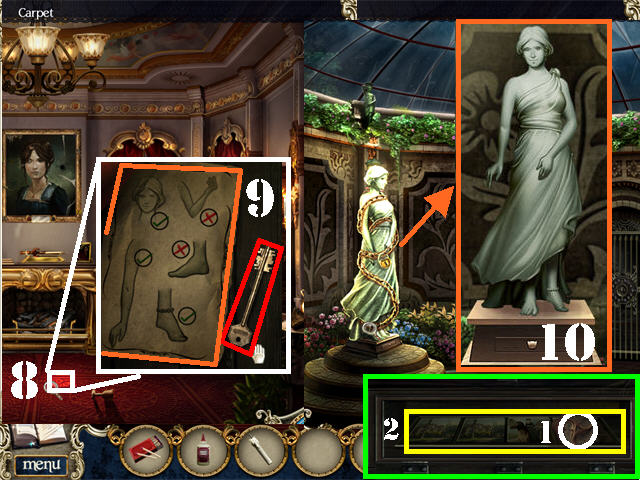
- Zoom into the spot marked in the carpet (8).
- Click on the carpet to lift it; take the STATUE KEY. Note the diagram below the carpet regarding the statue (9).
- Return to the Atrium.
- Place the STATUE KEY on the lock around the statue.
- Move her joints to resemble the image shown below the carpet in the Parlor (10).
- Take the LEVER (1) and the SLIDE (2).
- Return to the Lobby.
- Examine the Booth Door on the right (3); place the LEVER in the slot.
- Pull the LEVER to unlock the door; go into the Magic Lantern Booth.
- Grab the 5 STICKY NOTES marked in yellow.
- Return to the Lobby; zoom into the bulletin board on the right (4).
- Place the 5 STICKY NOTES on the board to trigger the puzzle.
- Click on any 2 pieces to swap their positions until they form the image in the screenshot (5).
- Take the KNOB (6).
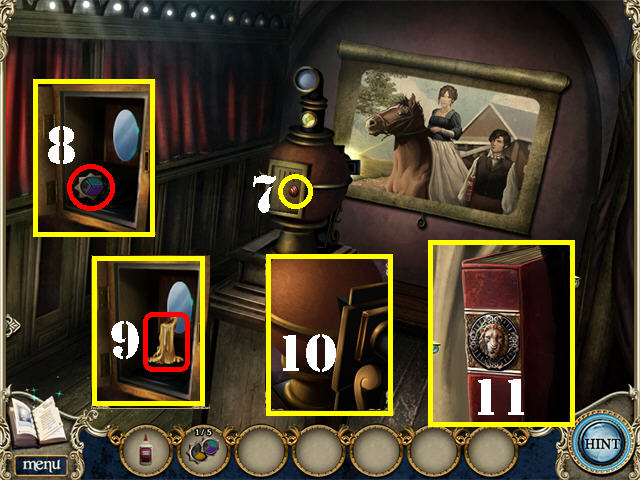
- Return to the Magic Lantern Booth.
- Place the KNOB on the magic lantern (7).
- Zoom into the compartment; take STAR 1/5 (8).
- Place the CANDLE in the compartment (9).
- Light the CANDLE with the MATCHES.
- Place the SLIDE into the slot to activate the slides (10).
- Zoom into the picture after the slide has finished; note the lion symbol on the book (11).
- Go to the Second Floor Hallway.
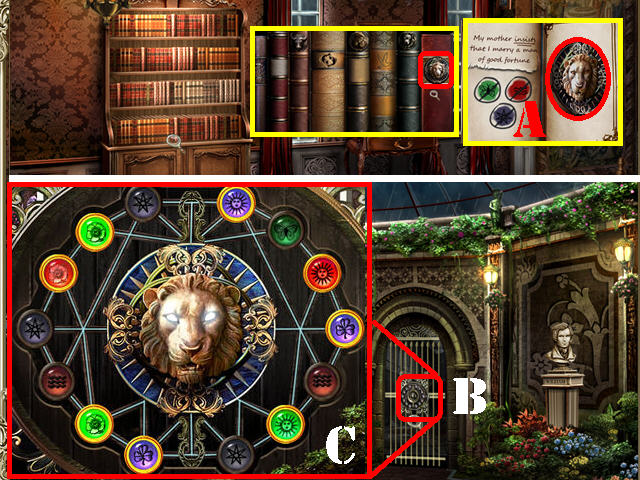
- Zoom into the bookcase.
- Click on the last book with the lion on the spine.
- Take the LION EMBLEM (A) on the right page. Note the symbols on the left page.
- Return to the Atrium.
- Zoom into the gate; place the LION EMBLEM in the slot (B).
- Following the diagram in the Second Floor Hallway, turn on the symbols as shown in the screenshot (C).
- Go through the gate to access the Conservatory.

- Grab the 6 SEED PACKETS marked in yellow.
- Zoom into the pot by the steps; take STAR 2/5 (D) and the last SEED PACKET (E).
- Zoom into the lower left window; take STAR 3/5 (F) and POUCH OF LETTERS (G).
- Note the names “CHARLOTTE” and “ROBERTSON” (1) on the window.
- Place the 7 SEED PACKETS on the Seed Rack between the benches to trigger a puzzle (H).
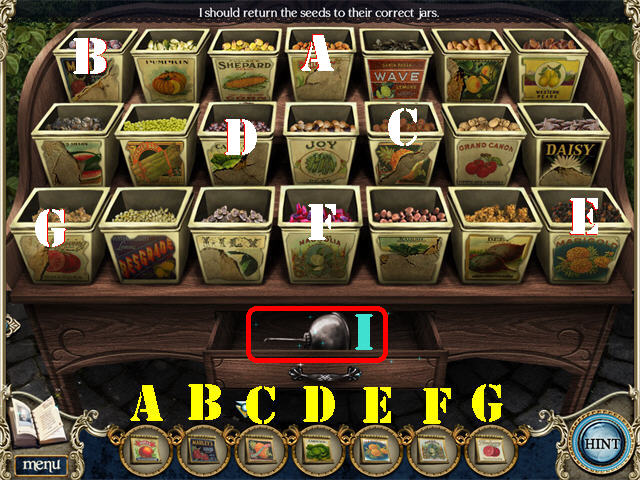
- Place the seed packets into the correct containers as shown in the screenshot.
- Take the CAN OF OIL (I) after the puzzle has been solved.
- Open the sliding gate above the steps (J).
- Zoom into the gate; place the CAN OF OIL on the 2 rusty hinges (K).
- Go through the gate to access the Balcony.
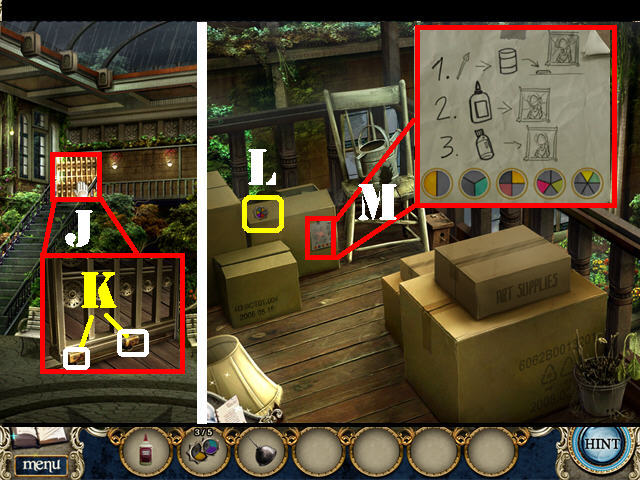
- Take STAR 4/5 (L) above the box next to the chair.
- Examine the paper on the side of the box by the chair (M).
- Go to the Parlor.
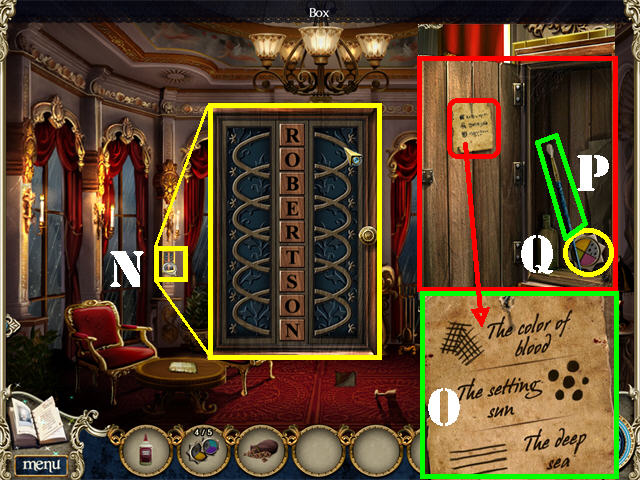
- Zoom into the box between the second and third windows on the left (N).
- Place the POUCH OF LETTERS in the box to activate a puzzle.
- Click on each BOX to change the letters to form the word: “ROBERTSON.”
- Click on the note on the left side of the box (O); read the descriptions.
- Take the BRUSH (P) and STAR 5/5 (Q) inside the box.
- Return to the Conservatory.
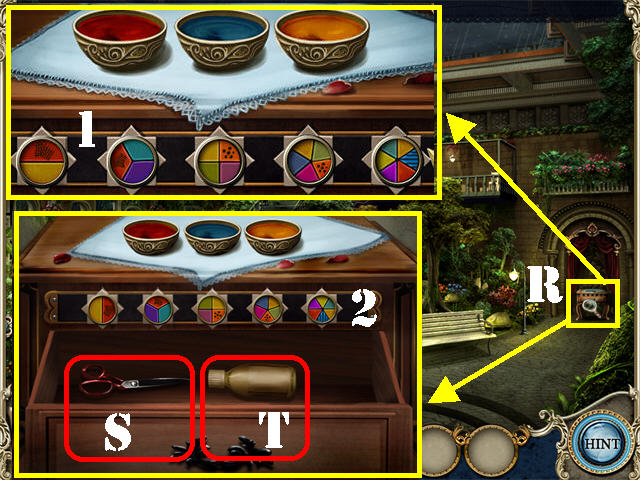
- Zoom into the side table in the back right side of the scene (R).
- Place the 5 STARS into the empty slots to activate a puzzle.
- Dip the brush into each color to attach that color to your cursor.
- Place the color of your choice into the marked sections of the stars matching the ones in your Notebook.
- Using the sketch you found in the Parlor, color the stars as shown in the screenshot (1).
- Rotate the stars to match the image found in the Balcony (2).
- Take the SCISSORS (S) and the VARNISH (T) inside the drawer after the puzzle has been solved.
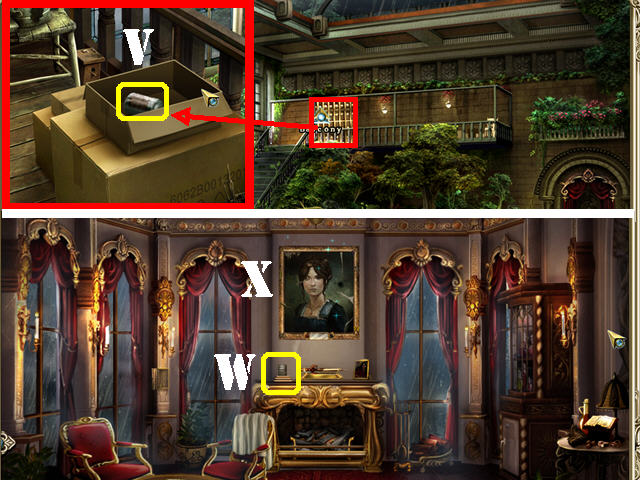
- Go up to the Balcony.
- Open the small box with the SCISSORS; take the SOLVENT (V).
- Return to the Parlor.
- Place the SOLVENT on the left side of the mantle, above the fireplace (W).
- Dip the BRUSH into the SOLVENT to create the BRUSH WITH SOLVENT.
- Place the BRUSH WITH SOLVENT on the painting (X).
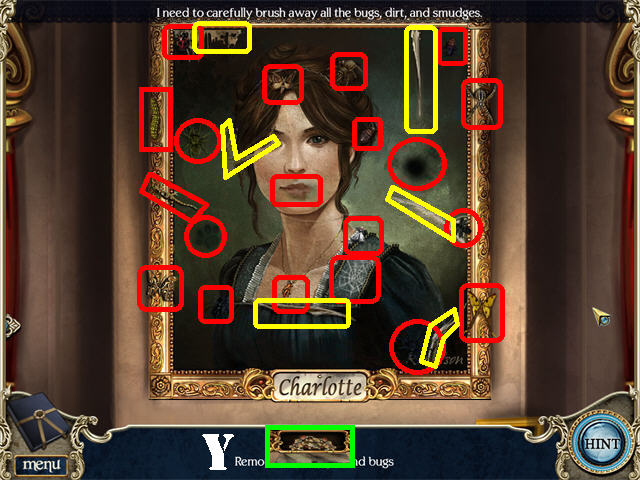
- Remove the 20 smudges marked in red on the painting.
- Put GLUE on the 6 tears marked in yellow.
- Place the VARNISH over the painting.
- Take the TORN PHOTO below the restored painting (Y).
- Go to the Lobby.
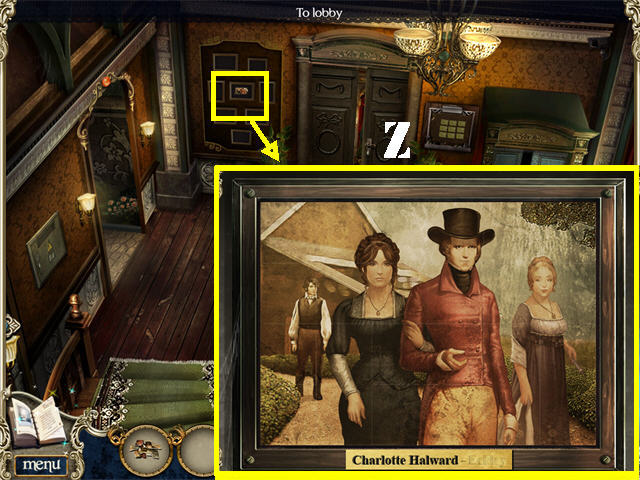
- Zoom into the PHOTO FRAMES on the back wall.
- Place the TORN PHOTO on the painting to activate a puzzle.
- Click on any 2 pieces to swap their positions.
- Please look at the screenshot for the solution (Z).
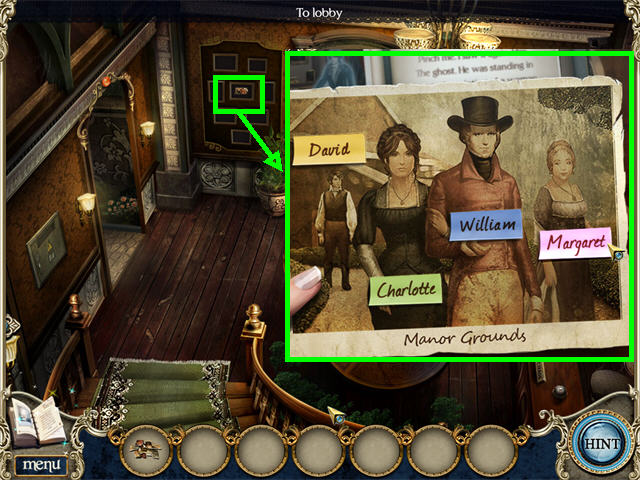
- Drag the NAME TAGS on the right into the right slots on the painting.
- From left to right the solution is: David, Charlotte, William, and Margaret.
- You will obtain PHOTOGRAPH 1/6 after the puzzle has been solved.
- Click on David’s ghost to end the chapter.
Chapter 2: The Manor Grounds
- Pick up the 2 SHOTGLASSES marked in red.
- Go into the Pub.
- Talk to the Concierge on the right.
- Talk to the Pub Owner; he will ask you for his glasses.
- Pick up the 3 SHOTGLASSES marked in red.
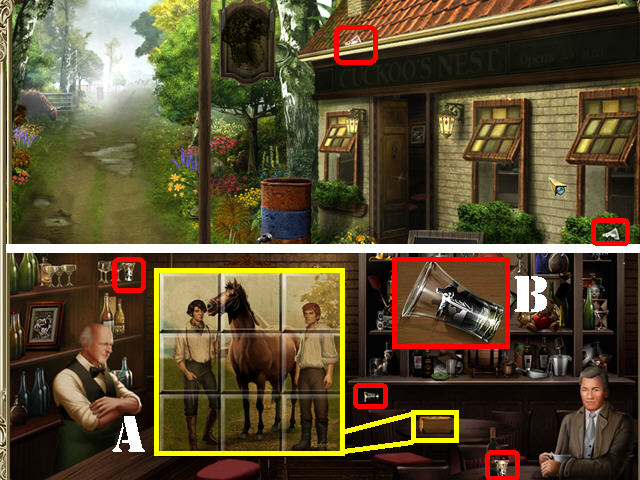
- Click on the puzzle box on the table to trigger a puzzle.
- Click on the squares to rotate them.
- Click on any 2 pieces to swap their positions until they form the image shown in the screenshot (A).
- Take the SHOTGLASS after the puzzle has been solved (B).
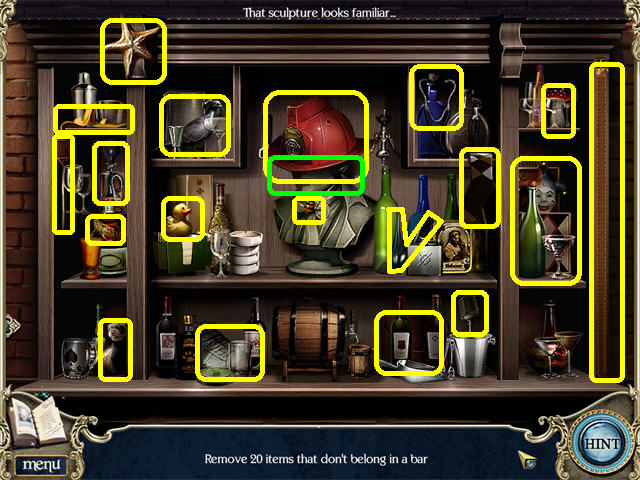
- Zoom into the right side of the back wall to activate a search scene.
- The 20 items that do not belong in a bar are marked in yellow.
- The READING GLASSES will be added to inventory.
- Give the READING GLASSES to the Pub Owner.
- Click down to exit the Pub and head left down the road.
- Pick up the 2 SHOTGLASSES marked in red.
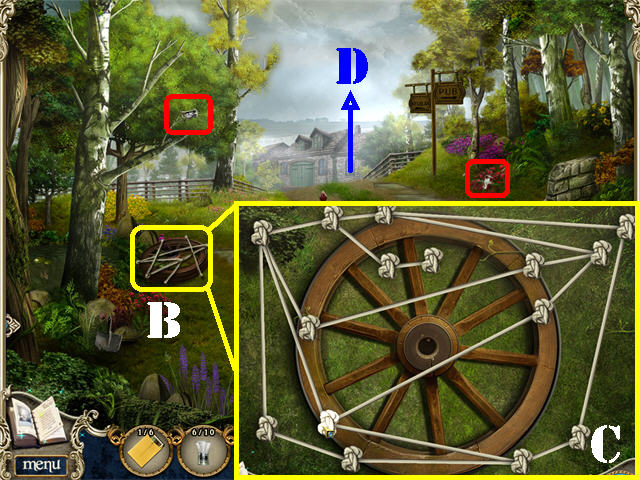
- Click on the wheel on the left to activate a puzzle (B).
- Untangle the ropes by pulling apart the knots.
- The white ropes are untangled and the gray ones are still tangled.
- Please look at the screenshot for a sample solution (C).
- WHEEL 1/2 will be added to inventory.
- Go toward the Outside Stables (D).
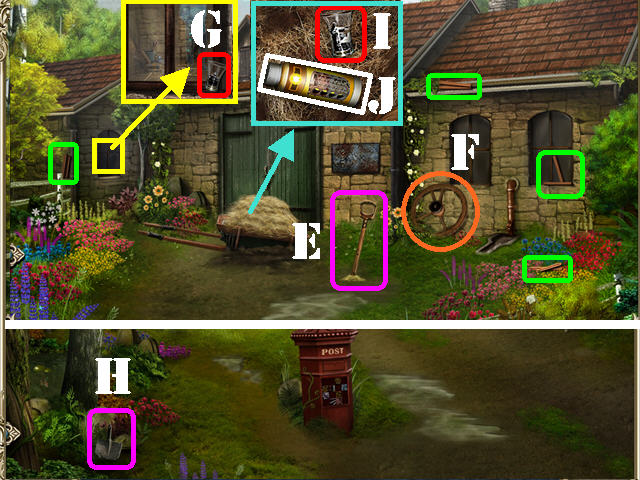
- Take the 4 SPOKES marked in green.
- Grab the HANDLE (E) in the ground.
- Place the 4 SPOKES on the wheel next to the house and take the WHEEL (F).
- Zoom into the left window; take SHOTGLASS 9/10 (G).
- Click down once.
- Place the HANDLE on the buried SHOVEL HEAD; take the SHOVEL (H).
- Go forward to the Outside of the Stables.
- Place the SHOVEL on the mud below the wheelbarrow.
- Place the 2 WHEELS on the wheelbarrow.
- Click on the wheelbarrow to move it out of the way.
- Click on the stablehand’s ghost.
- Examine the wheelbarrow; take SHOTGLASS 10/10 (I) and the RUST REMOVER (J).
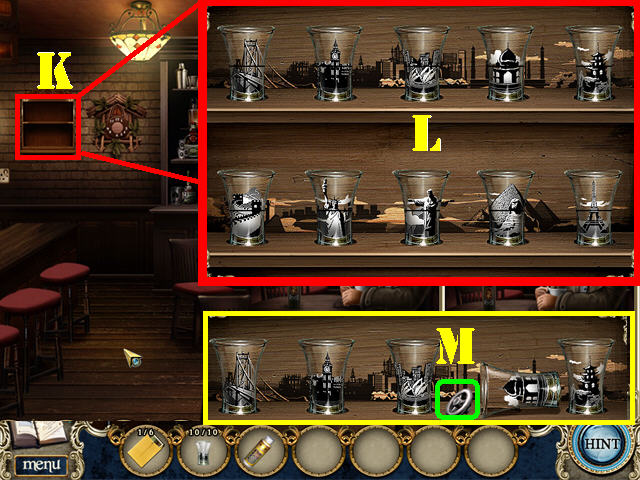
- Return to the Pub.
- Zoom into the shotglass rack on the back wall (K).
- Place the 10 SHOTGLASSES in the shotglass rack.
- Reconstruct the shotglasses so they blend in with the images in the background.
- You can swap the top and bottom pieces, but tops can only be swapped with tops and bottoms with bottoms.
- Shotglasses in the correct positions will light up as shown in the screenshot (L).
- Take the VALVE (M) after the puzzle has been solved.
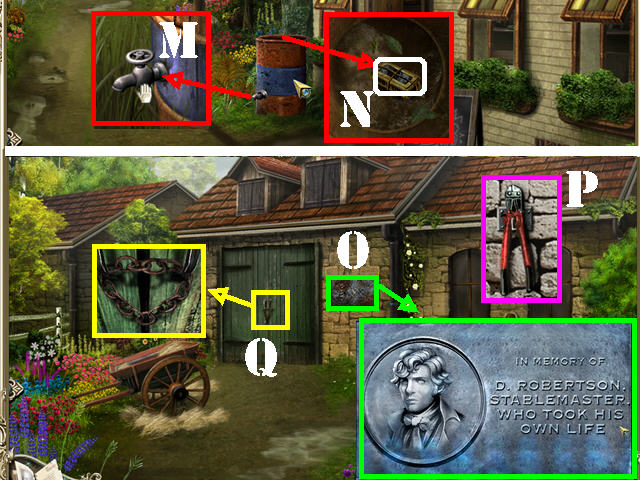
- Leave the Pub.
- Examine the faucet on the barrel.
- Place the VALVE on the faucet; turn the VALVE (M).
- Examine the top of the barrel; take the BOX OF METAL LETTERS (N).
- Return to the Outside of the Stables.
- Zoom into the rusty plaque on the side of the wall (O).
- Place the RUST REMOVER on the plaque.
- Place the BOX OF METAL LETTERS on the rust-free plaque.
- Scroll through all the letters at the bottom of the scene and place them in the right spots.
- The solution is: “WHO TOOK HIS OWN LIFE.”
- Grab the BOLT CUTTER after the puzzle has been solved (P).
- Zoom into the front door; cut the chains with the BOLT CUTTER (Q).
- Enter the Stables.
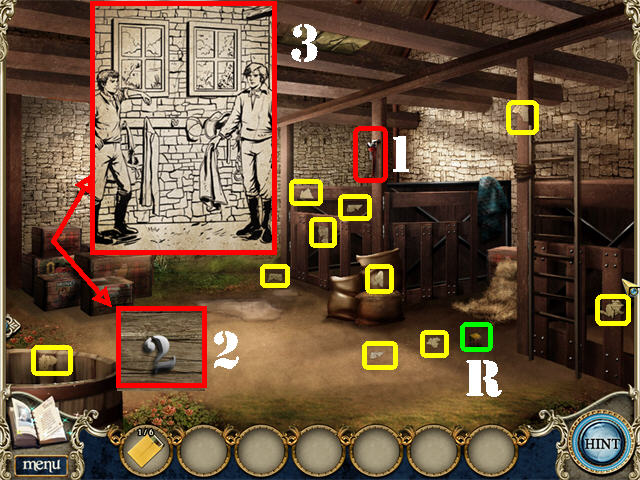
- Grab the 10 SKETCH PIECES marked in yellow.
- Take METAL CUBE 1/3 (R) on the ground.
- Pick up the WRENCH (1) on the wooden beam.
- Zoom into the crates on the left; take the NUMBER 2 (2).
- Place the 10 SKETCH PIECES on the crates to activate a puzzle.
- Click on a piece to rotate it; correct pieces will lock in place.
- Please see the screenshot for the solution (3).
- Click on the stall on the right to activate a search scene.
- The STABLE GEAR will be added to inventory after your search.
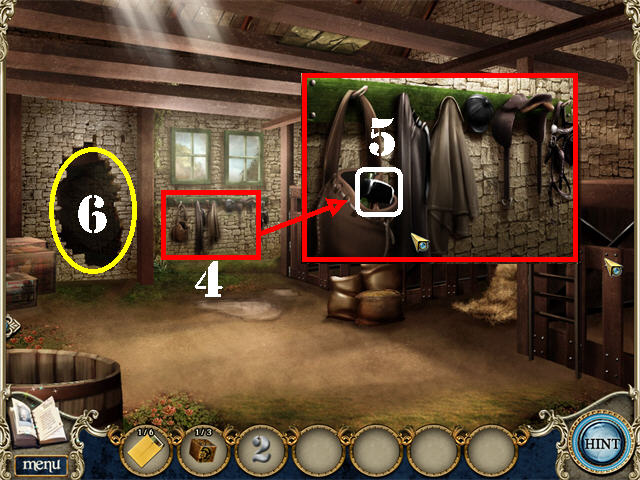
- Place the STABLE GEAR on the hooks in the back wall for a pop-up window to appear (4).
- Open the bag on the left; take the HAMMER AND CHISEL (5).
- Click on David’s ghost to move the crates aside.
- Place the HAMMER AND CHISEL on the brick wall 3 times (6).
- Go through the broken wall to access David’s Workshop.
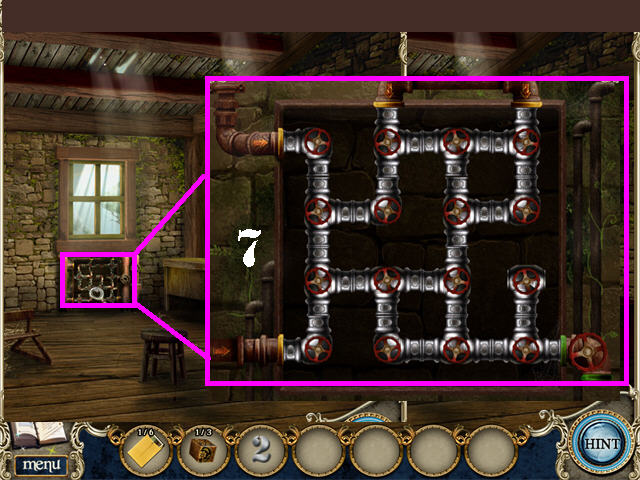
- Zoom into the pipes on the back wall to activate a puzzle.
- Click on the pipes to rotate them so that all pipes are connected as shown in the screenshot (7).
- Water will flow through the pipes outside the stables after this puzzle has been completed.
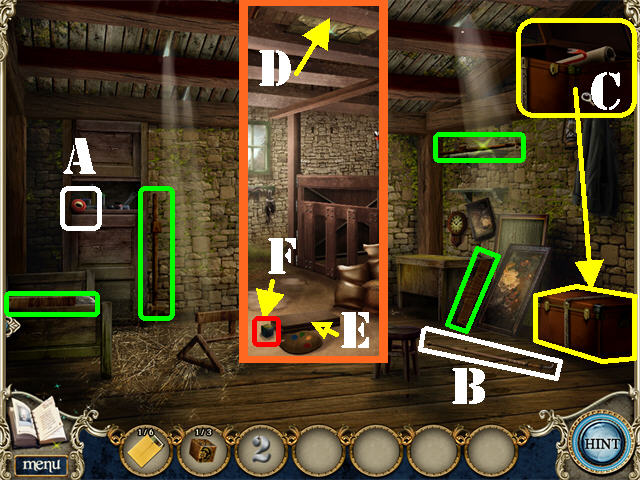
- Grab the ELECTRICAL TAPE (A).
- Take the LONG STICK (B) on the ground.
- Zoom into the trunk in the lower right.
- Open the 3 latches to unlock the trunk.
- Take the OLD CANVAS and the CROWBAR inside the trunk (C).
- Grab the 4 EASEL PARTS marked in green.
- Click down to enter the Stables.
- Use the LONG STICK on the ceiling 3 times (D).
- Take the POCHADE BOX (E) and METAL BOX 2/3 (F) that fall on the ground.

- Return to the Workshop.
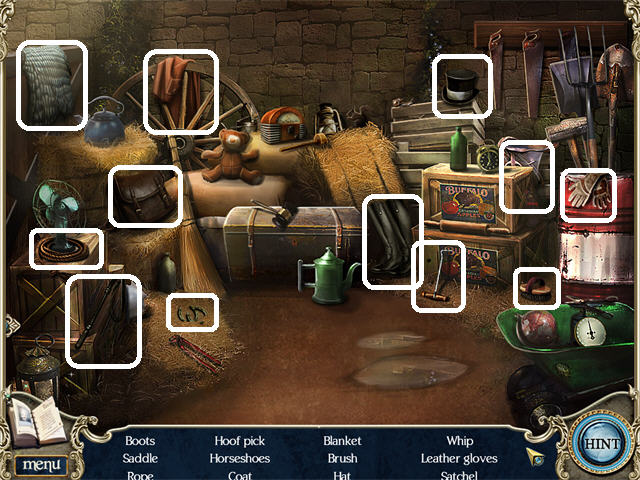
- Put the POCHADE BOX on the desk on the right to trigger a search scene.
- The 20 PAINT ITEMS are marked in white.
- The ART SUPPLIES will be added to inventory.
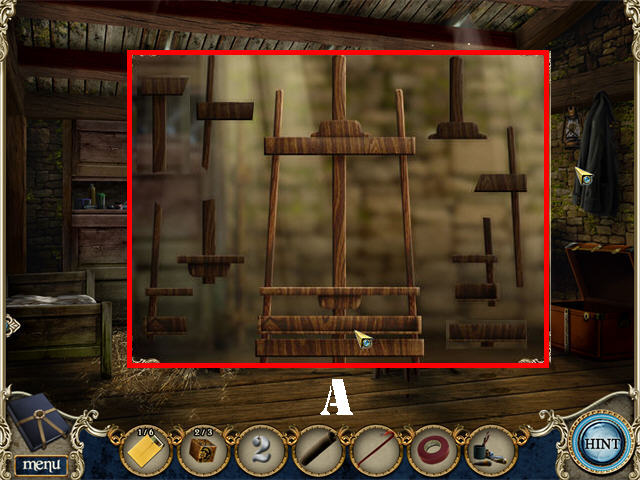
- Place the 4 EASEL PARTS on the easel to activate a puzzle.
- Drag the easel parts onto the silhouette as shown in the screenshot (A).
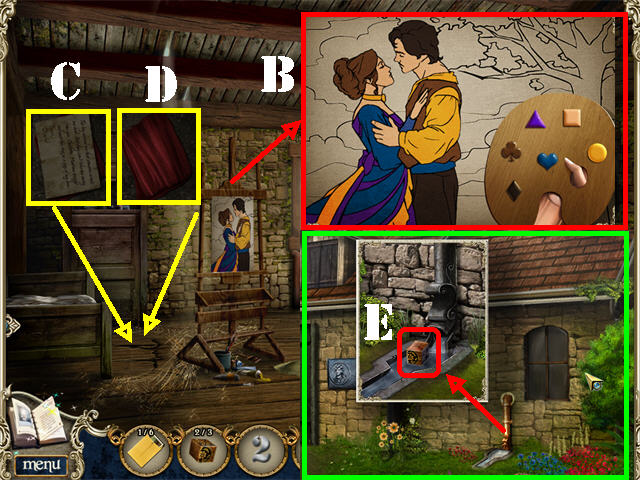
- Place the OLD CANVAS and the ART SUPPLIES on the easel to activate a puzzle.
- Use the shapes on the palette to fill in the colors.
- You only have to color the 2 characters on the canvas as shown in the screenshot (B).
- Click on David’s ghost.
- Zoom into the left side of the ground.
- Lift the boards with the CROWBAR; read DAVID’S NOTE (C) and click on it again to add it to inventory.
- Grab the DRY RAG (D) below the boards.
- Go Outside the Stables.
- Zoom into the faucet in the lower right side of the house: take METAL CUBE 3/3 (E).
- Place the DRY RAG in the water to create the WET RAG.

- Click down to access the Road.
- Zoom into the mailbox; place the 3 METAL CUBES on the mailbox to activate the puzzle.
- Click on the cubes to change their images until they form the pattern shown in the screenshot (1).
- Take the NUMBER 7 in the mailbox (F).
- Return to the Outside of the Pub.
- Zoom into the grate (G) in the lower right; remove the 4 BOLTS with the WRENCH (H).
- Take the POCKET KNIFE (I).
- Return to the Stables.
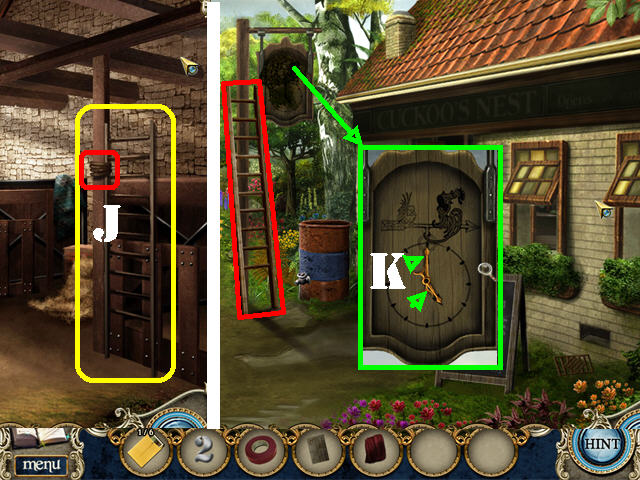
- Cut down the rope around the LADDER with the POCKET KNIFE (J) and take the LADDER.
- Return to the Outside of the Pub.
- Place the LADDER below the sign.
- Zoom into the sign; clean it with the WET RAG.
- Take the MINUTE HAND and the HOUR HAND from the clean sign; the clock points to 5:00 (K).
- Go inside the Pub.
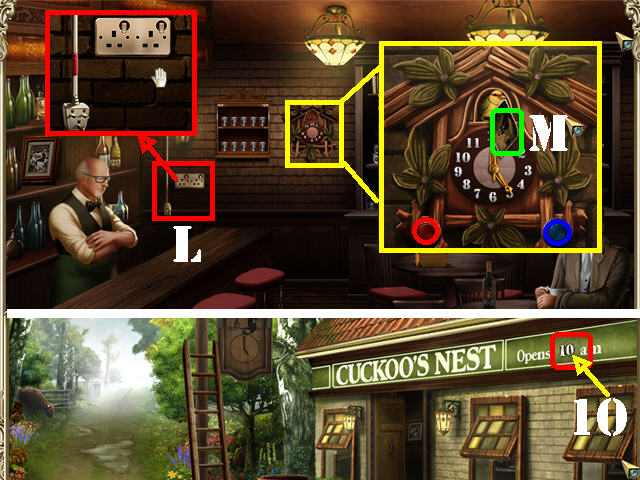
- Zoom into the plug on the left side of the wall (L).
- Place the ELECTRICAL TAPE on the plug; click on the switch to turn on the neon sign outside the Pub.
- Go outside the Pub.
- Take the NUMBER 10 (10) on the neon sign.
- Go inside the Pub.
- Zoom into the cuckoo clock.
- Place the following items on the clock; MINUTE HAND, HOUR HAND, NUMBERS 2, 7, and 10.
- Use the red and blue buttons to set the time to 5:00.
- Take PHOTOGRAPH 2/6 (M) after the time has been set.
Chapter 3: Baltoun Village
- Go into Town Hall.
- Take the FEATHER DUSTER (1) in the lower left.
- Grab the 4 SHEETS OF PAPER marked in yellow.
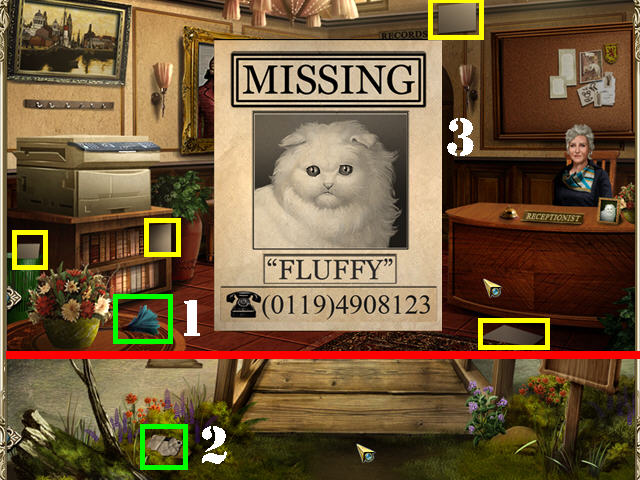
- Talk to the Receptionist and she will ask you to find her cat.
- Exit Town Hall, head right towards Town Square and forward to the Bridge.
- Grab the TORN CAT POSTER in the lower left (2).
- Return to Town Hall; give the TORN CAT POSTER to the Receptionist to activate a puzzle.
- Reassemble the cat poster by clicking on the puzzle pieces to rotate them as shown in the screenshot (3).
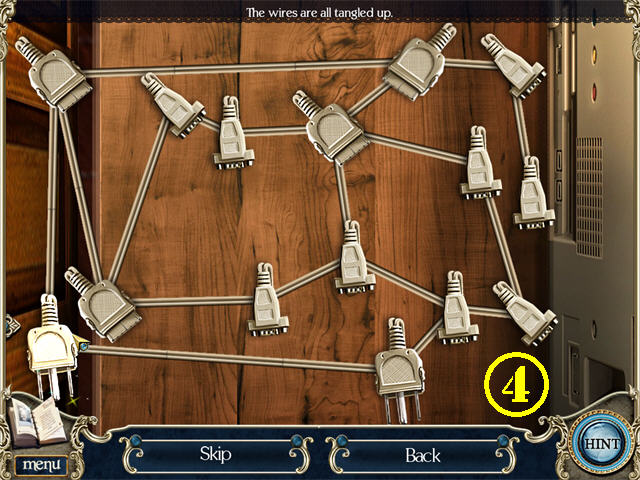
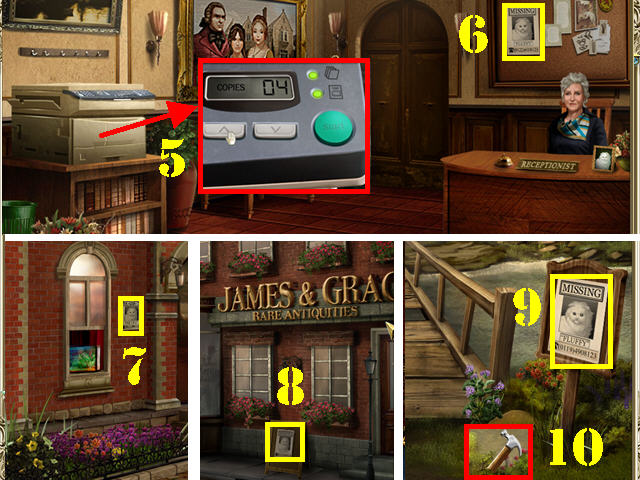
- Zoom into the photocopier.
- Untangle the wires by pulling on the plugs.
- White cords are untangled and gray cords are still tangled.
- Please look at the screenshot for a random solution (4).
- Talk to the Receptionist.
- Place the 4 SHEETS OF PAPER in the photocopier (5) and click the photocopier to open it.
- Insert the CAT POSTER into the photocopier.
- Click on the UP ARROW to change the amount of copies to 4 and then press the green Start Button.
- Four CAT POSTERS will be added to inventory.
- Place a CAT POSTER on the bulletin board (6).
- Go outside Town Hall; place a CAT POSTER on the outside of the building (7).
- Go right towards Town Square; place a CAT POSTER on the notice board (8).
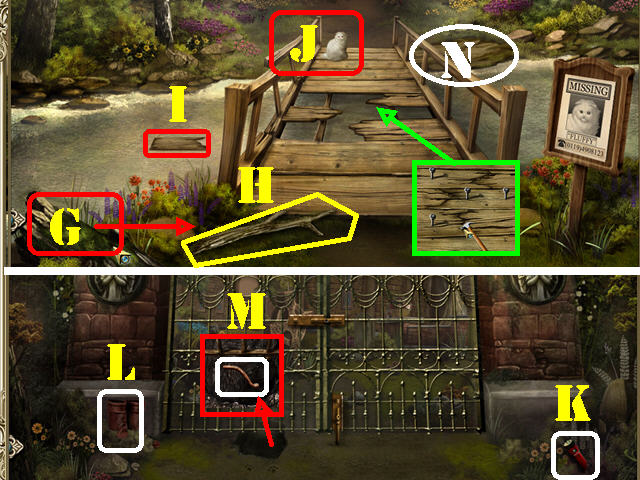
- Go to the Bridge; place a CAT POSTER on the Bridge Post (9) and take the CLAW HAMMER (10).
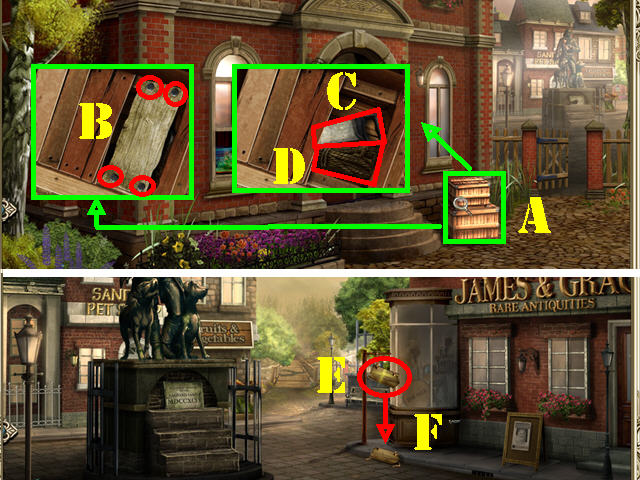
- Go outside Town Hall; zoom into the crate in the lower right (A).
- Remove the 4 NAILS with the CLAW HAMMER; take WOOD PLANK 1/3 (B).
- Take the HAND SAW (C) and the ROPE (D) inside the crate.
- Return to Town Square; place the HAND SAW on the broken sign (E).
- Take WOOD PLANK 2/3 (F) that falls on the ground.
- Return to the Bridge.
- Cut the TREE (G) in the lower left with the HAND SAW.
- Grab the BRANCH that fell from the tree (H).
- Use the BRANCH to remove WOOD PLANK 3/3 (I) in the water.
- Zoom into the broken section of the bridge.
- Put the 3 WOOD PLANKS on the bridge.
- Place the 4 NAILS on the wood planks.
- Hammer in the 4 NAILS using the CLAW HAMMER.
- Click on FLUFFY (J) and she will run away.
- Cross the Bridge.
- Click on the stablehand’s ghost.
- Grab the FLASHLIGHT (K) in the lower right.
- Take the RAIN BOOTS (L) in the lower left.
- Zoom into the hole below the gate; grab the ROD HANDLE (M).
- Return to the Bridge.
- Place the RAIN BOOTS in the mud on the right side of the other end of the bridge to trigger a puzzle (N).
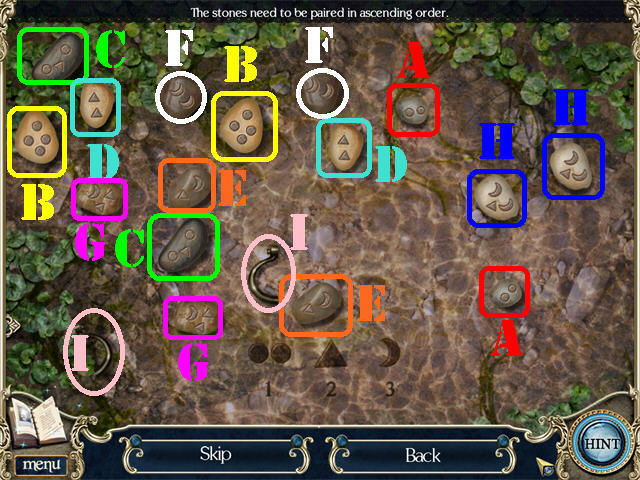
- Click on pairs of matching stones to eliminate them; use the code at the bottom of the screen as a guide.
- Click on the pair of stones as shown in the screenshot in alphabetical order. The positions of the stones may be different for everyone but the solution is the same.
- The RING HANDLE will be added to inventory.
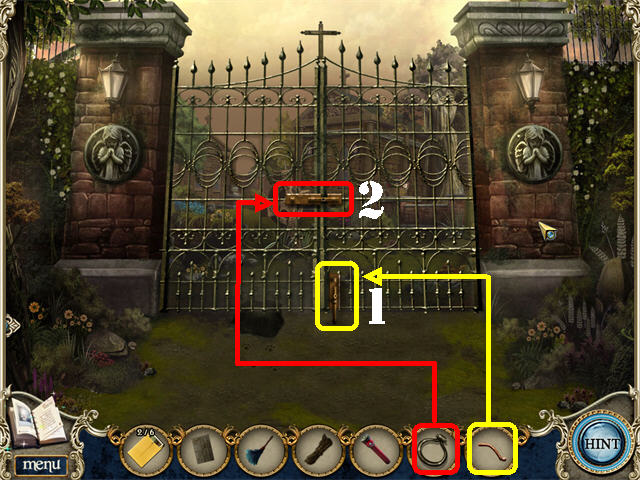
- Cross the Bridge.
- Zoom into the gate’s bottom lock; place the ROD HANDLE on the lock and click on it (1).
- Zoom into the gate’s top lock; place the RING HANDLE on the lock and click on it (2).
- Go through the gate.
- Click on the stablehand’s ghost and he will break the gravestone.
- Take both GRAVESTONE PIECES marked in white.
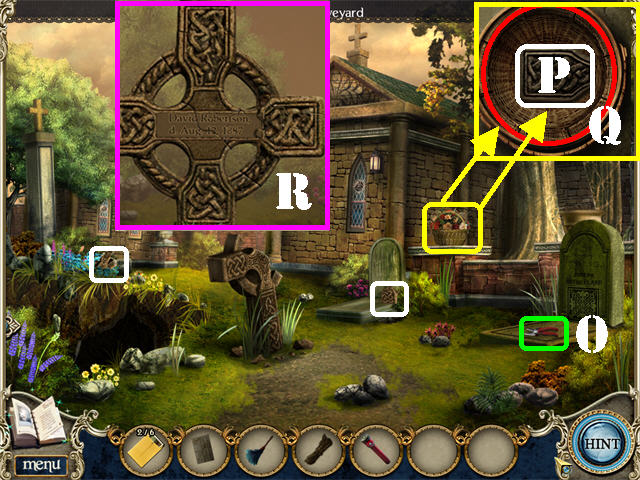
- Grab the SHEARS (O) in the lower right.
- Zoom into the basket by the statue.
- Remove the plants and take the last GRAVESTONE PIECE (P).
- Grab the BASKET (Q).
- Place the 3 GRAVESTONE PIECES on the broken gravestone to activate a puzzle.
- Click on the pieces to rotate them; drag them to the correct spots as shown in the screenshot (R).
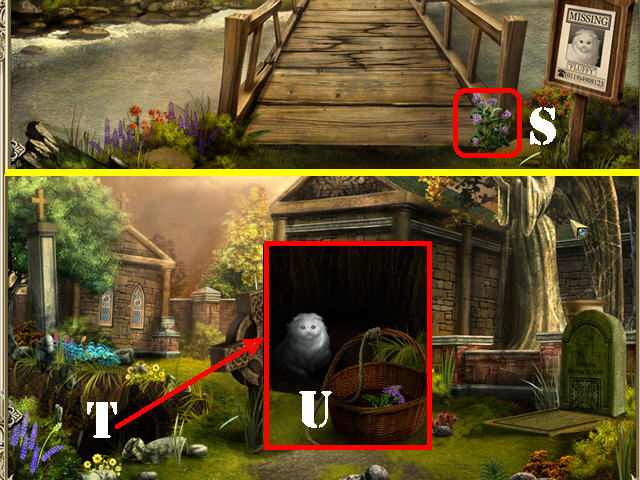
- Return to the Bridge; cut the CATNIP with the SHEARS (S).
- Return to the Graveyard.
- Place the FLASHLIGHT in the dark pit on the left to see Fluffy (T).
- Place the BASKET on the ground (U).
- Put the CATNIP and the ROPE in the basket.
- Click on the basket to lower it; click on it again to obtain FLUFFY.

- Return to Town Hall.
- Give FLUFFY to the Receptionist.
- Go into the Record’s Office behind the desk.
- Take the AQUARIUM NET (V) on the back wall.
- Clean the 3 sets of filing cabinets marked in white and red with the FEATHER DUSTER.
- Zoom into the center filing cabinet to trigger a puzzle (W).
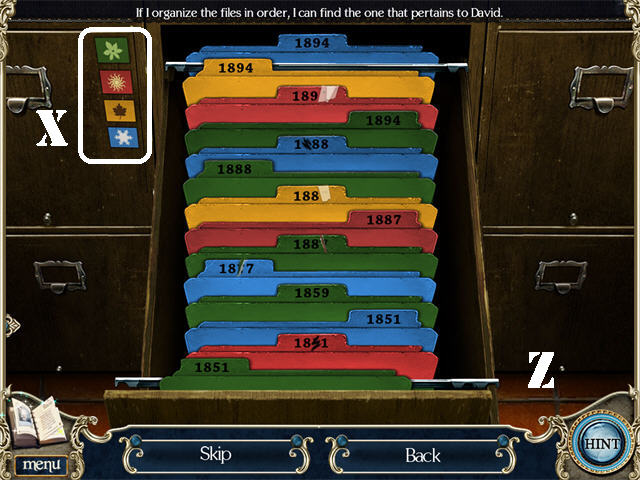
- Arrange the files according to the symbols in the upper right (X).
- Please look at the screenshot for the solution (Z).
- The 1887 FILE will be added to inventory.
- Put the 1887 FILE on the left drafting desk to trigger a search scene.
- The SUICIDE NOTE will be added to inventory.
- Zoom into the desk on the right.
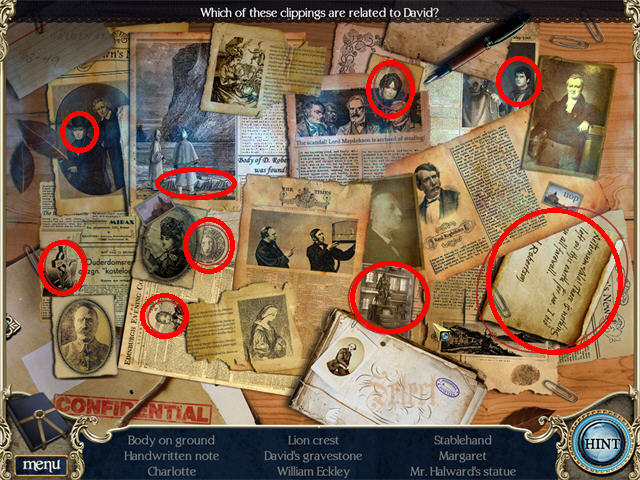
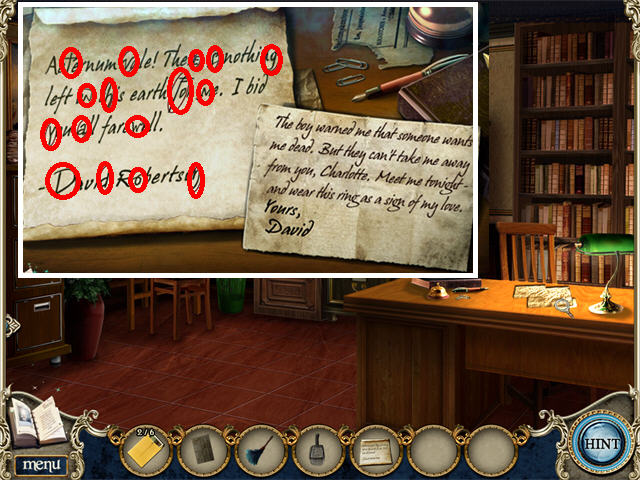
- Place the SUICIDE NOTE and DAVID’S NOTE on the desk to trigger a puzzle.
- Find the 16 TAMPERED LETTERS in the left note as indicated in the screenshot.
- The forged SUICIDE NOTE will return to inventory.
- Click on David’s Ghost.
- Go outside Town Hall.
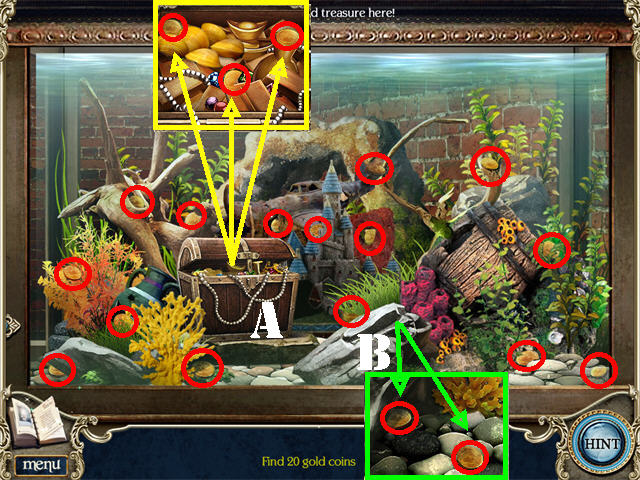
- Place the AQUARIUM NET on the fish tank in the lower left window to trigger a search scene.
- The 20 GOLD COINS are marked in red.
- Zoom into the chest (A) and the large stone (B) to find 3 and 2 GOLD COINS respectively.
- The BAG OF TREASURES will be added to inventory.
- Go into the Town Hall Lobby.
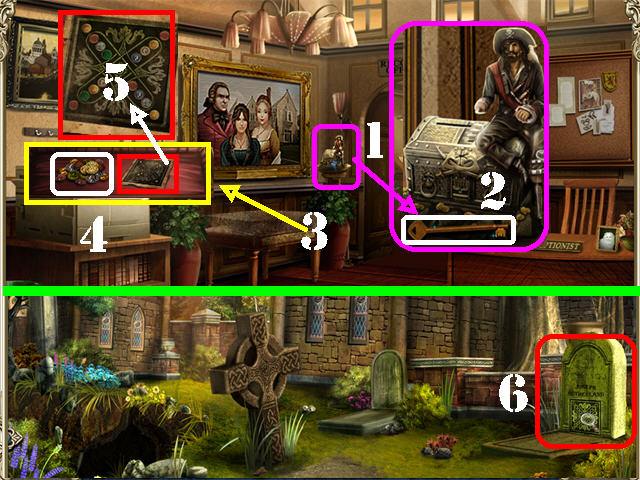
- Zoom into the pirate figurine; place the BAG OF TREASURES in the chest (1).
- Take the DISPLAY CASE KEY (2).
- Zoom into the display case below the picture; clean it with the FEATHER DUSTER (3).
- Open the display case with the DISPLAY CASE KEY; take the VINTAGE COINS (4) and look at the DIAGRAM (5).
- Return to the Graveyard.
- Zoom into the Stablehand’s gravestone on the right (6).
- Place the VINTAGE COINS on the grave to trigger a puzzle.
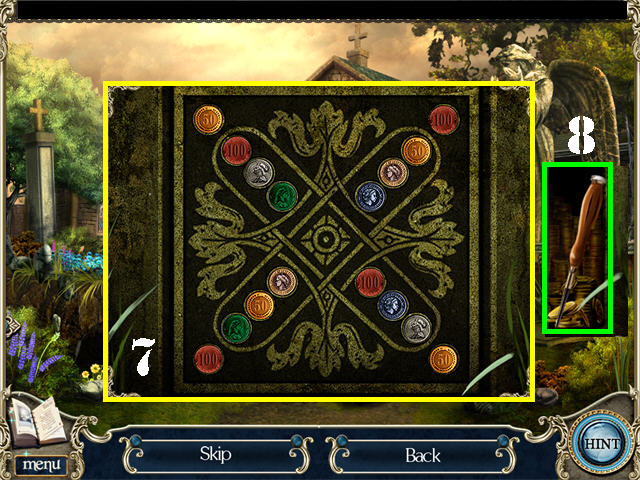
- Swap the coins around until they resemble the pattern in the display case in Town Hall (7).
- Take the SPECIAL SCREWDRIVER after the puzzle has been solved (8).
- Return to the Town Hall Lobby.
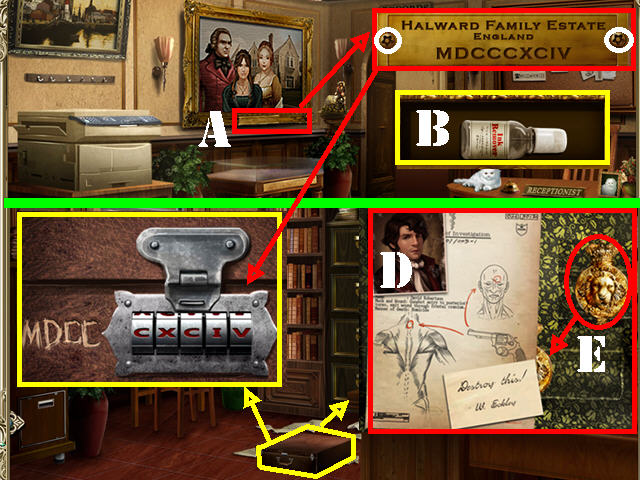
- Zoom into the plaque below the family portrait; remove the 2 screws with the SPECIAL SCREWDRIVER (A). Note the Roman numerals on the plaque.
- Take the INK REMOVER below the portrait (B).
- Go into the Records Office.
- Zoom into the briefcase; remove the gunk with the INK REMOVER to activate a puzzle.
- Finish the code with the numbers from the plaque to unlock the briefcase.
- Take the MEDICAL REPORT (D) and the BADGE (E) inside the briefcase.

- Return to Town Square.
- Examine Mr. Halward’s statue; place the BADGE on the statue’s lapel (1).
- Take PHOTOGRAPH 3/6 (P).
Chapter 4: England

- Zoom into the shrubbery in the lower left; take the TORN NOTE (A).
- Examine the doorbell (B) by the gate; place the TORN NOTE next to the yellow torn paper. The note now reads “Doorbell broken – use ringer.”
- Take the 4 RINGER PARTS marked in yellow.
- Place the 4 RINGER PARTS on the ringer next to the gate (C).
- Click on the ringer for Charlotte’s ghost to appear.
- Click on Charlotte’s ghost twice for the gate to open.
- Zoom into the tree bark on the right; take SHEARS HALF 1/2 (D).
- Go through the gate to the Garden.
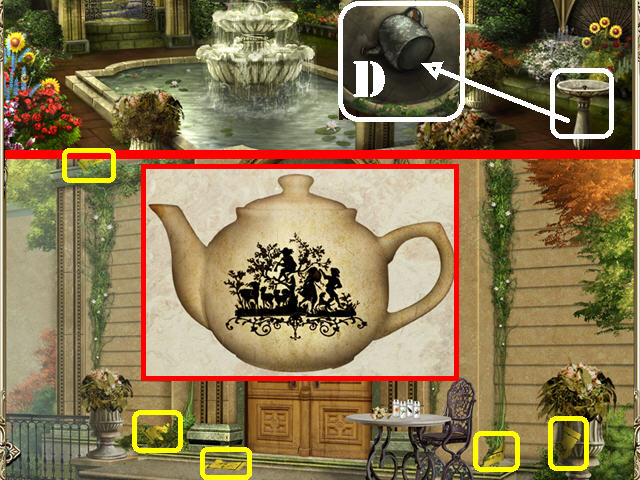
- Zoom into the birdbath on the right; take the WATERING CAN (D).
- Go through the back gate to access the door to Halward Manor.
- Take the 5 LIST OF CHORES pieces marked in yellow.
- Zoom into the table; click on the teapot pieces to trigger a puzzle.
- Assemble the teapot as shown in the screenshot.
- The TEAPOT will be added to inventory after the puzzle has been solved.
- Click on the front door to summon the butler.
- Click down and go into the right gate to access the outside of the Cottage.
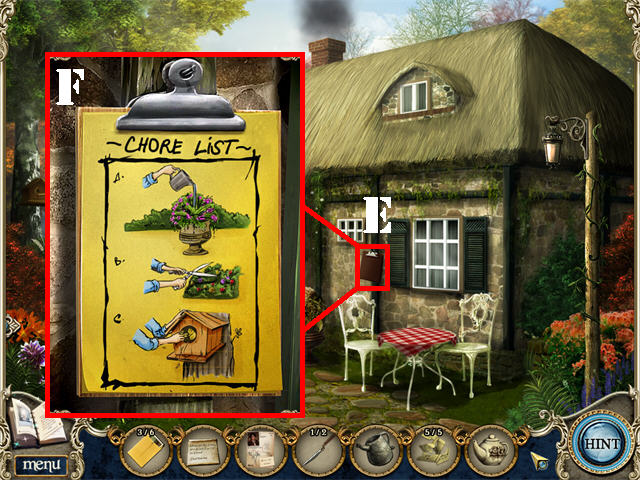
- Click on the front door to summon the housekeeper.
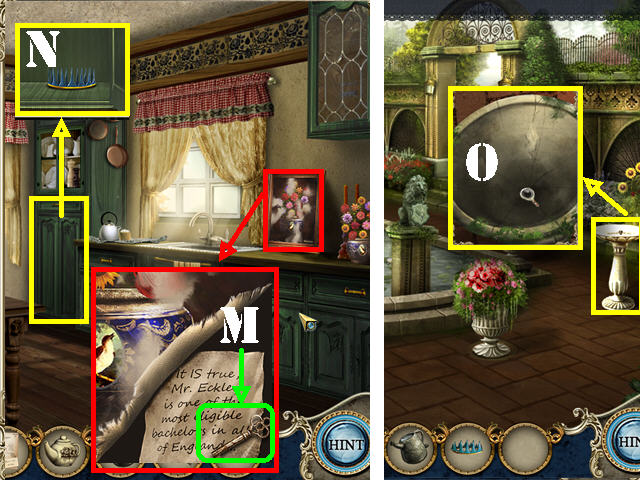
- Place the 5 LIST OF CHORES on the clipboard close to the right window to trigger a puzzle (E).
- Click on any 2 strips of paper to swap their positions.
- You must assemble 3 different images as shown in the screenshot (F).
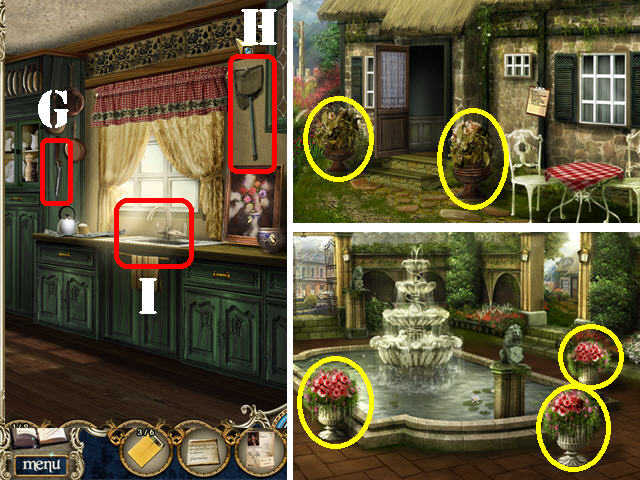
- Click on the front door again to summon the housekeeper and open the door to the Cottage.
- Go into the Cottage.
- Take SHEARS HALF 2/2 (G) on the side of the cabinet to complete the SHEARS.
- Grab the POOL NET (H) in the upper right.
- Place the WATERING CAN on the faucet to create the FILLED WATERING CAN (I).
- Leave the Cottage.
- Water the 2 plants marked in yellow with the FILLED WATERING CAN.
- Go to the Garden; water the 3 plants marked in yellow with the FILLED WATERING CAN.
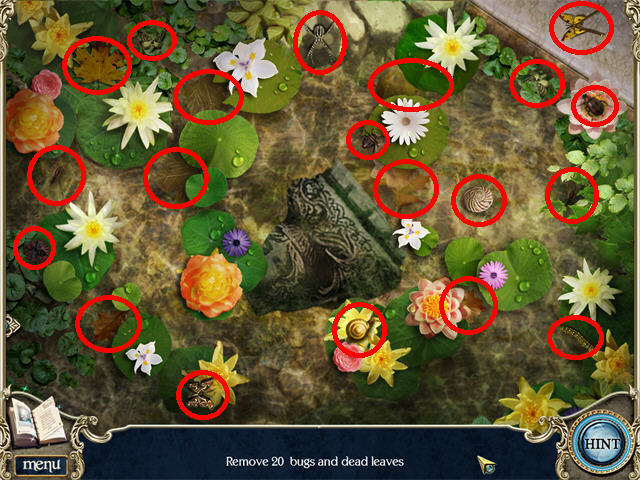
- Place the POOL NET in the pool to trigger a puzzle.
- Remove the 20 bugs and dead leaves marked in red.
- The CARVING PIECE will be added to inventory.
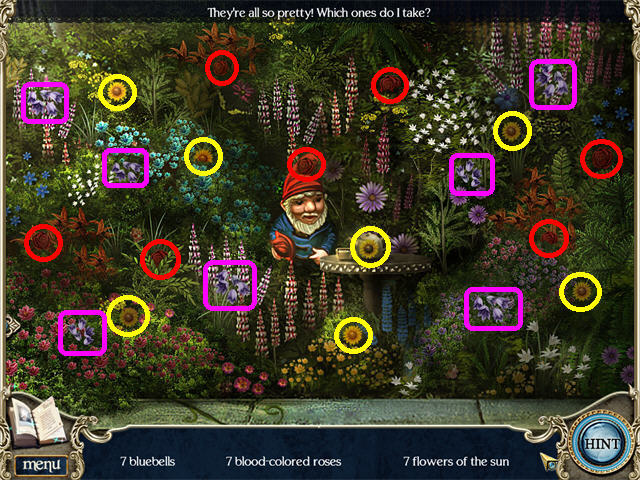
- Place the SHEARS on the flowerbed on the left side of the Garden to trigger a puzzle.
- Find the 21 items listed at the bottom of the screen.
- The FLOWERS will be added to inventory.
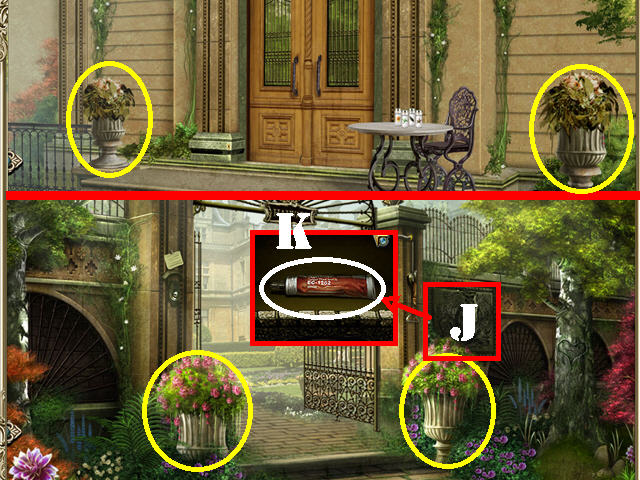
- Go to Halward Manor’s front door; water the 2 plants marked in yellow with the FILLED WATERING CAN.
- Go to the Gate; water the 2 plants marked in yellow with the FILLED WATERING CAN.
- Examine the carving in the upper right; place the CARVING PIECE (J) in the slot.
- Grab the SEALANT (K) in the crevice.
- Return to the Cottage.
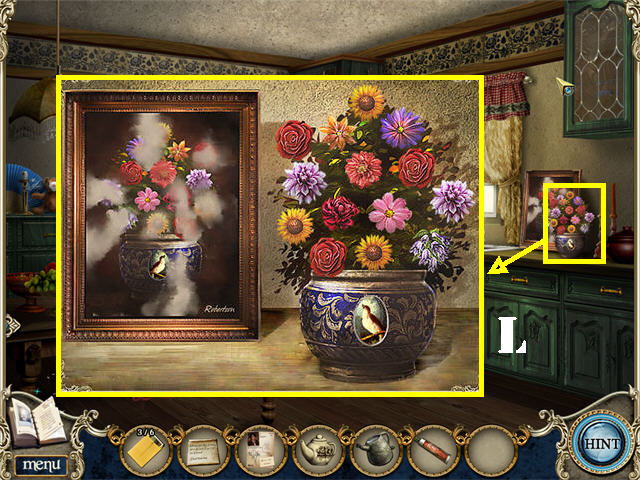
- Place the FLOWERS in the vase on the counter to trigger a puzzle.
- Rearrange the flowers on the right like the mirror image of the flowers in the painting.
- Click on any 2 flowers to swap their positions until they look like the image in the screenshot (L).
- Click on Charlotte’s ghost.
- Examine the painting on the counter.
- Click on the painting to lift the edge; take the CABINET KEY (M) and read the note.
- Zoom into the cabinet in the lower left; open it with the CABINET KEY.
- Take the BLUE CROWN (N).
- Return to the Garden.
- Zoom into the birdbath; place the SEALANT in the birdbath (O).
- Put the FILLED WATERING CAN in the birdbath for the bird to appear.

- Go to the Outside of the Cottage.
- Examine the nesting box in the upper left; open it and remove the debris.
- Take the ORANGE CROWN (P) and the DIRTY SPOON inside the box (Q).
- The housekeeper appears and makes an announcement.
- Go inside the Cottage.
- Talk to the housekeeper to receive the TEA GUIDE.
- Clean the DIRTY SPOON in the sink to obtain the CLEAN SPOON (R).
- Zoom into the tea tray by the window (S).
- Place the TEAPOT and the CLEAN SPOON on the tray.
- Place the TEA GUIDE on the back wall to activate the puzzle.
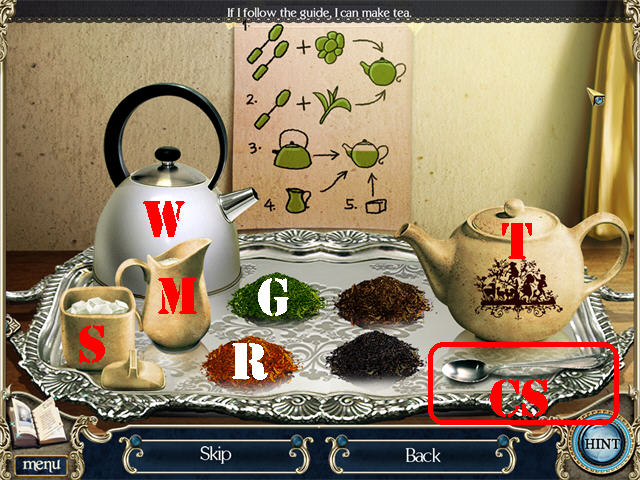
- Follow the instructions shown on the guide.
- Place the CLEAN SPOON (CS) on the RED TEA LEAVES (R) 2 times; insert both spoonfuls into the TEAPOT (T).
- Place the CLEAN SPOON (CS) on the GREEN TEA LEAVES (G) and insert it into the TEAPOT (T).
- Pour the HOT WATER (W) into the TEAPOT (T).
- Pour the MILK (M) into the TEAPOT (T).
- Place the SUGAR CUBES (S) into the TEAPOT (T).
- HOT TEA will be added to inventory.
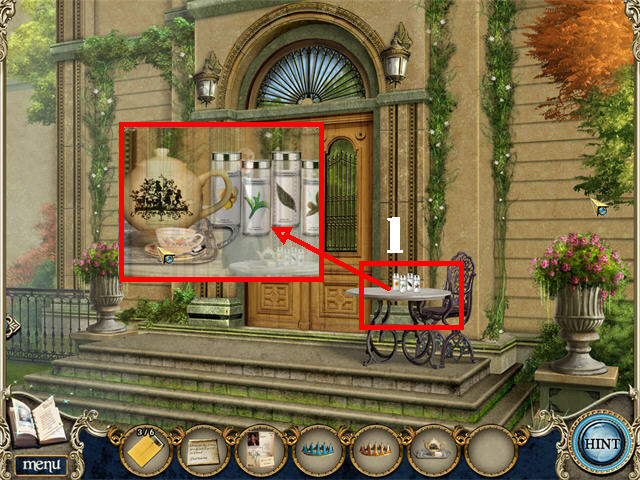
- Return to the Halward Manor’s front door.
- Zoom into the tea table; place the HOT TEA on the table (1).
- The butler will appear and hand you the GREEN CROWN.

- Return to the Garden.
- Examine the lion to the left of the back gate; zoom into the plaque to trigger a puzzle.
- Click on any 2 tiles to swap their positions until they form the image on the screenshot (2).
- Place the YELLOW CROWN on the statue.
- Examine the lion to the right of the back gate; zoom into the plaque to trigger a puzzle.
- Arrange the tiles as shown on the screenshot (3).
- Place the BLUE CROWN on the statue.
- Examine the Lion by the pool; zoom into the plaque to trigger a puzzle.
- Arrange the tiles as shown in the screenshot (4).
- Place the GREEN CROWN on the statue.
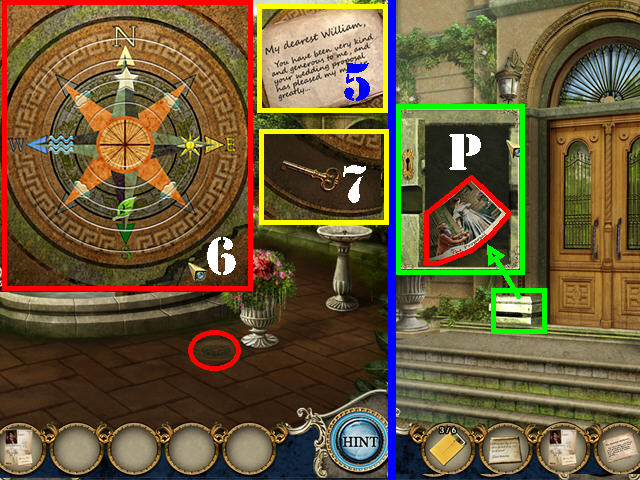
- Examine the compass on the ground; take HALF OF CHARLOTTE’S NOTE (5) to trigger a puzzle.
- Rotate each ring until the image matches the one in the screenshot (6).
- Take the COMPARTMENT KEY (7).
- Go through the back gate.
- Zoom into the compartment near the door; unlock it with the COMPARTMENT KEY (8).
- Take PHOTOGRAPH 4/6 (P) in the compartment.
- Go through the door to end the chapter.
Chapter 5: The Halward Estate
- Talk to the Butler.
- Click on Charlotte’s ghost.
- Take ANGEL 1/4 (1) on the left.
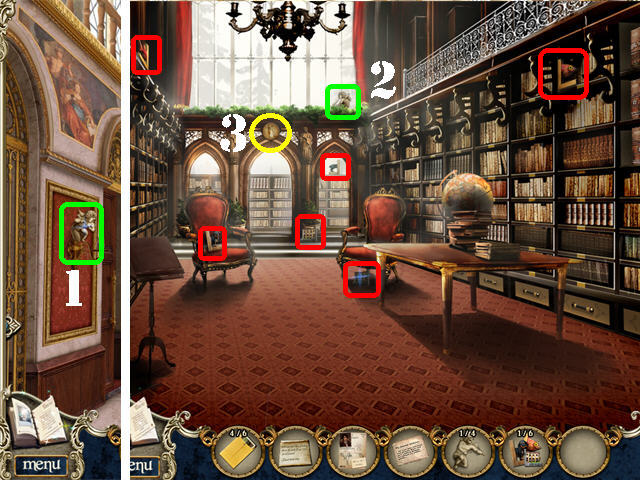
- Go through the left door to access the Library.
- Take ANGEL 2/4 (2) in the upper left.
- Grab the 6 BOOKEND pieces marked in red.
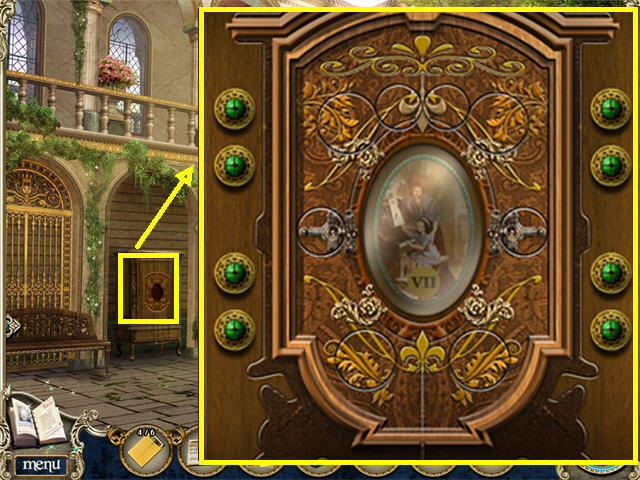
- Take the DISC (3) above the center back window.
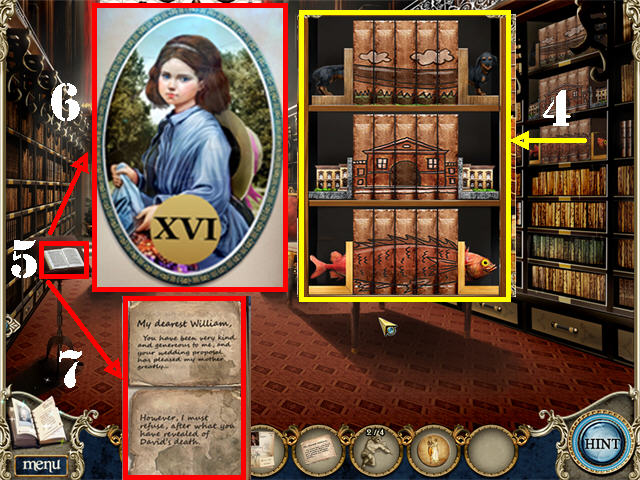
- Place the 6 BOOKEND pieces on the rightmost bookcase to trigger a puzzle.
- Click on any 2 books to swap their positions until they form the image on the screenshot (4).
- The BOOK will be added to inventory.
- Place the BOOK on the left bookstand to trigger a puzzle (5).
- Arrange the picture as shown in the screenshot (6).
- OVAL 1/5 will be added to inventory.
- Turn the page; place HALF OF CHARLOTTE’S LETTER next to the torn note (7).
- Click on the assembled letter to move it and add it to your Notebook.
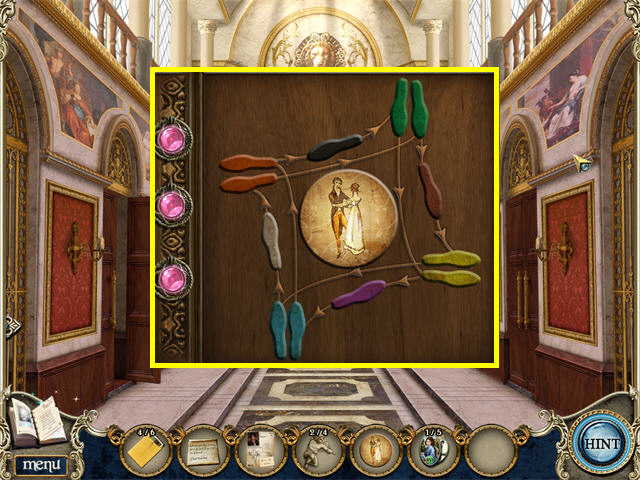
- Zoom into the back door; place the DISC on the door to activate a puzzle.
- Repeat the dance steps shown on the door; the sequence is random.
- Complete 3 rounds to beat the game. If you make a mistake the rounds will reset.

- Go through the back door to access the Music Room.
- Examine the painting on the lower left (A).
- Unlock the 4 latches and click on the painting to remove it.
- Click on the tiles to activate a puzzle.
- Rotate the tiles until they form the image shown on the screenshot (B).
- Take OVAL 2/5 (C) after the puzzle has been solved.
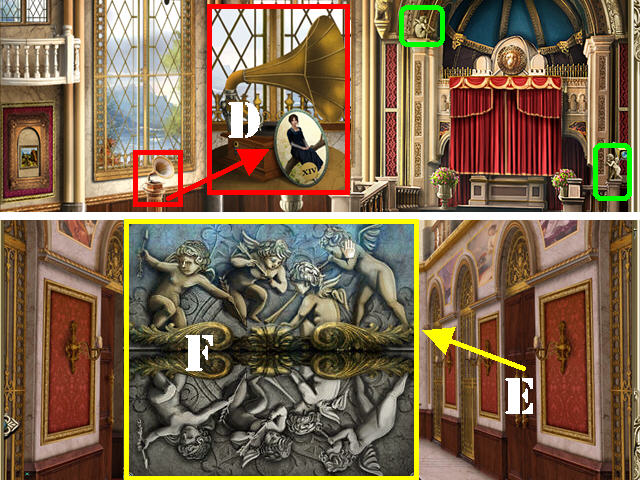
- Zoom into the gramophone; grab OVAL 3/5 (D).
- Take the last 2 ANGELS marked in green.
- Exit the Music Room.
- Examine the right door (E).
- Place the 4 ANGELS on the door to activate a puzzle.
- Click on the top angel’s heads, switching their positions to match the bottom reflection (F).
- Go through the door to access the Patio.
- Zoom into the armoire to trigger a puzzle.
- Click on the green knobs to align the ovals with the rest of the image.
- OVAL 4/5 will be added to inventory after puzzle has been solved.

- Zoom into the chess table to activate a puzzle.
- Arrange the puzzle pieces as shown in the screenshot (H).
- As soon as the chess puzzle is solved another will appear.
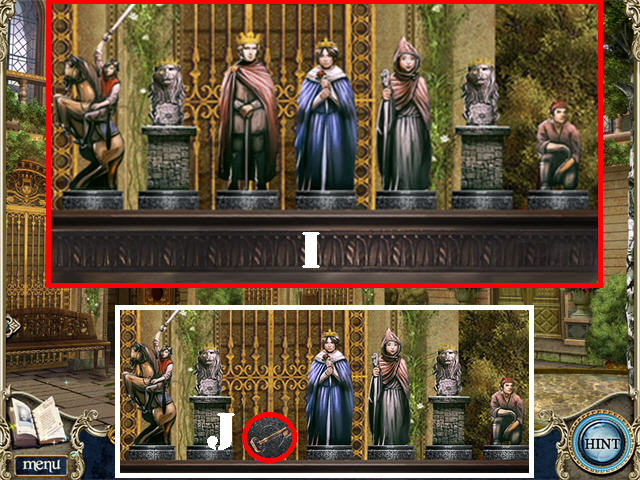
- Arrange the chess pieces using the note you found in the Library (it should be in your Notebook now) (I).
- Take the JEWEL KEY after the puzzle has been solved (J).
- Return to the Reception Hall.
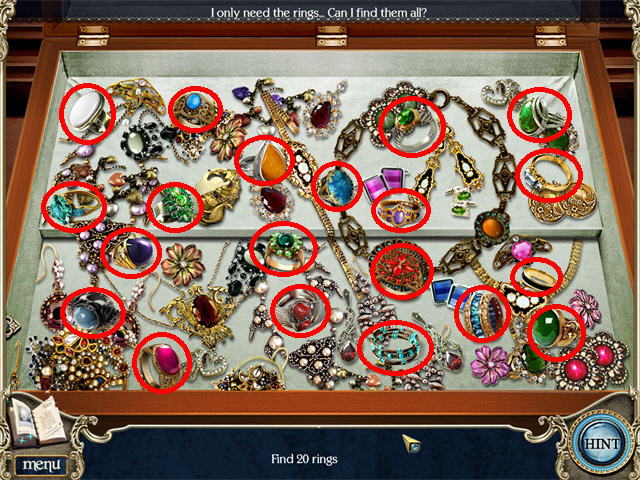
- Examine the jewelry display; open it with the JEWEL KEY.
- Click on the full jewelry box to activate a search scene.
- Grab the 20 rings marked in red.
- The RINGS will be added to inventory.
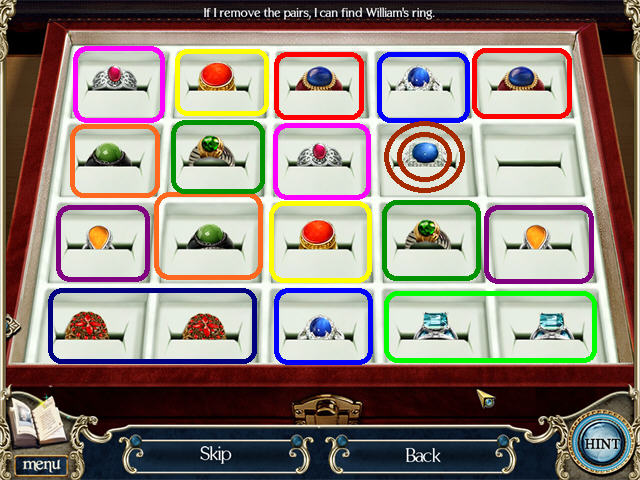
- Place the RINGS in the empty ring holder at the bottom of the jewelry display to activate a puzzle.
- Remove the matching ring pairs as shown in the screenshot.
- WILLIAM’S RING will be the last ring in the holder; click on it to add it to inventory.
- Go out to the Patio.
- Examine the wall sculpture next to the door; place WILLIAM’S RING in the slot (1).
- Click on the ring to move the plaque aside; take WILLIAM’S LETTER (2) and OVAL 5/5 (3).
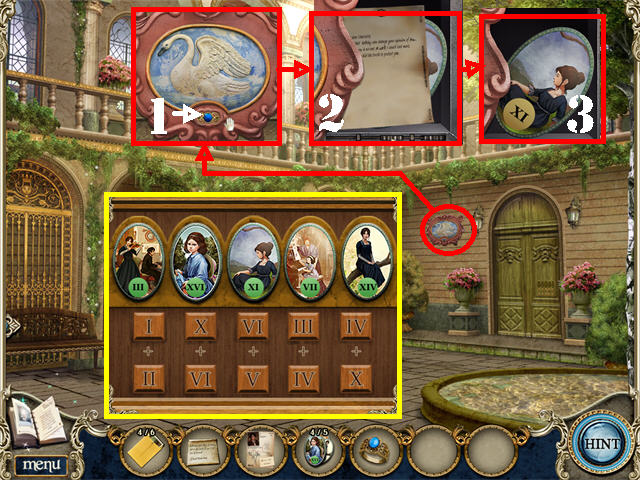
- Click on the right door; place the 5 OVALS into any slots to activate a puzzle.
- Swap the ovals around until their number matches the sum of the numbers below them.
- From left to right the solution is: III (I + II), XVI (X + VI), XI (VI + V), VII (III + IV), XIV (IV + X).
- Go through the door to access the Music Room.

- Grab the 5 PIANO KEYS marked in yellow.
- Return to the Library.
- Zoom into the desk.
- Place the SUICIDE NOTE and WILLIAM’S LETTER on the desk to activate a puzzle (4).
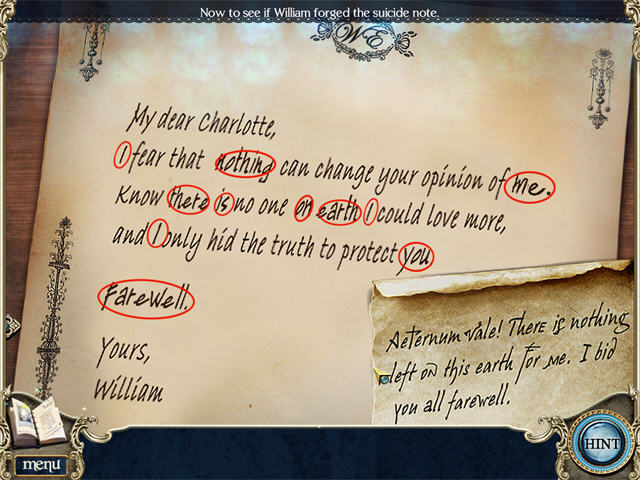
- Find the 11 words found in both letters.

- Return to the Reception Hall.
- Click on Charlotte’s Box (5) by the door to activate a puzzle.
- Click on the tiles to rotate them.
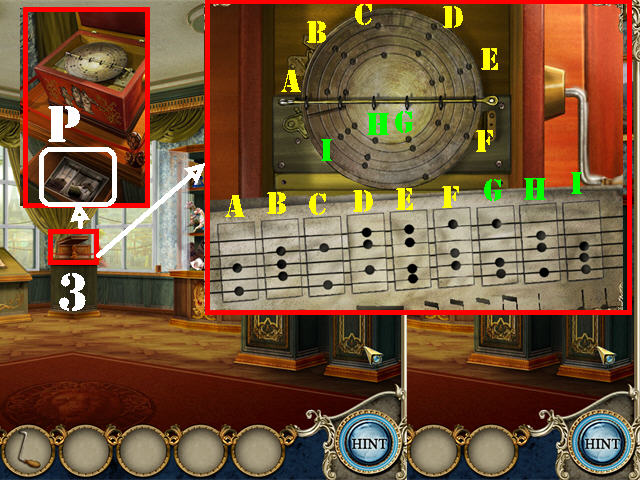
- Take the KEY and the MUSIC SHEET in the box (6).
- Return to the Music Room.
- Place the 5 PIANO KEYS and the MUSIC SHEET on the piano to activate a puzzle.
- Solve 3 rounds of this puzzle; sequences are random.
- Take the COINS (7) after the puzzle has been solved.
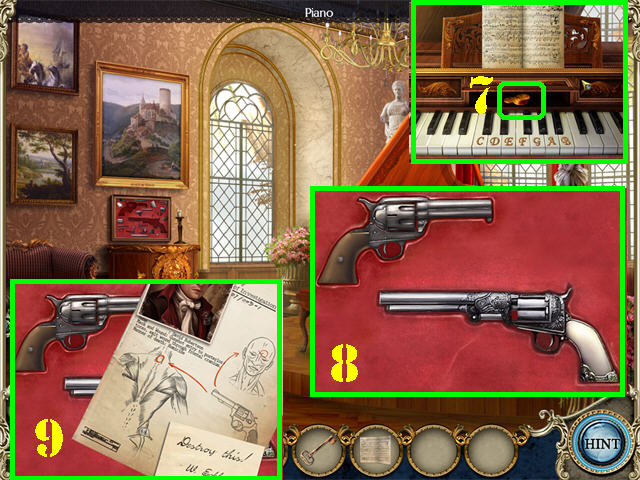
- Unlock the gun display with the KEY to trigger a puzzle.
- Arrange the gun parts as in the screenshot (8).
- Place the MEDICAL REPORT over the guns (9).
- Click on the report for the stablehand’s ghost to appear; click on him and he will knock down the case.
- Click on the case and take the DAGGER (1).
- Place the COINS in the coin slot on the side of music box to trigger a puzzle.
- Click on the buttons until the image is the same as in the screenshot. The solution is random.
- The RECORD will be added to inventory.
- Return to the Ballroom.
- Cut the curtains with the DAGGER, revealing a mural.
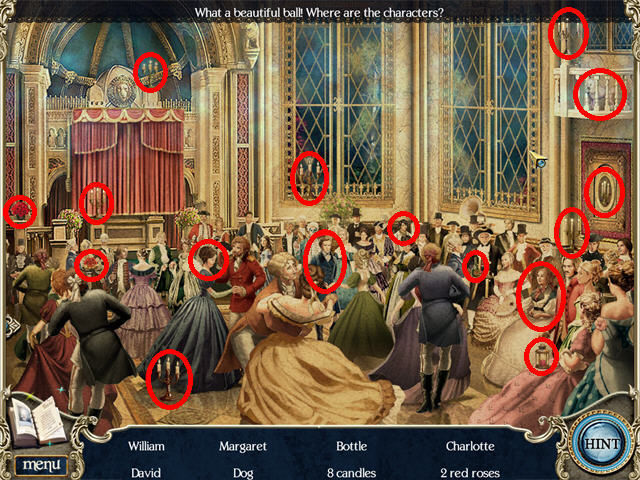
- Click on the mural to activate a search scene.
- Charlotte will appear after the search scene has been completed.
- Click on Charlotte and she will disappear.
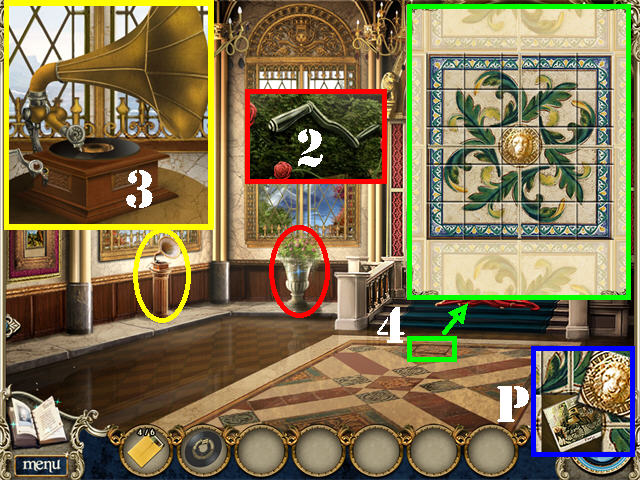
- Examine the pot by the right window; take the CRANK (2).
- Examine the gramophone (3).
- Place the CRANK and the RECORD on the gramophone.
- Turn the CRANK.
- Examine the floor tile close to the steps to activate a puzzle (4).
- Click on each tile to rotate it to reflect the image in the screenshot.
- Take PHOTOGRAPH 5/6 (P) below the tile.
Chapter 6: France
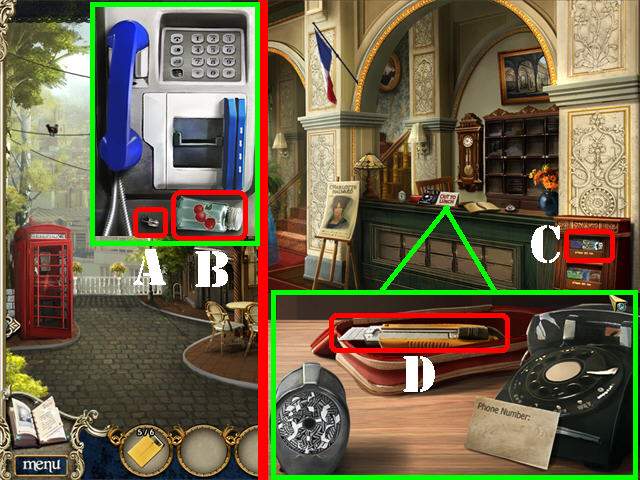
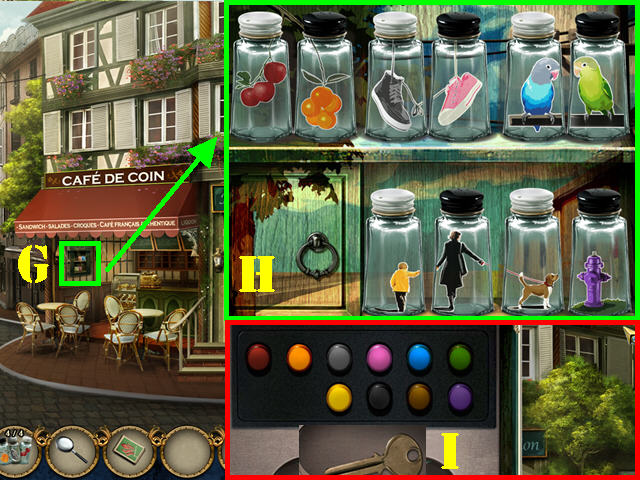
- Zoom into the phone booth; take the SALT SHAKER 1/4 (A) and the SMALL ZIPPER (B).
- Go through the door to access the Museum Lobby.
- Click on Charlotte.
- Take SALT SHAKER 2/4 (C) on the stand.
- Zoom into the counter.
- Place the SMALL ZIPPER on the red bag; click on the zipper to open the bag.
- Take the CUTTER inside the bag (D).
- Go left toward the Exhibit Room.
- Click on Charlotte.
- Take the TOWEL (E) by the window.
- Clean the dusty plastic sheet with the TOWEL (F).
- Cut the plastic sheet with the CUTTER.
- Remove the cut plastic sheet and go into the Gallery.
- Pick up the LIGHT BULB (G) in the wheelbarrow.
- Place the LIGHT BULB in the broken lamp (H).
- Turn on the light switch on the left wall (I).
- Grab SALT SHAKER 3/4 (J) above the ladder.
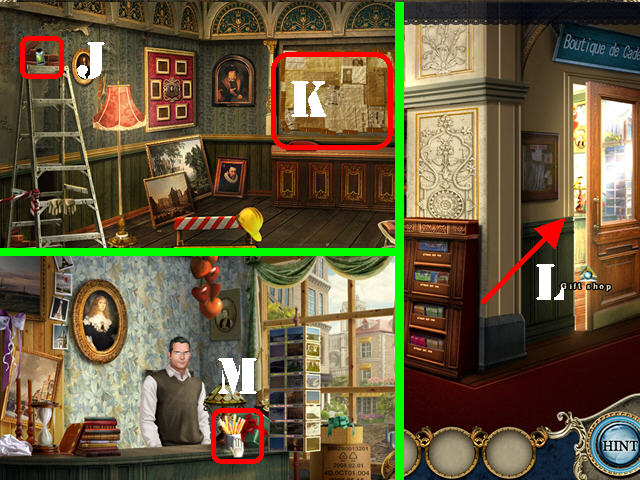
- Cut the newspaper-covered back wall with the CUTTER to reveal Charlotte’s painting (K). Click on it to trigger a search scene in the Gift Shop.
- Go into the Gift Shop located to the right of the Lobby (L).
- Talk to the store clerk.
- Grab the UNSHARPENED PENCIL on the counter (M).

- Click on the shop display on the right to trigger a search scene.
- The MAGNIFYING GLASS will be added to inventory.
- The clerk will not let you leave the shop.
- Hand the MAGNIFYING GLASS to the clerk.
- A puzzle will appear after you talk to the clerk.
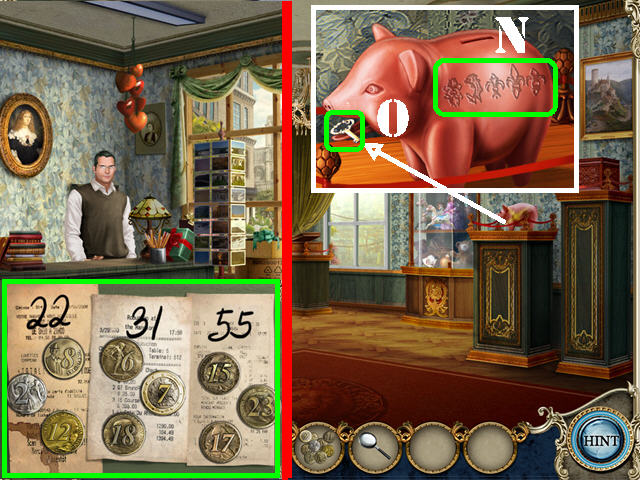
- Click on any 2 coins to swap their positions until the coins add up to the amount above the receipt.
- The solution is as follows: 22 (8 + 12 + 2), 31 (18 + 6 + 7), 55 (23 + 17 + 15).
- The LOOSE CHANGE and the MANGNIFYING GLASS will be added to inventory after the puzzle has been solved.
- Return to the Exhibit Room.
- Zoom into the piggy bank; place the LOOSE CHANGE in the slot. Note the symbols on the piggy bank (N).
- Take the SMALL KEY from the piggy bank’s mouth (O).
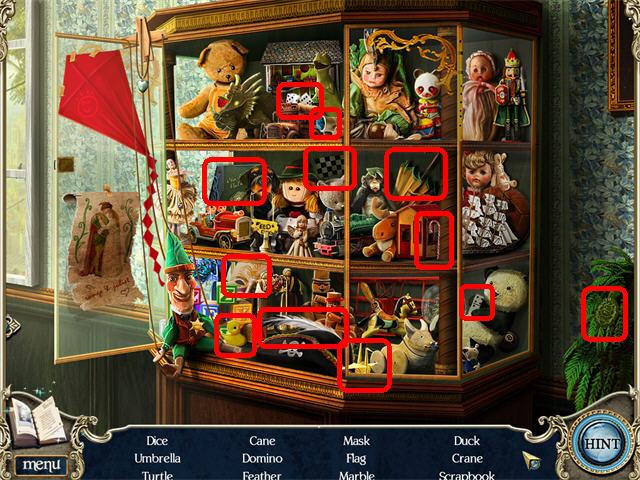
- Open the toy display with the SMALL KEY to trigger a search scene.
- The SCRAPBOOK will be added to inventory.
- Place the SCRAPBOOK on the stand by the window to activate a puzzle.
- Click on 2 pieces to swap their positions (P).
- Take the PHONE CARD inside the envelope on the right page (Q).
- Return to the Lobby.
- Zoom into the counter.
- Click on the pencil sharpener to activate a puzzle.
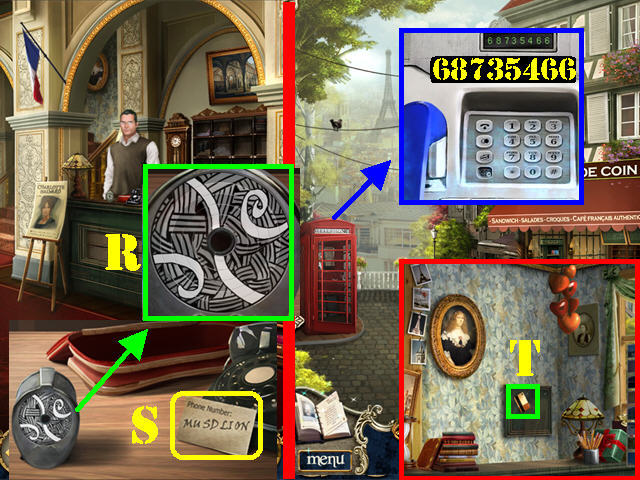
- Rotate the rings until they form the image in the screenshot (R).
- Place the UNSHARPENED PENCIL into the sharpener to create the SHARPENED PENCIL.
- Place the SHARPENED PENCIL on the card by the telephone twice for “MUSDLION” to appear (S).
- Go outside and zoom into the phone booth.
- Place the PHONE CARD in the slot to activate the puzzle.
- To call MUSDLION, click on the following numbers: 6-8-7-3-5-4-6-6.
- A message regarding the museum phone appears.
- Go to the Lobby.
- Click on the phone for the clerk to appear.
- Go into the Gift Shop; take the KEYCARD behind the counter (T).
- Leave the museum.
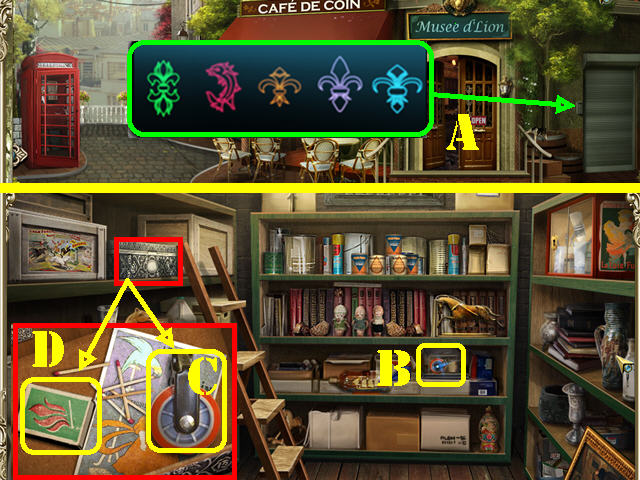
- Place the KEYCARD on the metal door to activate a puzzle.
- Change the symbols to match the ones found on the piggy bank; check your Notebook for the solution (A).
- Enter the Storage Room.
- Grab WHEEL 1/2 (B) on the back shelf.
- Examine the box in the upper left; take WHEEL 2/2 (C) and the MATCHES (D).
- Place the 2 WHEELS on the stepladder.
- Move the stepladder to the back shelf; zoom into the top shelf and take SALT SHAKER 4/4 (E).
- Move the stepladder to the right shelves; zoom into the top shelf and note the paint splatter patterns (F).
- Go outside the museum.
- Place the 4 SALT SHAKERS on the salt shaker display below the red awning to activate a puzzle (G).
- Place the salt shakers so they mimic the arrangement in the screenshot (H).
- Another puzzle appears after the salt shakers have been placed.
- Click on the buttons using the paint splatter pattern you found in the Storage Room.
- The solution is: Red, Orange, Gray, Pink, Blue, Green, Yellow, Black, Brown, and Purple.
- Take the SHELF KEY (I).
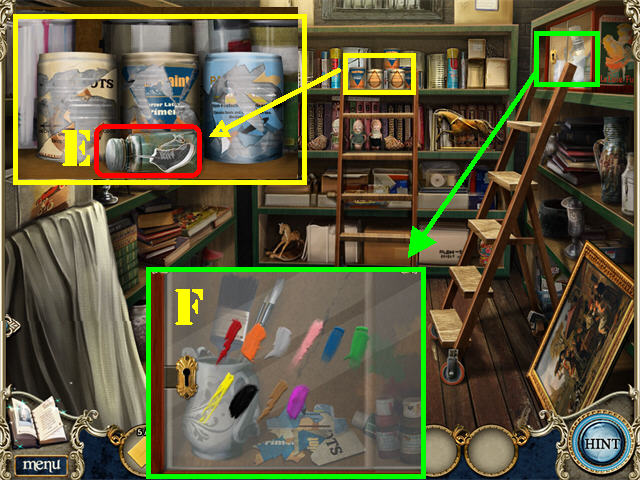
- Return to the Storage Room.
- Move the stepladder to the right shelves; zoom into the top shelf and open the case with the SHELF KEY.
- Take the LABELS (J) and the PAINTBRUSH (K) inside the case.
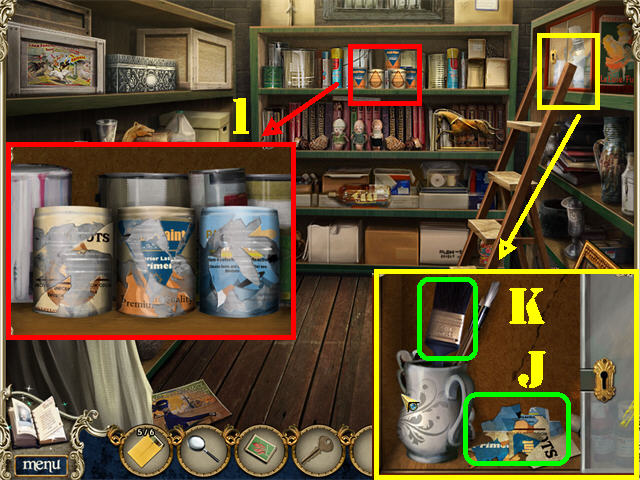
- Move the stepladder to the back shelf; zoom into the top shelf (1).
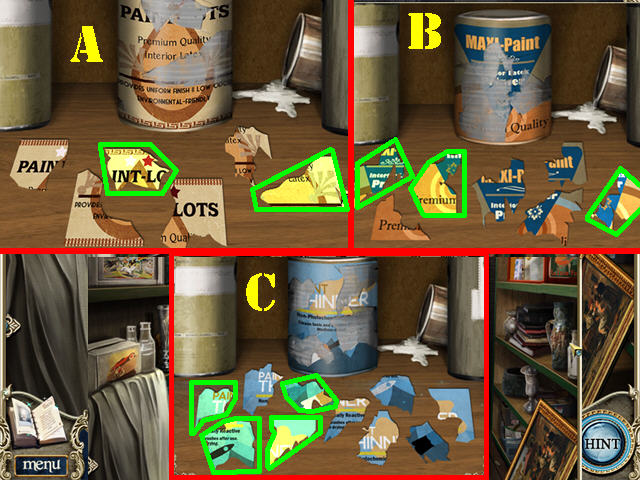
- Place the LABELS over the cans to trigger a puzzle.
- Click on the label bits that belong on the 3 sets of paint cans to solve the puzzle (A, B, C).
- The PAINT THINNER will be added to inventory.
- Return to the Gallery.
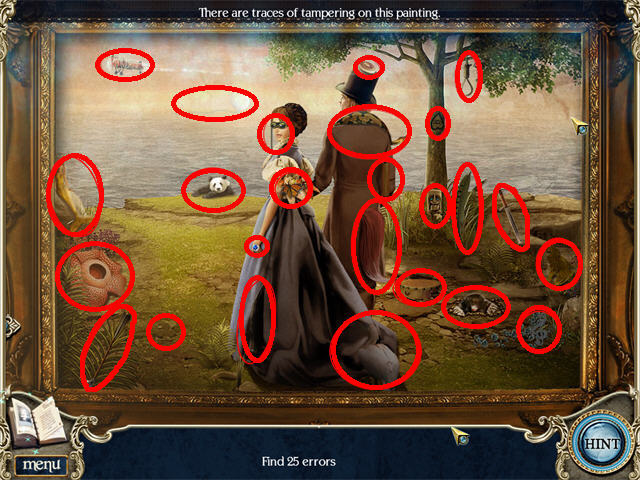
- Place the MAGNIFYING GLASS on Charlotte’s painting to trigger a puzzle.
- Find the 25 errors in the painting.
- Place the PAINT THINNER on the desk below the painting (1).
- Dip the PAINTBRUSH in the PAINT THINNER to create the DIPPED BRUSH.
- Zoom into the painting; place the DIPPED BRUSH over the painting twice to peel the painting back.
- Zoom out of the painting.
- Click on Charlotte’s ghost.
- Click on the painting again; take the WINDER (2).
- Return to the Exhibit Room.
- Zoom into the music box by the windows (3).
- Place the WINDER on the side of the music box to activate a puzzle.
- Swap the pattern at the bottom of the puzzle to match the pattern on the wheel.
- Take PHOTOGRAPH 6/6 (P) after the puzzle has been solved.
- Return to the Gallery.
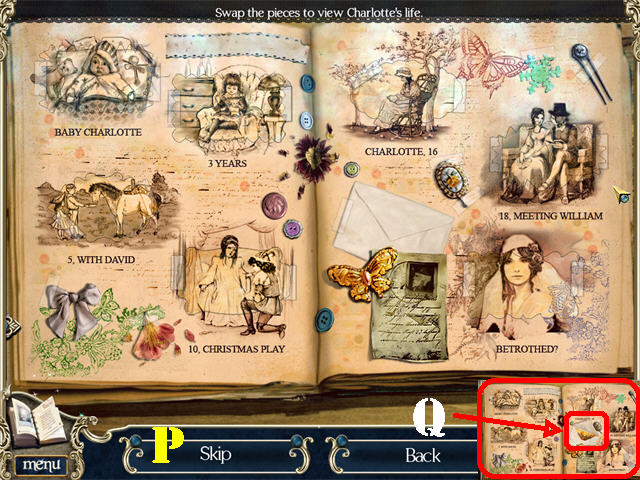
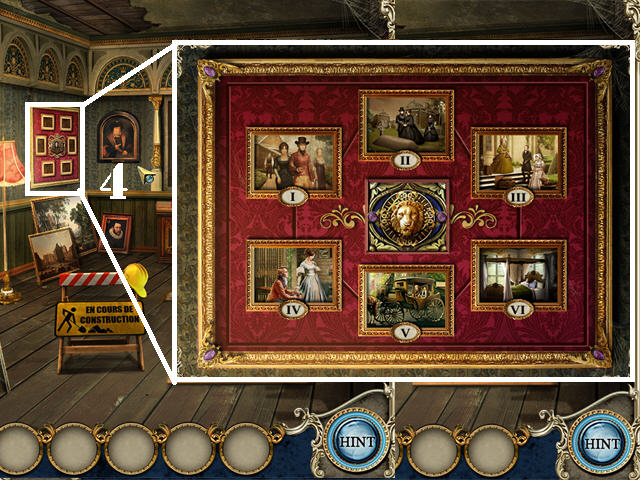
- Place the 6 PHOTOGRAPHS in the empty frames to trigger a puzzle (4).
- Click on any 2 photos to swap their positions.
- Arrange the photos in order of Charlotte’s Life as shown in the screenshot (4).
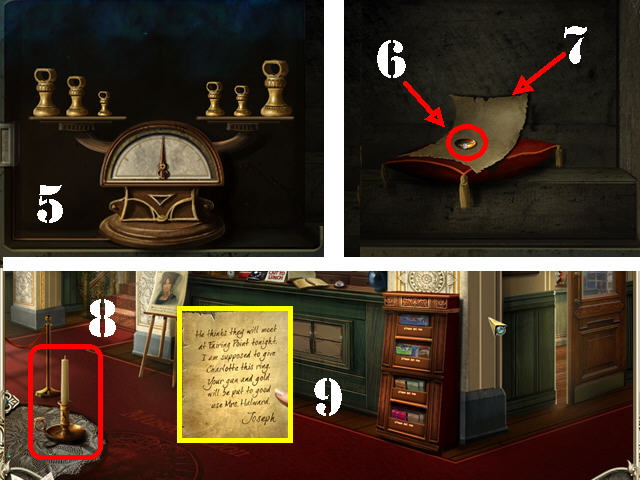
- A safe will appear behind the paintings; click on the scale to activate another puzzle.
- Balance the scale by placing the weights as shown in the screenshot (5).
- Zoom into CHARLOTTE’S RING (6); click on it to add it to inventory.
- Take the BLANK LETTER inside the safe (7).
- Go to the Lobby; place the MATCHES on the CANDLE in the lower left (8).
- Place the BLANK LETTER over the LIT CANDLE.
- Take the INVISBLE INK LETTER (9).
Chapter 7: Fairing Point
- Talk to the Concierge.
- Take the HALF-PAINTED CANVAS by the water (A).
- Grab the CLOTH (B) in the lower left.
- Take the EASEL (C).
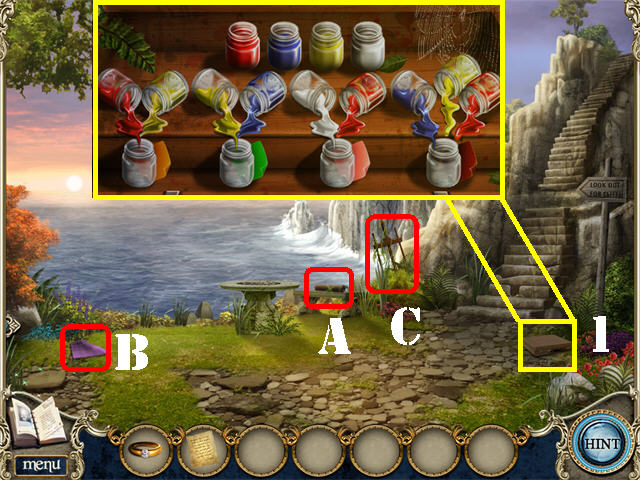
- Click on the Pochade box in the lower right (1).
- Place the correct color in the empty jar so that, when mixed with the color in the bottle(s) next to it, it creates the color in the bottom jar.
- Click on a color to attach it to your cursor; to switch colors, click on a different jar.
- The solution from left to right is: Orange (Red and Yellow), Green (Yellow and Blue), Pink (White and Red), Brown (Blue, Yellow, and Red).
- The PAINT JARS will be added to inventory.
- Go up the steps.
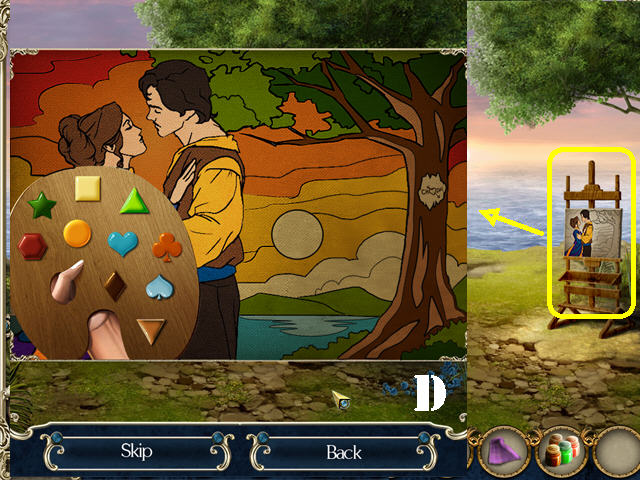
- Place the EASEL near the tree.
- Put the HALF-PAINTED CANVAS on the easel.
- Put the PAINT JARS on the canvas.
- Click on the canvas to activate the puzzle.
- Paint the canvas using the symbols on the palette (D).
- Note the carving on the tree in the painting.
- Zoom out of the painting.
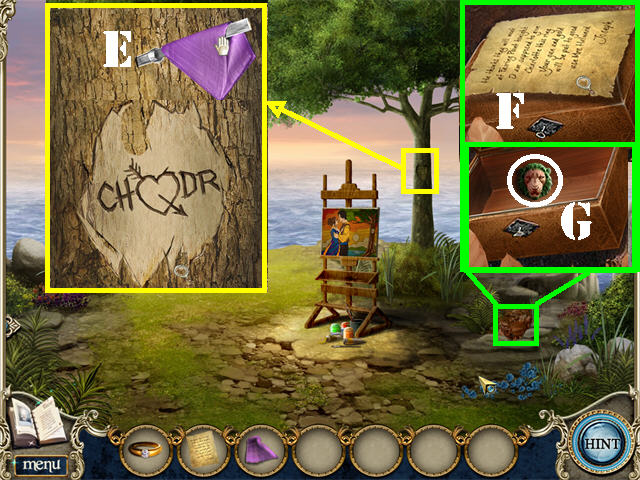
- Zoom into the tree trunk; take the CARVING KNIFE with the CLOTH (E).
- Click on the tree trunk with the CARVING KNIFE until to reveal a message.
- Remove the leaves in the lower right to reveal a box.
- Place the INVISIBLE INK LETTER on top of the box and exit the pop-up window (F).
- David’s ghost appears and opens the buried box; click on the ghost.
- Zoom into the buried box; take the LION EMBLEM (G).
- Go back down.
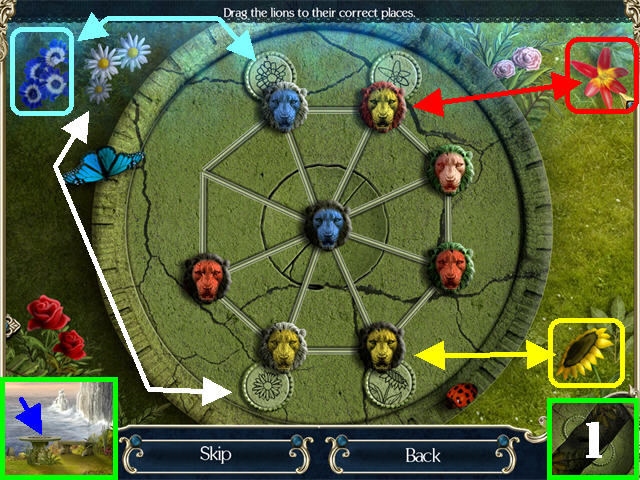
- Zoom into the stone table; place the LION EMBLEM on the table to activate a puzzle.
- Find a flower outside of the ring that matches the shape of the stone flower insides the ring. Place a lion with matching colors beside it.
- Place CHARLOTTE’S RING in the slot on the table to summon Charlotte’s ghost (1), then click on the ghost.
- Go to the top of the Cliff.
- Click on Charlotte or David to end the chapter.
- Congratulations! You’ve Completed Death at Fairing Point: A Dana Knightstone Novel!
Created at: 2011-01-29