

Walkthrough Menu
- General Tips
- Chapter 1: Vlad II – The Dragon
- Chapter 2: Radomir Obilic
- Chapter 3: Alessandro Massini
- Chapter 4: Antoine Crozar
- Chapter 5: Nicueza Diego
- Chapter 6: Milos Obilic
General Tips
- Choose between Easy and Hard Mode at the beginning of the game. This guide contains puzzle solutions for both modes.
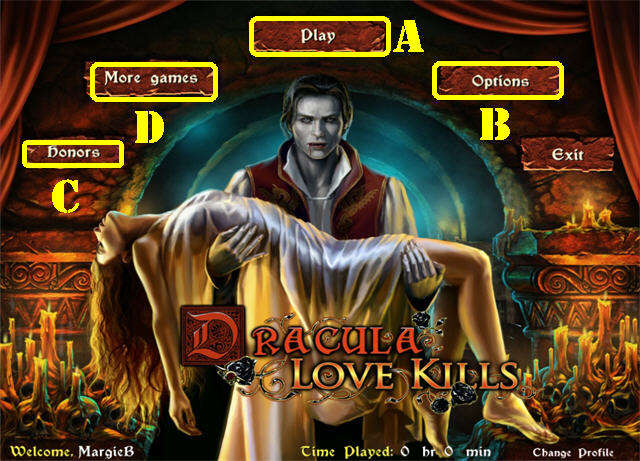
- Click on 'Play'(A) to begin your adventure.
- In the 'Options' (B) menu you can adjust the resolution, music volume, voice volume, sound effects, and custom cursor.
- The 'Honors' tab (C) gives you access to the all the achievements you’ve collected throughout the game.
- The 'More Games' (D) Button shows you other titles by this developer.
- You will be given a choice to drink the blood or not after you interact with the Queen’s apprentices. If you drink the blood you will not get an extra Hidden Object Scenes or puzzles to play.
- You can skip puzzles by clicking on the skip button once it fills.
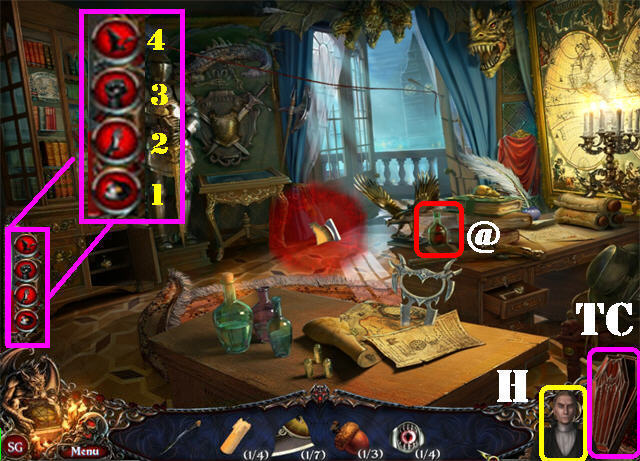
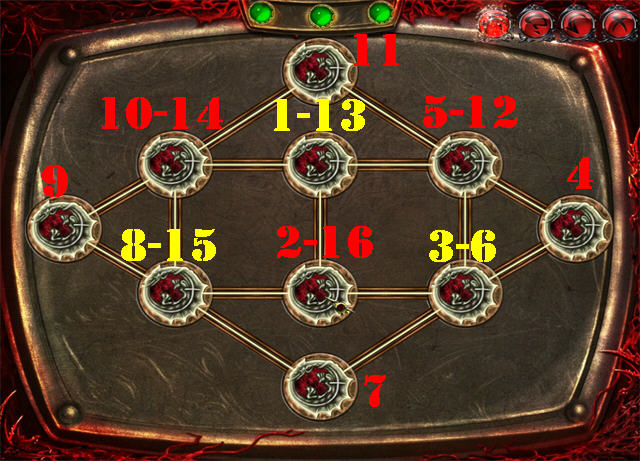
- Open the Traveling Coffin (TC) to access the map. Click on the thumbnails on the map to travel to different locations automatically. An exclamation point on the map indicates active areas.
- Click on the character in the lower right corner for a Hint (H).
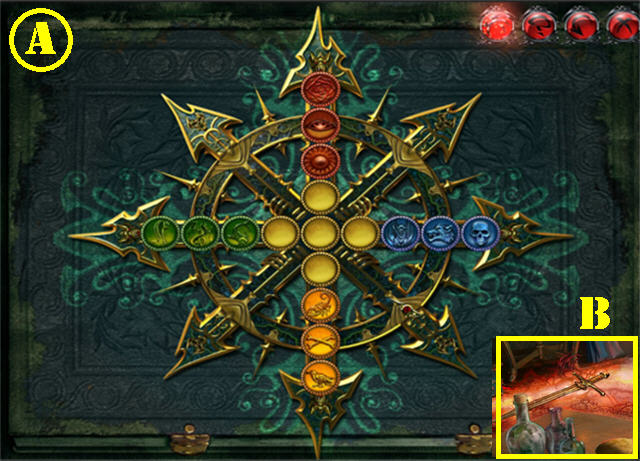
- Collect VIALS OF BLOOD (@) in order to use your abilities in the game.
- There are 4 special abilities in the game. Click on one and place it in the right area to use it; then take the item it unlocks ().
- The Vampiric Vision Ability allows you to materialize objects invisible to the naked eye (1).
- Strength Ability allows you to lift heavy items or break objects (2).
- Telekinesis Ability allows you to obtain out-of-reach items (3).
- The Animal Form Ability gives you the power to shift into different shapes so you can access different places (4).
- Use your abilities in areas in which your cursor appears as a red circle with a star in the middle.
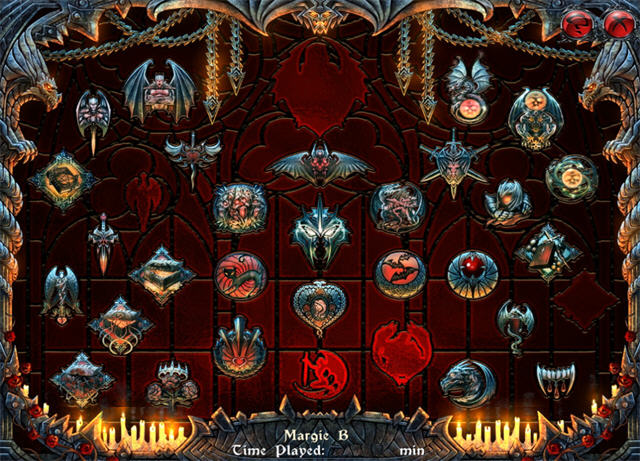
- There are 33 achievements in the game. You will receive an immediate notice each time one is earned.
- You can replay under the same profile as many times as you want in order to obtain all the achievements.
- View the 'Honors' section on the main menu, or by opening the book in the lower left during play.
- Hover your mouse over an achievement to read its fulfillment requirements.
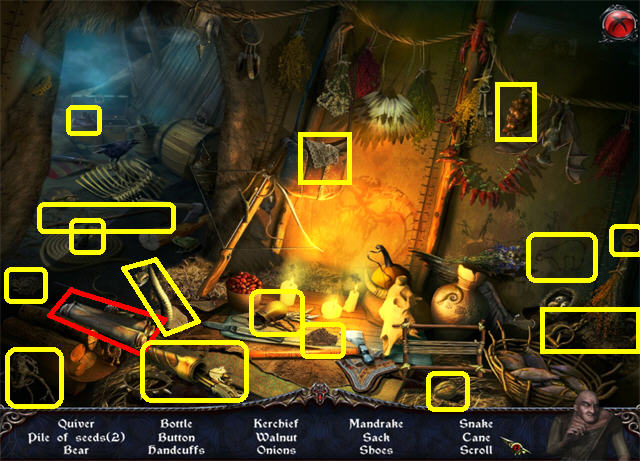
Chapter 1: Vlad II – The Dragon
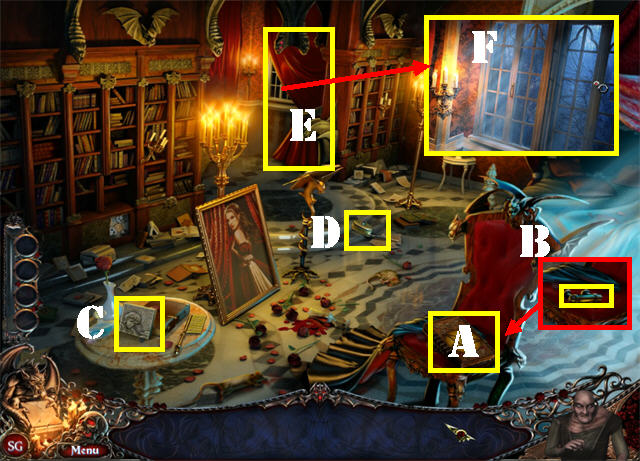
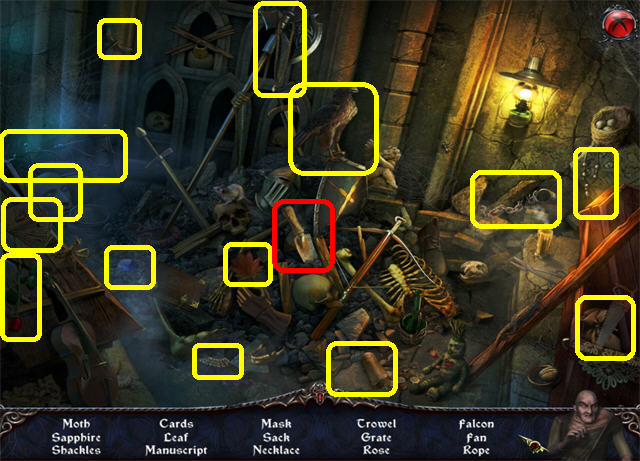
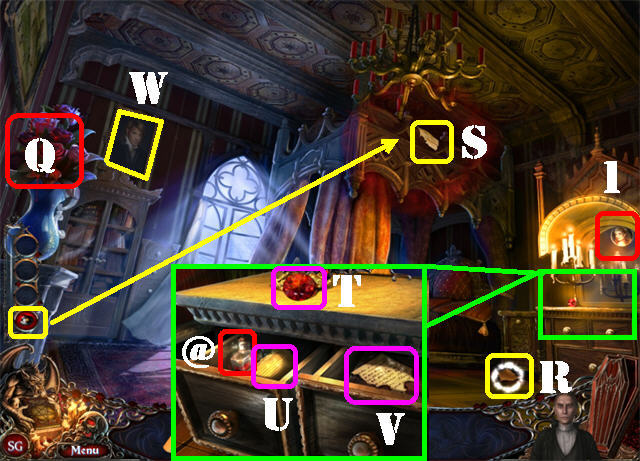
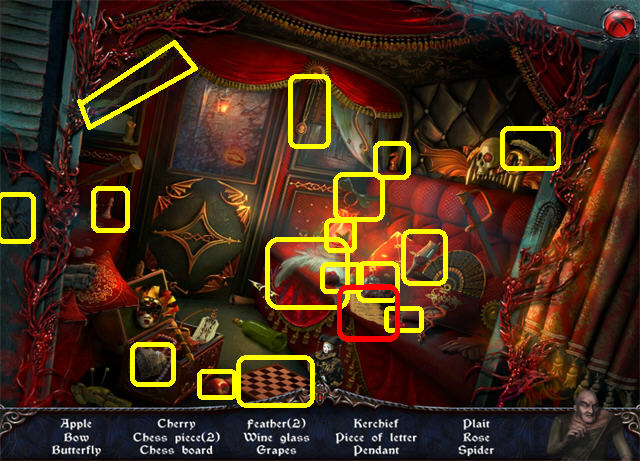
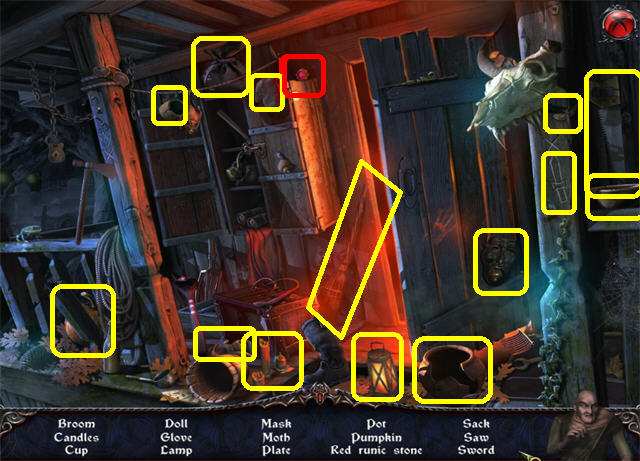
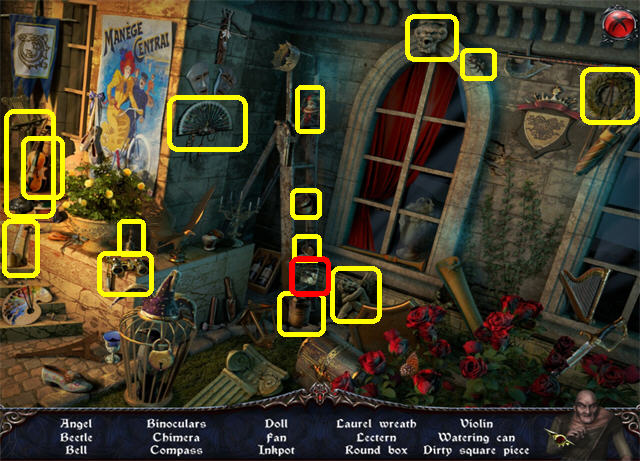
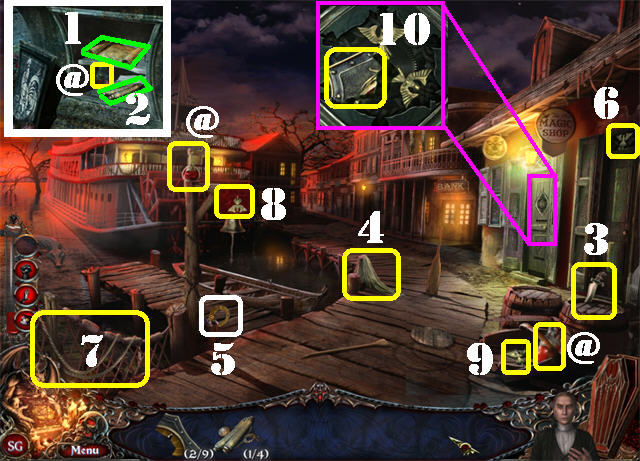
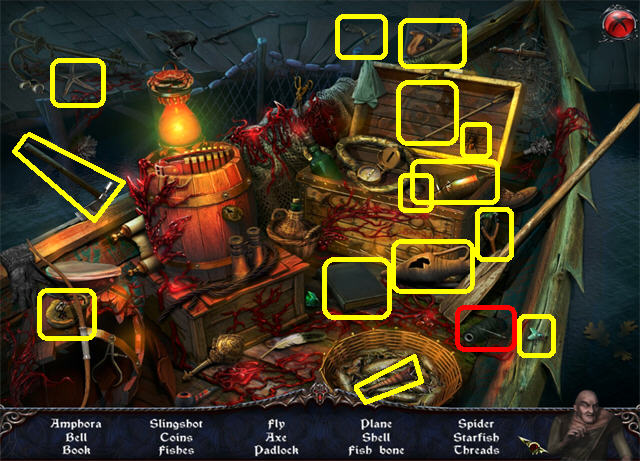
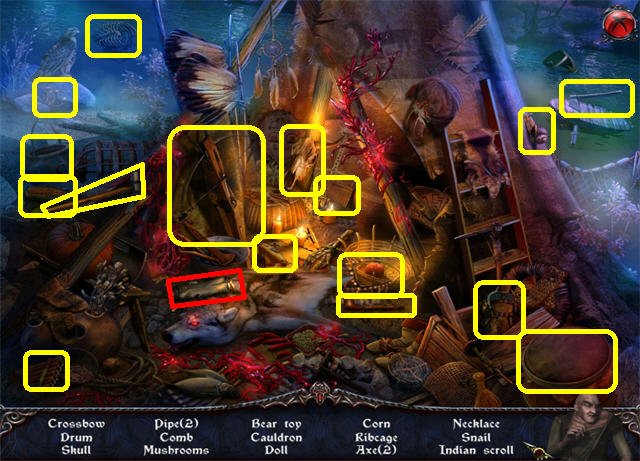
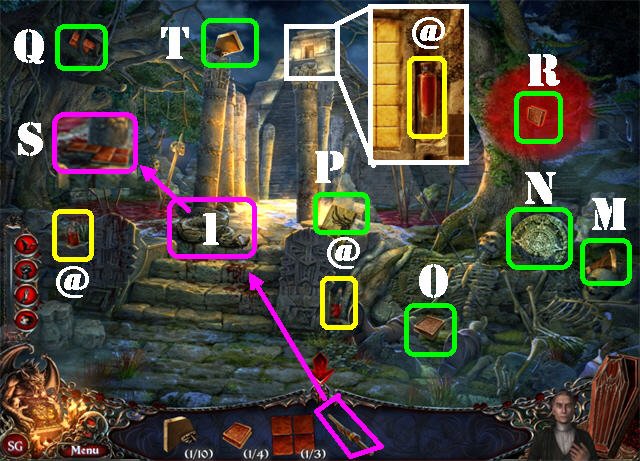
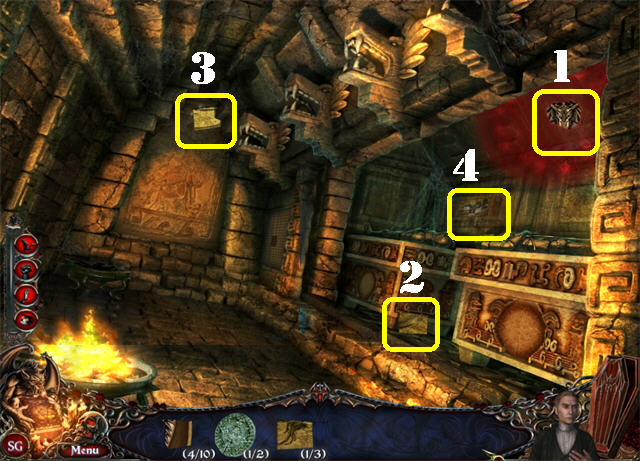
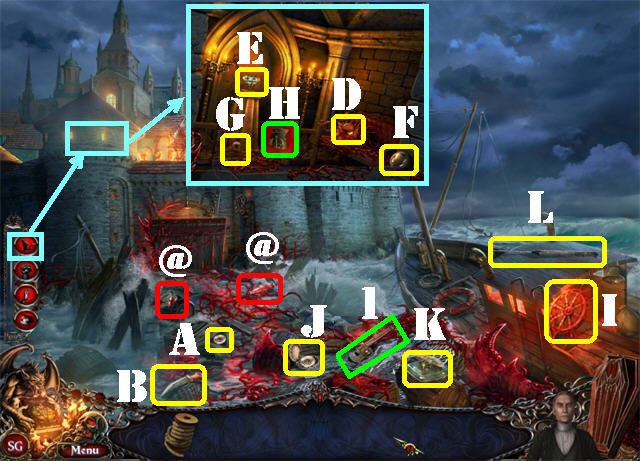
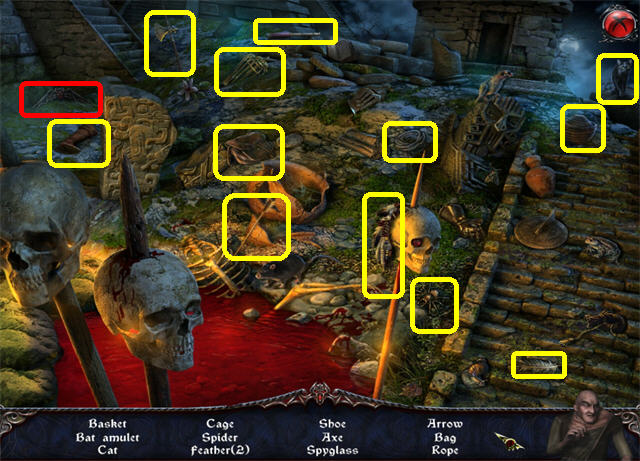
- Take the BOOK OF THE DRAGON ORDER (A) in the lower right; this book records all your achievements in the game.
- Take the WINDOW HANDLE (B) on the chair.
- Grab SQUARE STONE 1/2 (C) on the round table.
- Take the OIL CAN (D) by the steps.
- Take the CURTAIN (E).
- Take a closer look at the window; place the WINDOW HANDLE on it (F).
- Go through the window.
- Click on the sparkly area by the building to activate a Hidden Object Scene.
- Find all the items on the list.
- The ROPE will be added to inventory.
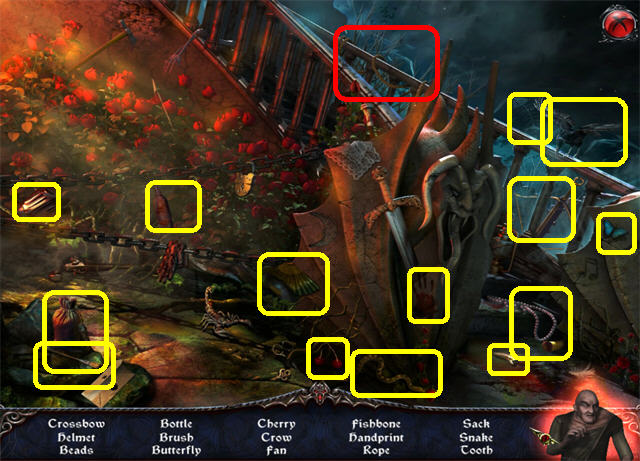
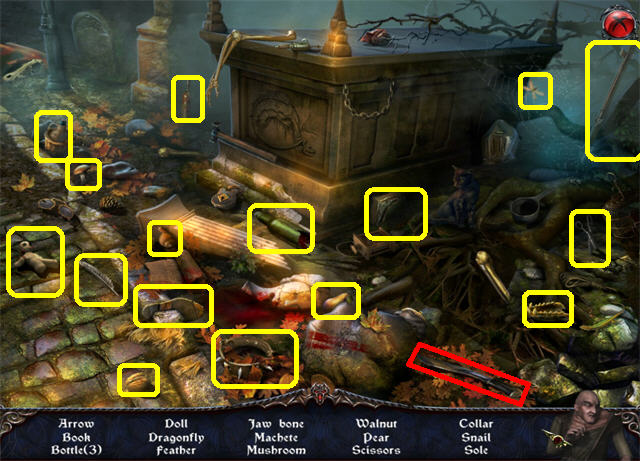
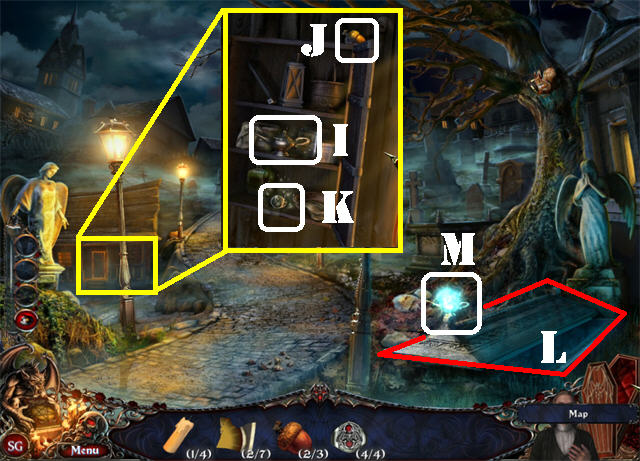
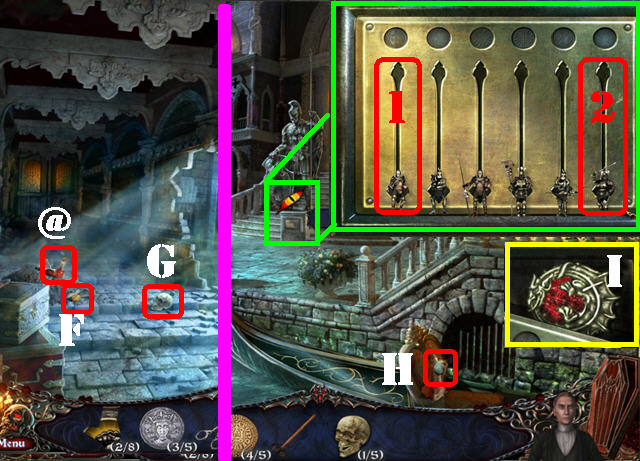
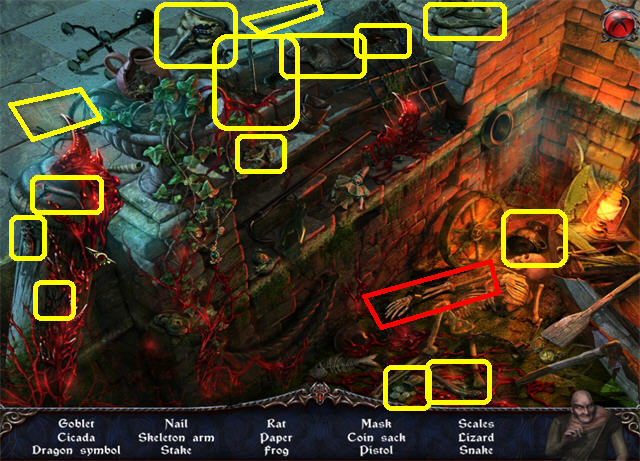
- Take the PIECE OF SHIELD (G) 1/6 in the upper right.
- Grab the KEY (H) on the side of the building on right.
- Go back up the room.
- Place the OIL CAN on the library mechanism at the bottom of the cabinet (I).
- Zoom into the chest; place the KEY on the board to activate a puzzle. (J).
- Find the 3 keys that fit into the lock. Take a key from the top, look at the teeth and match it up with the correct keyhole.
- If you make 3 wrong choices the puzzle will reset.
- The solution for this puzzle is random.
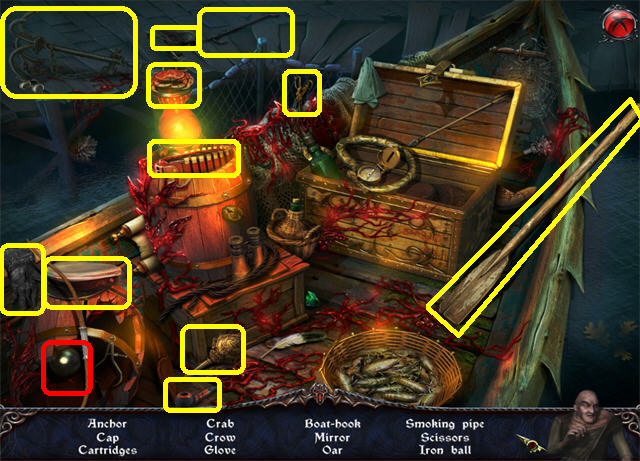
- Take the PIECE OF SHIELD 2/6 and the AXE from inside the chest (K).
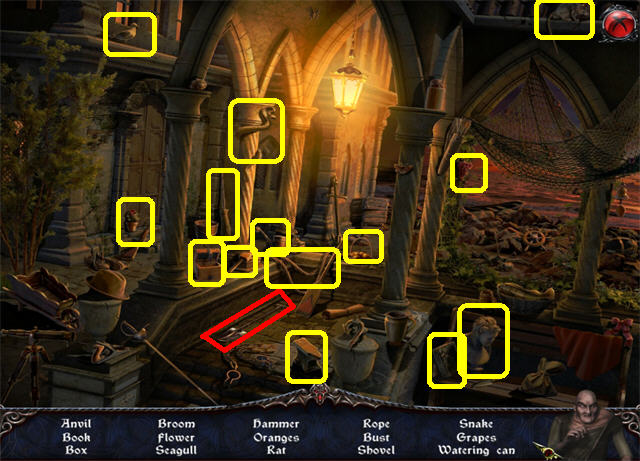
- Go through the window to go outside.
- Place the AXE on the crossed boards on the right (L).
- Take the LONG BOARDS (M) on the ground.
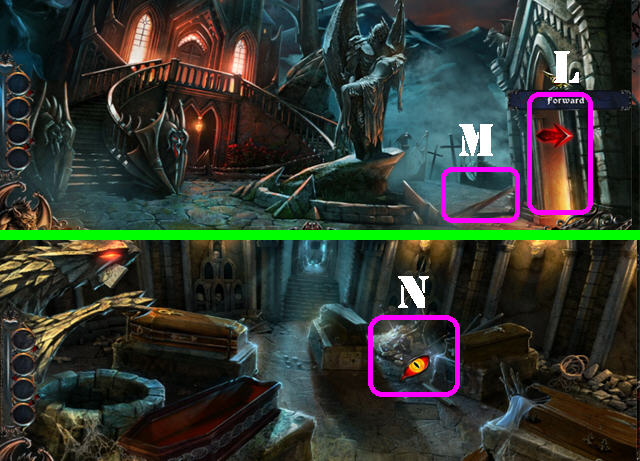
- Go through the door to enter the Crypt.
- Play the Hidden Object Scene by the rubble (N).
- Find all the items on the list.
- The TROWEL will be added to inventory.
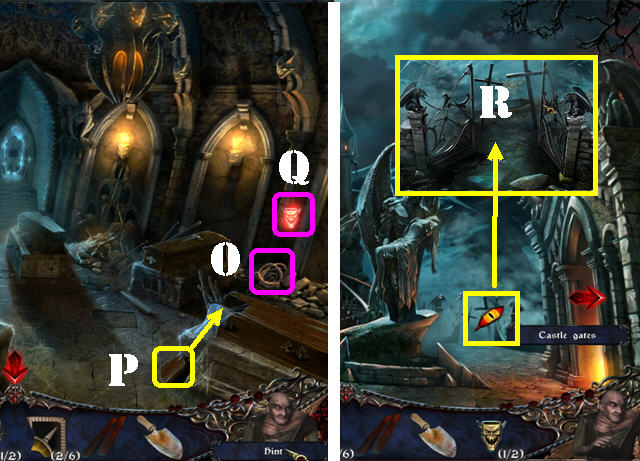
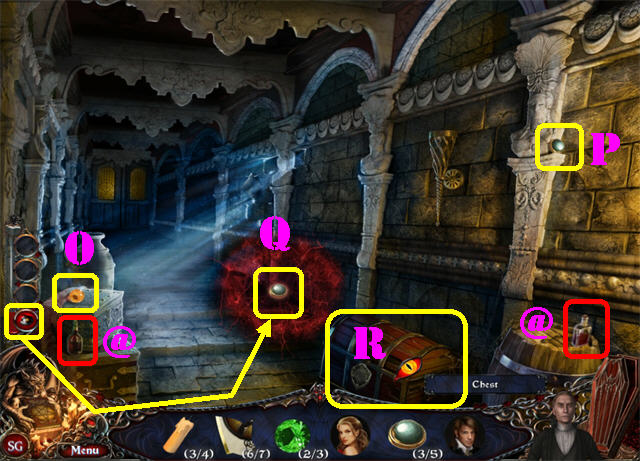
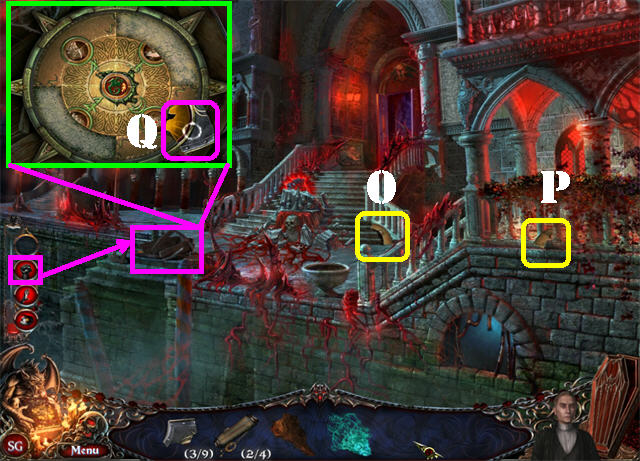
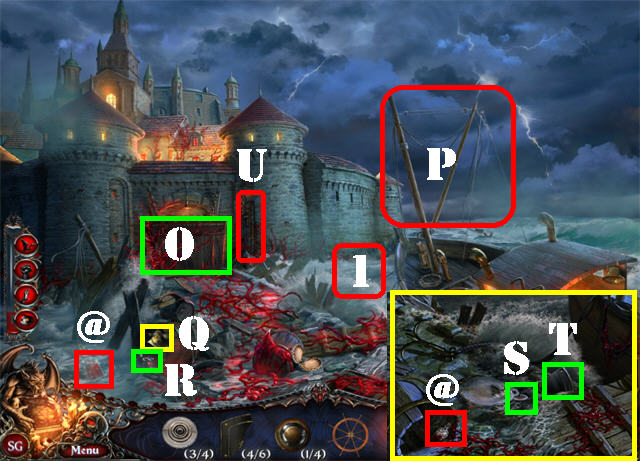
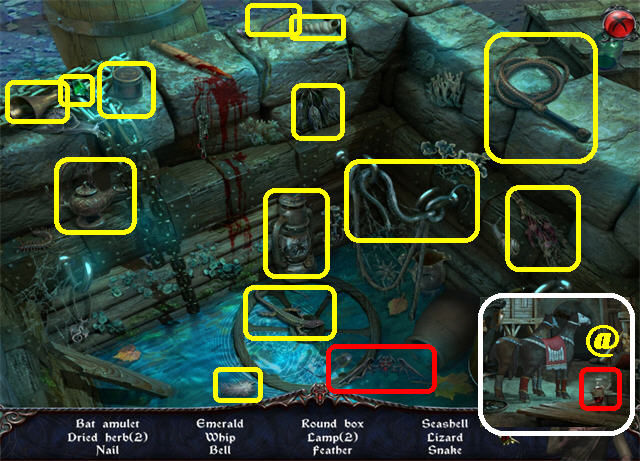
- Take ROPE 2/2 (O) in the lower right.
- Take the DAMAGED LID in the lower right (P); place the DAMAGED LID on the looted coffin on right.
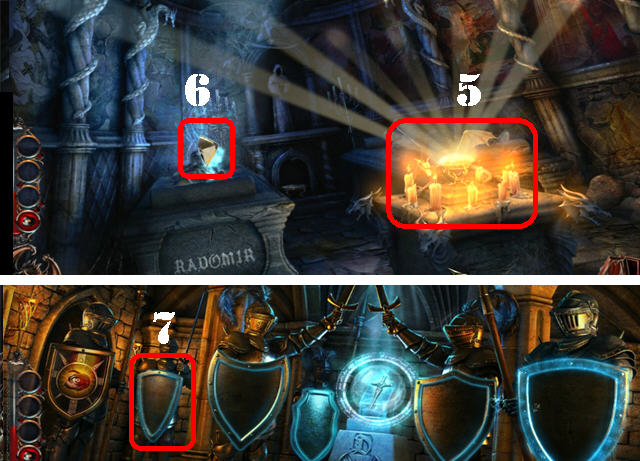
- Take SKULL MASK 1/2 (Q) that appears over the repaired coffin.
- Go outside.
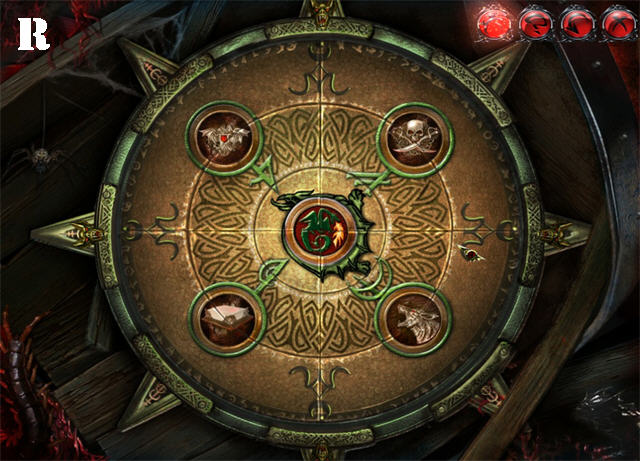
- Zoom into the castle gates; place the 2 ROPES on the gates (R).
- Go through the gates.
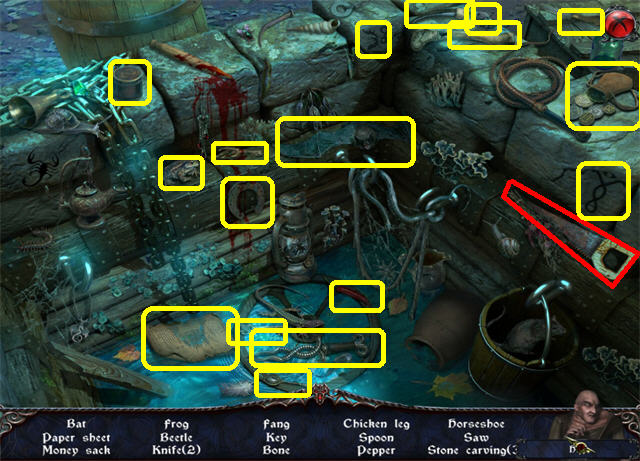
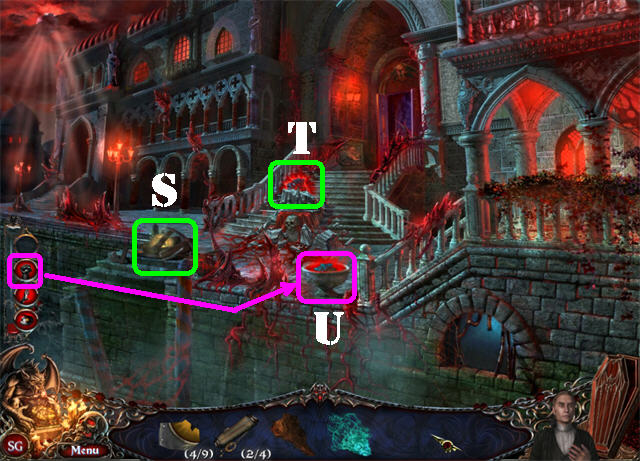
- Play the Hidden Object Scene by the well in the lower left.
- Find all the items on the list to obtain the SAW.
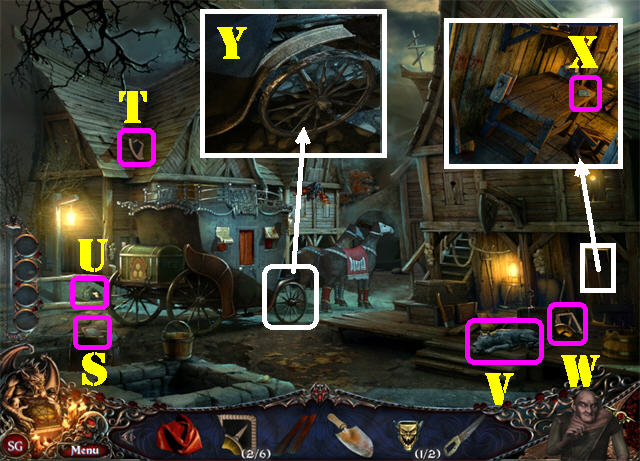
- Take the PIECE OF TOOLBOX (S) 1/2 in the lower left.
- Take the PIECE OF SHIELD (T) 3/6 on the roof in the upper left.
- Place the TROWEL in the hole in the lower left in order to retrieve a BONE (U).
- Give the BONE to the dog on the right (V); take the PIECE OF SHIELD 4/6 (W).
- Open the door to the workshop.
- Take the PIECE OF TOOLBOX 2/2 (X).
- Place the LONG BOARDS on the table.
- Cut the LONG BOARDS with the SAW; the SAW goes back into inventory.
- Take the SHORT BOARDS.
- Zoom into the coach; Cut the wheel with the SAW (Y).
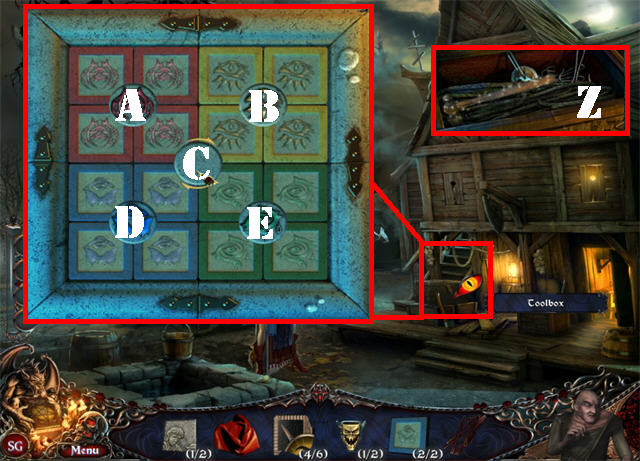
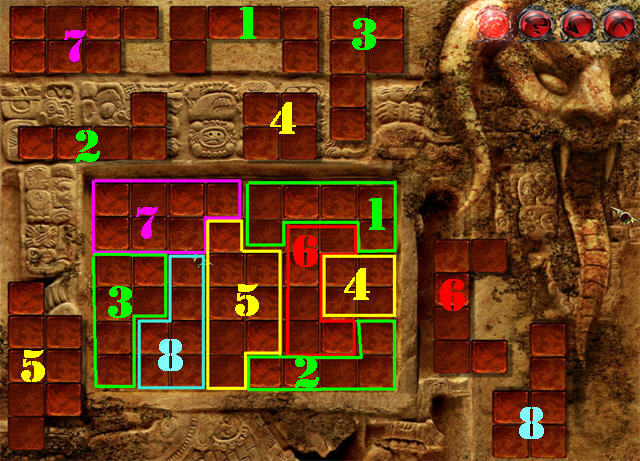
- Zoom into the toolbox; place the 2 PIECES OF TOOLBOX to activate a puzzle.
- Place the squares into their matching spaces according to the color on the circles in the center.
- Click on each circle to rotate the pieces.
- To solve the puzzle click on the buttons in this order: C, A, C, B, D, C, D, C, B, D, C, D x 3, C, E x2, C x 3, E x 2, C x 2, E x 2, and C.
- Take the HAMMER from inside the toolbox (Z).
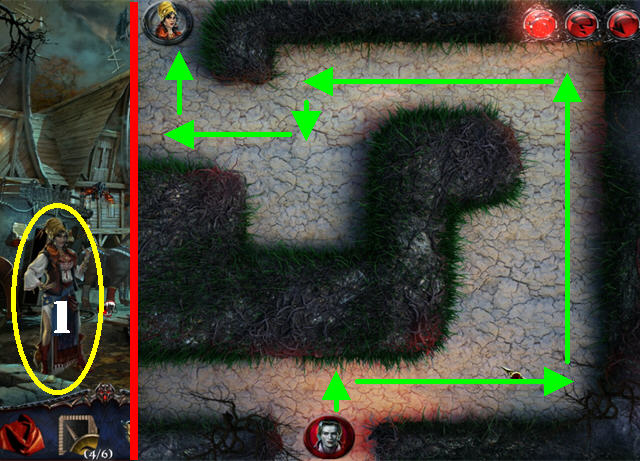
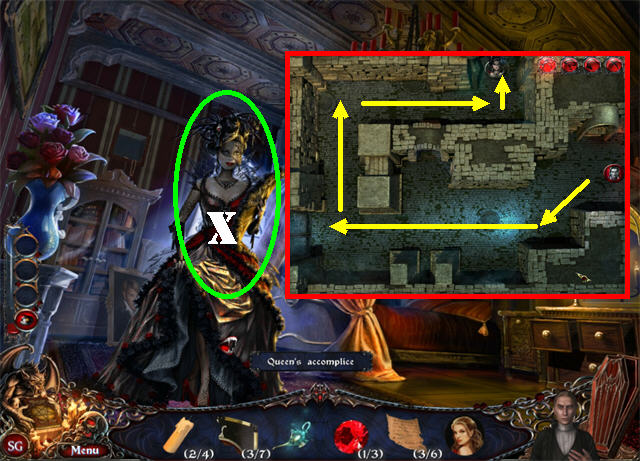
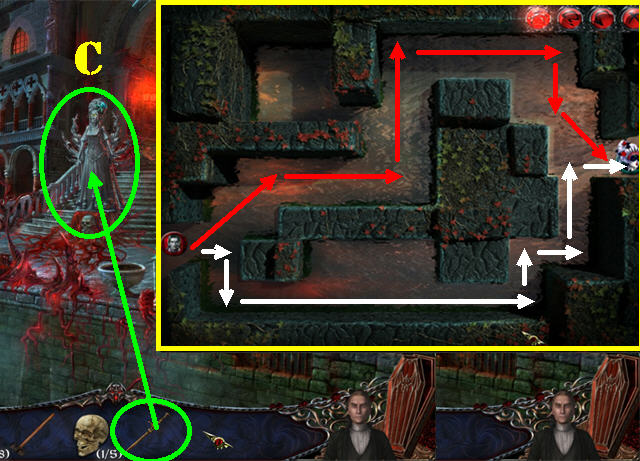
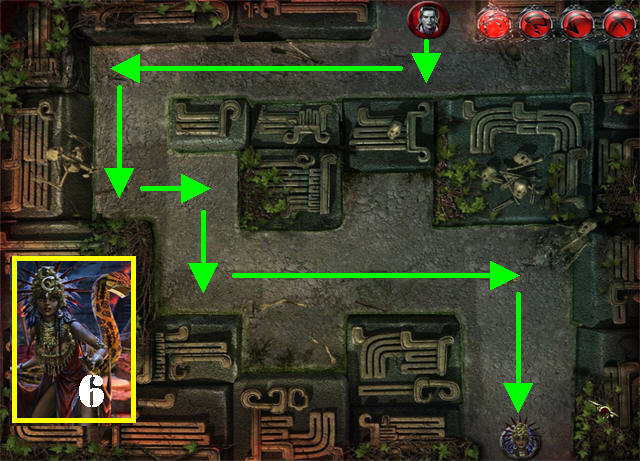
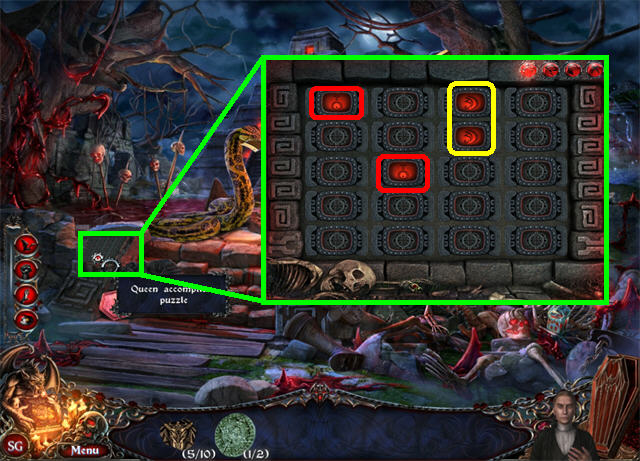
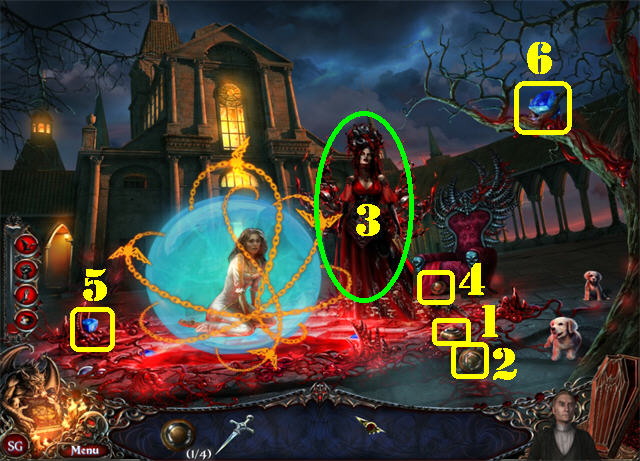
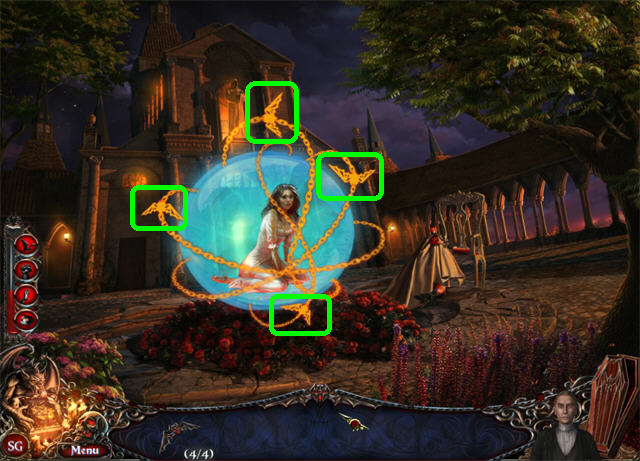
- Click on the Queen’s Accomplice to activate a puzzle (1).
- Drag Dracula’s icon around the maze without hitting the walls until you get to the accomplice in the upper left.
- Each time you drag Dracula’s icon around the scene will become dark; try to memorize the path.
- If you click on the walls 6 times the puzzle will reset.
- You will be given a choice to drink the blood or not. If you drink the blood you will not get an extra Hidden Object Scene or mini-game.
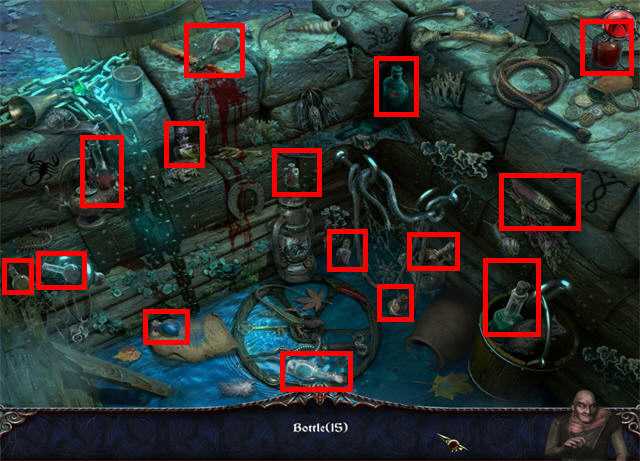
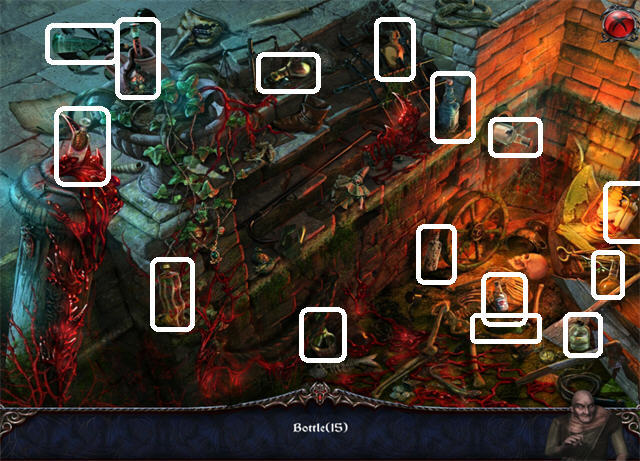
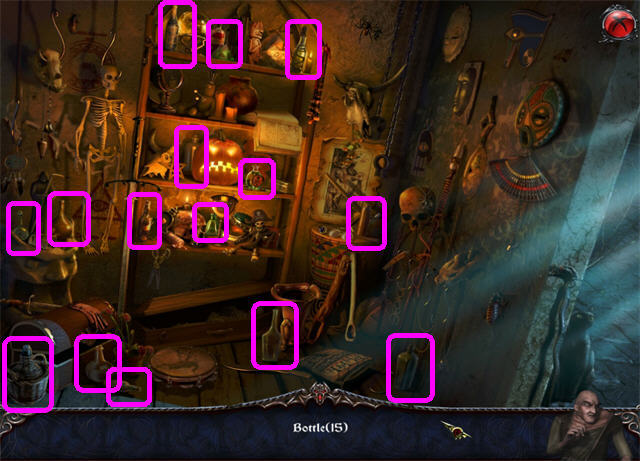
- Zoom into the well in the lower left.
- Find the 15 BOTTLES marked in red.
- You will earn a VIAL OF BLOOD.
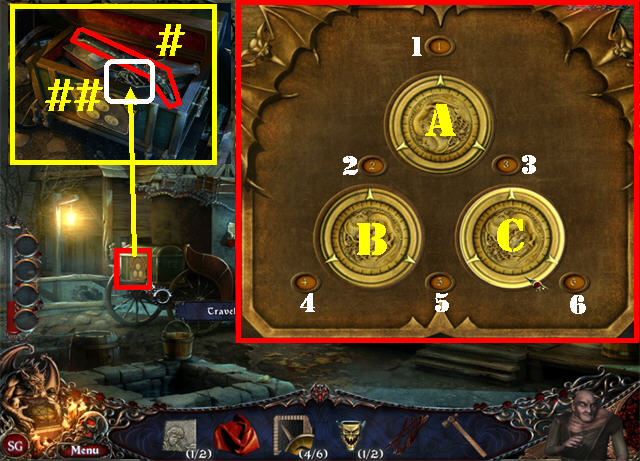
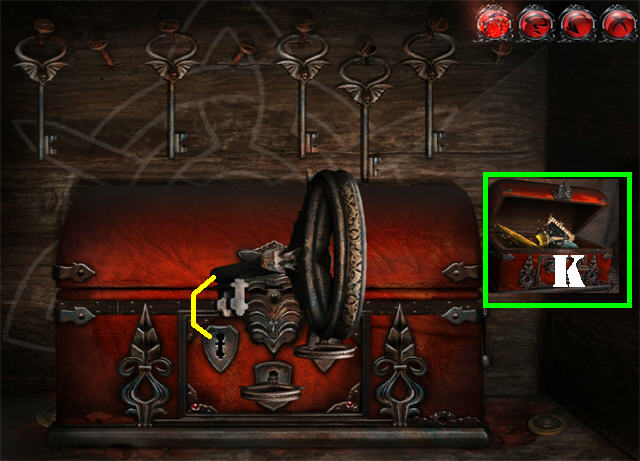
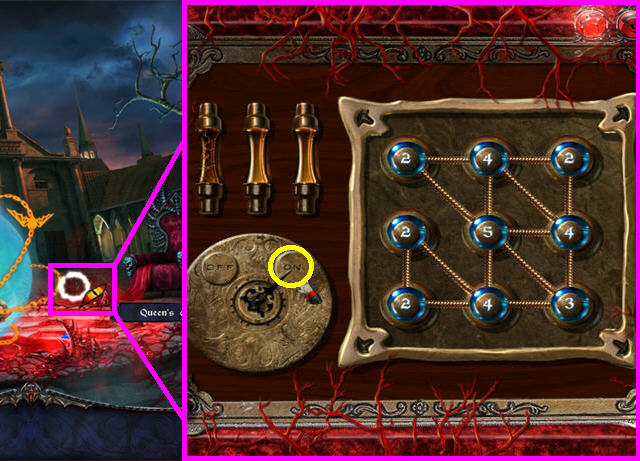
- Click on the travel chest behind the coach to activate a puzzle.
- Click on the gears until the number from top to bottom form the numbers 1 through 6.
- To solve the puzzle click on the gears in this order: B-A-C-B-C-B-C-C-B-C-C.
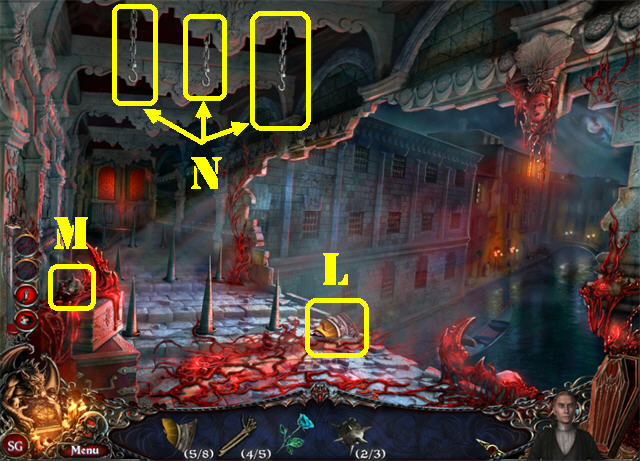
- Take the CROWBAR (#) and the NAILS (##) after the puzzle has been solved.
- Return to the Crypt.
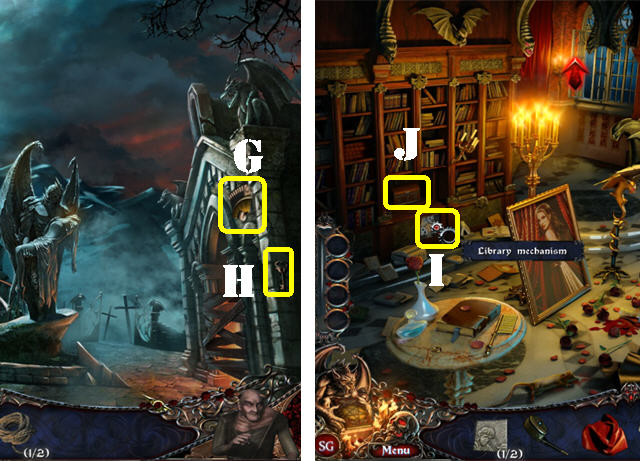
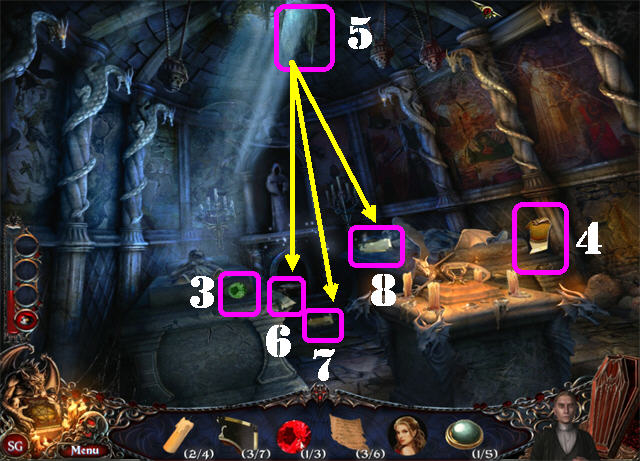
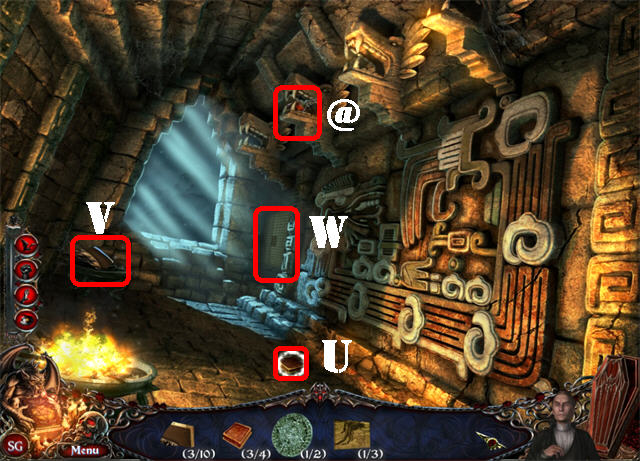
- Use the CROWBAR to remove SQUARE STONE 2/2 (A) in the upper left.
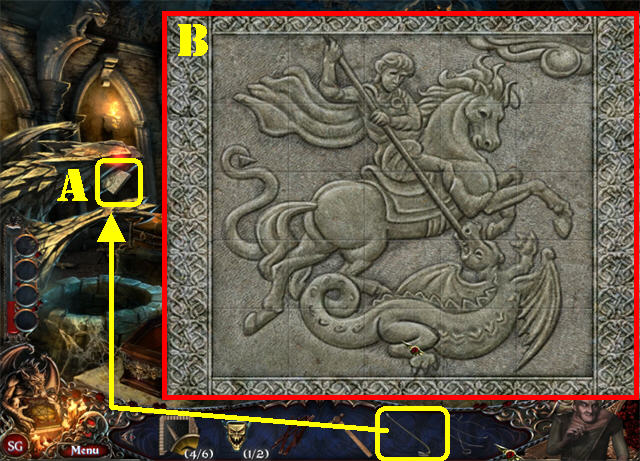
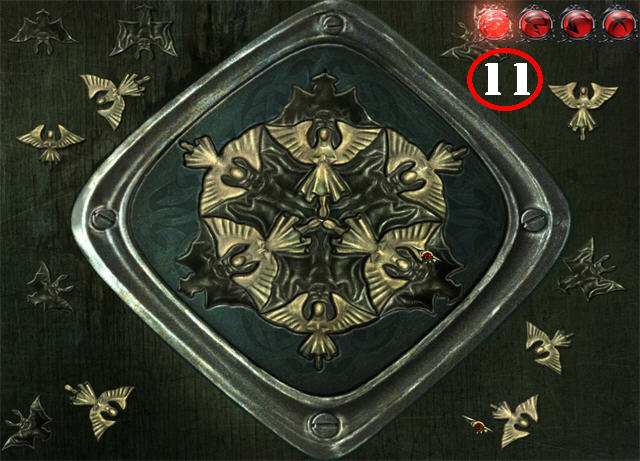
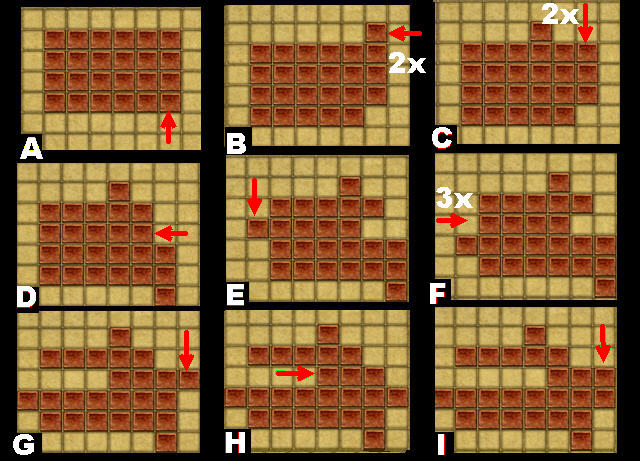
- Zoom into the fresco in the center; place the 2 SQUARE STONES on the fresco to activate a puzzle.
- Click on any 2 adjacent tiles to swap their positions until you form the image shown in the screenshot (B).
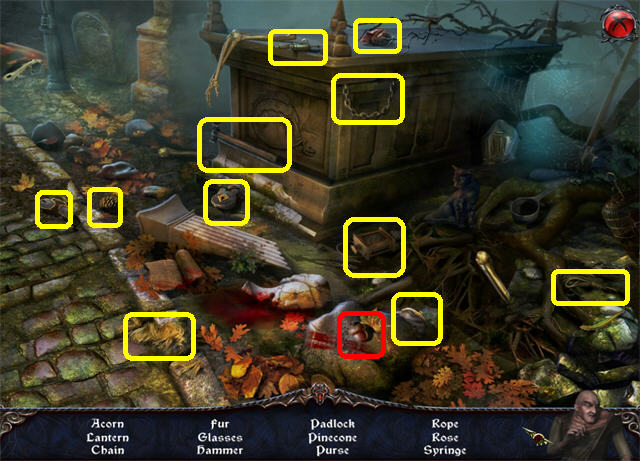
- Take PIECE OF SHIELD 5/6 (C) on the side of the fresco.
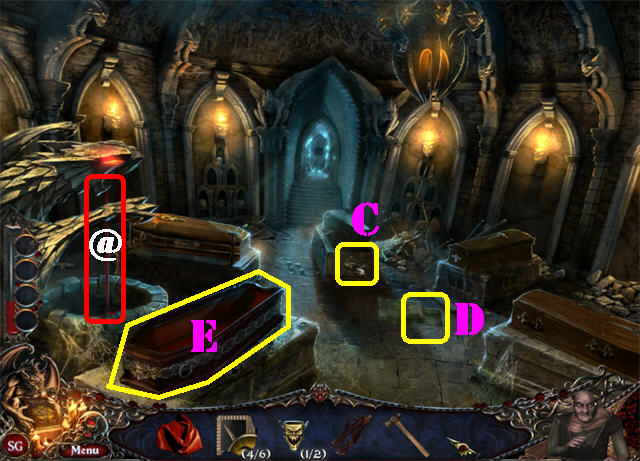
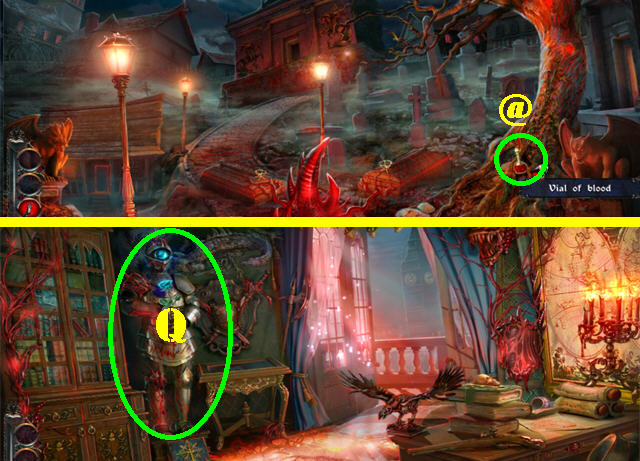
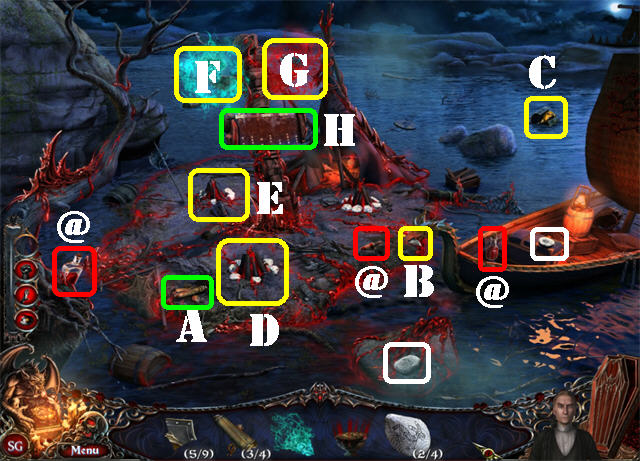
- Take the BLOOD (@) on the left.
- Place the CROWBAR on the loose tile; take the EARTH (D).
- Put the EARTH in the broken coffin on left (E).
- Place the SHORT BOARDS on the broken coffin, followed by the NAILS and then the HAMMER.
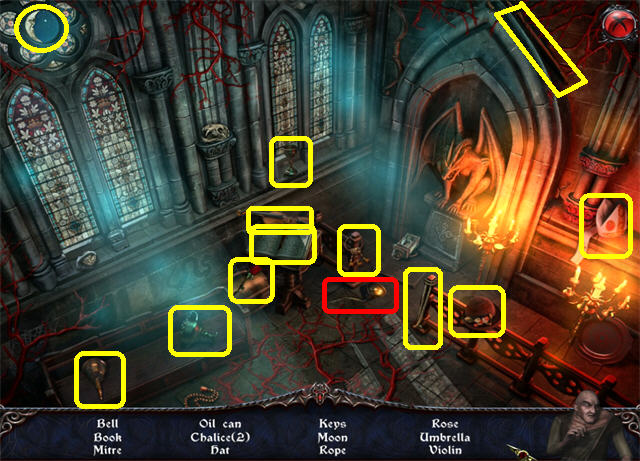
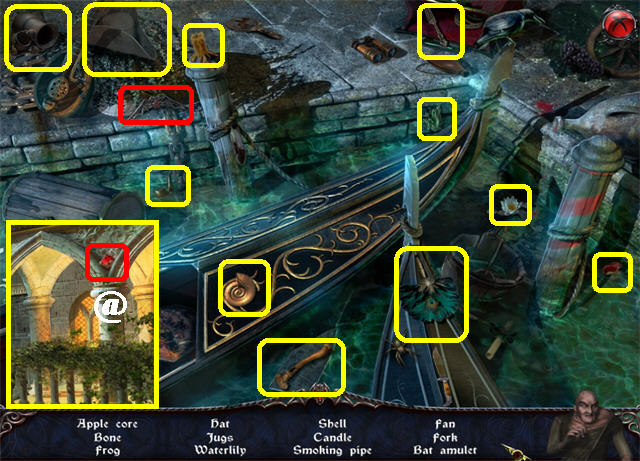
- Click on the TRAVELING COFFIN; choose the London location on the map.
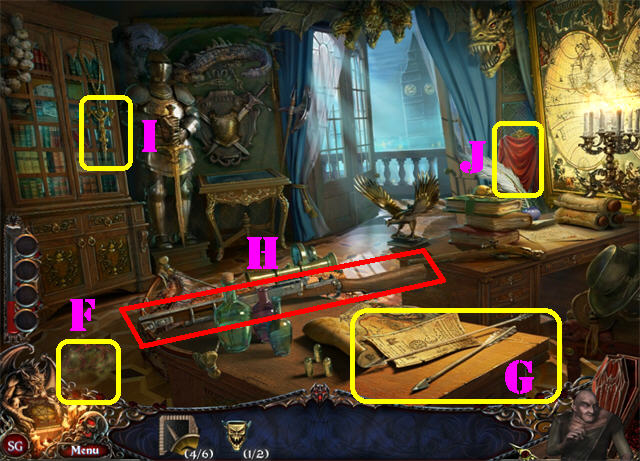
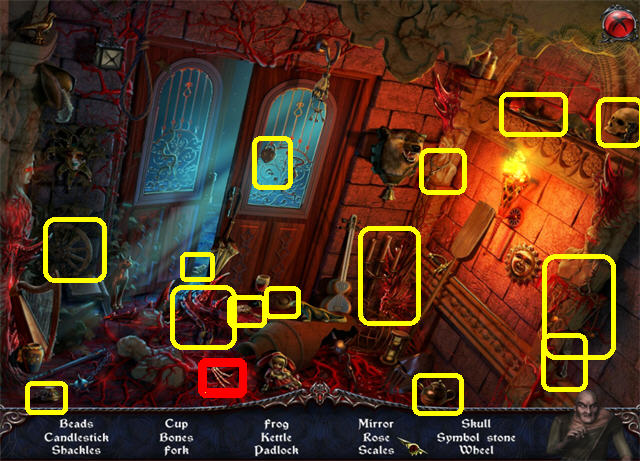
- Click on the CARPET in the lower left; take the DURABLE THREAD (F).
- Place the DURABLE THREAD on the arrows on the table to create the CONNECTED ARROWS (G).
- Place the CONNECTED ARROWS on the CROSSBOW to obtain the LOADED CROSSBOW (H).
- Place the LOADED CROSSBOW on the crucifix hanging on the cabinet (I).
- Put the CURTAIN over the mirror (J).
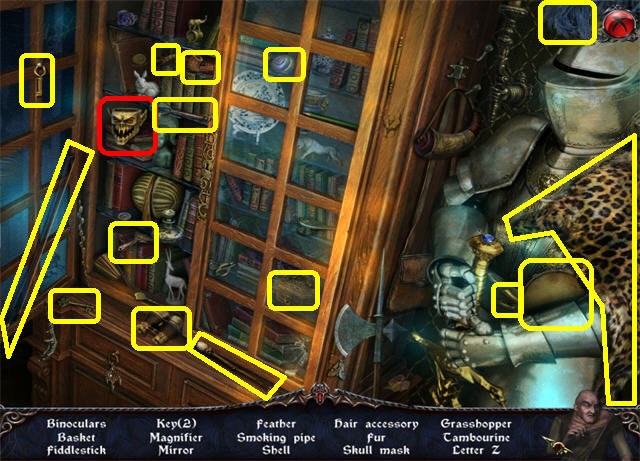
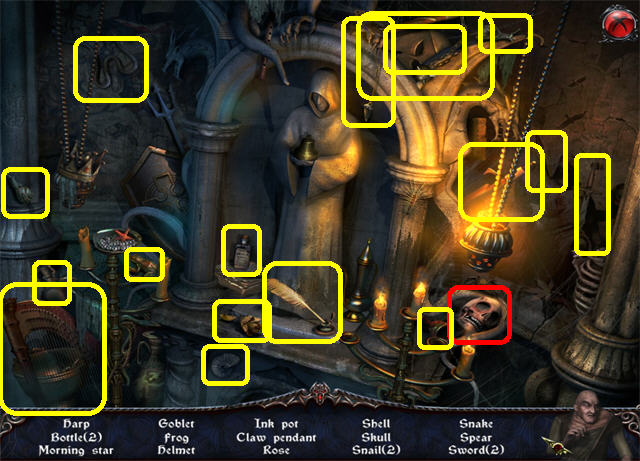
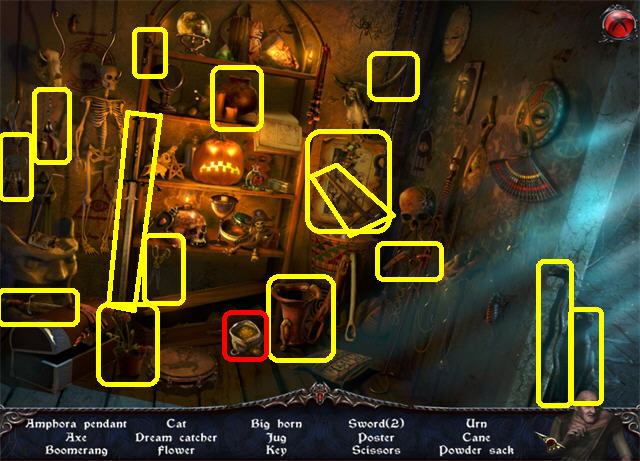
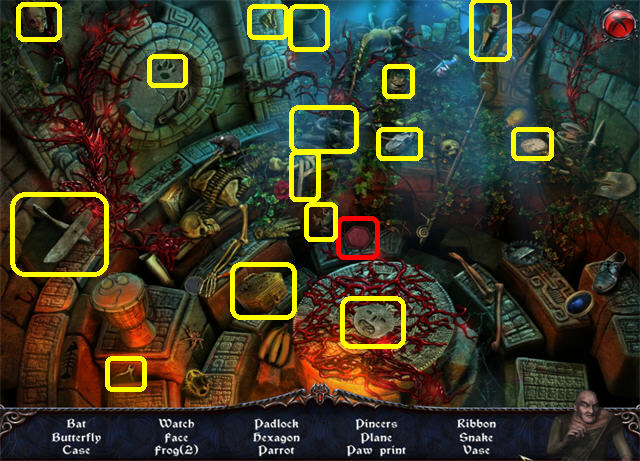
- Play the Hidden Object Scene by the cabinet.
- Find all the items listed to obtain SKULL MASK 2/2.
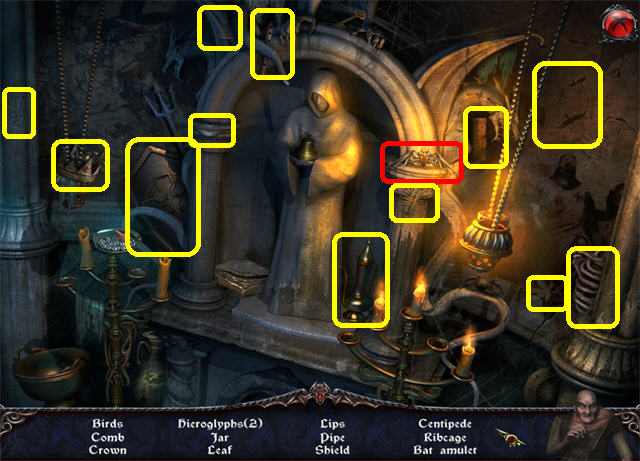
- Go to the Crypt.
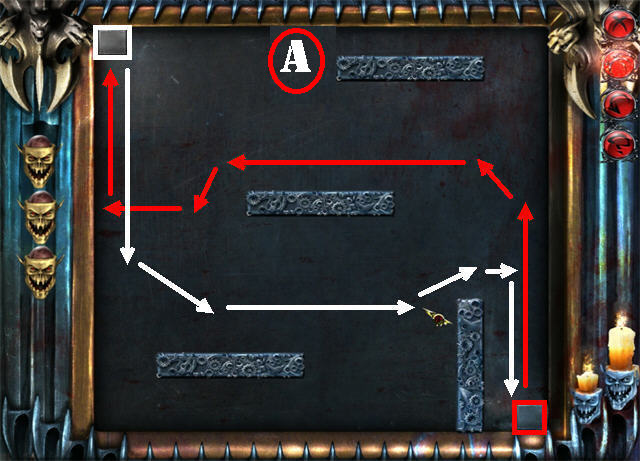
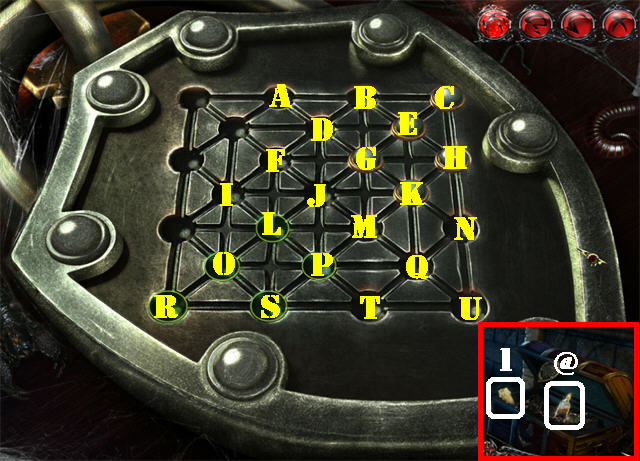
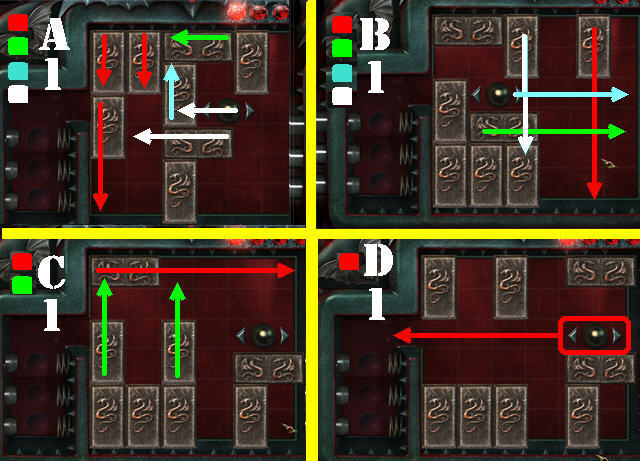
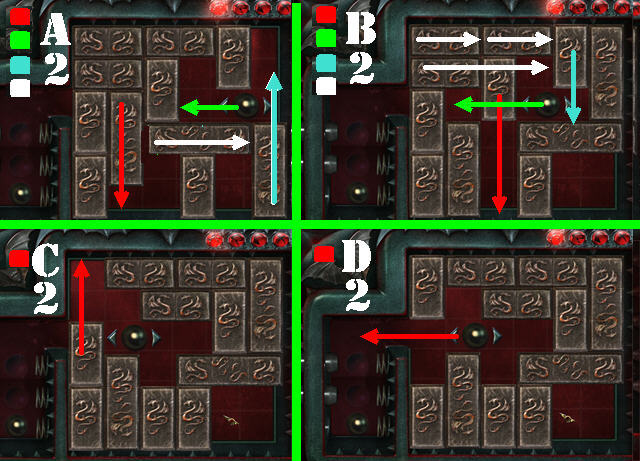
- Zoom into the Room of Knights; place the 2 MASKS in the slot to activate a puzzle.
- Move the boxes to the opposite sides without touching the walls.
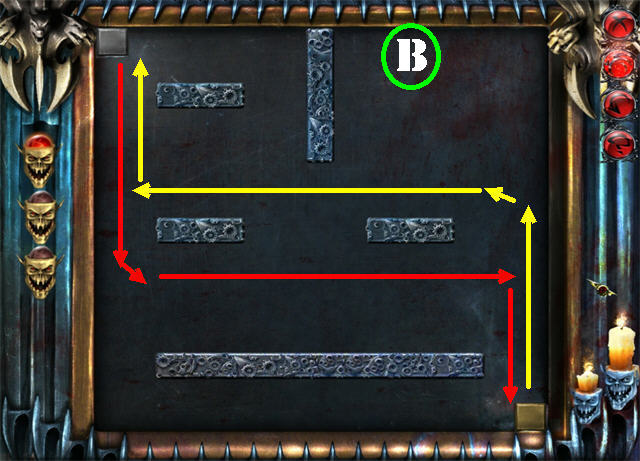
- Drag the boxes slowly around the course to avoid hitting the walls. Pay close attention to the movements so you do not hit the walls.
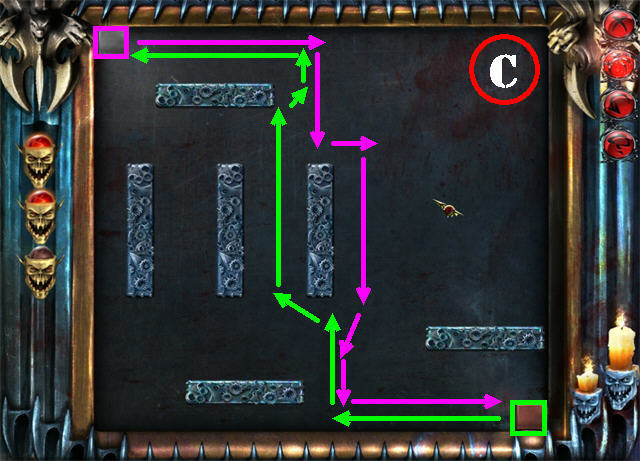
- Please look at the 3 screenshots for the correct paths to take.
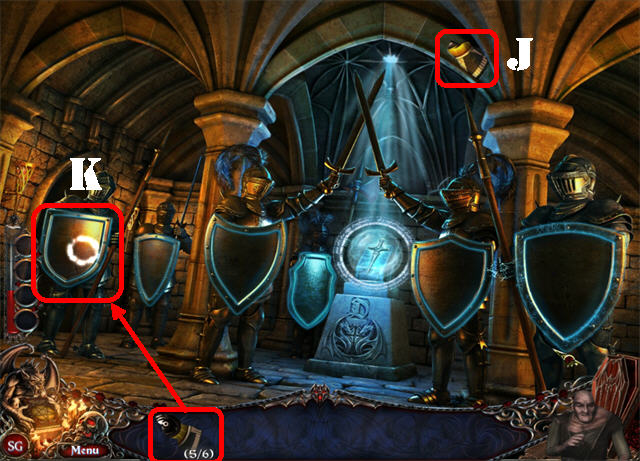
- Go forward to the Room of Knights.
- Take the PIECE OF SHIELD 6/6 (J) in the upper right.
- Place the 6 SHIELD PIECES on the shield on left (K).
- You will acquire the VAMPIRIC VISION ABILITY once the shield has been reconstructed.
Chapter 2: Radomir Obilic
- Play the Hidden Object Scene behind the tree.
- Find all the items on the list to obtain the MACHETE.
- Take the VIAL OF BLOOD (@) in the lower left corner.
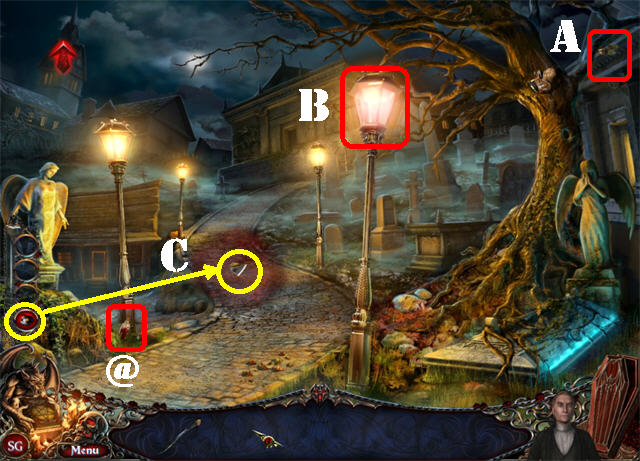
- Grab the ACORN (A) 1/3 in the upper right.
- Take the CANDLE 1/4 (B) in the lamppost on right.
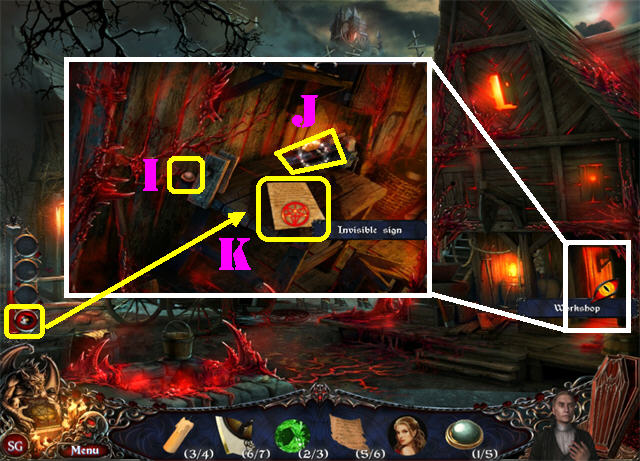
- Use the VAMPIRIC VISION ABILITY on the invisible sign on the road; take the PIECE OF SHIELD 1/7 (C).
- Go to Van Helsing’s Office in the upper left.
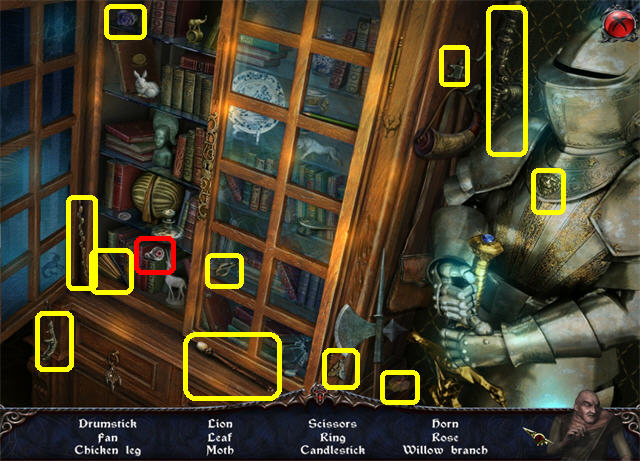
- Play the Hidden Object Scene by the cabinet.
- Find all the items on the list to obtain SEAL RING 1/4.
- Take the DAGGER on the table (D).
- Use the DAGGER to open the desk drawer and take the KEY TO SHED (E).
- Grab the VIAL OF BLOOD on the desk (@).
- Knock over the inkpot on the table; take the SEAL RING 2/4 (F).
- Place the VAMPIRIC VISION ABILITY on the invisible sign at the bottom of the blue curtain; take the PIECE OF SHIELD 2/7 (G).
- Open the drawer at the bottom of the cabinet; take the SEAL RING 3/4 (H).
- Return to the Cemetery.
- Zoom into the Shed on the left.
- Open the cabinet with the KEY TO SHED.
- Take the EMPTY LAMP (I), ACORN 2/ 3 (J) and the SEAL RING 4/4 (K) on the shelves.
- Place the MACHETE on the 'Grave in roots'in the lower right (L).
- Place the EMPTY LAMP into the opened grave; take the WISP (M).
- Play the Hidden Object Scene behind the tree.
- Find all the listed items to obtain ACORN 3/3.
- Place the 3 ACORNS over the acorn leftovers on the road.
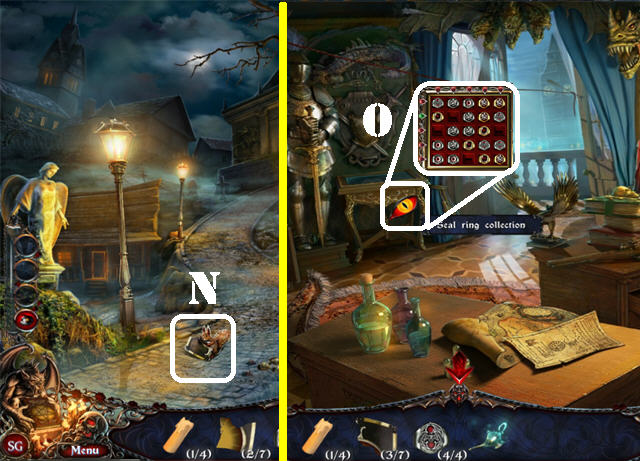
- The squirrel will come down from the tree; take PIECE OF SHIELD 3/7 (N).
- Return to Van Helsing’s Office.
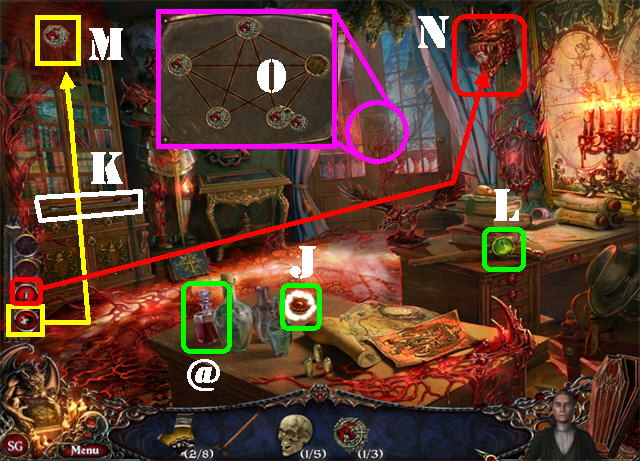
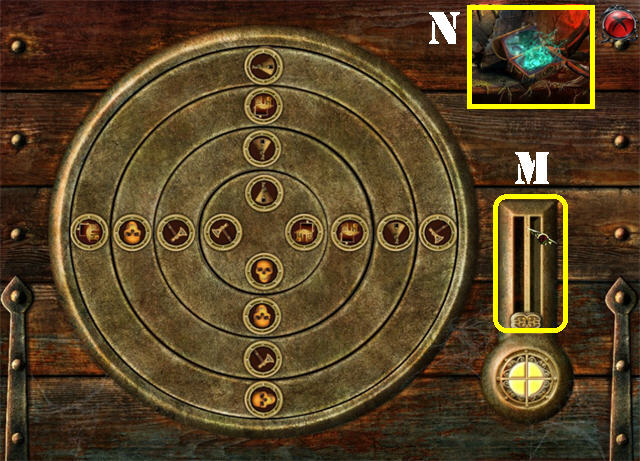
- Examine the seal ring collection; place the 4 SEAL RINGS into the display to activate a puzzle (O).
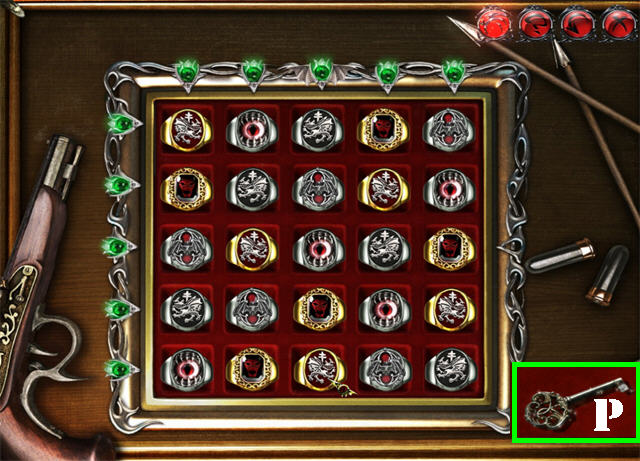
- Place the rings on the pad so no two rings are in the same row or column.
- Click on any 2 rings to swap their positions.
- The green lights mean that row or column is correctly positioned; red means there is something out of place.
- Please look at the screenshot for the solution.
- Take the KEY FROM HARKER’S APARTMENT after the puzzle has been solved (P).
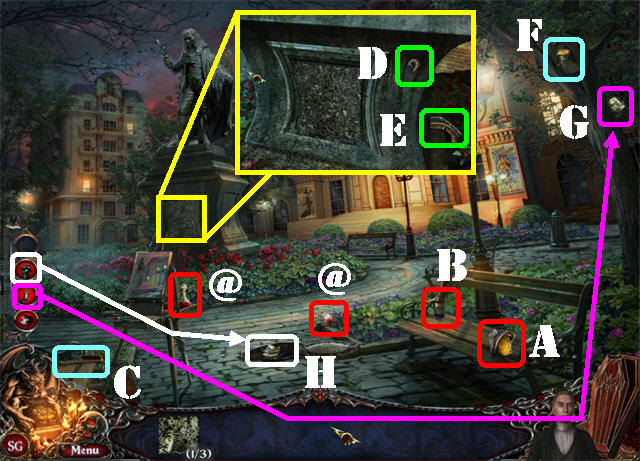
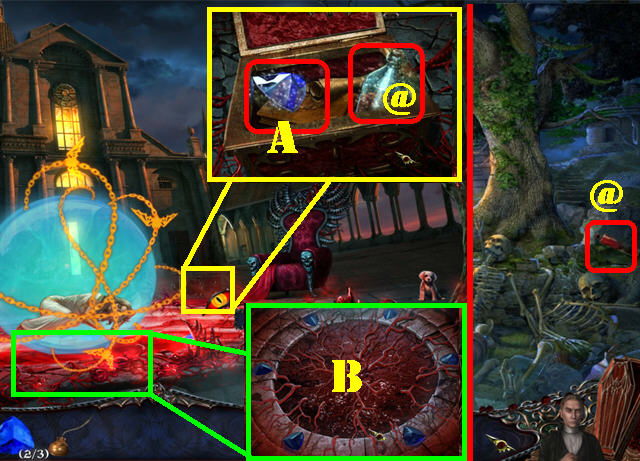
- Travel directly to Mina’s Room.
- Take the BLOOD on the roses (Q) on left.
- Take the PIECE OF LETTER 1/6 (R) below the nightstand.
- Use the VAMPIRIC VISION ABILITY on the invisible sign above the bed; take PIECE OF LETTER 2/6 (S).
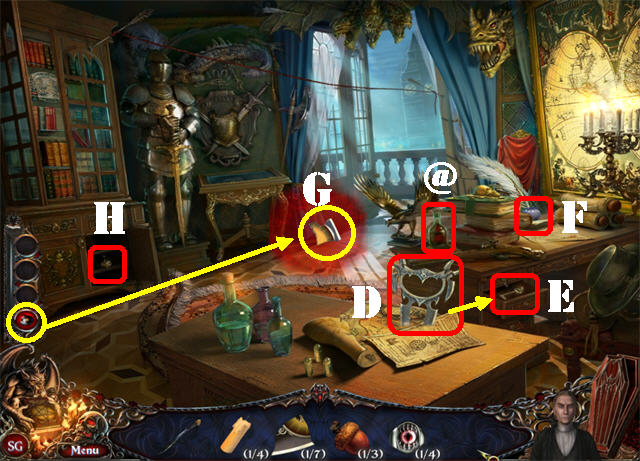
- Take the SMALL MINA’S PORTRAIT on the mirror above the nightstand (1).
- Zoom into the nightstand on right.
- Take the SMALL DIAMOND 1/3 (T) above the nightstand.
- Open the left drawer; take the VIAL OF BLOOD (@) and CANDLE 2./4 (U).
- Open the right drawer; take PIECE OF LETTER 3/6 (V).
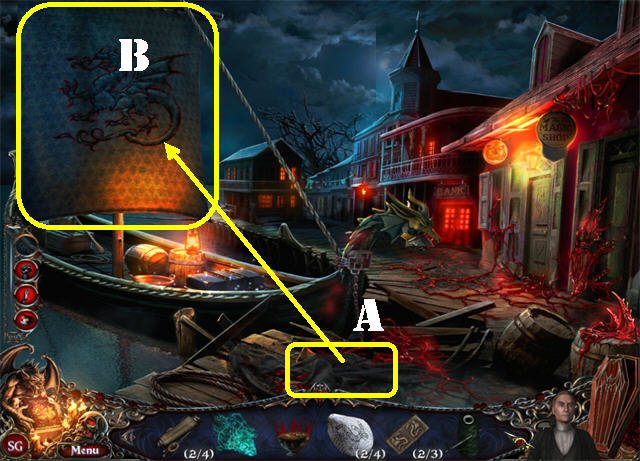
- Click on Harker’s portrait on left (W).
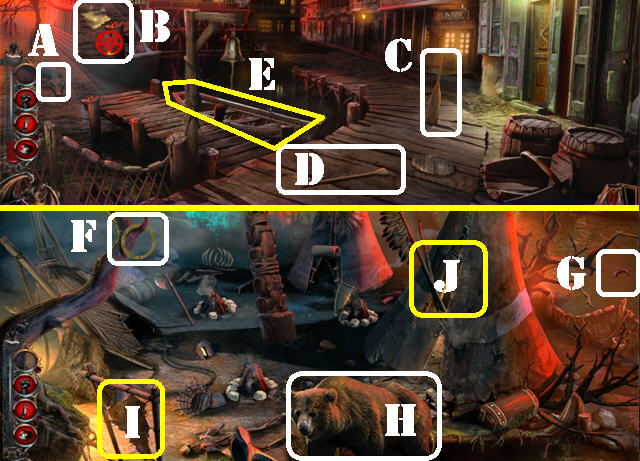
- Click on the Queen’s Accomplice to activate a puzzle (X).
- Drag Dracula’s icon over to the accomplice’s icon.
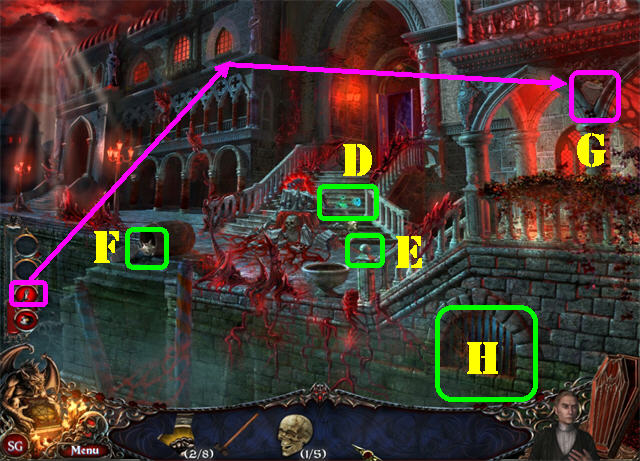
- Look at the screenshot for the correct path. Choose not to drink the blood at the end of the puzzle if you want to play an extra puzzle.
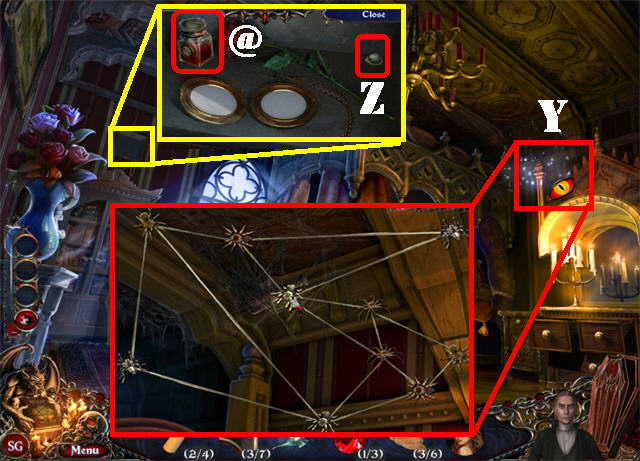
- Click on the upper right side of the ceiling to activate a puzzle (Y).
- Untangle the webs by pulling the spiders apart. Red lines are tangled and white ones are untangled.
- The screenshot shows one possible solution.
- A VIAL OF BLOOD will be given to you after the puzzle.
- Examine the secret compartment on the left; take the VIAL OF BLOOD (@) and the METAL KNOB 1/5 (Z).
- Return to the Cemetery.
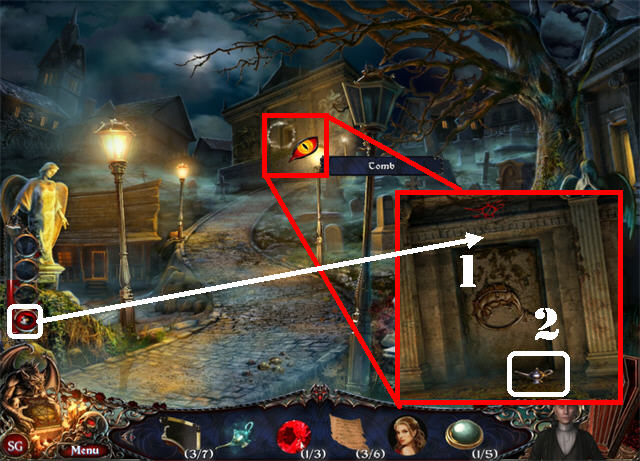
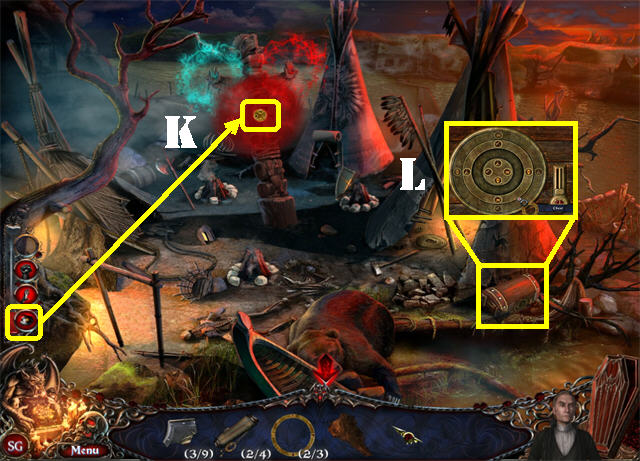
- Zoom into the tomb in the back; use the VAMPIRIC VISION ABILITY on the invisible sign on the tomb (1).
- Place the WISP on the tomb’s entrance (2).
- Enter the Tomb.
- Take the SMALL DIAMOND 2/3 (3) in the lower left.
- Take the PIECE OF SHIELD 4/7 (4) on the right.
- Click on the stuck leaves in the upper center (5).
- Take the PIECE OF LETTER 4/6 (6).
- Take CANDLE 3/4 (7) on the floor.
- Grab the PIECE OF SHIELD 5/7 in lower center (8).
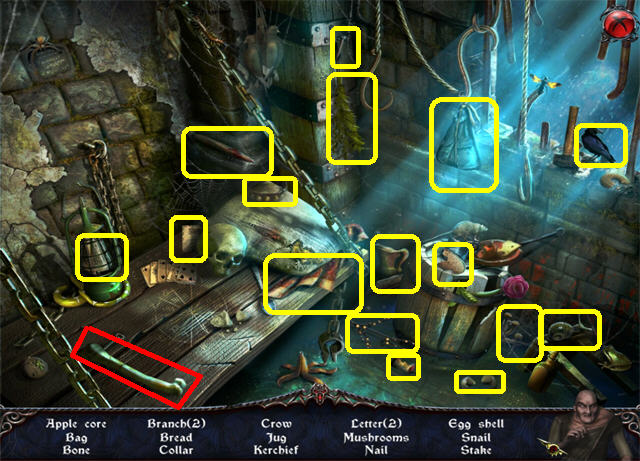
- Play the Hidden Object Scene in the back of the Tomb.
- Find all the listed items to receive the SKULL.
- Return to the Transylvanian Village.
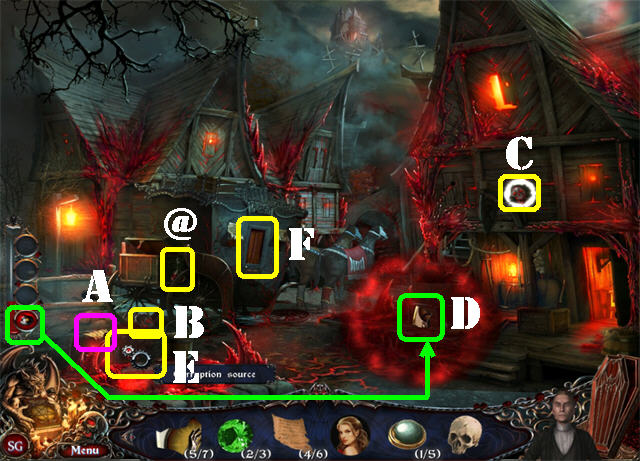
- Take the PIECE OF LETTER 5/6 (A) in the lower left.
- Take the BLACK SKULL 1/3 (B) behind the coach.
- Take the BLACK SKULL 2/3 (C) above the Workshop.
- Use the VAMPIRIC VISION ABILITY on the invisible sign by the toolbox; take the PIECE OF SHIELD 6/7 (D).
- Place the SKULL on the corruption source in the lower left to automatically obtain the BLACK SKULL 3/3 (E).
- Take the VIAL OF BLOOD on the coach (@).
- Zoom into the coach door (F); place the 3 BLACK SKULLS on the board to activate a puzzle.
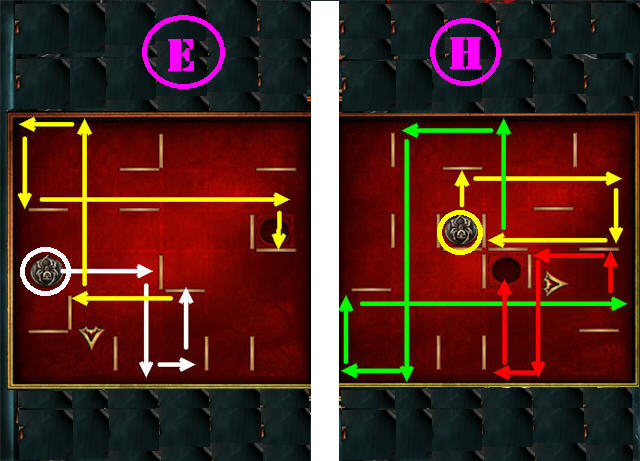
- Your goal is to move the black skull token into the hole on right.
- Place your cursor over the token for an arrow to appear. Move the arrow to the direction you want to head in and click on it.
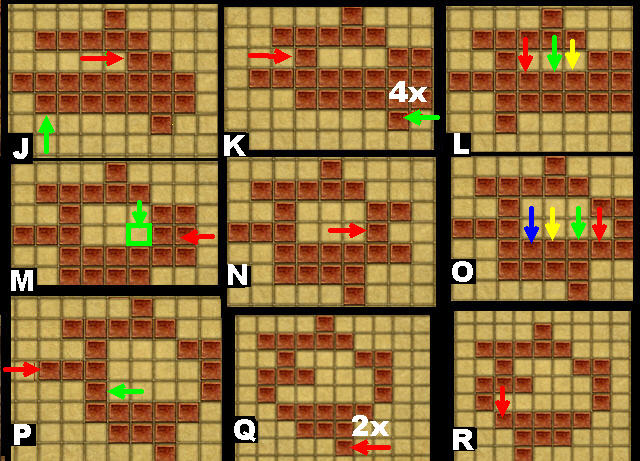
- To solve the puzzle for the easy mode follow the direction of the white arrows and then the yellow arrows on the screenshot (E).
- To solve the puzzle for the hard mode follow the direction of the arrows in this order: yellow, green, and red (H).
- Play the coach Hidden Object Scene.
- Find all the listed items to obtain the PIECE OF LETTER 6/6.
- Examine the Workshop door.
- Take the METAL KNOB 2/5 (I).
- Take the PIECE OF PICTURE 1/2 (J).
- Place the 6 LETTER PIECES on the table; use the VAMPIRIC VISION ABILITY on the invisible letter and then click on the letter (K).
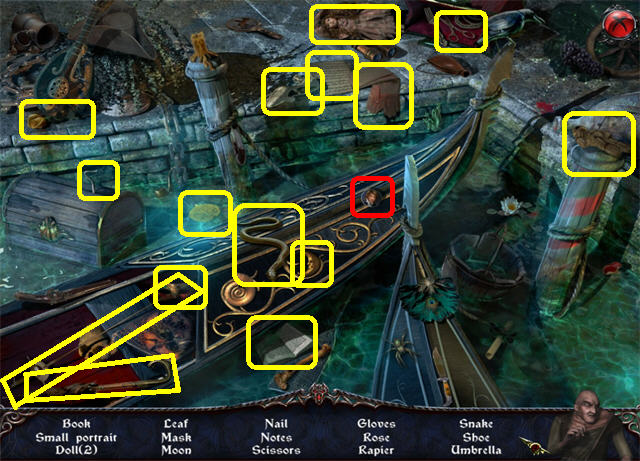
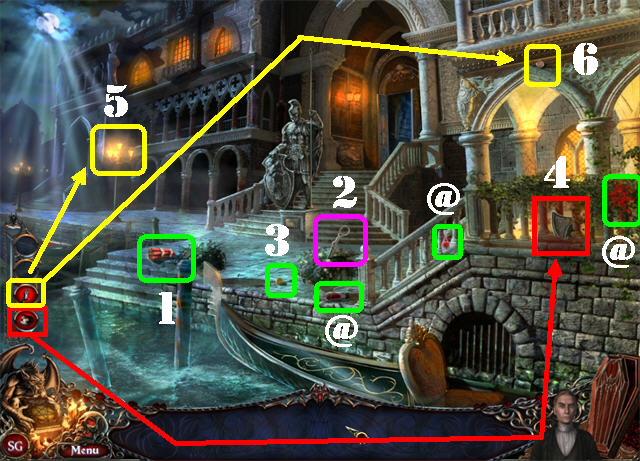
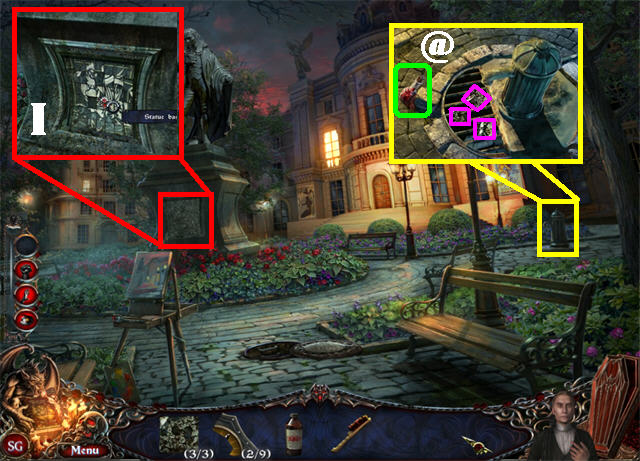
- Go to Venice, Doge Palace.
- Play the Hidden Object Scene in the lower left.
- Find the listed items to obtain the PORTRAIT OF JOHN HARKER.
- Take the METAL KNOB 3/5 (L) in the gondola.
- Take the BLOOD on the right railing (@).
- Use the VAMPIRIC VISION ABILITY on the invisible sign by the bottom steps; take the PIECE OF PICTURE 2/2 (M).
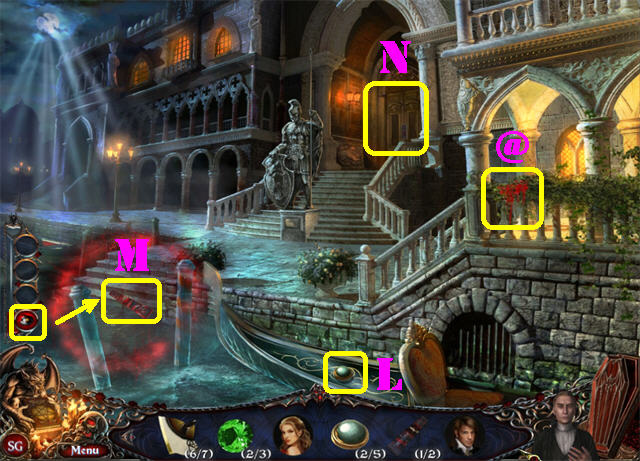
- Zoom into the door (N).
- Place the 2 PICTURE PIECES on the door to activate the puzzle.
- Drag one strip of picture over another piece to swap their positions.
- Please look at the screenshot for the solution (1).
- Go through the door after the puzzle has been solved.
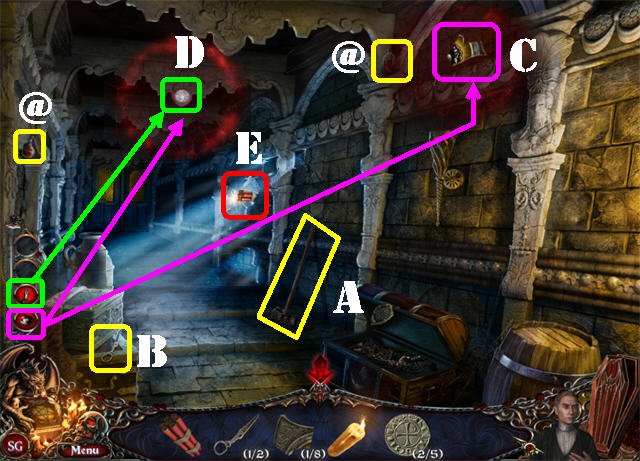
- Take the SMALL DIAMOND 3/3 (O) on lower left.
- Take the VIAL OF BLOOD (@) in the lower right, above the barrel.
- Take the VIAL OF BLOOD (@) in the lower left, above the trunks.
- Take the METAL KNOB 4/5 (P) in the upper right.
- Use the VAMPIRIC VISION ABILITY on the invisible sign on the right side of the wall; take the METAL KNOB 5/5 (Q).
- Zoom into the chest in the lower right (R).
- Place the 5 METAL KNOBS on the lock to activate a puzzle.
- Move the tokens to the green highlighted spots.
- Using the screenshot lettering move the tokens in this order to solve the puzzle:
- K to D, G to A, C to G, E to J, D to K.
- H to M, K to D, G to L, A to G, D to K.
- J to O, K to P, M to S, O to J, L to T.
- G to L, J to O, L to R, and T to L.
- Please look at the screenshot for the solution.
- Take the VIAL OF BLOOD (@) and CANDLE 4/4 (1) from inside the chest.
- Return to Mina’s Room.
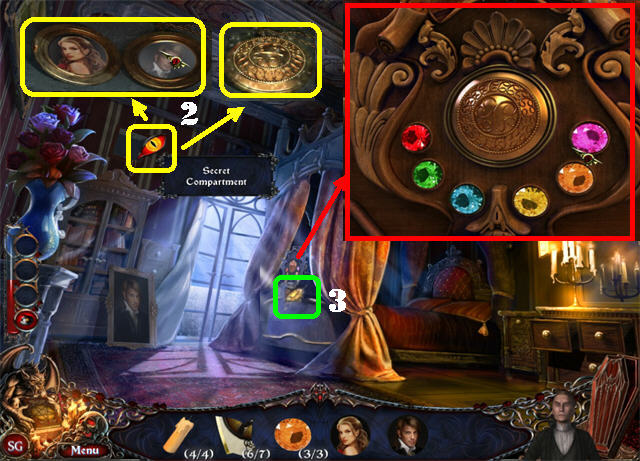
- Zoom into the secret compartment in the upper left.
- Place SMALL MINA’S PORTRAIT and SMALL HARKER’S PORTRAIT in the medallion; take the MEDALLION (2).
- Examine the headboard.
- Place the 3 SMALL DIAMONDS and the MEDALLION on the headboard to activate a puzzle.
- Repeat the sequence in which the gems light up.
- You must reproduce 3 sequences to beat this game.
- Take the DIAMOND (3) after the puzzle has been completed.
- Return to the Tomb.
- Place the 4 CANDLES and the DIAMOND on the altar (5).
- Use the VAMPIRIC VISION ABILITY on one of the highlighted spots by the rays of light.
- Take the PIECE OF SHIELD 7/7 (6) on left.
- Return to the Room of Knights.
- Place the 7 SHIELD PIECES on the left shield to obtain the TELEKINESIS ABILITY (7).
Chapter 3: Alessandro Massini
- Play the Hidden Object Scene by the water.
- Find the 15 BOTTLES in the scene to obtain A VIAL OF BLOOD.
- Grab the VIAL OF BLOOD (@) on the right side of the railing.
- Take the BLOOD (@) on the right corner.
- Take the VIAL OF BLOOD (@) on the plant on the right railing.
- Take the DYNAMITE (1) by the left side of the steps.
- Grab the PIECE OF SCISSORS 1/2 (2) by the flower pot.
- Take COIN 1/5 (3) on the ground.
- Use the VAMPIRIC VISION ABILITY on the invisible sign on the right side of the wall; take the PIECE OF SHIELD 1/8 (4).
- Use the TELEKINESIS ABILITY on the lamppost on left to obtain the LIGHTED CANDLE (5).
- Use the TELEKINESIS ABILITY on COIN 2/5 (6) in the upper right.
- Go to the Bridge.
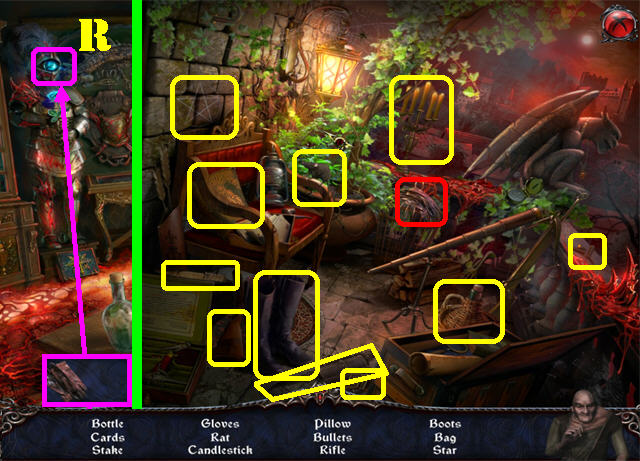
- Take the HAMMER (A) on the right wall.
- Take the PIECE OF SCISSORS 2/2 (B) in the lower left.
- Take the VIAL OF BLOOD (@) in the upper center.
- Take the VIAL OF BLOOD (@) in the upper left.
- Use the VAMPIRIC VISION ABILITY on the invisible sign in the upper right; take the PIECE OF SHIELD 2/8 (C).
- Use the VAMPIRIC VISION ABILITY on the invisible sign on the left side of the ceiling for a coin to appear.
- Use the TELEKINESIS ABILITY on COIN 3/5 (D) on the ceiling.
- Use the HAMMER on the crack on the right side of the wall (E); place the DYNAMITE in the hole.
- Light the DYNAMITE with the LIGHTED CANDLE for an explosion to take place.
- Take COIN 4/5 (F) in lower left.
- Grab the PART OF SKELETON 1/5 (G) on the ground.
- Take the VIAL OF BLOOD (@) on the ground.
- Click down.
- Tear the seat cushion with the SCISSORS; take COIN 5/5 (H).
- Examine the base of the statue.
- Place the 5 COINS in the slots to activate a puzzle.
- To solve the puzzle click on the first Knight and then on the last Knight.
- Take the DRAGON STONE 1/3 (I).
- Travel to Van Helsing’s Office.
- Take the VIAL OF BLOOD (@) and the METAL RIVET 1/3 (J) on the table.
- Take the CLEANING DRILL (K) on the cabinet.
- Use the CLEANING DRILL on the GUN on the desk and take the METAL RIVET 2/3 (L).
- Use the VAMPIRIC VISION ABILITY on the invisible sign on the cabinet; take the DRAGON STONE 2/3 (M).
- Use the TELEKINESIS ABILITY on the trophy in the upper right to obtain DRAGON STONE 3/3 (N).
- Zoom into the balcony; place the 3 DRAGON STONES on the lock to activate a puzzle (O).
- Click on two spots to form a line on the puzzle.
- You cannot pass over the same marked line twice but you can click on the same circles.
- Please look at the 3 screenshots for the solutions for all 3 rounds.
- Play the balcony Hidden Object Scene.
- Find the items listed to receive METAL RIVET 3/3.
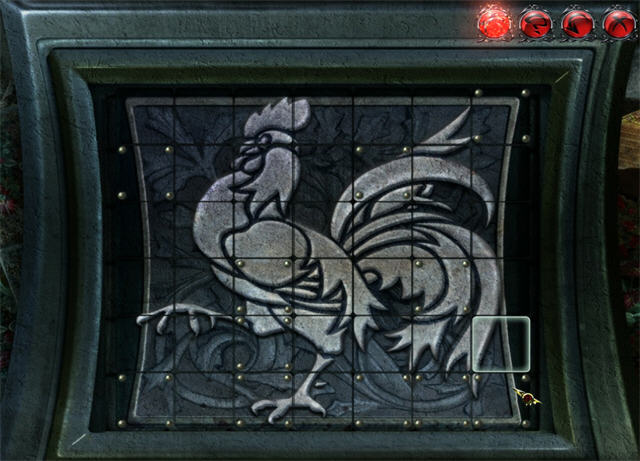
- Zoom into the book on the ground; place the 3 METAL RIVETS on the book to activate a puzzle.
- Place the colored tokens into the slots that match the color and symbol of that token.
- Tokens cannot jump over each other.
- The solution to this puzzle is random; therefore we cannot provide a step-by-step solution. The screenshot shows the final solution (A).
- Take the SWORD on the ground (B).
- Return to Venice.
- Give the SWORD to the statue of the Queen (C).
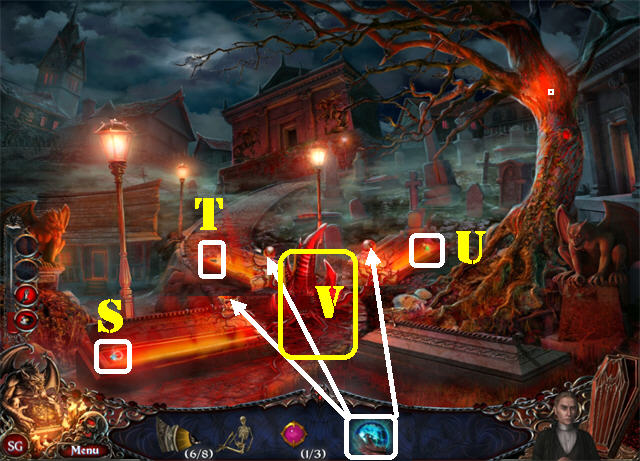
- Click on the Queen’s Apprentice for a maze puzzle to appear.
- Drag Dracula’s icon around the maze to get to his target.
- You can take either the white or red route marked in the screenshot.
- We chose not to drink the blood.
- Play The Hidden Object Scene in the lower left.
- Find the15 bottles to obtain a VIAL OF BLOOD.
- Take the BLUE ROSE (D) and the HEAVY SPIKE (E).
- Break the barrel on left with the HAMMER; take HEAVY SPIKE 2/3 (F).
- Use the TELEKINESIS ABILITY on the PIECE OF SHIELD 3/ 8 (G) in the upper right.
- Break the jail bars in the lower right with the HAMMER (H); go into the jail.
- Play the Hidden Object Scene in the jail.
- Find the items listed to receive PART OF SKELETON 2/5.
- Take the PIECE OF SHIELD 4/8 (I) in the upper left.
- Take the PIECE OF SHIELD 5/8 (J) by the bench.
- Use the VAMPIRIC VISION ABILITY on the invisible sign on the steps; take PART OF SKELETON 3/5 (K).
- Click down.
- Play the Hidden Object Scene in the lower left.
- Find the items listed to receive PART OF SKELETON 4/5.
- Go to the Bridge.
- Take PIECE OF SHIELD (L) 6/8 on the ground.
- Take the HEAVY SPIKE 3/3 (M) in the lower left.
- Place the 3 HEAVY SPIKES on the hanging chains to activate a Hidden Object Scene in the back; play it (N).
- Find the items listed to receive PART OF SKELETON 5/5.
- Return to the Jail.
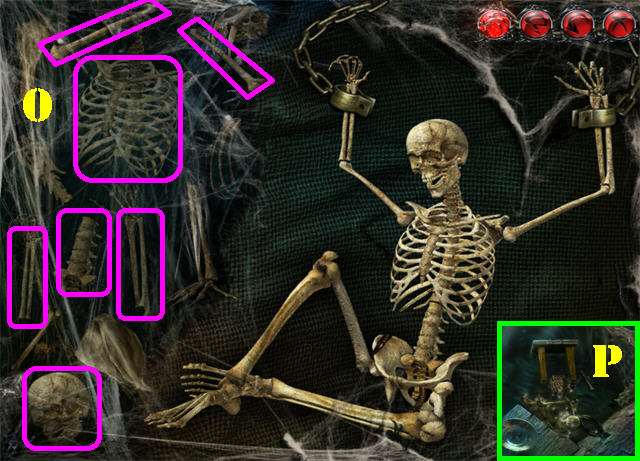
- Examine the incomplete skeleton in the lower right; place the 5 SKELETON PARTS on the skeleton to activate a puzzle.
- Reassemble the skeleton using the bones in the scene.
- Click on a bone until it lands on the correct spot on the skeleton.
- Please look at the screenshot for the solution (0).
- Take the COMPLETE SKELETON on the ground (P).
- Return to the London Cemetery.
- Play the Hidden Object Scene in the lower left.
- Find the items listed to receive RUNIC STONE 1/3.
- Take the VIAL OF BLOOD (@) in the lower right.
- Return to Van Helsing’s Office.
- Place the BLUE ROSE on the armor (Q) to trigger a Hidden Object Scene; play it.
- Find the items listed to receive LEATHER GLOVES.
- Take the ORB on the armor’s helmet with the use of the LEATHER GLOVES (R).
- Return to the Cemetery.
- Place the ORB on the altered grave in the lower left; take RUNIC STONE 2/3 from inside the coffin (S).
- The ORB will go back to inventory.
- Place the ORB on the altered grave on the far left; take PIECE OF SHIELD 7/8 from inside the coffin (T).
- The ORB will go back to inventory.
- Place the ORB on the altered grave on the far right; take RUNIC STONE 3/3 from inside the coffin (U).
- The ORB will go back to inventory.
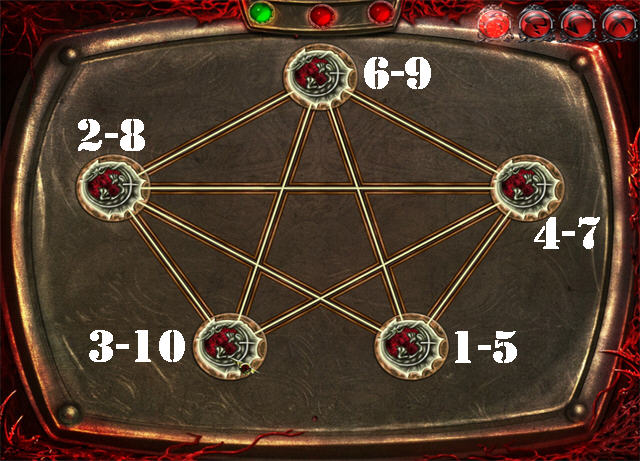
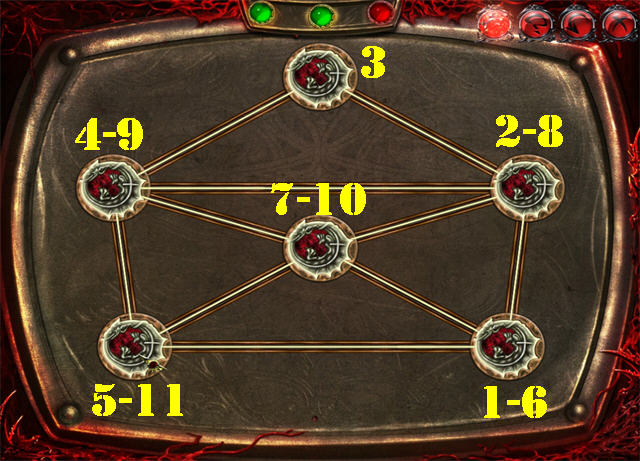
- Examine the pedestal of corruption; place the 3 RUNIC STONES on the irrigation system to activate a puzzle (V).
- Click and drag the balls so they land on their matching color.
- Use the other balls as a means to build a block between balls so you can place them where you want.
- Please look at the screenshots for the solution for all 3 rounds.
- Play the Hidden Object Scene in the lower left.
- Find the items listed to receive SHOVEL.
- Place the ORB on the altered grave in the lower right; place the SHOVEL on the earth inside the coffin (W).
- Place the COMPLETE SKELETON inside the grave.
- Take the PIECE OF SHIELD (X) 8/8 above the coffin.
- Return to the Room of Knights.
- Place the 8 SHIELD PIECES on the shield on left (Y).
- You will gain the STRENGTH ABILITY.
Chapter 4: Antoine Crozar
- Play the Hidden Object Scene by the large building.
- Find the items listed to receive DIRTY PIECE 1/3.
- Take the VIAL OF BLOOD (@) on the ground.
- Take the VIAL OF BLOOD (@) next to the easel.
- Take PIECE OF SHIELD (A) 1/9 and the BOTTLE OF SOLVENT (B) on the bench.
- Grab the SCRAPER (C) in the lower left.
- Examine the base of the statue; take the CATERPILLAR (D) and the PIECE OF SHIELD 2/9 (E).
- Place the CATERPILLAR on the STARLING-HOUSE in the upper right and a dirty piece will fall onto the tree (F).
- Use the TELEKINESIS ABILITY on the DIRTY PIECE 2/3 (G) on the tree.
- Use the STRENGTH ABILITY on the sewer plate; take DIRTY PIECE 3/3 (H).
- Zoom into the water pump; take the VIAL OF BLOOD (@).
- Place the 3 DIRTY PIECES on the grid by the water pump.
- Place the BOTTLE OF SOLVENT on the dirty pieces and then place the SCRAPER on the pieces.
- Click on the water pump to clean the pieces; take the 3 SQUARE PIECES.
- Zoom into the base of the statue; clean it with the SCRAPER (I).
- Place the 3 SQUARE PIECES on the base to activate a puzzle.
- Click on the squares to rotate them.
- The pieces with the rivets cannot be moved but you can click on them to rotate the surrounding pieces.
- Since this puzzle is random we cannot give you a step-by-step solution, however, the screenshot shows the final image.
- Take the LOUISIANA MAP (1), the INDIAN SCROLL (2), and the VIAL OF BLOOD (@) at the base of the statue.
- Go to the Louisiana Bank.
- Take the KNIFE (3) in the lower right.
- Grab the FISHING NET (4) on the ground.
- Take the PART OF CHEST 1/3 (5) on left.
- Grab ANGEL 1/3 (6) above the door in the upper right.
- Take the VIAL OF BLOOD (@) on the left post.
- Grab the ROPE (7) in the lower left.
- Use the VAMPIRIC VISION ABILITY on the invisible sign by the bell; take ANGEL 2/3 (8).
- Use the STRENGTH ABILITY on the barrel in the lower right; take ANGEL 3/3 (9) and the VIAL OF BLOOD (@).
- Examine the shop door; place the 3 ANGELS on the lock; take PIECE OF SHIELD 3/9 (10) to activate a puzzle.
- Place all the angels on the lock.
- Pieces placed correctly will lock in place as shown in the screenshot (11).
- Click on the shop door to activate a Hidden Object Scene.
- Find all the items listed to obtain the ANTI-ALLIGATOR POWDER.
- Give the ANTI-ALLIGATOR POWDER to the crocodile in the water (A).
- Use the TELEKINESIS ABILITY on the ISLES’ MAP (B) in the water.
- Use the STRENGTH ABILITY on the HALF OAR in the ground (C).
- Place the HALF OAR on the PART OF OAR on the ground to create the BROKEN OAR (D).
- Place the ROPE on the BROKEN OAR; take the OAR.
- Place the OAR in the boat (E); click on the arrow in the upper left to move forward.
- Grab the PART OF CHEST 2/3 (F) in the upper left.
- Place the FISHING NET on the trout in the water to obtain the FISHING NET WITH TROUT (G).
- Give the FISHING NET WITH TROUT to the grizzly bear (H).
- Cut the LEATHER in the lower left with the KNIFE to obtain the BISON SKIN (I).
- Cut the teepee with the KNIFE (J) to activate a Hidden Object Scene; play it.
- Find all the items on the list.
- The INDIAN SCROLL 2/4 will be added to inventory.
- Return to the Louisiana Bank.
- Play the Shop Hidden Object Scene by clicking on the shop’s door.
- Find the 15 BOTTLES to obtain the VIAL OF BLOOD.
- Return to the Isle.
- Use the VAMPIRIC VISION ABILITY on the invisible sign on the totem; take PART OF CHEST 3/3 (K).
- Zoom into the locked chest in the lower right; place the 3 CHEST PARTS on the mechanism to activate a puzzle (L).
- Find the correct combination by rotating the circles.
- Line up the symbols as shown in the screenshot.
- Click on the lever on right to check your work (M).
- Take the BLUE CRYSTAL from inside the chest (N).
- Return to Venice.
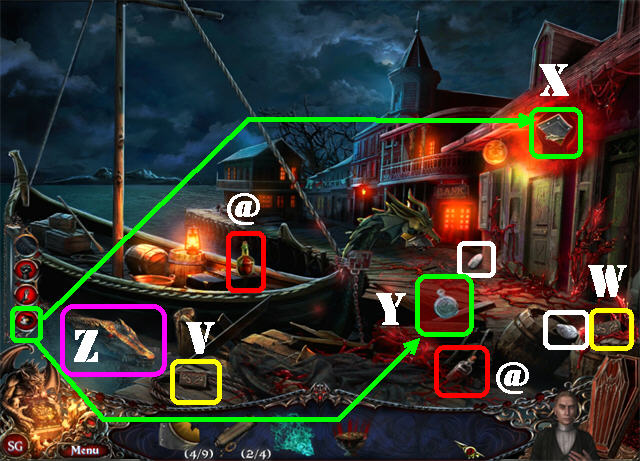
- Take WOODEN BOARD 1/2 (O) on the railing.
- Take WOODEN BOARD 2/2 (P) on the right.
- Use the STRENGTH ABILITY on the barrel; zoom into it and take PIECE OF SHIELD 4/9 (Q).
- Place the WOODEN BOARDS on the board to activate a puzzle.
- Drag the board pieces around until they form the correct image.
- Please look at the screenshot for the solution (R).
- Take the SEAL OF THE QUEEN after the puzzle has been solved (S).
- Put the BISON SKIN on the RED CRYSTAL on the steps (T).
- Place the SEAL OF THE QUEEN on the flowerpot (U).
- Use the STRENGTH ABILITY on the SEALED RED CRYSTAL in the flowerpot.
- Return to the Louisiana Bank.
- Take PEBBLES 1 and 2 of 4 marked in white.
- Grab the PIECE OF LOCK 1/3 (V) in the lower left.
- Grab the PIECE OF LOCK 2/3 (W) in the lower right.
- Take the VIAL OF BLOOD (@) in the lower right.
- Take the VIAL OF BLOOD (@) on the boat.
- Use the VAMPIRIC VISION ABILITY on the invisible sign in the upper right; take PIECE OF SHIELD 5/9 (X).
- Use the VAMPIRIC VISION ABILITY on the ground; take the HOLY WATER (Y).
- Give the HOLY WATER to the crocodile in the water (Z) to activate a Hidden Object Scene on the boat; play it.
- Find all the items on the list.
- The THREADS will be added to inventory.
- Place the THREADS on the black sheets in the lower center; take the BLACK SAIL (A).
- Put the BLACK SAIL on the boat’s mast to activate another Hidden Object Scene on the boat; play it (B).
- Find all the items on the list.
- The PIECE OF LOCK 3/3 will be added to inventory.
- Zoom into the docking system by the boat and place the 3 LOCK PIECES on the board to activate a puzzle.
- Slide the boards out of the way so you can move the ball through the hole on the left.
- Screenshot sections A1 through D 1 show the solution for the first round.
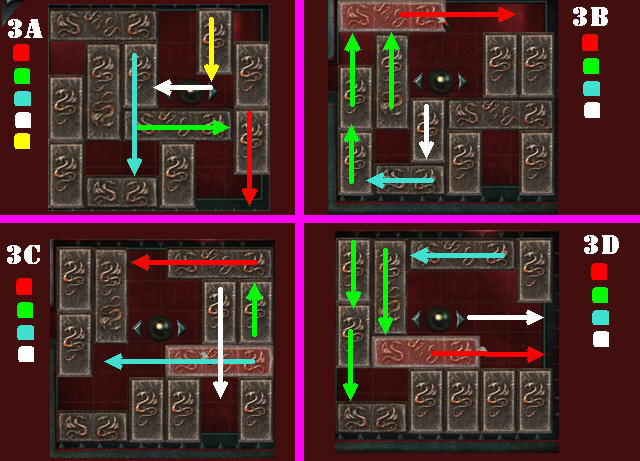
- Screenshot sections A2 through D2 show the solution for the second round.
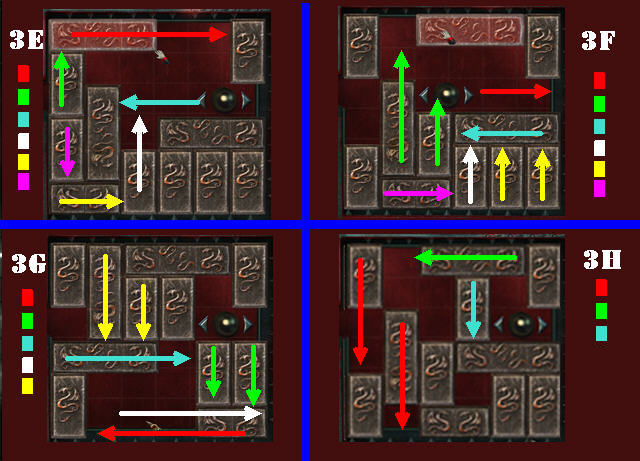
- Screenshot sections 3A through 3i show the solution for the third round.
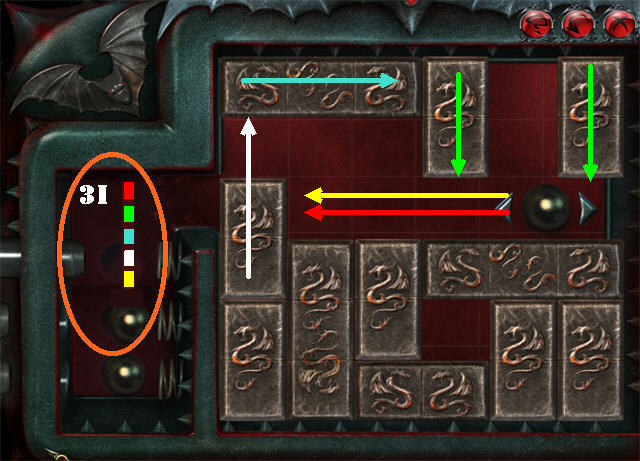
- Click on the arrow in the upper left after the puzzle has been solved to go forward.
- Play the Hidden Object Scene by the teepee.
- Find all the items listed to obtain INDIAN SCROLL 3/4.
- Take PEBBLES 3 and 4 of 4 marked in white.
- Grab the INDIAN SCROLL 4/4 (A) on left.
- Take the VIAL OF BLOOD (@) in the lower left.
- Take the VIAL OF BLOOD (@) in the boat.
- Take the VIAL OF BLOOD (@) by the boat.
- Use the STRENGTH ABILITY on the PIECE OF SHIELD 6/9 (B) by the boat.
- Use the TELEKINESIS ABILITY on the PIECE OF SHIELD 7/9 (C) in the water.
- Place 2 PEBBLES on the campfire in the lower center (D).
- Place 2 PEBBLES on the campfire on the left (E).
- Place the BLUE CRYSTAL over the blue fog on the totem (F).
- Place the SEALED RED CRYSTAL on the red fog on the totem (G).
- Zoom into the center of the totem; place the 4 INDIAN SCROLLS on the totem to activate a puzzle (H).
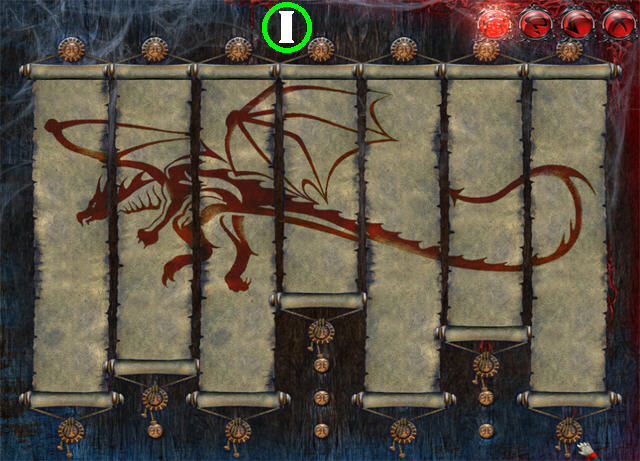
- Pull down on the scrolls and attach them to one of the hooks below.
- Form the image of the dragon shown in the screenshot (I).
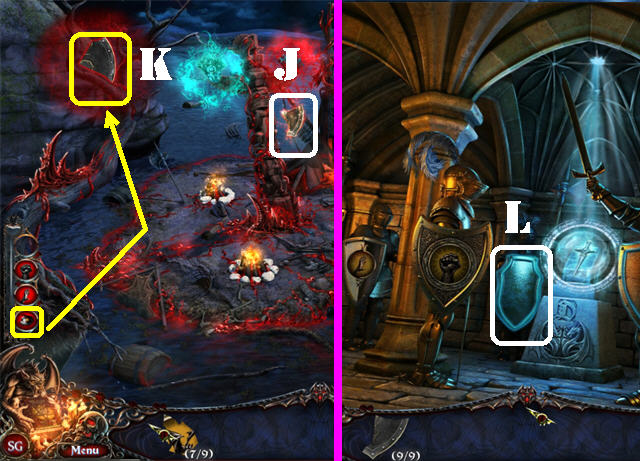
- Take PIECE OF SHIELD 8/9 (J) on the totem after the puzzle has been solved.
- Use the VAMPIRIC VISION ABILITY on the invisible sign in the upper left; take PIECE OF SHIELD 9/9 (K).
- Return to the Room of Knights.
- Place the 9 SHIELD PIECES on the shield to the left of the pedestal (L).
- You will gain the ANIMAL FORM ABILITY.
Chapter 5: Nicueza Diego
- Play the Hidden Object Scene on left.
- Find all the items listed to obtain the LEVER.
- Take the VIAL OF BLOOD (@) on right.
- Take the VIAL OF BLOOD (@) on left.
- Grab GEAR 1/3 (A) on the ground.
- Take PIECE OF SHIELD 1/10 (B) on left.
- Use the VAMPIRIC VISION ABILITY on the invisible sign by the water; take GEAR 2/3 (C).
- Use the STRENGTH ABILITY on the crate; take GEAR 3/3 (D).
- Place the LEVER on the switching system on the train tracks (E).
- Zoom into the steam engine; Take the SUPERVISOR KEY (F).
- Place the 3 GEARS on the engine to activate a puzzle.
- Drag the gears into the right spots as shown in the screenshot (G).

- Play the cabin Hidden Object Scene in the lower left.
- Find the items listed to receive the ENGINEER KEY.
- Zoom into the shed.
- Place the ENGINEER KEY and the SUPERVISOR KEY on the lock.
- Open the door and take the MACHETE (H), VIAL OF BLOOD (@), DRIED MEAT (I), PART OF TOMB ENTRANCE 1/3 (J), and SQUARE PIECE 1/4 (K).
- Place the MACHETE on the old road in the upper right; a jaguar will appear.
- Give the DRIED MEAT to the jaguar (L).
- Click on the arrow in the upper right to go forward.

- Play the Hidden Object Scene close to the tree on right.
- Find the items listed to receive BLOWPIPE WITH DART.
- Grab the VIAL OF BLOOD (@) next to the steps on the right.
- Grab the VIAL OF BLOOD (@) next to the steps on the left.
- Take PIECE OF SHIELD 2/10 (M) on right.
- Use the STRENGTH ABILITY on the SUN DISK 1/2 (N) in the lower right.
- Take SQUARE PIECE 2/4 (O) on the skeleton.
- Grab the PIECE OF ANIMAL PLATE 1/3 (P) by the steps.
- Use the TELEKINESIS ABILITY on the PART OF TOMB ENTRANCE 2/3 (Q) in the upper left.
- Use the VAMPIRIC VISION ABILITY on the invisible sign on the large tree on right; take SQUARE PIECE 3/4 (R).
- Place the BLOWPIPE WITH DART on the anaconda (1); take the PART OF THE TOMB ENTRANCE 3/3 (S).
- Zoom into the king’s tomb and take the VIAL OF BLOOD (@).
- Use the TELEKINESIS ABILITY on the PIECE OF SHIELD 3/10 (T) in the upper left.
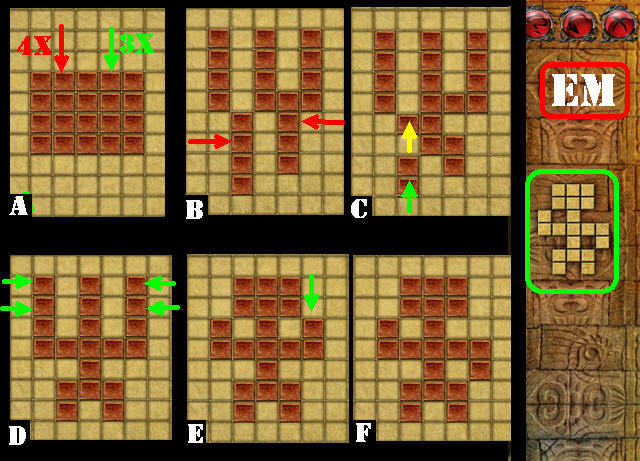
- Zoom into the King’s Tomb; place the 3 TOMB PARTS on the tomb to activate a puzzle.
- Your goal is to put all the shapes into the center of the square without overlapping.
- Please look at the screenshot for the solution.
- Click on the arrow in the upper center to move forward into the King’s Tombs.
- Take the VIAL OF BLOOD (@) from the second animal head in the upper center.
- Grab SQUARE PIECE 4/4 (U) on the ground.
- Take PIECE OF SHIELD 4/10 on left (V).
- Examine the mosaic by the door; place the 4 SQUARE PIECES to activate a puzzle (W).
- Duplicate the image on the right side of the puzzle.
- A square can only be moved when it is connected to another piece.
- Place your cursor around the edges of the squares; click on the arrow that is facing in the direction you seek.
- Screenshot (EM ) has the solution for easy mode.
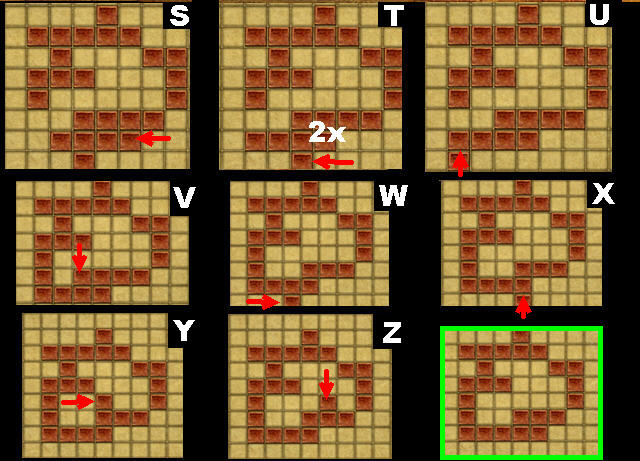
- The next 3 screenshots (A THROUGH Z) have the solution for hard mode. For squares with more than one arrow pointing to it always start with RED, followed by GREEN, YELLOW, and BLUE.
- Use the VAMPIRIC VISION ABILITY on the invisible sign in the upper right; take PIECE OF SHIELD 5/10 (1).
- Take PIECE OF ANIMAL PLATE 2/3 (2) next to the left tomb.
- Take PIECE OF ANIMAL PLATE 3/3 (3) above the newly-closed door.
- Zoom into the animal plate on the right; place the 3 PIECES OF ANIMAL PLATES on the board to activate a puzzle (4).
- Click on the squares to change their image to the correct one.
- Please look at the screenshot for the solution (5).
- Click on the arrow on the right to go into the City.
- Click on the Queen’s Accomplice for the maze to appear (6).
- Drag Dracula to the accomplice to solve the puzzle.
- We chose not to drink the blood.
- Click on the queen’s accomplice puzzle in the lower left.
- Click on two stones to see what is behind them; make matches of 2 identical items.
- If you make an incorrect match the symbols will shuffle.
- The solution to this puzzle is random.
- You will receive the VIAL OF BLOOD after the puzzle has been completed.
- Play the Hidden Object Scene in the upper right.
- Find the items listed to receive HEXAGON 1/3.
- Take the VIAL OF BLOOD (@) in the lower right.
- Take the VIAL OF BLOOD (@) by the steps.
- Grab HEXAGON 2/3 (7) in the lower left.
- Use the STRENGTH ABILITY on the PIECE OF SHIELD 6/10 (8) in the upper right.
- Click down to go to the Canal.
- Pick up the BAG OF PEPPER (A) in the lower right.
- Take the VIAL OF BLOOD (@) in the lower left.
- Take the VIAL OF BLOOD (@) on the right.
- Use the STRENGTH ABILITY on the mine wagon; take the HEXAGON 3/3 (B).
- Use the ANIMAL FORM ABILITY on the cavern on left; place the 3 HEXAGONS on the puzzle (C).
- Your goal is to click on the hexagons in the path in the number of moves shown at the bottom.
- You have to beat 6 stages of the game to beat the puzzle.
- Sections 1 and 2 of the screenshots show the solutions for the first 2 rounds.
- Sections 3 and 4 of the screenshots show the solutions for rounds 3 and 4.
- In round 3 you are required to make 14 steps. The last two steps count as double.
- Sections 5 and 6 of the screenshots show the solutions for the last 2 rounds.
- Take the PIECE OF SHIELD 7/10 (1) and the SUN DISK 2/2 (2) after the puzzle has been solved.
- Use the VAMPIRIC VISION ABILITY on the invisible sign on the cabin; take PIECE OF SHIELD 8/10 (3).
- Return to the Lost City in the upper right.
- Place the BAG OF PEPPER on the snake (4); take the PIECE OF SHIELD 9/10 (5).
- Go into the King’s Tomb.
- Place the 2 SUN DISKS in front of the 2 tombs (4); take the PIECE OF SHIELD 10/10 (5).
- Return to the Room of Knights.
- Place the 9 SHIELD PIECES on the shield to the right of the pedestal (6).
Chapter 6: Milos Obilic
- Play the Hidden Object Scene on right.
- The FISHING SPOOL will be added to inventory.
- Grab the PART OF BRIDGE MECHANISM 1/4 (A) in the lower left.
- Take the VIAL OF BLOOD (@) on the ground.
- Grab the other VIAL OF BLOOD (@) on the ground.
- Pick up the KNIFE (B) in the lower left.
- Take the ADJUSTABLE WRENCH (C) in the lower center (1).
- Use the ANIMAL FORM ABILITY on the tower window; take the PULSING RED SPHERE (D), CUT DIAMOND (E), GOLDEN KNOB 1/4 (F), and PART OF BRIDGE MECHANISM 2/4 (G).
- Use the VAMPIRIC VISION ABILITY on the invisible sign; take PIECE OF SHIELD 1/6 (H).
- Use the ADJUSTABLE WRENCH on the WHEEL (I).
- Open the SEASHELL with the KNIFE; take the PART OF BRIDGE MECHANISM 3/4 in the lower center (J).
- Open the other SEASHELL with the KNIFE; take the PIECE OF SHIELD 2/6 in the lower right (K).
- Place the FISHING SPOOL on the HARPOON to create the HARPOON WITH STRING (L).
- Put the PULSING RED SPHERE on the HARPOON WITH STRING to obtain the SPHERE ATTACHED TO HARPOON.

- Go to the Knight’s Tomb.
- Take the PIECE OF SHIELD 3/6 (M) in the upper left.
- Take the VIAL OF BLOOD (@) in the upper right.
- Take the VIAL OF BLOOD (@) in the lower right.
- Take the VIAL OF BLOOD (@) in the lower center.
- Place the CUT DIAMOND on the altar.
- Use the VAMPIRIC VISION ABILITY on any of the highlighted spots in the upper center; take PIECE OF SHIELD 4/6 (N).
- Return to Mont St. Michel.
- Place the SPHERE ATTACHED TO HARPOON on the gates. The HARPOON will return to inventory (O).
- Use the STRENGTH ABILITY on the BOAT’S MAST (P).
- Place the BOAT’S MAST on the barrel in the lower left; take the PIECE OF SHIELD 5/6 (Q) and the MAGGOTS (R) from inside the barrel.
- Take the VIAL OF BLOOD (@) in the lower left.
- Place the MAGGOTS and then the HARPOON on the fishy spot close to the castle (1); take the PART OF BRIDGE MECHANISM 4/4 (S) and the PIECE OF SHIELD 6/6 (T) and the BOTTLE (@).
- Use the ANIMAL FORM ABILITY on the gate’s mechanism (U).
- Place the 4 PARTS OF BRIDGE MECHANISM and the WHEEL on the gate’s mechanism to activate a puzzle.
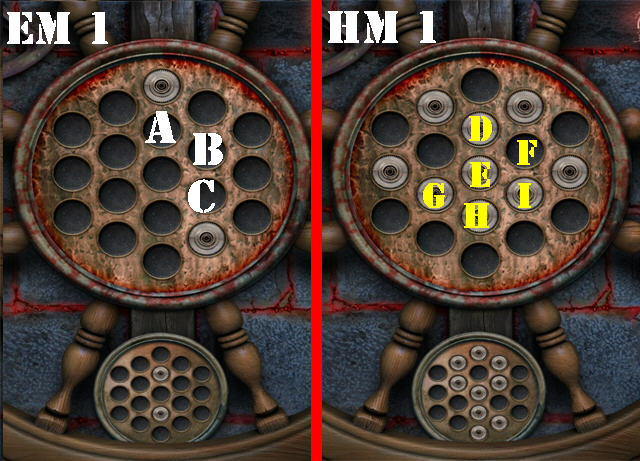
- Rotate the locks to match the image at the bottom.
- You must solve 3 rounds to beat this puzzle.
- Please look at the screenshot for the solutions and play attention to the letters on the locks to solve the puzzle.
- Screenshot (EM1) contains the solution for the first round in EASY MODE: A x 1-B x 5-C x 1
- Screenshot (HM1) contains the solution for the first round in HARD MODE; G, D, E, D, E, I, H x2, I x 2, H x 2, I x 2.
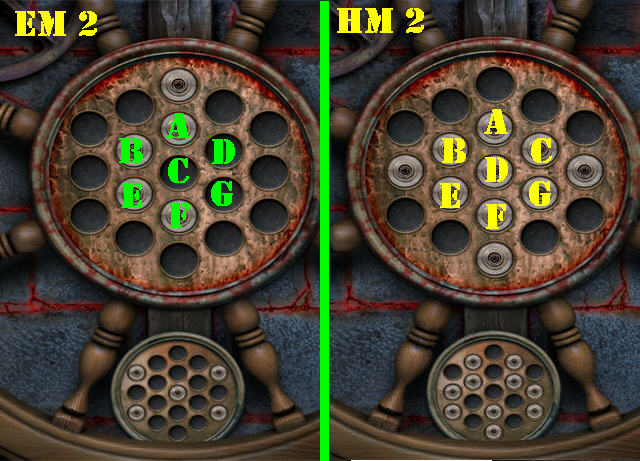
- Screenshot (EM2) contains the solution for the second round in EASY MODE: B x 2-E x 2-C x 2-D x 2-C x 4-G x 4-A x 3.
- Screenshot (HM2) contains the solution for the second round in HARD MODE: E x 3-G-D-F x 2-A-F-A-F x 3-A-F x 5-A x 2-F-A-F-A x 4-F-A-F x 3-A-F x 4.
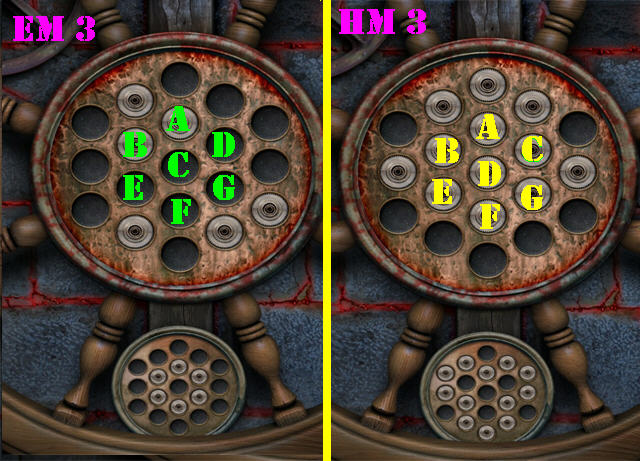
- Screenshot (EM3) contains the solution for the third round in EASY MODE: B x 1-G x 1-F x 3.
- This solution (HM3) is for the third round in HARD MODE: F x 3 – B-D-B x 2-C x 2-G x 2-A-C-G-C-G-C-A x 3-G x 4-C-G.
- Return to the Room of Knights.
- Place the 6 SHIELD PIECES into the shield on the right (1).
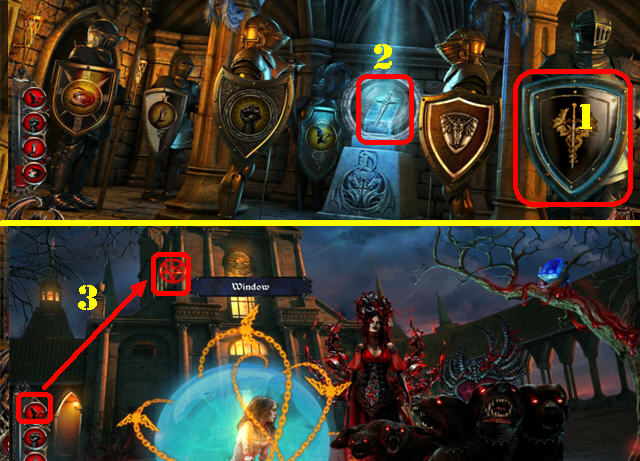
- Take the DAGGER OF THE ORDER (2).
- Return to Mont St. Michel; go into the Abbey by going through the castle’s door.
- Use the ANIMAL FORM ABILITY on the window in the upper left (3); click on the window to activate a Hidden Object Scene; play it.
- Find all the listed items.
- The HOLY WATER will be added to inventory.
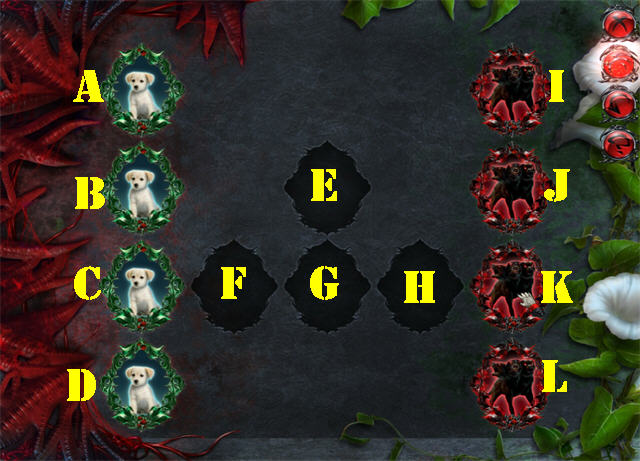
- Place the HOLY WATER on the Cerberus to activate a puzzle.
- Place the white dogs on the left and the black ones on the right.
- Follow these steps to solve the puzzle: C to E, K to C, L to F, E to L, F to E, C to K, D to H, E to D,
- H to E, K to C, J to F, E to J, F to K, C to H, B to E, A to G, D to A, G to D, H to B, K to C,
- J to F, I to G, L to I, G to L, E to J, F to E, L to F, E to L, F to E, C to K, D to H, E to D, H to E, K to C, and E to K.
- Take the GOLDEN KNOB 2/4 (1) and 3/4 (2) in the lower right.
- Place the DAGGER OF ORDER on the Queen of Vampires (3).
- Take the GOLDEN KNOB 4/4 (4) by the chair.
- Take the BLUE CRYSTAL 1/3 (5) in the lower left.
- Take BLUE CRYSTAL 2/3 (6) in the upper right using the TELEKINESIS ABILITY.
- Zoom into the Queen’s chest and place the 4 GOLDEN KNOBS on the chest to activate a puzzle.
- Connect the correct amount of lines to each button.
- Click on the 'ON' button (yellow) on left to enter your selection. Numbers that light up blue are correct, red ones are incorrect.
- You have 3 tries to get it right before the puzzle resets itself.
- Please look at the screenshot for a RANDOM solution.
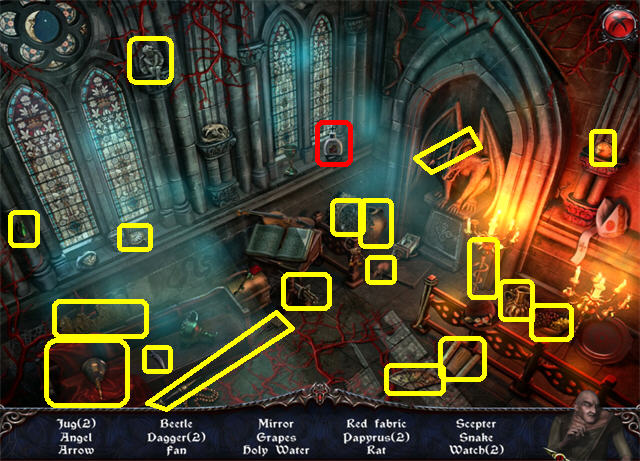
- Play the Window Hidden Object Scene in the upper left.
- Find the listed items to obtain the OIL CAN.
- Zoom into the Queen’s chest.
- Place the OIL CAN on the rusted lock; take the VIAL OF BLOOD (@) and BLUE CRYSTAL 3/3 (A) from inside the chest.
- Zoom into the vortex; place the 3 BLUE CRYSTALS on the Vortex (B).
- Return to the City in Panama.
- Take the VIAL OF BLOOD (@) in the lower right.
- Play the Hidden Object Scene by the tree.
- Find all the listed items to obtain the BAT AMULET 1/4 ().
- Return to the Village in Budapest.
- Take the VIAL OF BLOOD (@) by the horses.
- Play the Hidden Object Scene in the lower left.
- Find all the listed items to obtain the BAT AMULET 2/4.
- Return to Venice.
- Take the VIAL OF BLOOD (@) in the upper right.
- Play the Hidden Object Scene in the lower left to obtain BAT AMULET 3/4.
- Return to Knight’s Tomb in London and play the Hidden Object Scene.
- Find all the listed items to obtain the BAT AMULET 4/4.
- Return to Mont St. Michel.
- Place the 4 BAT AMULETS on the 4 bat outlines on Mina’s sphere marked in green.
- Play the Hidden Object Scene on right.
- Find all the listed items to obtain the SHOVEL.
- Return to the Battlements by clicking down.
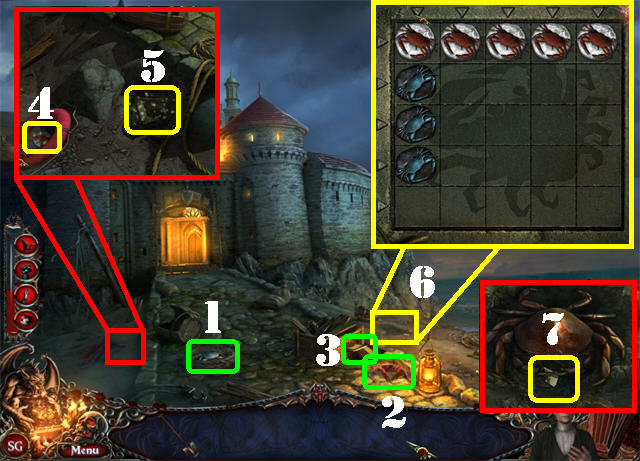
- Grab CRAB 1/3 (1) on lower left.
- Grab CRAB 2/3 (2) on lower right.
- Pick up PIECE OF HERALDRY 1/4 (3) on the ground.
- Place the SHOVEL on the mud in the lower left; take CRAB 3/3 (4) and PIECE OF HERALDRY 2/4 (5).
- Examine the crab hole; place the 3 CRABS in the hole to activate a puzzle (6).
- Click on the arrows to bring up the crabs. The red ones are yours and the blue ones belong to your opponents.
- Get 5 crabs in a row before your opponent does.
- Please look at the screenshot for a random solution.
- Take PIECE OF HERALDRY 3/4 (7) after the puzzle has been solved.
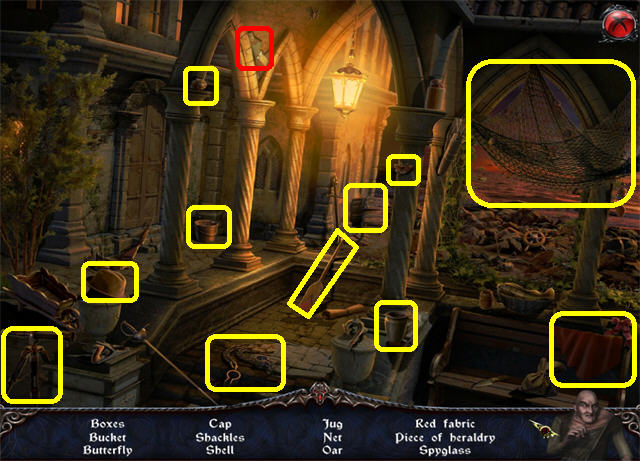
- Return to the Abbey.
- Play the Hidden Object Scene on right to obtain PIECE OF HERALDRY 4/4.
- Return to the Battlements by clicking down.
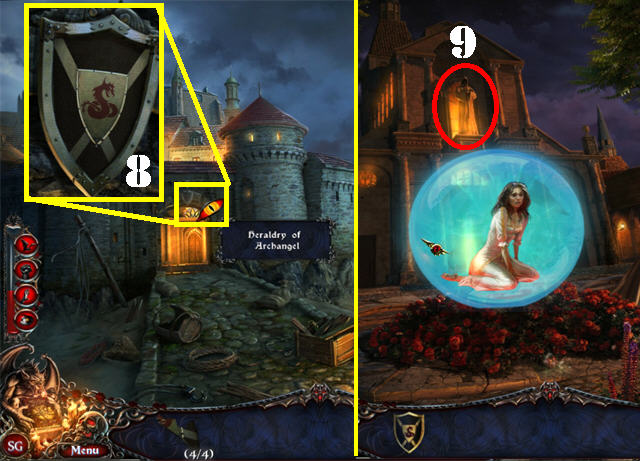
- Zoom into the Heraldry of Archangel above the doorway; place the 4 HERALDRY PIECES on the shield (8).
- Use the STRENGTH ABILITY on the Heraldry of Archangel to obtain the COMPLETE HERALDRY.
- Return to the Abbey.
- USE THE ANIMAL FORM ABILITY on the statue’s base in the upper center (9).
- Place the COMPLETE HERALDRY on the statue’s base to activate a puzzle.
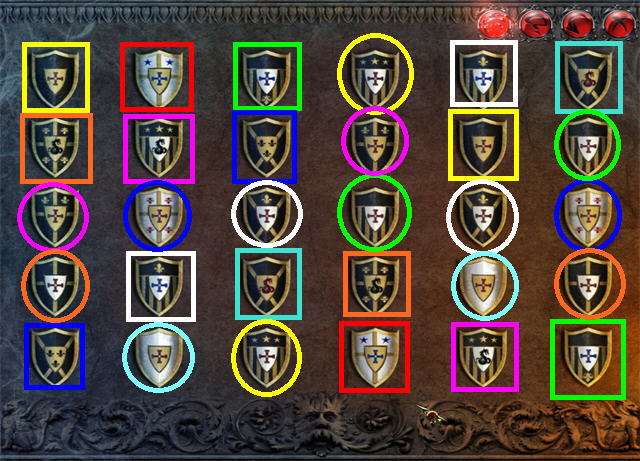
- Click on 2 matching shields to eliminate them from the board.
- Please look at the screenshot for the solution; matching pairs have been marked in matching colors and shapes.
- Congratulations! You have completed Dracula: Love Kills!
Created at: 2011-07-15