

Walkthrough Menu
- General Tips
- Episode 1 - Vampire Wars
- Episode 2 - The Wizard in the Basement
- Episode 3 - The Glutton of Gilborne
- Episode 4 - Inked
General Tips
- This is an Interactive Hidden Object Game.
- Click on Options for Voice Volume, Sound Effects Volume, and Music Volume.
- Click on Options for Full Screen and Wide Screen option.
- Choose Profiles, click on a slot; type in your player name, click create and then click on apply.
- Your cursor will change depending on what actions you can do.
- The red bat cursor means there is nothing to do there.
- The lady finger pointing means you can interact with or take an object.
- The silver cursor means you can exit to a new area.
- The (…) cursor means you can talk to the person or animal.
- The magnifying glass cursor signifies you can zoom in for a closer look.
- The cursor with the electric bolt means you can use a vampire power on an object.
- The clock face cursor means you need to wait.
- Click on the red X in the corner of pop-up scenes to close them.
- Click on items more than one time to get more dialogue about them. There is a little arrow on the bottom of the dialogue bar to advance it.
- Click on the arrow under the dialogue box to advance through the dialogue.
- Hidden Object and puzzle scenes will be marked with glowing symbols.
- Some of the items in the hidden object scenes will need to be created by using other items. For example, if it asks for “4 candies in a jar”, you will need to find 4 pieces of candy and drag them to a jar.
- Playing the mini-games is optional.
- You can skip some of the puzzles.
- When picking up an object, you may need to click multiple times to get through the dialogue about the item first. Be sure you have the item before moving on.
- The prizes you win for playing the mini games and completing puzzles and tasks can be viewed in the Trophy Room (A) located above the Menu button on the lower right.
- Excessive random clicking will cause you to freeze your cursor for a few seconds.
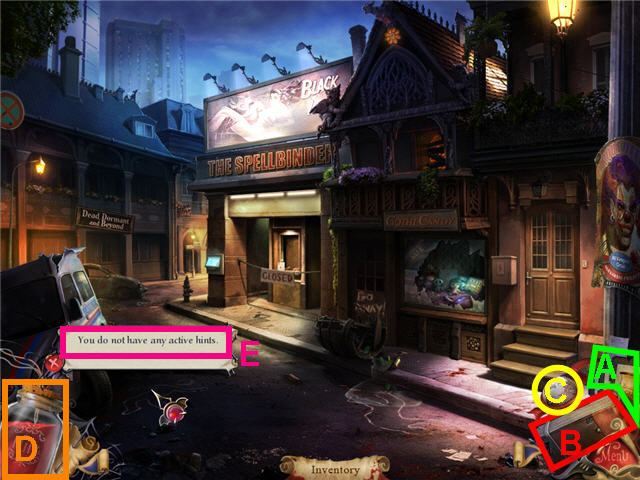
- Click on the journal (B) in the lower right to check your goals, story and important documents. The journal will flash when it has an update for you to read.
- Click on the question mark in the amulet bookmark hanging in the book on the lower right to access game instructions.
- Click on the compass (C) above the journal after the first area is complete to get a map for fast travel to other areas. If an area is sparkling on the map, there is something left for you to do there.
- The inventory bar can be accessed by moving your cursor to the bottom of the screen in the middle. It will automatically retract when you move your cursor away.
- Click on hint (D) to find out what to do next. Click on the hint itself (E) to get further help.
- To exit, click on Menu in the lower right and then click on exit to main menu.
Episode 1 – Vampire Wars
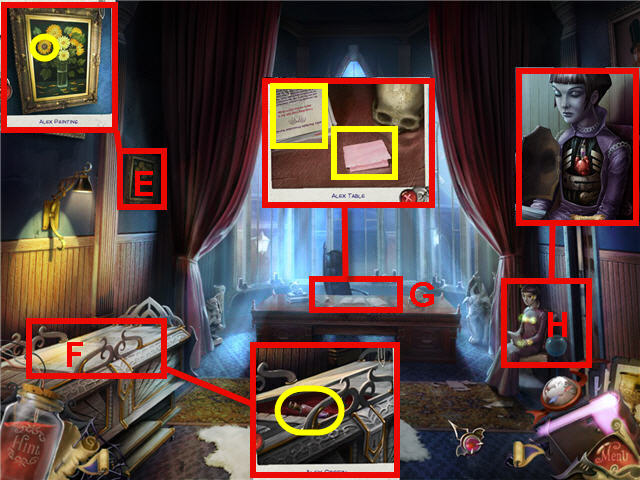
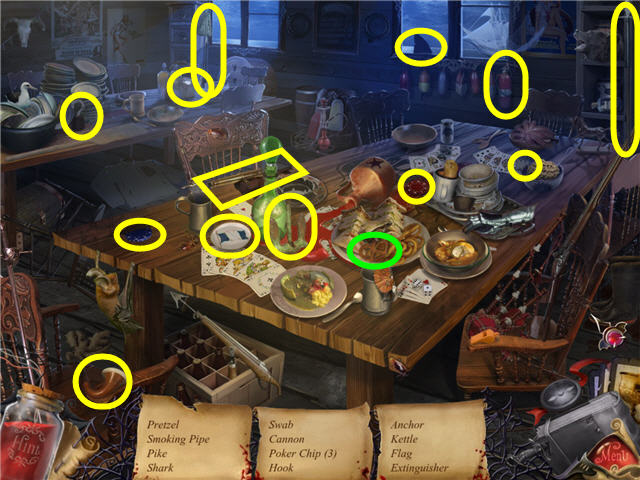
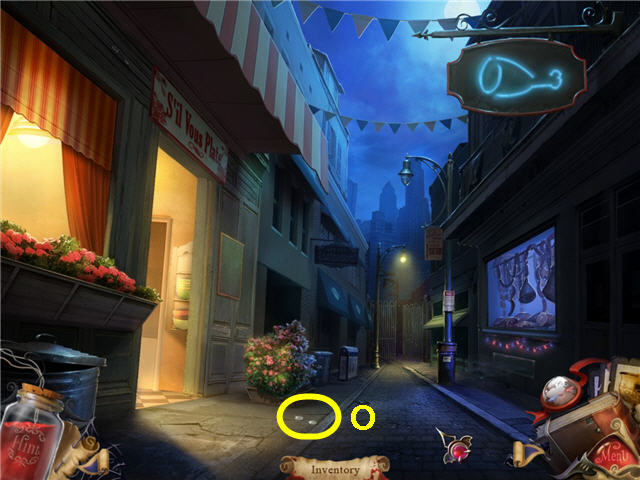
- Click on the poster in the far right and note the address is missing.
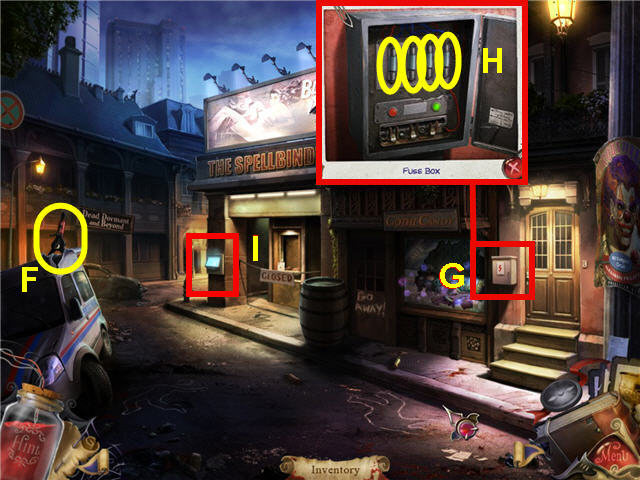
- Take the RESCUE JAWS (F) from the top of the mail truck by clicking on it a few times.
- Click on the body outlines drawn in the street.
- Click on the fuse box (G) on the left of the poster to get a close-up.
- Click on the fuse box to open it and take the 4 FUSES (H).
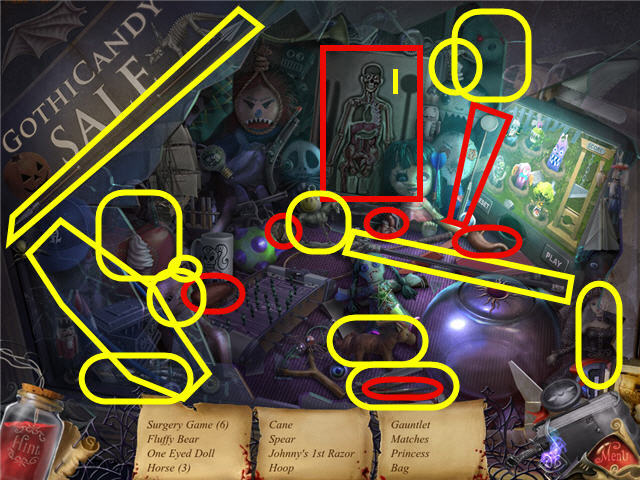
- Click on the Virtual Tourist Machine (I) to get a close-up and click play. Scroll through the info on the top and note that you need 5 dollars to get info.
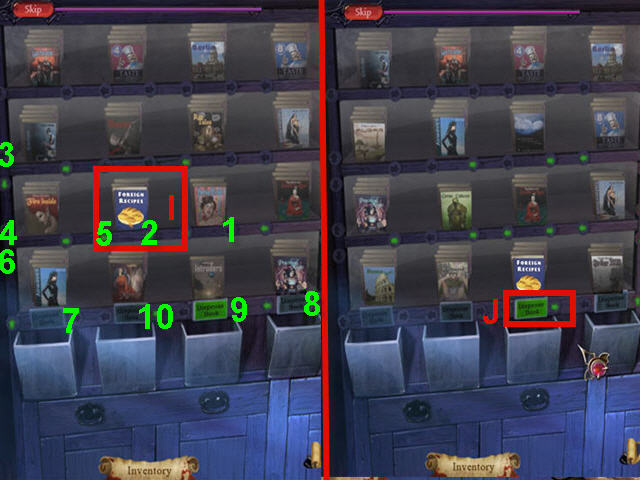
- Click on the GothiCandy store window to open a hidden object scene.
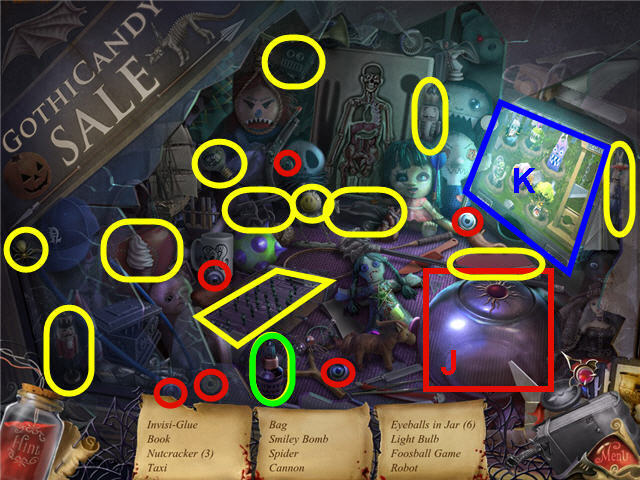
- Find all the items listed and get INVISI-GLUE.
- Drag the eyeballs circled in red into the jar (J) to get the eyeballs in jar.
- Click on the GothiCandy window to play the optional mini-game (K).
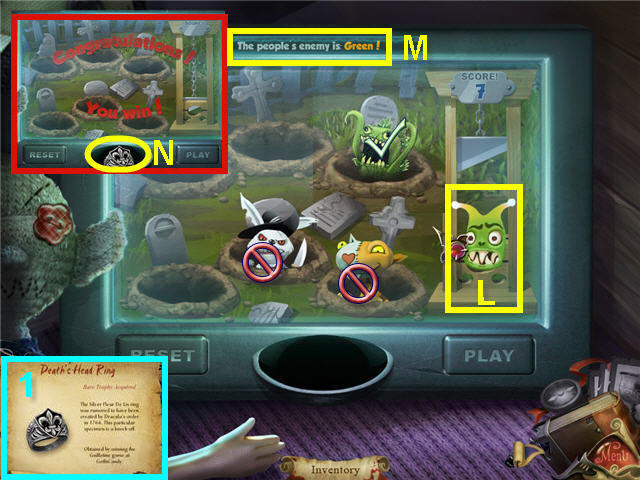
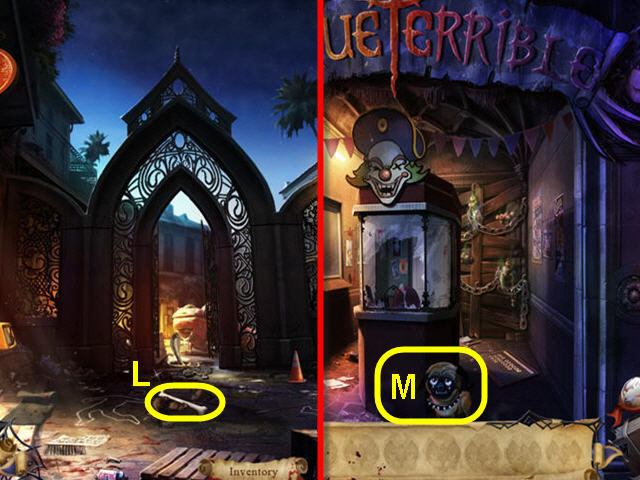
- The Guillotine Game is an arcade game like Whac-a-Mole.
- Your enemy is on the right (L) and the description is on the top (M).
- You get a point for each enemy you hit and lose a point for hitting an innocent or for not doing anything.
- You win when your score reaches 10.
- If you get down to 0, game is over and you lose.
- Take the prize, a Silver Fleur De Lies Ring from the prize slot (N).
- You will get a DEATH’S HEAD RING RARE TROPHY (1) added to the Trophy Room collection.
- Click on the street area to the left of the Spellbinder.
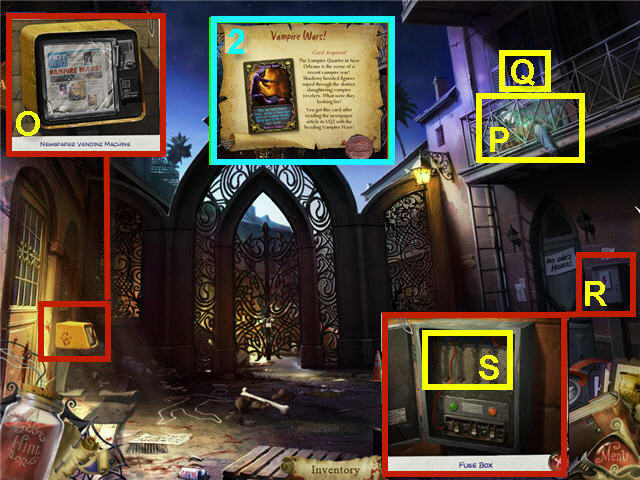
- Click on the newspaper box (O) on the left to get a close-up and click on it.
- Use the RESCUE JAWS on the newspaper box and read the newspaper.
- You get a VAMPIRE WARS CARD (2) in your Trophy area.
- Click on the journal in the lower right to read the update.
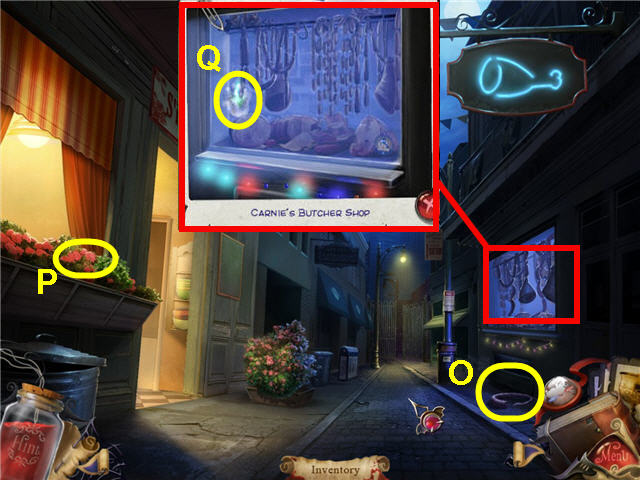
- Click on the body (P) on the balcony on the right.
- Click on the fan (Q) in the window above the body.
- Click on the fuse box (R) to get a close up and click again to open.
- Place the 4 FUSES in the empty slots (S).
- Click on the body on the balcony now that the fan is going to get a close-up.
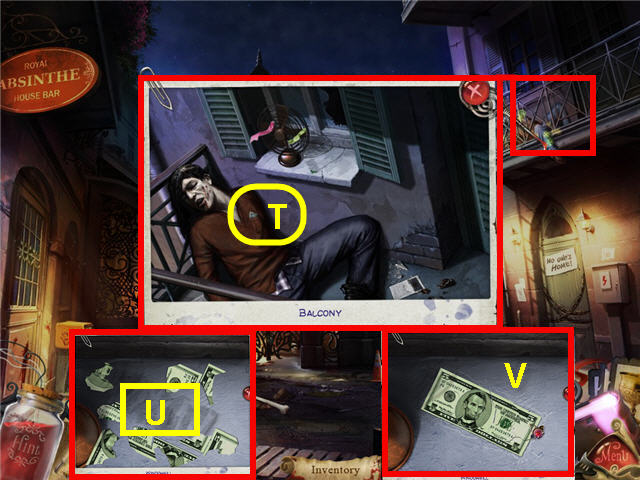
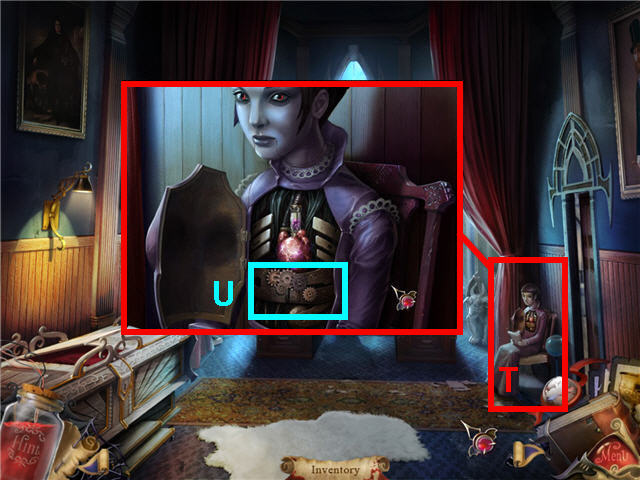
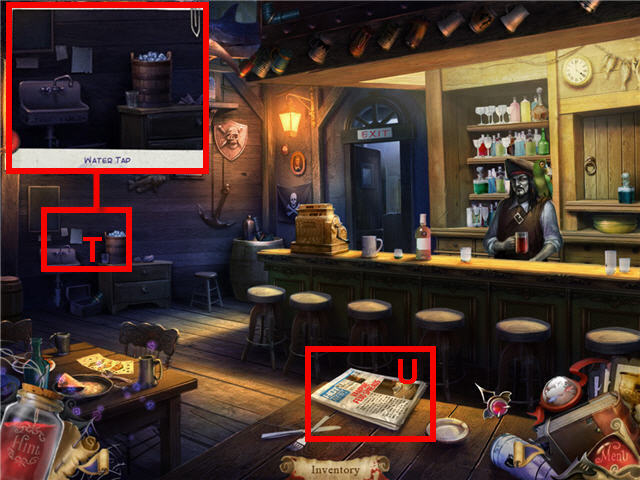
- Click on the shirt pocket on the body and expose a five dollar bill (T).
- Click on the 5 dollar bill and it triggers a puzzle.
- Use the INVISI-GLUE on the area with the bill pieces (U).
- Place the pieces on the glued area by left clicking to pick them up; and right clicking to turn them.
- Click on and take the FIVE DOLLARS (V) when complete.
- Exit via the bottom of the screen.

- Click on the beating heart (W) and exhaust all conversation with the man.
- Pick up the LOCKPICK (X) from the street.
- Click on the virtual tourist machine.
- Use the FIVE DOLLARS on the slot (Y) in the machine and get the address for the Cirque Terrible.
- Click on the compass by the journal to see the new map area is open on the map.
- Close the map for now and click on the street to the left of the Spellbinder.
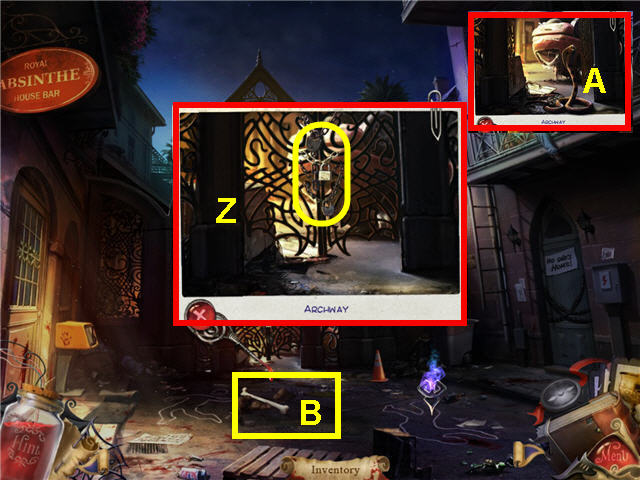
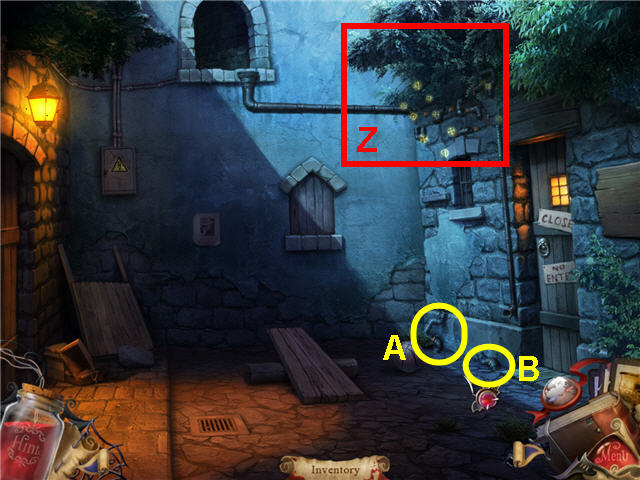
- Click on the archway gate to get a close-up.
- Use the LOCKPICK on the 3 locks (Z). You can use the RESCUE JAWS on the upper and lower one if you like, but you will still have to use the LOCKPICK on the middle one.
- Click on the unlocked archway and click on the cobra (A).
- Note the rats chewing on the bone (B) in the center.
- Click on the compass in the lower right to open the map and head to Cirque Terrible.
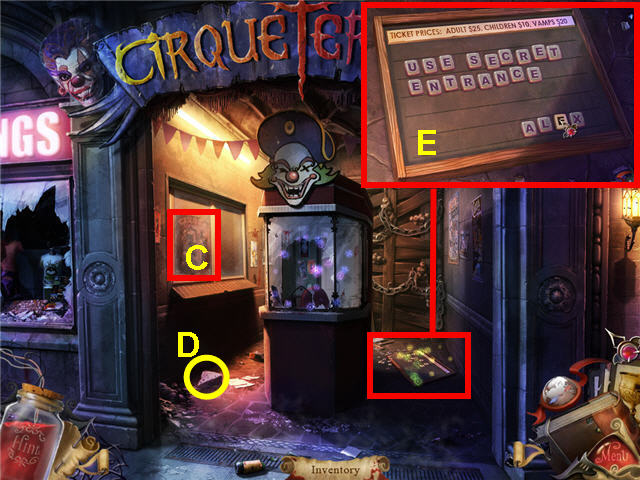
- Click on the poster (C) to get a close-up.
- Pick up the CHEESE (D) on the ground below the poster.
- Click on the green sparkly area on the floor to the right of the ticket booth to trigger a puzzle.
- Place the tiles on the board (E) to reveal a secret message.
- When the tiles are placed correctly they will lock in place.
- The secret message is “Use secret entrance, Alex”.
- Click on the chains covering the entrance to the theatre.
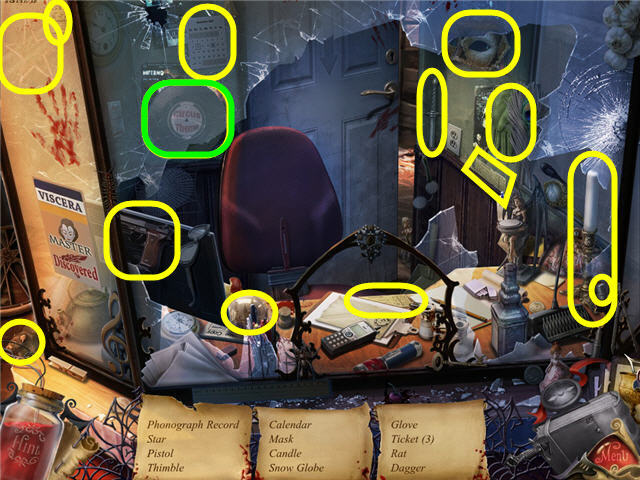
- Click on the ticket booth to reveal a hidden object scene.
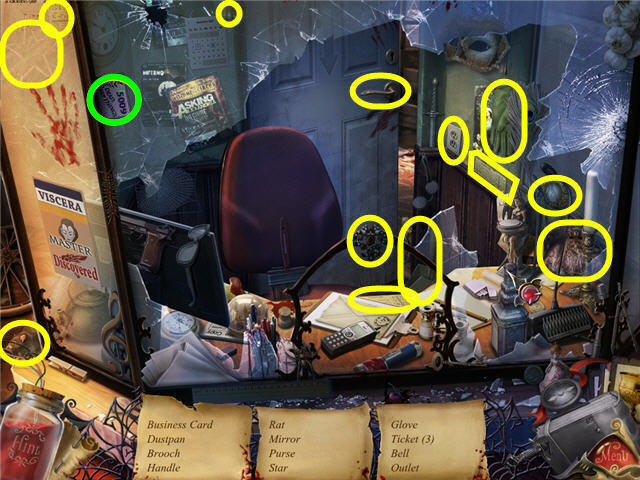
- Find the items listed and get a BUSINESS CARD.
- Click on the left side of the screen to trigger a puzzle.
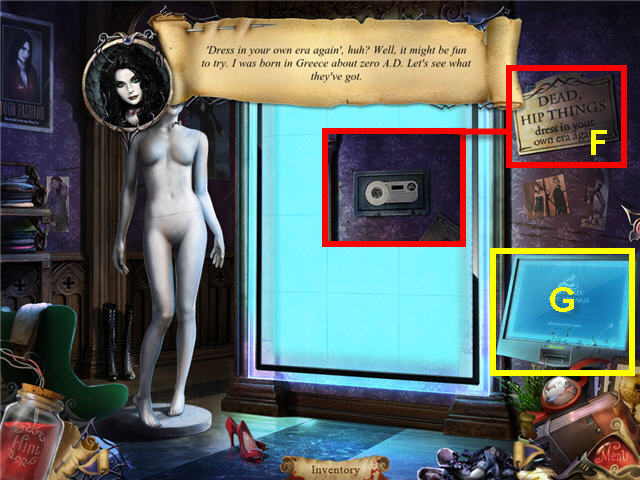
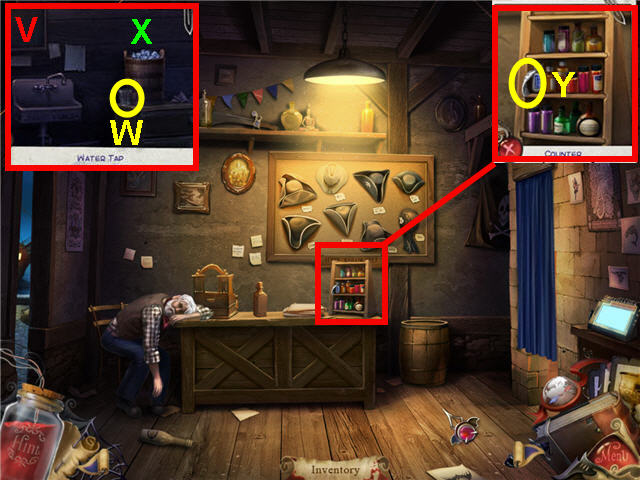
- Click on the sign (F) on the upper right to expose a safe.
- Click on the safe and note that you need a special key.
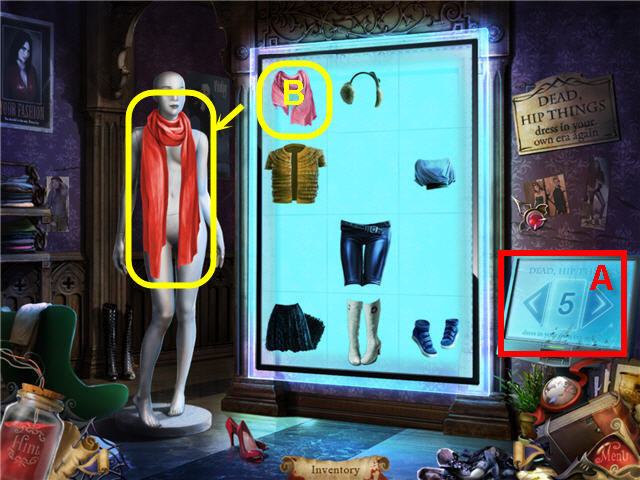
- Click on the Dead, Hip Things monitor (G) and note you need a pass code.
- Put the code 5009 from the BUSINESS CARD in inventory into the keypad on the panel and click on Enter.
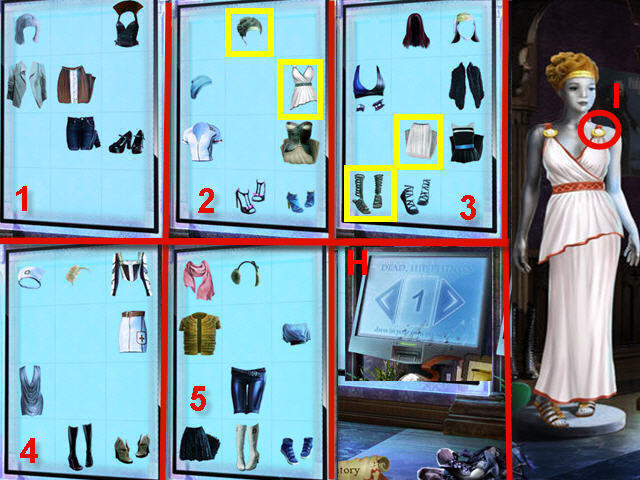
- Use the arrows on the panel (H) to scroll through the clothing options.
- See screenshot for the correct clothing choices for Greece, Zero A.D..
- Click on the button on her left shoulder to get a DIAMOND BUTTON (I).
- Exit via the bottom of the screen.
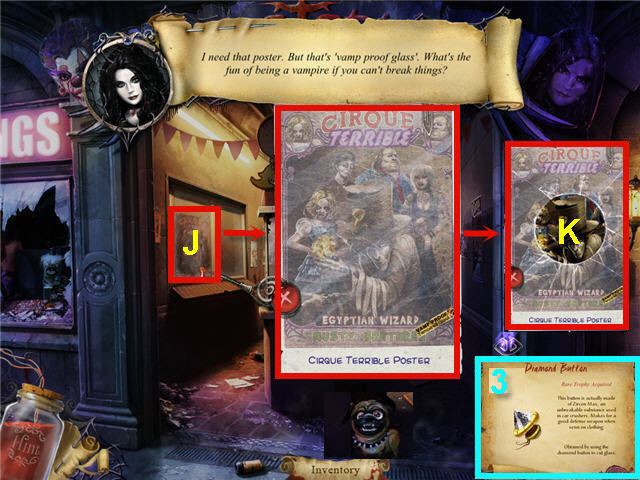
- Click on the poster (J) on the left of the ticket booth.
- Use the DIAMOND BUTTON on the vampire proof glass.
- Get the DIAMOND BUTTON RARE TROPHY (3).
- Take the CIRQUE TERRIBLE POSTER (K) from the hole in the glass.
- Click on the dog next to the ticket booth.
- Click on the compass to open the map and click on Vampire Quarter.
- Click on the street next to the Spellbinder.
- Place the CHEESE by the rats and take the BONE (L).
- Click on the compass to access the map and click on Cirque Terrible.
- Give the BONE to the Cinnamon the dog (M) and exhaust all dialogue.
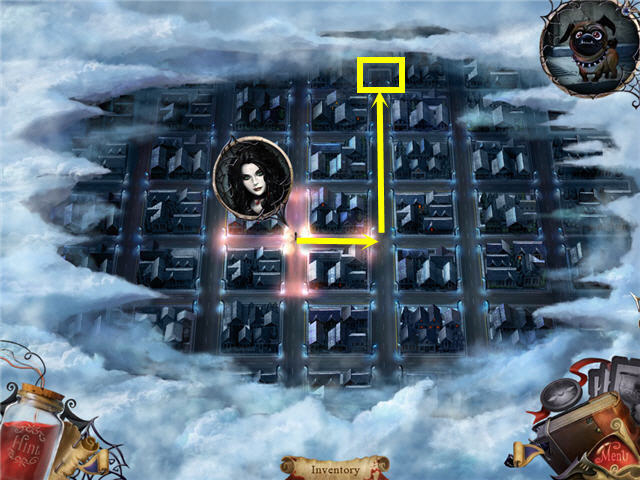
- The goal of the puzzle is to track down Cinnamon the dog to find another vampire.
- Click on an intersection in any direction next to the intersection your icon is at and listen for the barking.
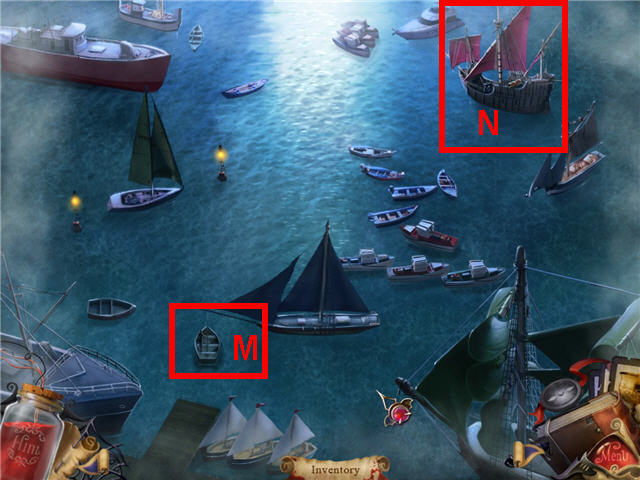
- You can tell how close you are to Cinnamon by how loud the barks are or how big the bark font is. See screenshot for my solution; these are random.
- Click on the Blood Bank on the Map.
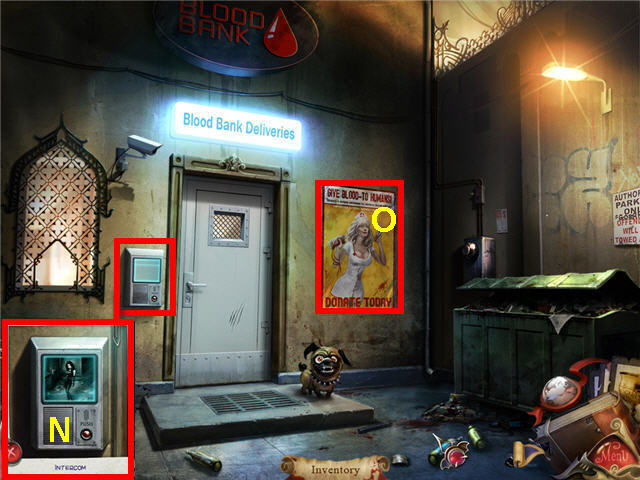
- Click on the window on the left and talk with the man inside.
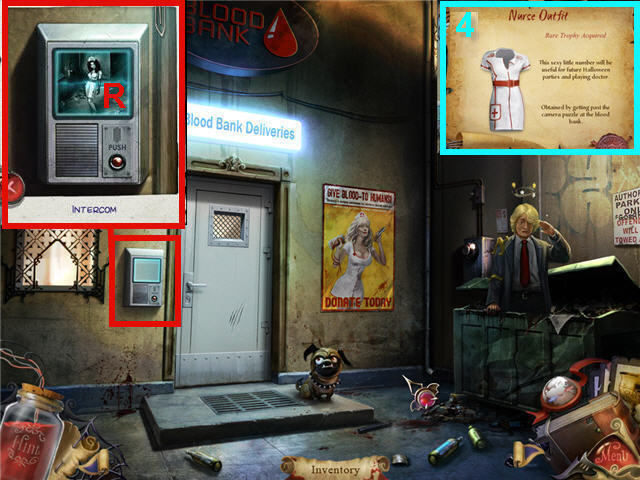
- Click on the intercom and click anywhere on the close-up (N).
- Click on the poster to the right of the door and note the outfit (O).
- Click on Cinnamon, the dumpster and the security camera.
- Click on the compass to access the map and click on Cirque Terrible.
- Click on the left of the screen to get to the wardrobe room.
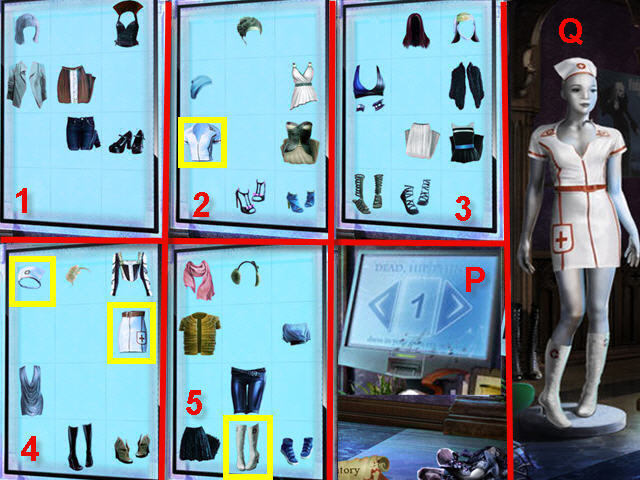
- The goal is to dress Dahlia like the nurse in the poster by the blood bank.
- Use the arrows on the panel (P) to scroll through the clothing options.
- See screenshot (Q) for the correct clothing choices for a nurse.
- Click on the outfit after Dahlia says it’s perfect to get a NURSE OUTFIT in inventory.
- Click on the compass to access the map and click on the Blood Bank.
- Note the two beating hearts while in vampire vision.
- Click on the beating heart in the dumpster and speak to the man in the dumpster.
- Click on the intercom to get a close-up.
- Use the NURSE OUTFIT on the intercom screen (R).
- Click on the intercom and speak to Slick till he sends you to Restful Acres.
- Click on the compass to access the map and click on Restful Acres.
- Get the NURSE OUTFIT RARE TROPHY (4).

- Click on the newspaper (S) on the ground to remove it.
- Take the BUTTON PANEL (T) that was covered by the paper.
- Take the SCREEN COVER (U) by the monitor on the right.
- Click on the bench to get a close-up.
- Take the RESIDENT INFORMATION CHIP (V) and the SCREWDRIVER (W) from under the bench.
- Click on the cat (X) on the wall and then click on the cat again when she comes down to the ground to get an ELECTRONIC KEY.
- Click on the Electronic Residents Board (Y) on the right.
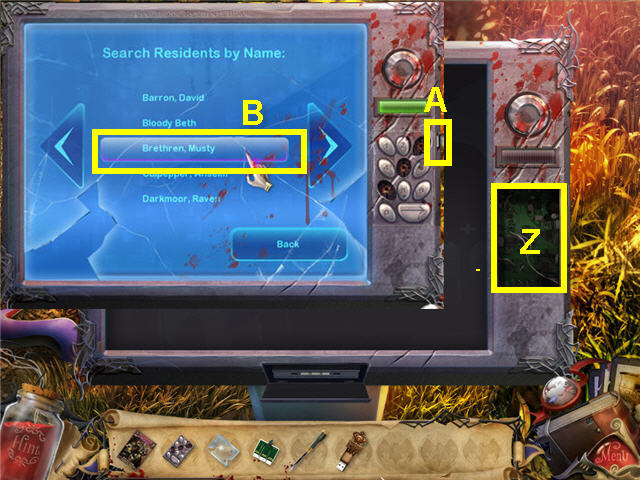
- Place the RESIDENT INFORMATION CHIP on the open space (Z) on the right side of the monitor.
- Place the BUTTON PANEL on top of the RESIDENT INFORMATION CHIP.
- Place the SCREEN COVER on top of the BUTTON PANEL.
- Place the ELECTRONIC KEY on the upper right of the keypad (A).
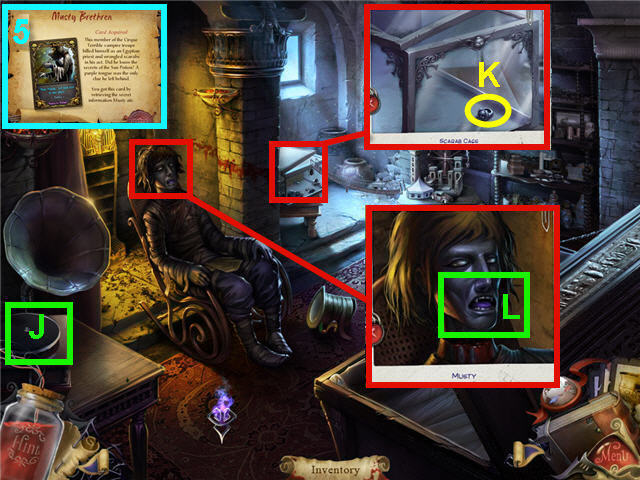
- Click on “search by name” and use the arrows to scroll through the names till you find the name that Slick provided; Musty Brethren.
- Click on Brethren, Musty (B).
- Click on “print and visit” on the graveyard map or on the highlighted mausoleum to automatically transport to Musty.
- Click on the purple sparkly area on the middle right of the room.
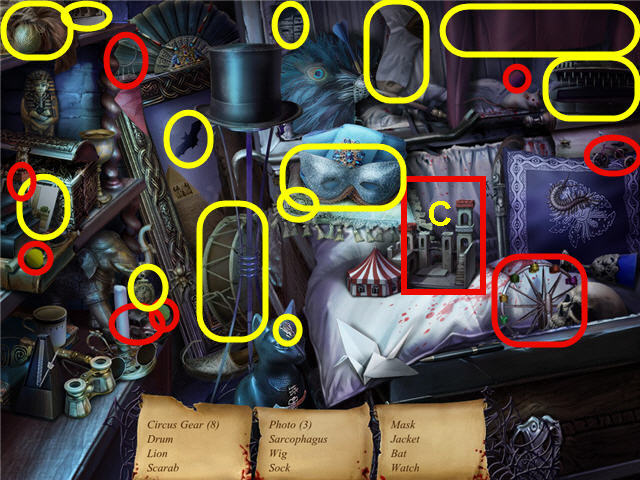
- Find all the items listed and get a SCARAB CIRCUS.
- Move the 8 circus gear items circled in red on the screenshot into the coffin (C).
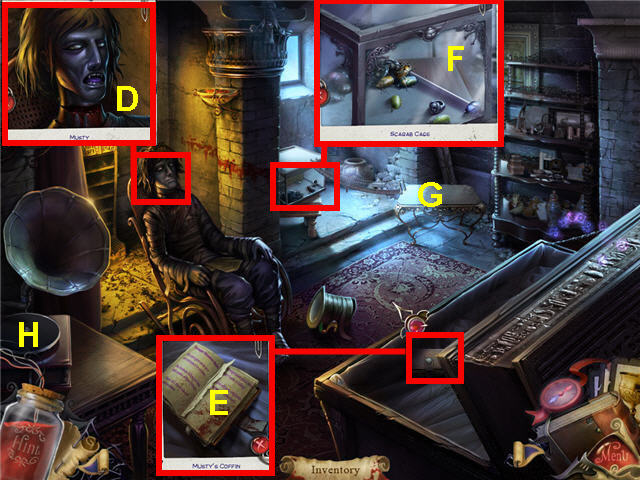
- Click on Musty’s face to get a close-up.
- Click on Musty’s face (D) again to note the purple tongue and then click on the purple tongue.
- Click on the book in Musty’s coffin to get a close-up; click again to open the book.
- Click on the open book (E) and note that a page is missing and it was written in purple ink.
- Click on Musty’s purple tongue again.
- Click on the terrarium (F) and note the scarabs eat dead flesh.
- Click on the ring in the terrarium.
- Place the SCARAB CIRCUS on the table (G).
- Click on the phonograph (H).
- Click on the compass to access the map and click on the Vampire Quarter.
- Click on the GothiCandy store window to access a hidden object game.
- Find all the items listed and get TWEEZERS and a TONGUE DEPRESSOR.
- Move the 6 surgery game pieces circled in red on the screenshot into the game board (I).
- Click on the compass to access the map and click on Cirque Terrible.
- Click on the ticket booth to access a hidden object scene.
- Find all the items listed and get a PHONOGRAPH RECORD.
- Click on the compass to access the map and click on Restful Acres.
- Click on the Electronic Resident’s Board on the right and search by name and click on Brethren, Musty and then on the highlighted mausoleum.
- Place the PHONOGRAPH RECORD on the phonograph (J).
- Click on the phonograph to start the music.
- Click on the scarab terrarium to open the lid and let them out if they do not go on their own and then click on the record again to play.
- Click on the terrarium and take the SIGNET RING (K).
- Click on the blue jar on the floor next to Musty and note the theatrical make-up.
- Click on Musty to get a close-up.
- Use the TONGUE DEPRESSOR on Musty’s tongue (L).
- Use the TWEEZERS on the note stuck in his mouth.
- Note the address of the secret entrance on the note; 100 Dormant.
- Get the MUSTY BRETHREN CARD (5) for the trophy room.
- Click on the compass to access the map and click on Cirque Terrible.
- Click on the left side of the screen to get to the wardrobe room.
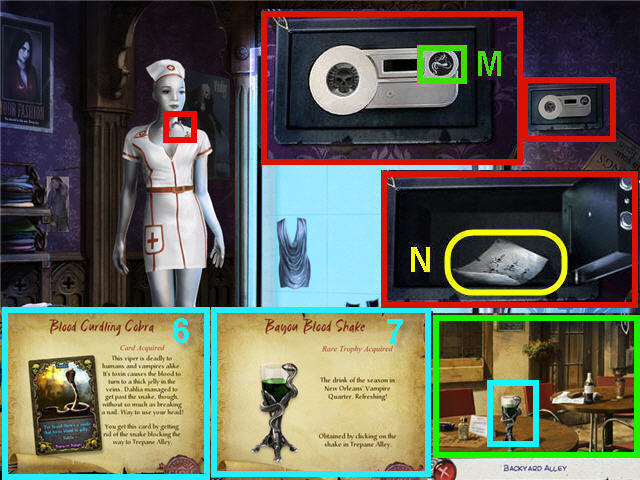
- Click on the wall safe to get a close-up. If you did not expose the safe earlier, click on the dead hip things sign on the wall to reveal the safe.
- Use the SIGNET RING on the slot (M) in the safe.
- Take the SKELETON DIAGRAM (N) from inside the safe.
- Make sure the mannequin is not wearing the nurse uniform and click on the screw on her neck.
- Use the SCREWDRIVER on the screw in her neck and automatically get the MANNEQUIN’S HEAD.
- Click on the compass and head to Vampire Quarters.
- Head to the left of the Spellbinder and click on the archway.
- Use the MANNEQUIN’S HEAD on the snake and get the BLOOD CURDLING COBRA CARD (6).
- Click on the cleared archway and get a close-up of the backyard alley.
- Click on the goblet and get the BAYOU BLOOD SHAKE RARE TROPHY (7).
- Click on the compass to access the map and click on Restful Acres.
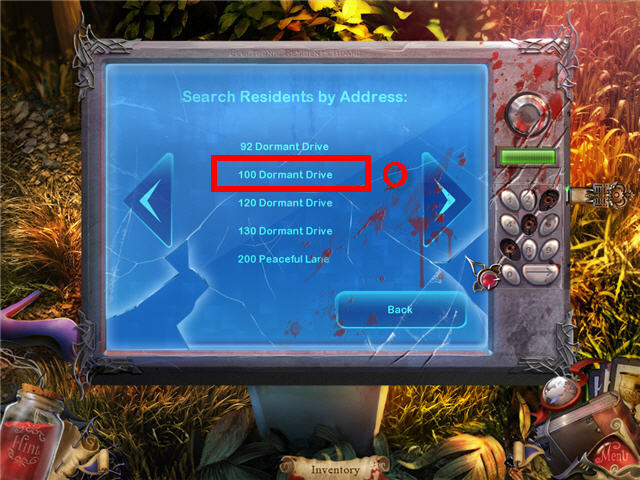
- Click on the Electronic Residents Board.
- Click on Search by Address.
- Click on the arrow on the right 2x till you reach 100 Dormant Drive.
- Click on 100 Dormant Drive (O) and then click on the highlighted building.

- Your SKELETON DIAGRAM (P) is automatically removed from inventory and placed on the secret door.
- Click-hold and drag the tiles on the sides of the door to the top of the door in the order of the diagram (Q).
- The location of the tiles on the side of the door is random. See screenshot for my solution.
- Click on the secret door to open it and click again to enter.
Episode 2 - The Wizard in the Basement
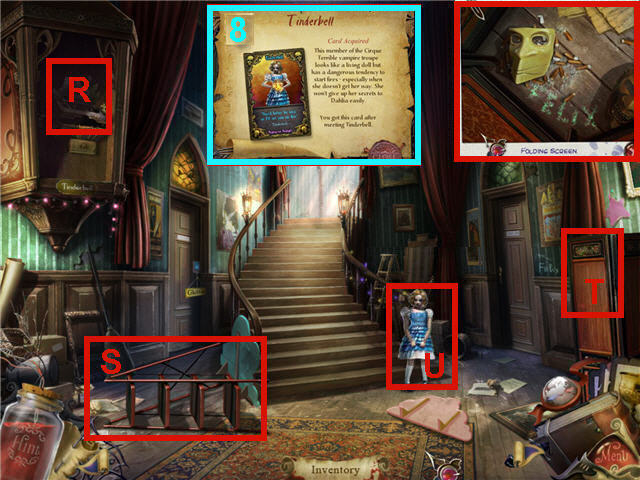
- Click on the music box display (R) on the upper left but it’s too high.
- Click on the ladder (S) to stand it up.
- Click on the folding screen (T) to the right and get a close-up.
- Click on the close-up using your vampire sense till you see Felix written in the dust.
- Click on Tinderbell (U) a couple times and get a TINDER BELL CARD (8) for the Trophy Room.
- Click on Felix’s Room on the right and note we need a key.
- Click on Glutton’s door on the left and note the special lock.
- Click on the music box display (R) and note the characters.
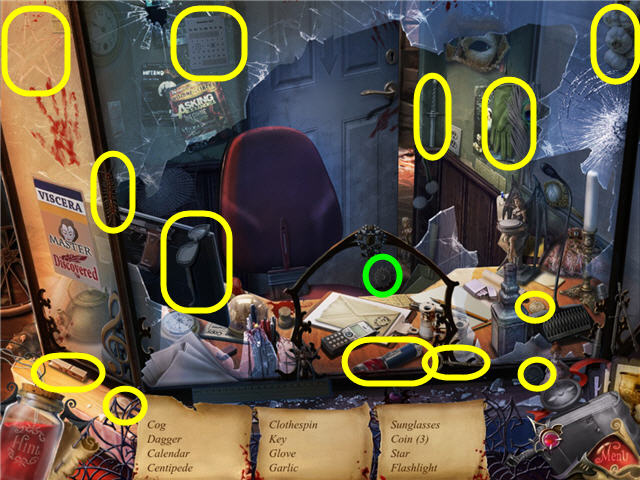
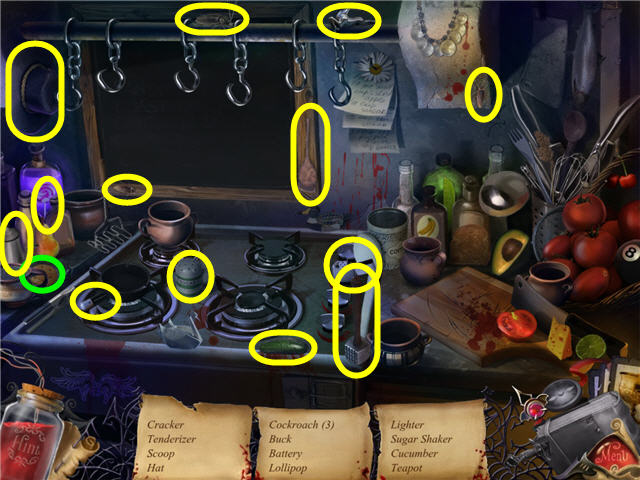
- Head upstairs and click on the trunk in the far left corner of the room to access a hidden object scene.
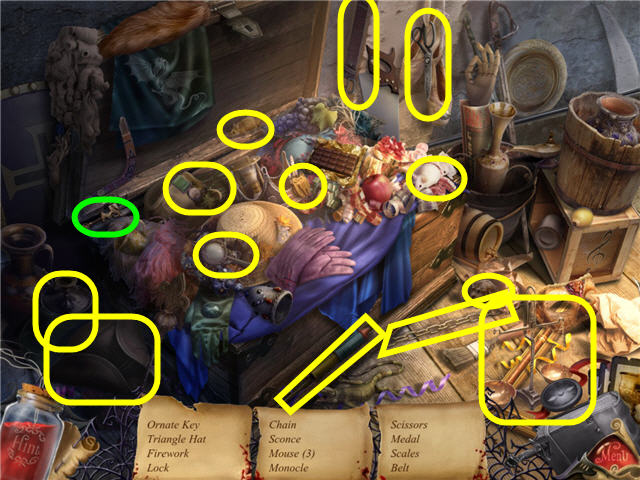
- Find the items listed and get an ORNATE KEY.
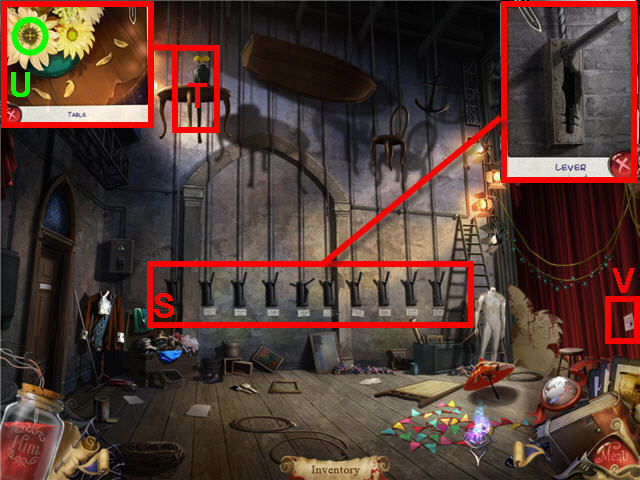
- Pull the levers (S) down and note that the 5th from the left lever is broken.
- Click on the table (T) after it is lowered and take a COG (U).
- Click on the note (V) on the curtain.
- Head into the room on the left.
- Click on the painting on the left wall (E) and take a COG.
- Click on the coffin (F) to open it.
- Click on the coffin (F) for a close-up and take the POTION VIAL.
- Click on the desk (G) and click on the pink note and see that Tinderbell’s favorite song is Auld Lang Syne. Click and read the stack of papers.
- Click on the mechanical secretary (H) in the chair and click on her chest to open up a panel and note it is missing parts.
- Exit the room to the right and then via the bottom of the screen to go back downstairs.
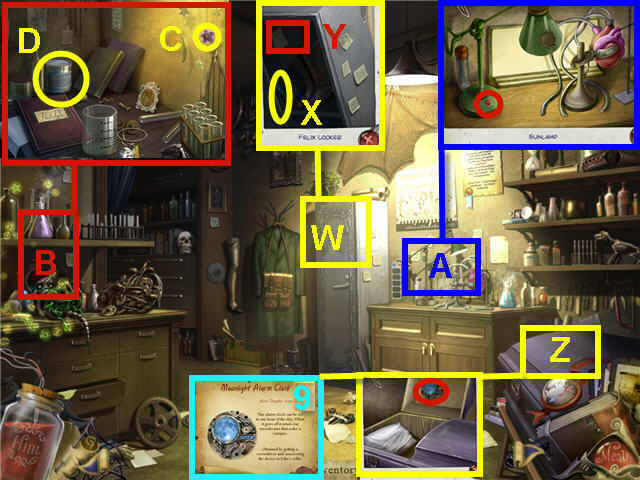
- Use the ORNATE KEY on Felix’s room door on the right.
- Click on the locker (W) to open it.
- Click on the opened locker to get a close-up and take the SCREWDRIVER (X).
- Click on the boots and the note (Y) on the locker wall to get an update in your journal on the Auld Lang Syne.
- Click on the coffin lid (Z) to open it.
- Click on the opened coffin to get a close-up and click on the fake moonlight.
- Use the SCREWDRIVER on the fake moonlight and get a MOONLIGHT ALARM CLOCK Rare Trophy (9).
- Click on the counter (A) to the right of the locker and get a close-up.
- Click on the red button on the sunlamp to try it and watch the burn.
- Use the POTION VIAL on the sunlamp.
- Click on the counter (B) on the left.
- Take the COG (C) from the flower center.
- Click on the book and open it.
- Click on the page in the open book to open the recipe.
- Take the DEAD SEA SALT (D).
- Click on the compass to access the map and click on the Blood Bank.
- Click on the window and talk to Slick till he asks you to get him a newspaper.
- Click on the compass to access the map and click on Vampire Quarter.
- Click on the street by the wrecked mail truck and note the oil on the ground.
- Click on the street to the left of the Spellbinder to go around the corner.
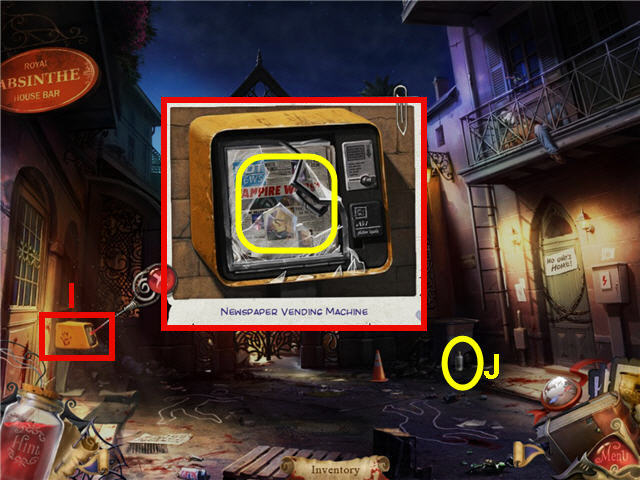
- Click on the newspaper vending machine (I) and take a NEWSPAPER.
- Take the TWIST-CAP BOTTLE (J) on the ground by the dumpster.
- Exit via the bottom of the screen to get back to the wrecked mail truck.
- Use the TWIST-CAP BOTTLE on the oil on the street to get a BOTTLE OF OIL.
- Click on the GothiCandy store window to access a hidden object scene.
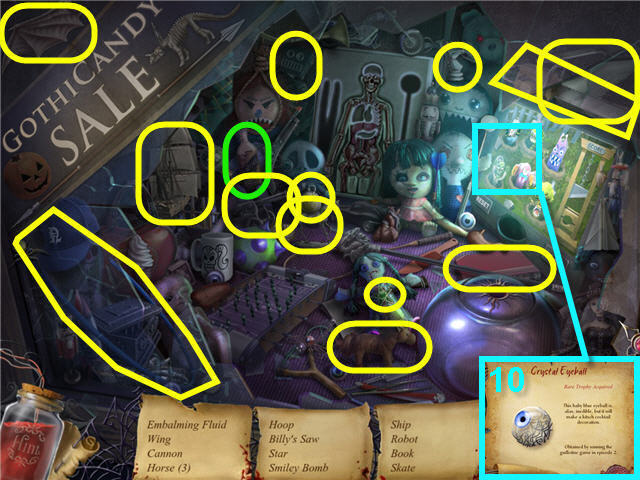
- Click on the Guillotine Game to play the optional mini-game.
- Take the eyeball from the prize slot under the game when complete and get the CRYSTAL EYEBALL RARE TROPHY (10).
- Find the items listed and get EMBALMING FLUID.
- Click on the compass to access the map and click on the Blood Bank.
- Use the NEWSPAPER on the window and click through the dialogue and Slick will give you a PINT OF BLOOD.
- Click on the compass to access the map and click on the Cirque Terrible Interior.
- Enter Felix’s Room on the right.
- Click on the counter on the left to get a close-up.
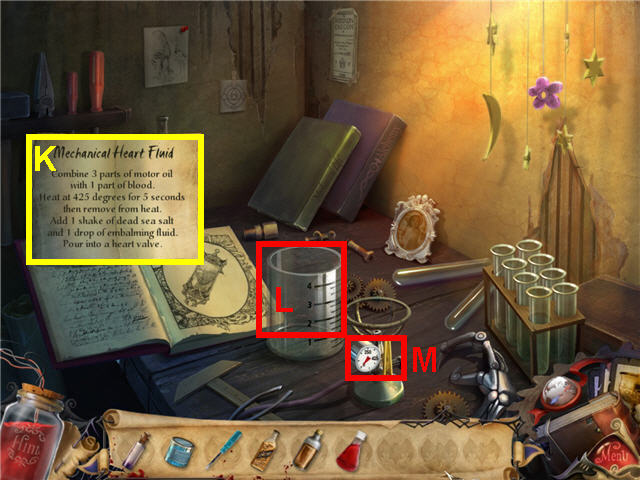
- Follow the recipe (K) for the mechanical heart fluid from the book next to the measuring cup.
- Use the BOTTLE OF OIL on the measuring cup (L) 3 times till it fills to the 3rd line on the cup.
- Use the PINT OF BLOOD on the measuring cup 1 time so that it is now filled to the 4 line.
- Click the thermometer (M) 2 times on the burner till it is close to 425 degrees.
- Click-hold and drag the measuring cup to the top of the burner. It will automatically go back to the counter top when the 5 seconds are over.
- Use the DEAD SEA SALT on the measuring cup 1 time.
- Use the EMBALMING FLUID on the measuring cup 1time.
- Exit the room and click on Tinderbell’s music box located to the left of the stairs above the red step ladder.
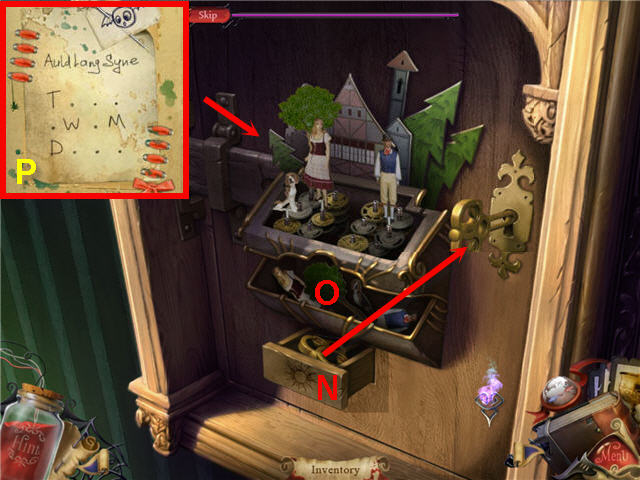
- The goal is to place the 4 characters on the right gears so that Tinderbell’s favorite song, Auld Lang Syne plays when you turn the key.
- Click on the drawer with the sun drawn on it (N) and take the MUSIC BOX KEY.
- Use the MUSIC BOX KEY on the keyhole.
- Take out the 4 characters from the opening (O) and place them on the pegs above using the note found in Felix’s locker (P).
- According to the note; T = Tree placed on the back left peg, W = Woman placed on the second from left peg in the middle row, M = Man placed on the far right peg in the middle row, D = Dog placed on the far left front row.
- Turn the key when you have all the characters in place. If you hear Auld Lang Syne, the door to Tinderbell’s room will unlock.
- Click on the shelves on the far right of Tinderbell’s room to access a hidden object scene.
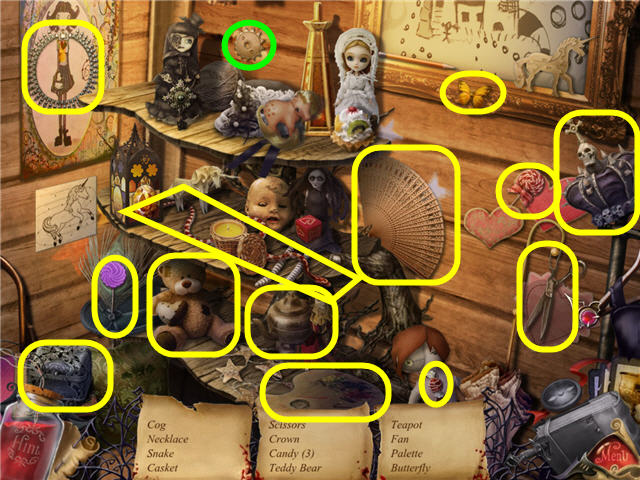
- Find the items listed and get a COG.
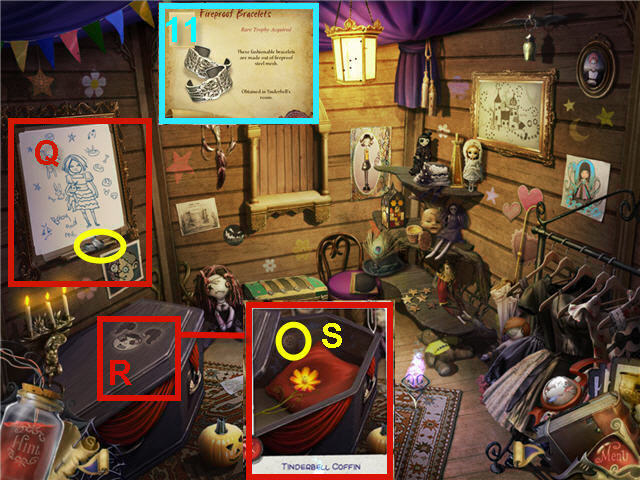
- Click on the whiteboard (Q) and take the bracelets to get a FIREPROOF BRACELET RARE TROPHY (11).
- Click on the coffin (R) to open it.
- Click on the open coffin to get a close-up and take the COG (S).
- Click on the flower on Tinderbell’s pillow.
- Click on Tinderbell when she appears in the room and exhaust all conversation.
- Click on the clothes rack on the bottom right.
- Exit the room and head up the staircase and into the office on the left.
- Click on the mechanical secretary (T) to get a close-up.
- Place the 5 COGS under her heart (U).
- Listen to the secretary speak and then note you need one more cog.
- Click on the compass to access the map and click on the Cirque Terrible.
- Click on the ticket booth to access a hidden object scene.
- Find the items listed and get a COG.
- Click on the compass to access the map and click on the Cirque Terrible Interior.
- Head up the stairs and into the office on the left.
- Click on the mechanical secretary and place the COG with the others under her heart.
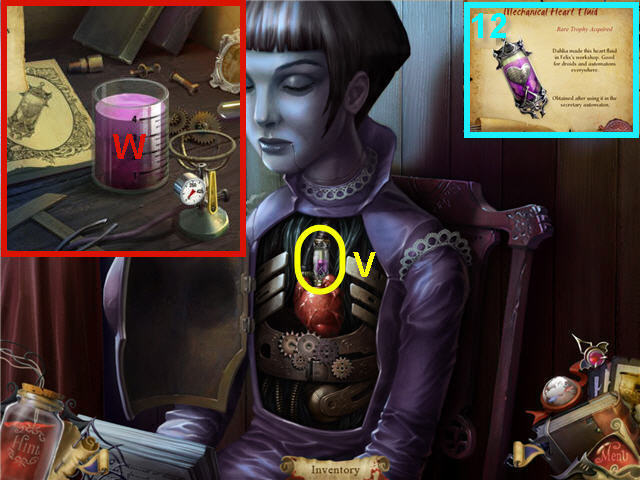
- After she speaks take the EMPTY HEART VIAL (V).
- Head out of the office, back out of the prop room and into Felix’s workshop on the right.
- Click on the counter on the left to get a close-up.
- Use the EMPTY HEART VIAL on the measuring cup full of mechanical heart fluid (W) to get MECHANICAL HEART FLUID. If you did not make the fluid previously, follow the recipe in the book on the table.
- Head back up to the office and click on the mechanical secretary.
- Place the MECHANICAL HEART FLUID above the heart and listen to her speak.
- Take the heart vial when finished to get the MECHANICAL HEART FLUID RARE TROPHY (12).
- Click on the secretary after you get out of the close-up and get a SPRING.
- Exit the room to the right to get to the prop room.
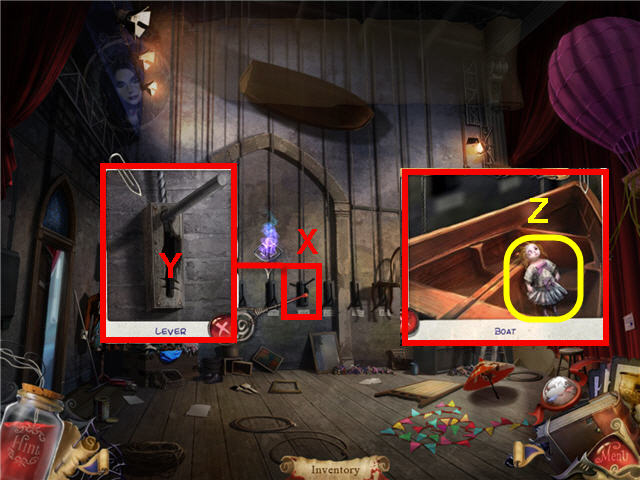
- Click on the 5th lever from left (X) to get a close-up.
- Place the SPRING under the lever (Y) and click the lever to lower the boat.
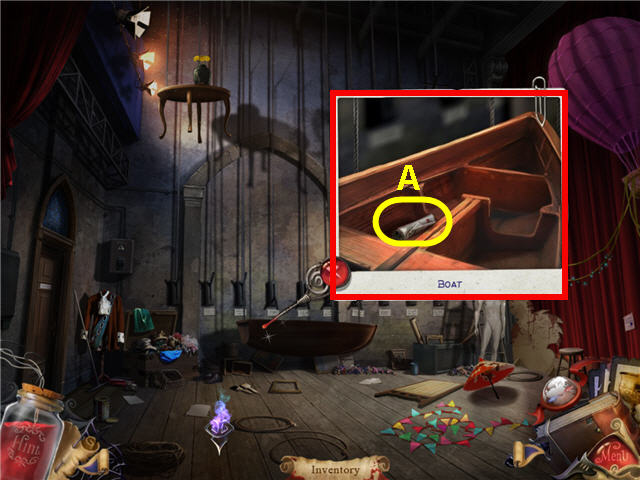
- Click on the boat to get a close-up.
- Take Baby (Z) from the boat and watch the cutscene.
Episode 3 – The Glutton of Gilborne
- Click on the boat to get a close-up.
- Take the rolled newspaper (A) to trigger a new area on the map.
- Click on the compass to access the map and click on the arrow to Memphis and then on Hog Haven.
- Click on the farmer hanging on the door, the padlocks on the barn door, the blood message and the stuff strewn on the ground.
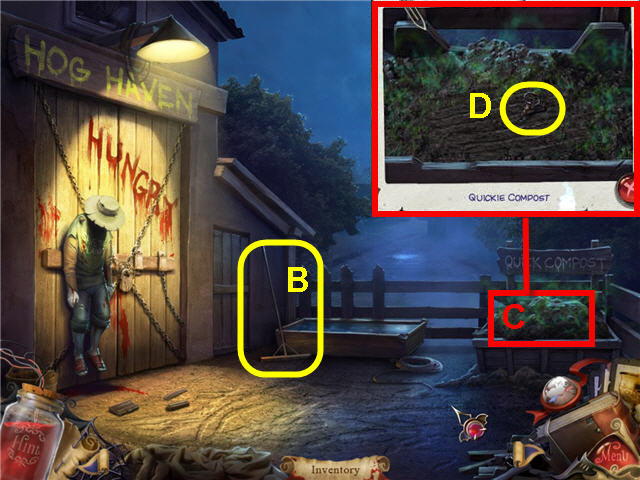
- Take the RAKE (B) by the trough.
- Click on the compost pile (C) to get a close-up.
- Use the RAKE on the compost pile and take the RUSTY KEY (D).
- Click on the compass to access the map and click on the arrow to New Orleans and then on Cirque Terrible Interior.
- Head up the staircase and click on the trunk in the corner to access a hidden object scene.
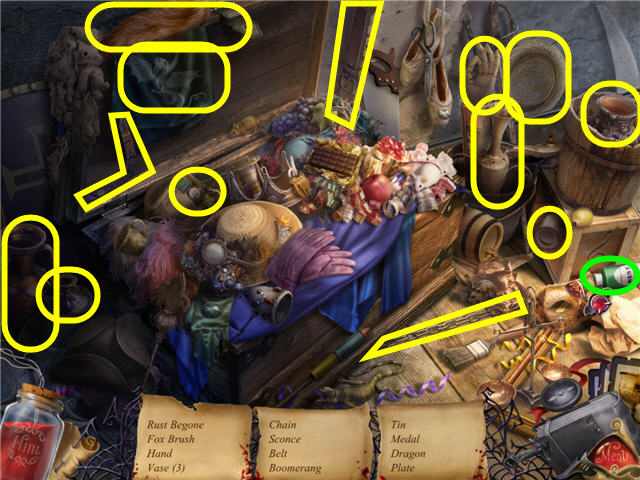
- Find the items listed and get RUST BEGONE which automatically cleans the RUSTY CLEAN to get a HOG HAVEN KEY.
- Click on the compass to access the map and click on the arrow to Memphis and click on Hog Haven.
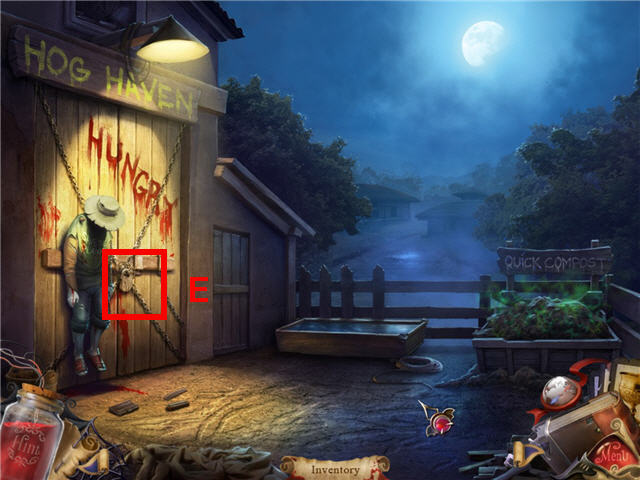
- Use the HOG HAVEN KEY on the padlock (E) and enter the barn.
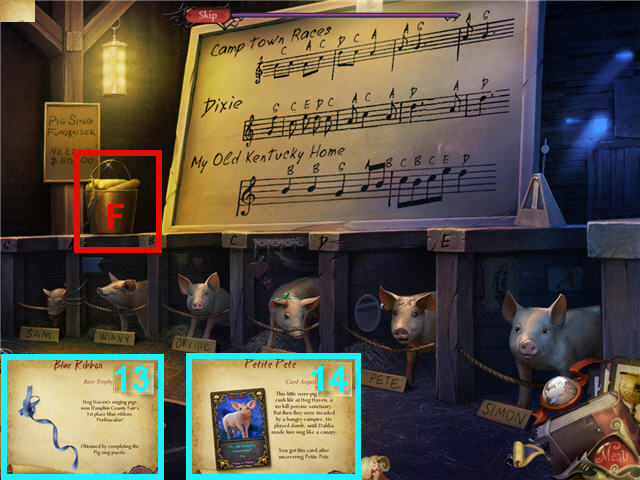
- The goal is to make the pigs sing the 3 songs and find out who the were-pig is.
- Each pig sings a specific note, which can be found on the upper left of each stall.
- Take a corn from the bucket (F) and click the corn on the pig that corresponds with the note requested.
- Once you pick up a corn, you will start the process. Watch the yellow circle that appears around the note on the song board above and click the corn on the matching pig till the song is complete.
- You can use the same piece of corn till you make a mistake.
- You have to be very fast to complete the songs and it’s easiest to look at the song ahead of time and note the exact order you will need to click on the pigs.
- Talk to Pete the pig.
- You will get a BLUE RIBBON RARE TROPHY (13) for the trophy room for completing the puzzle even if you skip the puzzle.
- You get a PETITE PETE CARD (14) added to the book in the trophy room.
- Click on the compass to access the map and click on Downtown.
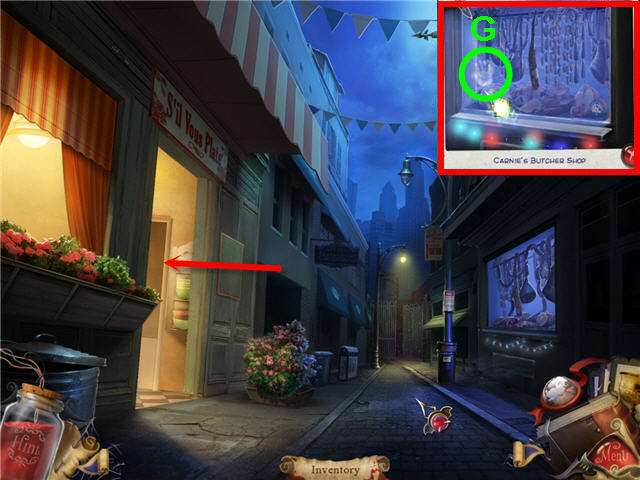
- Click on the butcher shop window on the right to get a close-up.
- Use your vampire sense (move the cursor around and watch the cursor turn into a flaming cursor) and click on Glutton’s handprint (G) a couple times and note the oxtail.
- Click on the flowering window box on the left and note the parsley.
- Head into the S’il Vous Plate restaurant.
- Click on the red glowing heart to note there is someone hiding.
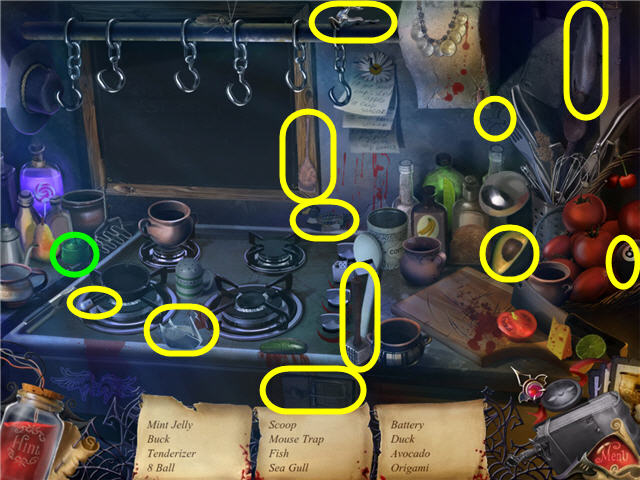
- Click on the stove top on the right to access a hidden object game.
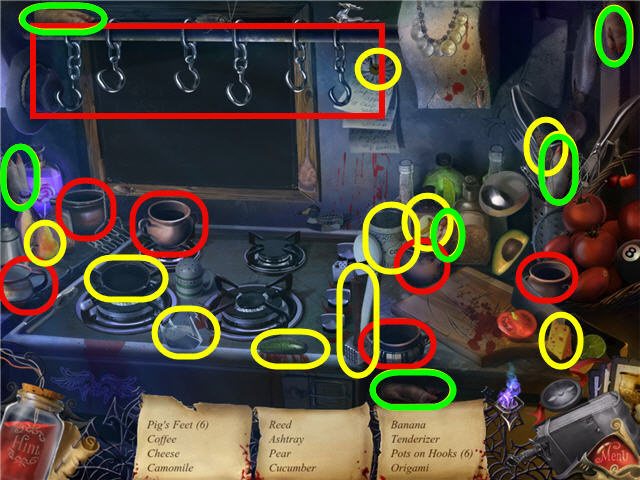
- Find the items listed and get 6 PIG’S FEET.
- Click-hold and drag the pots (marked in red on the screenshot) to the hooks to get the pots on hooks.
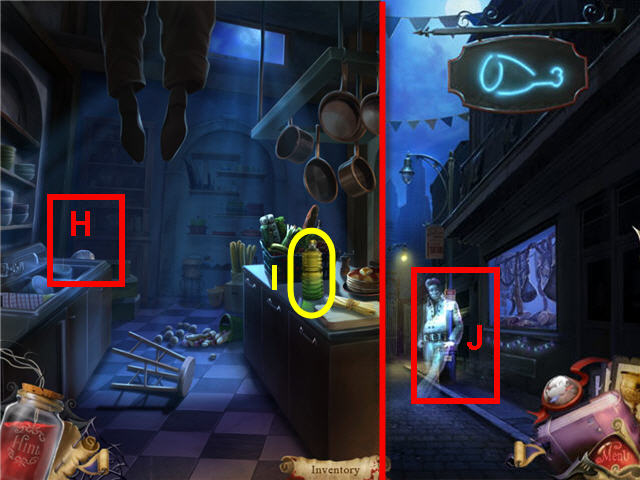
- Speak to M. BoBo (H) two times till you can no longer get any info.
- Take the COOKING OIL (I) from the counter.
- Exit the restaurant via the bottom of the screen.
- Speak to Melvis (J) two times till he agrees to get you the oxtail in exchange for sequins.
- Click on the compass to access the map and click on Southern Grease.
- Click on the book dispenser on the right to trigger a puzzle.
- The object is to expose the book with the bread on the cover and then move it to one of the dispenser slots.
- There can only be 4 books at a time in any given slot so the arrows will change with each move depending on the quantity you have in that slot. The arrows will only point to a slot with less than 4 books.
- The book in the 2nd row from the bottom, second slot from the left (I).
- Click on the buttons in the order marked in the screenshot to move the book to the dispenser.
- Click on the dispense book button (J) when you get the book to the bottom row and take the COOKBOOK from the tray.
- Click on the table.
- Take 4 POTATOES (K) from the basket. You will need to take one at a time.
- Click on the compass to access the map and click on Hog Haven.
- Click on the compost pile to get a close-up.
- Place the 4 POTATOES in the compost pile (L) and take the 4 ROTTEN POTATOES.
- You need to click on the ROTTEN POTATOES quickly or they will disappear and you will need to get more. You can do them individually if you wish.
- Click on the compass to access the map and click on the arrow to go New Orleans and click on the Blood Bank.
- Click on the window (M) and exhaust all conversation with Slick till he says he wants a TV in exchange for blood.
- Click on the compass to access the map and click on Restful Acres.
- Click on the entrance and automatically be at Musty’s place.
- Click on the far end of the coffin to access a hidden object scene.
- Find the items listed and get a JAR OF SEQUINS.
- Take the CLAY (N) in the jug next to Musty.
- Click on the compass to access the map and click on the arrow to Memphis and click on Downtown.
- Give the JAR OF SEQUINS to Melvis.
- Take the OXTAIL (O) from the ground in front of the butcher shop window.
- Click on the window box (P) on the left and take the PARSLEY.
- Click on the butcher shop window to get a close-up.
- Use the CLAY on the greasy print on the window (Q) to get a HAND PRINT.
- Click on the compass to access the map and click on the arrow to New Orleans and then on Cirque Terrible Interior.

- Click on Glutton’s door to get a close-up.
- Use the HAND PRINT on the lock (R) and enter the room.
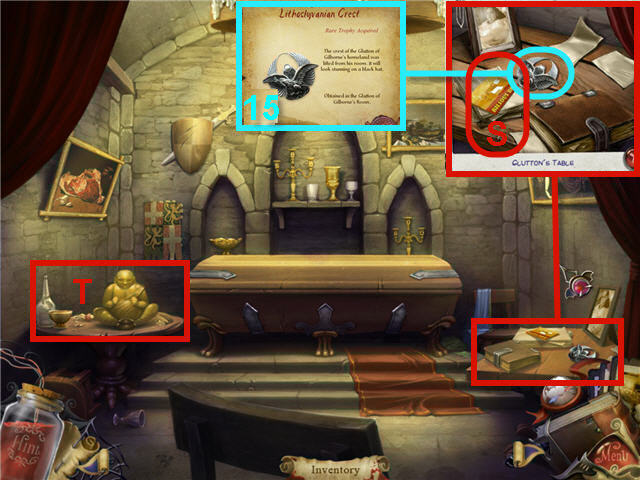
- Click on the table to the right to get a close-up.
- Take the LITHOSLYVANIAN CREST RARE TROPHY (15) from the table.
- Click on Bilious BBQ ad (S) to trigger a BBQ Pit location on the map.
- Click on the photo in the close-up.
- Click on the gold statue (T) on the left table in the room.
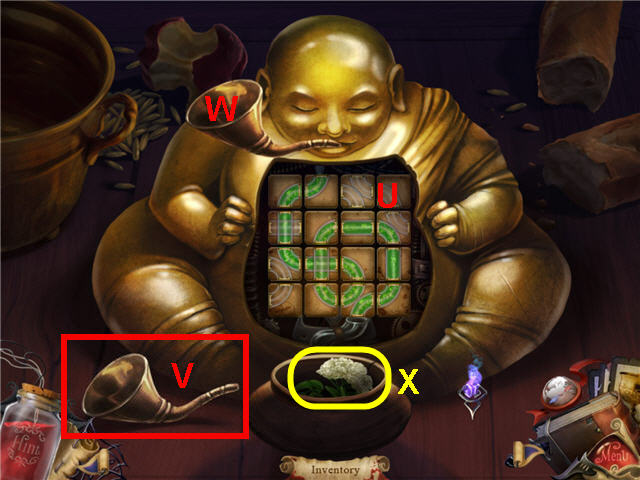
- Click on the belly of the statue to expose a set of pipes (U).
- The goal is to feed the statue by arrange the pipes so that you get a continuous flow from the top to bottom and then feeding it.
- Click on the pipes to rotate them.
- There will be no indication you have placed them correctly till you try and feed him.
- Click on the funnel (V) and it will automatically go into the statues mouth.
- Pour the COOKING OIL into the funnel (W).
- Take the SAMBUCA HERB (X) from the container.
- Click on the compass to access the map and click on the arrow to Memphis and then on the BBQ PIT.
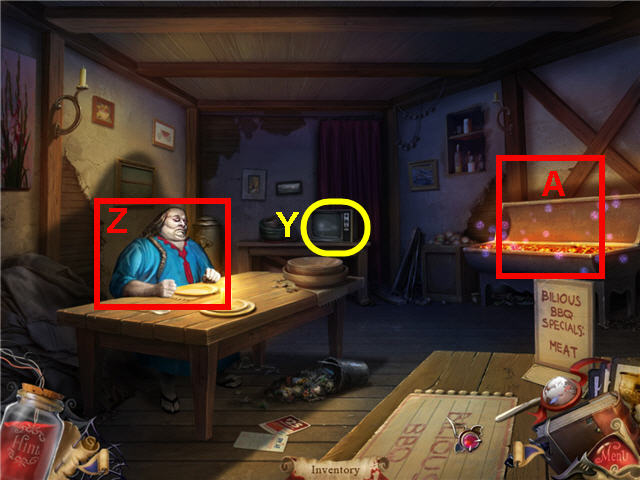
- Take the TV (Y) from the table in the back.
- Speak to the Glutton (Z) and exhaust all conversation.
- Click on the grill (A) on the right to access a hidden object scene.
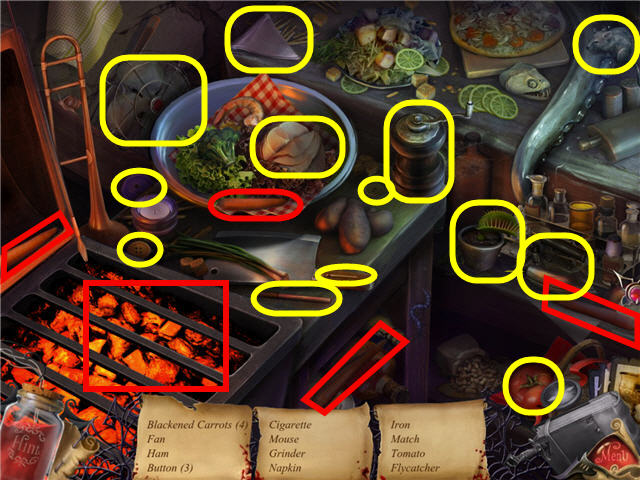
- Find the items listed.
- Click-hold and drag the 4 carrots (marked in red on the screenshot) on the grill (B) to get 4 BLACKENED CARROTS.
- Click on the compass to access the map and click on the arrow to New Orleans and then on the Blood Bank.
- Place the TV in the window and you will get a BAG OF BLOOD from Slick.
- Click on the compass to access the map and click on the arrow to Memphis and then on Downtown.
- Enter the restaurant on the left and click on the stove on the right.
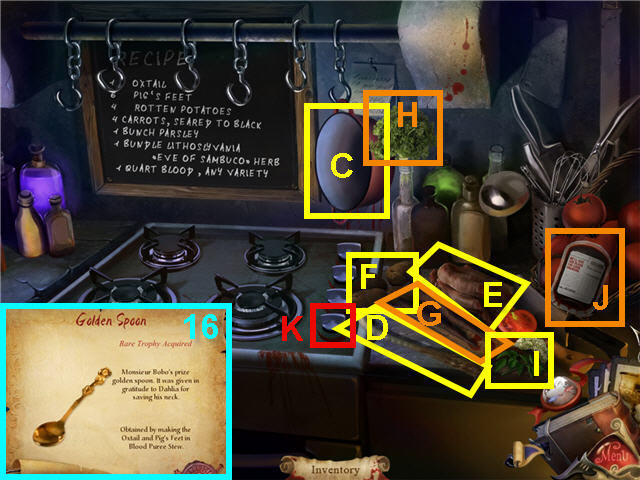
- Place the pot (C) on the stove.
- Place the OXTAIL (D) in the pot.
- Place the 6 PIG’S FEET (E) in the pot.
- Place the 4 ROTTEN POTATOES (F) in the pot.
- Place the 4 BLACKENED CARROTS (G) in the pot.
- Place the PARSLEY (H) in the pot.
- Place the SAMBUCA HERB (I) in the pot.
- Place the BAG OF BLOOD (J) in the pot.
- Click on the knob (K) to turn on the burner.
- Take the OXTAIL STEW IN BLOOD PUREE.
- Exit out of the stove area and speak to BoBo.
- Get a GOLDEN SPOON RARE TROPHY (16).
- Click on the compass to access the map and click on the BBQ PIT.

- Place the OXTAIL STEW IN BLOOD PUREE on the table and speak with the Glutton .
- Get the WHALE GREASE and The GLUTTON OF GILBORNE CARD (17) for the card book in the trophy area.
Episode 4 - Inked
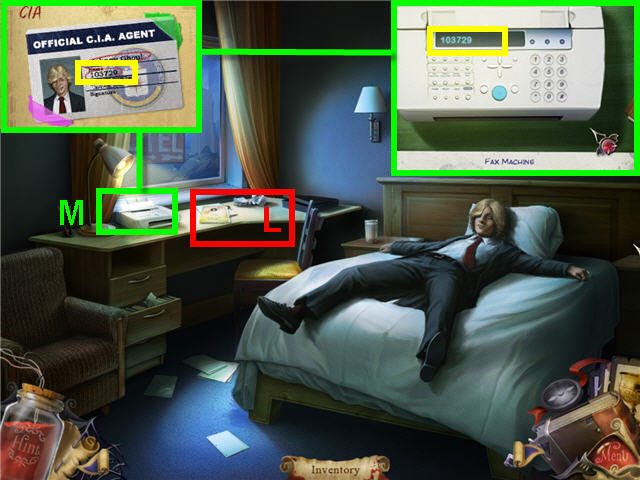
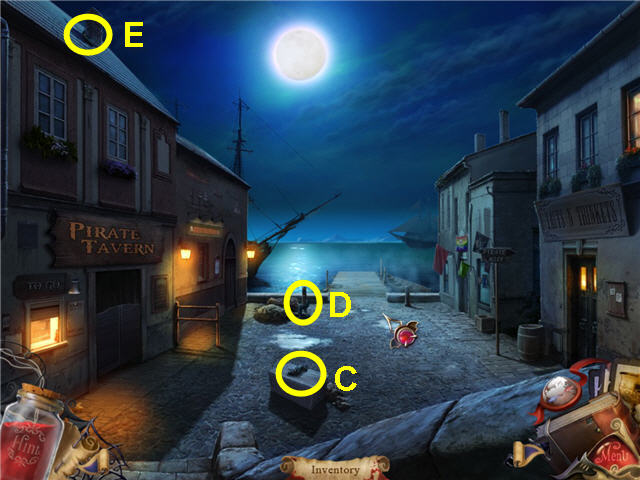
- Click on the CIA papers (L) on the desk a couple times and note that Mr. Ghoul is CIA Agent #103729.
- Click on the papers again in close-up and read about the sun potion.
- Click on the photos attached to the papers and click on the papers again to read about the Flagelli.
- Click on the fax machine (M) when it rings to get a close-up.
- Enter the CIA # 103729 from the card in your journal into the fax machine as the passcode.
- Press the blue button on fax machine after entering the code and read the message and click on it to add it to the journal.
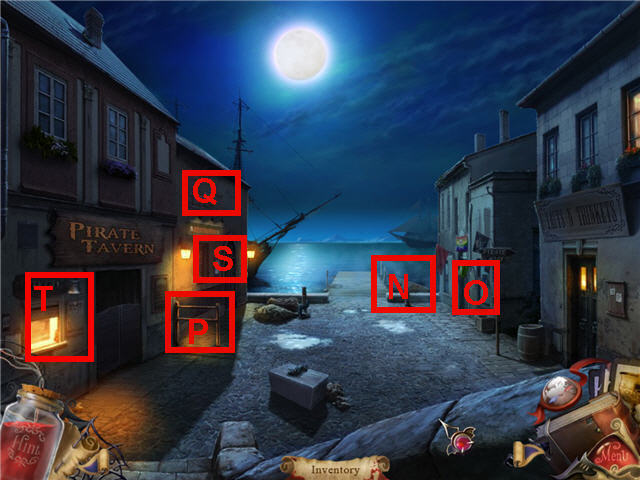
- Click on the dinghy (N).
- Click on the pirate flag dispenser (O) and note you need 50 cents to get a flag.
- Click on the hitching post (P) and note it is for parrots.
- Click on the mural (Q) and note the ships.
- Click on the window to ring the bell (R) on the left of the tavern.
- Click on the rest rooms (S).
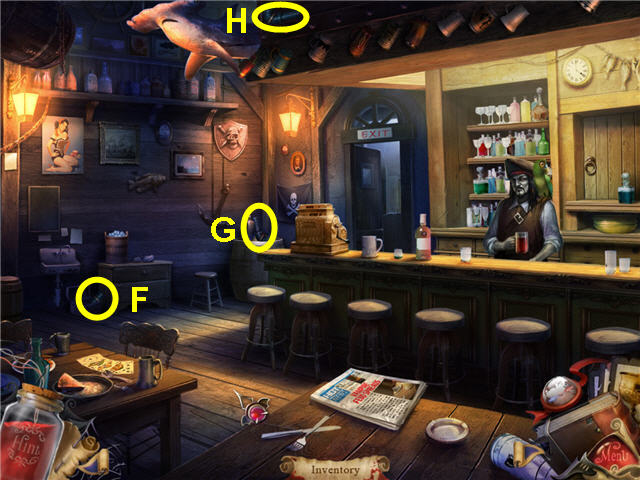
- Enter the Pirate Tavern on the left.
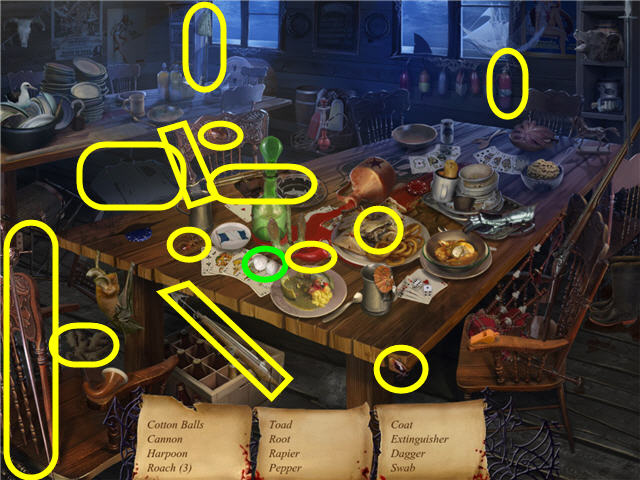
- Click on the table on the left to access a hidden object scene.
- Find the items listed and get a PRETZEL.
- Speak to the bartender two times.
- Read the newspaper (T) and note the Glutton and Tinderbell have been murdered.
- Click on the sink (U) and note the ice and water tap.
- Exit the tavern and head into the tattoo parlor on the right.
- Click on the tattooist sleeping at the counter.
- Head back across the street and go into the tavern.
- Click on the water tap area (V) and take the glass (W) and run in under the water tap to get a GLASS OF WATER.
- Take the GLASS OF WATER and use it on the ice bucket (X) to get WATER WITH ICE.
- Head back to the tattoo parlor and use the WATER WITH ICE on the tattooist.
- Speak with Salty Sam, the tattooist, 3 times till he has nothing left to say.
- Click on the inks on the counter and take the BLOOD THINNER (Y).
- Check out the pirate hats on the wall.
- Check out the tattoo making machine on the right side of the room.
- Leave the parlor and go right down Pirate Alley next to the tattoo parlor.
- Click on the pipes (Z) in the upper right of the screen and note the missing pipes.
- Pick up PIPE 8 (A) and PIPE 7 (B).
- Exit the alley.
- Pick up PIPE 1 (C) and PIPE 2 (D) and PIPE 3 (E).
- Enter the tavern.
- Pick up PIPE 6 (F) and PIPE 5 (G) and PIPE 4 (H).
- Exit the tavern and go right down Pirate Alley.
- Click on the pipe area on the rear right.
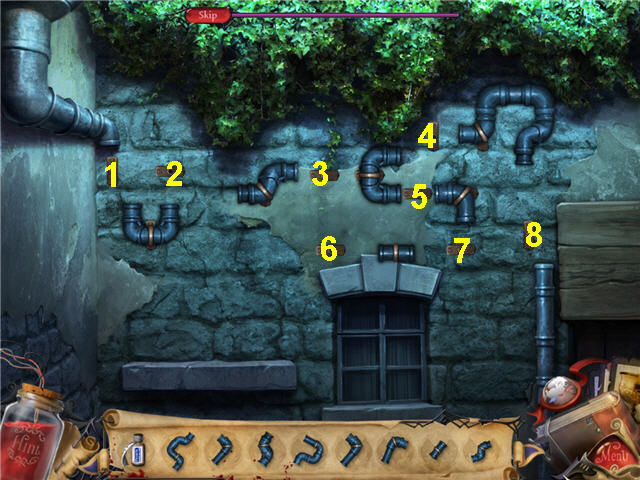
- The goal is to place the pipes on the brackets on the wall so that the drain pipe is complete.
- See screenshot for the number placement of the pipes.
- Click on the Beer to Go window (I) to get Black Jack to come to the window.
- When Black Jack appears at the window, head into the tavern.
- If Black Jack is back behind the bar when you get in there, leave and ring the bell again and immediately head into the tavern.
- Place the BLOOD THINNER in his drink (J).
- After Black Jack drinks the tainted drink and runs to the restroom, leave the tavern.
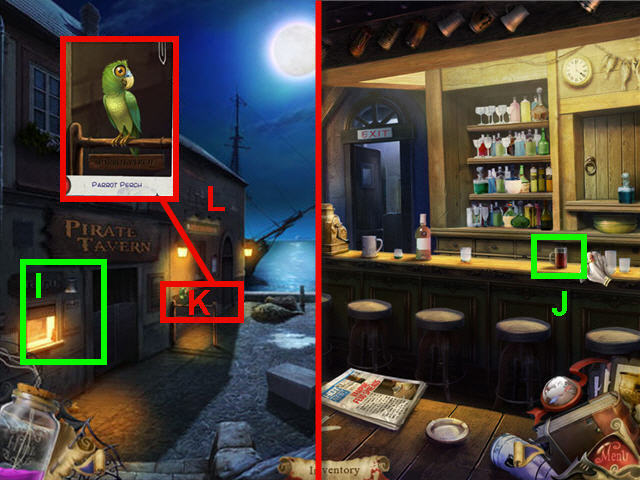
- Click on Polly (K) on the parrot perch and talk to her.
- Give her the PRETZEL and talk again.
- Click on the ship mural (L) above the restrooms and look at the pink ship in the middle, the HuberFlimple and note its colors.
- Click on the compass to access the map and click on the arrow to Memphis and then on Downtown.
- Pick up the TWO QUARTERS (O) in front of the S’il Vous Plate.
- Enter the S’il Vous Plate and click on the stove top to access a hidden object game.
- Find the items listed and get a CRACKER.
- Click on the compass to access the map and click on the arrow to Charleston and then the Harbor.
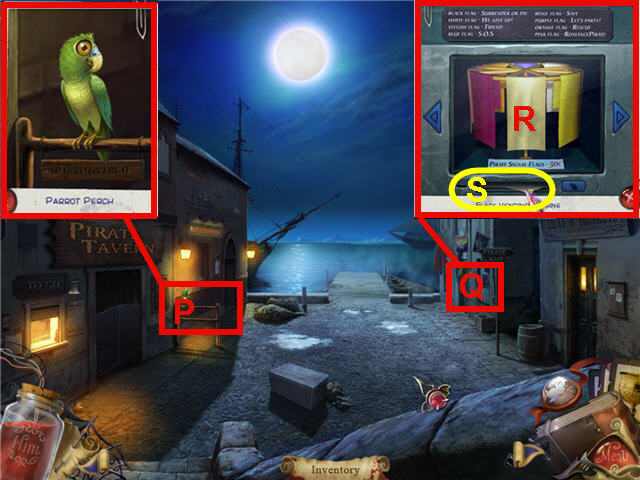
- Click on Polly (P) on the parrot perch and give her a CRACKER.
- Polly tells you the “flag is safe”.
- Click on the flag dispenser (Q) and put in the TWO QUARTERS.
- Look at the top of the dispenser and note that the beige flag is safe.
- Turn the flags by clicking on the arrows till the beige flag (R) is in the middle.
- Press the blue button on the right of the slot and take the PIRATE FLAG ‘SAFE’ (S).
- Head down Pirate Alley to the right.
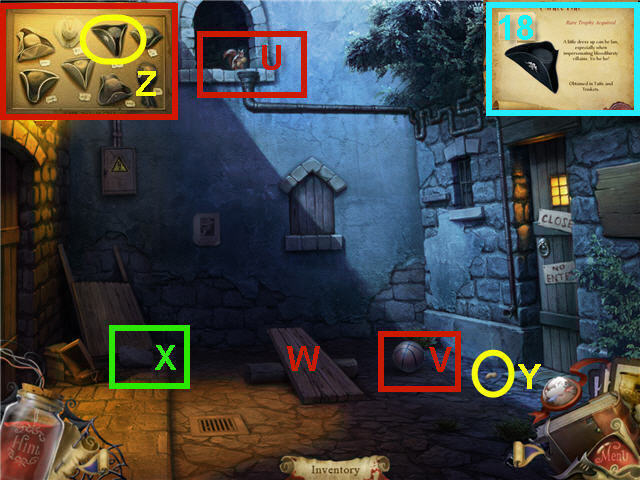
- Look at the squirrel (U) holding the peanut on top of the drain pipe.
- Click-hold and drag the basketball (V) on the teeter-totter (W).
- Click-hold and drag the rock (X) in the corner and place on the teeter-totter.
- Take the PEANUT (Y) from the bottom of the drain pipe.
- Exit the alley and click on the parrot perch.
- Give the PEANUT to Polly and she says “black hat”.
- Head into the tattoo parlor on the right.
- Take the BLACK PIRATE HAT (Z).
- Get a PIRATE HAT RARE TROPHY (18) for the trophy room.
- Click on the compass to access the map and click on the arrow to Memphis and then to New Orleans and click on Cirque Terrible.
- Head to the left to the wardrobe room and click through the monitor panel till you reach screen 5 (A).
- Take the RED SCARF (B). Be sure and take it off the mannequin or it will not be in your inventory.
- Click on the compass to access the map and click on the arrow to Memphis and then to Charleston and click on the Harbor.
- Click on Polly and give her the RED SCARF.
- Polly gives you the password “Needle–My-Eye.
- Click on the dinghy (M) and head over to the HuberFlimple (the ship with the pink sails) (N).
- You can easily steer the dinghy by clicking in the water in front of the dinghy and avoiding the obstacles.
- Talk to Estrella the Ink 3 times to make a deal.
- Exit the ship and steer the dinghy back to the pier.
- Enter the tattoo parlor and click on the tattoo machine in the right corner.
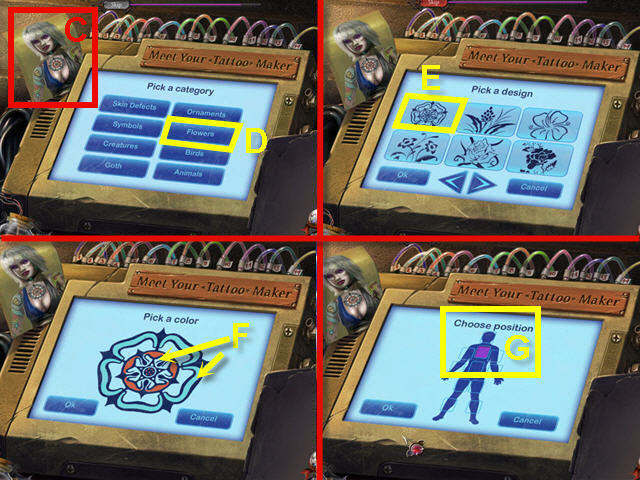
- Your goal is to make the tattoo look just as Estrella’s photo (C) in the upper left.
- Click on the category of Flowers (D) and choose the upper left one that matches Estrella’s (E) and click OK.
- Adjust the color on the inner and outer ring (F) of the flower by clicking on the ring till you get the desired color and then click OK.
- The outer ring is a light blue; the inner ring is an orangish color.
- Choose the chest position (G) and click OK.
- You will automatically get the tattoo put on when complete. See screenshot for solution.
- Click on the compass to access the map and click on the arrow to Memphis and then to New Orleans and then click on Cirque Terrible.

- Head to the left to the wardrobe room and assemble the outfit to look like Estrella (H).
- Use the arrows on the panel (I) to scroll through the clothing options.
- See screenshot for the correct clothing choices.
- Click on the outfit on the mannequin to get ESTRELLA’S OUTFIT.
- Click on the compass to access the map and click on the arrow to Memphis and then to Charleston and click on the Harbor.
- Click on the dinghy and head over to the HuberFlimple (the ship with the pink sails).
- Click on the curtain to talk to Estrella.
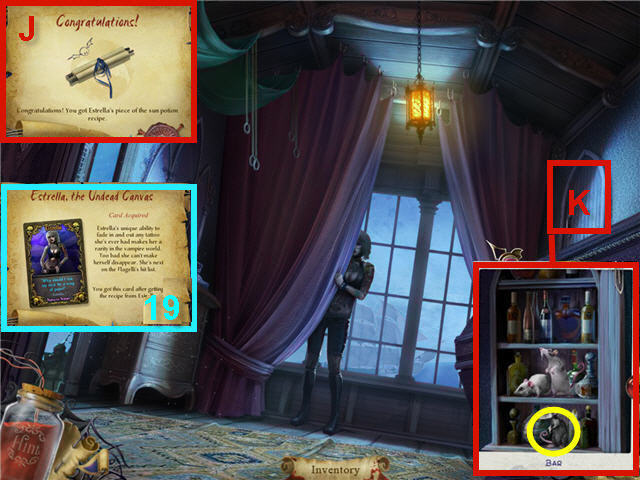
- Take ESTRELLA’S OUTFIT from inventory and click it on Estrella and exhaust all conversation.
- You will get ESTRELLA’S PIECE OF THE SUN POTION (J) and an ESTRELLA, THE UNDEAD CANVAS CARD (19) for the card book in the trophy room.
- Click on the cabinet above the coffin where the beating heart appears.
- Take the skinny rat (L) on the bottom shelf and look at the close-up.
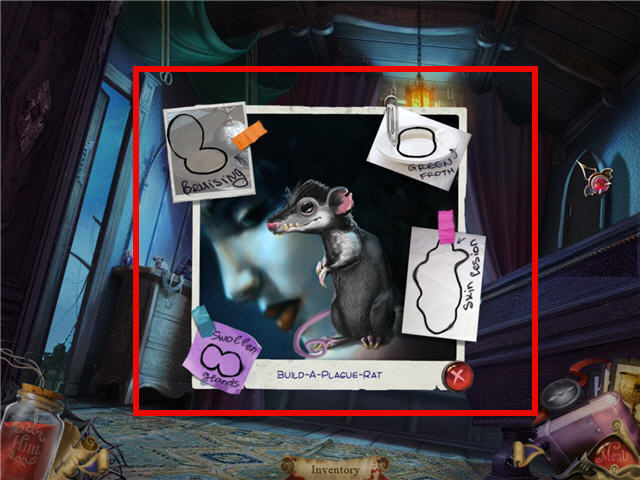
- Study the picture of the rat and look at the items in the corner of the photo to see what is needed to complete the look of a plaque rat.
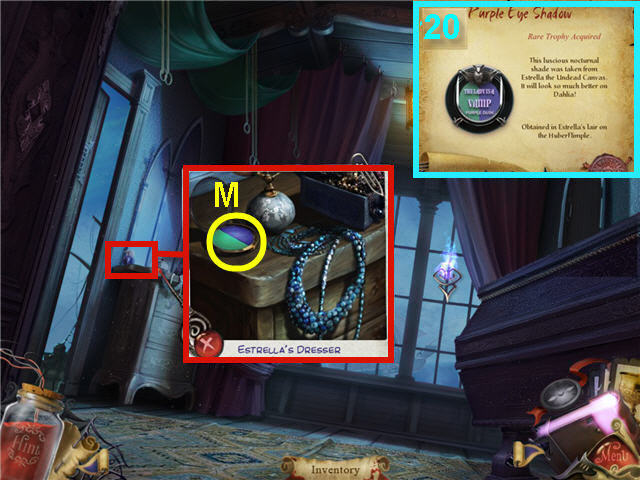
- Click on Estrella’s Dresser to get a close-up.
- Take the PURPLE EYE SHADOW (M) and it will automatically be added to the Build-A-Plague-Rat.
- Get a PURPLE EYE SHADOW RARE TROPHY (20).
- Exit the ship and steer the dinghy back to shore.
- Click on the compass to access the map and click on the arrow to Memphis and then on Downtown.
- Enter the S’il Vous Plate and click on the stove top to access a hidden object scene.
- Find the items listed and get a MINT JELLY.
- The MINT JELLY will automatically be added to the Build-A–Plague-Rat.
- Click on the compass to access the map and click on the arrow to Charleston and then on the Harbor.
- Head into the tavern and click on the table on the left to access a hidden object scene.
- Find the items listed and get TWO COTTON BALLS which will be automatically added to the Build-A-Plague-Rat.
- Exit the tavern and go across the street to the tattoo shop.
- Click on the Tattoo Maker machine.

- Your goal is to make the tattoo look like the back of the rat on the Build-A-Plague-Rat photo.
- Click on the category of Skin Defects (N) and choose the lower middle one that matches the Plague rat’s back (O) and click OK.
- Adjust the color on the two sets of blotches (P) to color. One is purple and the other is mustard.
- Choose the lower leg position (Q) and click OK.
- You will automatically get the tattoo put on the rat when complete. See screenshot for solution.
- You now have a PLAGUE RAT.
- Exit the tattoo parlor.
- Head right down the Pirate Alley.
- Remove the rock from the teeter-totter if it is still on there.
- Place the PLAGUE RAT on the teeter-totter.
- Use the rock on the teeter-totter to send the PLAGUE RAT up on the top of the drain pipe and watch the cutscene.
- Congratulations! You have successfully completed Charlaine Harris Episodes 1-4: Dying for Daylight.
Created at: 2011-02-12