

Walkthrough Menu
General Tips
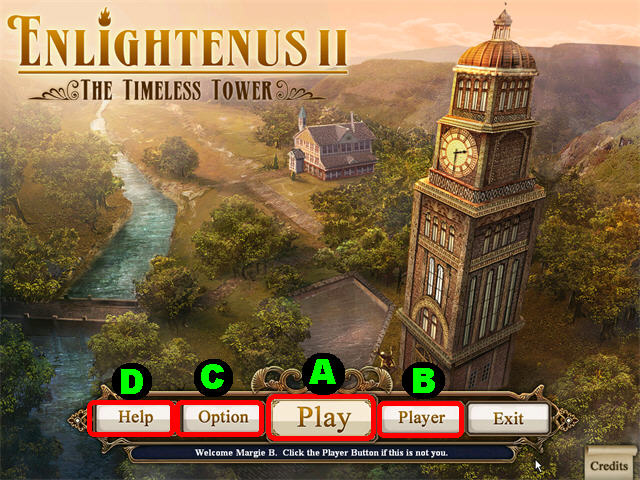
- This is the Official Strategy Guide for Enlightenus: The Timeless Tower!
- To access the game, click the Play (A) Button in the Main Menu.
- To manage your profiles, click the Player (B) Button.
- The Option (C) Button allows you to adjust screen size and volume.
- The Help (D) Button gives you brief information about playing the game.
- This guide contains all 99 E Card locations in the game.
- You will receive an Engraved Clock Piece at the end of each Hidden Object level.
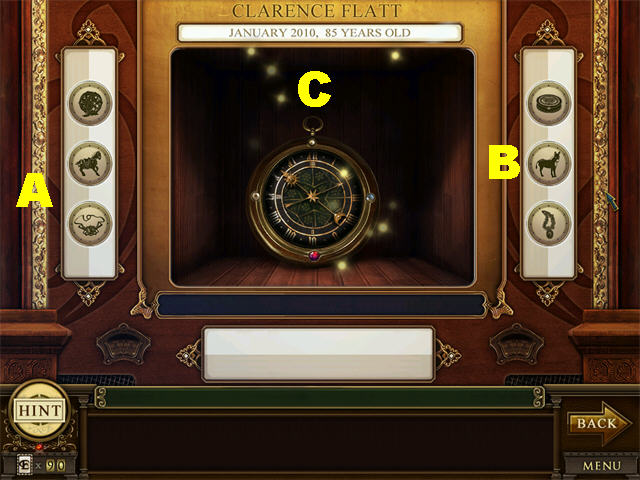
- Open the Ageless Clock in the lower right to place your clock pieces. Click on the sides of each portrait; read the clue given, and place the appropriate pieces in the slots.
- If you don’t have enough clock pieces, or you don’t have the right ones, you’ll need to keep exploring until you do.
- In Hidden Object Scenes, you’ll have to match the picture in your inventory with an item in the scene.
- Select an item from your tray and drag it over the items in the scene to see their descriptions. The names of the items will not be visible unless you have an item attached to your cursor.
- The screenshots are color-coded to help you locate pairs.
- More than one item with the same color means that several items will be used in the same spot and must be used in order.
- There are two E Cards in every Hidden Object Scene and one on each new floor.
- The Hint Meter in the lower left helps you locate hidden items. Hints are unlimited, but must recharge between uses. E Cards recharge the meter instantly.
- Drag an inventory item to the Hint Meter to see where that item belongs.
- Cards can be of different colors and sizes; some blend in well with the background, look carefully!
- All the E Cards are marked in white in the screenshots and have the letter “E” next to them.
Introduction
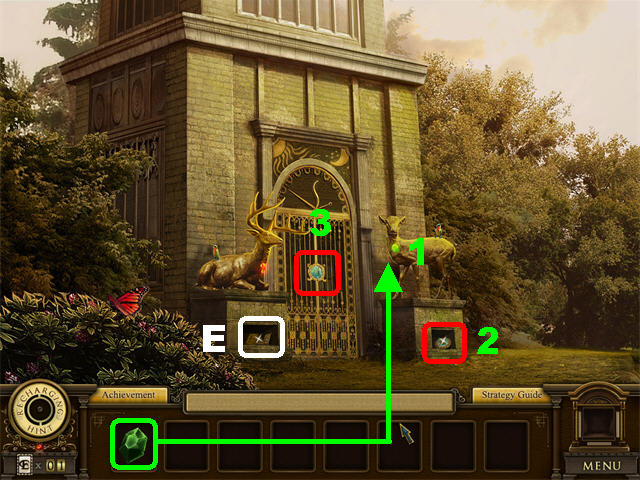
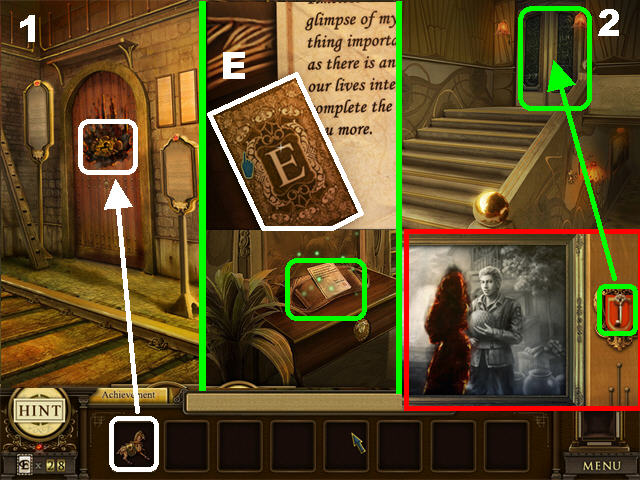
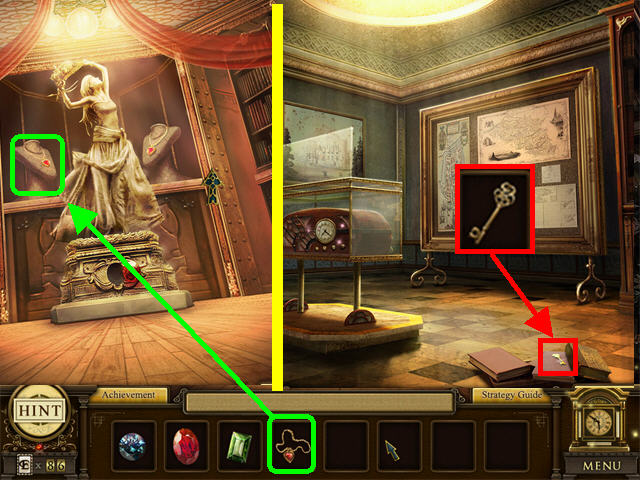
- Approach the tower. Place the EMERALD GEM on the right deer; the bases below both deer will open (1).
- Pick up the TOWER EMBLEM below the RIGHT DEER (2).
- Pick up the 3 E CARDS below the LEFT DEER (E).
- Place the TOWER EMBLEM in the center of the gate (3) and go inside.
Floor One
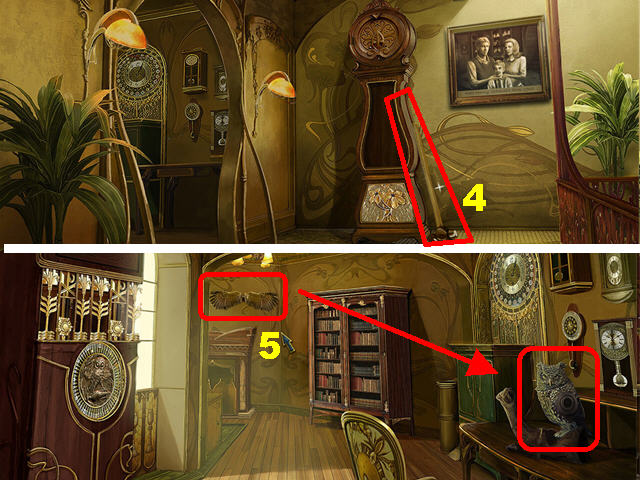
- Pick up the SLEDGEHAMMER (4) next to the CLOCK.
- Go left.
- Pick up the OWL WINGS (5) on the left side of the back wall; place them on the OWL.
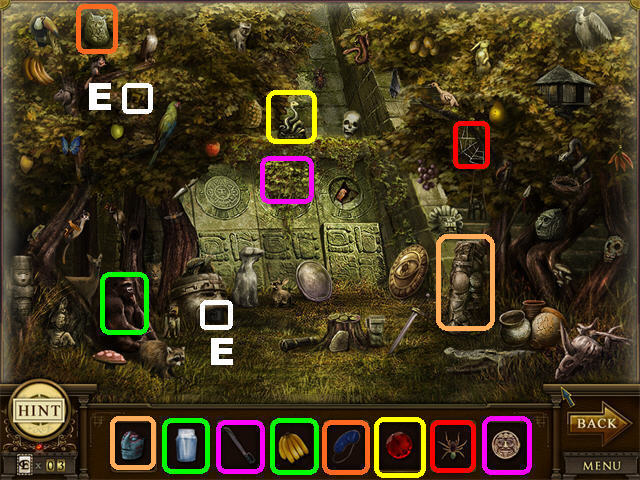
- Click on the sparkly clock on left to play the Mayan Jungle, 300 BC scene.
- Place the STONE MASK on the FACELESS STATUE.
- Give the JAR WITH WATER and then the BIG BANANAS to the GORILLA in the lower left.
- Place the MACHETE on the THICK BRIARS in the center.
- Place the ROUND MYTHICAL EMBLEM in the ROUND SLOT.
- Give the NOCTURNAL SLEEP MASK to the SLEEPY OWL.
- Place the SNAKE EYE GEM on the BLIND SNAKE STATUE in the center.
- Place the JUNGLE SPIDER on the EMPTY WEB.
- The DURABLE VAULT CLOCK PIECE will be added to the Ageless Clock.
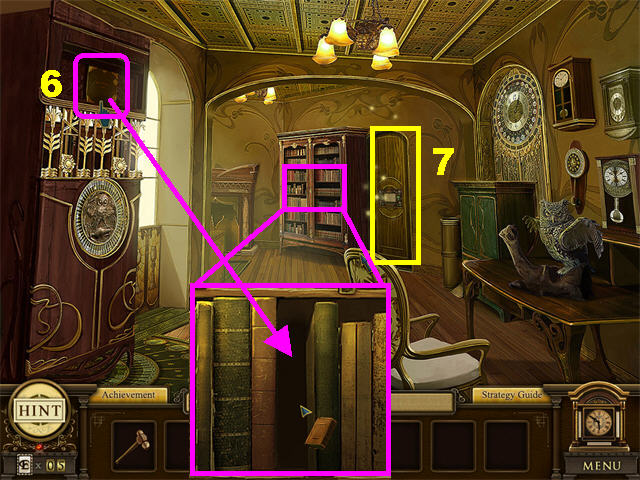
- Pick up the HARDCOVER BOOK in the upper left (6).
- Zoom into the BOOKCASE and place the HARDCOVER BOOK in the empty slot.
- Click the case to move it aside, revealing a hidden compartment. Click that compartment to trigger a puzzle (7).
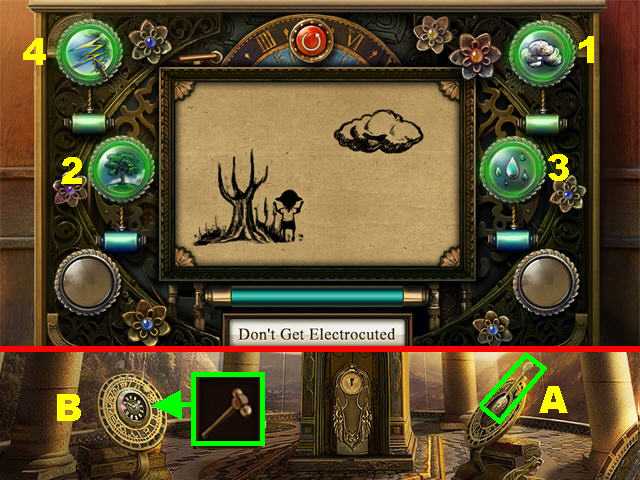
- Click the Cloud, Tree, Rain, and Lightning to complete the Don’t Get Electrocuted Puzzle.
- Go through the opening after the puzzle is solved.
- Pick up the GOLD PENDULUM on the RIGHT CLOCK (A).
- Break the LARGE CRYSTAL with the SLEDGEHAMMER (B).

- Play the Forbidden City, 1650 AD scene.
- The LANTERN SYMBOL belongs on the BLANK RED LANTERN.
- Place the AROMATIC INCENSE in the INCENSE HOLDER.
- Put the HOME IMPROVEMENT FIXERS on the CROOKED BOARD.
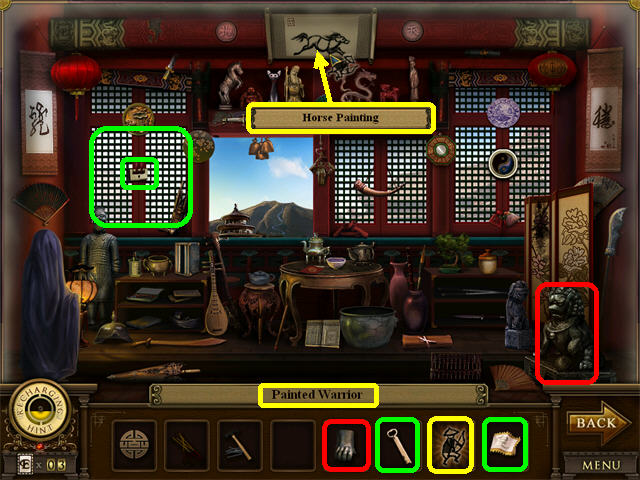
- Place the CHINESE BRUSH on the blank scroll in the upper center and a horse painting will appear.
- Place the PAINTED WARRIOR on the HORSE PAINTING.
- Place the LION’S PAW on the BROKEN STONE LION.
- Put the GOLDEN KEY on the GOLDEN LOCK, on the left window.
- Place the EMPEROR’S FLAG on the FLAG POLE outside the window.
- You will receive the RUSTY GATE CLOCK PIECE.
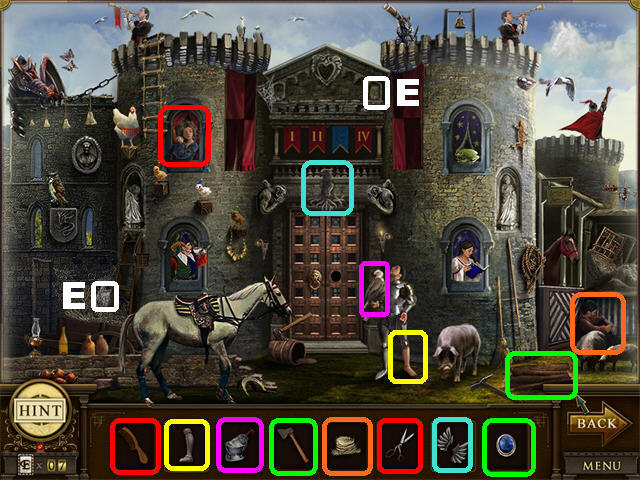
- Click down twice. Place the GOLD PENDULUM on the clock to trigger the Medieval Castle, 450 AD.
- The WOODEN COMB belongs on the FRIZZLED-HAIR PRINCESS in the upper left window.
- Place the BARBER SCISSORS on the LONG HAIR PRINCESS.
- The IRON GREAVE belongs on the BARE-LEGGED KNIGHT.
- Place the BIRD HELMET on the SOLDIER BIRD.
- Place the FARMER’S HAT on the LAZY FARMER.
- Place the STONE WINGS on the STONE EAGLE.
- Place the STURDY AXE on the UN-CHOPPED WOOD in the lower right.
- Place the ROYAL GEM on the INCOMPLETE CROWN.
- You will receive the MARBLE ORNATE DOOR PIECE.
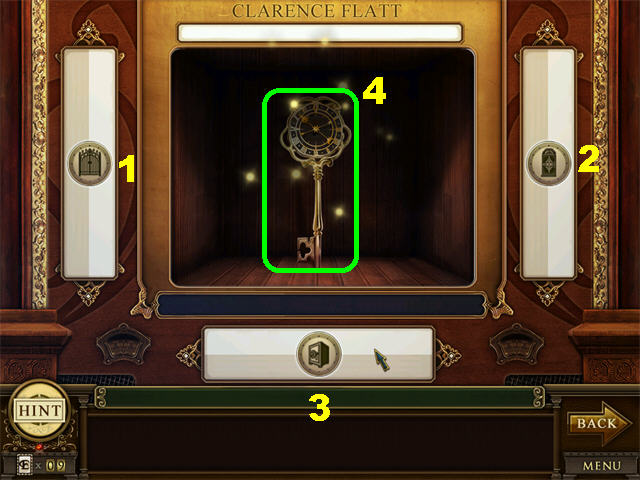
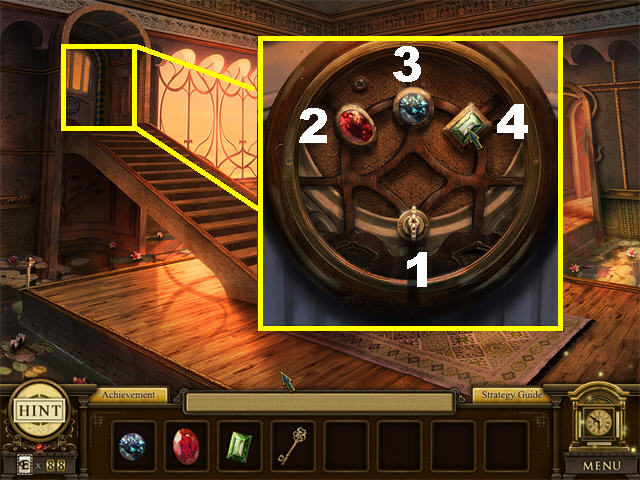
- Open the Ageless Clock.
- Place the RUSTY GATE PIECE in the left slot (1).
- Place the MARBLE ORNATE DOOR PIECE in the right slot (2).
- Place the DURABLE VAULT PIECE in the bottom slot (3).
- Pick up the ENLIGHTENUS KEY in the center (4).
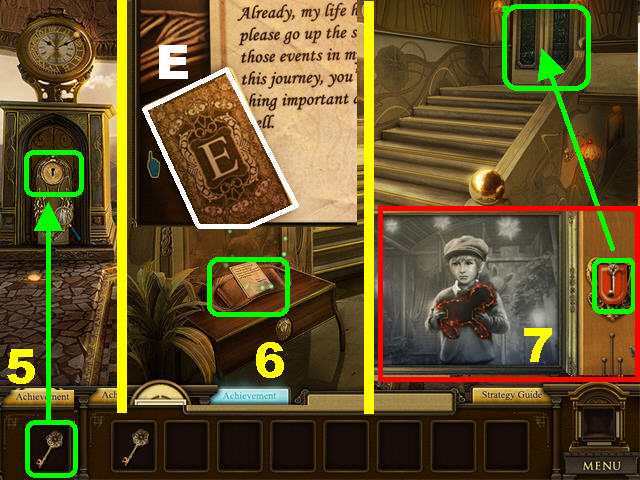
- Go outside to the portal. Place the ENLIGHTENUS KEY on the clock in the back of the scene and enter the Enlightenus World (5).
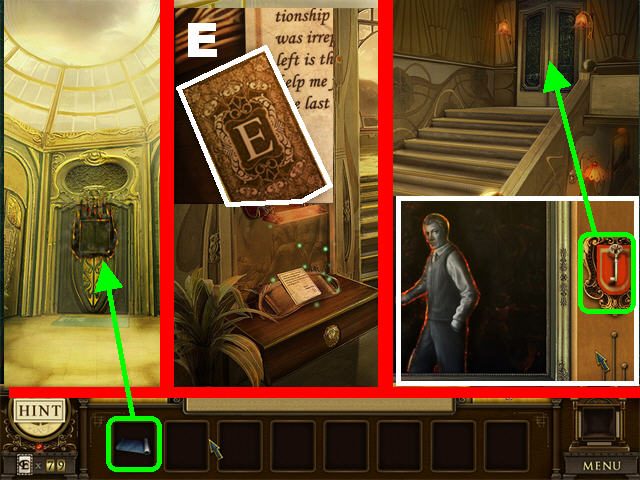
- Click on the sparkly area in the lower left.
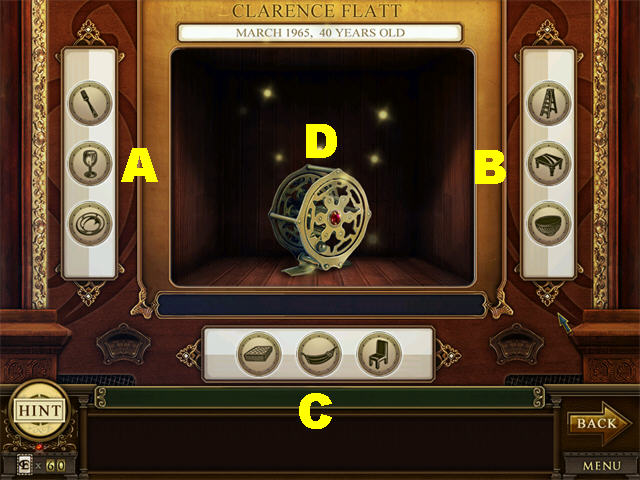
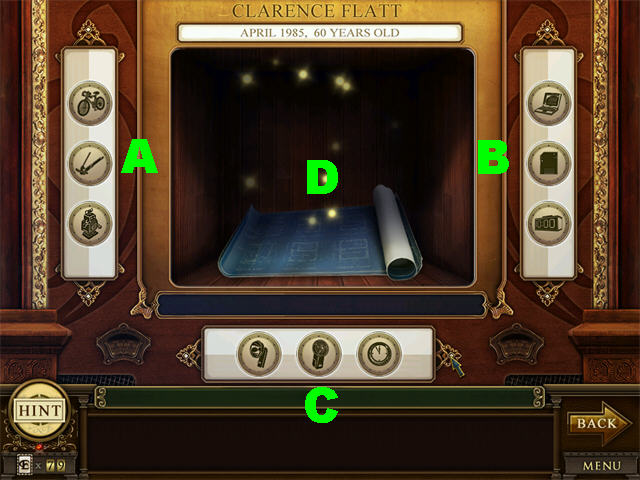
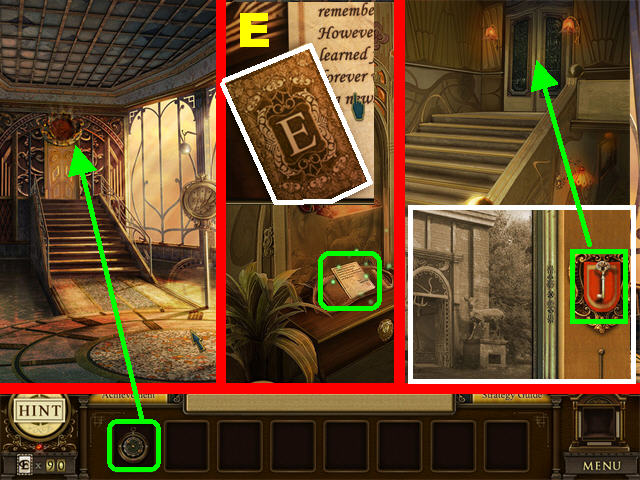
- Click on the E CARD and read the letter from Clarence Flatt (6).
- Go forward and take a closer look at the painting on the left.
- Pick up the YEAR 1935 KEY and use it to unlock the door above the steps (7).
Floor Two

- Go forward.
- Pick up the TOY DRAGON in the upper right (8).
- Zoom into the sparkly clock (9) to play the Ancient Egypt, 1,000 BC scene.
- Place the CLEANING CLOTH on the DIRTY JAR in the lower right.
- Place the WOOD-CUTTING KNIFE on the BLOCK OF WOOD to carve a doll.
- Put the MINIATURE DOLL WIG on the MINIATURE DOLL.
- Place the OBELISK GEM on the INCOMPLETE OBELISK.
- Place the PILE OF SAND in the EMPTY HOURGLASS.
- Place the STONE BEARD on the BEARDLESS STATUE.
- The STONE CHISEL belongs on the PLAIN TABLET.
- The DAMP TURBAN belongs on the WEARY TRAVELER.
- You will receive the MOUSE CLOCK PIECE.
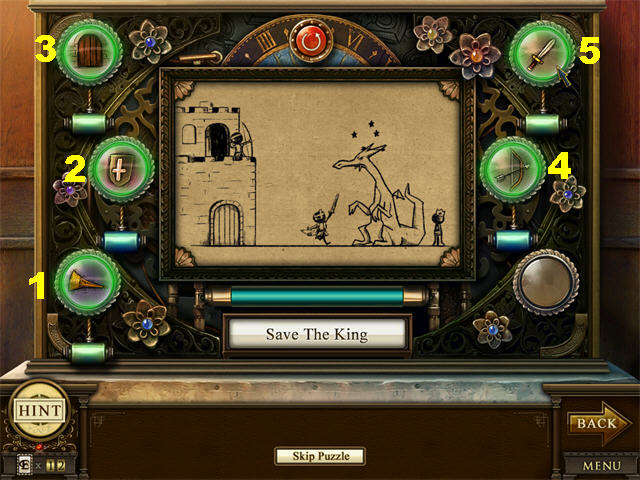
- Click on the right door to trigger the Save The King Puzzle.
- To solve the puzzle, click on the Bugle, Shield, Door, Arrow, and Sword (in order).
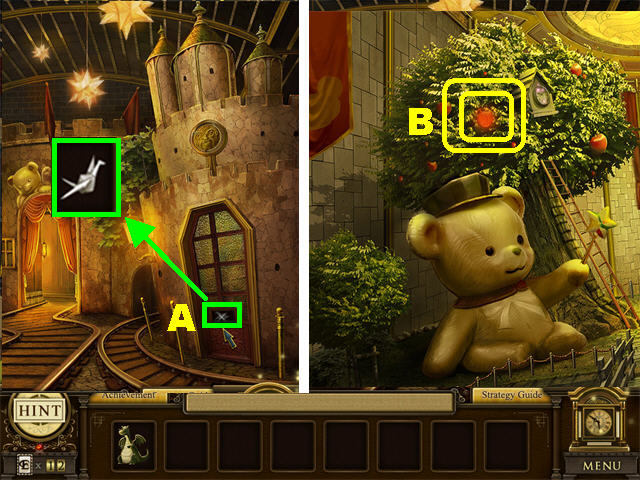
- Pick up the PAPER CRANE at the bottom of the door (A).
- Go through the back door.
- Grab the RED LENS on the tree (B).
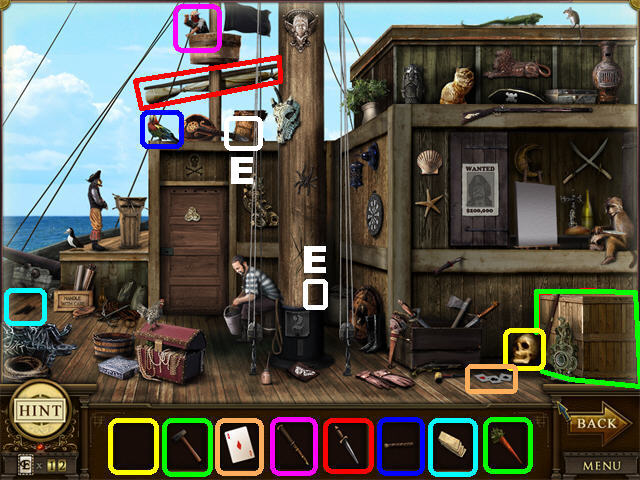
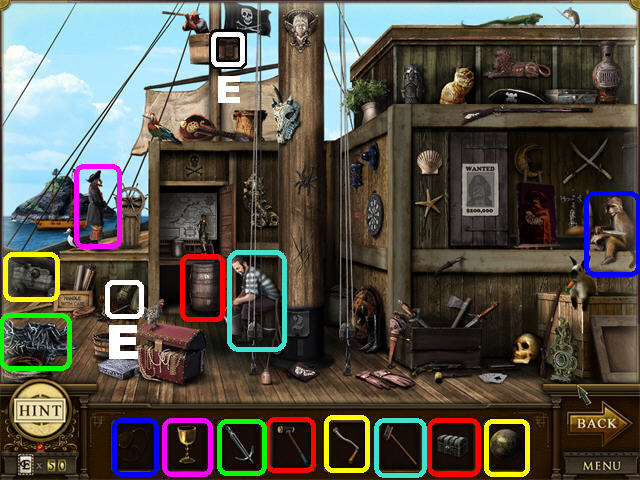
- Play the Queen Anne’s Revenge, 1717 AD scene.
- The GOLD TOOTH belongs on the GOLDEN SKULL.
- Use the CRATE OPENER on the SECURED CRATE and the HUNGRY RABBIT will emerge from the crate.
- Give the HUNGRY RABBIT the SCRUMPTIOUS CARROT.
- Place the ACE OF DIAMONDS on the THREE ACES.
- Give the LOOKOUT TELESCOPE to the PIRATE LOOKOUT.
- Place the ROPE-CUTTING KNIFE on the ROPED SAIL.
- Give the ODOROUS CIGAR to the CIGAR-LOVING PARROT.
- Place the DECK PLANKS on the DAMAGED DECK in the lower left.
- You will receive the COW CLOCK PIECE.
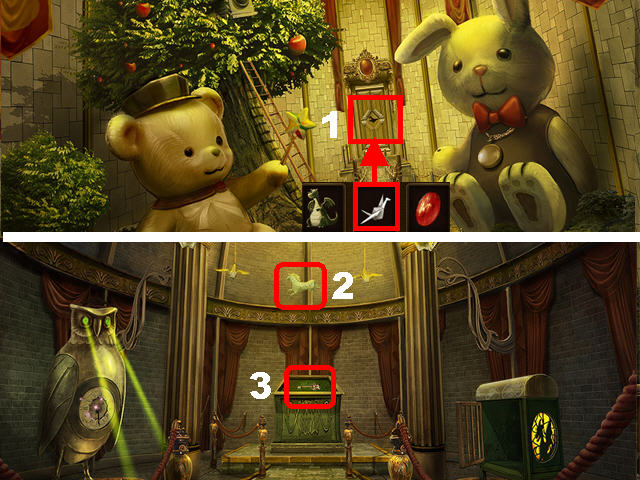
- Place the PAPER CRANE on the back door; then go through the door (1).
- Pick up the PAPER HORSE in the upper center (2).
- Grab the DOLLHOUSE KEY on the stand (3).
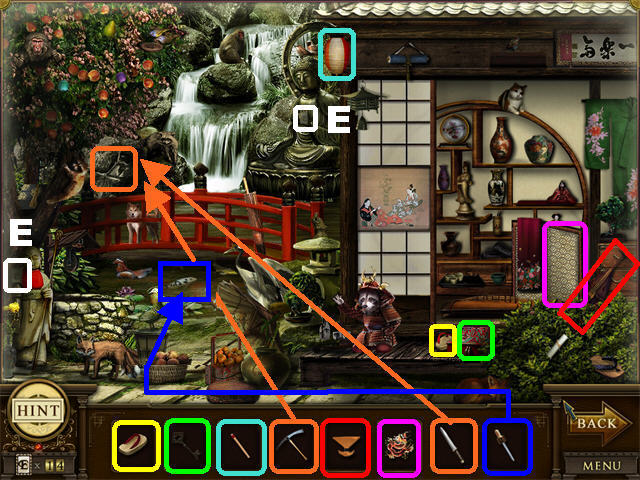
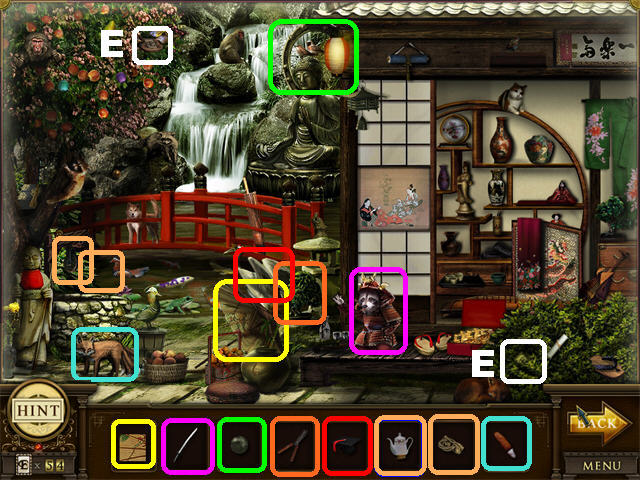
- Play the Japanese Garden, 960 AD scene on left.
- The SINGLE WOODEN SLIPPER belongs next to the SINGLE WOODEN SLIPPER in lower right.
- Put the REPOSITORY KEY on the LOCKED REPOSITORY.
- Place the LANTERN MATCH on the UNLIT LANTERN in the upper center.
- Place the STONE-CRUSHING PICKAXE on the FRACTURED STONE to reveal the LUMP OF UNSHAPED GOLD.
- Place the GOLD-SHAPING KNIFE on the LUMP OF UNSHAPED GOLD.
- The INSTRUMENTAL PLUCKING PICK belongs on the VINTAGE BIWA in the lower right.
- Put the FABRIC SCREEN PATTERN on the FABRIC SCREEN.
- Put the INK PIPETTE FOR KOI on the PLAIN KOI.
- You will receive the MOOSE CLOCK PIECE.
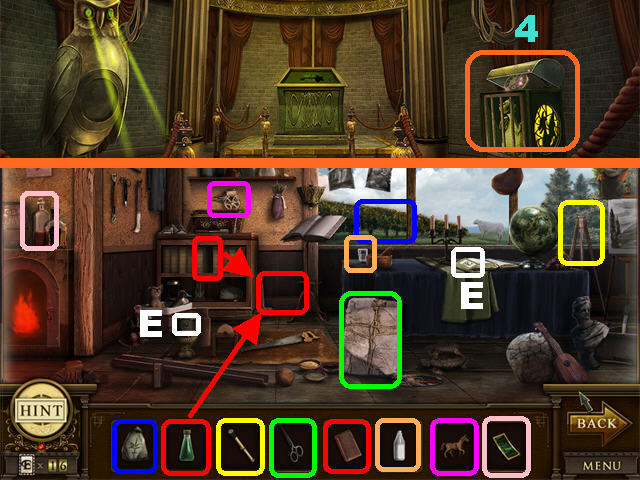
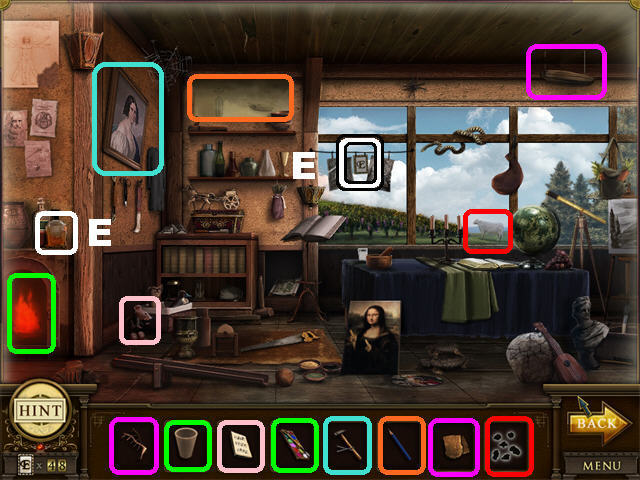
- Place the TOY DRAGON in the empty cage (4) on the right to trigger the Leonardo da Vinci’s Study, 1505 AD scene.
- Put the FAST-ACTING FERTILIZER on the BARREN VINEYARD.
- Place the GOLDEN TELESCOPE on the TELESCOPE STAND.
- Open the TIGHTLY-WRAPPED PARCEL with the SHARP SCISSORS.
- Place the HARDCOVER BOOK in the SHELF SPACE.
- Place the PHIAL OF INK on the BLANK SCROLL that appears.
- Place the BOTTLE OF MILK in the EMPTY GLASS on the table.
- The MODEL HORSE belongs on the MODEL CART on left.
- The PINOT LABEL belongs on the UNLABELED WINE on left.
- You will receive the OWL CLOCK PIECE.
- Click down twice. Zoom into the house on left and place the DOLLHOUSE KEY in the lock.
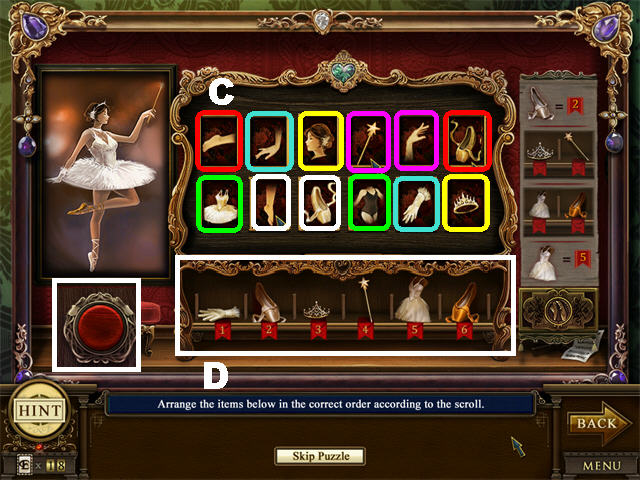
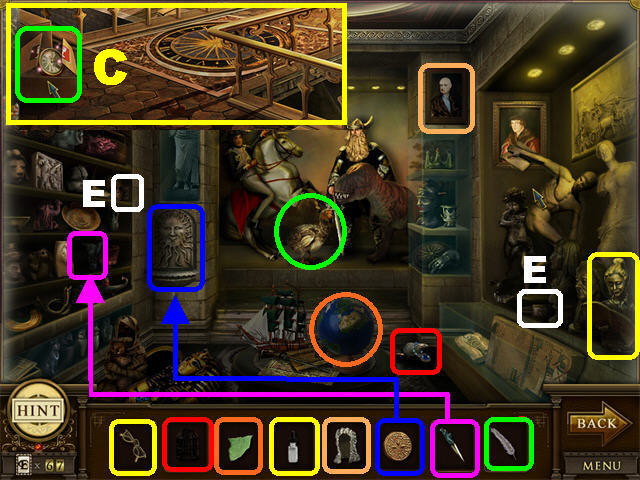
- Enter the house and click on the back door for a puzzle.
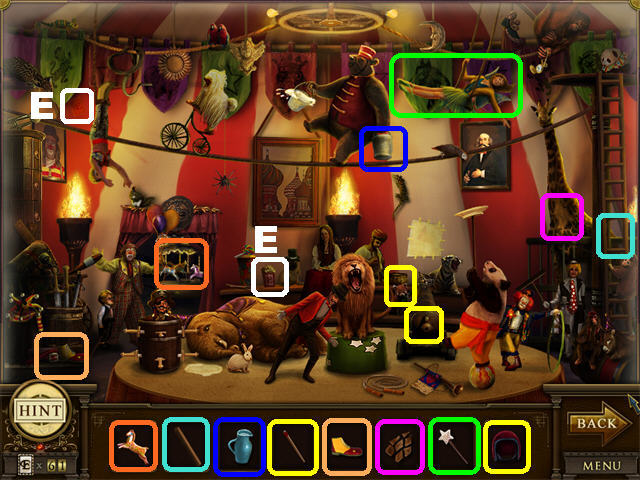
- Match similar pairs of items (i.e. hand and glove). As each match is made an item will drop to the bottom of the puzzle (C).
- Arrange the bottom items according to the order in the scroll. Click on two items to swap their positions.
- Place the Glove, Pink Slipper, Crown, Wand, Tutu, and Yellow Slipper from left to right to solve the puzzle (D).
- Press the Red Button once you’ve finish.
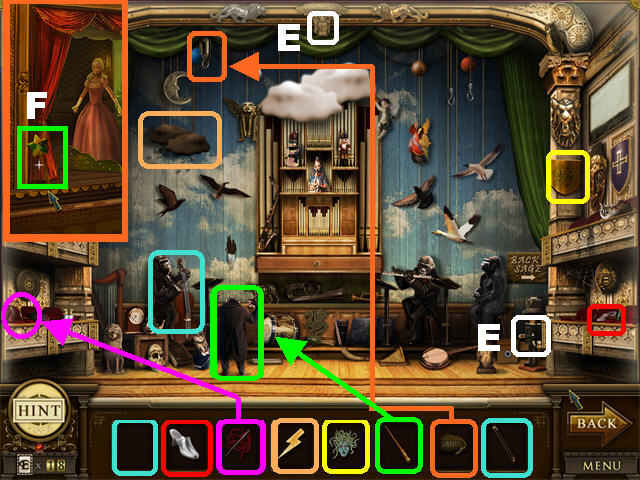
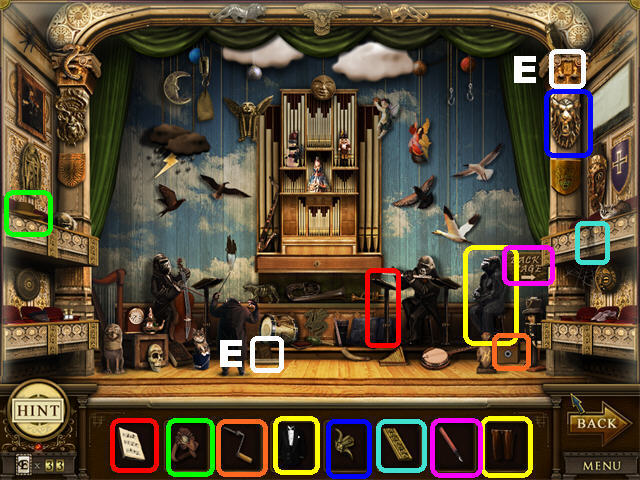
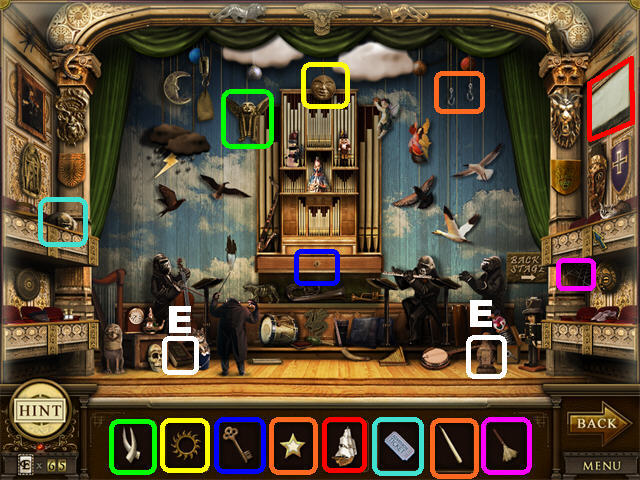
- Pick up the LARGE WAND (F) in the lower left corner of the stage.
- Play the Opera House, 1810 AD scene.
- Give the CELLO STRINGS and the CELLOW BOW to the CELLIST GORILLA.
- Place the GLASS SLIPPER next to the LONESOME GLASS SLIPPER in the lower right.
- Mend the FABRIC-DAMAGED SEAT in the lower left with the THREAD AND NEEDLE.
- Place the LIGHTNING PROP on the DREARY RAIN CLOUDS.
- Put the MEDUSA SHIELD EMBLEM on the GORGON SHIELD.
- Give the CONDUCTOR’S BATON to the MONKEY CONDUCTOR.
- Put the COUNTERWEIGHT SAND BAG on the COUNTERWEIGHT HOOK in the upper left.
- You will receive the BEAR CLOCK PIECE.
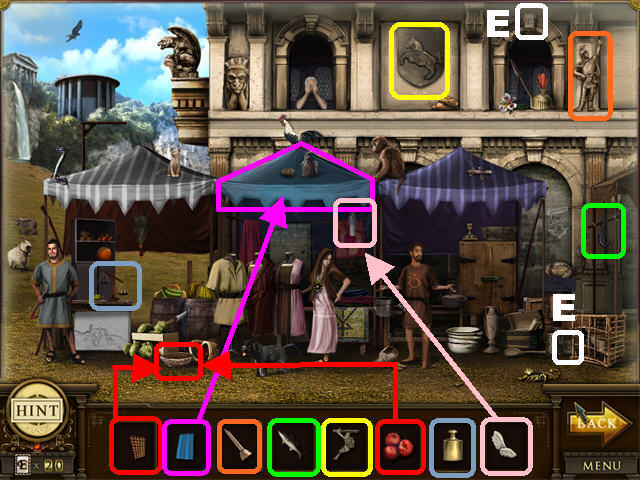
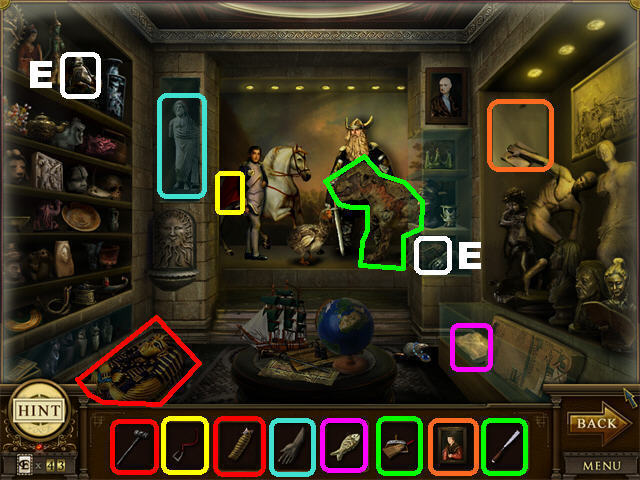
- Click the ballerina on the right to trigger the Rome Marketplace, 700 BC scene.
- Place the BASKET FIBERS on the DAMAGED BASKET in the lower left.
- Place the FRESH APPLES in the EMPTY FRUIT BASKET.
- Place the CANOPY PATTERN on the middle BLUE CANOPY.
- Give the SOLDIER STATUE SWORD to the SOLDIER STATUE.
- Put the LARGE FISH on the FISH HOOK.
- Place the HORSE-RIDER CARVING on the HORSE CARVING in the upper center.
- Put the COUNTERBALANCE WEIGHTS on the IMBALANCED SCALES in the lower left.
- Place the DOLL’S WINGS on the HANGING ANGEL DOLL below the middle canopy.
- You will receive the RABBIT CLOCK PIECE.
- Go through the backstage door (G).
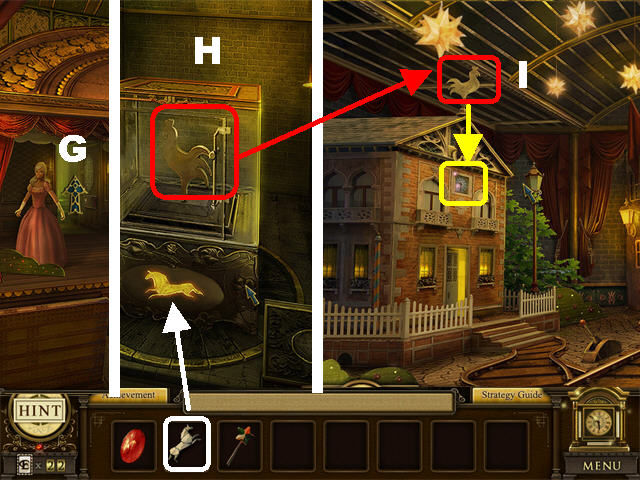
- Place the PAPER HORSE in the slot below the glass case.
- Pick up the WEATHER VANE inside the glass case (H).
- Click down twice.
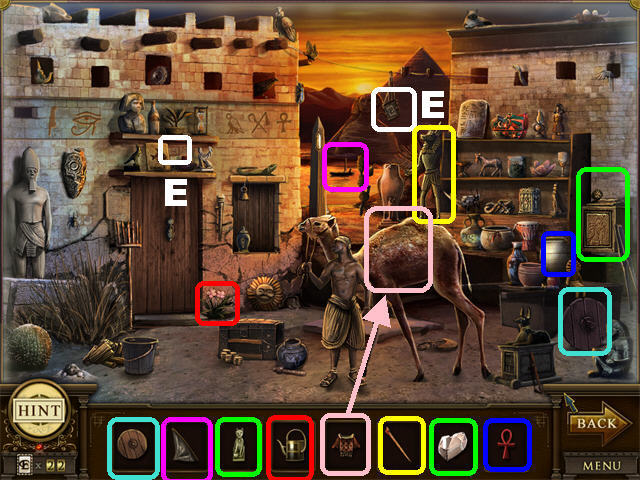
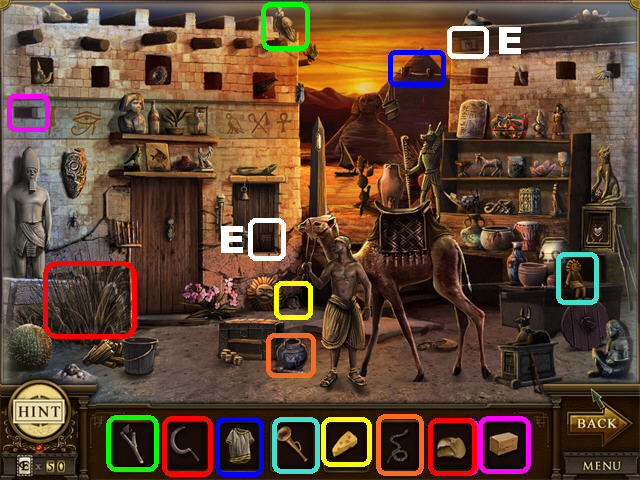
- Place the WEATHER VANE (I) above the dollhouse to trigger the Ancient Egypt, 1000 BC scene.
- Put the WHEEL HUB on the DAMAGED WHEEL.
- Place the DETACHED SAIL on the SAILLESS BOAT.
- Put the CAT STATUE on the STATUE STAND on the right.
- Place the LIFE GEM on the BOOK OF LIFE that appears.
- Put the WATERING CAN on the PARCHED FLOWERS by the door.
- Place the LEATHER SADDLE on the DROMEDARY CAMEL.
- Give ANUBIS’ SCEPTRE to the ANUBIS STATUE.
- Place the ANKH POT PATTERN on the PLAIN POT on the right.
- You will receive the ALLIGATOR CLOCK PIECE.
- Click down to reach the railroad tracks.

- Place the RED LENS (J) in the upper center to trigger the Medieval Castle, 450 AD scene.
- Place the WEATHER ROOSTER on the WEATHER VANE.
- Shave the BEARDED PIG with the RAZOR.
- Give the CLARINET FLAG to the MINSTREL in the upper right.
- Paint the BLUE FLAG with the RED PAINTBRUSH.
- Place FLAG III over the RED FLAG.
- Give the CRUSADER SWORD to the CRUSADER.
- Place the SMALL PRINCE CROWN on the FROG PRINCE.
- Place the THREAD AND NEEDLE on the TATTERED FLAG.
- You will receive the RACCOON CLOCK PIECE.
- Go forward twice to the giant bear and bunny.
- Give the LARGE WAND to the giant rabbit to trigger the Mayan Jungle, 300 BC scene.
- Place the PIECE OF BRICK in the MISSING BRICK on the back wall.
- Place the TRAVELER’S BOOTS in the UNFINISHED SHOEPRINT.
- Put the STONE-BREAKING SLEDGEHAMMER on the DECRIPT STONE.
- Open the TREASURE CHEST that appears with the RUSTY KEY.
- Put the BLACK FEATHERS on the FEATHERLESS CROW in the upper right.
- Place the TURQUOISE PUPIL GEM on the EYELESS SHIELD.
- Put the EGGS in the VACANT NEST.
- Give the TINY VIOLIN to the MUSICIAL SQUIRREL in the upper left.
- You will receive the GOAT CLOCK PIECE.
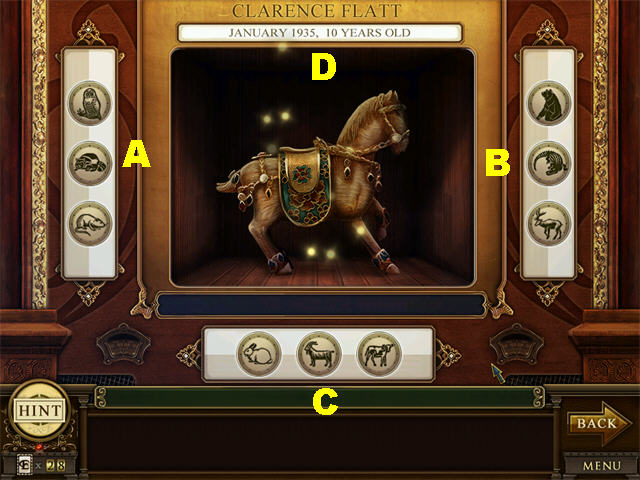
- Open the Ageless Clock.
- Place the OWL, RACCOON, and MOUSE PIECES in the left slot (A).
- Place the BEAR, ALLIGATOR, and MOOSE PIECES in the right slot (B).
- Place the RABBIT, GOAT, and COW PIECES in the bottom slot (C).
- Pick up the WOODEN HORSE (D) in the center once you’ve completed the puzzle.
- Return to the railroad tracks.
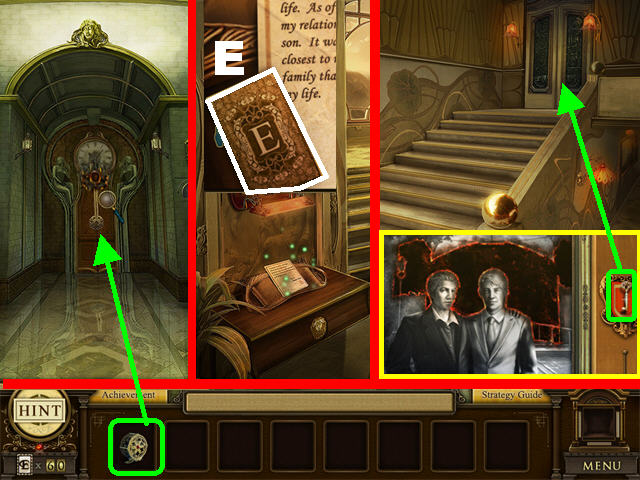
- Place the WOODEN HORSE on the right door and go through it (1).
- Click on the book on the left and pick up the E CARD (E).
- Go up the steps and open the portrait on the left wall.
- Pick up the YEAR 1950 KEY on the painting and use it to unlock the door above the steps (2).
Floor Three
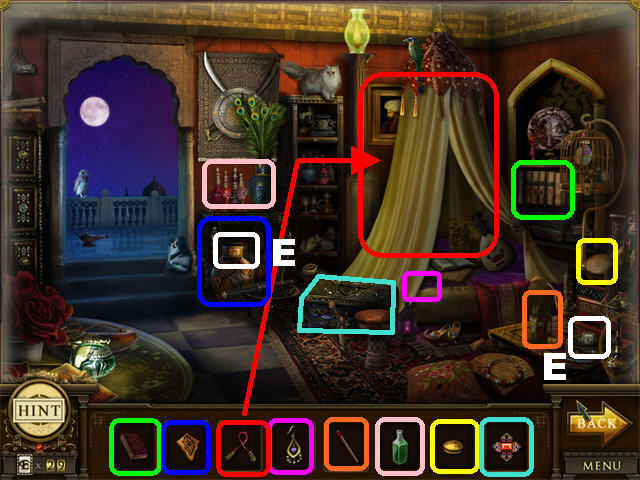
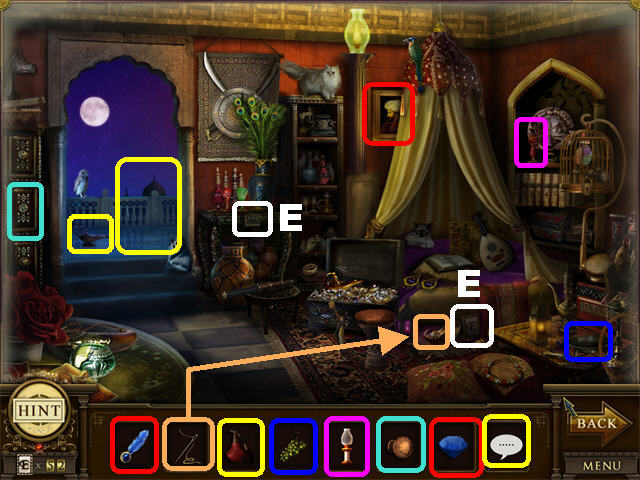
- Play the Arabian Palace, 1100 AD scene by the lamppost.
- Place the HARDCOVER STORYBOOK VOLUME on the SERIES OF STORYBOOKS.
- Place the VASE PATTERN on the DISCOLORED VASE.
- Put the CURTAIN STRING on the UNTIED SILK CURTAIN.
- Place the SINGLE GEMMED EARRING next to the SINGLE GEMMED EARRING on the bed.
- Place the WOODEN MATCH on the UNLIT LANTERN.
- Place the FRAGRANT PERFUME LIQUID on the EMPTY PERFUME BOTTLE.
- Place the ARABIC RIQ’S CYMBAL on the BROKEN ARABIC RIQ.
- Place the RUBY TREASURE CHEST KEY on the LOCKED TREASURE CHEST.
- You will receive the LEATHER SHOE CLOCK PIECE.

- Click on the left door to activate a puzzle.
- Open the slot in the upper left to uncover a wheel.
- Open the slot in the upper right to uncover a puzzle piece.
- Place the wheels at the bottom of the puzzle, matching the number on the peg with the number of sides on the wheel.
- Turn the large steering wheel once all pieces are correctly placed to reveal slots on top.
- Place the puzzle piece in the upper right, next to the others.
- Click on any two pieces to swap their locations until they mirror the image in the screenshot.
- Go through the door after the puzzle has been activated to reach the boat.
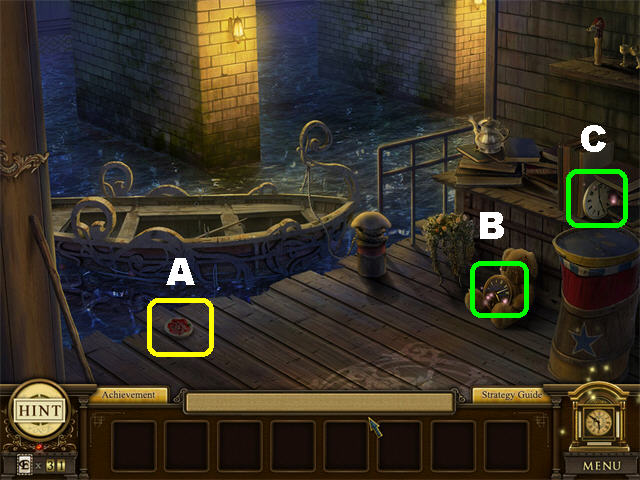
- Pick up the ROSE EMBLEM FOR DISH (A) in the lower left.
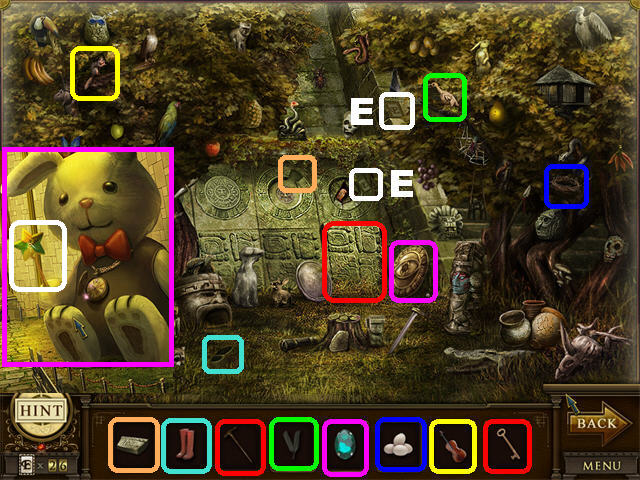
- Hidden Object scenes are marked in green (B and C).
- Click on the books above the teddy bear to activate the Queen Anne’s Revenge, 1717 AD scene (C).
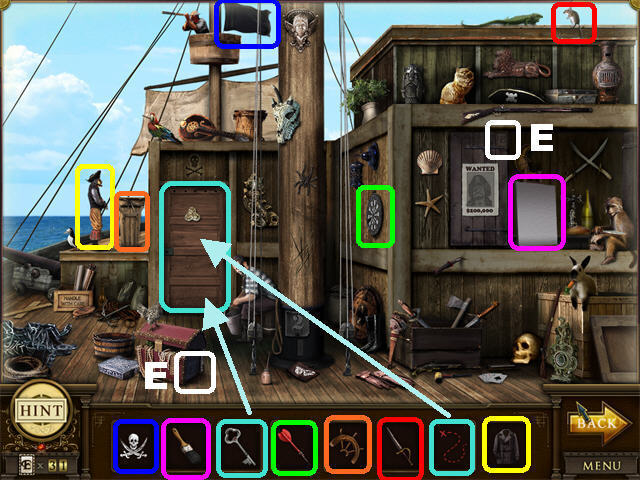
- Place the JOLLY ROGER SYMBOL on the BLACK FLAG.
- The ARTISTIC PAINTBRUSH belongs on the BLANK CANVAS.
- Place the CABIN KEY on the LOCKED CABIN DOOR.
- Place the DIRECTIONS TO SECRET TREASURE on the SECRET TREASURE MAP that appears.
- Put the RED DART on the WELL-WORN DARTBOARD.
- Place the NAVIGATION WHEEL REPAIR PART on the BROKEN NAVIGATION WHEEL.
- Give the MOUSE-SIZED RAPIER to the DEFENSELESS MOUSE in the upper right.
- Give the PIRATE’S LONGCOAT to the SHIVERING PIRATE.
- You will receive the BLACK DRESS CLOCK PIECE.

- Play the Forbidden City, 1650 AD scene on the teddy bear.
- Put the SHARP STONE on the CRACKED POT.
- Place the JADE STONE PIECE on the PARTIAL JADE STONE inside the CRACKED POT.
- Use the SCISSORS to cut the CLOTH.
- Give the WARRIOR’S SPEAR to the TERRACOTA SOLDIER below the CLOTH.
- Place the GOOD LUCK COINS on the LUCKY ENVELOPE on the table.
- The YANG EMBLEM belongs with the YIN SYMBOL by the window.
- Place the ROYAL SWORD on the ROYAL SWORD HOLDER.
- Place the RED FLOWERS on the VASE WITH WATER.
- You will receive the BOWTIE CLOCK PIECE.
- Exit this scene.
- Go up the steps to the bridge.
- Go forward from the bridge to reach the plaza.
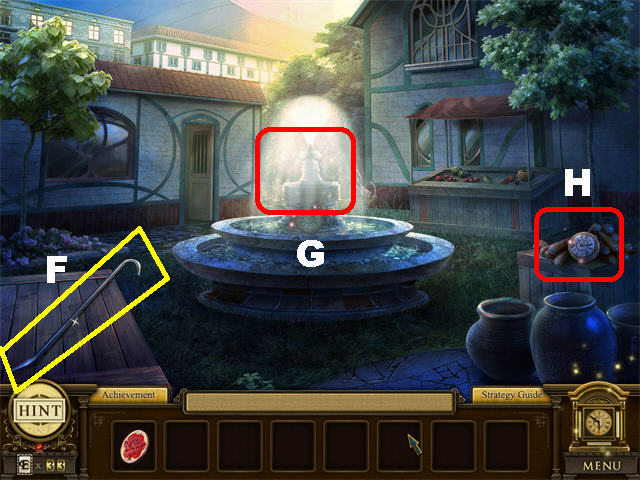
- Pick up the PRY BAR in the lower left (F).
- There is a playable scene by the fountain (G).
- Click above the crate to activate the Opera House, 1810 AD scene (H).
- Place the SHEET MUSIC on the EMPTY MUSIC STAND on the right.
- Place the HAT ROSETTE on the UNDECORATED LADY’S HAT on the left balcony.
- Place the BOX’S HAND CRANK on the BOX WITH MISSING HANDLE in the lower right.
- Give the SIMIAN TUXEDO to the NAKED SIMIAN.
- Give the CONGA DRUMS to the now DRUMLESS APE.
- Place the BESTIAL CROWN on the UNCROWNED LION.
- Place the BALCONY PANEL on the MISSING PANEL on the right.
- Place the CORRECTIVE PAINTBRUSH on the MISSPELLED SIGN in the lower right.
- You will receive the HIGH HEEL SHOE CLOCK PIECE.
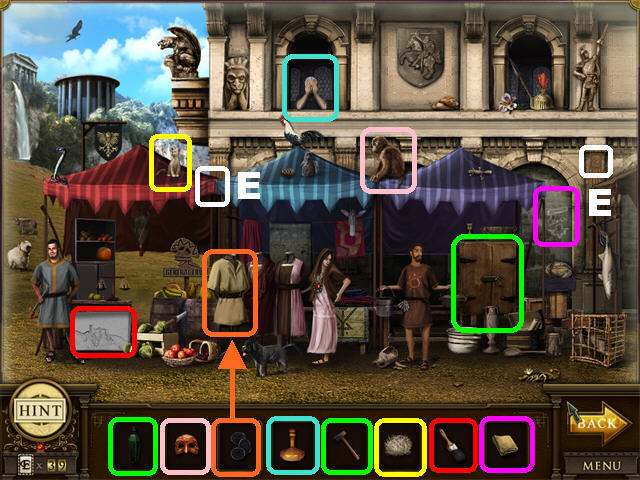
- Play the Rome Marketplace, 700 BC scene by the fountain.
- Place the KIOSK SIGN on the SIGN POST.
- Place the CARVING KNIFE on the UNCARVED KIOSK SIGN.
- Place the CANOPY DIE on the WHITE CANOPY.
- Place the TEMPLE PILLAR on the ROMAN TEMPLE.
- Place the BLACK SANDALS on the man’s BARE FEET in the lower right.
- Place the EAGLE BANNER on the BANNER POST above the red canopy.
- Place the RESPLENDENT RUBY on the woman’s RUBYLESS NECKLACE in the lower center.
- Put the BOTTLE OF INSTA-RIPE on the GREEN BANANAS.
- You will receive the GLOVES CLOCK PIECE.
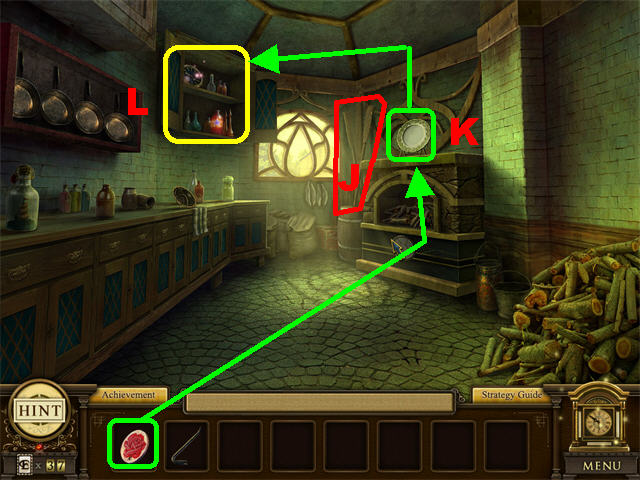
- Go through the left door to the kitchen.
- Pick up the WOODEN OARS against the back wall (J).
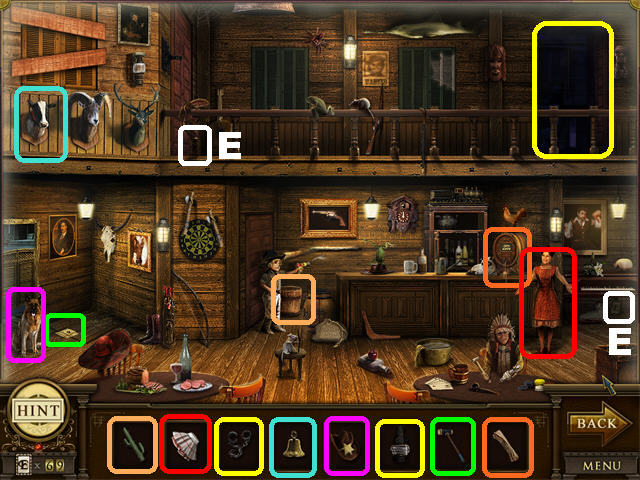
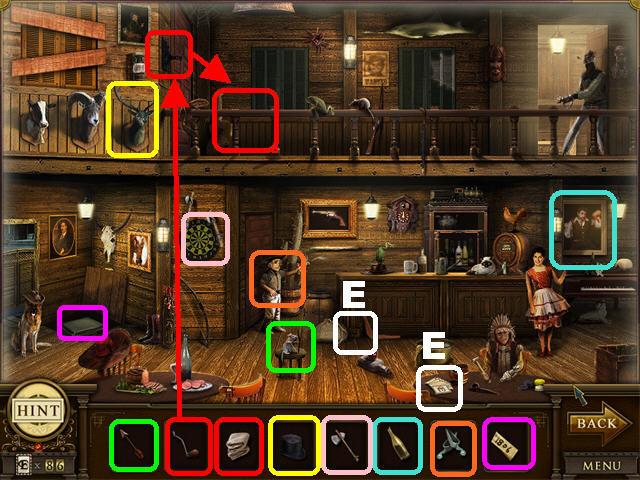
- Place the ROSE EMBLEM FOR DISH on the WHITE DISH (K) in the upper right to trigger the Old West Saloon, 1850 AD scene on the left cupboard (L).
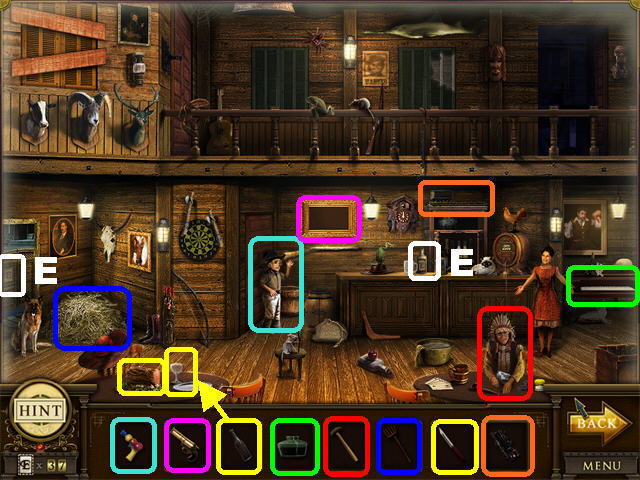
- Give the TOY PISTOL to the COWBOY KID.
- Place the COMMEMORATIVE GOLDEN GUN on the WALL-MOUNTED DISPLAY CASE.
- Place the EBONY INK FOR KEYS on the WHITE PIANO KEYS.
- Give the CRAFTS HAMMER to the INDIAN CRAFTSMAN.
- Place the PITCHFORK on the UNTIDY PILE OF HAY.
- Place the CARVING DINNER KNIFE on the UNSLICED ROAST BEEF in the lower left.
- Place the RED WINE on the SERVED MEAT AND WINE GLASS.
- Place the LOCOMOTIVE MODEL on the INCOMPLETE TRAIN MODEL.
- You will receive the EARRINGS CLOCK PIECE.
- Click the bottom shelf of the left cupboard to play the Rome Marketplace, 700BC.
- Place the METAL DISSOLVING ACID on the METAL LOCK of the cupboard on the right.
- Use the REPAIR HAMMER on the DAMAGED METALWORK inside the cupboard.
- Place the MONKEY MASK on the SNEAKY MONKEY above the last canopy.
- Place the TUNIC BUTTONS on the BUTTONLESS TUNIC.
- Give the BOTTLED PANACEA to the SICK OLD MAN in the window.
- Place the CAT’S MANE on the PERSIAN CAT above the red canopy.
- Put the PAINTBRUSH on the UNCOLORED PAINTING.
- Clean the GRAFFITTI-COVERED WALL with the WALL CLEANER.
- You will receive the EARMUFF CLOCK PIECE.
- Go to the Bridge.
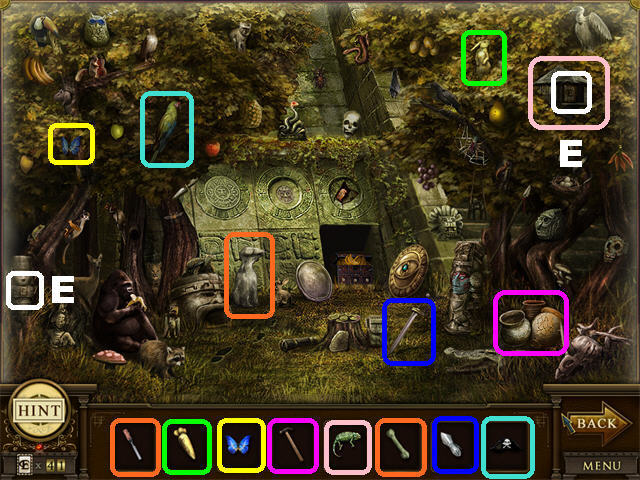
- Open the grid on the ground with the PRY BAR to trigger the Mayan Jungle, 300 BC scene.
- Place the CHISEL on the UNFINISHED STATUE.
- Give the STONE BONE to the DOG STATUE.
- Give the GOLDEN CARROT to the GOLDEN BUNNY.
- Put the TWIN BUTTERFLY next to the TWIN BUTTERFLY in the upper left.
- Break the CRACKED MAYAN POTS in the lower right with the HAMMER.
- Place the LIZARD in the LIZARD HUT in the upper right.
- Put the KNIGHT’S FINAL GRASP next to the SWORD in the grass.
- Give the PIRATE HAT to the PIRATE PARROT.
- You will receive the COLOGNE CLOCK PIECE.
- Return to the boat area.
- Place the WOODEN OARS on the boat; click on it to reach the statues.
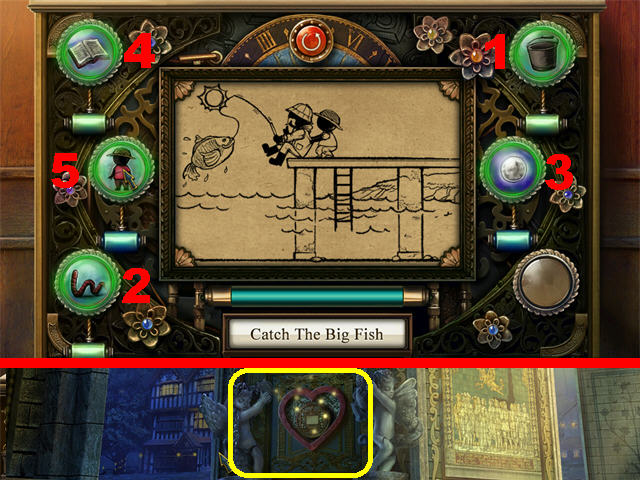
- Click on the Catch The Big Fish Puzzle by the statues.
- Click on the BUCKET and then the WORM. The cat will come and push the fish back in the water.
- Click on the MOON and then the BOOK.
- As soon as the big fish grabs the small fish, click the MAN icon (he will help you catch the BIG FISH).
- The London Museum, 1915 AD scene will be unlocked after you’ve completed the puzzle.
- Open the PHARAOH’S COFFIN with the COFFIN HAMMER.
- Place the MUMMIFIED CAT inside the EMPTY CAT COFFIN.
- Place the SADDLE STRAP on the DEFECTIVE SADDLE behind Napoleon.
- Place the GREEK PHILOSOPHER STATUE FOREARM on the GREEK PHILOSOPHER STATUE.
- Place the FOSSILIZED FISH on the FOSSILIFEROUS ROCK in the lower right.
- Use the DUST SWEEPER on the DUSTY DINOSAUR in the back.
- Use the DINO TEETH SHARPENER on the DULL TEETH.
- Hang the FRAMED PORTRAIT on the MISSING PAINTING in the upper right.
- You will receive the JACKET CLOCK PIECE.
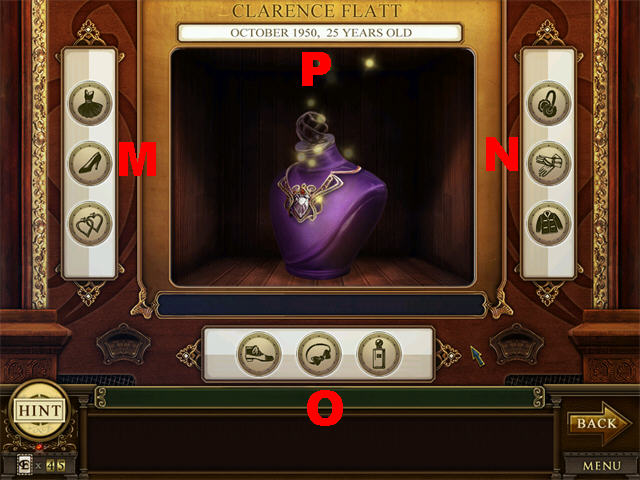
- Open the Ageless Clock.
- Place the BLACK DRESS, HIGH HEEL SHOE, and EARRINGS PIECES in the left slot (M).
- Place the EARMUFFS, GLOVES, and JACKET in the right slot (N).
- Place the LEATHER SHOW, BOWTIE, and COLOGNE in the bottom slot (O).
- Pick up the PEARL NECKLACE in the center of the puzzle (P).
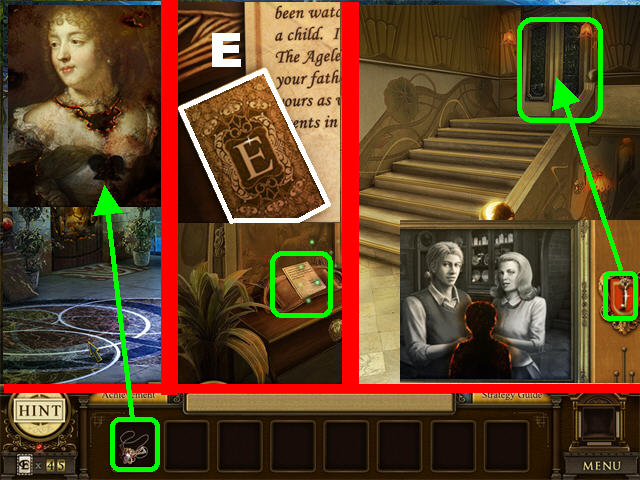
- Return to the area by the steps.
- Zoom into the portrait on the right and place the PEARL NECKLACE on the lady’s neck.
- Go through the open door.
- Click on the book on the left and pick up the E CARD (E).
- Go up the steps and click on the portrait on the left wall.
- Pick up the YEAR 1965 KEY on the painting and use it to unlock the door above the steps.
Floor Four
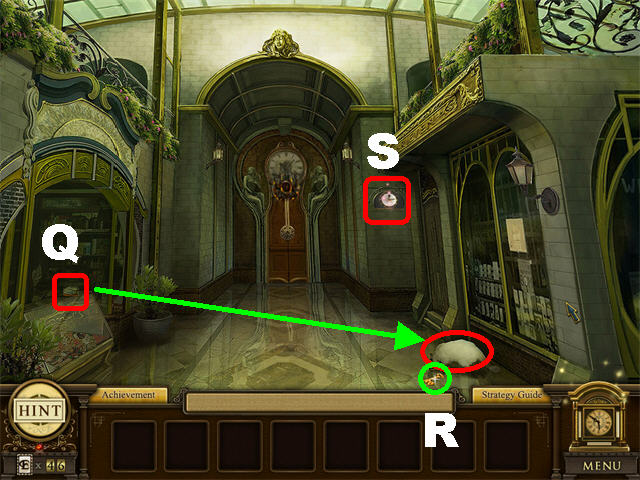
- Give the CANNED CAT FOOD (Q) in the lower left to the HUNGRY CAT in the lower right.
- Pick up the ANTIQUE SHOP KEY (R) below the CAT.
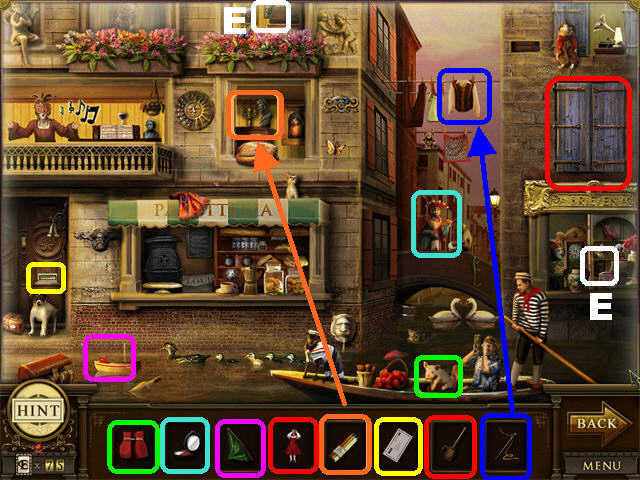
- Play the Venice Sunset, 1980 AD scene by the back door (S).
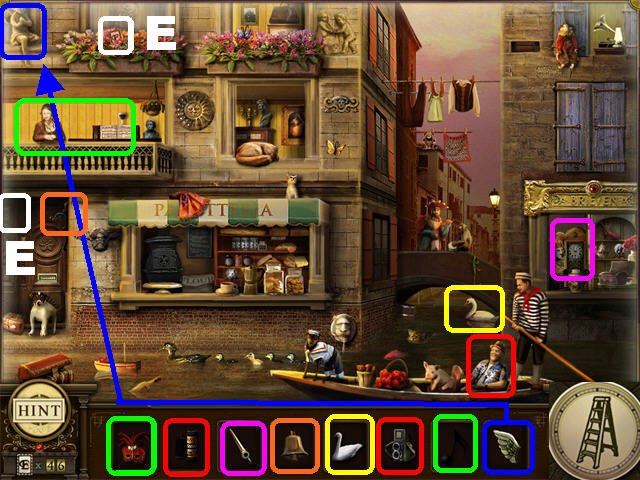
- Give the OPERA MASK to the UNMASKED OPERA SINGER.
- Place the MUSIC NOTE on the INCOMPLETE MUSIC NOTES next to the singer.
- Place the CLOCK HAND on the BROKEN CLOCK.
- Put the RINGING BELL on the BELL HANGER by the door in the lower left.
- Place the SINGLE SWAN next to the FORLORN SWAN.
- Give the TOURIST’S CAMERA to the FRETFUL TOURIST in the gondola.
- Place the CAMERA FILM in the USELESS CAMERA.
- Place the DETACHED CHERUB’S WING on the DEFACED CHERUB STATUE in the upper left corner.
- You will receive the LADDER CLOCK PIECE.
- Open the door to the workshop on the right with the ANTIQUE SHOP KEY.
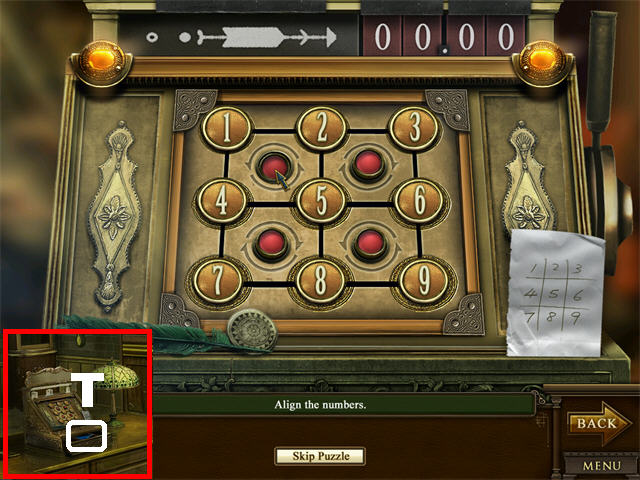
- Click on the cash register to trigger a puzzle.
- Use the red buttons to rotate the positions of the numbers into numerical order (this solution is random).
- Pick up the PASSWORD PAPER (T) inside the cash register.
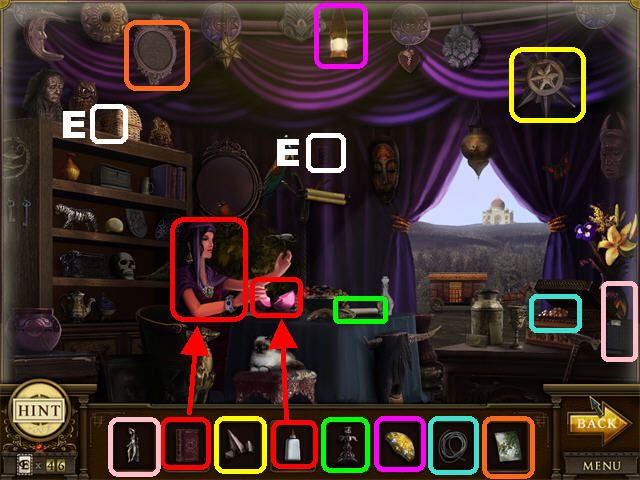
- Play the Gypsy Tent, 1600 AD on the left.
- Place the GYPSY DOLL on the DOLL STAND in the lower right.
- The SUNRAY FRAGMENT belongs on the DAMAGED SUN ORNAMENT in the upper right.
- The POTENT GLUE belongs on the CRACKED CRYSTAL BALL on the table.
- Give the BOOKLESS FORTUNE TELLER the SOOTHSAYER’S BOOK.
- Place the METAL CANDLESTICK on the NEGLECTED CANDLE on the table.
- The GLASS LIGHT FIXTURE belongs on the EXPOSED LIGHTBULB.
- Place the UNADORNED NECKLACE STRING on the LOOSE PEARLS in the lower right.
- Put the UNFRAMED PICTURE in the VACANT PICTURE FRAME.
- You will receive the MATTRESS ENGRAVED CLOCK PIECE.
- Go through the door on the left.
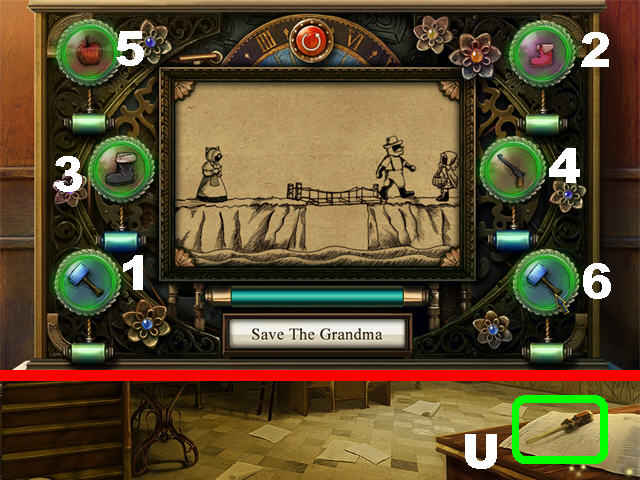
- Pick up the SCREWDRIVER on the lower right (U).
- Click the Save The Grandma Puzzle on the right.
- Click the Left Mallet, Red Boot, Black Boot, Gun, Apple, and Right Mallet, in that order, to solve the puzzle.
- The Leonardo da Vinci’s Study 1505 AD scene will be unlocked once you’ve solved the puzzle.
- Place the ORNITHOPTER WINGS FRAME on the ORNITHOPTER BODY.
- Place the LIGHTWEIGHT CANVAS WINGS on the ORNITHOPTER FRAMEWORK.
- Place the UNFIRED CERAMIC POT in the POTTERY KILN.
- Place the POTTERY PAINTS on the FIRED POTTERY.
- Give the VOCAL SCORE to the MOUSE TROUBADOR in the lower left.
- Place the HAMMER AND NAILS on the LOOSE PAINTING.
- Place the BLUE PENCIL on the UNFINISHED BLUEPRINT.
- Place the COW’S SPOTS on the UNUSUAL COW outside the window.
- You will receive the HAMMOCK ENGRAVED CLOCK PIECE.
- Go up the ladder next to the clock.
- Play the Queen Anne’s Revenge, 1717 AD scene on the clock.
- Place the MASCOT’S EYEPATCH on the ONE-EYED MONKEY.
- Give the GOLDEN CHALICE OF WATER to the THIRSTY PIRATE.
- Place the HEAVY ANCHOR on the ANCHOR CHAIN.
- Put the REINFORCED SLEDGEHAMMER on the REINFORCED BARREL.
- Place the LOCKED TREASURE CHEST on the TREASURE CHEST KEY below the pirate’s booty.
- Place the CANNON LEVER on the BROKEN CANNON in the lower right.
- Place the ROUND SHOT CANNONBALL in the CANNON.
- Give the DECK SWAB to the LAZY PIRATE.
- You will receive the GLASS CUP ENGRAVED CLOCK PIECE.
- Click down and go up the steps on the left.
- Click on the papers on the desk to trigger the Ancient Egypt, 1,000 BC scene.
- Place the HUNTING SLINGSHOT on the TROUBLESOME VULCHER in the upper center.
- Place the KEEN-EDGED SICKLE on the OVERGROWN GRASS in the lower left.
- Place the ORNAMENTAL MOLDING GOLD on the UNFINISHED GOLD BUST in the lower left.
- Put the DAMP T-SHIRT on the UNUSED CLOTHESPIN.
- Give the TOY TRUMPET to the TOY SOLDIER.
- Give the TANTALIZING CHEESE to the HUNGRY MOUSE in the mouse hole below the camel head.
- Place the TRAINED SNAKE in the SNAKE POT.
- Place the STURDY BRICK on the UNREPAIRED WALL SECTION.
- You will receive the CERAMIC PLATE CLOCK PIECE.
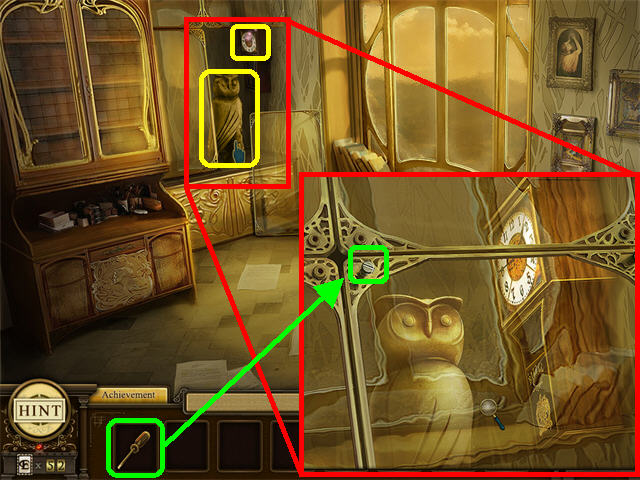
- Zoom into the glass case and place the SCREWDRIVER on the SCREW.
- Collect the OWL STATUE inside the case.
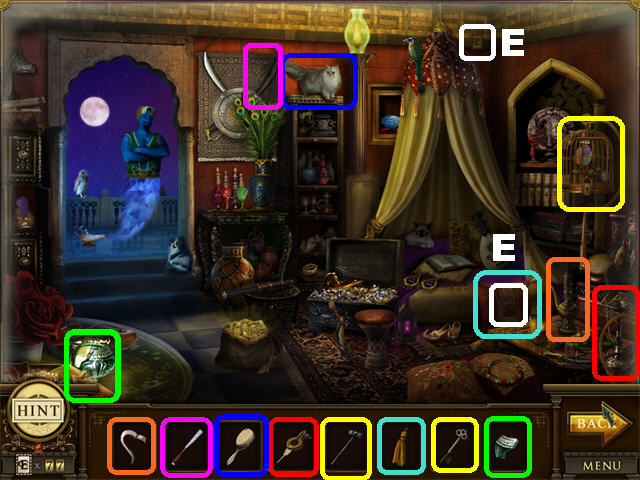
- Play the Arabian Palace, 1100 AD scene unlocked in the case.
- Place the SECRET VAULT KEY on the SECRET VAULT behind the curtains.
- Place the RARE AZURE GEM on the AZURE GEM DISPLAY.
- Put the SHOE REPAIRING KIT on the DAMAGED SANDALS below the bed.
- Place the TRAPPED DJINN on the MAGIC LAMP.
- Give the THREE WISHES to the MAGICAL DJINN.
- Put the SEMILLON GRAPES on the EMPTY GRAPE PLATTER in the lower right.
- Place the PERFUME BOTTLE NOZZLE on the UNCAPPED FINE PERFUME BOTTLE on the right.
- Put the CABINET KNOB on the cabinet’s MISSING KNOB on the left.
- You will receive the STEEL CHAIR CLOCK PIECE.
- Go down and then up the ladder next to the clock.
- Place the OWL STATUE on the left side of the clock.
- Play the Japanese Garden, 960 AD scene.
- Place the UMBRELLA PAPER on the RIPPED PAPER UMBRELLA.
- Give the KATANA to the SAMURAI RACCOON.
- Place the BRONZE BUDDHA STATUE on the BRONZE BUDDHA RING in the upper center.
- Place the BONSAI TRIMMER on the UNTRIMMED BONSAI TREE.
- Put the PROFESSOR’S HAT on the CRANE PROFESSOR in the lower left.
- Place the PULLEY ROPE on the PULLEY WHEEL in the lower left, next to the monk statue.
- Place the ELEGANT TEAPOT on the ELEGANT TEACUP IN A BASKET that appears after the pulley.
- Place the FOX TAIL on the EIGHT-TAILED FOX.
- You will receive the SHINY FORK CLOCK PIECE.
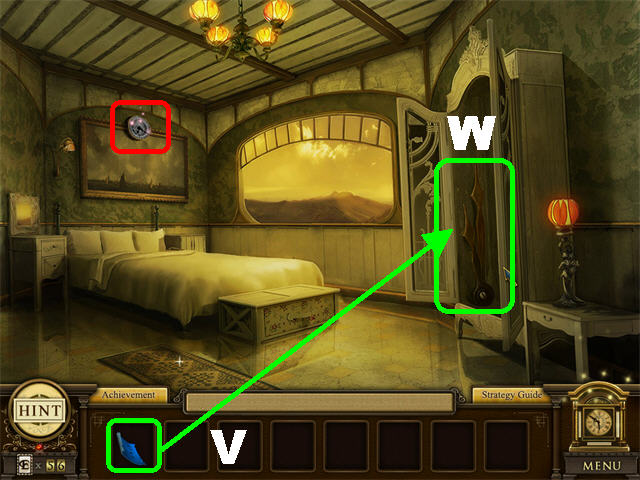
- Go down to the cash register area and take the steps.
- Put the PASSWORD PAPER (V) on the locked closet on the right.
- Pick up the METALLIC CLOCK HANDS (W) inside the cabinet.
- Play the Japanese Garden, 960 AD scene above the bed.
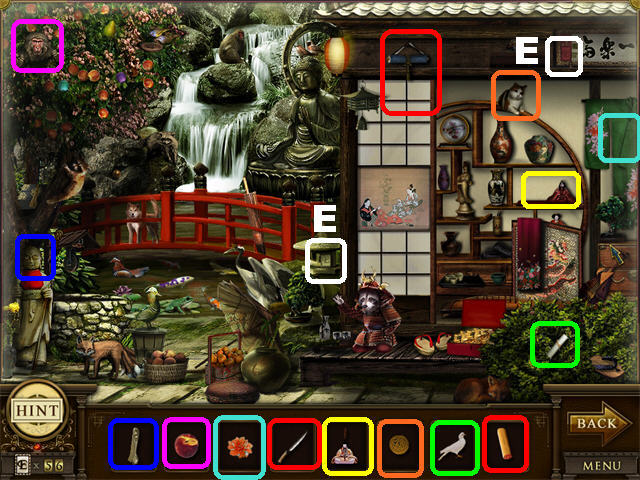
- Place the STONE EARRING on the Monk’s MISSING EARRING.
- Give the DELICIOUS PEACH to the PEACH LOVING BABOON in the upper left.
- Place the FLORAL PATTERN on the INCOMPLETE FLORAL PATTERN in the upper right.
- Place the STRING-CUTTING KNIFE on the TAUTLY-TIED SCROLL in the upper center.
- Place the SCROLL PAINT on the UNPAINTED SCROLL ILLUSTRATION.
- Place EMPEROR NINGYO next to EMPRESS NINGYO on the right.
- Give the BALL OF YARN to the BORED CAT in the upper right.
- Place the CARRIER PIGEON on the UNDELIVERED LETTER in the lower right.
- You will receive the ROUND BOWL CLOCK PIECE.
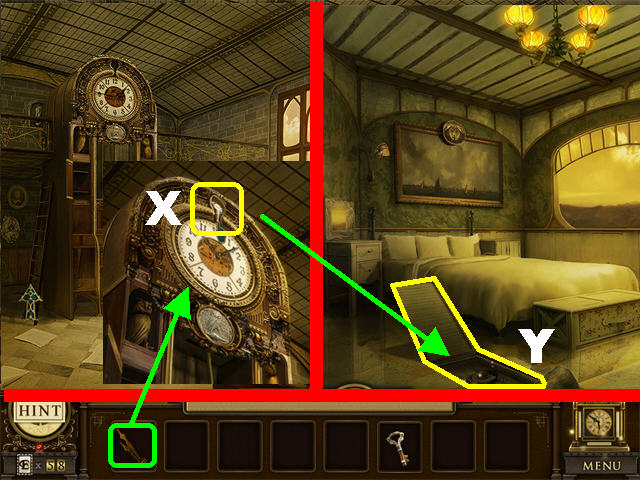
- Click down; go through the left door and up the ladder next to the clock.
- Place the METALLIC CLOCK HANDS on the antique clock’s face.
- Pick up the TRAPDOOR KEY (X) above the clock.
- Click down twice and go up the steps.
- Click on the rug in the lower left and place the TRAPDOOR KEY on the trapdoor (Y).
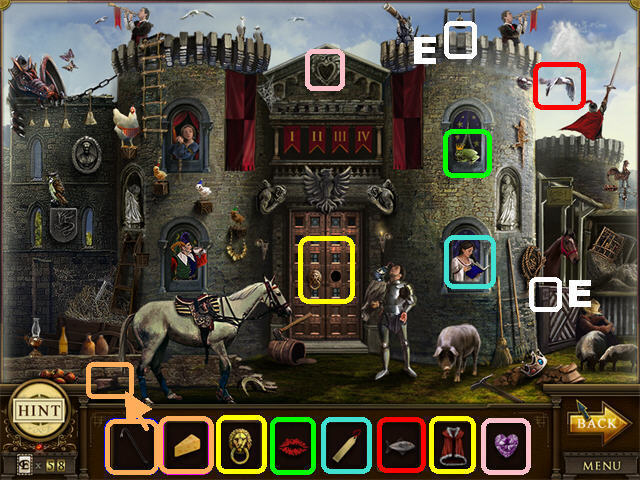
- Play the Medieval Castle, 450 AD scene by the trapdoor.
- Put the CROWBAR FOR BRICKS on the LOOSE BRICK in the lower left corner.
- Give the CHEESE to the HUNGRY RAT.
- Place the LION DOORKNOB on the ROYAL DOOR to open it.
- Give the KING the KING’S CLOAK.
- Place the PRINCESS’ MAGICAL LIPS on the CROWNED FROG.
- Place the BOOKMARK on the OPEN BOOK held by the lady in the lower right window.
- Give the DINNER FISH to the HUNGRY BIRD in the upper right.
- Place the HEART-SHAPED GEM in the HEART INDENTATION in the upper center.
- You will receive the TABLE CLOCK PIECE.
- Open the Ageless Clock!
- Place the SHINY FORK, GLASS CUP, and CERAMIC PLATE in the left slot (A).
- Place the LADDER, TABLE, and ROUND BOWL in the right slot (B).
- Place the MATTRESS, HAMMOCK, and STEEL CHAIR in the bottom slot (C).
- Click on the GEMMED CLOCK HULL after you’ve solved the puzzle (D).
- Go down to the hallway and place the GEMMED CLOCK HULL on the back door.
- Go through the open door; click on the book on the left and pick up the E CARD (E).
- Go up the steps.
- Click on the portrait on the left wall; pick up the YEAR 1985 KEY on the painting and use it to unlock the door above the steps.
Floor Five
- Play the Traveling Circus, 1600 AD scene on the left.
- Place the MINIATURE HORSE on the MINIATURE CAROUSEL.
- Place the WOODEN RUNG on the ladder’s MISSING RUNG.
- Put the FULL PITCHER OF WATER in the bear’s EMPTY BUCKET on the tightrope.
- Put the SINGLE CLOWN SHOE next to the SINGLE CLOWN SHOE in the lower left.
- Place the ANIMAL SPOTS on the giraffe’s SPOTLESS PATCH.
- Give the FAIRY’S WAND to the SWINGING FAIRY.
- Place the CRASH HELMET on the FELINE CANNONBALL on right.
- Place the MATCH on the CANNON WITH UNLIT FUSE.
- You will receive the WALL CLOCK PIECE.
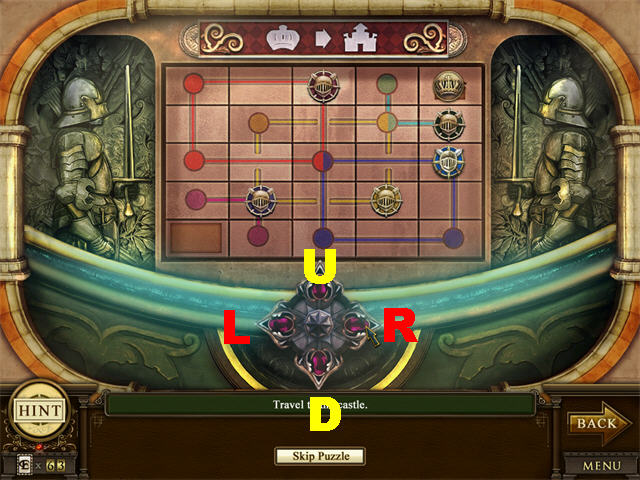
- Click on the front door to trigger a puzzle.
- Click the buttons R, R, U, R, D, L, U, R, L, U, U, U, R, and R to solve the Get The Crown To The Castle Puzzle.
- Go through the door after you’ve completed the puzzle.
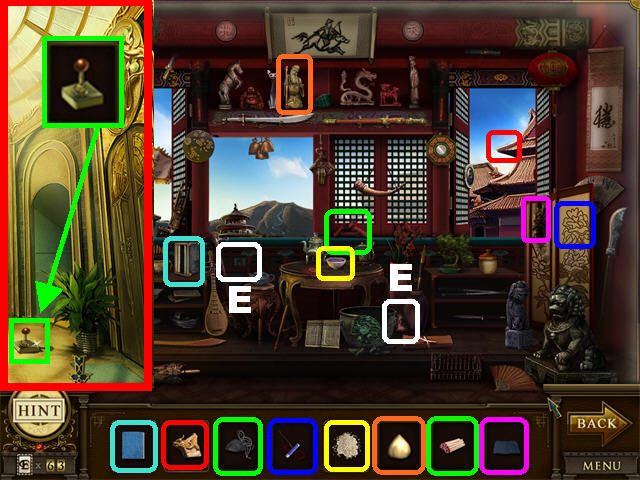
- Pick up the JOYSTICK on the floor.
- Play the Forbidden City, 1650 AD scene.
- Place the LITERATURE BOOK VOL 2 with the LITERATURE BOOKS.
- Place the ROOFTOP GUARDIAN STATUE on the MISSING STAUE spot outside the right window.
- Place the FUSES AND GUNPOWDER in the EMPTY FIRECRACKERS.
- Place the MATCHES on the FIRECRACKERS.
- Place the NEEDLE AND WHITE THREAD on the UNFINISHSED STITCHES on the right screen.
- Clean the DIRTY FOLDING SCREENS on the right with the CLEAN RAG.
- Place the COOKED RICE in the EMPTY RICE BOWL.
- Give the GOLDEN STONE PEAR to the GOLDEN STATUE.
- You will receive the LAPTOP CLOCK PIECE.
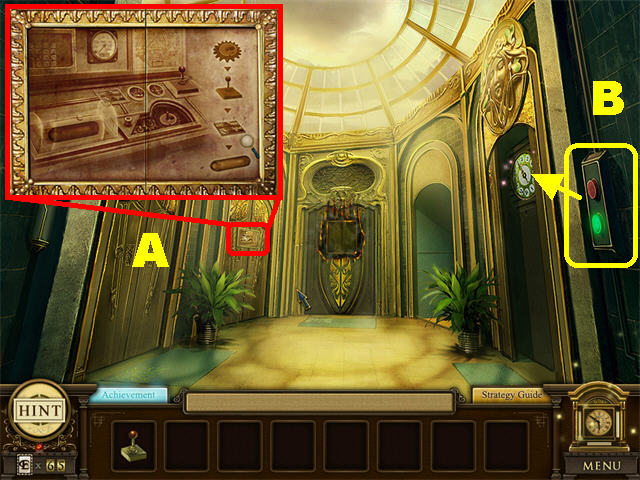
- Zoom into the intricate machine’s instruction manual posted on the far left door (A).
- Click on the elevator button (B) to trigger the Opera House, 1810 AD scene.
- Give the MONSTER HORNS to the HORNLESS MONSTER PROP in the upper center.
- Place the CARDBOARD SUNBEAMS on the SUN FACE in the upper right.
- Place the ORGAN KEY on the organ’s LOCKED KEYBOARD LID.
- Hang the PROP STAR on the STAR HOOKS in the upper right.
- Place the LIT CANDLE on the UNLIT PROP STAR.
- Place the BOAT PAINTING on the SEA PAINTING.
- Give the OPERA HOUSE TICKET to the UNINVITED MONKEY on the left balcony.
- Clean the DUSTY COBWEB in the right balcony with the PLUMED DUSTER.
- You will receive the DIGITAL CLOCK ENGRAVED CLOCK PIECE.
- Go through the door in the far right.
- Open the box (C) in the lower left and play the London Museum, 1915 AD scene.
- Give the READING GLASSES to the NEARSIGHTED READER in the lower right.
- Give the EYE DROPS to the DRY-EYED READER.
- Place the RAT CAGE on the ORNERY RAT in the lower right.
- Place the GLOBE FRAGMENT on the INCOMPLETE GLOBE.
- Place the WIG PAINTING on the BALD NOBLE PAINTING.
- Place the LUCKY COIN in the WISHING FOUNTAIN.
- Place the MAYAN DAGGER on the DAGGER DISPLAY STAND in the lower left.
- Place the BIRD FEATHER on the dodo bird’s MISSING HIND FEATHER in the display.
- You will receive the MECHANICAL TOY CLOCK PIECE.
- Play the Old West Saloon, 1850 AD scene.
- Place the SAGUARO CACTUS in the CACTUS BUCKET next to the little boy.
- Give the SERVING GIRL’S APRON to the SERVING GIRL.
- Give the COW BELL to the WALL MOUNTED COW.
- Place the SHERRIF’S HAT on the SHERIFF DOG in the lower left.
- Place the INDOOR LAMP in the VERY DARK ROOM in the upper right.
- Place the STAINLESS STEEL HANDCUFFS on the MASKED OUTLAW.
- Place the LOCK-SMASHING SLEDGEHAMMER on the HEAVY-DUTY TRAPDOOR LOCK in the lower left.
- Place the ABSORBENT TOWEL on the LEAKING BARREL on the right.
- You will receive the CAN OPENER CLOCK PIECE.
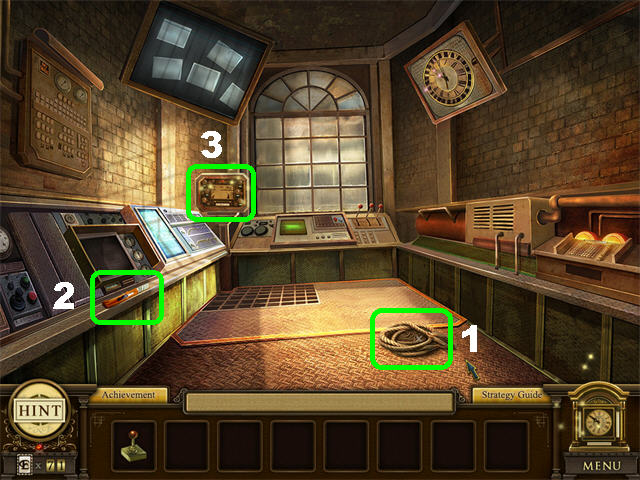
- Go through the door in the upper center.
- Pick up the ROPE on the ground (1).
- Pick up the USE-ONCE BOX CUTTER on the left (2).
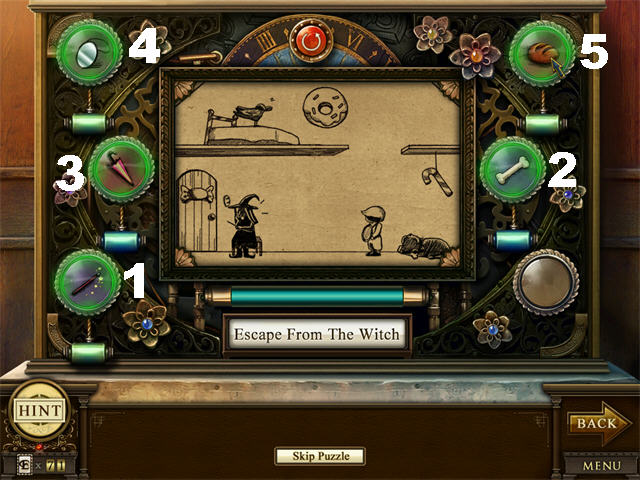
- Play the Escape From The Witch Puzzle by the left control panel (3).
- See the screenshot for the solution.
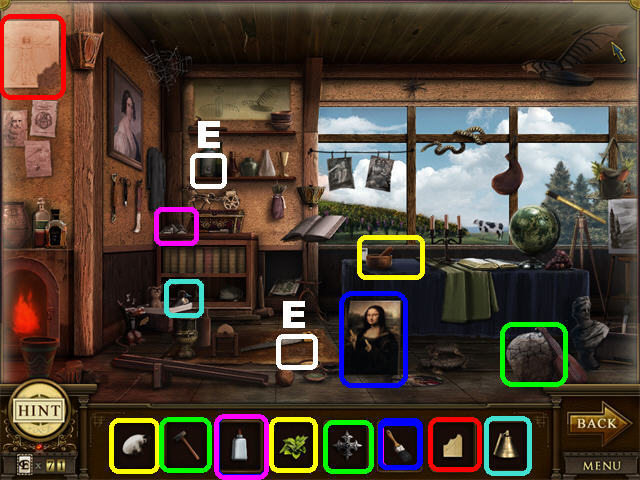
- Play the Leonardo da Vinci’s Study, 1505 AD scene after you’ve completed the puzzle.
- Place the DURABLE CHISEL on the CRACKED STONE in the lower right.
- Place the AMULET WITH EMPTY SOCKET on the BLUE SAPPHIRE inside the pot.
- Place the POWERFUL ADHESIVE on the SCATTERED SKULL FRAGMENTS on the left.
- Put the MEDICAL HERB in the MORTAR AND PESTLE on the table.
- Place the SICK RABBIT on the PET MEDICINE on the table.
- Place DA VINCI’S BRUSH on the ABNORMAL MONA LISA painting.
- Place the TORN SCRAP OF PAPER on the TORN VITRUVIAN MAN.
- Place the CAST METAL BELL on the CONFINED DUCK.
- You will receive the MEMORY CARD CLOCK PIECE.
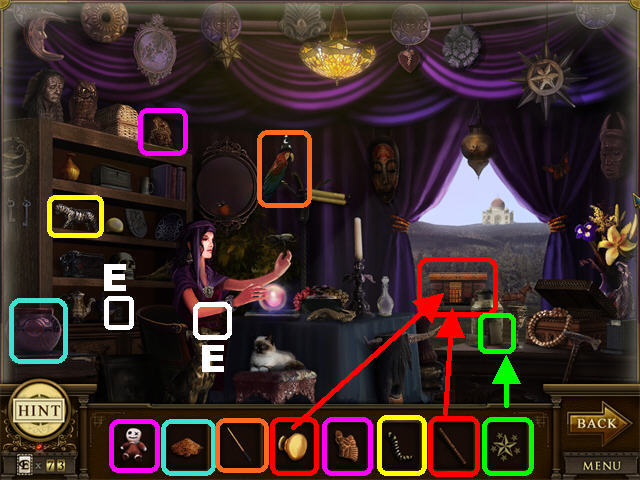
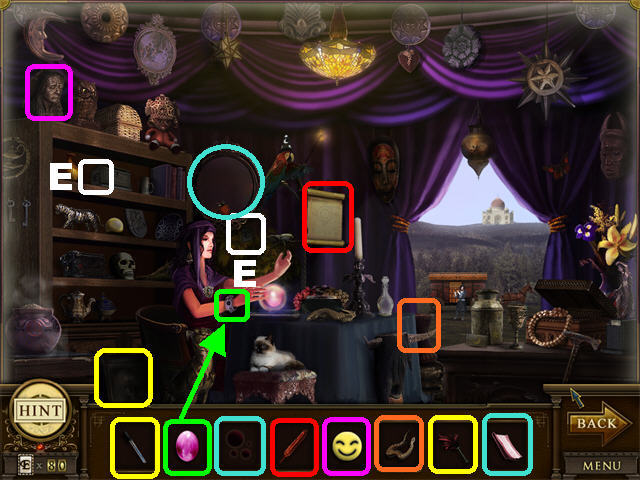
- Play the Gypsy Tent, 1600 AD scene.
- Place the AROMATIC INCENSE in the AROMA VESSEL.
- Give the MAGICIAN’S WAND to the PARROT MAGICIAN in the upper center.
- Place the WAGON DOORKNOB on the WAGON DOOR outside.
- Give the WOODEN FLUTE to the GYPSY MUSICIAN next to the wagon.
- Place the WOODEN MASK PIECE on the MARRED WOODEN MASK in the upper left.
- Give the SHAMAN DOLL to the SHAMAN DOLL’S MASK.
- Place the BRONZE TAIL on the BRONZE TIGER.
- Put the MAJOR ARCANUM: THE STAR on the BLANK TAROT in the lower right.
- You will receive the BICYCLE CLOCK PIECE.
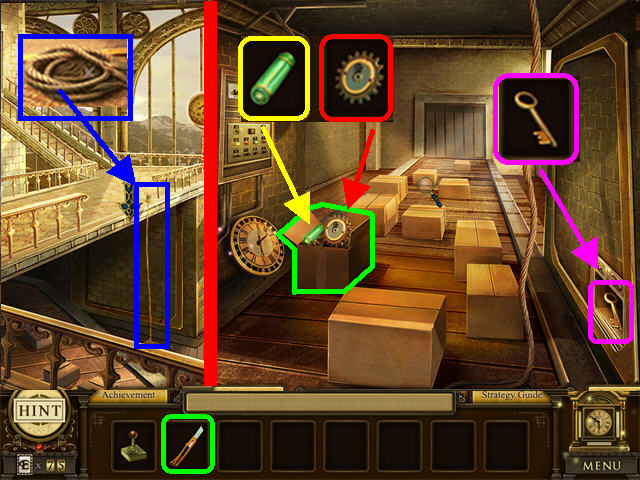
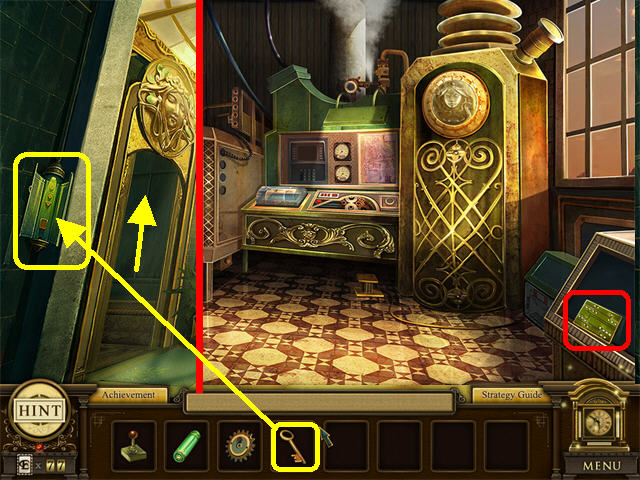
- Go to the walkway and place the ROPE on the side of the railing to go down.
- Pick up the ELEVATOR KEY in the lower right.
- Open the box marked in green with the USE-ONCE BOX CUTTER.
- Pick up the ENERGY CELL and the GEAR inside the box.
- Play the Venice Sunset, 1980 AD scene on the left.
- Put the LIFE JACKET on the FRIGHTENED PIGLET on the boat.
- Place the CLOWN MAKEUP on the SAD CLOWN.
- Place the SAIL CANVAS FOR A TOY on the TOY SAILBOAT.
- Place the PACK OF CANDLES on the CANDELABRA WITHOUT CANDLES in the upper center.
- Place the LETTER IN AN ENVELOPE in the MAILBOX on the left.
- Place the GREASING OIL on the UNGREASED WINDOW SHUTTERS in the upper right.
- Give the LOST GIRL to the WORRIED MOTHER.
- Place the SEWING NEEDLE on the TORN SHIRT in the upper right.
- You will receive the FLASHLIGHT CLOCK PIECE.
- Go to the elevator area. Place the ELEVATOR KEY in the lock on the left and enter the control room.
- Pick up the CHIP in the lower right.
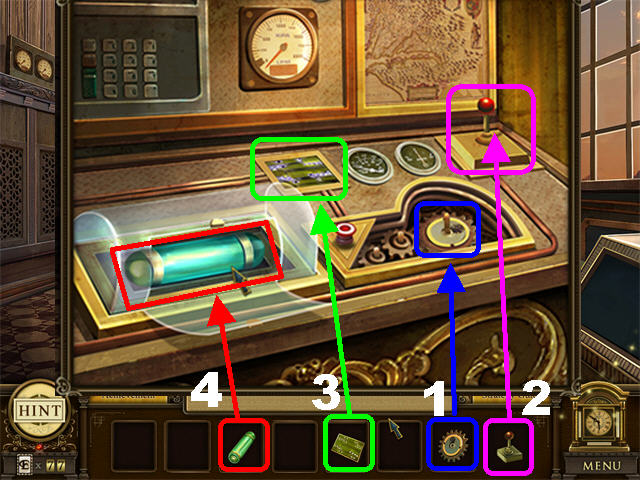
- Zoom into the control panel and place the items into the machine according to the instruction manual by the elevators.
- Place the GEAR, JOYSTICK, CHIP, and ENERGY CELL into the machine, as in the screenshot.
- Play the Arabian Palace, 1100 AD scene after completing the control panel.
- Place the LARGE KETTLE HANDLE on the TALL BRONZE KETTLE.
- Place the BLADE SHARPENER on the DULL CEREMONIAL SCIMITAR.
- Place the CAT’S HAIRBRUSH on the UNKEMPT PERSIAN CAT.
- Place the FLAVORED TOBACCO in the HOOKAH PIPE in the lower right.
- Place the PILLOW TASSEL on the DEFICIENT PILLOW at the foot of the bed.
- Put the BIRDCAGE KEY on the LOCKED BIRDCAGE on the right.
- Place the CHAIN BREAKER on the CHAINED PARROT.
- Place the CAULDRON PIECE on the BROKEN CERAMIC CAULDRON in the lower left.
- You will receive the PORTABLE FAN CLOCK PIECE.
- Open the Ageless Clock!
- Place the BICYCLE, CAN OPENER, and MECHANICAL TOY PIECES in the left slot (A).
- Place the LAPTOP, MEMORY CARD, and DIGITAL CLOCK PIECES in the right slot (B).
- Place the FLASHLIGHT, PORTABLE FAN, and WALL CLOCK PIECES into the bottom slot (C).
- Pick up the BLUEPRINT PIECE after you’ve solved the puzzle (D).
- Go to the elevator.
- Place the BLUEPRINT PIECE on the back door.
- Go through the open door; click on the book on the left and pick up the E CARD (E).
- Go up the steps; click on the portrait on the left wall and pick up the YEAR 2010 KEY on the painting.
- Use the YEAR 2010 KEY to unlock the door above the steps.
Floor Six

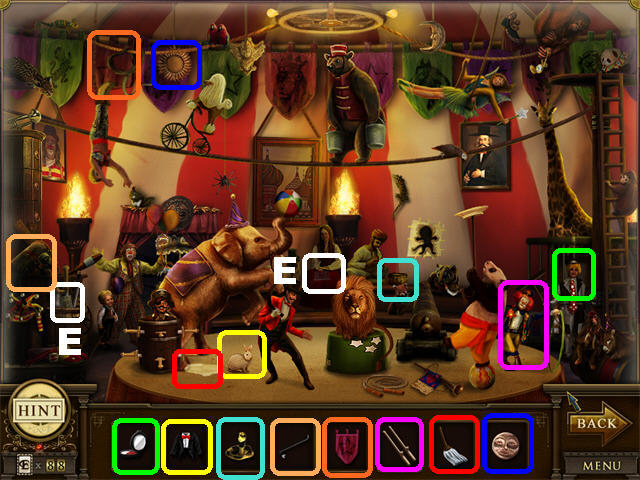
- Play the Traveling Circus, 1600 AD scene.
- Give the RUSSIAN RUBLE to the POOR BOY in the lower left.
- Place the RINGMASTER’S HAT on the RINGMASTER’S PORTRAIT.
- Place the HAIR SCISSORS on the SHAGGY POODLE.
- Give the BOTTLE OF MILK to the HUNGRY BABY TIGER.
- Give the BROWN BULLWHIP to the SMILING LION TAMER.
- Give the HUNGER-CURING BANANA to the FAMISHED ELEPHANT.
- Give the ANIMAL PERFORMER’S BEACHBALL to the PLAYFUL ELEPHANT WITHOUT TOY.
- Give the PAIR OF CYMBALS to the MONKEY PERCUSSIONIST on the right.
- You will receive the GEMMED CLOCK HULL CLOCK PIECE.
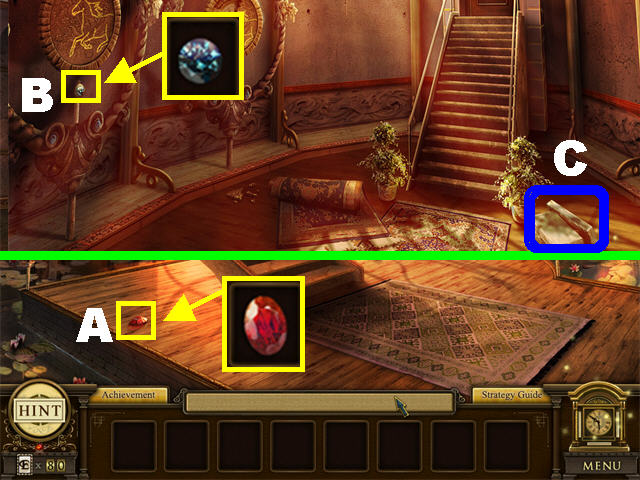
- Pick up the GARNET GEM in the lower left (A).
- Go through the right door.
- Pick up the DIAMOND on the left side of the wall, below the horse (B).
- Pick up the FLOATING STEPS in the lower right (C).
- Play the Gypsy Tent, 1600 AD scene by clicking on the horse image on the left.
- Place the BRACELET RUBY on the UNADORNED GYPSY BRACELET.
- Place the MAGIC FEATHER PEN on the MAGIC SCROLL.
- Place a HAPPY FACE on the SAD-FACED BUST in the upper left.
- Place the PYTHON on the FORTUNTELLER’S TABLE.
- Clean the DUSTY PAINTING in the lower left with the FEATHER DUSTER.
- Give the EYE DROPS to the DRY-EYED PAINTING.
- Place the DRY TOWEL on the STEAMED MIRROR.
- Place the INSECT’S SPOTS on the ABERRANT LADYBUG on the mirror.
- You will receive the RUBY NECKLACE CLOCK PIECE.
- Click down; place the FLOATING STEPS on the pool of water by the back door and enter the next room.
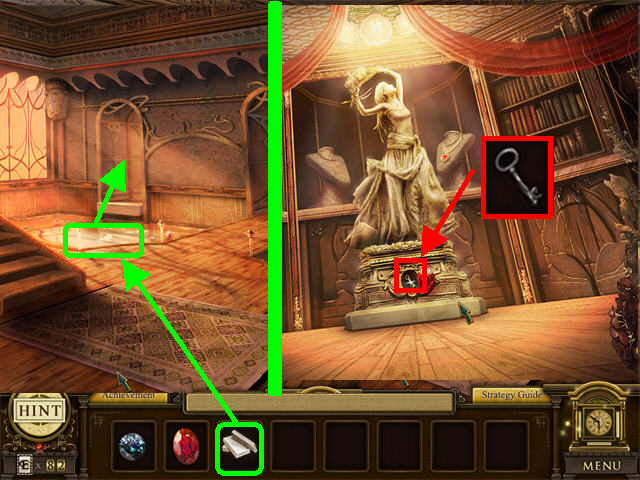
- Open the base of the statue and pick up the SILVER KEY.
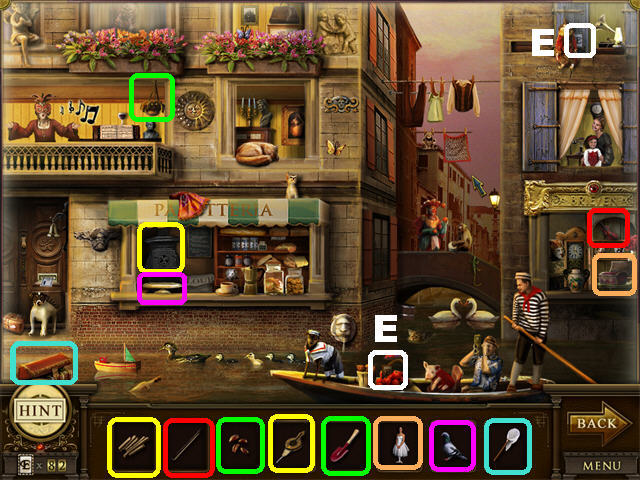
- Play the Venice Sunset, 1980 AD scene.
- Place the BAKERY’S FIREWOOD in the COLD BAKERY OVEN.
- Place the FIREPLACE HAND BELLOWS in the BAKERY OVEN.
- Place the HUNGRY PIGEON on the FRESH APPLE PIES in front of the oven.
- Place the VIOLIN BOW on the VIOLIN in the lower right.
- Place the FLOWER POT SCOOPER in the DEAD PLANT in the upper left.
- Place the ROSE SEEDS in the EMPTY FLOWER POT.
- Place the MINIATURE BALLERINA in the BALLERINA’S MUSIC BOX.
- Place the TREASURE-SNATCHING NET on the FLOATING-TREASURE BOX.
- You will receive the WOODEN MULE CLOCK PIECE.
- Exit this scene and go into the right door.
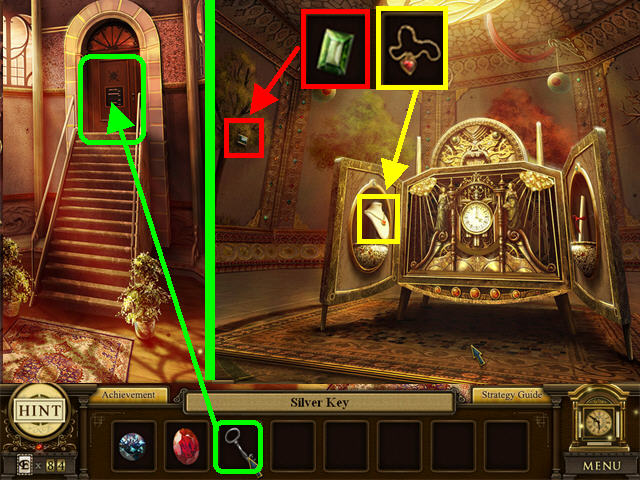
- Open the back door with the SILVER KEY.
- Pick up the PEARL NECKLACE on the left side of the clock.
- Pick up the SAPPHIRE GEM on the left wall.
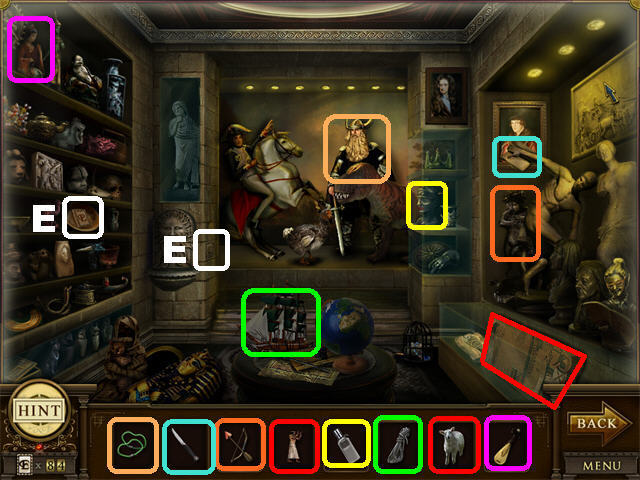
- Play the London Museum, 1915 AD scene by clicking at the bottom of the tree on the right wall.
- Put the HAIR ELASTICS on the SCRUFFY VIKING.
- Place the STONE-CARVING KNIFE on the UNCARVED DISCUS.
- Place the CUPID’S BOW AND ARROW on the UNHAPPY CUPID.
- Place the GLYPH OF EGYPTIAN MAN on the BARE EGYPTIAN HIEROGLYPHS in the lower right.
- Place the SACRIFICIAL LAMB on the INSUFFICIENT SACRIFICE.
- Place the COSMETICS REMOVER on the EXCESSIVE LIPSTICK on the right bust.
- Place the SAILING SHEETS on the THREE SHEETS IN THE WIND SHIP on the ground.
- Give the CHINESE PIPA to the EMPTY HANDED MUSICIAN.
- You will receive the PEARL NECKLACE CLOCK PIECE.
- Click down twice and enter the left door.
- Place the PEARL NECKLACE on the display bust in the back and enter the secret door that opens.
- Click on the books on the ground and pick up the GOLD KEY.
- Play the Old West Saloon, 1850 AD scene by opening the glass case and clicking on the radio.
- Give the MINIATURE ARROW to the MOUSE ARCHER.
- Place the CRANK HANDLE on the CONNECTING ROD MECHANISM in the upper left.
- Place the DRY TOWEL on the BATHING PIG hanging from the ceiling.
- Place the DEER’S TOP HAT on the WALL-MOUNTED DEER in the upper left.
- Put the TOMAHAWK on the TOMAHAWK DISPLAY.
- Give the PAINTING OF WINE BOTTLE to the THIRSTY ALCOHOLIC PORTRAIT on the right.
- Place the TOY COWBOY SPURS on the COWBOY KID.
- Place the LOCK COMBINATION in the LOCKED SAFE in the lower left.
- You will receive the WOODEN HORSE CLOCK PIECE.
- Click down twice and zoom into the upper left door.
- Place the GOLD KEY in the keyhole.
- Place the GARNET GEM, DIAMOND, and SAPPHIRE GEM as shown in the screenshot.
- Go through the door.
- Play the Traveling Circus, 1600 AD scene by clicking on the clock.
- Give the CLOWN MAKEUP to the MAKEUP-LESS FACE on the right.
- Place the ASSISTANT’S SUIT on the RABBIT ASSISTANT on the ground.
- Place the “TAME” COBRA in the SNAKE BASKET on the back wall.
- Place the TITANIUM CROWBAR on the LOCKED CHEST in the lower left.
- Place the STAR BANNER CLOTH on the TORN STAR BANNER.
- Give the LONG STILTS to the EXCEPTIONALLY SHORT CLOWN in the lower right.
- Place the YARN MOP on the CARELESS PUDDLE.
- Place the FACE OF THE SUN on the FACELESS SUN ORNAMENT.
- You will receive the GOLDEN CLOCK HULL CLOCK PIECE.
- Open the Ageless Clock!
- Place the GEMMED CLOCK HULL, WOODEN HORSE, and PEARL NECKLACE PIECES in the left slot (A).
- Place the GOLDEN CLOCK HULL, WOODEN MULE, and RUBY NECKLACE PIECES in the right slot (B).
- Pick up the MEMORY CHIP, once you’ve solved the puzzle, and place it on the back door (C).
- Go through the open door; click on the book on the left and pick up the E CARD.
- Go up the steps; click on the portrait on the left wall and pick up the ENLIGHTENUS KEY on the painting.
- Use the ENLIGHTENUS KEY to unlock the door above the steps.
- Congratulations! You have just completed Enlightenus II: The Timeless Tower!
Created at: 2010-08-20