

Walkthrough Menu
Walkthrough Menu
General Tips
- This is an Adventure Game.
- Click on Settings to adjust the Master Volume, Music Volume, Effects Volume, footstep sounds, Fullscreen and Text Speed.
- Choose between hardcore or casual mode.
- In hardcore mode you will have to choose between the hand or the magnifying glass to interact with objects in the scene and there are no hints.
- In casual mode the hand or magnifying glass will be chosen for you and there will be less dialogue with abundant hints in your journal.
- If you use the hardcore mode, in this walkthrough, “click on or take” refers to using the hand icon, “look at” refers to using the magnifying glass and “speak or talk to” refers to using the thought bubble icon.
- To access the task list, click on the journal on the bottom left of the screen.
- When a new task is added the journal will bounce up and down.
- In casual mode, you can click on the tasks in your journal to get hints. The hints will start out subtle and the more you click on them, the more direct the hints become.
- You can choose the extent of tutorial you wish to have during the first dialogue choices.
- Your inventory is in the blue bag on the lower left.
- Inventory items are marked in red on the screenshots.
- To use an inventory item, click on it and it will automatically become your cursor and you can then use it on the object of your choice.
- You can combine items in inventory by clicking on one item and then clicking on the item you wish to combine it with.
- The game autosaves periodically as you play and you can click on Options to save at any time.
- There are 6 saves slots showing but new panels of additional save slots will open up as you fill them in. I used 24 save slots and did not run out.
- You can get your character to move faster by double clicking where you wish to go.
- Exits are marked with an arrow and can be located by moving your cursor around the screen or clicking on the red question mark in the lower right.
- Click on the question mark in the lower right to highlight all the hotspots and exits.
- Click anywhere on the screen to advance the dialogue.
- Dialogue trees will be in white script if you have not covered the topics and they will be gray if you have asked it already.
- You can exit the game by clicking on the green monitor in the upper left and clicking on Quit Game.
Chapter 1 – The Mazslow
- These directions start after the lessons from Kralek if you chose to get instruction from him.
- Speak to Kralek to get your task list and exhaust all conversation.
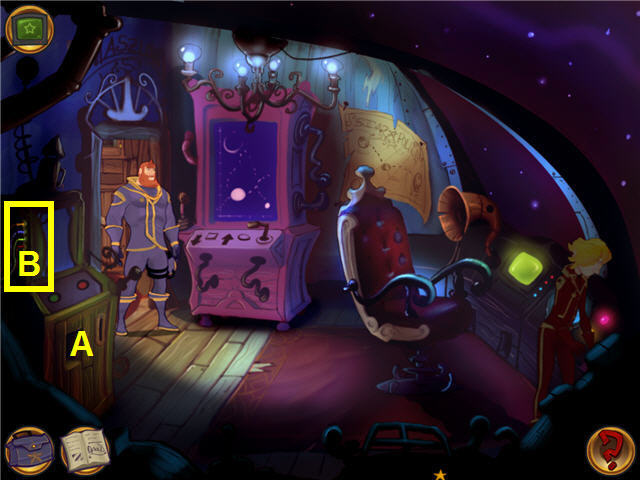
- Look at the translator (A) and see that it is not functioning.
- Speak to Kralek and ask him about the translator till he gives you the POWER SCHEMES.
- Look at the wires (B) on the top of the translator and note the order, Yellow-Blue-Green-Red.
- Look at the POWER SCHEMES in inventory by clicking on the magnifying glass and clicking it on the POWER SCHEMES. Note the order of the wires is 3-2-1-2.
- Head left into the kitchen.
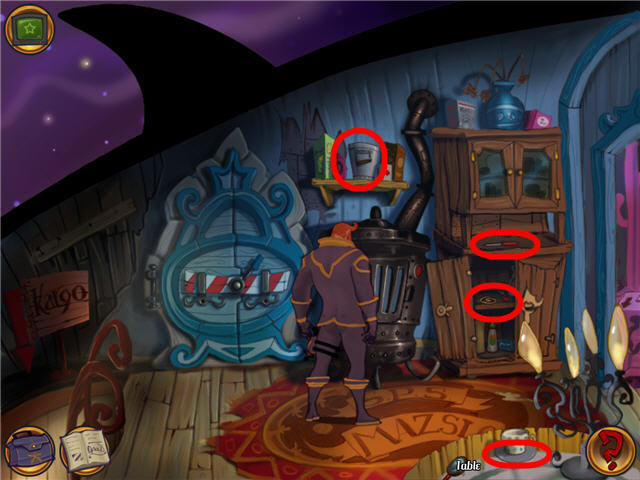
- Click on the lower cupboard to open it and take the COPPER WIRE from the top shelf.
- Take the POTATO PEELER from the shelf between the upper and lower cupboard.
- Take the EMPTY BUCKET from the shelf above the stove.
- Look at the tea cup and then take it to get the SMUDGED TRANSLATOR DISC.
- Head to the cargo hold down the ladder to the left.
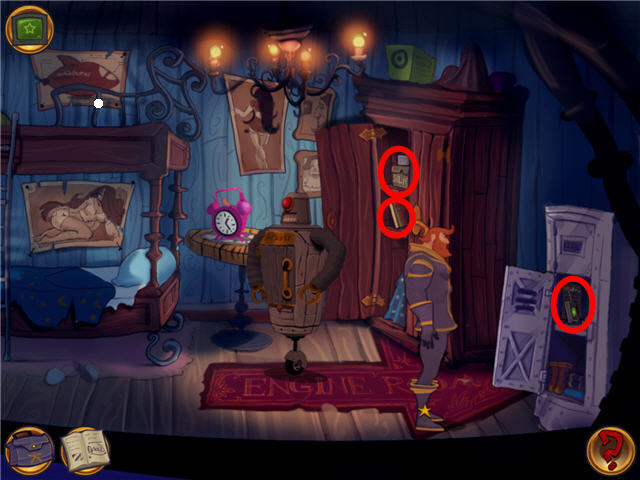
- Open the closet and take the SILICONE BLOCK and the ROWBOAT MANUAL.
- Open the locker on the right and take the locators to get a LOCATOR and BROKEN LOCATOR in inventory.
- Look at the poster of Luna on top of the bottom bunk.
- Head to the engine room on the right.
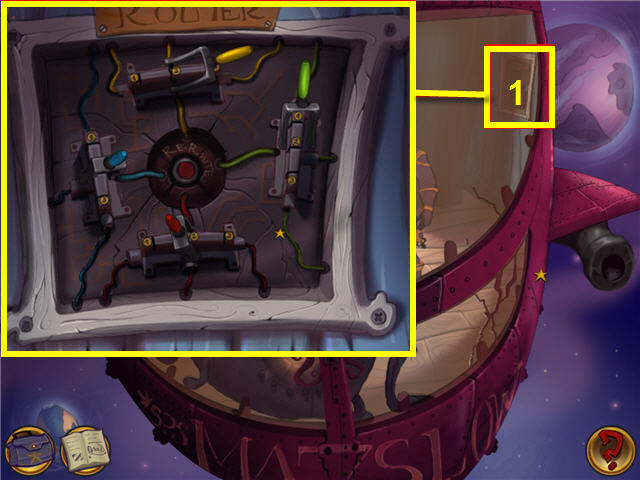
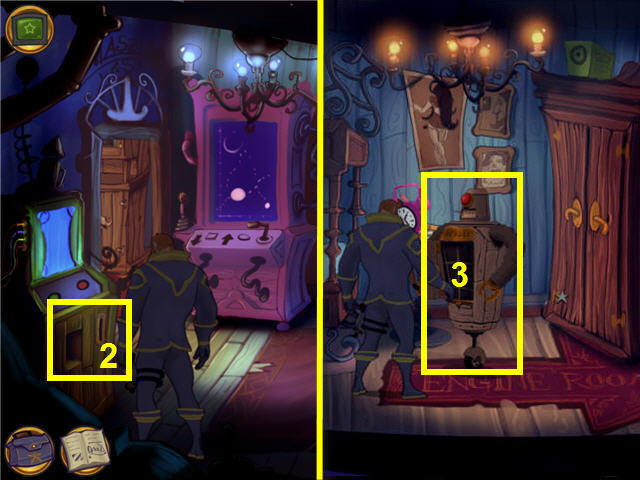
- Approach the router (1) on the right to get a close-up.
- Move the levers to the numbers on the POWER SCHEME; Yellow – 3, Blue -2, Green -1, Red -2. See screenshot for solution.
- Push the red button in the center of the router to activate.
- Head back up the ladder from the bedroom into the kitchen.
- Click on the oven door to open it.
- In inventory, combine the SILICONE BLOCK and the EMPTY BUCKET.
- Place the BUCKET WITH SILICONE in the opened oven and click the red power button on the stove.
- You will automatically get MELTED SILICONE in inventory.
- Combine the MELTED SILICONE with the COPPER WIRE to get COPPER WIRE WITH SILICONE.
- Combine the COPPER WIRE WITH SILICONE with the BROKEN LOCATOR to get a WORKING LOCATOR.
- Head right into the cockpit.
- Combine the HANKY on the SMUDGED TRANSLATOR DISK to get a CLEAN TRANSLATOR DISK.
- Place the ROWBOAT MANUAL in the translator service hole (2).
- Place the CLEAN TRANSLATOR DISK in the translator disc slot.
- Click on the service hole after the translator is done to get the TRANSLATED MANUAL.
- In inventory, use the magnifying glass or hand on the TRANSLATED MANUAL in inventory to get the directions.
- Head to the cargo hold and open the hatch on the ROWBOAT (3).
- Click on the ROWBOAT two times and automatically get it to go online.
- Head back to the cockpit and speak to Kralek and give him the LOCATOR.
- Speak to Kralek again and tell him you are ready to go.
Chapter 2 – Jama Spacea
- Speak to Kralek and get your task.
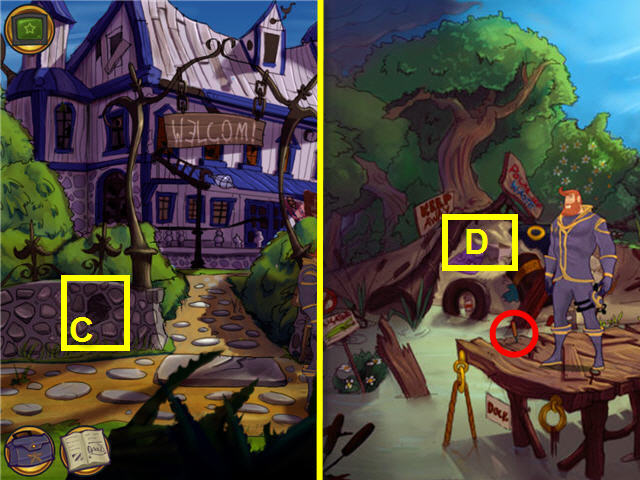
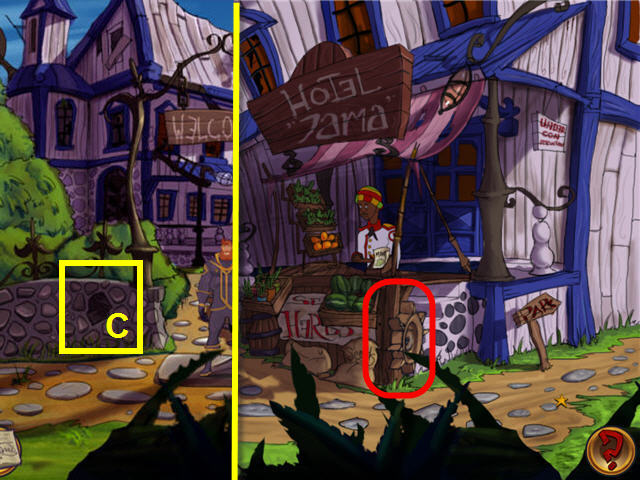
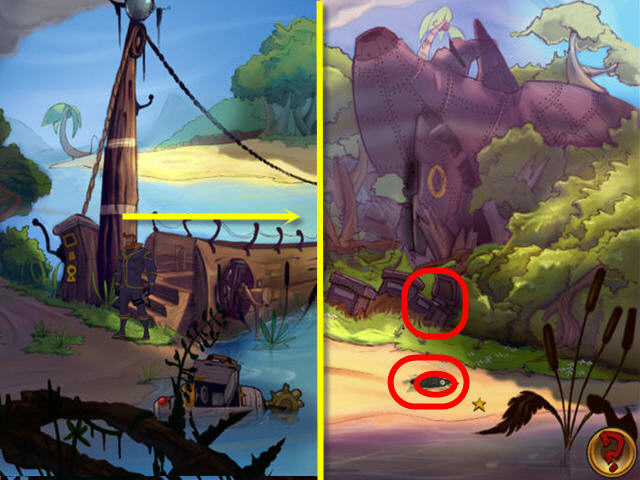
- Look at the dark stone (C) in the stone wall to the left of the path two times and note that it is a flint stone.
- Head left to the swamp pier.
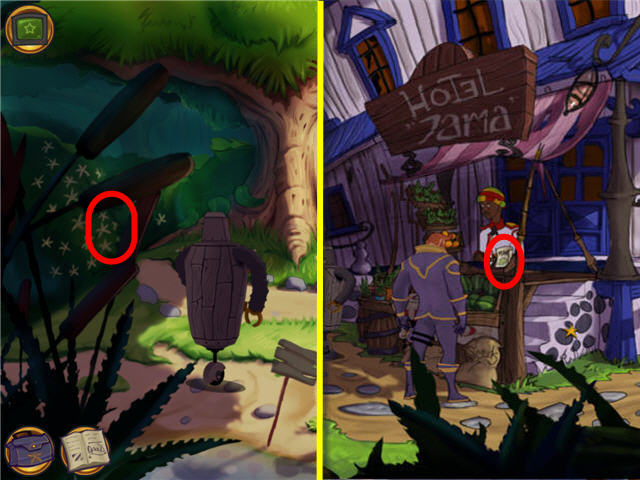
- Click on the nail on the left of the pier a few times to pull it out to get a SCREWDRIVER.
- Look at the pile of junk (D) two times and note that there is a ship wing in there.
- Head back to the crossroads and speak to Kralek regarding the ship wing and gain new tasks.
- Head up to the motel.
- Speak to the hotel clerk at the fruit and vegetable stand and be sure to exhaust all conversation.
- Attempt to take the wheel on the right of the stand.
- Use the SCREWDRIVER on the wheel.
- Head left to the crossroads and use the SCREWDRIVER on the flint stone (C).
- Head back to the motel and use the SHARPENED SCREWDRIVER on the wheel.
- Click on the wheel again and automatically ask the clerk if you can have it. Click again to get the WHEEL in inventory.
- Head to the park on the right.
- Click on the flowering bush on the left and take a FIVE LEAVED FLOWER two times.
- Use the hand in inventory to pluck off a leaf off of one of them and get a FOUR LEAVED FLOWER.
- Speak to the old man and exhaust all conversation.
- You can answer yes or no to the question from the old man if you want to see the walking stick, or for fun, have him ask you twice and choose both answers.
- Head back over the little bridge to get the map and click on the landing site.
- Enter the Mazslow Spaceship by clicking on the lower half of the ship to get an arrow.
- Place the FOUR LEAVED FLOWER into the oven and push the red power button to automatically get a BAKED FOUR LEAVED FLOWER.
- Head back to the motel.
- Give the BAKED FOUR LEAVED FLOWER to the clerk and exhaust all conversation.
- Take the SWAMP MAP and speak to the clerk again.
- Head over to the swamp pier.
- Place ROWBOAT in the swamp.
- Place the WHEEL on the ROWBOAT to make a propeller.
- Click on the ROWBOAT to get in and click on the cave by the dam when the map comes up.
- Cross over the dam to the other side and head right to the clearing.
- Look at the opened crate and take the BATTERY.
- Take the ASHES on the beach.
- Take the strange device from the sand from under where the ASHES were, to get a BEEPING DEVICE.
- Head back to the dam and go left to the cave.
- Click on the power switch and see it needs a battery.
- Use the BATTERY on the power switch but the BATTERY is dead.
- Leave the cave and head up into the cemetery.
- Look at the plaque on your right and note that half the plaque is missing.
- Leave the cemetery and click on the ROWBOAT in the water and be back on the swamp pier.
- Head to the right to get back to the crossroads and speak to Kralek and exhaust all conversation.
- The map should come up automatically when all the topics have been covered. If not, speak to Kralek again.
- Click on the crash site but you can’t get there because the dam is blocking the way.
- Click on the windmill location on the map.
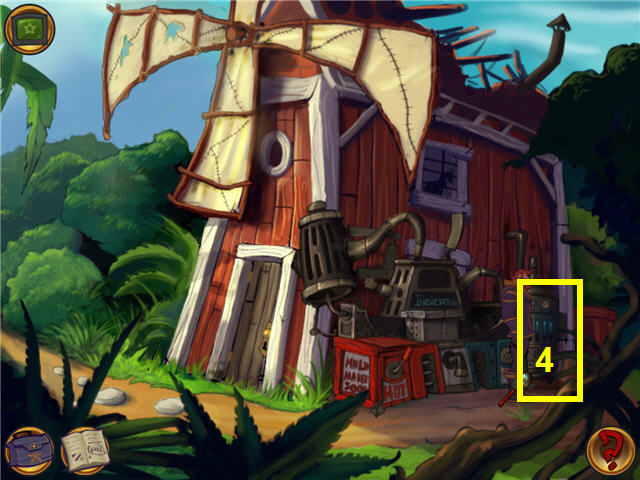
- Look at the polar ion generator (4).
- Use the BATTERY on the polar ion generator to get a CHARGED BATTERY.
- Enter the windmill.
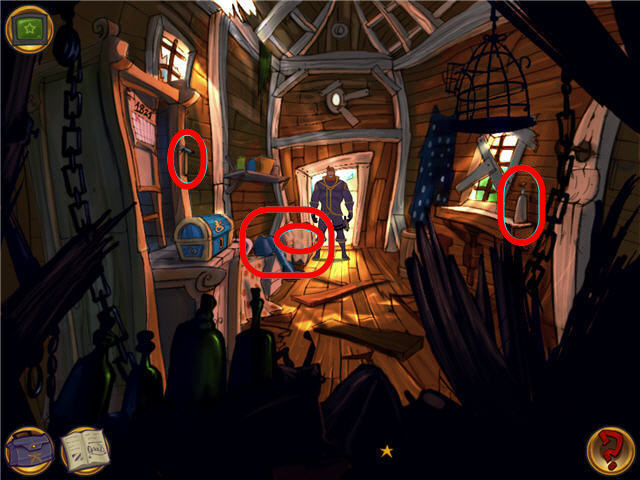
- Take the HAMMER from wall next to the calendar.
- Remove the sheet covering the box at the left of the door to expose a box.
- Take the piece of plaque from the box to get a PLAQUE.
- Look into the box again and take the DIARY.
- Inspect the DIARY in inventory and read it.
- Take the window cleaner from the window sill to get a GLASS CLEANER in inventory.
- Try and open the blue chest on the left but it is locked.
- Look at the calendar above the blue chest and note that May 1st is crossed out.
- Exit the windmill and head to the left and go to the motel.
- Speak to the hotel clerk and exhaust all conversation and get a new task in your journal.
- Look at the DIARY in inventory one more time and Brawe acknowledges the name Fuseman.
- Head to the park at the right.
- Speak to the old man in the park and exhaust all conversation.
- You will need to keep talking till you get the name Grubby Larson.
- Head to the right over the bridge to trigger the map and click on the dam.
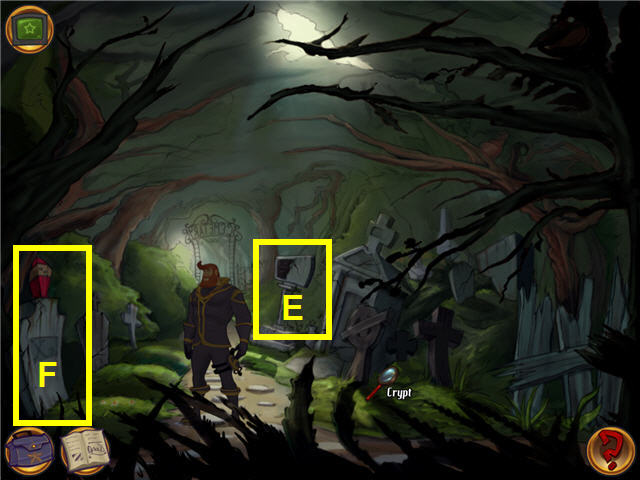
- Head into the cemetery.
- Look at the plaque and then exit out of the close-up.
- Try and place the PLAQUE in inventory on the plaque (E) in the cemetery.
- Combine the MELTED SILICONE with the PLAQUE in inventory to get PLAQUE WITH SILICONE.
- Place the PLAQUE WITH SILICONE on the plaque in the cemetery.
- Look close at the repaired plaque and click on it to make a note that Grubby Larson is buried at gravesite X2.
- Look and then click on the grave at the front left (F) and note that it has an X2 on it, so it must be Grubby’s grave.
- Exit the cemetery and head into the cave.
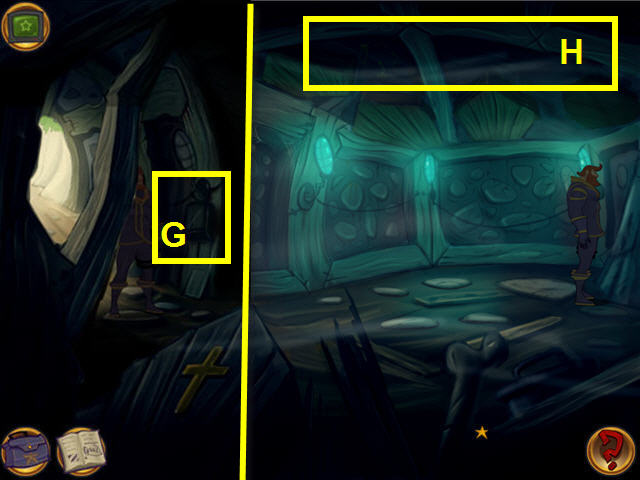
- Use the CHARGED BATTERY on the power switch (G) and click on it two times till the room lights up.
- Look up at the ceiling (H) and note that the ceiling is actually the bottom of the graves.
- Click on the ceiling a few times till Brawe says he needs to mark the correct grave.
- Leave the cave and head back to the park.
- Speak to the old man and he will ask you for tobacco.
- Take a FIVE LEAVED FLOWER from the flowering bush on the left if you did not take more than one earlier.
- Head over the bridge to trigger the map and click on the landing site.
- Enter the Mazslow.
- Place the FIVE LEAVED FLOWER in the oven and click on the red power button to automatically get a BAKED FIVE LEAVED FLOWER.
- Use the hand in inventory to crush the BAKED FIVE LEAVED FLOWER to get CRUSHED FLOWERS.
- Leave the landing site and go to the park.
- Speak to the old man and give the old man the CRUSHED FLOWERS.
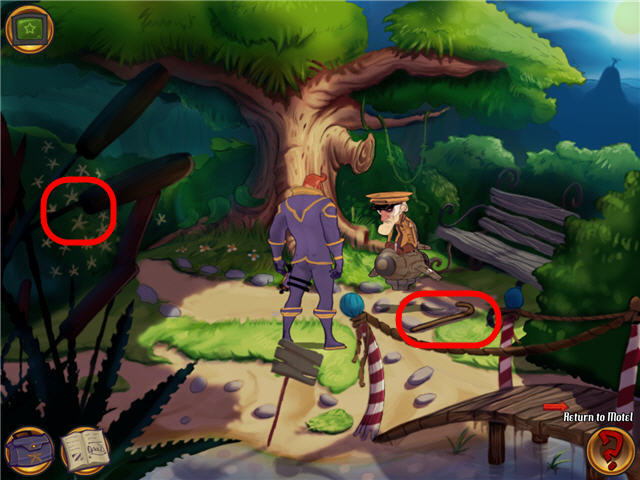
- Take the CANE that the old man dropped.
- Leave the area and head to the dam and go into the cemetery.
- Attempt to use the CANE on Grubby’s grave but it’s too dull.
- Combine the POTATO PEELER with the CANE in inventory to get a SHARPENED CANE.
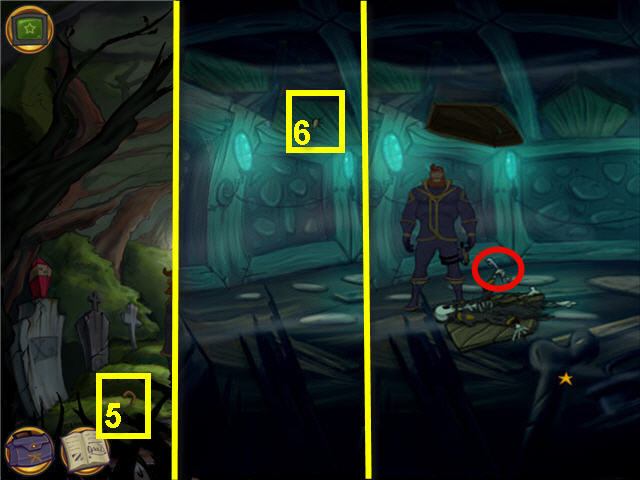
- Use the SHARPENED CANE on Grubby’s grave (5).
- Use the HAMMER on the SHARPENED CANE to push it through.
- Leave the cemetery and head into the cave.
- Use the HAMMER on the lower part of the cane (6).
- Take the KEY from the skeleton.
- Leave the cave but stay in the dam area.
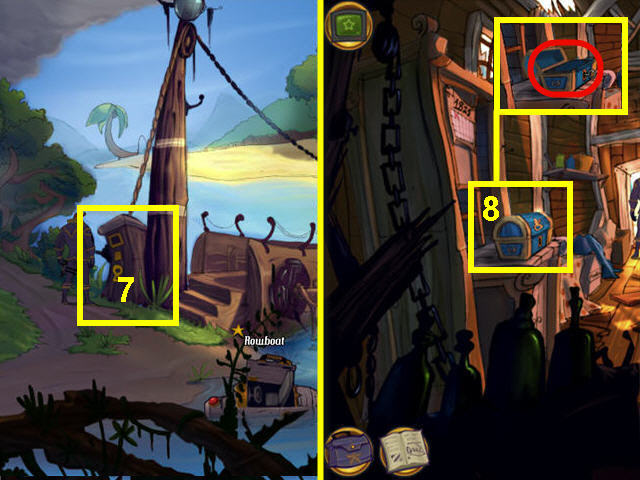
- Try the KEY on the dam mechanism (7), but it does not work.
- Leave the area and head to the left of the hotel to the windmill.
- Enter the windmill.
- Use the KEY with the lock on the blue chest (8). Be sure you are using on the lock and not the chest.
- Look at the chest when opened and take the NOTE and the ION X PLOSIVES.
- Use the magnifying glass in inventory on the NOTE.
- Use the magnifying glass in inventory on the DIARY.
- Look at the calendar above the chest and note the date that is crossed; May 1st, 1821.
- Head over to the park.
- You need to improvise with the items you have in order to complete the instructions in the riddle.
- The word tree is the missing rhyming word from the first paragraph.
- The GLASS CLEANER contains alcohol, so you can use the GLASS CLEANER on the tree bark.
- Use the HANKY (rug reference in the riddle) on the smeared spot on the tree to expose a hatch.
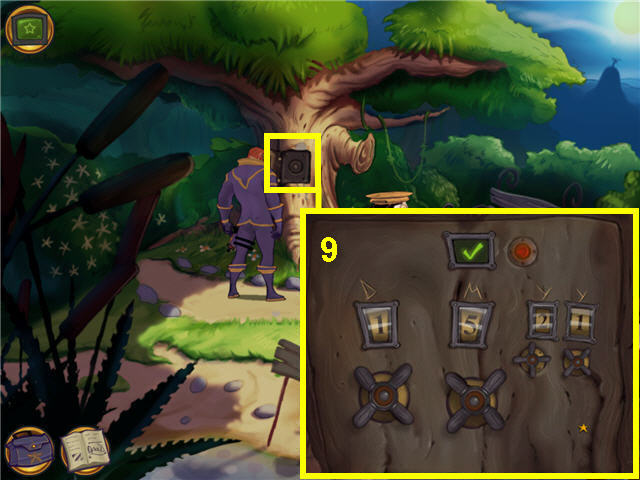
- Click on the hatch (9) to open it and it will expose a safe.
- Look close at the safe and see the etching of a D, an M and YY’s above the numbers, which would be a date, month and last two digits of a year.
- Enter the date from the calendar; 1st of May, 1821 or 1-5-2-1 by clicking on the knobs.
- Push the red button the upper part of the safe when complete and you will get a green check if correct. See screenshot for solution.
- Open the safe and click on it two times to get the DRY FUSE from the safe.
- Head back to the dam.
- Combine the DRY FUSE with the ION X PLOSIVES in inventory to get X PLOSIVES WITH FUSES.
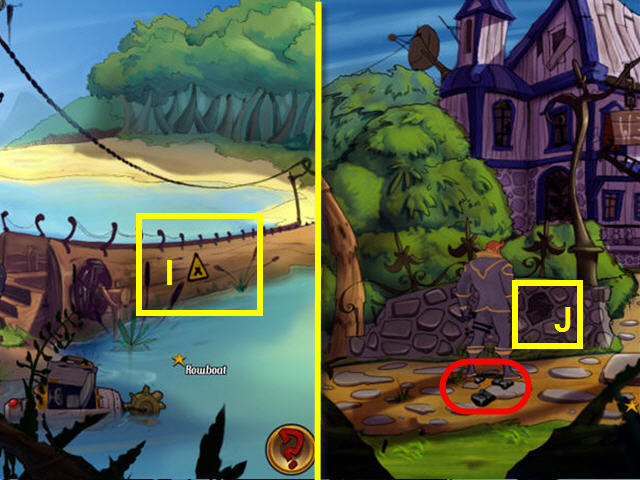
- Place the X PLOSIVES WITH FUSES on the wooden dam (I) by the x in the middle of the dam.
- Head to the crossroads and use the SHARPENED SCREWDRIVER on the flint stone (J).
- Use the HAMMER on the SHARPENED SCREWDRIVER.
- Pick up the PIECES OF FLINT that fell to the ground.
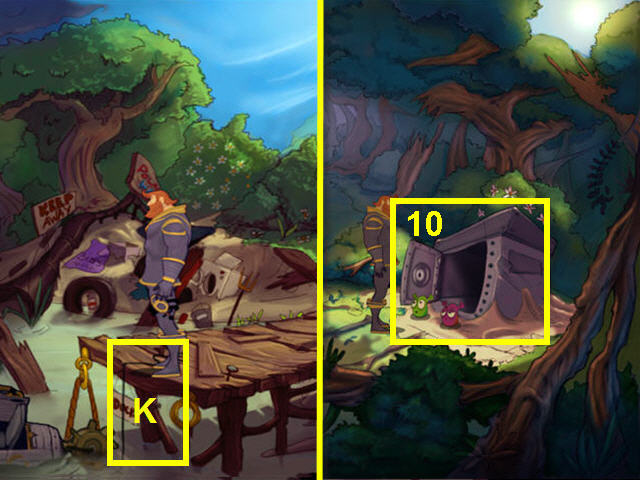
- Head back to the swamp pier and use the PIECES OF FLINT on the fuse (K) at the end of the pier and watch the explosion.
- Enter the ROWBOAT and click on the crash site on the map.
- Click on the steel container (10) and see that it is sealed shut.
- Use the SHARPENED SCREWDRIVER on the steel container and unscrew the lock.
- Click on the steel container to open it and look inside.
- Speak to Albert and Robert, the aliens, and exhaust all conversation.
- Speak to She and exhaust all conversation, the use the ASHES on her.
- While she is incapacitated, open the steel container to free the aliens and automatically head back to Kralek.
- Progress through the Kaptain Brawe dialogue with himself and then transport back to the Mazslow.
- Speak to Kralek and automatically arrive at the police station.
- Congratulations! You have successfully completed the first episode of Kaptain Brawe: A Brawe New World.
Created at: 2010-12-06