

Walkthrough Menu
- General Tips
- Chapter 1: Meet Nathaniel Hawthorne
- Chapter 2: Find Hawthorne’s Grave
- Chapter 3: Rumors of His Death
- Chapter 4: Find the Warrant
- Chapter 5: The Love Potion
- Chapter 6: The English Tale
- Chapter 7: Salem Customs
- Chapter 8: The House of Seven Gables
- Chapter 9: Gallows Hill
- Chapter 10: Breaking the Curse
General Tips
- This is a Hidden Object Puzzle Adventure Game.
- You can skip any mini-game.
- Click randomly in the scene and the black cat will appear on the screen disallowing you to use your hints or your cursor.
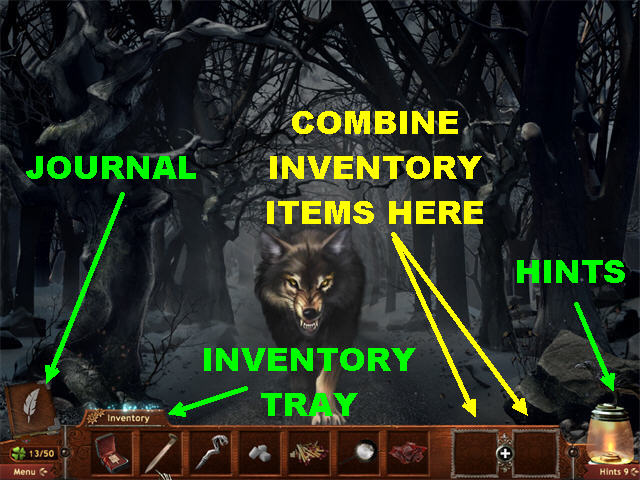
- Use the Journal to see what happened throughout the game. It is located in the lower left corner of the scene.
- An area of interest will be symbolized by an Eye Icon in the scene. Click on the Eyes to take a closer look or open something in the scene.
- Use the arrows on the ends of the inventory tray to scroll through all the items.
- You will need to combine certain inventory items before you can use them. Place 2 items that you think are compatible in the blank boxes in the lower right corner and click on the “+” sign to combine them and form a new items.
Raven and Clovers
- Find all 50 Clovers in the game to unlock the Unlimited Hidden Object Mode at the end of the game.
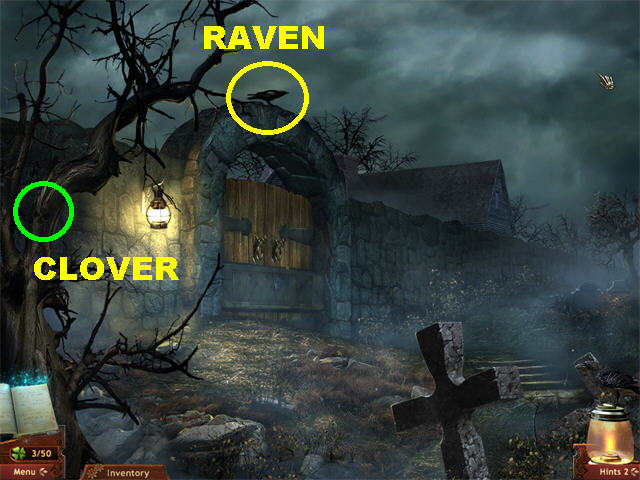
- The CLOVERS will be circled in green throughout the guide.
- The RAVENS will be circled in yellow throughout the guide.
- To use a Hint click on the Raven in the lower right corner of the scene.
- You will start with one Raven at the beginning of the game and you can earn extra hints by clicking on the Ravens you find in the scenes.
- The Raven can help you locate items in a Hidden Object Scene.
- The Raven can also help you figure out where to use an inventory item. Drag an inventory item of your choice to the raven and it will show you where that item should be placed.
- Use the lantern below the raven to reveal a silhouette of an item on the find list. Click on any object name on the list to see the silhouette in the lantern.
Achievements Room
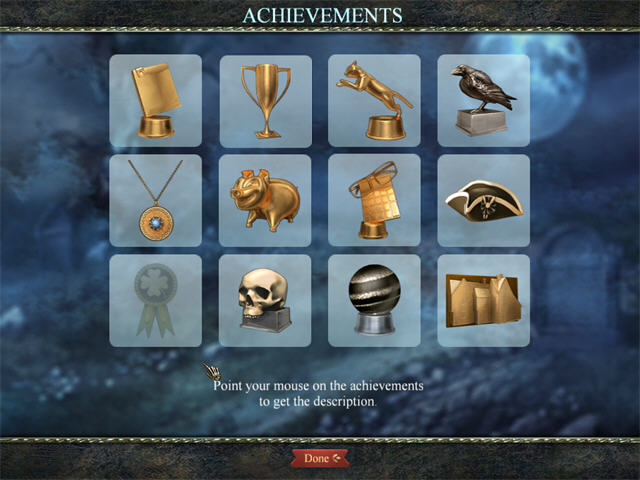
- There are 16 Achievements you can earn throughout the game. You can access the Achievements from the Main Menu.
- Master Storyteller – Complete Story Mode.
- Perfect – Complete Story Mode without using any hints.
- Scaredy Cat – Complete Story Mode with no Black Cat Appearances.
- Ornithologist – Collect all 28 Ravens in Story Mode.
- Beady Eyes – Unlock Unlimited Hidden Object Mode.
- Golden Greek – Solve all the puzzles in Story Mode.
- Irish Rover – Collect all 63 Clovers in Story Mode.
- Black Hole – Complete each Hidden Object Scene in Story Mode without using the lantern.
- Thick Skull – Find Corwin.
- Worker’s Comp – Construct the House of the Seven Gables.
- HOG Wild – Complete a Hidden Object Scene in less than a minute.
- HOG Baron – Find every object in all Unlimited Hidden Object Mode scenes.
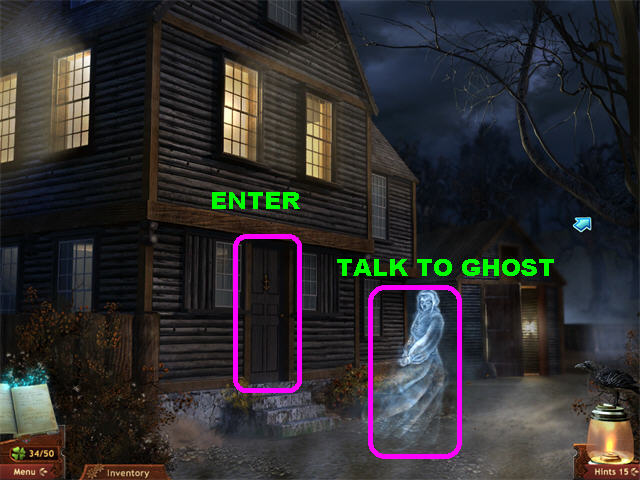
Chapter 1: Meet Nathaniel Hawthorne
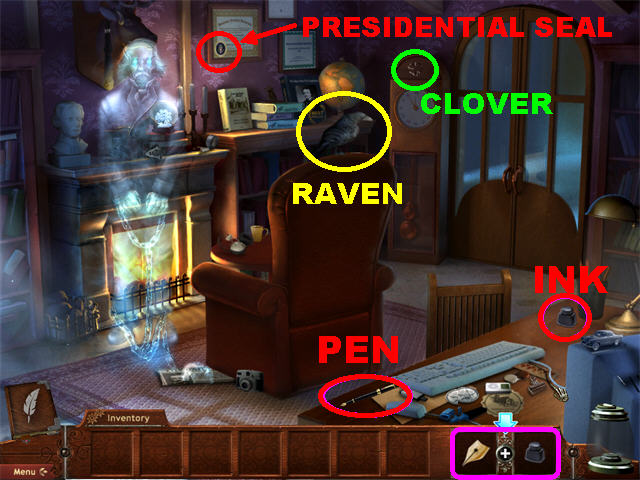
- Pick up the EMPTY PEN (A) and the INK (B) on the desk.
- Place the EMPTY PEN and the INK in the 2 boxes in the lower right corner; then click on the “+” sign to combine the items.
- Give the FULL INK PEN to Hawthorne the ghost to trigger a Hidden Object Scene.
- To obtain the BLACK CAT click on the door to open it and click on the Black Cat that is outside.
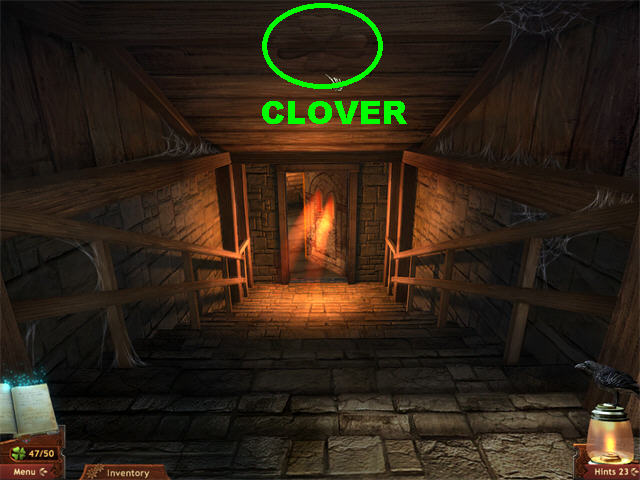
- Pick up the CLOVER marked in green and the RAVEN marked in yellow in the scene.
- Pick up the PRESIDENTIAL SEAL marked in red.
- Talk to Hawthorne and exhaust all conversation options.
- Take Hawthorne’s hand and you will be automatically taken to the Cemetery.
Chapter 2: Find Hawthorne’s Grave
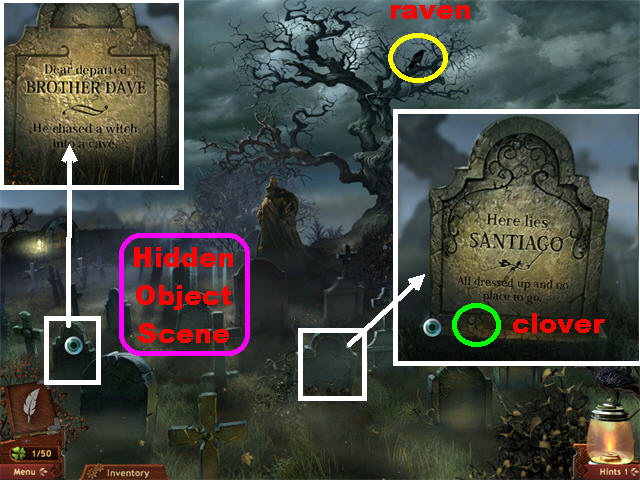
- Click on the RAVEN marked in yellow.
- Zoom into the 2 graves marked in white.
- Pick up the CLOVER in Santiago’s tombstone.
- Click on the Hidden Object Scene on the left.
- Play the Hidden Object Scene.
- Pick up the 2 CLOVERS marked in green.
- Pick up the RAVEN marked in yellow.
- Pick up the BOLT CUTTERS in the lower left.
- Exit the Hidden Object Scene and head towards the bridge on right.
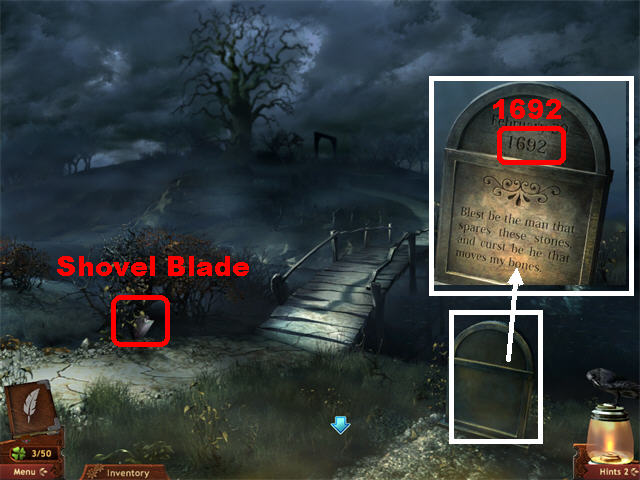
- Pick up the SHOVEL BLADE in the lower left.
- Zoom into the tombstone on right to see the date “1692”.
- Go down and click on left.
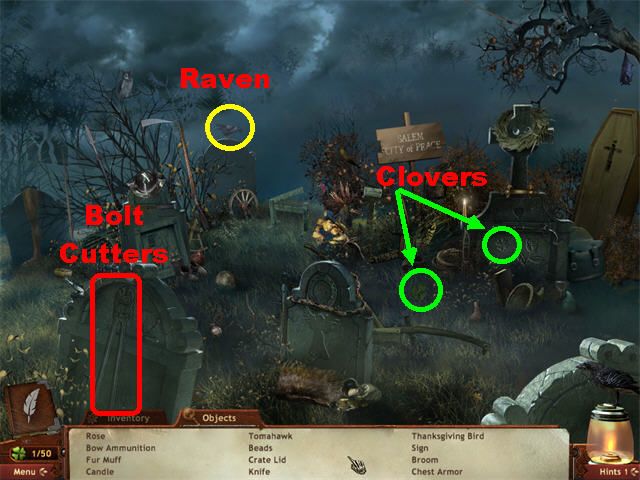
- Pick up the CLOVER marked in green and the RAVEN marked in yellow.
- Zoom into the gates.
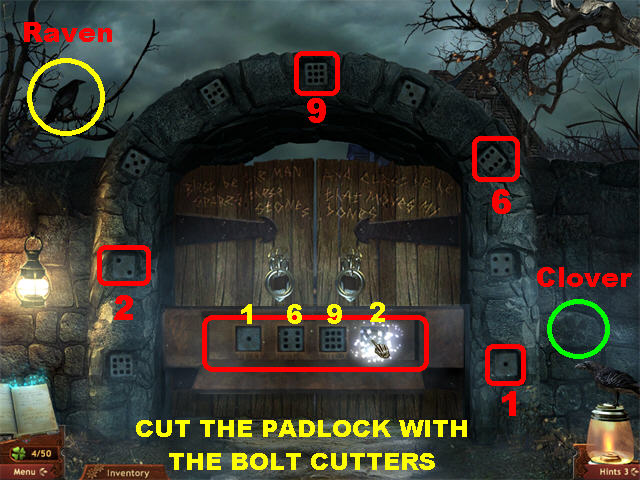
- Pick up the CLOVERS marked in green.
- Pick up the RAVEN marked in yellow.
- Cut the padlock with the BOLT CUTTERS to reveal some slots below the door.
- Grab the dice 1-6-9-2 and place them in that order in the empty slots.
- Go through the gate, go right twice to access the Shed.
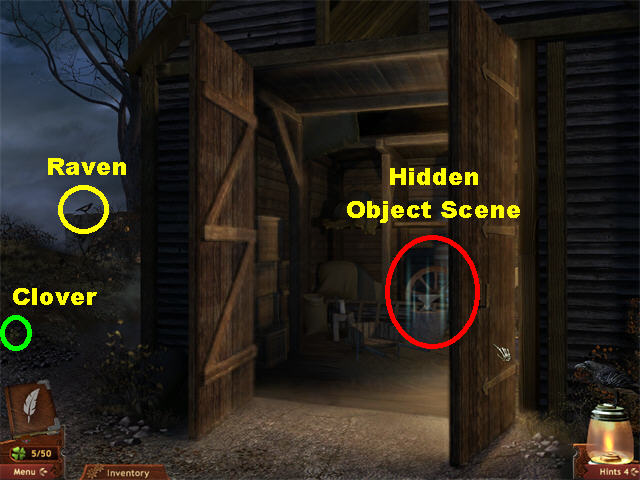
- Pick up the CLOVER marked in green.
- Pick up the RAVEN marked in yellow.
- Go inside the Shed to access the Hidden Object Scene.
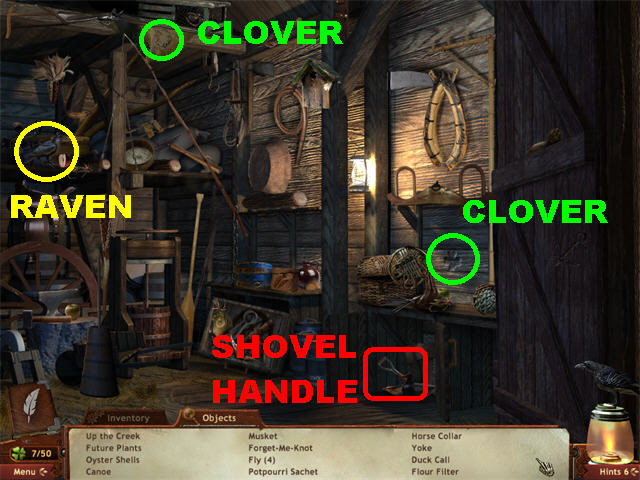
- Pick up the 2 CLOVERS circled in green.
- Pick up the RAVEN circled in yellow.
- Open the cabinet in the lower right; pick up the SHOVEL HANDLE.
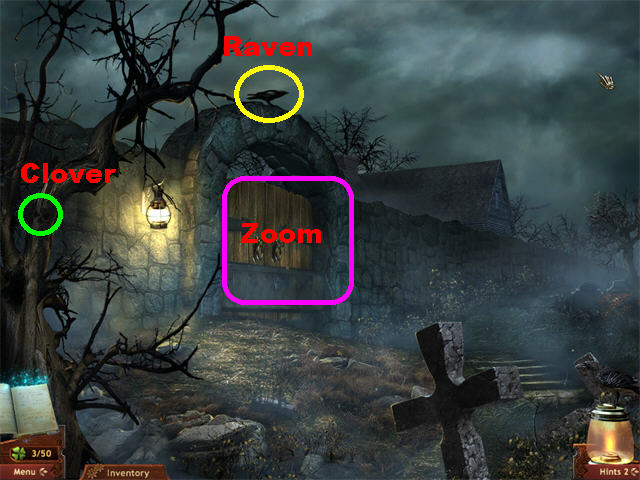
- Click down 3 times and head towards the Courthouse on left.
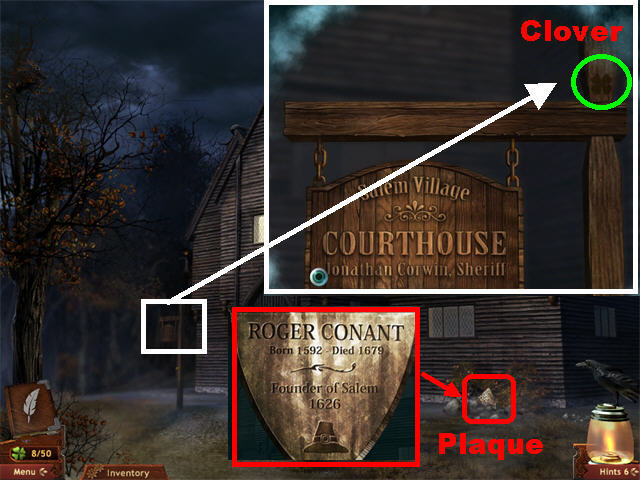
- Pick up the PLAQUE in the lower right.
- Zoom into the Courthouse Sign and pick up the CLOVER marked in green.
- Click downwards until you reach the Cemetery; zoom into the Puritan Statue.

- Pick up the RAVEN circled in yellow.
- Zoom into the base of the statue in the lower right.
- Pick up the CLOVER circled in green.
- Place the PLAQUE into the slot on the base.
- Talk to Roger Conant’s ghost and he will ask you for the shovel.
- Combine the SHOVEL HANDLE and the SHOVEL BLADE to create the SHOVEL.
- Give the SHOVEL to the ghost and the ground will open up.
- Go into the grave.
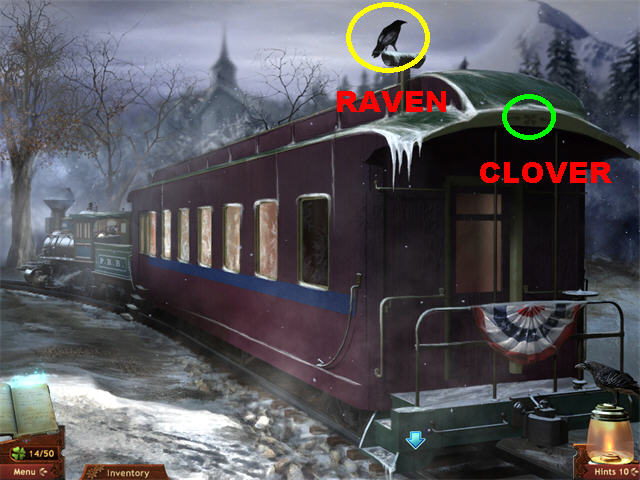
Chapter 3: Rumors of His Death
- Pick up the RAVEN marked in yellow.
- Pick up the CLOVER marked in green.
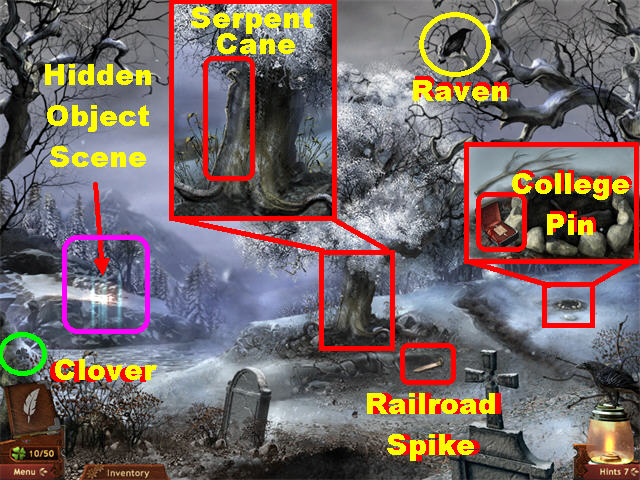
- Pick up the RAILROAD SPIKE marked in red on the right side of the ground.
- Zoom into the fire pit on right; pick up the COLLEGE PIN.
- Zoom onto the snowglobe tree; pick up the SERPENT CANE.
- Play the Hidden Object Scene on left.
- Pick up the 2 CLOVERS marked in green.
- Pick up the RAVEN circled in yellow.
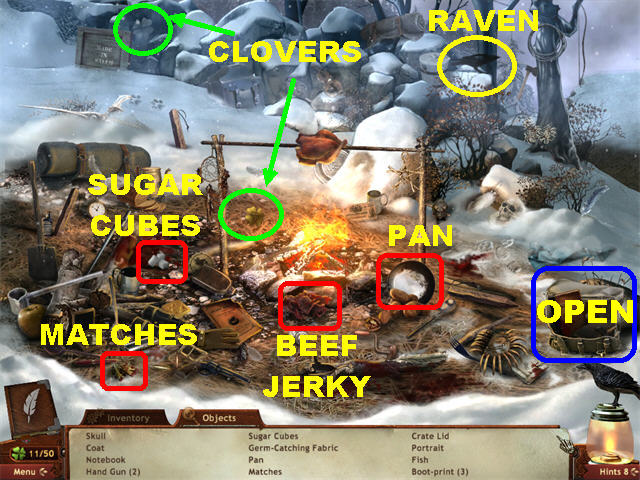
- Open the backpack in the lower right; pick up the handgun.
- The SUGAR CUBES, MATCHES, and PAN will be added to inventory.
- Pick up the BEEF JERKY in the lower center.
- Go back to the tree and head towards the dirt road on the right.
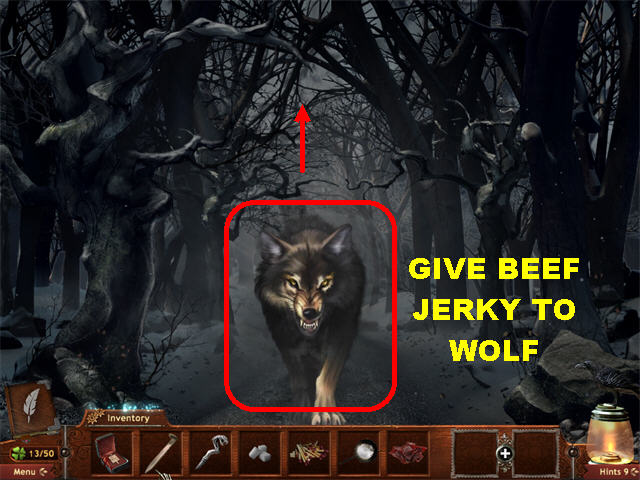
- Give the BEEF JERKY to the wolf.
- Go forward.
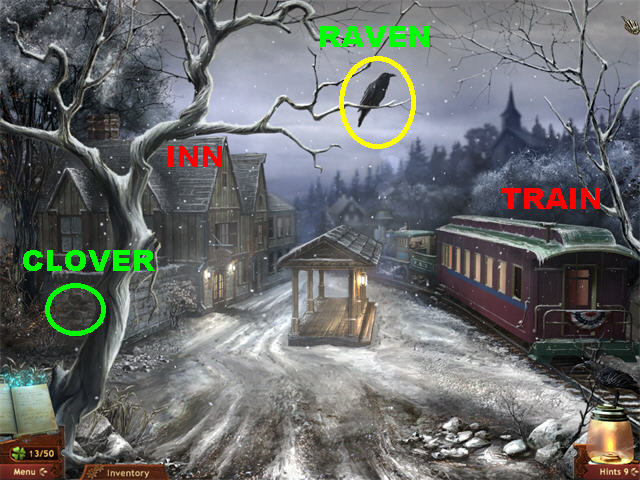
- Pick up the RAVEN marked in yellow.
- Pick up the CLOVER marked in green.
- Go right towards the train.
- Pick up the RAVEN marked in yellow.
- Pick up the CLOVER marked in green.
- Click down and go left towards the Inn.
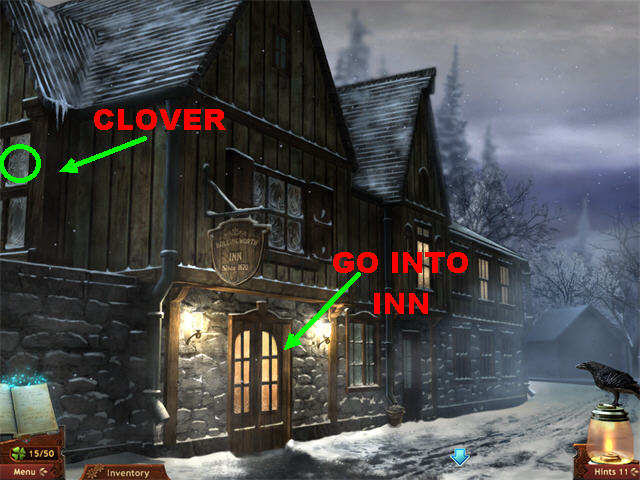
- Pick up the CLOVER marked in green.
- Go inside the Inn.
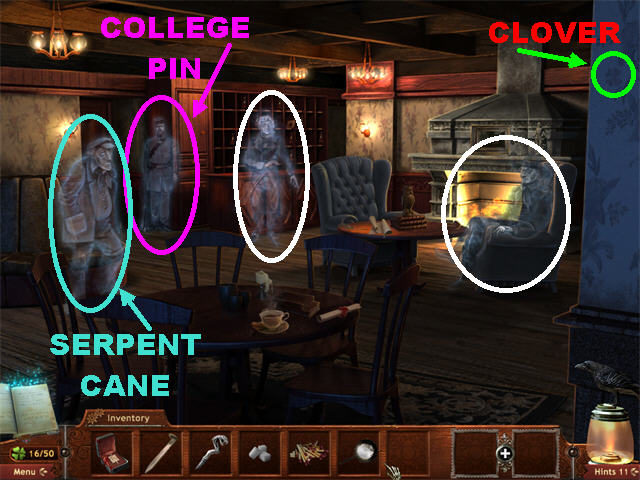
- Pick up the CLOVER marked in green.
- Exhaust all conversations with all the ghosts circled in white.
- Talk to the old man circled in blue on left and give him his SERPENT CANE. Keep talking the old man and he will give you a SILVER COIN.
- Give the COLLEGE PIN to the guard circled in purple.
- Exhaust all conversations with the ghost of Franklin Pierce that appears in the center of the scene.
- Go into the Examining Room on left.
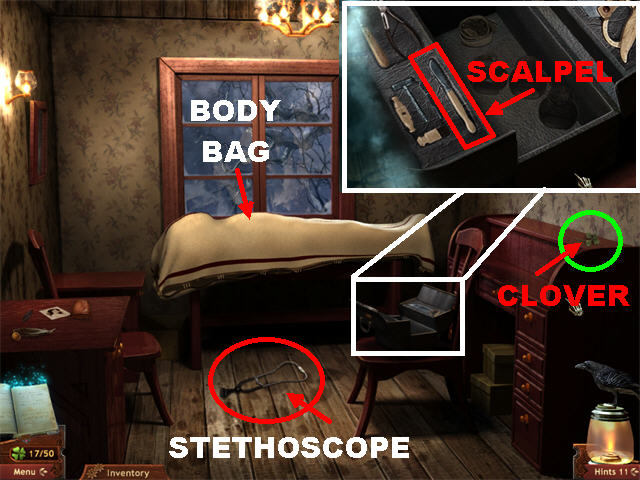
- Pick up the CLOVER marked in green.
- Click on the bag on the chair to make the ghost appear; talk to him.
- Pick up the STETHOSCOPE that falls on the ground after the ghost disappears.
- Zoom into the bag; pick up the SCALPEL inside the bag.
- Speak to Nathaniel Hawthorne when he appears in the room.
- Click on the body bag by the window and the guard will carry you into the train.
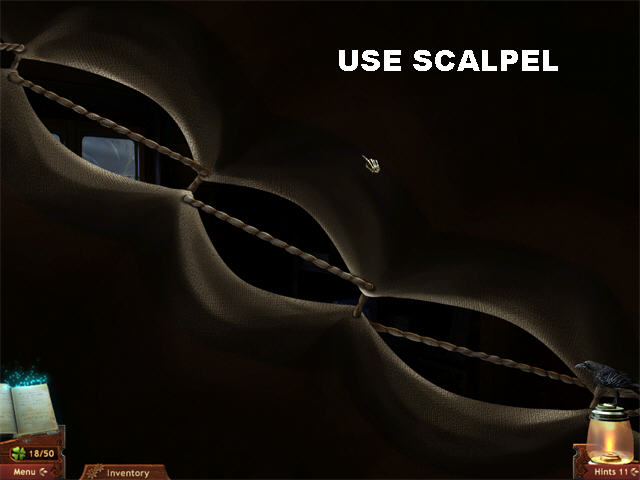
- Use the SCALPEL on the body bag.
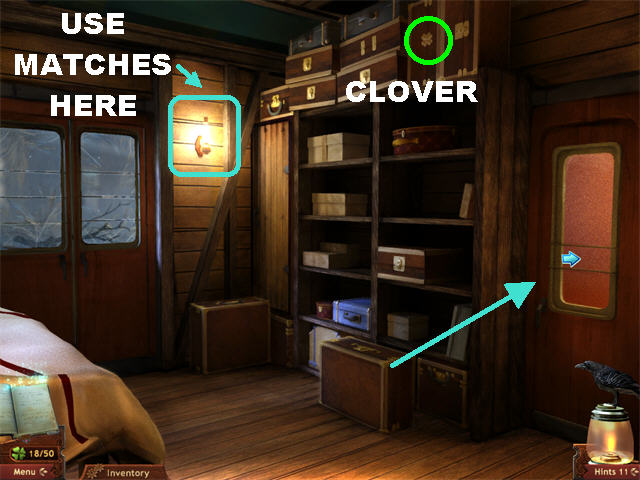
- Light the lantern in the upper left with the MATCHES.
- Pick up the CLOVER marked in green.
- Go to the Engine Room on right.
- Pick up the CLOVER circled in green.
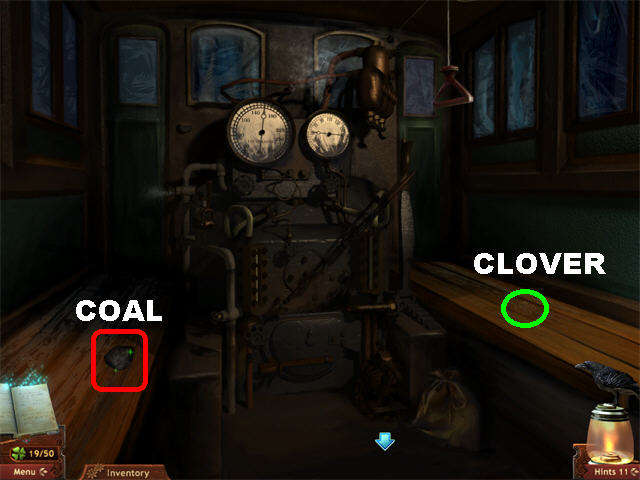
- Pick up the COAL in the lower left.
- Click down and then click in the lower left.
- Pick up the CLOVER circled in green.
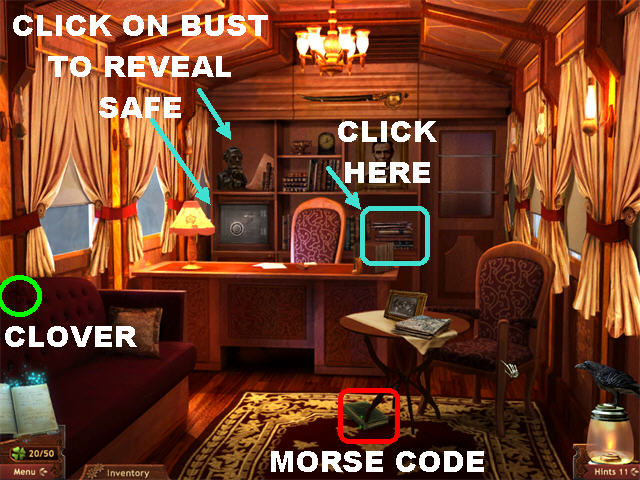
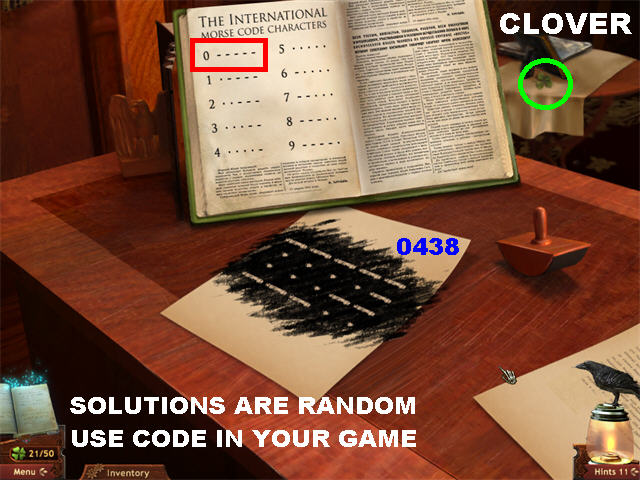
- Pick up the MORSE CODE BOOK on the ground.
- Click on the bust on upper left to reveal the safe below it.
- Zoom into the right side of the desk.
- Pick up the CLOVER circled in green.
- Click on the books to reveal a secret compartment.
- Place the COAL on the paper that comes out from behind the books and some Morse code characters will appear on the page.
- Place the MORSE CODE BOOK in front of the secret compartment.
- You have to decipher the code that appears on the paper using the Morse Code Book. The solutions are random so you must use the codes from your game to solve the puzzle.
- Click down to exit.
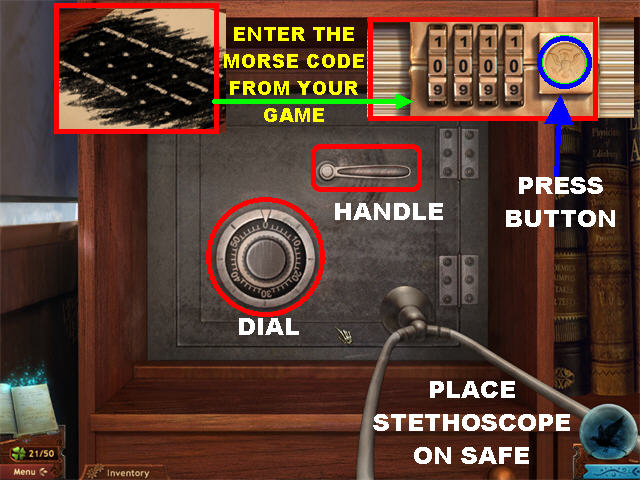
- If you haven’t done so already click on the bust on the back wall to find the hidden safe.
- Zoom into the safe for a closer look.
- Place the STETHOSCOPE on the safe.
- You must turn the dial until you hear a click; once you hear a click turn the dial in the opposite direction until you hear another click.
- To solve the puzzle click on the dial in this order:Turn Clockwise until you hear a click. Turn Counterclockwise until you hear a click. Turn Clockwise until you hear a click.
- The stethoscope will disappear once you’ve solved the puzzle.
- Click on the handle to open the safe and take a closer look at the diary inside.
- Click on the numbers to change them to match the ones found in the Morse Code on the desk.
- Click on the GOLD ROUND LOCK to open the diary; click on the PREDIDENTIAL DIARY to enter it into inventory.
- Click down to exit.
- Give the PRESIDENTIAL DIARY to Hawthorne.
- You are automatically taken back to the woods.
- Go into the grave in the lower center to end the chapter.
Chapter4: Find the Warrant
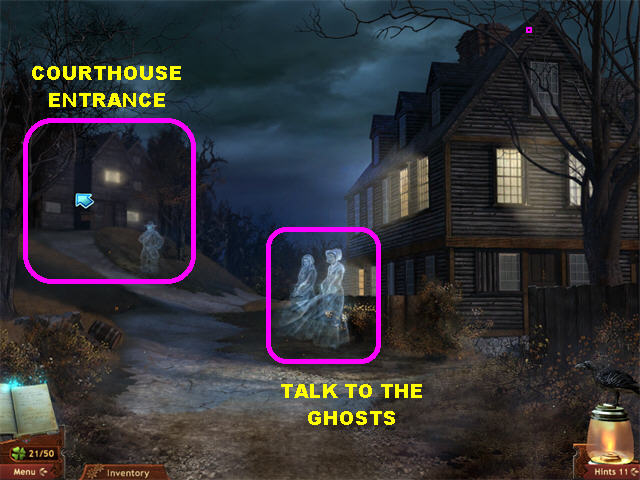
- Go to the Salem Gate by clicking down and then left.
- As you approach the gate you will see 2 ghosts. Talk to Abigail.
- Go through the gates and talk to Abigail’s ghost.
- Go left towards the Courthouse Entrance.
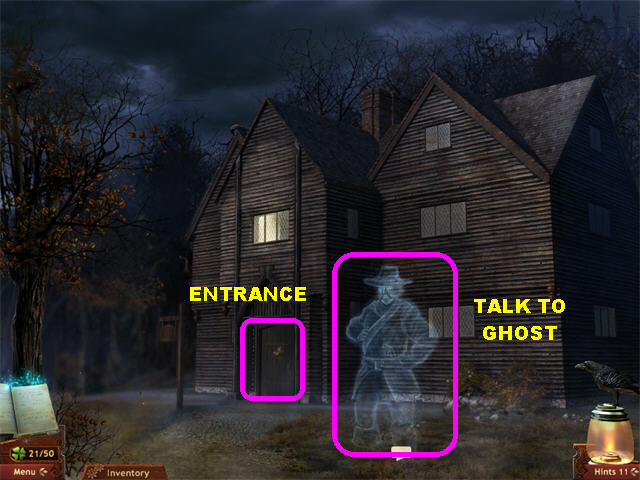
- Talk to the ghost and go through the dialogue options so he can open the door to the courthouse.
- Go into the Courtroom.
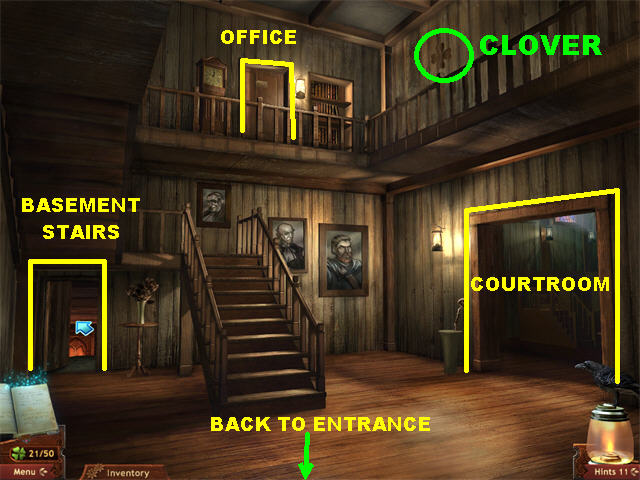
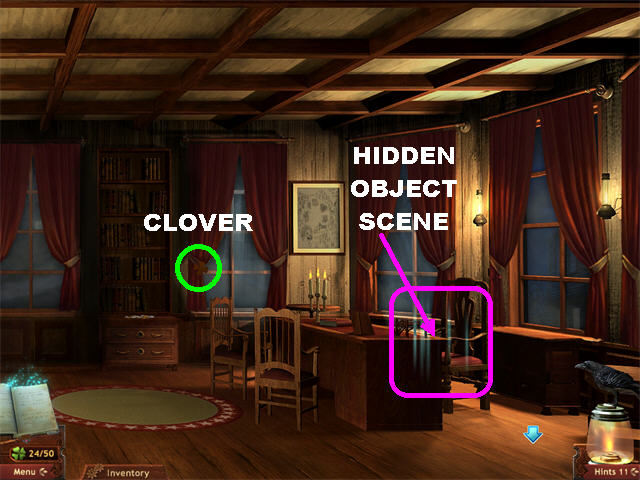
- Pick up the CLOVER marked in green.
- Click on the lower right to access the Courtroom.
- Pick up the CLOVER circled in green.
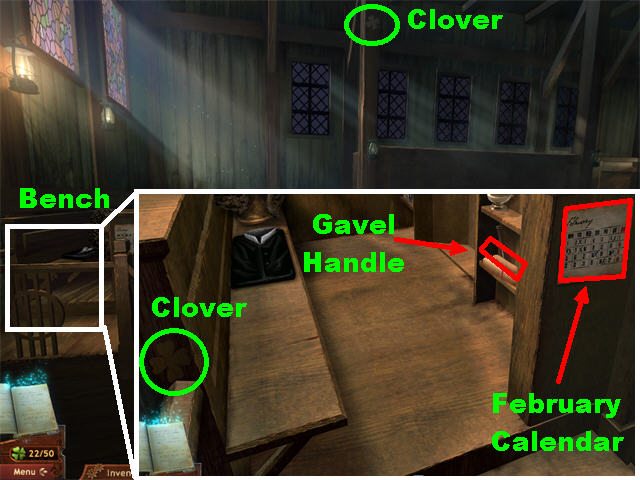
- Go left to the bench.
- Pick up the CLOVER circled in green.
- Pick up the FEBRUARY CALENDAR and the GAVEL HANDLE marked in red.
- Go to the Foyer and go up the steps.
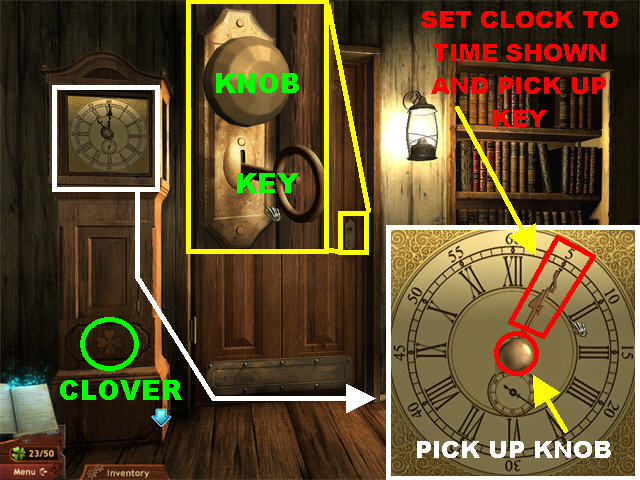
- Pick up the CLOVER circled in green.
- Zoom into the clock.
- Turn the clock hands to 1:05 as shown in the screenshot to form a key.
- Pick up the KEY on the clock’s face.
- Pick up the KNOB in the center of the puzzle.
- Zoom into the door.
- Place the KEY on the lock.
- Put the KNOB on the shaft and click on it to unlock the door; go through it.
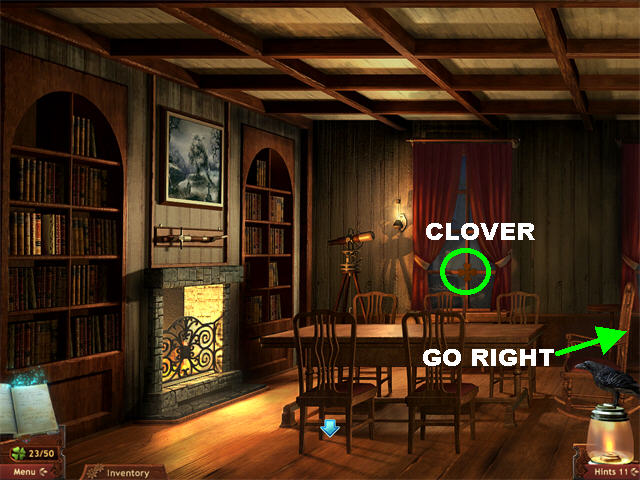
- Pick up the CLOVER marked in green.
- Go right.
- Pick up the CLOVER marked in green.
- Play the Hidden Object Scene by the desk.
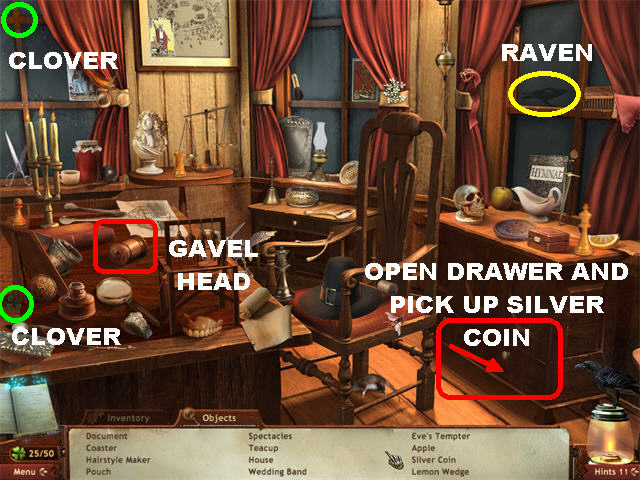
- Pick up the 2 CLOVERS marked in green.
- Pick up the RAVEN marked in yellow.
- Open the bottom drawer in lower right; pick up SILVER COIN inside the drawer.
- Pick up the GAVEL HEAD on the left desk.
- Click down.
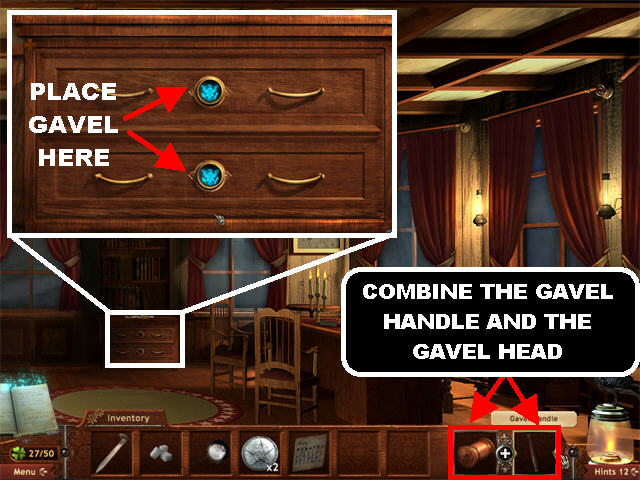
- Combine the GAVEL HEAD and the GAVEL HANDLE to create the GAVEL.
- Zoom into the chest.
- Place the GAVEL in the center of both drawers to unlock a puzzle.
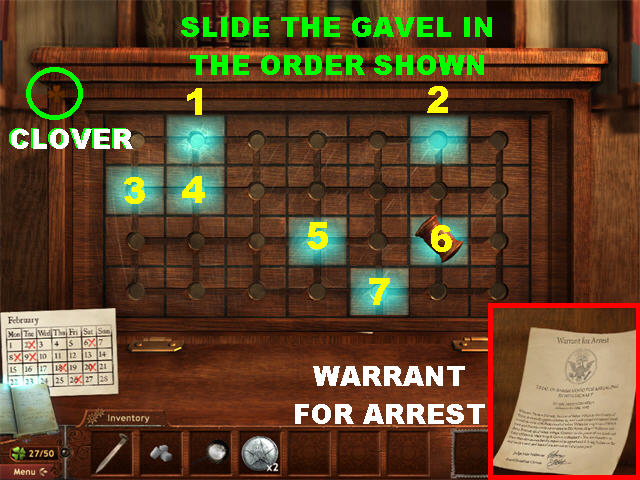
- Pick up the CLOVER marked in green.
- Place the GAVEL on the puzzle board.
- Click and hold the gavel; slide it to the spots shown on the calendar in the lower left.
- Please look at the screenshot for the solution.
- Click on the ARREST WARRANT FOR SARAH GOOD inside the chest.
- Click down to exit the puzzle.
- Some coins fall on the ground.
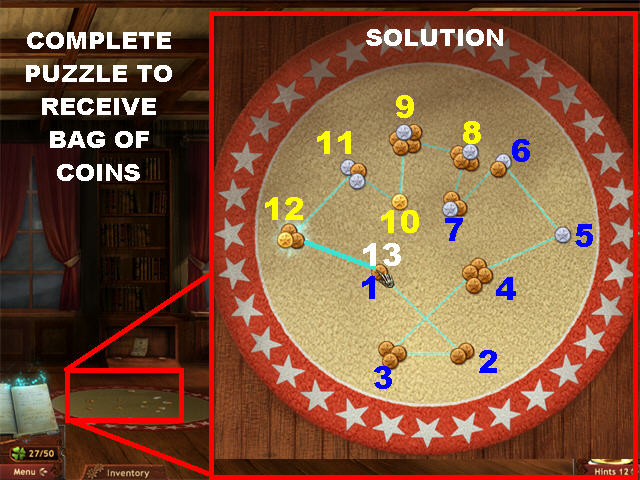
- Click on the coins on the rug to trigger a puzzle.
- Connect the coins from smallest to largest.
- Click on a coin to light it and then click on the next coin to connect the beam of light to it.
- Please look at the screenshot for the solution.
- The BAG OF COINS will be added to inventory after the puzzle has been solved.
Chapter 5: The Love Potion
- The Judge’s office transforms into the Lincoln’s Civil War Oval Office; click anywhere in the scene to go back to the Judge’s office.
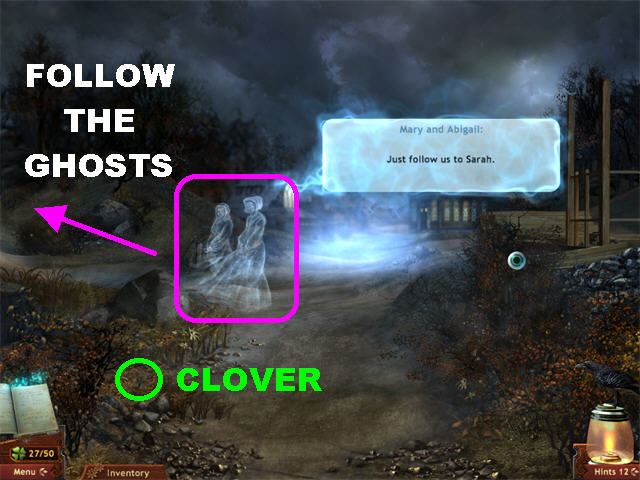
- Leave the courthouse; Mary’s ghost will be outside. Click down and go forward.
- Pick up the CLOVER circled in green.
- Follow the ghosts to the left side of the scene.
- Pick up the CLOVER marked in green .
- Pick up the RAVEN marked in yellow.
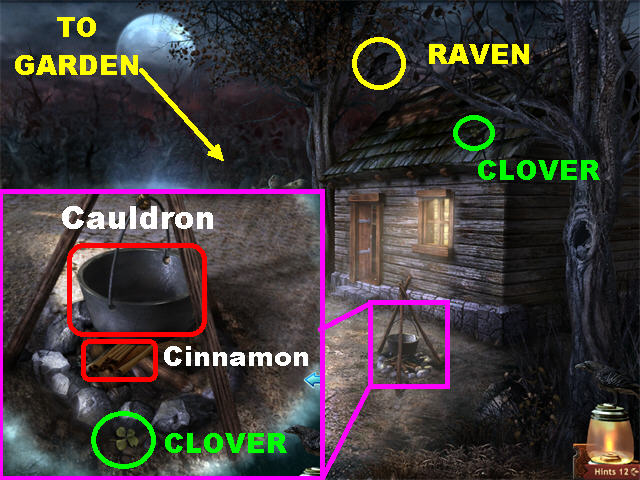
- Click on the door to speak to Sarah; she will ask you for a cauldron.
- Zoom into the fire pit.
- Pick up the CLOVER marked in green.
- Pick up the CAULDRON and CINNAMON.
- Go to the Garden by clicking on the left side of the house.

- Collect the 2 RAVENS marked in yellow.
- Pick up the CLOVER marked in green.
- Collect the BARREL LID marked in orange.
- Pick up the 3 GARLIC HEADS marked in white.
- Pick up the 4 MOLDY BERRIES marked in purple.
- Pick up the CORN marked in white.
- Click down and go through the door.
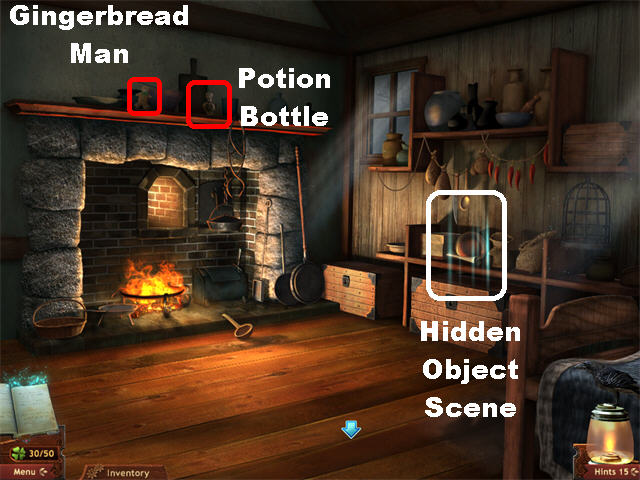
- Pick up the POTION BOTTLE and the GINGERBREAD MAN above the fireplace.
- Play the Hidden Object Scene on right.
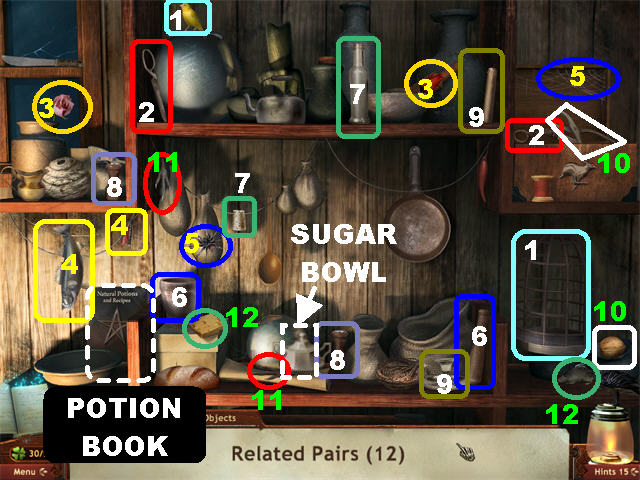
- Find the 12 related pairs. Please look at the screenshot for the solution.
- Pick up the SUGAR BOWL in the lower center.
- Pick up the POTION BOOK in the lower left. The ingredients you’ve already picked up will be crossed off the list.
- The 2 CROW’S FEET and the 2 ROSE BUDS will be added to inventory.
- Go back outside.
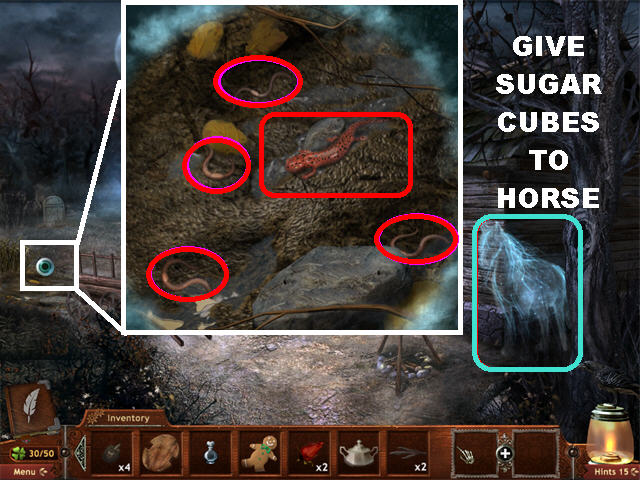
- Give the SUGAR CUBES to the horse on the right so it can move to the left.
- Click behind the horse to enter a new area.
- Pick up the RED SALAMANDER and the 4 EARTHWORMS marked in red.
- Go back inside.

- Zoom into the fireplace.
- Click on 3 COAL pieces to add them into the fire.
- Put the CAULDRON on the fire for circles to appear around it.
- Place the ingredients into the right spots in the circle.
- Once all the ingredients are in the circles you have to place them into the cauldron by looking at the silhouette that appears in the center of the cauldron.
- The order in which you have to place the ingredients into the cauldron is random.
- Place the POTION BOTTLE into the cauldron to create the LOVE POTION.
- Exit the cauldron.
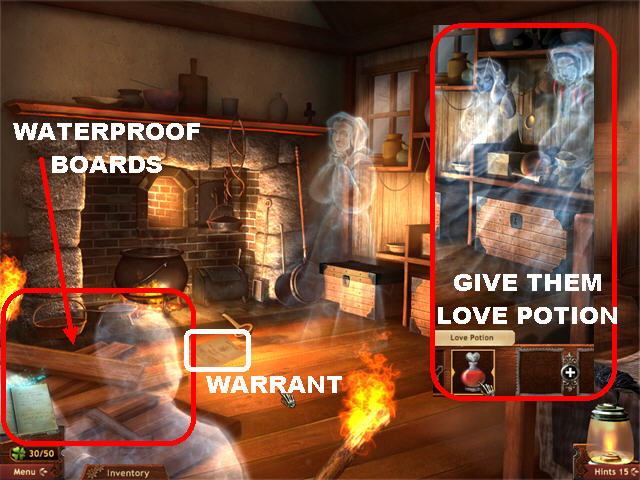
- The 2 ghosts will appear; give them the LOVE POTION. Talk to Sarah Good.
- Pick up the WATERPROOF BOARDS in the lower left.
- Click on the WARRANT FOR ARREST on the ground.
- Go outside.
- Click on Sarah’s ghost.
- Follow the cart back to the Courthouse and enter it.
- Go right once inside the Foyer. Click on the scene until all the dialogue ends.
Chapter 6: The English Tale
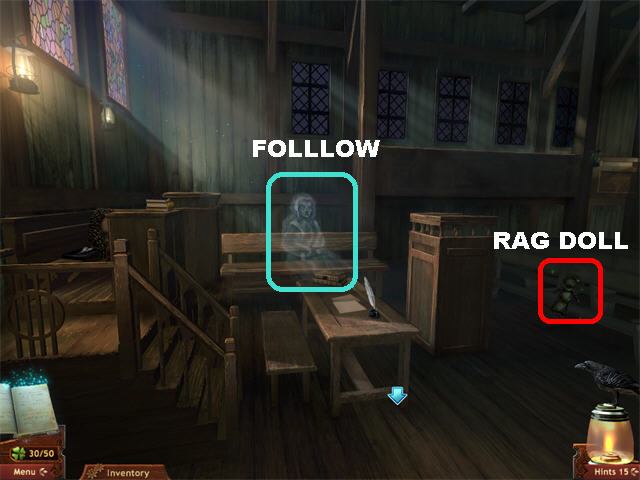
- Pick up the RAG DOLL on the bench.
- Talk to Mary’s ghost and she will automatically take you the construction site for the House of Seven Gables.
- Click down and go forward to the Village Corner.
- Pick up the CLOVER marked in green.
- Pick up the RAVEN marked in yellow.
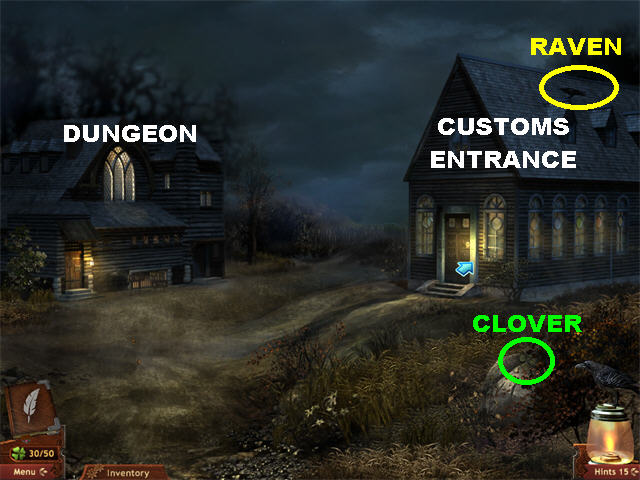
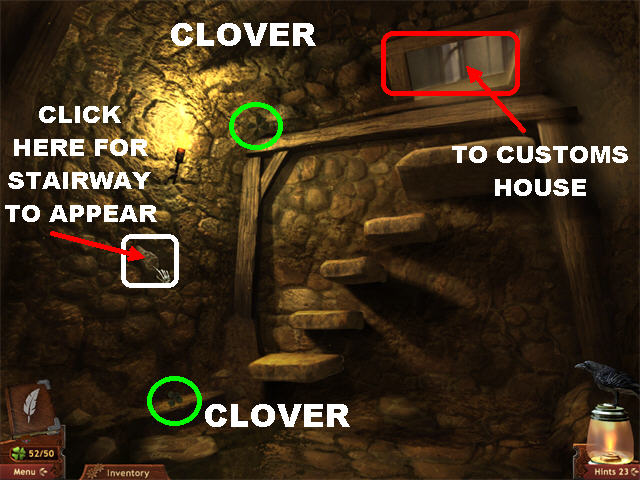
- Go to the Customs House on the right.
- Pick up the CLOVER circled in green.
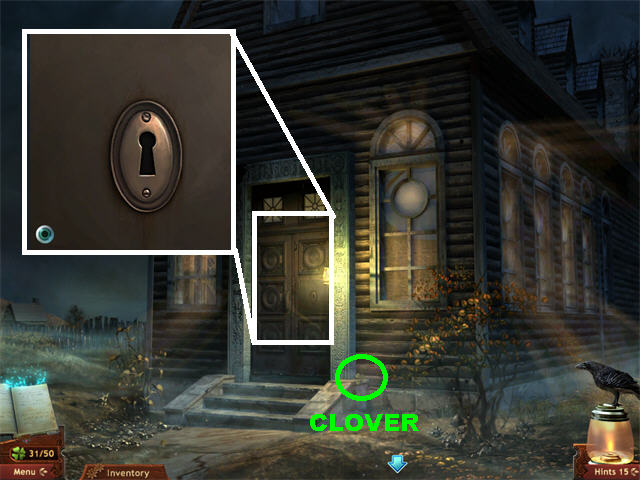
- Zoom into the door.
- Click down to the Village Corner. Go to the Dungeon Entrance on left.

- Pick up the CLOVER circled in green.
- Pick up the RAVEN marked in yellow.
- Enter the Dungeon.
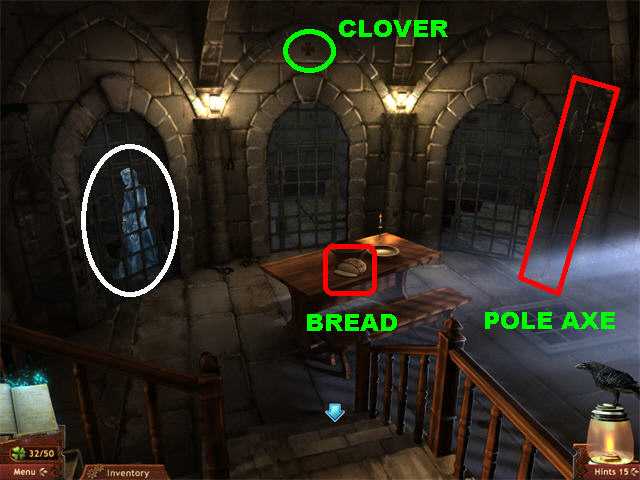
- Pick up the CLOVER circled in green.
- Pick up the BREAD and the POLE AXE marked in red.
- Zoom into the left cell.

- Pick up the CLOVER circled in green.
- Give the BREAD to Sarah’s ghost and exhaust all conversations with her.
- Go to the English House. Click down 5 times from the cell and turn right.
- Talk with Mary’s ghost and enter the house.
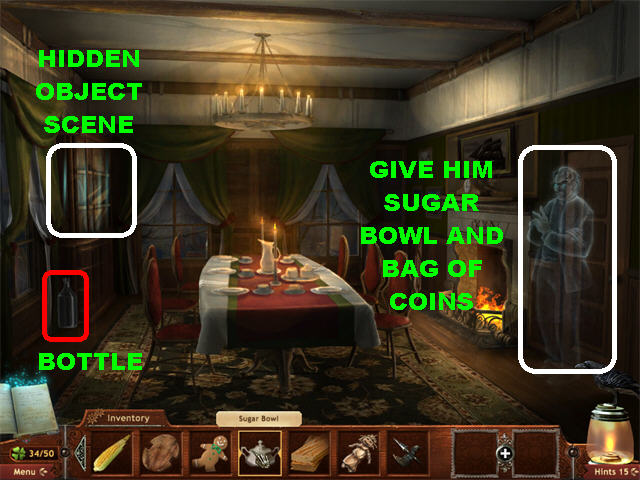
- Pick up the BOTTLE marked in red.
- Give the SUGAR BOWL to the ghost of Philip English on right. Exhaust all conversations until he asks you for a bag of coins.
- Give the BAG OF COINS to Philip English.
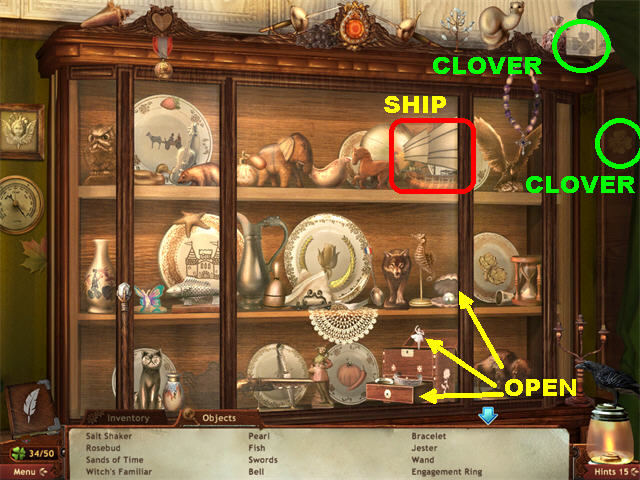
- Play the Hidden Object Scene on left.
- Pick up the 2 CLOVERS marked in green.
- Pick up the SHIP in the scene.
- Click down to exit the Hidden Object Scene and go right.

- Pick up the CLOVER marked in green.
- Pick up the RAVEN marked in yellow.
- Combine the SHIP and the BOTTLE to create the BOTTLED SHIP.
- Zoom into the desk; place the BOTTLED SHIP on the base.
- Pick up the KEY to the Customs House that appears in the hidden compartment below the bottled ship.
- Read the Last Will and Testament marked in white.
- Click down until you discover Mary’s ghost. Go forward twice and go right to the Customs House.
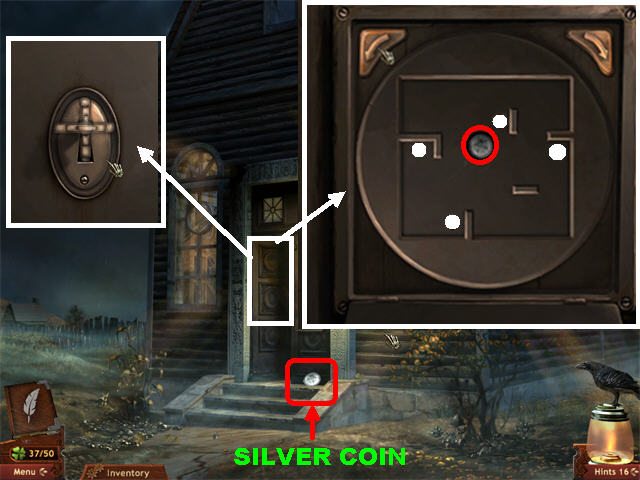
- Please watch the video for a step-by-step solution for this puzzle.
- Zoom into the door; use the KEY on the door to trigger a puzzle.
- The buttons above the puzzle will rotate the board left or right.
- Your goal is to slide the SILVER COIN over each of the 4 buttons on the puzzle.
- A hole will appear in the center of the board after each coin has passed over one of the 4 buttons.
- Slide the coin into the center button.
- Pick up the SILVER COIN that fell on the ground.
- Go into the house.
Chapter 7: Salem Customs
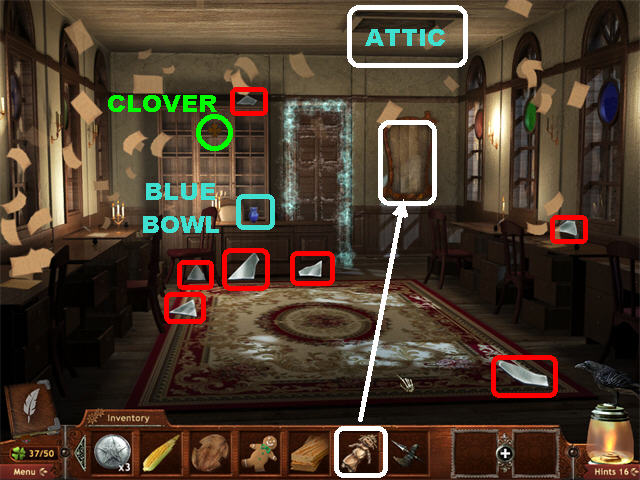
- Pick up the CLOVER marked in green.
- Pick up the BLUE BOWL.
- Pick up the 7 MIRROR PIECES marked in red.
- Give the RAGDOLL to the ghost in the mirror.
- Go to the Attic in the ceiling.

- Pick up the CLOVER circled in green.
- Pick up the RED FLOAT in the upper left.
- Play the Hidden Object Scene on right.
- Pick up the 2 CLOVERS marked in green.
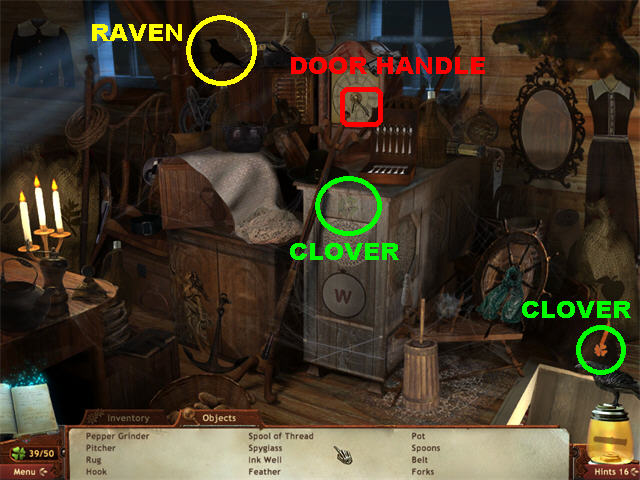
- Pick up the RAVEN marked in yellow.
- Pick up the DOOR HANDLE in the upper center.
- Click down to exit the Hidden Object Scene and go to the back of the Attic.
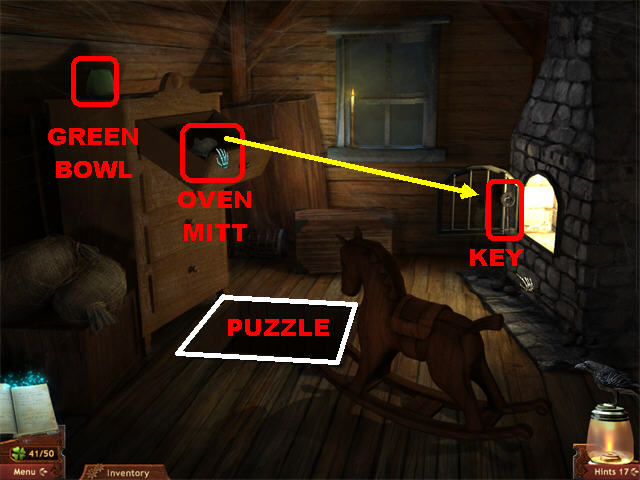
- Pick up the GREEN BOWL in the upper left.
- Zoom into the top drawer; pick up the OVEN MITT inside.
- Open the chimney door on the right with the OVEN MITT.
- Pick up the KEY from inside the chimney. This key will be used to open a coffin later on in the game.
- Enter the Warehouse Puzzle on the ground below the drawers.
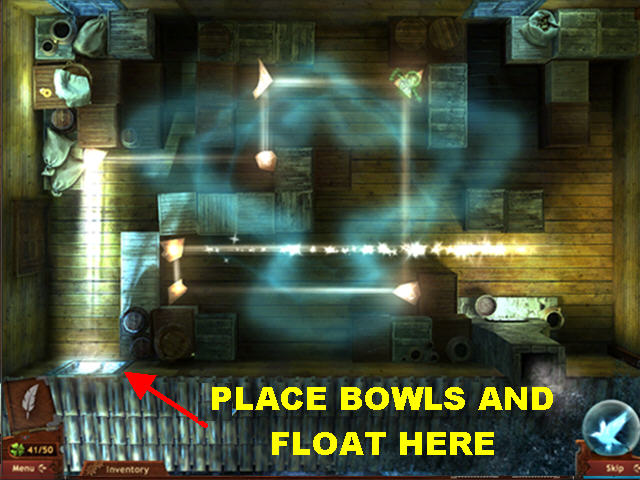
- Please watch the video for a step-by-step solution for this puzzle.
- Your goal is to direct the beam of light onto the ghost with its matching color at that time.
- Place the items in this order:
- Put the RED FLOAT on the window in the lower left corner; place a mirror at the end of the beam.
- Place the GREEN BOWL in the window; place 2 mirrors at the end of the beams.
- Place the BLUE BOWL in the window; place the 4 mirrors at the end of the light beams.
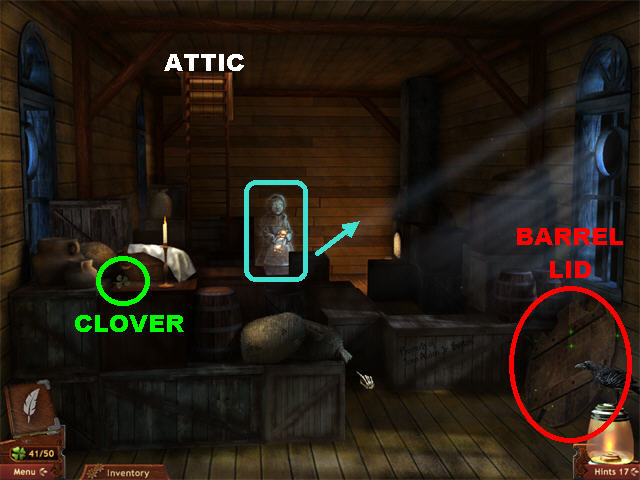
- Pick up the CLOVER marked in green.
- Pick up the BARREL LID in the lower right.
- Click to the right of the ghost to access the next area.
- Talk to Dorothy’s ghost until she opens a hidden area revealing a small house.
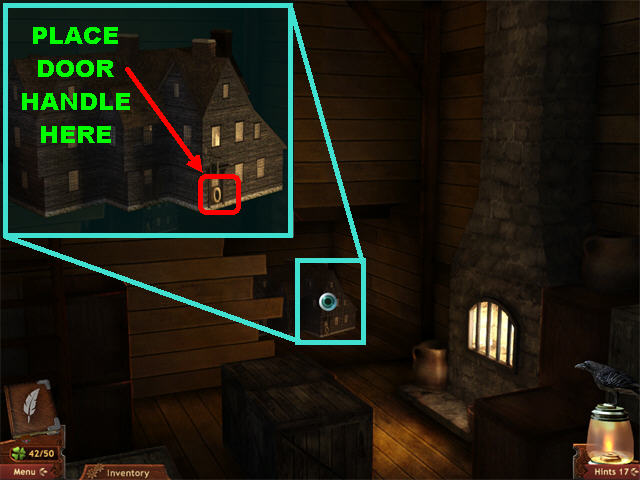
- Place the DOOR HANDLE on the door of the small house to trigger a puzzle.
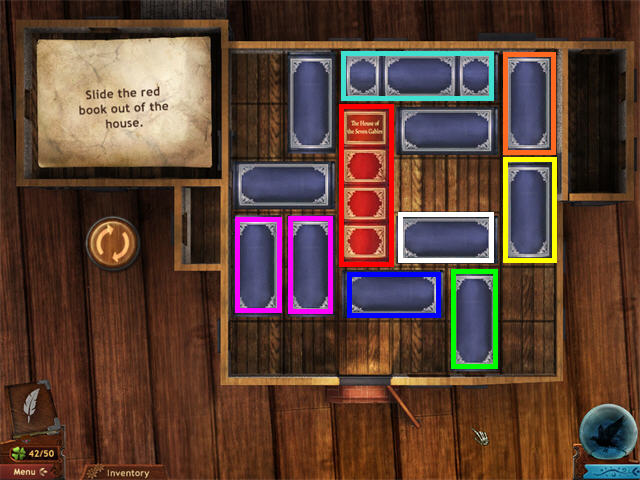
- Your goal is to slide the red block through the opening in the lower center.
- Please look at the screenshot for the solution. Move the books in this order:Yellow Down White Right Orange Down Light Blue Right Red Up White Left Green and Yellow Up Dark Blue Right 2 Purple Down White Left Slide Red all the way down.
- You will receive The House of the Seven Gables book.
- Go back to the Construction Site. Keep clicking downwards until you see the ghost and then go right to reach the Construction Site.
Chapter 8: The House of the Seven Gables
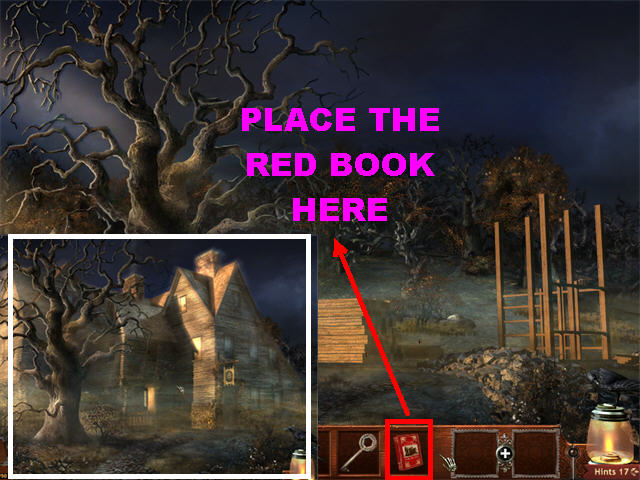
- Place the House of the Seven Gables book anywhere in the scene.
- The house will appear after a few seconds. Go into the house.
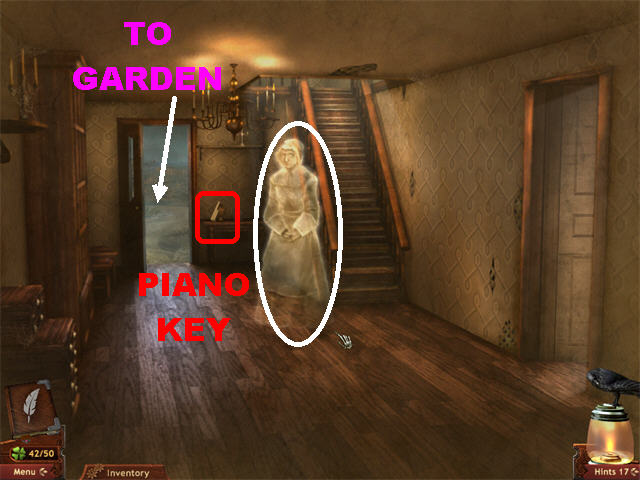
- Pick up the PIANO KEY 1/5 marked in red.
- Talk to the Hepzibah’s ghost and she will ask you for a list of items.
- Go out to the Garden through the door in the back left side.
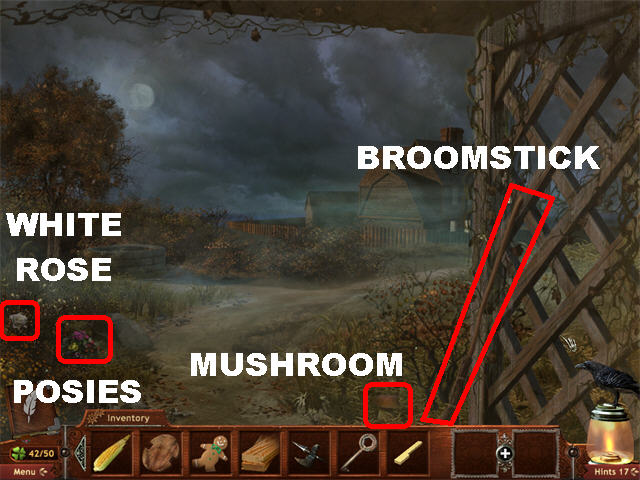
- Pick up the WHITE ROSE, POSIES, MUSHROOM and BROOMSTICK marked in red.
- Click down.
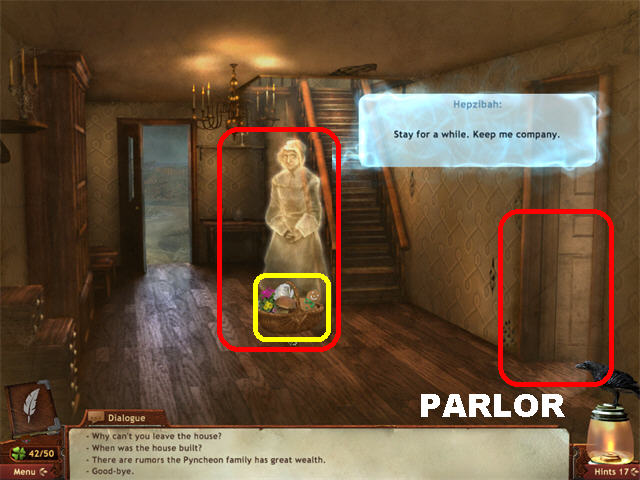
- Place the following items into the basket by the ghost:WHITE ROSE MUSHROOM GINGERBREAD MAN CORN POSIES
- Talk to the ghost until she gives you the CLOSET KEY.
- Go right to the Parlor.
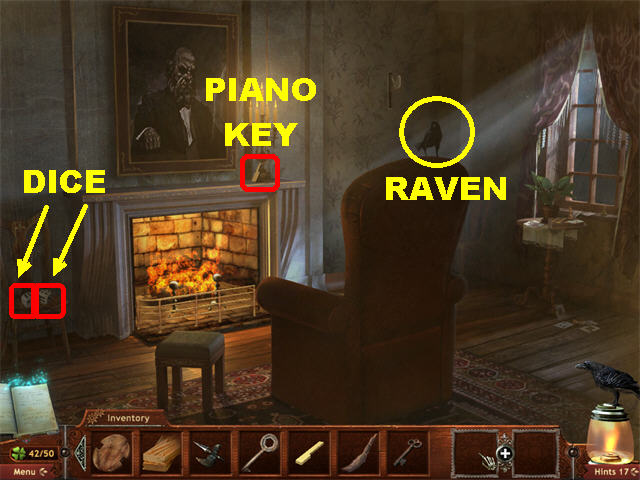
- Pick up the RAVEN marked in yellow.
- Pick up the 2 DICE marked in red.
- Pick up the PIANO KEY 2/5 above the fireplace.
- Exit and go to the Second Floor.
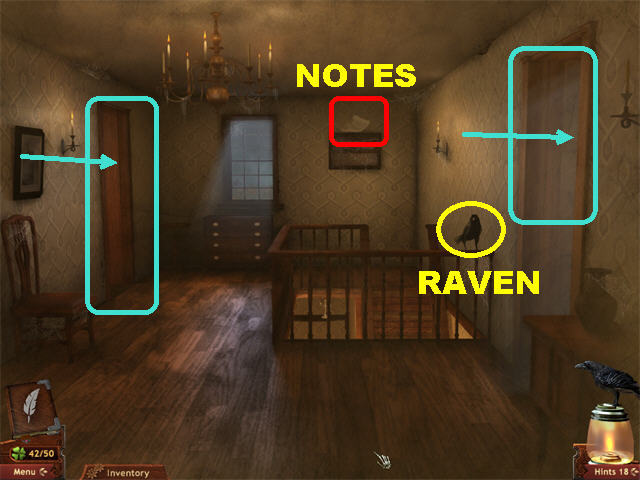
- Pick up the RAVEN marked in yellow.
- Pick up the NOTES in the upper center.
- Enter room on right.
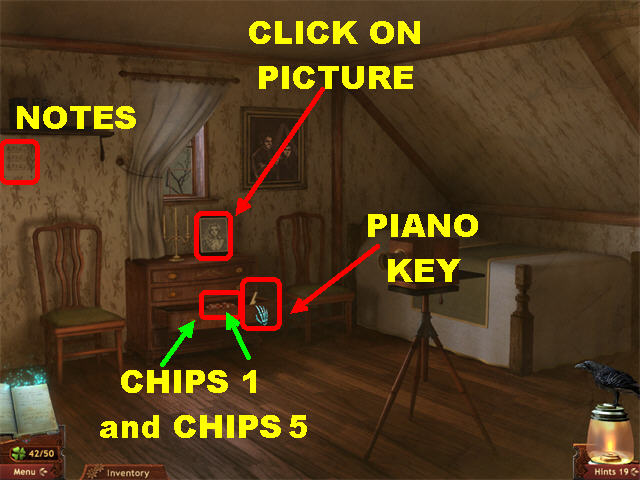
- Click on the photograph on top of the drawer to make the ghost appear.
- Click on the bottom drawer; pick up the 2 CHIPS (1 and 5) and the PIANO KEY 3/5 inside drawer.
- Pick up the NOTES on the upper left side of the wall.
- Exit and go through left door.
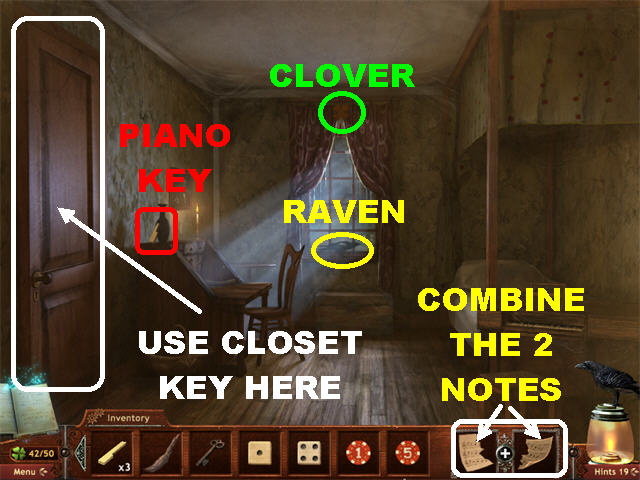
- Pick up the CLOVER marked in green.
- Pick up the RAVEN marked in yellow.
- Pick up the PIANO KEY 4/5 on the desk.
- Combine the 2 NOTES to form the SHEET MUSIC.
- Place the CLOSET KEY on the left door to trigger a Hidden Object Scene.
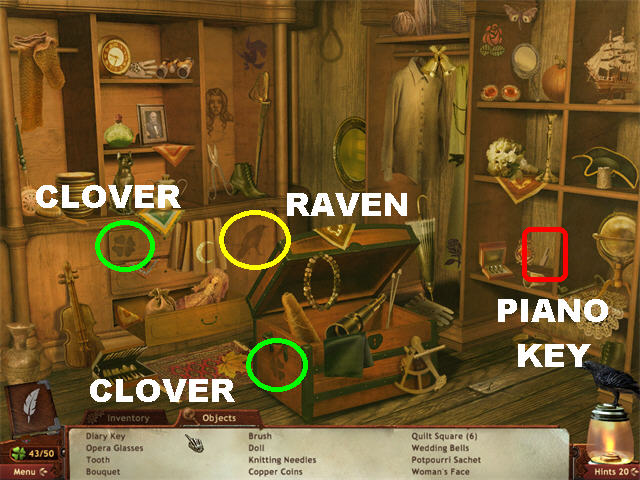
- Pick up the 2 CLOVERS circled in green.
- Pick up the RAVEN marked in yellow.
- Pick up the PIANO KEY 5/5 in the lower right cubicle.
- Click down to exit.
- Zoom onto the piano on right.
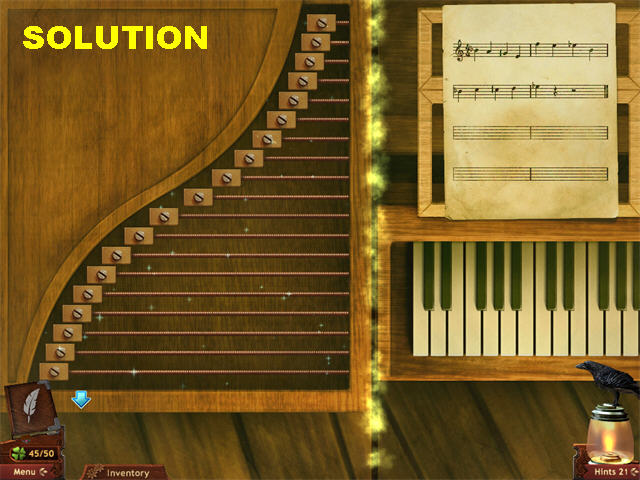
- Put the 5 PIANO KEYS on the keyboard.
- Place the SHEET MUSIC on the holder in the upper right.
- Click on 2 strings to swap their positions, from shortest on top to longest at the bottom. Please look at the screenshot for the solution.
- Alice’s ghost will appear and hand you the LANDSCAPE PAINTING after the puzzle has been solved.
- Exit and go down the steps and enter door in lower right.
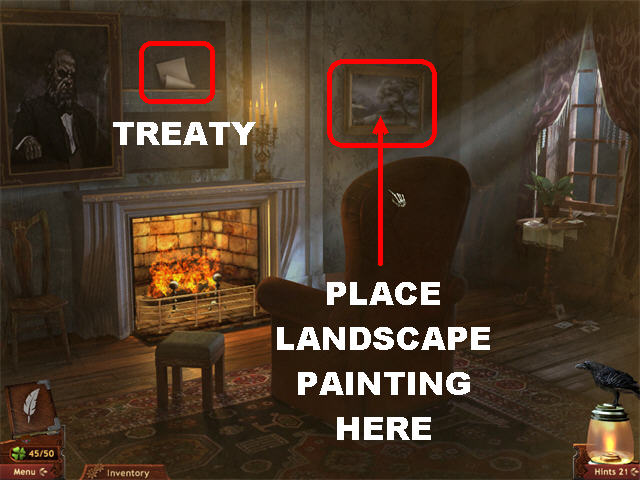
- Place the LANDSCAPE PAINTNG on the hook on the right side of the wall to reveal a hidden area.
- Pick up the TREATY above the fireplace.
- The room will begin shaking; click on the painting on right to be automatically transported back to Sarah’s Grounds.
Chapter 9: Gallows Hill
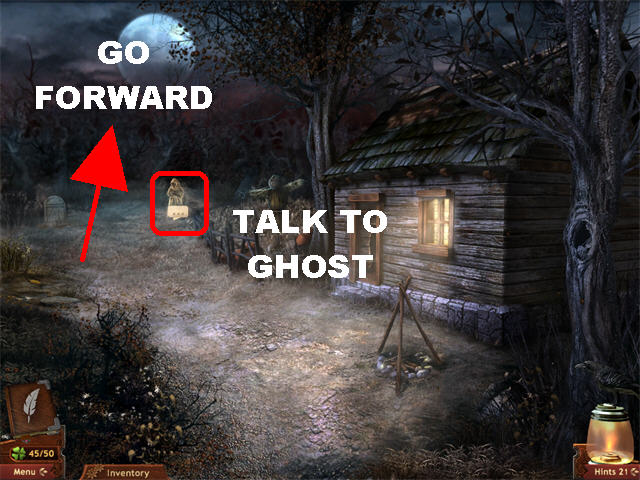
- Talk to the Guard ghost in the back of the scene.
- Go forward into the woods.
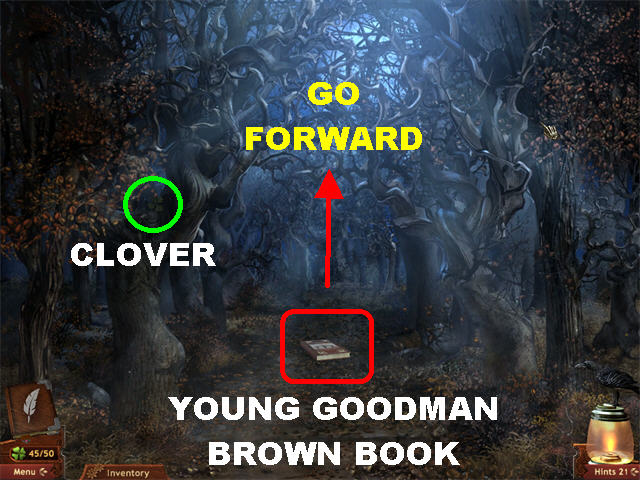
- Pick up the CLOVER marked in green.
- Pick up the YOUNG GOODMAN BROWN book on the ground.
- Go forward to the Altar.
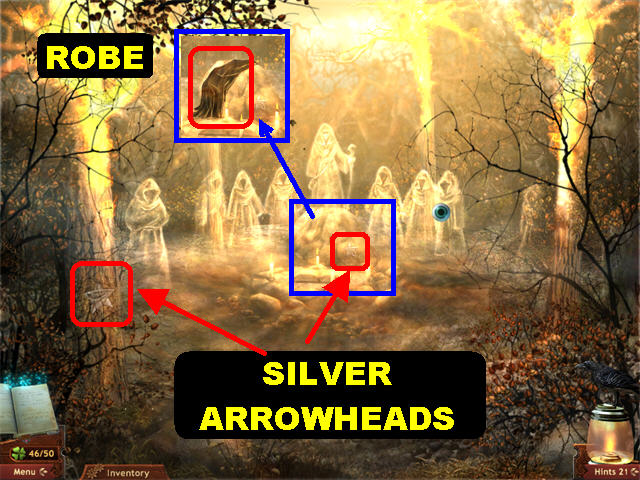
- Pick up the 2 SILVER ARROWHEADS marked in red. They will be added to inventory as 4 SILVER ARROWHEADS.
- Click on the ghosts to trigger a ceremony.
- Speak with the Alice’s ghost until the ceremony ends.
- Pick up the ROBE above the altar.
- Go through the entrance that appears in the left.
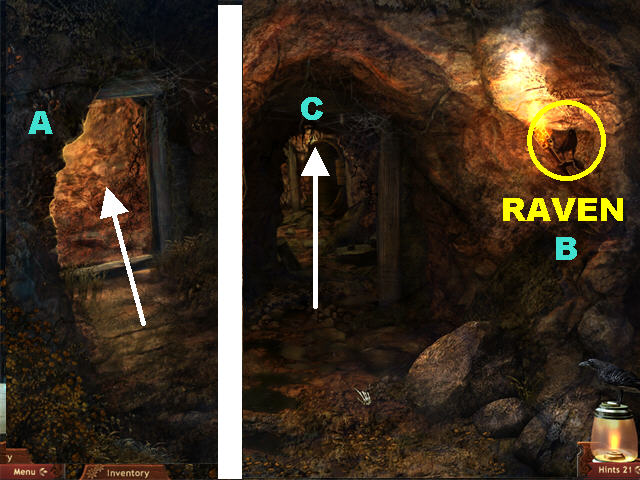
- Go through door (A).
- Pick up RAVEN (B) marked in yellow in upper right.
- Go forward through door (C).
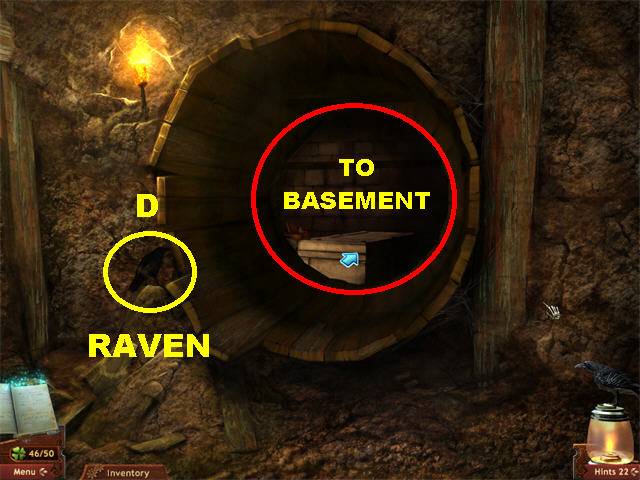
- Pick up the RAVEN (D) marked in yellow.
- Go into the basement by clicking in the center of the scene.
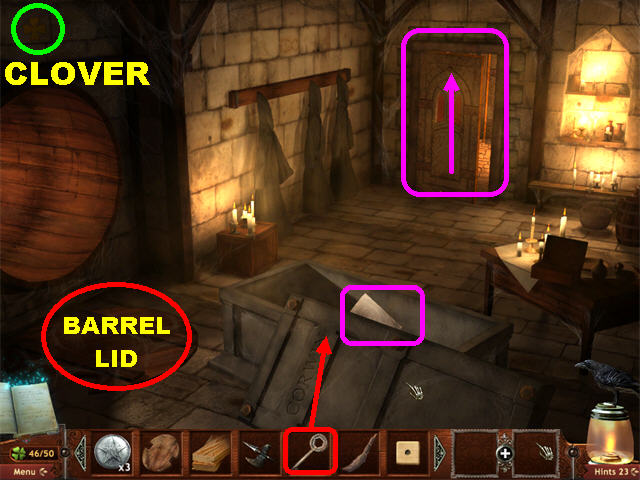
- Pick up the CLOVER circled in green.
- Pick up the BARREL LID in the lower left.
- Unscrew the bolts on the coffin with the KEY.
- Read the NOTE inside the coffin.
- Go through the door in the back.
- Pick up the CLOVER in the upper center.
- Click down to enter the Courthouse Foyer. Exit the Courthouse, go down, forward twice and enter Dungeon on left.
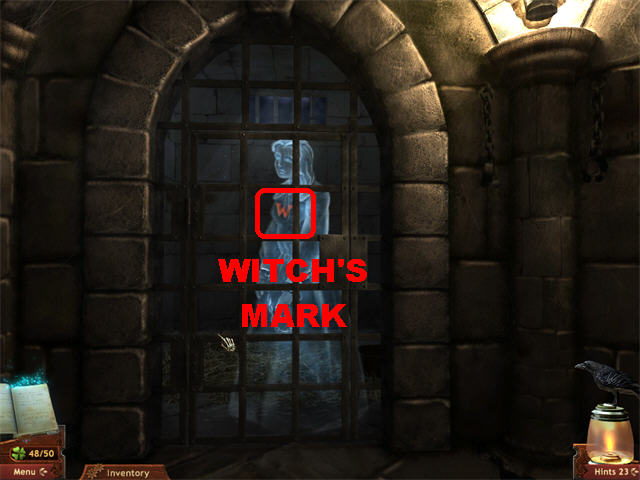
- Zoom into Sarah’s Cell on left.
- Pick up the WITCH’S MARK on her cell.
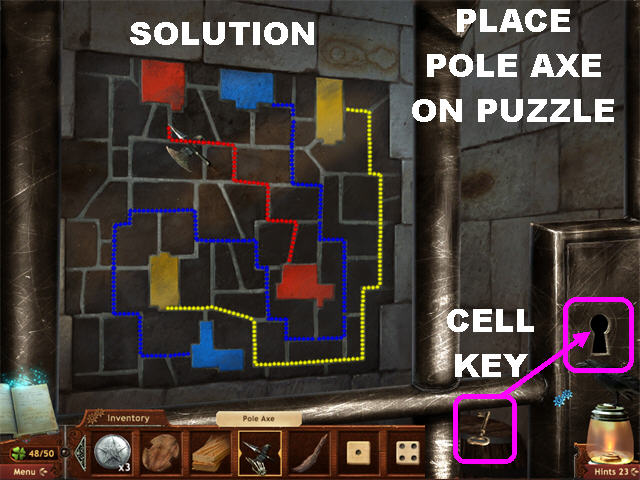
- Exit Sarah’s cell and speak with Philip English in the third cell.
- Click on Philip again to trigger a puzzle.
- Break the wall with the POLE AXE.
- Trace an uninterrupted path from one colored brick to its matching counterpart. When you reach a corner, pause for a second so you can bend the line.
- Follow these steps until all the bricks have an uninterrupted line running through them.
- Click and hold your mouse over the areas you wish to connect. You can start with the yellow line first.
- Please look at the screenshot for the solution.
- Pick up the CELL KEY in the lower right and use it to open the lock in the lower right.
- Go through tunnel.
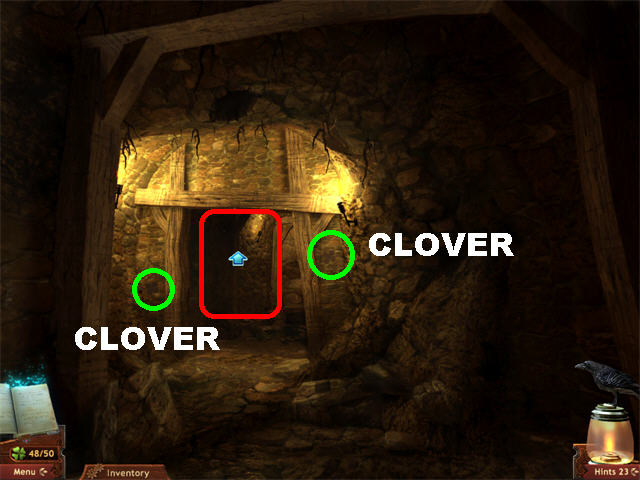
- Pick up the 2 CLOVERS circled in green.
- Go forward.

- Pick up the 2 CLOVERS circled in green.
- Go forward.
- Pick up the 2 CLOVERS circled in green.
- Click on the stone marked in white for the stairway to appear.
- Go to the Customs House in the upper right.
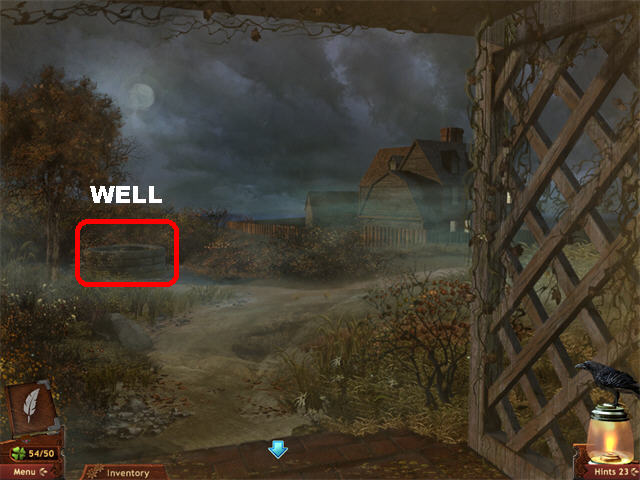
- Return to the garden behind the House of Seven Gables.
- Zoom into the well.
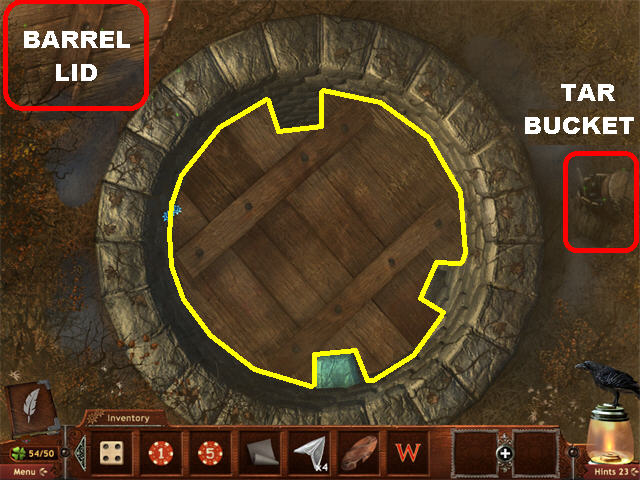
- Pick up the BARREL LID in the upper left.
- Pick up the TAR BUCKET in the lower right.
- Place the LID shown on the screenshot in the well and twist it until it falls all the way down the well.
- Pick up the SKELETON from inside the coffin. You’ve earned the THICK SKULL achievement.
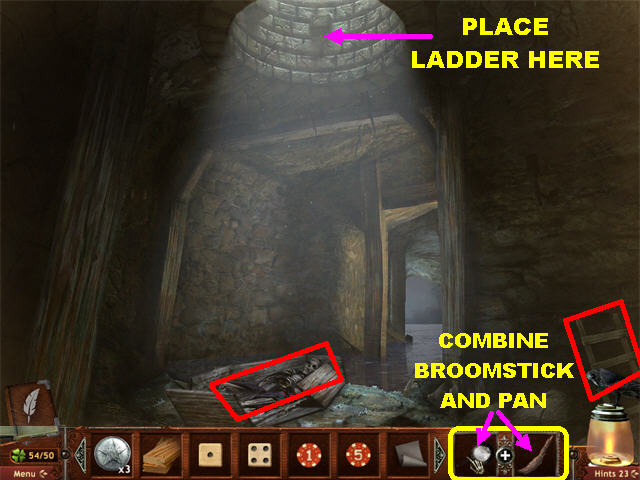
- Pick up the LADDER on the lower right.
- Place the LADDER in the upper center of the scene.
- Combine the BROOMSTICK with the PAN to create the OAR.
- In this order, place the WATERPROOF BOARDS, TAR BUCKET and OAR on the coffin.
- The boat will float away and end up by the broken bridge.
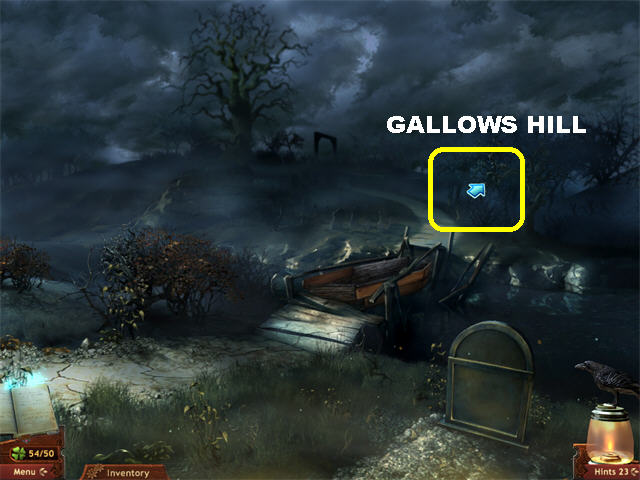
- Enter Gallows Hill in upper right.
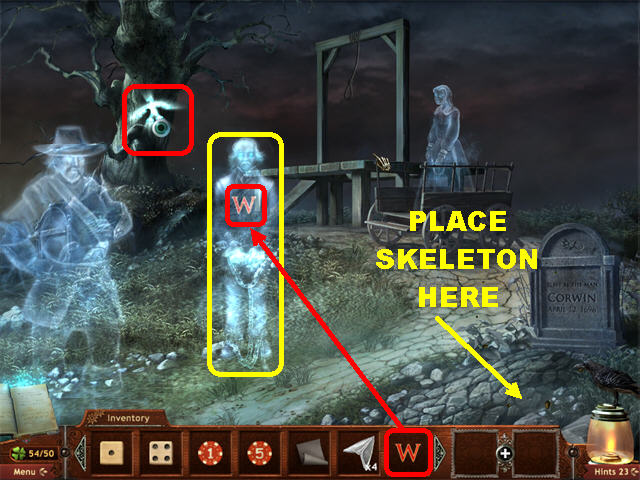
- Place the SKELETON inside the grave in lower right.
- Place the WITCH’S MARK on Hawthorne’s ghost.
- Click on the “W” on Hawthorne’s chest after he stops talking.
- Click on the tree to be transported back to the Cave entrance.
Chapter 10: Breaking the Curse

- Pick up the CLOVER marked in green.
- Pick up the RAVEN circled in yellow.
- Pick up the MILL STONE and the WOODEN STAKE marked in red.
- Click down to return to the Snowglobe Tree.
- Play the Hidden Object Scene on lower left.
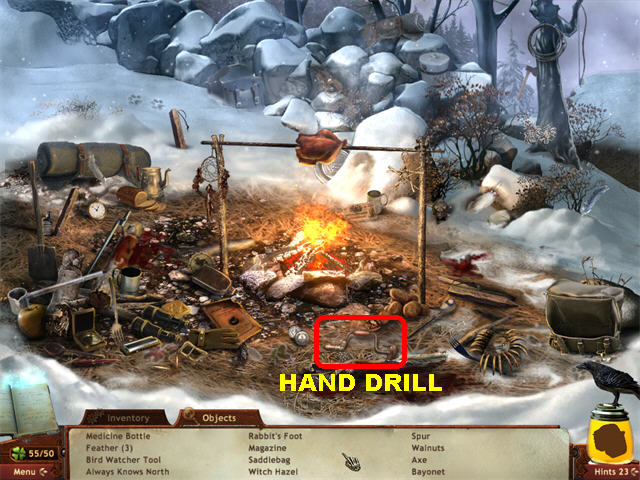
- Collect the HAND DRILL in the lower right.
- Go back to the cave on left.
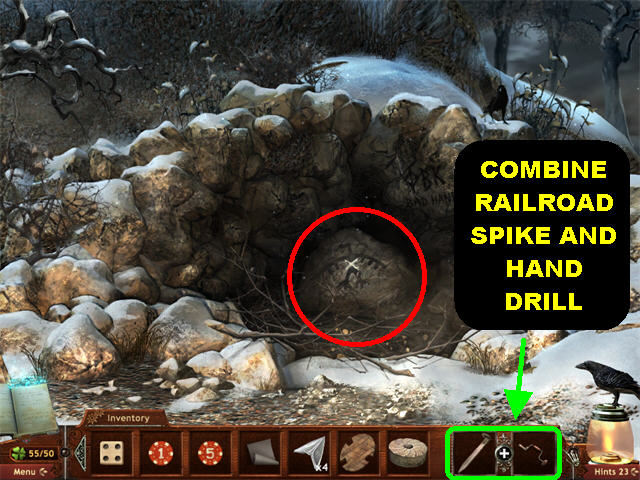
- Combine the RAILROAD SPIKE and the HAND DRILL to create the HOLE BORER.
- Drill a hole in the center of the cave with the HOLE BORER.
- Put the WOODEN STAKE in the hole.
- Use the MILL STONE to hammer the wooden stake into the rock.
- Go into the cave.
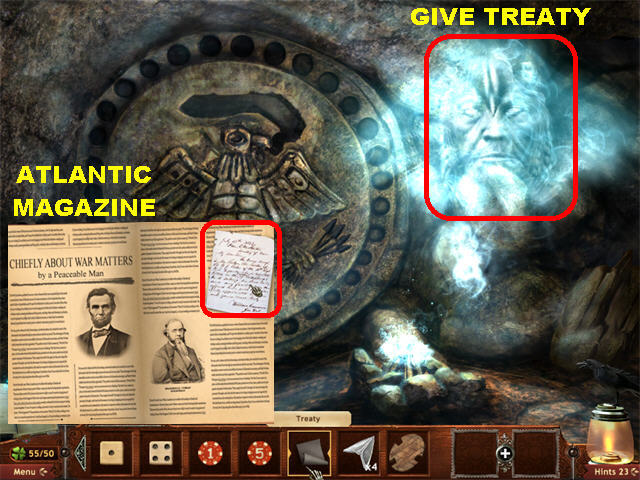
- Give the TREATY to the spirit.
- Exhaust all conversation possibilities to receive the ATLANTIC MAGAZINE.
- You will be automatically transported to the Oval Office back in 1862.
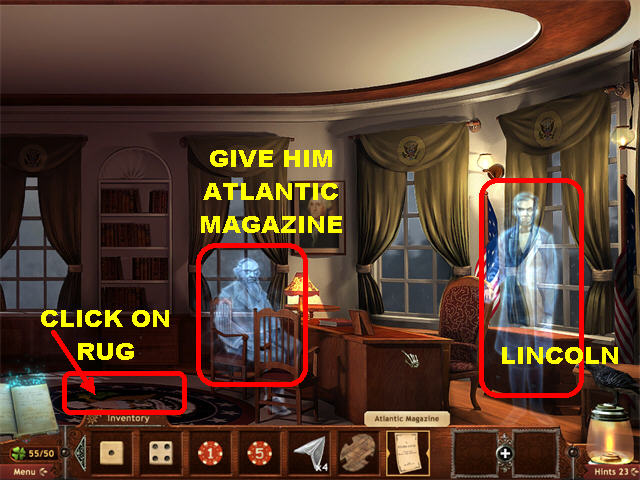
- Give the ATLANTIC MAGAZINE to the left ghost.
- Talk to the left ghost until he makes a comment about Pierce’s Diary.
- Click on Lincoln’s ghost on right.
- Click on the rug to be transported back to the office.
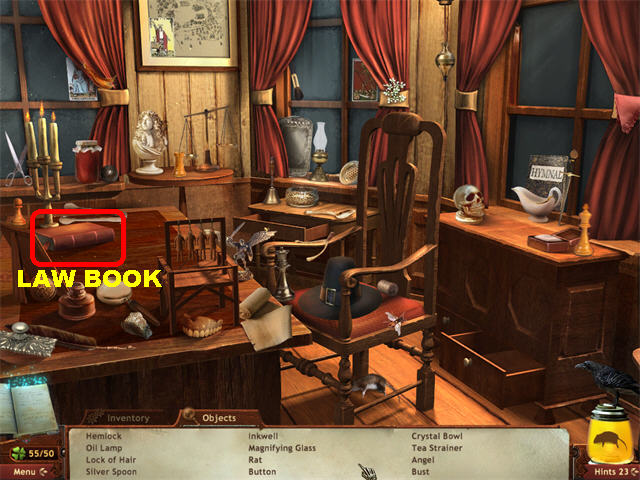
- Play the Hidden Object Scene by the desk.
- Pick up the LAW BOOK on the left.
- Exit the Hidden Object Scene and go to the left side of the office.
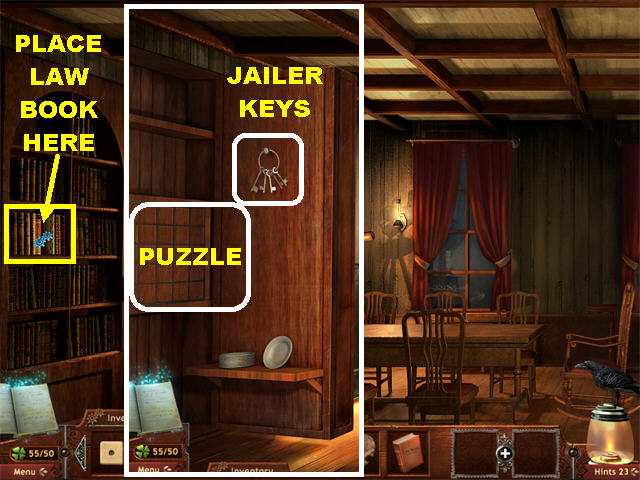
- Place the LAW BOOK in the bookshelf to reveal a hidden area.
- Pick up the JAILER KEYS in the hidden area.
- Zoom into the panel on left to trigger a puzzle.
Safe Puzzle
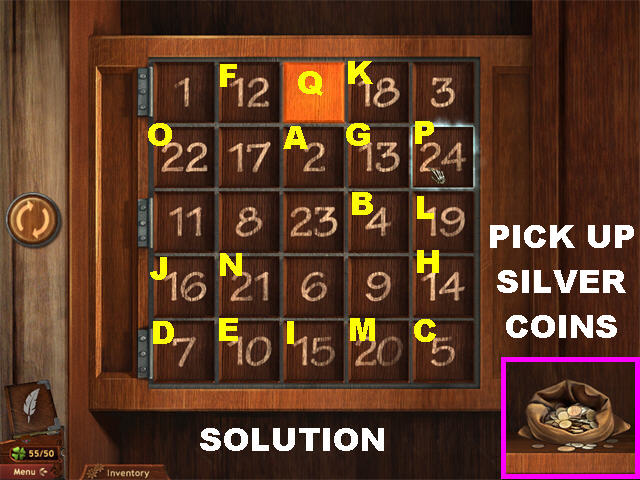
- Your goal is to press every square on the board moving the L-shaped pattern of a Chess Knight Move in numerical order from 1-25.
- Please look at the screenshot for the solution.
- Pick up the SILVER COINS from the safe.
- Go back to the Dungeon.
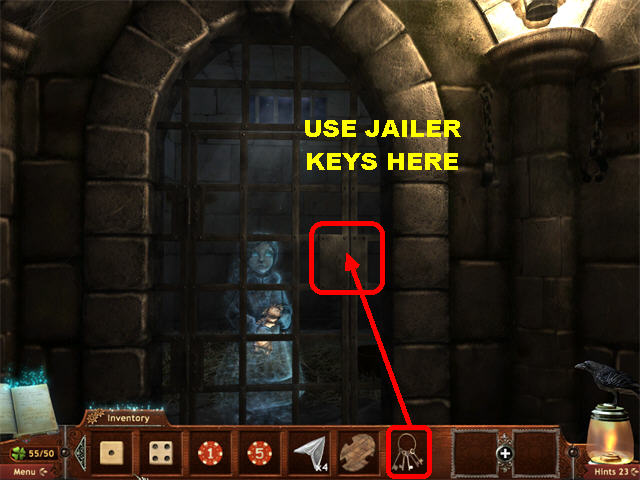
- Zoom into the left cell and you will see Dorothy’s ghost inside.
- Unlock the cell with the JAILER KEYS.
- Exit the cell.
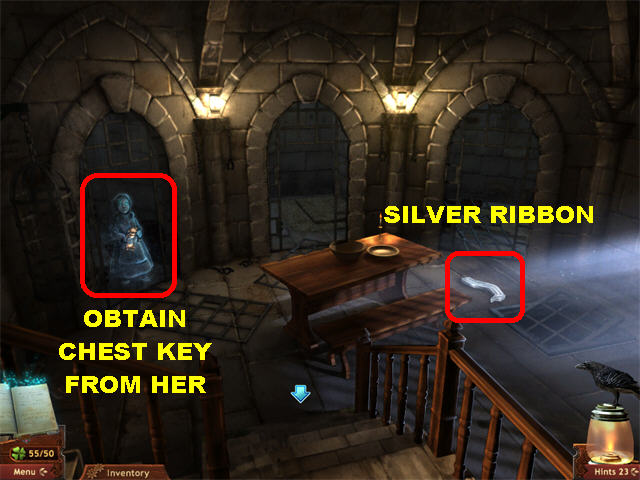
- Pick up the SILVER RIBBON in the lower right.
- Click on Dorothy outside the cell to receive the CHEST KEY.
- Go back to Sarah Good’s House (scene with the cauldron).

- Zoom into the chests in the lower right.
- Pick up the CLOVER marked in green.
- Use the CHEST KEY to open both chests.
- Pick up the DOMINO and the SILVER OLIVE BRANCH from the right chest.
- Go back to the Parlor inside the House of Seven Gables.
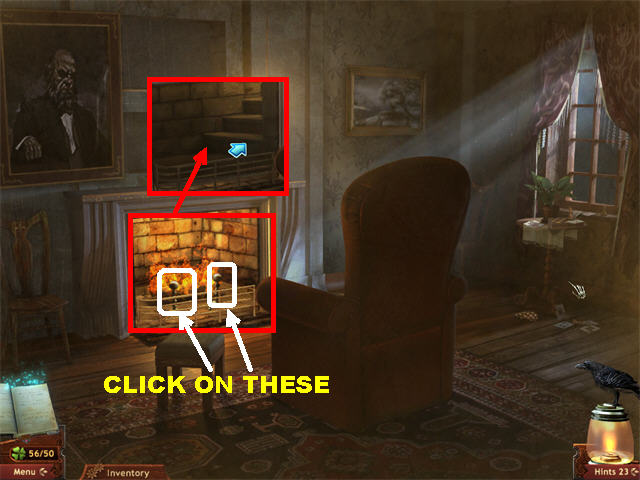
- Click on each POST in the fireplace to depress them and open up a hidden passage; go through the passage.
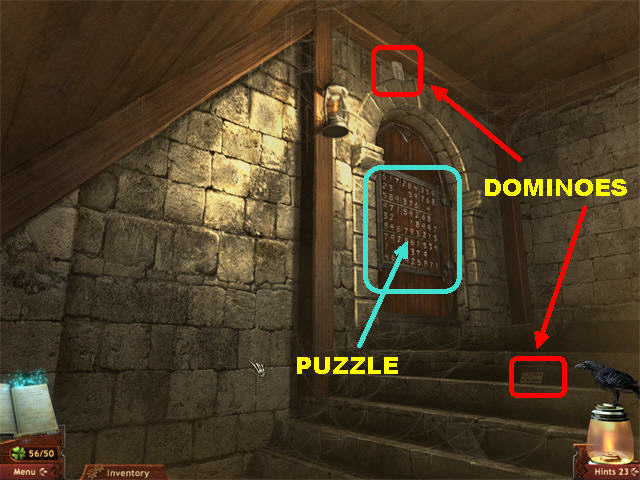
- Pick up the 2 DOMINOES marked in red.
- Click on the puzzle.
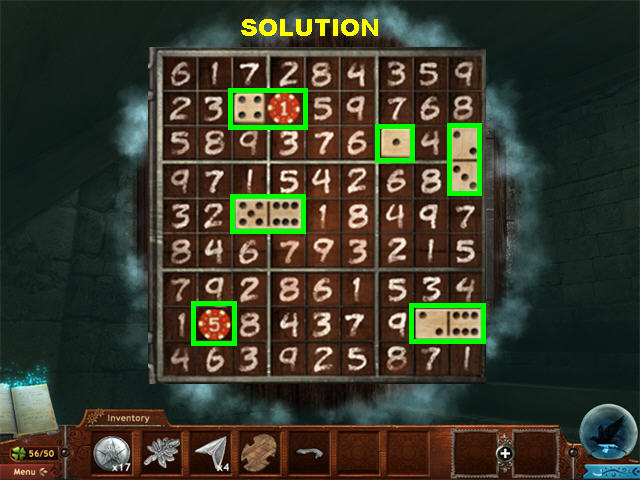
- Place the DOMINOES, CHIPS AND DICE into the correct spots so that no number is repeated in a column or row.
- You can rotate the Domino pieces by clicking on them.
- Please look at the screenshot for the solution.
- Go to the Secret Room.
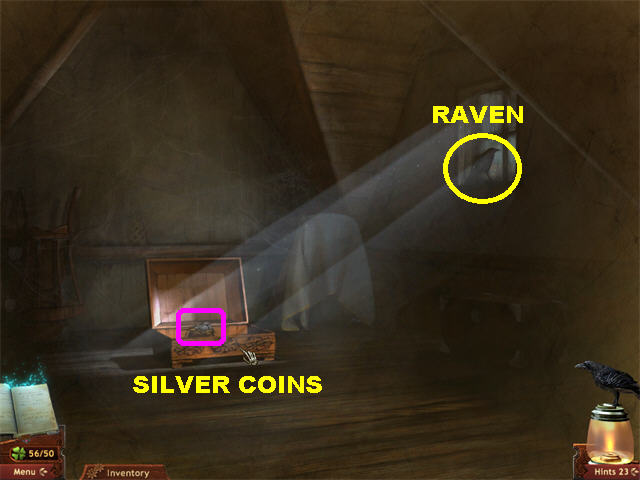
- Zoom into the chest; pick up the SILVER COINS inside the chest. You should have a total of 32.
- Exit the house to be automatically transported to the Cemetery.
- Go into Hawthorne’s grave and go left to the Cave.
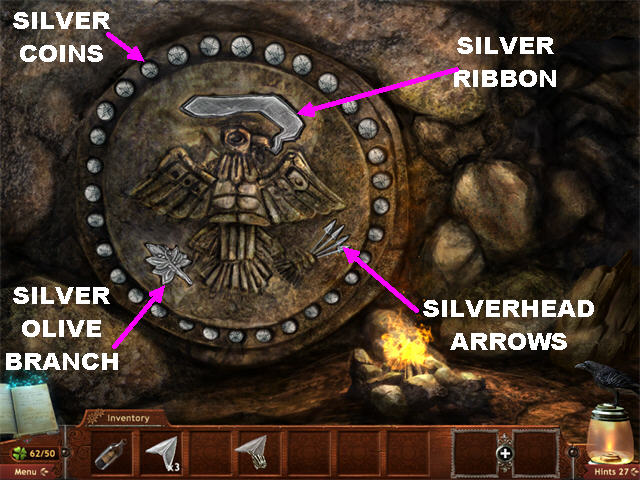
- Put the SILVERHEAD ARROWS, SILVER COINS, SILVER OLIVE BRANCH and SILVER RIBBON on the carving.
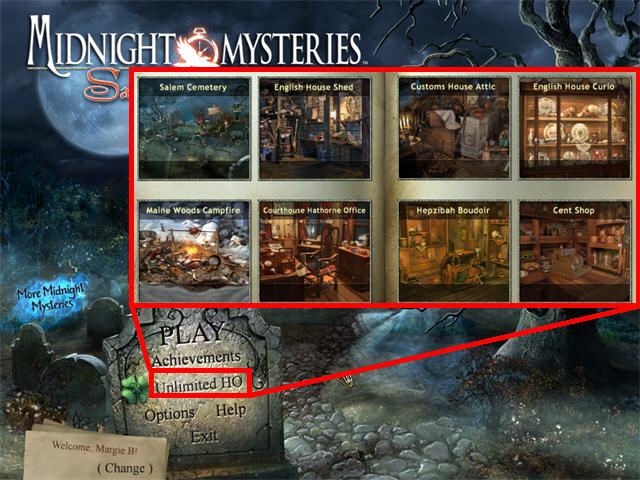
- You’ve unlocked the Unlimited HO section of the game. Go to the Main Menu and click on “Unlimited HO to find all the items in a particular scene.
- Congratulations! You’ve completed Midnight Mysteries: Salem Witch Trials!
Created at: 2010-06-14