
Walkthrough Menu
- General Tips
- Chapter 1: The Boulevard
- Chapter 2: The Shop
- Chapter 3: Police Station
- Chapter 4: Corey's House
- Chapter 5: Gift Shop
- Chapter 6: Auction House
- Chapter 7: The finale
General Tips
- This is the official guide for Punished Talents: Seven Muses!
- This guide will not mention each time you have to zoom into a location; the screenshots will show each zoom scene.
- Hidden-object puzzles are referred to as HOPs in this guide. Items listed in green are hidden or require additional actions to locate. Interactive items in HOPs are color-coded.
- Mini-games and HOPs are sometimes randomized; your solution may vary.
- This guide will give step-by-step solutions for all puzzles which are not random. Please read the instructions in the game for each puzzle.
Chapter 1: The Boulevard
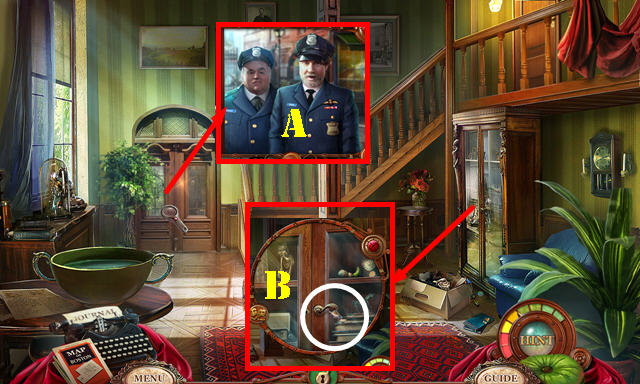
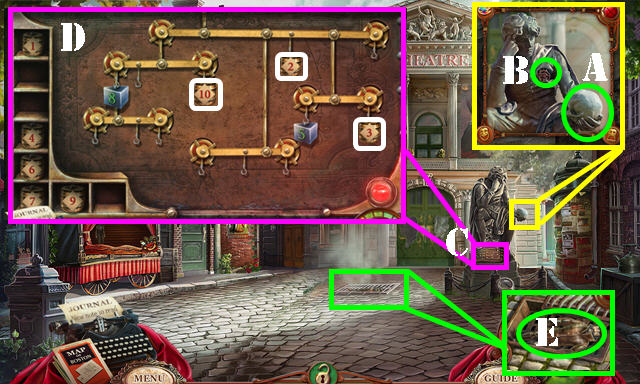
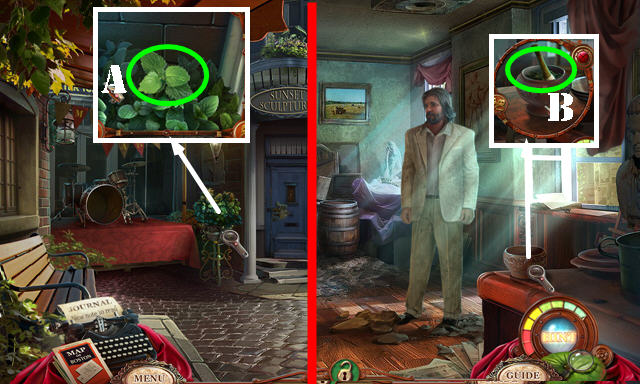
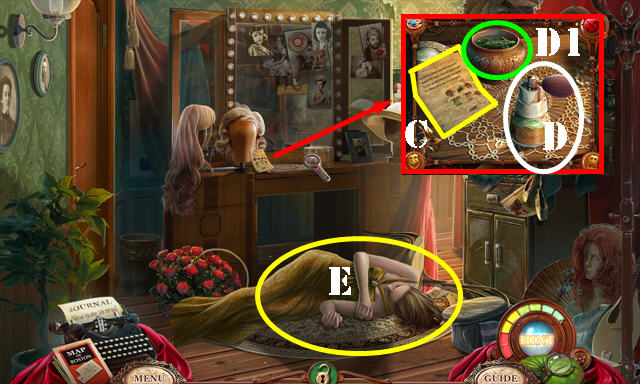
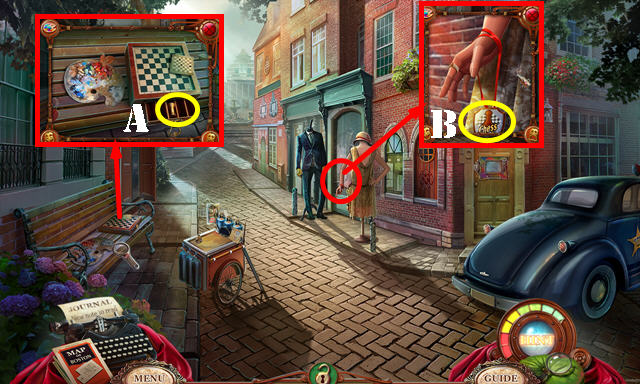
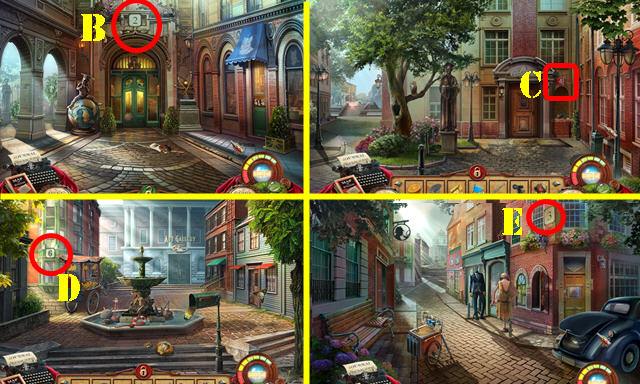
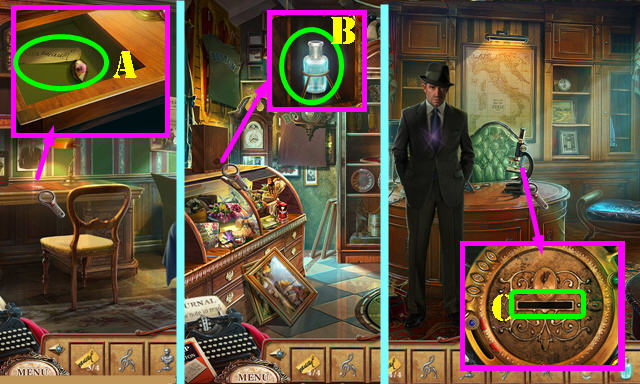
- Open the door to talk to the officers (A).
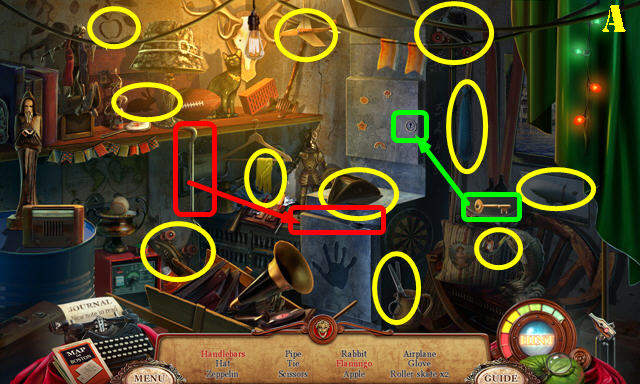
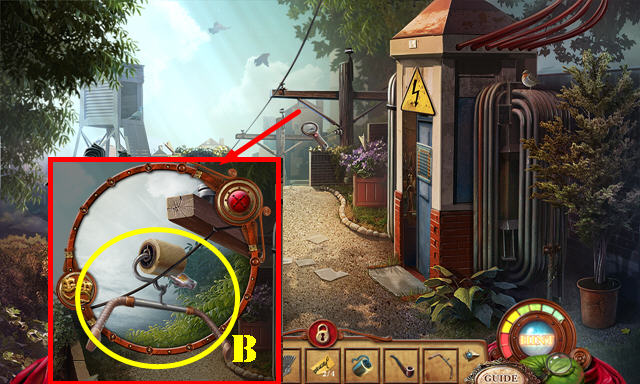
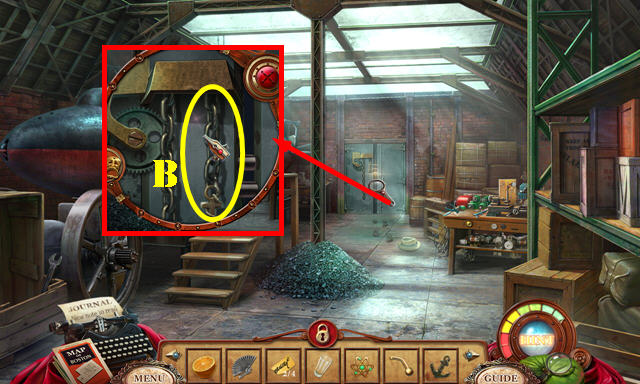
- Pull the handle (B) to activate a HOP.
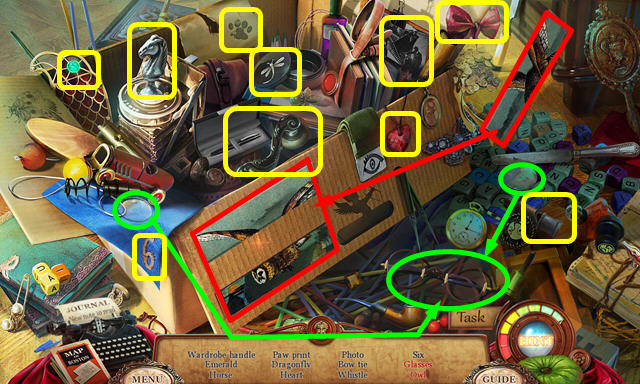
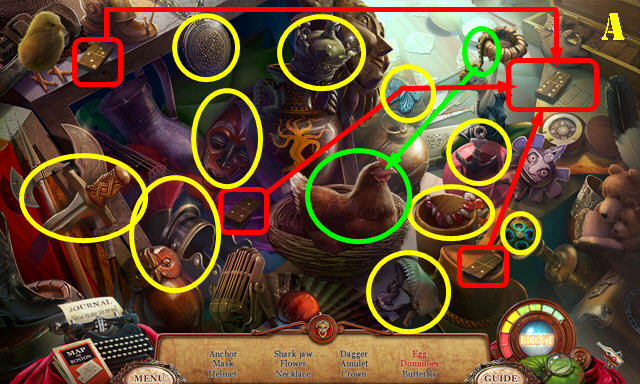
- Play the HOP.
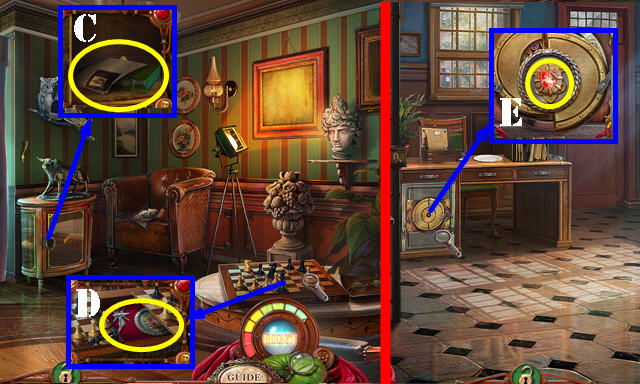
- You receive the WARDROBE HANDLE (C).
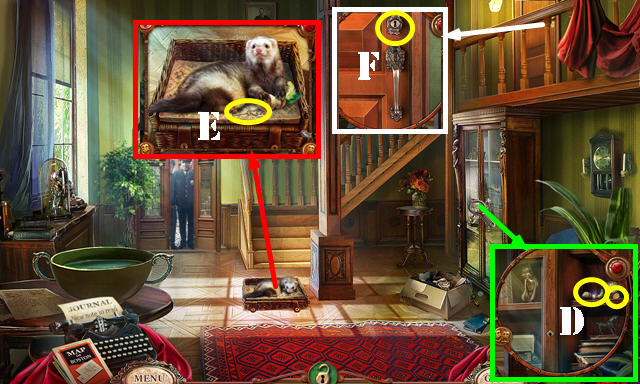
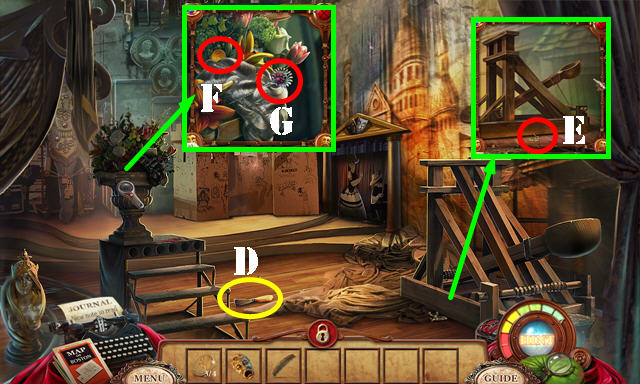
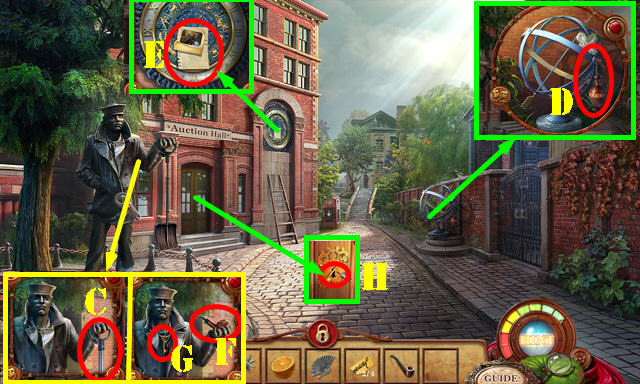
- Place the WARDROBE HANDLE on the wardrobe and pull it; take the FERRET TOY and COIN 1/4 (D).
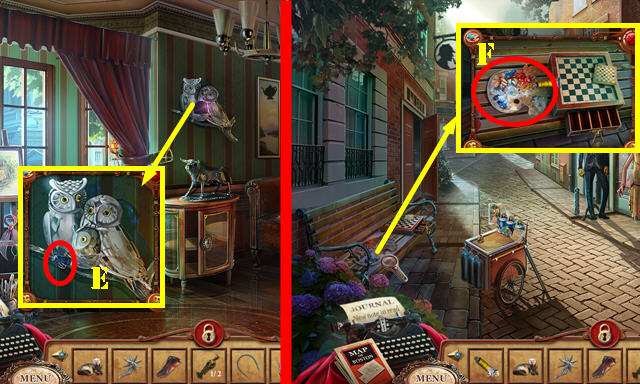
- Give the FERRET TOY to the ferret; take the OFFICE KEY (E).
- Use the OFFICE KEY in the lock (F); turn the key and go through the door.
- Touch anywhere on the scene.
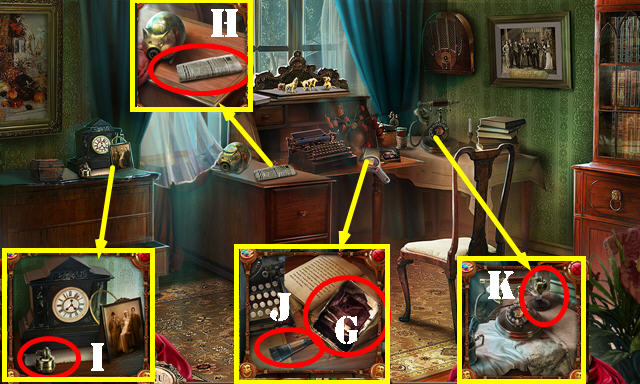
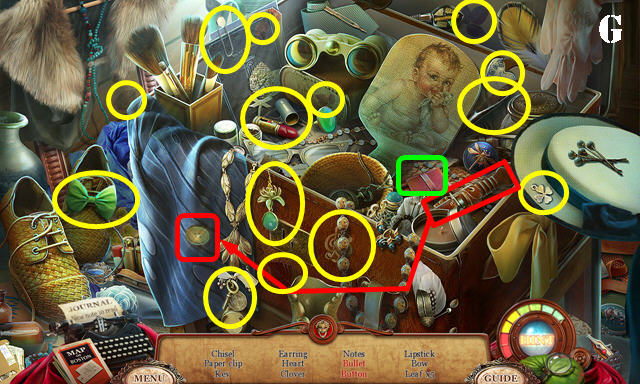
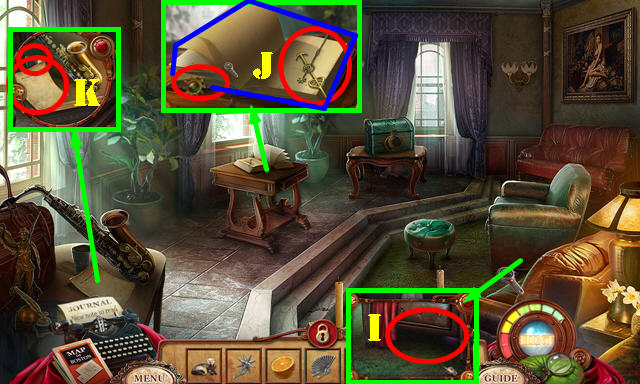
- Take the 2 Notes (G and H).
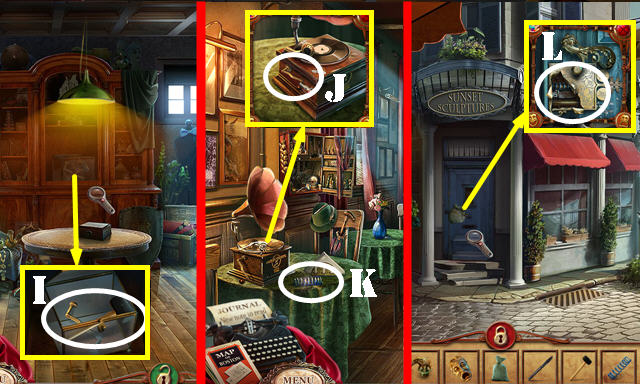
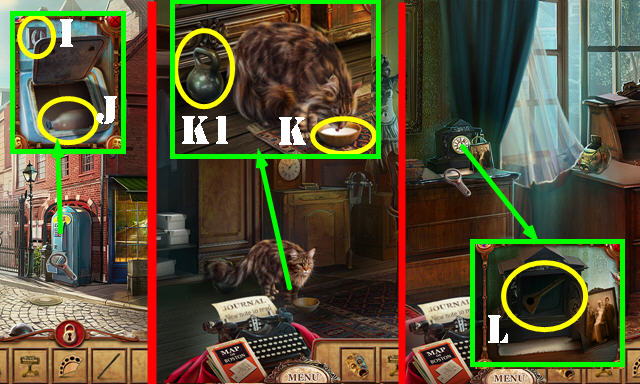
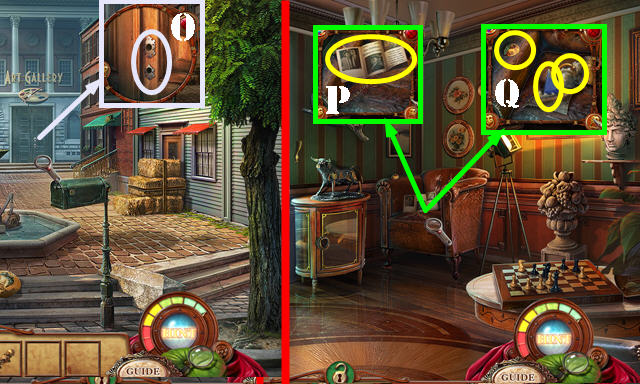
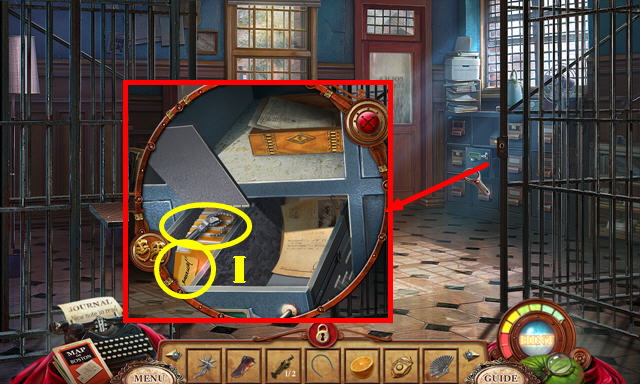
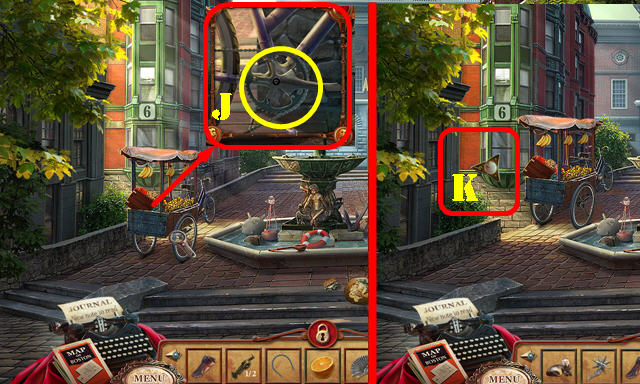
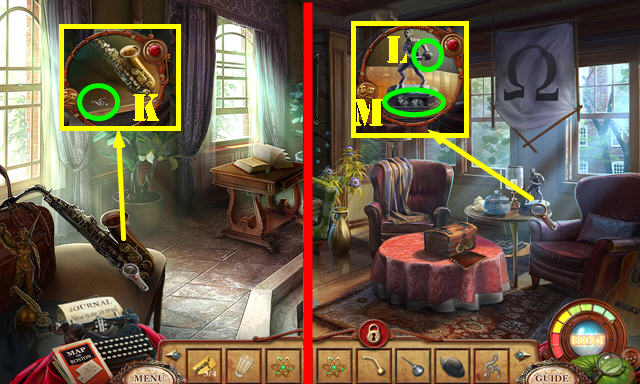
- Take the EARPIECE (I) and GLUE (J).
- Place the EARPIECE on the phone and then answer it (K).
- Walk down and go out the door.
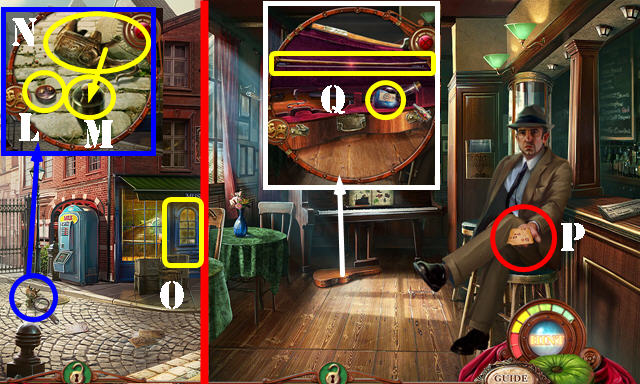
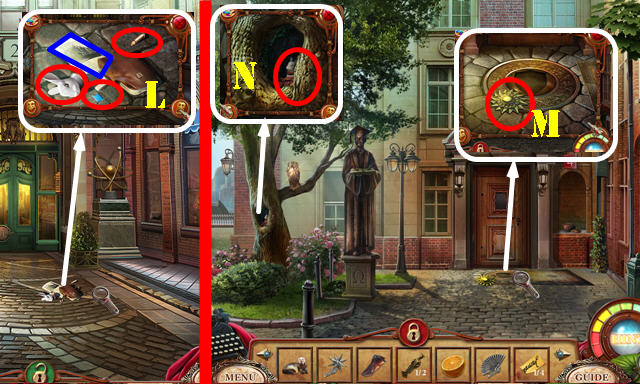
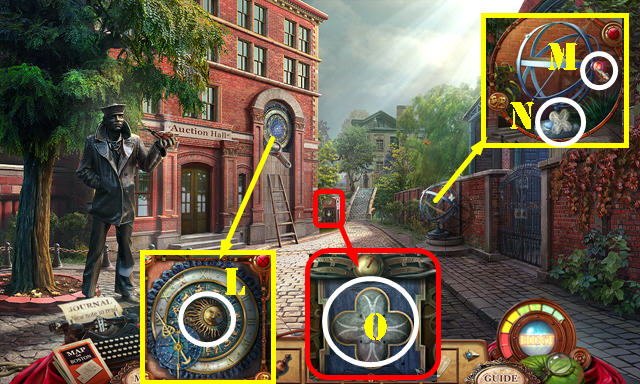
- Take the PIG SNOUT (L).
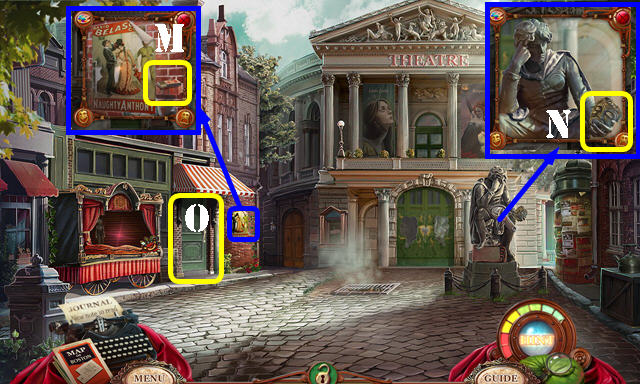
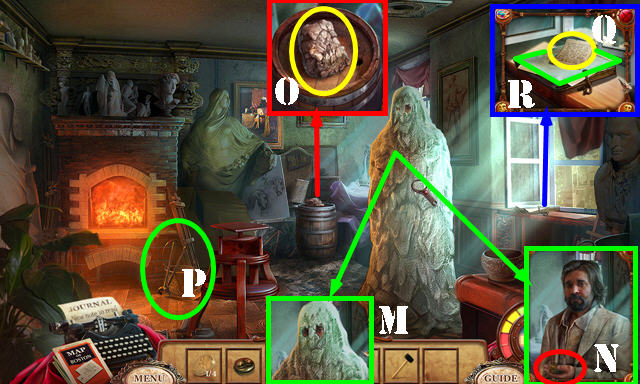
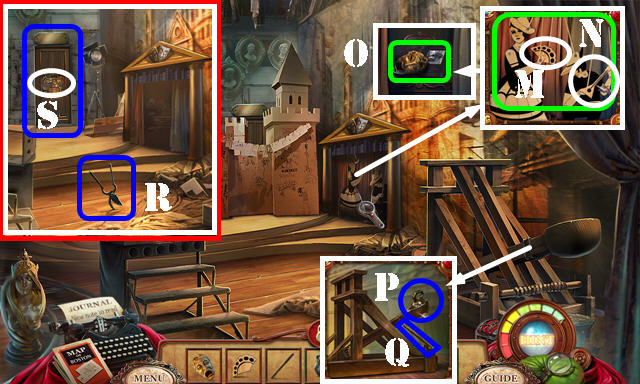
- Use some GLUE on the base (M), then place the statue on it (N) and take the ELEPHANT FIGURINE.
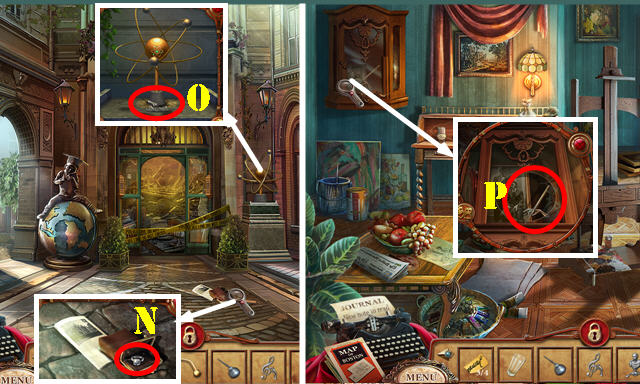
- Enter the Cafe (O).
- Talk to Robert; take the DECODER (P).
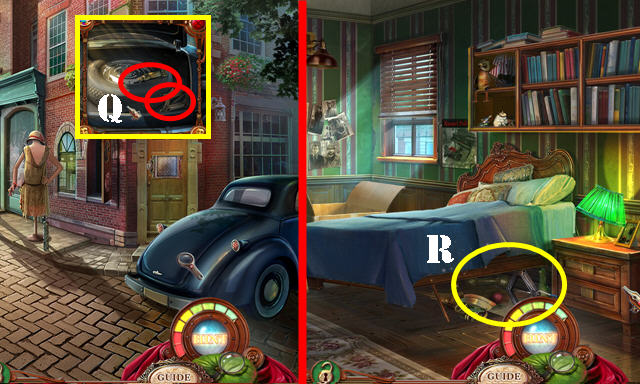
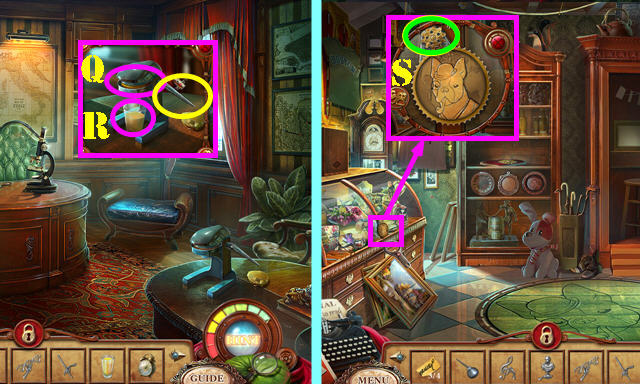
- Open the latches; take the CLEANING SOLUTION and BOW (Q).
- Return to Russell's Office.
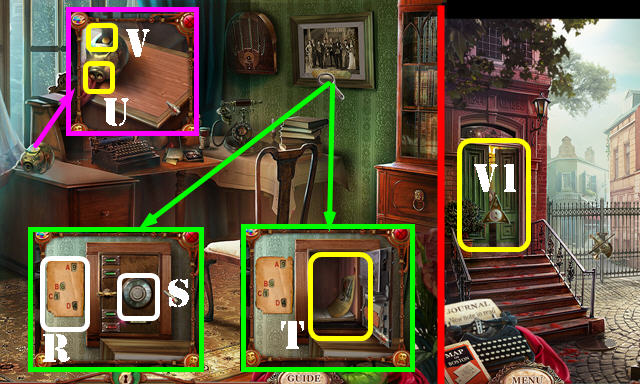
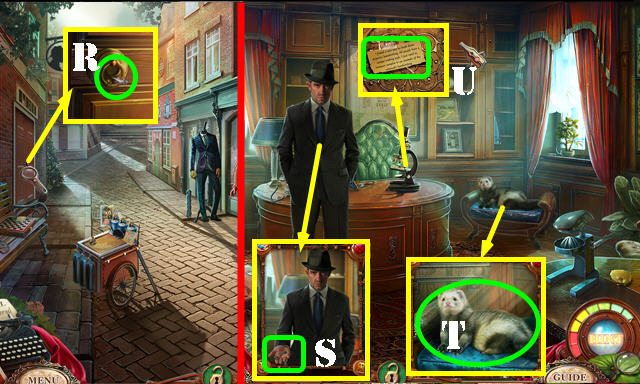
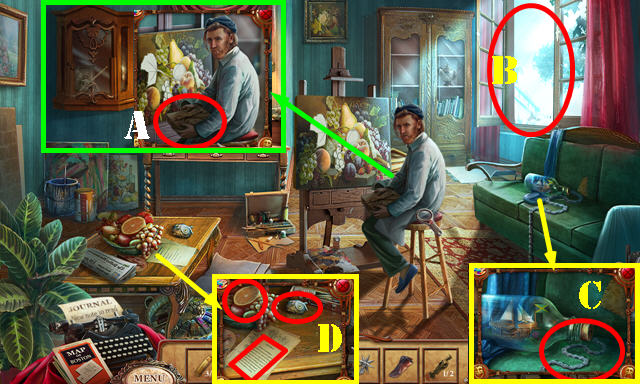
- Remove the picture and place the DECODER on the paper (R).
- Turn the dial (S) to 9614 (in either direction) and stop after each one.
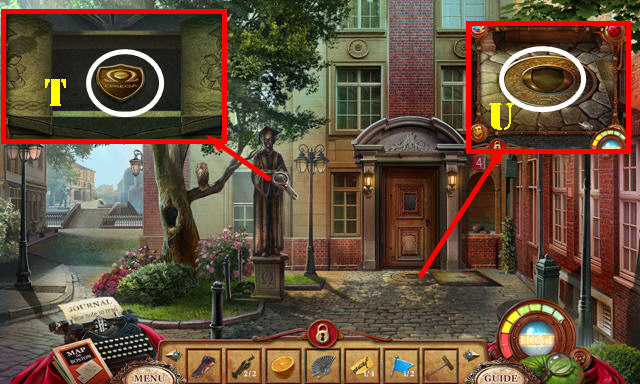
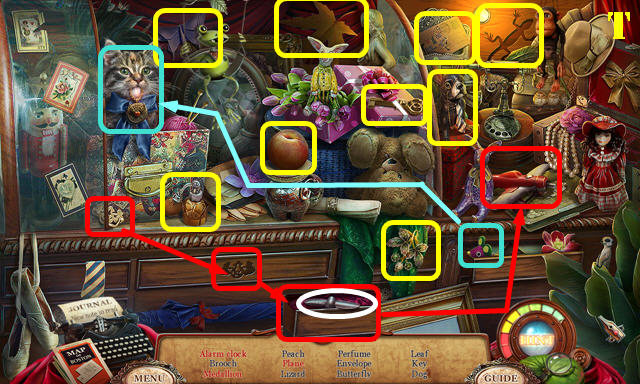
- Take the Note and the MANUSCRIPT (T).
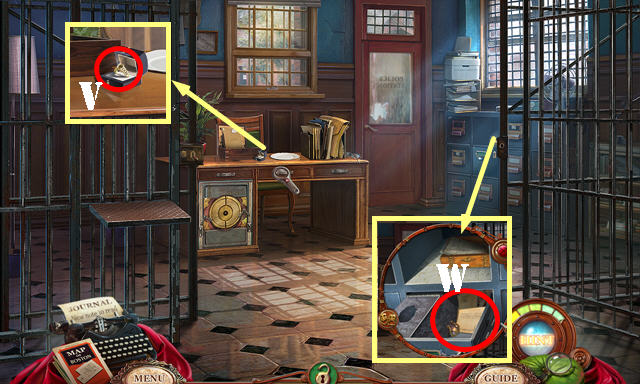
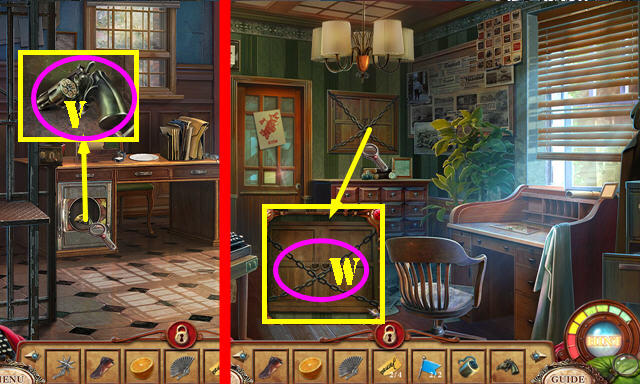
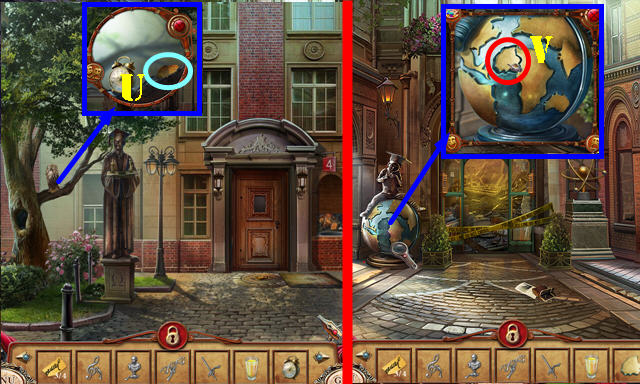
- Place the PIG SNOUT on the pig (U); take the COIN 2/4 (V).
- Return to the Boulevard and go through the left door (V1).
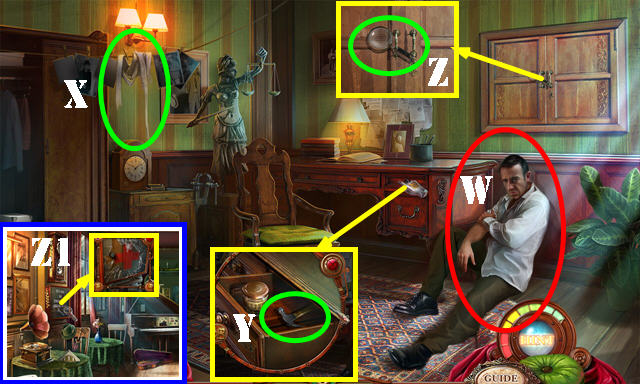
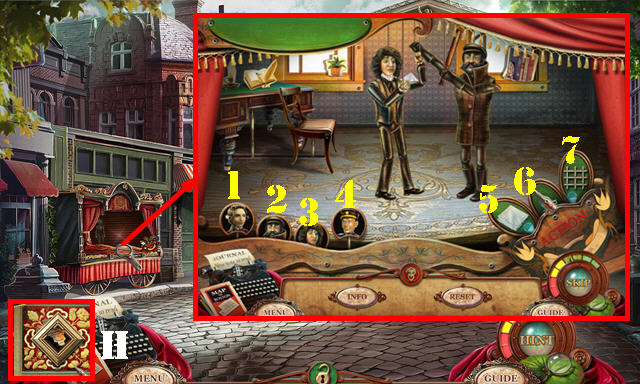
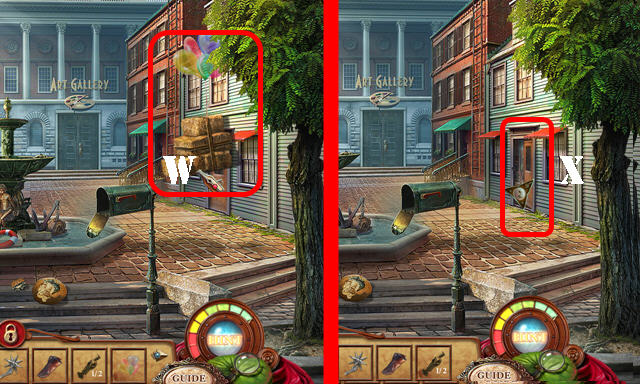
- Talk to Robert (W).
- Take the DIRTY BANDAGE (X).
- Open the drawer; take the HAMMER (Y).
- Grab the MAGNIFYING GLASS (Z).
- Return to the Cafe.
- Break the glass with the HAMMER and open the door to activate a HOP (Z1).
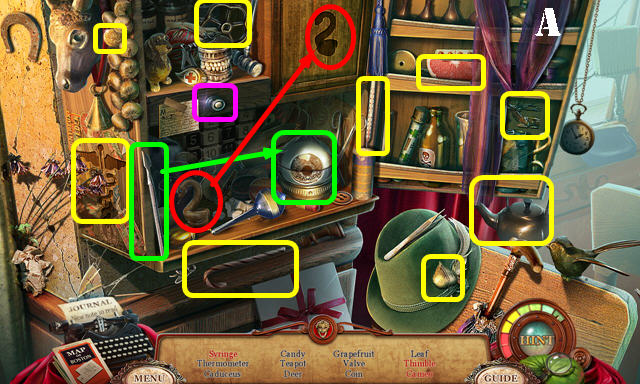
- Play the HOP.
- You receive the SYRINGE (A).
- Walk down twice.
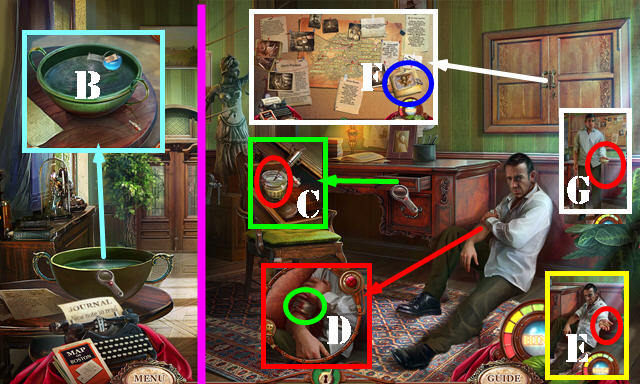
- Use the CLEANING SOLUTION in the bowl, then place the DIRTY BANDAGE in it to get the BANDAGE (B).
- Return to Robert's House.
- Remove the lid and dip the SYRINGE in the bottle to get the SYRINGE WITH MORPHINE (C).
- Use the SYRINGE WITH MORPHINE on Robert's arm and then place the BANDAGE on it (D).
- Give Robert the MANUSCRIPT and take the EVIDENCE-BOARD KEY (E).
- Use the EVIDENCE-BOARD KEY on the lock; take the Note (F).
- Take the SHEET MUSIC PART from Robert (G).
- Return to the Cafe.

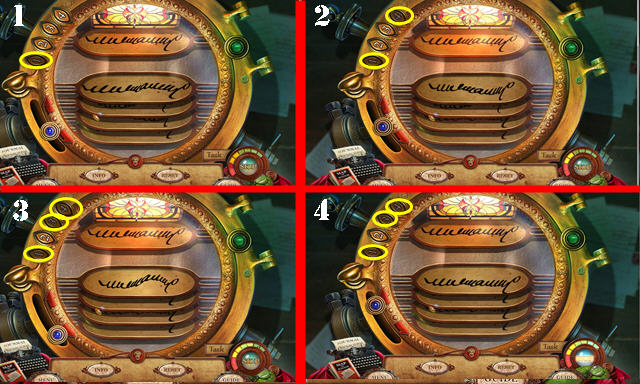
- Place the SHEET MUSIC PART over the other one to activate a puzzle.
- Select the keys from 1-12. Take the KEYBOARD (H).
- Walk down.
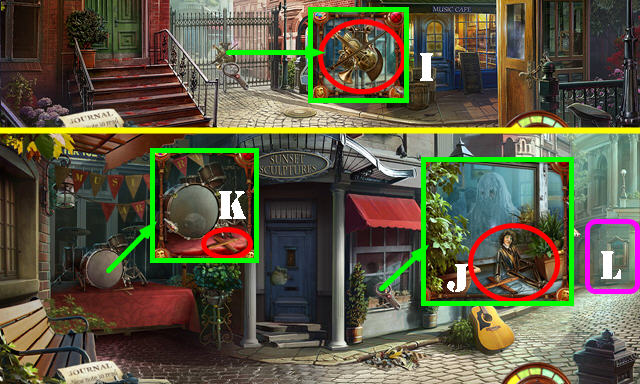
- Place the BOW and the KEYBOARD on the gate; go through the gate (I).
- Look at the window; take the PUPPET (J).
- Take the OPERATING CROSS (K).
- Head to the Acting Block (L).
- Take the MATCHES (M) and TRAGEDY MASK (N).
- Enter the Shop (O).
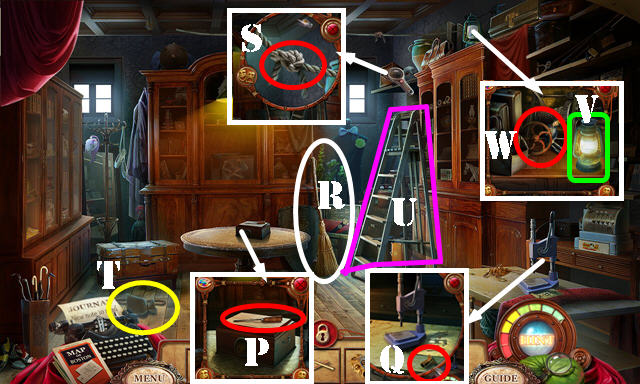
- Take the SCREWDRIVER (P), GUITAR PEG (Q), and BROOM (R).
- Untie the rope (S); take the BAG OF PLASTER (T).
- Move the ladder twice (U); use the MATCHES on the lantern (V); take the PUPPET and the VALVE (W).
- Walk down twice.
- Use the BROOM on the debris; take the ZEBRA FIGURINE (X).
- Place the GUITAR PEG on the guitar; turn the peg twice and take the STRINGS (Y).
- Use the SCREWDRIVER on the screws and take the SKULL (Z).
- Return to the Acting Block.
- Place the SKULL in the hand (A) and the VALVE in the slot (B). Turn the valve.
- Open the puzzle (C).
- Place the wrights on the right hooks (D).
- Open the grate; take the PUPPET BODY (E).
- Enter the Shop.
Chapter 2: The Shop
- Put down the OPERATING CROSS, STRINGS and the PUPPET BODY.
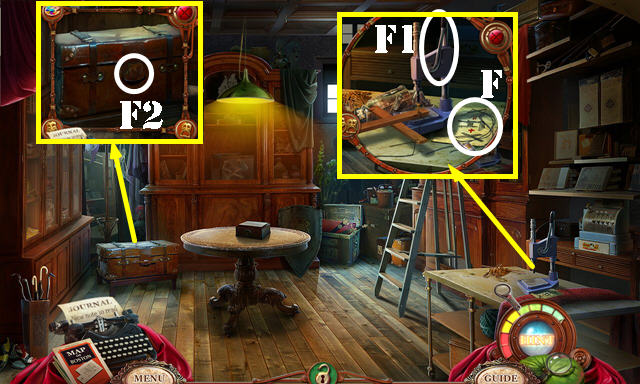
- Add the strings (F) to the cross and touch the machine (F1). Repeat these steps 3 more times. Take the PUPPET.
- Place the ZEBRA FIGURINE in the slot to activate a HOP (F2).
- Play the HOP.
- You receive the CHISEL (G).
- Walk down.
- Place the 3 PUPPETS on the stage to activate a puzzle.
- Round One: 3, 2, 6.
- Round Two: 1, 2, 6, 5, 4, 5.
- Round Three: 3, 4, 5, 7.
- Take the THEATER SYMBOL (H).
- Return to the Shop.
- Use the THEATER SYMBOL in the slot; take the SLEDGEHAMMER and GRAMOPHONE HANDLE (I).
- Return to the Cafe.
- Place the GRAMOPHONE HANDLE on the gramophone (J); take the SPRING (K).
- Return to the Music Block.
- Use the CHISEL on the plaster and the SLEDGEHAMMER on the chisel. Place the SPRING in the mechanism (L) and go through the door.
- Use the SLEDGEHAMMER on the sculptor (M). Talk to him and take the BOX LOCK (N).
- Take the CLAY (O), PINCERS (P) and the Note (Q).
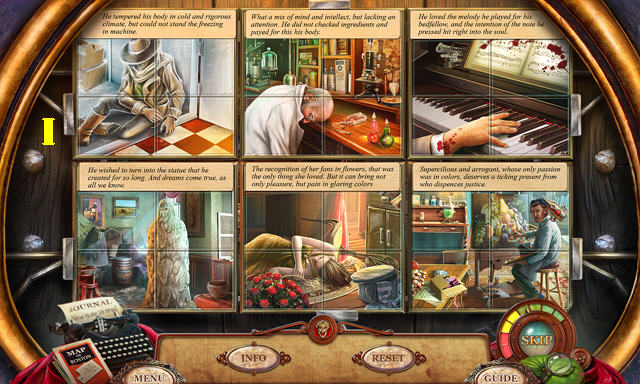
- Touch the book to activate a puzzle (R).
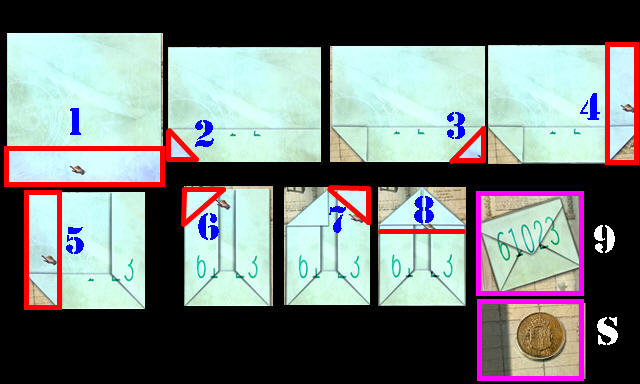
- Fold the paper in the right order (1-8). Nine shows the final image.
- Take the COIN 3/4 (S).
- Return to the Boulevard.
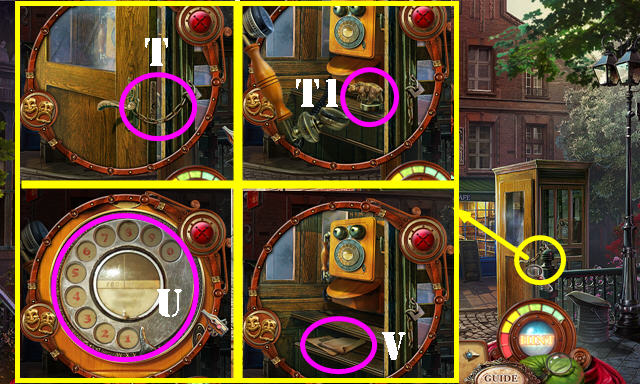
- Use the PINCERS on the chain (T); open the door and take the BEAR FIGURINE (T1).
- DIAL 61023 (U). Take the Note and then the CUPID BLUEPRINT (V).
- Return to Russell's Office.
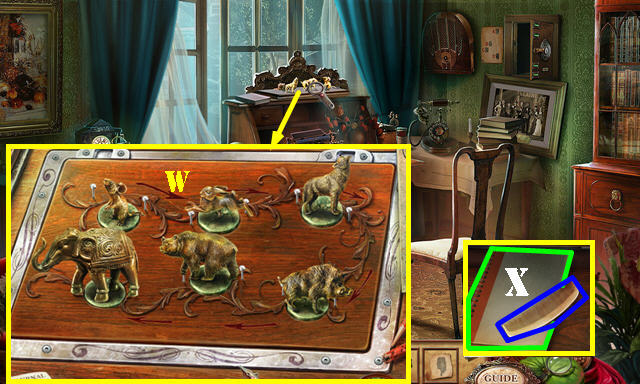
- Put down the BEAR FIGURINE and the ELEPHANT FIGURINE to activate a puzzle.
- Swap the figurines as shown (W).
- Take the COMB and open the book (X).
- Return to the Acting Block.
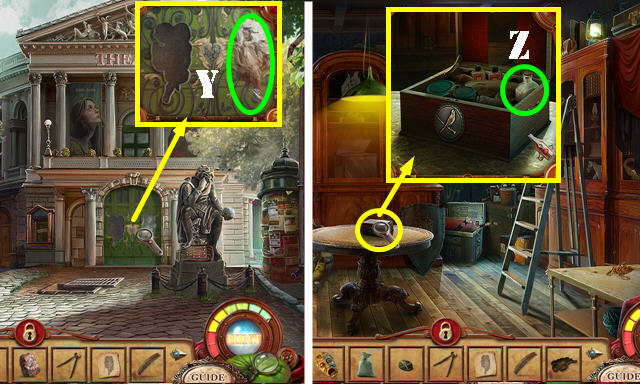
- Place the CLAY over the cupid (Y); take the CUPID CAST.
- Return to the Shop.
- Place the BOX LOCK in the slot; take the PLASTER SOLVENT (Z).
- Return to the Sculptor's Studio.

- Put down the CUPID BLUEPRINT and CUPID CAST. Place the BAG OF PLASTER and then the PLASTER SOLVENT in the mold. Take the FORM WITH PLASTER (A).
- Place the FORM WITH PLASTER in the fireplace; use the PINCERS to place it in the fire and then take the PLASTER CUPID (B).
- Return to the Acting Block.
- Place the PLASTER CUPID on the door (C). Go through the door.
- Talk to Corey.
- Take the SCRAPER (D) and the CLOCK KEY (E).
- Take the COIN 4/4 (F). Use the COMB on the wig and take the HAIRPIN (G).
- Walk down.
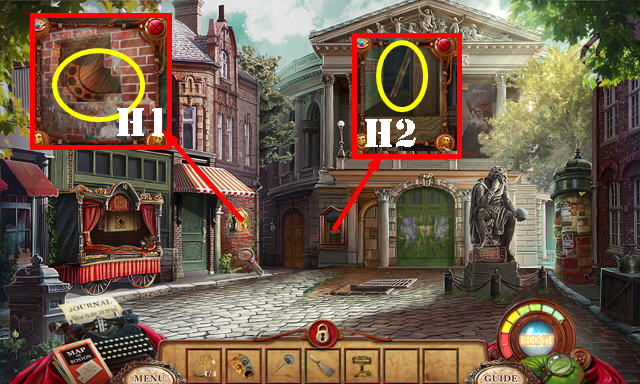
- Remove the poster with the SCRAPER; take the FAN (H1).
- Use the HAIRPIN on the window; take the LEVER (H2).
- Walk down twice.
- Insert the 4 COINS in the slot (I); take the MILK (J).
- Return to Robert's House.
- Place the MILK in the saucer (K); take the WEIGHT (K1).
- Return to Russell's Office.
- Use the CLOCK KEY in the clock; turn the key twice and take the BALALAIKA (L).
- Return to Backstage.
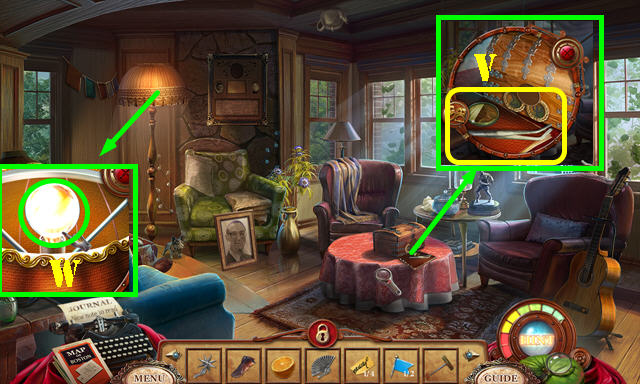
- Place the FAN (M) and the BALALAIKA (N) on the puppets.
- Take the COMEDY MASK and the Book (O).
- Place the WEIGHT (P) and the LEVER (Q) on the catapult; pull the lever. Take the PRUNERS (R).
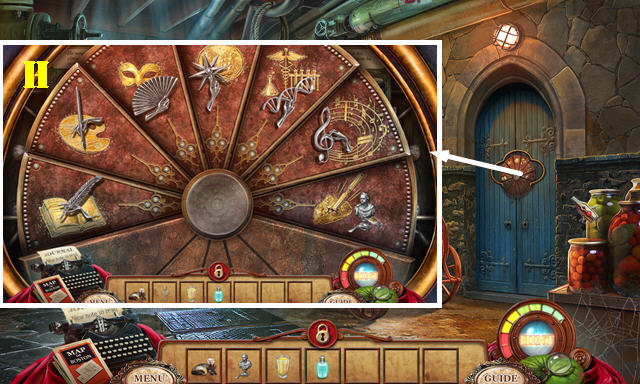
- Place the COMEDY and TRAGEDY MASKS on the back door (S) to activate a puzzle.
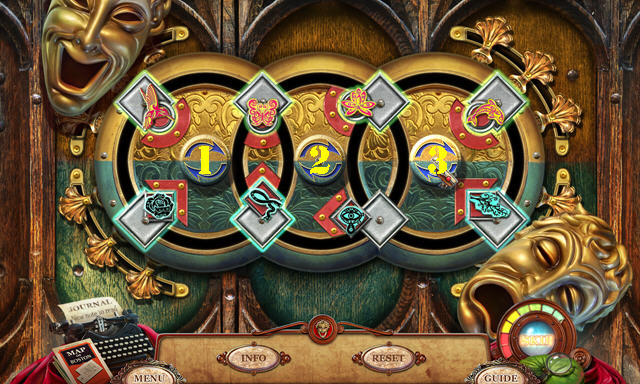
- Place the symbols in the right spots.
- Solution: 2, 2, 1, and 3.
- Go through the door to enter the Dressing Room.
- Talk to Kaya.
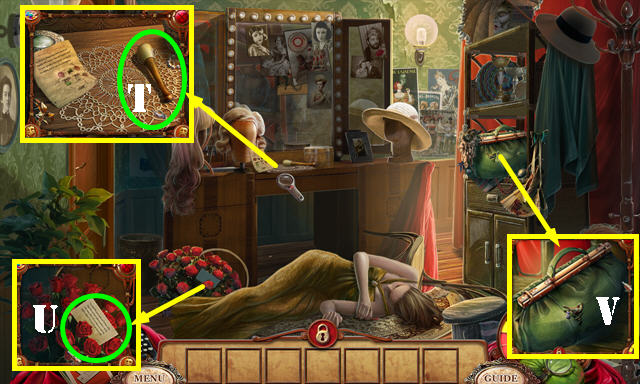
- Take the PESTLE (T).
- Take the Note (U).
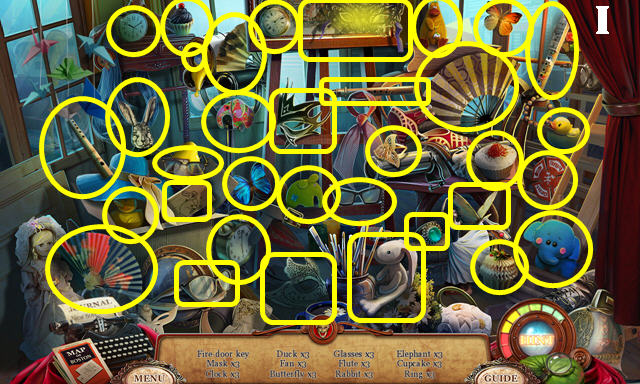
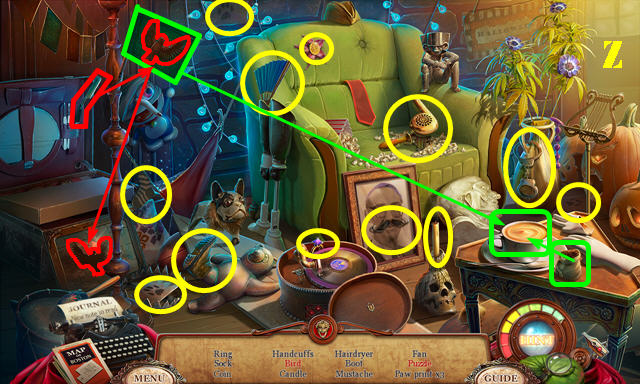
- Open the bag (V) to activate a HOP.
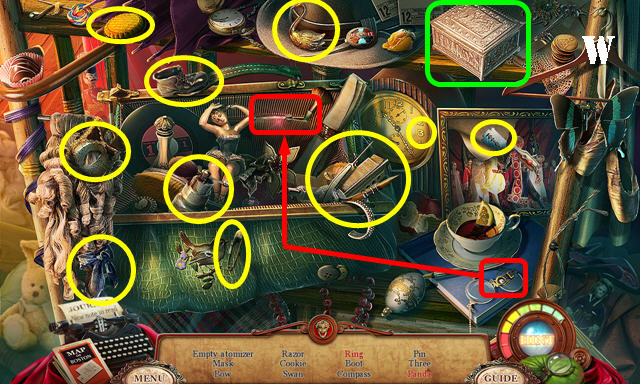
- Play the HOP.
- You receive the EMPTY ATOMIZER (W).
- Return to the Music Block.
- Use the PRUNERS on the plant to get the MINT (A).
- Return to the Sculptor's Studio.
- Place the MINT in the mortar and use the PESTLE to crush it; take the CRUSHED MINT (B).
- Return to the Dressing Room.
- Look at the Note (C).
- Put down the EMPTY ATOMIZER (D) and the CRUSHED MINT (D1). Place the crushed mint inside the atomizer and take the ASTHMA MEDICINE.
- Use the ASTHMA MEDICINE on Kaya (E). You will be transported to the Police Station.
Chapter 3: Police Station
- Talk to Jack and the officer.
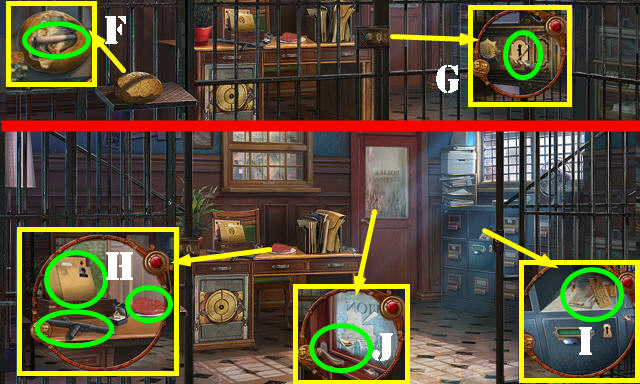
- Touch the bread; take the Note and the LOCKPICK (F). Take the BREAD.
- Use the LOCKPICK on the lock (G).
- Take the POLICE BATON, STEAK and Note (H).
- Take the bullet 1/6 (I).
- Break the glass with the POLICE BATON; pull the inside handle and go through the door (J).
- Take the PENKNIFE and the BULLET 2/6 (K). Look at the Note (green).
- Go forward.
- Take the PAINT TUBE 1/3 (L).
- Place the BREAD on the ground to activate a HOP (M).
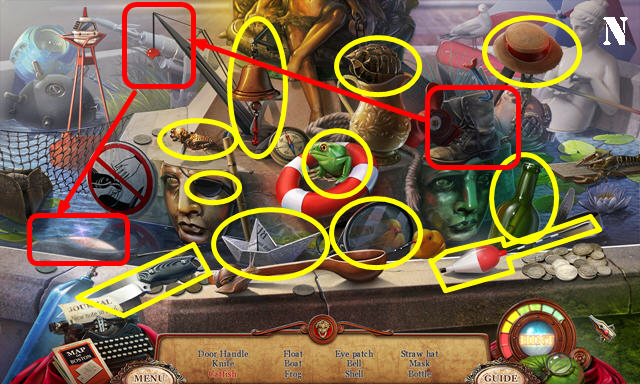
- Play the HOP.
- You receive the GALLERY DOOR HANDLE (N).
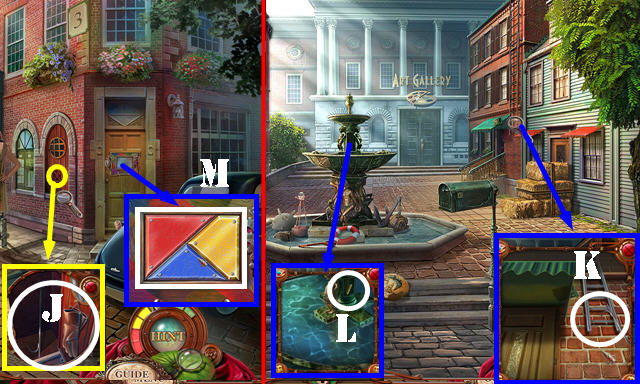
- Place the GALLERY DOOR HANDLE on the door (O); enter the Art Gallery.
- Take the Note (P).
- Cut the chair with the PENKNIFE; take the AMBER, PUZZLE PART 1/3 and DOOR KNOCKER (Q).
- Walk down twice.
- Place the DOOR KNOCKER on the door; knock on it and go through the door (R).
- Talk to the detective; take the CARD-FILE KEY (S).
- Give the STEAK to the ferret to receive LUCY (T).
- Take the Note (U).
- Walk down twice.
- Place the AMBER on the ring; take the AMBER RING (V).
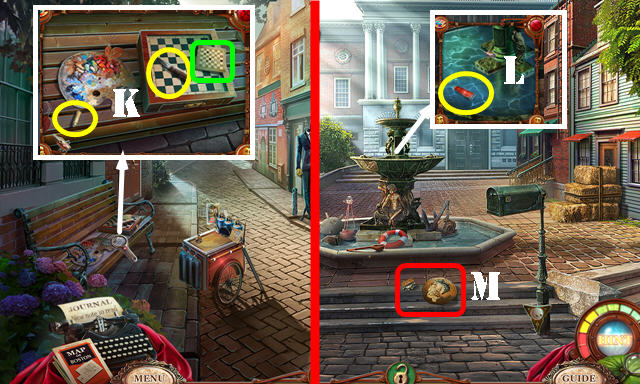
- Use the CARD-FILE KEY in the lock; turn the key and look at the Note, then take the CHESSBOARD OPENER (W).
- Return to the Art Block.
- Use the CHESSBOARD OPENER on the lock; take the CHESS FIGURINE 1/2 (A).
- Place the AMBER RING on the finger; take the CHESSMAN SYMBOL (B).
- Return to the Art Gallery.
- Place the CHESSMAN SYMBOL in the slot and twist the knob; take the Note, CHESS FIGURINE 2/2 and BOOK 1/3 (C).
- Place the 2 CHESS FIGURINES on the board; take the EXPLORER'S MUSE and the SAFE DIAL (D).
- Return to the Police Station.
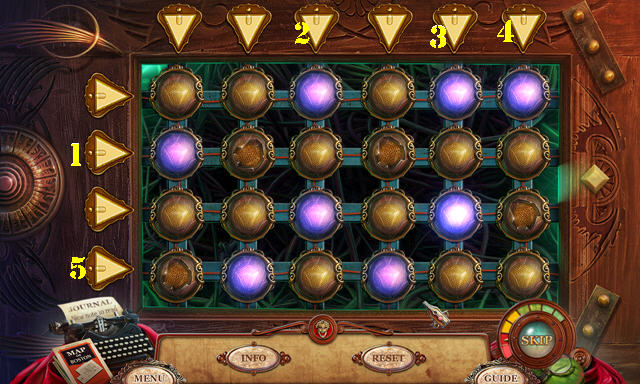
- Place the SAFE DIAL on the lock to activate a puzzle (E).
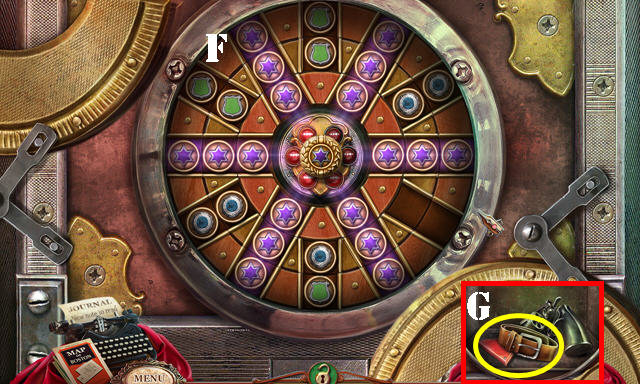
- Place the purple stars in the right spots by rotating the rings into place.
- Please look at the screenshot for the final image (F).
- Take the BELT and the PUZZLE PART 2/3 (G).
- Return to the Art Gallery.

- Place the BELT on the curtains (H) to activate a HOP.
- Play the HOP.
- You receive the FIREFIGHTER SYMBOL (I).
- Walk down twice.
- Place the FIREFIGHTER SYMBOL in the slot; take the POKER and the GLOVES (J).
- Go forward.
- Pull down the ladder with the POKER. Place LUCY on the ladder to get the FOUNTAIN PLATE (K).
- Place the FOUNTAIN PLATE on the fountain; take the PUZZLE PART 3/3 (L).
- Walk down.
- Place the 3 PUZZLE PARTS on the door to activate a puzzle (M).
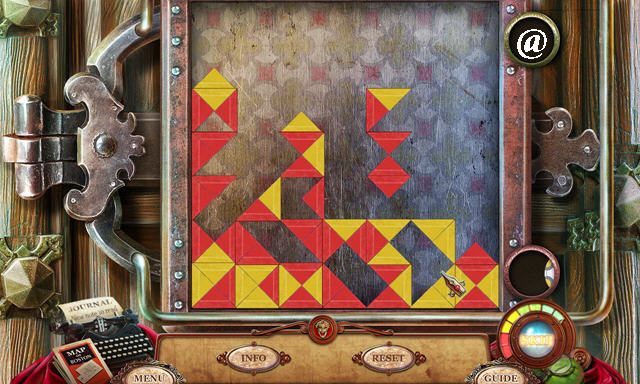
- Remove the fields of the same color in groups of four or more by rotating the pieces until you've eliminated enough red and yellow squares.
- Random solution (@).
- Enter Corey's House.
Chapter 4: Corey's House
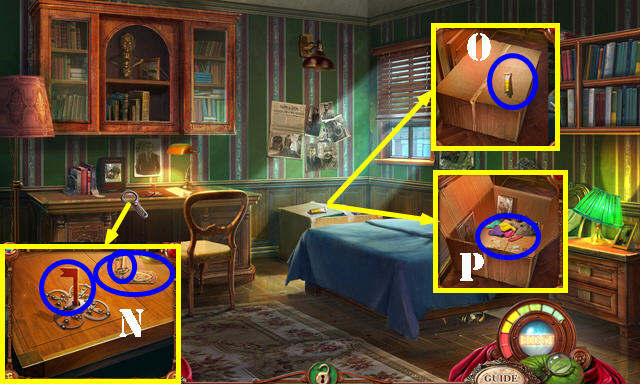
- Take the MAILBOX FLAG, TRUNK KEYS and Note (N).
- Take the PAINT TUBE 2/3 (O). Cut the box with the PENKNIFE and take the BALLOONS (P).
- Walk down.
- Use the TRUNK KEYS in the lock and turn the key; take the FOUNDER FIGURE 1/2 and the JACK (Q).
- Return to the Corey's House.
- Use the JACK under the bed to activate a HOP (R).
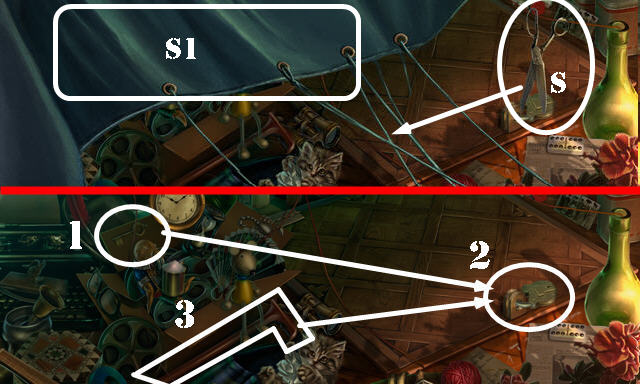
- Play the HOP.
- Cut the string with the scissors (S) and move the cover (S1).
- Use the key (1) in the lock (2) and use the cane on the door (3).
- Dip the spoon (4) in the powder (5). Place the powder in the brush (light blue).
- Take the 5 Prints (6).
- You receive the BOOK 2/3.
- Return to the Fountain.
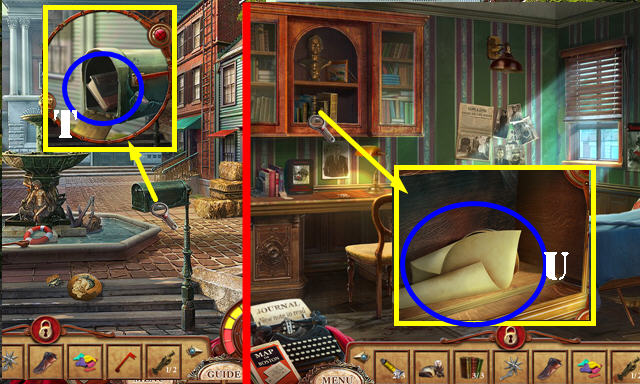
- Place the MAILBOX FLAG on the mailbox; take the BOOK 3/3 (T).
- Return to Corey's House.
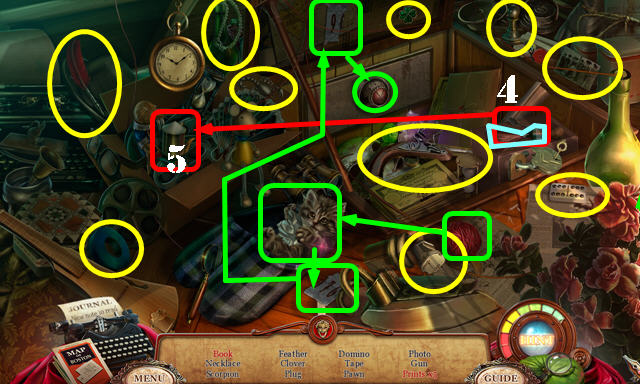
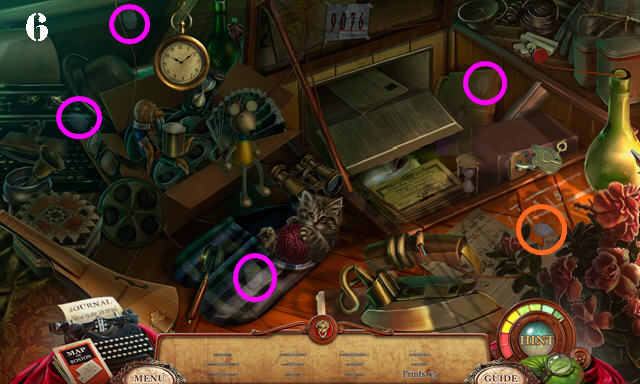
- Place the 3 BOOKS on the shelf; take the Note, PRESSURE GAUGE, and BULLET 3/6 (U).
- Walk down.
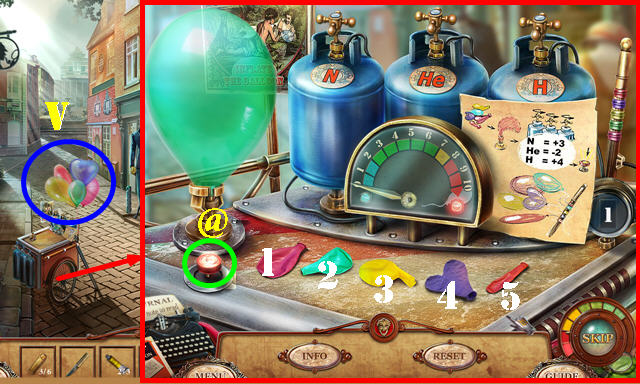
- Put down the BALLOONS and PRESSURE GAUGE to activate a puzzle. Inflate the balloons using the clue as a guide.
- Use the combinations below in the order shown and then press the button (@) after each combination has been entered.
- Red Balloon (5): N x3 and He x2.
- Purple Balloon (4): N x2.
- Yellow Balloon (3): N x1, and H.
- Green Balloon (2): Hx2.
- Pink Balloon (1): N x2, and H.
- Take the BALLOONS (V).
- Go Forward.
- Place the BALLOONS on the haystack (W).
- Go through the door to access the Artist's House (X).
- Talk to the artist; take the PACKAGE (A).
- Open the window and throw the PACKAGE out the window (B).
- Talk to the artist again.
- Take the CHAIN (C).
- Take the Note, CRYSTAL OWL, and ORANGE (D).
- Return to the Art Gallery.
- Place the CRYSTAL OWL next to the others; take the PAINT TUBE 3/3 (E).
- Walk down twice.
- Place the 3 PAINT TUBES on the PALETTE, then take it (F).
- Return to the Artist's House.

- Give the PALETTE to the artist and take the PAINTING (G).
- Return to the Art Gallery.
- Place the PAINTING in the frame and open the safe; take the BULLET 4/6, POLICE BADGE, and ACTOR'S MUSE (H).
- Return to the Police Station.
- Place the POLICE BADGE in the slot; take the CHAIN KEY and the HANDWRITING SAMPLE 1/4 (I).
- Return to the Fountain.
- Place the CHAIN on the bicycle and then use the CHAIN KEY on it (J).
- Go to the Science Block (K).
- Take the BULLET 5/6, PIN 1/2 and RABBIT HEAD (L). Look at the note (blue).
- Head left.
- Move the rug and take the STAR (M).
- Use LUCY in the tree hole to get the RABBIT 1/2 (N).
- Return to Corey's House.
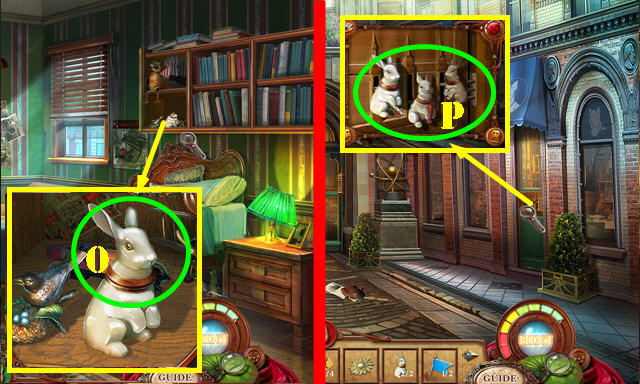
- Place the RABBIT HEAD on the statue; take the RABBIT 2/2 (O).
- Return to the Science Block.
- Place the 2 RABBITS on the door and enter the Gift Shop (P).
Chapter 5: Gift Shop
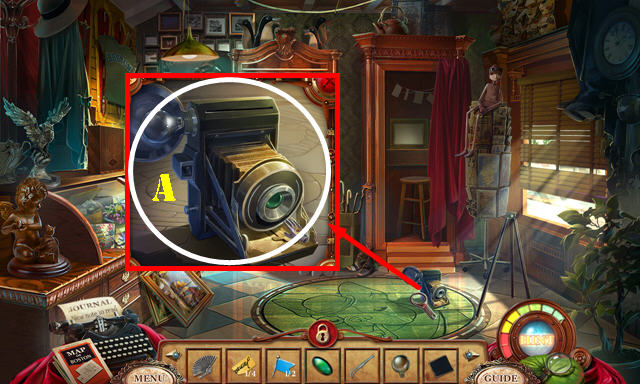
- Touch the camera (Q).
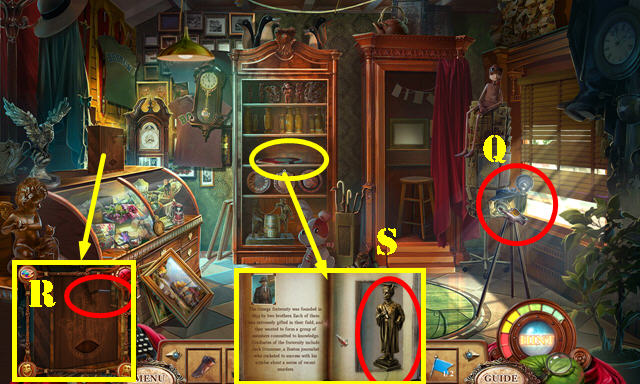
- Take the CORKSCREW (R).
- Place the STAR on the book; open it and take the FOUNDER FIGURE 2/2 (S).
- Return to the College.
- Place the 2 FOUNDER FIGURES on the book; take the FRATERNITY SYMBOL (T).
- Place the FRATERNITY SYMBOL in the slot (U); go through the door.
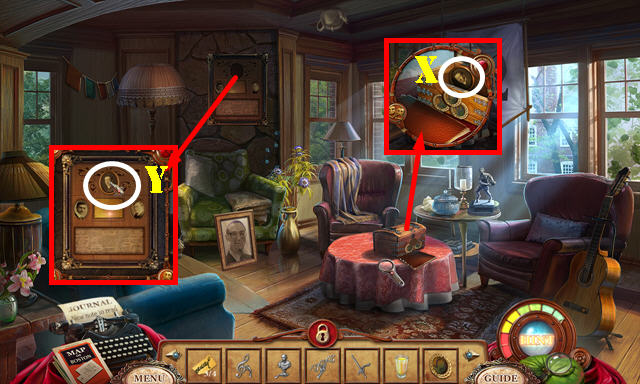
- Take the PHOTO LENS and TWEEZERS. Open the book (V).
- Touch the bulb; take the LIGHT BULB with the GLOVES (W).
- Return to the Artist's House.
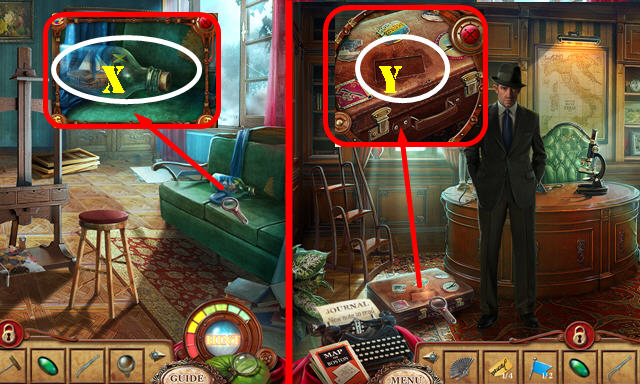
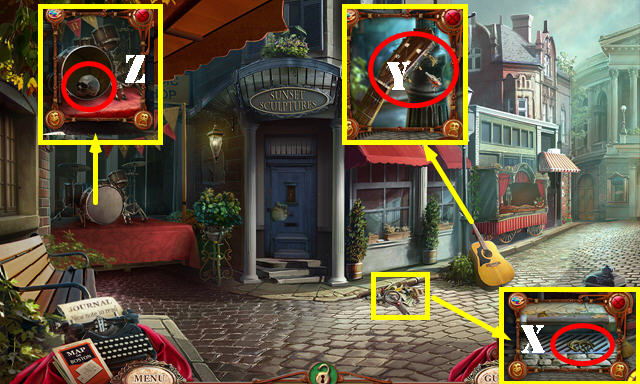
- Remove the cork with the CORKSCREW; use the TWEEZERS to get the JAMAICAN FLAG (X).
- Return to the Detective's Office.
- Place the JAMAICAN FLAG on the suitcase to activate a HOP (Y).

- Play the HOP.
- You receive the PHOTO PAPER (Z).
- Return to the Gift Shop.
- Place the LIGHT BULB, PHOTO LENS, and PHOTO PAPER in the camera; take the CAMERA (A).
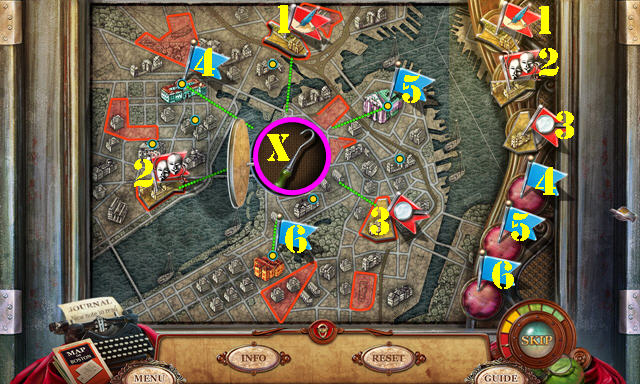
- Go to the Science Block. Use the CAMERA on the number 2 to get the UNDEVELOPED FILM 1/4 (B).
- Go to the College. Use the CAMERA on the number 4 to get the UNDEVELOPED FILM 2/4 (C).
- Return to the Fountain. Use the CAMERA on the number 6 to get the UNDEVELOPED FILM 3/4 (D).
- Return to the Art Block. Use the CAMERA on the number 3 to get the UNDEVELOPED FILM 4/4 (E).
- Return to the Gift Shop.
- Look at the clue (F).
- Put down the 4 UNDEVELOPED FILMS (G) and use the TWEEZERS on them; take the PHOTOS (H).
- Return to the Fraternity.
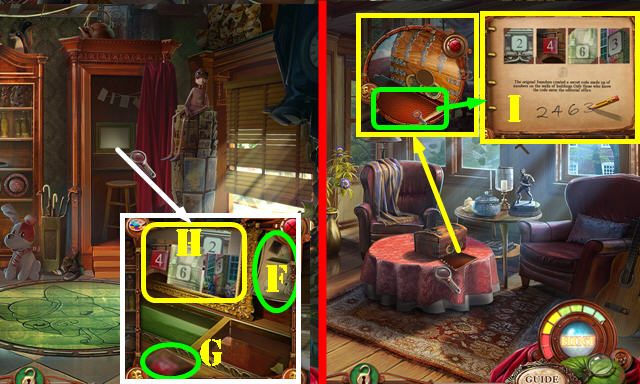
- Open the journal and flip the page. Place the PHOTOS on the page; touch the page and take the CODE (I).
- Walk down twice.
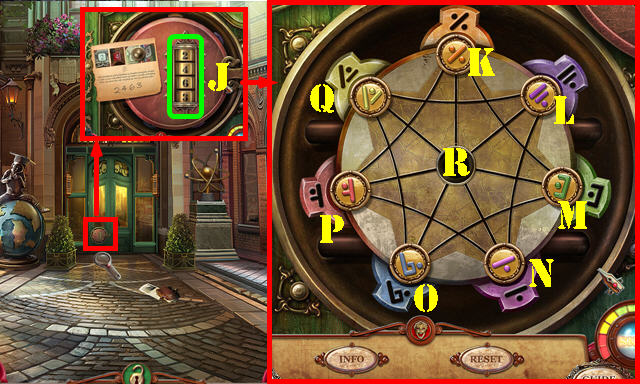
- Place the CODE on the door; enter 2463 on the tumblers to activate a puzzle (J).
- Place the chips in their matching slots.
- Solution: R-P, L-R, Q-L, O-Q, M-O, K-M, R-K, L-R, N-L, P-N, R-P, L-R, Q-L, O-Q, M-O, and R-M.
- Go through the door to access the Editorial Office.
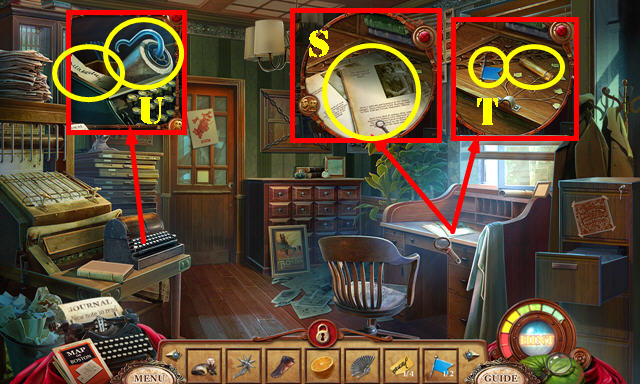
- Read the note (S), then take the PIN 2/2 and the BULLET 6/6 (T).
- Use the PENKNIFE on the typewriter; take the HANDWRITING SAMPLE 2/4 and the REEL (U).
- Return to the Police Station.
- Place the 6 BULLETS in the revolver; take the REVOLVER WITH BULLETS (V).
- Return to the Editorial Office.
- Use the REVOLVER WITH BULLETS on the chains (W). Open the door and place the 2 PINS on it to activate a puzzle.
- Place the pins in the right spots.
- Solution (1-6). Take the HOOK (X).
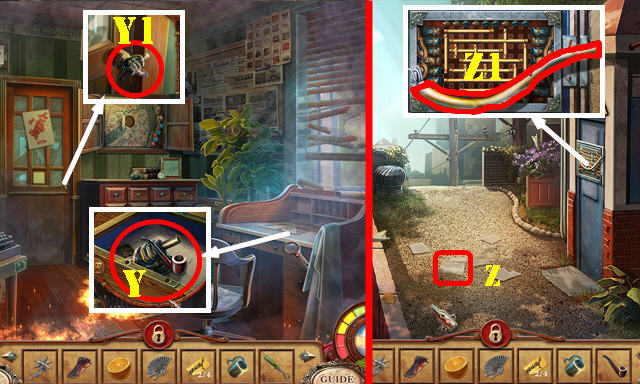
- Use the HOOK on the desk; take the SMOKING PIPE, DOOR HANDLE and Note (Y).
- Use the DOOR HANDLE on the door; go through the door to access the Roof (Y1).
- Take the Note (Z).
- Place the GLOVES on the wires to activate a puzzle (Z1).
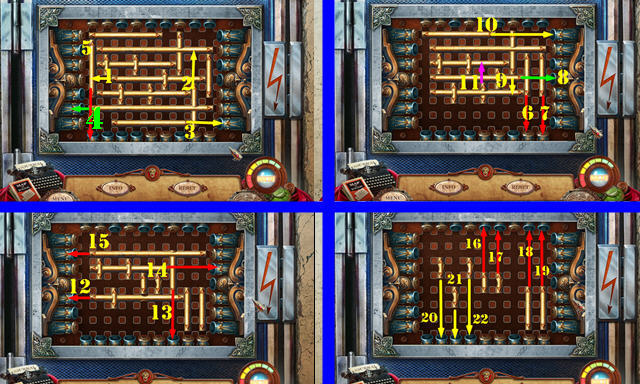
- Remove the metal bars in order (1-22).
- Solving the puzzle activates a HOP.
- Play the HOP.
- You receive the HANDLEBARS (A).
- Place the REEL on the wire and then place the HANDLEBAR on the on the reel (B). Push it and then go down to reach the Port Block.
Chapter 6 : Auction House
- Take the SHOVEL (C), VASE (D) and the 2 Notes (E).
- Give the SMOKING PIPE to the statue (F); take the AUCTION-HOUSE KEY (G).
- Use the AUCTION-HOUSE KEY in the lock (H); turn the key and enter the Auction House.
- Use LUCY under the chair to get the SEXTANT KNOB (I).
- Take the CLOCK HANDS and COGWHEEL; look at the book (J).
- Take the Note and GLASS (K).
- Walk down.
- Place the CLOCK HANDS on the clock; take the SUN (L).
- Place the SEXTANT KNOB in the slot (M); take the BRIDGE KEY (N).
- Place the BRIDGE KEY and then the COGWHEEL on the mechanism to activate a puzzle (O).
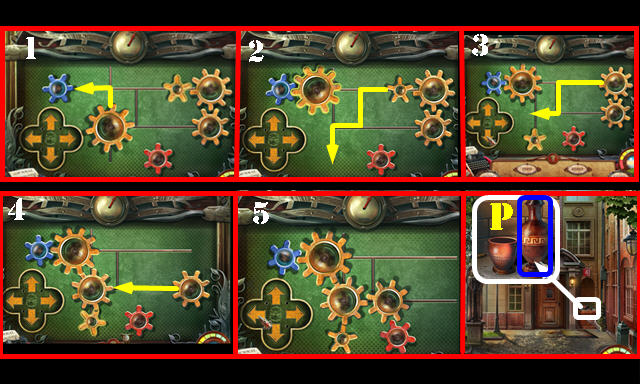
- Position the gears as shown (1-5) Select the gear first and then select the arrows. Position 5 shows the final image.
- Cross the bridge to arrive at the College.
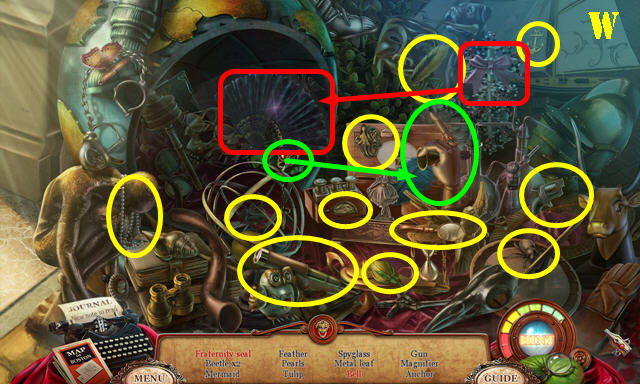
- Put down the VASE to activate a HOP (P).
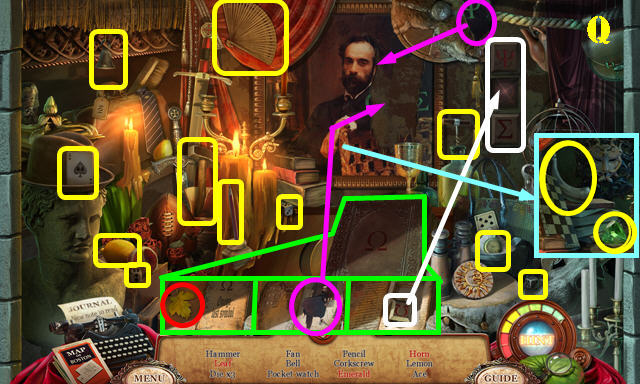
- Play the HOP.
- Move the curtain in the upper right.
- Open the book (green) and flip the pages. Place the items in the areas shown.
- Place the Omega sign in the slot (white) and then press the blocks in the order that appears on the completed picture (purple).
- You receive the HAMMER (Q).
- Return to Port Block.
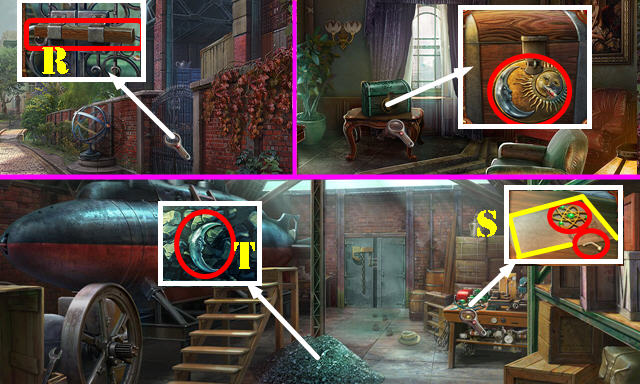
- Use the HAMMER on the block (R) and then go through the gate.
- Remove the debris; take the ATOMIC SYMBOL and PURSE CLASP (S).
- Use the SHOVEL on the coal; take the MOON (T).
- Return to the Auction House.
- Place the SUN and MOON in the slots and open the latch to activate a HOP (U).
- Play the HOP.
- You receive the ANCHOR SIGN (A).
- Return to the Warehouse.
- Remove the broken anchor and place the ANCHOR SIGN on the chain (B).
- Go down to the Cellar.
- Take the VALVE (C), HANDSAW (D), HANDWRITING SAMPLE 3/4 (E), RUGBY BALL (F) and OILER (G).
- Cut the bar with the HANDSAW; open the door and go through it (H).
- Place the VALVE on the door (I). Turn it to activate a HOP.
- Play the HOP.
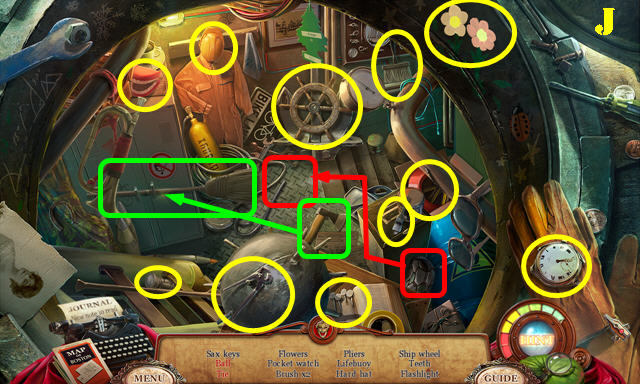
- You receive the SAX KEYS (J).
- Return to the Auction House.
- Place the SAX KEYS on the sax; take the MUSICIAN'S MUSE (K).
- Return to the Fraternity.
- Place the RUGBY BALL on the statue (L); take the SCULPTOR'S MUSE (M).
- Walk down twice.
- Place the PURSE CLASP on the purse; take the DIAMOND RING (N).
- Place the ATOMIC SYMBOL on the model; take the SCIENTIST'S MUSE (O).
- Return to the Artist's Studio.
- Use the DIAMOND RING on the glass; take the ARTIST'S MUSE (P).
- Return to the Detective's Office.
Chapter 7: The Finale
- Place the ORANGE in the juicer (Q) and put down the GLASS. Press the handle (yellow) and take the ORANGE JUICE (R).
- Return to the Gift Shop.
- Use the OILER on the gear to activate a HOP (S).
- Play the HOP.
- You receive the ALARM CLOCK (T).
- Return to the College.
- Use the ALARM CLOCK on the owl; take the CONTINENT PIECE (U).
- Walk down.
- Place the CONTINENT PIECE on the globe to activate a HOP (V).
- Play the HOP.
- You receive the GREEK SYMBOL (W).
- Return to the Fraternity.
- Put the GREEK SYMBOL in the slot; take the PHOTO OF FRATERNITY FOUNDER (X).
- Place the PHOTO OF FRATERNITY FOUNDER in the slot to activate a HOP (Y).
- Play the HOP.
- You receive the RHOMBUS RING (Z).
- Return to Corey's House.
- Place the RHOMBUS RING in the slot; take the GIFT-BOX KEY and the HANDWRITING SAMPLE 4/4 (A).
- Return to the Gift Shop.
- Place the GIFT-BOX KEY in the slot; take the GLOWING LIQUID (B).
- Return to the Detective's Office.
- Place the 4 HANDWRITING SAMPLES in the slot to activate a puzzle (C).
- Adjust the knob until each sample matches the top example (1-4).
- Take the WRITER'S MUSE.
- Return to the Cellar.
- From left to right, place the items in this order: WRITER'S MUSE, ARTIST'S MUSE, ACTOR'S MUSE, EXPLORER'S MUSE, SCIENTIST'S MUSE, MUSICIAN'S MUSE, and SCULPTOR'S MUSE (H) to activate a puzzle.
- Swap the images as shown (I).
- Drag all the items marked in red into the areas numbered in yellow (1-10).
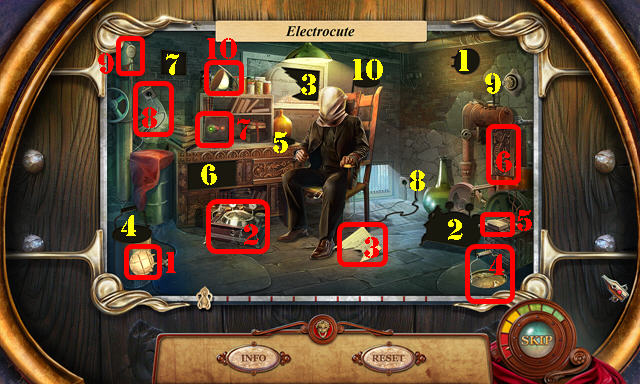
- Enter the Execution Site.
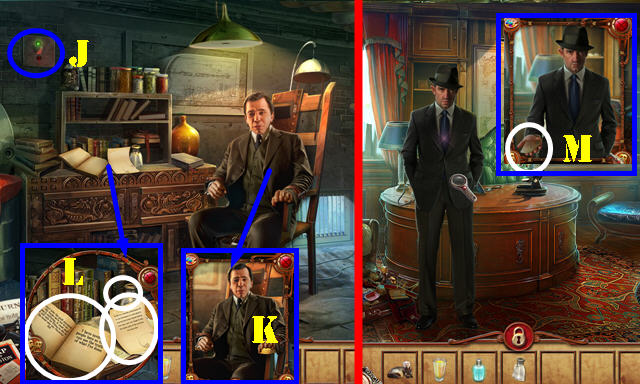
- Turn on the switch (J).
- Talk to Russell (K).
- Take the Note and the CLEAR LIQUID, then look at the Book (L).
- Return to the Detective's Office.
- Talk to the Detective; take the RECIPE (M).
- Return to the Artist's House.
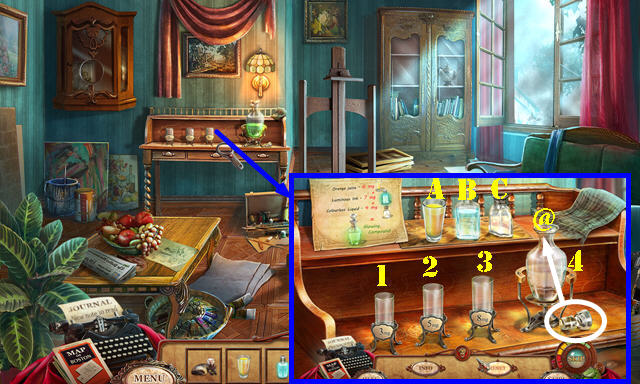
- Put down the ORANGE JUICE, GLOWING LIQUID, RECIPE and CLEAR LIQUID.
- Solution One: A-3, 3-2, A-1, 1-3, 3-4.
- Solution Two: B-2, 2-3, B-2, 2-1, 2-3, 3-4.
- Solution Three: C-2, 2-1, 2-3, 1-C, C-2, 2-1, 2-3, 3-4.
- Place the stopper on the flask, and take the GLOWING COMPOUND (@).
- Return to the Cellar.
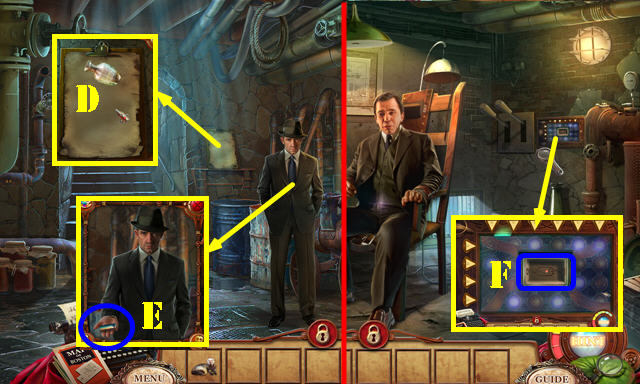
- Place the GLOWING COMPOUND on the paper (D).
- Talk to the Detective and take the TRANSISTOR (E).
- Return to the Execution Site.
- Place the TRANSISTOR in the slot to activate a puzzle (F).
- Turn off all the lamps by selecting them in this order: (1-5).
- Congratulations, you have completed Punished Talents: Seven Muses!
Created at: 2013-12-15