

Walkthrough Menu
- General Tips
- Chapter 1: A Kidnapping
- Chapter 2: Mansion Raniel
- Chapter 3: Finding Jason
- Chapter 4: Mirror World
General Tips
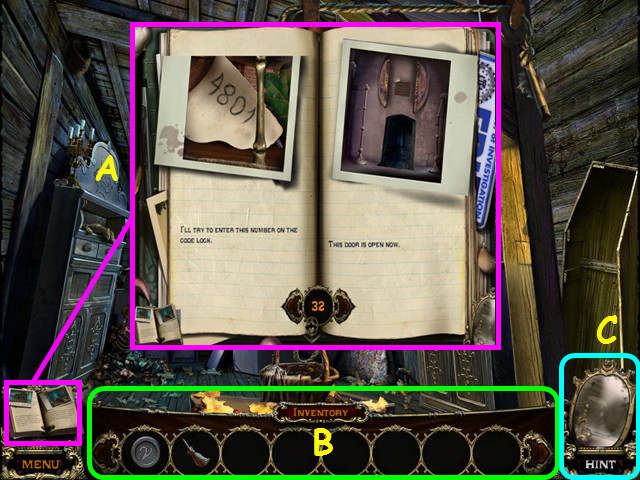 • Read your journal for important clues that you have found
(A). • Your inventory (B) is located in the lower panel –
select an item to use it. • The panel auto-hides, so move your
mouse towards the bottom of the scene to reveal the panel. •
Hints are unlimited, but you must wait for the meter to refill
(C). • Hidden Object Scenes and mini-games are often
randomized - your solution may vary. • Hidden Object Scenes
will be referred to as HOS in this walkthrough. • Hidden
Object items listed in yellow are hidden or require additional
steps.
• Read your journal for important clues that you have found
(A). • Your inventory (B) is located in the lower panel –
select an item to use it. • The panel auto-hides, so move your
mouse towards the bottom of the scene to reveal the panel. •
Hints are unlimited, but you must wait for the meter to refill
(C). • Hidden Object Scenes and mini-games are often
randomized - your solution may vary. • Hidden Object Scenes
will be referred to as HOS in this walkthrough. • Hidden
Object items listed in yellow are hidden or require additional
steps.
Chapter 1: A Kidnapping
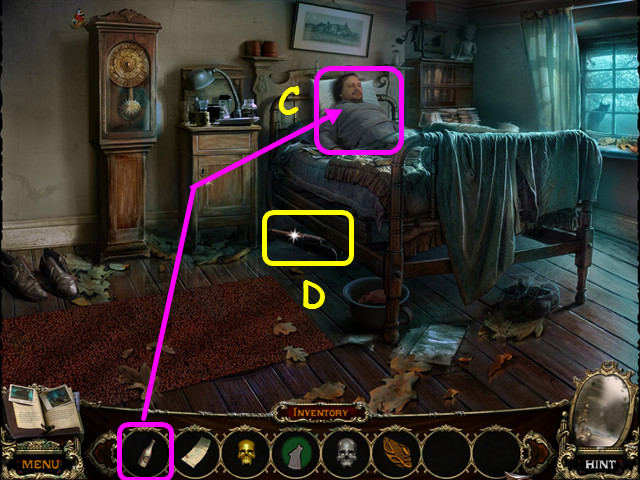
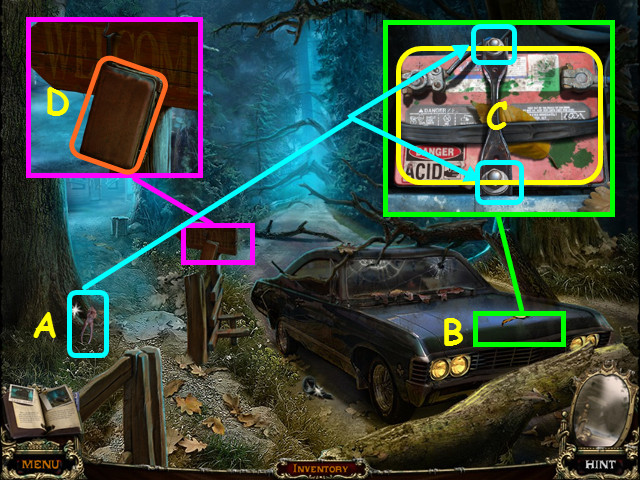 • You will have the option of a brief tutorial. • Zoom in and
take the PLIERS (A). • Open the hood, then look inside (B). •
Use the PLIERS on the 2 bolts, then take the BATTERY WITH ACID
(C). • Zoom into the sign and open the case for a mini-game
(D).
• You will have the option of a brief tutorial. • Zoom in and
take the PLIERS (A). • Open the hood, then look inside (B). •
Use the PLIERS on the 2 bolts, then take the BATTERY WITH ACID
(C). • Zoom into the sign and open the case for a mini-game
(D).
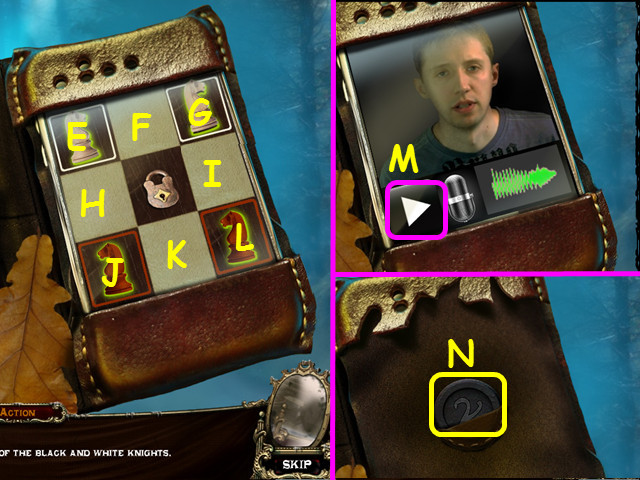 • Swap the positions of the black and white knights. • Move
the pieces in this sequence: E-I, J-F, I-J, L-H, G-K, H-G,
K-E, F-L, L-H, G-K, H-G, E-I, K-E, J-F, F-L, and I-J. • Listen
to the recordings (M). • Take the 1/3 SYMBOL (N). • Walk
forward down the path on the left.
• Swap the positions of the black and white knights. • Move
the pieces in this sequence: E-I, J-F, I-J, L-H, G-K, H-G,
K-E, F-L, L-H, G-K, H-G, E-I, K-E, J-F, F-L, and I-J. • Listen
to the recordings (M). • Take the 1/3 SYMBOL (N). • Walk
forward down the path on the left.
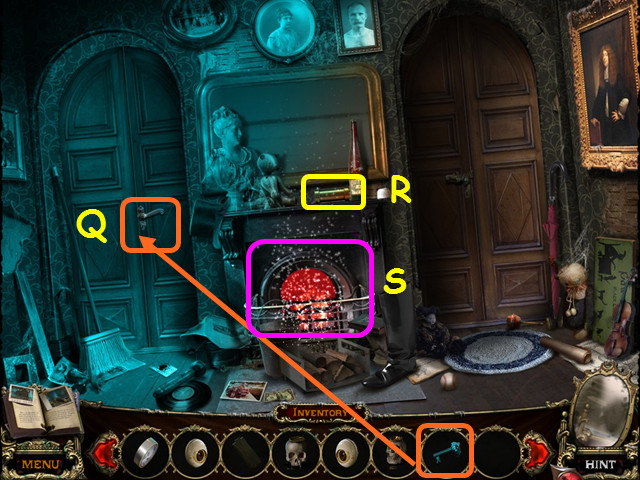
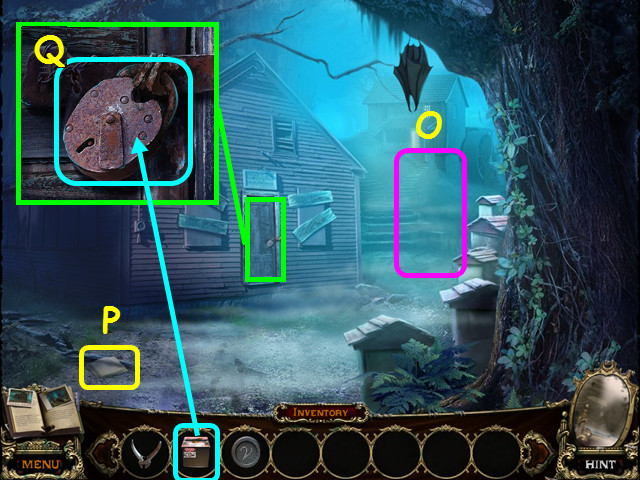 • Note the path (O). • Take the RAG (P). • Look at the door
and use the BATTERY WITH ACID on the lock (Q). • Walk down.
• Note the path (O). • Take the RAG (P). • Look at the door
and use the BATTERY WITH ACID on the lock (Q). • Walk down.
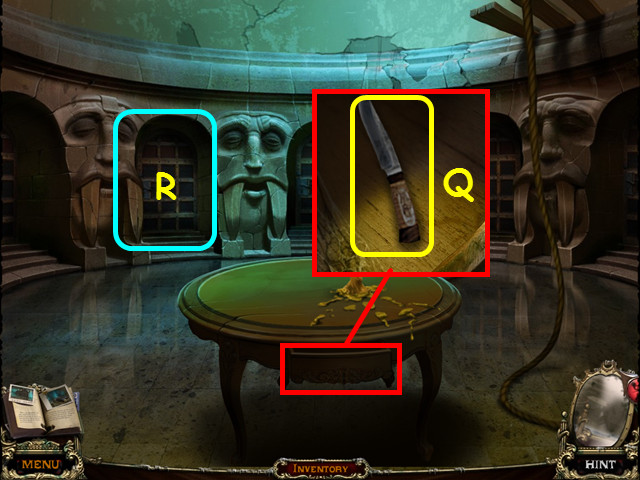
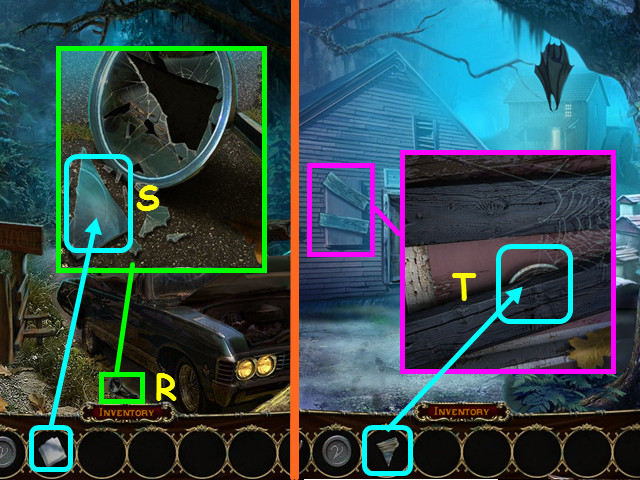 • Look at the broken mirror (R). • Use the RAG to take the
MIRROR SHARD (S). • Walk forward. • Look at the window; use
the MIRROR SHARD to loosen, then take the 2/3 SYMBOL (T). •
Enter the shed.
• Look at the broken mirror (R). • Use the RAG to take the
MIRROR SHARD (S). • Walk forward. • Look at the window; use
the MIRROR SHARD to loosen, then take the 2/3 SYMBOL (T). •
Enter the shed.
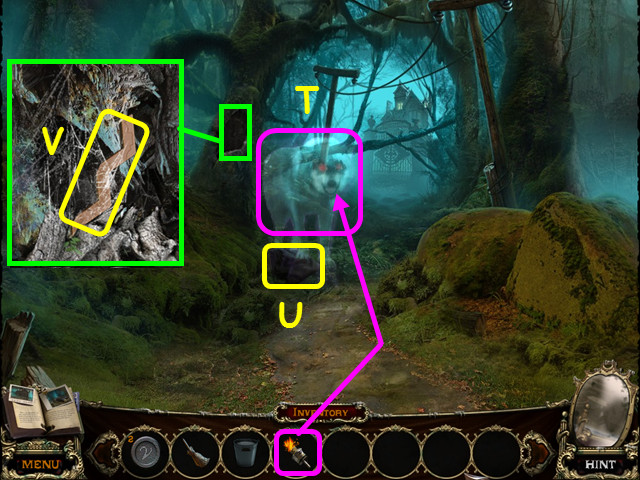
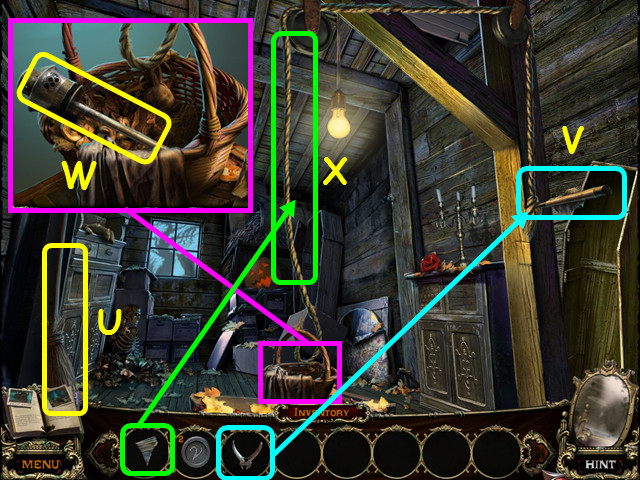 • Take the BROOM (U). • Zoom in and use the PLIERS on the
crossbow bolt (V). • Look in the basket and take the TORCH
(W). • Use the MIRROR SHARD to cut the rope, then take the
ROPE WITH BOLT (X). • Walk down to exit the shed, then go
forward on the path on the right.
• Take the BROOM (U). • Zoom in and use the PLIERS on the
crossbow bolt (V). • Look in the basket and take the TORCH
(W). • Use the MIRROR SHARD to cut the rope, then take the
ROPE WITH BOLT (X). • Walk down to exit the shed, then go
forward on the path on the right.
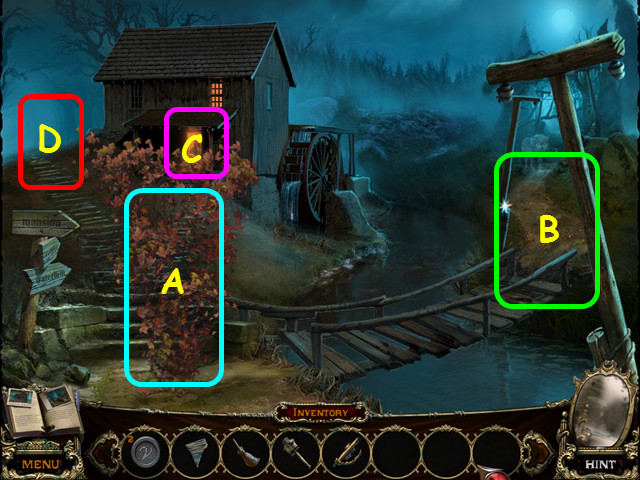 • Touch the swirling leaves to make them disappear (A). • Try
to walk across the bridge (B). • Note the entrance to the
watermill (C). • Walk on the left path (D). • Select the area
to the right of the gate for a HOS.
• Touch the swirling leaves to make them disappear (A). • Try
to walk across the bridge (B). • Note the entrance to the
watermill (C). • Walk on the left path (D). • Select the area
to the right of the gate for a HOS.
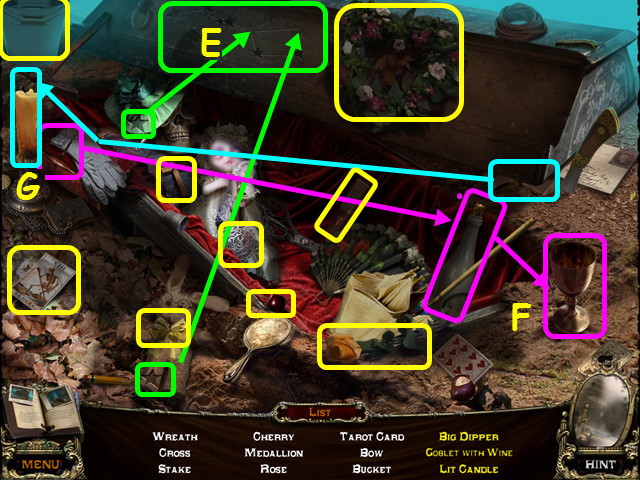 • Locate all the items on the list. • Move the 2 stars to
complete the Big Dipper (E). • Use the corkscrew to open the
bottle, then pour it to make the Goblet with Wine (F). • Use
the lighter to make the Lit Candle (G). • You will earn the
BUCKET. • Walk down once, then enter the watermill.
• Locate all the items on the list. • Move the 2 stars to
complete the Big Dipper (E). • Use the corkscrew to open the
bottle, then pour it to make the Goblet with Wine (F). • Use
the lighter to make the Lit Candle (G). • You will earn the
BUCKET. • Walk down once, then enter the watermill.
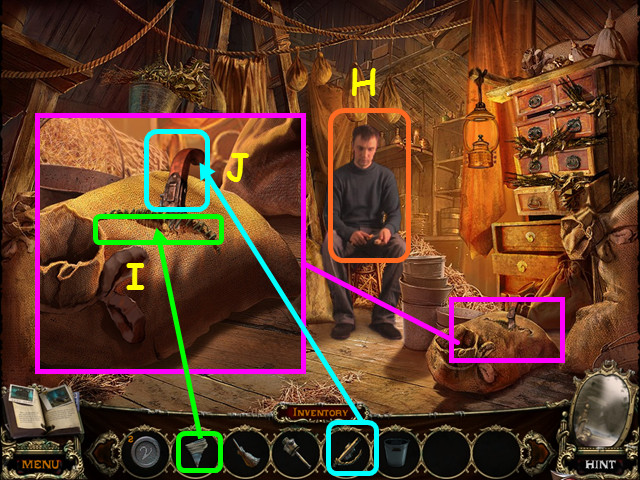 • Talk to the strange guy (H). • Look at the sack and use the
MIRROR SHARD on the seam (I). • Use the ROPE WITH BOLT on it,
then take the CROSSBOW (J). • Walk down once.
• Talk to the strange guy (H). • Look at the sack and use the
MIRROR SHARD on the seam (I). • Use the ROPE WITH BOLT on it,
then take the CROSSBOW (J). • Walk down once.
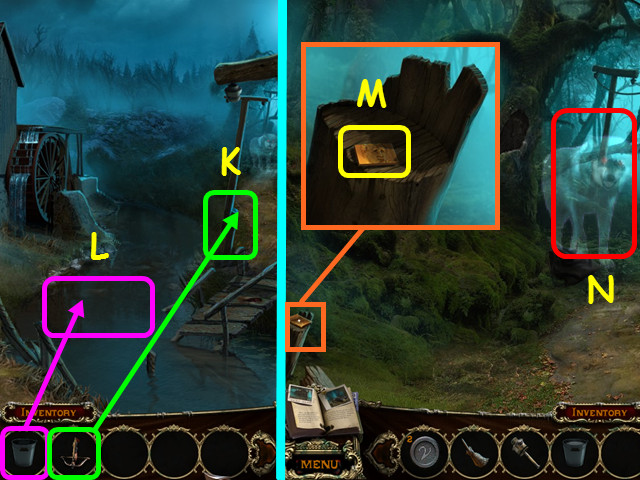 • Use the CROSSBOW on the pole (K). • Use the BUCKET on the
water to get the BUCKET WITH WATER (L). • Walk to the right. •
Look at the post and take the LAMP FRAGMENT (M). • Note the
ghost wolf (N). • Walk down, then enter the watermill.
• Use the CROSSBOW on the pole (K). • Use the BUCKET on the
water to get the BUCKET WITH WATER (L). • Walk to the right. •
Look at the post and take the LAMP FRAGMENT (M). • Note the
ghost wolf (N). • Walk down, then enter the watermill.
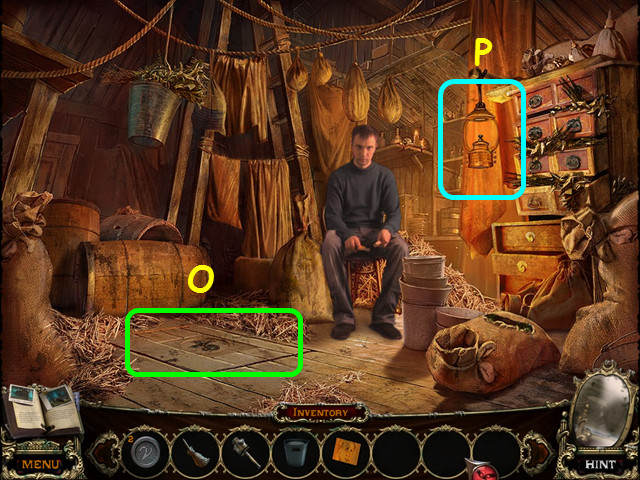 • Note the trapdoor (O). • Look at the lamp for a mini-game
(P).
• Note the trapdoor (O). • Look at the lamp for a mini-game
(P).
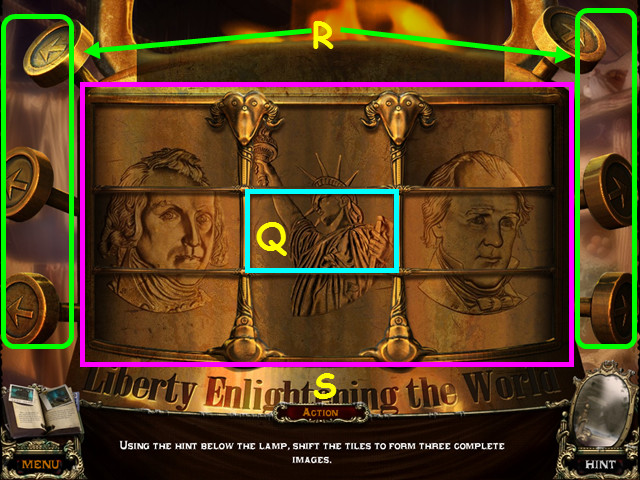 • Place the LAMP FRAGMENT in the center space to activate the
mini-game (Q). • Press the buttons (R) to move the tiles to
the shown solution (S). • Use the TORCH on the lamp to get the
LIT TORCH. • Walk down, then go to the right.
• Place the LAMP FRAGMENT in the center space to activate the
mini-game (Q). • Press the buttons (R) to move the tiles to
the shown solution (S). • Use the TORCH on the lamp to get the
LIT TORCH. • Walk down, then go to the right.
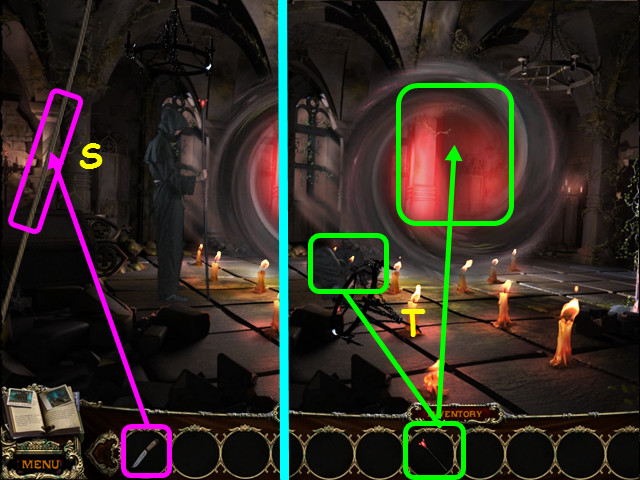
 • Use the LIT TORCH on the ghost wolf (T). • Take the BAG (U).
• Look at the tree hollow and take the HONEYCOMB PIECE (V). •
Walk forward.
• Use the LIT TORCH on the ghost wolf (T). • Take the BAG (U).
• Look at the tree hollow and take the HONEYCOMB PIECE (V). •
Walk forward.
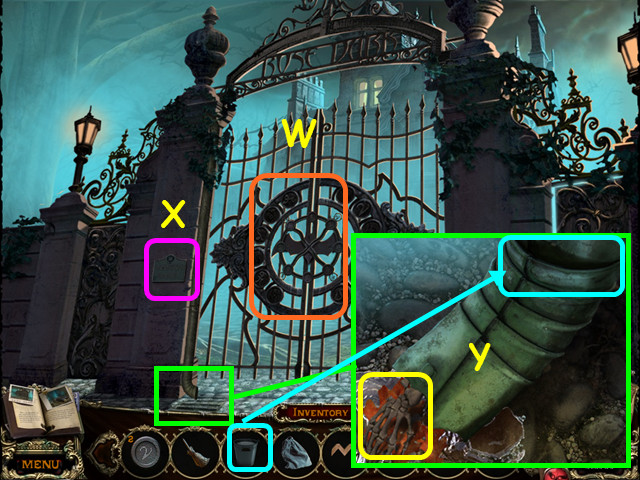 • Note the mini-game on the gate (W). • Read the plaque (X). •
Look at the drain; pour the BUCKET WITH WATER, then take the
HAND (Y). • Walk down 3 times, then enter the shed.
• Note the mini-game on the gate (W). • Read the plaque (X). •
Look at the drain; pour the BUCKET WITH WATER, then take the
HAND (Y). • Walk down 3 times, then enter the shed.
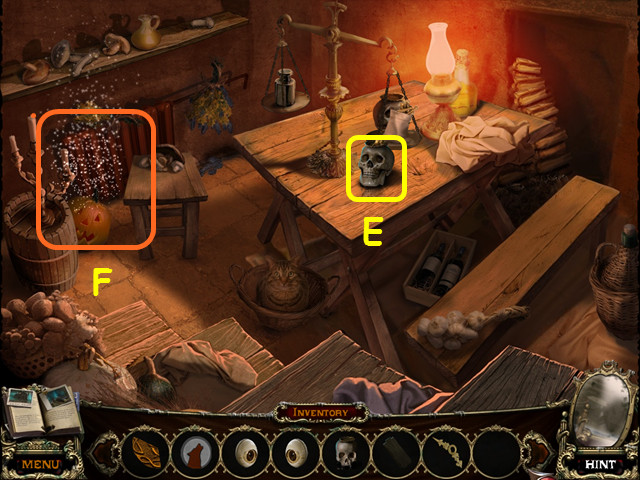
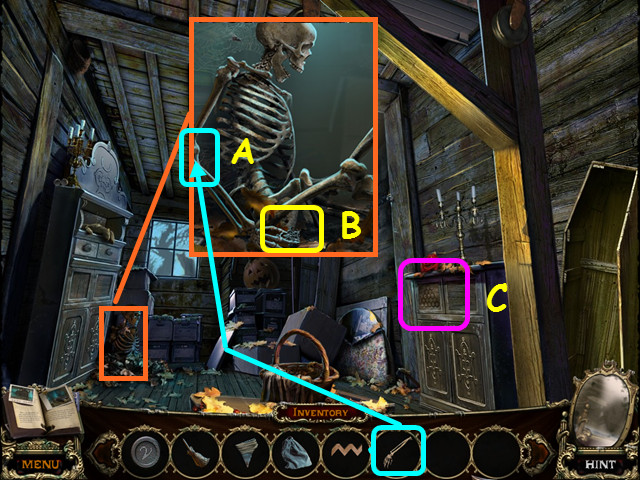 • Look at the skeleton and place the HAND on the arm (A). •
Take the PATTERNED KEY (B). • Look at the cabinet for a
mini-game (C).
• Look at the skeleton and place the HAND on the arm (A). •
Take the PATTERNED KEY (B). • Look at the cabinet for a
mini-game (C).
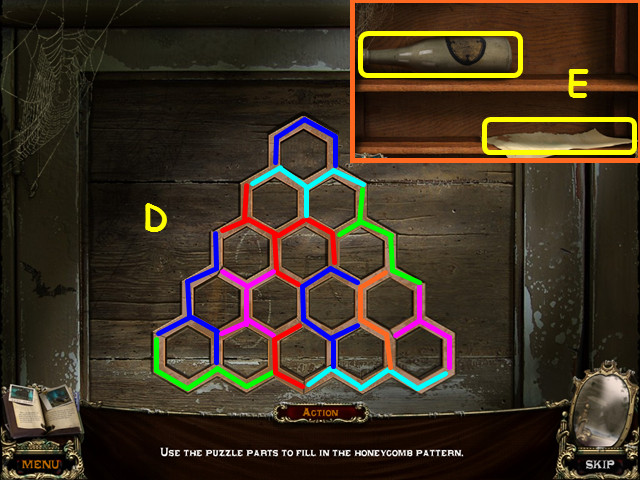 • Place the HONEYCOMB PIECE on the board to trigger the
mini-game. • Use the pieces to fill in the honeycomb pattern
(D). • Take the FERMENTED JUICE and the LETTER PIECE (E). •
Walk down to exit the shed; go forward, then enter the
watermill.
• Place the HONEYCOMB PIECE on the board to trigger the
mini-game. • Use the pieces to fill in the honeycomb pattern
(D). • Take the FERMENTED JUICE and the LETTER PIECE (E). •
Walk down to exit the shed; go forward, then enter the
watermill.
 • Give the BAG to the strange man and he will give you the 1st
SKULL (F). • Look at the trapdoor and place the PATTERNED KEY
into the niche (G). • Enter the trapdoor.
• Give the BAG to the strange man and he will give you the 1st
SKULL (F). • Look at the trapdoor and place the PATTERNED KEY
into the niche (G). • Enter the trapdoor.
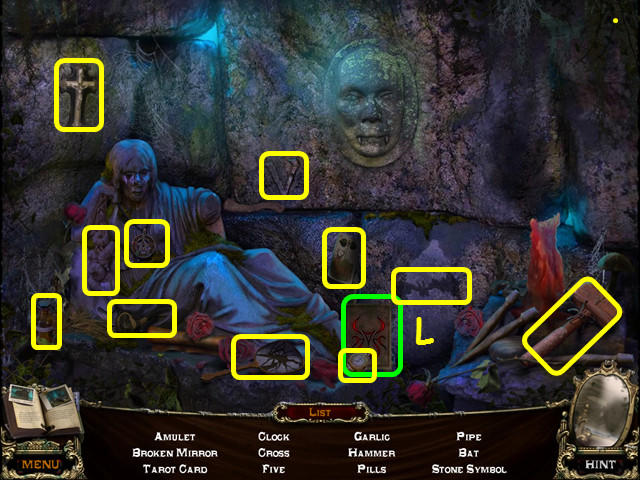
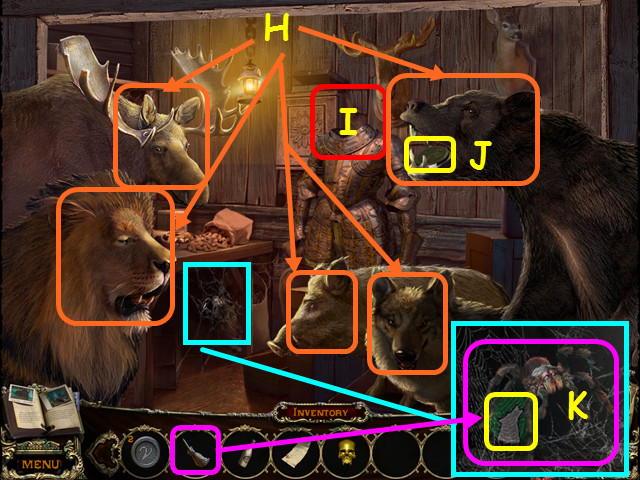 • Move the animal heads to the correct bodies (H). • You can
place one head on the armor temporarily (I). • Take the 3/3
SYMBOL from the bear's mouth (J). • Look under the table; use
the broom on the cobwebs and take the 1st WOLF COIN (K). •
Walk down twice, then go to the right. • Select the rocks on
the right for a HOS.
• Move the animal heads to the correct bodies (H). • You can
place one head on the armor temporarily (I). • Take the 3/3
SYMBOL from the bear's mouth (J). • Look under the table; use
the broom on the cobwebs and take the 1st WOLF COIN (K). •
Walk down twice, then go to the right. • Select the rocks on
the right for a HOS.
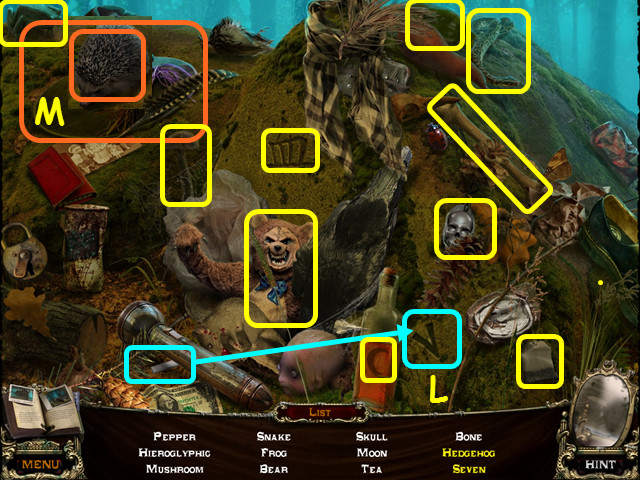 • Locate all the items on the list. • Use the chalk twice on
the V to make Seven (L). • Remove the hat to find the Hedgehog
(M). • You will earn the 2nd SKULL. • Walk forward and look at
the gate for a mini-game.
• Locate all the items on the list. • Use the chalk twice on
the V to make Seven (L). • Remove the hat to find the Hedgehog
(M). • You will earn the 2nd SKULL. • Walk forward and look at
the gate for a mini-game.
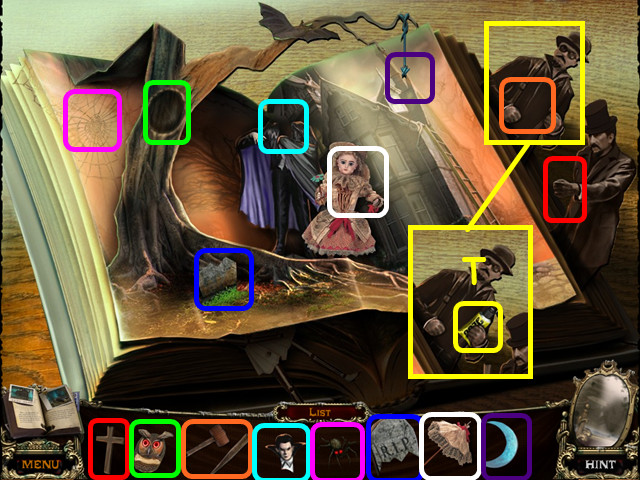
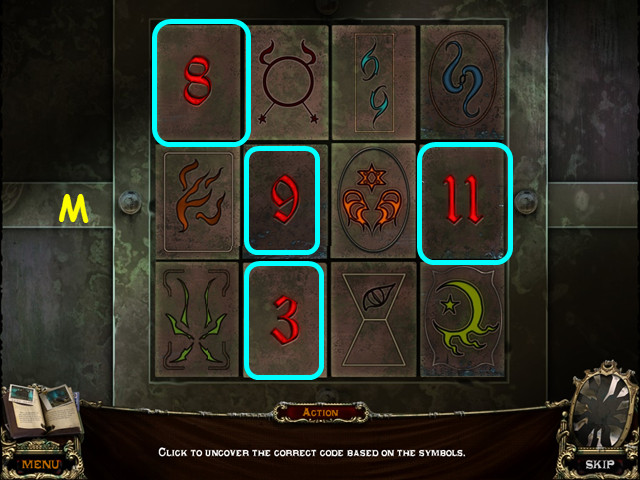
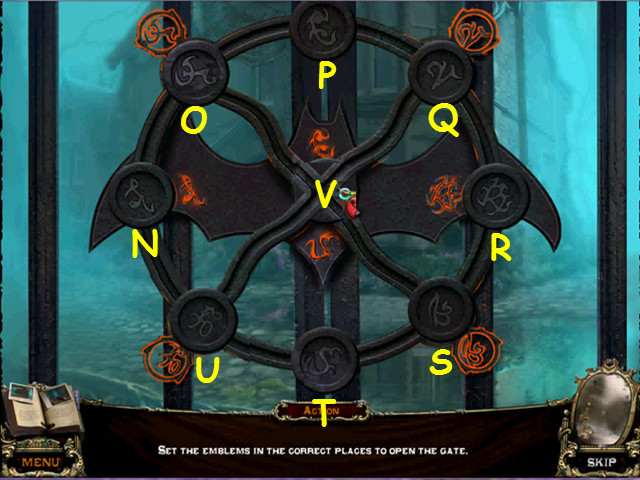 • Place the 3 SYMBOLS on the wheel to trigger the mini-game. •
Slide the symbol disks to the positions with matching symbols.
• Select the discs in this order:
Q-P-O-N-U-V-Q-R-S-T-U-V-O-N-U-T-S-R-Q-P-O-N-U-V-O-P-Q-R-S-T-U-V.
• The symbols will light up when the disks are in the correct
position.
• Place the 3 SYMBOLS on the wheel to trigger the mini-game. •
Slide the symbol disks to the positions with matching symbols.
• Select the discs in this order:
Q-P-O-N-U-V-Q-R-S-T-U-V-O-N-U-T-S-R-Q-P-O-N-U-V-O-P-Q-R-S-T-U-V.
• The symbols will light up when the disks are in the correct
position.
Chapter 2: Mansion Raniel
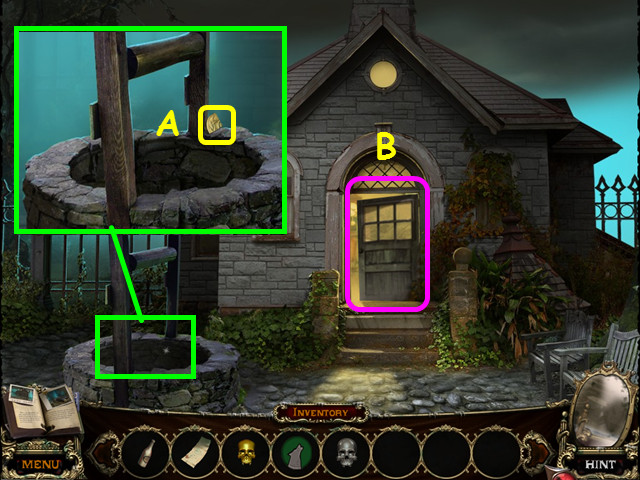 • Enter the gates and walk left towards the well. • Look at
the well and take the SYMBOL (A). • Pull down the door, then
enter the cottage (B).
• Enter the gates and walk left towards the well. • Look at
the well and take the SYMBOL (A). • Pull down the door, then
enter the cottage (B).
 • Use the FERMENTED JUICE on the wounded guard (C). • Take the
HAND RAKE (D). • Walk down. • Select the bench on the right
for a HOS.
• Use the FERMENTED JUICE on the wounded guard (C). • Take the
HAND RAKE (D). • Walk down. • Select the bench on the right
for a HOS.
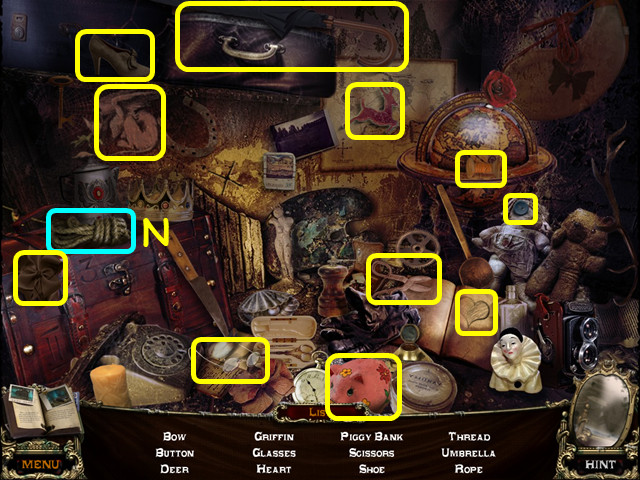
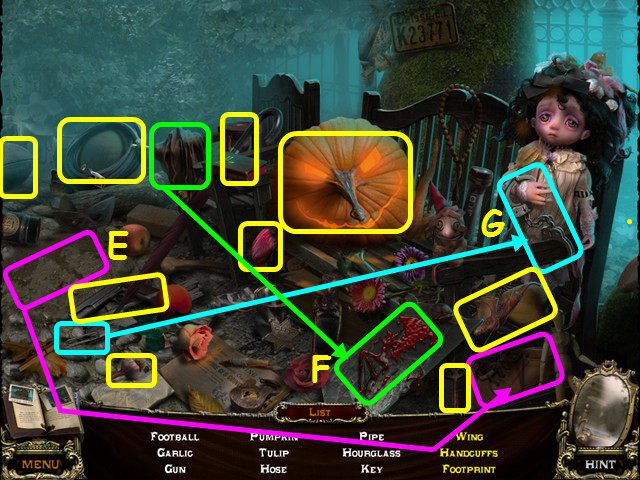 • Locate all the items on the list. • Use the shoe on the dirt
to make the Footprint (E). • Use the rag on the paint to find
the Wing (F). • Use the paperclip on the cuffs to get the
Handcuffs (G). • You will earn the KEY. • Enter the cottage.
• Locate all the items on the list. • Use the shoe on the dirt
to make the Footprint (E). • Use the rag on the paint to find
the Wing (F). • Use the paperclip on the cuffs to get the
Handcuffs (G). • You will earn the KEY. • Enter the cottage.
 • Look at the cabinet and use the KEY in the lock (H). • Take
the BANDAGE and the TAPE (I). • Use the BANDAGE on the injured
guard and he will give you the 3rd SKULL (J). • Walk down
twice.
• Look at the cabinet and use the KEY in the lock (H). • Take
the BANDAGE and the TAPE (I). • Use the BANDAGE on the injured
guard and he will give you the 3rd SKULL (J). • Walk down
twice.
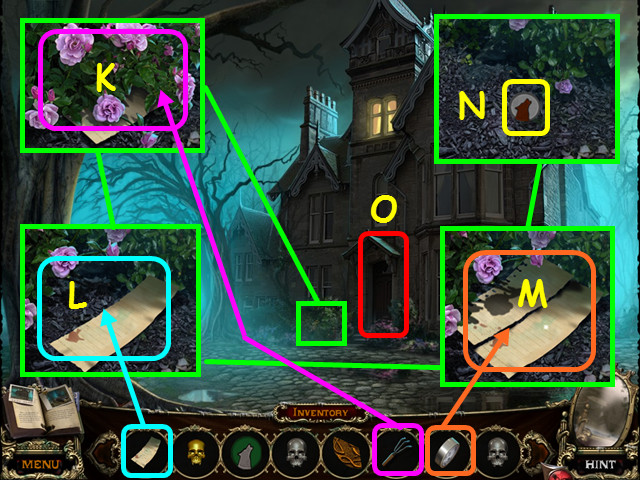 • Look in the bushes and use the HAND RAKE to move aside the
flowers (K). • Place the LETTER PIECE next to the piece on the
ground (L). • Use the TAPE on the torn letter (M). • Take the
2nd WOLF COIN (N). • Look at the front door for a mini-game
(O).
• Look in the bushes and use the HAND RAKE to move aside the
flowers (K). • Place the LETTER PIECE next to the piece on the
ground (L). • Use the TAPE on the torn letter (M). • Take the
2nd WOLF COIN (N). • Look at the front door for a mini-game
(O).
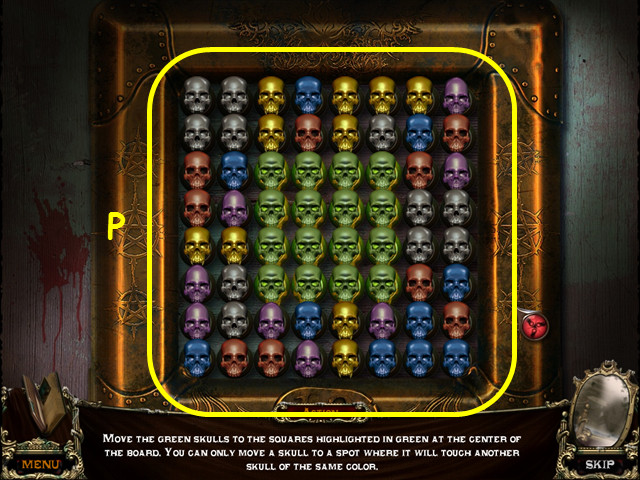 • Place the 3 SKULLS onto the grid to activate the mini-game.
• Move the green skulls to the center square area as shown in
the screenshot (P). • Select 2 adjacent skulls to swap
positions, one of the skulls must move to a spot where it is
touching a skull of the same color. • This mini-game is
randomly generated; your solution may vary.
• Enter the mansion.
• Place the 3 SKULLS onto the grid to activate the mini-game.
• Move the green skulls to the center square area as shown in
the screenshot (P). • Select 2 adjacent skulls to swap
positions, one of the skulls must move to a spot where it is
touching a skull of the same color. • This mini-game is
randomly generated; your solution may vary.
• Enter the mansion.
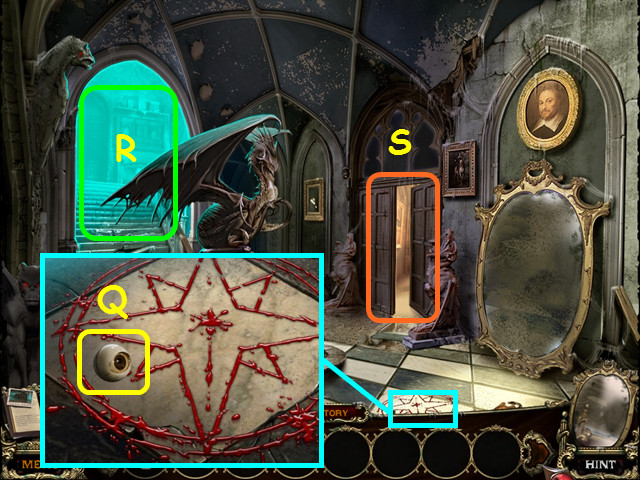 • Look at the ritual symbol and take the 1st GLASS EYE (Q). •
Note the stairs on the left (R). • Enter the doors on the
right (S), then walk right to the greenhouse.
• Look at the ritual symbol and take the 1st GLASS EYE (Q). •
Note the stairs on the left (R). • Enter the doors on the
right (S), then walk right to the greenhouse.
 • Look at the barrel and take the EYE (T). • Look at the
skeleton and take the 1st SKULL (U). • Select the back area
for a HOS (V).
• Look at the barrel and take the EYE (T). • Look at the
skeleton and take the 1st SKULL (U). • Select the back area
for a HOS (V).
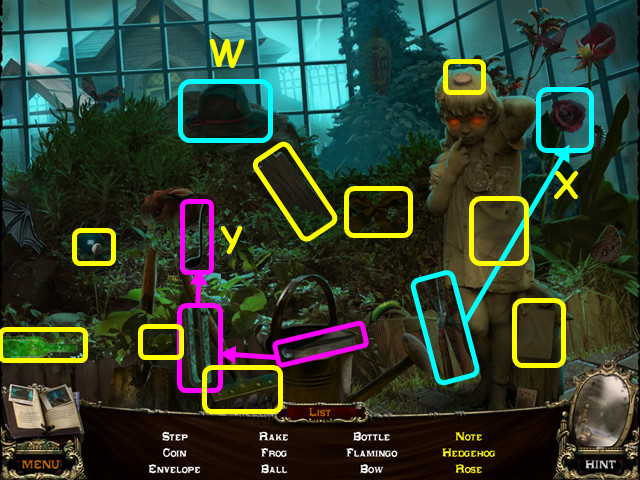 • Locate all the items on the list. • Remove the hat to find
the Hedgehog (W). • Use the clippers to cut the Rose (X). •
Use the drumstick on the tuning fork to make the Note (Y). •
You will earn the STEP. • Walk down 3 times, go left, then
enter the cottage.
• Locate all the items on the list. • Remove the hat to find
the Hedgehog (W). • Use the clippers to cut the Rose (X). •
Use the drumstick on the tuning fork to make the Note (Y). •
You will earn the STEP. • Walk down 3 times, go left, then
enter the cottage.
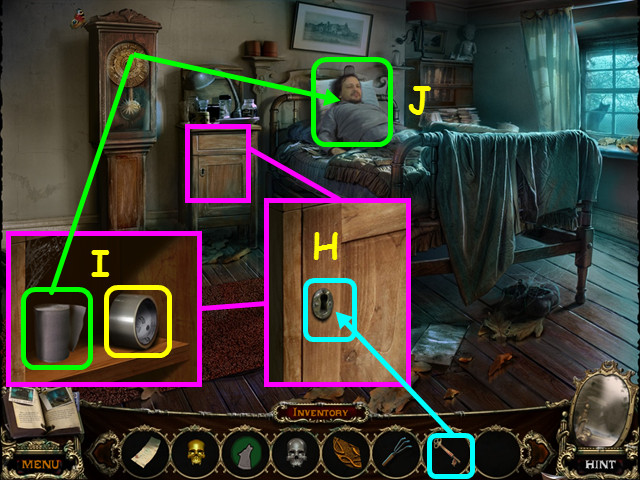
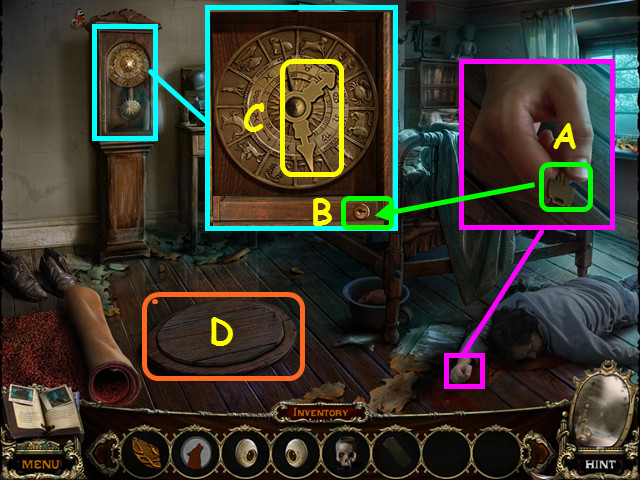 • Zoom into the guard's hand and take the KEY (A). • Look at
the clock and use the KEY in the lock (B). • Note the position
of the 3 hands, then take the CLOCK HANDS (C). • The positions
will be noted in your journal. • Open the trapdoor and go down
to the cellar (D).
• Zoom into the guard's hand and take the KEY (A). • Look at
the clock and use the KEY in the lock (B). • Note the position
of the 3 hands, then take the CLOCK HANDS (C). • The positions
will be noted in your journal. • Open the trapdoor and go down
to the cellar (D).
 • Take the 2nd SKULL (E). • Select the area by the pumpkin for
a HOS (F).
• Take the 2nd SKULL (E). • Select the area by the pumpkin for
a HOS (F).
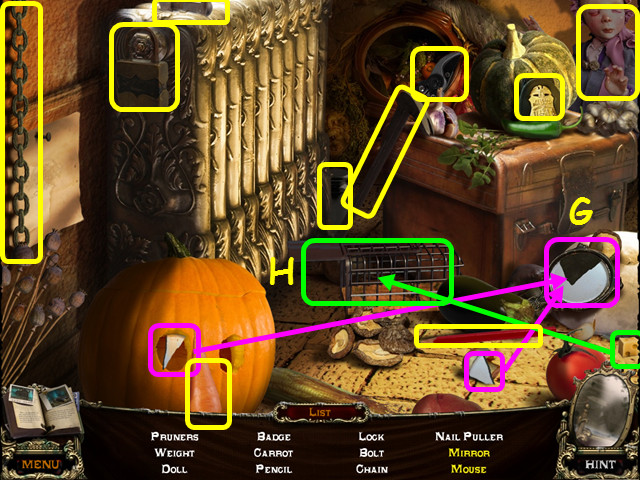 • Locate all the items on the list. • Place the 2 mirror
pieces into the frame to make the Mirror (G). • Place the
cheese in the trap to find the Mouse (H). • You will earn the
PRUNER. • Walk down 3 times, then go right to the side of the
house.
• Locate all the items on the list. • Place the 2 mirror
pieces into the frame to make the Mirror (G). • Place the
cheese in the trap to find the Mouse (H). • You will earn the
PRUNER. • Walk down 3 times, then go right to the side of the
house.
 • Look at the side of the house and use the PRUNER on the
vines (I). • Note the diagram and take the HAMMER (J). • Walk
down, enter the mansion, go through the door on the right,
then walk right to the greenhouse.
• Look at the side of the house and use the PRUNER on the
vines (I). • Note the diagram and take the HAMMER (J). • Walk
down, enter the mansion, go through the door on the right,
then walk right to the greenhouse.
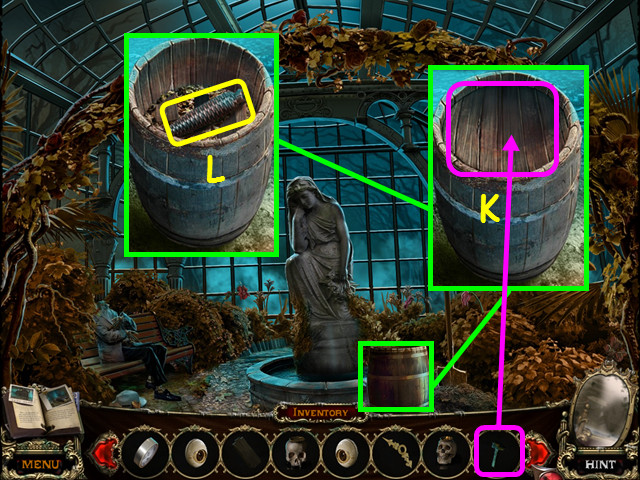 • Look at the barrel and use the HAMMER on the lid (K). • Take
the WEIGHT (L). • Walk down once.
• Look at the barrel and use the HAMMER on the lid (K). • Take
the WEIGHT (L). • Walk down once.
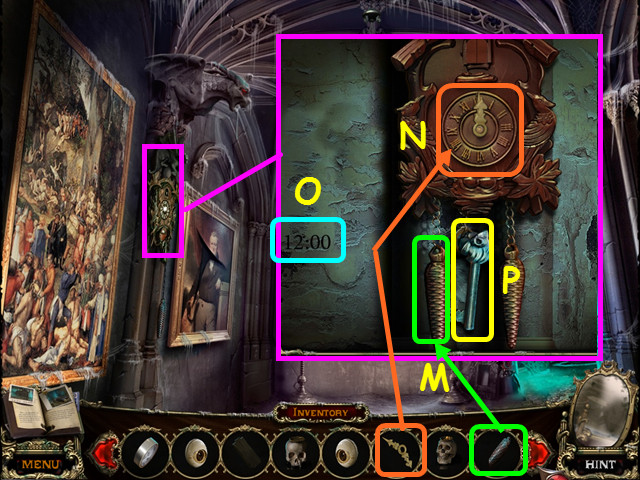 • Look at the clock and hang the WEIGHT on the chain (M). •
Place the CLOCK HANDS on the clock face (N) and set them to
12:00 per the writing on the wall (O). • Take the KEY (P). •
Walk down, then go up the stairs on the left.
• Look at the clock and hang the WEIGHT on the chain (M). •
Place the CLOCK HANDS on the clock face (N) and set them to
12:00 per the writing on the wall (O). • Take the KEY (P). •
Walk down, then go up the stairs on the left.
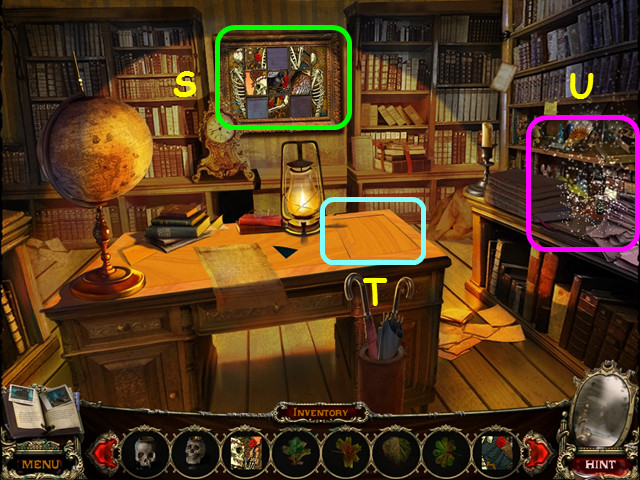
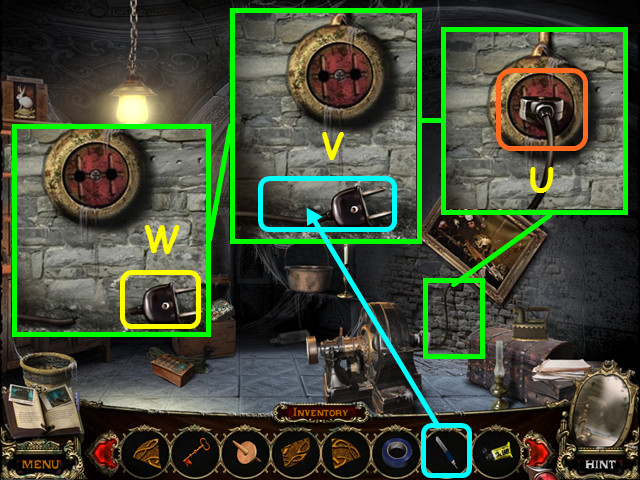
 • Zoom into the left door and use the KEY in the lock (Q). •
Take the 1st PIPE (R). • Select the fireplace for a HOS (S).
• Zoom into the left door and use the KEY in the lock (Q). •
Take the 1st PIPE (R). • Select the fireplace for a HOS (S).
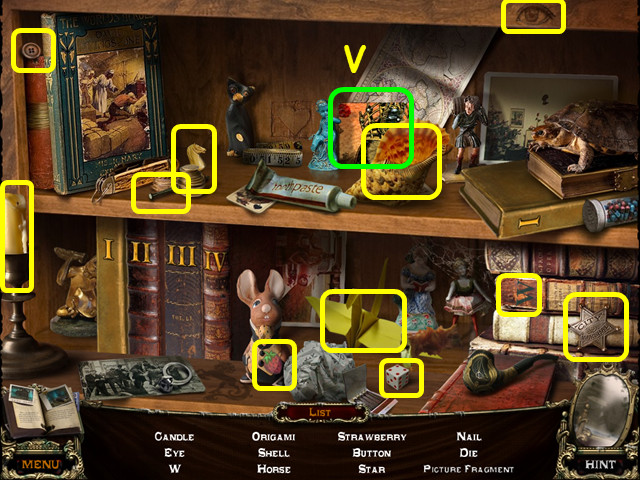
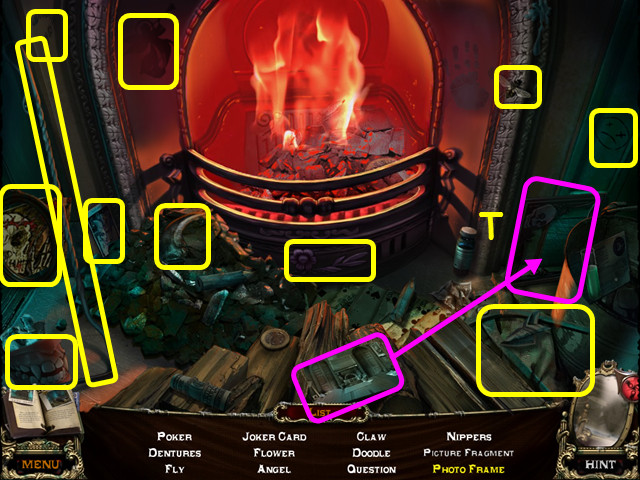 • Locate all the items on the list. • Place the picture into
the frame to make the Photo Frame (T). • You will earn the 1st
PUZZLE FRAGMENT. • Enter the door on the left.
• Locate all the items on the list. • Place the picture into
the frame to make the Photo Frame (T). • You will earn the 1st
PUZZLE FRAGMENT. • Enter the door on the left.
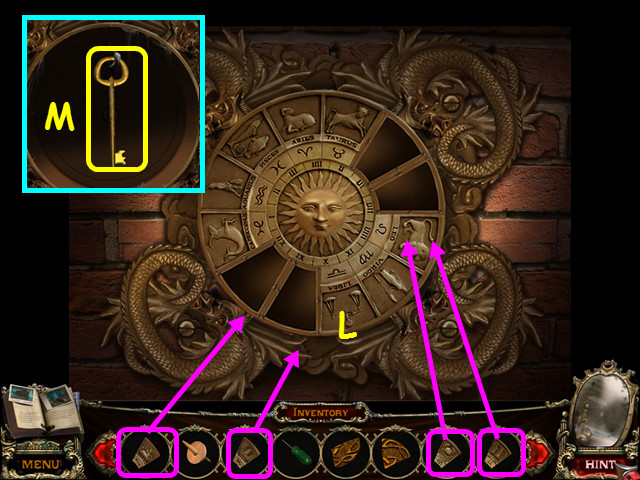
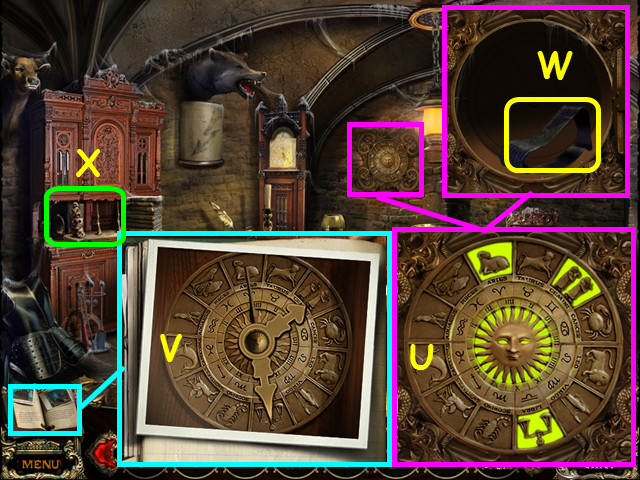 • Look at the Zodiac plate and press the 3 signs that you
noted on the clock in the cottage (U). • Refer to your journal
if necessary (V). • Take the BELT (W). • Look at the cabinet
for a mini-game (X).
• Look at the Zodiac plate and press the 3 signs that you
noted on the clock in the cottage (U). • Refer to your journal
if necessary (V). • Take the BELT (W). • Look at the cabinet
for a mini-game (X).
 • Move the skulls from the left to the right. • Move one skull
at a time until they are all on the right. • You can only
place a skull on a larger skull, not a smaller one. • Labeling
the 3 platforms A, B, and C, move the top weight in the stack
in the order below. • A to C, A to B, C to B, A to C, B to A,
B to C, A to C, A to B, C to B, C to A, B to A, C to B, A to
C, A to B, C to B, A to C, B to A, B to C, A to C, B to A, C
to B, C to A, B to A, B to C, A to C, A to B, C to B, A to C,
B to A, B to C, A to C.
• Make note of the code; take the 1st LEAF and the KEY (@). •
See the video solution here: http://youtu.be/ehMAZZ7lGr4
• Move the skulls from the left to the right. • Move one skull
at a time until they are all on the right. • You can only
place a skull on a larger skull, not a smaller one. • Labeling
the 3 platforms A, B, and C, move the top weight in the stack
in the order below. • A to C, A to B, C to B, A to C, B to A,
B to C, A to C, A to B, C to B, C to A, B to A, C to B, A to
C, A to B, C to B, A to C, B to A, B to C, A to C, B to A, C
to B, C to A, B to A, B to C, A to C, A to B, C to B, A to C,
B to A, B to C, A to C.
• Make note of the code; take the 1st LEAF and the KEY (@). •
See the video solution here: http://youtu.be/ehMAZZ7lGr4
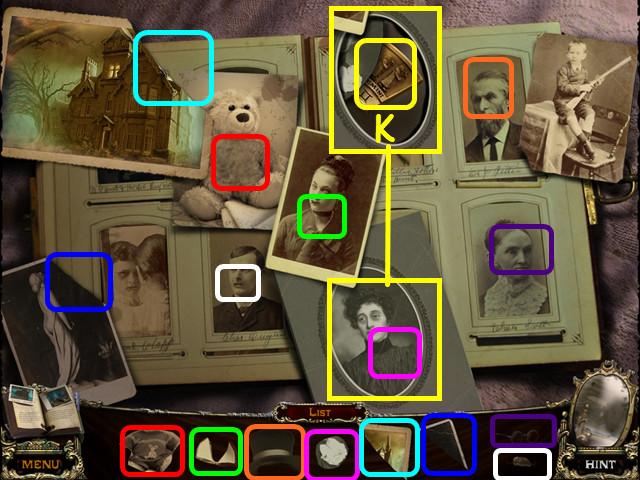
 • Look at the drawer and use the KEY on the lock (D). • Take
the RAG and the 2nd LEAF (E). • Walk down twice. • Zoom into
the mirror and use the RAG to clean off the grime (F). • Go
forward through the doors.
• Look at the drawer and use the KEY on the lock (D). • Take
the RAG and the 2nd LEAF (E). • Walk down twice. • Zoom into
the mirror and use the RAG to clean off the grime (F). • Go
forward through the doors.
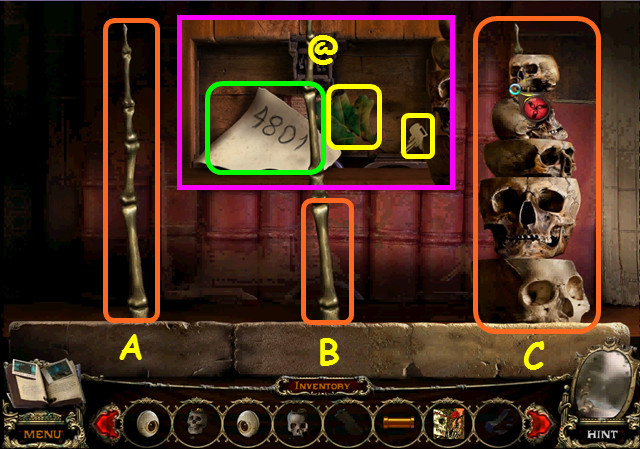
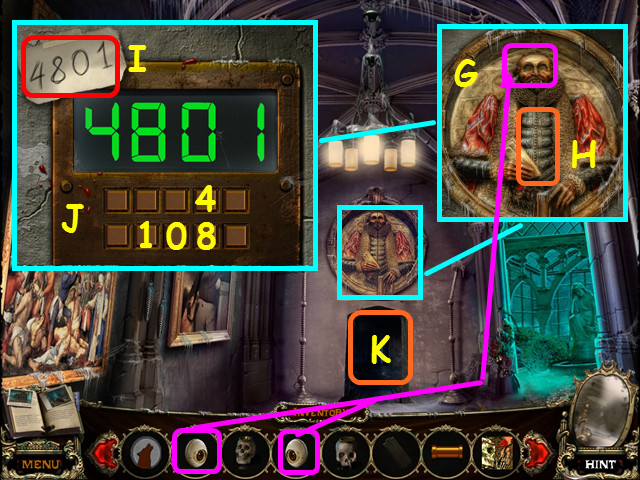 • Look at the carving and place the GLASS EYE and the EYE into
the sockets (G). • Press on the figure's chest to open the
panels (H). • Enter the code (I) that was found earlier by
pressing the buttons (J). • The buttons are all mixed up; try
them until you find the numbers you need. • Select 4-8-0-1. •
Walk forward (K).
• Look at the carving and place the GLASS EYE and the EYE into
the sockets (G). • Press on the figure's chest to open the
panels (H). • Enter the code (I) that was found earlier by
pressing the buttons (J). • The buttons are all mixed up; try
them until you find the numbers you need. • Select 4-8-0-1. •
Walk forward (K).
Chapter 3: Finding Jason
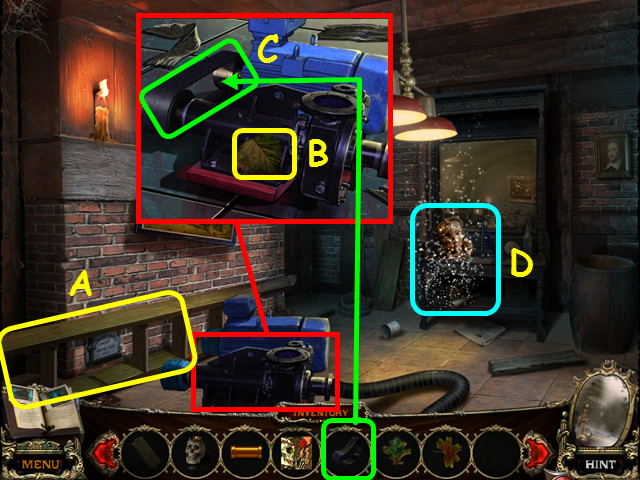 • Take the LADDER (A). • Look at the pump and take the 3rd
LEAF (B). • Place the BELT on the pump (C). • Select the table
for a HOS (D).
• Take the LADDER (A). • Look at the pump and take the 3rd
LEAF (B). • Place the BELT on the pump (C). • Select the table
for a HOS (D).
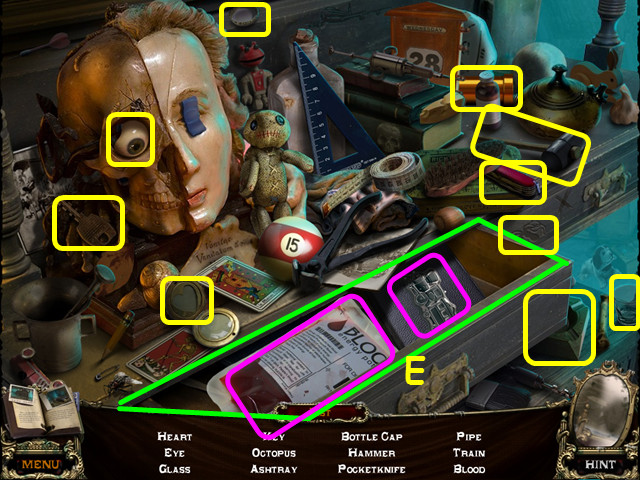 • Locate all the items on the list. • Open the drawer to find
the Train and the Blood (E). • You will earn the 2nd PIPE. •
Walk down twice. • Look at the fountain for a mini-game.
• Locate all the items on the list. • Open the drawer to find
the Train and the Blood (E). • You will earn the 2nd PIPE. •
Walk down twice. • Look at the fountain for a mini-game.
 • Place the 2 PIPES onto the grid to trigger the mini-game. •
Rotate the pipes (F) to connect the top pipe (G) with the
bottom pipe (H). • Select a pipe to rotate in place. • Walk
forward through the doors, then walk right to the greenhouse.
• Place the 2 PIPES onto the grid to trigger the mini-game. •
Rotate the pipes (F) to connect the top pipe (G) with the
bottom pipe (H). • Select a pipe to rotate in place. • Walk
forward through the doors, then walk right to the greenhouse.
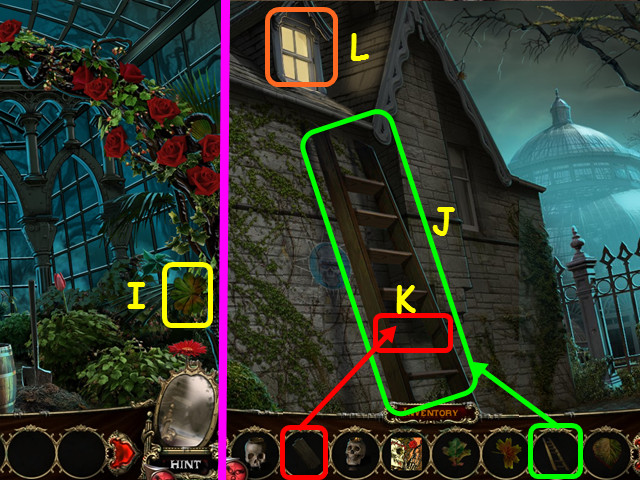 • Take the 4th LEAF (I). • Walk down 3 times, then walk to the
right side of the house. • Place the ladder against the side
of the house (J). • Place the STEP in the ladder (K). • Enter
the 2nd story window (L).
• Take the 4th LEAF (I). • Walk down 3 times, then walk to the
right side of the house. • Place the ladder against the side
of the house (J). • Place the STEP in the ladder (K). • Enter
the 2nd story window (L).
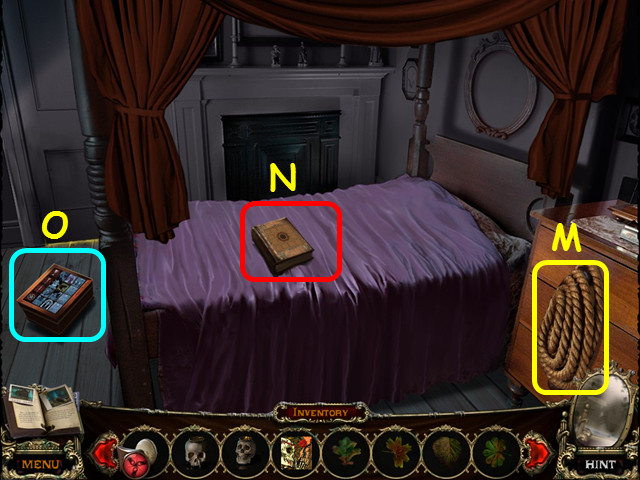 • Take the ROPE (M). • Note the mini-game on the bed (N). •
Select the mini-game on the floor (O).
• Take the ROPE (M). • Note the mini-game on the bed (N). •
Select the mini-game on the floor (O).
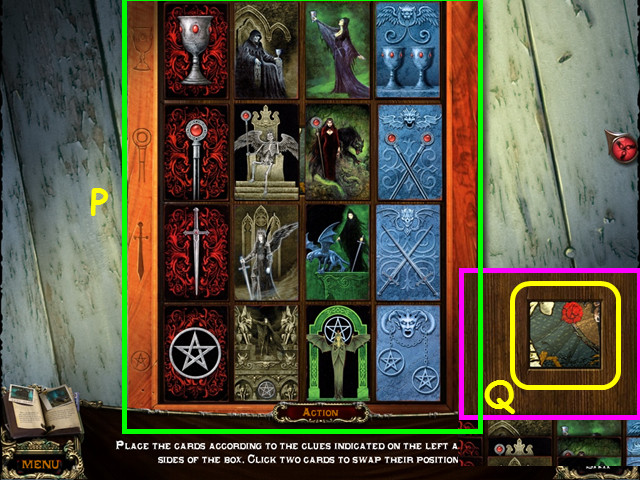 • Arrange the cards based on the clue on the box (P). • Select
2 cards to swap positions. • Take the 2nd PUZZLE FRAGMENT (Q).
• Walk down twice, then walk to the left.
• Arrange the cards based on the clue on the box (P). • Select
2 cards to swap positions. • Take the 2nd PUZZLE FRAGMENT (Q).
• Walk down twice, then walk to the left.
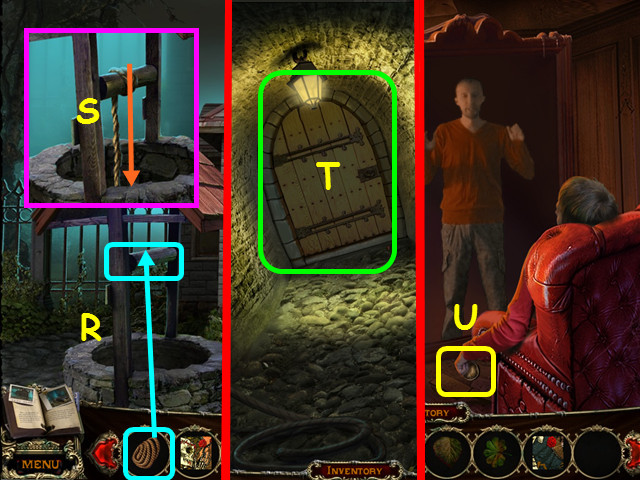 • Zoom into the well and use the ROPE on the beam (R). • Enter
the well (S). • Open the door and walk forward (T). • Take the
KEY from Jason (U). • Walk down 3 times, go to the right side
of the house and enter the window.
• Zoom into the well and use the ROPE on the beam (R). • Enter
the well (S). • Open the door and walk forward (T). • Take the
KEY from Jason (U). • Walk down 3 times, go to the right side
of the house and enter the window.
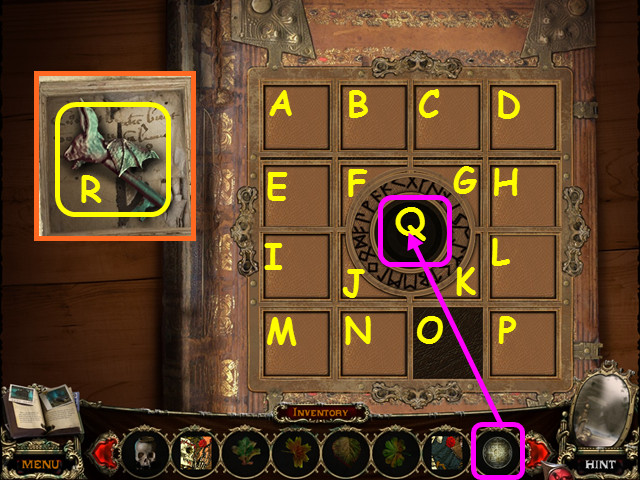 • Select the book on the bed for a mini-game. • Use the square
puzzle piece to move the others around the board so the round
seal is in the center. • To solve the puzzle, select the
squares in this order:
C-G-F-B-A-E-F-B-A-E-I-J-N-M-I-J-K-L-P-O-N-J-K-O. • Place the
KEY in the center (Q). • Turn the book's page then, take the
KEY (R). • Walk down twice, enter the mansion and go up the
stairs on the left. • Look at the right door and use the key
in the lock. • Enter the right door.
• Select the book on the bed for a mini-game. • Use the square
puzzle piece to move the others around the board so the round
seal is in the center. • To solve the puzzle, select the
squares in this order:
C-G-F-B-A-E-F-B-A-E-I-J-N-M-I-J-K-L-P-O-N-J-K-O. • Place the
KEY in the center (Q). • Turn the book's page then, take the
KEY (R). • Walk down twice, enter the mansion and go up the
stairs on the left. • Look at the right door and use the key
in the lock. • Enter the right door.
 • Note the mini-game on the back wall (S). • Note the
mini-game on the desk (T). • Select the shelves for a HOS (U).
• Note the mini-game on the back wall (S). • Note the
mini-game on the desk (T). • Select the shelves for a HOS (U).
 • Locate all the items on the list. • You will earn the 3rd
PUZZLE FRAGMENT (V). • Select the mini-game on the desk.
• Locate all the items on the list. • You will earn the 3rd
PUZZLE FRAGMENT (V). • Select the mini-game on the desk.
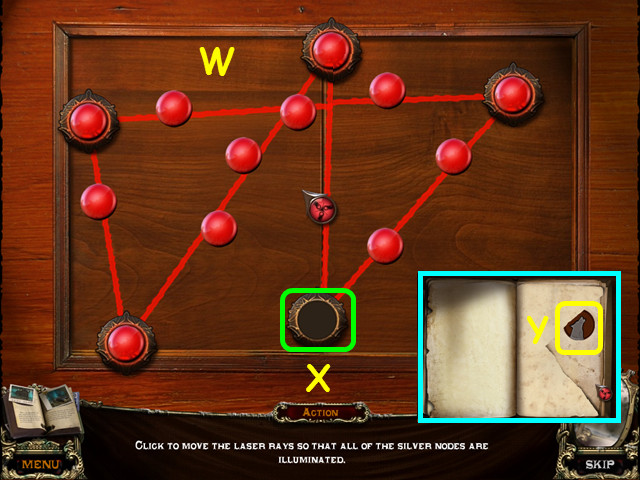 • Move the 4 discs so that all the silver buttons turn red
(W). • The 5th disc does not move (X). • Turn the page and
take the 3rd WOLF COIN (Y). • Walk down 7 times and enter the
shed.
• Move the 4 discs so that all the silver buttons turn red
(W). • The 5th disc does not move (X). • Turn the page and
take the 3rd WOLF COIN (Y). • Walk down 7 times and enter the
shed.
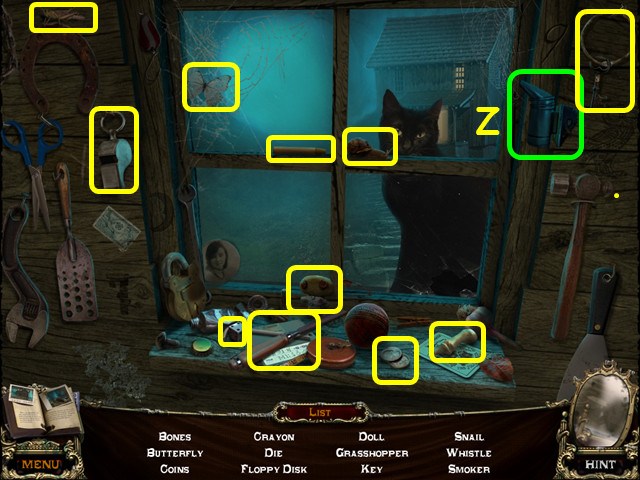 • Select the window for a HOS. • Locate all the items on the
list. • You will earn the SMOKER (Z). • Walk down once.
• Select the window for a HOS. • Locate all the items on the
list. • You will earn the SMOKER (Z). • Walk down once.
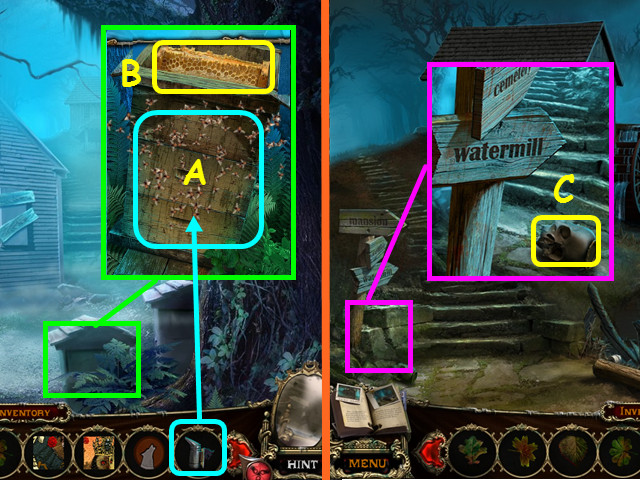 • Use the SMOKER on the beehive (A). • Take the BEESWAX (B). •
Walk forward. • Look at the base of the sign and take the 3rd
SKULL (C). • Enter the watermill.
• Use the SMOKER on the beehive (A). • Take the BEESWAX (B). •
Walk forward. • Look at the base of the sign and take the 3rd
SKULL (C). • Enter the watermill.
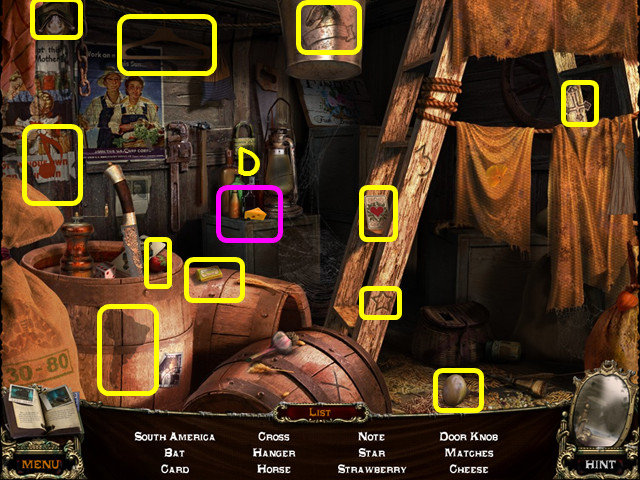 • Select the back left area for a HOS. • Locate all the items
on the list. • You will earn the CHEESE (D). • Walk down, then
go to the left. • Look at the cemetery gate for a mini-game.
• Select the back left area for a HOS. • Locate all the items
on the list. • You will earn the CHEESE (D). • Walk down, then
go to the left. • Look at the cemetery gate for a mini-game.
 • Place the 3 WOLF COINS onto the device to trigger the
mini-game. • Move the wolf heads to the coins of the same
color (E). • Move the green heads to the green coins and so
on. • Each wolf neck has 1 or 2 resting spaces that you can
move the heads to (green).
• Walk forward.
• Place the 3 WOLF COINS onto the device to trigger the
mini-game. • Move the wolf heads to the coins of the same
color (E). • Move the green heads to the green coins and so
on. • Each wolf neck has 1 or 2 resting spaces that you can
move the heads to (green).
• Walk forward.
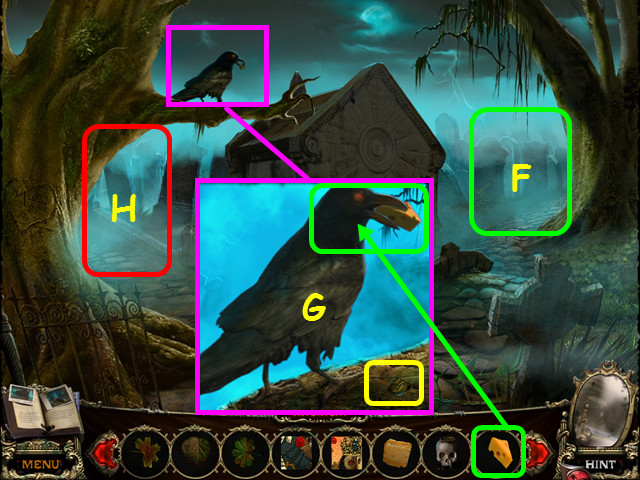 • Note the path to the right (F). • Look at the raven and give
him the CHEESE; take the AMULET PIECE (G). • Walk to the left
(H).
• Note the path to the right (F). • Look at the raven and give
him the CHEESE; take the AMULET PIECE (G). • Walk to the left
(H).
 • Take the 4th SKULL (I). • Walk down, then go to the right. •
Look at the broken tombstones for a mini-game (J).
• Take the 4th SKULL (I). • Walk down, then go to the right. •
Look at the broken tombstones for a mini-game (J).
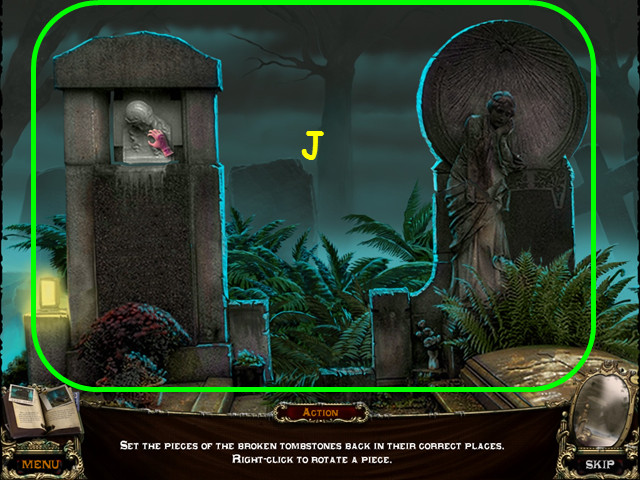 • Restore the 2 tombstones by placing the broken pieces in the
correct positions (J). • Left-click to take/place a piece;
right-click to rotate a piece. • The ghost will give you the
4th PUZZLE FRAGMENT. • Walk down 3 times, go to the right,
then go forward twice. Enter the mansion, go up the stairs on
the left, then enter the door on the right. • Select the
mini-game on the back wall.
• Restore the 2 tombstones by placing the broken pieces in the
correct positions (J). • Left-click to take/place a piece;
right-click to rotate a piece. • The ghost will give you the
4th PUZZLE FRAGMENT. • Walk down 3 times, go to the right,
then go forward twice. Enter the mansion, go up the stairs on
the left, then enter the door on the right. • Select the
mini-game on the back wall.
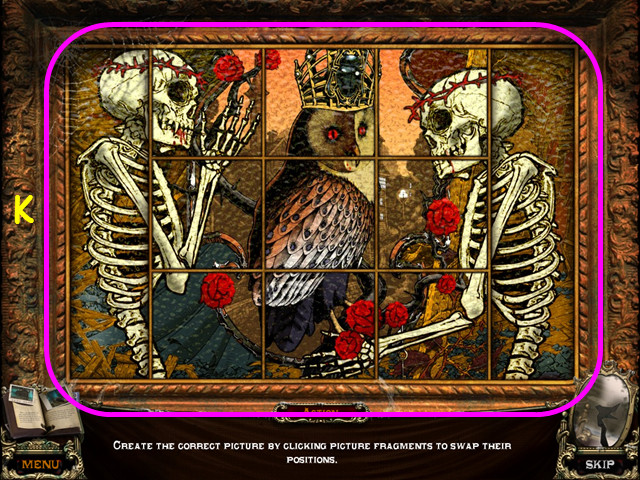 • Place the 4 PUZZLE FRAGMENTS into the grid to activate the
mini-game. • Restore the picture (K) by swapping pieces;
select 2 pieces to swap positions. • Walk forward.
• Place the 4 PUZZLE FRAGMENTS into the grid to activate the
mini-game. • Restore the picture (K) by swapping pieces;
select 2 pieces to swap positions. • Walk forward.
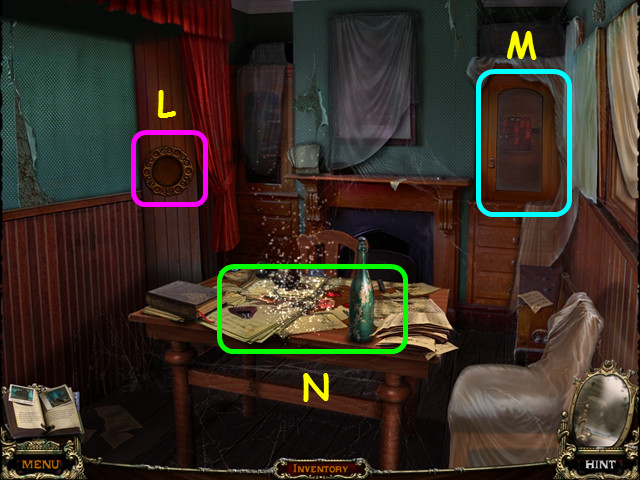 • Note the mini-game by the curtain (L). • Note the mini-game
in the cabinet (M). • Select the table for a HOS (N).
• Note the mini-game by the curtain (L). • Note the mini-game
in the cabinet (M). • Select the table for a HOS (N).
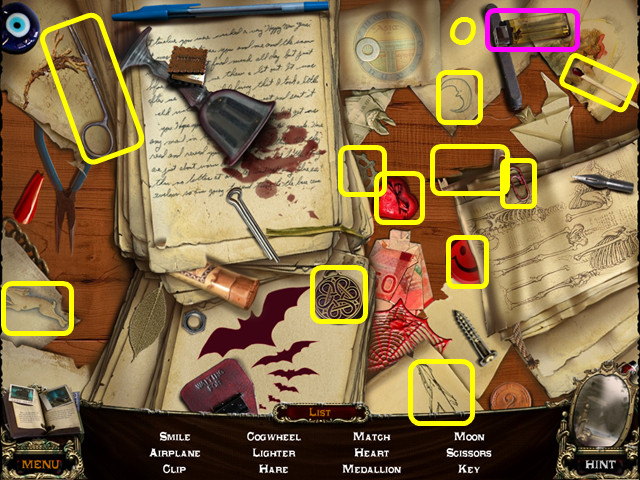 • Locate all the items on the list. • You will earn the
LIGHTER (O). • Look at the cabinet for a mini-game.
• Locate all the items on the list. • You will earn the
LIGHTER (O). • Look at the cabinet for a mini-game.
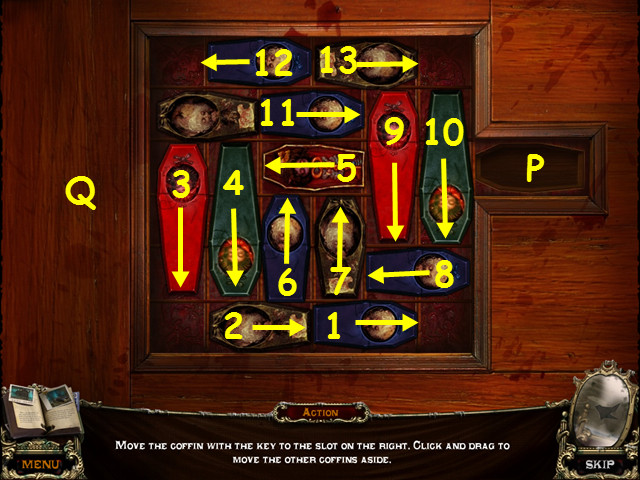
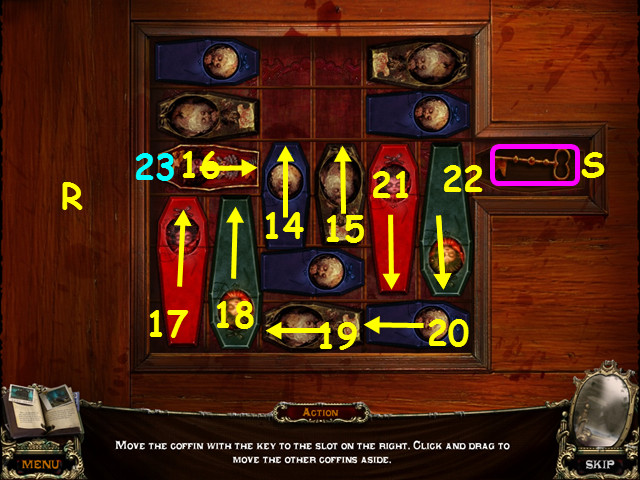 • Open the cabinet door and zoom in to activate the mini-game.
• Move the coffins around so you can move the coffin with the
key to the exit (P). • Move the pieces in the direction
indicated in numerical order (1-13) as seen in the first part
(Q). • Move the pieces in the direction indicated in numerical
order (14-23) as seen in the second part (R). • Take the KEY
(S). • Walk down twice and enter the room on the left.
• Open the cabinet door and zoom in to activate the mini-game.
• Move the coffins around so you can move the coffin with the
key to the exit (P). • Move the pieces in the direction
indicated in numerical order (1-13) as seen in the first part
(Q). • Move the pieces in the direction indicated in numerical
order (14-23) as seen in the second part (R). • Take the KEY
(S). • Walk down twice and enter the room on the left.
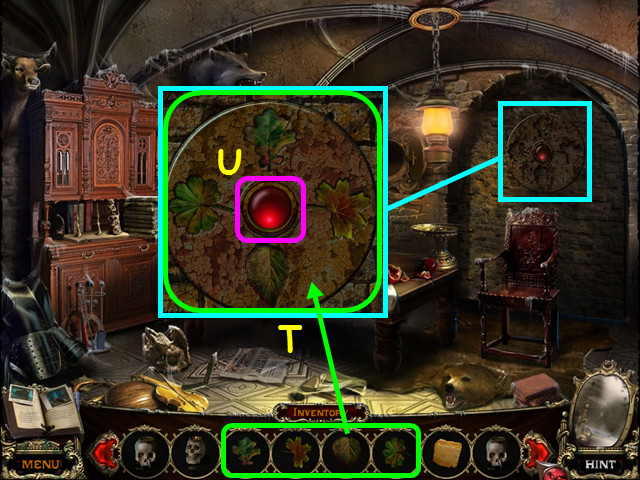 • Look at the wall decoration and place the 4 LEAVES into the
matching indentations (T). • Press the red button in the
center (U). • Walk forward.
• Look at the wall decoration and place the 4 LEAVES into the
matching indentations (T). • Press the red button in the
center (U). • Walk forward.
 • Take the 5th SKULL (V). • Look at the table for a mini-game
(W).
• Take the 5th SKULL (V). • Look at the table for a mini-game
(W).
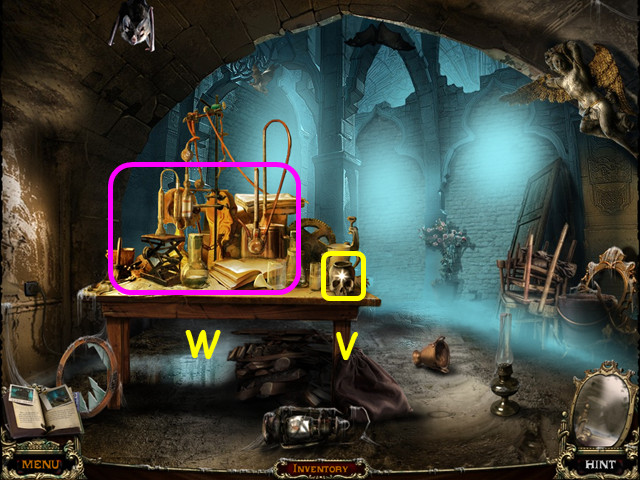
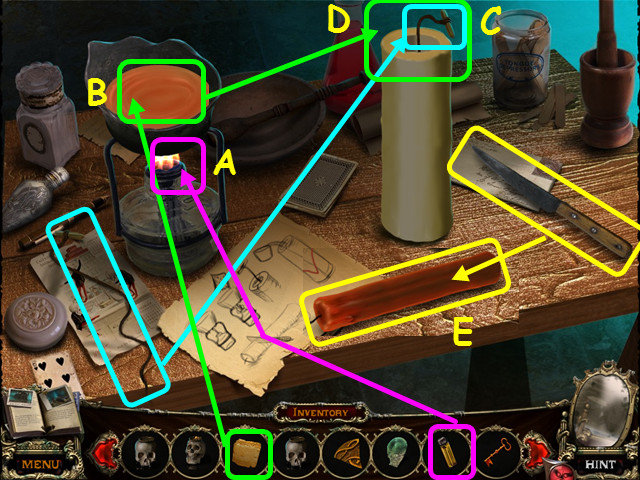 • Use the LIGHTER on the burner (A). • Place the BEESWAX in
the pan (B). • Place the wick in the mold (C). • Pour the pan
of melted beeswax into the mold (D). • Use the knife on the
candle, then take the CANDLES (E). • Walk down 3 times.
• Use the LIGHTER on the burner (A). • Place the BEESWAX in
the pan (B). • Place the wick in the mold (C). • Pour the pan
of melted beeswax into the mold (D). • Use the knife on the
candle, then take the CANDLES (E). • Walk down 3 times.
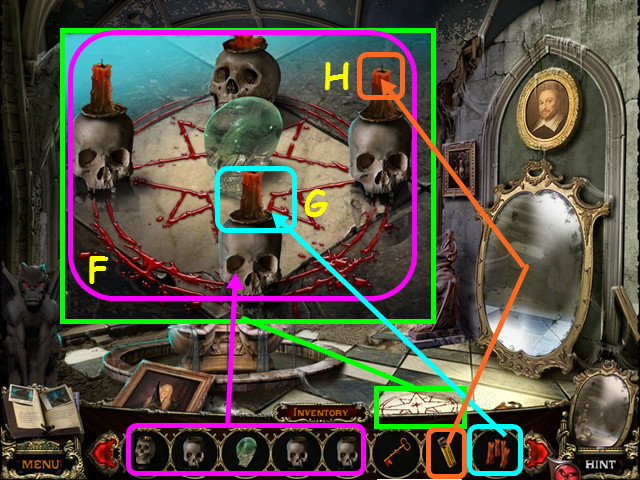 • Look at the ritual symbol on the floor and place the 5
SKULLS on the symbol (F). • Place the CANDLES on the skulls
(G). • Use the LIGHTER on the candles (H).
• Look at the ritual symbol on the floor and place the 5
SKULLS on the symbol (F). • Place the CANDLES on the skulls
(G). • Use the LIGHTER on the candles (H).
Chapter 4: Mirror World
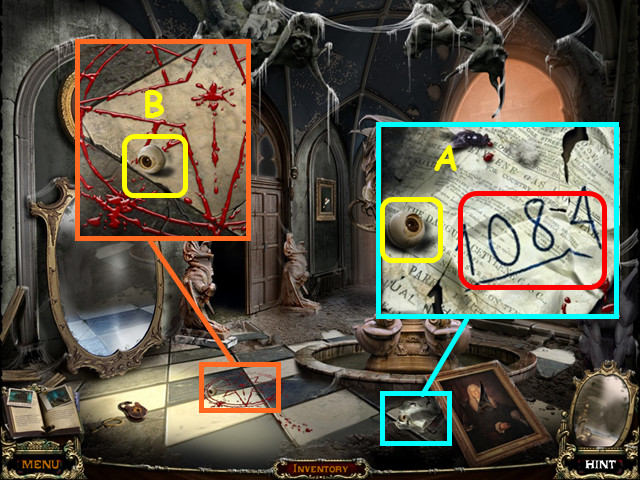 • Look at the paper, note the code, and take the GLASS EYE
(A). • Look at the ritual symbol and take the EYE (B). • Enter
the doors on the left, then walk left to the greenhouse.
• Look at the paper, note the code, and take the GLASS EYE
(A). • Look at the ritual symbol and take the EYE (B). • Enter
the doors on the left, then walk left to the greenhouse.
 • Select the skeleton for a HOS. • Place the items from the
list with their pairs (color coded). • Take the HOSE (E). •
Walk down.
• Select the skeleton for a HOS. • Place the items from the
list with their pairs (color coded). • Take the HOSE (E). •
Walk down.
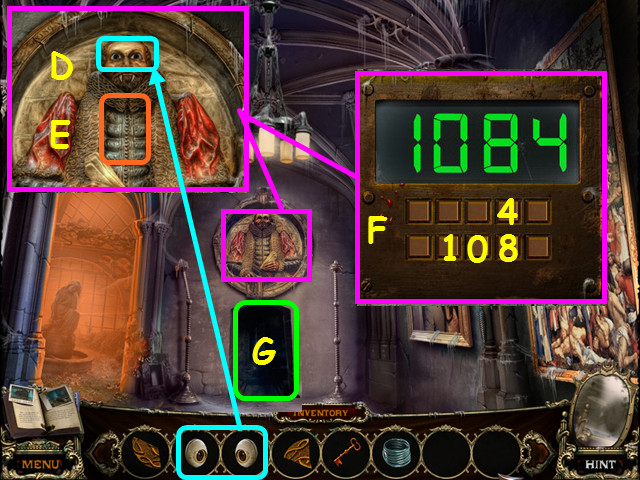 • Look at the carving and place the GLASS EYE and the EYE into
the sockets (D). • Press on the figure's chest to open the
panels (E). • Enter the code that was found earlier by
pressing the buttons (F). The buttons are all mixed up; try
them until you find the numbers you need. • Select 1-0-8-4. •
Walk forward (G).
• Look at the carving and place the GLASS EYE and the EYE into
the sockets (D). • Press on the figure's chest to open the
panels (E). • Enter the code that was found earlier by
pressing the buttons (F). The buttons are all mixed up; try
them until you find the numbers you need. • Select 1-0-8-4. •
Walk forward (G).
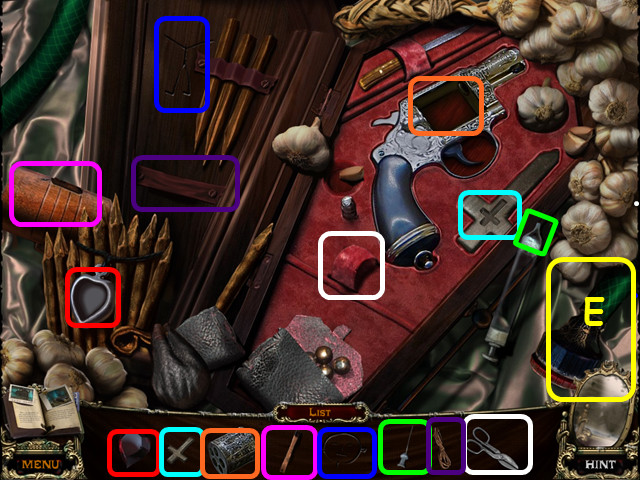
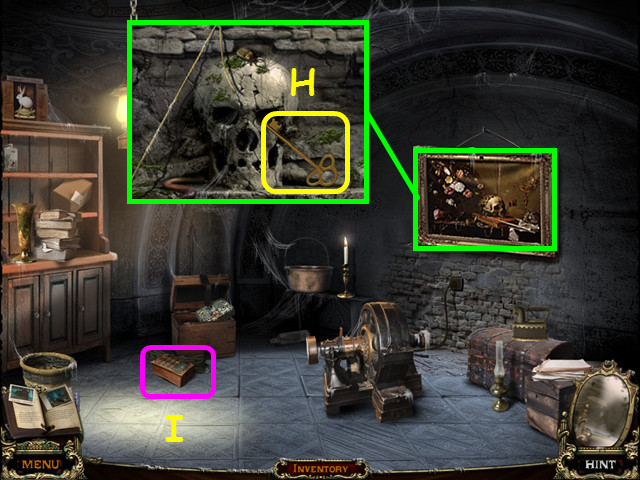 • Look at the painting, pull it down, and take the brass
colored KEY (H). • Select the mini-game on the floor (I).
• Look at the painting, pull it down, and take the brass
colored KEY (H). • Select the mini-game on the floor (I).
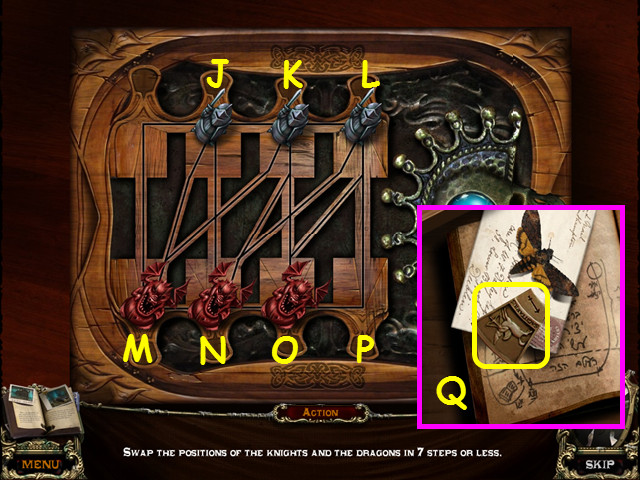 • Swap the positions of the dragons and knights in 7 steps or
less. • Make the following moves: L-P, N-L, J-N, M-J, K-M,
O-K, and P-O. • Take SAGITTARIUS (Q). • Walk down twice, then
go up the stairs. • Look at the left door and use the brass
colored KEY on the lock. • Enter the room on the left.
• Swap the positions of the dragons and knights in 7 steps or
less. • Make the following moves: L-P, N-L, J-N, M-J, K-M,
O-K, and P-O. • Take SAGITTARIUS (Q). • Walk down twice, then
go up the stairs. • Look at the left door and use the brass
colored KEY on the lock. • Enter the room on the left.
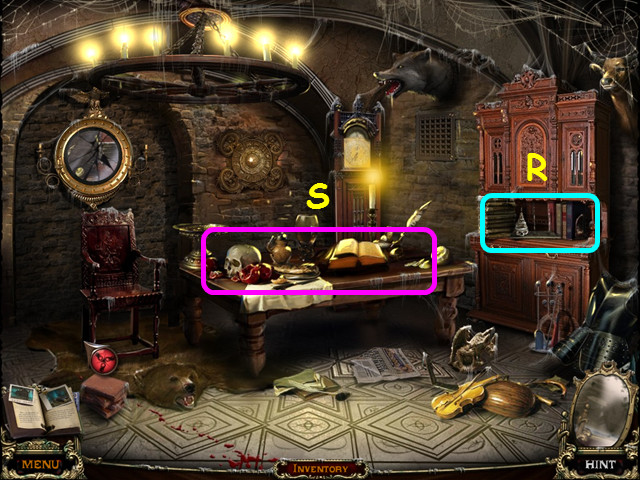 • Note the mini-game on the cabinet (R). • Select the table
for a mini-game (S).
• Note the mini-game on the cabinet (R). • Select the table
for a mini-game (S).
 • Place the bookmark in the book (T). • Place the pen on the
inkwells (U). • Place the sugar cube in the teacup (V). •
Place the clock hands on the clock (W). • Move the plus sign
to the equations (X). • Use the knob on the drawer (Y). • Take
the VALVE and the 1/4 TOP (Z). • Select the mini-game on the
cabinet.
• Place the bookmark in the book (T). • Place the pen on the
inkwells (U). • Place the sugar cube in the teacup (V). •
Place the clock hands on the clock (W). • Move the plus sign
to the equations (X). • Use the knob on the drawer (Y). • Take
the VALVE and the 1/4 TOP (Z). • Select the mini-game on the
cabinet.
 • Move the skulls from the right to the left. • Move one skull
at a time until they are all on the left. • You can only place
a skull on a larger skull, not a smaller one. • Labeling the 3
platforms A, B, and C, move the top weight in the stack in the
order below. • A to C, A to B, C to B, A to C, B to A, B to C,
A to C, A to B, C to B, C to A, B to A, C to B, A to C, A to
B, C to B, A to C, B to A, B to C, A to C, B to A, C to B, C
to A, B to A, B to C, A to C, A to B, C to B, A to C, B to A,
B to C, and A to C. • Take SCORPIO and the SCREWDRIVER (D). •
Walk down 3 times, then go right to the well.
• Move the skulls from the right to the left. • Move one skull
at a time until they are all on the left. • You can only place
a skull on a larger skull, not a smaller one. • Labeling the 3
platforms A, B, and C, move the top weight in the stack in the
order below. • A to C, A to B, C to B, A to C, B to A, B to C,
A to C, A to B, C to B, C to A, B to A, C to B, A to C, A to
B, C to B, A to C, B to A, B to C, A to C, B to A, C to B, C
to A, B to A, B to C, A to C, A to B, C to B, A to C, B to A,
B to C, and A to C. • Take SCORPIO and the SCREWDRIVER (D). •
Walk down 3 times, then go right to the well.
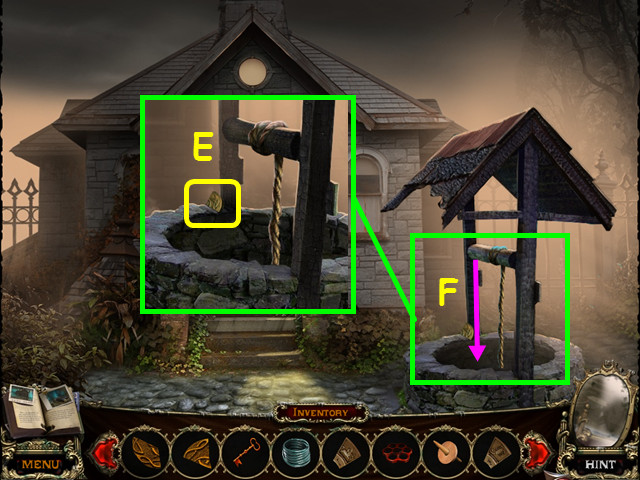 • Look at the well and take the AMULET PIECE (E). • Enter the
well (F).
• Look at the well and take the AMULET PIECE (E). • Enter the
well (F).
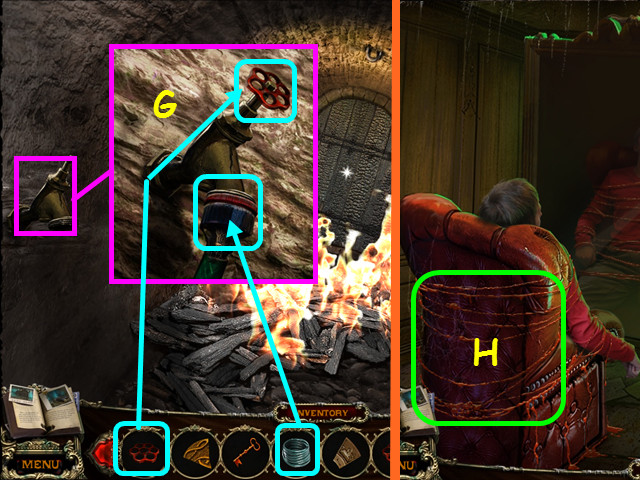 • Look at the spigot and attach the HOSE and the VALVE (G). •
Open the door and walk forward. • Undo the ropes binding your
brother (H). • Walk down twice, enter the cottage, then go
down the trapdoor to the cellar. • Select the table for a
mini-game.
• Look at the spigot and attach the HOSE and the VALVE (G). •
Open the door and walk forward. • Undo the ropes binding your
brother (H). • Walk down twice, enter the cottage, then go
down the trapdoor to the cellar. • Select the table for a
mini-game.
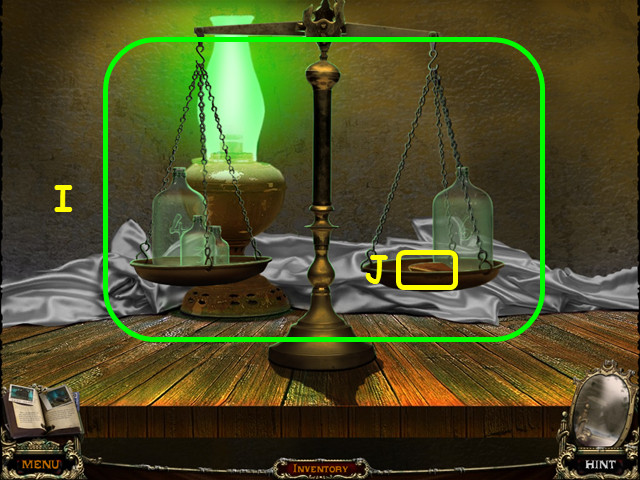 • Place the jars on the scale so the sides are balanced (I). •
Take the CANCER piece (J). • Walk down 3 times, go to the left
side of the house and enter the window. • Select the photos on
the bed for a HOS.
• Place the jars on the scale so the sides are balanced (I). •
Take the CANCER piece (J). • Walk down 3 times, go to the left
side of the house and enter the window. • Select the photos on
the bed for a HOS.
 • Place the items from the inventory area onto the photos
(color coded). • Take the GEMINI piece (K). • Walk down twice,
enter the mansion, go up the stairs, then enter the door on
the left.
• Place the items from the inventory area onto the photos
(color coded). • Take the GEMINI piece (K). • Walk down twice,
enter the mansion, go up the stairs, then enter the door on
the left.
 • Look at the back wall for a mini-game. • Place the CANCER,
GEMINI, SAGITTARIUS, and SCORPIO pieces into the slots (L). •
Take the KEY (M). • Walk forward.
• Look at the back wall for a mini-game. • Place the CANCER,
GEMINI, SAGITTARIUS, and SCORPIO pieces into the slots (L). •
Take the KEY (M). • Walk forward.
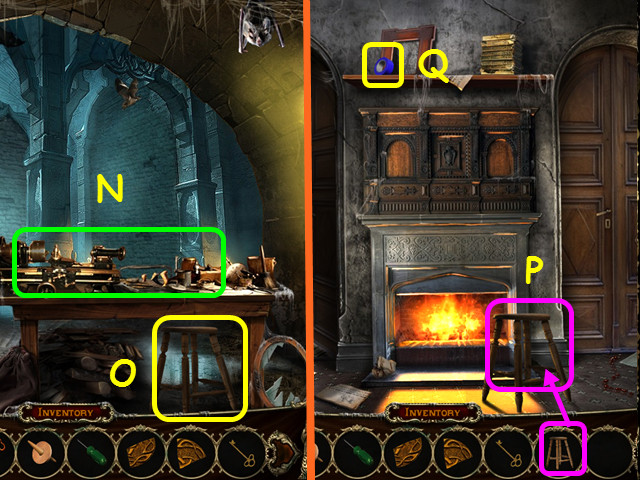 • Note the worktable (N). • Take the STOOL (O). • Walk down
twice. • Place the stool in front of the fireplace (P). • Zoom
into the mantle and take the TAPE (Q). • Enter the room on the
left.
• Note the worktable (N). • Take the STOOL (O). • Walk down
twice. • Place the stool in front of the fireplace (P). • Zoom
into the mantle and take the TAPE (Q). • Enter the room on the
left.
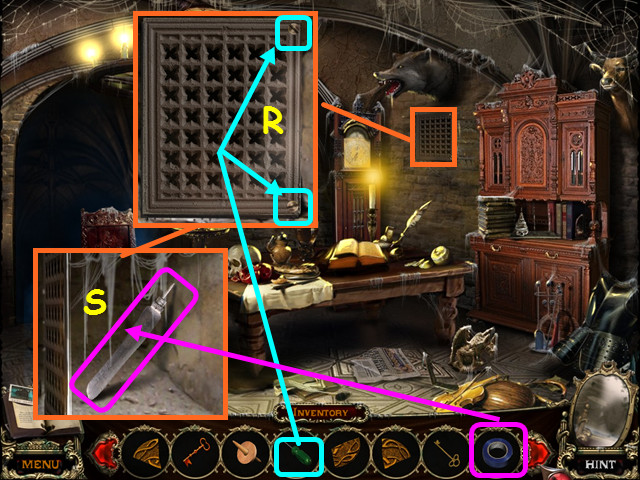 • Look at the grate and use the SCREWDRIVER on the 2 screws
(R). • Use the TAPE on the blade to make the KNIFE (S). • Walk
down, look at the right door and use the KEY in the lock. •
Walk forward.
• Look at the grate and use the SCREWDRIVER on the 2 screws
(R). • Use the TAPE on the blade to make the KNIFE (S). • Walk
down, look at the right door and use the KEY in the lock. •
Walk forward.
 • Look at the desk for a mini-game. • Place the items from
inventory into the story book (color coded). • Take the GLUE
(T). • Walk down twice, enter the doors on the left, then walk
forward.
• Look at the desk for a mini-game. • Place the items from
inventory into the story book (color coded). • Take the GLUE
(T). • Walk down twice, enter the doors on the left, then walk
forward.
 • Look at the area below the painting; pull the plug from the
socket (U). • Use the KNIFE on the cord (V). • Take the PLUG
(W). • Walk down twice, go up the stairs, enter the room on
the left, walk forward, then look at the table.
• Look at the area below the painting; pull the plug from the
socket (U). • Use the KNIFE on the cord (V). • Take the PLUG
(W). • Walk down twice, go up the stairs, enter the room on
the left, walk forward, then look at the table.
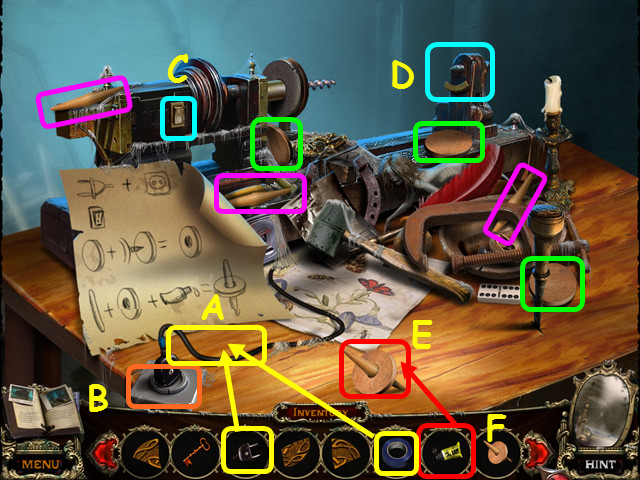 • Place the PLUG near the wire, then use the TAPE on the wire
(A). • Plug the wire into the socket (B). • Turn on the power
(C). • Take one of the discs (green) and place it in the
holder (D). • Place one of the pegs (pink) into the drilled
disc (E). • Use the GLUE on the disc/peg to make 2/4 TOP (F).
• Repeat this process to make the 3/4 and 4/4 TOPS. • Walk
down 3 times.
• Place the PLUG near the wire, then use the TAPE on the wire
(A). • Plug the wire into the socket (B). • Turn on the power
(C). • Take one of the discs (green) and place it in the
holder (D). • Place one of the pegs (pink) into the drilled
disc (E). • Use the GLUE on the disc/peg to make 2/4 TOP (F).
• Repeat this process to make the 3/4 and 4/4 TOPS. • Walk
down 3 times.
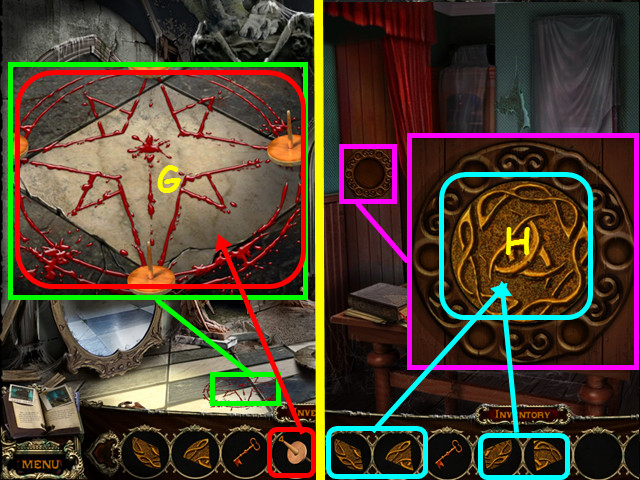 • Look at the ritual symbol and place the 4 TOPS onto the
diagram (G). • Walk up the stairs, enter the door on the
right, then walk forward twice. • Look at the left wall and
place the 4 AMULET PIECES into the circle (H). • Walk down 7
times, go left, enter the cemetery, then walk to the left.
• Look at the ritual symbol and place the 4 TOPS onto the
diagram (G). • Walk up the stairs, enter the door on the
right, then walk forward twice. • Look at the left wall and
place the 4 AMULET PIECES into the circle (H). • Walk down 7
times, go left, enter the cemetery, then walk to the left.
 • Zoom into the crypt door and use the KEY in the lock (I). •
Walk forward. • Note the mini-game on the door (J). • Select
the area on the right for a HOS (K).
• Zoom into the crypt door and use the KEY in the lock (I). •
Walk forward. • Note the mini-game on the door (J). • Select
the area on the right for a HOS (K).
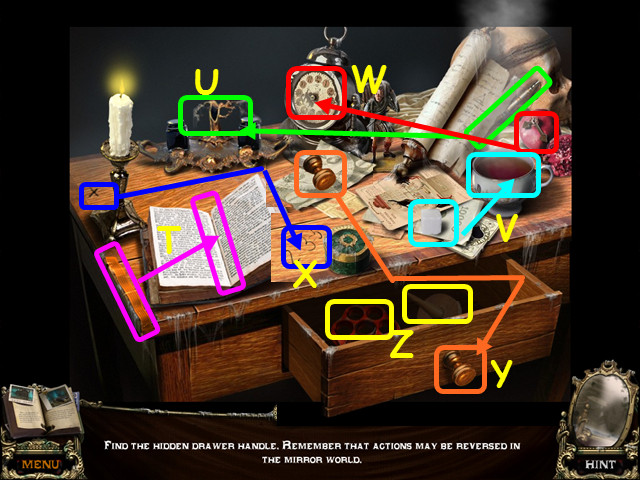
 • Locate all the items on the list. • You will earn the SYMBOL
(L). • Look at the mini-game on the door.
• Locate all the items on the list. • You will earn the SYMBOL
(L). • Look at the mini-game on the door.
 • Place the SYMBOL onto the grid to trigger the mini-game. •
Find the 4 symbols to unlock the door. • Press the 4 red
symbols (M). • Walk forward. • Open the door on the left, then
look inside for a HOS.
• Place the SYMBOL onto the grid to trigger the mini-game. •
Find the 4 symbols to unlock the door. • Press the 4 red
symbols (M). • Walk forward. • Open the door on the left, then
look inside for a HOS.
 • Locate all the items on the list. • You will earn the ROPE
(N).
• Locate all the items on the list. • You will earn the ROPE
(N).
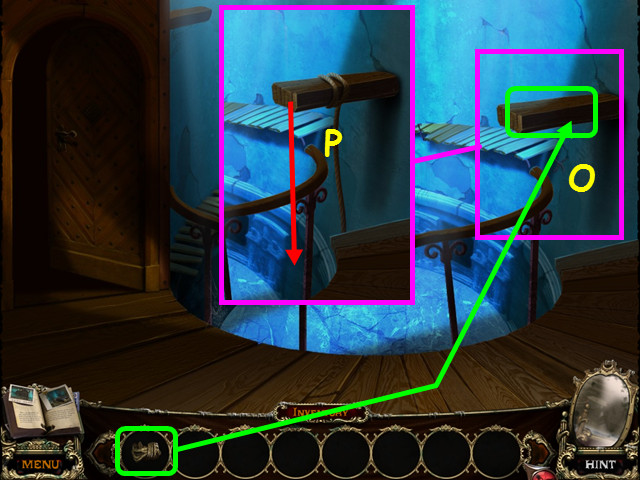 • Use the ROPE on the beam (O). • Climb down the rope (P).
 • Open the drawer, look inside, and take the KNIFE (Q). • Walk
forward (R).
• Open the drawer, look inside, and take the KNIFE (Q). • Walk
forward (R).
 • Use the KNIFE on the rope (S). • Take the STAFF from Kane,
then use it on the vortex (T). • Congratulations! You have
completed the Tales of Terror: Crimson Dawn!
• Use the KNIFE on the rope (S). • Take the STAFF from Kane,
then use it on the vortex (T). • Congratulations! You have
completed the Tales of Terror: Crimson Dawn!
Created at: 2012-09-22