

Walkthrough Menu
- General Tips & Information
- Chapter One: Escape the Cavern
- Chapter Two: Lisa in 1979
- Chapter Three: Alex in 1989
- Chapter Four: Lisa and the Archeologist's House
- Chapter Five: Lisa and the Gang Leader's Treasure
- Chapter Six: Alex and the Antique Shop
- Chapter Seven: Alex and the Lighthouse
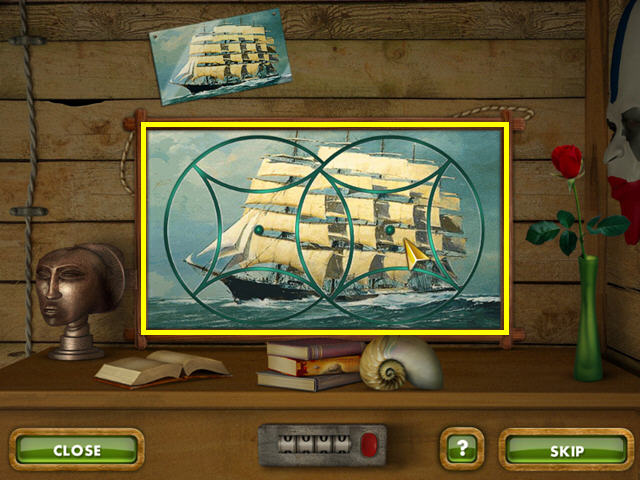
- Chapter Eight: Alex and Mr. Hope's Ship
- Chapter Nine: Lisa and the Ancient Temple
- Chapter Ten: Lisa and the Museum
- Chapter Eleven: Alex and the Ancient Temple
- Chapter Twelve: Alex and the Mine
- Chapter Thirteen: Lisa and the Archives
- Chapter Fourteen:Alex and the Abandoned Treasury
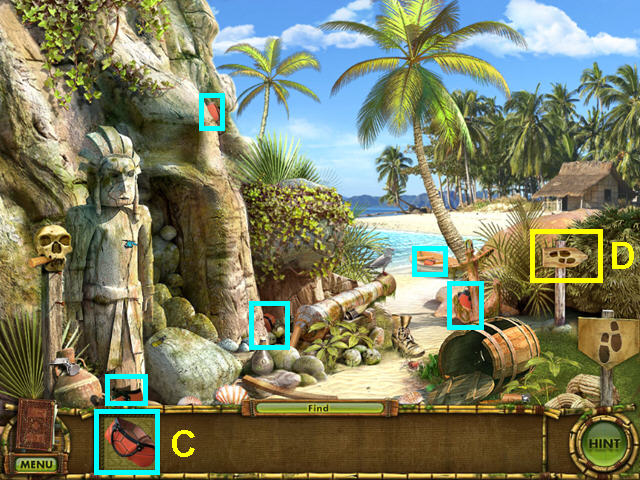
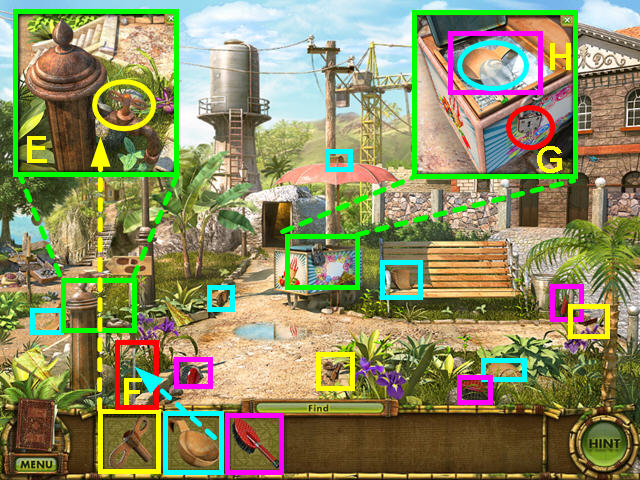
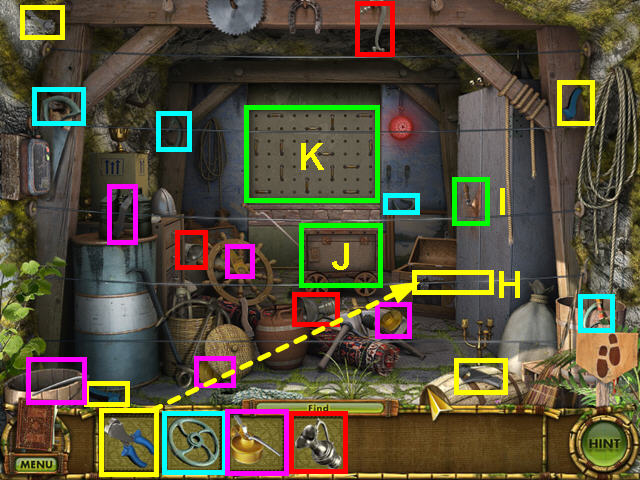
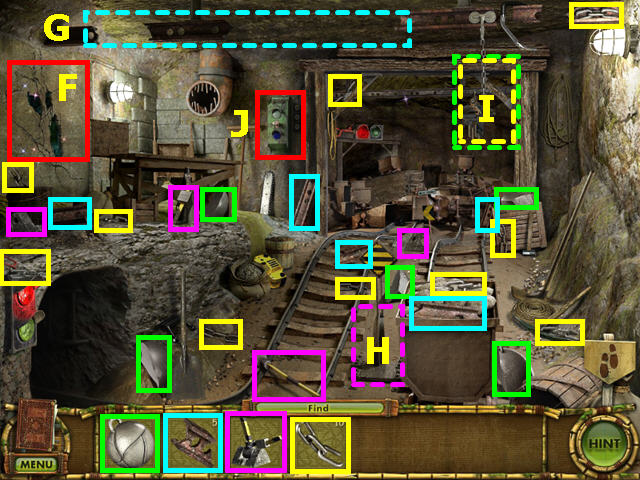
General Tips & Information
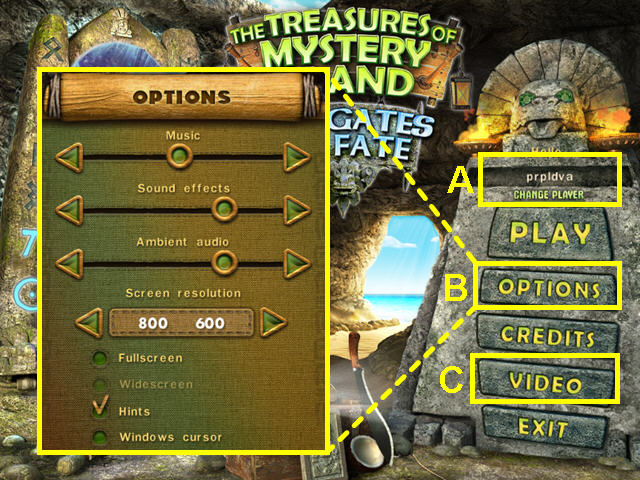
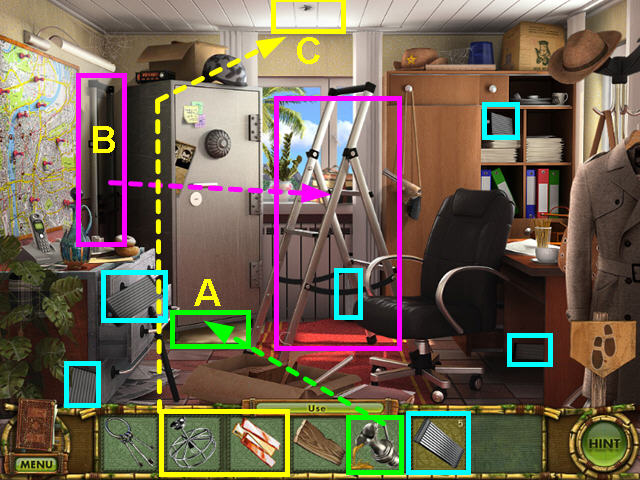
- From the main screen you may manage player profiles (A).
- The options menu allows for the adjustment of music and sounds volume (B).
- You may play this game in windowed or full screen mode and it supports widescreens.
- You may also adjust the resolution from the options menu.
- The custom cursor and/or hints may be disabled.
- You will unlock the videos to replay as you progress in the game (C).
- You have the choice of a brief tutorial once you start the game.
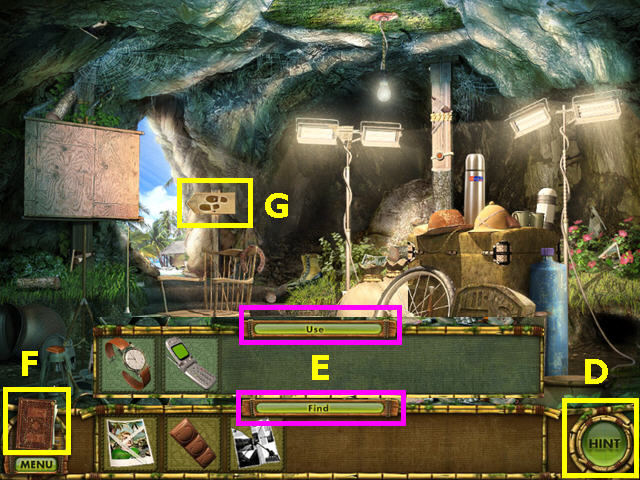
- Hints are unlimited, but must recharge before you can reuse (D).
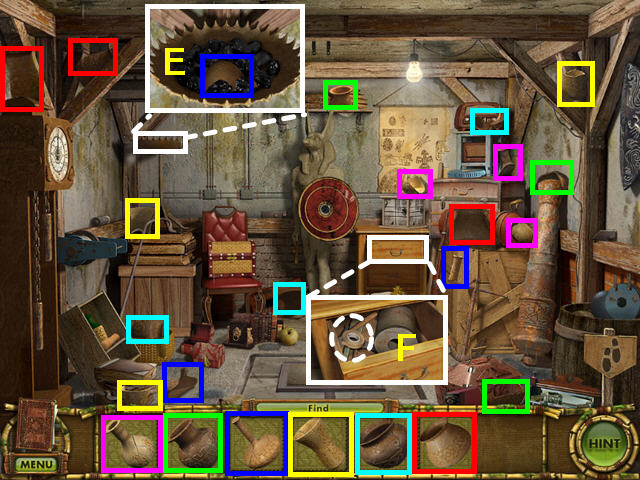
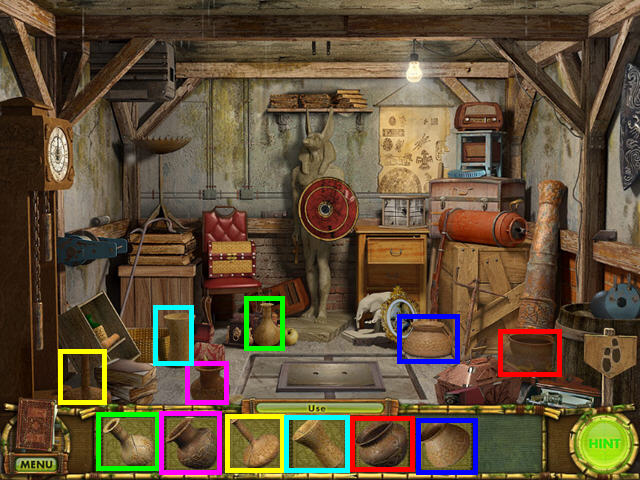
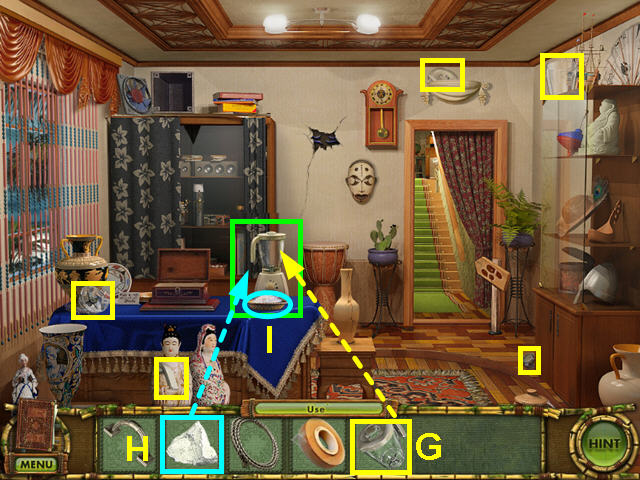
- Inventory and items you are searching for are in the bottom panel.
- Click on 'FIND' to open the inventory screen and click on 'USE' to return to the search list (E).
- Hover your cursor over an item for a description and a blow-apart showing the number of pieces.
- Your cursor will change to indicate what action is available on an item.
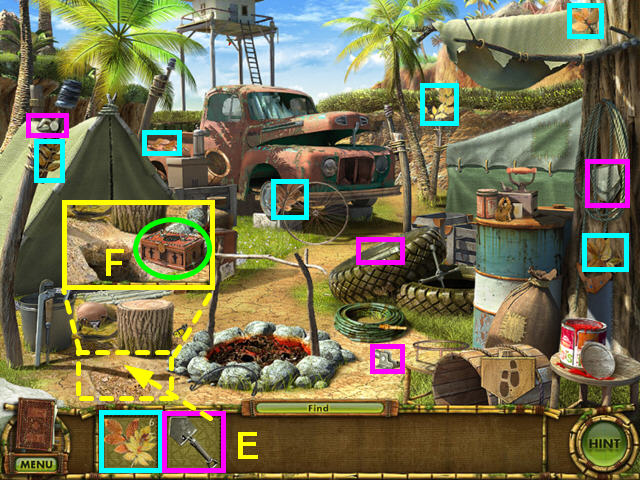
- The journal in in the lower left corner, just above the menu button (F).
- Two walking feet will appear on your cursor if you can move to another location. You may also click on the footsteps signs to change location (G).
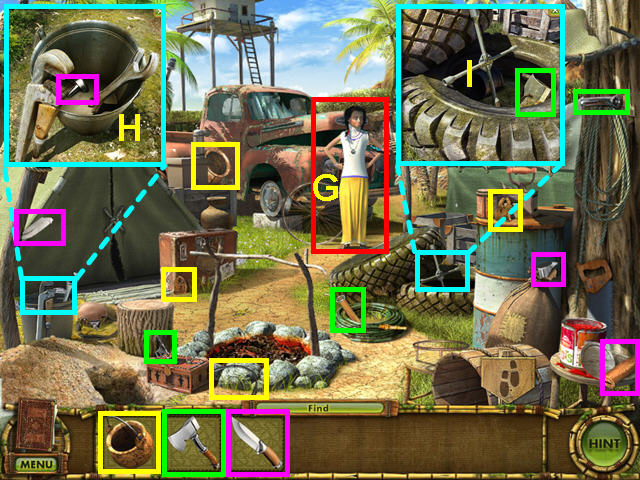
- The eye and question mark icons indicates that you can take a closer look.
- The hand icon shows you can interact with an item.
- The gears icon shows that an inventory item is needed.
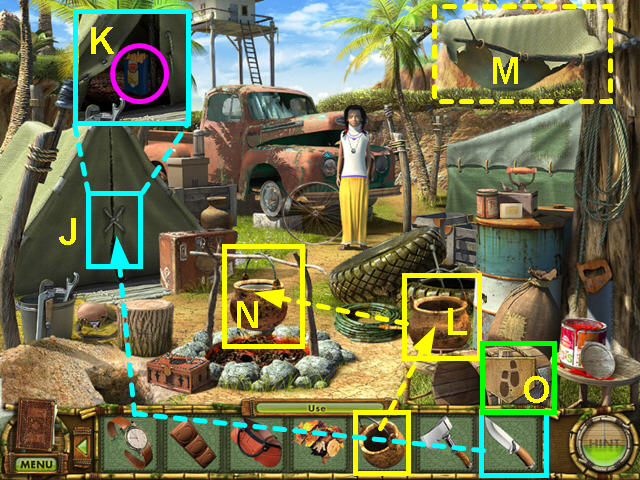
- Mini-games are skip-able immediately.
- Some mini-game have a refresh button to reset the puzzle, for others click on the close button then return.
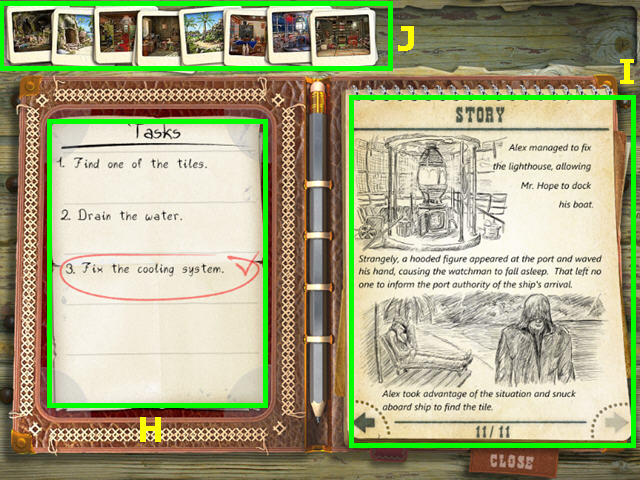
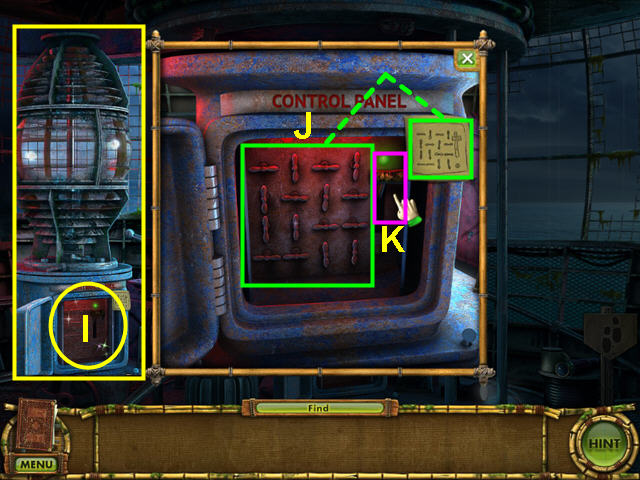
- The journal provide you with the status of current tasks on the left page (H).
- The right pages recap the tale thus far (I).
- Clicking on the upper tiles will jump you to the notes on another chapter (J).
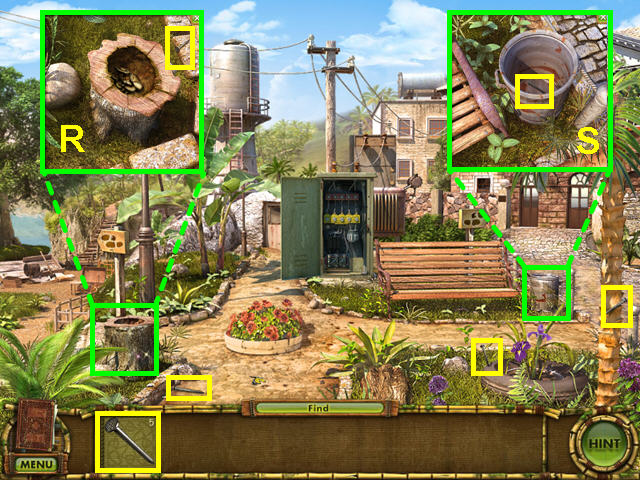
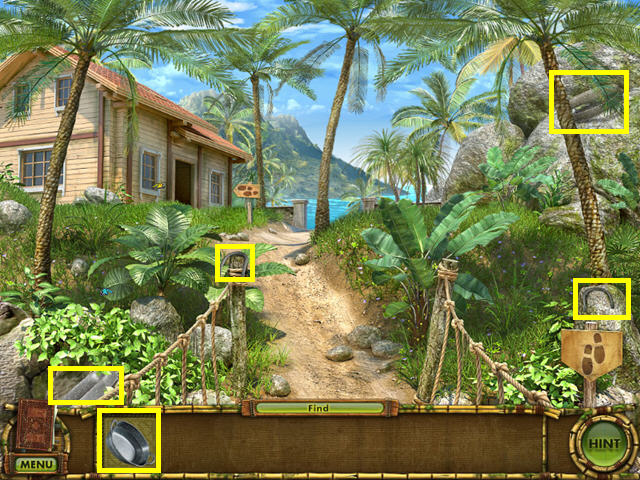
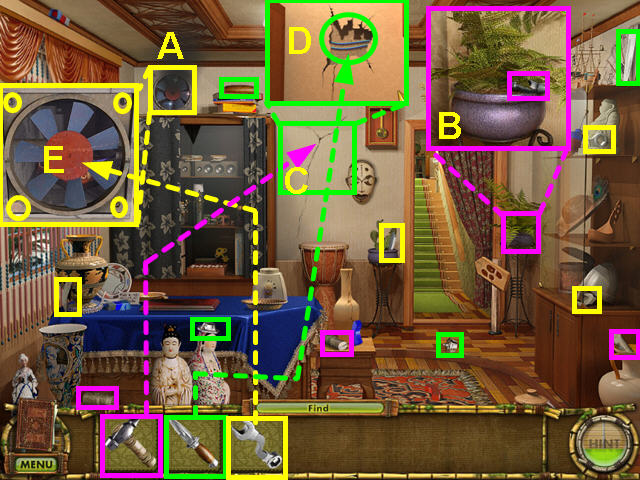
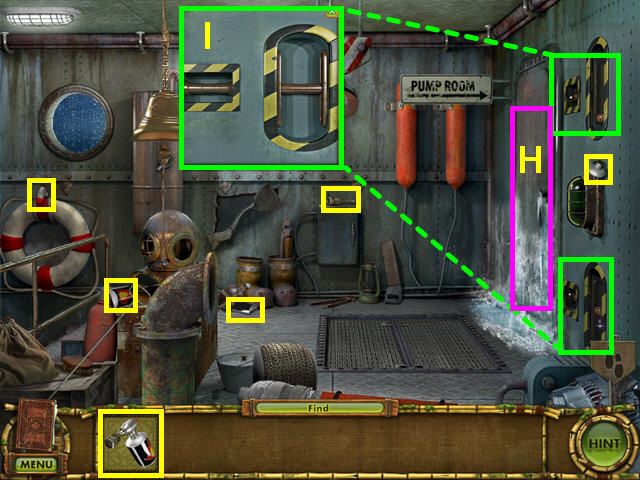
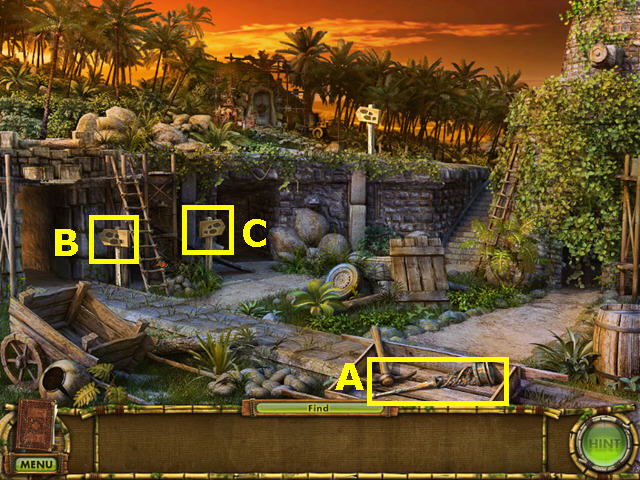
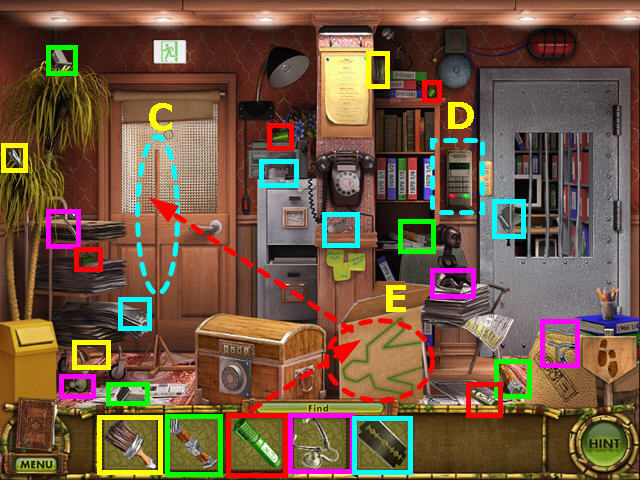
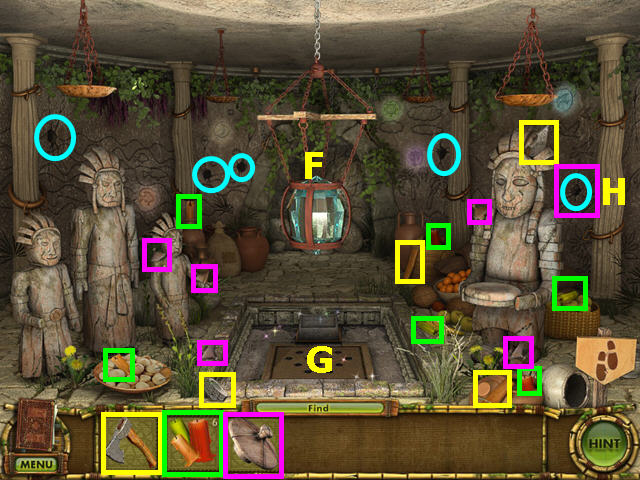
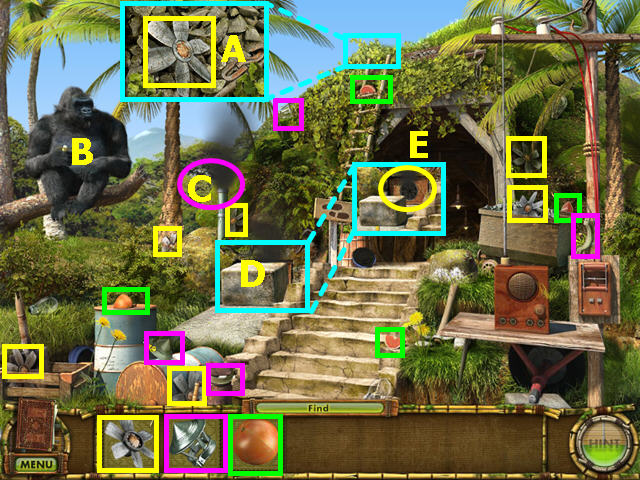
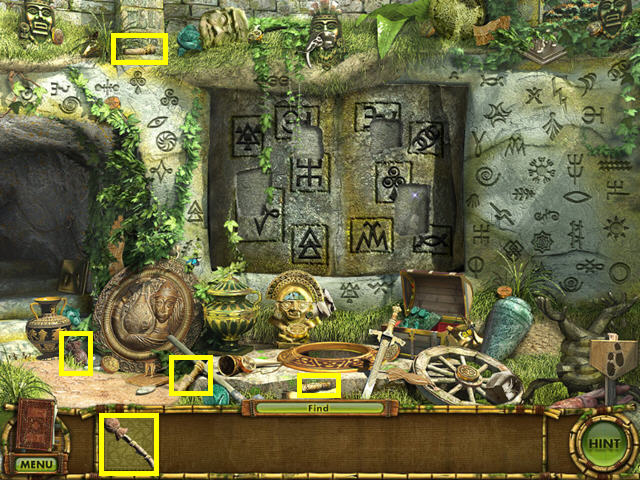
Chapter One: Escape the Cavern
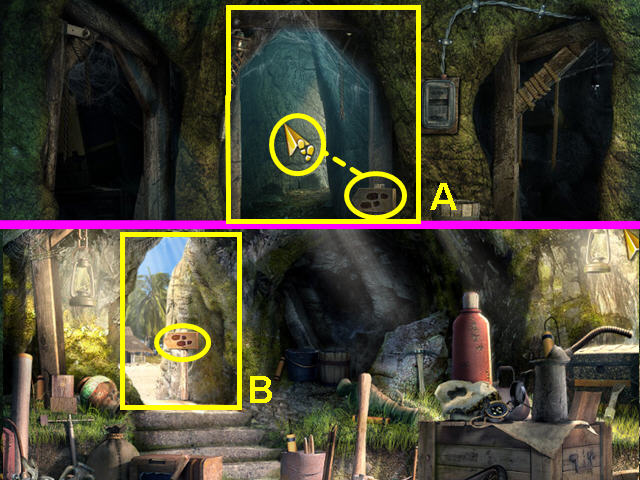
- Walk forward through the center tunnel by clicking on either the footsteps sign or when you see footsteps on your cursor (A).
- Move to exit the mine (B).
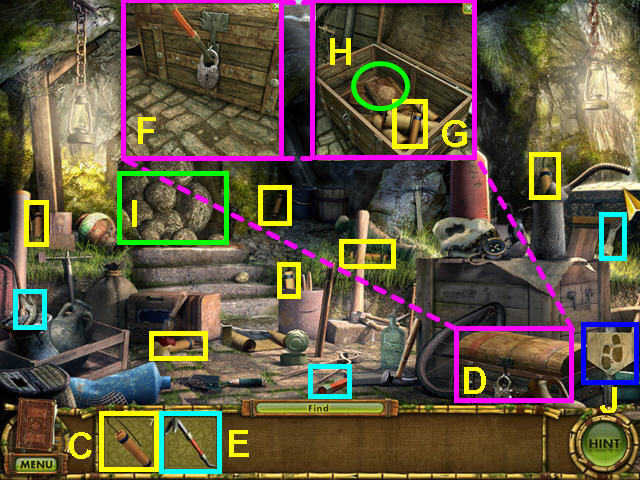
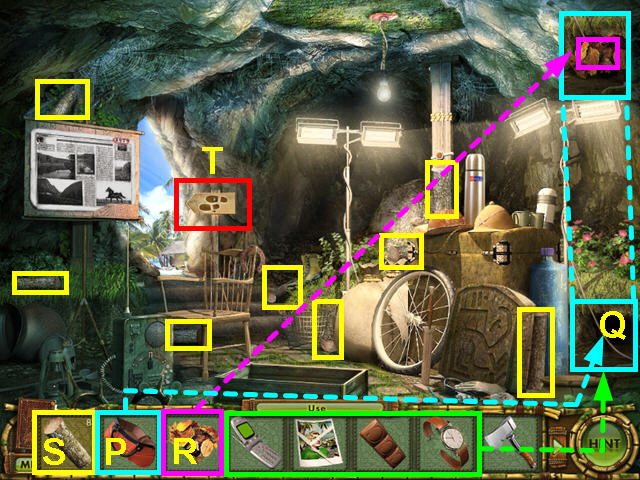
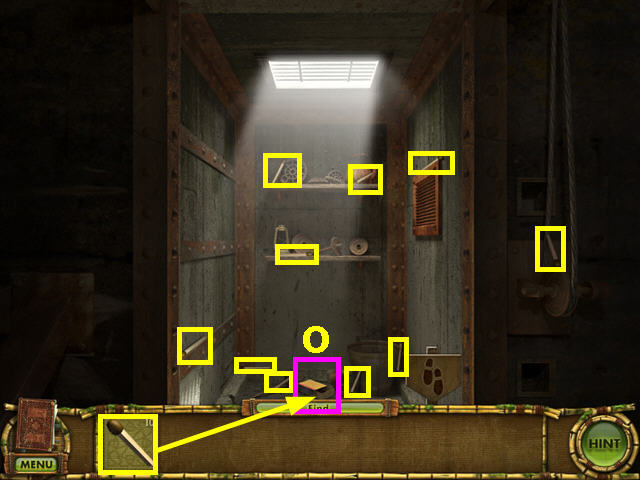
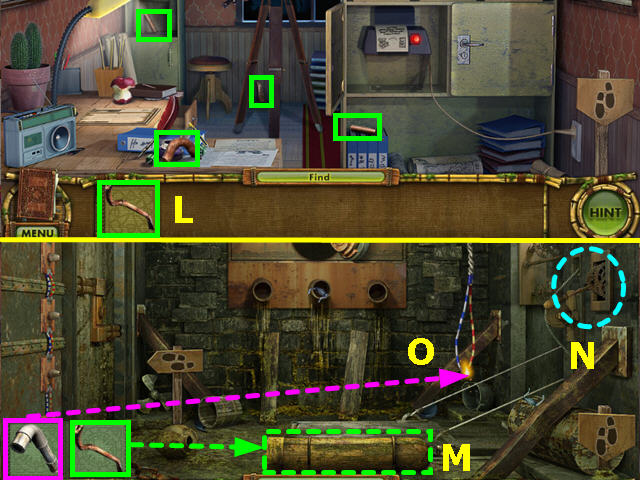
- After the entrance collapses, locate 6 of the 7 sticks of DYNAMITE (C).
- Look at the lock on the chest to learn you need a tool (D).
- Find the 3 pieces of the CROWBAR (E).
- Look at the close-up of the chest and use the CROWBAR on the lock (F).
- Click on the crowbar to break the lock.
- Click again on the chest to look inside.
- Take the final stick of DYNAMITE from the chest (G).
- Read the journal in the chest (H).
- Place the DYNAMITE on the cave-in (I).
- Use the lower left sign to move to the next room in the mine (J).
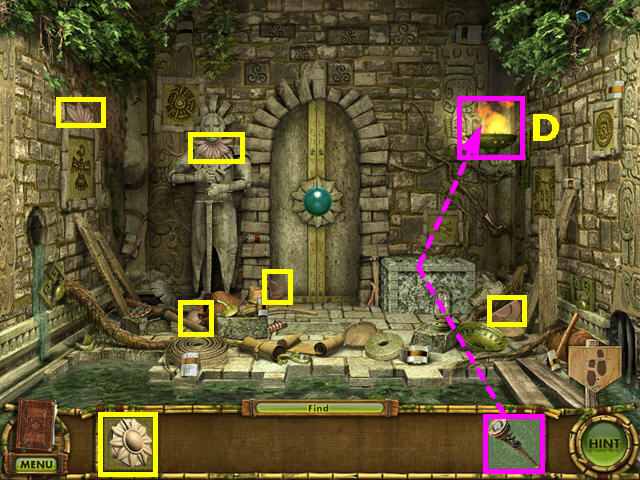
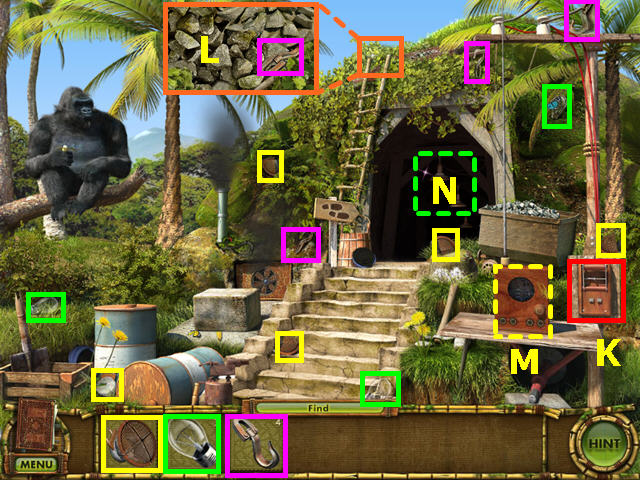
- Enter the left tunnel the click on the glowing Gate of Fate.
- The guardian appears then vines grow over the gate.
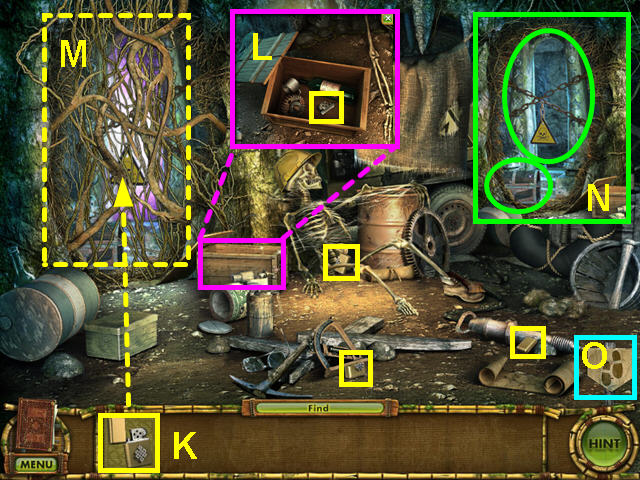
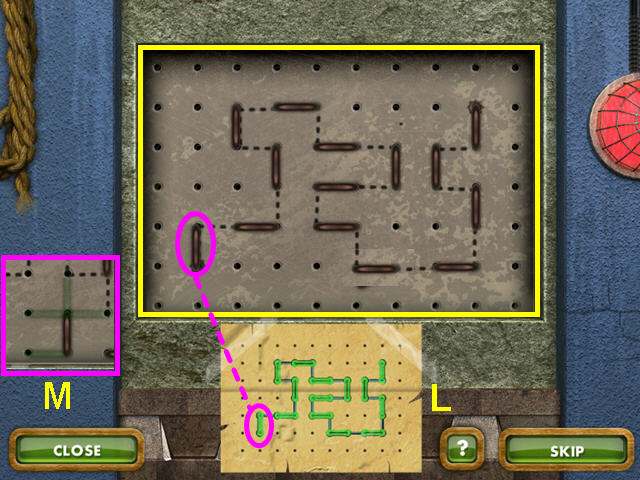
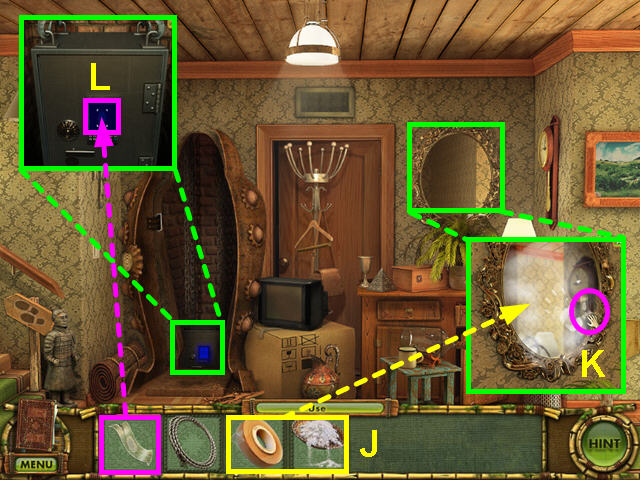
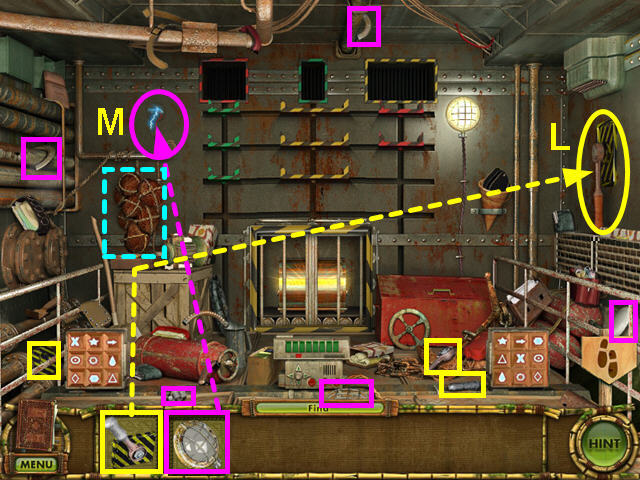
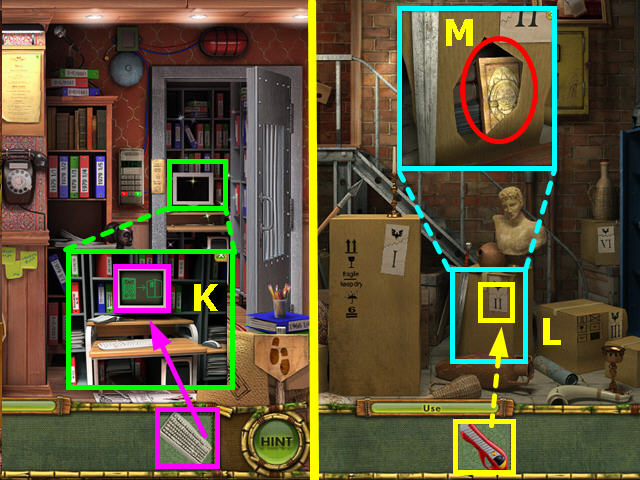
- Locate the pieces of the LIGHTER (K).
- Look in the box for the last LIGHTER piece (L).
- Use the LIGHTER on the vines (M).
- Look at the Gate and note that the chest needs a key (N).
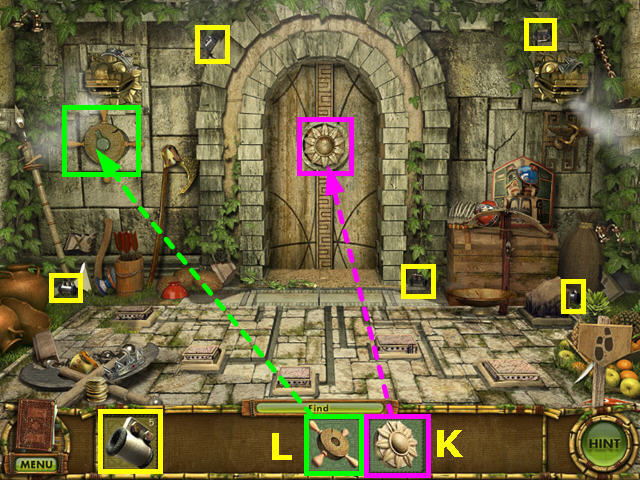
- Click on the sing in the lower left to move to the next room (O).
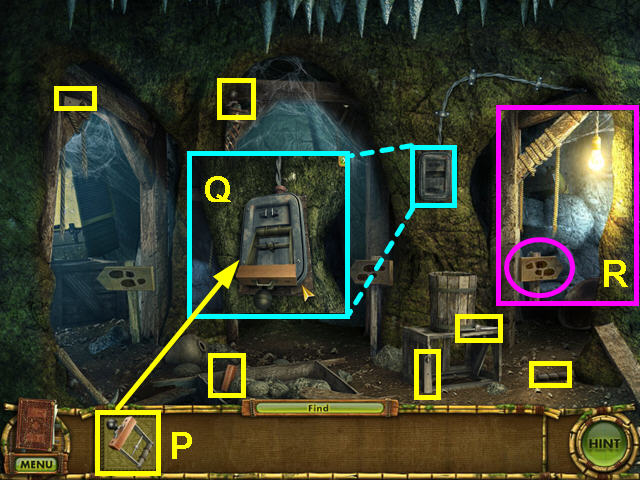
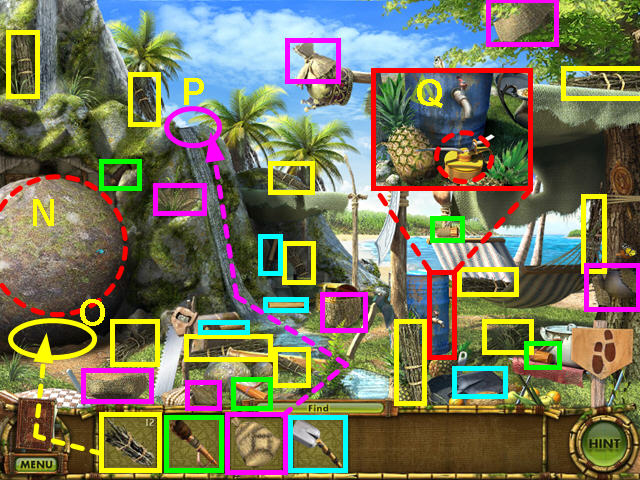
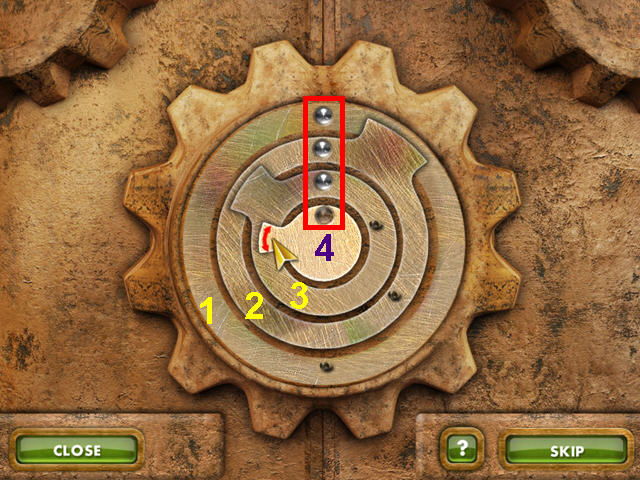
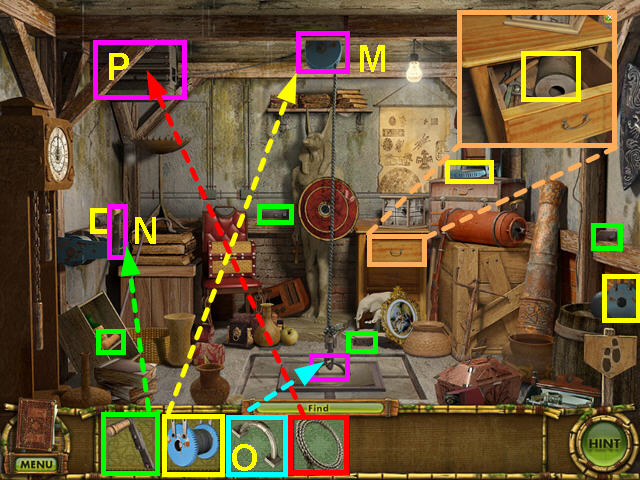
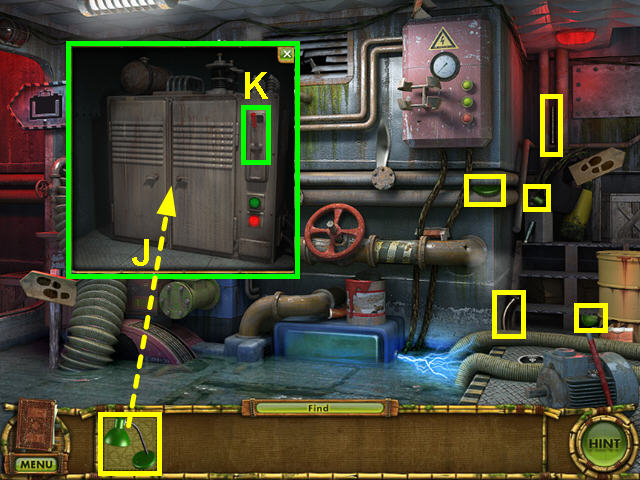
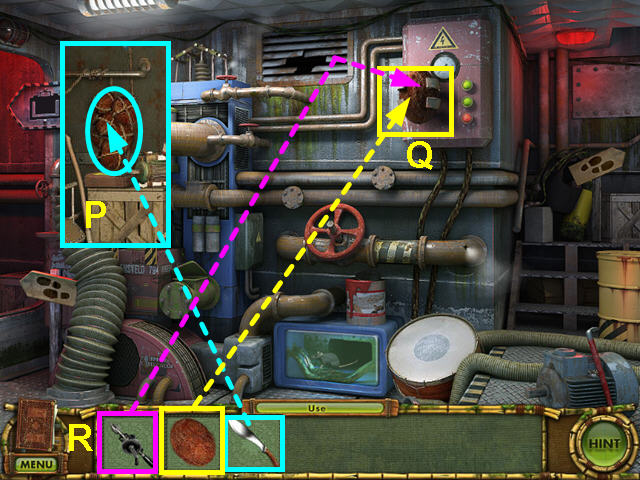
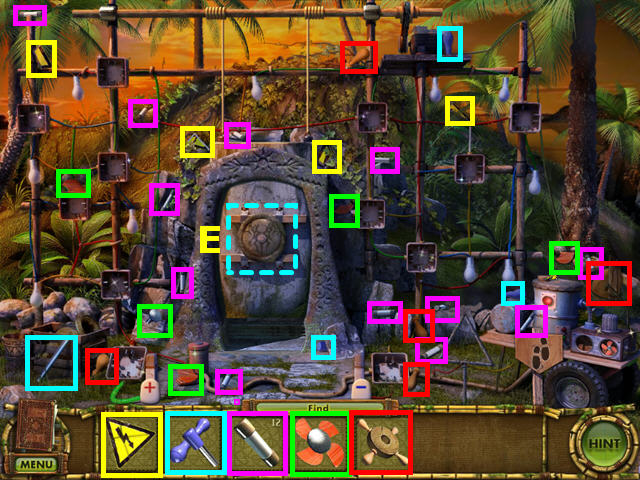
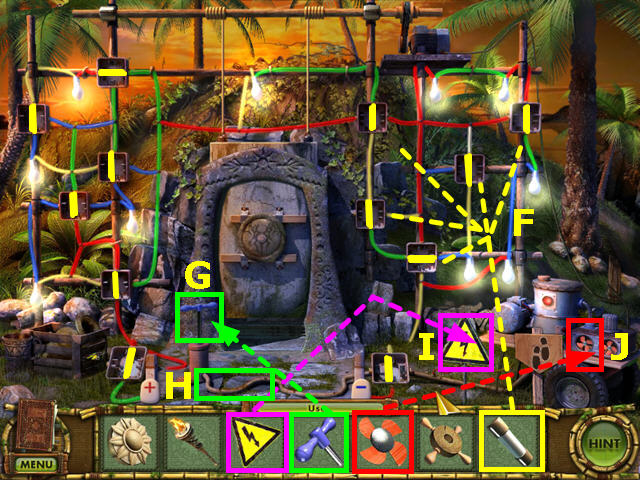
- Find the pieces of the SWITCH (P).
- Use the SWITCH on the circuit breaker (Q).
- Now that there is light, enter the far right tunnel (R).
- Look at the lid of the well and click on the chains to learn you need something to remove the chains (S).
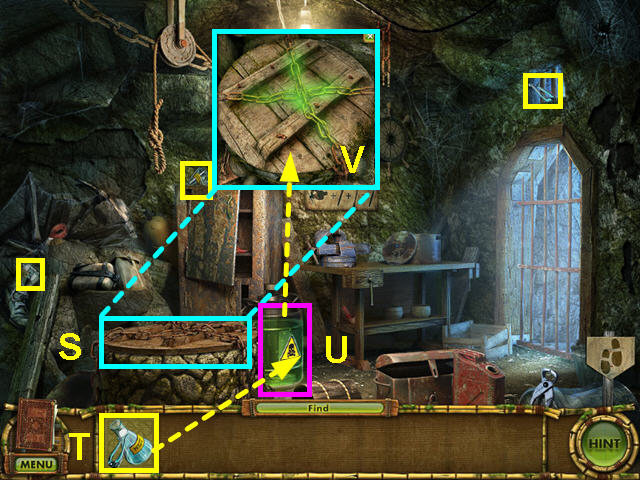
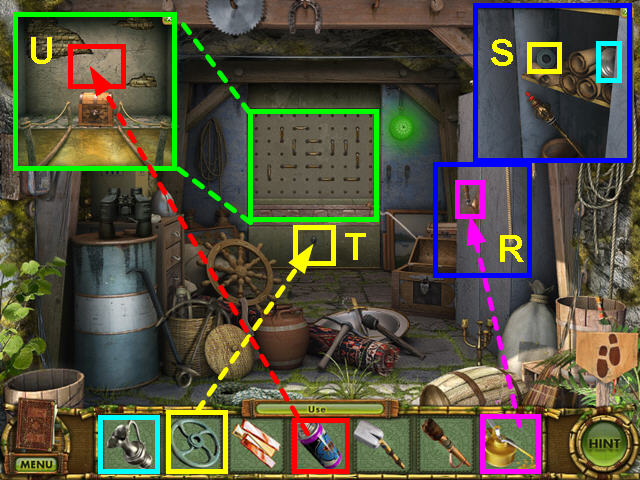
- Find the pieces of the FLASK (T).
- Use the FLASK to collect some ACID (U).
- Use the ACID-FILLED FLASK on the chains (V).
- Click on the well lid several times to push it off the well.
- Look down the well to learn you need to retrieve something from the bottom.
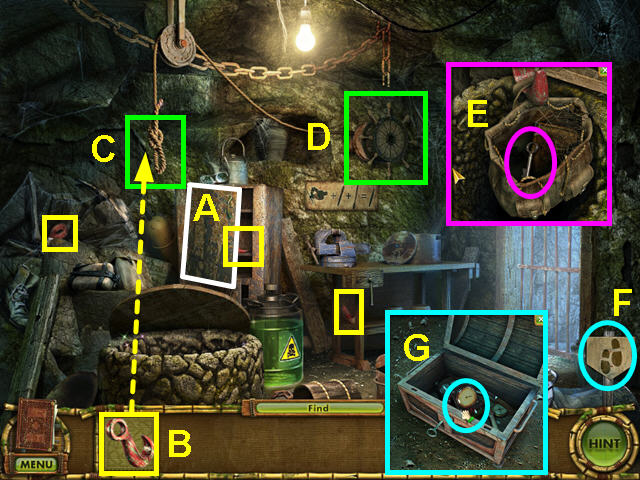
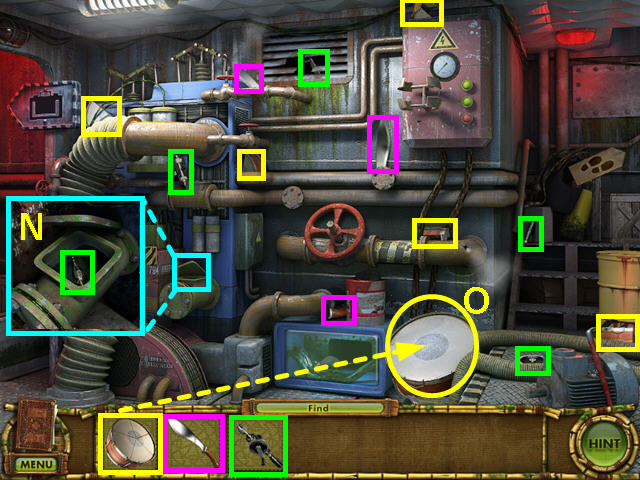
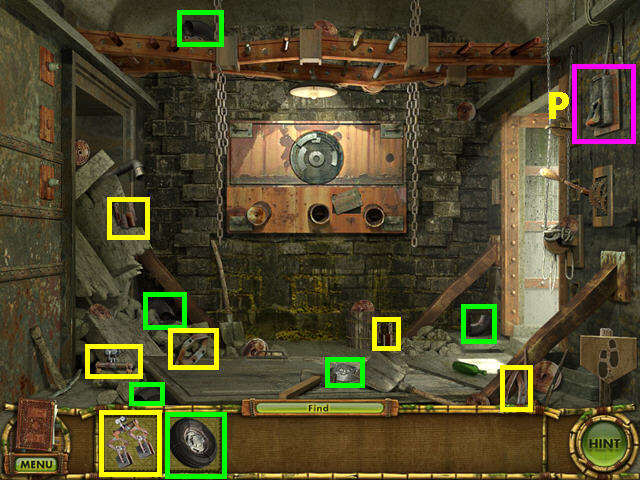
- Click on the loose cabinet door to move it out of the way (A).
- Collect the HOOK pieces (B).
- Use the HOOK on the rope (C).
- Click on the winch to lower the rope and retrieve the item (D).
- Look in the backpack and take the KEY (E).
- Exit the room (F) and enter the far left tunnel.
- Look at the close-up of the chest by the Gate and use the KEY on the lock.
- Click to open the chest and take the DETONATOR (G).
- Exit the room and enter the center tunnel.
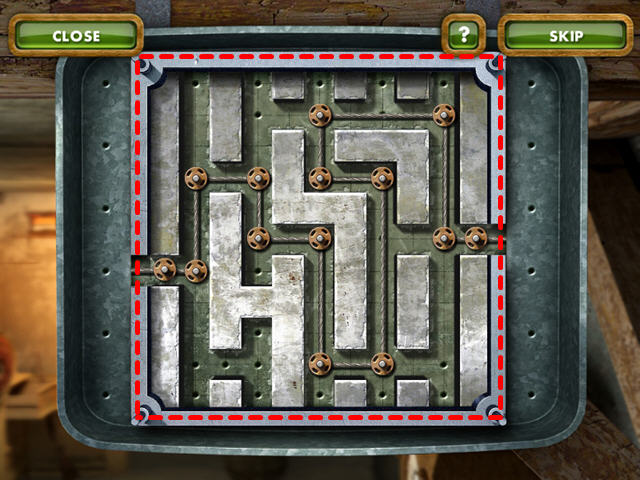
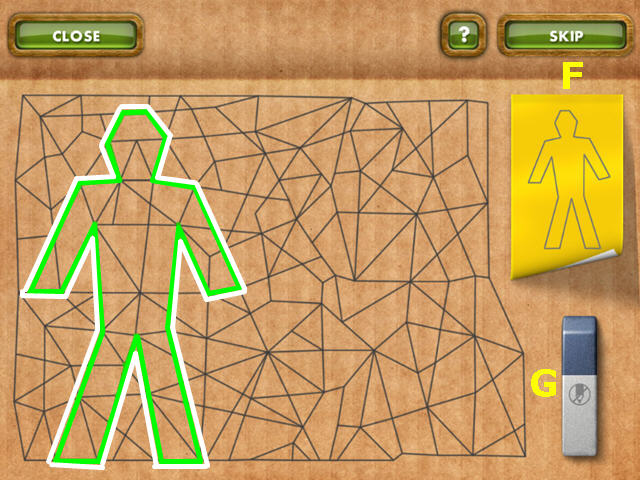
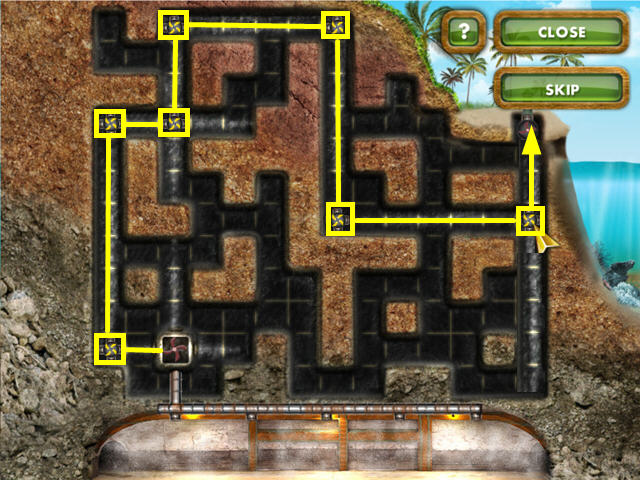
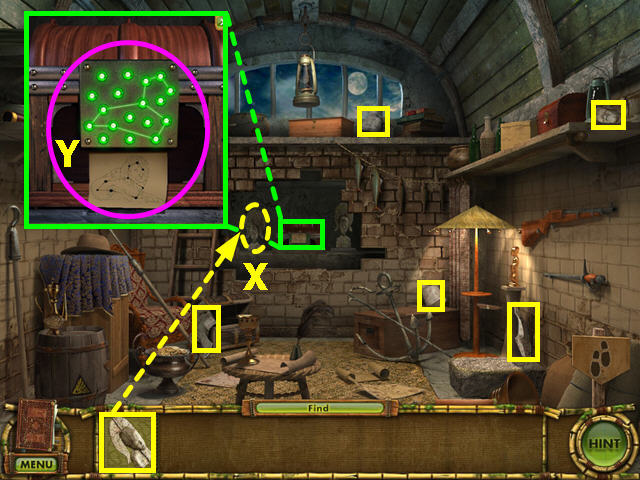
- Use the DETONATOR on the dynamite in the rocks to trigger a mini-game.
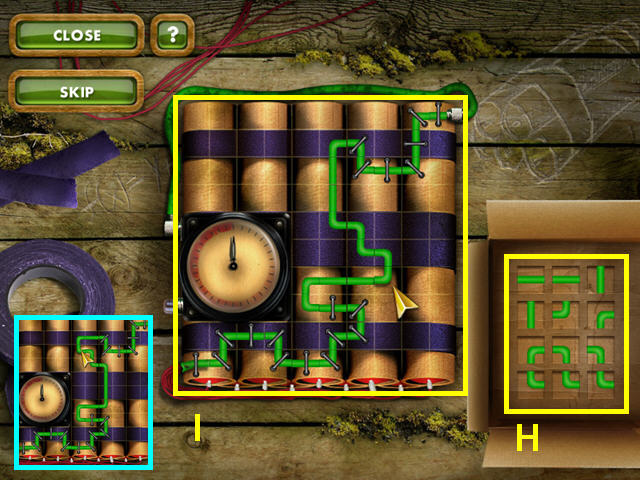
- The object of this mini-game is to complete the circuit by placing the wire pieces into the grid.
- Left-click to select a wire piece from the tray (H) and left-click to place the wire in the grid (I).
- Once the dynamite explodes, exit the cavern.
- There are several possible solutions to this mini-game.
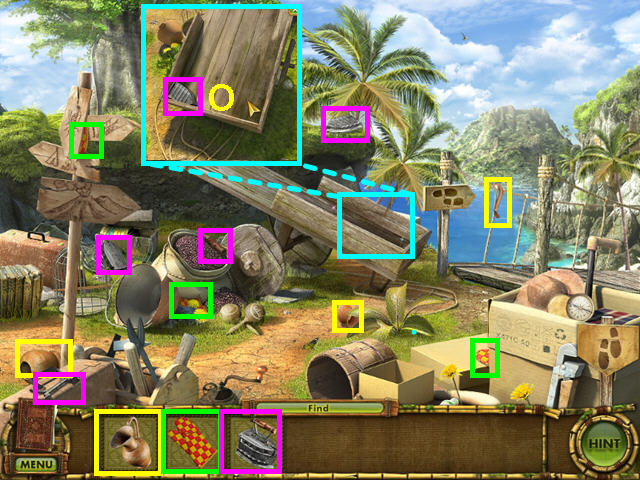
Chapter Two: Lisa in 1979
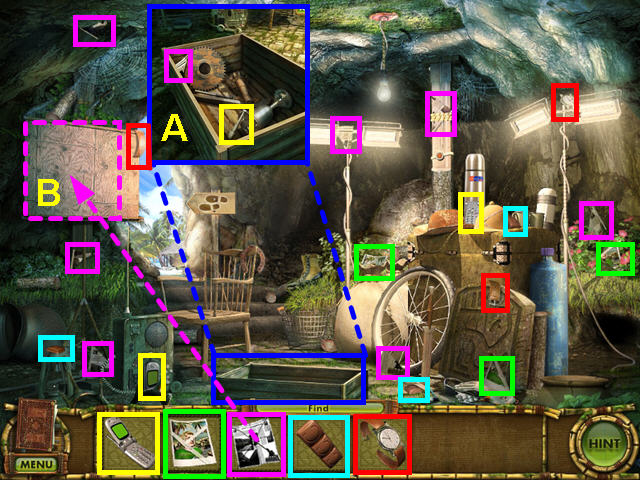
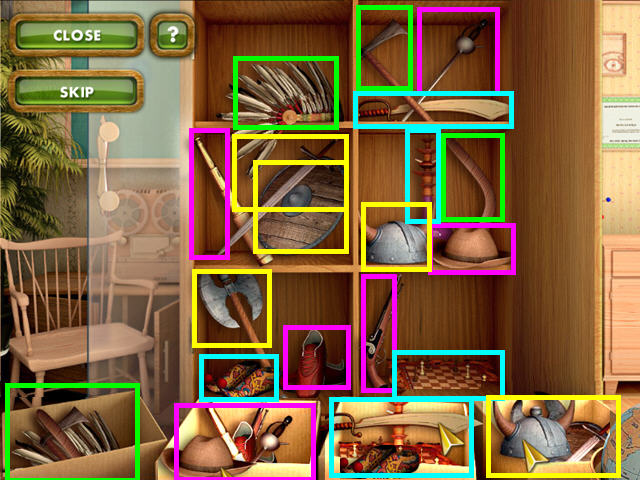
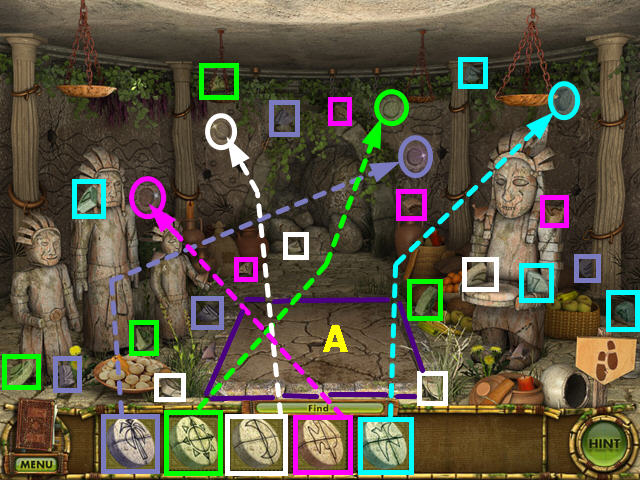
- Locate all the fragments of the color-coded items.
- Two pieces are located in the close-up view of the box (A).
- Once you have collected all the NEWSPAPER PIECES, use them on the easel board for a mini-game (B).
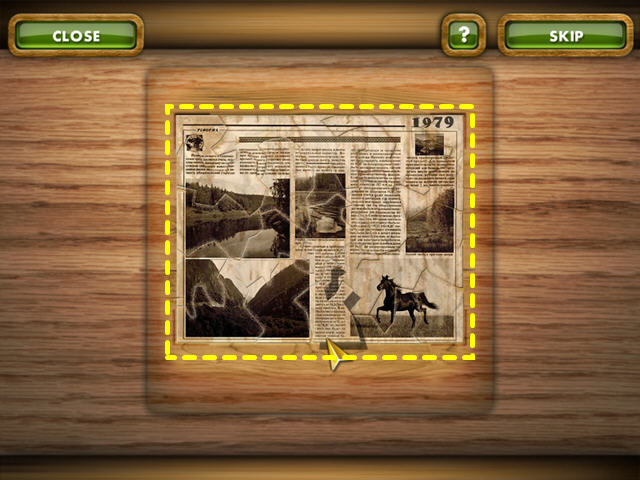
- Restore the newspaper in this jigsaw-style mini-game.
- Left-click to take or place a piece in the grid.
- Exit the cavern.
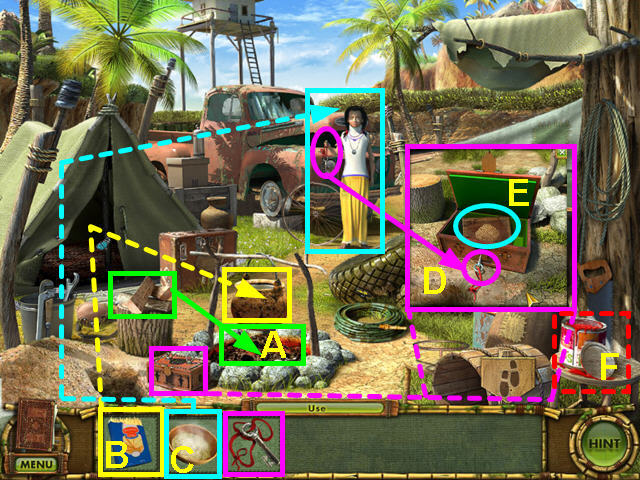
- Locate all the pieces of the PURSE (C).
- Walk to the right (D).
- Locate all the fragments of the color-coded items.
- Use the SHOVEL on the loose dirt (E).
- Click on the hole to remove the chest.
- Look at the chest to learn you need a key (F).
- Talk to Nicky to learn she is hungry (G).
- Locate all the fragments of the color-coded items.
- Look in the close-up of the bucket for a KINFE piece (H).
- Look in the close-up of the tire for an AXE piece (I).
- Use the KNIFE to cut open the tent (J).
- Take the PASTA from inside the tent (K).
- Place the POT on the stand (L).
- Click on the tarp to put water into the POT (M).
- Take the POT with WATER and hang it over the fire (N).
- Walk down to exit the scene (O).
- Walk down again to re-enter the cavern.
- Place the PURSE in the hole (P).
- Put the CELLPHONE, CHOCOLATE, WATCH, and PHOTO into the purse (Q).
- Place the LEAVES over the purse to hide it (R).
- Collect the 8 LOGS (S).
- Click on the sign to exit the cavern (T).
- Walk right to return to the campsite.
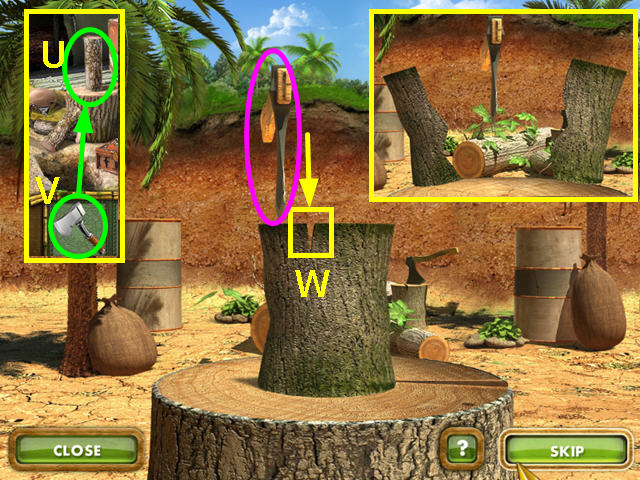
- Place the LOGS on the stump to the left of the campfire (U).
- Use the axe on the logs to trigger a mini-game (V).
- Left-click when the axe is directly over the notch in the log to split the wood (W).
- There are 8 logs to split.
- Place the CUT LOGS onto the fire (A).
- Put the PASTA into the pot (B).
- The BOWL of COOKED PASTA will go into your inventory- give it to Nicky (C).
- Take the KEY from Nicky and use it to unlock the chest (D).
- Read the journal (E).
- Make note of the can of red paint (F).
- Walk down to exit the campsite.
- Locate all the fragments of the color-coded items.
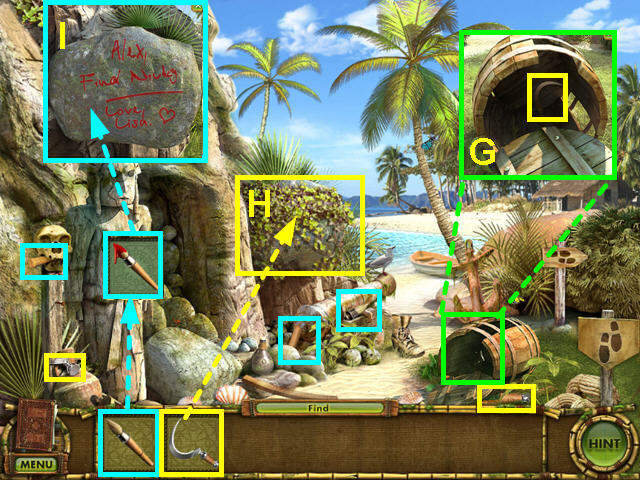
- Look in the close-up of the barrel for a SCYTHE piece (G).
- Use the SCYTHE on the vines (H).
- Walk right to the campsite and use the BRUSH on the red paint.
- Walk down to exit the campsite.
- Use the BRUSH with PAINT on the rock to leave a message (I).
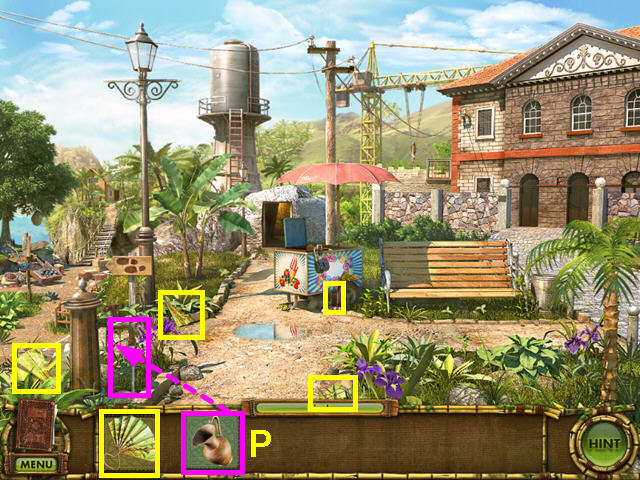
Chapter Three: Alex in 1989
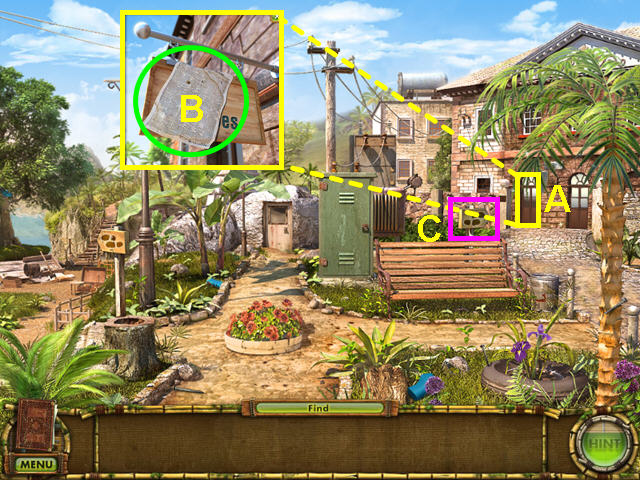
- Look at the sparkling door to see a close-up of the sign (A).
- Click on the newspaper to remove it from the sign (B).
- Select the right footsteps sign to enter the building (C).
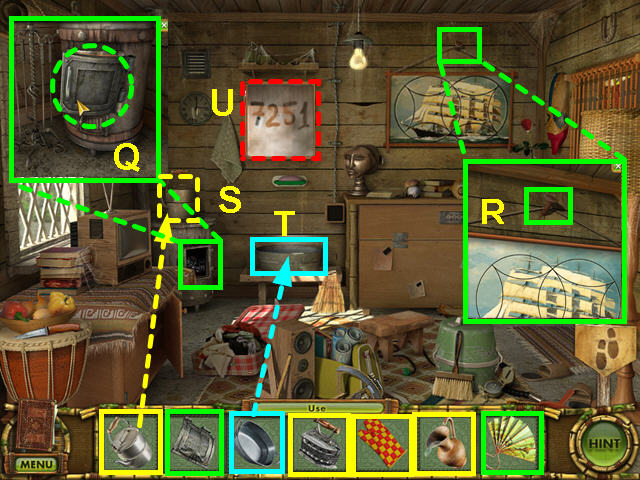
- Talk to the archivist on the left when you first enter the building.
- Locate all the pieces of the color-coded items.
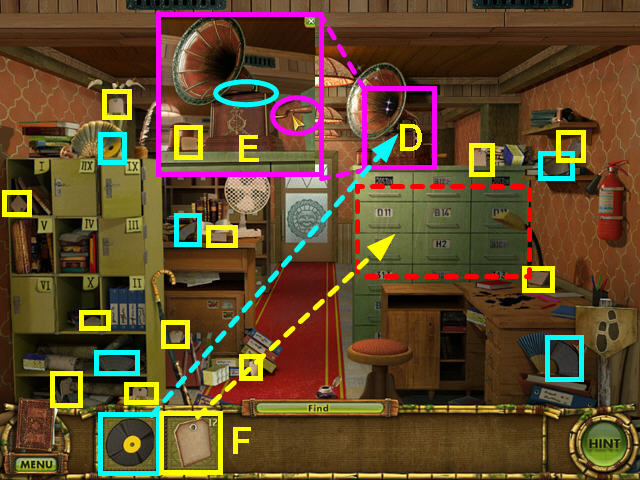
- Once you complete the RECORD, use it on the Victrola (D).
- Turn the crank to find the last LABLE (E).
- Use the LABELS on the right cabinets for a mini-game (F).
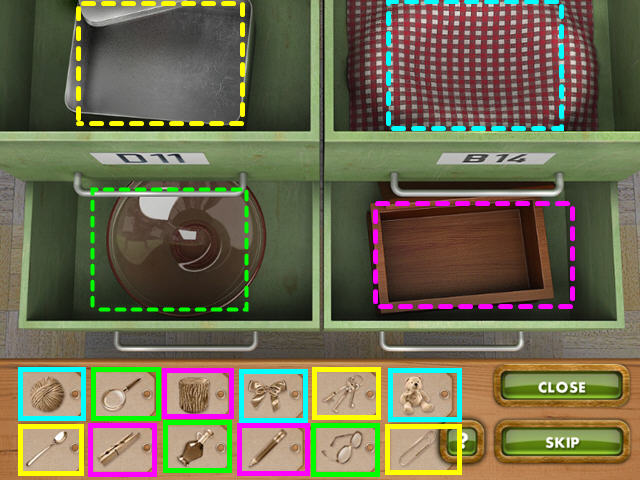
- The object of this mini-game is to sort the labels by material.
- All items made of metal go in the upper left, and cloth items go in the upper right.
- Glass items go in the lower left, and wooden items in the lower right.
- Locate all the fragments of the color-coded items.
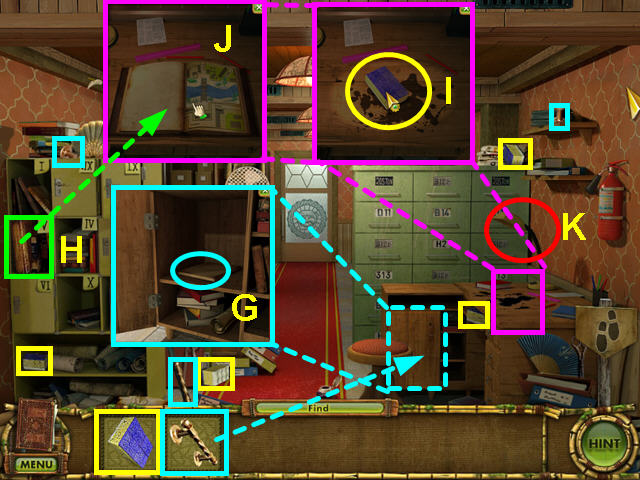
- Use the HANDLE to open the cupboard and read the document (G).
- Take the MAPBOOK from locker “V” (H).
- Look at the close-up of the desk and use the SPONGE on the ink spill (I).
- Left-click, hold and drag the sponge until the stain is gone.
- Place the MAPBOOK on the desk (J).
- Try to read the MAPBOOK, but it is too dark.
- Note the desk lamp (K).
- Walk down to exit the archive office.
- Walk left to the bridge and take the LIGHT BULB from the trunk lid.
- Return to the archive office and use the LIGHT BULB on the desk lamp.
- When the fuse blows, exit the archive office.
- Look at the transformer with smoke coming out of the grate.
- Return to the archive office and take the FIRE EXTINGUISHER off of the right wall.
- Exit the archive office.
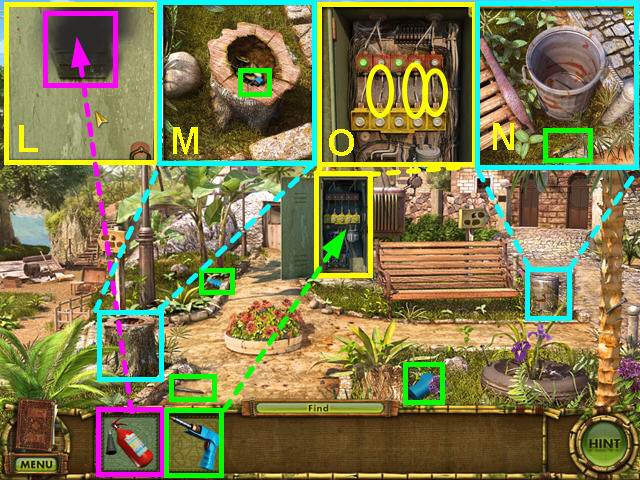
- Look at the close-up of the transformer and use the FIRE EXTINGUISHER on the smoke (L).
- Left-click, hold and drag the extinguisher until the smoke is gone.
- Look inside the transformer to learn you need to solder the wires.
- Locate all the pieces of the SOLDERING IRON.
- Look inside the tree stump for one piece (M).
- Look in the garbage can for another piece (N).
- Use the SOLDERING IRON on the 3 severed wires in the transformer (O).
- Return to the archive office and look at the desk.
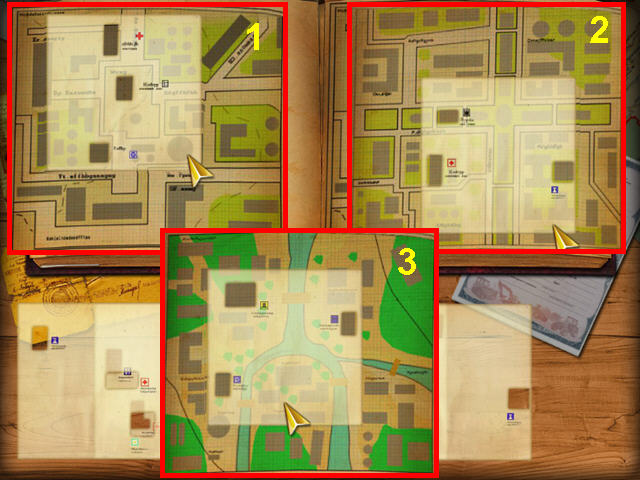
- Click on the map book for a mini-game.
- The object is to match the overlays to the pages of maps.
- The cutouts in the overlay represent buildings on the map.
- Find the overlay that has the same pattern as the map.
- Once the overlay is correct, the page will turn.
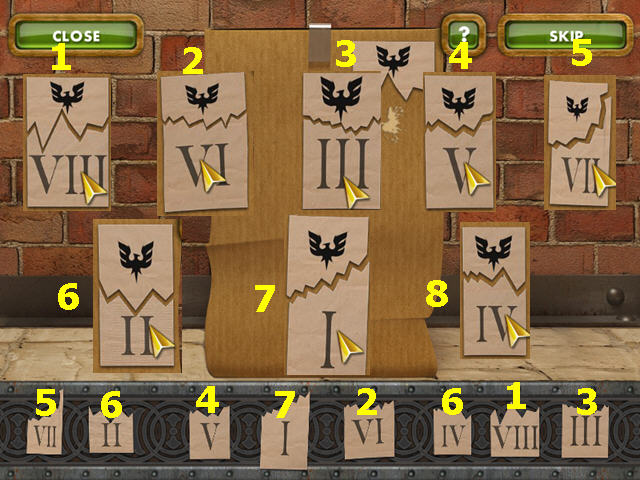
- These are the first 3 map solutions (1-3).
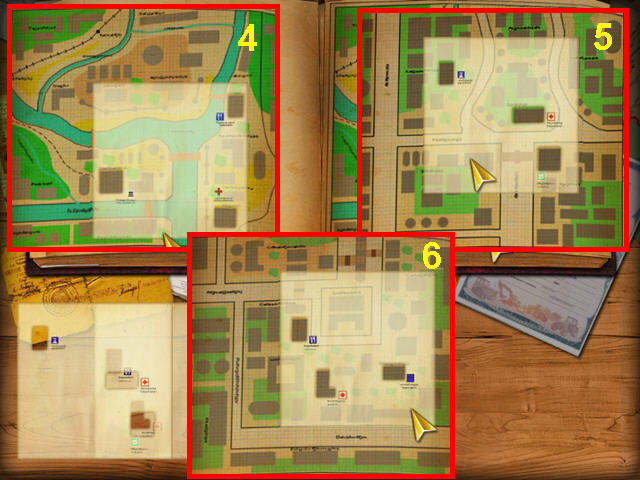
- These are the last 3 map solutions (4-6).
- Click again on the map book to learn the way to Nicky's.
- Exit the archive office, then click on the left sign to walk to the bridge.
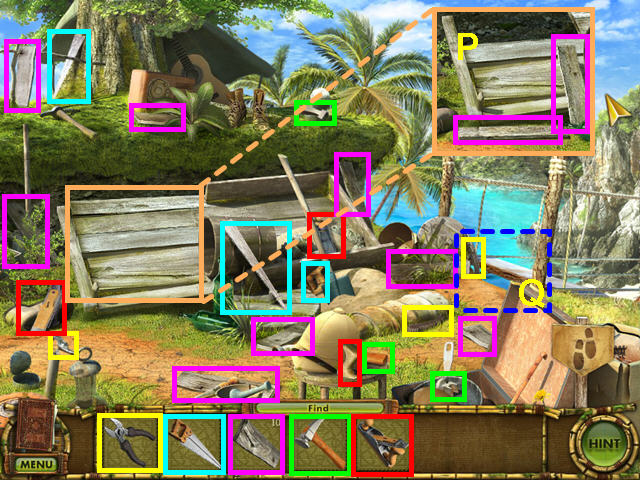
- Locate all the fragments of the color-coded items.
- Use the SAW on the left end of the wagon for 2 PLANKS (P).
- Place the PLANKS the end of the bridge, then place the PLANE, HAMMER, and PLIERS on the planks (Q).
- Walk down to return to the transformer area.
- Locate all the NAILS.
- Look inside the tree stump for one nail (R).
- Look in the garbage can for another nail (S).
- Walk left and return to the bridge.
- Place the NAILS with the planks and tools, then click on the pile for a mini-game.
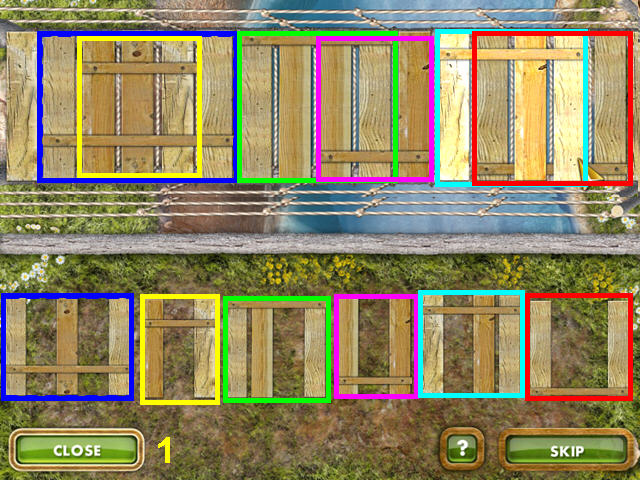
- The object is to place the planks and repair the bridge.
- Place the pieces so that no planks overlap and all spaces are filled.
- This is the first of 3 sections to solve (1).
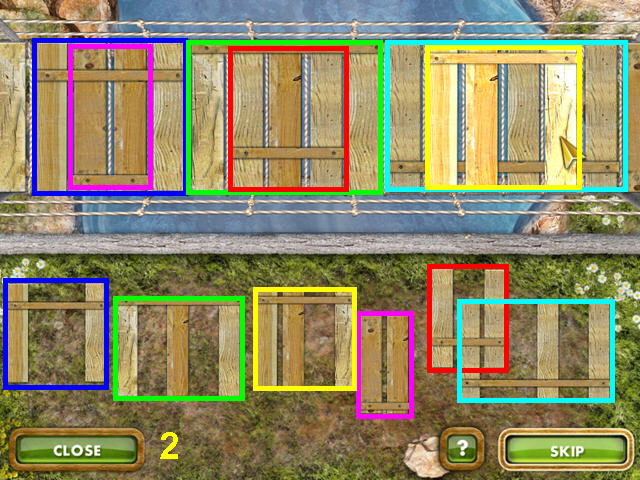
- This is the second of 3 sections to solve (2).

- This is the third of 3 sections to solve (3).
Chapter Four: Lisa and the Archeologist's House
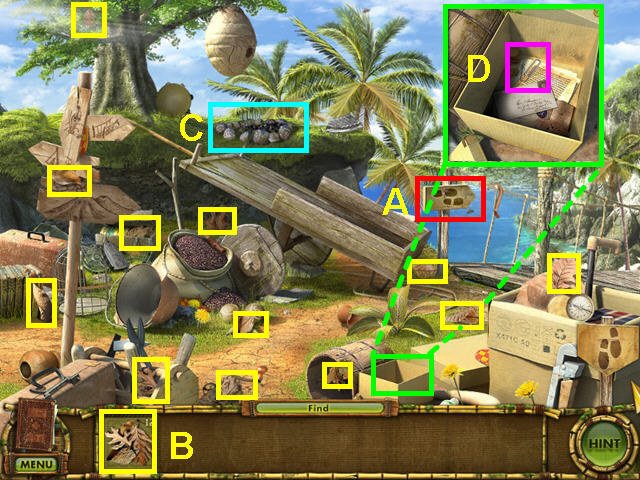
- Walk left to the bridge.
- Walk right to try and cross the bridge (A).
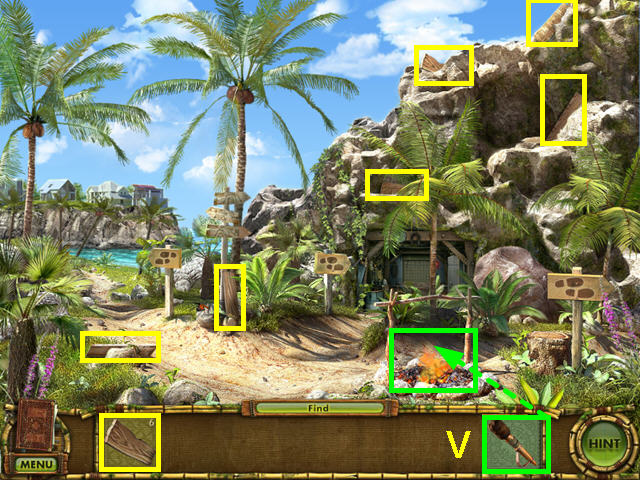
- Collect all the LEAVES (B).
- Place the LEAVES in the fire-pit below the bee hive (C).
- Look in the box and take the PAPERCLIP (D).
- Walk down to exit the bridge area.
- Locate all the fragments of the color-coded items.
- Look at the close-up of the water spigot and use the WATER TAP HANDLE to turn the water on (E).
- Use the BOWL to collects some water (F).
- Look at the close-up of the ice cream cart and use the PAPERCLIP on the lock (G).
- Place the BOWL of WATER into the freezer area (H).
- Use the HAIRBRUSH to polish the ice in the bowl.
- Take the ICE LENS.
- Walk left to return to the bridge area.
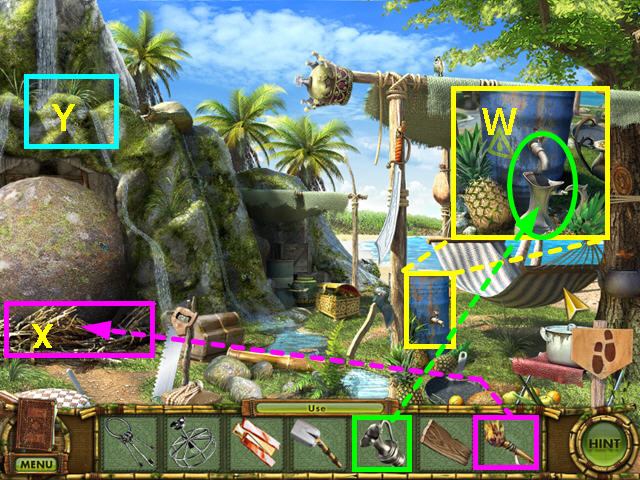
- Try to use the ICE LENS to light the leaves under the beehive, but the leaves are blocking the sun (I).
- Take the PROP and use it on the branches on the left side of the tree (J).
- Use the ICE LENS on the leaves to trigger a mini-game.
- The object of this mini-game is to move the lens to focus the sunlight and start a fire.
- Left-click, hold and drag the lens into position (K).
- Place it where the light is small, focused and intense (L).
- You will see smoke when properly placed.
- Walk right to cross the bridge, then left to enter the archeologist's house.
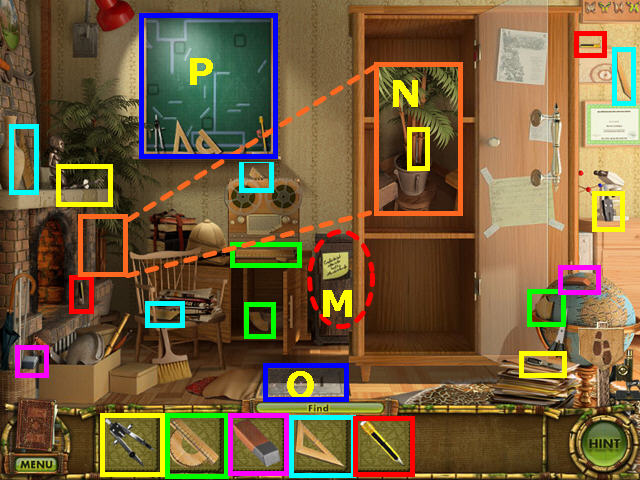
- Click on the cloth hanging on the bureau (M).
- Look at the lock that was hidden beneath the cloth.
- Locate all the fragments of the color-coded items.
- Look at the close-up of the stove and place the COAL inside (N).
- Exit the house.
- Locate all the fragments of the WASH BASIN.
- Walk down to cross the bridge.
- Locate all the fragments of the color-coded items.
- Look in the back of the cart for a piece of the IRON (O).
- Walk down to leave the bridge area.
- Use the JUG to get water at the spigot (P).
- Collect all the FAN pieces.
- Walk left, right, then left to return to the archeologist's house.
- Look at the close-up of the stove and use the FAN on the coals (Q).
- Place the STOVE DOOR on the stove.
- Take the NAIL used to hang the painting and use it on the stove door (R).
- Place the KETTLE on top of the stove (S).
- Pour the JUG of WATER into the kettle.
- Use the OVEN MITT to take the KETTLE of HOT WATER.
- Place the WASH BASIN under the mirror (T).
- Pour the KETTLE of HOT WATER into the WASH BASIN.
- Look at the mirror to see the code (U).
- Select the fallen painting for a mini-game.
- Restore the painting by rotating the 2 circles and swapping the pieces.
- If you make a mistake, select close to exit and the puzzle will reset.
- To solve, make the following moves:Turn the right wheel clockwise. Rotate the left wheel counterclockwise. Turn the right wheel clockwise. Rotate the left wheel counterclockwise twice. Turn the right wheel counterclockwise. Rotate the left wheel clockwise. Turn the right wheel clockwise twice. Rotate the left wheel counterclockwise. Turn the right wheel counterclockwise twice. Rotate the left wheel clockwise. Turn the right wheel clockwise. Rotate the left wheel counterclockwise. Turn the right wheel clockwise.
- Look at the close-up of the lock and enter the numbers from the mirror (V).
- Press the red button to open the compartment.
- Take the WET PAPERS and place them on the table (W).
- Look at the news report on the television (X).
- Place the IRON on the stove to get hot (Y).
- Take the HOT IRON and use it on the wet papers (Z).
- Look at the the dry papers.
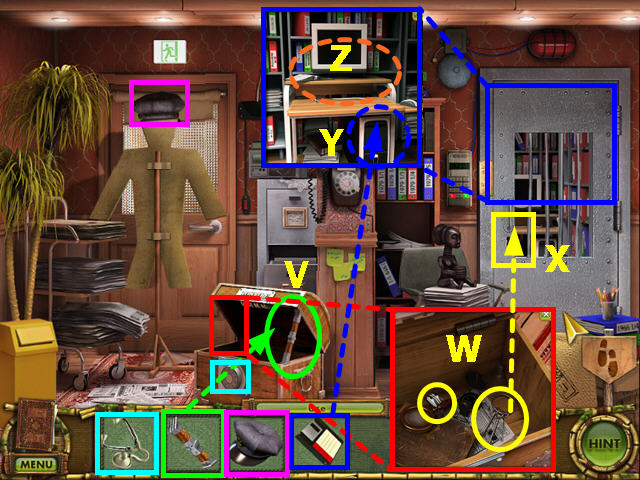
Chapter Five: Lisa and the Gang Leader's Treasure
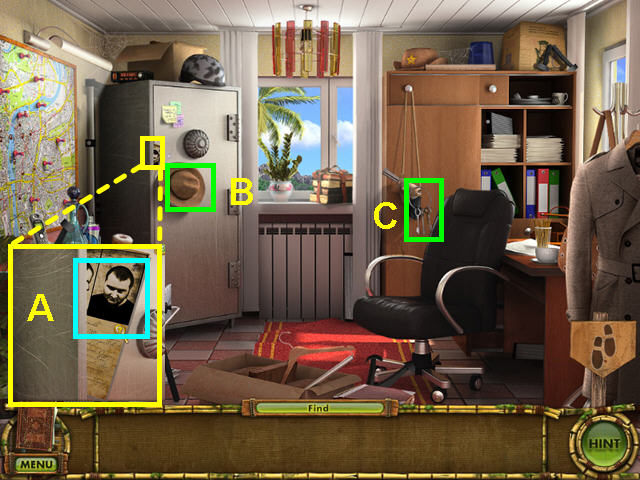
- Walk froward to enter the police station.
- Look at the close-up of the safe and click on the gangster's photo (A).
- Take the HAT hanging on the safe handle (B).
- Take the KEYS hanging on the revolver (C).
- Locate all the fragments of the color-coded items.
- Look in the box on the floor for a piece of the CEILING LAMP GLASS and the HANGAR (D).
- Look on desk for a piece of the CEILING LAMP GLASS and the CEILING LAMP (E).
- Take the BUG SPRAY off the left counter (F).
- Place the HANGAR, then the HAT on the top of the coat rack (G).
- Try to hang the ceiling LAMP, but you need a stepladder.
- Try to move the safe, but you need to make the floor slippery.
- Walk down to exit the Police station.
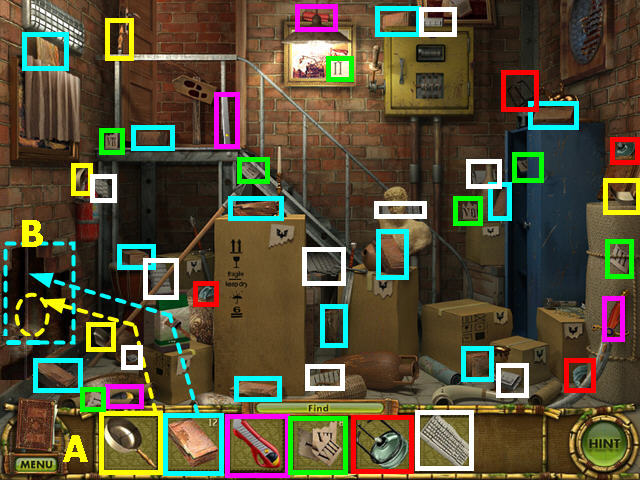
- Walk down again and click on the center sign to enter the cave.
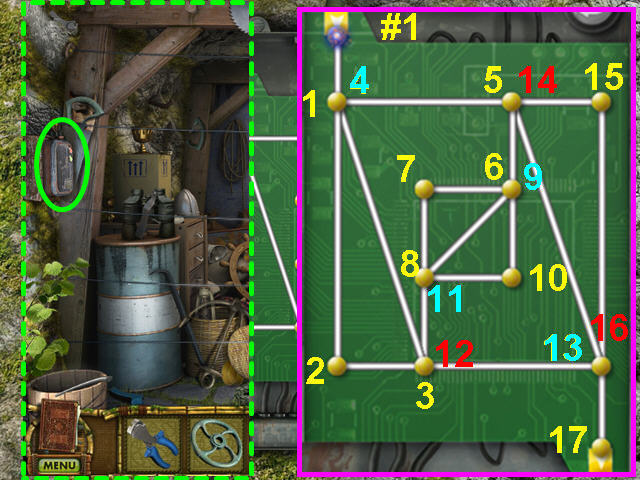
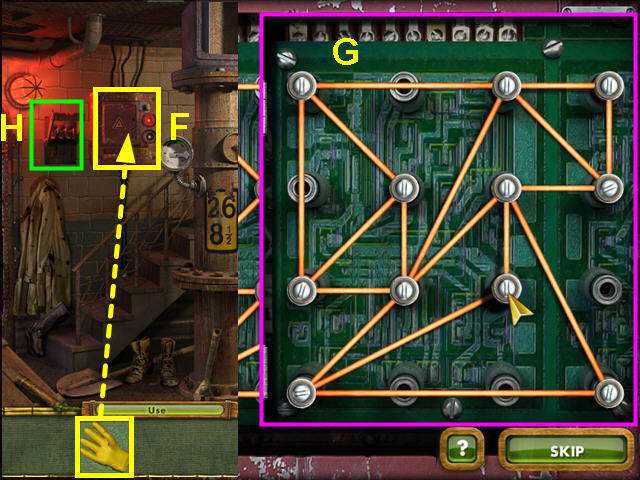
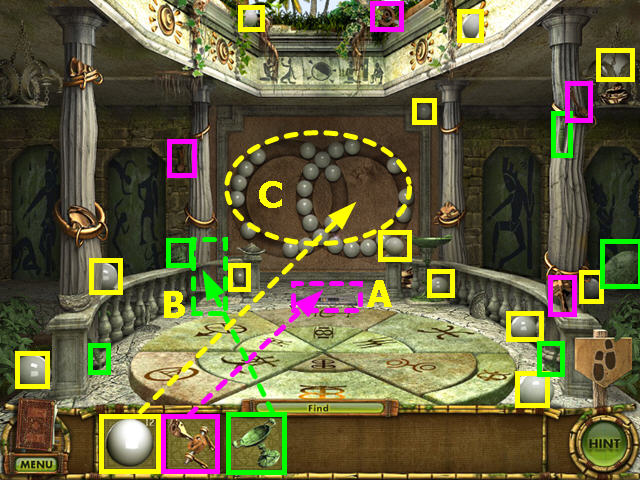
- Click on the power control panel on the left for a mini-game.
- The object of this mini-game is to burn a path to the end using all the paths only once.
- Click on the points in numerical order (1-17).
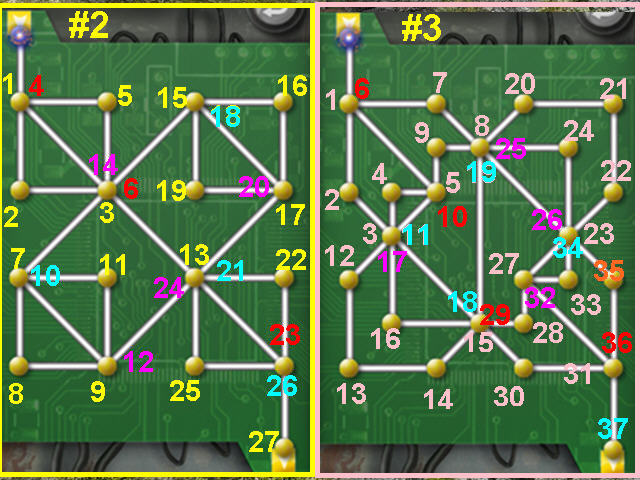
- There are three levels to this mini-game.
- The solutions for the second and third parts are noted here.
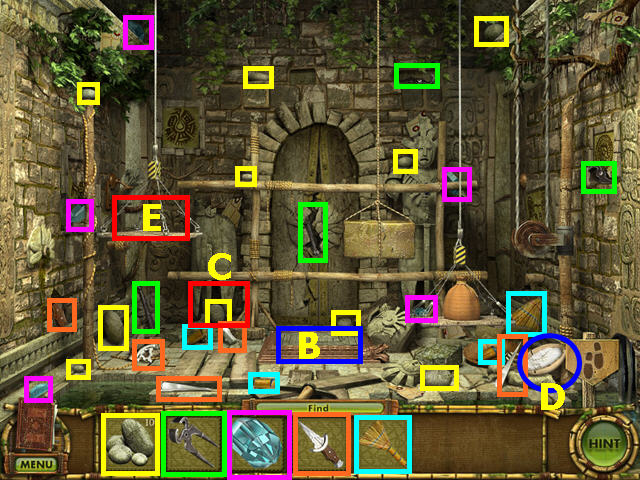
- Locate all the pieces to the WIRE CUTTERS then use them to cut the wires (H).
- Find all the pieces to the OILER, and all but one each for the JUG and VALVE.
- Try to open the cabinet on the right, but it needs oiling (I).
- Click on the rail cart to move it out of the way (J).
- Select the pegboard on the back wall for a mini-game (K).
- The object of this mini-game is to duplicate the pattern in the bottom picture on the pegboard (L).
- Click on a staple peg to see the possible positions it can move to and click on one of the green bars to move (M).
- Walk down, then left to the waterfall.
- Look at the cache on the left and a giant stone will block the entrance (N).
- Locate all the fragments of the color-coded items.
- Place the BRUSHWOOD at the base of the rock (O).
- Place the SACK at the top of the waterfall (P).
- Look at the close-up of the oil drum and place the OILER on the ground (Q).
- Click on the oiler to open the top, then click on the spigot to fill the oiler.
- Take the OILER.
- Walk down to exit, then enter the cave.
- Use the OILER on the rusty cabinet handle (R).
- Open the cabinet and take the remaining VALVE and JUG pieces (S).
- Use the VALVE on the back knob to open the wall (T).
- Use the BUG SPRAY to get rid of the mosquitoes (U).
- Note that you will need to build a bridge to reach the chest.
- Walk down to exit the cave.
- Collect the 6 PLANKS.
- Use the TORCH on the campfire (V).
- Walk right to return to the campsite.
- Look at the close-up of the oil barrel and place the JUG on the ground (W).
- Click on the tap to fill the jug, then take the JUG of OIL.
- Use the TORCH to light the brushwood under the rock (X).
- Click on the ledge just above the large rock to divert the water with a mini-game (Y).
- The object of this mini-game is to block the water so it only flows through the center canal.
- Place the rocks in holes to block the water.
- This is the first of three levels.
- This is the solution for the second level.
- This is the solution for the third level.
- Use the SHOVEL to remove the broken rock.
- Walk down, left and up to return to the Police station.
- Use the JUG of OIL on the floor in front of the safe (A).
- Click on the safe to move it away from the wall.
- Take the STEPLADDER and place in under the spot for the light (B).
- Try to place the CEILING LAMP on the ceiling to learn you need steps for the ladder (C).
- Collect the 5 STEPS and use them on the ladder.
- Place the CEILING LAMP on the ceiling then put the GLASS on the lamp for a mini-game.
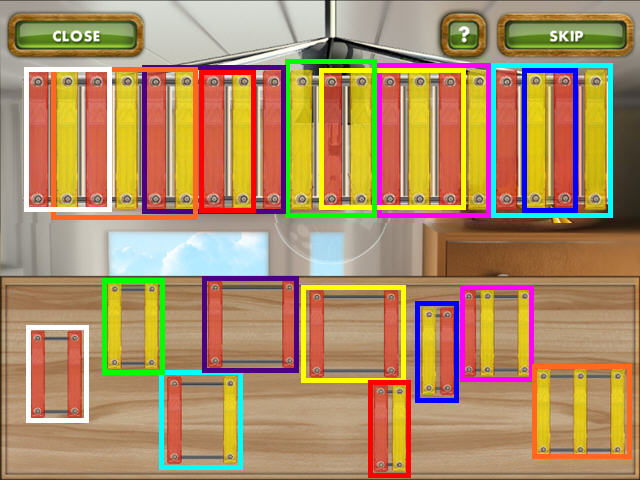
- The object is to place the glass pieces and repair the lamp.
- Place the pieces so that no pieces overlap, the colors alternate and all spaces are filled.
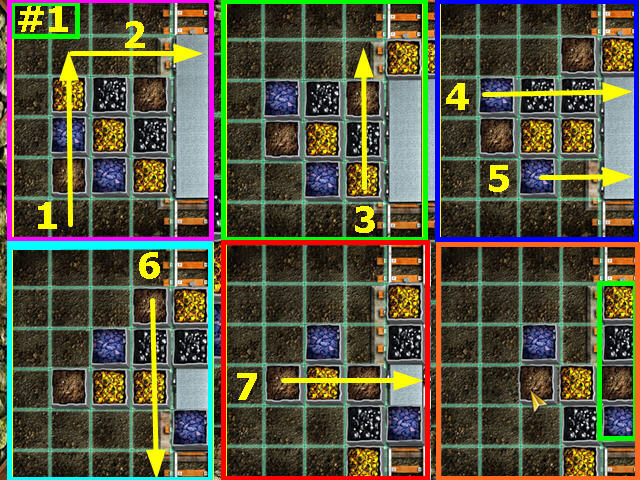
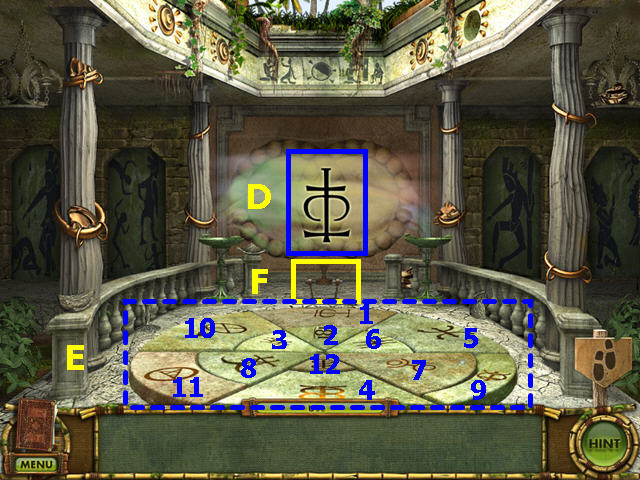
- Use the KEYS to open the safe and click on the inside for a mini-game.
- The object is to place all the books into the middle compartment (D).
- You can use the top shelf to move books around, but you cannot leave them there (E).
- There are several solutions to this puzzle.
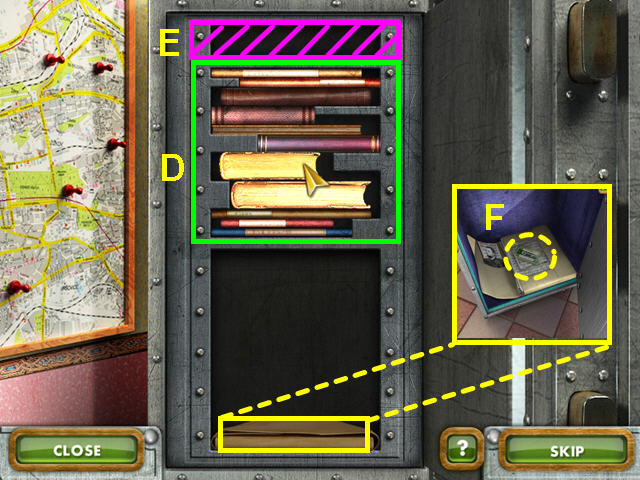
- Look inside the safe and open the folder.
- Take the AUDIOTAPE (F).
- Exit the Police station and walk down.
- Walk right to the campsite.
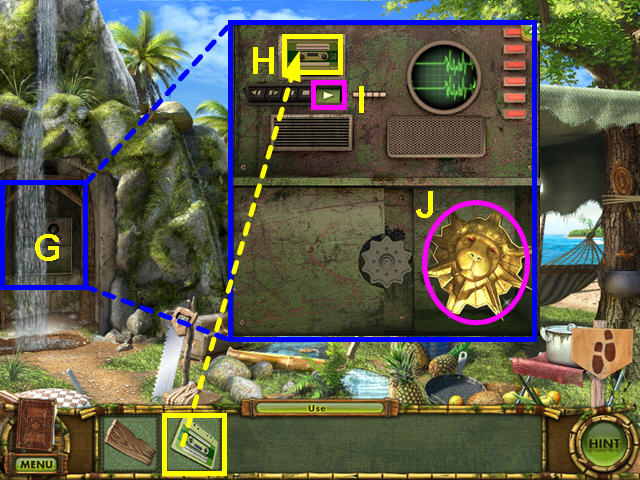
- Look at the close-up of the cache (G).
- Place the AUDIOTAPE into the player (H).
- Push the Play button (I).
- Take the LOCKET (J).
- Walk down to exit the campsite and enter the cave.
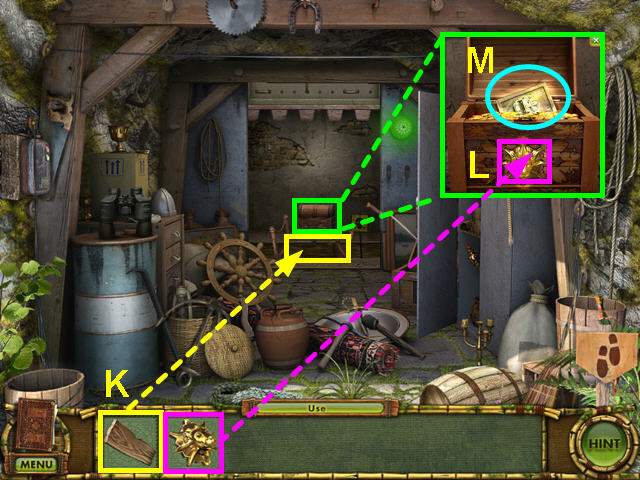
- Use the PLANKS to make a bridge to the chest (K).
- Look at the close-up of the chest.
- Place the LOCKET in the niche on the front of the chest (L).
- Take the TILE (M).
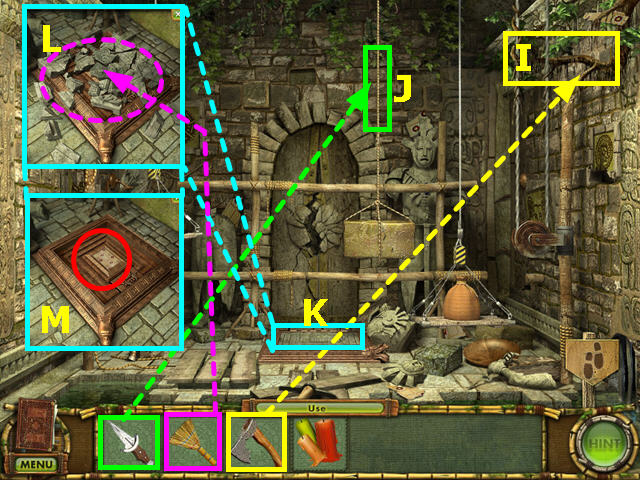
Chapter Six: Alex and the Antique Shop
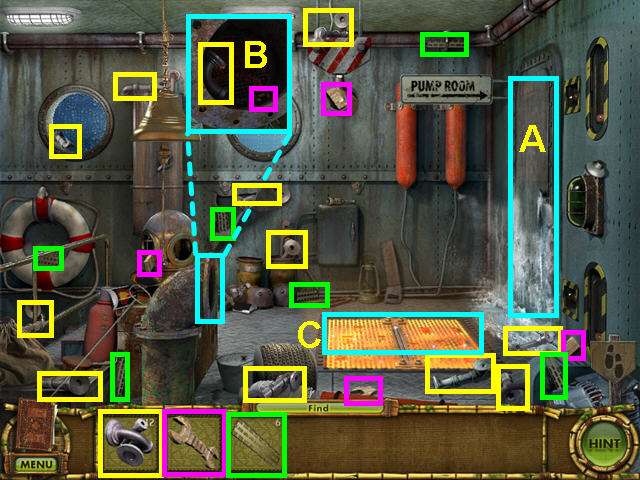
- Look at the smoking fan and the bolts holding it shut to learn you need tools (A).
- Locate all the fragments of the color-coded items.
- Look in the planter for a piece of the HAMMER (B).
- Use the HAMMER on the cracked wall (C).
- Use the DAGGER to cut the wires in the wall (D).
- Look at the close-up of the fan and use the WRENCH on the 4 bolts.
- Take the JEWELRY BOX that was hidden in the fan.
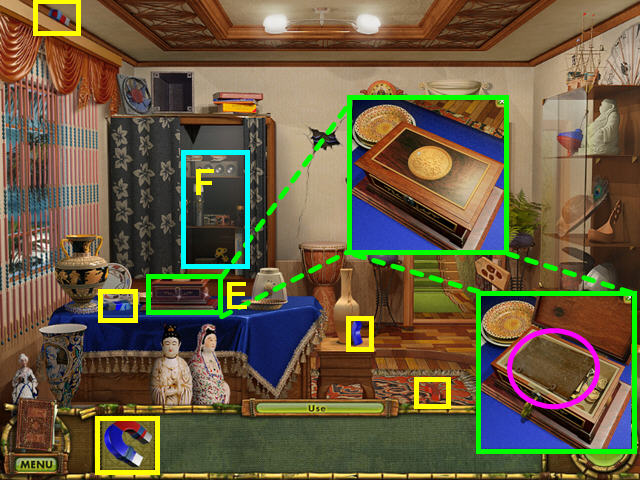
- Place the JEWELRY BOX on the table (E).
- Look at the close-up and try to open the jewelry box.
- Find the 4 pieces of the MAGNET.
- Use the MAGNET on the wall unit for a mini-game (F).
- The object of this mini-game is to use the magnet to drag the KEY out of the wall unit.
- Hold the magnet over the key to pick it up.
- Move slowly and guide the key to the hole in the glass at the top.
- Use the KEY to open the box and read the journal inside.
- Walk up to exit the room.
- Locate all the pieces of the color-coded items.
- Take the CHALK (G).
- Take the ROPE (H).
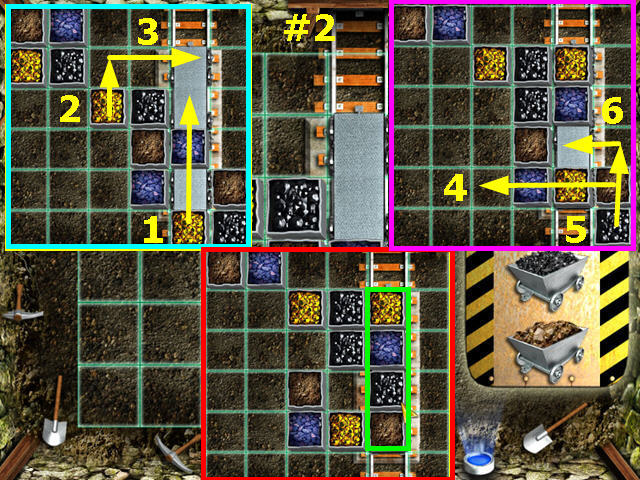
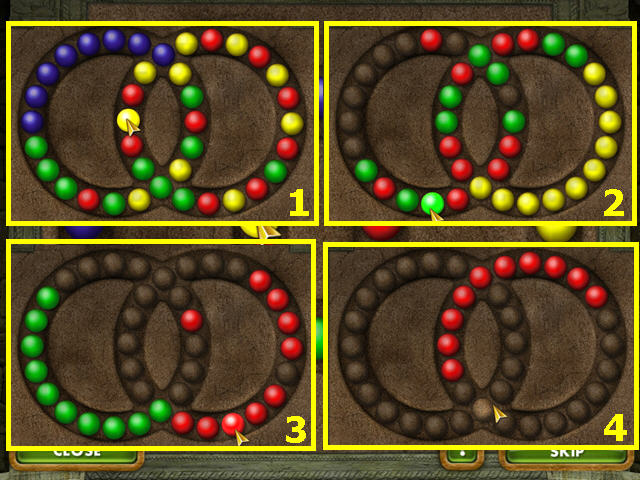
- Use the BUGS on the sarcophagus, then push the center button to trigger a mini-game (I).
- The object of this mini-game is to move the rings so that the opening is over the silver ball.
- You can only turn the inner piece.
- Left-click, hold and drag to move the inner piece.
- Turn the inner piece clockwise until the 1st or outer ring's hole is over the silver ball.
- Turn the inner piece counterclockwise until the 2nd ring's hole is over the silver ball.
- Rotate the inner piece clockwise until the 3rd ring is in place with the silver ball showing.
- Lastly, rotate the inner piece counterclockwise until the hole is over the silver ball.
- Look inside the sarcophagus at the safe to learn you need a specific fingerprint.
- Look at the mirror.
- Walk left to go to the attic.
- Locate all the fragments of the color-coded items.
- Look in the sconce for a piece of a jug (E).
- Look in the drawer and take the STICKY TAPE (F).
- You now need to place the JUGS to catch all the dripping water.
- Notice that each JUG has a different size opening.
- Fit the JUG to the size of the leak.
- Note-You cannot place a jug in the wrong position.
- Walk down twice to return to the dining room.
- Locate the pieces of the BLENDER.
- Place the BLENDER on the base (G).
- Place the CHALK in the blender (H).
- Take the SAUCER of CHALK from in front of the blender (I).
- Walk up to exit the room.
- Look at the close-up of the mirror.
- Use the SAUCER of CHALK on the mirror, followed by the STICKY TAPE (J).
- Take the FINGERPRINT (K).
- Look at the close-up of the safe.
- Use the FINGERPRINT on the scanner (L).
- Try to open the safe, but you need to raise it higher.
- Walk left to go to the attic.
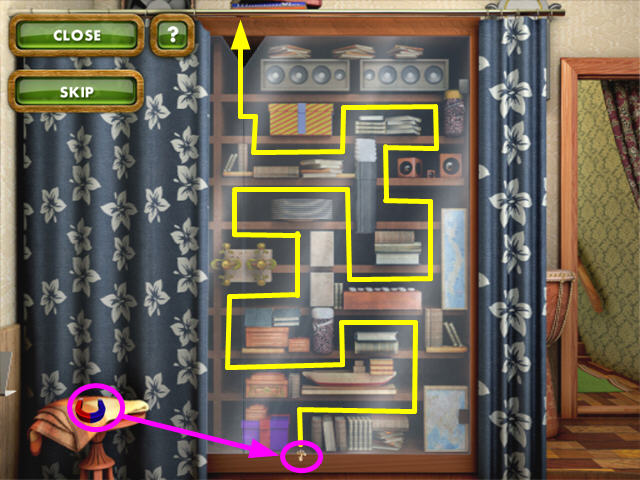
- Find all the pieces of the WINCH HANDLE and the PULLEY.
- Find one piece of the PULLEY in the drawer.
- Place the PULLEY on the ceiling (M).
- Place the WINCH HANDLE on the winch on the left wall (N).
- Place the HANDLE on the trapdoor (O).
- Use the rope on the motor in the upper left corner to trigger a mini-game (P).
- The object is to thread the wire through the maze using all the connectors.
- Place a connector to move the wire ahead.
- Continue until the wire reached the right side of the maze.
- Click on the winch handle.
- Walk down to return to the area with the safe.

- Look at the close-up of the safe (Q).
- Click on the door to open it.
- Take the tile (R).
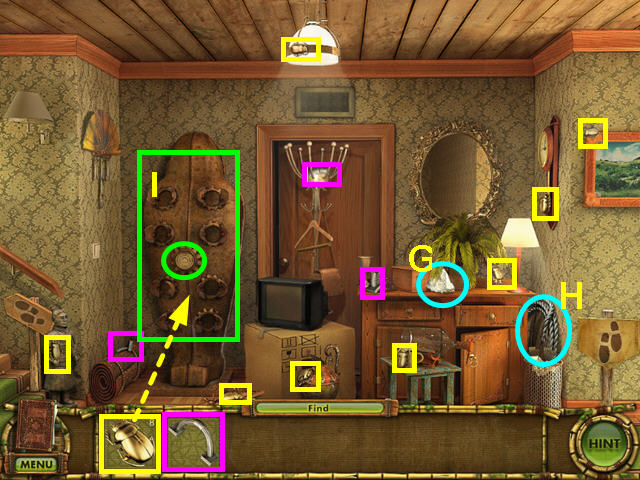
Chapter Seven: Alex and the Lighthouse
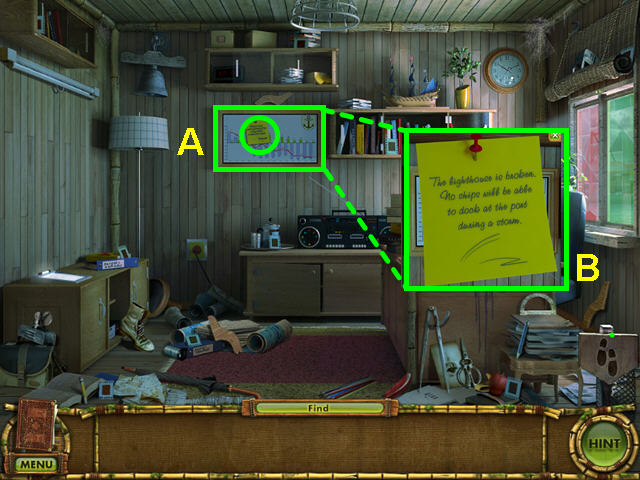
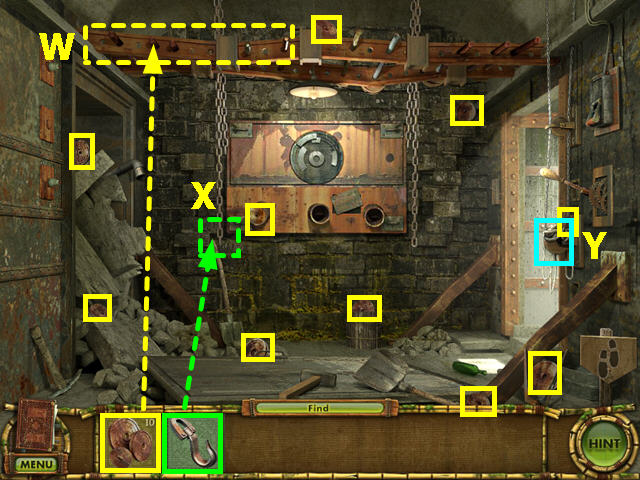
- Look at the close-up of the message board and click on the sticky note (A).
- Read the sticky note to learn the lighthouse needs to be repaired so the ship can dock (B).
- Walk down twice, then walk to the right to enter the lighthouse.
- Once inside, walk up the stairs.
- Locate all the fragments of the color-coded items.
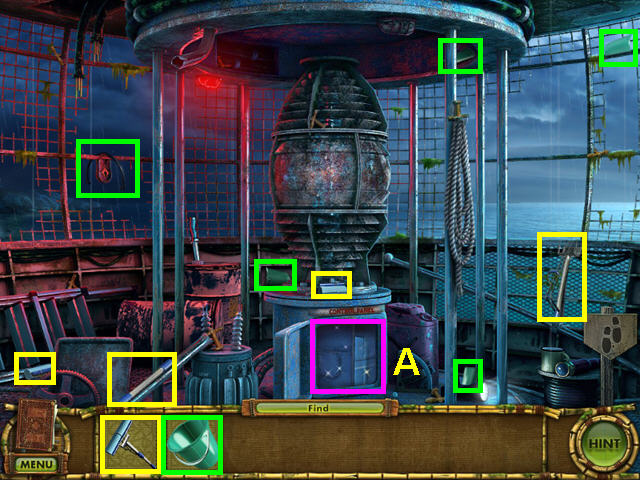
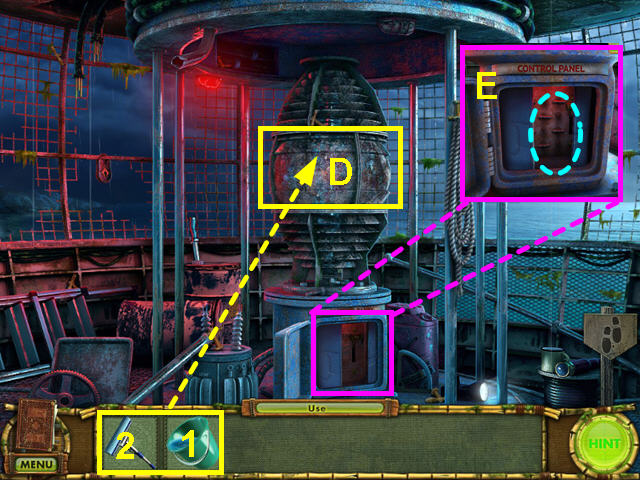
- Look at the control panel at the base of the lamp (A).
- Walk downstairs.
- Find all the pieces of the LEVER.
- Use the LEVER on the control (B).
- Click on the lever to activate the mechanism.
- Walk down to exit the lighthouse.
- Place the BUCKET at the base of the pump (C).
- Click on the pump handle to put water in the bucket.
- Take the BUCKET WITH WATER and walk right.
- Walk up to the second level of the lighthouse.
- Use the BUCKET of WATER on the lamp, followed by the MOP (D).
- Look at the close-up of the control panel.
- Click inside the panel to learn that there is not enough pressure (E).
- Walk downstairs.
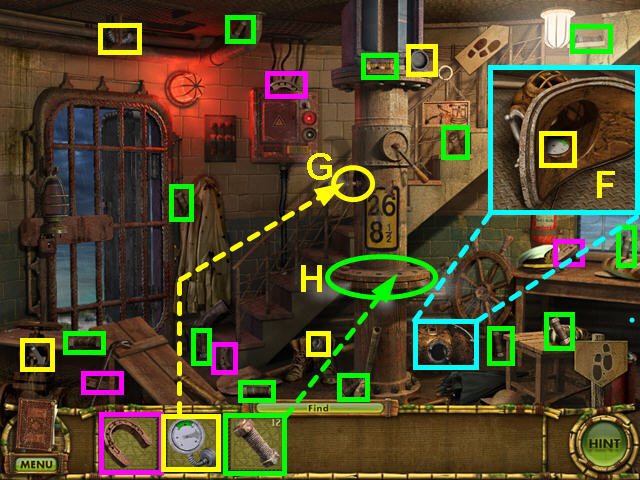
- Locate all the fragments of the color-coded items.
- Look inside the diving helmet for a piece of the GAUGE (F).
- Use the GAUGE where the steam is releasing on the pole (G).
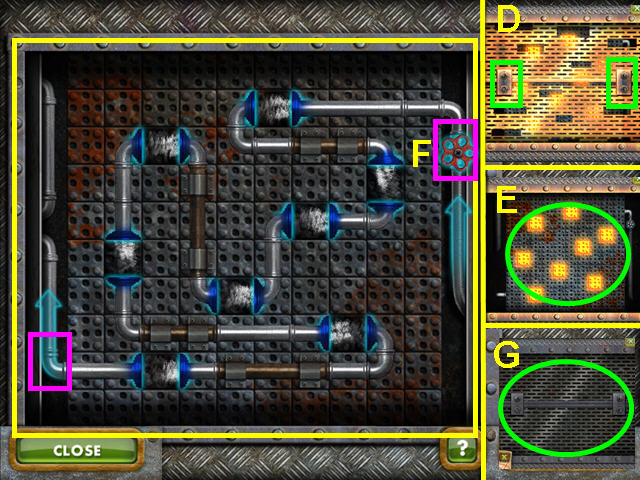
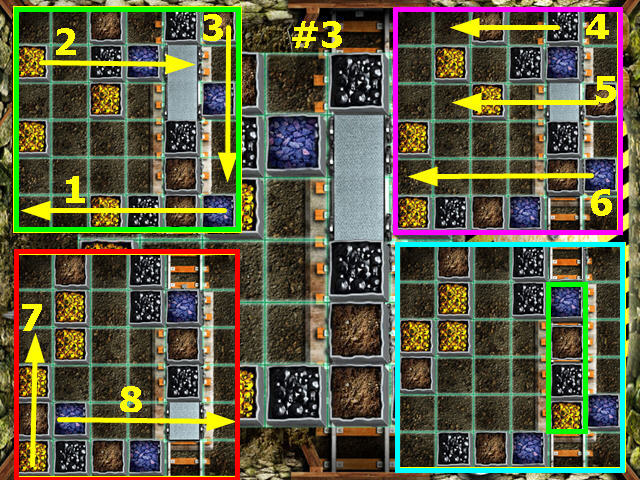
- Use the BOLTS on the pipe flange to trigger a mini-game (H).
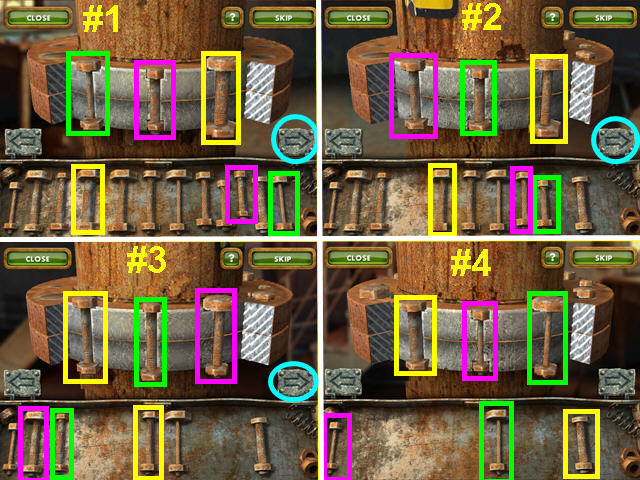
- The object of this mini-game is to place the 12 bolts into the matching spots.
- You can only place the bolts where they fit.
- Left and right buttons allow you to rotate the pipe flange.
- For this walkthrough, place the 3 bolts marked in #1, then press the right button 3 times.
- Place the 3 bolts marked in #2, then press the right button 3 times.
- Place the 3 bolts marked in #3, then press the right button 3 times.
- Place the 3 bolts marked in #4 to complete the puzzle.
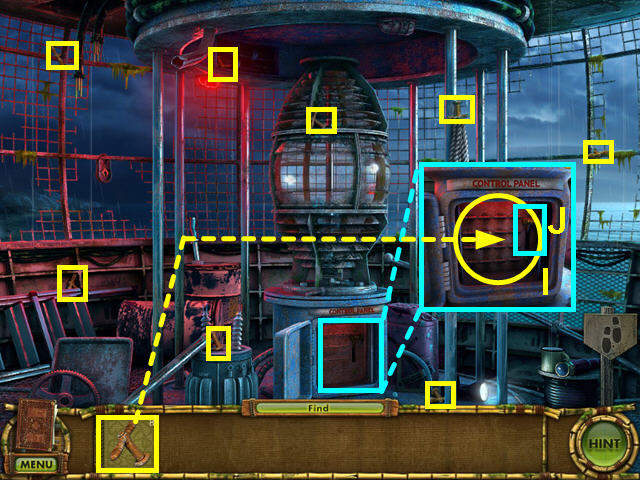
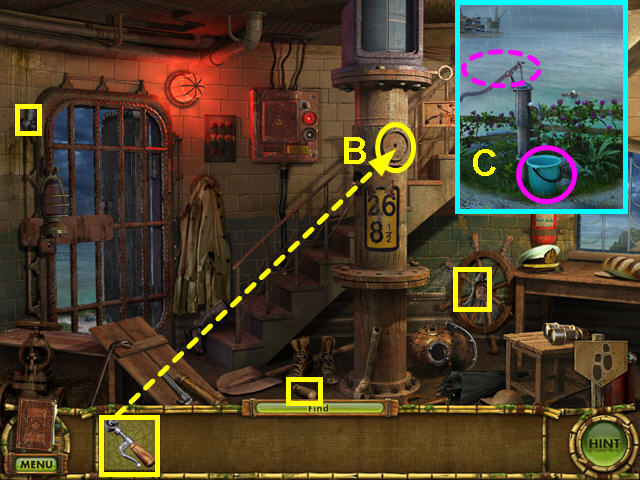
- Locate all the CONTROL SWITCHES.
- Look at the close-up of the control panel and use the CONTROL SWITCHES to replace the missing ones (I).
- Click on the right lever to learn there is no electricity (J).
- Walk down to the first floor.

- Locate all the pieces of the SWITCH.
- Place the SWITCH on the wall panel, then click to flip the switch (K).
- Click on the fuse box to learn you need rubber gloves (L).
- Walk down to exit the light house, the walk left twice to return to the port office.
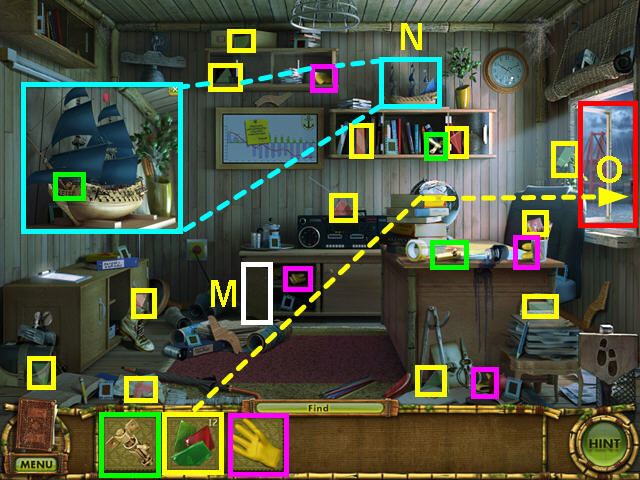
- Locate all the fragments of the color-coded items.
- Open the cabinet to find a piece of the GLOVE (M).
- Look at the close-up of the model ship for a piece of the WINDOW LOCK (N).
- Use the GLASS PIECES on the window for a mini-game (O).
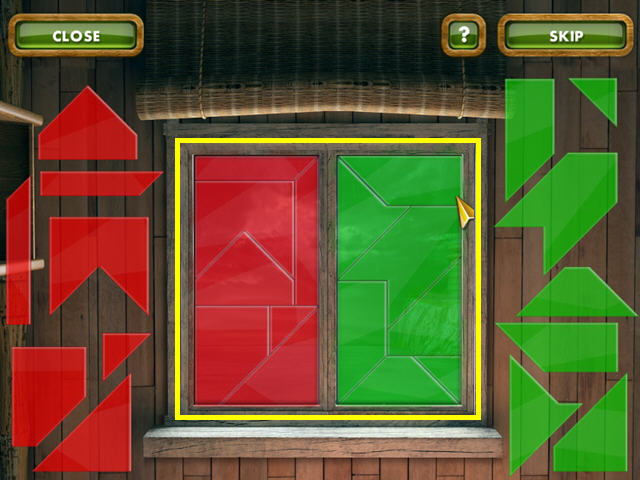
- The object of this mini-game is to replace the glass in the frame.
- Use the red on the left and the green on the right.
- Left-click to take or place a piece of glass.
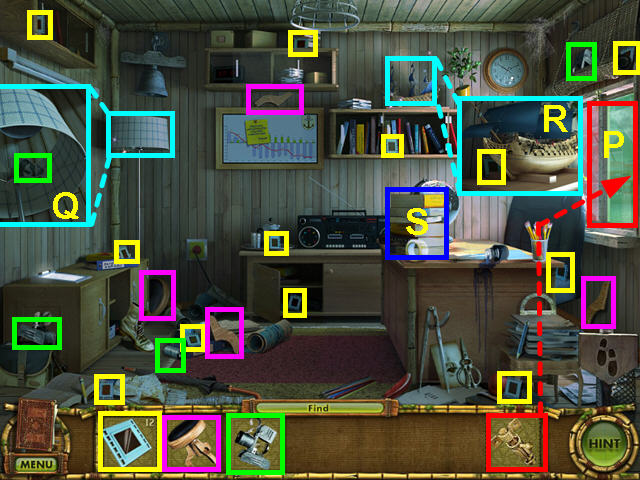
- Use the WINDOW LOCK on the window (P).
- Locate all the fragments of the color-coded items.
- Look in the lamp for a piece of the SLIDE PROJECTOR (Q).
- Look at the close-up of the model ship for a SLIDE (R).
- Take the BOOKS from the desk (S).
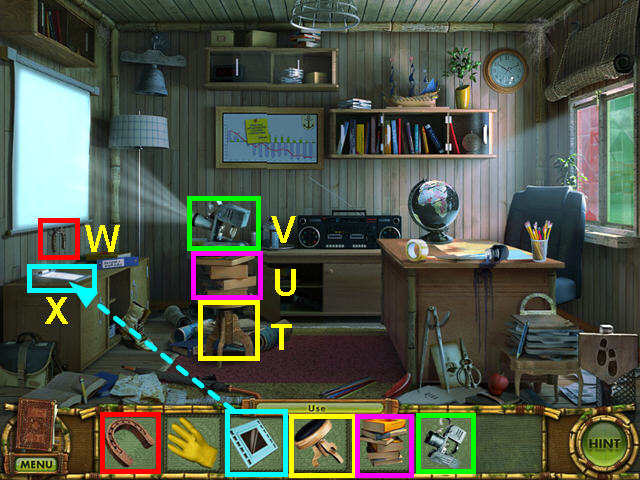
- Place the STOOL on the floor (T).
- Place the BOOKS on the stool (U).
- Set the SLIDE PROJECTOR atop the books (V).
- Use the HORSESHOE to hold the screen down (W).
- Use the SLIDES on the sorter for a mini-game (X).
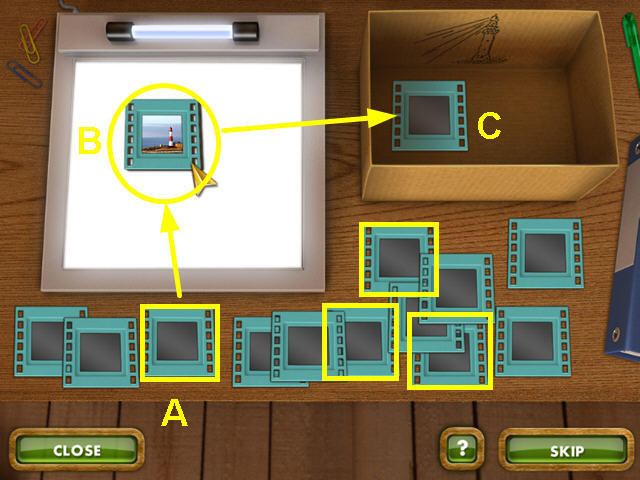
- The object of this mini-game is to find the slides with lighthouses.
- Left-click to pick up a slide from the bottom area (A).
- Hold the slide over the lighted screen to see the picture (B).
- If the slide has a lighthouse, place it in the box on the right (C).
- There are 4 slides to find.
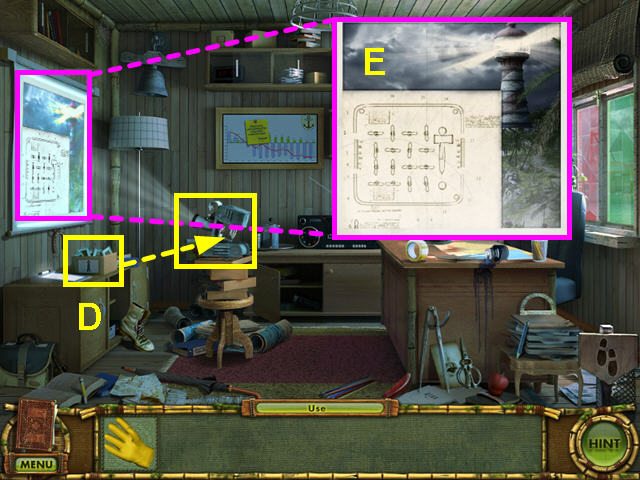
- Take the BOX OF SLIDES and use it on the slide projector (D).
- Click on the screen to see the schematic for the lighthouse (E).
- Walk down twice, then right to return to the lighthouse.
- Use the GLOVES on the electrical panel to open the door (F).
- Click inside the panel for a mini-game.
- The object is to untangle the wires so that none are crossing and colored red.
- Move the connectors to different spots on the circuit board to untangle the wires.
- Tip- place the connector with the most wires near the center and work your way out.
- There are many solutions, this is only one (G).
- Flip the switch to the left of the electrical panel to turn on the power (H).
- Walk up to the second floor of the lighthouse.
- Look at the close-up of the control panel under the light (I).
- Turn the switches to match the schematic (J).
- Pull the lever on the right to start the lighthouse (K).
Chapter Eight: Alex and Mr. Hope's Ship
- Try to walk to the left to learn you need to drain the water.
- Walk to the right and look at the frozen door on the right (A).
- Locate all the fragments of the color-coded items.
- Look in the exhaust pipe for a piece of the WRENCH and a PIPE (B).
- Look at the hatch to the cooling system (C).
- Use the WRENCH on the 4 bolts on the hatch (D).
- Use the PIPES on the grid to trigger a mini-game (E).
- The object of the mini-game is to connect the pipes so that air jets cross each hot tile.
- Turn the valve on the right to see where the air goes (F).
- Pipes cannot cross the tiles, only air.
- You need to have the blue intake and outtake pipes on opposite sides of each tile so that air blows across.
- Place the GRATES on the hatch cover to fill in the holes (G).
- Collect all the pieces of the GAS TORCH.
- Look at the close-up of the door and use the GAS TORCH to melt the ice (H).
- Left-click, hold and drag to melt the ice.
- Try to open the door, but it is locked.
- Look at the two manual locks on the right and move the bar on each to the center position (I).
- Click on the door to open it.
- Look inside to discover you need light.
- Walk down to return to the flooded area of the ship.
- Locate all the LAMP pieces.
- Walk right and click on the right door.
- Use the LAMP on the darkness (J).
- Pull the lever to start the pumps (K).
- Walk down, then left.
- Find all the pieces to the LEVER and place it on the right wall (L).
- Click on the lever to start the conveyors.
- Locate all the pieces to the LIGHT and place it on the back left wall (M).
- Note the bag of coconuts below the left light.
- Walk down to exit the room.
- Locate all the fragments of the color-coded items.
- Look in the pipe for a piece of the HAND DRILL (N).
- Place the DRUM to the right of the rat (O).
- Click on the drum to see the rat leave but return after a few seconds.
- Walk to the left and look at the coconuts (P).
- Use the KNIFE to cut the rope and take a COCONUT.
- Walk down.
- Place the COCONUT into the metal holder (Q).
- Use the HAND DRILL on the coconut to drip milk onto the drum and scare away the rat (R).
- Walk left to exit the room.
- You must complete a memory match mini-game to start the conveyor.
- Select a square on the left grid and find its mate on the right grid.
- An approximation of the symbols is show here to show where the matching pairs rest.
- Locate all the fragments of the color-coded items.
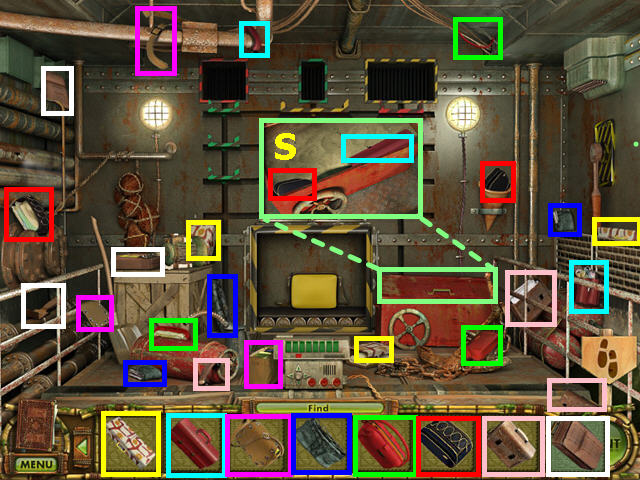
- Look in the red storage bin for a piece of the red PURSE and the black SUITCASE (S).
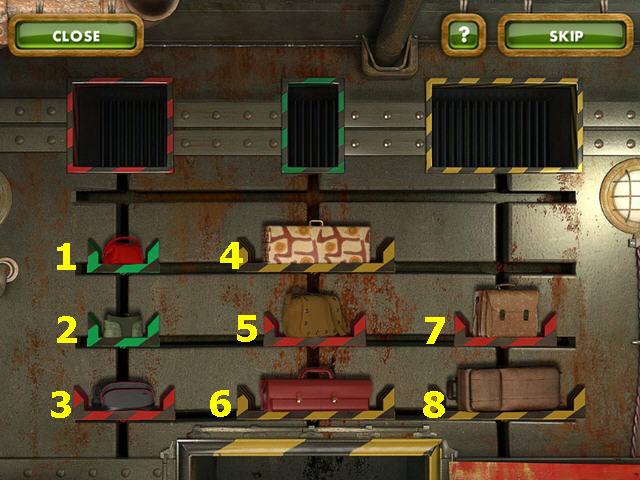
- Place all 8 pieces of luggage in the racks on the back wall.
- Click on the racks for a mini-game.
- The object is to move the luggage to the matching color bins.
- Columns and row move together.
- There are many solutions to this mini-game.
- Number the bags as shown in the screenshot and make the following moves: (1 U + R), (2 U + R), (3 U + D + D + D), (5 L), (2 L), (8 U), (6 R), (4 R + U), (3 L), (5 D + L), (6 D), (2 R), (5 U + U + R), (7 U + D), (5 L + D + D), (1 L), (8 U + U + L), (6 U).
- Look in the chest and take the tile.
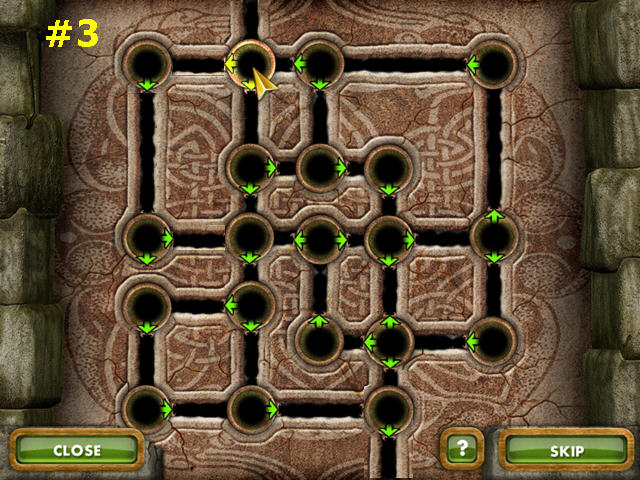
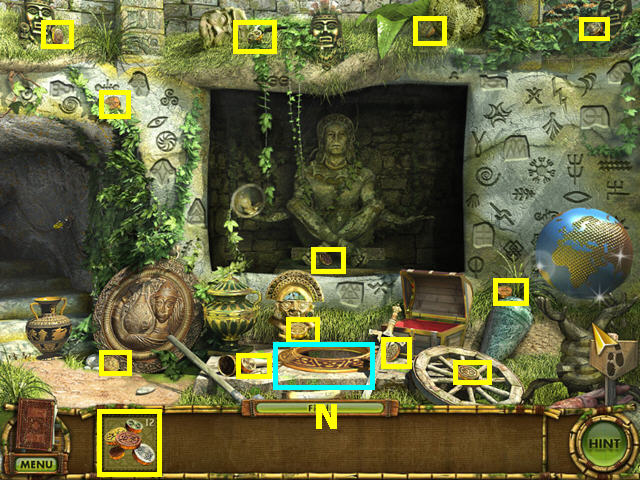
Chapter Nine: Lisa and the Ancient Temple
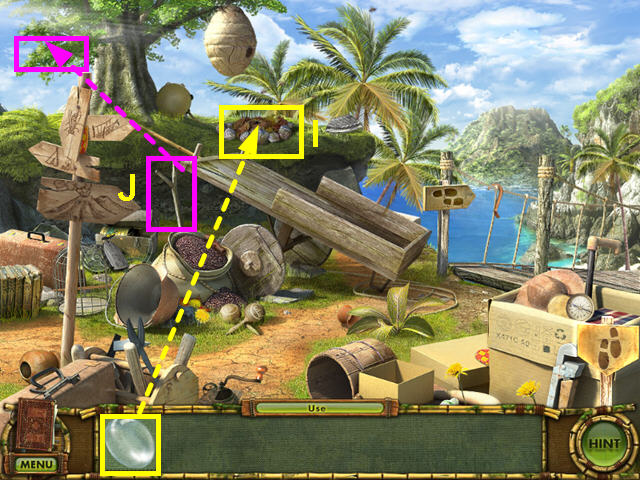
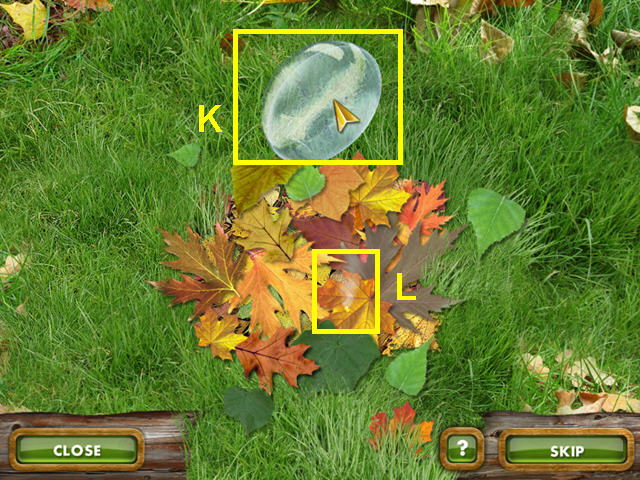
- Take the TORCH (A).
- Enter the left cave and the guardian will seal the vault (B).
- Walk down to return to the courtyard.
- Enter the center cave (C).
- Locate the 5 pieces of the lock.
- Use the TORCH on the sconce (D).
- Walk down to return to the courtyard.
- Walk up to the upper right.
- Press the circle in the center of the stone gate (E).
- Locate all the fragments of the color-coded items.
- Use the FUSES on any of the 12 holders (F).
- Place the PUMP HANDLE on the pump (G).
- Click on the pump handle, then look at the hose to learn it needs repair (H).
- Place the SIGN into the stand (I).
- Use the FAN BLADE on the machine (J).
- Click on each of the holders to turn the fuses either vertical or horizontal to turn on all the lights.
- Walk down to return to the courtyard and enter the left cave.
- Locate the 5 clamps.
- Place the LOCK on the door and push the center (K).
- Use the WHEEL on the left control (L).
- Click on the wheel to open the vault doors.
- Walk down to return to the courtyard.
- Walk up the hill to the right.
- Use the CLAMPS on the leaky hose (M).
- Push the pump handle several times to raise the stone door (N).
- Push the symbol revealed by the door (O).
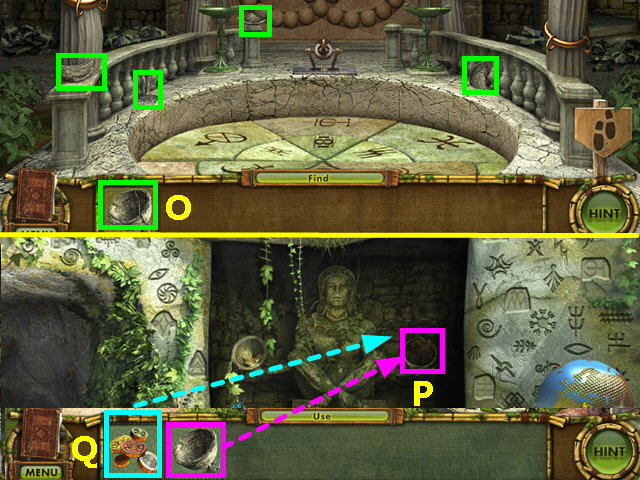
- Walk down and enter the center cave.
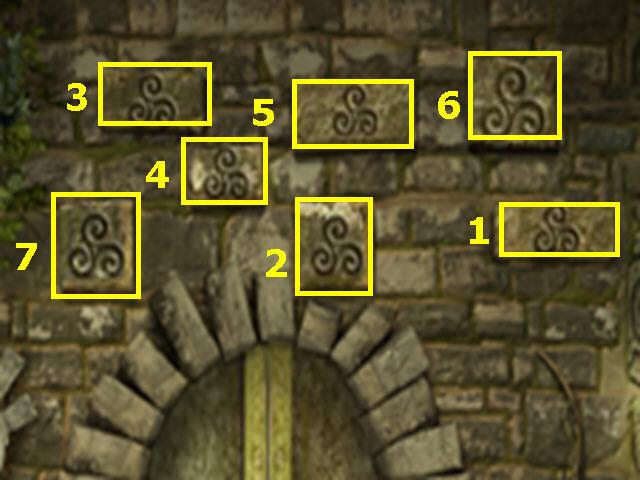
- Look at the stone symbols over the archway.
- The object is to push all the stones in.
- Find the 1st stone that stays in, then find the second.
- If you push an incorrect stone, you must start over.
- Push the stones in numerical order (1-7).
- After solving the stones puzzle a new location appears.
- Try to walk down to the pool using the left footsteps sign (P).
- Locate all the pieces to the JAGUAR HEAD.
- Place the JAGUAR HEAD on the left wall where the water is draining (Q).
- Walk down to the pool using the left footsteps sign and look at the ledges on the bars to see they are missing weights.
- Swim up to leave the pool.
- Locate all the WEIGHTS.
- Enter the pool of water.
- Use the WEIGHTS on the bars to start the mini-game.
- The object is to line up all the weights in the center using the weights (R).
- Moving one weight can effect other weights and they can be blocked by the ledges (S).
- Drag the weights up and down until they are all in the center and lit.
- Swim up to exit the pool.
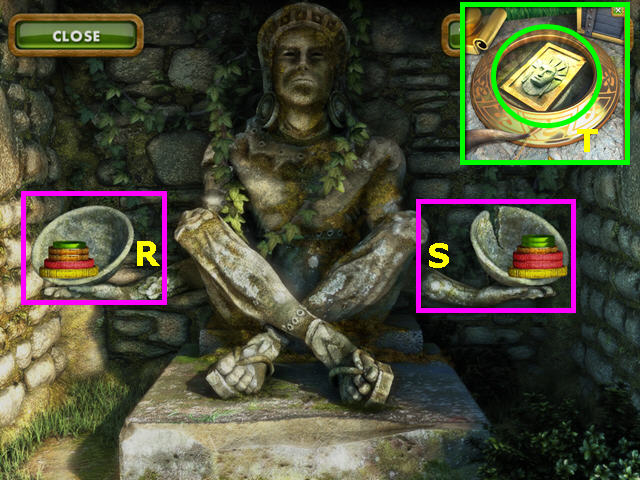
- Locate all the pieces of the LAMP and the SWORD HANDLE.
- Place the LAMP on the left wall (T).
- Use the TORCH to light the lamp.
- Place the SWORD HANDLE in the hands of the left statue (U).
- Click on the blue ball to open the door (V).
- Enter the room for a mini-game.
- The object of this mini-game is to rotate the bowls so that oil flows to all the areas.
- Click on a bowl to turn it- the arrows indicate where the oil can flow.
- This is the first of 3 solutions.
- This is the second of 3 solutions.
- This is the third of 3 solutions.
- Walk down to exit, then enter the left cave.
- Locate all the fragments of the color-coded items.
- Look in the pile of pots for a piece of the ORB, VASE, and GOBLET (W).
- Place the PEDESTAL PIECE on the broken right pedestal (X).
- Place all the items on the pedestals so that they all recede into the ground.
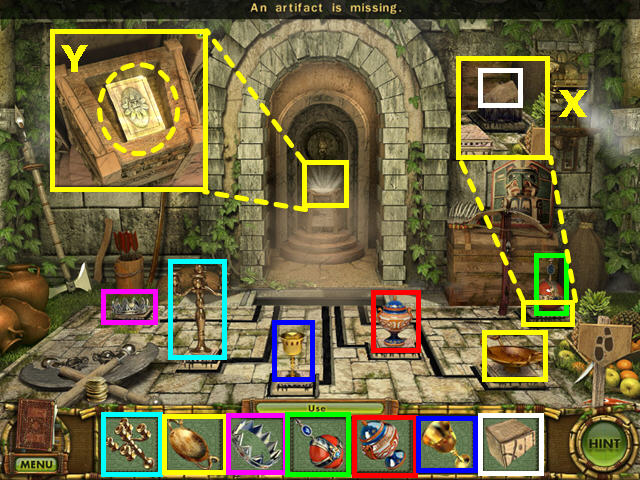
- Look at the close-up of the glowing are in the vault and take the tile (Y).
Chapter Ten: Lisa and the Museum
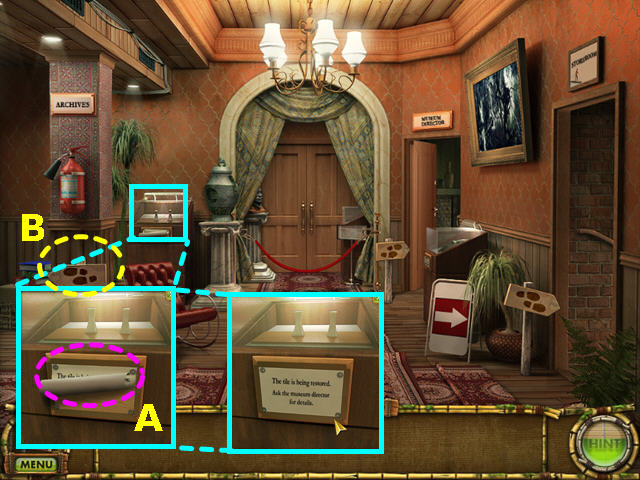
- Look at the sparkling display case and click on the curled up sign (A).
- Read the sign to learn the tile is being restored.
- Walk right and enter the basement storage and immediately exit back to the lobby.
- Walk left to enter the archives (B).
- Locate all the fragments of the color-coded items except for one piece of the PAINTBRUSH.
- Note the stand in front of the left door (C).
- Note the keypad next to the right door (D).
- Use the GREEN MARKER on the cardboard for a mini-game (E).
- The object of this mini-game is to duplicate the figure on the right (F).
- Click on adjacent points where lines intersect to draw the figure.
- A red line means you are incorrect, while green means correct.
- Click on the eraser to clear the board and start over (G).
- Use the razor on the cardboard, then place the CUTOUT on the stand in front of the door.
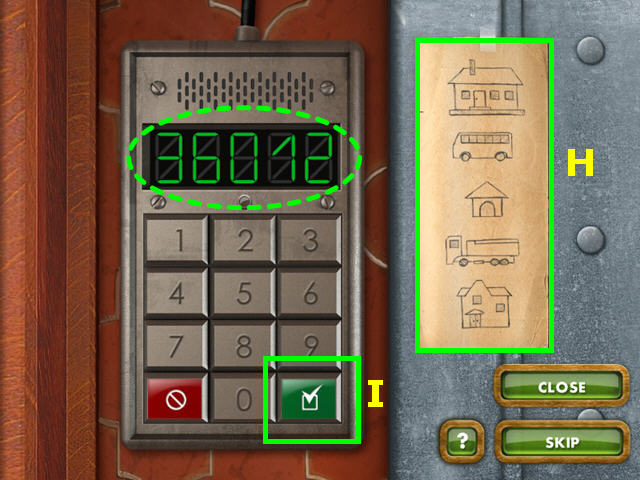
- Look at the close-up of the keypad by the right door.
- Look at the sketch to the right of the keypad (H).
- Count the number of windows in each item to find the code.
- Enter 3-6-0-1-2, then press the green enter key (I).
- Walk down to exit the archives and enter the director's office.
- Walk to the upper right to enter the director's office.
- Look at the close-up of the red rug and click to move it aside (I).
- Look at the safe to learn you need to move the bookcase.
- Click on the bookcase to learn it is too heavy (J).
- Locate all the fragments of the color-coded items.
- Look at the close-up of the plant to find a piece of the GUARD HAT and a BOX.
- Use the DOOR HANDLE on the left bookcase door (K).
- Click on the handle to open the door.
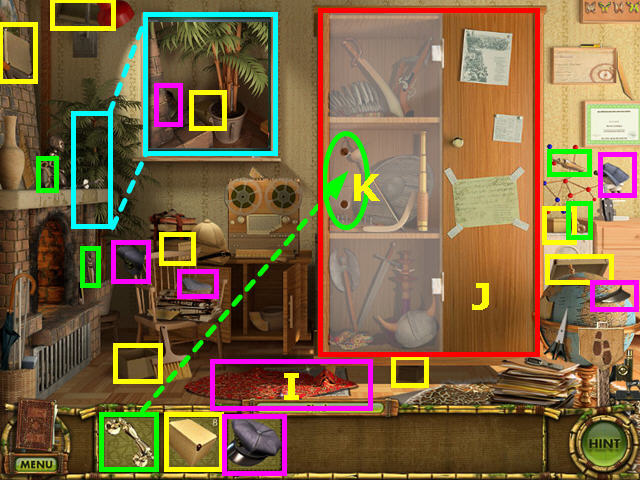
- Use the boxes on the shelves for a mini-game.
- The object of this mini-game is to sort the items from the shelves into the boxes by culture.
- Click to open the right wooden door (L).
- You may use any box you wish for each culture.
- The 4 cultures are Persian, Spanish Explorer, Indian, and Viking.
- Click on the bookcase to move it to the side.
- Look at the sticky note that was behind the bookcase (M).
- Locate all the fragments of the color-coded items.
- Look at the close-up of the plant to find a piece of the COMPASS (N).
- Note the safe on the floor (O).
- Place the COMPASS, PROTRACTOR, TRIANGLE, ERASER, and PENCIL on the green work-board (P).
- Click on the board for a mini-game.
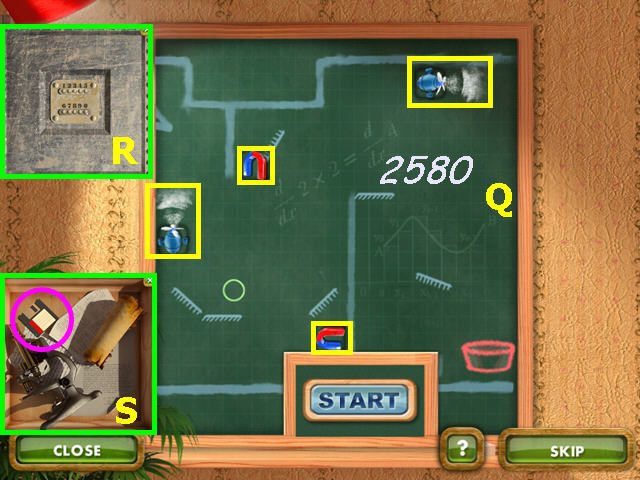
- The object of this Incredible Machine type mini-game is to guide the ball in the upper left to the basket in the lower right.
- Place the fans and magnets in the 4 boxes, then press start to see if you are correct.
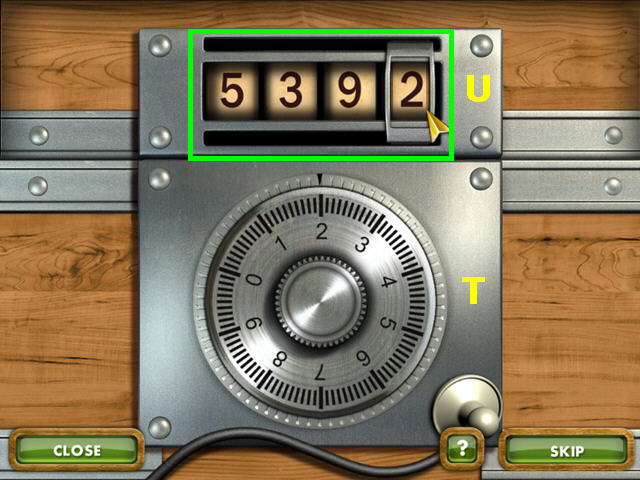
- Once you get the ball in the basket, the code 2580 will appear on the board (Q).
- Look at the safe on the floor and enter the numbers 2580 (R).
- Inside the safe, take the FLOPPY DISK (S).
- Exit the office and return to the archives.
- Use the GUARD HAT on the cutout in front of the left door.
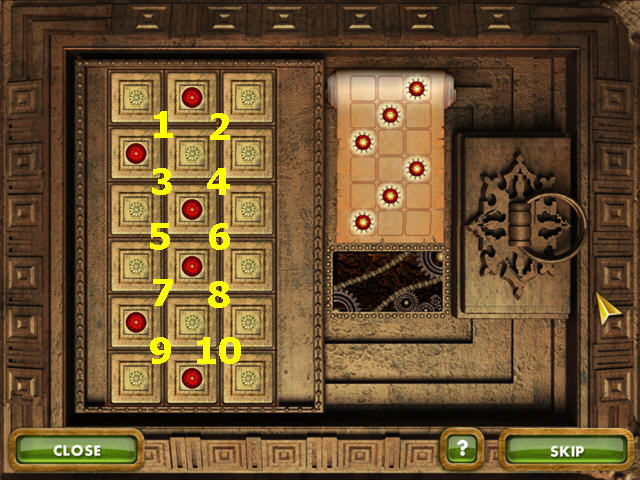
- Use the STETHESCOPE on the chest for a mini-game.
- Drag the dial slowly to the right until you hear and “see” a click (T).
- Click on the number in the frame to change it to the number on the dial (U).
- Click on the next number to move the frame.
- Turn the dial to find the next number.
- Repeat this until you have all four numbers and the chest will unlock.
- Use the GIRDER on the chest to prop it open (V).
- Look inside the chest and take the KEYS and the last piece of the PAINTBRUSH (W).
- Use the KEYS to open the right door (X).
- Look at the computer and use the FLOPPY DISC on the computer (Y).
- Click on the monitor to learn the keyboard is missing (Z).
- Exit the archives and walk right to the basement storeroom.
- Locate all the fragments of the color-coded items except 1 piece of the STICKERS and 1 piece of the KEYBOARD.
- Use the PAN to collect some water from the hole in the left wall (A).
- Use the BRICKS on the left wall for a mini-game (B).
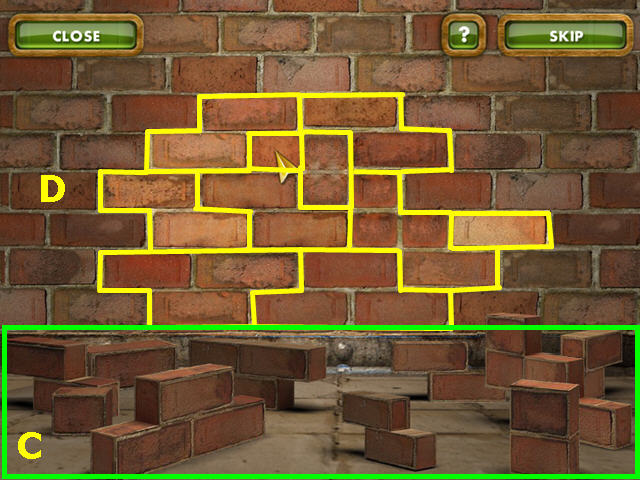
- The object of this Tanablocks-style mini-game is to fit all the brick pieces into the hole.
- Left-click to take or place a piece of brick from the bottom area (C).
- Place the pieces into the the empty spaces, working from the bottom to the top (D).
- There are several solutions to this mini-game.
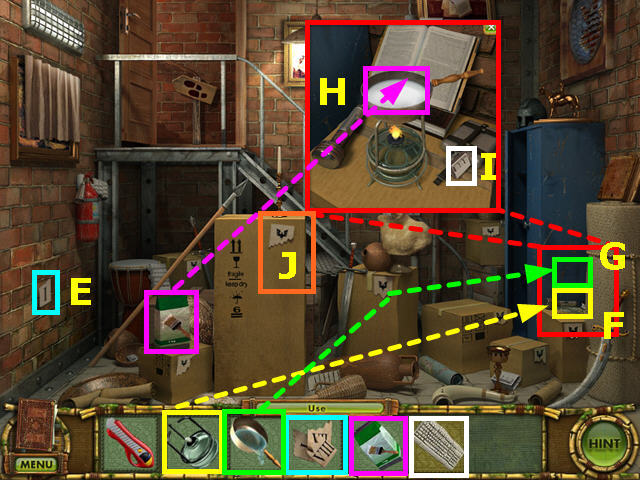
- Take the final STICKER (E).
- Place the SPIRIT LAMP on the box by the right wall (F).
- Place the POT of WATER on the spirit lamp (G).
- Look at the close-up of the lamp and pot of water.
- Take the GLUE and use it in the pot of water (H).
- Look at the glue in the pot to learn you don't want to touch it with bare hands.
- Take the last piece of the KEYBOARD (I).
- Use the PAINTBRUSH on the glue then use it on any one of the torn stickers on the boxes (J).
- Use the STICKERS on the torn sticker for a mini-game.
- Match a piece from the bottom to the sticker on the board.
- Look at the torn edges to match them together.
- There are 8 stickers to repair.
- Exit the basement and walk left to the archives.
- Look at the close-up of the computer in the right room.
- Use the KEYBOARD on the computer to learn the tile is in Box II (K).
- Exit the archive office and walk right to the basement.
- Use the BOX CUTTER on Box II (L).
- Take the TILE from inside the box (M).
Chapter Eleven: Alex and the Ancient Temple
- Enter the right doorway.
- Look at the slab on the floor (A).
- Locate all the fragments of the color-coded items.
- Place the 5 SYMBOL DISCS into the niches of the same color.
- Walk down to exit, then enter the left chamber.
- Look at the close-up of the slab in the floor and click on the slab to learn you will need to break the slab (B).
- Locate all the fragments of the color-coded items.
- Use the TONGS to loosen the STONE caught in the bottom of the statue (C).
- Take the BOWL of FLOUR (D).
- Place the STONES on the left scale platform (E).
- Walk down to exit, then enter the right chamber.
- Place the GEM in the hanger, then click on it to rotate the gem until a laser forms and breaks the slab below (F).
- Look at the mechanism below the slab to learn you need to block some drafts (G).
- Locate all the fragments of the color-coded items.
- Use the BOWL of FLOUR on the 5 holes in the wall to find the draft (H).
- Find the 5 pieces of the LID and use it on the hole with the draft.
- Note- the draft will be the last hole floured.
- Exit and return to the left chamber.
- Use the AXE to cut the branch (I).
- Use the KNIFE to cut the rope (J).
- Look at the close-up of the slab (K).
- Use the BROOM to remove the rubble (L).
- Click on the schematic picture (M).

- Locate all the pieces to the SCHEMATIC.
- Place the SCHEMATIC on the picture for a mini-game (N).
- The object of this mini-game is to move the stones to match the pattern on the right.
- There are three patterns to duplicate.
- Click on the intersections between 4 stones to rotate those 4 stones.
- Numbering the intersections 1-10, the click on the numbers to solve the mini-game.
- The solution for the first pattern is: 2-3-8-9.
- The solution for the second pattern is: 3-4-4-4-10-8-8-6-9-9-8-9.
- The solution for the third pattern is: 1-1-3-4-4-4-8-5-8-10-8-9-9-10-10-9-10-9.
- Look in the chest and take the CANDLE LAYOUT.
- Exit and return to the right chamber.
- Look at the close-up of the mechanism and place the CANDLE LAYOUT on the plate.
- Use the CANDLES on the grid for a mini-game.
- Arrange the candle so that the glow matches the layout.
- Look at the pedestal and take the tile.
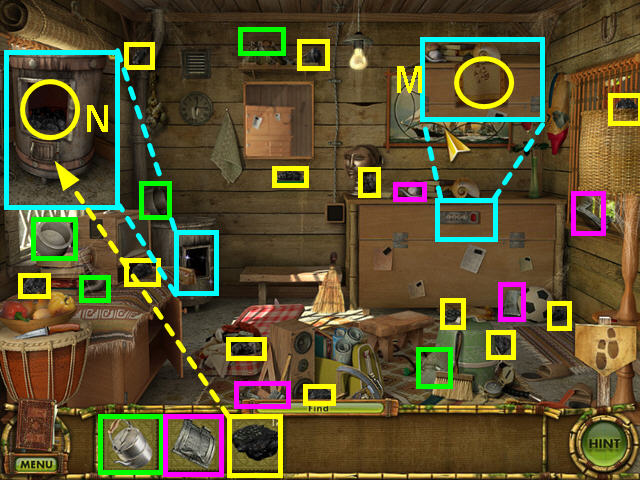
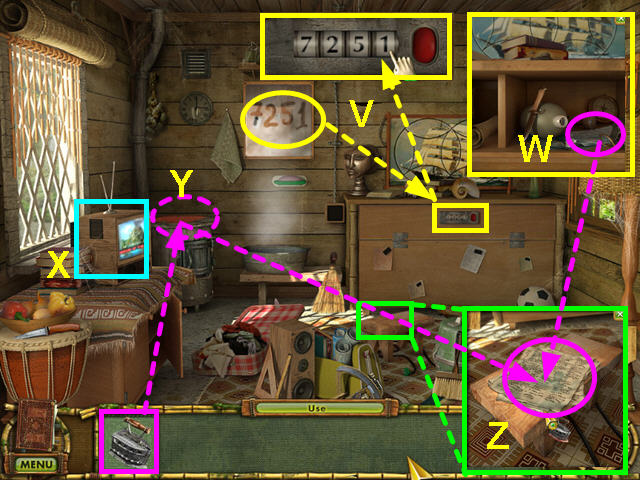
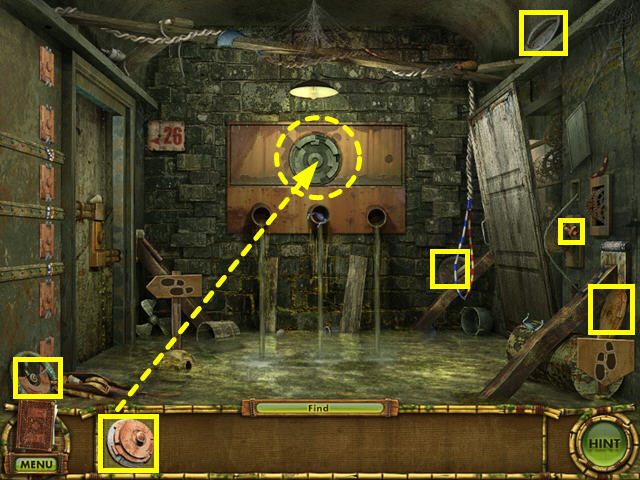
Chapter Twelve: Alex and the Mine
- Enter the mine to learn that the exhaust needs to be repaired.
- Walk down to exit.
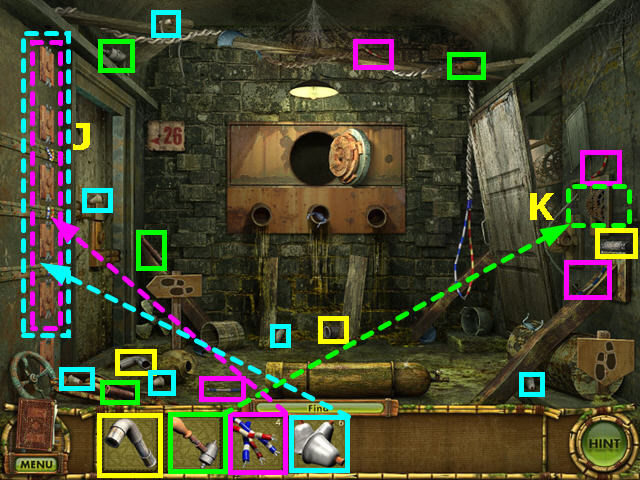
- Locate all the fragments of the color-coded items.
- Look at the close-up at the top of the ladder to find a FAN (A).
- Throw the GRAPEFRUIT at the ape and he throws back the BANANA PEEL (B).
- Use the PIPE COVER on the smoking pipe (C).
- Place the BANANA PEEL by the block of stone (D).
- Click on the block of stone to move it away.
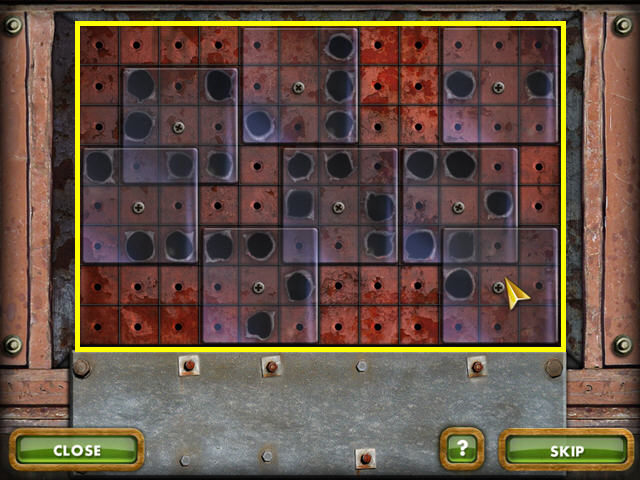
- Use the FAN BLADES on the ventilation system behind the block for a mini-game (E).
- The object of this mini-game is to move the smoke out of the pipes using the fans.
- Place the fans in the path of the smoke to force it to turn on the path and continue to the end.
- Enter the mine.
- Look at the hole in the left wall to learn there is a secret room (F).
- Locate all the fragments of the color-coded items.
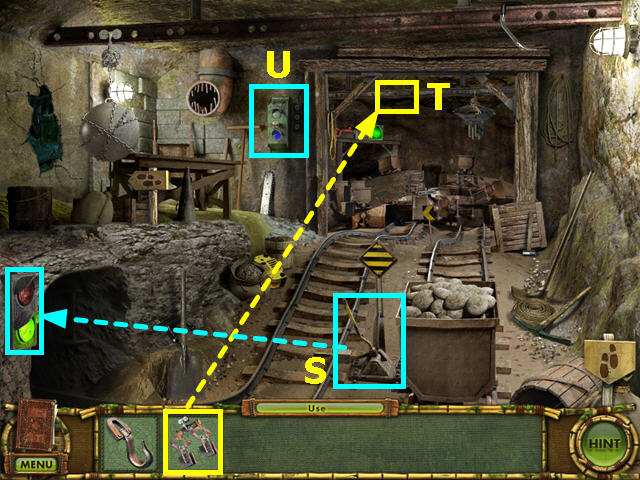
- Use the OVERHEAD RAILS on the rail with missing areas (G).
- Place the LEVER at the switch (H).
- Hang the WRECKING BALL from the chain (I).
- Once the chain breaks and the wrecking ball falls, use the CHAIN to replace the old chain.
- Take the WRECKING BALL from where it fell and hang it on the chain again.
- Push the wrecking ball into the left wall to hake the hole larger.
- Look at the wrecking ball control on the back wall (J).
- Walk down to exit the mine.
- Click on the power switch (K).
- Locate all the fragments of the color-coded items.
- Look at the top of the ladder for one of the HOOKS (L).
- Use the SPEAKER on the radio (M).
- Use the LIGHT BULBS on the lights (N).
- Enter the mine.
- Walk left to enter the secret room through the hole in the wall.
- Walk left to the storage area.
- Locate all the MATCHES.
- Use the MATCHES on the box (O).
- Take the MATCHBOX.
- Walk down to exit the room.
- Use the MATCHBOX to search for the light switch and click on it (P).
- Locate all the pieces of the TIRE and the RAIL CLAMP.
- Walk down twice to exit the mine.
- Use the TIRE on the axle of the cart (Q).
- Locate the pieces of the PUMP.
- Use the PUMP on the tire.
- Click on the radio cart to move it away from the switch (R).
- Click on the switch to turn on the power (S).
- Enter the mine.
- Click on the switch to change the light to green (T).
- Use the RAIL CLAMP on the back rail (U).
- Click on the crane control for a mini-game (V).
- The object of this mini-game is to load the car to match the picture on the right.
- Push columns and rows to load the car.
- There are many solutions to this mini-game.
- This is the first of three levels (#1).
- This is the second of three levels (#2).
- This is the third of three levels (#3).
- Walk left into the hole in the wall.
- Locate the 10 GEARS.
- Use the GEARS on the overhead rail (W).
- Use the HOOK on the chain (X).
- Click on the tangled pulley for a mini-game (Y).
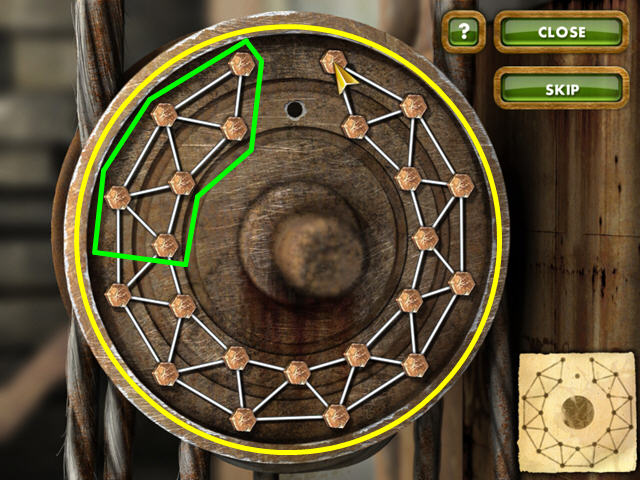
- The object of this mini-game is to untangle the ropes and form the figure on the right.
- The first 6 bolts on the upper left are already in the correct position.
- Move bolts to the empty position to rearrange the ropes.
- Tip-start by finding the outer piece for each section.
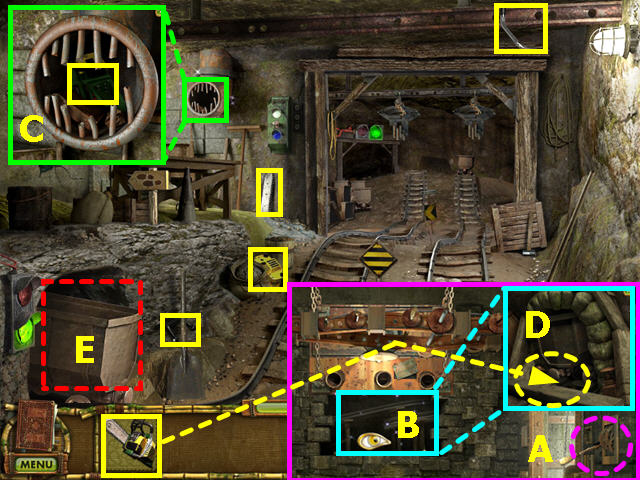
- Pull the lever on the right wall (A).
- Look inside the hole on the back wall to learn you need a chainsaw (B).
- Walk down to exit the room.
- Find all the pieces of the CHAINSAW.
- Look in the broken grill for a piece of the CHAINSAW (C).
- Walk left to enter the hole in the wall.
- Look inside the wall and use the CHAINSAW to cut the beam (D).
- Exit the room and look at the rail car that appears on the lower left and take the tile (E).
Chapter Thirteen: Lisa and the Archives
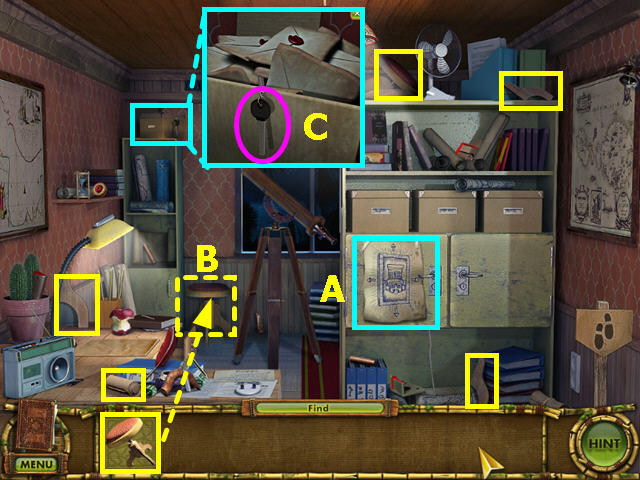
- Look at the door at the end of the hall and read the name on the door.
- Walk forward to enter the room.
- Look at the tile drawing (A).
- Look at the box in the upper left to learn you need a stool.
- Find all the pieces of the stool.
- Place the stool on the floor (B).
- Look in the box and take the KEYS (C).
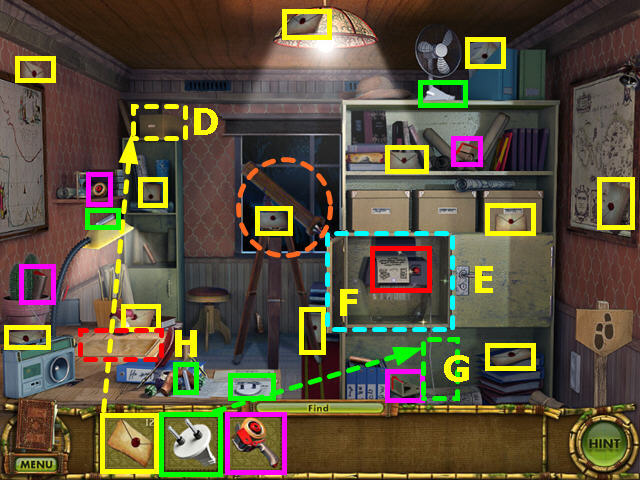
- Find all the LETTERS.
- Place the LETTERS into the box (D).
- Note the telescope in front of the window.
- Use the KEYS to open the cabinet (E).
- Look at the paper in the shredder, then push the red button to learn there is no power (F).
- Locate all the pieces for the PLUG and the PACKING TAPE.
- Use the PLUG on the shredder wire (G).
- Look at the shredder, push the red button and take the shredded note from the bottom of the machine.
- Place the SHREDDED NOTE on the desk for a mini-game (H).
- The object of this mini-game is to rearrange the strips to repair the document.
- Click on two strips to swap positions.
- Use the PACKING TAPE on the document to learn you need to know how the constellation Leo looks.
- Look at the telescope to learn it is missing a lens.
- Walk down twice to exit the archives office, the enter the bunker in the center of the screen.
- Locate all the pieces of the LOCK HANDLE.
- Use the LOCK HANDLE on the lock against the back wall (I).
- Click on the handle twice to activate a mini-game.
- The object of this mini-game is to place the clear panels so that all the large holes are covered.
- The screws in the center of the panels must go in a smaller screw hole.
- Some panels will overlap.
- Locate all the fragments of the color-coded items.
- Use the WIRES and the FUSES on the left wall (J).
- Use the LEVER on the control on the right wall (K).
- Click on the lever 3 times to lower the door.
- Exit and return to the archive office.
- Locate all the pieces of the CROWBAR (L).
- Exit and return to the bunker.
- Use the CROWBAR on the oxygen tank (M).
- Click on the crowbar to roll the tank onto the door.
- Pull the lever twice to raise the door so that the end of the tank is near the sparking wire (N).
- Use the PIPE where the tank meets the wire (O).
- Walk left into room 26.
- Locate all the fragments of the color-coded items.
- Look in the kettle for 1 of the LENSES (P).
- Take the CANDLE (Q).
- Walk down to exit the room.
- Find all the pieces to the ROASTING PAN (R).
- Walk down to exit, then return to the archive office.
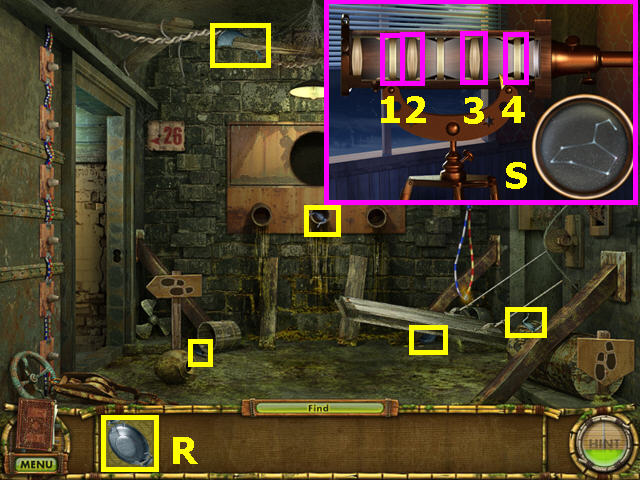
- Use the LENSES on the telescope for a mini-game.
- The object of this mini-game is to focus the lenses so you can see the constellation Leo in the bottom right (S).
- Click on the lenses in numerical order.
- Walk down twice to exit the archive office, then enter the bunker.
- Walk left to enter room 26.
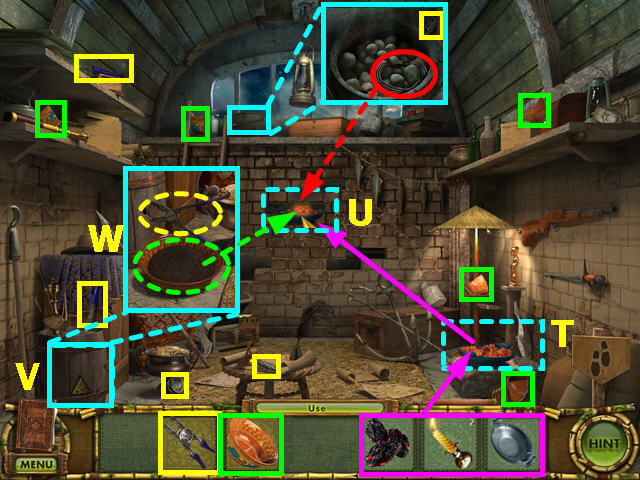
- Place the ROASTING PAN onto the slab (T).
- Put the COALS into the roasting pan then use the CANDLE to light the coals.
- Take the ROASTING PAN with HOT COALS and put it in the hole in the brick wall with the fresh air (U).
- Tip- the hole with fresh air will cause the coals to blow some smoke.
- Look at the barrel of gunpowder (V).
- Find all the pieces to the BOWL and TONGS.
- Look at the close-up of the gunpowder barrel and place the bowl under the bung (W).
- Use the TONGS to remove the bung and fill the bowl with gunpowder.
- Take the BOWL with GUNPOWDER and use it on the same hole as the coals.
- Use the FUSE on the hole, then light it with the CANDLE.
- Locate all the pieces of the STONE HEAD.
- Look at the close-up of the hole and place the STONE HEAD on the pedestal (X).
- Look at the chest in the center.
- Press the gems to make the pattern of the constellation Leo (Y).
- Look in the chest and take the tile.
Chapter Fourteen:Alex and the Abandoned Treasury
- Locate all the fragments of the color-coded items.
- Place the LEVER on the back center part of the floor (A).
- Place the INSCENSE BURNER on the left to pair with the other burner (B).
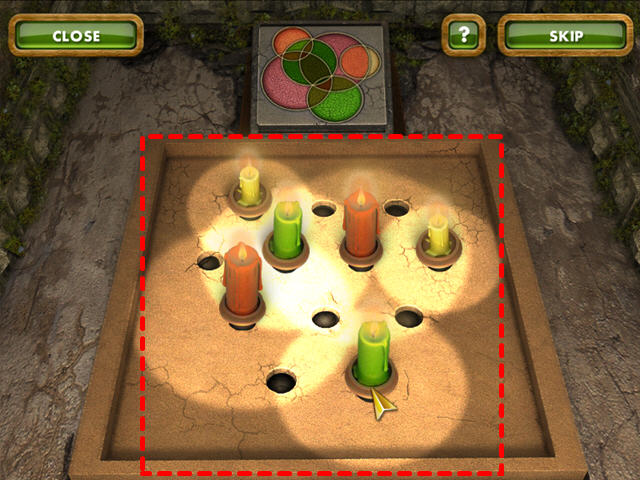
- Use the BALLS on the back wall for a mini-game (C).
- The object of this mini-game is to turn all the balls to brown.
- Rotate the rings back and forth to create a chain with all the balls of one color.
- Once all the balls of one color are in a chain, they will turn to brown.
- Continue until all the colors are gone.
- When symbol appears in the smoke (D), push the stone wedge with the matching symbol (E).
- There are 12 symbols to match.
- Once the stone center sinks down, click on the lever to lower the gong (F).
- Click on the gong to learn you need a tool.
- Walk down to exit, then walk right to the temple.
- Collect all the pieces of the DRUMSTICK.
- Walk down to exit the temple area and walk up to return to the Treasury.
- Use the DRUMSTICK on the gong (G).
- Return the DRUMSTICK to your tools.
- Find all the pieces of the DISC.
- Use the DISC on the speaker hole (H).
- Use the DRUMSTICK on the gong again.
- Look in the far right room and take the GLOBE (I).
- Walk down, then right to return to the temple area.
- Look at the close-up of the hands and place the globe in the hands (J).
- Locate all the fragments of the color-coded items.
- Look at the close-up of the globe for a piece of the KANGAROO (K).
- Look again at the close-up of the globe and use the EAGLE on the ghostly eagle above the globe (L).
- Take the ARTIFACT FRAGMENT that appears.
- Repeat this process with the ELEPHANT, BEAR and KANGAROO.
- Use the ARTIFACT FRAGMENTS to repair the 4 holes in the door (M).
- When a symbol lights up on the door, locate and click on the matching symbol.
- There are 10 symbol pairs to find.
- Collect all the COINS.
- Note the gold opening in the ground (N).
- Walk down, then up to the Treasury.
- Find all the pieces of the BOWL (O).
- Walk down, then right to return to the temple area.
- Use the BOWL in the statue's empty hand (P).
- Use the COINS on the bowl for a mini-game (Q).
- The object of the mini-game is to level the statue's hands using all the coins.
- Place 1 yellow, 1 red, 2 gold, and 1 green coin in the left bowl (R).
- Place 1 yellow, 2 red, 1 gold, and 2 green coin in the right bowl (S).
- Look at the close-up of the gold opening in the ground and take the tile (T).
Created at: 2010-09-08