

Walkthrough Menu
- General Tips
- Chapter 1: In Which We Begin To Not Understand
- Chapter 2: We Shall Have To Eat Red Meat Now
- Chapter 3: In Which Frederic Larsan Explains How The Murderer Was Able To Get Out Of The Yellow Room
- Chapter 4: I Expect The Assassin Later This Evening
- Chapter 5: In Which Rouletabille Appears In All His Glory
General Tips
 • Hidden Object Scenes and mini-games are often randomized -
your solution may vary. • Hidden Object Scenes will be
referred to as HOS in this walkthrough. • Hints are unlimited,
but you must wait for the meter to refill. They are only
available in HOS. • Items in yellow require additional steps.
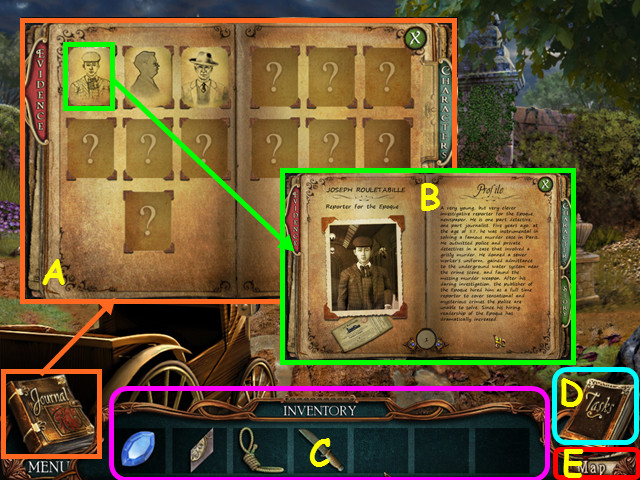
• Read your journal to review evidence and characters (A). •
Select a piece of evidence or character to get more
information (B). • Your inventory is in the bottom panel -
select an item to choose it for use (C). • The inventory panel
auto-hides, move your mouse down to reveal the panel. • Select
the Tasks for details on what to investigate (D) • Select the
Map button for your current location (E).
• Hidden Object Scenes and mini-games are often randomized -
your solution may vary. • Hidden Object Scenes will be
referred to as HOS in this walkthrough. • Hints are unlimited,
but you must wait for the meter to refill. They are only
available in HOS. • Items in yellow require additional steps.
• Read your journal to review evidence and characters (A). •
Select a piece of evidence or character to get more
information (B). • Your inventory is in the bottom panel -
select an item to choose it for use (C). • The inventory panel
auto-hides, move your mouse down to reveal the panel. • Select
the Tasks for details on what to investigate (D) • Select the
Map button for your current location (E).
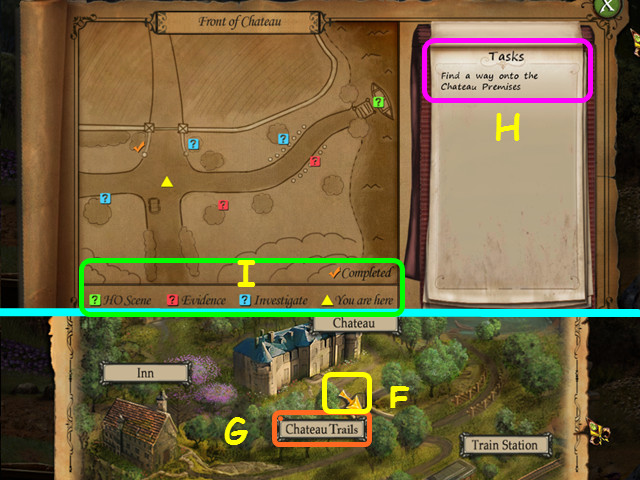 • Use the map to determine your current location; you are the
yellow arrow (F). • Selecting the name of a location will also
bring up the task list (G). • The task list will give a more
detailed map of the area to include the locations of interest
(H). • Refer to the legend to see where HOS and other areas
are located (I). • Note that some HOS may need to be triggered
and will not be immediately available.
• Use the map to determine your current location; you are the
yellow arrow (F). • Selecting the name of a location will also
bring up the task list (G). • The task list will give a more
detailed map of the area to include the locations of interest
(H). • Refer to the legend to see where HOS and other areas
are located (I). • Note that some HOS may need to be triggered
and will not be immediately available.
Chapter 1: In Which We Begin To Not Understand
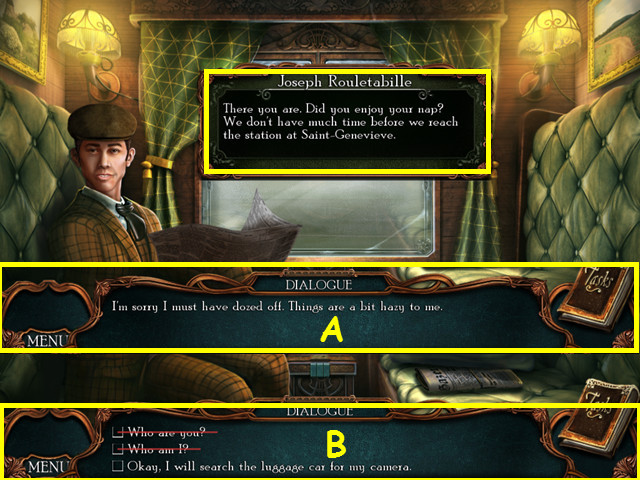 • You will have the option of some interactive help. • During
conversations, select the question or statement you wish to
speak (A). • Previously asked questions will have a red line
through them (B). • This guide will assume you have completed
all future dialog.
• You will have the option of some interactive help. • During
conversations, select the question or statement you wish to
speak (A). • Previously asked questions will have a red line
through them (B). • This guide will assume you have completed
all future dialog.
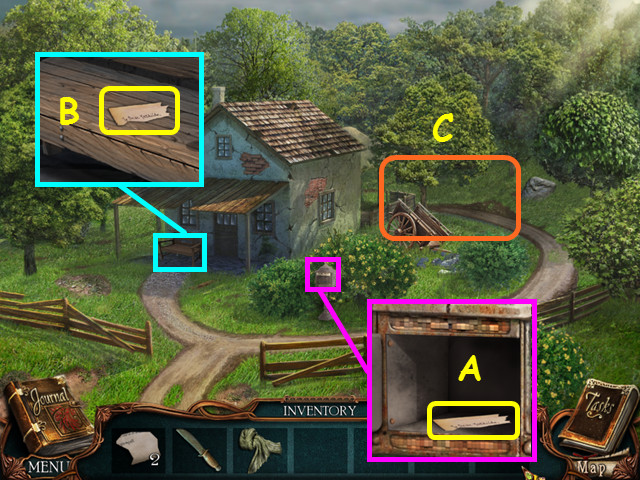
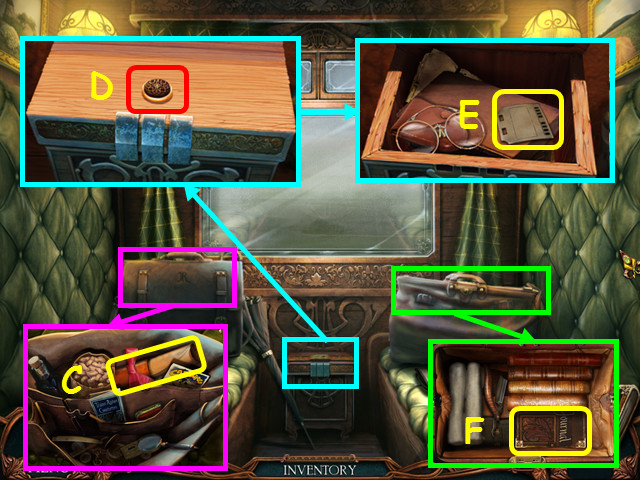 • Look at and open the briefcase on the left; take the map
(C). • Look at the box in the center and press the button (D).
• Take the 1/2 PAPER CARD (E). • Look inside the bag on the
right and take the journal (F). • Walk down to exit the
compartment.
• Look at and open the briefcase on the left; take the map
(C). • Look at the box in the center and press the button (D).
• Take the 1/2 PAPER CARD (E). • Look inside the bag on the
right and take the journal (F). • Walk down to exit the
compartment.
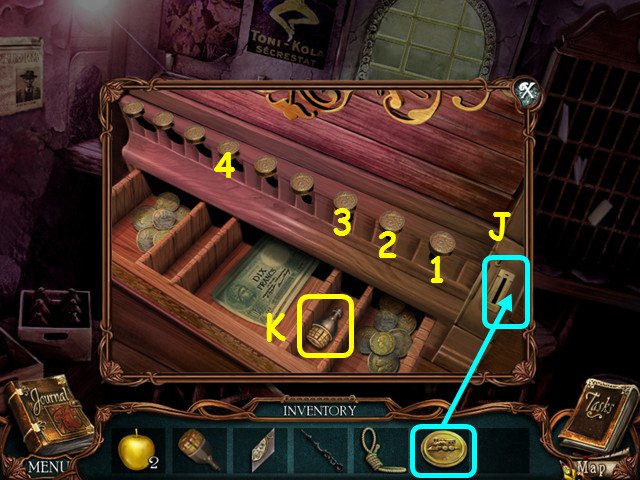
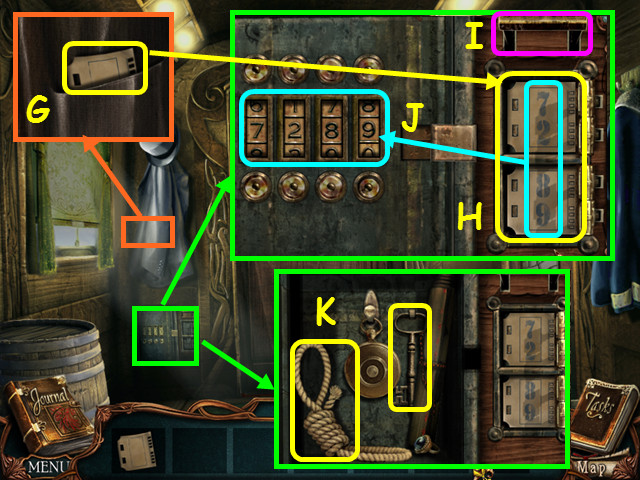 • After you are shot at, walk forward to the back door. • Look
at the coat and take the 2/2 PAPER CARD (G). • Look at the
device below the coat and place the 2 PAPER CARDS on the right
(H). • Pull down the lever to reveal the safe code on the
paper cards (I). • Enter the code on the left; 7-2-8-9 (J). •
Take the ROPE and the KEY from the safe (K). • Walk down once
to the hallway. • Select the area under the right window for a
HOS.
• After you are shot at, walk forward to the back door. • Look
at the coat and take the 2/2 PAPER CARD (G). • Look at the
device below the coat and place the 2 PAPER CARDS on the right
(H). • Pull down the lever to reveal the safe code on the
paper cards (I). • Enter the code on the left; 7-2-8-9 (J). •
Take the ROPE and the KEY from the safe (K). • Walk down once
to the hallway. • Select the area under the right window for a
HOS.
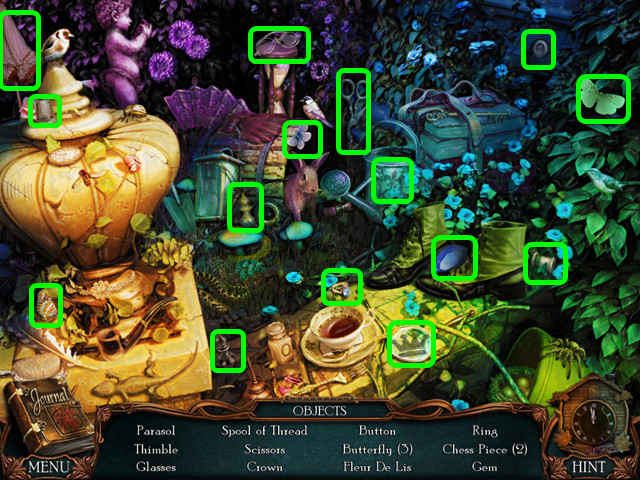
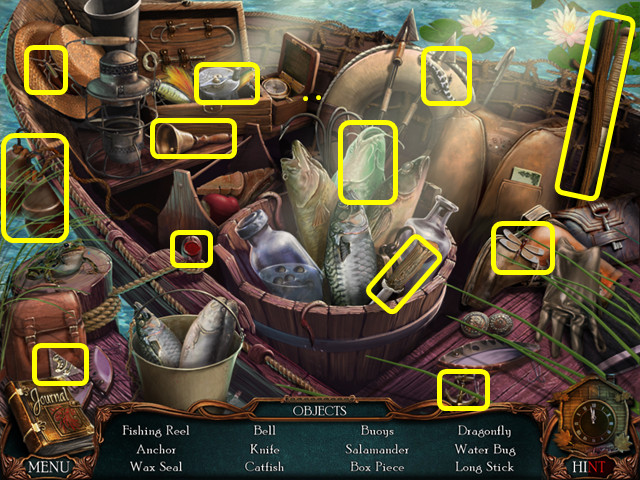
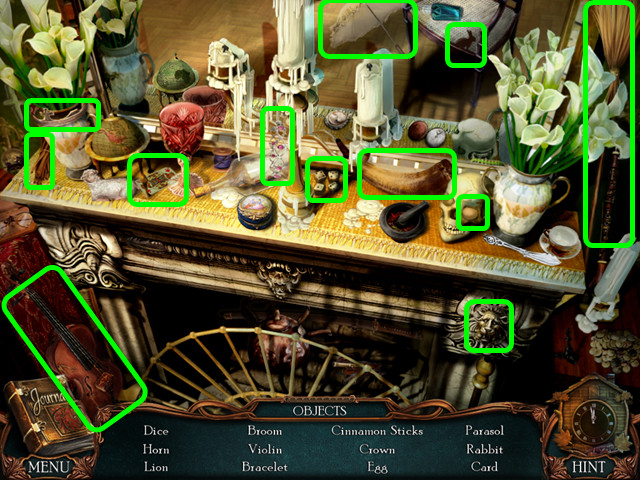
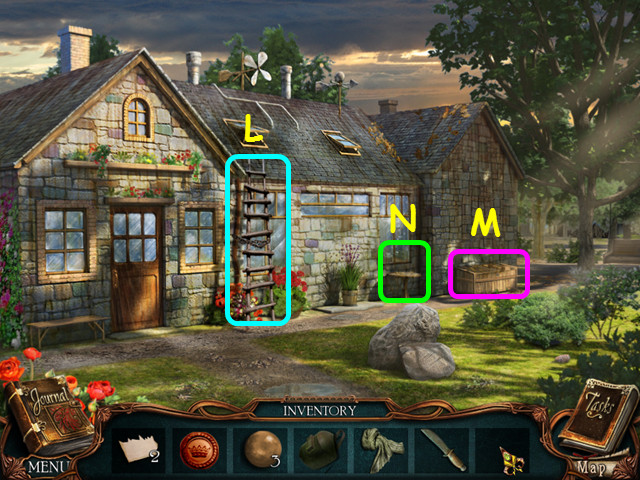
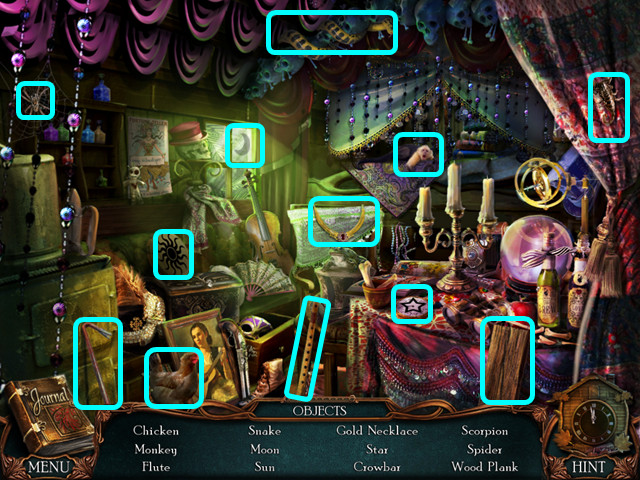
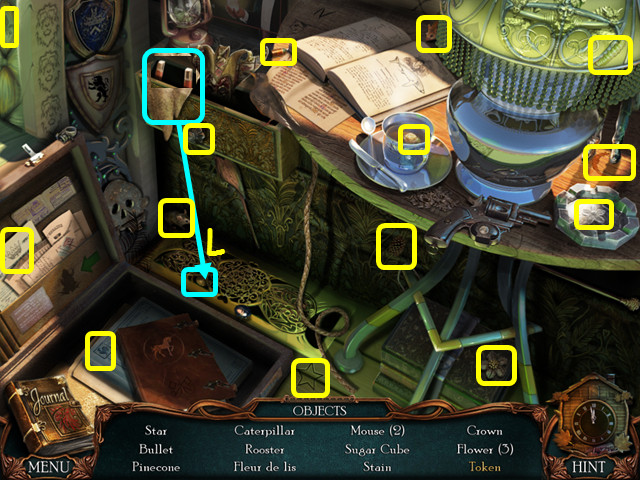 • Locate all the items on the list. • Remove the cloth, take
the magnet and use it on the grate to get the token (L). • You
will earn the TOKEN. • Walk forward to the back door.
• Locate all the items on the list. • Remove the cloth, take
the magnet and use it on the grate to get the token (L). • You
will earn the TOKEN. • Walk forward to the back door.
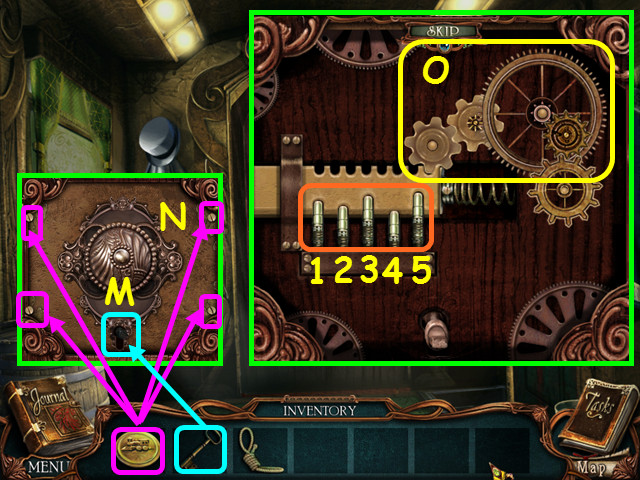 • Look at the baggage door; use the KEY in the lock, then turn
the key (M). • Use the TOKEN to remove the 4 screws (N). •
Drag the 4 gears to the pegs to connect to the locks spring
(O). • Find the correct sequence to push the tumblers down so
they all stay down. • Press 4-2-1-3-5. • Walk forward twice to
the luggage car.
• Look at the baggage door; use the KEY in the lock, then turn
the key (M). • Use the TOKEN to remove the 4 screws (N). •
Drag the 4 gears to the pegs to connect to the locks spring
(O). • Find the correct sequence to push the tumblers down so
they all stay down. • Press 4-2-1-3-5. • Walk forward twice to
the luggage car.
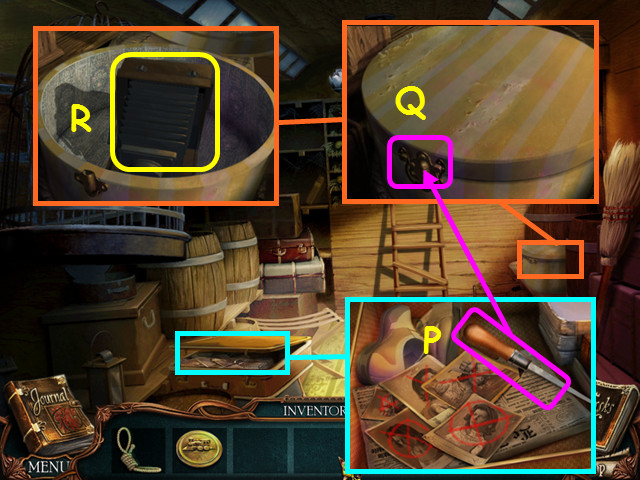 • Look in the suitcase on the left and take the FILE (P). •
Look at the hat box and use the FILE on the hasp (Q); take the
camera (R). • Your cursor will now change to a camera when you
need to take a photo. • Walk down 4 times.
• Look in the suitcase on the left and take the FILE (P). •
Look at the hat box and use the FILE on the hasp (Q); take the
camera (R). • Your cursor will now change to a camera when you
need to take a photo. • Walk down 4 times.
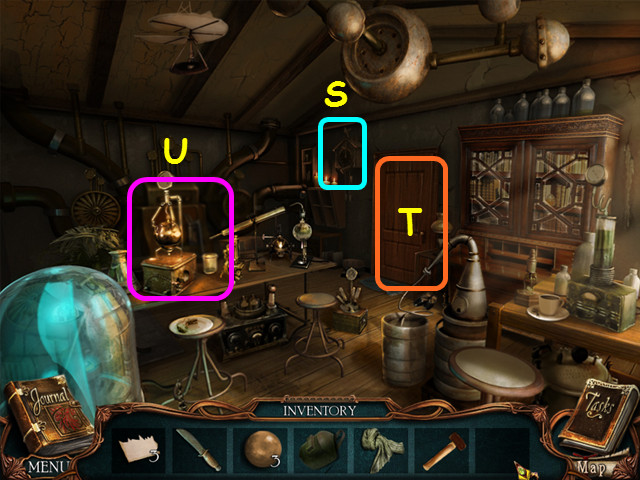
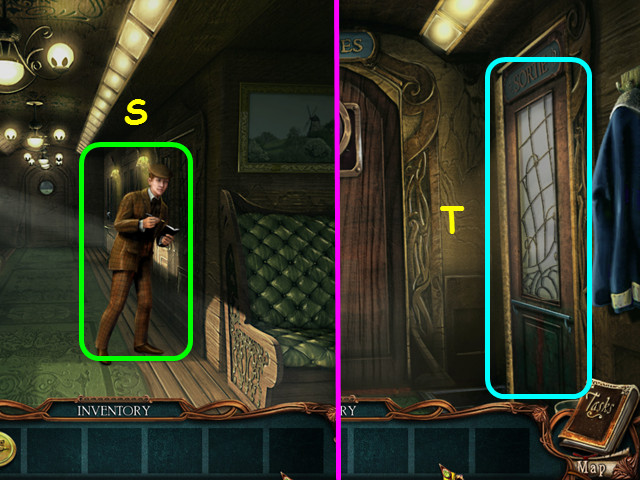 • Take a picture of Rouletabille (S). • Make sure to take
photos of evidence and characters to fill in your journal. •
Select Joseph to eavesdrop on the compartment. • Walk down,
forward, then go right to the train station (T).
• Take a picture of Rouletabille (S). • Make sure to take
photos of evidence and characters to fill in your journal. •
Select Joseph to eavesdrop on the compartment. • Walk down,
forward, then go right to the train station (T).
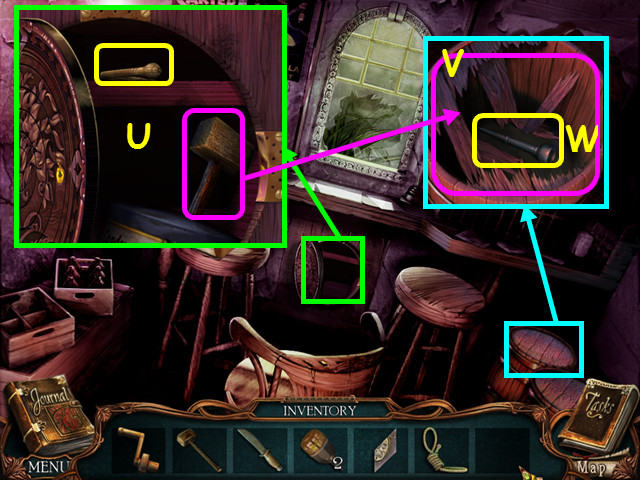
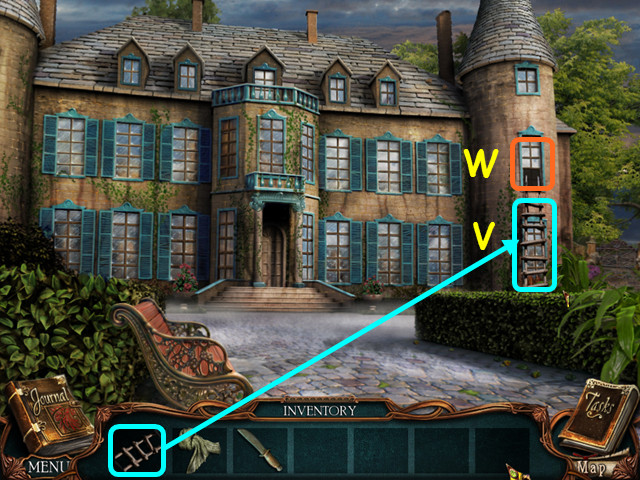
 • Look at the schedule and note the time (U). • Pull up the
bottom left corner and take the CLOCK HAND (V). • Enter the
station (W).
• Look at the schedule and note the time (U). • Pull up the
bottom left corner and take the CLOCK HAND (V). • Enter the
station (W).
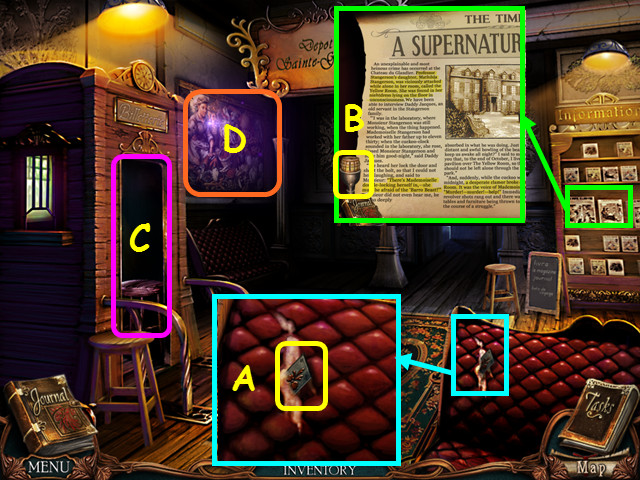 • Look at the rip in the seat and take the 1/3 BOX PIECE (A).
• Look at the newspaper, take a photo, then take the 1/2
SPARKPLUG (B). • Note the entrance to the ticket booth (C). •
Select the painting for a HOS (D).
• Look at the rip in the seat and take the 1/3 BOX PIECE (A).
• Look at the newspaper, take a photo, then take the 1/2
SPARKPLUG (B). • Note the entrance to the ticket booth (C). •
Select the painting for a HOS (D).
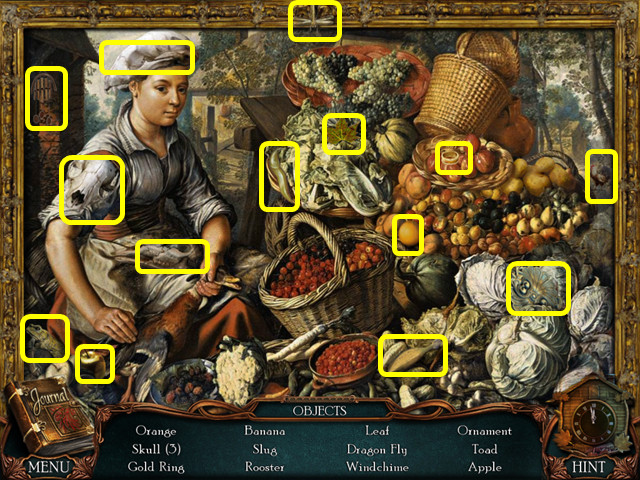 • Locate all the items on the list. • You will earn the 1/3
APPLE. • Enter the ticket booth.
• Locate all the items on the list. • You will earn the 1/3
APPLE. • Enter the ticket booth.
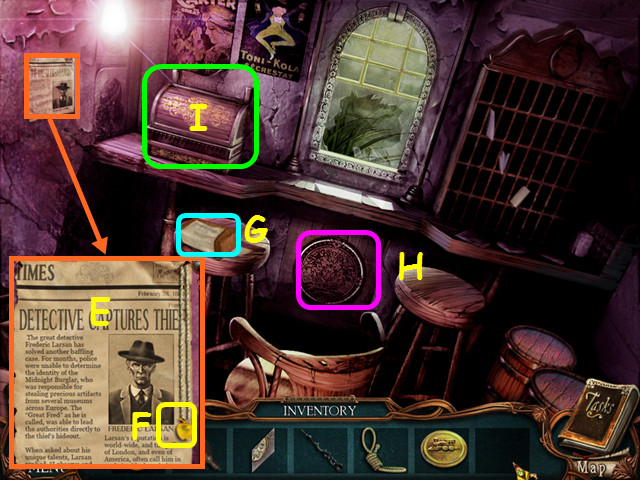 • Look at the newspaper and take a picture of the article (E).
• Take the 2/3 APPLE (F). • Look at the brick and photograph
the note (G). • Note the mini-game under the counter (H). •
Look at the register for a mini-game (I).
• Look at the newspaper and take a picture of the article (E).
• Take the 2/3 APPLE (F). • Look at the brick and photograph
the note (G). • Note the mini-game under the counter (H). •
Look at the register for a mini-game (I).
 • Place the token in the slot on the right to activate the
mini-game (J). • Push all the buttons down; some buttons
affect others. • Push 1-2-3-4 to open the drawer. • Take the
2/2 SPARKPLUG (K). • Exit the ticket booth and go forward to
the back of the station.
• Place the token in the slot on the right to activate the
mini-game (J). • Push all the buttons down; some buttons
affect others. • Push 1-2-3-4 to open the drawer. • Take the
2/2 SPARKPLUG (K). • Exit the ticket booth and go forward to
the back of the station.
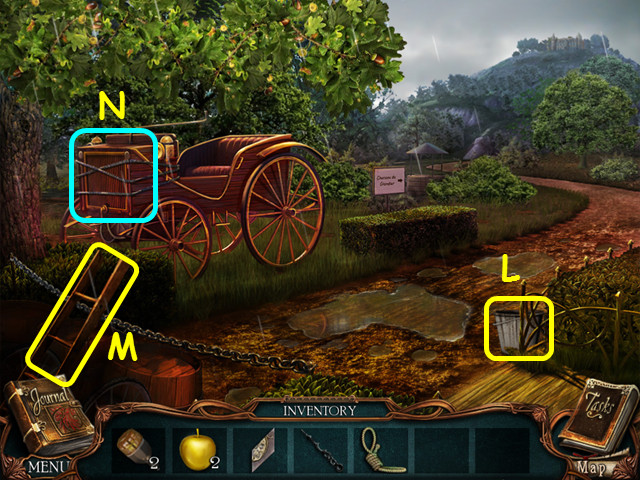 • Take the BUCKET of RAINWATER (L). • Take the LADDER (M). •
Note the front end of the car (N). • Walk down twice to the
front of the station.
• Take the BUCKET of RAINWATER (L). • Take the LADDER (M). •
Note the front end of the car (N). • Walk down twice to the
front of the station.
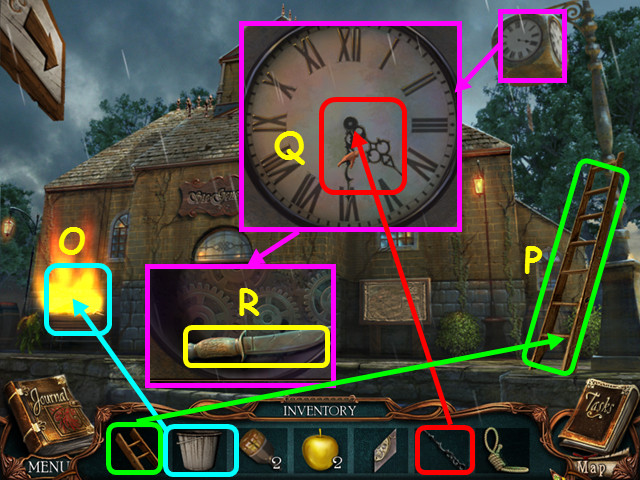 • Use the BUCKET OF RAINWATER to put out the fire in the bin
(O). • Use the LADDER on the clock's pole (P). • Look at the
clock and place the CLOCK HAND in the center (Q). • Set the
clock to 4:30. • Take the KNIFE from inside the clock (R). •
Select the bin for a HOS.
• Use the BUCKET OF RAINWATER to put out the fire in the bin
(O). • Use the LADDER on the clock's pole (P). • Look at the
clock and place the CLOCK HAND in the center (Q). • Set the
clock to 4:30. • Take the KNIFE from inside the clock (R). •
Select the bin for a HOS.
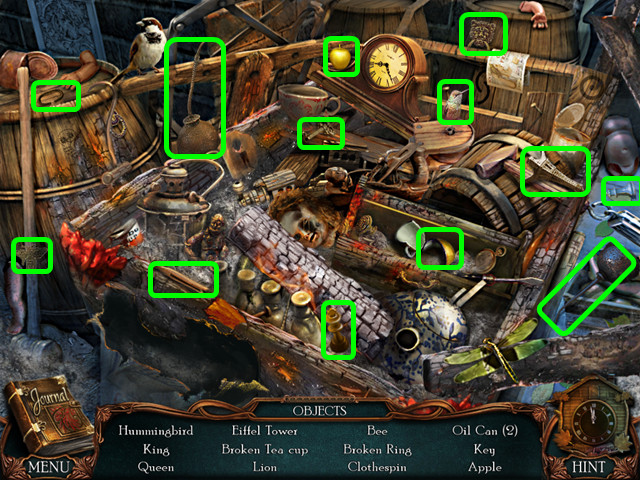 • Locate all the items on the list. • You will earn the 3/3
APPLE. • Enter the station, then the ticket booth. • Select
the mini-game under the counter.
• Locate all the items on the list. • You will earn the 3/3
APPLE. • Enter the station, then the ticket booth. • Select
the mini-game under the counter.
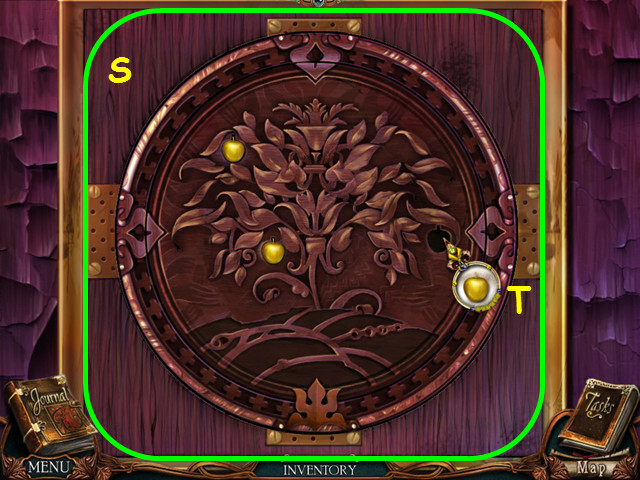 • Rotate the rings to restore the carving (S). • Place the 3
APPLES in the indentations (T).
• Rotate the rings to restore the carving (S). • Place the 3
APPLES in the indentations (T).
 • Take the MALLET and the CRANK (U). • Look at the barrel on
the right and use the MALLET 4 times on the lid (V). • Take
the PISTON (W). • Return to the back of the station and look
at the front of the car.
• Take the MALLET and the CRANK (U). • Look at the barrel on
the right and use the MALLET 4 times on the lid (V). • Take
the PISTON (W). • Return to the back of the station and look
at the front of the car.
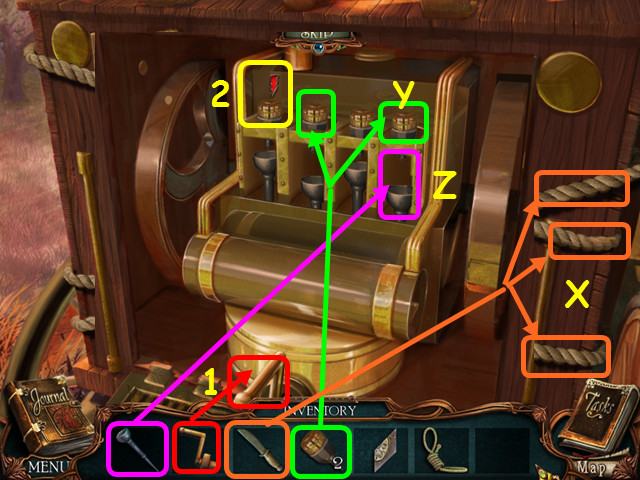 • Use the KNIFE to cut the 3 ropes (X). • Place the 2
SPARKPLUGS into the holes near the top (Y). • Place the PISTON
in the empty space beneath the sparkplugs (Z). • Use the CRANK
on the hole at the bottom (1). • Turn the crank to start the
engine then select each sparkplug when the meter above it is
full (2). • You will have to restart the engine should you
click in error.
• Use the KNIFE to cut the 3 ropes (X). • Place the 2
SPARKPLUGS into the holes near the top (Y). • Place the PISTON
in the empty space beneath the sparkplugs (Z). • Use the CRANK
on the hole at the bottom (1). • Turn the crank to start the
engine then select each sparkplug when the meter above it is
full (2). • You will have to restart the engine should you
click in error.
Chapter 2: We Shall Have To Eat Red Meat Now
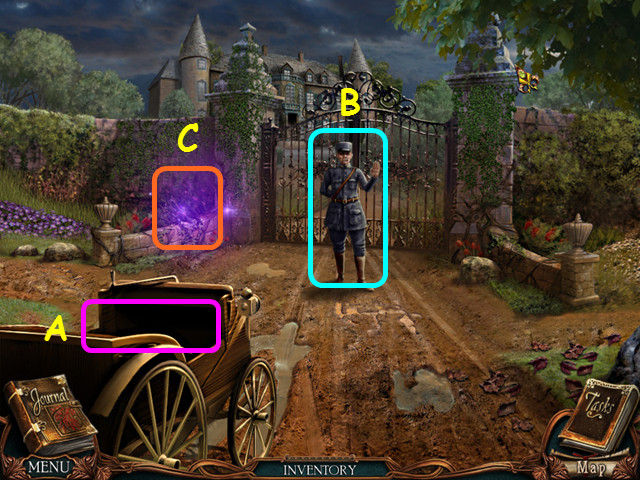 • Note there is a place to assemble something in the car (A).
• Talk to the guard to learn you are not permitted entry (B).
• Select the garden area next to the gate for a HOS (C).
• Note there is a place to assemble something in the car (A).
• Talk to the guard to learn you are not permitted entry (B).
• Select the garden area next to the gate for a HOS (C).
 • Locate all the items on the list. • You will earn the GEM. •
Walk to the left.
• Locate all the items on the list. • You will earn the GEM. •
Walk to the left.
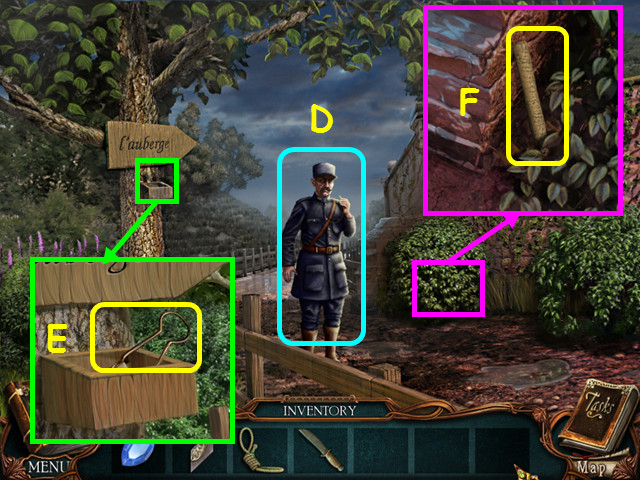 • Try to talk to the guard (D). • Look at the container and
take the CLIPPERS (E). • Look in the bushes and take the RAKE
(F). • Walk to the right.
• Try to talk to the guard (D). • Look at the container and
take the CLIPPERS (E). • Look in the bushes and take the RAKE
(F). • Walk to the right.
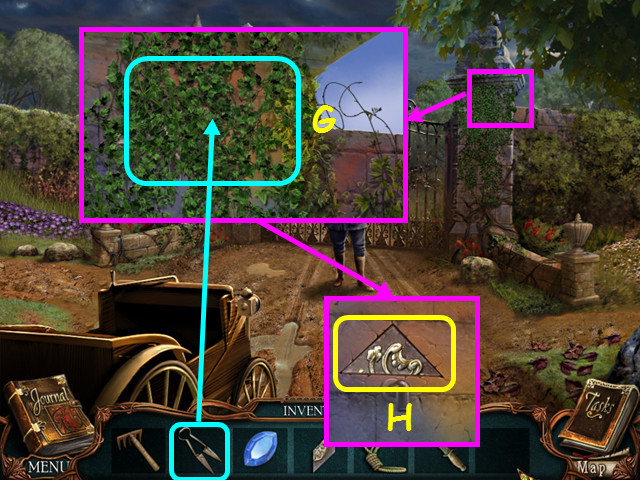 • Look at the right column and use the CLIPPERS 5 times on the
vines (G). • Take the 2/3 BOX PIECE (H). • Walk to the right.
• Look at the right column and use the CLIPPERS 5 times on the
vines (G). • Take the 2/3 BOX PIECE (H). • Walk to the right.
 • Look at the sign and take the LATCH PIN (I). • Note the box
hanging overhead (J).
• Look at the sign and take the LATCH PIN (I). • Note the box
hanging overhead (J).
 • Note the mini-game on the right (K). • Look at the bushes
and take the SHOVEL (L). • Walk forward to the lake.
• Note the mini-game on the right (K). • Look at the bushes
and take the SHOVEL (L). • Walk forward to the lake.
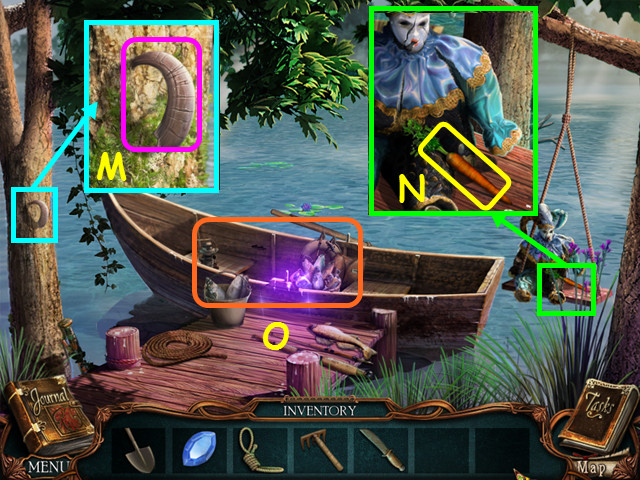 • Look at the claw in the tree and take a photo (M). • Look at
the clown and take the CARROT (N). • Select the boat for a HOS
(O).
• Look at the claw in the tree and take a photo (M). • Look at
the clown and take the CARROT (N). • Select the boat for a HOS
(O).
 • Locate all the items on the list. • You will earn the LONG
STICK and the 3/3 BOX PIECE. • Walk down once and look at the
mini-game on the right.
• Locate all the items on the list. • You will earn the LONG
STICK and the 3/3 BOX PIECE. • Walk down once and look at the
mini-game on the right.
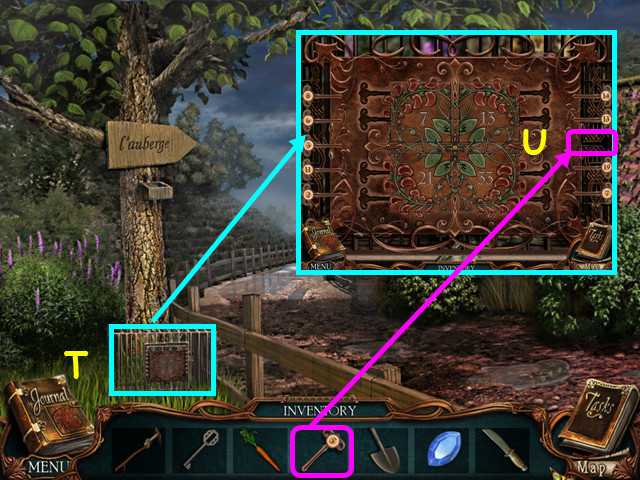
 • Place the 3 BOX PIECES on the lid to trigger the mini-game.
• Drag pieces into position to complete the lid of the box;
select pieces to rotate in place (P). • Take a photo of the
note and take the MAIL KEY (Q). • Walk down twice and look in
the car.
• Place the 3 BOX PIECES on the lid to trigger the mini-game.
• Drag pieces into position to complete the lid of the box;
select pieces to rotate in place (P). • Take a photo of the
note and take the MAIL KEY (Q). • Walk down twice and look in
the car.
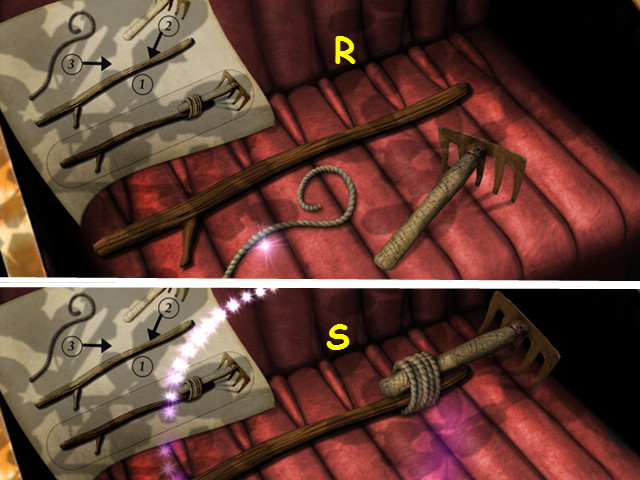 • Place the LONG STICK, RAKE, and ROPE on the seat (R). • Move
the rake to the top of the stick, then tie the pieces together
with the rope (S). • Take the LONG RAKE. • Walk to the left.
• Place the LONG STICK, RAKE, and ROPE on the seat (R). • Move
the rake to the top of the stick, then tie the pieces together
with the rope (S). • Take the LONG RAKE. • Walk to the left.
 • Take a photo of the cage (T). • Look at the cage and place
the LATCH PIN on the right to trigger a mini-game (U).
• Take a photo of the cage (T). • Look at the cage and place
the LATCH PIN on the right to trigger a mini-game (U).
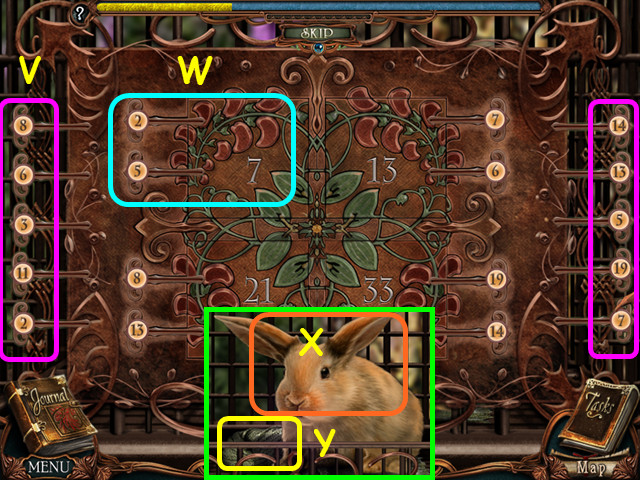 • Take latch pins from the sides (V) and place them in the
grooves so the numbers on the pins equal the number in the
square (W). • Give the CARROT to the bunny (X) and take the
SCARF (Y). • Walk right twice, then go forward.
• Take latch pins from the sides (V) and place them in the
grooves so the numbers on the pins equal the number in the
square (W). • Give the CARROT to the bunny (X) and take the
SCARF (Y). • Walk right twice, then go forward.
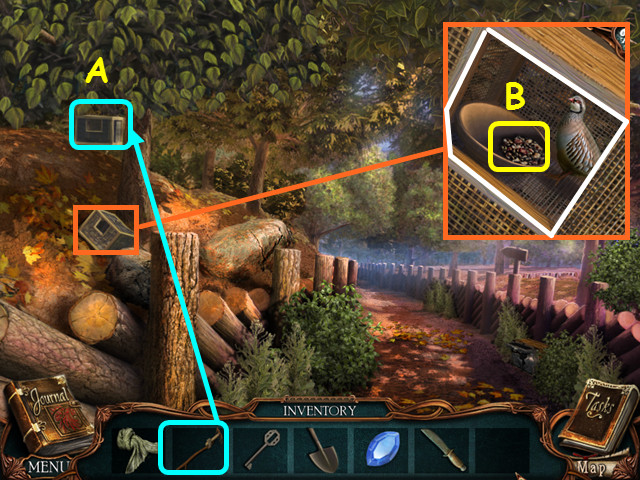 • Use the LONG RAKE to knock the box closer (A). • Look at the
box, remove the door and take the BIRD SEED (B). • Walk down
twice; go left, then forward to the Inn.
• Use the LONG RAKE to knock the box closer (A). • Look at the
box, remove the door and take the BIRD SEED (B). • Walk down
twice; go left, then forward to the Inn.
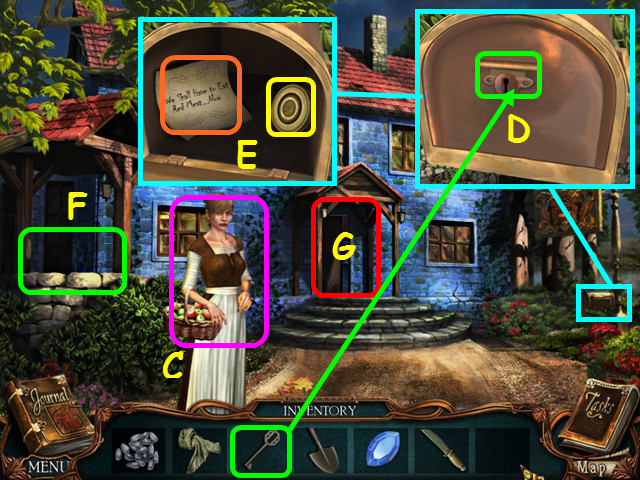 • Take a photo of the innkeeper's wife (C). • Look at the
mailbox and use the MAIL KEY on the lock (D). • Photograph the
note and take the SAFE DIAL (E). • Note the well (F). • Walk
forward to enter the inn (G).
• Take a photo of the innkeeper's wife (C). • Look at the
mailbox and use the MAIL KEY on the lock (D). • Photograph the
note and take the SAFE DIAL (E). • Note the well (F). • Walk
forward to enter the inn (G).
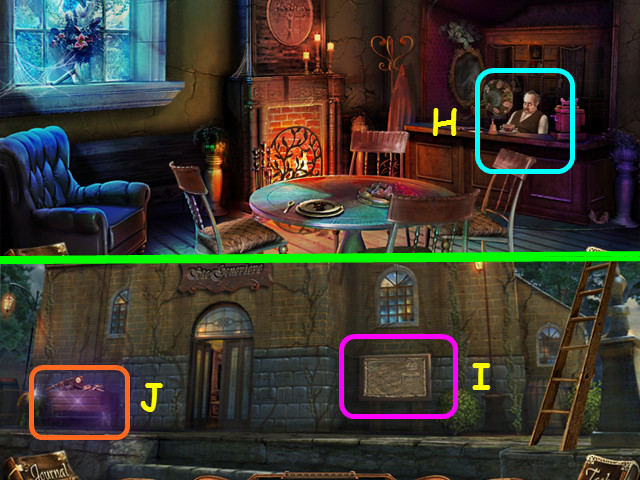 • Take a photo of the innkeeper (H). • Walk down 6 times to
return to the front of the train station. • Look at the
schedule to see that the train from Calais should arrive at
4:54 (I). • Select the bin for a HOS (J).
• Take a photo of the innkeeper (H). • Walk down 6 times to
return to the front of the train station. • Look at the
schedule to see that the train from Calais should arrive at
4:54 (I). • Select the bin for a HOS (J).
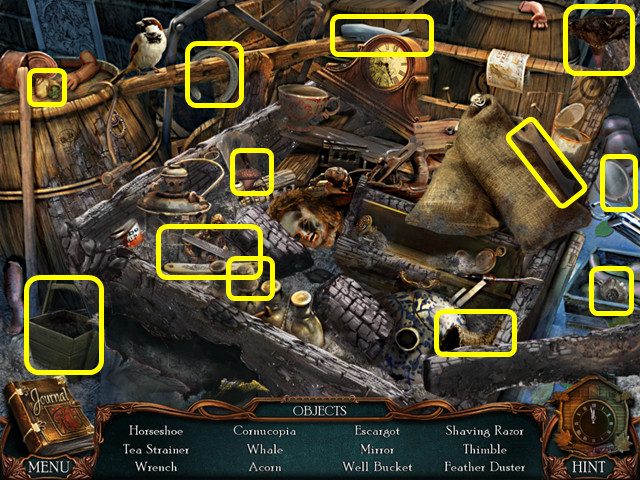 • Locate all the items on the list. • You will earn the WELL
BUCKET and the FEATHER DUSTER. • Walk forward 3 times, go
left, forward and enter the inn. • Talk to the innkeeper again
to learn he wants honey. • Walk down once to exit the inn.
• Locate all the items on the list. • You will earn the WELL
BUCKET and the FEATHER DUSTER. • Walk forward 3 times, go
left, forward and enter the inn. • Talk to the innkeeper again
to learn he wants honey. • Walk down once to exit the inn.
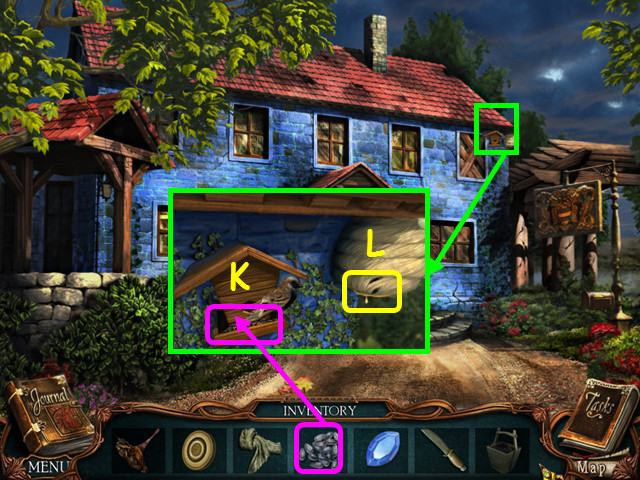 • Look at the eave and place the BIRDSEED on the feeder (K). •
Take the HONEY from the hive (L).
• Look at the eave and place the BIRDSEED on the feeder (K). •
Take the HONEY from the hive (L).
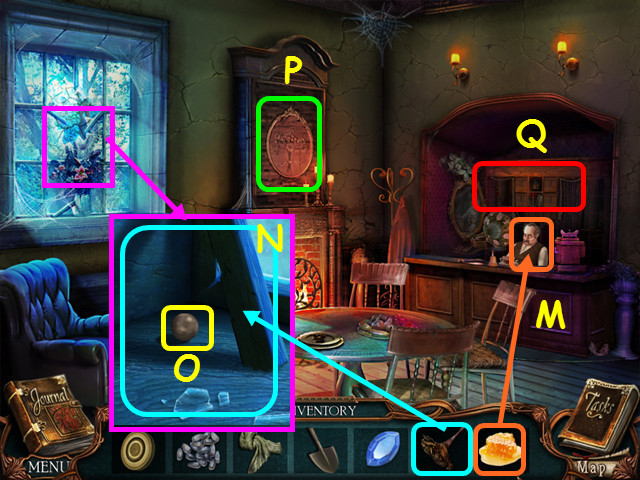 • Enter the inn and give the HONEY to the innkeeper (M). •
Look at the window and use the DUSTER 4 times to remove the
dust (N). • Take the 1/3 LEAD BALL (O). • Note the safe (P). •
Select the area behind the counter for a HOS (Q).
• Enter the inn and give the HONEY to the innkeeper (M). •
Look at the window and use the DUSTER 4 times to remove the
dust (N). • Take the 1/3 LEAD BALL (O). • Note the safe (P). •
Select the area behind the counter for a HOS (Q).
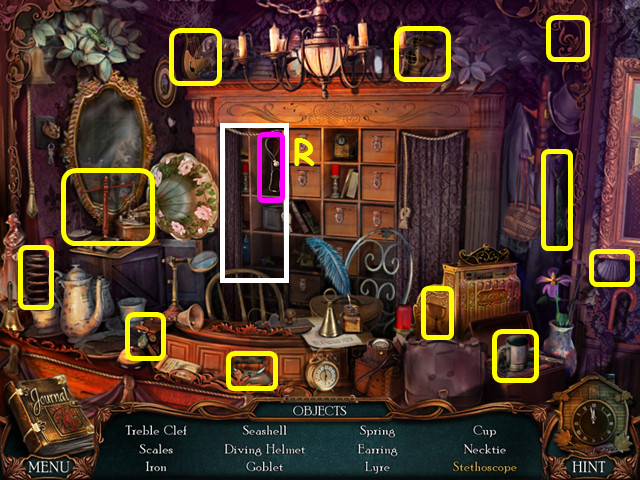 • Locate all the items on the list. • Open the curtain to find
the stethoscope (R). • You will earn the STETHOSCOPE. • Open
the cover and zoom into the safe for a mini-game.
• Locate all the items on the list. • Open the curtain to find
the stethoscope (R). • You will earn the STETHOSCOPE. • Open
the cover and zoom into the safe for a mini-game.
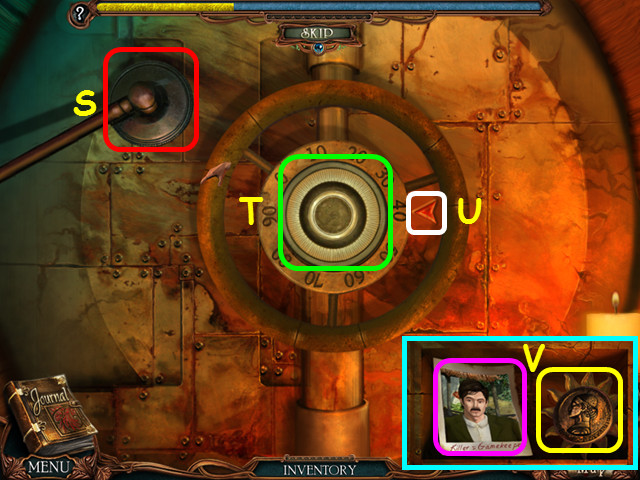 • Place the STETHOSCOPE (S) and the SAFE DIAL (T) on the safe
to trigger the mini-game. • Turn the dial until the arrow
turns green (U), then release the dial. • Do this 2 more times
to open the safe. • Photograph the gamekeeper's picture and
take the MEDALLION (V). • Exit the inn and look at the well.
• Place the STETHOSCOPE (S) and the SAFE DIAL (T) on the safe
to trigger the mini-game. • Turn the dial until the arrow
turns green (U), then release the dial. • Do this 2 more times
to open the safe. • Photograph the gamekeeper's picture and
take the MEDALLION (V). • Exit the inn and look at the well.
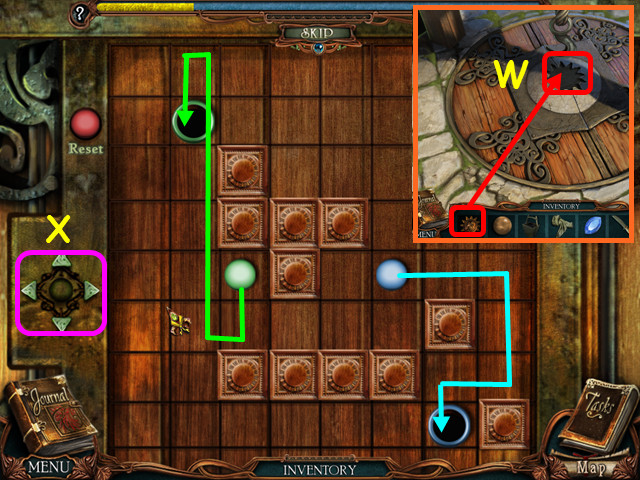 • Place the MEDALLION in the center of the well cover (W). •
Use the arrows (X) to move the balls into the matching colored
holes at the same time. • Press the arrows: right x 2, down x
2, left, up x 5, down.
• Place the MEDALLION in the center of the well cover (W). •
Use the arrows (X) to move the balls into the matching colored
holes at the same time. • Press the arrows: right x 2, down x
2, left, up x 5, down.
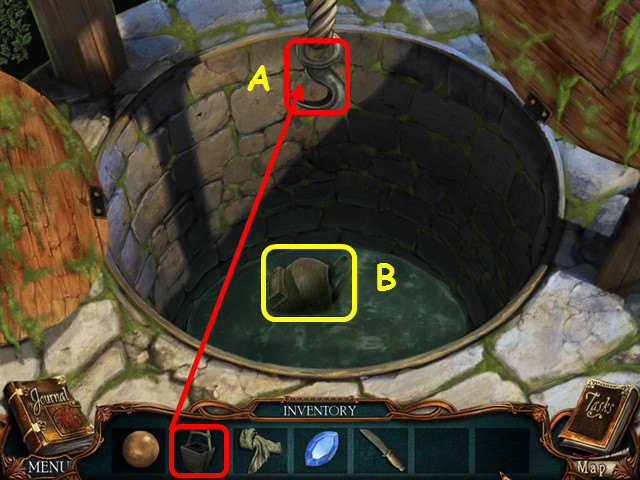 • Place the WELL BUCKET (A) on the hook to retrieve the
WELDING MASK (B). • Walk down, then go to the right twice.
• Place the WELL BUCKET (A) on the hook to retrieve the
WELDING MASK (B). • Walk down, then go to the right twice.
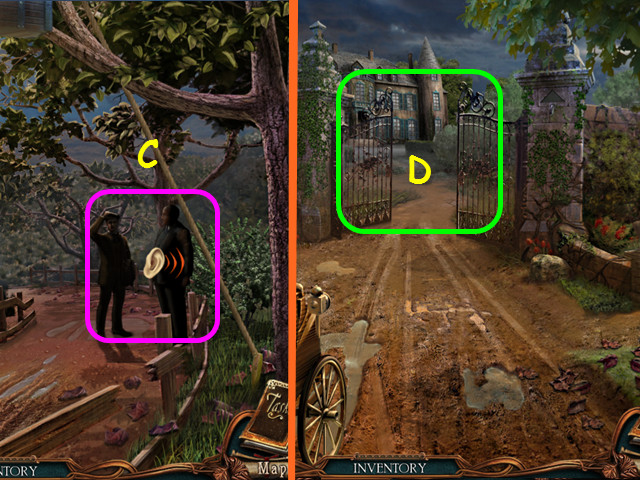 • Select the men to eavesdrop on their conversation (C). •
Walk down once then go forward through the gate (D).
• Select the men to eavesdrop on their conversation (C). •
Walk down once then go forward through the gate (D).
Chapter 3: In Which Frederic Larsan Explains How The Murderer Was Able To Get Out Of The Yellow Room
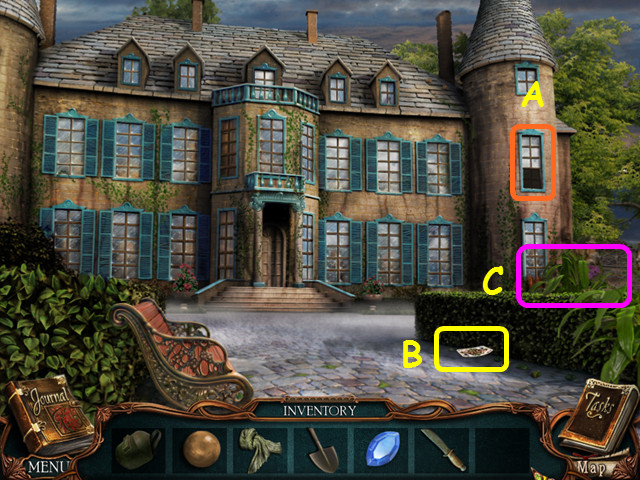 • Note the open window (A). • Take the 1/4 CARD (B). • Walk
right to the garden (C).
• Note the open window (A). • Take the 1/4 CARD (B). • Walk
right to the garden (C).
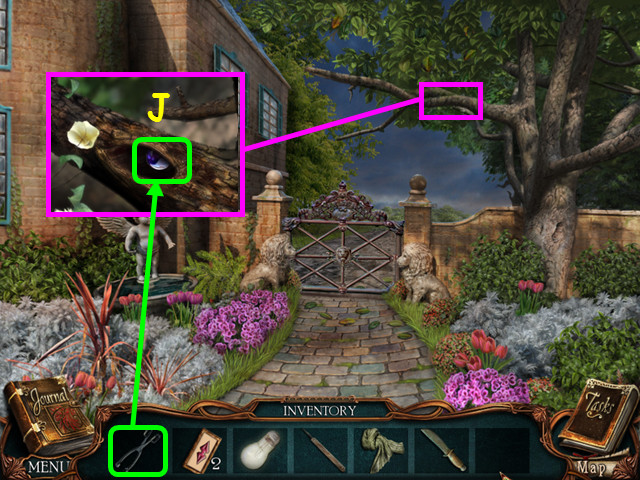
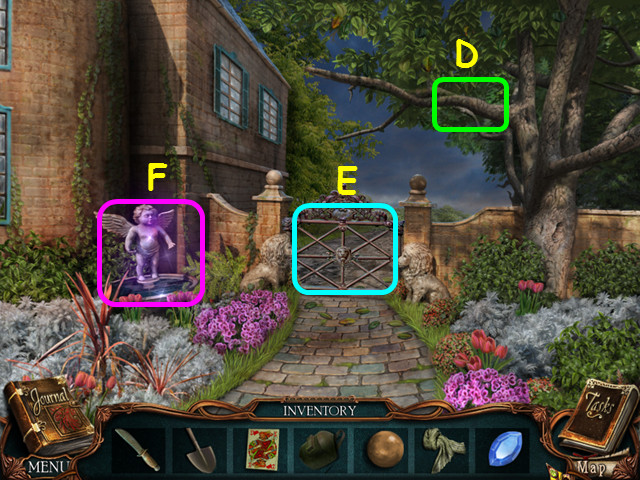 • Note there is something in the tree (D). • Note the locked
gate (E). • Select the fountain for a HOS (F).
• Note there is something in the tree (D). • Note the locked
gate (E). • Select the fountain for a HOS (F).
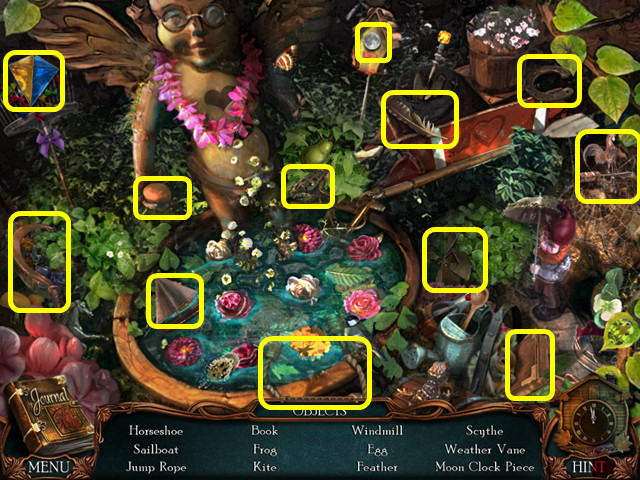 • Locate all the items on the list. • You will earn the MOON
CLOCK PIECE. • Walk down, then enter the chateau.
• Locate all the items on the list. • You will earn the MOON
CLOCK PIECE. • Walk down, then enter the chateau.
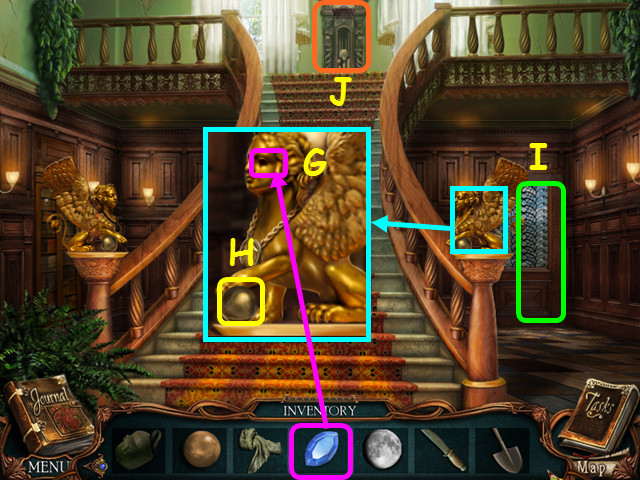 • Look at the right griffin and place the gem in the eye
socket (G). • Take the 2/3 LEAD BALL (H). • Note the locked
door on the first floor (I). • Select the clock for a
mini-game (J).
• Look at the right griffin and place the gem in the eye
socket (G). • Take the 2/3 LEAD BALL (H). • Note the locked
door on the first floor (I). • Select the clock for a
mini-game (J).
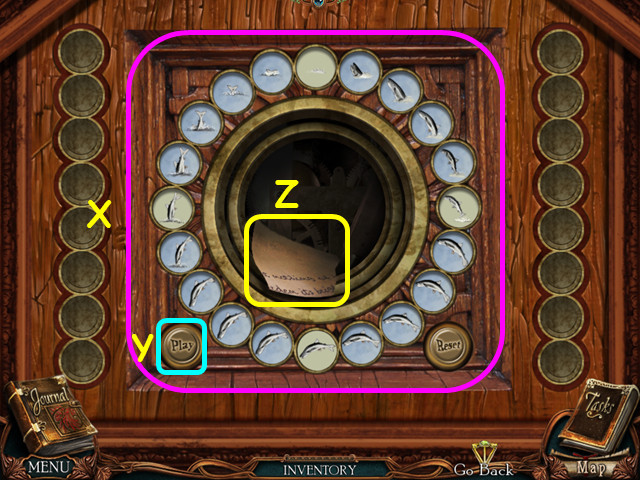
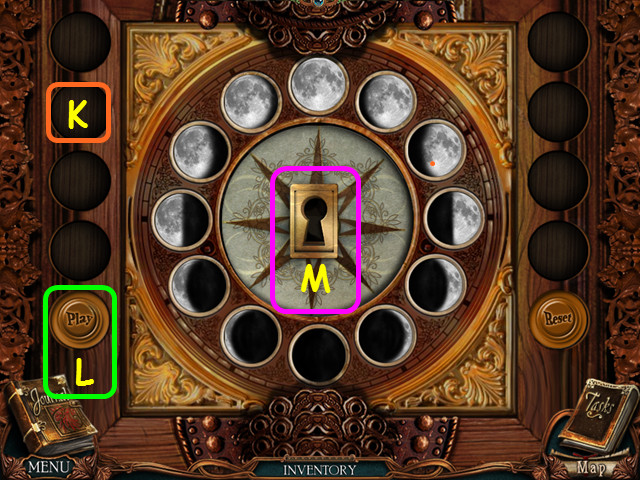 • Place the MOON CLOCK PIECE in the empty spot on the left to
trigger the mini-game (K). • Place the moons in chronological
order, then press the 'Play' button to see if you are correct
(L). • Note the secret keyhole that appears (M). • Walk to the
upper left hall.
• Place the MOON CLOCK PIECE in the empty spot on the left to
trigger the mini-game (K). • Place the moons in chronological
order, then press the 'Play' button to see if you are correct
(L). • Note the secret keyhole that appears (M). • Walk to the
upper left hall.
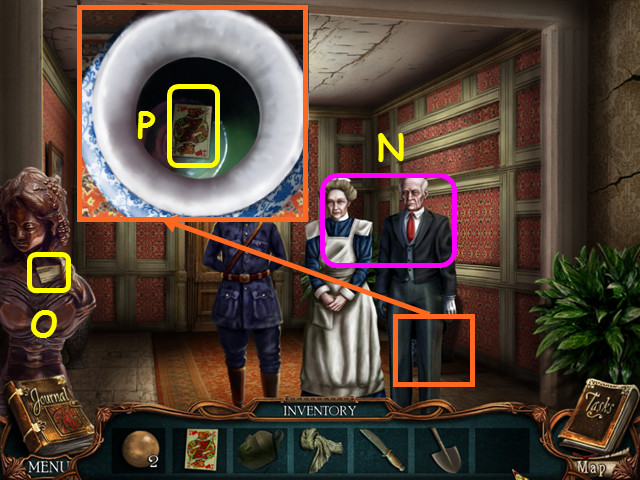 • Take a photo of the officer and caretakers (N). • Take the
1/8 LETTER PIECE (O). • Look in the blue vase behind the
caretakers and take the 2/4 CARD (P). • Walk down, speak to
Rouletabille, then go to the upper right hall.
• Take a photo of the officer and caretakers (N). • Take the
1/8 LETTER PIECE (O). • Look in the blue vase behind the
caretakers and take the 2/4 CARD (P). • Walk down, speak to
Rouletabille, then go to the upper right hall.
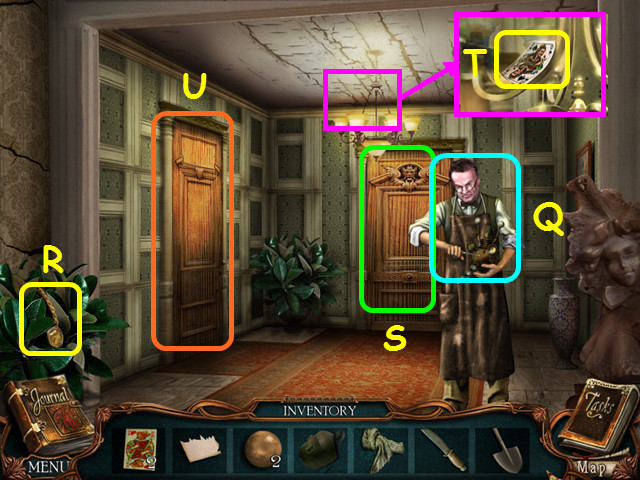 • Take a photo of Daddy Jacques (Q). • Take the NECKLACE (R).
• Note Mathilde's room (S). • Look at the chandelier and take
the 3/4 CARD (T). • Enter Rouletabille's room on the left (U).
• Take a photo of Daddy Jacques (Q). • Take the NECKLACE (R).
• Note Mathilde's room (S). • Look at the chandelier and take
the 3/4 CARD (T). • Enter Rouletabille's room on the left (U).
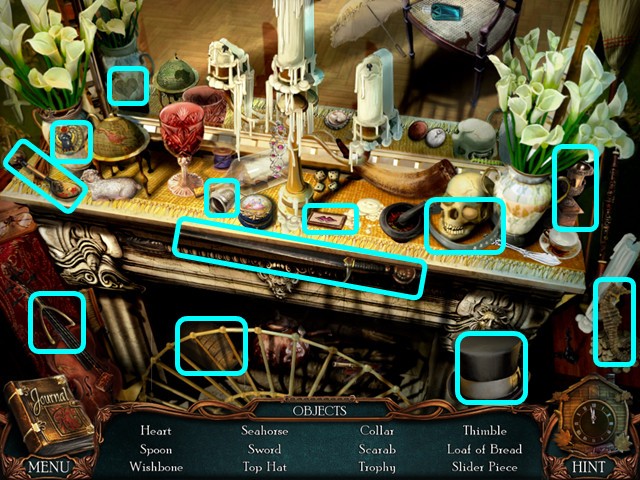
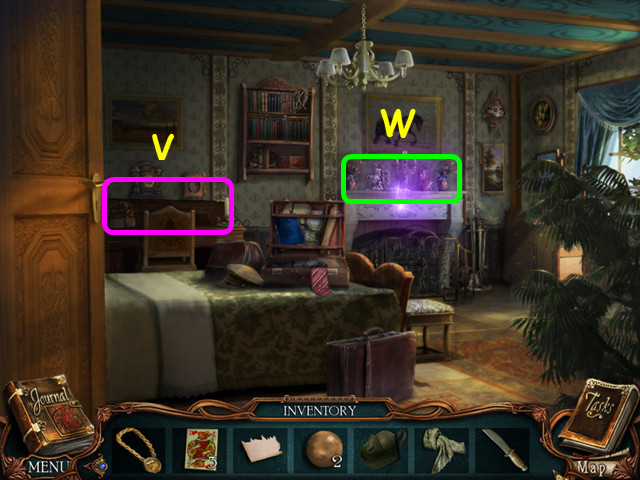 • Note the mini-game on the left (V). • Select the mantle for
a HOS (W).
• Note the mini-game on the left (V). • Select the mantle for
a HOS (W).
 • Locate all the items on the list. • You will earn the 4/4
CARD. • Look at the mini-game on the left.
• Locate all the items on the list. • You will earn the 4/4
CARD. • Look at the mini-game on the left.
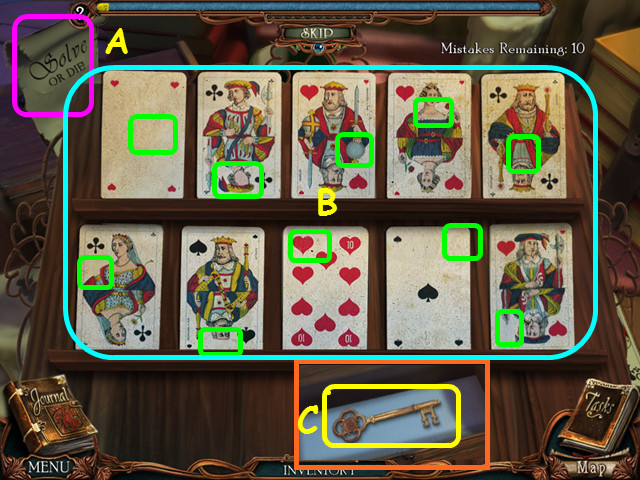 • Take a photo of the note (A). • Place the 4 CARDS on the
board to activate the mini-game. • There is an error on each
card; select the spot that is missing something (B). • Take
the CLOCK KEY (C). • Walk down twice.
• Take a photo of the note (A). • Place the 4 CARDS on the
board to activate the mini-game. • There is an error on each
card; select the spot that is missing something (B). • Take
the CLOCK KEY (C). • Walk down twice.
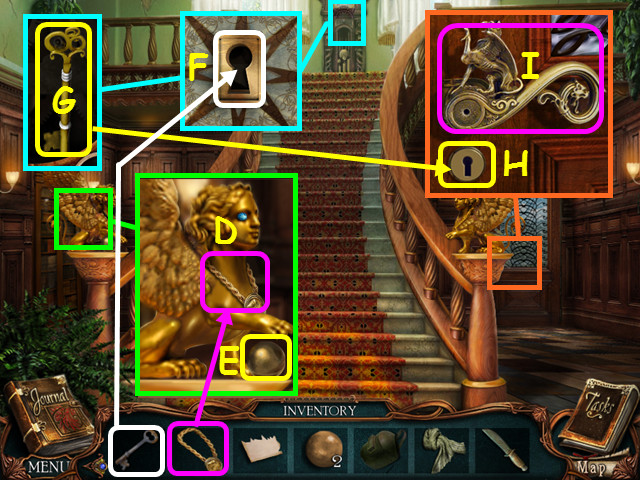 • Look at the griffin on the left and place the NECKLACE on
its neck (D). • Take the 3/3 LEAD BALL (E). • Look at the
clock and use the CLOCK KEY in the lock (F). • Take the BACK
DOOR KEY from the compartment (G). • Look at the door and use
the BACKDOOR KEY on the lock (H). • Turn the key, then use the
door handle (I). • Walk out to the laboratory area.
• Look at the griffin on the left and place the NECKLACE on
its neck (D). • Take the 3/3 LEAD BALL (E). • Look at the
clock and use the CLOCK KEY in the lock (F). • Take the BACK
DOOR KEY from the compartment (G). • Look at the door and use
the BACKDOOR KEY on the lock (H). • Turn the key, then use the
door handle (I). • Walk out to the laboratory area.
 • Look at the statue and take the CHECKER (J). • Look at the
bench and take the 2/8 LETTER PIECE (K). • Walk forward.
• Look at the statue and take the CHECKER (J). • Look at the
bench and take the 2/8 LETTER PIECE (K). • Walk forward.
 • Note the ladder (L). • Note the locked storage bin with the
rusty lock (M). • Look at the table for a mini-game (N).
• Note the ladder (L). • Note the locked storage bin with the
rusty lock (M). • Look at the table for a mini-game (N).
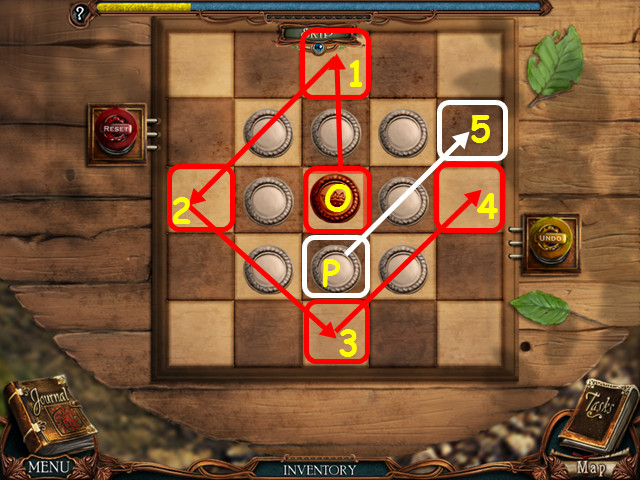 • Place the CHECKER on the board to trigger the mini-game. •
You must remove all the white checkers from the board by
jumping over them. • White can jump white checkers, but not
the red checker. • Select the red checker (O) in the center
and move it in numerical order (1-4) • Select the bottom
center white checker (P) and have it jump the right center
white checker (5).
• Place the CHECKER on the board to trigger the mini-game. •
You must remove all the white checkers from the board by
jumping over them. • White can jump white checkers, but not
the red checker. • Select the red checker (O) in the center
and move it in numerical order (1-4) • Select the bottom
center white checker (P) and have it jump the right center
white checker (5).
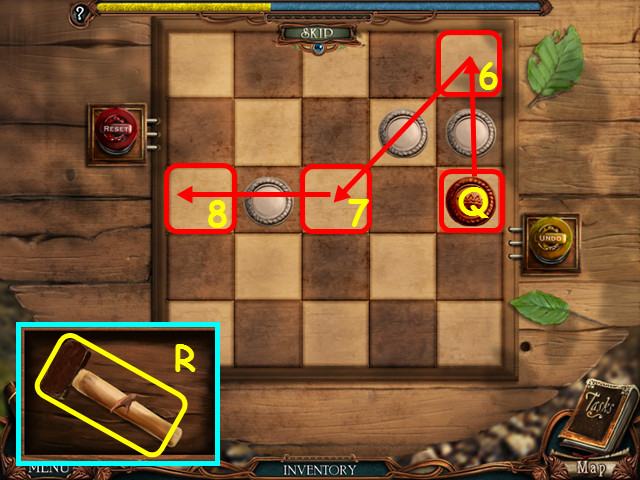 • Select the red checker again (Q) and make moves 6-8. • Take
the HAMMER from the compartment (R). • Look at the storage bin
and use the HAMMER on the rusty lock. • Select the storage bin
for a HOS.
• Select the red checker again (Q) and make moves 6-8. • Take
the HAMMER from the compartment (R). • Look at the storage bin
and use the HAMMER on the rusty lock. • Select the storage bin
for a HOS.
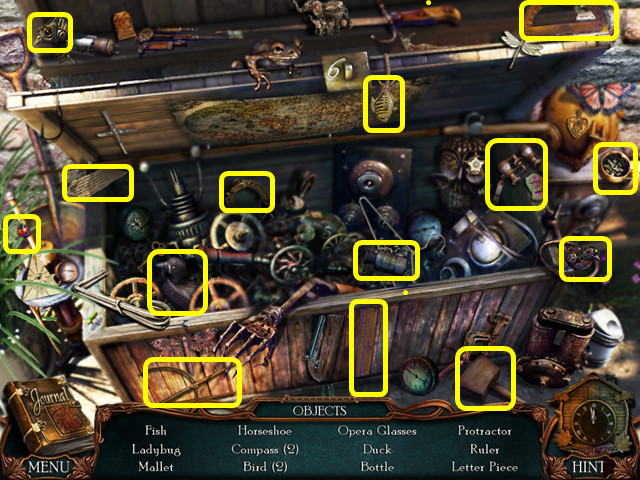 • Locate all the items on the list. • You will earn the 3/8
LETTER PIECE. • Enter the building.
• Locate all the items on the list. • You will earn the 3/8
LETTER PIECE. • Enter the building.
 • Note the clock mini-game (S). • Note the door to the yellow
room (T). • Select the device for a mini-game (U).
• Note the clock mini-game (S). • Note the door to the yellow
room (T). • Select the device for a mini-game (U).
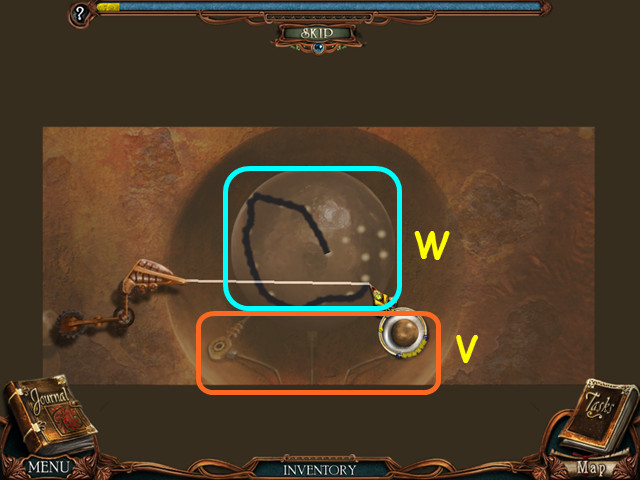 • Use the WELDING MASK on the device to trigger the mini-game.
• Place a LEAD BALL on the prongs in the center (V). • Drag
your cursor along the white dots to cut out a shape (W). •
Repeat the process for the other 2 LEAD BALLS. • You will earn
the HORSE, ROOSTER, and PIG. • Select the clock mini-game.
• Use the WELDING MASK on the device to trigger the mini-game.
• Place a LEAD BALL on the prongs in the center (V). • Drag
your cursor along the white dots to cut out a shape (W). •
Repeat the process for the other 2 LEAD BALLS. • You will earn
the HORSE, ROOSTER, and PIG. • Select the clock mini-game.
 • Place the tiles in sequential order to show the fish jumping
out of the water (X). • Press the 'Play' button to see the
movie and learn if you are correct (Y). • Take the 4/8 LETTER
PIECE from the compartment (Z). • Enter the yellow room.
• Place the tiles in sequential order to show the fish jumping
out of the water (X). • Press the 'Play' button to see the
movie and learn if you are correct (Y). • Take the 4/8 LETTER
PIECE from the compartment (Z). • Enter the yellow room.
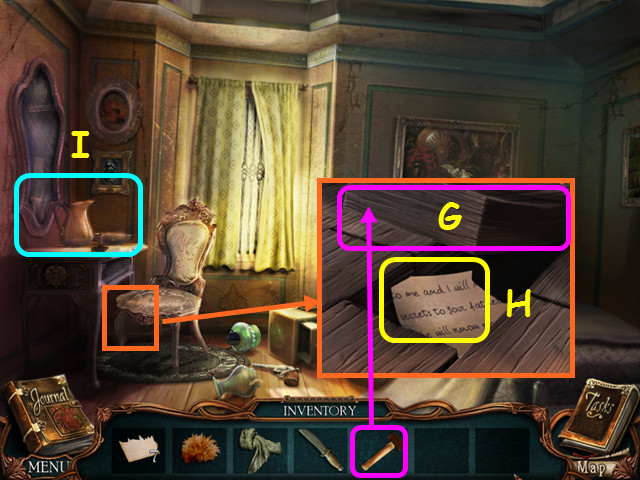
 • Note the vanity has a place to reassemble the letter pieces
(A). • Look at the nightstand; take the 5/8 LETTER PIECE and
take a photo of the handgun (B). • Select the painting for a
HOS (C).
• Note the vanity has a place to reassemble the letter pieces
(A). • Look at the nightstand; take the 5/8 LETTER PIECE and
take a photo of the handgun (B). • Select the painting for a
HOS (C).
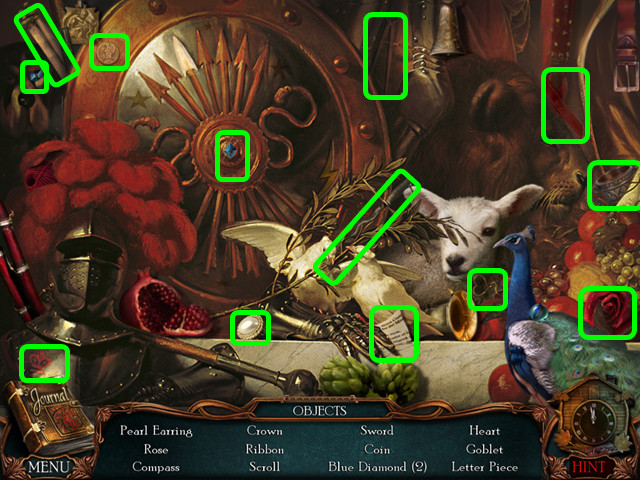 • Locate all the items on the list. • You will earn the 6/8
LETTER PIECE. • Walk down 6 times, then go to the right.
• Locate all the items on the list. • You will earn the 6/8
LETTER PIECE. • Walk down 6 times, then go to the right.
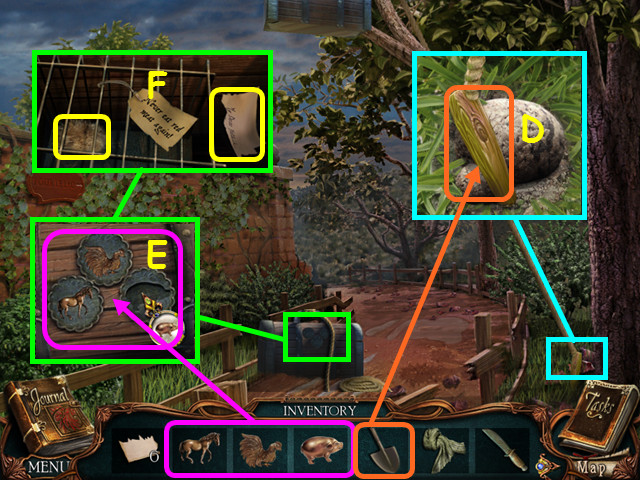 • Look at the stake holding the rope and use the SHOVEL to dig
it up (D). • Look at the fallen chest and place the PIG,
ROOSTER, and HORSE on the lid (E). • Take the FUR and the 7/8
LETTER PIECE (F). • Walk down, go forward twice, walk out the
back door and go forward 3 times to the yellow room.
• Look at the stake holding the rope and use the SHOVEL to dig
it up (D). • Look at the fallen chest and place the PIG,
ROOSTER, and HORSE on the lid (E). • Take the FUR and the 7/8
LETTER PIECE (F). • Walk down, go forward twice, walk out the
back door and go forward 3 times to the yellow room.
 • Look under the desk and use the HAMMER on the loose
floorboard (G). • Take the 8/8 LETTER PIECE (H). • Look at the
vanity for a mini-game (I).
• Look under the desk and use the HAMMER on the loose
floorboard (G). • Take the 8/8 LETTER PIECE (H). • Look at the
vanity for a mini-game (I).
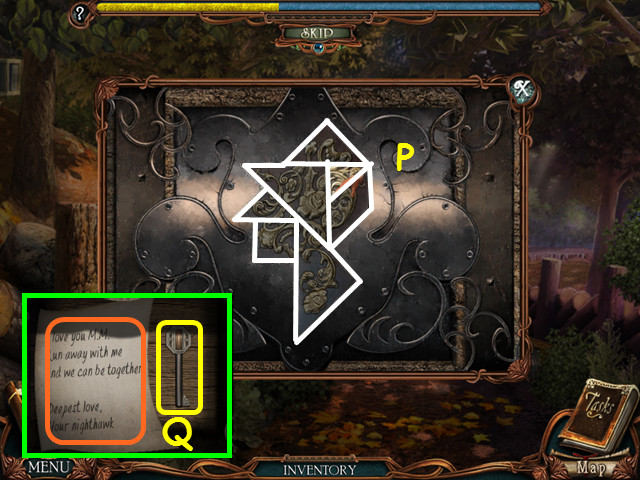
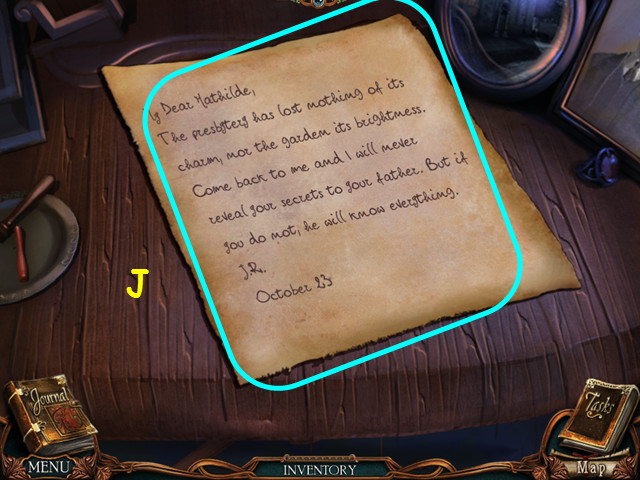 • Place the 8 LETTER PIECES on the table to start the
mini-game. • Restore the letter jigsaw-style by dragging the
pieces into position (J). • Take a photo of the letter.
• Place the 8 LETTER PIECES on the table to start the
mini-game. • Restore the letter jigsaw-style by dragging the
pieces into position (J). • Take a photo of the letter.
Chapter 4: I Expect The Assassin Later This Evening
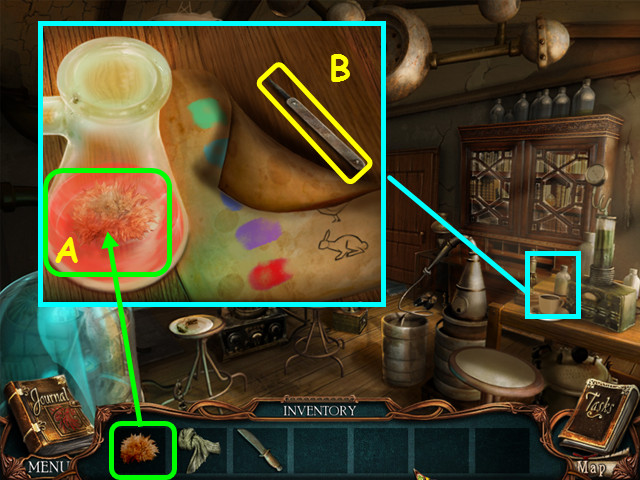 • Walk forward to enter the lab. • Look at the testing
apparatus on the right and place the FUR in the flask (A). •
Take the LOCK PICK (B). • Walk down twice.
• Walk forward to enter the lab. • Look at the testing
apparatus on the right and place the FUR in the flask (A). •
Take the LOCK PICK (B). • Walk down twice.
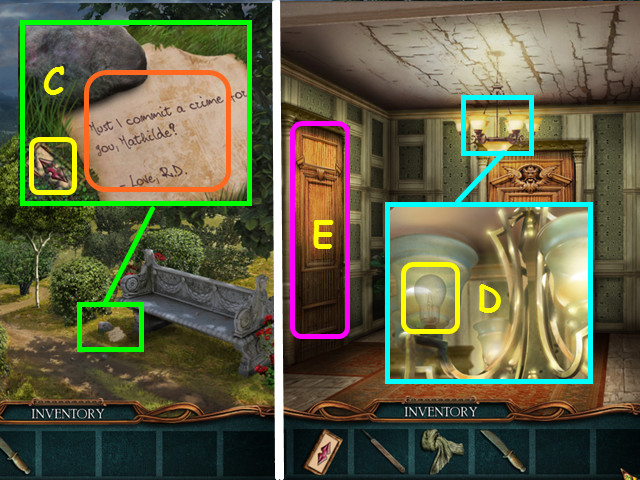 • Look at the rock by the bench; photograph the note and take
the 1/4 SLIDER (C). • Walk down to enter the chateau, the walk
to the right hall. • Look at the chandelier and take the LIGHT
BULB (D). • Enter Rouletabille's room on the left (E).
• Look at the rock by the bench; photograph the note and take
the 1/4 SLIDER (C). • Walk down to enter the chateau, the walk
to the right hall. • Look at the chandelier and take the LIGHT
BULB (D). • Enter Rouletabille's room on the left (E).
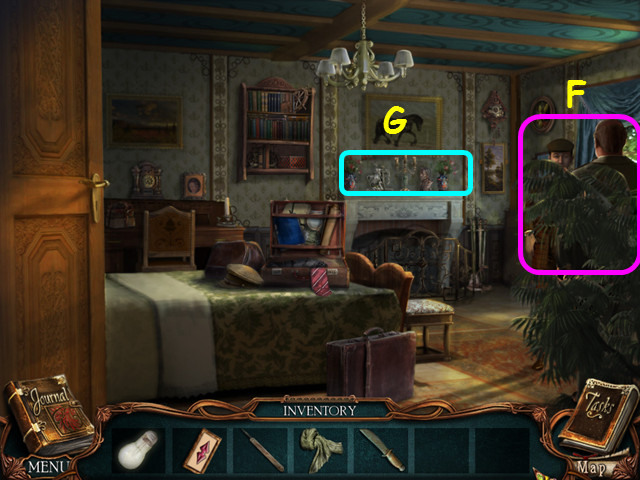 • Eavesdrop on the 2 men (F). • Select the mantle for a HOS
(G).
• Eavesdrop on the 2 men (F). • Select the mantle for a HOS
(G).
 • Locate all the items on the list. • You will earn the 2/4
SLIDER. • Walk down, then enter Mathilde's room.
• Locate all the items on the list. • You will earn the 2/4
SLIDER. • Walk down, then enter Mathilde's room.
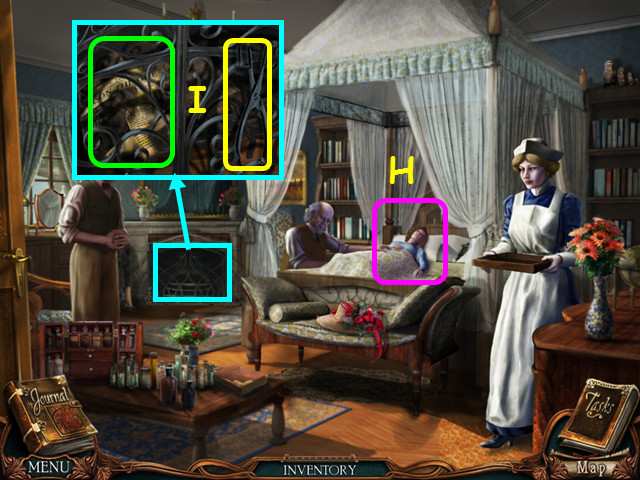 • Photograph Mathilde (H). • Look in the fireplace; take the
TONGS and take a photo of the newspaper (I). • Walk down 3
times and go right to the garden.
• Photograph Mathilde (H). • Look in the fireplace; take the
TONGS and take a photo of the newspaper (I). • Walk down 3
times and go right to the garden.
 • Look at the branch and use the TONGS to take the MARBLE (J).
• Walk down, enter the chateau, then go out the back door.
Walk forward to the laboratory and go inside.
• Look at the branch and use the TONGS to take the MARBLE (J).
• Walk down, enter the chateau, then go out the back door.
Walk forward to the laboratory and go inside.
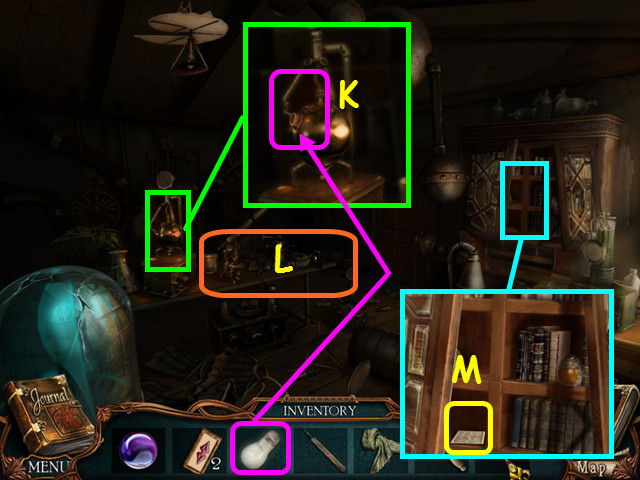 • Look at the table on the left and use the LIGHT BULB on the
device (K). • Take a photo of the ransacked table (L). • Look
at the bookcase and take the TAROT CARD (M). • Walk forward to
the yellow room and select the painting for a HOS.
• Look at the table on the left and use the LIGHT BULB on the
device (K). • Take a photo of the ransacked table (L). • Look
at the bookcase and take the TAROT CARD (M). • Walk forward to
the yellow room and select the painting for a HOS.
 • Locate all the items on the list. • You will earn the 3/4
SLIDER. • Walk down 4 times to enter the chateau, the go to
the left hall.
• Locate all the items on the list. • You will earn the 3/4
SLIDER. • Walk down 4 times to enter the chateau, the go to
the left hall.
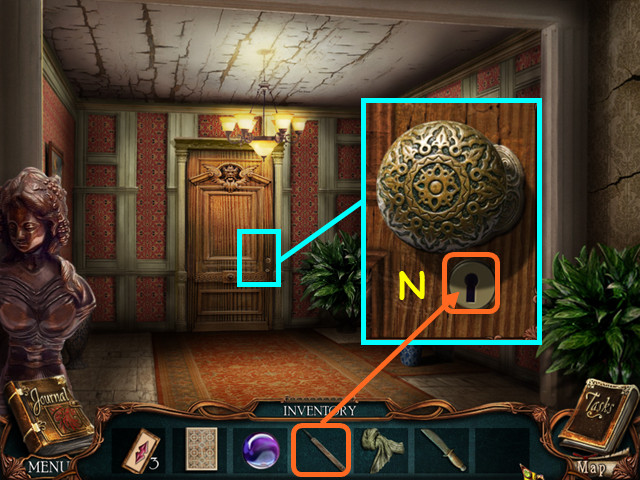 • Look at the door and use the LOCK PICK in the lock (N). •
Enter Larsan's room.
• Look at the door and use the LOCK PICK in the lock (N). •
Enter Larsan's room.
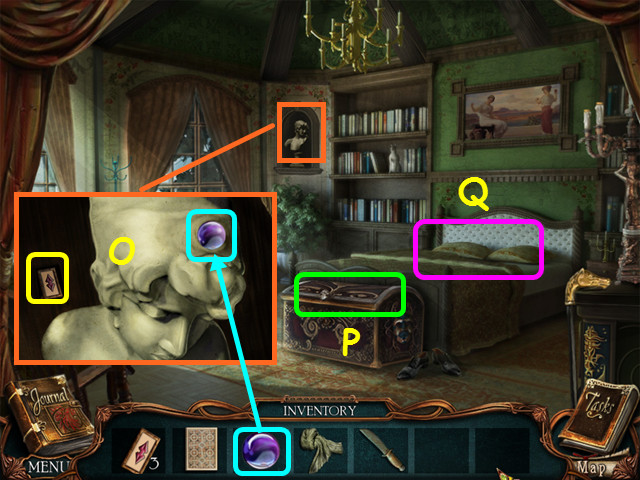 • Look at the bust, place the MARBLE in the hole, and take the
4/4 SLIDER (O). • Note the chest mini-game (P), • Select the
bed for a mini-game (Q).
• Look at the bust, place the MARBLE in the hole, and take the
4/4 SLIDER (O). • Note the chest mini-game (P), • Select the
bed for a mini-game (Q).
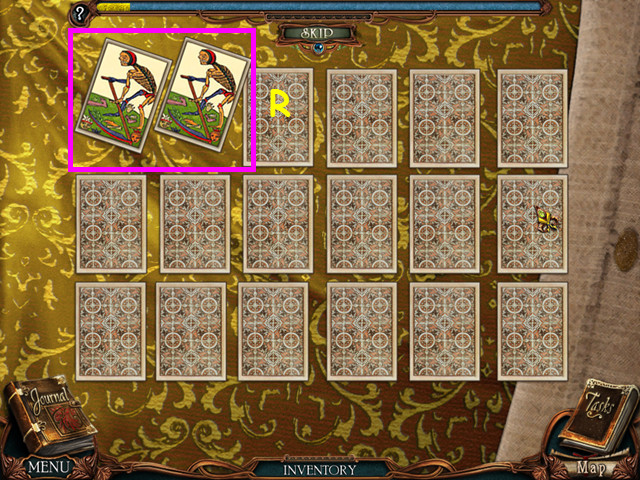 • Place the TAROT card in the empty space to trigger the
mini-game. • Remove the cards by turning over matching pairs
(R). • This mini-game is randomly generated. • Take the SLIDER
KEY. • Look at the chest for a mini-game.
• Place the TAROT card in the empty space to trigger the
mini-game. • Remove the cards by turning over matching pairs
(R). • This mini-game is randomly generated. • Take the SLIDER
KEY. • Look at the chest for a mini-game.
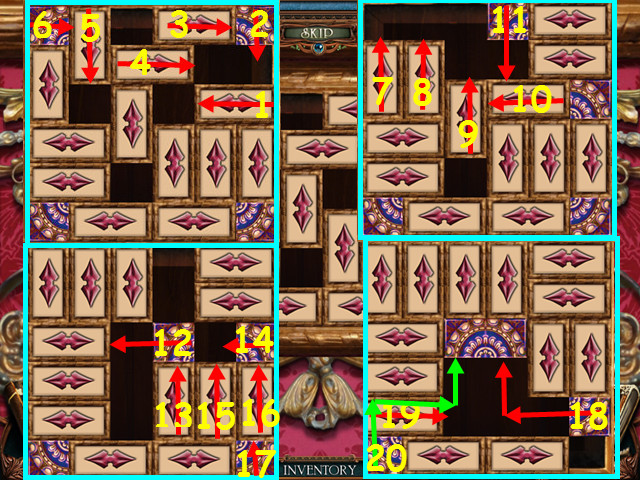 • Place the 4 SLIDERS on the board to trigger the mini-game. •
Move the sliders so you can move the 4 corner pieces to the
center. • Move the sliders in numerical order in the direction
indicated (1-20). • Note that moves 18 and 20 move more than
one direction. • Use the SLIDER KEY on the lock, then take a
photo of the knife and code. • Walk down twice and speak with
Rouletabille. • Go out the back door and walk forward.
• Place the 4 SLIDERS on the board to trigger the mini-game. •
Move the sliders so you can move the 4 corner pieces to the
center. • Move the sliders in numerical order in the direction
indicated (1-20). • Note that moves 18 and 20 move more than
one direction. • Use the SLIDER KEY on the lock, then take a
photo of the knife and code. • Walk down twice and speak with
Rouletabille. • Go out the back door and walk forward.
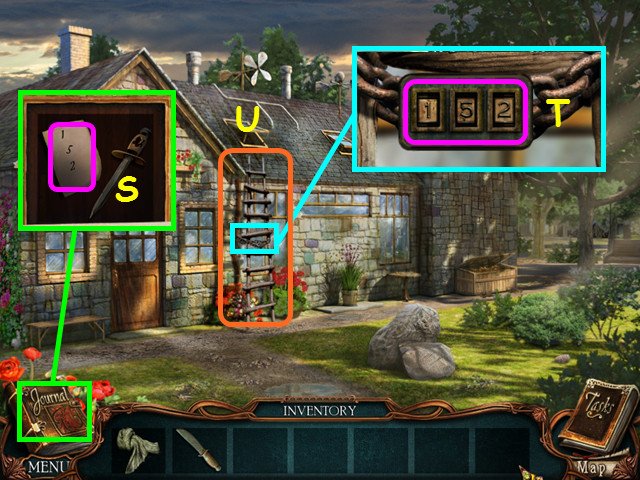 • Look at the chain on the ladder and enter the code from the
slider box (S) on the lock (T). • Take the LADDER (U). • Walk
down 3 times to the front of the chateau.
• Look at the chain on the ladder and enter the code from the
slider box (S) on the lock (T). • Take the LADDER (U). • Walk
down 3 times to the front of the chateau.
 • Use the LADDER under Mathilde's window (V). • Look in the
window (W). • After the cut-scene, walk to the right.
• Use the LADDER under Mathilde's window (V). • Look in the
window (W). • After the cut-scene, walk to the right.
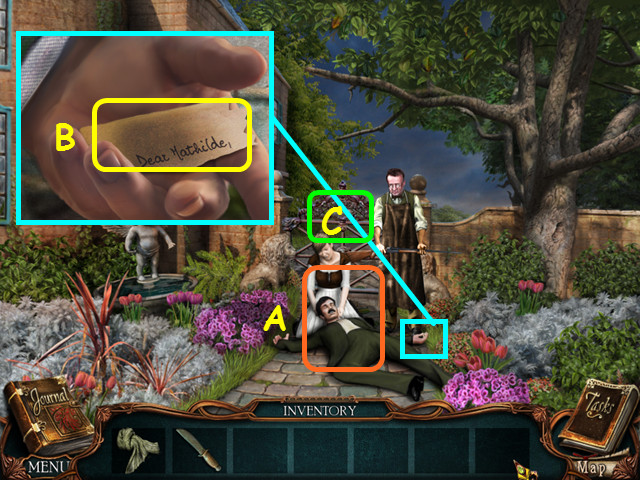 • Take a photo of Mr. Green (A). • Look at his hand and take
the 1/8 NOTE PIECE (B). • Note the locked gate (C). • Walk
down, enter the chateau, walk to the right hall, and enter
Rouletabille's room.
• Take a photo of Mr. Green (A). • Look at his hand and take
the 1/8 NOTE PIECE (B). • Note the locked gate (C). • Walk
down, enter the chateau, walk to the right hall, and enter
Rouletabille's room.
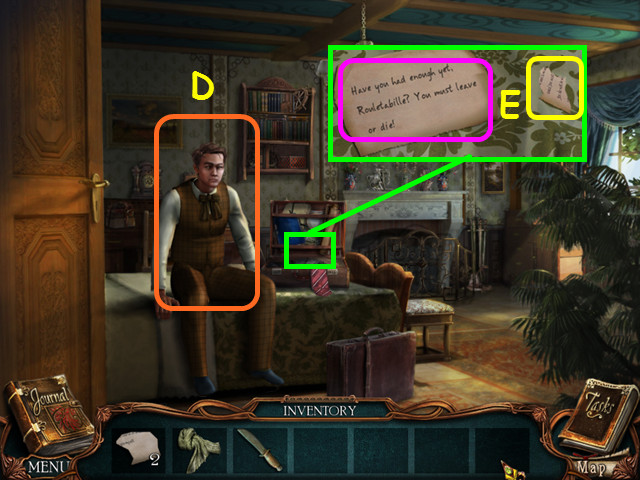 • Take a photo of Rouletabille (D). • Look in the briefcase;
photograph the threat and take the 2/8 NOTE PIECE (E). • Walk
down 2 times, then go right to the garden. • After talking to
Rouletabille, walk down 5 times to the front of the station. •
Rouletabille will talk to you again.
• Take a photo of Rouletabille (D). • Look in the briefcase;
photograph the threat and take the 2/8 NOTE PIECE (E). • Walk
down 2 times, then go right to the garden. • After talking to
Rouletabille, walk down 5 times to the front of the station. •
Rouletabille will talk to you again.
Chapter 5: In Which Rouletabille Appears In All His Glory
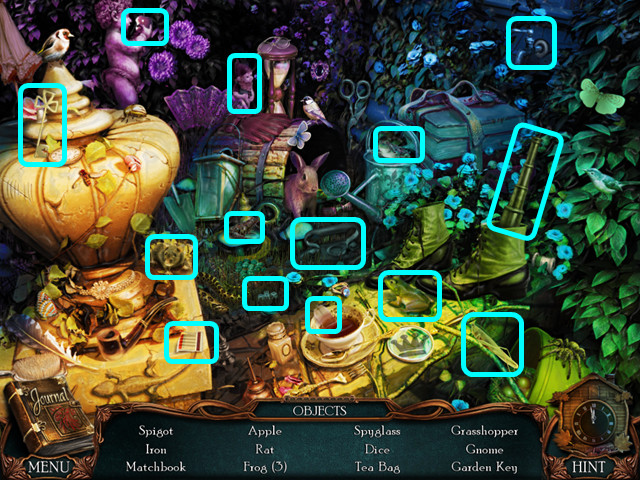 • Walk forward 3 times and select the bushes on the left side
of the gate for a HOS. • Locate all the items on the list. •
You will earn the GARDEN KEY. • Walk forward, then right to
the garden. • Look at the gate and use the GARDEN KEY on the
lock. • Turn the key then walk forward.
• Walk forward 3 times and select the bushes on the left side
of the gate for a HOS. • Locate all the items on the list. •
You will earn the GARDEN KEY. • Walk forward, then right to
the garden. • Look at the gate and use the GARDEN KEY on the
lock. • Turn the key then walk forward.
 • Look at the mailbox; open the door and take the 3/8 NOTE
PIECE (A). • Look at the bench and take the 4/8 NOTE PIECE
(B). • Walk forward to the back porch (C).
• Look at the mailbox; open the door and take the 3/8 NOTE
PIECE (A). • Look at the bench and take the 4/8 NOTE PIECE
(B). • Walk forward to the back porch (C).
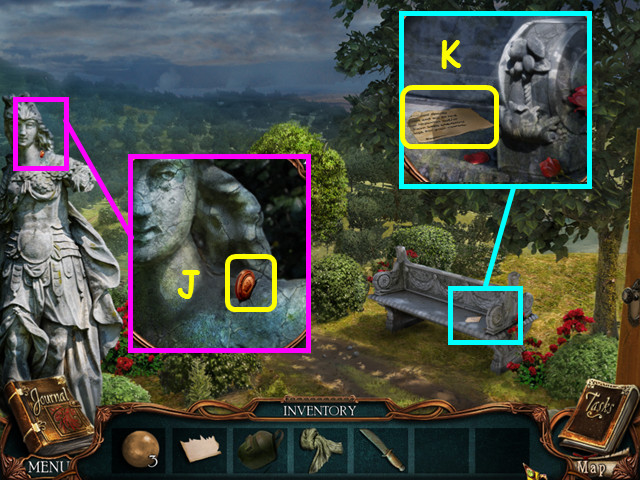
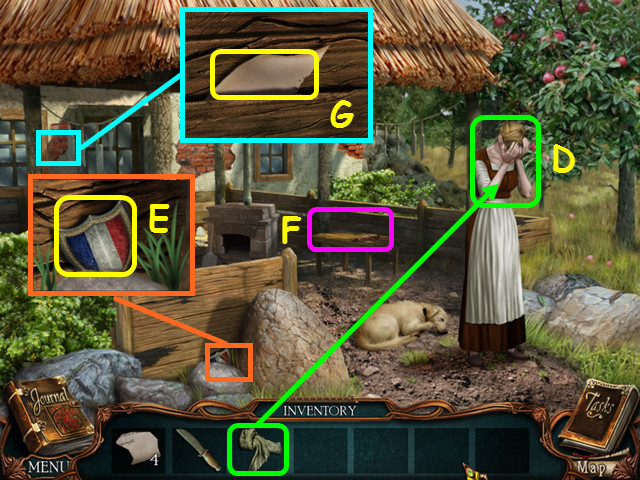 • Give the SCARF to the crying woman and she will give you the
5/8 NOTE PIECE (D). • Look at the rocks and take the CREST
(E). • Note the table where you can reassemble the note (F). •
Look at the wall and take the 6/8 NOTE PIECE (G). • Walk down
3 times, enter the chateau, then go left and enter Larsan's
room.
• Give the SCARF to the crying woman and she will give you the
5/8 NOTE PIECE (D). • Look at the rocks and take the CREST
(E). • Note the table where you can reassemble the note (F). •
Look at the wall and take the 6/8 NOTE PIECE (G). • Walk down
3 times, enter the chateau, then go left and enter Larsan's
room.
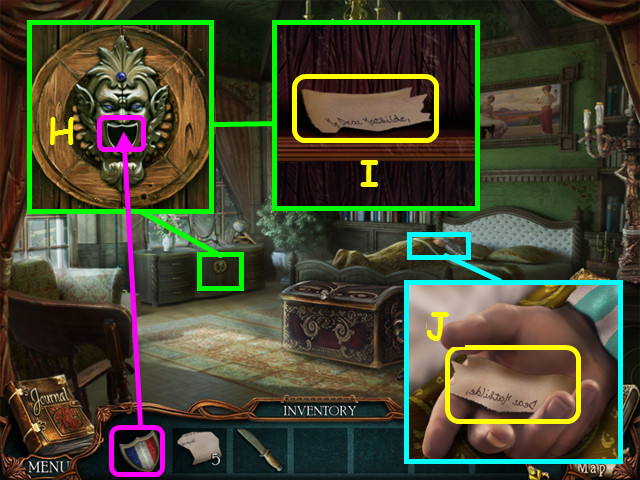 • Look at the dresser and use the CREST in the joker's mouth
(H). • Take the 7/8 NOTE PIECE (I). • Look at Larsan and take
the 8/8 NOTE PIECE from his hand (J). • Walk down 3 times, go
right to the garden, then forward twice to the back porch. •
Look at the table to reassemble the note.
• Look at the dresser and use the CREST in the joker's mouth
(H). • Take the 7/8 NOTE PIECE (I). • Look at Larsan and take
the 8/8 NOTE PIECE from his hand (J). • Walk down 3 times, go
right to the garden, then forward twice to the back porch. •
Look at the table to reassemble the note.
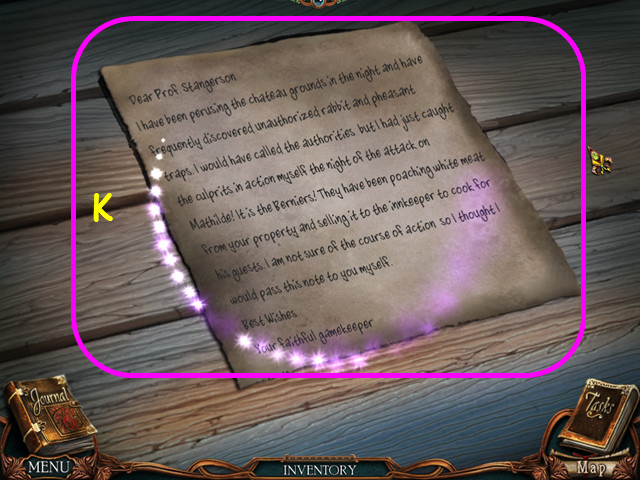 • Place the 8 NOTE PIECES on the table to activate the
mini-game. • Restore the note by assembling the pieces
jigsaw-style (K). • Photograph the note. • Walk down twice to
return to the garden. • Select the fountain on the left for a
HOS.
• Place the 8 NOTE PIECES on the table to activate the
mini-game. • Restore the note by assembling the pieces
jigsaw-style (K). • Photograph the note. • Walk down twice to
return to the garden. • Select the fountain on the left for a
HOS.
 • Locate all the items on the list. • You will earn the OAR. •
Walk down once and Daddy Jacques will speak to you. • Walk
down, go right, then forward and Larsan will speak to you. •
Walk forward once more to the dock.
• Locate all the items on the list. • You will earn the OAR. •
Walk down once and Daddy Jacques will speak to you. • Walk
down, go right, then forward and Larsan will speak to you. •
Walk forward once more to the dock.
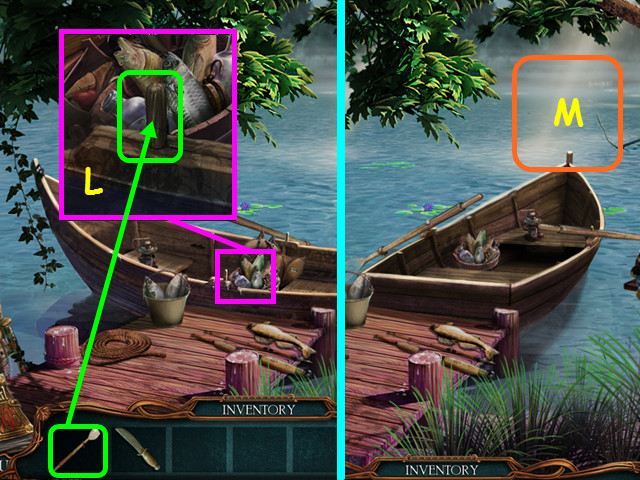 • Look at the boat and place the OAR on the oarlock (L). • Go
forward across the lake (M).
• Look at the boat and place the OAR on the oarlock (L). • Go
forward across the lake (M).
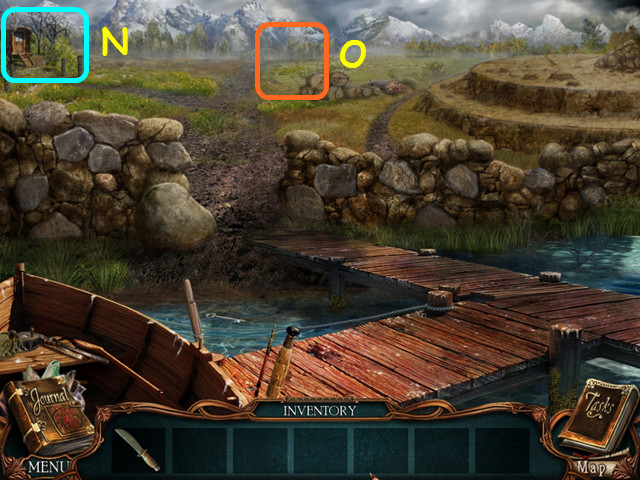 • Note the Gypsy shack (N). • Walk forward to the cave path
(O).
• Note the Gypsy shack (N). • Walk forward to the cave path
(O).
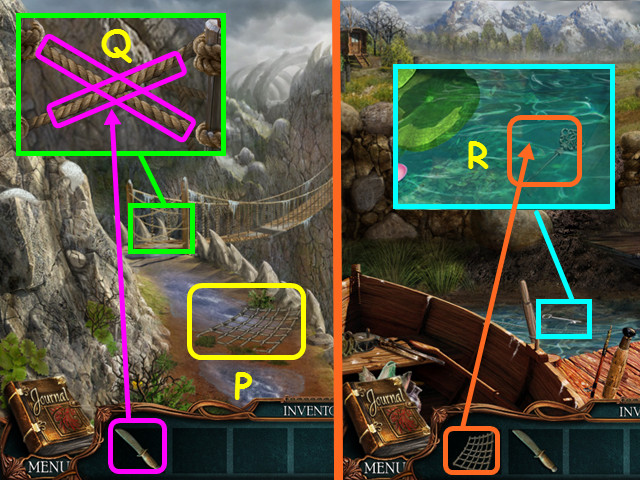 • Take the FISHING NET (P). • Look at the end of the bridge
and use the KNIFE to cut each of the 2 ropes (Q). • Walk down
once. • Look in the water and use the FISHING NET to get the
GYPSY KEY (R). • Walk left to the gypsy hut.
• Take the FISHING NET (P). • Look at the end of the bridge
and use the KNIFE to cut each of the 2 ropes (Q). • Walk down
once. • Look in the water and use the FISHING NET to get the
GYPSY KEY (R). • Walk left to the gypsy hut.
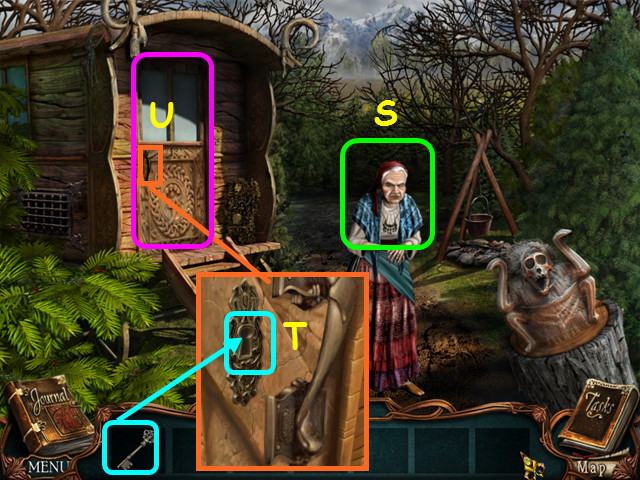 • Take a photo of the gypsy woman (S). • Look at the door and
use the key in the lock (T). • Turn the key, then select the
doorway for a HOS (U).
• Take a photo of the gypsy woman (S). • Look at the door and
use the key in the lock (T). • Turn the key, then select the
doorway for a HOS (U).
 • Locate all the items on the list. • You will earn the
CROWBAR and the 1/2 WOOD PLANK. • Walk down once.
• Locate all the items on the list. • You will earn the
CROWBAR and the 1/2 WOOD PLANK. • Walk down once.
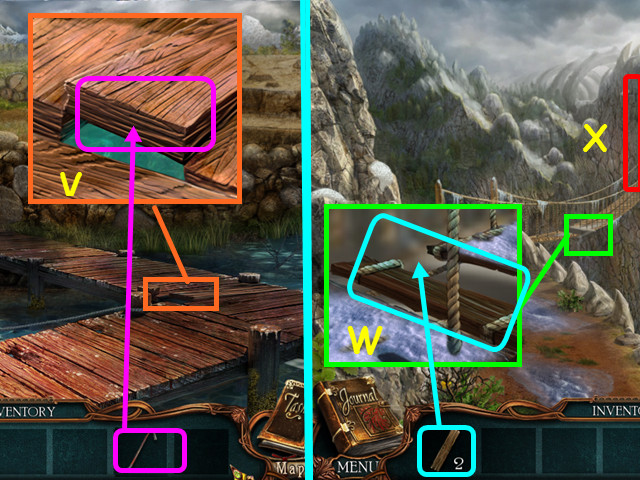 • Look at the dock and use the CROWBAR to take the loose 2/2
WOOD PLANK (V). • Walk forward to the cave path. • Look at the
bridge and use the 2 WOOD PLANKS to fill in the holes (W). •
Walk across the bridge to the beastie cave (X).
• Look at the dock and use the CROWBAR to take the loose 2/2
WOOD PLANK (V). • Walk forward to the cave path. • Look at the
bridge and use the 2 WOOD PLANKS to fill in the holes (W). •
Walk across the bridge to the beastie cave (X).
 • Look at the body frozen in the ground and take a photograph
of the bullet wound (Y). • Walk down 6 times and walk forward
to the chateau. • After talking to Daddy Jacques, enter the
house, walk to the right, and go inside Rouletbille's room.
• Look at the body frozen in the ground and take a photograph
of the bullet wound (Y). • Walk down 6 times and walk forward
to the chateau. • After talking to Daddy Jacques, enter the
house, walk to the right, and go inside Rouletbille's room.
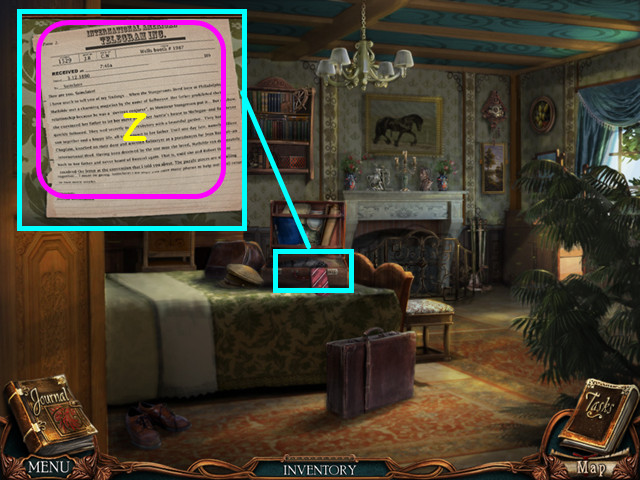 • Look on the bed and photograph the telegram (Z). • After the
cut scene, walk down 7 times to the front of the station. •
After speaking to Rouletbille, walk forward 7 times back to
the laboratory. • Congratulations! You have completed
Victorian Mysteries: The Yellow Room!
• Look on the bed and photograph the telegram (Z). • After the
cut scene, walk down 7 times to the front of the station. •
After speaking to Rouletbille, walk forward 7 times back to
the laboratory. • Congratulations! You have completed
Victorian Mysteries: The Yellow Room!
Created at: 2012-04-16